Operator Collection Tutorial
A step-by-step walkthrough of building a new Operator Collection.
Prerequisites
- OpenShift® Cluster (version 4.10 or later)
- OpenShift® Command Line Interface (CLI)
- Ansible® CLI Tools (version 2.9.10 or later)
- Kubernetes Python Client
- z/OS Cloud Broker v2.2.0+
- z/OS Cloud Broker Encryption CLI (optional)
Overview
This tutorial is a walkthrough of building a new operator collection that performs RACF user management against a z/OS environment. This operator will allow you to create a new user ID by creating instances in OpenShift®, and remove this ID once this instance is deleted.
(Optional) Configure the IBM Operator Collection SDK Alias Commands
Optionally, you can configure alias commands to simplify the IBM Operator Collection SDK ansible-playbook commands:
Open your bash profile using the following command:
vi ~/.bash_profileor
vi ~/.zshrcCopy the following commands to your bash profile and save:
  alias ocsdk-init="ansible-playbook ibm.operator_collection_sdk.init_collection"
alias ocsdk-create-offline-requirements="ansible-playbook ibm.operator_collection_sdk.create_offline_requirements"
alias ocsdk-create-operator-config="ansible-playbook ibm.operator_collection_sdk.create_operator_config"
alias ocsdk-install="ansible-galaxy collection install git+https://github.com/IBM/operator-collection-sdk.git#ibm/operator_collection_sdk -f"
alias ocsdk-create-operator="ANSIBLE_JINJA2_NATIVE=true ansible-playbook ibm.operator_collection_sdk.create_operator"
alias ocsdk-redeploy-collection="ansible-playbook ibm.operator_collection_sdk.redeploy_collection"
alias ocsdk-redeploy-operator="ansible-playbook ibm.operator_collection_sdk.redeploy_operator"
alias ocsdk-delete-operator="ansible-playbook ibm.operator_collection_sdk.delete_operator"
alias ocsdk-create-credential-secret="ansible-playbook ibm.operator_collection_sdk.create_credential_secret"
Source your bash profile to pick up the latest changes:
source ~/.bash_profileor
source ~/.zshrcThe aliases that were created can now be called instead of the full
ansible-playbookcommands.~> ocsdk-create-operator Enter your ZosEndpoint name:
Install the IBM Operator Collection SDK
To install the latest version of IBM Operator Collection SDK, run the following command:
ansible-galaxy collection install git+https://github.com/IBM/operator-collection-sdk.git#ibm/operator_collection_sdk -f
Alternatively, you can run the following alias:
ocsdk-install
Initialize a new Operator Collection
To initialize a new Operator Collection, run the following command:
ansible-playbook ibm.operator_collection_sdk.init_collection.yml
Alternatively, you can run the following alias:
ocsdk-init
Enter the collection name and Ansible® Galaxy namespace when prompted. For the collection name, enter racf_operator. For the Ansible Galaxy namespace, enter the name of your existing namespace in Ansible Galaxy. Note that a valid Ansible Galaxy namespace is required only if you plan to publish this collection to Ansible Galaxy after completion.
After completing the previous step, an Operator Collection scaffold should appear in the ./<galaxy-namespace>/<collection-name> directory. Navigate to this directory to proceed with the rest of this tutorial.
Apply collection modifications
Update collection requirements
Update the collections/requirements.yml file as follows to add the ibm.ibm_zos_core collection:
  collections:
  - name: operator_sdk.util
    version: "0.4.0"
  - name: kubernetes.core
    version: "2.4.0"
  - name: ibm.ibm_zos_core
Apply playbooks and roles
Clone the repo, and copy the files in the playbooks/ directory from the racf-operator example and replace the files in your current playbooks/ directory with the ones you copied.
The playbooks and roles in the playbooks/ directory serve as your operator controller logic and execute every time a user creates an operator instance in OpenShift.
add-user.yml- This playbook creates a new user ID on the z/OS environment.remove-user.yml- This playbook removes a user ID from the z/OS environment.
Note: Playbooks must use the hosts: all parameter. Target hosts for operator collection are driven by using z/OS endpoints that are provided by the IBM® z/OS Cloud Broker. When the Ansible playbook is executed by the IBM® z/OS Cloud Broker, the hosts: all value is limited to the selected z/OS endpoint by setting the --limit flag. The IBM® z/OS Cloud Broker handles host limiting internally and no additional playbook modifications are required.
Update the operator-config
The operator-config.yml file contains the necessary metadata for the IBM® z/OS Cloud Broker to configure your operator in OpenShift. This file is used to configure things such as the name, description, and icon to be displayed in your operator. This is also where you will configure the name of the custom resource to be generated in OpenShift. More details on configuring custom resources will be discussed in the following sections.
Let’s start by configuring the domain, name, version, displayName, and description of our operator:
  domain: <galaxy-namespace> # Convert underscores to dashes
name: racf-operator
version: 1.0.0
displayName: RACF Operator
description: >-
  # z/OS RACF Operator

  This operator allows users to create and delete user IDs on z/OS.
Now let’s configure our new custom resource:
A custom resource is an object that expands the functions of the Kubernetes API or allows you to introduce your own API into a project or a cluster. In this example, we will introduce a new custom resource called ZosUserId. This custom resource will enable OpenShift users to call our new ZosUserId API and create user IDs on a z/OS endpoint.
When creating our new custom resource, we also need to configure our operator with the playbook to execute when a new custom resource instance is created by the user, and the playbook to execute when the custom resource instance is deleted. This is done by supplying these playbook locations in the playbook and finalizer fields respectively.
  resources:
  - kind: ZosUserId
    displayName: z/OS User Id
    description: A User ID managed by the RACF security facility on z/OS.
    playbook: playbooks/add-user.yml
    finalizer: playbooks/remove-user.yml
Now we need to configure the variables that are needed to execute our playbooks.
The add-user playbook requires two variables, name, and userid, which must be supplied by the user. The remove-user playbook also accepts the userid variable. To prompt the user for these values in OpenShift, we must configure these variables in the vars section of our new custom resource. By doing this, the IBM® z/OS Cloud Broker can configure our operator to request these values from the user. After configuration, these values will be supplied to the playbook as “extra vars” (-e) input parameters during execution.
  vars:
    - name: name
    displayName: Real Name
    description: Specifies the user name to be associated with the new user ID.
    type: string
    required: true
    - name: userid
    displayName: User ID
    description: Specifies the user to be defined to RACF.
    type: string
    required: true
Last, we will supply a based64-encoded icon for our operator.
  icon:
  - base64data: >-
      PHN2ZyBpZD0iaWNvbiIgeG1sbnM9Imh0dHA6Ly93d3cudzMub3JnLzIwMDAvc3ZnIiB2aWV3Qm94PSIwIDAgMzIgMzIiPjxkZWZzPjxzdHlsZT4uY2xzLTF7ZmlsbDpub25lO308L3N0eWxlPjwvZGVmcz48dGl0bGU+dXNlcjwvdGl0bGU+PHBhdGggZD0iTTE2LDRhNSw1LDAsMSwxLTUsNSw1LDUsMCwwLDEsNS01bTAtMmE3LDcsMCwxLDAsNyw3QTcsNywwLDAsMCwxNiwyWiIvPjxwYXRoIGQ9Ik0yNiwzMEgyNFYyNWE1LDUsMCwwLDAtNS01SDEzYTUsNSwwLDAsMC01LDV2NUg2VjI1YTcsNywwLDAsMSw3LTdoNmE3LDcsMCwwLDEsNyw3WiIvPjxyZWN0IGlkPSJfVHJhbnNwYXJlbnRfUmVjdGFuZ2xlXyIgZGF0YS1uYW1lPSImbHQ7VHJhbnNwYXJlbnQgUmVjdGFuZ2xlJmd0OyIgY2xhc3M9ImNscy0xIiB3aWR0aD0iMzIiIGhlaWdodD0iMzIiLz48L3N2Zz4=
    mediatype: image/svg+xml
In the end, your operator-config.yml field should look similar to this example.
Create the operator
Now that we’ve applied our playbooks and updated our operator-config, we can build our collection and create an operator in OpenShift to validate our changes.
To do this, you should first install the latest release in the v2.2 channel of the IBM® z/OS Cloud Broker in your namespace and create an instance of the ZosCloudBroker resource. Once the installation is successful, log in to the cluster from your command line by using the oc login command and validate that you are in the correct project by using the oc project command.
Now, you should be able to run the following command by using the IBM Operator Collection SDK to build your collection and create an operator:
ANSIBLE_JINJA2_NATIVE=true ansible-playbook ibm.operator_collection_sdk.create_operator
Alternatively, you can run the following alias:
ocsdk-create-operator
This command should now prompt you for the z/OS endpoint you would like to execute this operator against, and the SSH credentials that are needed to access this endpoint.
  Enter your ZosEndpoint name: wazi-sandbox
Enter your ZosEndpoint host: api.z-stack-int.cp.fyre.ibm.com
Enter your ZosEndpoint port [22]: 32281
Enter your SSH Username for this endpoint (Press Enter to skip if the zoscb-encrypt CLI isn't installed): ibmuser
Enter the path to your private SSH Key for this endpoint (Press Enter to skip if the zoscb-encrypt CLI isn't installed): ~/.ssh/id_rsa
Enter the passphrase for the SSH Key for this endpoint (Press Enter to skip if the zoscb-encrypt CLI isn't installed):
Note: SSH credentials are optional when creating the operator. If SSH credentials are not supplied, the operator is configured by using the personal credential type, which requires a credential to be generated by using the zoscb-encrypt CLI before creating an instance of the operator.
After the installation completes, you should see the RACF Operator in OpenShift under Operators > Installed Operators.

Create an instance of the operator
In the installed operator in OpenShift, you can now attempt to create an instance of the operator by supplying the required values and clicking Create.
Note: The initial creation will fail due to an injected failure. However, this failure will be corrected in the following debugging stage.
Debugging the operator
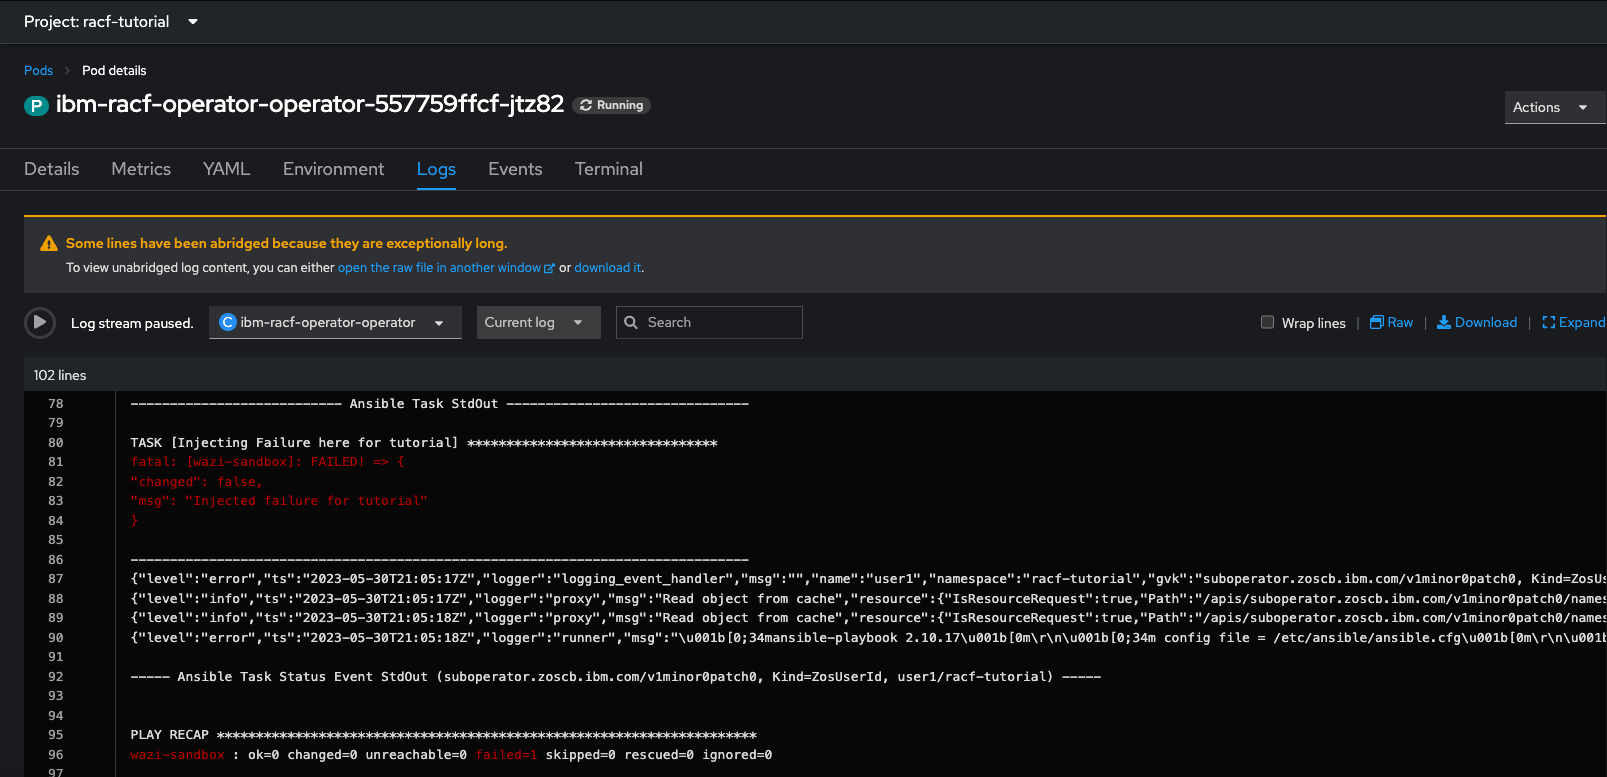
There are multiple ways to debug failures in the operator. The first way would be to open the newly created instance and scroll down to the Conditions section to see whether a task message is displaying with a Failed Reason.

Another way would be to scan the Pod logs under Workloads > Pods > <racf-operator-podname>. Once you click the Logs tab in the pod, you should see the task failure displayed at the bottom of the log.

If both the Conditions and the Pod logs aren’t displaying the failure, you can access the verbose logs within the container itself. To access these logs, do the following steps:
- Click the
Terminalwithin thePod. cdinto the/tmp/ansible-operator/runner/suboperator.zoscb.ibm.com/<api-version>/ZosUserId/<ocp-namespace>/<instance-name>/artifacts/latest/directory andcatthestdoutfile.
To resolve this failure, you should remove the task that is named “Injecting Failure here for tutorial” in the playbooks/roles/add-zos-user/tasks/main.yml file.
After removing this task, run the following command to publish this playbook modification to the installed operator Pod:
ansible-playbook ibm.operator_collection_sdk.redeploy_collection
Alternatively, you can run the following alias:
ocsdk-redeploy-collection
After the operator Pod restarts, the instance that is previously created in the namespace should reconcile automatically and create the requested user ID on the z/OS endpoint.
Next, we will add a new task to send an email containing the generated password to the user. This task will require a new variable called email_to, which will allow us to go through the end-to-end flow of the steps that are required to append a new variable to an existing operator.
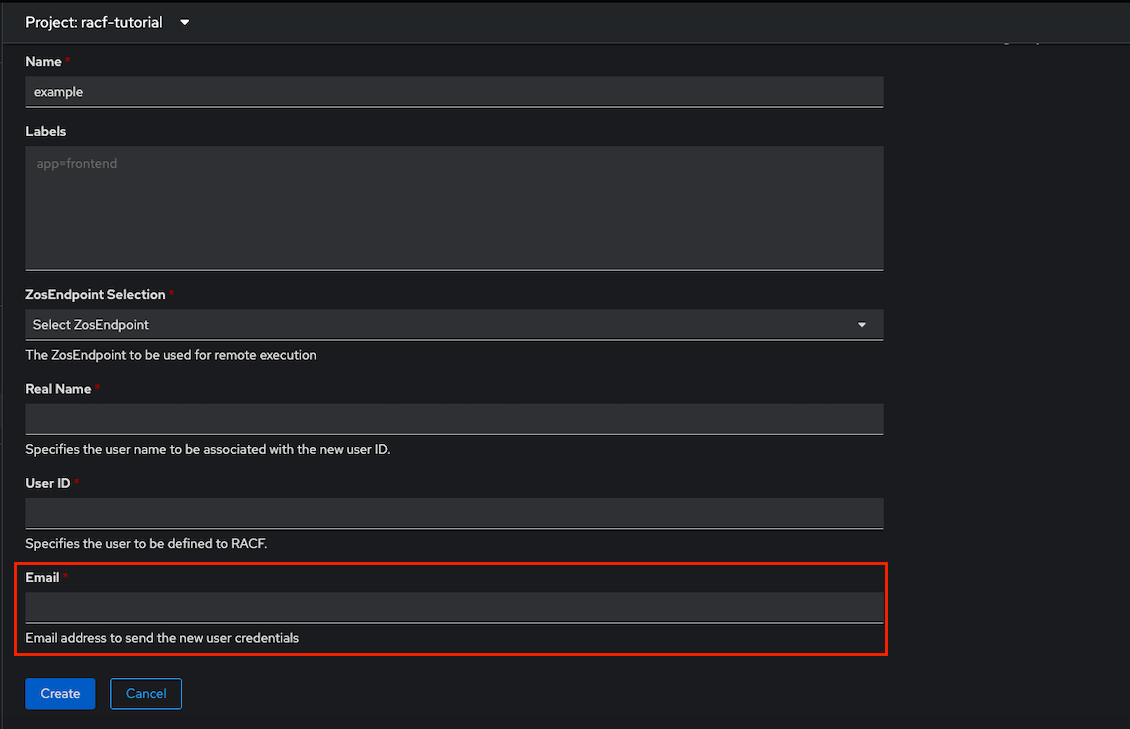
First, we should uncomment the task that is named “Send email containing login credentials to {{ email_to }}” in playbooks/roles/add-zos-user/tasks/main.yml. Then, we need to update the operator-config.yml file to add a new variable called email_to:
  - name: email_to
  displayName: Email
  description: Email address to send the new user credentials
  type: string
  required: true
Note: Adding new required variables can cause an error in OpenShift if there are existing instances in the namespace. This is because those instances would not have the new required variable in their spec. To avoid this error, you should remove all existing instances for this custom resource before applying this new configuration.
As we are updating the operator-config to display a new variable to the user, it is necessary to redeploy the entire operator. This should not be confused with redeploying the collection, as we have done previously. Therefore, run the following command to redeploy the entire operator:
ansible-playbook ibm.operator_collection_sdk.redeploy_operator
Alternatively, you can run the following alias:
ocsdk-redeploy-operator
After the redeploy is successful, you should be able to create a new instance and supply an email address for the credentials to be sent after completion.

Note: An email will not be sent to the requested email ID because this is a fake task that simply prints a debug statement.
Cleanup
After validating that your operator runs successfully, you can delete the operator from your namespace by running the following command:
ansible-playbook ibm.operator_collection_sdk.delete_operator
Alternatively, you can run the following alias:
ocsdk-delete-operator
Watch The Video
Click here to watch the video of the scenarios covered above.