WatsonX ITSM Ticket Enrichment
Overview
In this lab we will review how we can use WatsonX to enrich tickets generated from SevOne into ServiceNow using RNA.
SevOne is an NPM solution that can generate alerts when something goes wrong on the network, however the information that SevOne sends to the operator/NOC is limited to the information available in SevOne. Rapid Network Automation allows us to receive the notifications from SevOne alerts, send them to WatsonX to find more information about the alert (why is this happening? how do we fix it?) and add that information into the incident created in ServiceNow (although it could be another ITSM solution), all this using the no code automation approach available in Rapid Network Automation, allowing us to create the automation without the need of scripting capabilities.
Prerequirements
In order to complete this lab, it is required to have access to a ServiceNow instance. If you don't have one already, please create one using following the steps defined on this link.
It's important to change your role to admin to be able to use the instance properly (see link here )
Also, we will need an account to access IBM Research BAM to access WatsonX through API. An IBMid is required to access this tool https://bam.res.ibm.com/lab?mode=builder
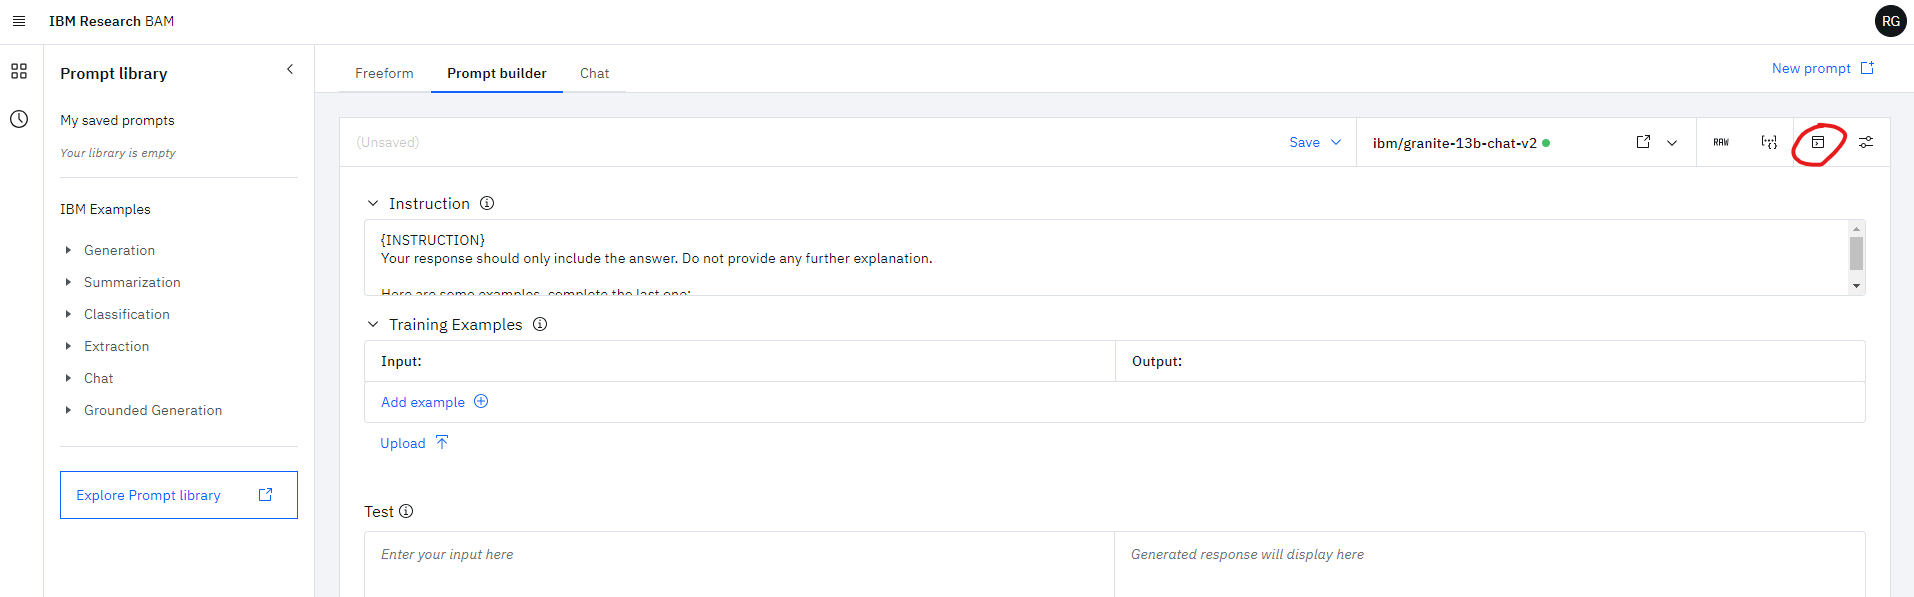
Generate Bearer Token for WatsonX
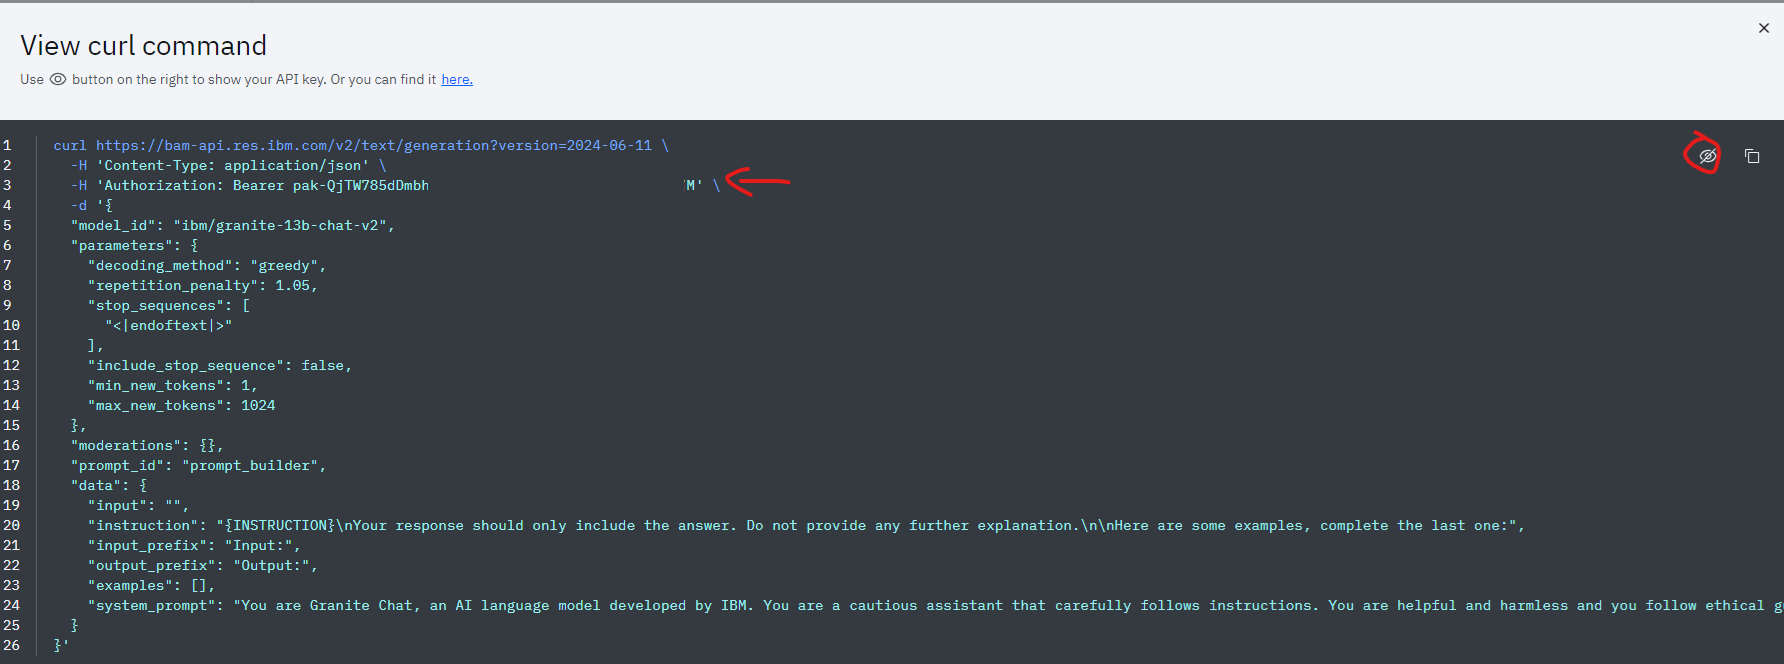
Click on the 'View curl command' icon
- Click on the 'eye' icon to uncover the Bearer token and copy it for later use
Create RNA workflow
- Go to RNA webpage
If ServiceNow authentication has already been created, please skip this block of actions and continue to step 5.
Click Create Authentication
a. Name: ServiceNow
b. Service: ServiceNow
c. Protocol: https://
d. Host: (Your SNOW instance URL, example: dev109667.service-now.com)
e. Username: (Your SNOW instance username, example: admin)
f. Password: (Your SNOW instance password)
Go to Workflows
Click Create Workflow
a. Name: IT Assist
b. Layout type: Sequence
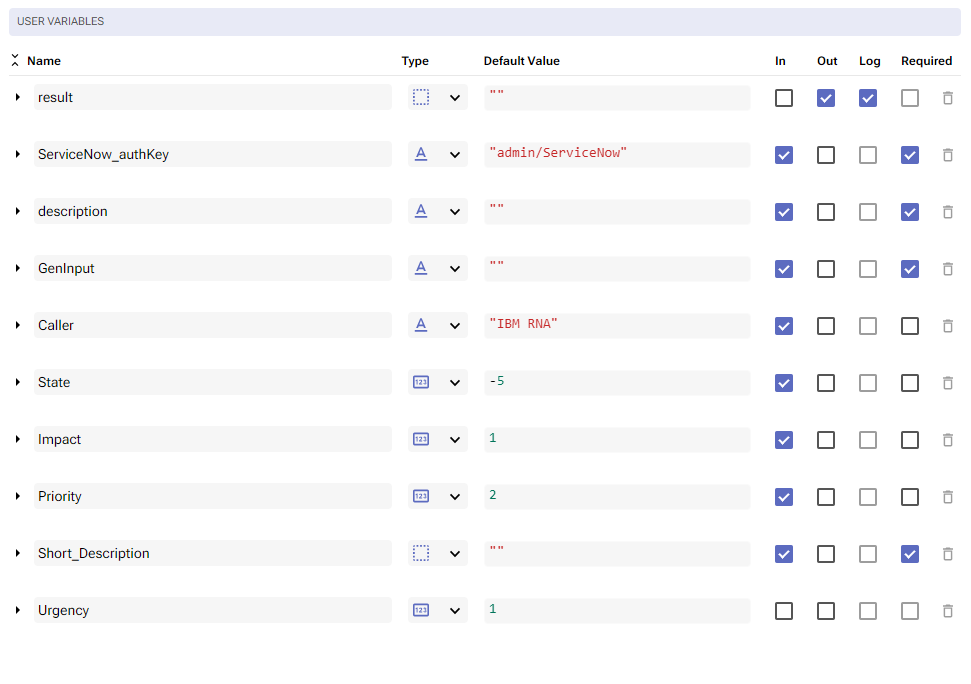
Add variables to Start
a. ServiceNow_authkey
i. Name: ServiceNow_authkey

ii. Type: Authentication -> ServiceNow

iii. Default Value: "admin/ServiceNow"

iv. In

v. Required
b. Description
i. Name: Description

ii. Type: String

iii. Default Value: ""

iv. In

v. Required
c. GenInput
i. Name: GenInput

ii. Type: String

iii. Default Value: ""

iv. In

v. Required
d. Caller
i. Name: Caller

ii. Type: String

iii. Default Value: "IBM RNA"

iv. In
e. State
i. Name: State

ii. Type: Number

iii. Default Value: -5

iv. In
f. Impact
i. Name: Impact

ii. Type: Number

iii. Default Value: 1

iv. In
g. Priority
i. Name: Priority

ii. Type: Number

iii. Default Value: 2

iv. In
h. Short_Description
i. Name: Short_Description

ii. Type: String

iii. Default Value: ""

iv. In

v. Required
i. Urgency
i. Name: Urgency

ii. Type: Number

iii. Default Value: 1

iv. In
j. GenAI
i. Name: GenAI

ii. Type: Boolean

iii. Default Value: false

iv. In

v. Required
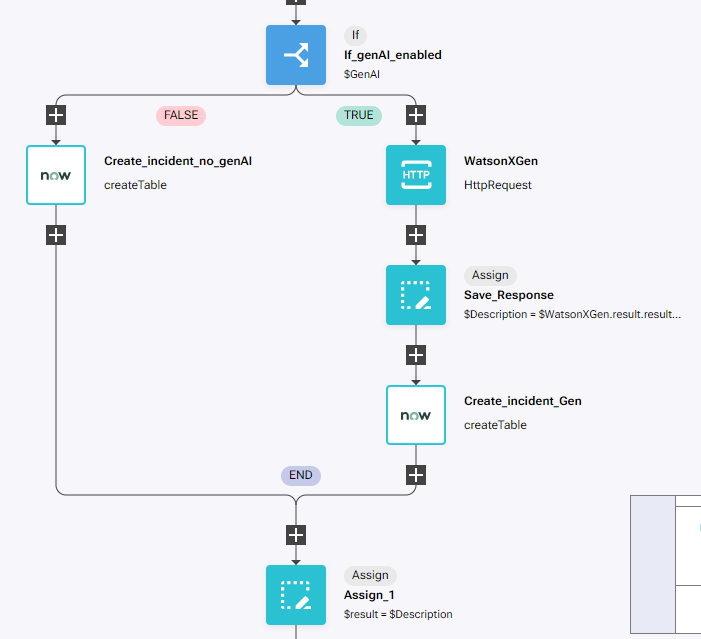
Change to Flow View
On the left hand side panel, Click on Common
Select "If" and drop it after the building block START
a. Change name to If_genAI_enabled
b. Click on the building block to open the right side panel and complete the following fields
i. condition: $GenAIOn the FALSE branch of the If, add a new building block, ServiceNow -> createTable
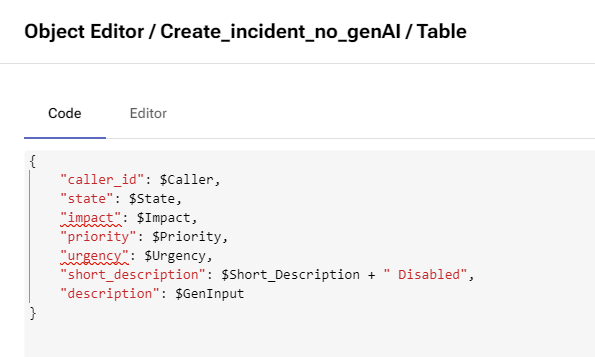
a. Change name to Create_incident_no_genAI
b. Click on the building block to open the right side panel and complete the following fields
i. authKey: $ServiceNow_authkey

ii. tableName: 'incident'

iii. Table -> click on the pencil next to [Object] to edit the json file

    {
        "caller_id": $Caller,
        "state": $State,
        "impact": $Impact,
        "priority": $Priority,
        "urgency": $Urgency,
        "short_description": $Short_Description + " Gen AI Disabled",
        "description": $GenInput
    }

iv. content_type: "application/json"
On the 'TRUE' branch of the If, add a new building block, Common -> HttpRequest
a. Change name to WatsonXGen
b. Click on the building block to open the right side panel and complete the following fields
i. method: POST

ii. host: "bam-api.res.ibm.com"

iii. protocol: https

iv. path: "/v2/text/generation"

v. query: "version=2024-03-19"

vi. headers -> click on the pencil next to [Object]

    {
        "Content-Type": "application/json",
        "Authorization": "Bearer XXXXXXXXXXXXXXXXXXXXXXXXXXXXXXXXXXX"
    }

NOTE: replace all the XXXXX with the token generated on step 3, it should look like

{
    "Content-Type": "application/json",
    "Authorization": "Bearer pak-ApAAa9aaAAaAA1ApA4pAA1_pppAAp11pApAAp1pAA1o"
}

vii. body -> click on the pencil next to [Object]

{
    "model_id": "ibm/granite-13b-chat-v2",

    "parameters": {
        "decoding_method": "greedy",
        "repetition_penalty": 1.05,
        "stop_sequences": ["<|endoftext|>"],
        "include_stop_sequence": false,
        "min_new_tokens": 1,
        "max_new_tokens": 1024
    },
    "moderations": {},
    "prompt_id": "prompt_builder",

    "data": {
        "input": $GenInput,
        "instruction": "{INSTRUCTION}\nYour response should only include the answer. Do not provide any further explanation. Give only one response.\n\nYou should ingest a response from a network device and explain the issue in normal language. You should also provide a suggestion as to how to fix it. ",
        "input_prefix": "Input:",
        "output_prefix": "Output:",

        "examples": [{
            "input": "cisco asa high cpu ssl process",
            "output": "I have seen cases where SYN attacks / flooding causes this. check you logs to see if you pickup any flooding/syn attack events"
        }],
        "system_prompt": "You are Granite Chat, an AI language model developed by IBM. You are a cautious assistant that carefully follows instructions. You are helpful and harmless and you follow ethical guidelines and promote positive behavior. You respond in a comprehensive manner unless instructed otherwise, providing explanations when needed while maintaining a neutral tone. You are capable of coding, writing, and roleplaying. You are cautious and refrain from generating real-time information, highly subjective or opinion-based topics. You are harmless and refrain from generating content involving any form of bias, violence, discrimination or inappropriate content. You always respond to greetings (for example, hi, hello, g'''day, morning, afternoon, evening, night, what'''s up, nice to meet you, sup, etc) with \"Hello! I am Granite Chat, created by IBM. How can I help you today?\". Please do not say anything else and do not start a conversation."
    }
}

NOTE: this is the same content that we can see on step 3, but we have added some examples to train the model on what we want to achieve. If you want to play further with this lab, please keep adding examples of suitable answers to messages sent to WatsonX
Add a new building block, Common -> Assign
a. Change name to Save_Response
b. Click on the building block to open the right side panel and complete the following fields
i. variable: $Description

ii. value: $WatsonXGen.result.results[0].generated_text
Add a new building block, ServiceNow -> createTable
a. Change name to Create_incident_Gen
b. Click on the building block to open the right side panel and complete the following fields
i. authKey: $ServiceNow_authkey

ii. tableName: 'incident'

iii. Table -> click on the pencil next to [Object] to edit the json file

    {
        "caller_id": $Caller,
        "state": $State,
        "impact": $Impact,
        "priority": $Priority,
        "urgency": $Urgency,
        "short_description": $Short_Description + " Gen AI Enabled",
        "description": $WatsonXGen.result.results[0].generated_text
    }

iv. content_type: "application/json"
On the existing Assign_1 building block (if there isn't, create a new Common -> Assign block):
a. Click on the building block to open the right side panel and complete the following fields
i. variable: $result

ii. value: $Description
Create RNA API Gateway
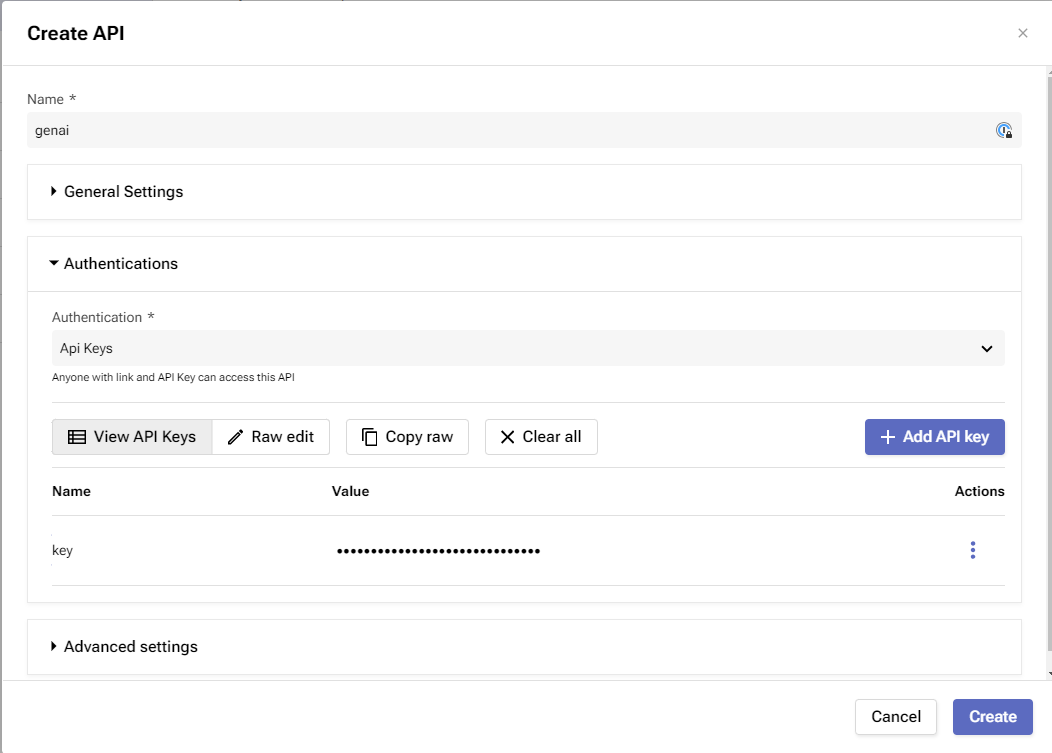
Go to APIS
Click on Create API
a. Name: genai
b. Authentication:
i. Authentication: API keysc. Click on Add API Key
i. Name: key

ii. Copy the value for later use
Click on Create (top right side corner)
a. Workflow -> navigate to find the IT assist workflow created
b. Stage -> click on the + icon within the Stage box
i. click Create (no other configurations on Stage)c. Endpoint -> click on the + icon within the Endpoint box
i. Path: /itassist

ii. Method: POST

iii. click Create
d. Click Deploy

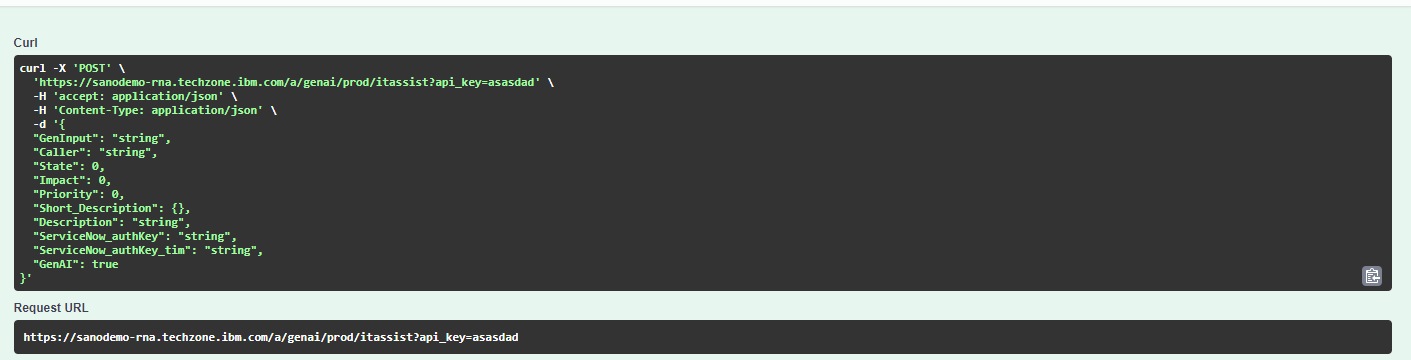
Click on Swagger UI
a. Click on Authorize
b. Paste the key copied on step 16
c. Click Authorize and Close
Click on Try it Out
Click Execute
a. The test will fail, however we need to perform this step to get the Request URL that will be needed in SevOne
Create SevOne Webhook and Alert
Go to NMS
Go to Events -> Configuration -> Webhook Definition Manager
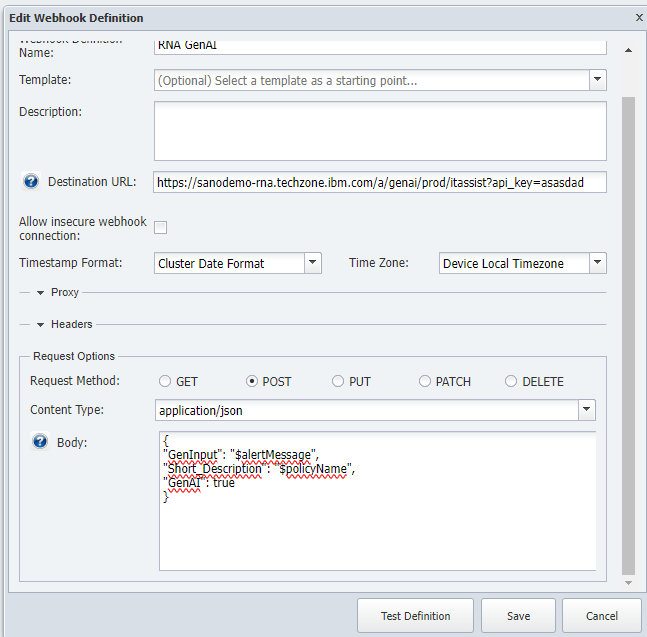
Add Webhook Definition
a. Webhook Definition Name: RNA GenAI
b. Destination URL: paste the URL copied on step 20
c. Allow insecure webhook connection: enabled
d. Request Method: POST
e. Body:
{
    "GenInput": "$alertMessage",
    "Short_Description": "$policyName",
    "GenAI": true
}
f. Click Save
Go to Events -> Configuration -> Policy Browser
Create Policy
a. Name: High CPU on Cisco ASA
b. Device Group: All Device Groups
c. Object Type: CPU (Cisco ASA)
Click on Trigger Conditions
a. Add a new condition:
1. Indicator: CPU 5 minute average

2. Threshold: 50 percent

3. Duration: 20 minutes
b. Click save
c. On Trigger Message (over conditions) add: cisco asa high cpu ssl process
d. On webhooks, select RNA GenAI and move it to the right side

- Click on Save as New
Review
There are two ways to review the outcome of this PoT:
a. Reduce the threshold in the alert policy to generate hundreds of alerts

b. Test it from Swagger UI
As a next step, we will review this lab using Swagger UI
Go back to RNA
Go to APIS and open the genai API
Go to Swagger UI
a. Click on Authorize
b. Paste the key copied on step 16
c. Click Authorize and Close
Click on Try it Out
a. Use the following body:
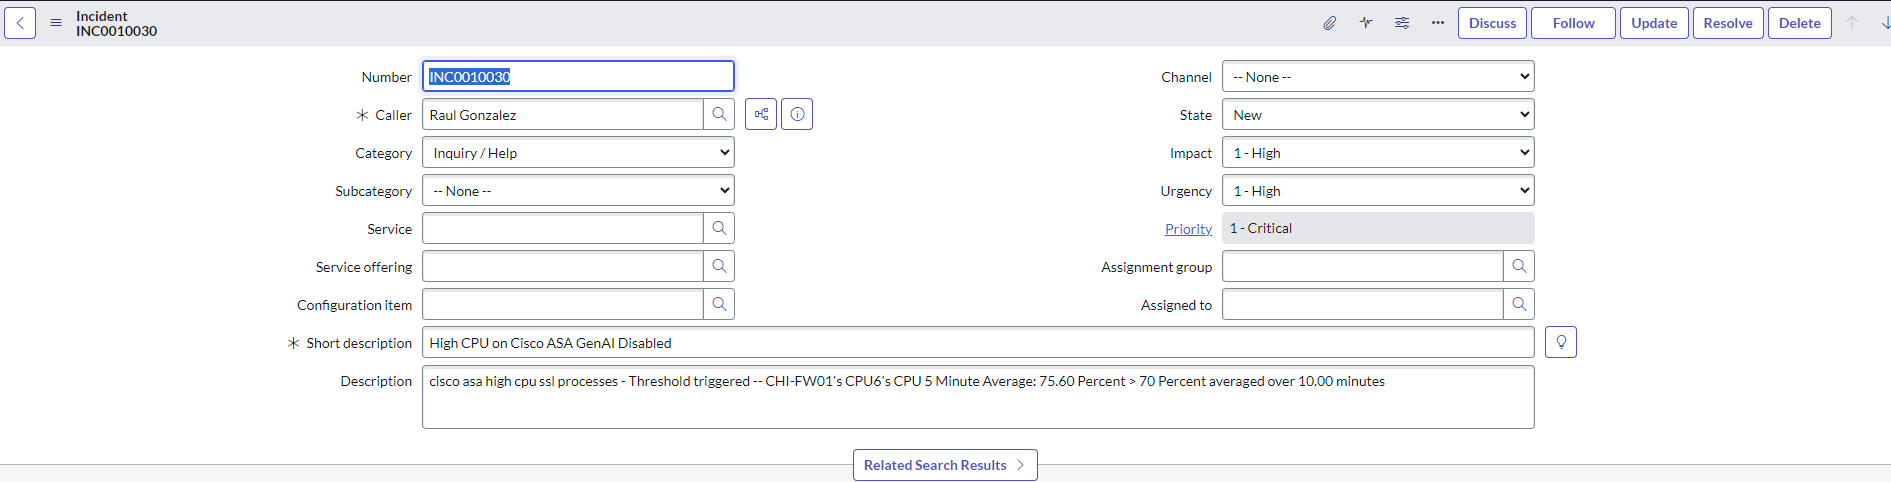
{
    "GenInput": "cisco asa high cpu ssl processes - Threshold triggered -- CHI-FW01's CPU6's CPU 5 Minute Average: 75.60 Percent > 70 Percent averaged over 10.00 minutes",
    "Short_Description": "High CPU on Cisco ASA",
    "GenAI": false
}
b. Click Execute
c. Go to your ServiceNow instance -> All -> Incidents -> Click in All and change view to Default (click on the list icon -> View -> Default View)
d. Use the following body:

    {
        "GenInput": "cisco asa high cpu ssl processes - Threshold triggered -- CHI-FW01's CPU6's CPU 5 Minute Average: 75.60 Percent > 70 Percent averaged over 10.00 minutes",
        "Short_Description": "High CPU on Cisco ASA",
        "GenAI": false
    }

e. Click Execute

f. Go to your ServiceNow instance -> All -> Incidents -> Click in All and change view to Default (click on the list icon -> View -> Default View)
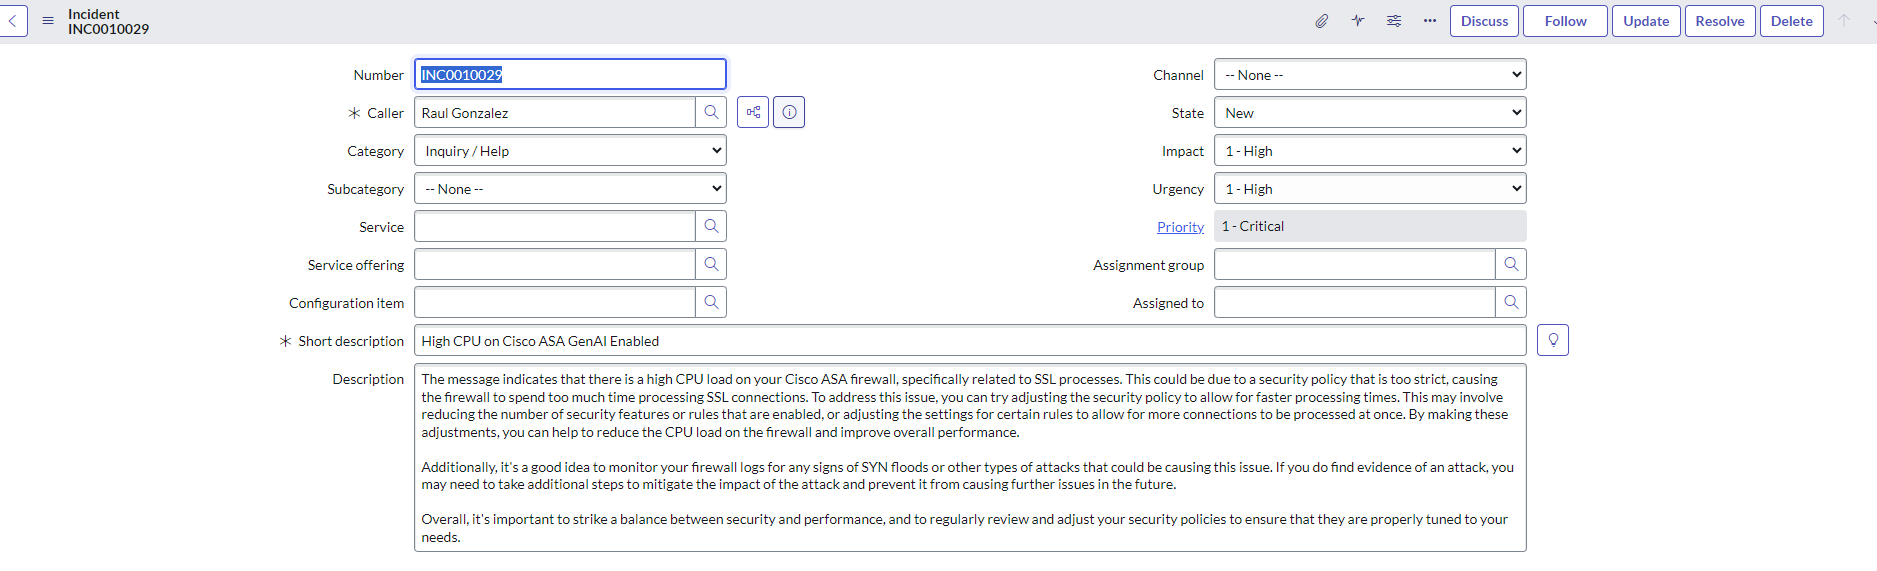
There should be these two incidents created in your ServiceNow instance
