Agent Installation
4.1: Instana Agent Deployment Options
Instana has a variety of agent installation options including the mirror repository and static agents that allow customers to meet strict change control processes. Some of the available options are listed below:
- OS specific installer (Linux, MacOS, Windows, UNIX)
- Container setup
- Docker (and other container managers)
- Kubernetes
- OpenShift
- Hosted Cloud Services
- Serverless component
All above mentioned methods are accessible via the wizard on the Instana UI.
If at any point you want to review the Instana agent documentation you can find it here.
If you are unable to access the Instana Web UI you will need to go back through the previous lab and follow all the steps to ensure that the Instana server is up and running.
When installing the Instana agent you have to select if you want the agent to be dynamic or static based on whether it can update itself or not.
-
A Dynamic host agent downloads the latest set of sensors from repositories. By default, a dynamic agent updates itself at agent startup and checks daily for updates to the agent and sensor code. This automatically gives you access to new features and bug fixes. It is also possible to tightly control the updating of dynamic host agents by pinning a version. It is also possible to change the interval that the Agent checks for updates.
By default, dynamic host agents use the Instana repository to pull updates, but it is possible to set up your own managed mirror. Currently, the mirror must be a Nexus or Artifactory repository. This is probably the best option for most customers because it allows them the benefits of automatic updates, while at the same time controlling the content that is in the repository. In addition, it eliminates the need for every Agent to have internet access to the repositories.
-
A Static host agent is a self-contained host agent that includes all the latest available components at the time of its release, and has no dynamic update capabilities. The static host agent has a stable "bill of materials" that never changes after the host agent's installation. Static Agents must be manually upgraded or upgraded via automation such as Ansible.
Static host agents require no internet connection to the Instana repository, and are recommended in restrictive network setups.
4.2: Installing a local Instana Agent on K3s for self monitoring
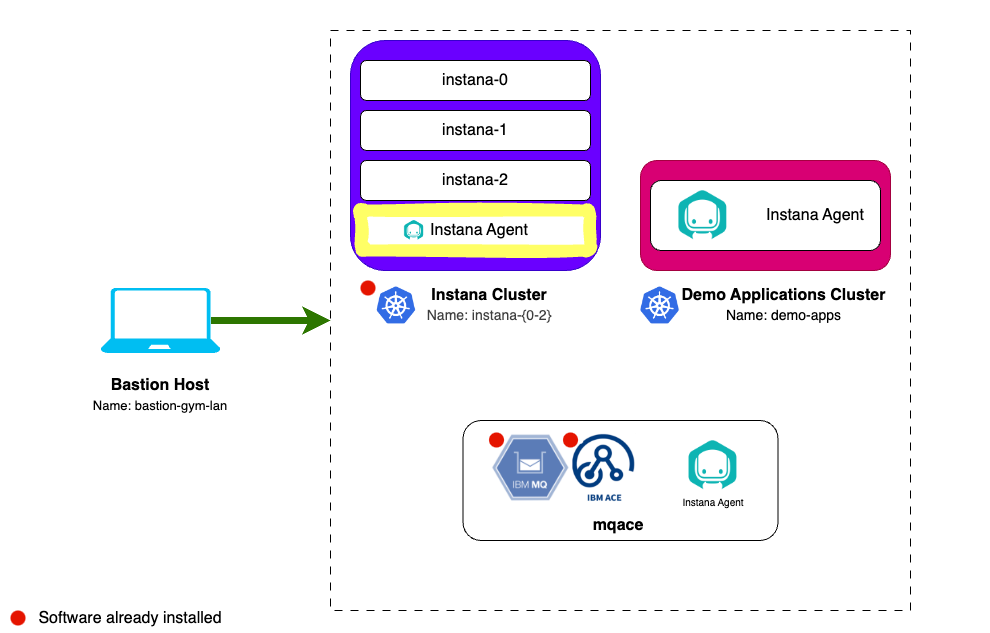
Instana provides the ability to setup self monitoring of the Standard Edition server types (single and multi-node). Self monitoring the Instana Backend when using the Standard Edition of Instana installed on K3s is very simple, the Agent is automatically configured to monitor the key technologies such as cassandra, kafka, postgres, etc. so that the entire Instana backend server is being monitored.
Open a new terminal tab by selecting File -> New Tab.
SSH to the Instana server with the stanctl cli tool installed:
ssh jammer@instana-0
Become the root user:
sudo -i
Run the following command:
stanctl agent apply
You should see the following output:
⠼ Adding Instana Helm repo  [13s] ✓
⠧ Applying Instana agent  [1m16s] ✓
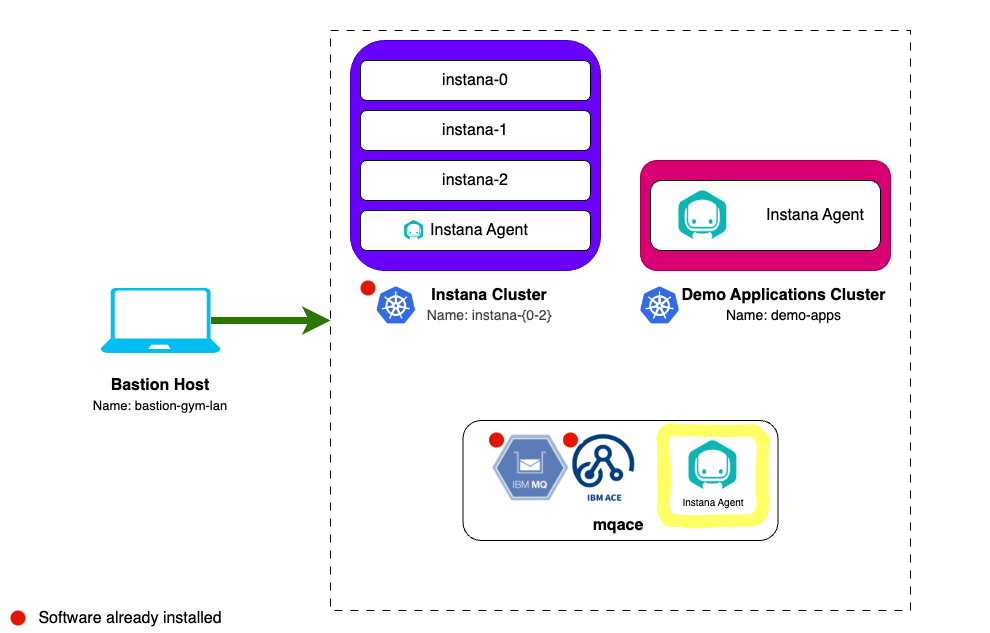
4.3: Installing Instana Agent on a Linux VM
Next we will install the Instana Agent on a Linux VM that is running IBM MQ and ACE.
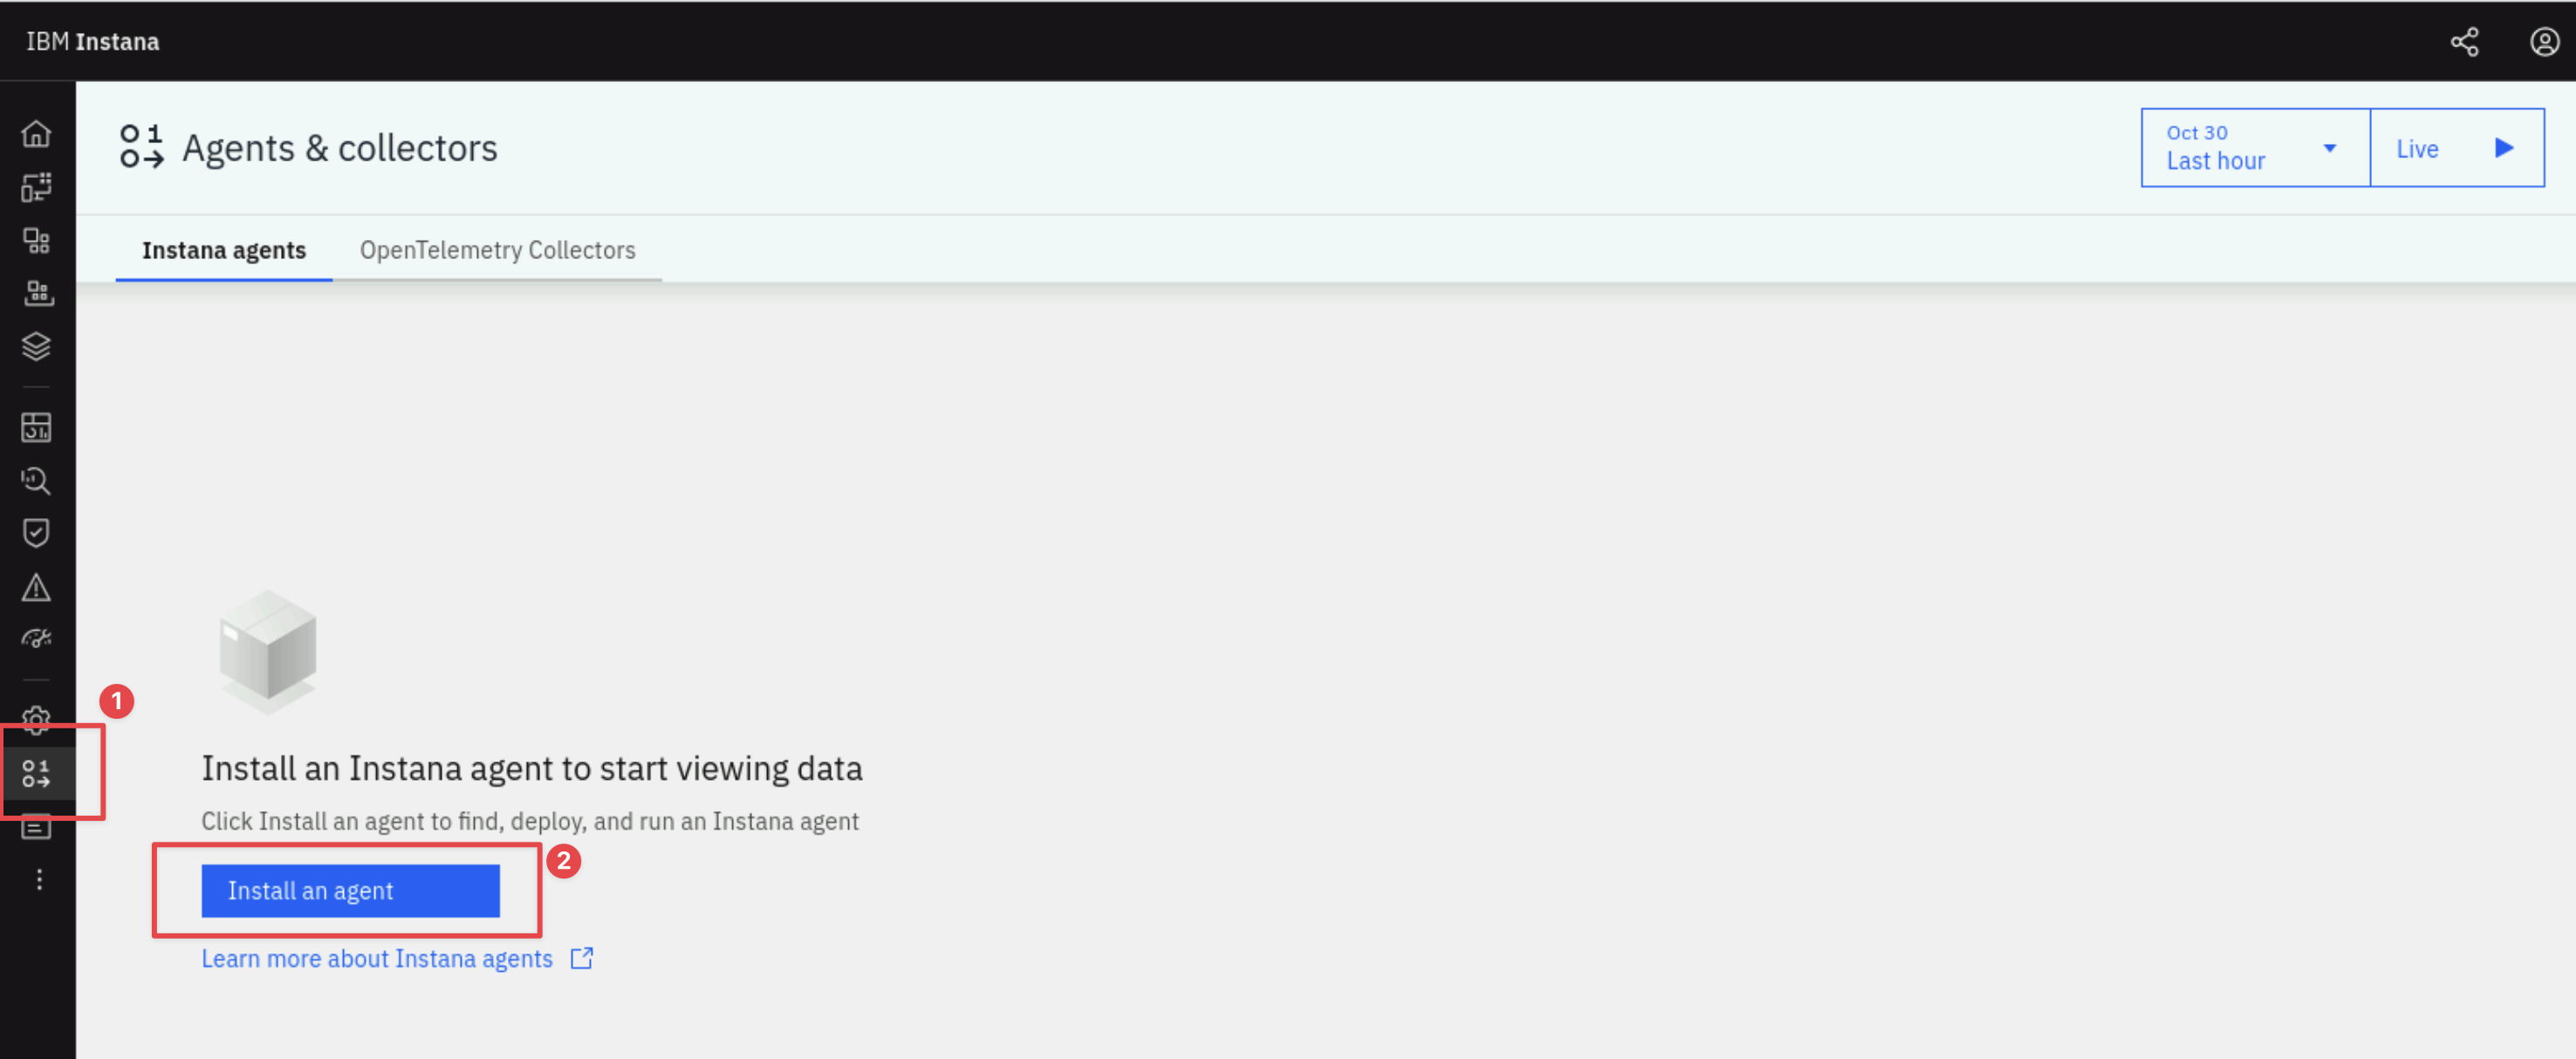
After logging into Instana for the first time you will be taken to the Agent Deployment page.
If you aren't on the Instana agent installations screen you can get there by selecting the Agents & collectors menu in the left navigation and then clicking the Install an agent button.
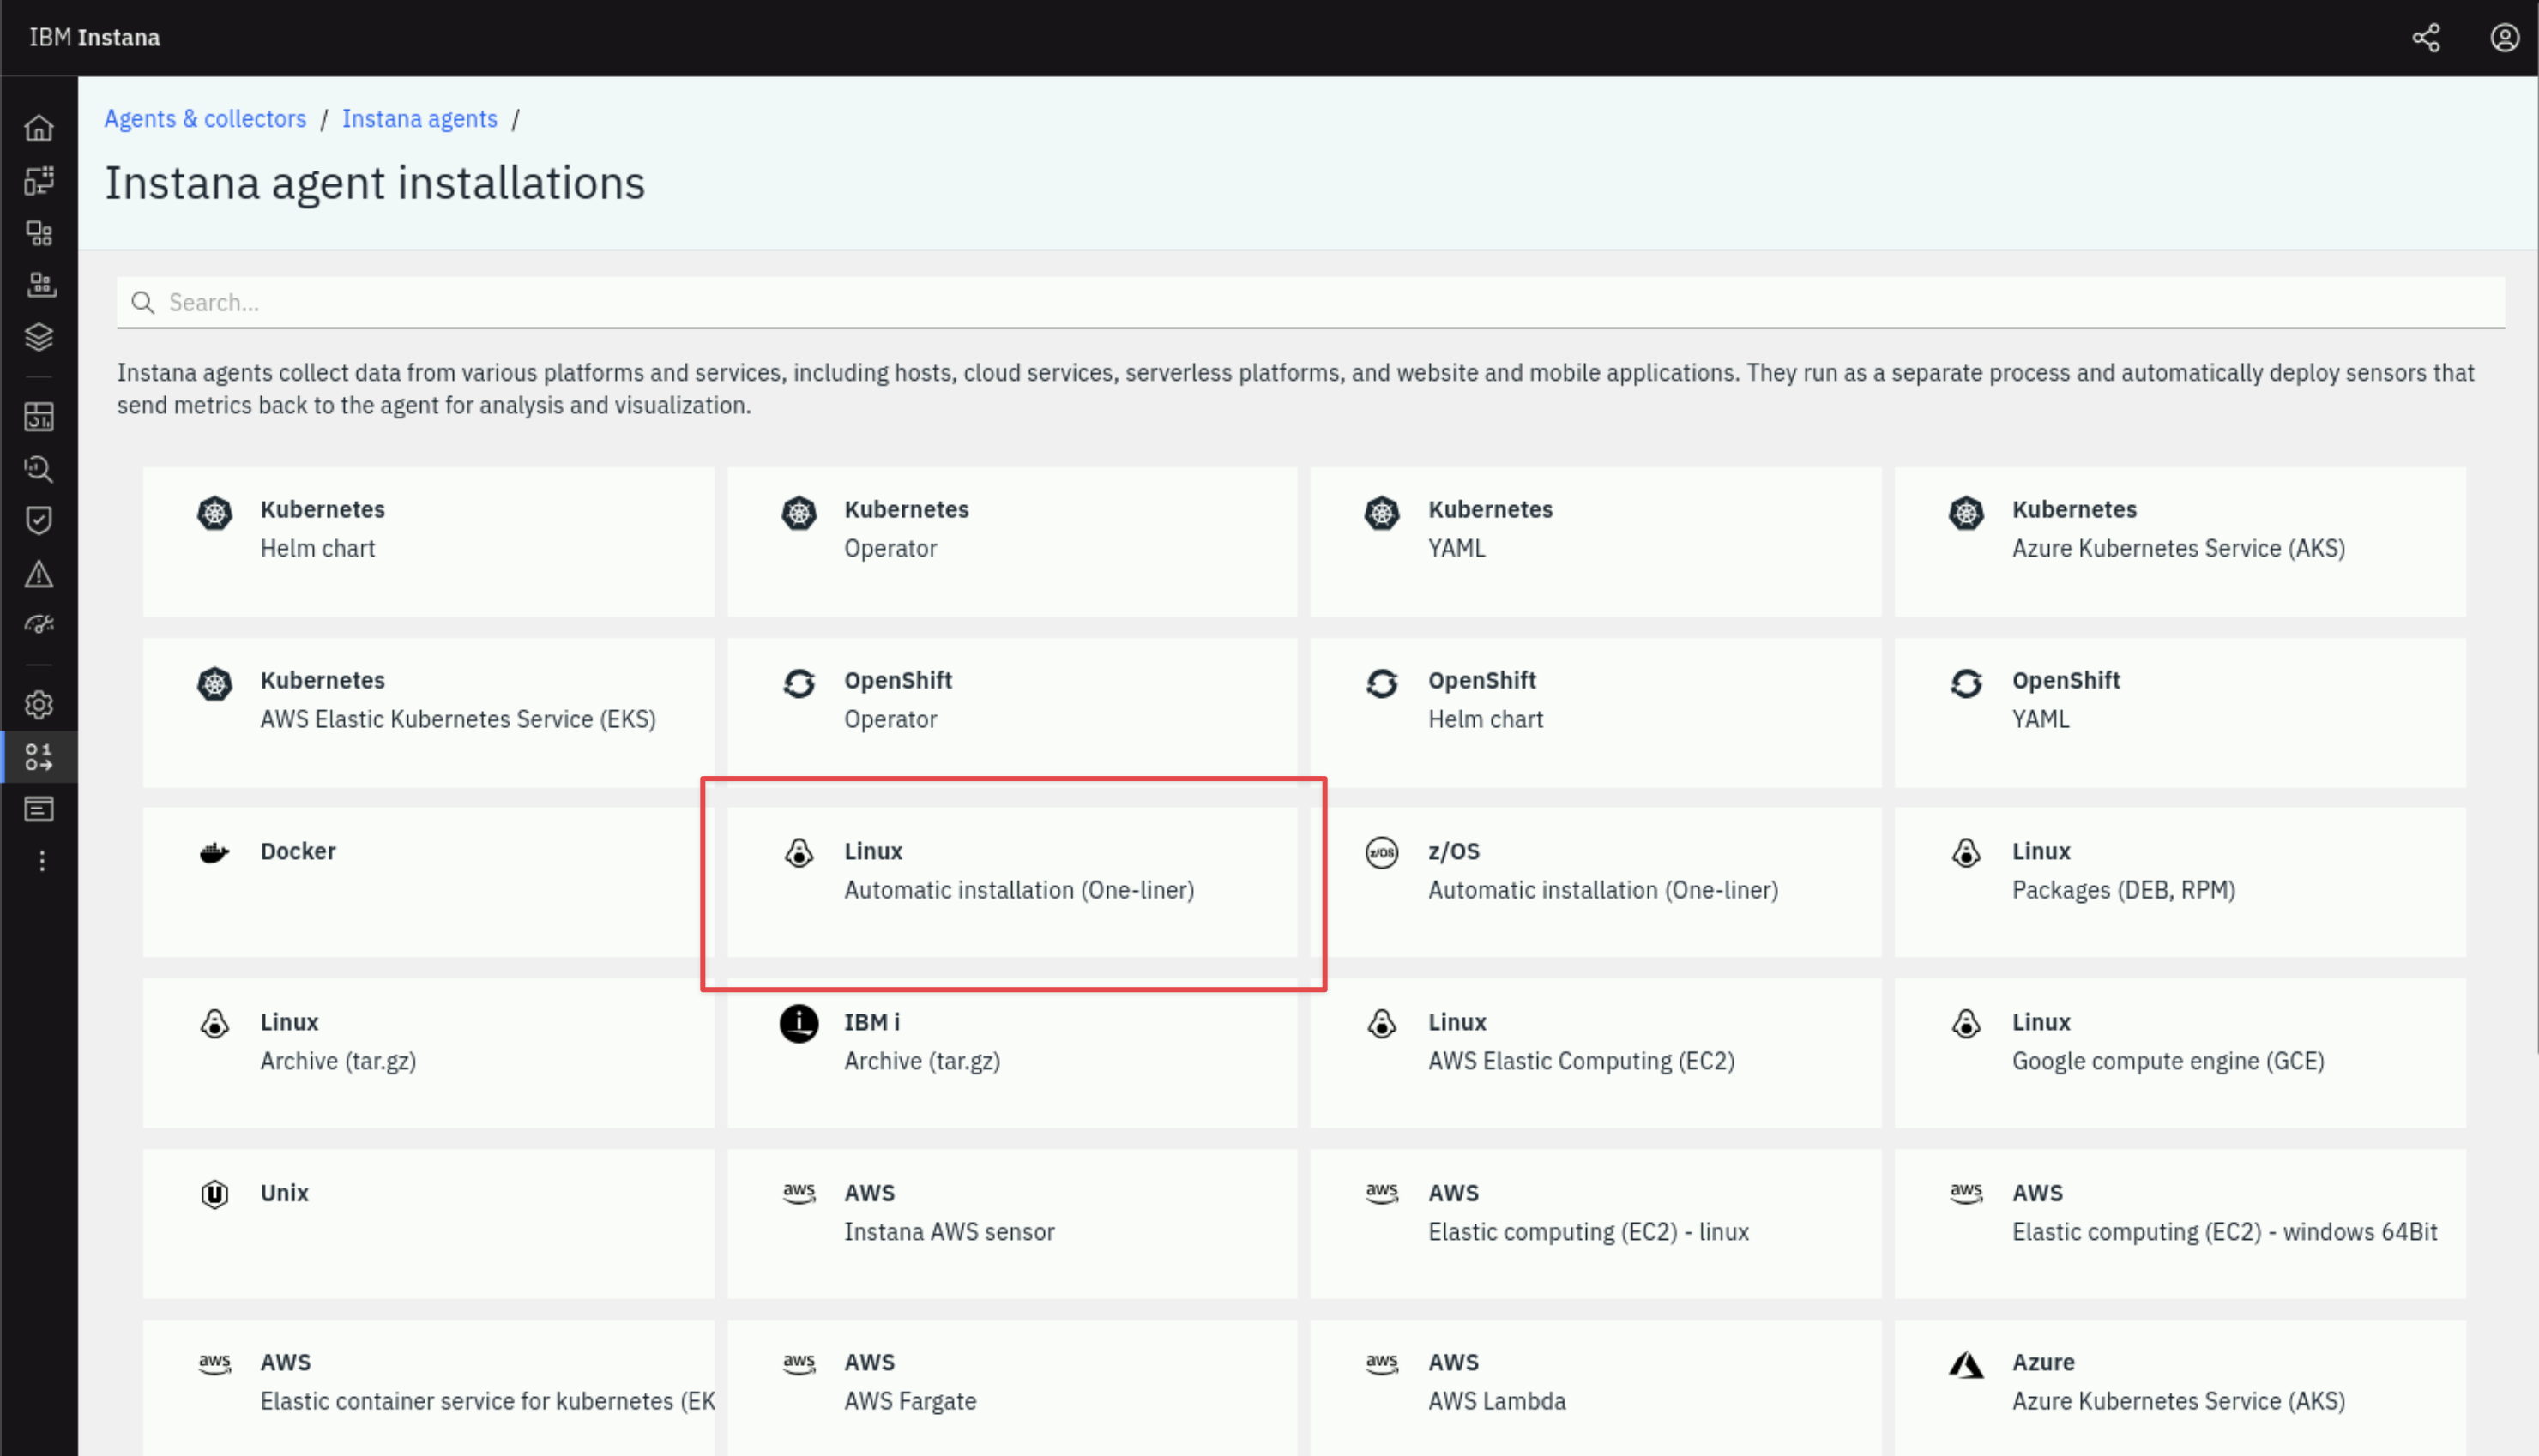
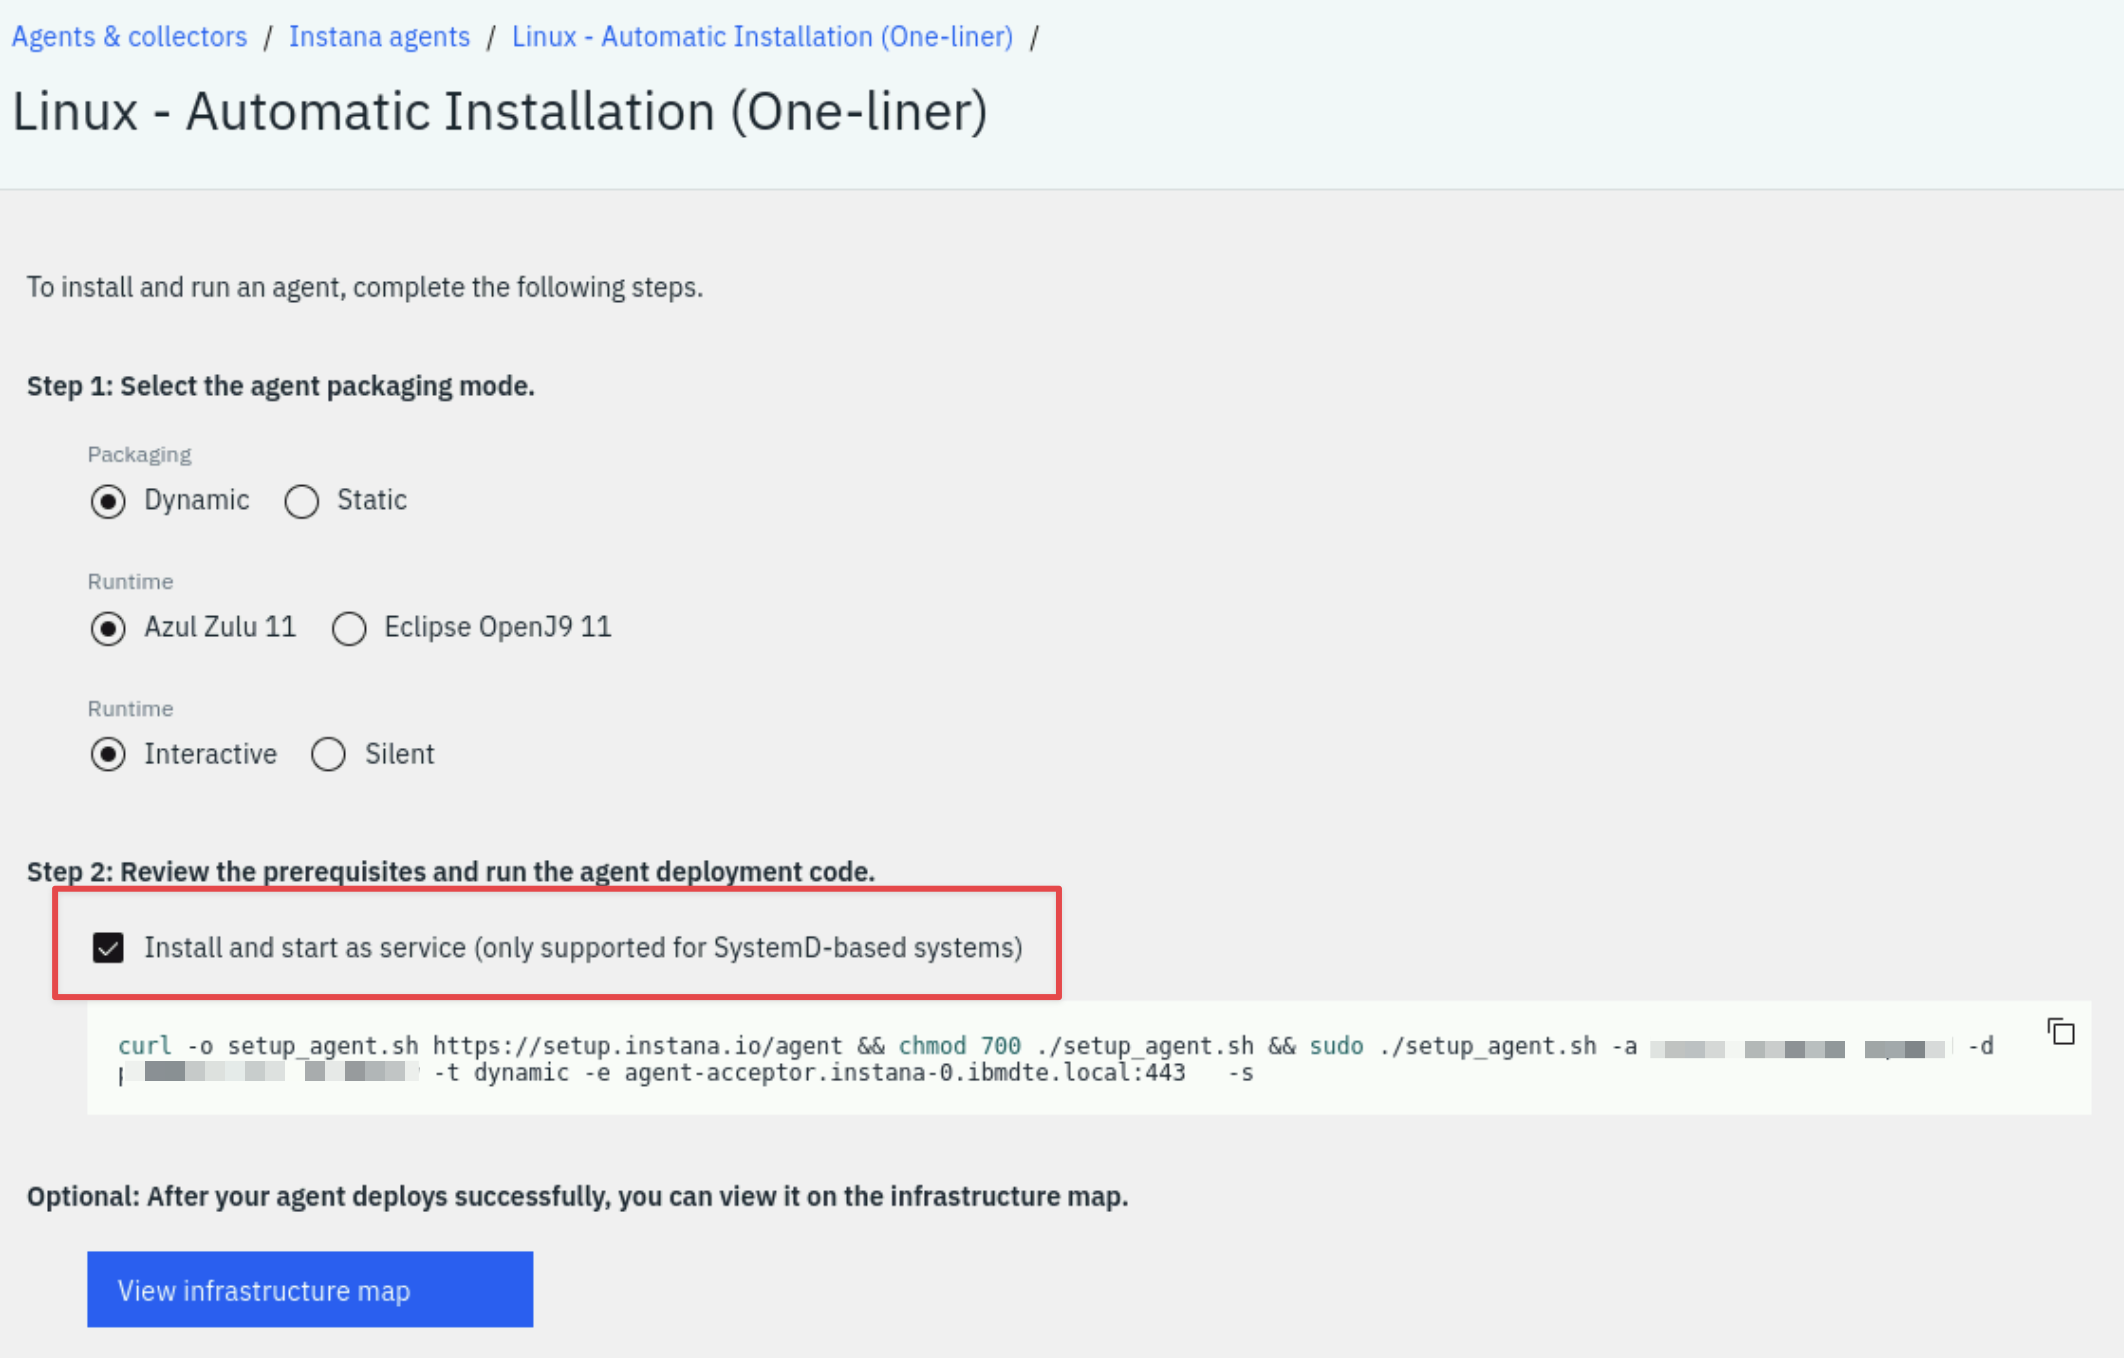
A list of different environments where you can install the Instana Agent is shown. For example, on Linux, you can choose a automatic one-liner installation, RPM, or TAR file installation. For OpenShift/kubernetes, you have multiple options including operator, helm, and yaml installs. The MQACE VM is a Linux server, the easiest method for Linux is the automatic one-liner, so select Linux Automatic Installation (One-liner).
There are a few options on this page for the agent packaging mode including the use of different java versions, static vs. dynamic agents, etc. Leave the default settings.
Select the checkbox next to "Install and start as service". This will setup the systemctl autostart process and will also start the Agent immediately after it is installed. Select Copy to copy the command to your clipboard.
Open a new terminal tab by selecting File -> New Tab.
SSH to the ACE/MQ server as follows:
ssh jammer@mqace
When prompted if you want to continue connecting, type: yes
Use sudo to switch to the root user:
sudo -i
Paste the curl command you copied earlier into the root@mqace terminal
window and answer y when prompted.
At this point the Agent is installed and up and running. You can confirm this by running:
ps -ef | grep instana
You should see a process running, the short version looks like this:
root 22012 1 99 12:35 ? 00:00:11 /opt/instana/agent/jvm/bin/java .....
The Agent will automatically start monitoring the operating system and start discovering key processes and middleware. In many cases it will automatically instrument those technologies. In the case of some technologies (eg. MQ an and App Connect Enterprise), there are manual configuration steps required due to the need to provide credentials for accessing those applications.
4.4: Installing the Instana Agent on a Kubernetes Cluster
The next step is to install the Instana Agent into the demo-apps Kubernetes Cluster. In future labs we'll be using this cluster to host our demo applications like Robot Shop, Quote of the Day and others.
Navigate back to the Instana agent installations page by using the Instana agents breadcrumb at the top of the Linux - Automatic Installation page:

Alternatively you can again select Agents & collectors from the left navigation menu and then clicking the Install an agent button.
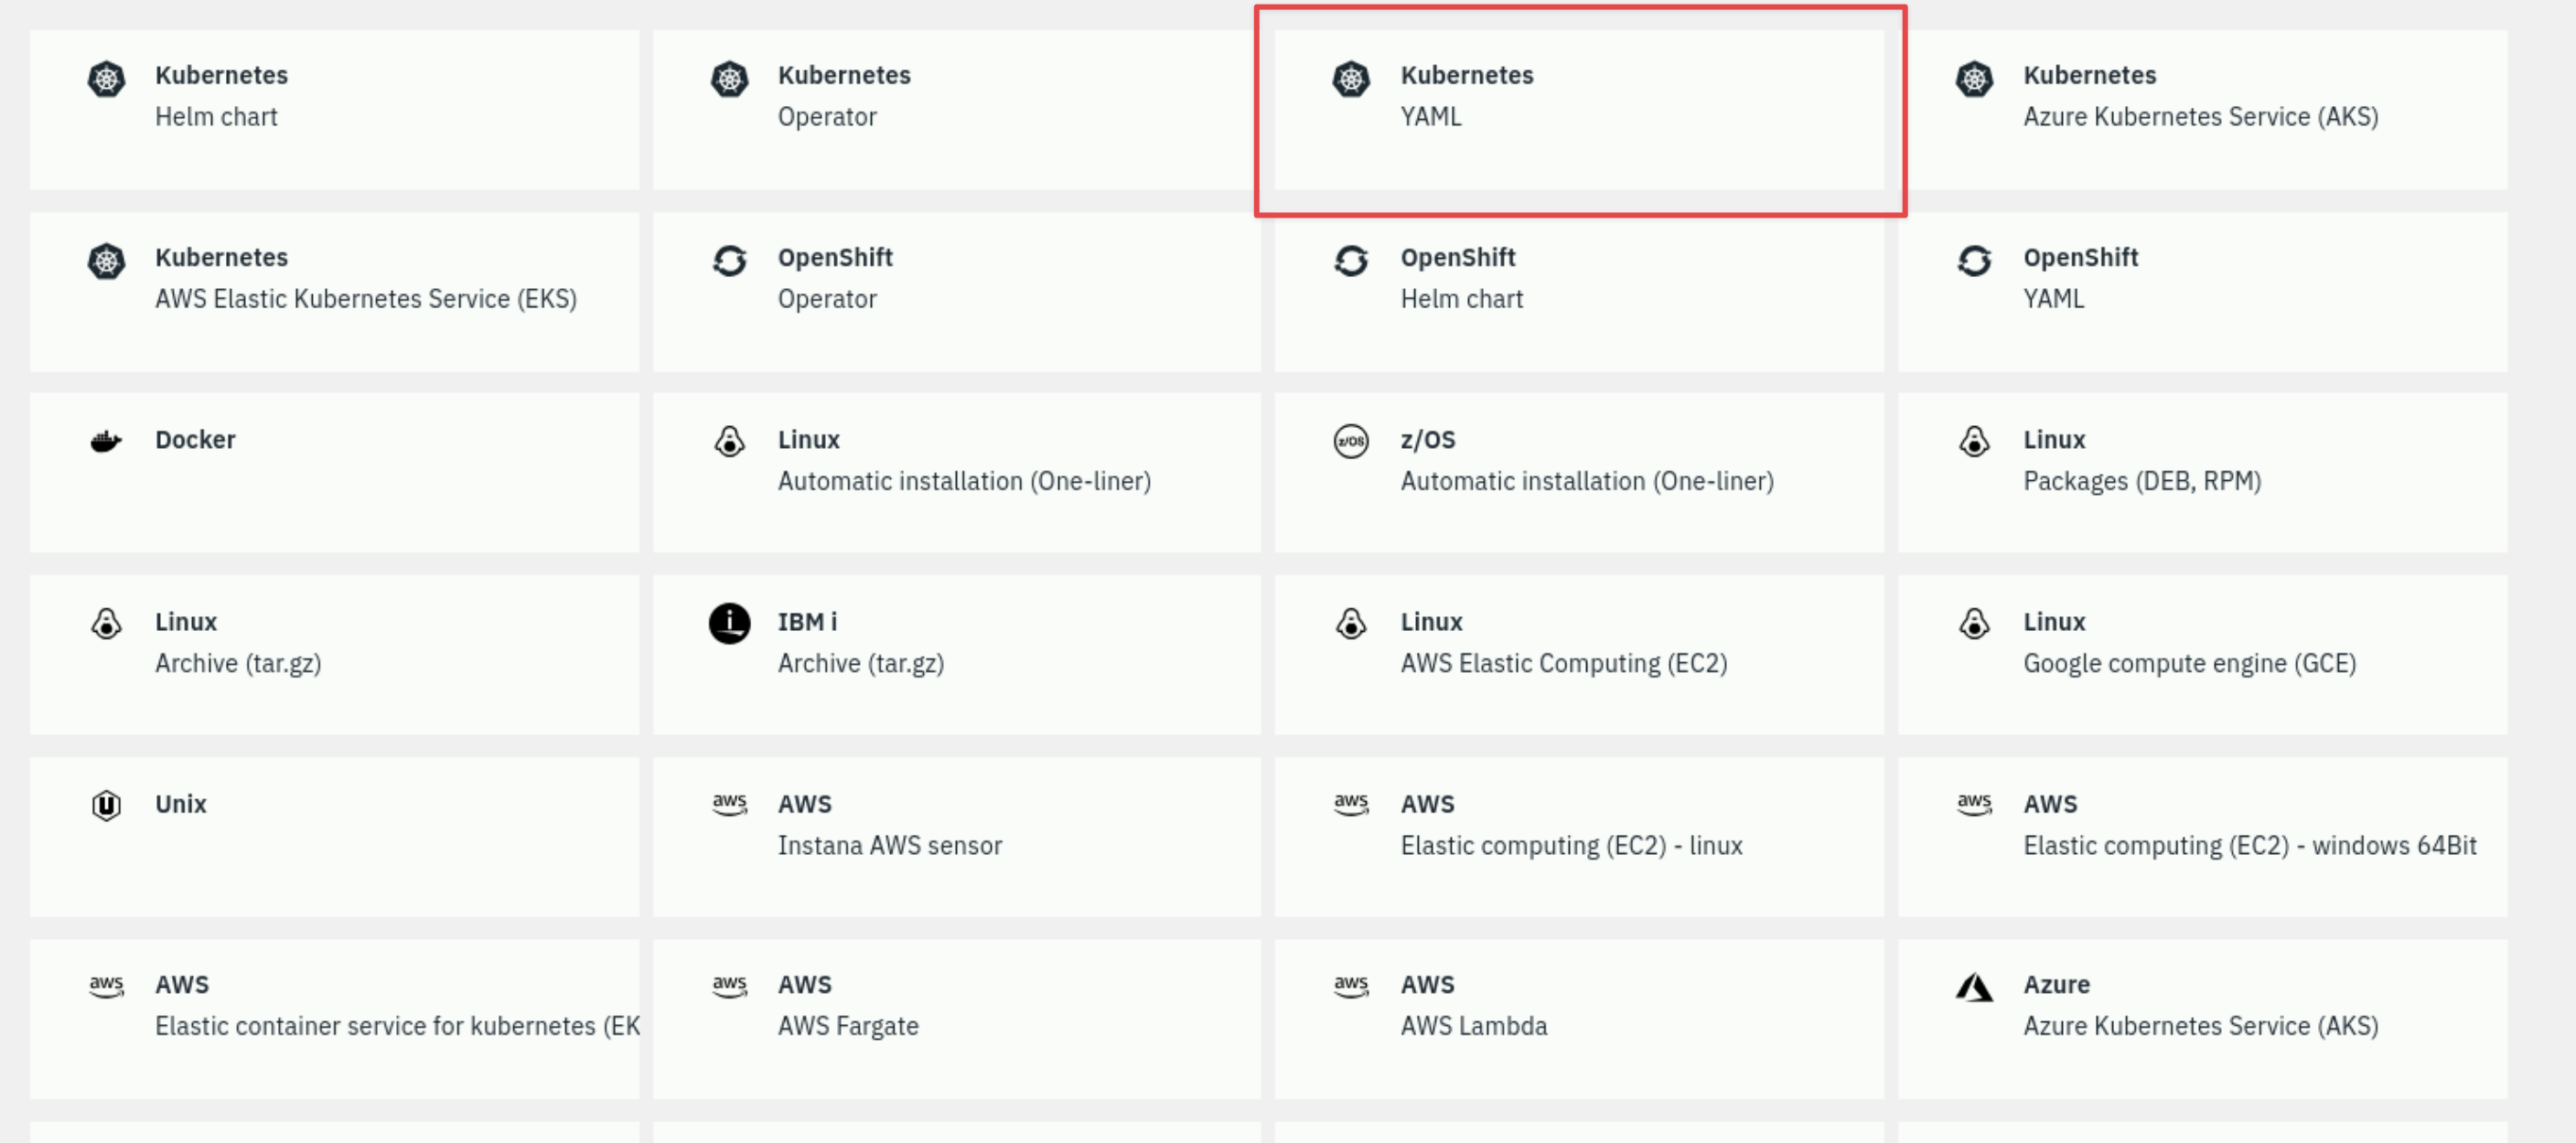
There are a few different options for installing the Instana Agent on a Kubernetes cluster. A common method is to use the Helm chart, you will need to ensure that Helm has been installed first though. A 'dependency free' option is the YAML method.
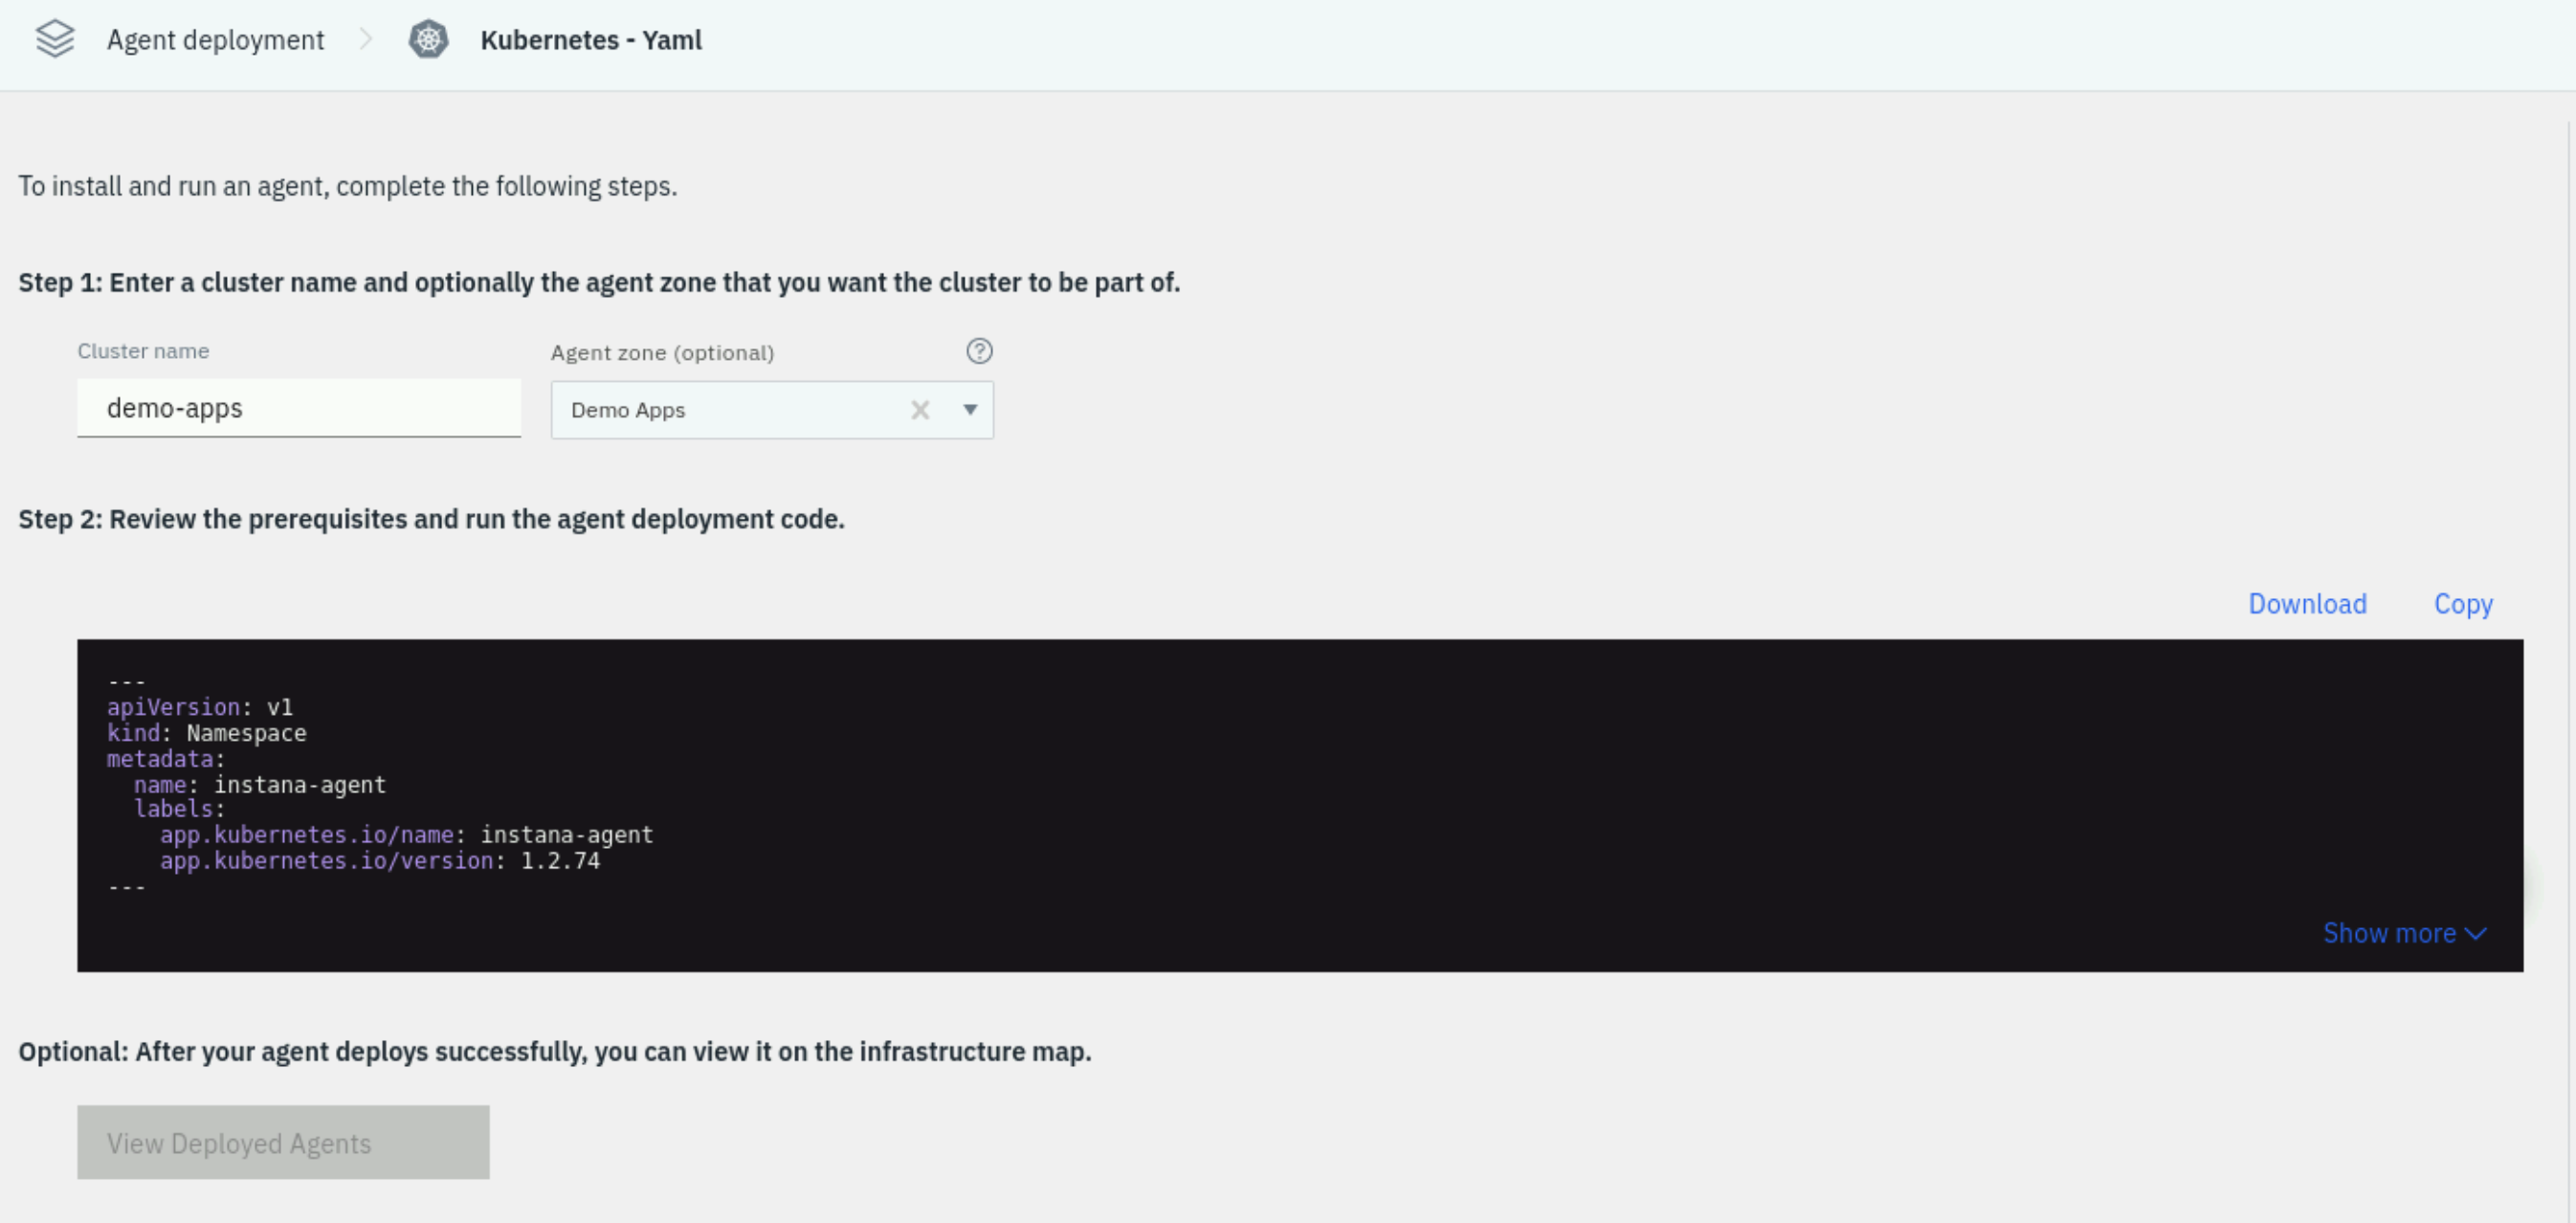
Select the tile Kubernetes YAML.
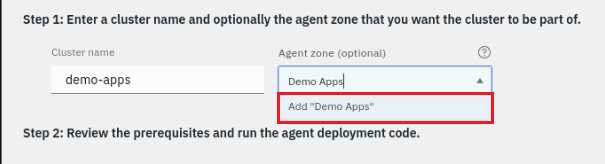
Provide a meaningful name for the Cluster and specify and Agent Zone. These namespace will show up within the Instana UI:
-
Cluster name:
demo-apps -
Agent Zone:
Demo Apps-
Ensure you click the Add "Demo Apps" popup to set the zone name:
-
Setting these values will allow you to find your Agent and Kubernetes Cluster within the user interface and not get confused by data coming in from other agents.
Zones are used to organize the Instana Agents (and sensors). Many customers create zones for lines of business, data center locations, public cloud regions, etc
Select the Copy button to copy the yaml content.
If you try to highlight the text block containing the yaml, you must first click on the show more link in the lower right corner.
Open a new tab in your terminal. SSH to the demo-apps kubernetes cluster:
ssh jammer@demo-apps
When prompted if you want to continue connecting, type: yes
Use sudo to switch to the root user:
sudo -i
You can check to ensure you are in the right place by running the following:
kubectl get nodes
You should see the following output:
NAME        STATUS   ROLES                  AGE   VERSION
demo-apps   Ready    control-plane,master   19h   v1.32.2+k3s1
We not need to paste the yaml content into a text document. Start by creating and opening a new file called instana-agent.yaml using the vi editor.
vi instana-agent.yaml
Enter insert mode by pressing i and then paste the yaml content you copied
earlier.
If at any times you have any issues you can press the Esc key to exit insert
mode and then type :q! to quit the editor without saving. You can then try
again.
Save the file and exit the editor by pressing Esc and then typing :wq and
then Enter.
You can now apply the yaml file to the cluster by running the following command:
kubectl apply -f instana-agent.yaml
If done correctly you should see the following output:
root@demo-apps:~# kubectl apply -f instana-agent.yml
namespace/instana-agent created
serviceaccount/instana-agent created
service/instana-agent created
service/instana-agent-headless created
secret/instana-agent created
configmap/instana-agent created
daemonset.apps/instana-agent created
clusterrole.rbac.authorization.k8s.io/instana-agent created
clusterrolebinding.rbac.authorization.k8s.io/instana-agent created
configmap/k8sensor created
deployment.apps/k8sensor created
clusterrole.rbac.authorization.k8s.io/k8sensor created
clusterrolebinding.rbac.authorization.k8s.io/k8sensor created
serviceaccount/k8sensor created
Next, wait for the agent pods to be running in the agent namespace:
kubectl get pods -n instana-agent -w
There will be one pod for each worker node in your target cluster. This Kubernetes cluster only has one node so you will only see one agent pod running.
root@demo-apps:~# kubectl get pods -n instana-agent
NAME                        READY   STATUS    RESTARTS   AGE
instana-agent-vw7lz         1/1     Running   0          63s
k8sensor-85995748f9-4qtz9   1/1     Running   0          63s
k8sensor-85995748f9-mc6x5   1/1     Running   0          63s
k8sensor-85995748f9-sfldk   1/1     Running   0          63s
Wait for all pods to be in a Running state before continuing:
- Press
CTRL+Cto return to the shell prompt if needed.
This completes the installation of Instana agent on Kubernetes cluster.
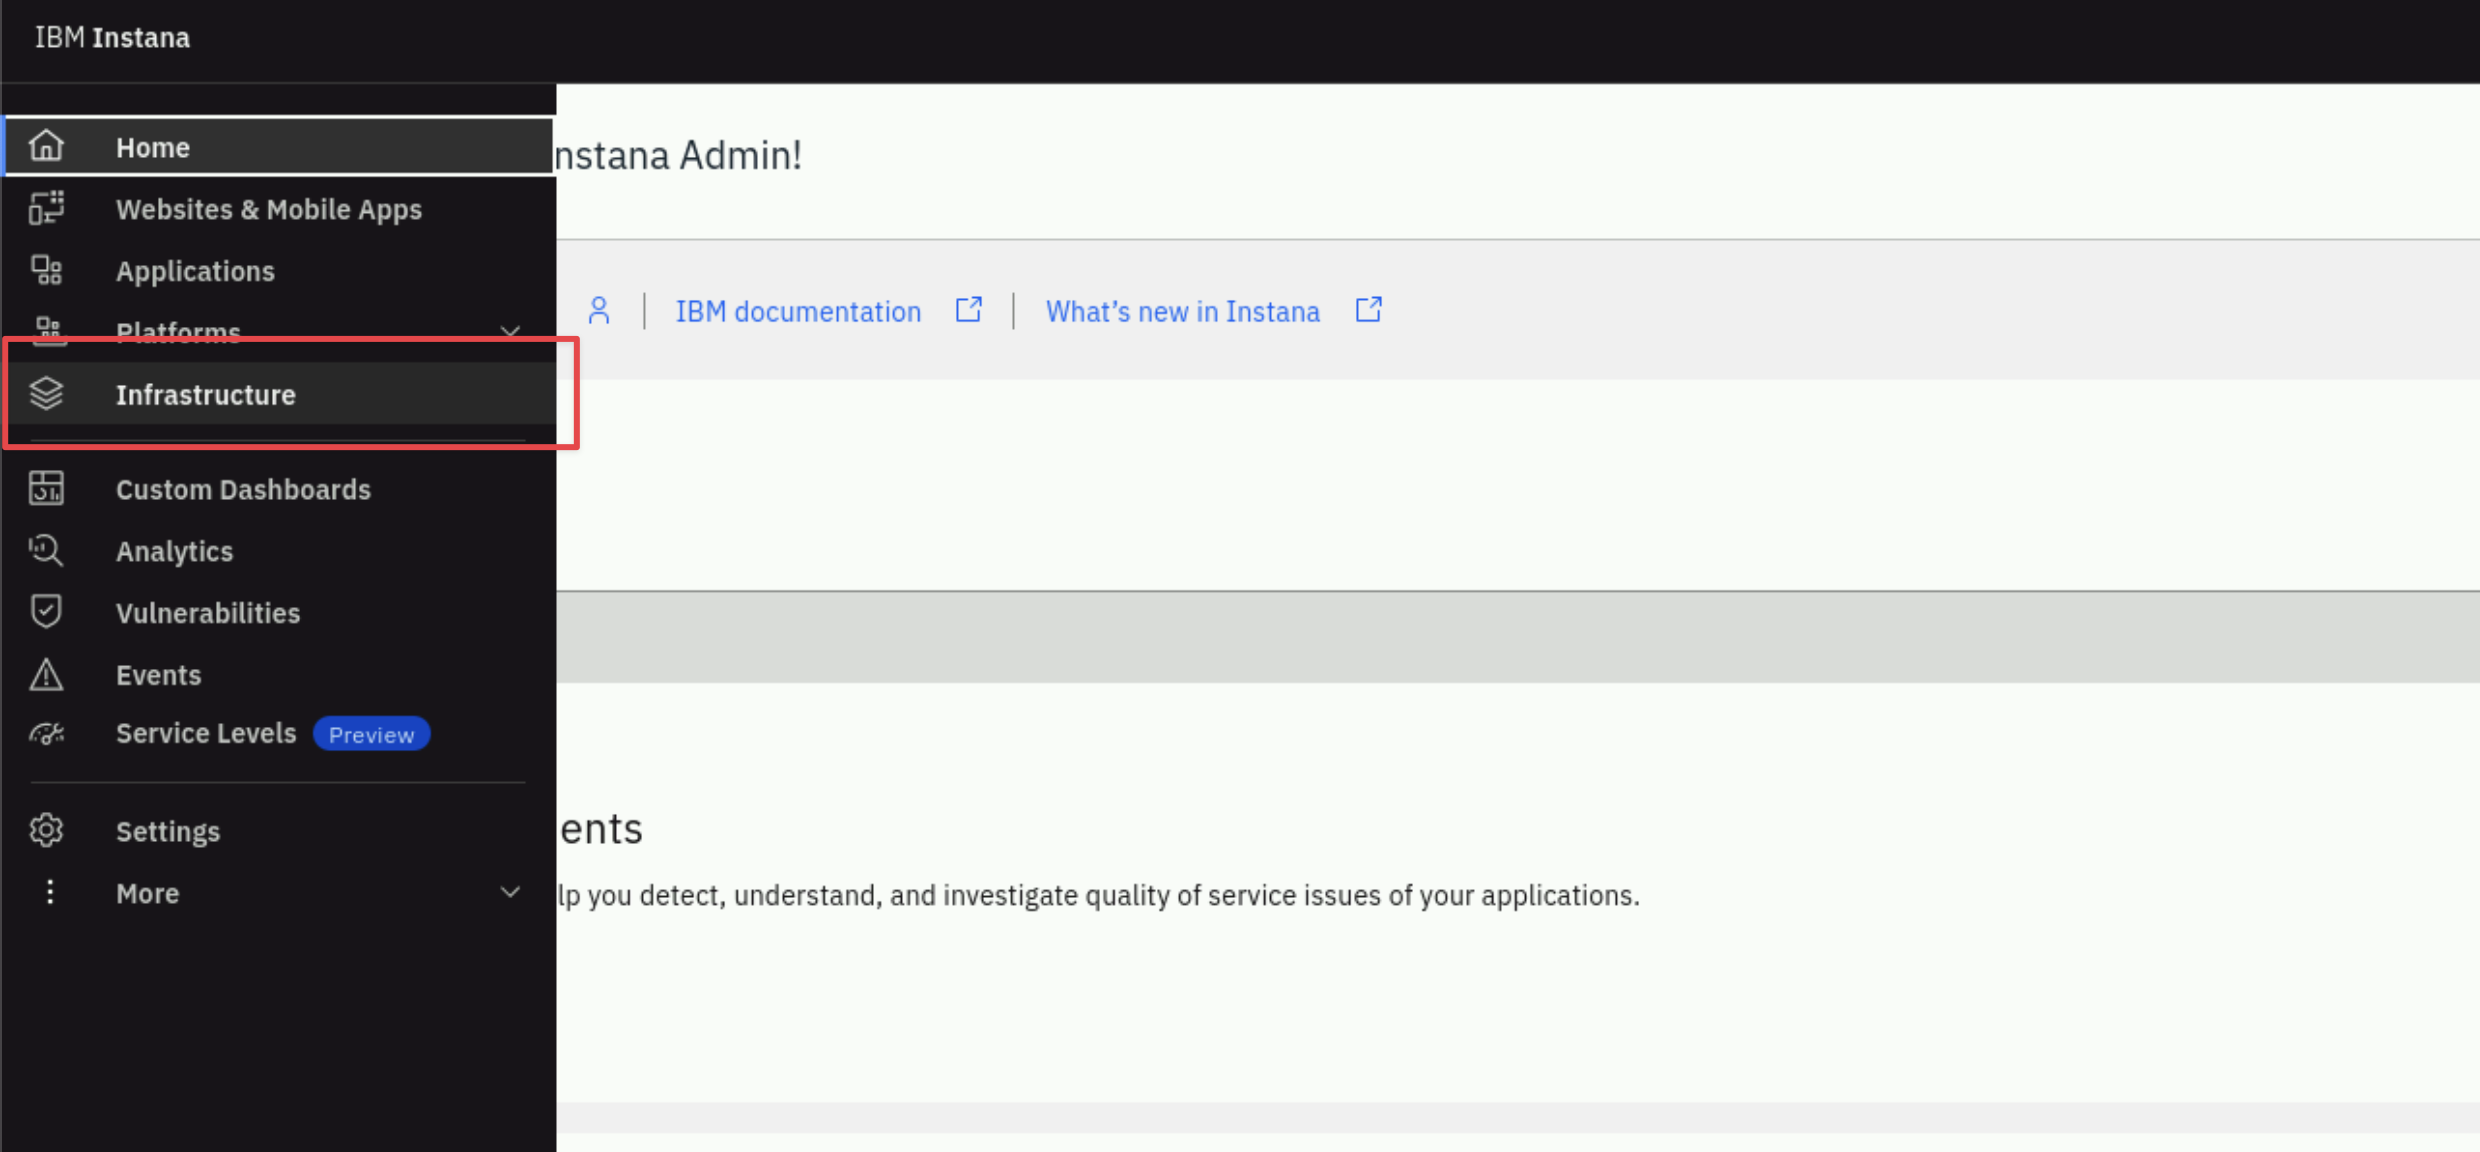
4.5: View Instana Agents in the Instana UI
From the left navigation select Infrastructure.
Toggle on the live view:

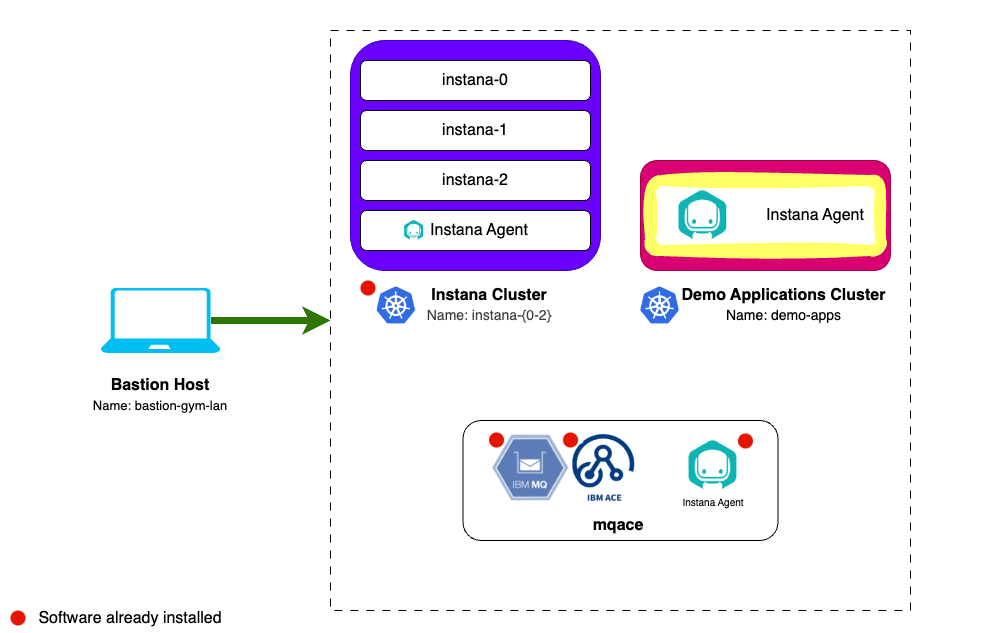
After a short wait you should see 5 nodes reporting. The Multi-node Instana Cluster, the MQACE VM and the Single Node Kubernetes VM. If you don't see them yet, give the agents a few minutes to start reporting.
In an upcoming section we will learn how to update the name of the zone where the MQACE VM resides.
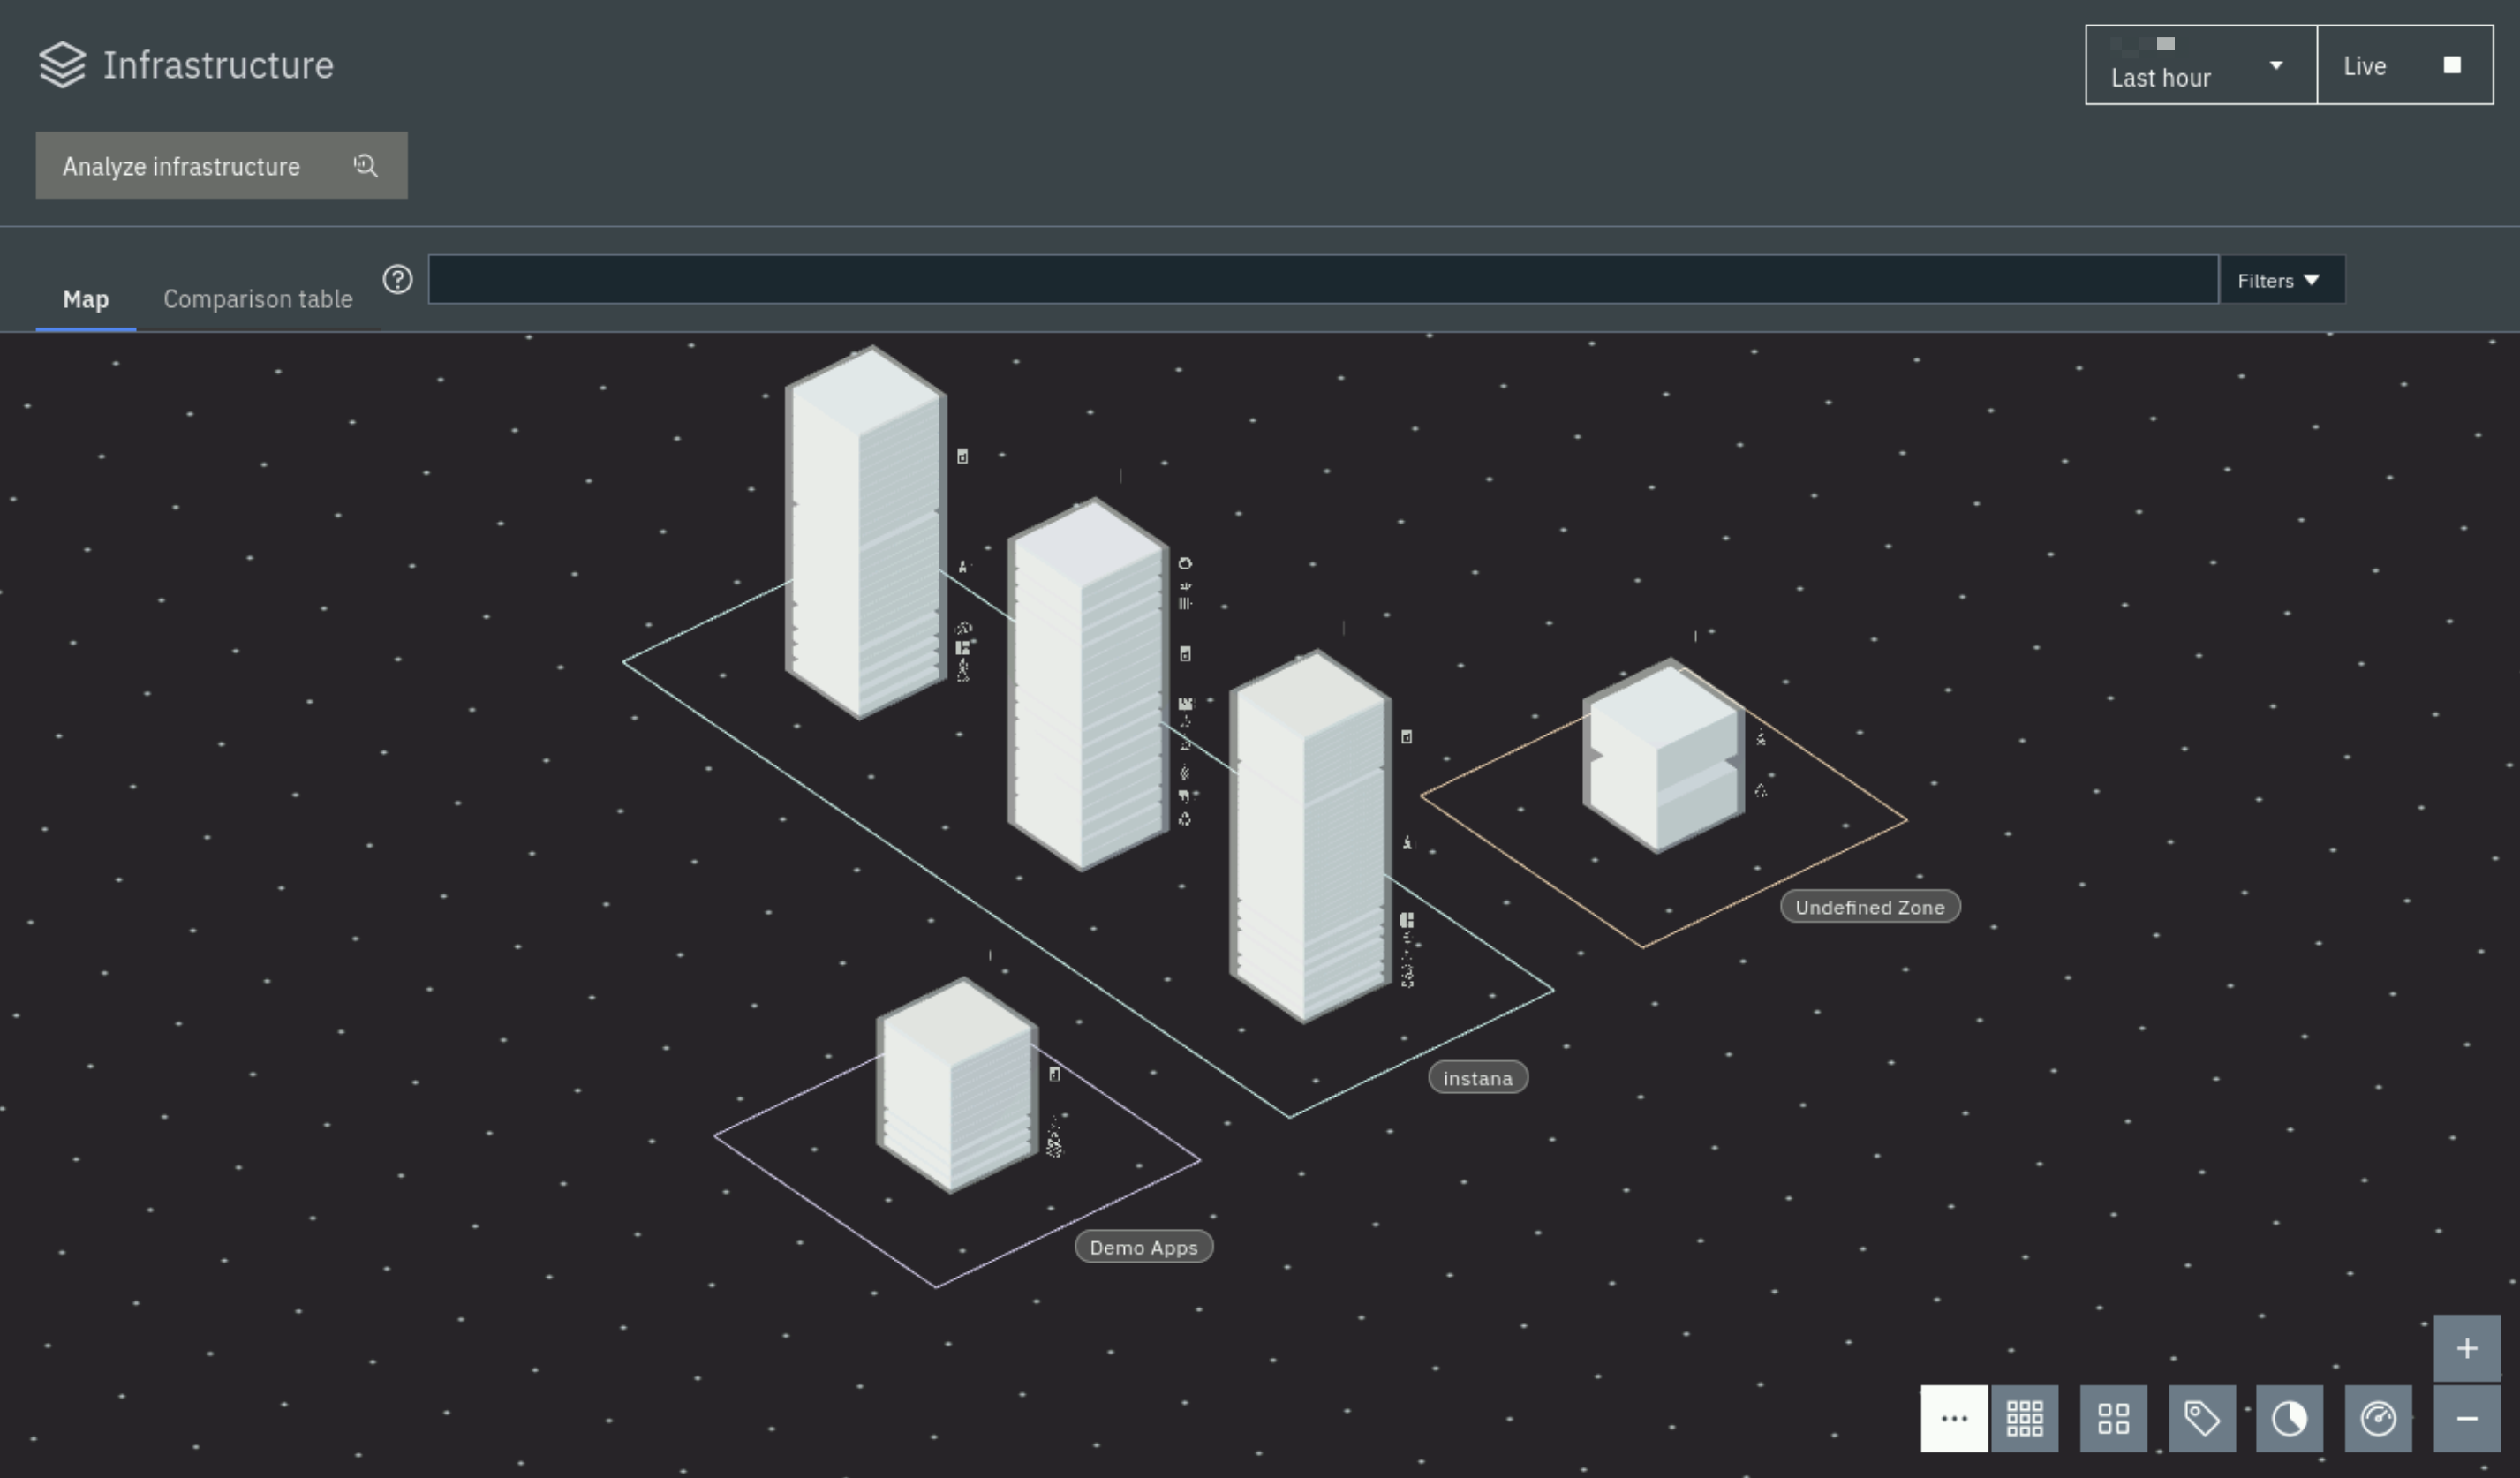
If the demo-apps cluster is showing as yellow it can be ignored in this environment. It is an Instana warning letting us know that the vm is operating at a consistently high load.
4.6: Troubleshooting the Instana Agent Installation on Linux
If you cannot see the MQACE host in the Instana UI you should read the Instana agent logs on the mqace host. From the bastion host run the following command:
ssh jammer@mqace
sudo -i
View the Instana agent log file:
cat /opt/instana/agent/data/log/agent.log
Look for the current status and any warnings or errors that may be shown.
4.7: Troubleshooting the Instana Agent Installation on a Kubernetes Cluster
If you don't see the demo-apps host in the Demo Apps zone after a couple of minutes, you need to troubleshoot the Instana Agent.
From the bastion host run the following command:
ssh jammer@demo-apps
sudo -i
Check to make sure that all pods are running. Since Instana agent runs as a DaemonSet the number of pods should be equal to number of nodes in your cluster, in this case one.
kubectl get pods -n instana-agent
You can check the Instana Agent pod logs by running:
kubectl logs $(kubectl get pods -n instana-agent -o custom-columns=POD:.metadata.name --no-headers | grep instana-agent) -n instana-agent -c instana-agent
Configuring Proxy
You should not perform any steps in this section, it is for information only.
If there is no direct connectivity for the Instana agent you may need to setup a proxy. There are 2 connections with 2 different locations for configuration:
- Connection to Instana Backend - defined in
INSTANA-AGENT-DIR/etc/instana/com.instana.agent.main.sender.Backend.cfg - Connection to Agent/Sensor Repository - defined in
INSTANA-AGENT-DIR/etc/mvn-settings.xml(This is used in case client wants to setup internal maven2 mirror repository)
Proxy configuration goes into the respective files. You can also use environment variables
For backend connectivity you have to define INSTANA_AGENT_PROXY_* variables. For repository connectivity you have to define INSTANA_REPOSITORY_PROXY_* variables.
Configuring the Instana Agent
You should not perform any steps in this section, it is for information only.
There are multiple ways to configure the Instana agent. These instructions apply
to the Instana Agent installed on a traditional server. Instructions would be
different for docker or kubernetes versions of the Agent. Settings related to
agent functionality reside in configuration.yaml file located by default in
/opt/instana/agent/etc/instana directory. However, other settings related to
agent environment sit in other *.cfg files.
The Agent will read and use configuration.yaml and
configuration-<suffix>.yaml files in the /opt/instana/agent/etc/instana
directory.
Some customers choose to have separate yaml files for each key technology. For
example, you could create a configuration-mq.yaml file and a
configuration-ace.yaml file in the same directory and it would read both files.
configuration.yaml will contain sample configuration entries and comments for
ALL available sensors at the time of your install, BUT it will not
automatically add new sensor config as new sensors become available.
For host based installation you can update configuration.yaml and the Agent
should pick up changes automatically (no restart required).
For Kubernetes based installations, you can specify the same content that would
go into the configuration.yaml file, but the mechanism is different. See the
product documentation for Operator and yaml based installations. For helm
installs, you use an agent.configuration_yaml parameter to reference a
values.yaml file. The configuration information would be placed in the
values.yaml file. Yaml content can be placed directly in the helm command, but
the syntax gets a little tricky. Here is an example helm command:
helm install instana-agent \
  --repo https://agents.instana.io/helm \
  --namespace instana-agent \
  --set agent.key=wxyz  \
  --set agent.downloadKey=abcdefg \
  --set agent.endpointHost=agent-acceptor.instana-0.ibmdte.local  \
  --set agent.endpointPort=443 \
  --set zone.name=zone1 \
  --set cluster.name='cluster1' \
  --set agent.configuration_yaml="$(cat values.yaml)" \
  --set k8s_sensor.deployment.enabled=true \
  --set k8s_sensor.deployment.replicas=2 \
  instana-agent
Instana agent configuration file must be a proper YAML - if your changes are not applied, make sure that it's not a formatting error
Configuring GitOps for Agents
You should not perform any steps in this section, it is for information only.
If you don't want to modify the Instana agent configuration files for each agent locally, you can setup a centralized git repository for configuration files and instruct Instana agent to use these files. The documentation for this functionality is available here.
The Instana agent fetches configuration updates from the remote repository:
- Upon the startup or restart.
- Through a reboot initiated over the Agent Management Dashboard.
- Through a configuration change over the Agent Management Dashboard.
- Through the Web API as described in the Host Agent section and the integrations that rely on it like the GitHub Update Agent action.
You have now completed the Instana Server and Agent installation lab. Feel free to explore the other Instana Jam-in-a-Box labs available on TechZone.