Instana Server Installation
3.1: Introduction
Instana backend is available as SaaS (preferred option) or self hosted (aka on-prem). For on-premises installations, Instana offers multiple containerized options:
- Standard Edition
- Single-node cluster Installs both the Instana backend and datastores on a single node K3s cluster.
- Multi-node cluster Installs both the Instana backend and datastores a three node K3s cluster.
- Custom Edition Installs the backend Kubernetes Operator on a RedHat OpenShift or Kubernetes cluster. The datastores are not installed by the operator, they require manual installation either locally on the same cluster or remotely.
- Classic Edition Install both the Instana backend and the datasotres on a single VM using Docker. Unlike the other options this deployment does not support multi-tenancy. Note: Classic Edition is not a strategic deployment option. Many recent enhancements such as synthetics, automation catalog, and more are not available with Classic Edition.
On-premises (self-hosted) releases are delivered every 4 weeks. The release have odd numbers such as 225, 227, 229, etc. Historically upgrading, you may upgrade from N-1 or N-2, but you couldn't skip more than one release. So, you can upgrade from 225 to 229, but not to 231. Even numbered releases are for SaaS only. SaaS is upgraded every 2 weeks. With the most recent version of Self-Hosted Standard Edition, the N-1/N-2 requirement doesn't exist. When you upgrade Instana, you will be provided a list of available releases that can be installed. However, we still recommend keeping your Instana version fairly current. For example, plan for upgrades every 2 months.
For the installation of the Instana server, we'll be following the instructions from the Instana documentation for a Self-Hosted Standard Edition Multi-node. The instructions can be found here for your reference, but you can follow the steps below. You will be performing an online installation during this Tech Jam, but Instana does support off-line (air-gapped) installs.
The Classic Edition and Standard Editions are Instana's smallest on-premises installation options. Larger deployments are installed into kubernetes for horizontal scale and resiliency. For this lab the installation of Instana will be completed on the VM's named instana-0, instana-1 and instana-2.
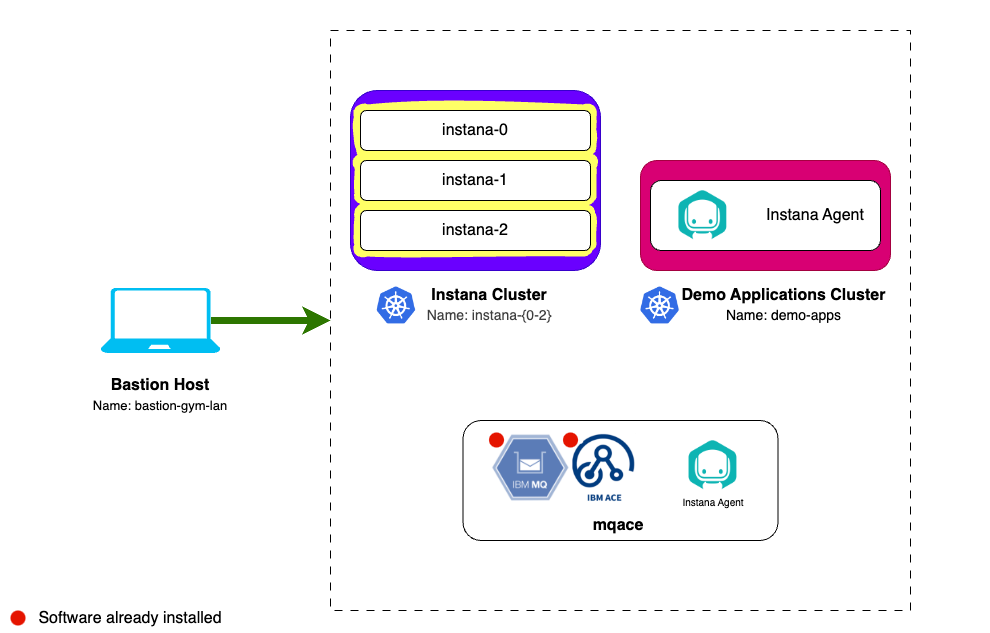
3.2: Instana Multi-node Cluster
The three nodes in a multi-node cluster have specific uses:
- instana-0 is labeled
node-role.instana.io: "backend". It is used for running backend workloads that require persistent volumes. The node also runs the gateway, acceptors, and the UI backend. - instana-1 is labeled
node-role.instana.io: "datastore". It is used for running data stores. - instana-2 is labeled
node-role.instana.io: "other". It used for running the rest of Instana workloads.
3.3 Prerequisites
For this multi-node installation, Instana requires the following:
CPU and Memory
3 Linux servers with 12 cores and 48 GB of RAM each.
Storage
~4TB of storage rated at at least 6000 IOPS (preferred 9000 IOPS) for production environments. A detailed storage breakdown can be found here.
It is worth noting that Demo deployments only require 3000 IOPS however multi-node deployments can only be installed in production mode.
Networking
Normally, you would need to ensure that the virtual machine has the correct ports opened in the firewall for the agent, UI, and EUM communications. We have already done this work for you. For reference, in an on-prem deployment, please check the ports on your host must be open and accessible for the Single-node cluster and Multi-node cluster. The ports for SaaS are slightly different.
In addition, online installations need access to a number of repositories that are documented here for reference: here are the repositories
3.4. Preparing the server
Prior to installing Instana, always ensure there is no instance of snap Docker on the machine/s you will use as it can conflict with K3s.
There are few tasks that need to be run to prepare the servers for installation. Lets start by ensuring you can connect to the first Instana host.
From the Bastion host, open a terminal window by selecting Activities at the top left of the screen and then the terminal icon.
If you are unsure how to get access to the Bastion host (Guacamole) see Accessing a Lab Environment
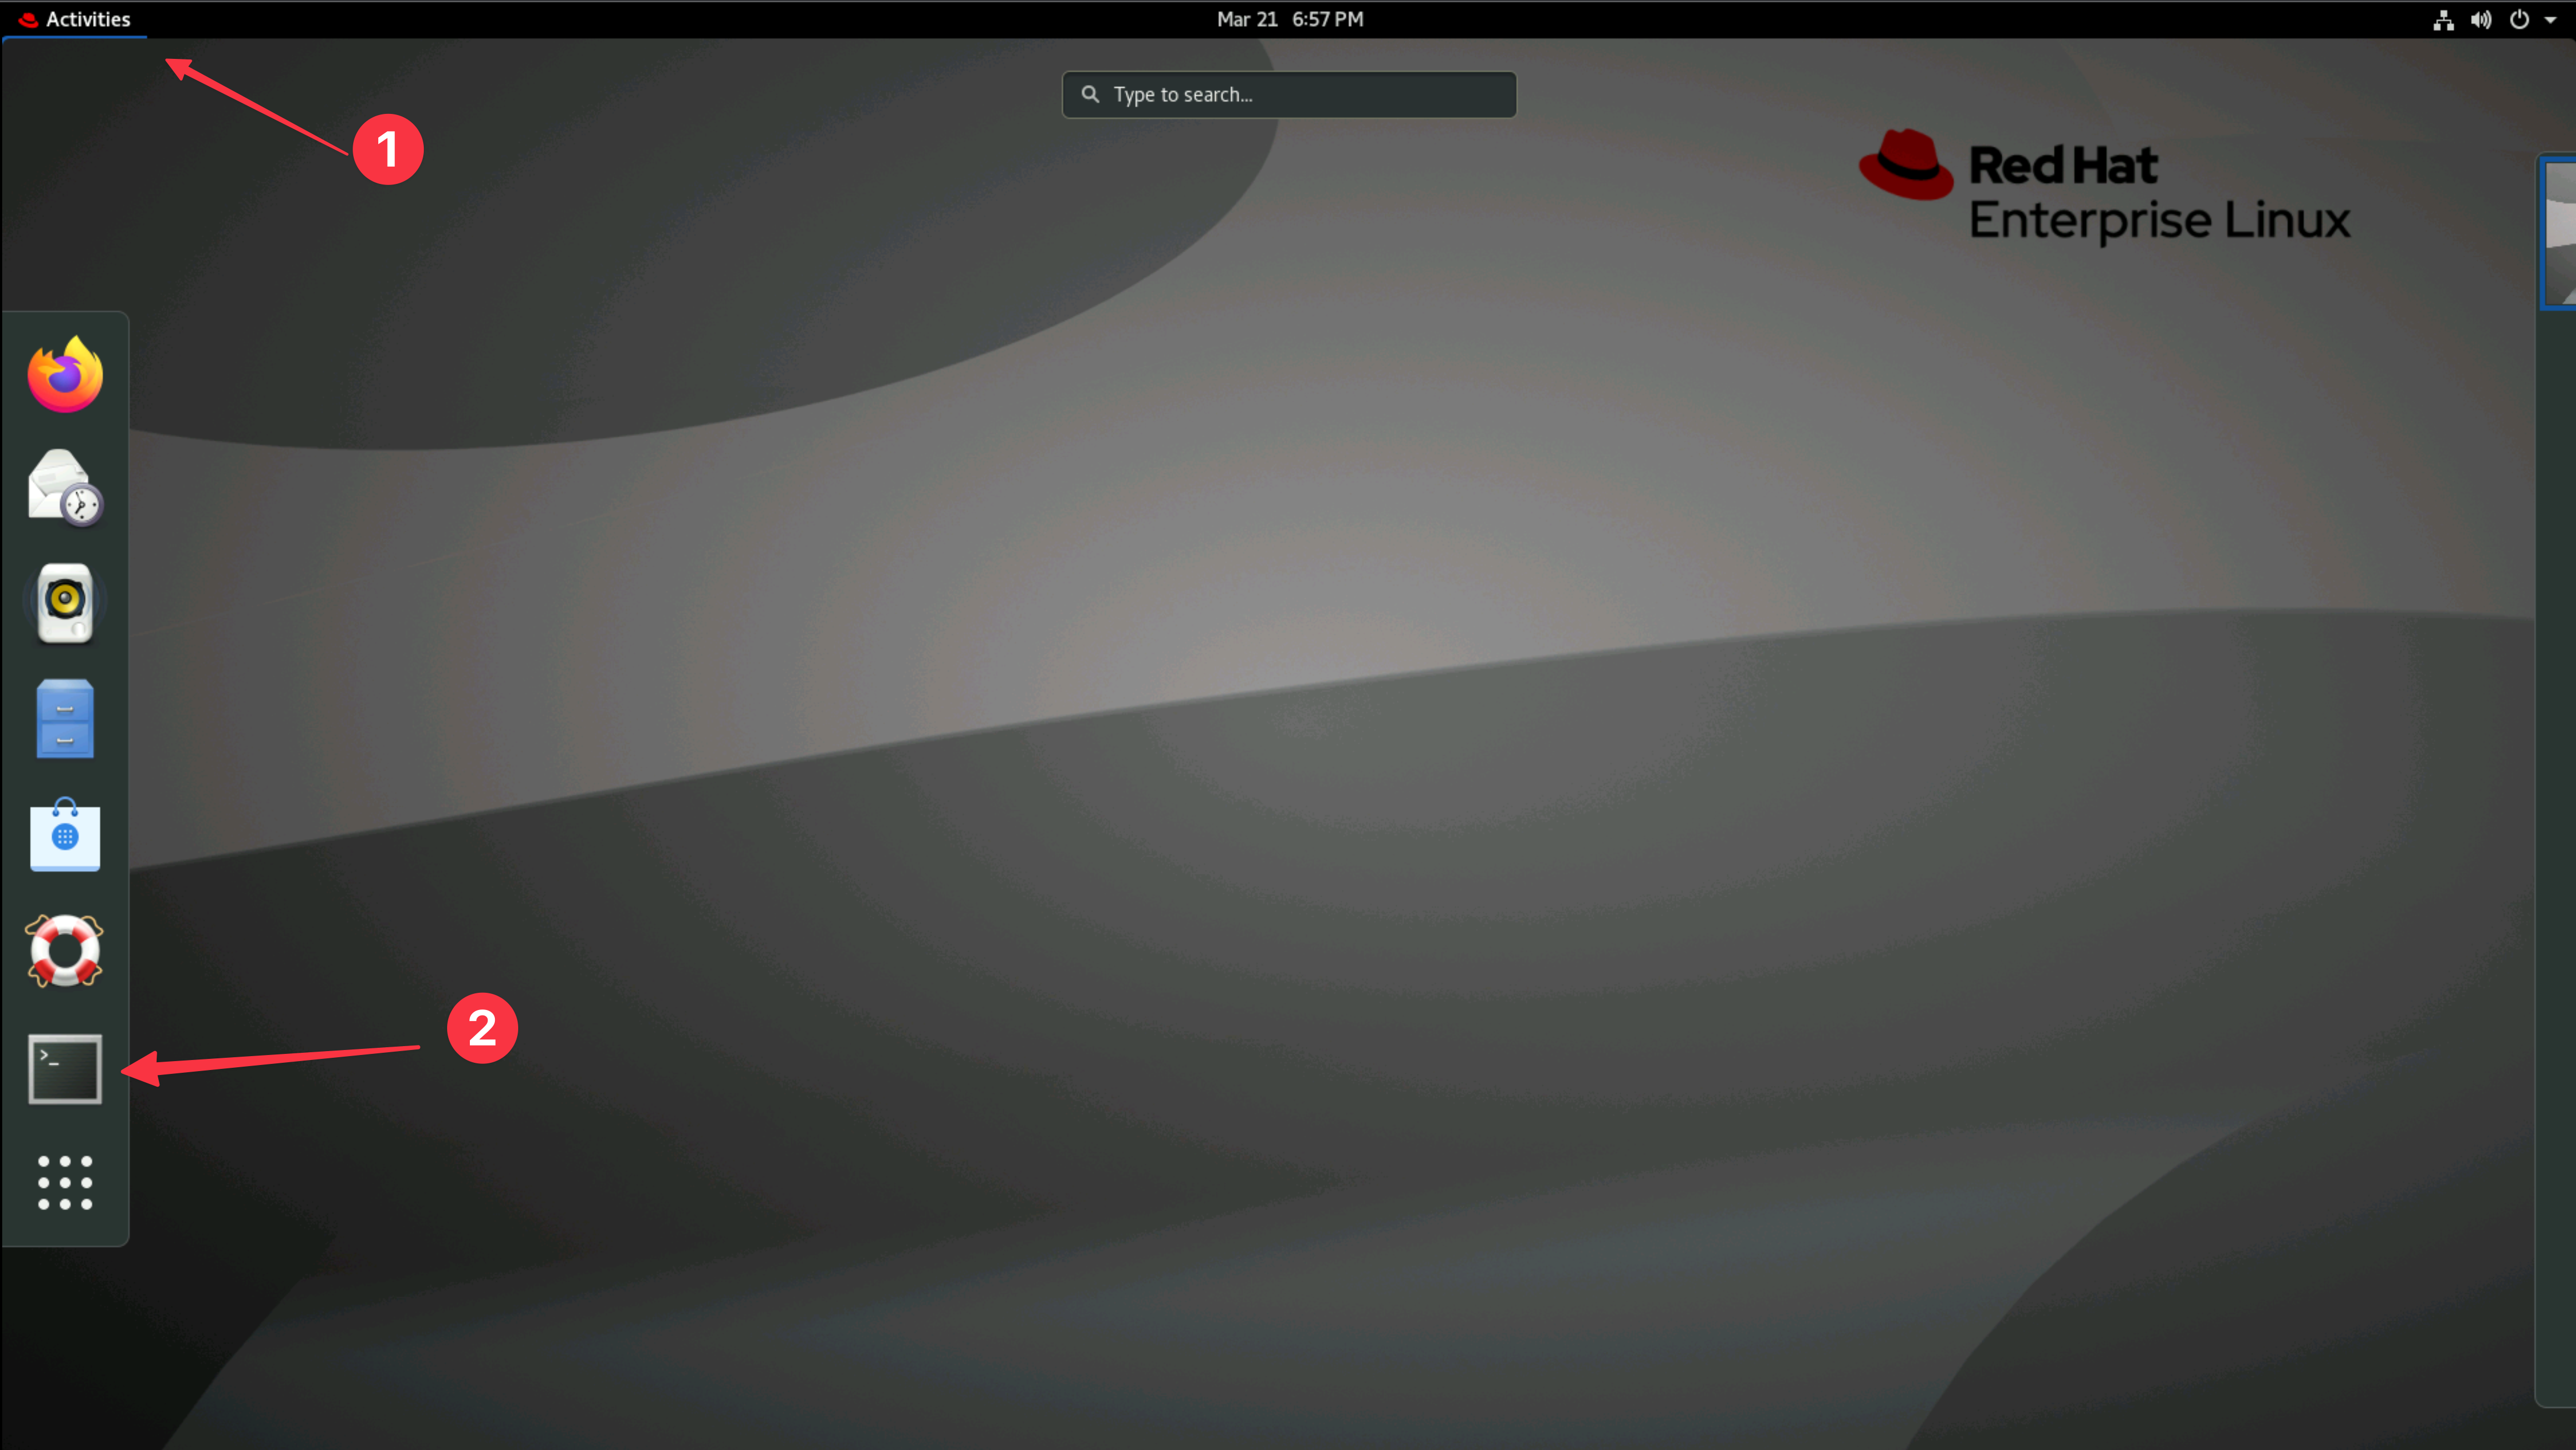
Use the terminal to login to the first Instana host:
ssh jammer@instana-0
When prompted if you want to continue connecting, type: yes
Use sudo to become root.
sudo -i
You are now operating as root on the first Instana host.
3.4.1. Prepare storage
The largest allocation of storage (3.7TB) for a multi-node installation is split across four data storage directories on two nodes. The allocation for these directories is as follows:
| Node | Directory | Path | Required Disk (GB) |
|---|---|---|---|
| instana-0 | Objects | /mnt/instana/stanctl/objects | 1000 |
| instana-1 | Data | /mnt/instana/stanctl/data | 500 |
| Metrics | /mnt/instana/stanctl/metrics | 1000 | |
| Analytics | /mnt/instana/stanctl/analytics | 1200 | |
| instana-2 | No additional disks | N/A | N/A |
The storage devices have been added to the hosts that require them but they must be prepared with a filesystem and mounted prior to installation.
3.4.1.1. Prepare storage on instana-0
Open your terminal window connected to instana-0 and run the following to list the available storage devices:
lsblk
As per the above table, we should expect to see a spare disk with the size of 1TB (1000GB) for the Objects directory. You should see output similar to the below:
In this example, the device with 1000GB free is named sdb, the device name may be different on your host.
NAME                      MAJ:MIN RM   SIZE RO TYPE MOUNTPOINTS
loop0                       7:0    0     4K  1 loop /snap/bare/5
loop1                       7:1    0  55.6M  1 loop /snap/core18/2566
loop2                       7:2    0    62M  1 loop /snap/core20/1587
loop3                       7:3    0  63.2M  1 loop /snap/core20/1623
loop4                       7:4    0 238.5M  1 loop /snap/firefox/2015
loop5                       7:5    0 346.3M  1 loop /snap/gnome-3-38-2004/119
loop6                       7:6    0 349.7M  1 loop /snap/gnome-3-38-2004/143
loop7                       7:7    0  91.7M  1 loop /snap/gtk-common-themes/1535
loop8                       7:8    0   103M  1 loop /snap/lxd/23541
loop9                       7:9    0  89.4M  1 loop /snap/lxd/31333
loop10                      7:10   0  68.2M  1 loop /snap/powershell/220
loop11                      7:11   0  73.7M  1 loop /snap/powershell/283
loop12                      7:12   0    71M  1 loop /snap/prometheus/86
loop13                      7:13   0    47M  1 loop /snap/snapd/16292
loop14                      7:14   0    48M  1 loop /snap/snapd/17336
sda                         8:0    0   500G  0 disk
├─sda1                      8:1    0     1M  0 part
├─sda2                      8:2    0     2G  0 part /boot
└─sda3                      8:3    0   498G  0 part
  └─ubuntu--vg-ubuntu--lv 253:0    0   100G  0 lvm  /var/snap/firefox/common/host-hunspell
                                                    /
sdb                         8:16   0  1000G  0 disk
Capture the device name of the spare disk into the variable OBJECTS_DISK.
OBJECTS_DISK=$(lsblk -o NAME,SIZE,TYPE,MOUNTPOINT | awk '
  $2 == "1000G" && $3 == "disk" {
    cmd = "lsblk -n /dev/" $1 " | wc -l";
    cmd | getline lines;
    close(cmd);
    if (lines == 1) print $1;  # Only 1 line means no partitions
  }
' | head -1)
You can run the following command to verify the value of the variable matches the device name of the spare disk:
echo $OBJECTS_DISK
You can now create an Ext4 filesystem on the device.
for disk in $OBJECTS_DISK ; do
    echo "make filesystem for $disk"
    mkfs.ext4 -m 0 -E lazy_itable_init=0,lazy_journal_init=0,discard /dev/$disk
done
Now you will need to create the Objects directory that will be used to mount the device:
mkdir -p /mnt/instana/stanctl/objects
Then make a backup of the existing fstab file, get the UUID of the device and add the new mount point for it:
# Backup the existing fstab file
cp /etc/fstab /etc/fstab.backup

# Get the UUID of the device
OBJECTS_DEVICE_UUID=$(blkid -s UUID -o value /dev/$OBJECTS_DISK)

# Add the new mount point to the fstab file in case of a reboot
echo "UUID=$OBJECTS_DEVICE_UUID  /mnt/instana/stanctl/objects    ext4    discard,defaults,nofail        0 0" >> /etc/fstab

# Mount all filesystems
mount -a
Verify the mount point was added correctly by running the following command:
lsblk /dev/$OBJECTS_DISK
You should now see that your device is mounted on the
/mnt/instana/stanctl/objects directory.
NAME MAJ:MIN RM  SIZE RO TYPE MOUNTPOINTS
sdb    8:16   0 1000G  0 disk /mnt/instana/stanctl/objects
3.4.1.2. Prepare storage on instana-1
Now we have to repeat the same steps for the 3 storage directories required on the instana-1 host.
Leave you current tab open, you will need it later.
Open a new terminal tab and connect to instana-1:
ssh jammer@instana-1
Use sudo to become root.
sudo -i
You are now operating as root on the instana-1 host.
Run the following to list the available storage devices:
lsblk
As per the above table, we should expect to see three spare disks with the size of 500GB, 1000GB and 1200GB. You should see output similar to the below:
The device names may be different for each storage allocation on your host.
NAME                      MAJ:MIN RM   SIZE RO TYPE MOUNTPOINTS
loop0                       7:0    0  55.6M  1 loop /snap/core18/2566
loop1                       7:1    0     4K  1 loop /snap/bare/5
loop2                       7:2    0    62M  1 loop /snap/core20/1587
loop3                       7:3    0  63.2M  1 loop /snap/core20/1623
loop4                       7:4    0 238.5M  1 loop /snap/firefox/2015
loop5                       7:5    0 346.3M  1 loop /snap/gnome-3-38-2004/119
loop6                       7:6    0 349.7M  1 loop /snap/gnome-3-38-2004/143
loop7                       7:7    0  91.7M  1 loop /snap/gtk-common-themes/1535
loop8                       7:8    0   103M  1 loop /snap/lxd/23541
loop9                       7:9    0  89.4M  1 loop /snap/lxd/31333
loop10                      7:10   0  68.2M  1 loop /snap/powershell/220
loop11                      7:11   0  73.7M  1 loop /snap/powershell/283
loop12                      7:12   0    71M  1 loop /snap/prometheus/86
loop13                      7:13   0  44.4M  1 loop /snap/snapd/23771
sda                         8:0    0   500G  0 disk
├─sda1                      8:1    0     1M  0 part
├─sda2                      8:2    0     2G  0 part /boot
└─sda3                      8:3    0   498G  0 part
  └─ubuntu--vg-ubuntu--lv 253:0    0   100G  0 lvm  /var/snap/firefox/common/host-hunspell
                                                    /
sdb                         8:16   0   500G  0 disk
sdc                         8:32   0  1000G  0 disk
sdd                         8:48   0   1.2T  0 disk
Capture the device names of the spare disks into the variables DATA_DISK, METRICS_DISK and ANALYTICS_DISK.
You could manually assign the device names to the variables DATA_DISK, METRICS_DISK and ANALYTICS_DISK and continue however these commands will ensure that the correct device names are used based on the size of the disk and the partition status.
DATA_DISK=$(lsblk -o NAME,SIZE,TYPE,MOUNTPOINT | awk '
  $2 == "500G" && $3 == "disk" {
    cmd = "lsblk -n /dev/" $1 " | wc -l";
    cmd | getline lines;
    close(cmd);
    if (lines == 1) print $1;  # Only 1 line means no partitions
  }
' | head -1)

METRICS_DISK=$(lsblk -o NAME,SIZE,TYPE,MOUNTPOINT | awk '
  $2 == "1000G" && $3 == "disk" {
    cmd = "lsblk -n /dev/" $1 " | wc -l";
    cmd | getline lines;
    close(cmd);
    if (lines == 1) print $1;
  }
')

ANALYTICS_DISK=$(lsblk -o NAME,SIZE,TYPE,MOUNTPOINT | awk '
  $2 == "1.2T" && $3 == "disk" {
    cmd = "lsblk -n /dev/" $1 " | wc -l";
    cmd | getline lines;
    close(cmd);
    if (lines == 1) print $1;
  }
')
You can run the following command to verify the value of the variable:
echo $DATA_DISK
echo $METRICS_DISK
echo $ANALYTICS_DISK
You can now create an Ext4 filesystem on the device.
for disk in $DATA_DISK $METRICS_DISK $ANALYTICS_DISK ; do
    echo "make filesystem for $disk"
    mkfs.ext4 -m 0 -E lazy_itable_init=0,lazy_journal_init=0,discard /dev/$disk
done
Now you will need to create the data, metrics and analytics directories that will be used to mount the devices:
mkdir -p /mnt/instana/stanctl/data
mkdir -p /mnt/instana/stanctl/metrics
mkdir -p /mnt/instana/stanctl/analytics
Then make a backup of the existing fstab file, get the UUID of the device and add the new mount point for it:
# Backup the existing fstab file
cp /etc/fstab /etc/fstab.backup

# Get the UUID of the device
DATA_DEVICE_UUID=$(blkid -s UUID -o value /dev/$DATA_DISK)
METRICS_DEVICE_UUID=$(blkid -s UUID -o value /dev/$METRICS_DISK)
ANALYTICS_DEVICE_UUID=$(blkid -s UUID -o value /dev/$ANALYTICS_DISK)

# Add the new mount point to the fstab file in case of a reboot
echo "UUID=$DATA_DEVICE_UUID  /mnt/instana/stanctl/data    ext4    discard,defaults,nofail        0 0" >> /etc/fstab
echo "UUID=$METRICS_DEVICE_UUID  /mnt/instana/stanctl/metrics    ext4    discard,defaults,nofail        0 0" >> /etc/fstab
echo "UUID=$ANALYTICS_DEVICE_UUID  /mnt/instana/stanctl/analytics    ext4    discard,defaults,nofail        0 0" >> /etc/fstab

# Mount all filesystems
mount -a
Verify the mount points were added correctly by running the following commands:
lsblk
You should now see that your devices are mounted on the /mnt/instana/stanctl/data, /mnt/instana/stanctl/metrics and /mnt/instana/stanctl/analytics directories.
NAME                      MAJ:MIN RM   SIZE RO TYPE MOUNTPOINTS
...
sdb                         8:16   0   500G  0 disk /mnt/instana/stanctl/data
sdc                         8:32   0  1000G  0 disk /mnt/instana/stanctl/metrics
sdd                         8:48   0   1.2T  0 disk /mnt/instana/stanctl/analytics
3.4.2. Set kernel parameters
There are some Kernel parameters that need to be set of each of the nodes. For full details on the parameters, please refer to the Kernel Parameters documentation.
Open a new terminal tab, this will default you back to the admin user on the bastion-gym-lan host. From the bastion host, run the following command to iterate over each of the nodes and set the required kernel parameters:
StrictHostKeyChecking is set to no to avoid the need to accept the SSH key for the instana-2 machine that we have not connected to yet.
export SSH_OPTIONS="-o StrictHostKeyChecking=no"

for host in instana-0 instana-1 instana-2; do
  # Set vm.swappiness to 0 to make sure that application pages are not moved to swap space.
  ssh $SSH_OPTIONS jammer@$host "grep -q 'vm.swappiness=0' /etc/sysctl.d/99-stanctl.conf 2>/dev/null || sudo sh -c 'echo vm.swappiness=0 >> /etc/sysctl.d/99-stanctl.conf'"

  # Set fs.inotify.max_user_instances to 8192 to make sure that the system allows a maximum of 8192 inotify instances.
  ssh $SSH_OPTIONS jammer@$host "grep -q 'fs.inotify.max_user_instances=8192' /etc/sysctl.d/99-stanctl.conf 2>/dev/null || sudo sh -c 'echo fs.inotify.max_user_instances=8192 >> /etc/sysctl.d/99-stanctl.conf'"

  # Apply changes made to /etc/sysctl.d/99-stanctl.conf from the above commands
  ssh $SSH_OPTIONS jammer@$host "sudo sysctl -p /etc/sysctl.d/99-stanctl.conf"

  # Disable Transparent Huge Pages (THP) permanently for memory management.
  ssh $SSH_OPTIONS jammer@$host "sudo sh -c 'echo never > /sys/kernel/mm/transparent_hugepage/enabled && echo never > /sys/kernel/mm/transparent_hugepage/defrag'"

  # Disable the firewall
  ssh $SSH_OPTIONS jammer@$host "sudo ufw disable"

  echo "$host completed"
done
vm.swappiness = 0
fs.inotify.max_user_instances = 8192
Firewall stopped and disabled on system startup
instana-0 completed
vm.swappiness = 0
fs.inotify.max_user_instances = 8192
Firewall stopped and disabled on system startup
instana-1 completed
Warning: Permanently added 'instana-2' (ECDSA) to the list of known hosts.
vm.swappiness = 0
fs.inotify.max_user_instances = 8192
Firewall stopped and disabled on system startup
instana-2 completed
You are now ready to start the installation of the Instana Server.
3.5. Installing Instana
First we need to ensure that the host instana-0 has root access to the other hosts in the Instana cluster. This is required to allow the stanctl tool to install Instana components on the other hosts. To do this we need to generate a new public/private key pair and distribute the new keys to the Instana hosts.
- Create a new ssh key pair
- Add the public key to the root user on the instana-1 and instana-2 hosts
- Copy the private key to the instana-0 host
- Add the private key to the root users .ssh directory and set permissions on instana-0
- Ensure the new ssh key is used by by instana-0 when connecting to instana-1 and instana-2
Ensure you are on the bastion-gym-lan host and operating as the admin user.
Run the following commands to create a new ssh key and store it in the environment variable PUBLIC_KEY.
ssh-keygen -t rsa -f ~/.ssh/instana-cluster -N "" -C "Instana Cluster Key"
Run the following to add the new public ssh key to the root user on instana-1 and instana-2 hosts.
PUBLIC_KEY=$(cat ~/.ssh/instana-cluster.pub)
for i in 1 2; do
  ssh jammer@instana-$i "sudo -i bash -c 'mkdir -p ~/.ssh && chmod 700 ~/.ssh && echo \"$PUBLIC_KEY\" >> ~/.ssh/authorized_keys && chmod 600 ~/.ssh/authorized_keys' && echo \"SSH key added to instana-$i successfully\""
done
Setup the root user on instana-0 to use the new ssh key to connect to instana-1 and instana-2:
scp ~/.ssh/instana-cluster jammer@instana-0:/tmp/instana_key && echo "Key copied successfully" && \
ssh jammer@instana-0 "sudo -i bash -c 'mkdir -p ~/.ssh && chmod 700 ~/.ssh && \
mv /tmp/instana_key ~/.ssh/id_rsa && chmod 600 ~/.ssh/id_rsa && chown root:root ~/.ssh/id_rsa && \
echo \"Host instana-1 instana-2 192.168.252.30 192.168.252.31 192.168.252.32\" > ~/.ssh/config && \
echo \"    User root\" >> ~/.ssh/config && \
echo \"    IdentityFile ~/.ssh/id_rsa\" >> ~/.ssh/config && \
echo \"    StrictHostKeyChecking no\" >> ~/.ssh/config && \
chmod 600 ~/.ssh/config && echo \"All operations completed successfully\"'"
Now the host instana-0 has access to the private ssh key that has been added to the other hosts.
Navigate back to your terminal tab connected to instana-0. Ensure you are still operating as the root user, you can check this by running the following:
hostname && whoami
You should see output similar to the following:
instana-0
root
If you don't see the above output you should open a new tab, connect to instana-0 and become the root user.
ssh jammer@instana-0
sudo -i
Ensure you are able to connect to instana-1 and instana-2 as the root user using the newly created cluster key. Run the following:
ssh -o StrictHostKeyChecking=no -i ~/.ssh/id_rsa root@instana-1 "echo Connection to instana-1 successful" && ssh -o StrictHostKeyChecking=no -i ~/.ssh/id_rsa root@instana-2 "echo Connection to instana-2 successful"
You should see the following output:
Connection to instana-1 successful
Connection to instana-2 successful
If you do not see the above output you need to revisit the key exchange and confirm all steps have been successfully run.
Export your Instana Download and Sales keys as environment variables. Run the
following after replacing <your-download-key> and <your-sales-key> with the
keys provided for your lab environment.
export AGENT_DOWNLOAD_KEY=<your-download-key>
export SALES_KEY=<your-sales-key>
Run the following commands to add the Instana repository.
echo 'deb [signed-by=/usr/share/keyrings/instana-archive-keyring.gpg] https://artifact-public.instana.io/artifactory/rel-debian-public-virtual generic main' > /etc/apt/sources.list.d/instana-product.list

cat << EOF > /etc/apt/auth.conf
machine artifact-public.instana.io
  login _
  password $AGENT_DOWNLOAD_KEY
EOF

wget -nv -O- --user=_ --password="$AGENT_DOWNLOAD_KEY" https://artifact-public.instana.io/artifactory/api/security/keypair/public/repositories/rel-debian-public-virtual | gpg --dearmor > /usr/share/keyrings/instana-archive-keyring.gpg
Update the package list and install the Instana stanctl utility. The stanctl tool is used to install Instana and perform other Instana administrative tasks.
apt update -y && \
apt install -y stanctl=1.12.0-1
Hold the stanctl package to prevent it from being upgraded unintentionally.
apt-mark hold stanctl
You can now verify your stanctl version by typing:
stanctl -v
You should see that the version is 1.12.0.
Install Instana
-
We are installing Instana in production mode. A multi-node cluster only supports production mode.
-
DNS has already been configured in this environment for the Instana vm's. Instana can be reached at instana-0.ibmdte.local. Further details on required DNS entries can be found here.
-
Internally, Instana has tenants, which are a logical construct. Each tenant has one or more tenant units. There are restrictions to the names that can be chosen. In this installation the tenant is ibm and the unit is unit0.
-
The default administrator username is
admin@instana.localand the password isPassw0rd. -
We are setting the volumes to the directories we created earlier during the storage configuration tasks.
-
We are setting the SMTP configuration to use an SMTP server that has been configured in your lab environment.
The installation below, uses a set of optional installation flags. If you are interested in seeing all of the available installation flags, you can run:
Host: instana-0stanctl up --help
Start the installation by running the following command:
-
If prompted with "Would you like to execute the script (stanctl-preflight.sh)?" press N for no.
-
When prompted to "Enter TLS certificate file (hit ENTER to auto-generate):" press Enter to auto-generate the certificate.
stanctl up \
  --instana-version="3.311.587-0" \
  --multi-node-enable \
  --multi-node-ips="192.168.252.30,192.168.252.31,192.168.252.32" \
  --install-type="production" \
  --core-base-domain="instana-0.ibmdte.local" \
  --timeout="60m0s" \
  --download-key=$AGENT_DOWNLOAD_KEY \
  --sales-key=$SALES_KEY \
  --unit-initial-admin-password="Passw0rd" \
  --unit-tenant-name="ibm" \
  --unit-unit-name="unit0" \
  --volume-analytics="/mnt/instana/stanctl/analytics" \
  --volume-metrics="/mnt/instana/stanctl/metrics" \
  --volume-objects="/mnt/instana/stanctl/objects" \
  --volume-data="/mnt/instana/stanctl/data" \
  --core-smtp-from="server@instana.com" \
  --core-smtp-host="192.168.252.33" \
  --core-smtp-port="30025" \
  --core-smtp-check-server-identity=false \
  --core-smtp-start-tls=false \
  --core-smtp-use-ssl=false
Many of these installation parameters are optional if you are performing a
default install. If you do not specify the mandatory parameters such as the
SALES_KEY, you will be prompted during the installation.
The --timeout parameter is important for slower environments. The default
timeout is 30 minutes. If the install doesn't complete in the required time, the
install will fail.
The core-base-domain, unit-tenant-name, and unit-unit-name are important
parameters. The core-base-domain is typically the fully qualified hostname of
the server and must be in DNS. The unit name, tenant name, and base domain get
concatenated into the URL that you use to Log into the Instana UI.
Example: https://unit0-ibm.instana-0.ibmdte.local
This name must also be in the DNS server.
The instana license is automatically applied during the installation process. You can view it by running the following command:
stanctl license info
The installation will take approximately 20 minutes, but depends on the performance of your server.
3.6: Launch the Instana User interface
Once the installation finished and you are prompted with the message....
You can open a browser and login to the Instana user interface.
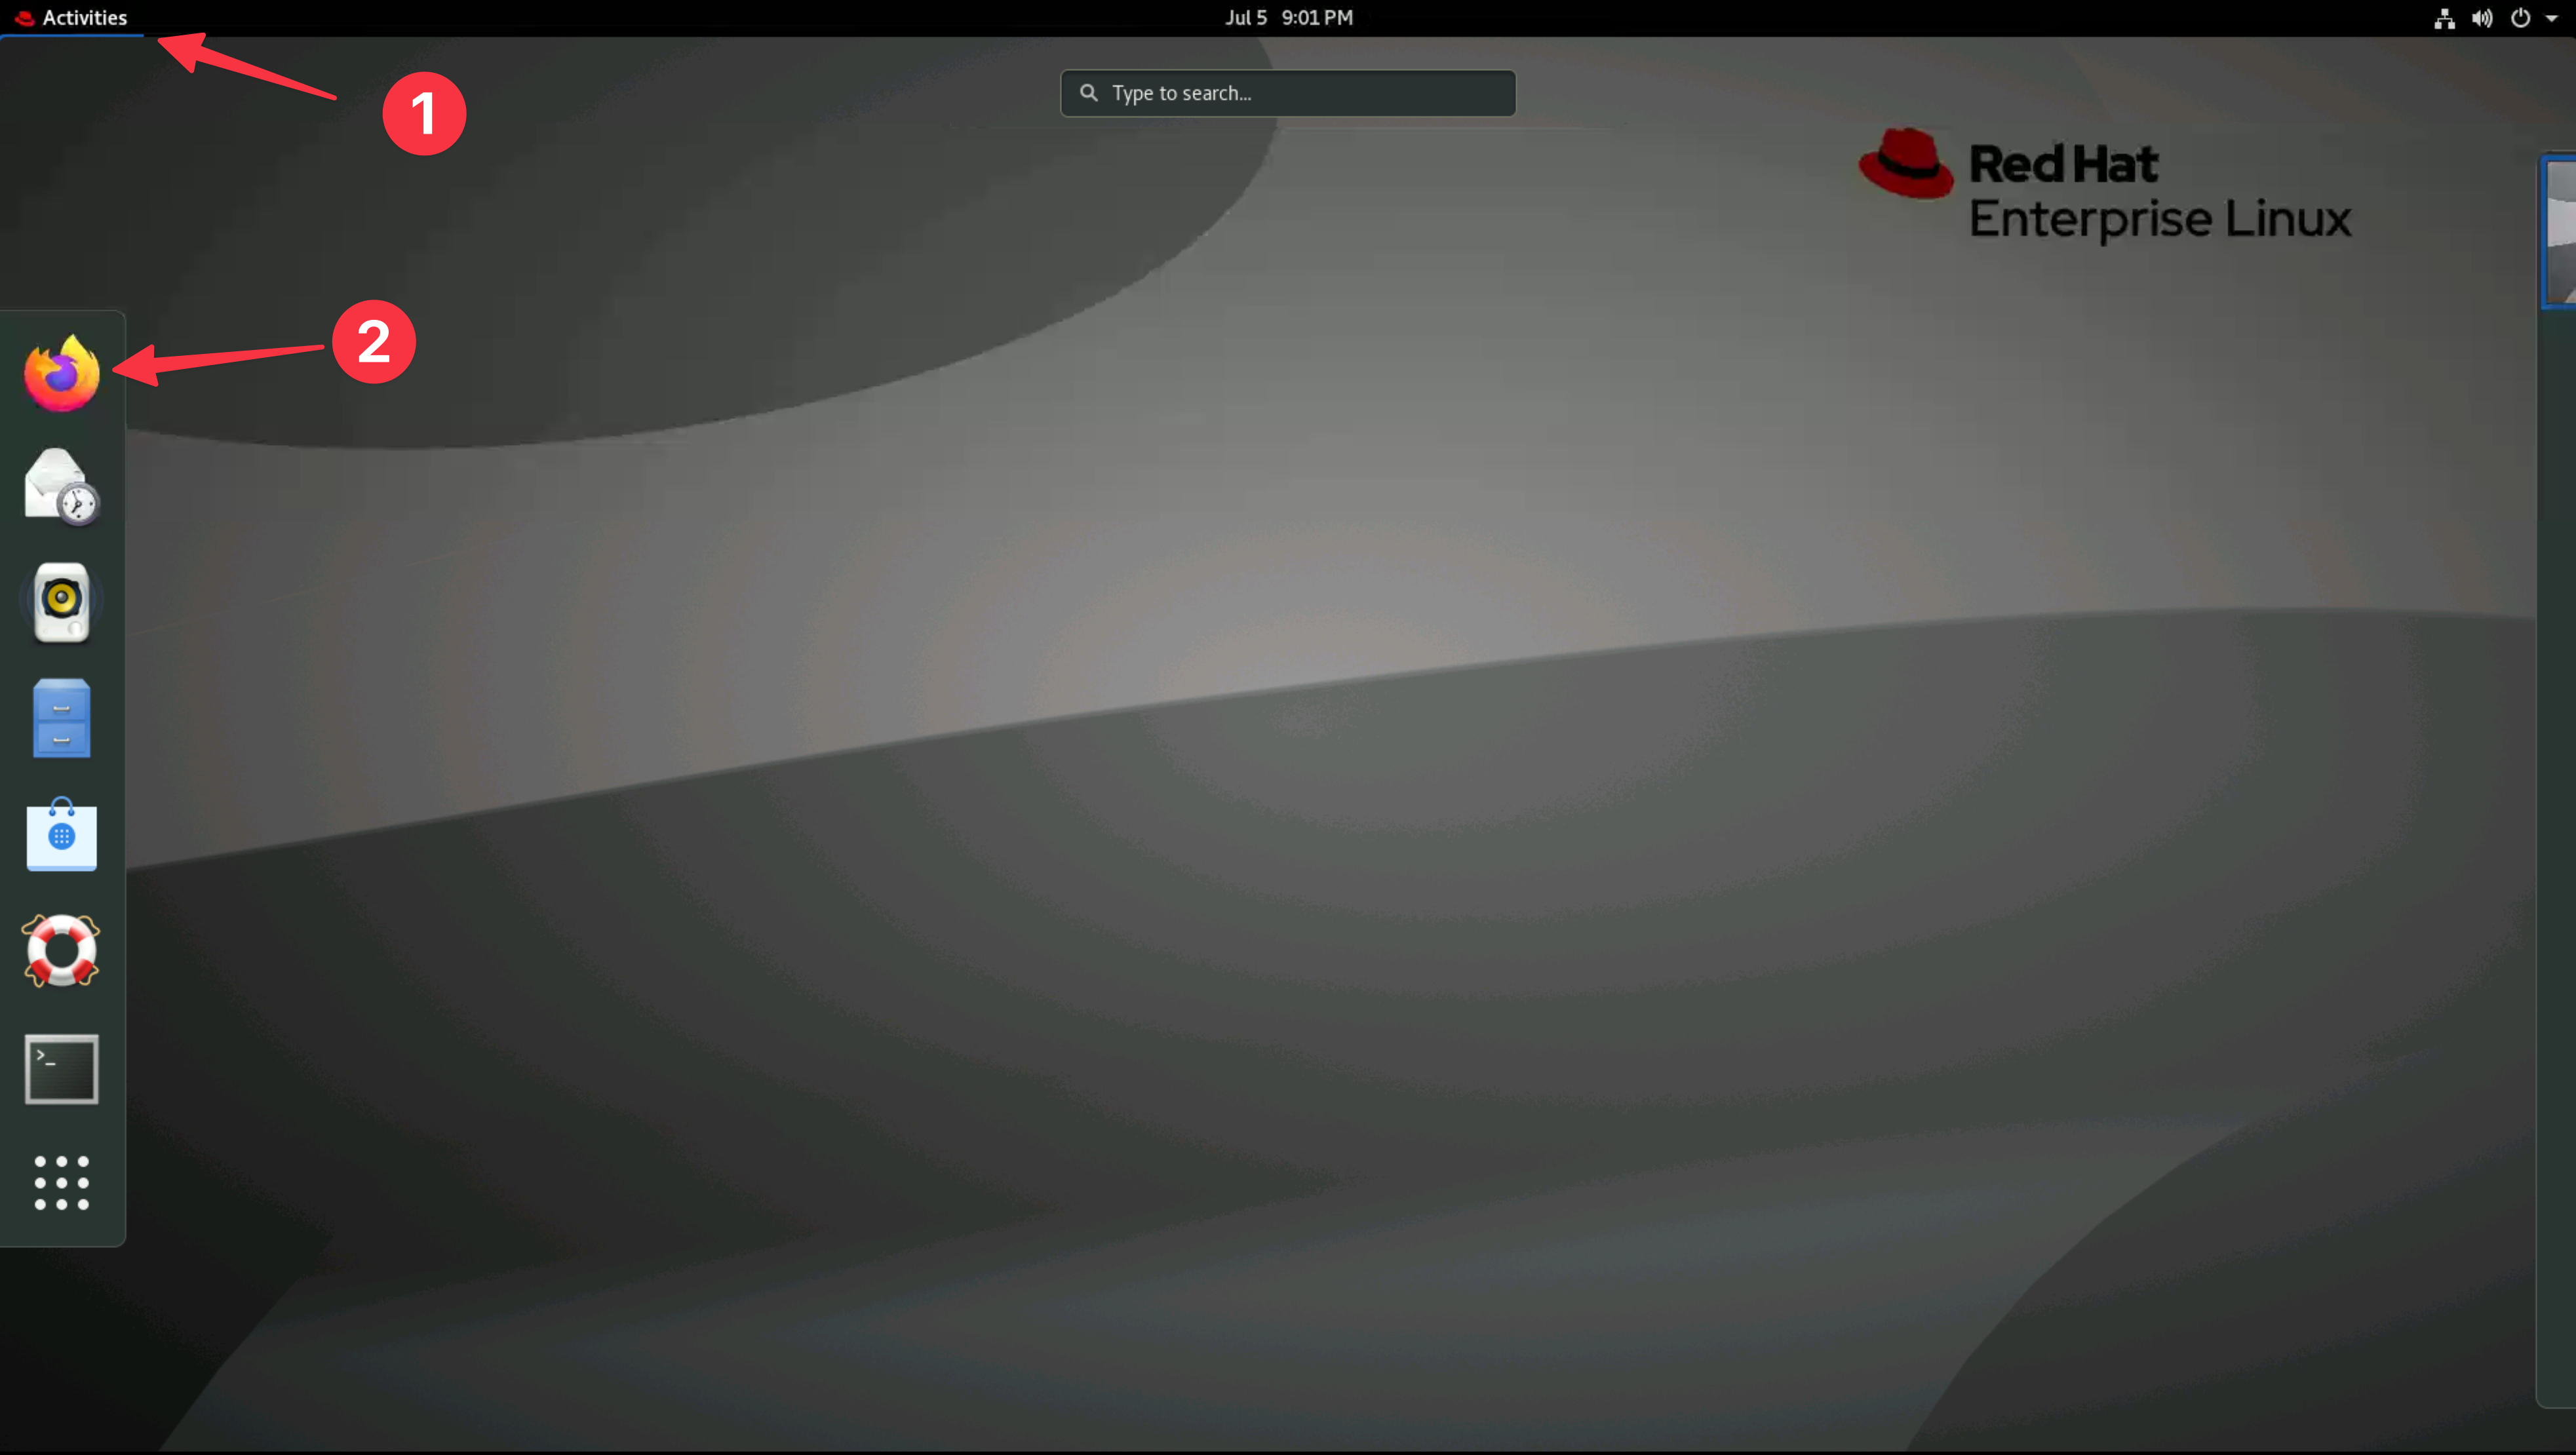
Open a firefox browser and select the Instana bookmark.
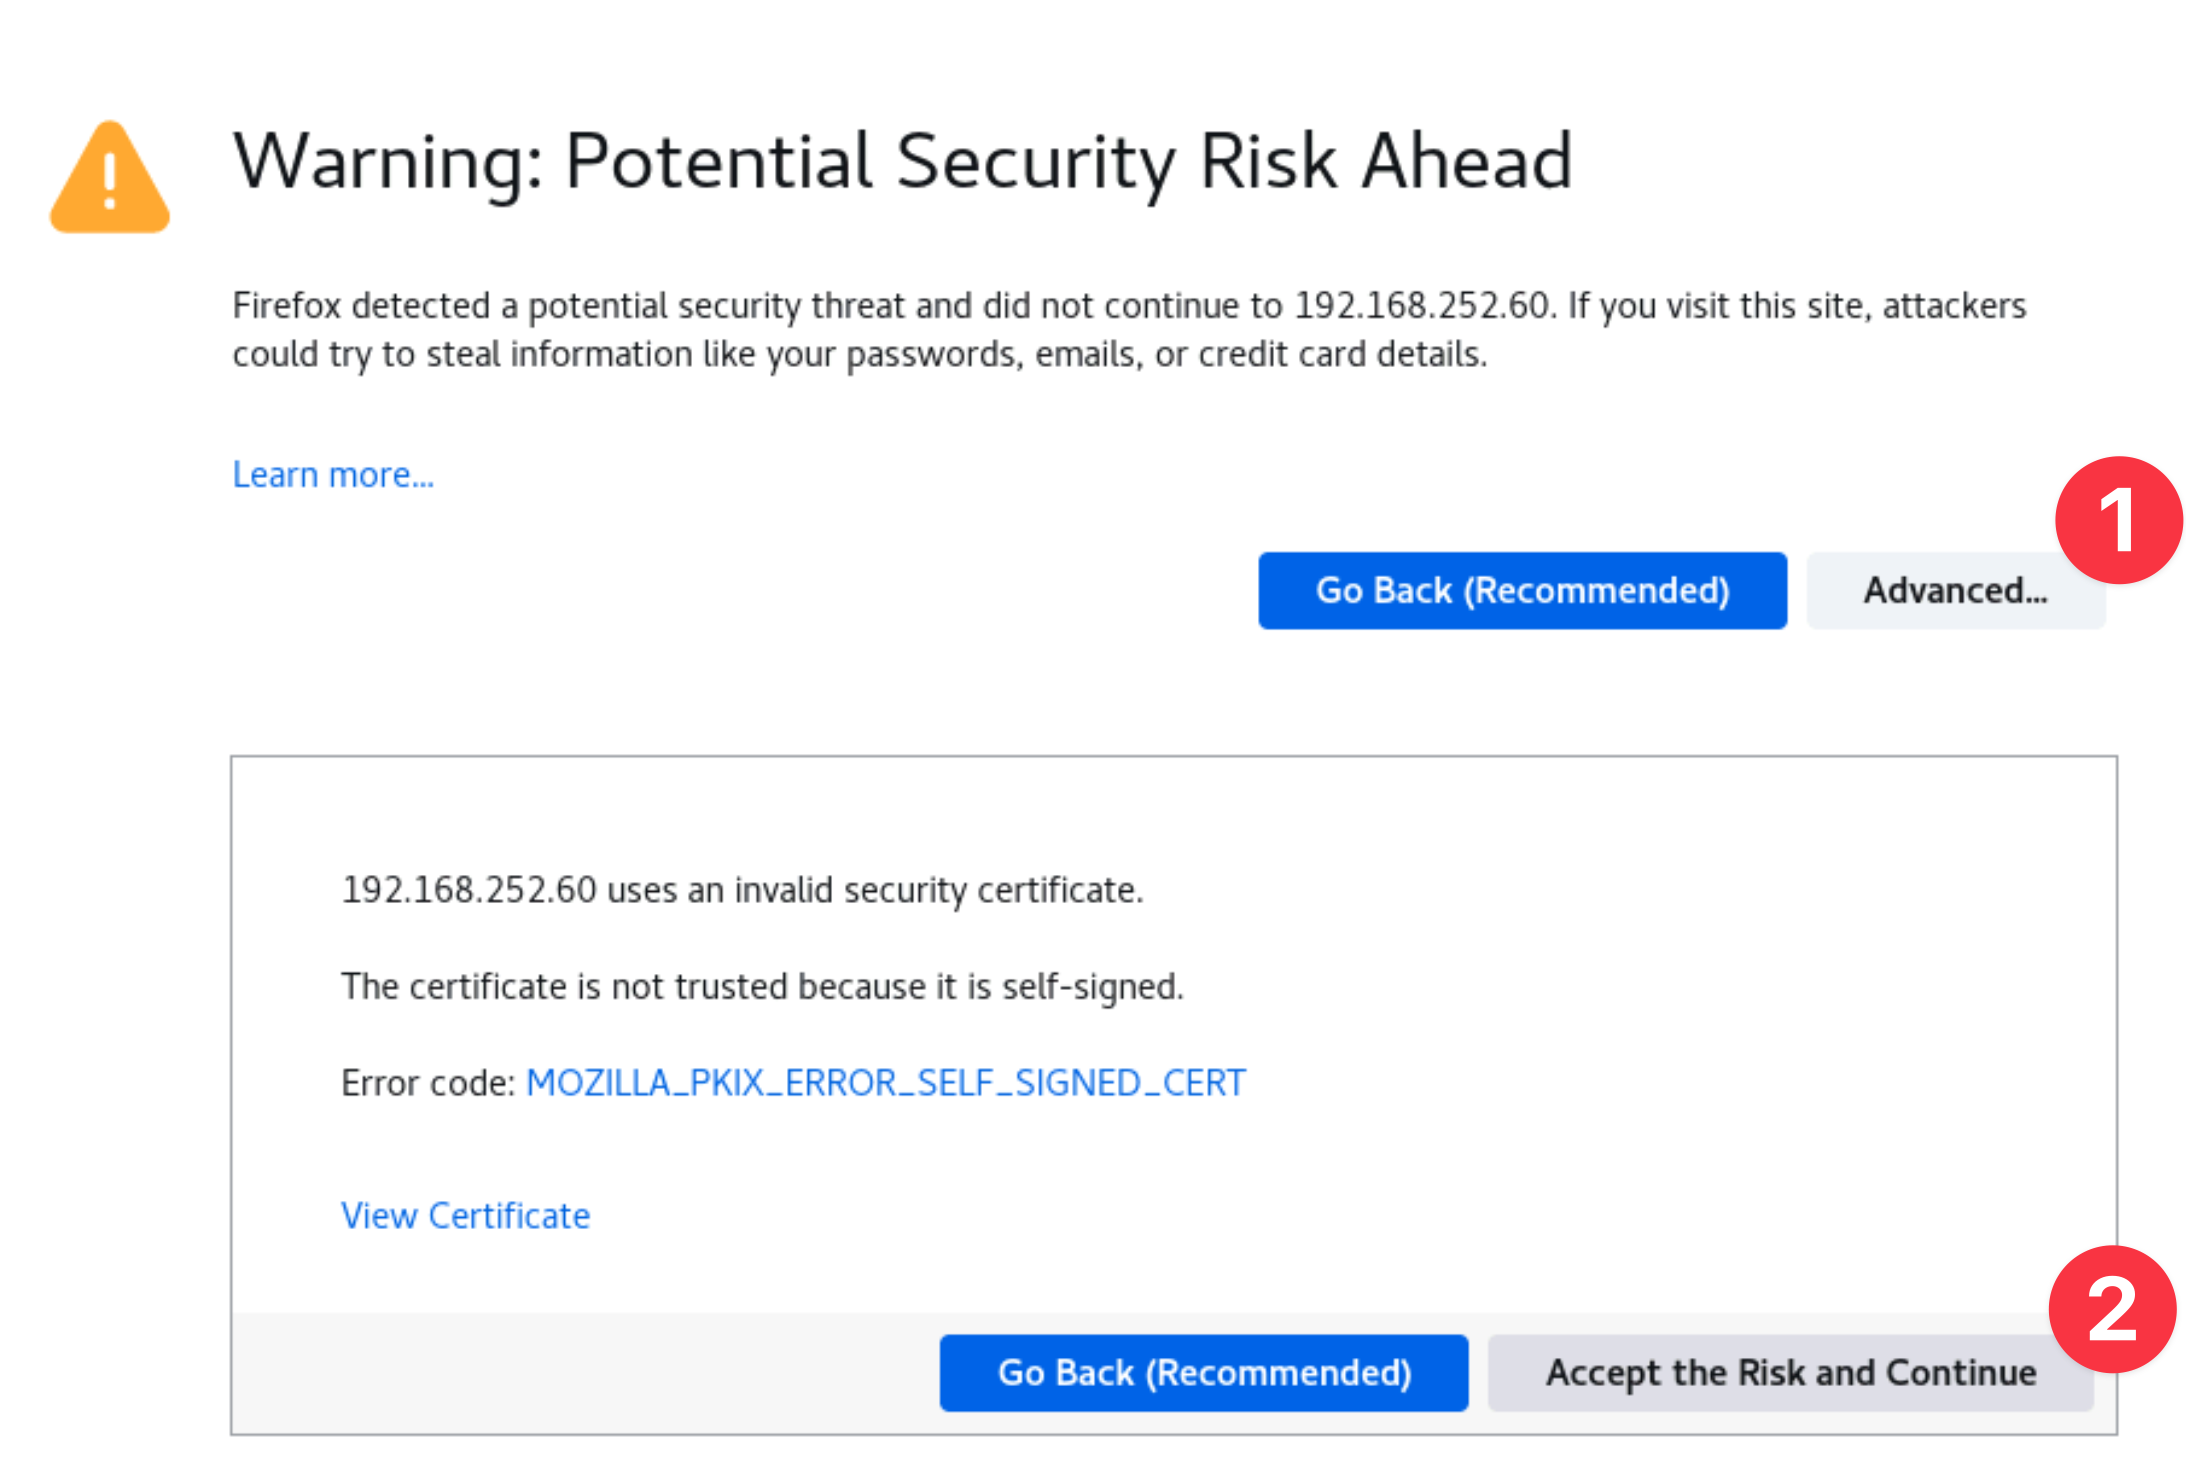
You can safely ignore the warning about the certificate being untrusted.
When prompted, enter the username and password that you updated earlier.
- Username: admin@instana.local
- Password: Passw0rd

You will be taken to an Initial Screen where you can install the instana agents or navigate to the main product UI. We will install an Instana Agent in the upcoming section of the lab.
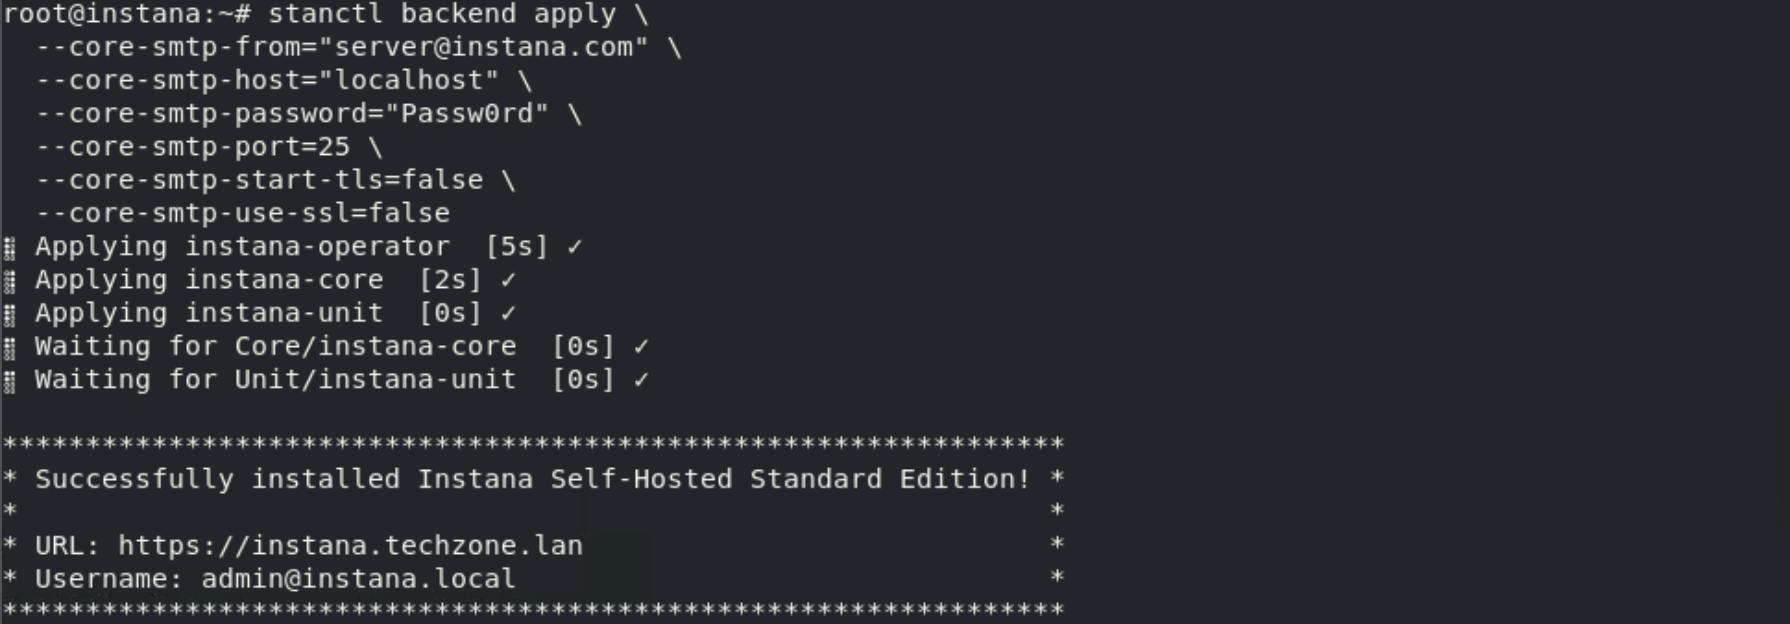
Configuring SMTP after installation
You should not perform any steps in this section, it is for information only.
If you look back at the command used for installation you will see you have already configured an SMTP server in this environment. You do not need to configure your server at the time of installation, the SMTP settings can be later modified using the stanctl tool. The following command will update the SMTP settings of the Instana server:
stanctl backend apply \
  --core-smtp-from="server@instana.com" \
  --core-smtp-host="X.X.X.X" \
  --core-smtp-password="PASSWORD" \
  --core-smtp-port=25 \
  --core-smtp-start-tls=false \
  --core-smtp-use-ssl=false
Once updated you should see output similar to the below:
If you are interested in all of the parameters that can get specified using the stanctl backend apply command, type:
stanctl backend apply --help
Turning on optional features
You should not perform any steps in this section, it is for information only.
There are optional configurations that you will likely want to make to your installation of Instana.
These options are made available via optional 'feature flags'. For features such as VMware/vSphere monitoring, Power HMC monitoring, and zHMC monitoring which are disabled by default.
As an example to enable VMware/vSphere monitoring, you would run the following command:
stanctl backend apply --core-feature-flags feature.vsphere.enabled
You can view a full list of available feature flags here.
Upgrading the Instana server
You should not perform any steps in this section, it is for information only.
Upgrades are made simple with the stanctl tool. The process for an upgrade is to first upgrade stanctl and then upgrade the Instana backend.
Upgrading the stanctl tool is different depending on the Operating System you are using. As an example for Ubuntu you would run the following commands:
# Unhold the stanctl package if it is held
sudo apt-mark unhold stanctl

apt update -y
apt install -y stanctl

# Hold the stanctl package again to prevent it from being upgraded unintentionally.
apt-mark hold stanctl
Then upgrade the backend:
stanctl up
The command will list the available update options. Use the arrows on your keyboard to move up and download to select the version that you want to install from the list provided.
3.7: Summary
In this portion of the lab, you have learned how to prepare an environment for the installation of the Self-Hosted Multi-node Standard Edition Instana server. You have also learned how to configure SMTP settings and how to enable feature flags.
For a POC, we recommend either SaaS or the single node Standard Edition. For production deployments, customers will want the multi-node Standard Edition or Self-Hosted Custom Edition. Multi-Node Standard Edition will increase scalability. Self-Hosted Custom Edition provides more flexibility in terms of kubernetes/OpenShift environments and dramatically improves scalability as well as providing built-in resiliency.
You are now ready to learn how to install and configure an Instana Agent.