Kubernetes Data Target
4.1: Introduction
Turbonomic ARM is generally agentless and pulls data from configured targets using APIs.
The exception to this is the Kubernetes platform. Since Kubernetes is highly complex and dynamic environment, an agent component is deployed onto target Kubernetes and OpenShift cluster which then send data to the Turbonomic ARM server, this agent is called Kubeturbo.
The kubeturbo GitHub wiki contains a wealth of information about installation, configuration, troubleshooting, and more.
The content of this section follows the recommended OpenShift deployment procedure and provides contextual instruction in relation to the lab environment being built out within this site.
When we installed the Turbonomic Platform we used the CLI. To try something different we will use the OpenShift Console to install the Kubeturbo agent.
4.2: Prerequisites
The steps in this lab for installing the KubeTurbo agent should be performed on the Apps SNO OpenShift cluster. It will be configured to connect to the Turbonomic server.
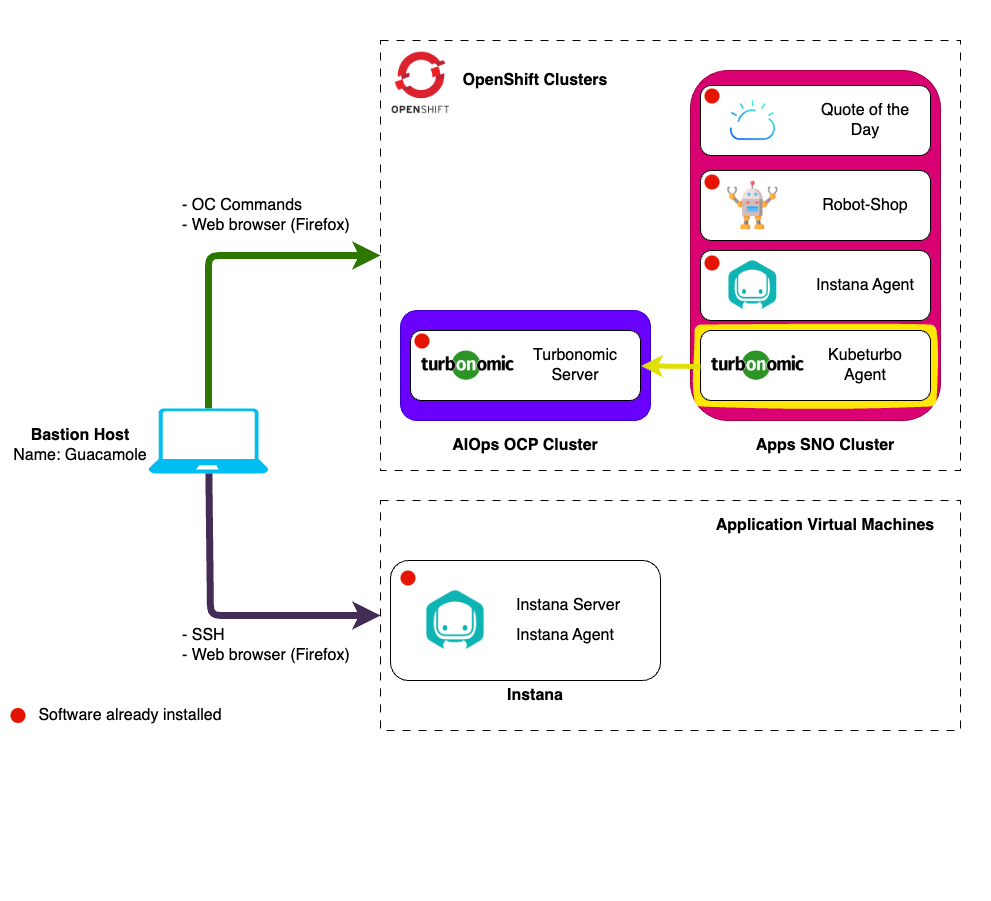
-
In your browser, navigate to your Apps Single Node OpenShift console by selecting the SNO Dashboard bookmark.
infoYou can safely ignore the warning about the certificate being untrusted.
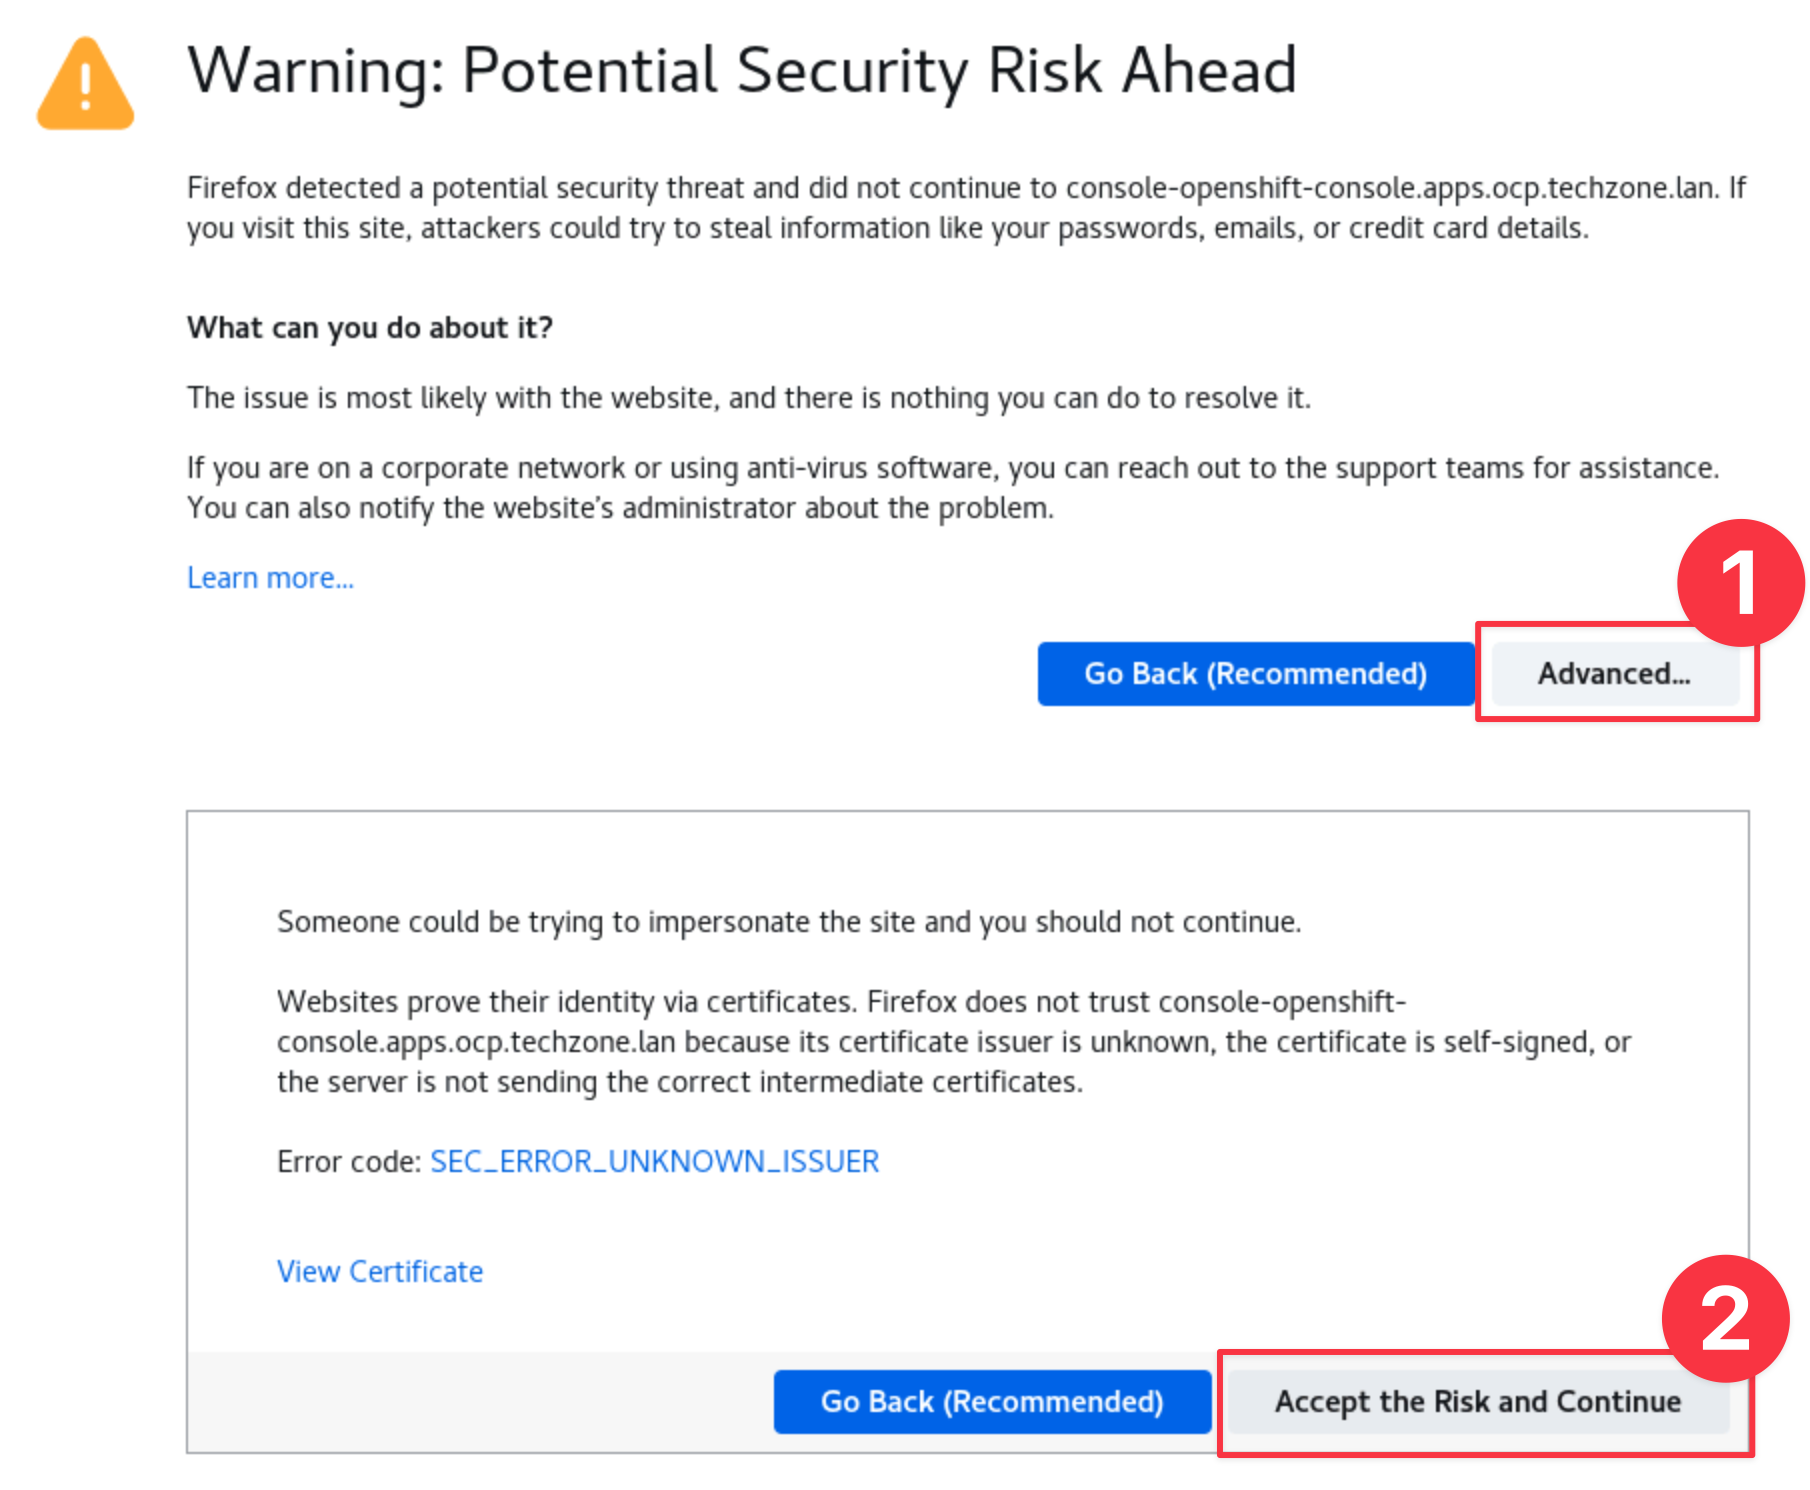
-
Login to the OCP Console using the credentials provided in IBM Tech Zone.
- Username: kubeadmin
- Password: The value of "SNO Cluster Admin Password" from your IBM Tech Zone reservations or the environment ready email you received from IBM Tech Zone.
-
Create a project in the OCP cluster where KubeTurbo will be deployed:
- Navigate to Home -> Projects and click on the Create Project button.
- Fill in details as below:
- Name:
kubeturbo-operator - Display Name:
Operator Hub based deployment of kubeturbo
- Name:
- Click the Create button.

4.3: Deploy the Operator
-
Click on Operators -> OperatorHub. Ensure the kubeturbo-operator project is selected in the dropdown.
-
Search for
kubeturboand select the Certified KubeTurbo operator:warningYou must use the Certified Kubeturbo Operator.
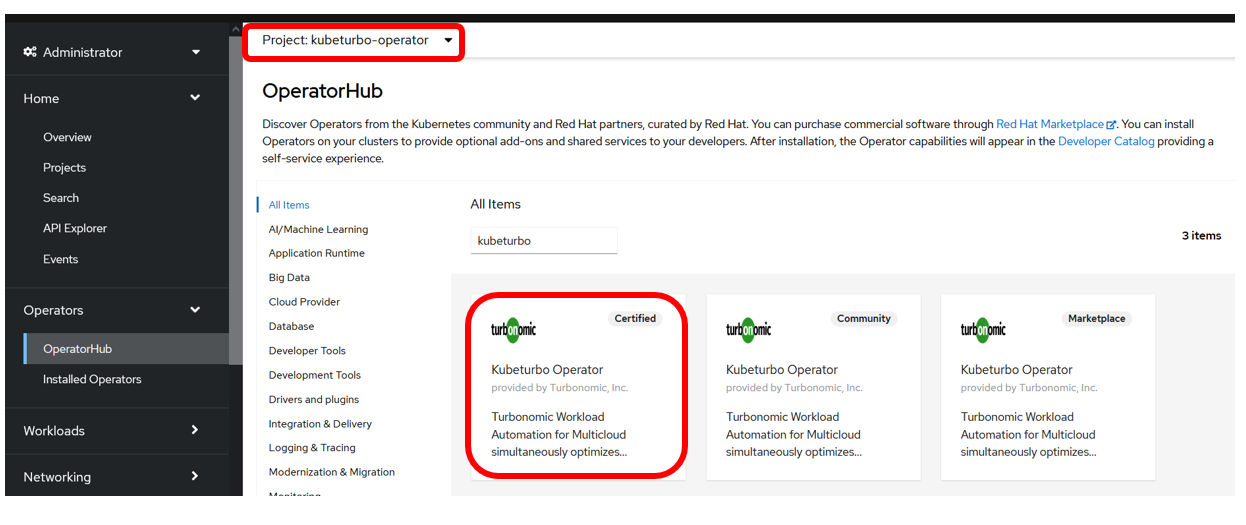
-
Select and click on the Install button:

-
Select options as below:
-
Select A specific namespace on the cluster
-
Set the Installed Namespace to kubeturbo-operator
-
Set Update approval to Manual:
tipAutomatic updates are not recommended if you are not also automatically updating the Turbonomic Server
-
Click the Install button.
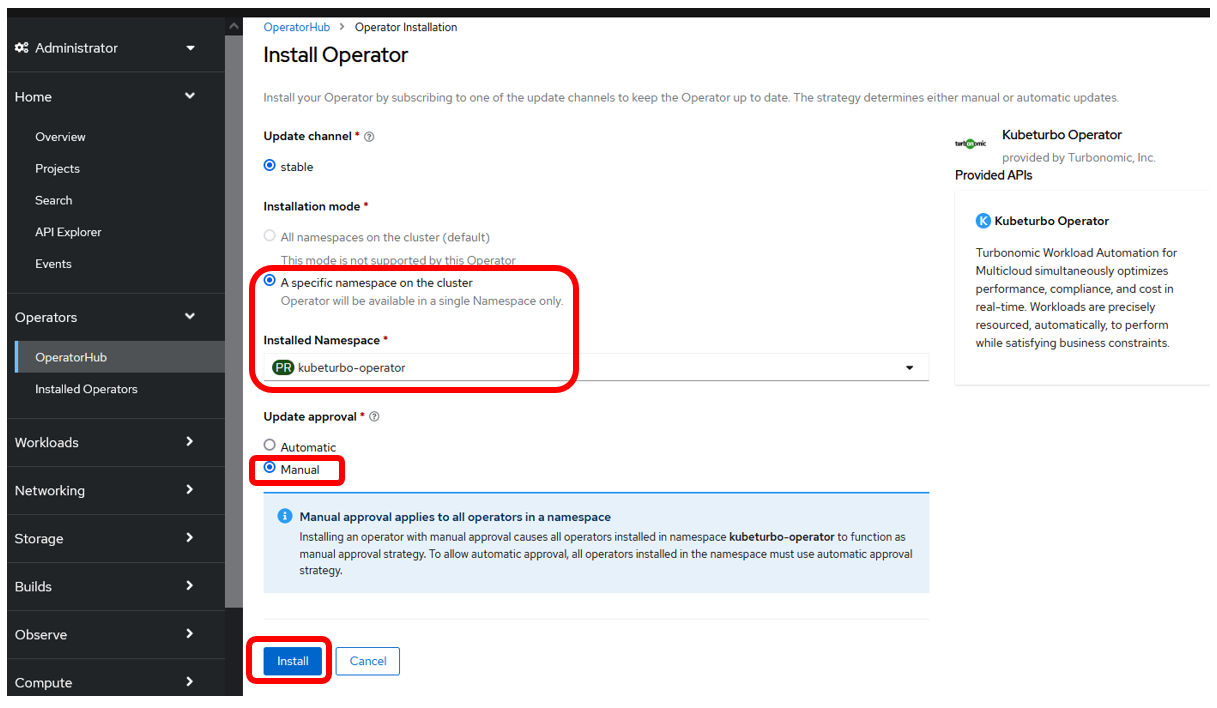
-
-
Click on the Approve button when the Manual approval required prompt appears:
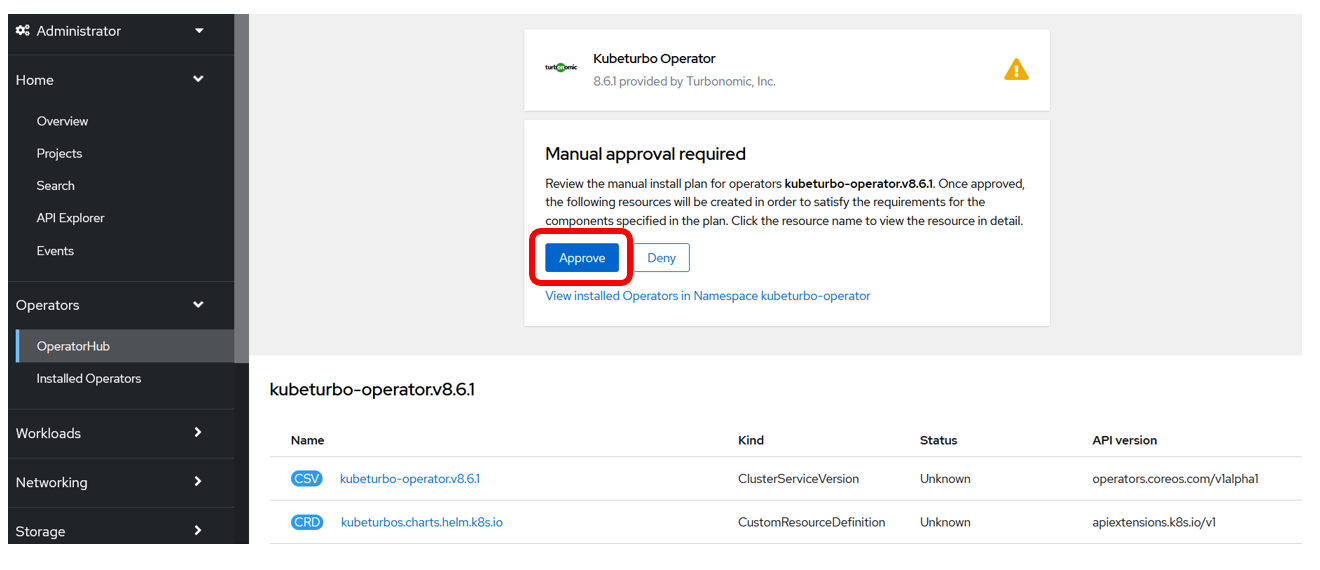
-
The operator will install and when it's ready you can view the operator (Click on View Operator) to create an instance, which will be your KubeTurbo agent (or probe) that will monitor and manage this cluster:
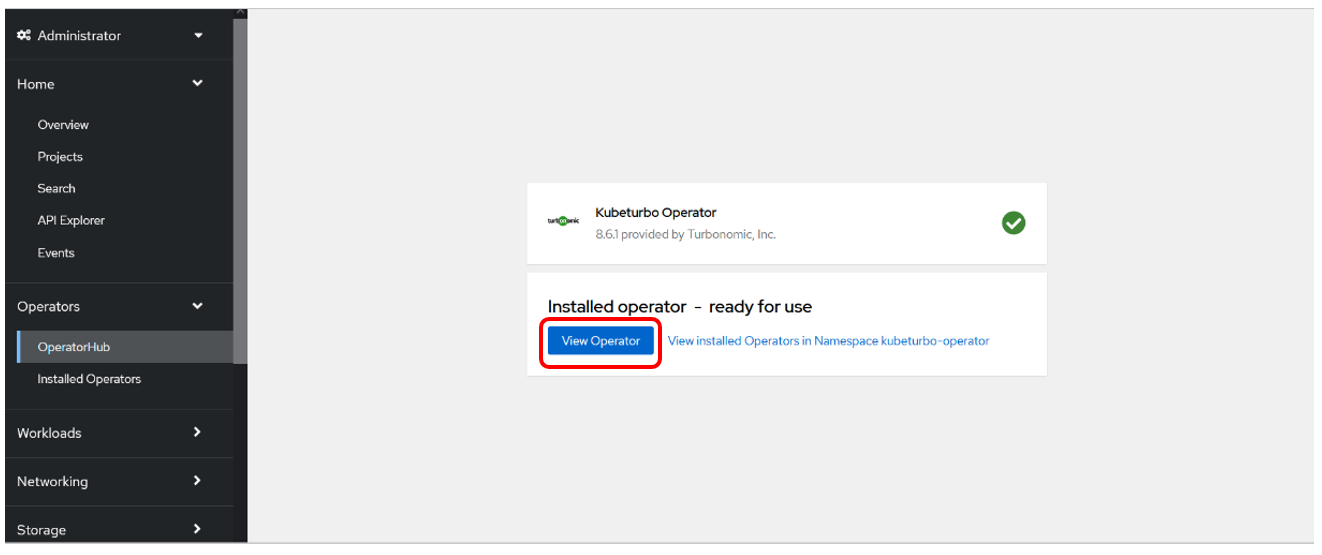
4.4: Configure Kubeturbo Instance
-
When viewing the deployed operator, click on Create instance:
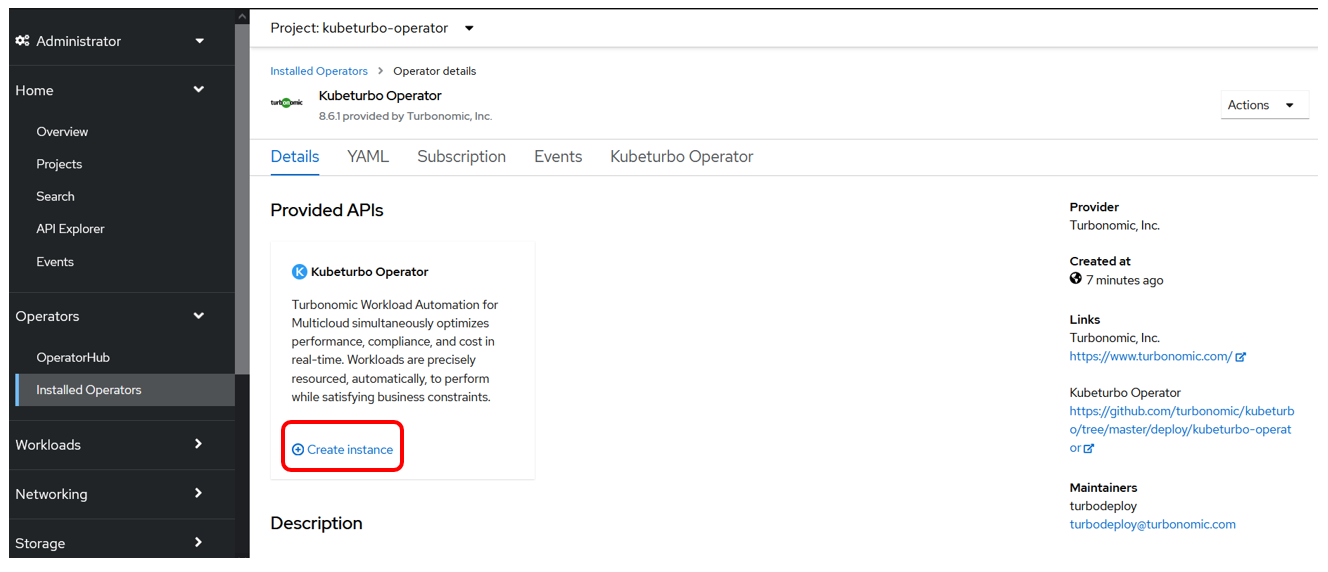
-
To configure this instance click on the YAML view option:
infoRefer to Configure KubeTurbo Instance for more information on the
Form viewoption.For this lab, use the YAML view option.
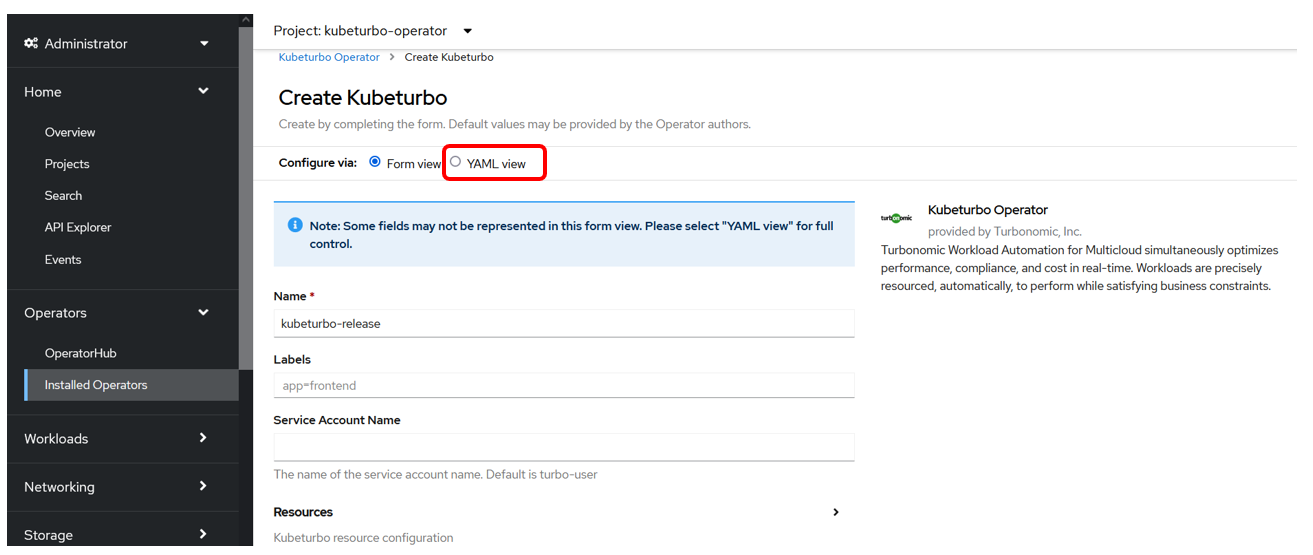
-
Replace all the content in the YAML editor view with the YAML config below
warningDO NOT CLICK CREATE YET!!
kind: Kubeturbo
apiVersion: charts.helm.k8s.io/v1
metadata:
  name: kubeturbo-release
  namespace: kubeturbo-operator
spec:
  args:
    sccsupport: '*'
  image:
    repository: icr.io/cpopen/turbonomic/kubeturbo
    tag: <turbonomic server version, e.g. 8.11.4>
  restAPIConfig:
    opsManagerPassword: <your turbonomic server password>
    opsManagerUserName: <your turbonomic server username>
  serverMeta:
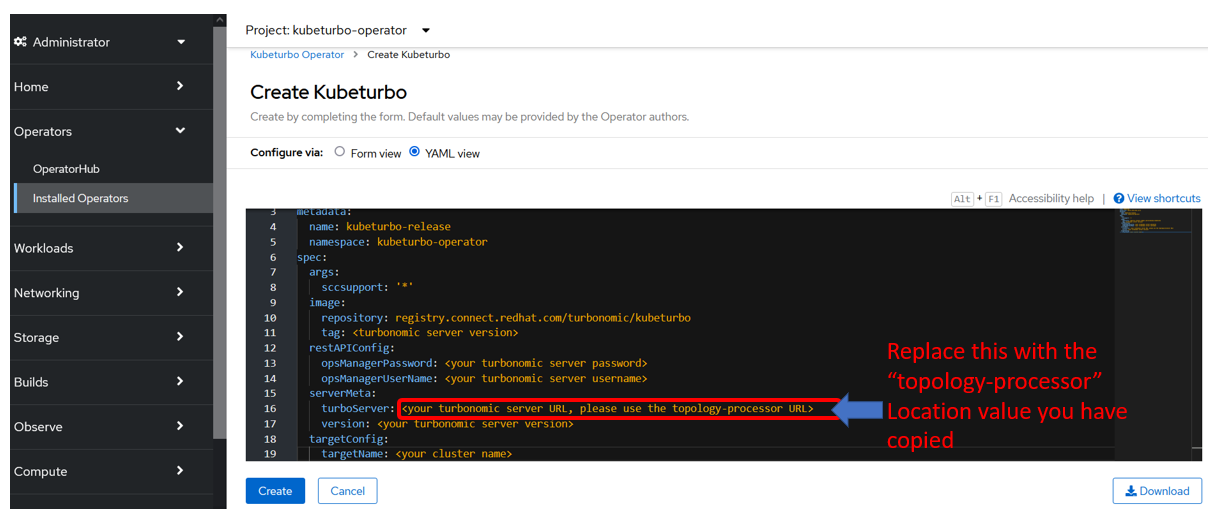
    turboServer: <your turbonomic server URL, please use the topology-processor URL>
    version: <your turbonomic server version>
  targetConfig:
    targetName: <your cluster name>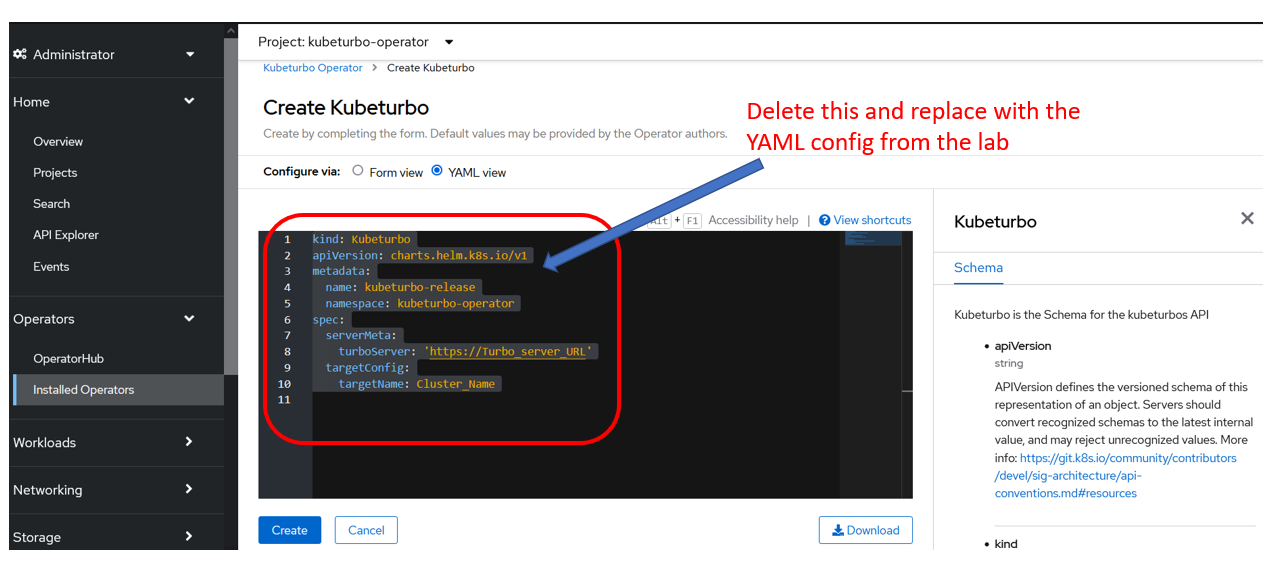
-
Now, replace the text
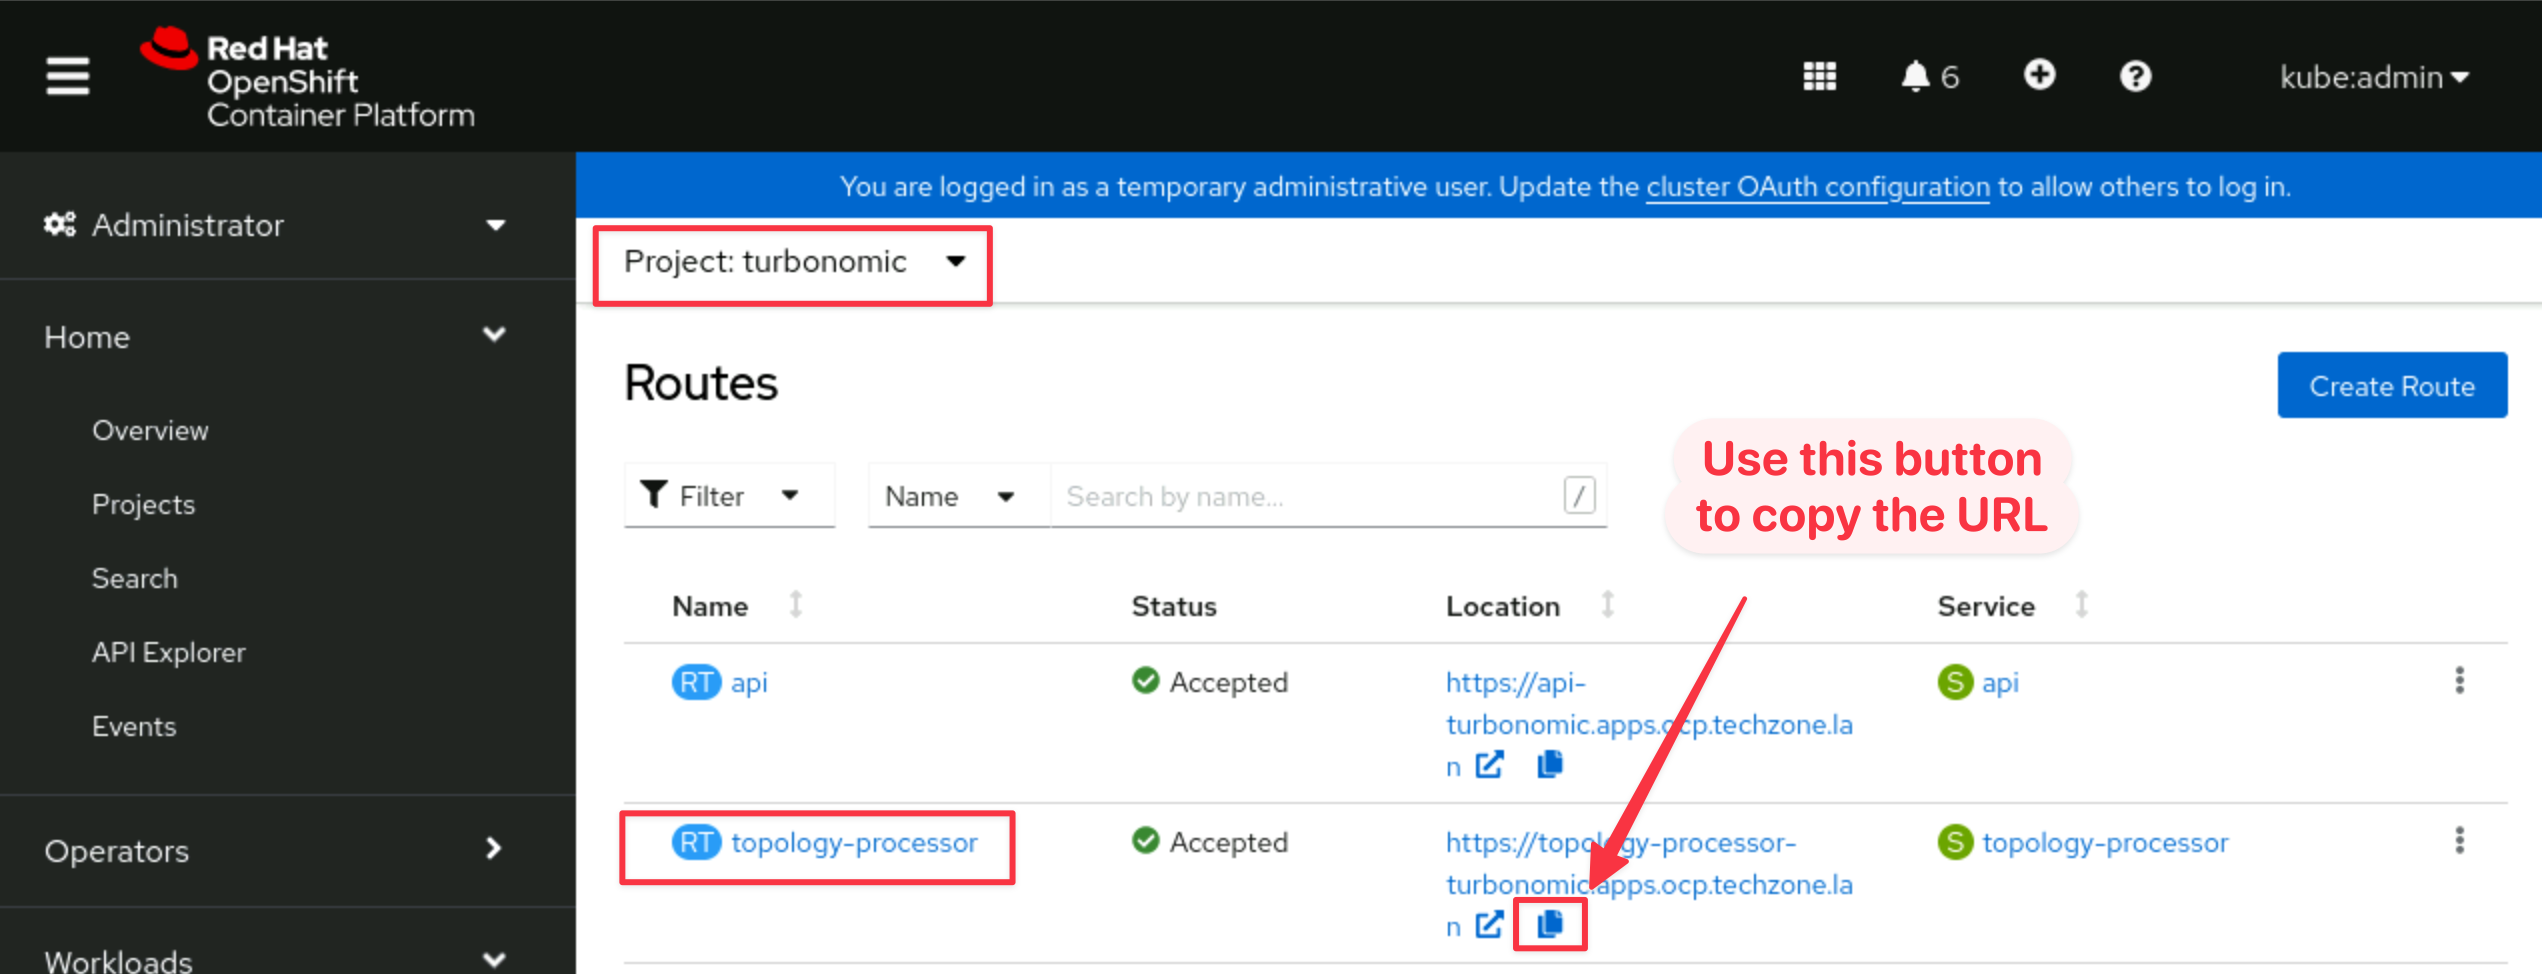
<your turbonomic server URL, please use the topology-processor URL>with the actual turbonomic server URL:How to get the Turbonomic Server URL:
-
Go to the AIOps OCP Dashboard bookmark or browse to
https://console-openshift-console.apps.ocp.techzone.lanin another browser tab: -
Navigate to Networking -> Routes, ensure the turbonomic project is selected from the dropdown and and copy the Location for the topology-processor route by clicking the copy icon:
-
Go back to your YAML editor view in Step 3 earlier. Assign it as the turboServer value:
-
-
Next, replace the text
<your turbonomic server version>with the actual turbonomic server version:How to get the Turbonomic Server Version?
-
Go back to the AIOps OCP Dashboard where turbonomic is installed:
-
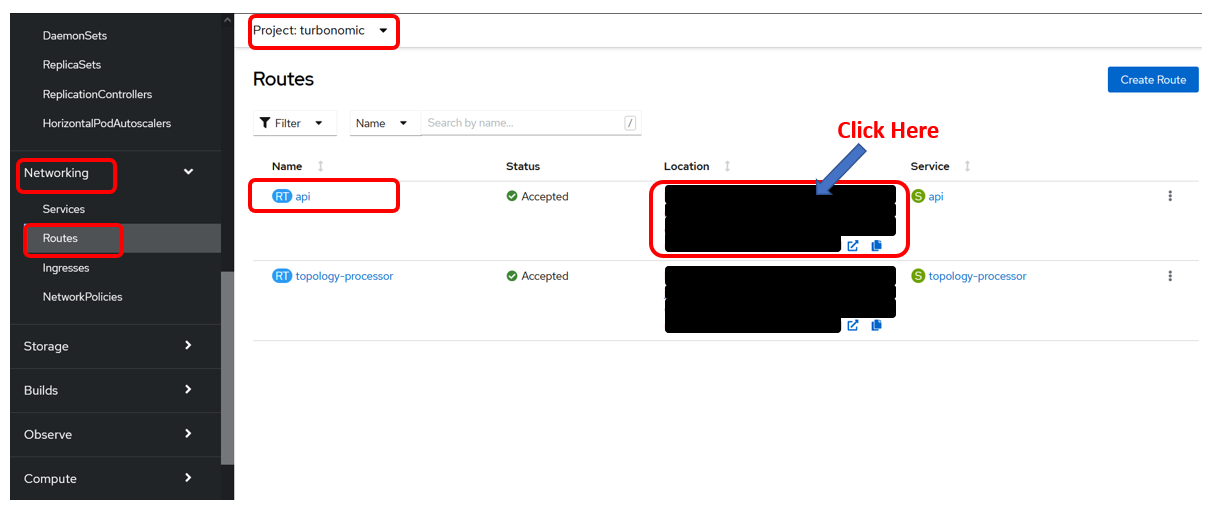
Navigate to Networking -> Routes, select the turbonomic project and click the Location value for the api route:
-
It will bring up the Turbonomic UI page as below. Check the version listed at the bottom of the page.
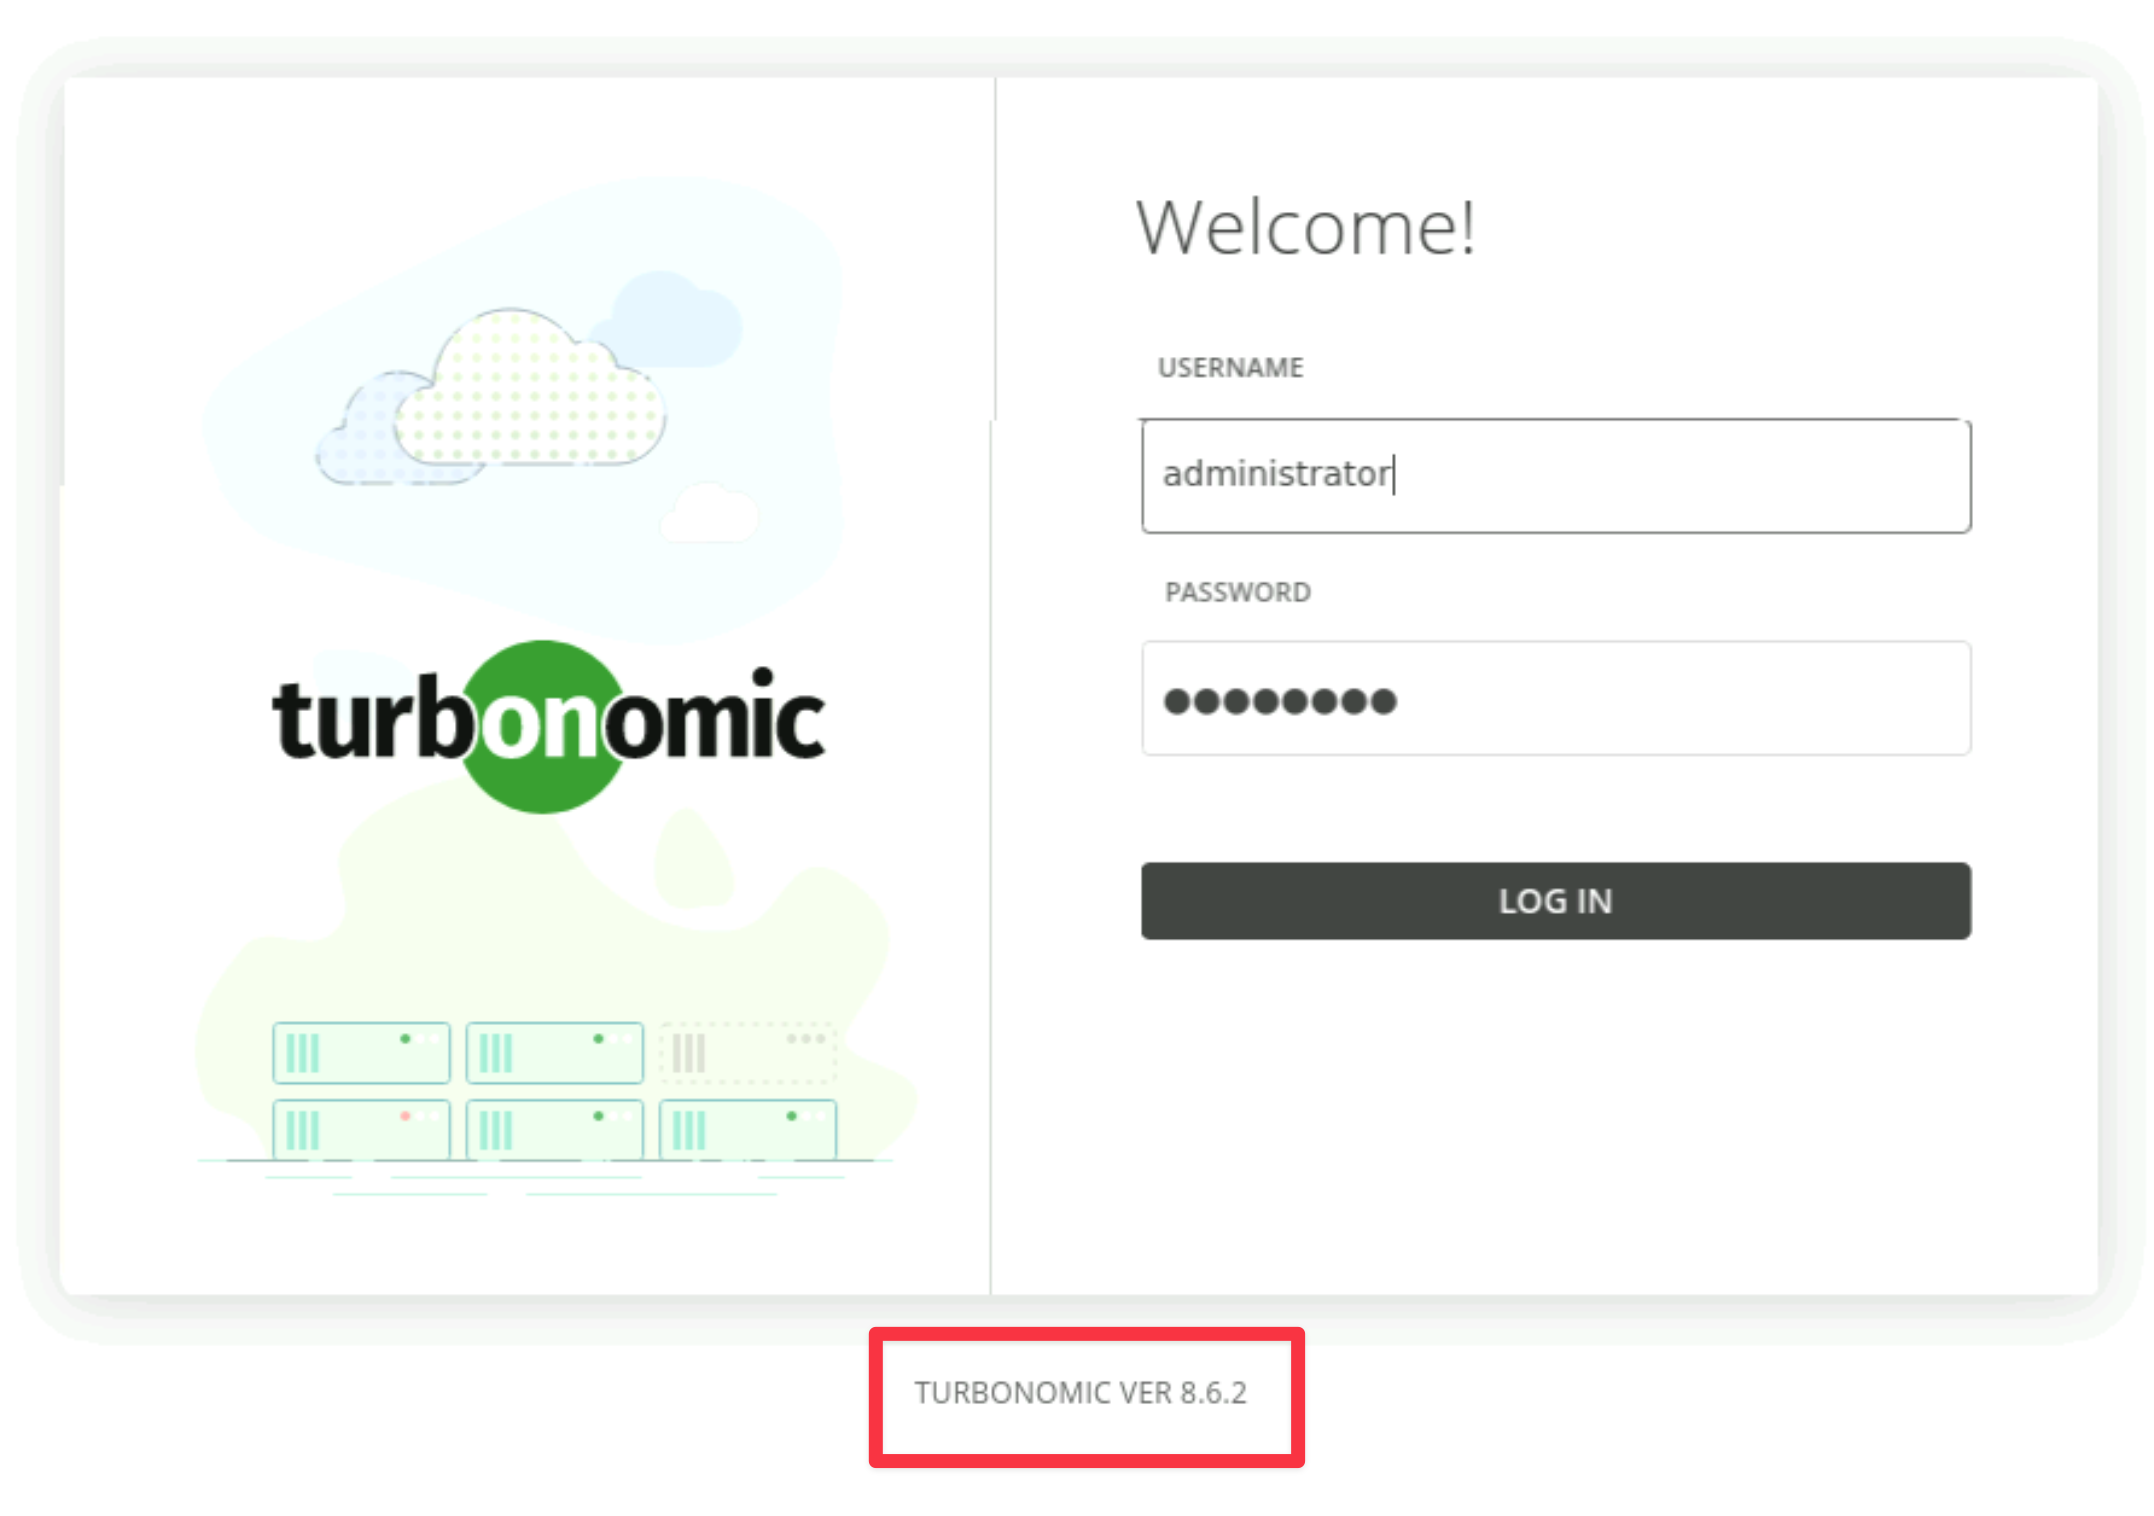
-
Go back to your YAML editor view in Step 3 earlier. Assign the value to:
- image -> tag value
- serverMeta -> version value

-
-
Next, replace the values of
<your turbonomic server password>and<your turbonomic server username>with the credentials that you have used to log into the Turbonomic UI:
-
Then set a cluster name for the targetName, e.g.
application-kubeturbo-cluster.
Your config should now look similar to the below:
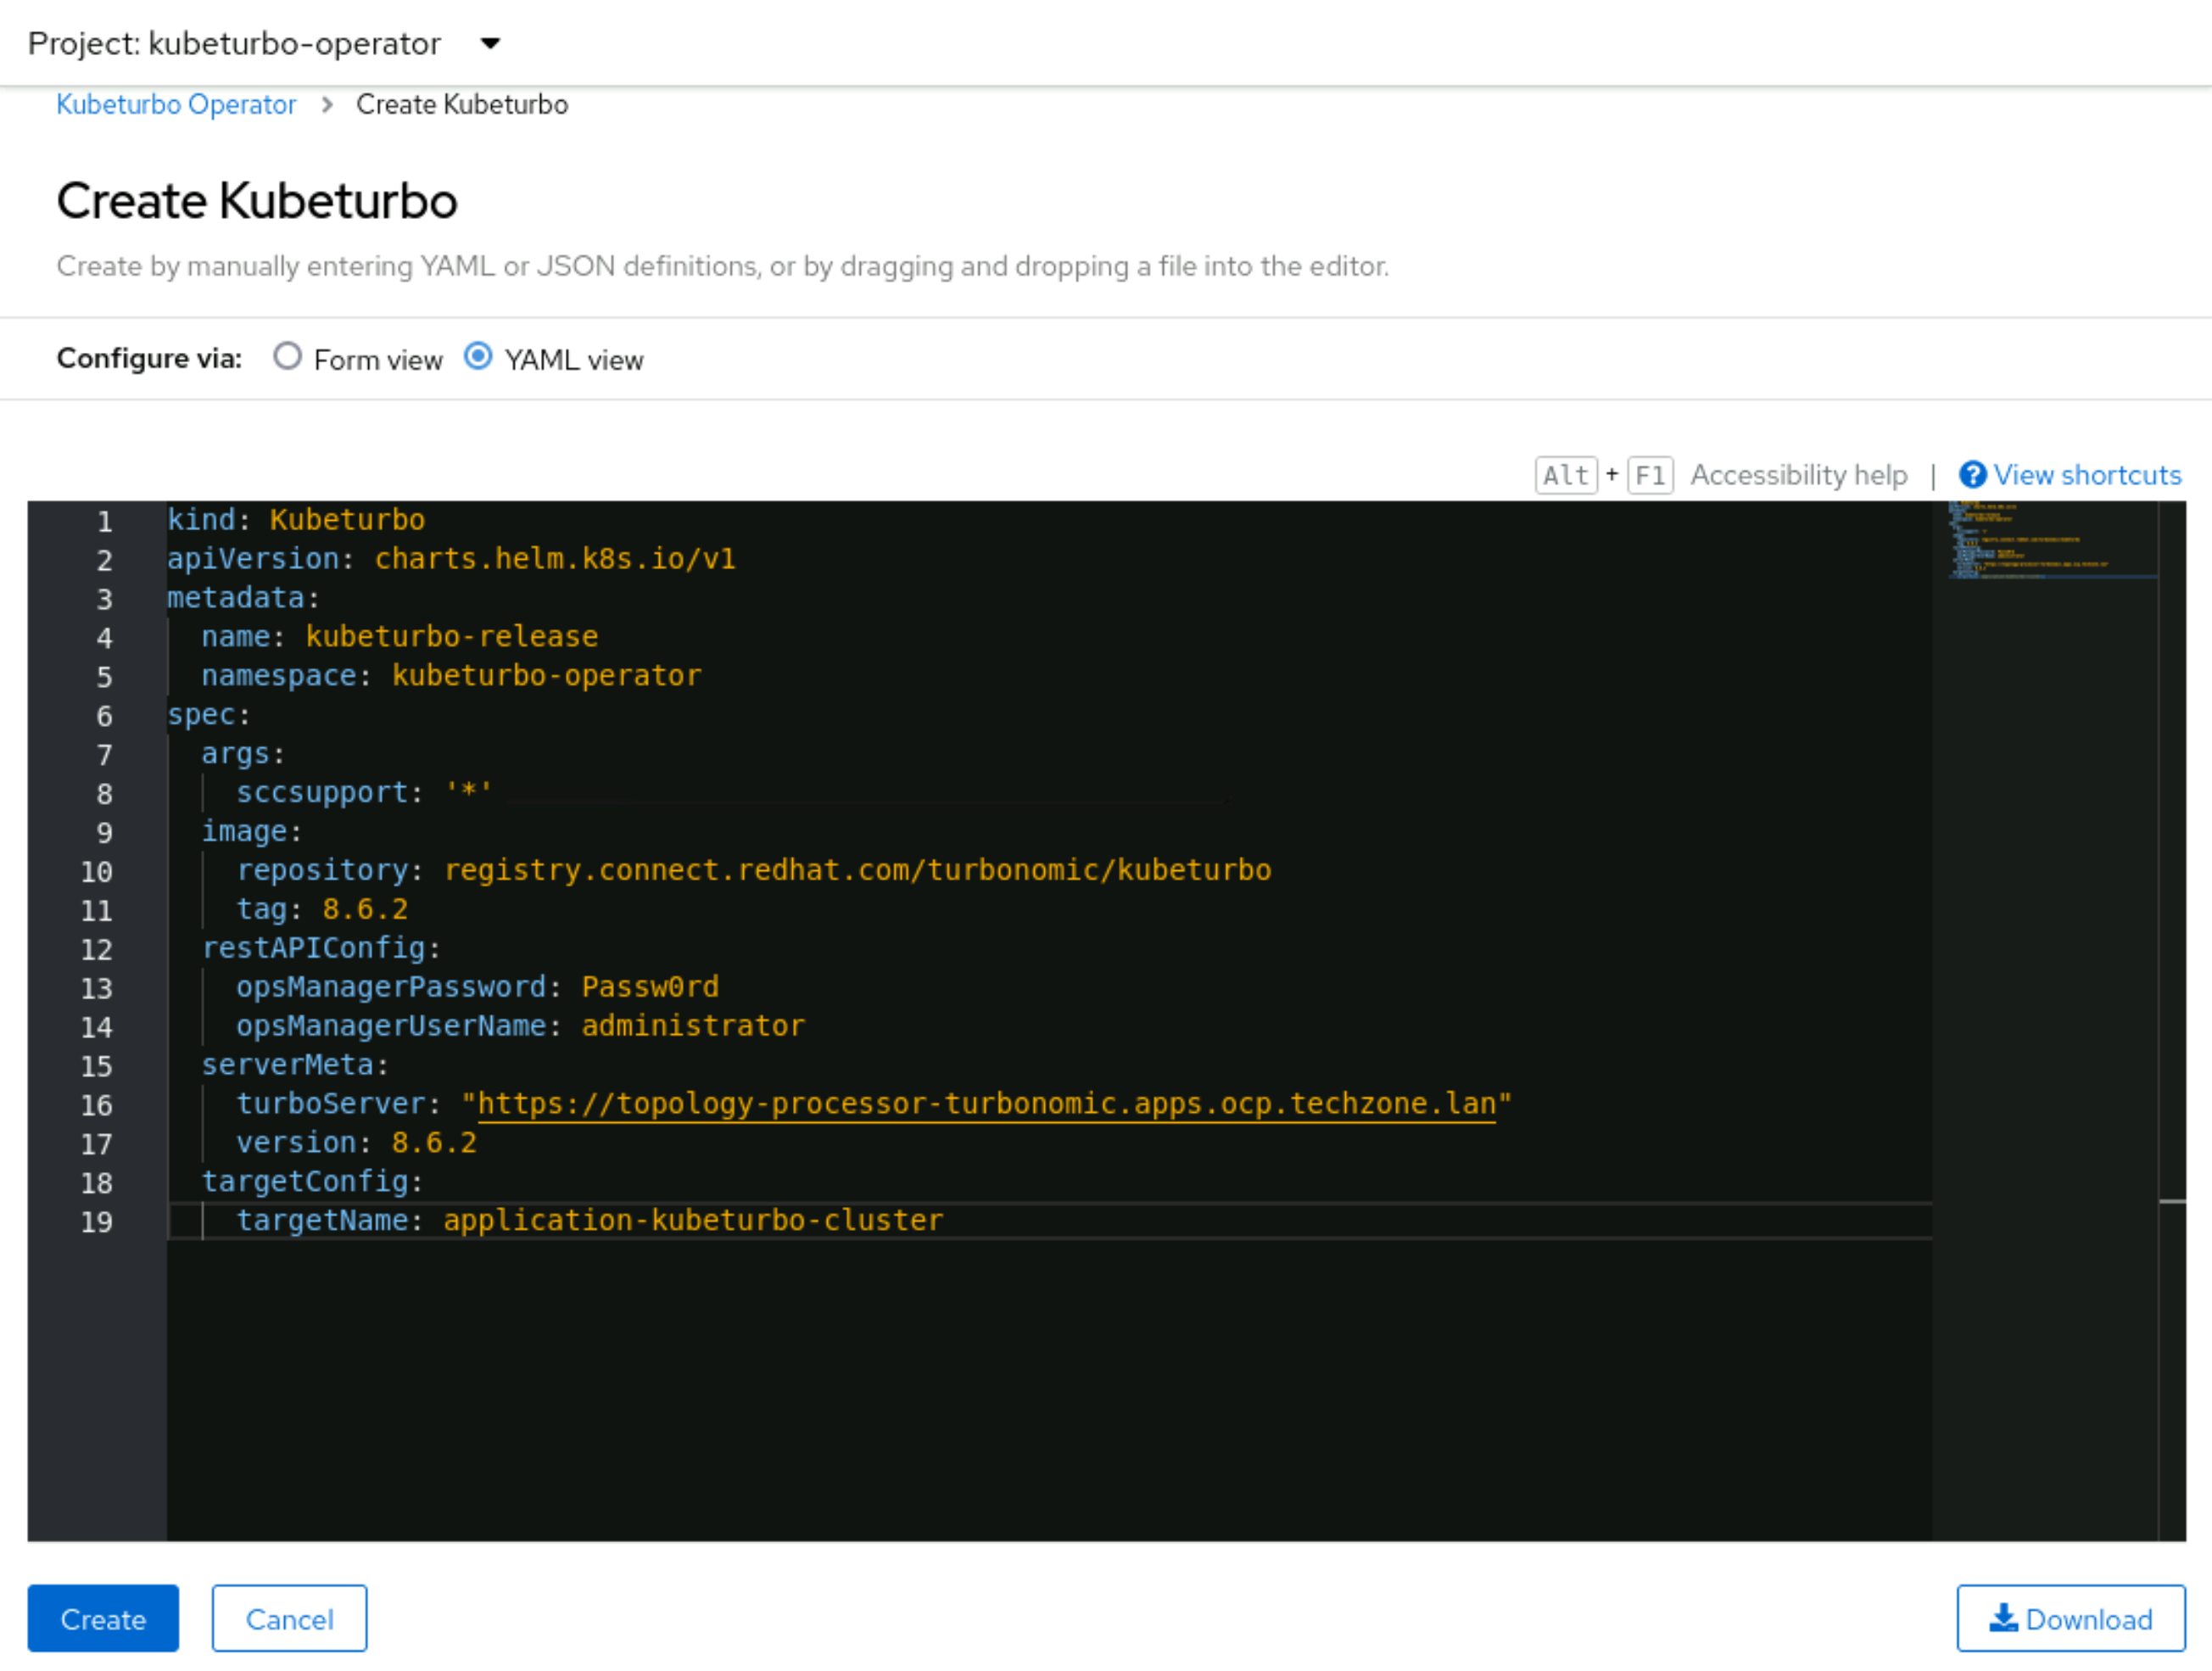
-
Finally, click on the Create button.
-
When you have applied your configuration you will see that you have created an instance, or custom resource, called kubeturbo-release:
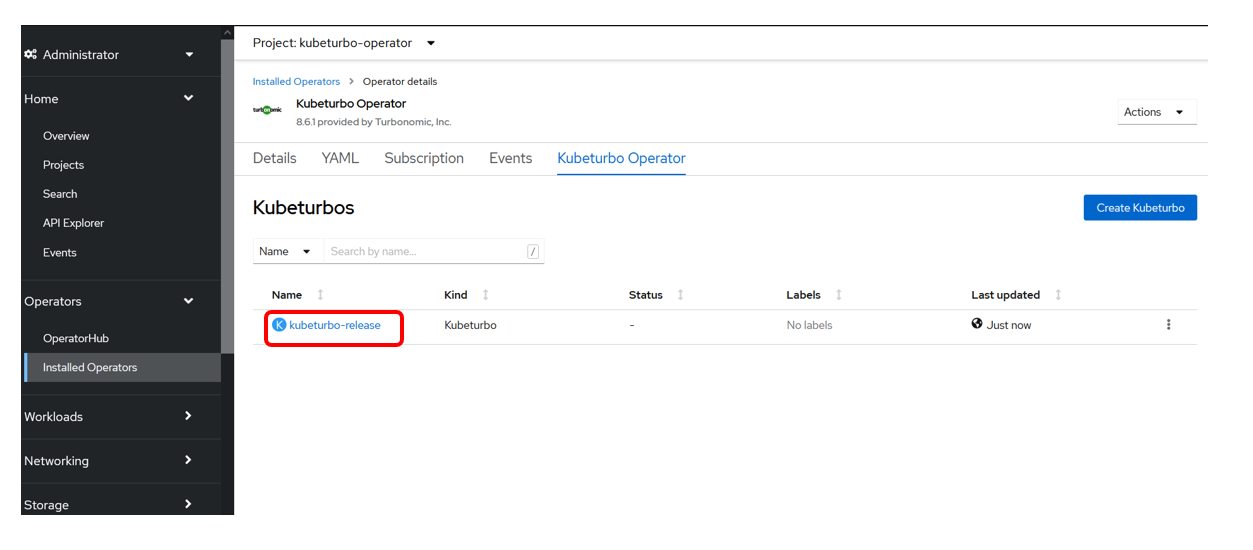
4.5: Validate Deployment
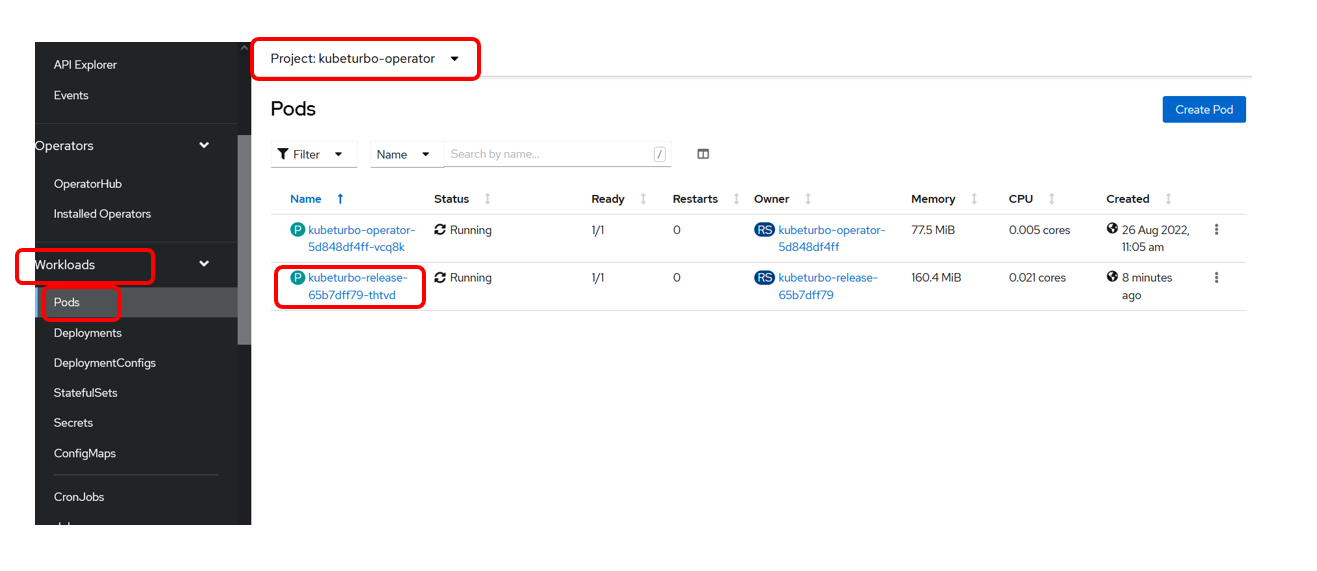
You can now check to see that you have two deployments and two running pods in the kubeturbo-operator namespace:
- One is the operator
- The other is the Kubeturbo probe (release)
-
On your Apps SNO OpenShift cluster, navigate to Workloads -> Deployment and select the kubeturbo-operator project:
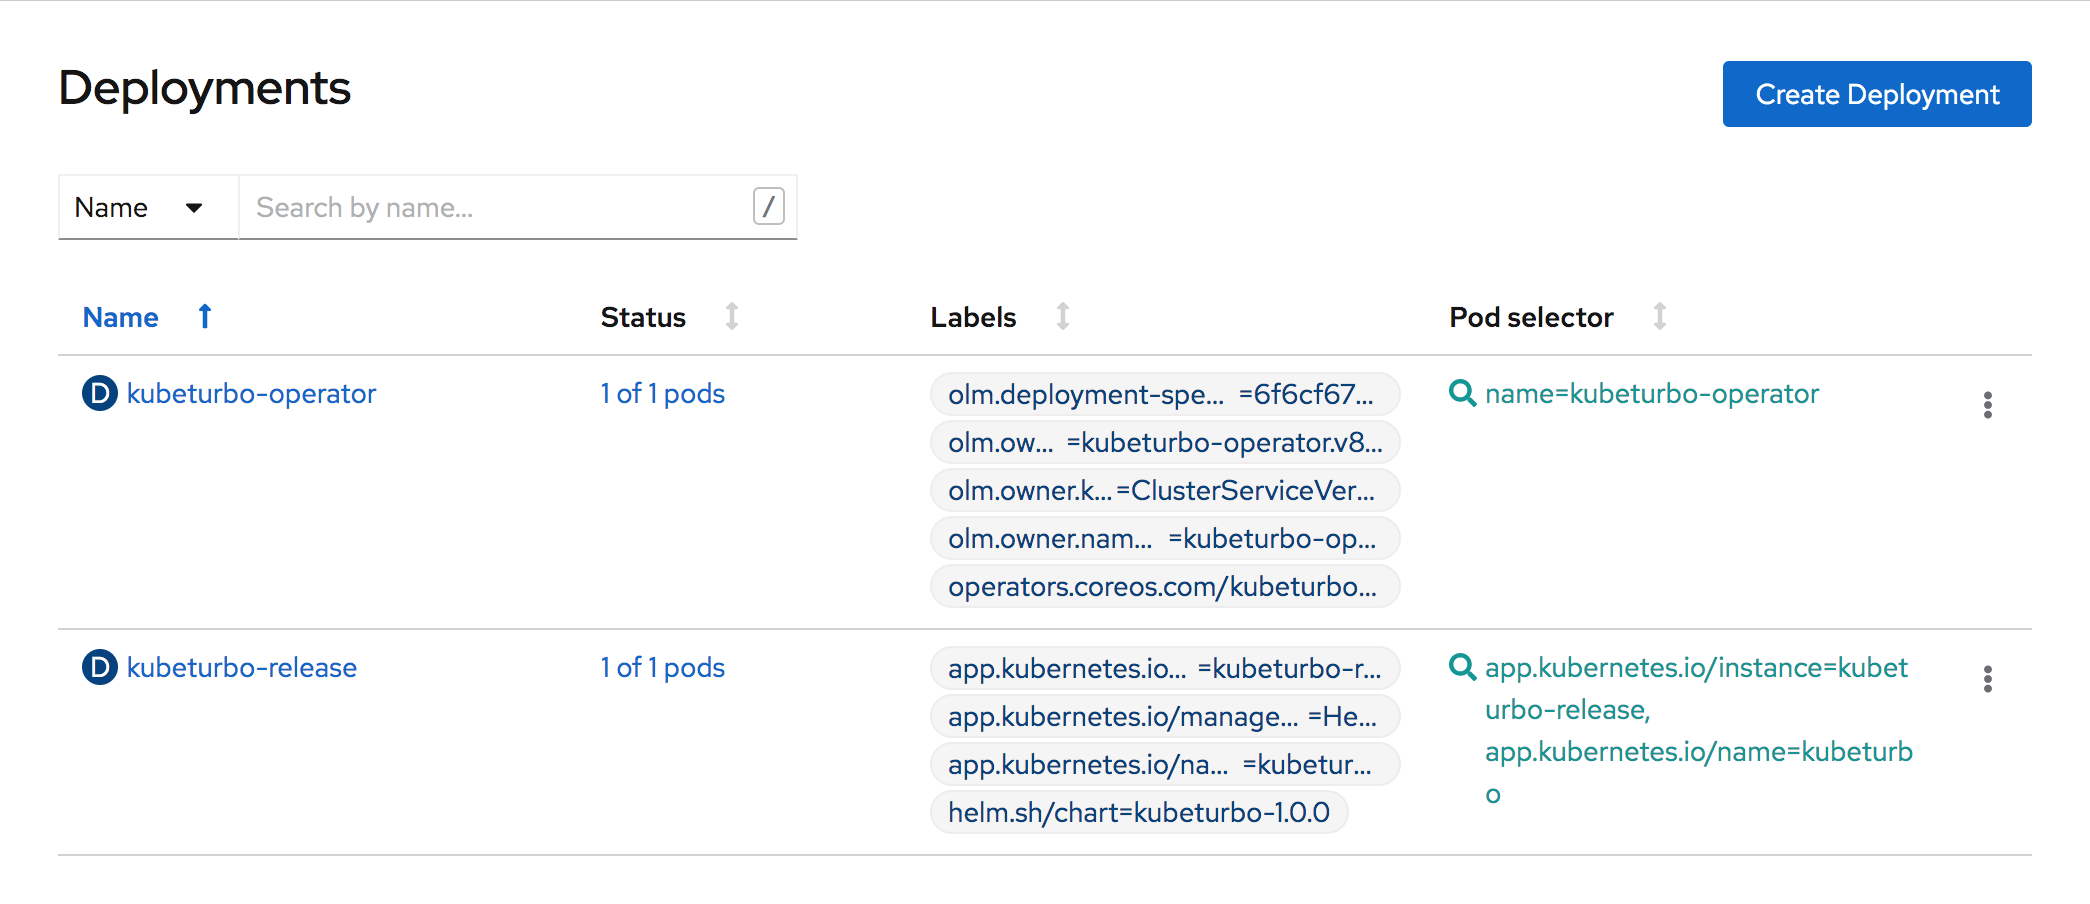
-
Navigate to Workloads -> Pods again in the kubeturbo-operator project:

-
Then click on the kubeturbo-release pod.
-
Then click on Logs to validate that the probe has successfully registered by searching the logs for
Probe registration succeeded
-
Validate the target in the Turbonomic Server UI
-
Go to your Turbonomic Server UI -> Settings -> Target Configuration and you will see a new target listed with the name
Kubernetes-your_cluster_name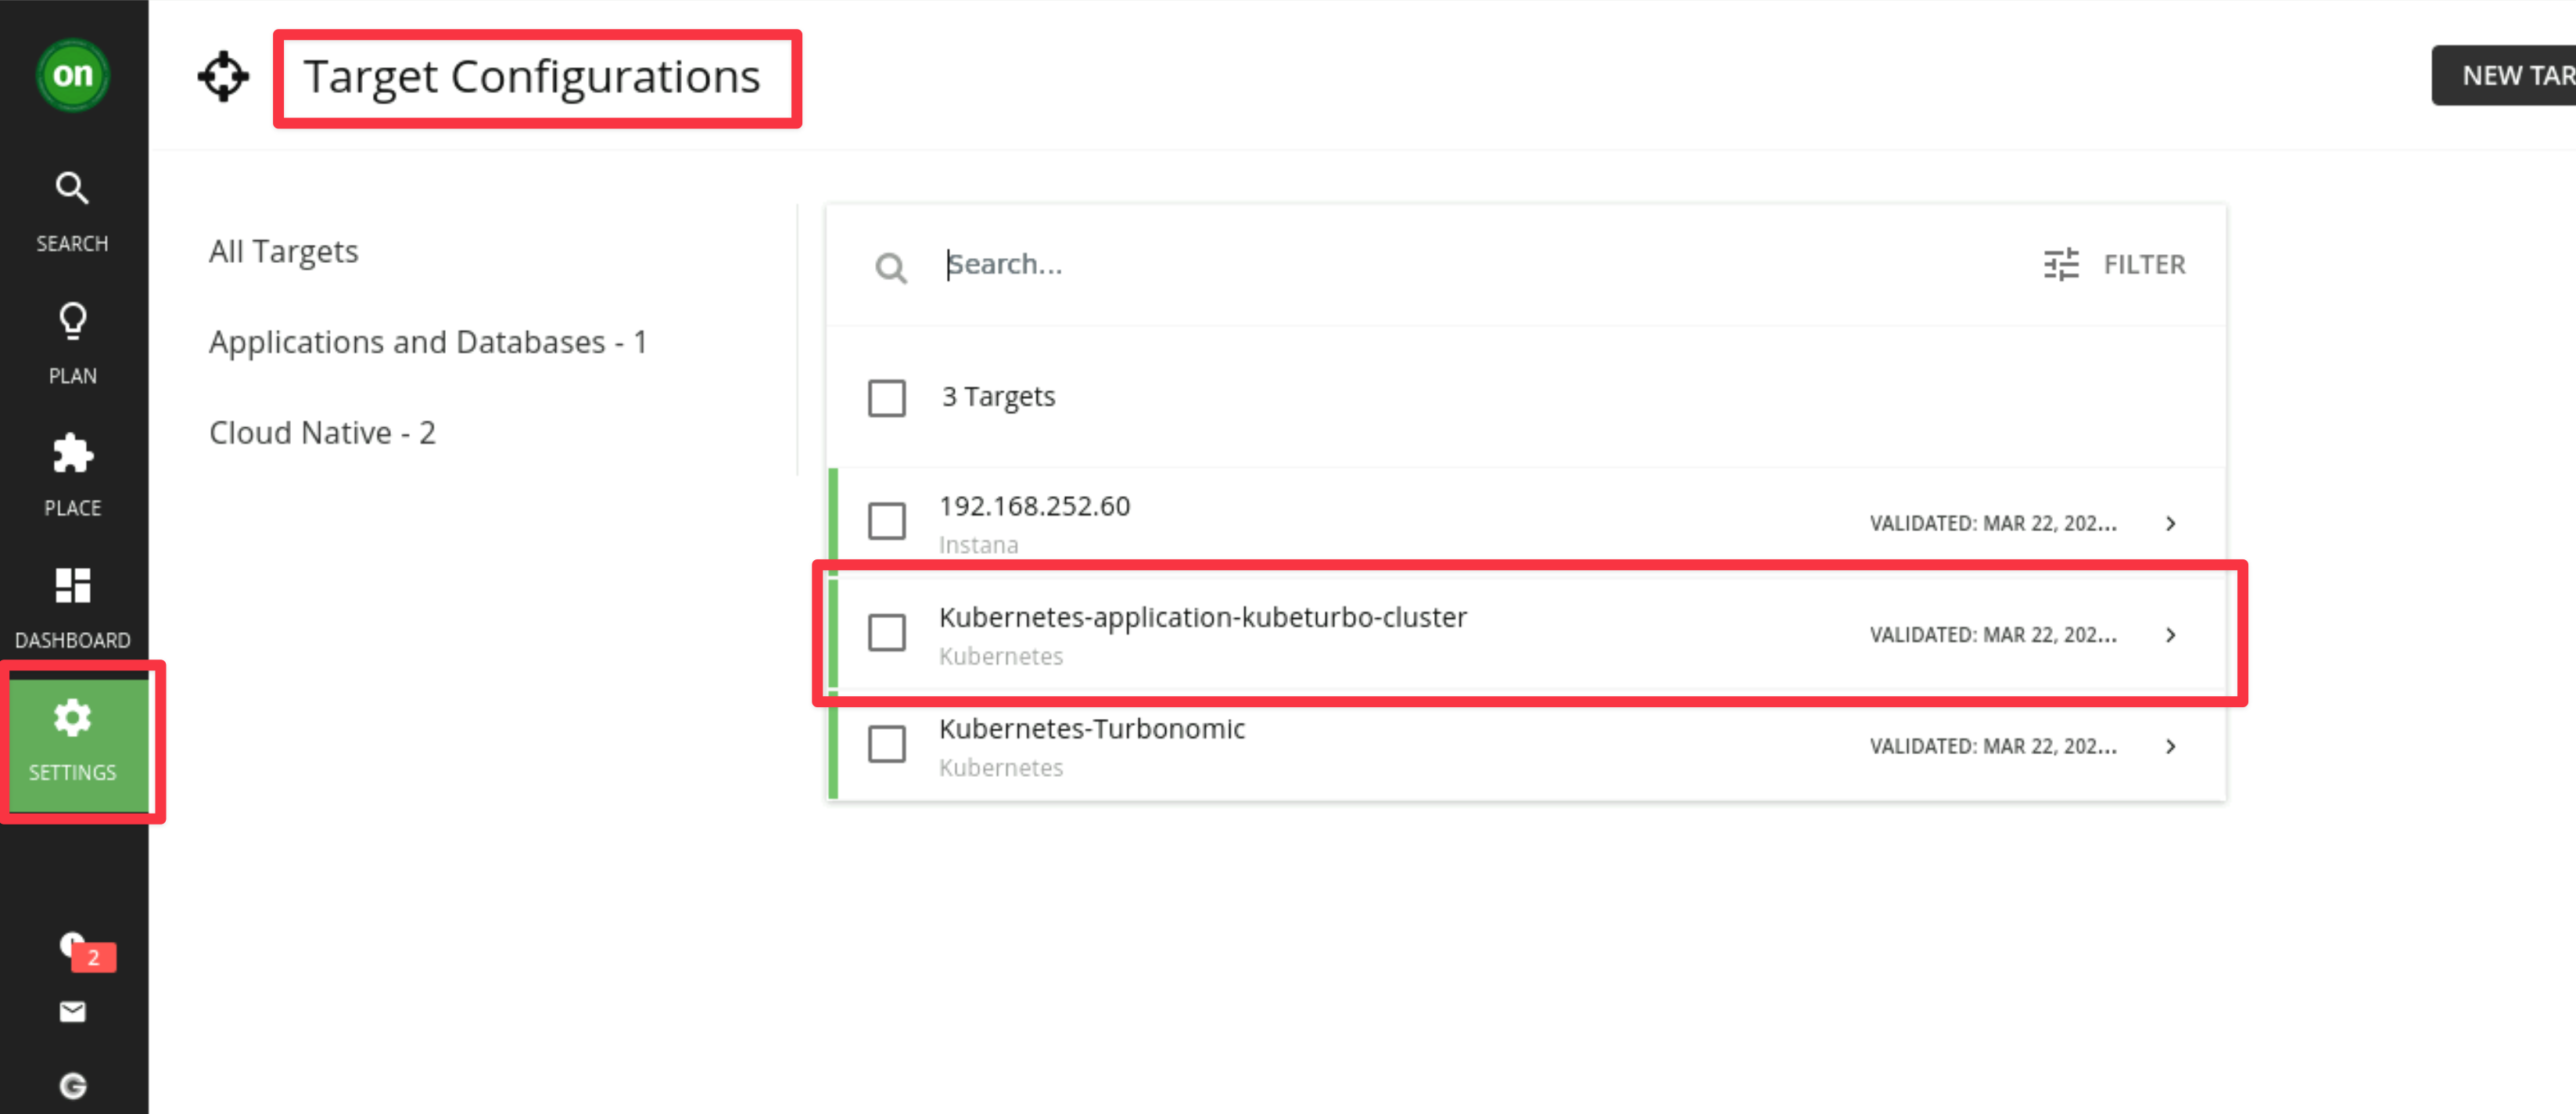
-
-
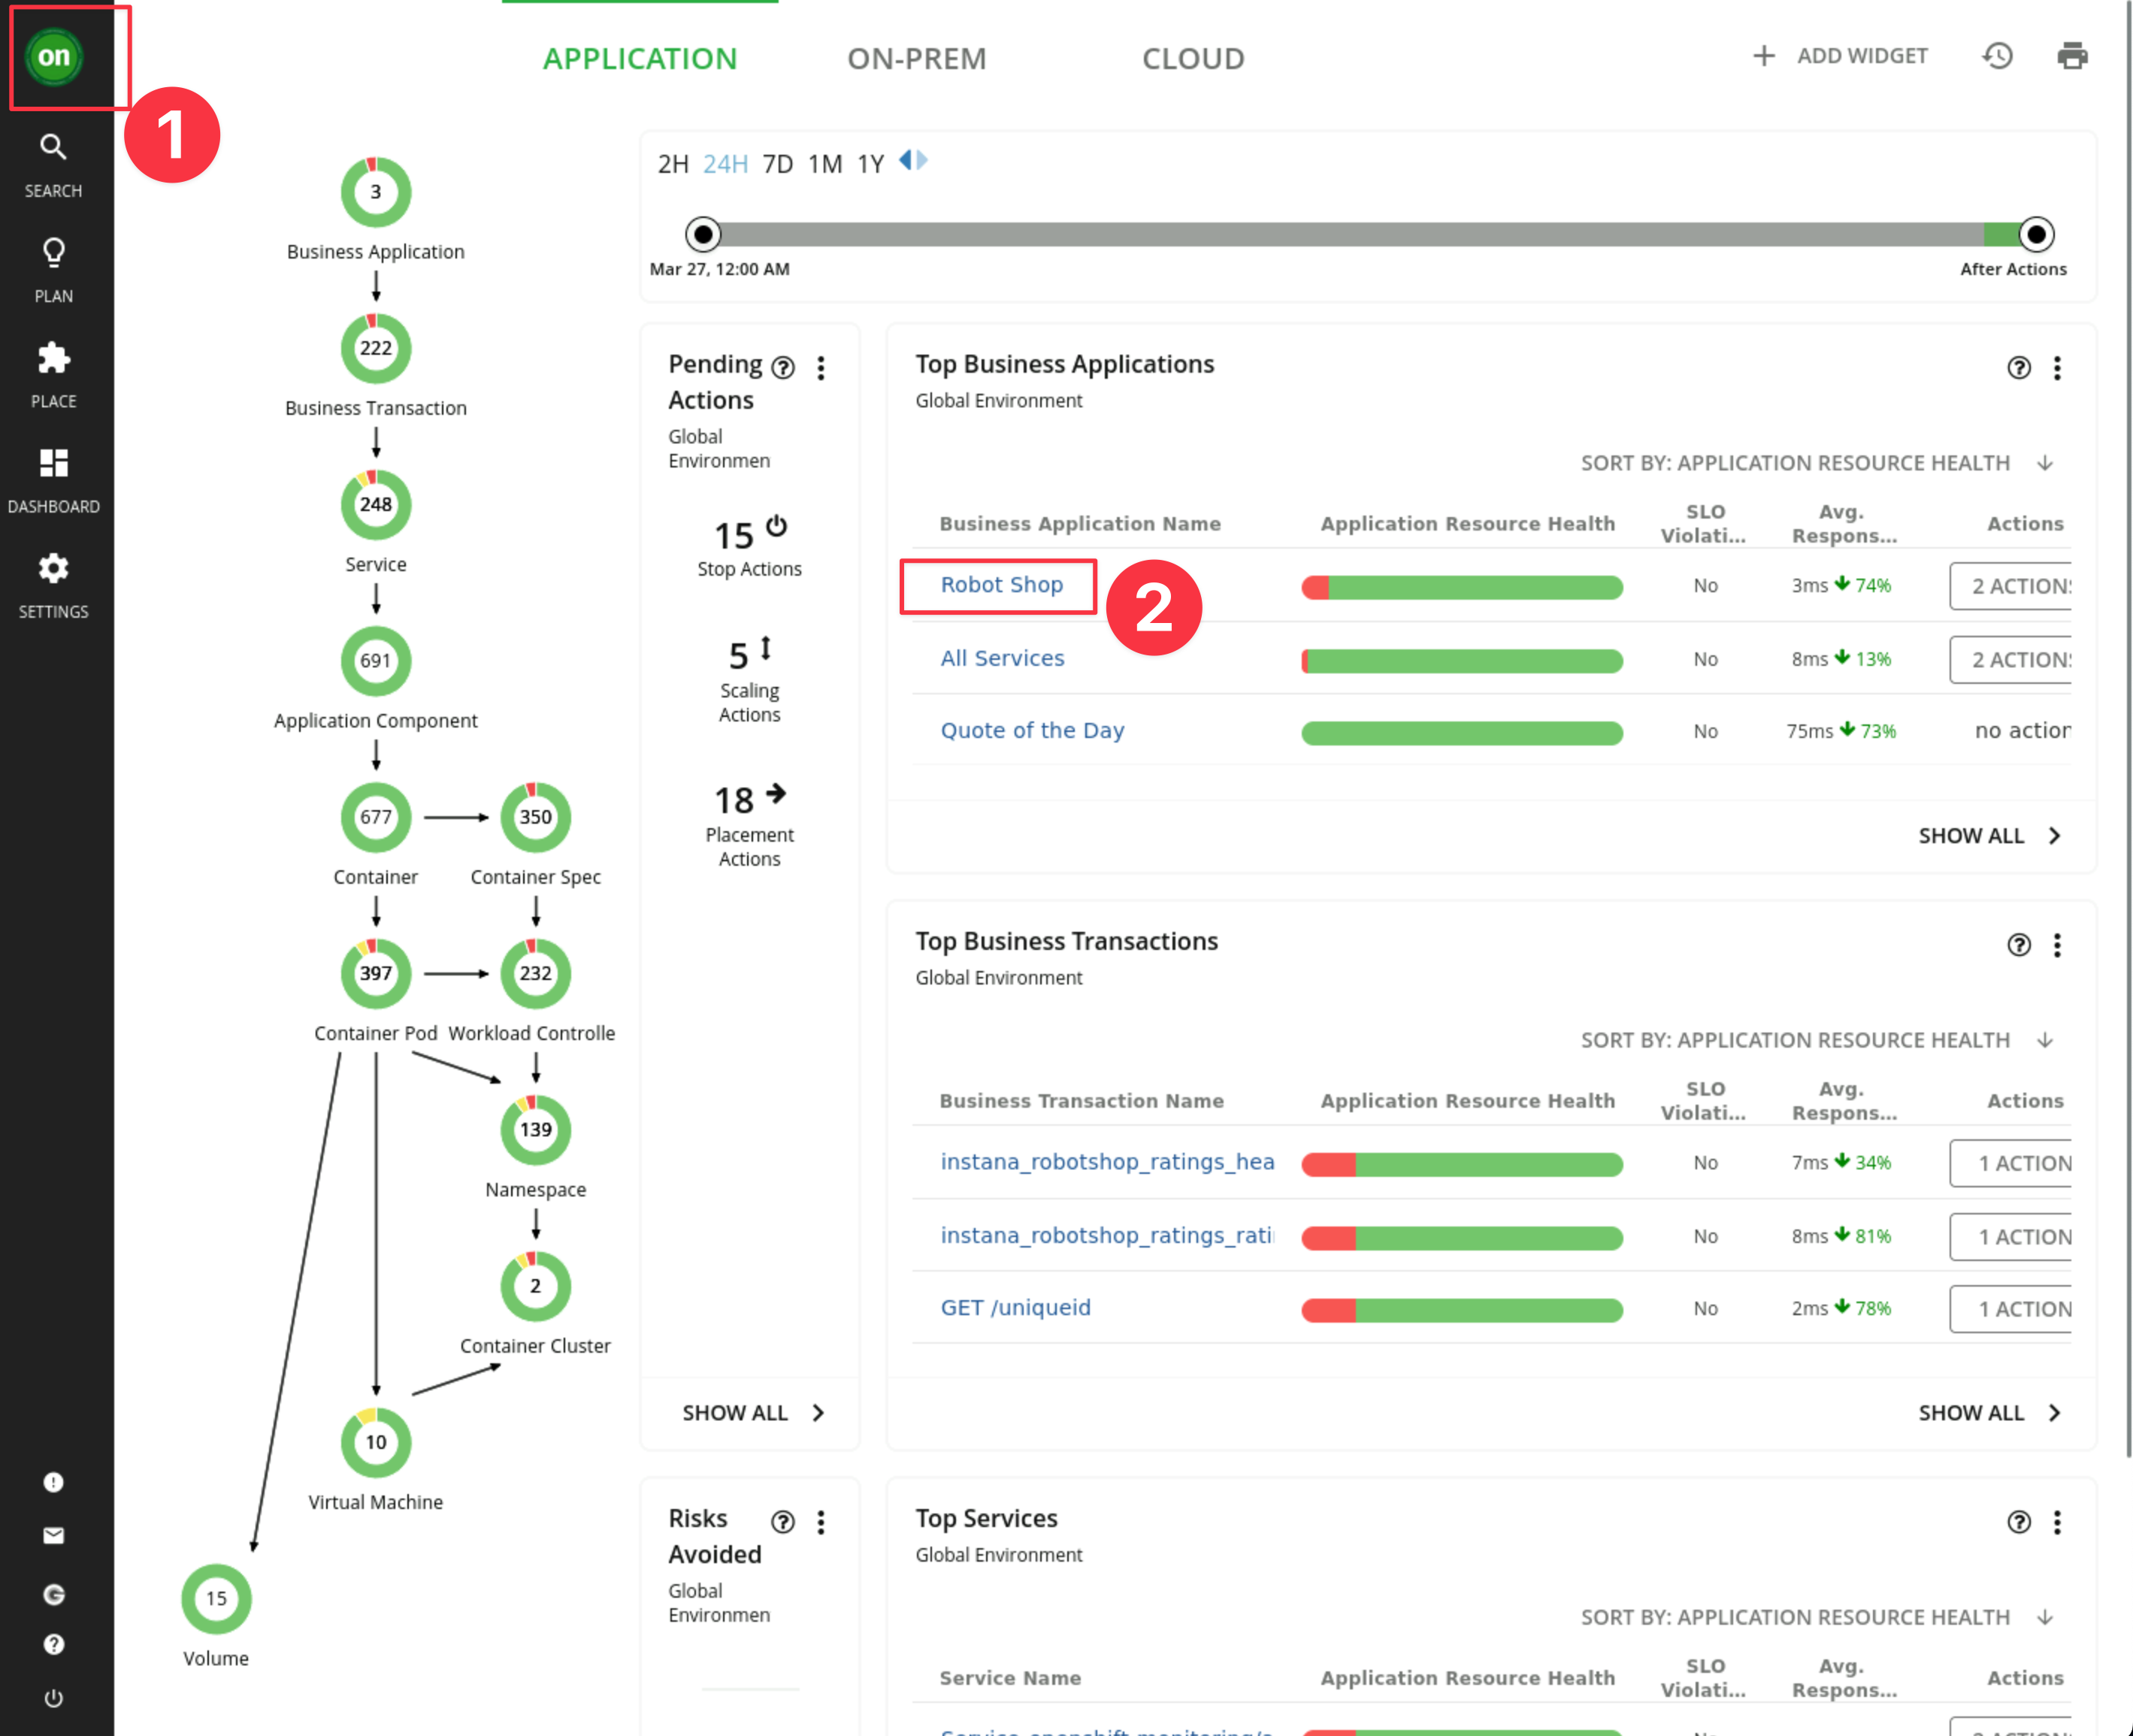
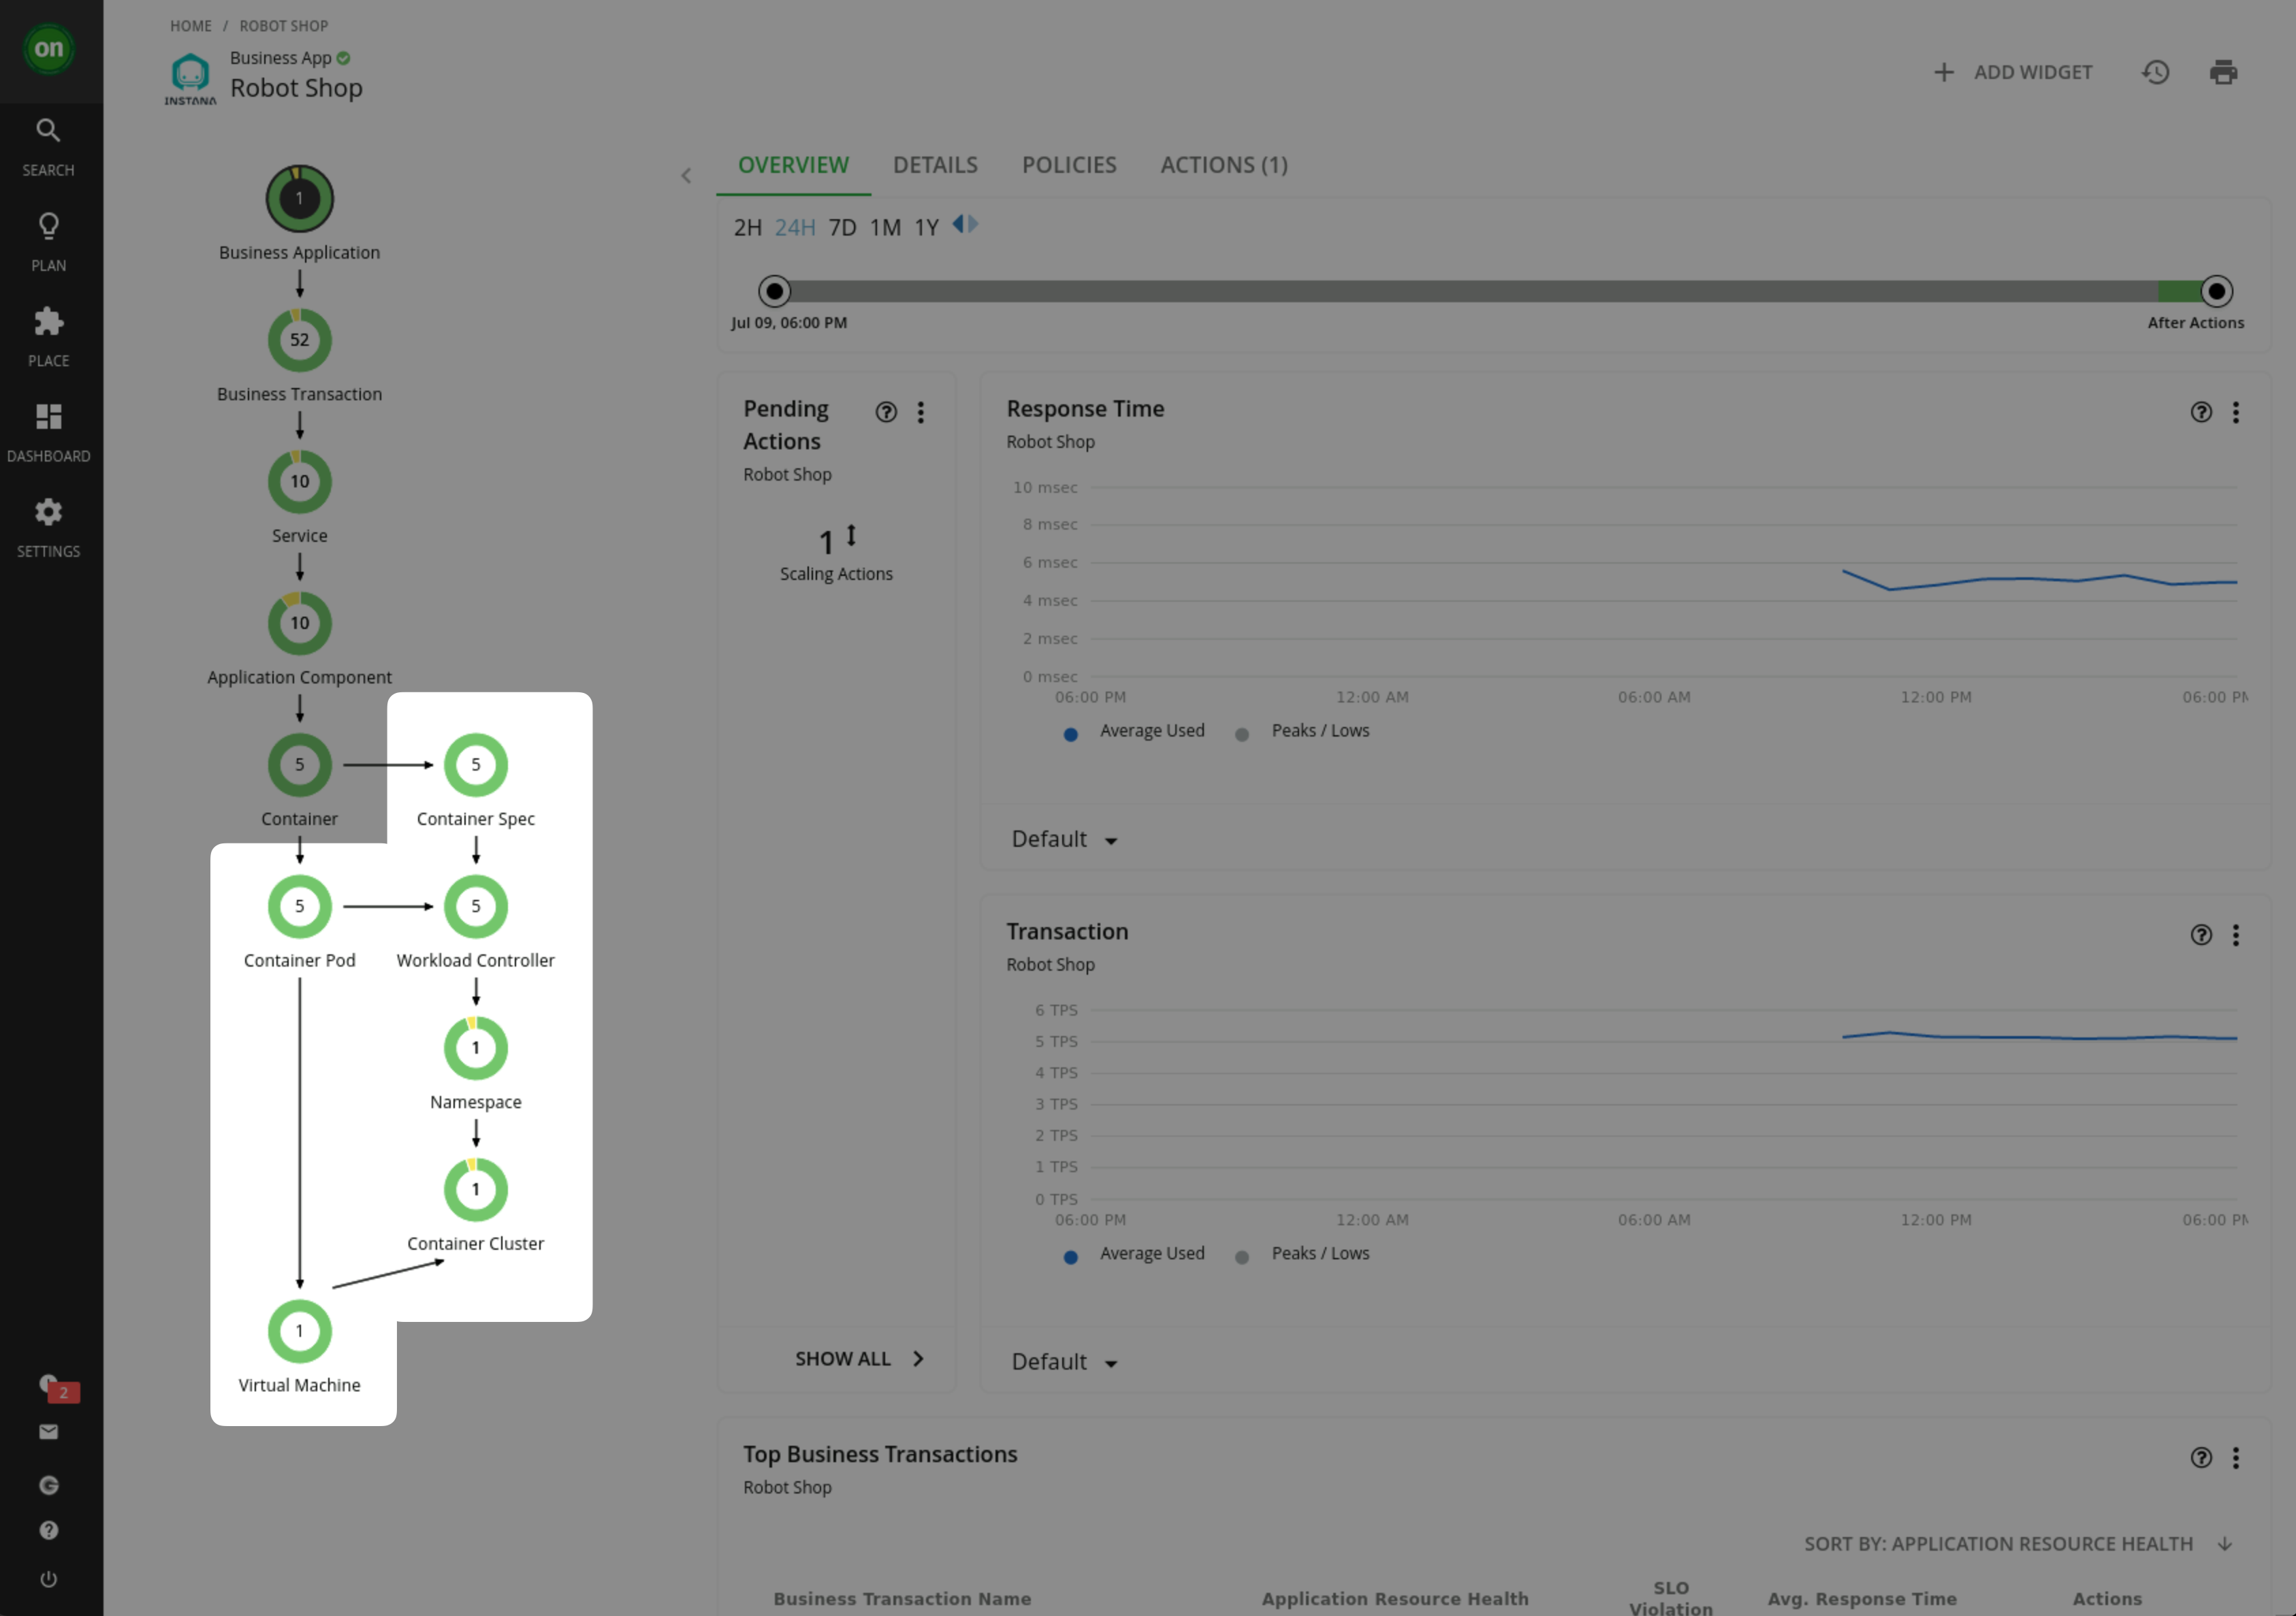
Finally validate that Kubeturbo is discovering additional entitites from the SNO Cluster VM and that the Robot Shop application has been stitched in correctly.
-
Navigate to the Robot Shop Business Application
-
Confirm the SNO Virtual Machine and other Kubernetes entities have now been discovered and stitched into the Turbonomic Supply Chain.
It could take a little while to populateIf you don't see it yet give the system some time to process. This can take approximately 10 - 15 minutes to show.
In the meantime you can read the Kubeturbo container logs to view the current status.
Notice Turbonomic is now using data from both Instana and Kubeturbo to populate the Robot-Shop supply chain.
-
4.6: Summary
In this lab you have learned how to install the KubeTurbo agent in an OpenShift cluster. You have confirmed it is running and understood the value of combining multiple data sources to get a complete picture of an applications architecture.
To learn more about how Turbonomic can use this data to make intelligent decisions about how to manage the resources of this application consider completing the Policies & Taking Actions lab.