IBM MAS Connector for Envizi
The IBM MAS Connector for Envizi is released under the name "MAS Connector for Envizi". This connector supports the following capabilities through an App Connect flow:
-Automatically synchronize Asset location and meter readings from MAS to Envizi to automate tracking of energy usage and calculating its related scope 1 and 2 emissions of Electricity, Natural Gas, and Water.
Use Case Examples
Corporate sustainability managers can gather and maintain accurate sustainability data for their portfolio of assets directly from Maximo where those assets are managed. Location data from Maximo serves as a baseline for all other Sustainability reports in Envizi; continuously updated meter readings data captured in Maximo (Electricity, Gas, Water) enables accurate GHG accounting and performance reporting in Envizi.
Connector Architecture
IBM App Connect provides a flexible environment for integration solutions to transform, enrich, route, and process business messages and data.
App Connect Flows enable specific integration use cases by connecting to predefined APIs to route and map data. Mapping has been pre-defined, but it can be customized.
Native API framework is used for Maximo and enabled thorugh provided packages that can be imported.
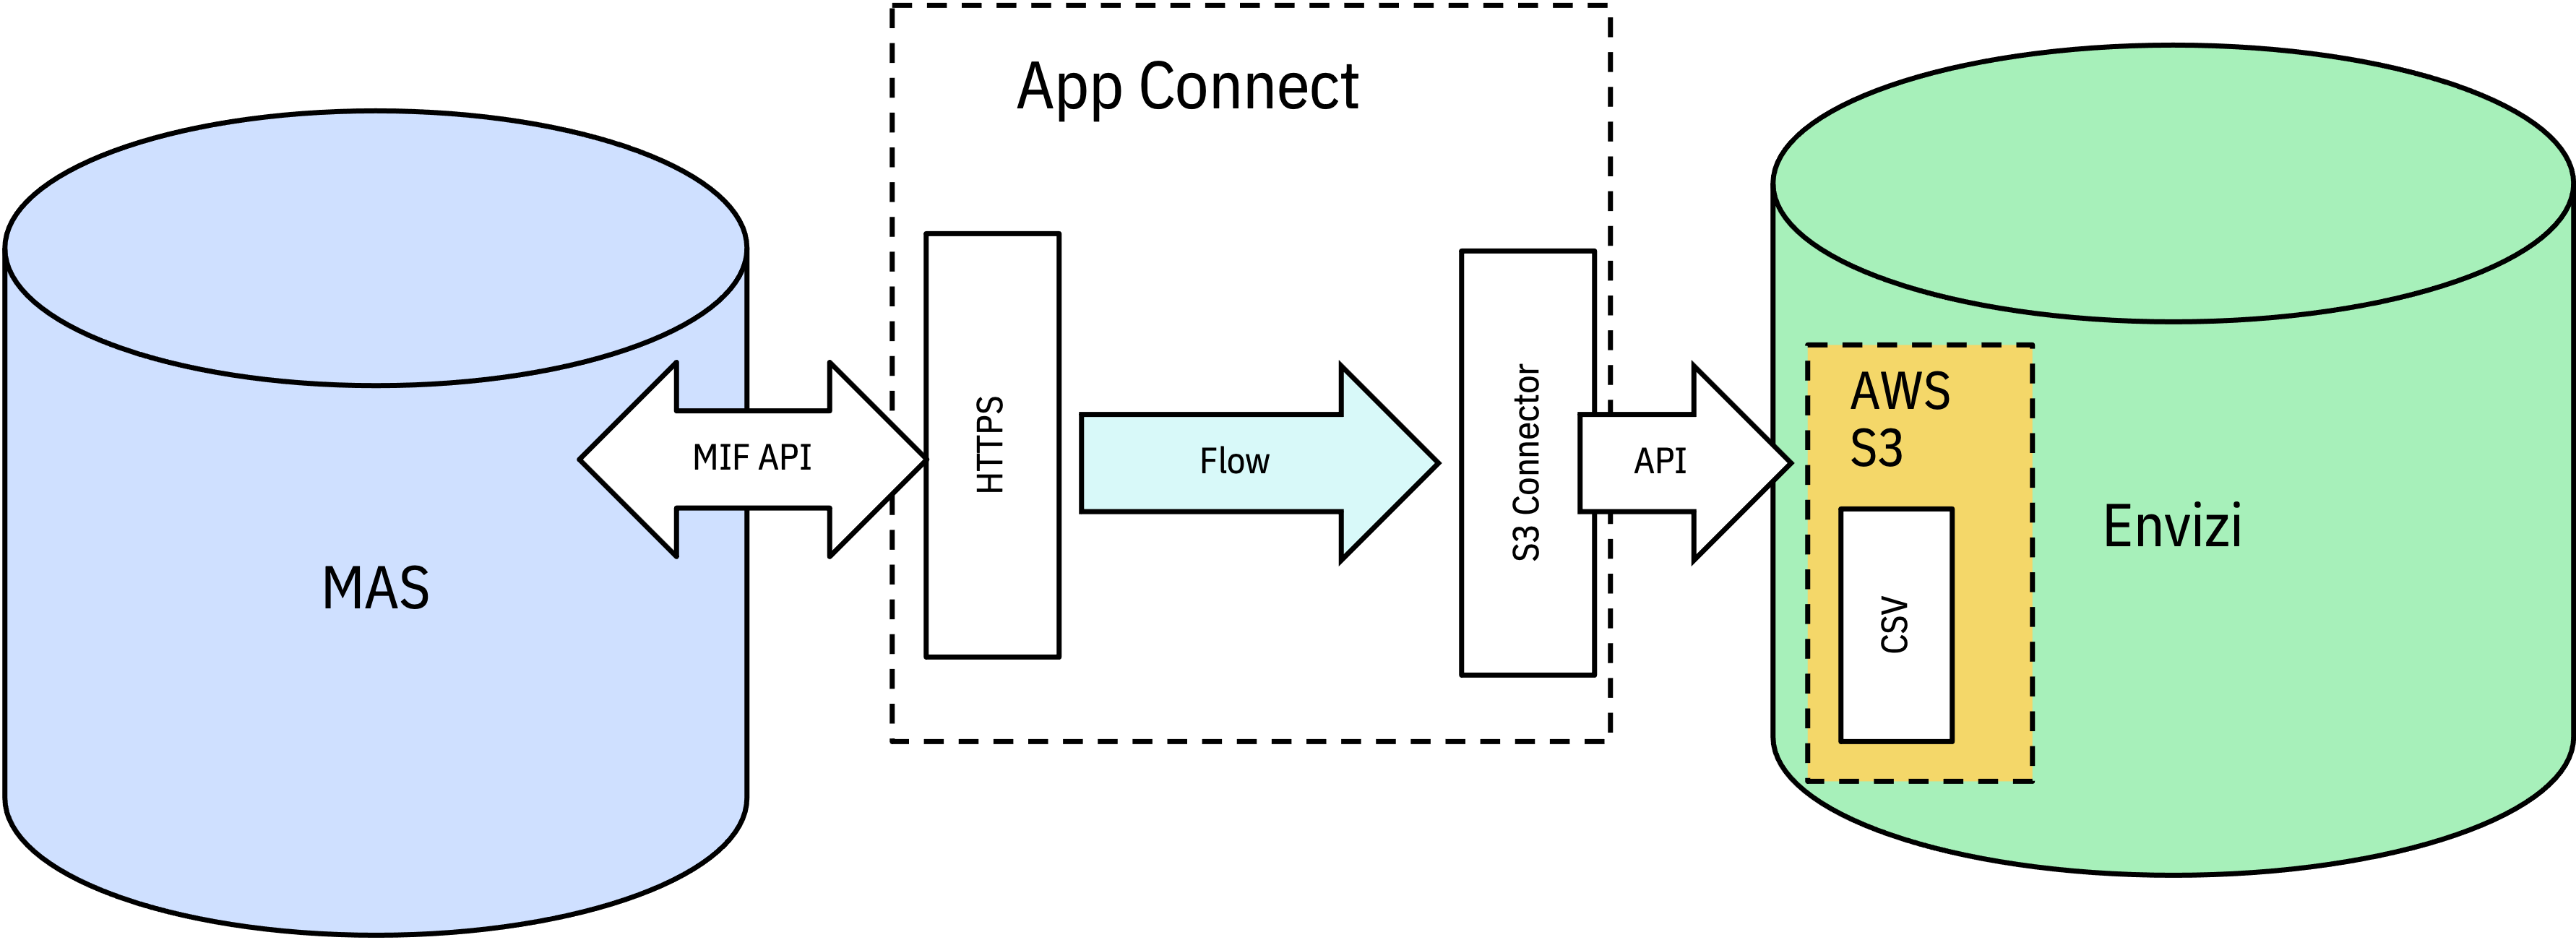
Maximo to Envizi Integration Diagram
Data Mapping
The image below illustrates the type of data that is being sent by the API and App Connect Flows.
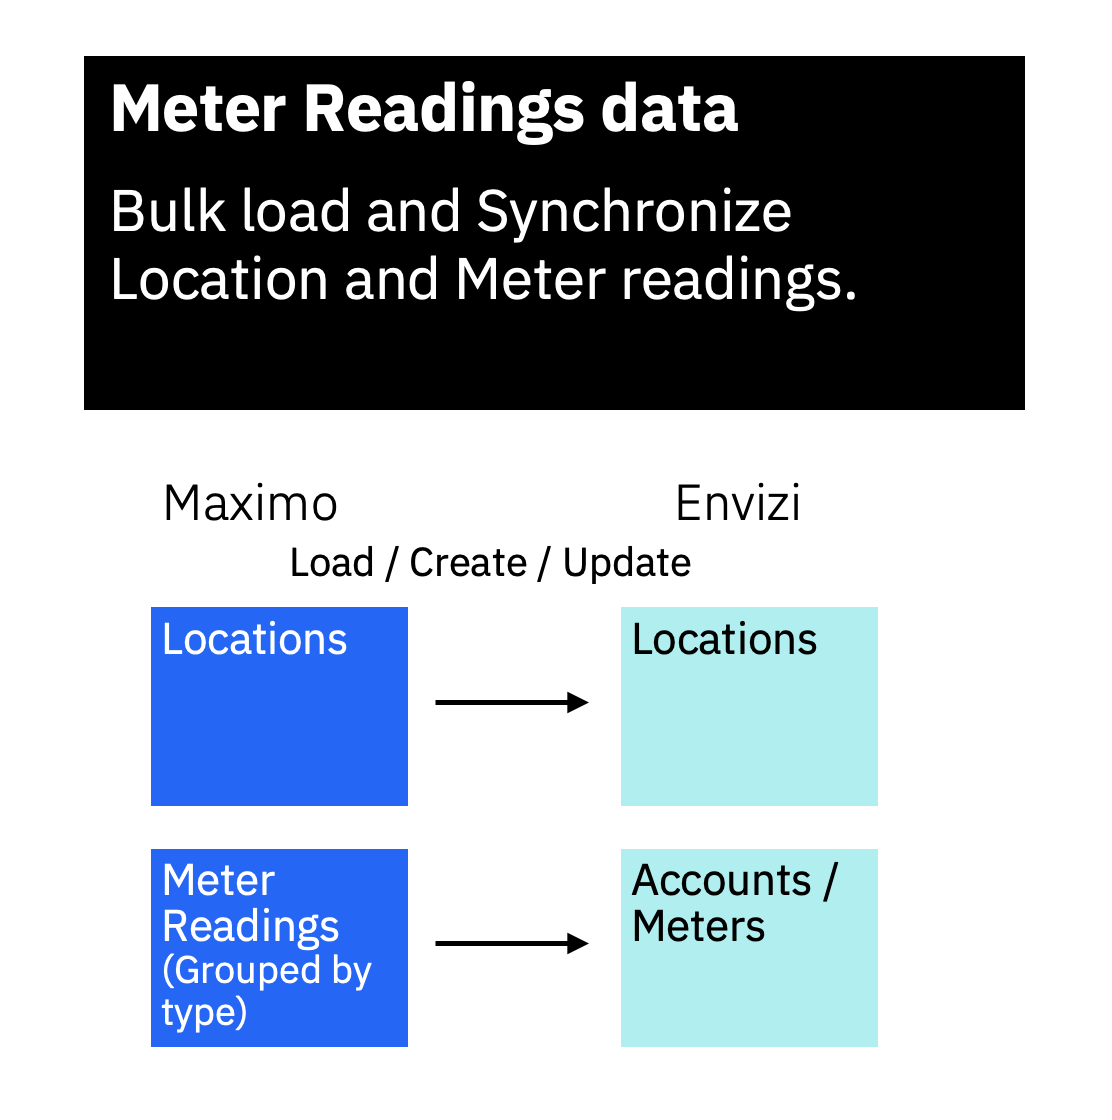
Maximo to Envizi Data Map
App Connect Flows
Included with this connector is a flow that exports locations and meter readings, along with all the required fields they contain. The table below shows the naming convention for this flow and the current integration use case.
| File | Flow | Destination | Operation |
|---|---|---|---|
| PLUSZMXTOS3_v1_1_0.yaml | Locations and Meter Reading | Max to Envizi | Bulk Load or Load Changes |
Installation & Configuration Guide
Before you begin you will need:
- An instance of App Connect Enterprise or App Connect Pro with the Designer component.
- Admin access to your Maximo instance with an api key generated for this integration.
- Envizi instance with a AWS S3 Bucket
- Import AppConnect Cert to Maximo to enable encrypted communication
- Check that meter data uses supported units of measure
Downloadable Resources
Download the zip file that has all of the flows and configuration files.
Installation Steps Overview
- Install Connector
- Configure App Connect
a. Import Flows into App Connect
b. Configure Flows - Configure Maximo
a. Upload Configuration File
b. Categorize existing meters into groups
c. Set up End Points
d. Configure Cron Task - Test
a. MAS outbound connectivity
Part 1. Install Connector
MAS 8.9
The MAS Connector to Envizi in Manage can be installed by using the proper customization .zip file provided from Passport Advantage. This .zip file will have all of the configurations necessary to complete step 4 in the Installation process. To apply this to the instance of Manage:
-
Head to the admin dashboard and click on Catalog and then Manage.
-
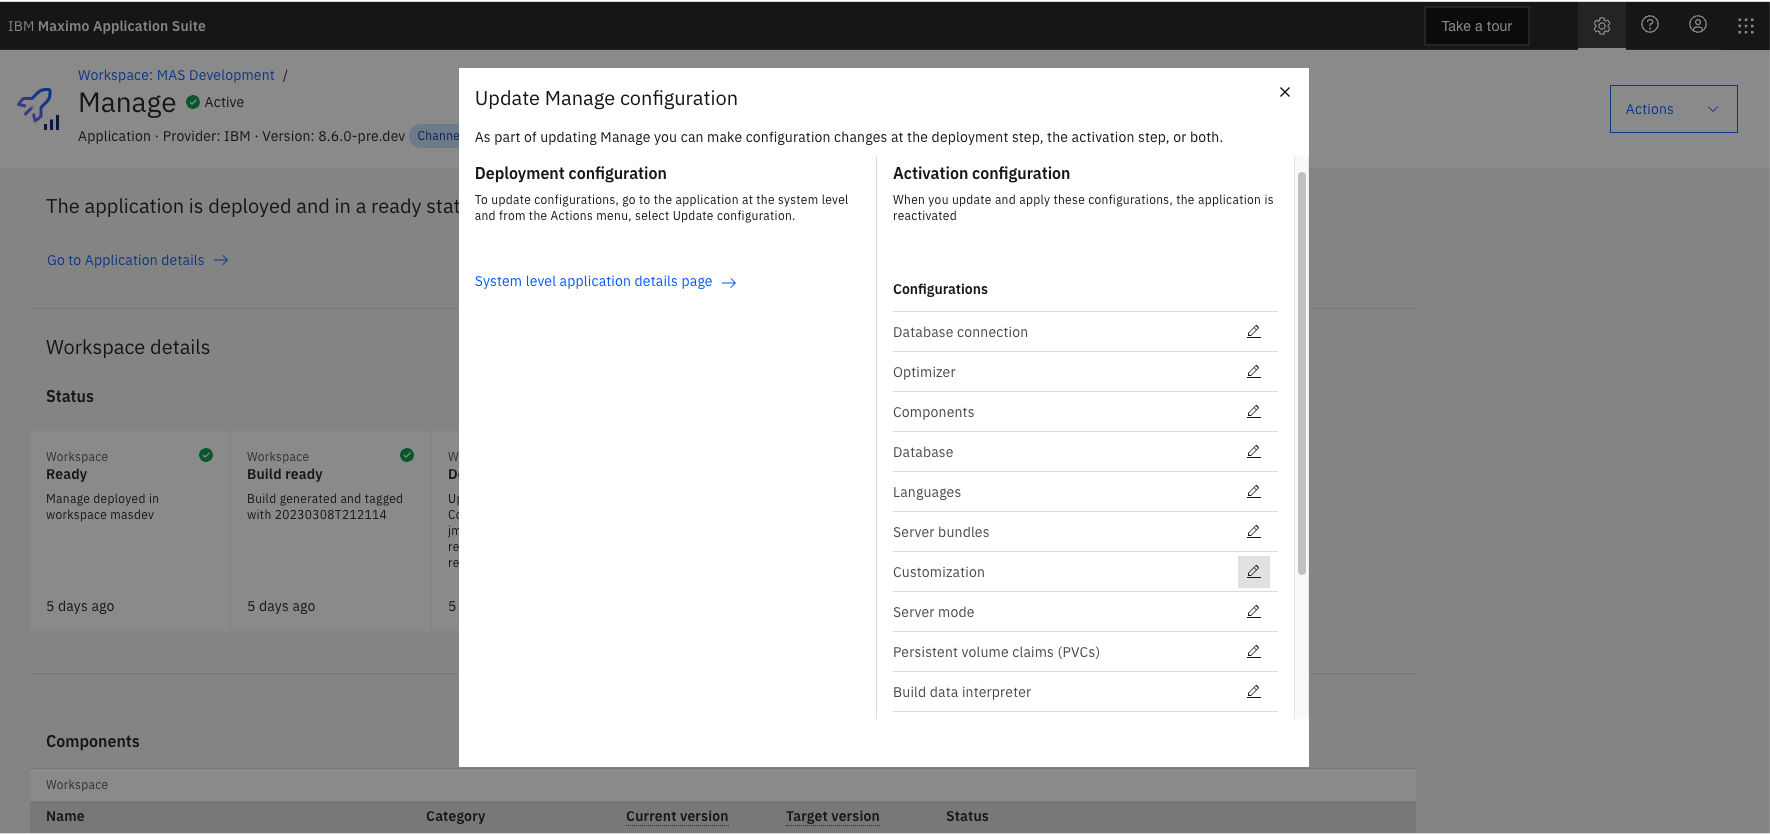
Click on View deployment details and then Go to workspace details page at the bottom of the Manage status page. At the top right corner of the page under Actions, select Update configuration. From the right side of the pop up under Configurations, select Customization.
-
Un-select the System managed button and add the File address for the file. Be sure to leave the Alias as the default value or else this process will not work properly. Once added, scroll to the top and click Apply Changes and Confirm on the next window.
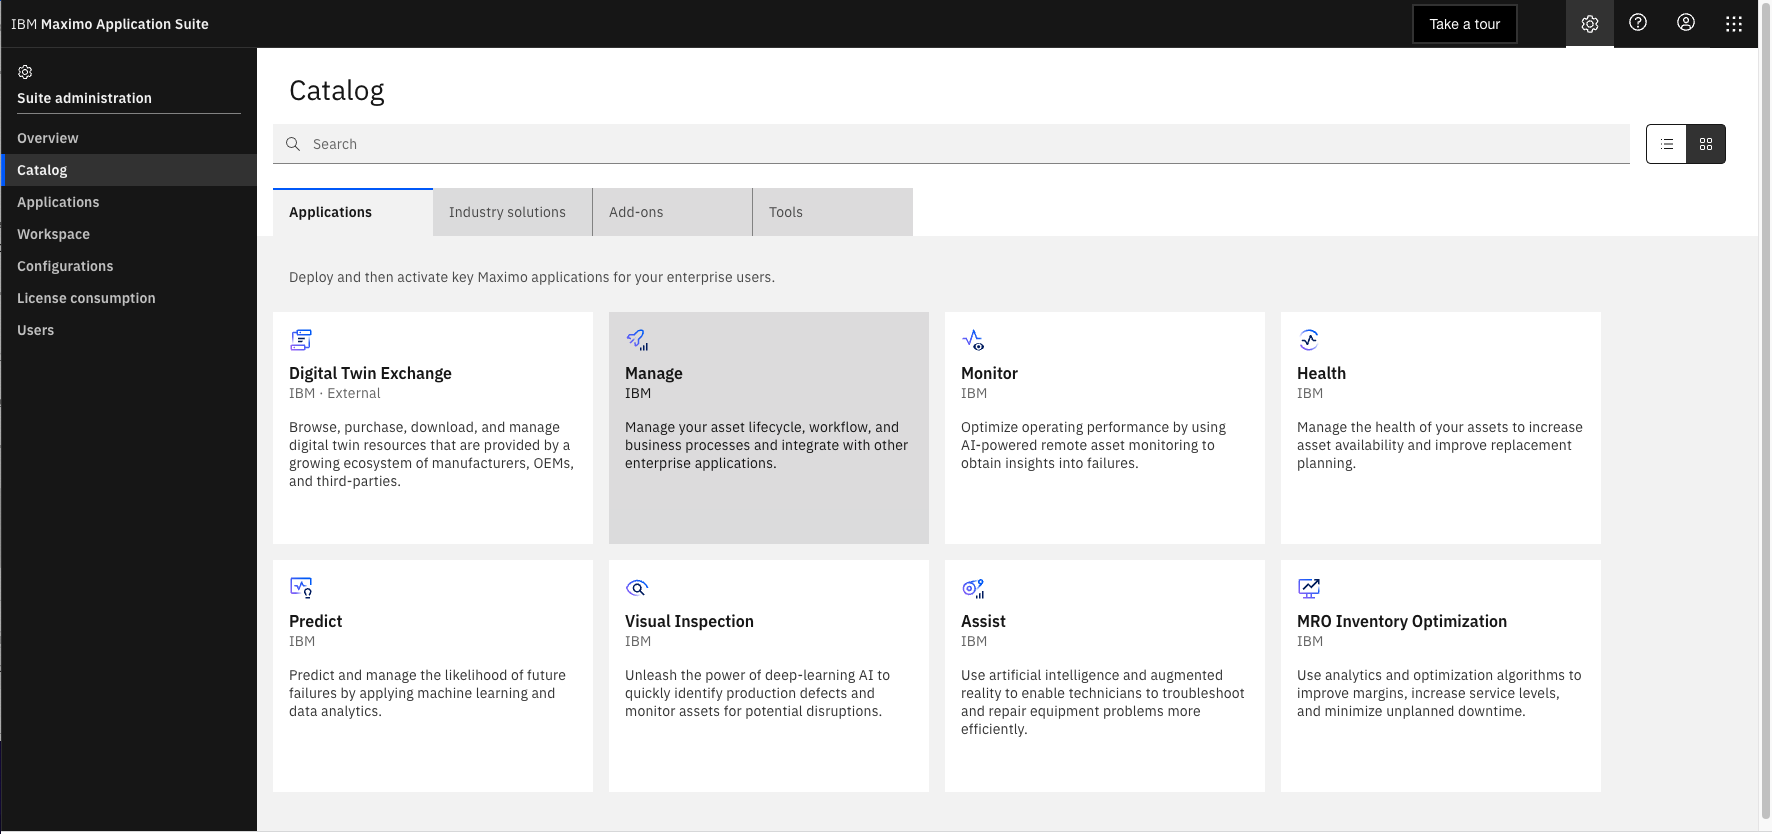 Step 1: Manage dashboard
 Step 2: Navigate to Configuration page
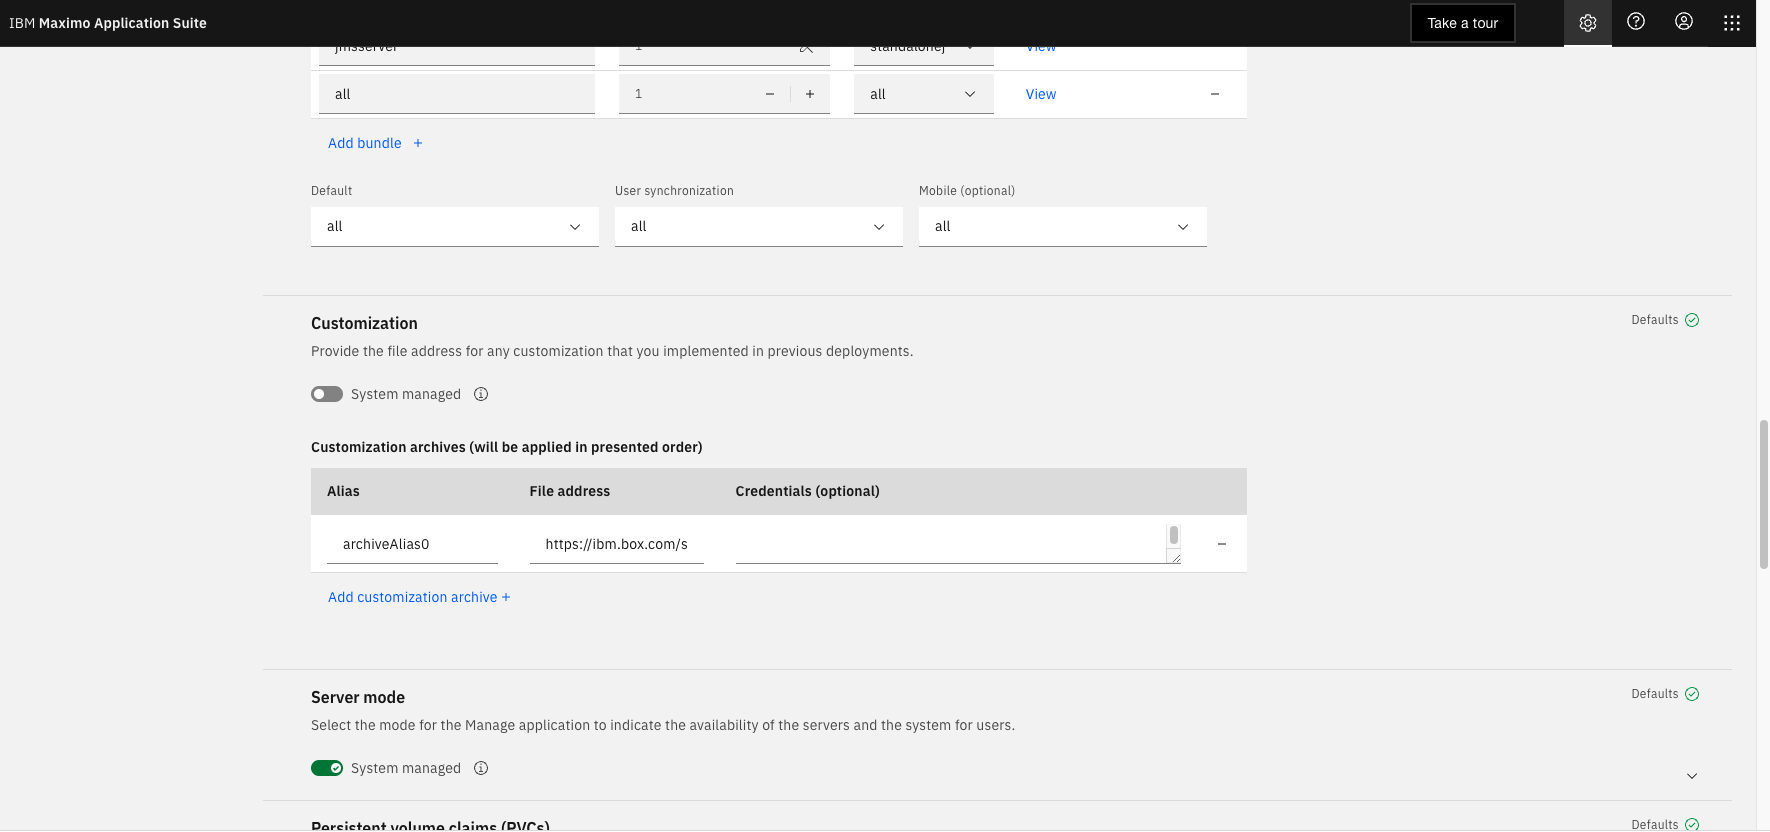 Step 3: Add Customization to Manage instance
The process can take anywhere between 20 minutes to 1-2 hours depending on the cluster resources. Monitor the logs in the created build pods in the Manage namespace in the OpenShift cluster to see the progress.
MAS 8.10
The MAS Connector to Envizi in Manage can be installed on the MAS administration dashboard through the tile.
-
Search for Envizi from the Catalog page and select the Envizi Connector tile.
-
On the tile page, click Configure and it will take you to the update configuration page. Select the latest version of the connector under the Components section and then click Apply Changes at the top of the page and Confirm on the next window.
 Step 1: Select Connector Tile
Step 2: Apply Changes for Connector
The process can take anywhere between 20 minutes to 1-2 hours depending on the cluster resources. Monitor the logs in the created build pods in the Manage namespace in the OpenShift cluster to see the progress.
Part 2: App Connect Configuration
Note: IBM App Connect Professional or Enterprise is needed to run this flow. The flows have been tested on IBM Cloud App Connect, AWS App Connect, as well as the containerized version of App Connect.
Note: The names in the screenshots are generic, other instances will not have the same names during setup.
Adding Accounts
Before importing the flow to App Connect, add Accounts for S3 and HTTP connectors.
-
Navigate to Catalog section of the AppConnect instance
-
In the Search application, type name of the connector to add the account for
-
If the AppConnect instance does not have an account for the connector, click on Connect to create a new account. Else, open the account selection drop down, and click on Add a new account ...
-
Enter the necessary details for the connector
a. For S3, it will be the S3 server and user account.
b. For HTTP, it will be the Authentication Key or username and password needed for Maximo. -
Click on Connect
-
From the account selection drop down, select the newly created account. e.g., The default name will be
Account 2if you already haveAccount 1 -
Click on the kebab menu (three dots) and select Rename Account
-
Enter an account name and click on Rename Account. This name can now be used by the connector in the flow.


Importing the flow
- Open the Dashboard of the AppConnect instance
-
Click on the New button and select Import Flow
-
Browse to the flow's YAML file and click on Import
-
The flow will now be imported and opened.


Configuring the flow to use the right accounts
When importing a flow, it is important to check if the flow is using the right accounts for the different connectors.
-
Click on Edit Flow
-
See if the connectors are using the right accounts.
-
To change the account for any connector, select the connector and click on the dropdown icon next to the Account's name
-
Select the account name that you want to use from the list


Authentication
On-prem based App Connect
If the instance of App Connect is on-prem, basic authentication will be used.
-
Click on Test.
-
Click on POST from the left hand side and then the Try It tab to get the username and password for the flow.
-
Use this authentication in the End Point section of the Maximo Configuration.


Cloud based App Connect
If the instance of App Connect is on cloud
-
Click on Manage.
-
Scroll to the bottom of the page. Click on Create API key and documentation link
-
Enter name for the API key and click on Create
-
Make a note of this key. Maximo End Point will be configured to send this API key as value for the
X-IBM-Client-Idheader while calling the AppConnect flow API. -
Open the API Documentation Link in another tab.
-
Click on the Route to see the URL
-
Copy the link show in details tab next to the HTTP Method


It is helpful to use a tool like Postman to test this API prior to testing it for the first time from Maximo.
Part 3: Maximo Configuration
Deploying Maximo Build
Within Maximo, the integration provides integration components (via .dbc script files) and Java Classes as part of the solution. These components need to be installed in the customer's Maximo environment. Components and other content created for this integration solution will be identified by names that begin with PLUSZ.
Maximo 7.6.1.2+
-
On the Maximo Admin workstation, overlay the Maximo SMP directory (
/opt/IBM/SMP/maximo) with the contents from the solution zip file that is provided. This will lay down the Java Classes and .dbc files provided with the solution. -
Shutdown the MXServer
-
Run UpdateDB command to install the solution components
a. Navigate to/opt/IBM/SMP/maximo/tools/maximo
b. Run./updatedb.sh -
Build the Maximo EAR file
a. Navigate to/opt/IBM/SMP/maximo/deployment
b. Run./buildmaximoear.sh -
Deploy the new Maximo EAR File on all Maximo servers
a. In WebSphere console, navigate to Applications->Application types->Websphere enterprise applications
b. Select MAXIMO and then hit Update button
c. Select Browse and select the EAR file from Step 4
d. Hit Next and accept defaults from all pages
e. After deployment, click on Save -
Start the applications and MXServer
MAS 8.8+
- Navigate to the Admin dashboard of the instance of Manage within MAS.
- Select the workspace the instance is deployed on and update the configuration.
- Scroll down to Customization and link to the location of the .zip file in the field (Additional details on setting customizations)
- Click Apply Changes and Manage will update the instance with the customization.
Configuring Artifacts
Meter Groups
Make sure all the Meters that need to sync with Envizi are in the right meter groups:
| Meter Group | Meters |
|---|---|
PLUSZ_ELEC |
Electric Meters |
PLUSZ_GAS |
Natural Gas Meters |
PLUSZ_WTR |
Water Meters |
End Points
-
In the Maximo menu, click on Integration -> End Points
End Point Navigation
-
Under the End Point column, type PLUSZ and hit Enter to search.
End Point Search
-
Click on the PLUSZEXPORT End Point and configure the parameters required to execute the App Connect flow. Click on Save End Point on the left side once finished.
| Field | Value |
|---|---|
| URL | Full URL to the flow's API as show in App Connect API Documentation Link |
| HEADERS | Replace the YourAPIKeyHere with the App Connect flow's API Key. Do not remove ,Content-Type:application/json |
| HTTPMETHOD | Do not change the default value POST |

End Point Configuration Page
Cron Tasks
The integration is equipped to export Locations and Location Meter Readings out of Maximo. As part of the PLUSZEXPORT cron task, there are four individual cron tasks that are configurable- two for Locations and two for Meter Readings. These are the Always-on Cron Task and the On-Demand Cron Task.
Always-on Cron Task
This is for pulling the live or recent data from Locations and Meter Readings, and is supposed to be run frequently. This will pull the data that has come into the system after the last time it ran.
Based on its running frequency, the system will automatically decide the window of dates/timestamps to pull the data from.
These Cron Task Instances will use the suffix _ALWAYS_ON

On-demand Cron Task
Even though this is a Cron Task, this is supposed to run just once, on-demand, when the user wants to pull data between fixed dates/timestamps. Once the first cron event executes, it should be stopped in order to prevent the same data getting pulled again and again.
This is a stop-gap for now as we dont have another way from Maximo to call a preconfigured API on-demand.
This might be needed during initial setup of the system, as the Always-on Cron will start pulling data that has arrived after it has been started. This can also be used anytime in the future if there is any need to pull any historical data on-demand.
The start date (OVERRIDESTARTDATE) and end date (OVERRIDEENDDATE) have to be configured before the cron is started.
These Cron Task Instances will use the suffix ON_DEMAND

Basic Cron Task Parameters
-
MXURL: The base URL of the Maximo instance. This would include the protocol, domain name and the port number. Do not put a trailing/at the end. In the absense of port number, the default port for the protocol will be used (80 for http, 443 for https).- e.g. http://example.maximo.com:9080
- For MAS deployments, this route should be to the Manage instance domain. You can find this route in OpenShift under Networking -> Routes within the Manage namespace. The route should have the format "workspace".manage."instanceid"
-
CUSTOMER: Name of the customer. This will be used to name the CSV files. To be supplied by Envizi. -
OVERRIDESTARTDATE: (Only for On-demand Cron) The start timestamp of the window between which the data will be pulled from.- The date must be specified in ISO 8601 format.
- e.g.
2022-06-26T23:09:30-07:00where-07:00represents timezone offset of UTC-07:00 hours
OVERRIDEENDDATE: (Only for On-demand Cron) The end timestamp of the window between which the data will be pulled from.- The date must be specified in ISO 8601 format.
- e.g.
2022-06-26T23:09:30-07:00where-07:00represents timezone offset of UTC-07:00 hours
Advanced Parameters
These will be set to the right values by default. DO NOT change these parameters without consulting with Envizi.
SELECT: Names of the fields from the Object StructureFROM: Name of the Object StructureWHERE: (Optional). OSLC Condition for data selectionORDERBY: (Optional). Sequence by which the data should be pulledTARGETDATECOLUMN: Name of the DateTime Column in the Object structure that will be used to filter records between a date-time window.SAVEDQUERYENDPOINTNAME- Name of the Maximo End Point configured to connect to the AppConnect flow.PAGESIZE- Maximum number of records pulled from Maximo in one API call. This will also be the maximum number of records in the CSV file.
Configuring Cron Task
-
In the Maximo menu, click on System Configuration > Platform Configuration > Cron Task Setup
-
Under the Cron Task column, type PLUSZ and hit enter to search
-
Click on the PLUSZEXPORT Cron Task
- In the Cron Task Instances, click on the Schedule/Calendar icon to set the schedule for the Cron Task Instance
- Once it is configured, click on OK
- Select the Cron Task Instance to configure Parameters
- Scroll down to the Cron Task Parameters section and configure the Value column as needed. Ideally, only the
CUSTOMERandMXURLparameters will need to be edited for all instances. For the On-demand Crons, theOVERRIDESTARTDATEandOVERRIDEENDDATEparameters will need to be edited. - Click on Save


Operating the connector
Start/Stop the Cron Task Instance
- Navigate inside the desired Cron Task.
- Enable/Disable the checkbox in the column Active? in front of the desired Cron Task Instance
- Click on Save
Starting and Stopping the flow
-
If using AppConnect Dashboard, Click on the kebab menu (three dots) on the flow's tile.
-
If inside the flow, Click on the kebab menu (three dots) on top right of the screen.
-
Click on Start API or Stop API depending on what action you want to perform.


Part 3: Testing
To test that the configuration is complete, send a test payload in order to test connectivity.
- Go to the End Points application and click Test at the bottom of the PLUSZExport end point.
- Send a test payload that is a valid object.
{"Hello":"World"}would work. - If the response is anything other than Bad Request, see what might be causing the error
Troubleshooting
When testing that the end point is entered correctly on the End Points application, there are a few common errors:
| Error | Cause | Resolution |
|---|---|---|
| Response code received from the HTTP request from the endpoint is not successful | Invalid URL in the Integration Object | Double check the URL that all of the components are entered correctly. Make sure there are no accidental spaces at the beginning or the end in event of a copy/paste. |
| 404: Not Found | Flow is not Running | Make sure the flow is Running before starting the cron tasks |
| PKSync error | Certificate error | Confirm the certificate is configured correctly |
| Unable to Verify Leaf Signature | Certificate Error | Confirm the HTTP account is set with "Allow Self-Signed Certificates" as True. |
| Status Code 400: BMXAA8744E - The OSLC query was not parsed. | Incorrect character in cron task parameter field, such as a decimal point in Page Size | Check the parameters in the cron task. |
| “Cannot GET /maximo/api/os/PLUSZLOCATIONS” | MXUrl is not valid | Verify the MXURL parameter in Cron task that it is pointing to the correct url. |
Reference for Pre-requisite
Pre-requisite: Pre-check that Data is correct
Data for Location Meter will not be exported to Envizi if the Unit of Measurement is not configured.
The current integration with Envizi only supports the following Units of Measurement for the Location Meter data:
| Meter Type | Supported Unit of Measure |
|---|---|
| Electric | GJ, kWh, MWh |
| Natural Gas | GJ, MJ, kWh, m3, mmbtu, therms |
| Water | litres, kliter, m3, gallons |
If these Units of Measure are not present on the instance of Maximo, they can be added in the Item Master application under Inventory on the drop down menu.
Select Unit of Measure and Conversion -> Add/Modify Units of Measure and add the missing units.


A Service Address must be configured in Location with the following fields for proper functioning of Envizi's features:
- Street Address
- City
- State
- Post Code
- Country
- Latitude
- Longitude
If the Location does not have a Service Address, navigate to Address Information under the Location and either select or create an associated Service Address.

If one needs to be created, navigate to Administration -> Service Address and click New Service Address and enter the required fields. Then return to the desired location and associate the Service Address in Address Information.


Pre-requisite: add an App Connect Certificate in MAS 8.9+
-
Extract the App Connect certificate from an imported flow URL. Navigate to the flow's page and click on Test and then Try It to get the proper URL.
-
Navigate to the Admin dashboard for MAS and go to the workspace where Manage is deployed.
-
Update the configuration and scroll down to Imported Certificates. Untick the System managed button and fill in the extracted certificate in the fields.
-
Click Apply Changes at the top of the page and MAS will update the truststore with the new certificate.

Step 2: Manage Workspace

Step 3: Imported Certificates
Pre-requisite: add an App Connect Certificate in Maximo 7.6.1.2+:
Configure WebSphere Certificates. This makes a test connection to a Secure Sockets Layer (SSL) port and retrieves the signer from the server during the handshake.
-
Log into the WebSphere console that is hosting the Maximo server.
-
Click on Security -> SSL certificate & key management. Under Related Items click on Key stores and certificates.
-
Click on CellDefaultTrustStore and on the next page under Additional Properties click on Signer certificates.
-
From this page, click on the button that says Retrieve from Port and fill in the required fields using the table below:
Field Value Host The host from the imported flow URL Port 443 Alias appconnect -
Once all three have been entered in, click Retrieve signer information and the information from the URL will populate on screen. Click Save in the box at the top and then repeat the process for NodeDefaultTrustStore.

Step 2: WebSphere Homepage

Step 3: Websphere Keystores

Step 4: Websphere Signer Certs