Lab 3 (Optional) - Understanding the Java Implementation
Note: If you want to examine the java developer task you can do that lab, if not, just directly jump into lab 4 - Deploying to OpenShift.
Understanding the Java implementation: lab video (9:09 mins)
Additional information: ‘create one Mircroservice with Java, OpenLiberty and MicroProfile’: video (18 mins)
1. Usage of Maven for Java
We begin with the Maven part for our Java project.
Maven Apache Maven is a software project management and comprehension tool. Based on the concept of a project object model (POM), Maven can manage a project’s build, reporting and documentation from a central piece of information.
In the pom file we define the configuration of our Java project with dependencies, build, and properties including the compiler information as you can see in the pom file below.
<project xmlns="http://maven.apache.org/POM/4.0.0"
	xmlns:xsi="http://www.w3.org/2001/XMLSchema-instance"
	xsi:schemaLocation="http://maven.apache.org/POM/4.0.0 http://maven.apache.org/xsd/maven-4.0.0.xsd">
	<modelVersion>4.0.0</modelVersion>
	<groupId>com.ibm.cloud</groupId>
	<artifactId>authors</artifactId>
	<version>1.0-SNAPSHOT</version>
	<packaging>war</packaging>

	<dependencies>
		<dependency>
			<groupId>javax</groupId>
			<artifactId>javaee-api</artifactId>
			<version>8.0</version>
			<scope>provided</scope>
		</dependency>
		<dependency>
			<groupId>org.eclipse.microprofile</groupId>
			<artifactId>microprofile</artifactId>
			<version>2.1</version>
			<scope>provided</scope>
			<type>pom</type>
		</dependency>
	</dependencies>

	<build>
		<finalName>authors</finalName>
	</build>

	<properties>
		<maven.compiler.source>1.8</maven.compiler.source>
		<maven.compiler.target>1.8</maven.compiler.target>
		<failOnMissingWebXml>false</failOnMissingWebXml>
		<project.build.sourceEncoding>UTF-8</project.build.sourceEncoding>
	</properties>
</project>
2. Configuration the Open Liberty Server
Our Authors microservice will run on an OpenLiberty Server in a container on Kubernetes.
We need to configure the OpenLiberty server with a server.xml file. For our Java implementation we decided to use MicroProfile and within the feature definition in the server.xml we provide this information to our server with the entries webProfile-8.0 and microProfile-2.1.
The server must be reached in the network. Therefore we define the httpEndpoint including httpPort we use for our microservice. For configuration details take a look into the openliberty documentation.
IMPORTANT: We should remember that this port (httpPort="3000") must be exposed in the Dockerfile for our container and mapped inside the Kubernetes deployment configuration.
Also the name of the executable web application is definied in the server.xml.
<?xml version="1.0" encoding="UTF-8"?>
<server description="OpenLiberty Server">

    <featureManager>
        <feature>webProfile-8.0</feature>
        <feature>microProfile-2.1</feature>
    </featureManager>

    <httpEndpoint id="defaultHttpEndpoint" host="*" httpPort="3000" httpsPort="9443"/>

    <webApplication location="authors.war" contextRoot="api"/>

</server>
3. Implementation of the REST GET endpoint with MicroProfile
3.1 MicroProfile basics
Some definitions:
Microservice architecture is a popular approach for building cloud-native applications in which each capability is developed as an independent service. It enables small, autonomous teams to develop, deploy, and scale their respective services independently.
Eclipse MicroProfile is a modular set of technologies designed so that you can write cloud-native Java™ microservices. In this introduction, learn how MicroProfile helps you develop and manage cloud-native microservices. Then, follow the Open Liberty MicroProfile guides to gain hands-on experience with MicroProfile so that you can build microservices with Open Liberty.
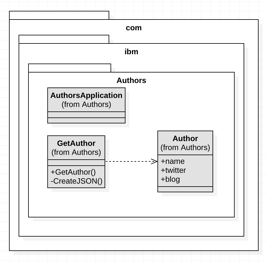
3.2 Java classes needed to expose the Authors service
For the Authors service to expose the REST API we need to implement three classes:
- AuthorsApplication class repesents our web application.
- Author class repesents the data structure we use for the Author.
- GetAuthor class repesents the REST API.
3.2.1 Class AuthorsApplication
Our web application does not implement any business or other logic, it simply needs to run on a server with no UI. The AuthorsApplication class extends the javax.ws.rs.core.Application class to do this.
The AuthorsApplication class provides access to the classes from the com.ibm.authors package at runtime.
The implementation of the interface class Application enables the usage of easy REST implementation provided by MircoProfile.
With @ApplicationPath from MicroProfile we define the base path of the application.
package com.ibm.authors;

import javax.ws.rs.core.Application;
import javax.ws.rs.ApplicationPath;

@ApplicationPath("v1")
public class AuthorsApplication extends Application {
}
3.2.2 Class Author
This class simply repesents the data structure we use for the Author. No MircoProfile feature is used here.
package com.ibm.authors;

public class Author {
public String name;
public String twitter;
public String blog;
}
3.2.3 Class GetAuthor
This class implements the REST API response for our Authors microservice. We implement the REST client using the MicroProfile REST Client. We use @Path and @Get statements from JAX-RS and for the OpenAPI documentation @OpenAPIDefinition statements from MicroProfile OpenAPI which automatically creates an OpenAPI explorer.
REMEMBER: In the server.xml configuration we added MicroProfile to the Open Liberty server as a feature, as you see in the code below.
<featureManager>
        <feature>microProfile-2.1</feature>
        ....
</featureManager>
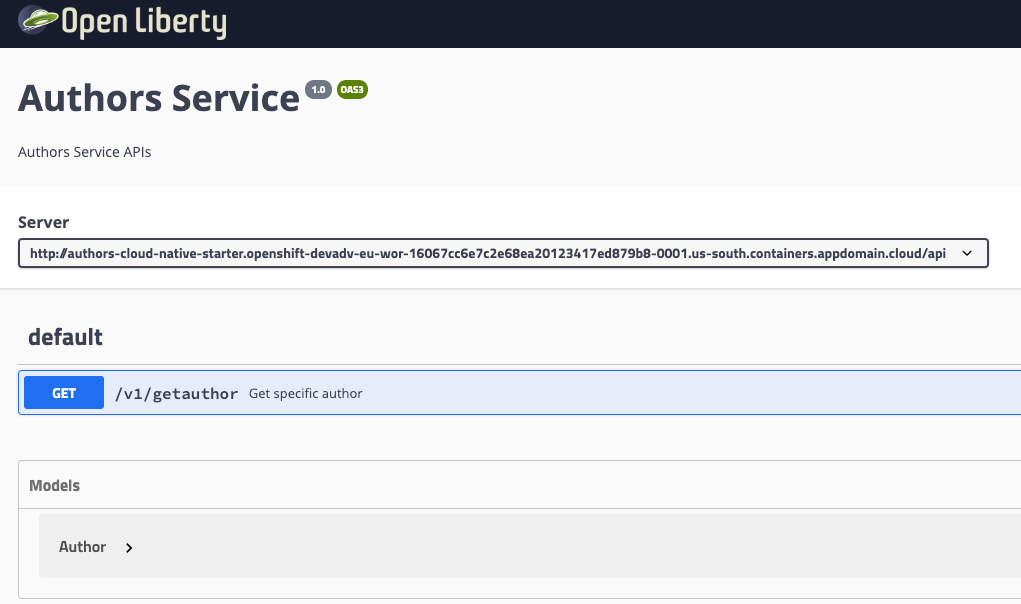
With the combination of the server.xml and our usage of MicroProfile features in the GetAuthor class we will be able to access an OpenAPI explorer with this URL http://host:http_port/openapi later.
This is the source code of the GetAuthors class with the mentioned MicroProfile features:
@ApplicationScoped
@Path("/getauthor")
@OpenAPIDefinition(info = @Info(title = "Authors Service", version = "1.0", description = "Authors Service APIs", contact = @Contact(url = "https://github.com/nheidloff/cloud-native-starter", name = "Niklas Heidloff"), license = @License(name = "License", url = "https://github.com/nheidloff/cloud-native-starter/blob/master/LICENSE")))
public class GetAuthor {

	@GET
	@APIResponses(value = {
		@APIResponse(
	      responseCode = "404",
	      description = "Author Not Found"
	    ),
	    @APIResponse(
	      responseCode = "200",
	      description = "Author with requested name",
	      content = @Content(
	        mediaType = "application/json",
	        schema = @Schema(implementation = Author.class)
	      )
	    ),
	    @APIResponse(
	      responseCode = "500",
	      description = "Internal service error"
	    )
	})
	@Operation(
		    summary = "Get specific author",
		    description = "Get specific author"
	)
	public Response getAuthor(@Parameter(
            description = "The unique name of the author",
            required = true,
            example = "Niklas Heidloff",
            schema = @Schema(type = SchemaType.STRING))
			@QueryParam("name") String name) {

			Author author = new Author();
			author.name = "Niklas Heidloff";
			author.twitter = "https://twitter.com/nheidloff";
			author.blog = "http://heidloff.net";

			return Response.ok(this.createJson(author)).build();
	}

	private JsonObject createJson(Author author) {
		JsonObject output = Json.createObjectBuilder().add("name", author.name).add("twitter", author.twitter)
				.add("blog", author.blog).build();
		return output;
	}
}
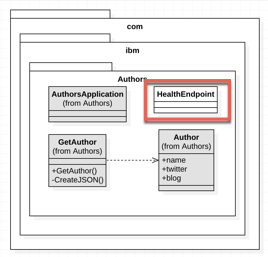
3.3 Supporting live and readiness probes in Kubernetes with HealthCheck
We have added the class HealthEndpoint into the Authors package as you can see in the following diagram.
We want to support this Kubernetes function:
Kubernetes provides liveness and readiness probes that are used to check the health of your containers. These probes can check certain files in your containers, check a TCP socket, or make HTTP requests. MicroProfile Health exposes readiness and liveness endpoints on your microservices. Kubernetes polls these endpoints as specified by the probes to react appropriately to any change in the microservice’s status.
For more information check the Kubernetes Microprofile Health documentation and the documentation on GitHub.
This is the implementation of the Health Check for Kubernetes in the HealthEndpoint class of the Authors service:
@Health
@ApplicationScoped
public class HealthEndpoint implements HealthCheck {

    @Override
    public HealthCheckResponse call() {
        return HealthCheckResponse.named("authors").withData("authors", "ok").up().build();
    }
}
This HealthEndpoint is configured in the Kubernetes deployment yaml. In the following yaml extract we see the livenessProbe definition.
    livenessProbe:
      exec:
        command: ["sh", "-c", "curl -s http://localhost:3000/"]
      initialDelaySeconds: 20
    readinessProbe:
      exec:
        command: ["sh", "-c", "curl -s http://localhost:3000/health | grep -q authors"]
      initialDelaySeconds: 40
Change the REST API Data and run the Container locally
Note: Here are some additional instructions based on your choosen setup. In case you have skipped lab 2 you have to follow this steps. Otherwise please work in your local terminal session.
Tools - Option 1 (prefered for Mac and Linux)
| Step | |
|---|---|
| 1 | You need to open a new local terminal session |
| 2 | Navigate to your local project folder openshift-on-ibm-cloud-workshops/deploying-to-openshift |
| 3 | Move on with the lab. |
Tools - Option 2 (prefered for Windows)
| Step | |
|---|---|
| 0 | Open a new local terminal session |
| 1 | You need to download or clone the project onto your local PC, first. $ git clone https://github.com/IBM/openshift-on-ibm-cloud-workshops.git |
| 2 | Open a new terminal and navigate tp your local project folder openshift-on-ibm-cloud-workshops/deploying-to-openshift |
| 3 | Move on with the lab. |
Step 1:
In GetAuthor.java change the returned author name to something similar like “MY NAME”.
public Response getAuthor(@Parameter(
            description = "The unique name of the author",
            required = true,
            example = "MY NAME",
            schema = @Schema(type = SchemaType.STRING))
			@QueryParam("name") String name) {

			Author author = new Author();
			author.name = "MY NAME";
			author.twitter = "https://twitter.com/MY NAME";
			author.blog = "http://MY NAME.net";

			return Response.ok(this.createJson(author)).build();
	}
Step 2:
To test and see how the code works you can run the code locally as a Docker container:
$ ROOT_FOLDER=$(pwd)
$ cd $ROOT_FOLDER/deploying-to-openshift
$ docker build -t authors .
$ docker run -i --rm -p 3000:3000 authors
Step 3:
Open the swagger UI of the mircoservice in a browser.
http://localhost:3000/openapi/ui/
Continue with Lab 4 - Deploying to OpenShift