Operational Modernization Solution
Table of Contents
- Introduction
- Analysis (Reading)
- Build (Hands-on)
- Deploy (Hands-on)
- Access the Application (Hands-on)
- Summary
Introduction
Operational modernization gives an operations team the opportunity to embrace modern operations best practices without putting change requirements on the development team. Modernizing from WebSphere Network Deployment (ND) to the traditional WebSphere Application Server Base V9 runtime in a container allows the application to be moved to the cloud without code changes.
The scaling, routing, clustering, high availability and continuous availability functionality that WebSphere ND previously provided will be handled by containers orchestrator Red Hat OpenShift and allows the operations team to run cloud-native and older applications in the same environment with the same standardized logging, monitoring and security frameworks.
While traditional WebSphere isn’t a ‘built for the cloud’ runtime like Liberty, it can still be run in container and will receive the benefits of the consistency and reliability of containers as well as helping to improve DevOps and speed to market.
This type of modernization shouldn’t require any code changes and can be driven by the operations team. This path gets the application in to a container with the least amount of effort but doesn’t modernize the application or the runtime.
This repository holds a solution that is the result of an operational modernization for an existing WebSphere Java EE application that was moved from WebSphere ND v8.5.5 to the traditional WebSphere Base v9 container and is deployed by the IBM Cloud Pak for Applications to RedHat OpenShift.
In this workshop, we’ll use Customer Order Services application as an example. In order to modernize, the application will go through analysis, build and deploy phases. Click here and get to know the application, its architecture and components.
Analysis
IBM Cloud Transformation Advisor helps you to analyze your on-premises workloads for modernization. It determines the complexity of your applications, estimates a development cost to perform the move to the cloud, and recommends the best target environment. It was used to analyze the existing Customer Order Services application running in the WebSphere ND environment. The steps taken were:
-
Used the IBM Cloud Transformation Advisor available as part of IBM Cloud Pak for Applications. Transformation Advisor Local (Beta) can also be used.
-
Downloaded and executed the Data Collector against the existing WebSphere ND runtime.
-
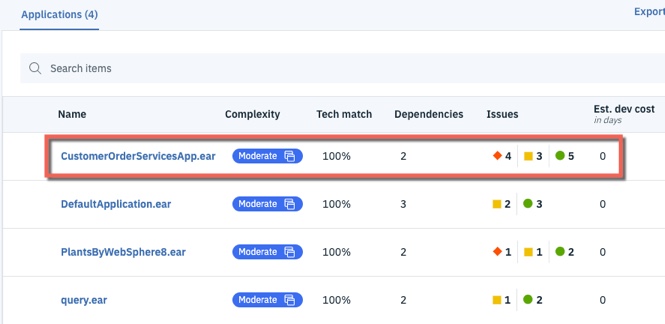
Uploaded the results of the data collection to IBM Cloud Transformation Advisor. A screenshot of the analysis is shown below:
-
Analyzed the Detailed Migration Analysis Report. In summary, no code changes are required to move this application to the traditional WebSphere Base v9 runtime, and the decision was to proceed with the operational modernization.
Homework: After you complete this workshop, review the step-by-step instructions on how to replicate these steps from the resources included in Next Steps section. Then try Transformation Advisor with one of your applications.
Build
In this section, you’ll learn how to build a Docker image for Customer Order Services application running on traditional WebSphere Base v9.
Building this image could take around ~8 minutes (since the image is around 2GB and starting/stopping the WAS server as part of the build process takes few minutes). So, let’s kick that process off and then come back to learn what you did. The image will be built by the time you complete this section.
-
You’ll need the web terminal (the same one from lab setup). If it’s not already open, follow the instructions here to access the web terminal.
-
You also need to be logged into the OpenShift CLI (command-line interface) using web terminal. Follow the instructions here to login to OpenShift CLI.
- Clone the GitHub repo with the lab artifacts and list the files. Run the following commands on your web terminal:
cd / && mkdir was90 && cd was90 git clone --branch was90 https://github.com/IBM/teaching-your-monolith-to-dance.git cd teaching-your-monolith-to-dance ls - Run the following command to create a new project in OpenShift. A project allows a community of users to organize and manage their content in isolation from other communities.
oc new-project apps-was - Run the following command to start building the image. Make sure to copy the entire command, including the
"."at the end (which indicates current directory). This command will be explained later in the Build image section. While the image is building (takes ~8 minutes) continue with rest of the lab:docker build --tag image-registry.openshift-image-registry.svc:5000/apps-was/cos-was .
Application artifacts
As per container’s best practices, you should always build immutable images. Injecting environment specific values at deployment time is necessary most of the times and is the only exception to this rule.
You should create a new image which adds a single application and the corresponding configuration. You should avoid configuring the image manually (after it started) via Admin Console or wsadmin (unless it is for debugging purposes) because such changes won’t be present if you spawn a new container from the image.
We started with the wsadmin script that is used by existing Customer Order Services running on-prem. This script enables application security, creates users and creates JDBC provider for a DB2 database.
Since this is a legacy application, it runs on older frameworks: most notably it uses JPA 2.0 and JAX-RS 1.1. These are not the default in WAS v9 (as they are in WAS v8.5.5), but they are supported. To avoid making application code changes at this time, we modified these settings in the scripts. For example, older JAX-RS specification is configured by adding:
AdminTask.modifyJaxrsProvider(Server, '[ -provider 1.1]')
Review the contents of the wsadmin script.
We are going to install the application using a properties file, which is an alternative way to install the application, or apply any configuration. The application could also be installed using the wsadmin jython script, but we chose to use the properties file to show the two methods configurations can be applied at build time.
Let’s review the contents of the properties file. The first block specifies Application resource type, followed by the property values, including the location of the ear file:
ResourceType=Application
ImplementingResourceType=Application
CreateDeleteCommandProperties=true
ResourceId=Deployment=CustomerOrderServicesApp

Name=CustomerOrderServicesApp
TargetServer=!{serverName}
TargetNode=!{nodeName}
EarFileLocation=/work/apps/CustomerOrderServicesApp.ear
Some environment variables are specified towards the end:
cellName=DefaultCell01
nodeName=DefaultNode01
serverName=server1
Build instructions
Let’s review the contents of the Dockerfile:
FROM ibmcom/websphere-traditional:9.0.5.0-ubi

COPY --chown=1001:0 resources/db2/ /opt/IBM/db2drivers/

COPY --chown=1001:0 config/PASSWORD /tmp/PASSWORD

COPY --chown=1001:0 config/cosConfig.py /work/config/

COPY --chown=1001:0 config/app-update.props  /work/config/

COPY --chown=1001:0 app/CustomerOrderServicesApp-0.1.0-SNAPSHOT.ear /work/apps/CustomerOrderServicesApp.ear

RUN /work/configure.sh
-
The base image for our application image is
ibmcom/websphere-traditional, which is the official image for traditional WAS Base in container. The tag9.0.5.0-ubiindicates the version of WAS and that this image is based on Red Hat’s Universal Base Image (UBI). We recommend using UBI images. -
For security, traditional WebSphere Base containers run as non-root. This is in fact a requirement for running certified containers in OpenShift. The
COPYinstruction by default copies as root. So, change user and group using--chown=1001:0command. -
We need to copy everything that the application needs into the container. So, we copy the db2 drivers which are referenced in the wsadmin jython script.
-
Specify a password for the wsadmin user at
/tmp/PASSWORD. This is optional. A password will be automatically generated if one is not provided. This password can be used to login to Admin Console (should be for debugging purposes only). -
We copy
cosConfig.pyjython script and theapp-update.propsfile into/work/config/folder, so they are run during container creation. -
Then we copy application ear to the
EarFileLocationreferenced inapp-update.props -
Then we run the
/work/configure.shwhich will start the server and run the scripts and apply the properties file configuration.
Each instruction in the Dockerfile is a layer and each layer is cached. You should always specify the volatile artifacts towards the end.
Build image
This is the command you ran earlier.
docker build --tag image-registry.openshift-image-registry.svc:5000/apps-was/cos-was .
It instructs docker to build the image following the instructions in the Dockerfile in current directory (indicated by the "." at the end).
A specific name to tag the built image with is also specified. The value image-registry.openshift-image-registry.svc:5000 in the tag is the default address of the internal image registry provided by OpenShift. Image registry is a content server that can store and serve container images. The registry is accessible within the cluster using the Service. Note the format of a Service address: name.namespace.svc. So in this case, the image registry is named image-registry and it’s in namespace openshift-image-registry.
5000 is the port, which is followed by namespace and name for the image. Later when we push the image to OpenShift’s internal image registry, we’ll refer to the image by the same values.
Go back to the web terminal to check on the image build.
You should see the following message if image was successfully built. Please wait if it’s still building.
Successfully tagged image-registry.openshift-image-registry.svc:5000/apps-was/cos-was:latest
Validate that image is in the repository by running command:
docker images
You should get an output similar to this. Notice that the base image, websphere-traditional, is also listed. It was pulled as the first step of building application image.
REPOSITORY                                                             TAG                 IMAGE ID            CREATED             SIZE
image-registry.openshift-image-registry.svc:5000/apps-was/cos-was      latest              9394150a5a15        10 minutes ago      2.05GB
ibmcom/websphere-traditional                                           9.0.5.0-ubi         898f9fd79b36        12 minutes ago      1.86GB
You built the image and verified that it’s available locally.
Let’s push the image into OpenShift’s internal image registry. First, login to the image registry by running the following command in web terminal. A session token is obtained using the oc whoami -t command and used as the password to login.
docker login -u openshift -p $(oc whoami -t) image-registry.openshift-image-registry.svc:5000
Now, push the image into OpenShift’s internal image registry, which will take 1-2 minutes:
docker push image-registry.openshift-image-registry.svc:5000/apps-was/cos-was
Verify that the image is in image registry. The following command will get the images in the registry. OpenShift stores various images needed for its operations and used by its templates in the registry. Filter through the results to only get the image you pushed. Run the following command:
oc get images | grep apps-was/cos-was
The application image you just pushed should be listed. The hash of the image is stored alongside (indicated by the SHA-256 value).
image-registry.openshift-image-registry.svc:5000/apps-was/cos-was@sha256:fbb7162060754261247ad1948dccee0b24b6048b95cd704bf2997eb6f5abfeae
OpenShift uses ImageStream to provide an abstraction for referencing container images from within the cluster. When an image is pushed to registry, an ImageStream is created automatically, if one already doesn’t exist. Run the following command to see the ImageStream that’s created:
oc get imagestreams -n apps-was
You can also use the OpenShift console (UI) to see the ImageStream. From the panel on left-side, click on Builds > Image Streams. Then select apps-was from the Project drop-down menu. Click on cos-was from the list. Scroll down to the bottom to see the image that you pushed.
Deploy
The following steps will deploy the modernized Customer Order Services application in a traditional WebSphere Base container to a RedHat OpenShift cluster.
Customer Order Services application uses DB2 as its database. You can connect to an on-prem database that already exists or migrate the database to cloud. Since migrating the database is not the focus of this particular workshop and to save time, the database needed by the application is already configured in the OpenShift cluster you are using.
Operator
Operators are a method of packaging, deploying, and managing a Kubernetes application. Conceptually, Operators take human operational knowledge and encode it into software that is more easily shared with consumers. Essentially, Operators are pieces of software that ease the operational complexity of running another piece of software. They act like an extension of the software vendor’s engineering team, watching over a Kubernetes environment (such as OpenShift Container Platform) and using its current state to make decisions in real time.
We’ll use Appsody Operator, available as part of IBM Cloud Pak for Applications, to deploy the application you containerized. Appsody Operator is capable of deploying any application image with consistent, production-grade Quality of service (QoS).
We’ll use the following AppsodyApplication custom resource (CR), to deploy the Customer Order Services application:
apiVersion: appsody.dev/v1beta1
kind: AppsodyApplication
metadata:
  name: cos-was
  namespace: apps-was
spec:
  applicationImage: image-registry.openshift-image-registry.svc:5000/apps-was/cos-was
  service:
    port: 9080
  readinessProbe:
    httpGet:
      path: /CustomerOrderServicesWeb/index.html
      port: 9080
    periodSeconds: 10
    failureThreshold: 3
  livenessProbe:
    httpGet:
      path: /CustomerOrderServicesWeb/index.html
      port: 9080
    periodSeconds: 30
    failureThreshold: 6
    initialDelaySeconds: 90
  expose: true
  route:
    termination: edge
    insecureEdgeTerminationPolicy: Redirect
-
The
apiVersionand thekindspecifies the custom resource to create.AppsodyApplicationin this case. -
The metadata specifies a name for the instance of
AppsodyApplicationcustom resource (CR) and the namespace to deploy to. -
The image you pushed to internal registry is specified for
applicationImageparameter. -
The port for service is specified as 9080.
-
Readiness probe specifies when the application, running inside the pod, is ready to accept traffic. Traffic will not be sent to it unless it’s in
Readystate. -
Liveness probe specifies the ongoing health of the running container. The container will be restarted when liveness probe failures exceed the specified threshold. The hope is that the problem will be resolved with restart.
-
For probes, we are using the main page
/CustomerOrderServicesWeb/index.html, which is not the best indication that the app is fully functional. Since the application was not modified, it’s the best option. When we modernize the application later, we’ll implement better mechanisms. - The settings on probes are:
periodSeconds: how often (in seconds) to perform the probefailureThreshold- When a Pod starts and the probe fails, Kubernetes will try this many times before giving up. Giving up in case of liveness probe means restarting the container. In case of readiness probe the Pod will be marked unready.initialDelaySeconds: Number of seconds after the container has started before probes is initiated. Allows the application to complete initial setups.
-
The
exposefield is a simple toggle to enable Route (proxy) - to expose your application outside the cluster. - The termination policy specified under
routeconfigures a secured route.
Deploy application
-
In OpenShift console, from the panel on left-side, click on Operators > Installed Operators.
-
From the
Projectdrop-down menu, selectapps-was. -
You’ll see
Appsody Operatoron the list. From theProvided APIscolumn, click onAppsody Application. -
Click on
Create AppsodyApplicationbutton. -
Replace the content of default template with the above
AppsodyApplicationcustom resource (CR). -
Click on
Createbutton. -
Click on
cos-wasfrom the list. -
Navigate down to
Conditionssection and wait forReconciledtype to displayTruein Status column. This means Appsody Operator had processed the configurations you specified. - Click on the
Resourcestab. The resources that the operator created will be listed: Deployment, Service and Route.- The operator will continue to watch over these resources. If anything changes unexpectedly in the cluster and as a result these resources are no longer in the desired state you defined in
AppsodyApplicationCR then it’ll take necessary actions to reach the desired state.
- The operator will continue to watch over these resources. If anything changes unexpectedly in the cluster and as a result these resources are no longer in the desired state you defined in
-
On the row with
DeploymentasKind, click oncos-wasto get to the Deployment. -
Click on
Podstab. -
Wait until the
Statuscolumn displays Running andReadinesscolumn displays Ready (as shown in the screenshot below). It may take 1-2 minutes. These indicate that the application within the container is running and is ready to handle traffic.Troubleshoot: : If you see the Pod with a status of
ImagePullBackOfforErrImagePull(instead of the expectedRunningstatus) then an intermittent error has occurred. Try deleting the Pod. Click on the menu option on the right-side of where the pod is listed and click onDelete Pod. On the prompt, click onDeleteto confirm. You will see that the old Pod will be terminating as another Pod is created. If you encounter the same issue with the new Pod, please inform the host to get help.
Access the application
-
From the left-panel, select Networking > Routes.
-
Note that the URL, listed under the
Locationcolumn, is in the format application_name-project_name._your_cluster_url - Click on the Route URL.
- Note: since there isn’t an application served at server context root
/, it’s expected to get a message stating SRVE0255E: A WebGroup/Virtual Host to handle / has not been defined.
- Note: since there isn’t an application served at server context root
-
The username and password to login to the application are
skywalkerandforcerespectively. Add/CustomerOrderServicesWebto the end of the URL in the browser to access the application. -
Click on the
Accounttab to see user details. This information is retrieved from the database. -
From the
Shoptab, add few items to the cart as illustrated in the screen recording below. Click on an item and then drag and drop the item into the shopping cart. Add at least 5 items to the cart. As the items are added, they’ll be shown under Current Shopping Cart (on the right side).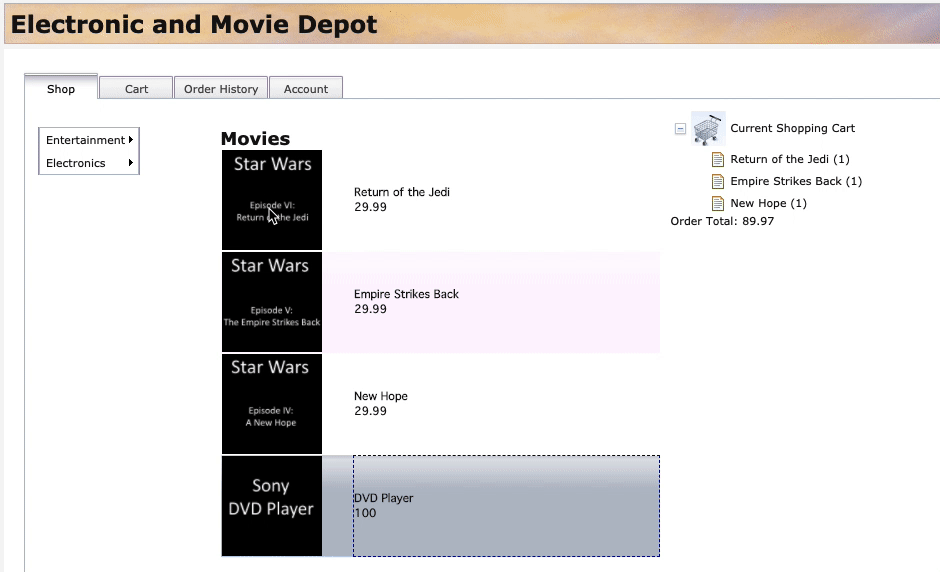
Summary
Awesome! You’ve completed the first lab of the workshop. You containerized and deployed a monolith application to cloud! Do you see that it has started to “dance”? It can do better.
Let’s continue with the workshop. Head over to the Runtime Modernization lab.