Configure the Hub
Objectives
A newly installed CI/CD Hub will require some additional configuration to setup users and cross component integrations.
Pre-requisites
- Newly installed CI/CD Hub
- See initial CI/CD Hub login details
Add users to OpenLDAP
To add users to the to the OpenLDAP installed with the CI/CD Hub. You can follow the instructions to add users to a standalone Telco Network Cloud Orchestration (TNC-O).
Slave ALMs can be configured at installation time to use the OpenLDAP instance deployed with the CI/CD Hub. Users configured in the CI/CD OpenLDAP will then have access to any slave LMs.
Documentation for Jenkins, Gogs and Nexus can show how to configure those functions to also use the shared OpenLDAP instance. These instructions are outside the scope of this learning center.
Configure Jenkins
The next step is to configure Jenkins and its required plugins.
Install Plugins
The following plugins are required:
- Pipeline
- Gogs
To install these plugins follow the steps below:
- Log into Jenkins
- On Jenkins dashboard select ‘Manage Jenkins’
- Select ‘Manage Plugins’
- Check each plugin is listed under the ‘installed’ tab.
- If a plugin is not installed, search for it under the ‘Available’ tab and select it to install it.
- Check the ‘Restart Jenkins when installation is complete and no jobs are running’ link
- Wait for Jenkins to restart
Add Jenkins credentials
Jenkins credentials are required to add tags to git and upload files to Nexus. Perform the following steps to setup the credentials.
- Log into the Jenkins UI
- On the Jenkins dashboard select ‘Credentials’
- In the row for ‘Jenkins’ hover over (global) and in the drop list select ‘Add Credentials’
- Add the username ‘jenkins’ and a password to log into Gogs and add a note in the description that these are the gogs credentials.
- Enter ‘gogs-id’ in the ‘ID’ field
- Press OK
- Repeat for nexus, using ‘nexus-id’ as the ‘ID’ value and a valid username and password that has permission to upload (for demo use the admin credentials)
Configuring an LMCTL Jenkins slave
Choose LMCTL JNLP Image
Select a version of the lmctl-jnlp-slave image from Docker Hub.
Create LMCTL Config Map
- Create a new configmap in Kubernetes with
kubectl, providing the the LMCTL configuration file as data (you will need to remember the file name for your LMCTL configuration file when configuring the slave):
kubectl create configmap lmctl-slave-config -n <cicdhub-namespace> --from-file <your-lmctl-config-file>
Add Template to Jenkins
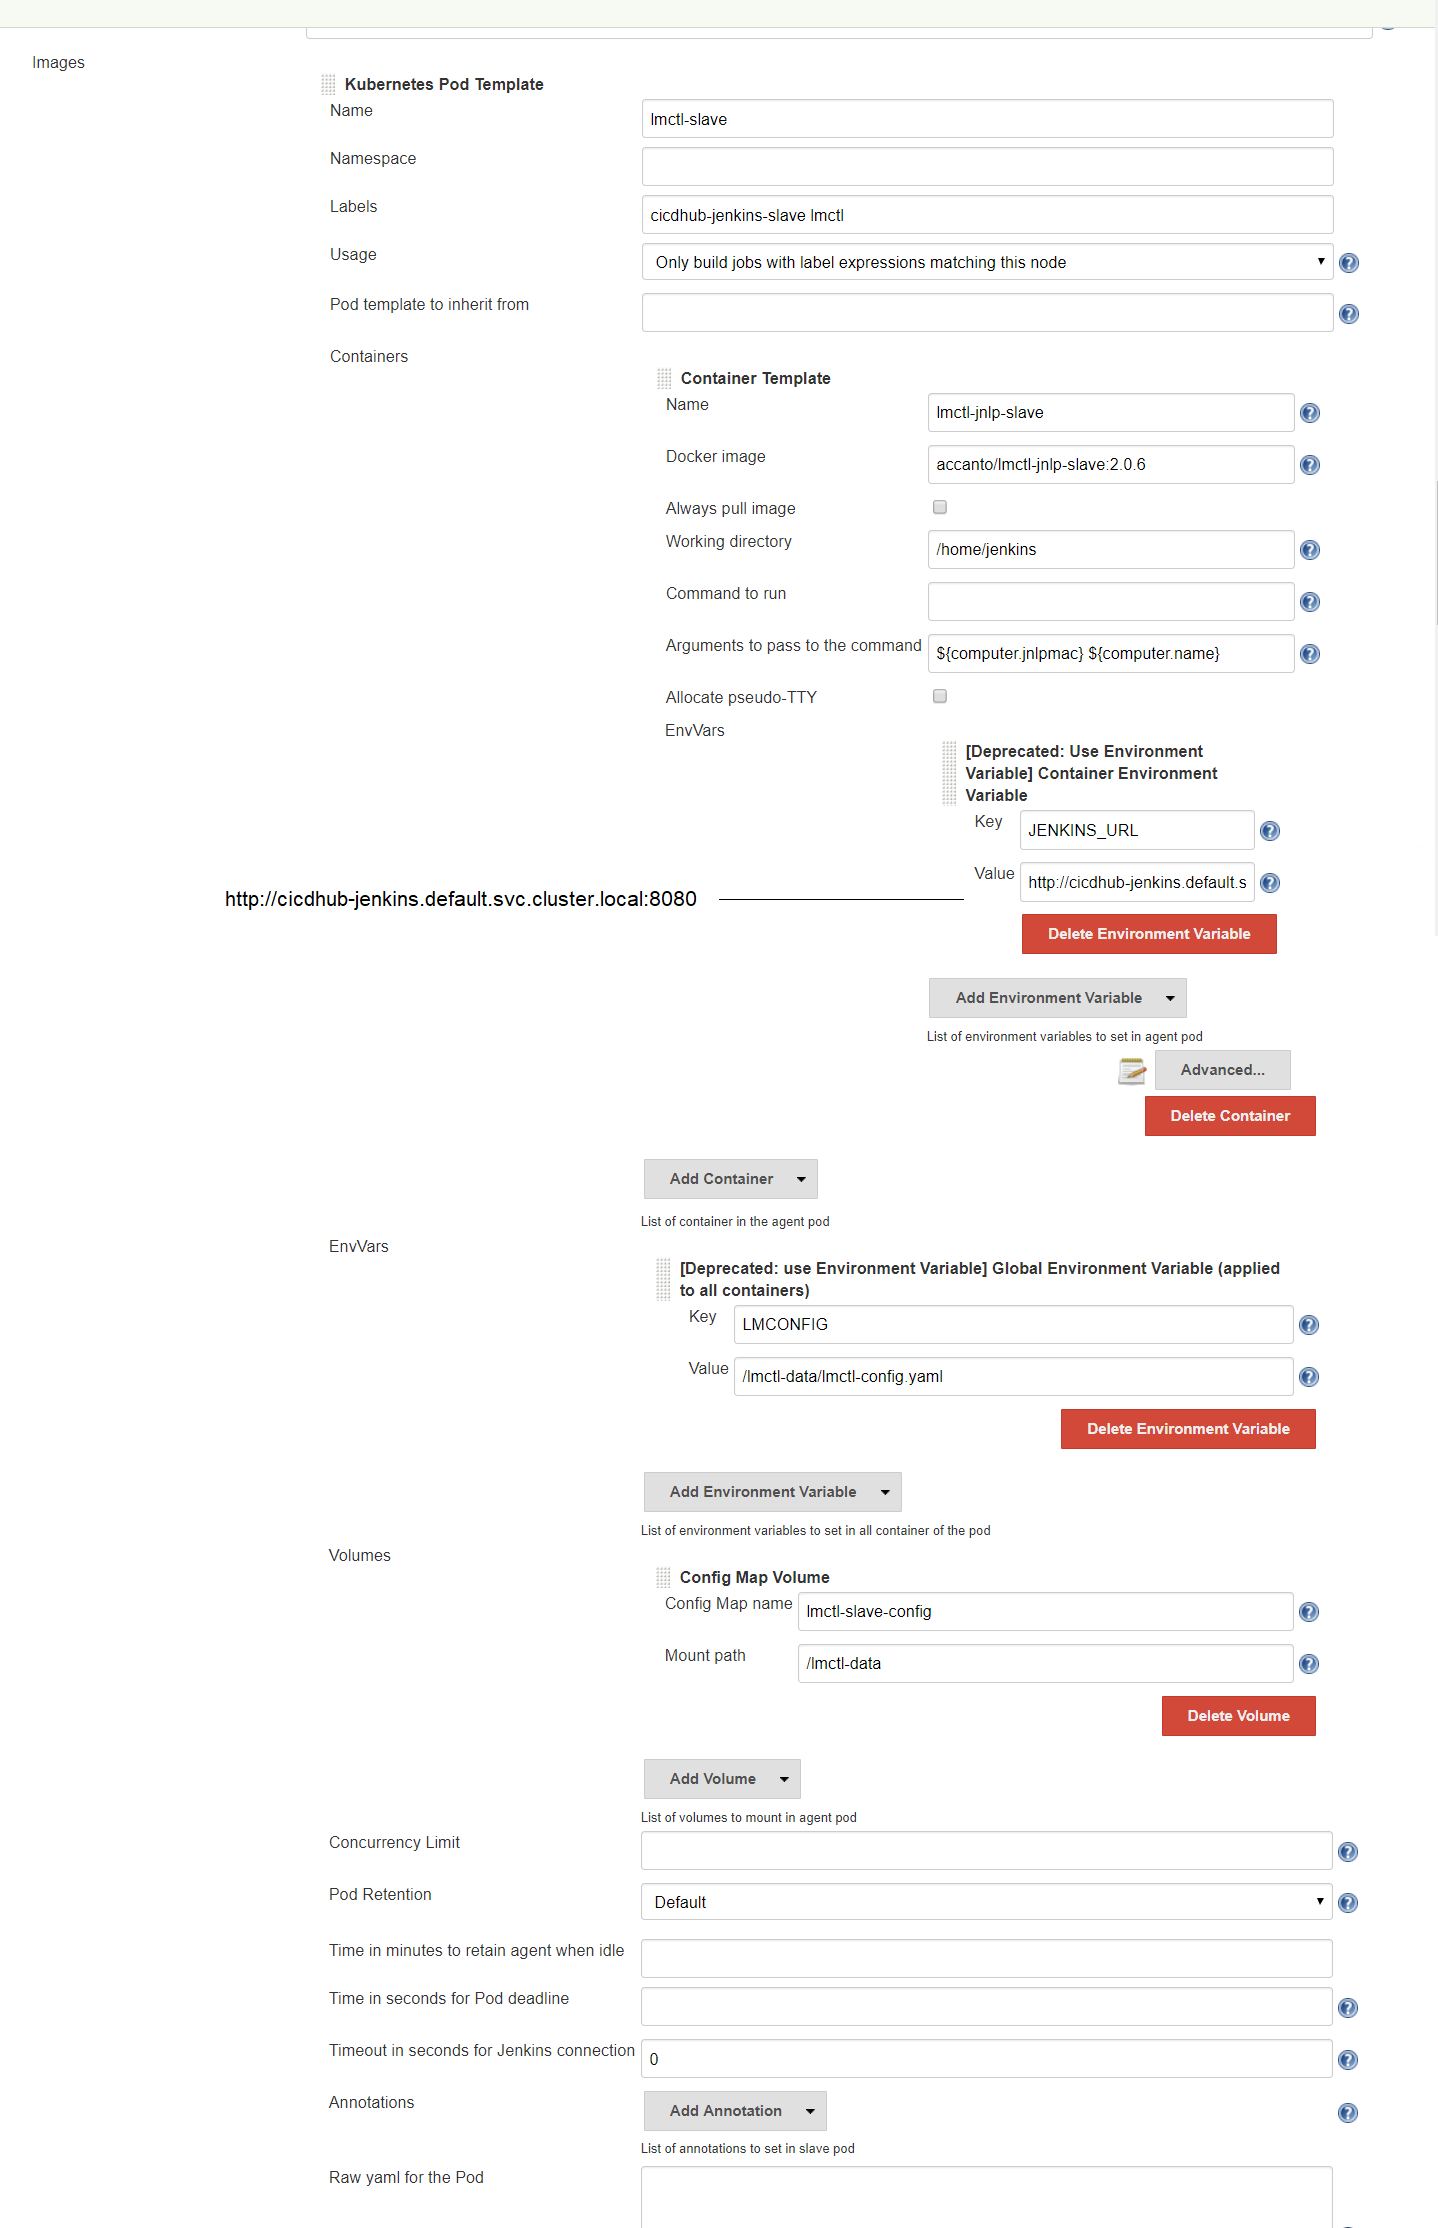
Navigate to the cloud settings in the Jenkins UI (Manage Jenkins->Configure System->Kubernetes->Images)
Find the existing
Pod Templatenameddefault.Modify the name of the template to
lmctl-slave.Add
lmctlas a label (leave a space after any existing labels)Modify the
Docker imagevalue of theContain templateto the name of the LMCTL JNLP image you selected e.g.accanto/lmctl-jnlp-slave:2.0.6Under
EnvVarsuseAdd Environment Variableto add a new environment variable with:- key: LMCONFIG
- value:
/lmctl-data/<name of the LMCTL configuration file used earlier>
Under
VolumesuseAdd Volumeto add a newConfig Map Volumewith:- Config Map name: lmctl-slave-config
- Mount path: /lmctl-data
Save the template
An example of this configuration can be seen below:

The template is now configured to create a new pod for any Jenkins job which requests an agent with the lmctl label.
Changing configuration of an existing LMCTL Jenkins slave
To update the LMCTL configuration used on any slave pods you need to re-create the configmap with the updated LMCTL configuration file:
kubectl create configmap lmctl-slave-config -n lm --from-file <your-updated-lmctl-config-file> -n lm
Configure Additional Slaves
There are very few use cases for configuring additional LMCTL slave templates to Jenkins as the existing template will be used any time a slave with LMCTL is required.
If you need to use different Telco Network Cloud Orchestration (TNC-O) environments in each Jenkins job, you can update the configmap with an updated LMCTL configuration file featuring all of the potential environments.
It may be reasonable to configure an additional slave if you need an alternative version of LMCTL (or want to try out a new version without losing your old slave template). If this is the case, follow the Configure Slave instructions for the additional template, changing the names of the configmap and JNLP template name to a unique value.
Configure Gogs
The following Gogs configuration should be performed.
Register users
- Log into Gogs as admin
- From the top right drop down list titled ‘SIGNED IN AS CICDHUB-ADMIN’ click and select ‘Admin Panel’
- Go to Users and add user ‘jenkins’ (with same password as set in the Jenkins credentials step above) . This account is used for Jenkins to push changes to Gogs projects.
- Give the jenkins user admin permissions
- Add any additional Gogs users who will be creating and maintaining Network Services and VNFs. New users can change their password later. Register on the home page (before you sign in)
Create an Organization
The following steps creates an organization which will contain Network Service and VNF projects for your team.
- Log into Gogs as admin
- Create (+) New Organization name ‘marketplace’. This is where Network Services and VNF projects will be created. If you use a different name, then you will have to edit your Jenkinsfile for each of the pipeline automation’s you create later.
- ‘Invite Someone’ to join the organization for all the users you created. You can add/delete users later and add/remove them from the organization.
- Add ‘jenkins’ to the ‘marketplace’ organizations.
Configure Nexus
The following Nexus configuration should be performed to create an initial repository for storing NS/VNF packages built through the CI/CD Hub pipeline:
- Log in as Nexus admin
- Click settings (the cog icon in the top navigation bar)
- Select repositories from the left side menu
- Click
Create repositorybutton at the top of main pane - Select
raw (hosted)from the list of recipes - Enter a name e.g.
raw - Click
Create repositoryat the bottom of the screen to finish creating the repository