6. Vulnerability Scanning
6.1: Overview
In this section, we will configure automation rules to allow Concert to create issues/tickets automatically, then we will perform the vulnerability scanning of the qotd application container images using Trivy, and integrate it into the Jenkins CI/CD pipeline. We will also verify that the vulnerability information is ingested into Concert and is visible in the Concert dashboard. At the same time, Instana will pull the vulnerability information from Concert.
Trivy is a comprehensive, open-source vulnerability scanner developed by Aqua Security that detects security issues in applications, infrastructure, and code artifacts. It is especially popular for scanning container images. For more information, visit the Trivy GitHub repository.
6.2: Creating a GitHub Integration from Concert
You will use the personal access token that you created previously to configure a GitHub Connection. Concert will leverage this connection to create GitHub issues for the detected vulnerabilities in the qotd application.
From the Bastion Remote Desktop, on the Firefox browser click on the Concert tab.
- Go to Administration > Integrations
- Select the Connections tab
- Click on Create connection
- Search for GitHub and click on the GitHub tile
- Enter a unique Name for the connection such as
github-connection - Skip the Description field
- Under Parameters, provide the following details:
- Host:
https://api.github.com/ - Personal Access Token: the PAT you created during the Lab Preparation step
- Host:
- Click on Validate connection to verify the connection is successful
- Click Create
6.3: Creating Automation Rules in Concert
Concert calculates a risk score and assigns a priority to all detected CVEs impacting the applications based on the ingested CVE vulnerability scans. Using automation rules, we will automate the issue/ticket creation in GitHub to quickly address high priority CVEs impacting the application. Note that Concert can also integrate with other ticketing systems such as Jira, Salesforce, ServiceNow, etc.
In addition to automation rules, Concert can leverage ingestion jobs to pull data from external issue tracking systems in order to automatically update ticket status. This configuration is out of scope for this lab.
From the Bastion Remote Desktop, on the Firefox browser click on the Concert tab.
- Click Administration > Integrations
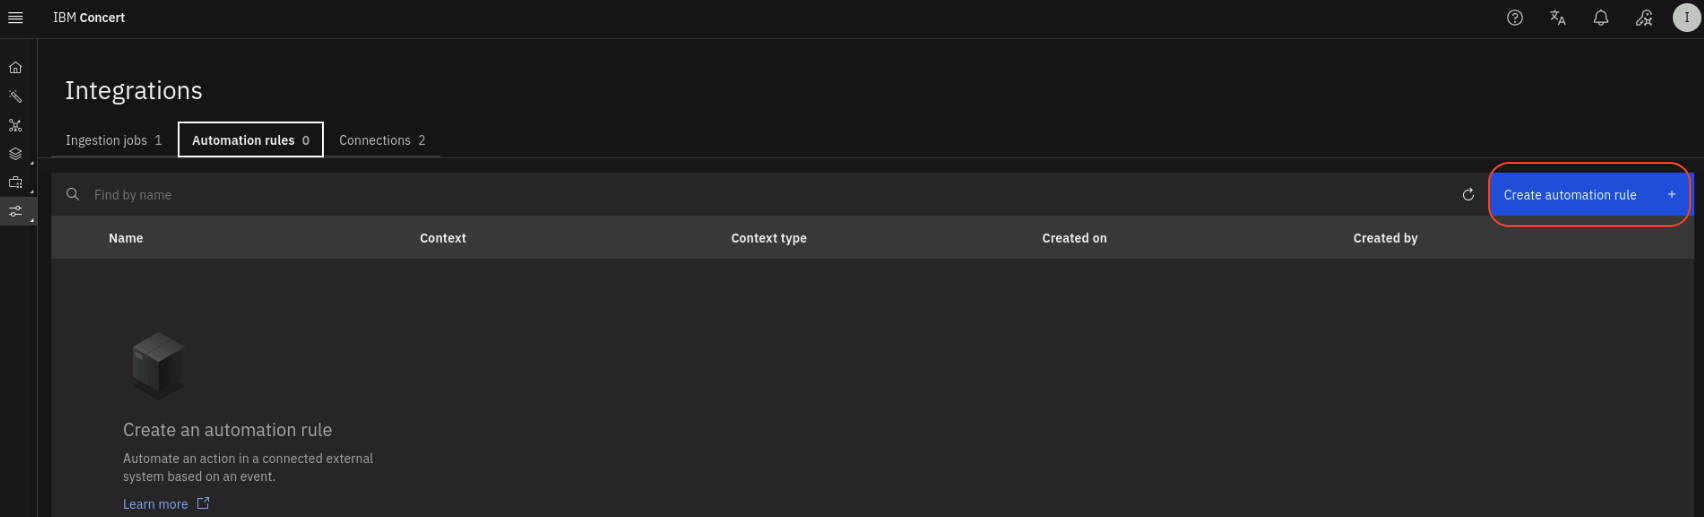
- Select the Automation rules tab
- Click the Create automation rule button on the right
- Enter a name for the automation rule such as
issue-creation - Skip the Description for the automation rule
- Under Take this action:
- Select Open a GitHub issue
- In Enter target organization type your GitHub username
- In Enter target repository type
concert-vulnerability-lab
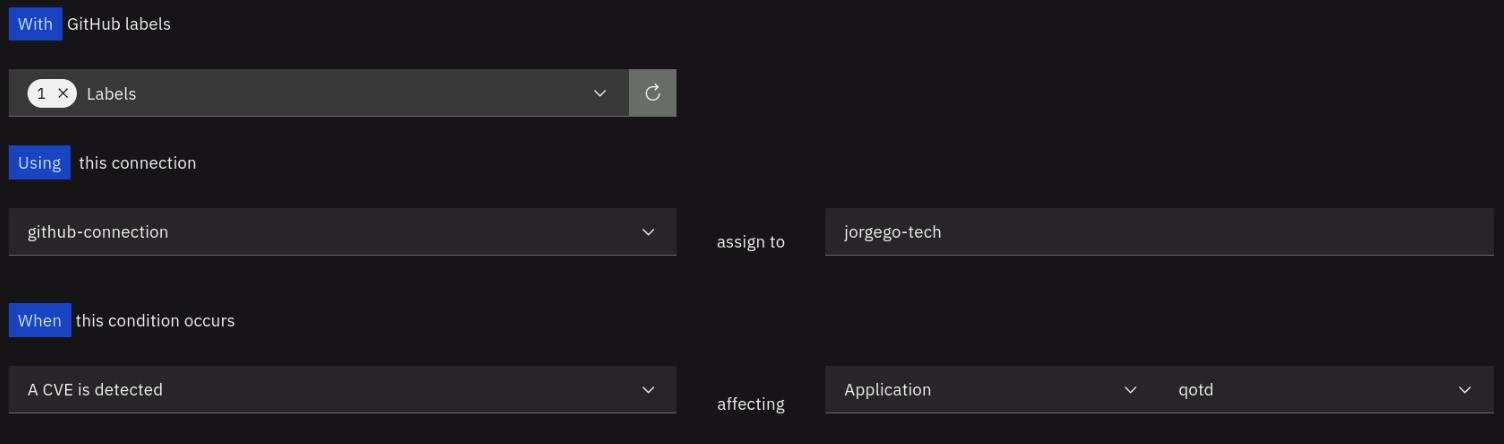
- Under With GitHub labels,
- Click on the refresh icon
- Check the bug label from the list
- Under Using this connection:
- Select the GitHub connection created during the lab preparation
- For assign to, type your GitHub username
- Under When this condition occurs:
- Select A CVE is detected
- For affecting, select Application and then select qotd from the list of applications
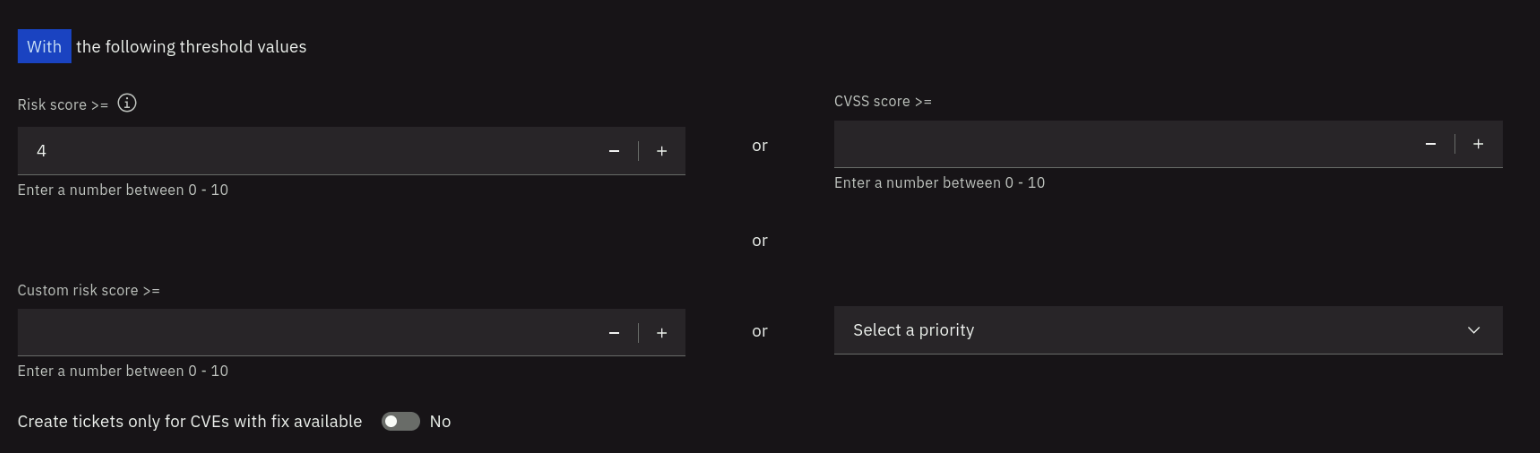
- Under With the following threshold values:
- For Risk Score >=, type
4. This is the only condition that will trigger the issue creation - Leave the other fields blank
- For Risk Score >=, type
- For Create tickets only for CVEs with fix available, keep No as selection
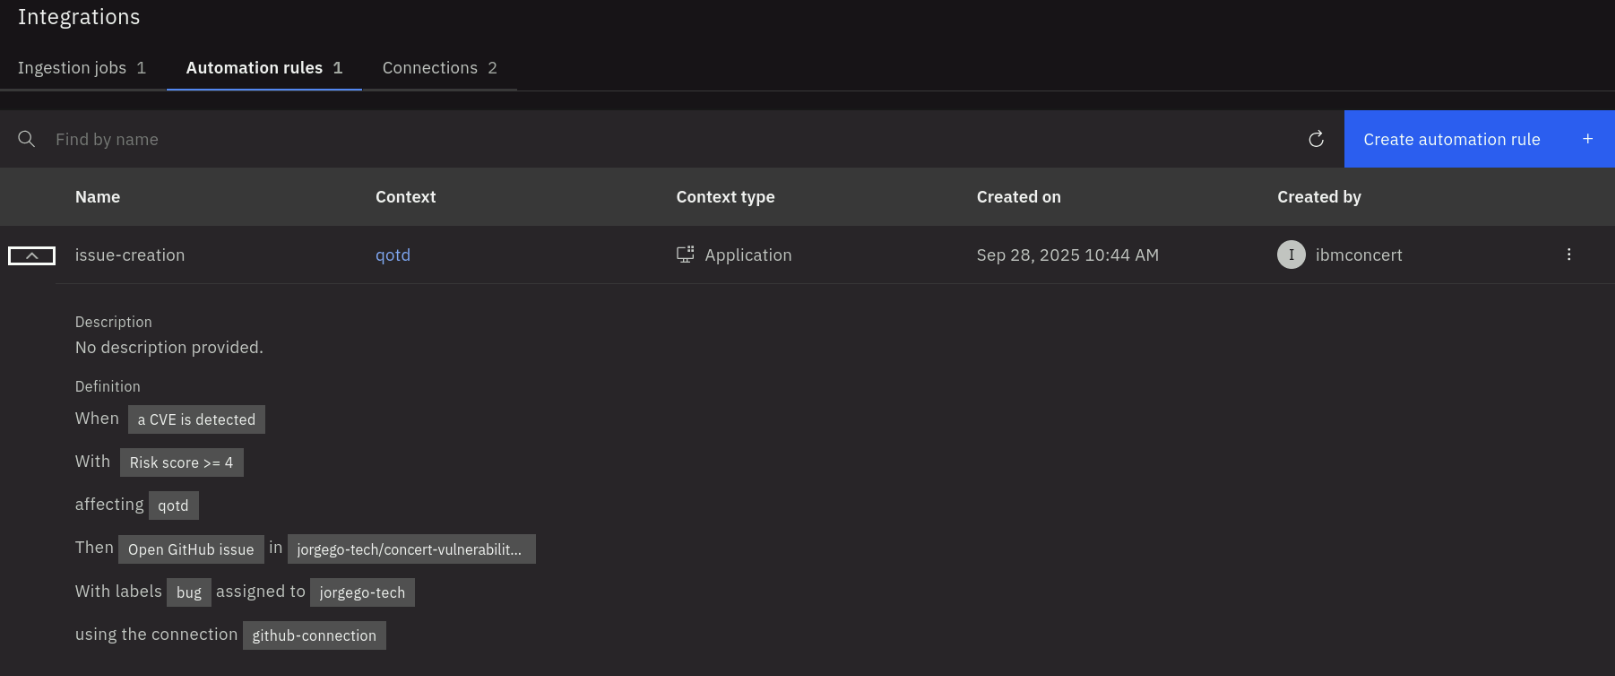
Your configuration should look similar to the screenshot below. Your github name will be different:

- Click Create to create the automation rule.
After the rule is created, it will appear in the list of automation rules. Click on the twistie before the rule name to expand the section and see more details. Review the conditions that will trigger the issue creation.
6.4: Configuring the Jenkins Pipeline for Application Vulnerability Scanning
We will now create a new Jenkins pipeline that includes a vulnerability scanning stage using Trivy.
From the Bastion Remote Desktop, on the Firefox browser click on the Jenkins tab.
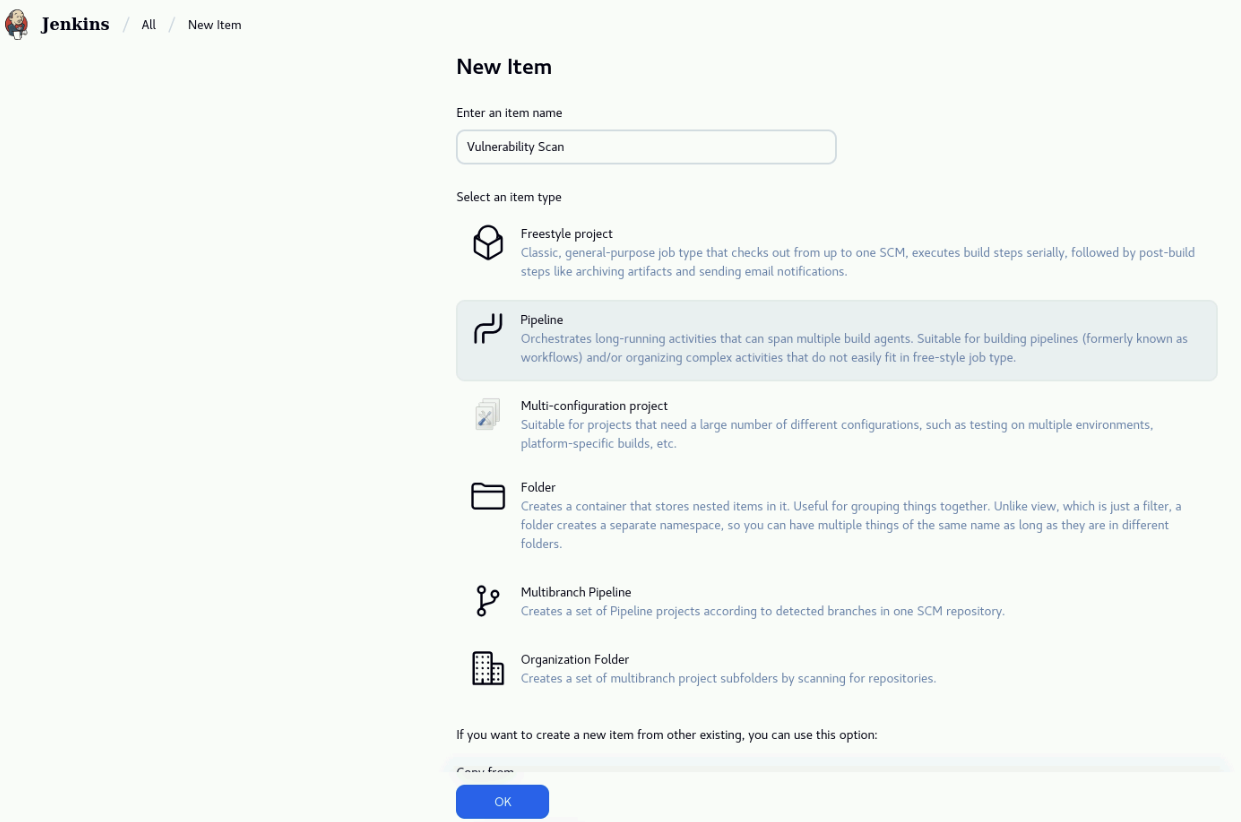
On the Jenkins dashboard, click on New Item on the left menu.
On the New Item page, on the Enter an item name field, enter Vulnerability Scan. Select Pipeline and click OK.
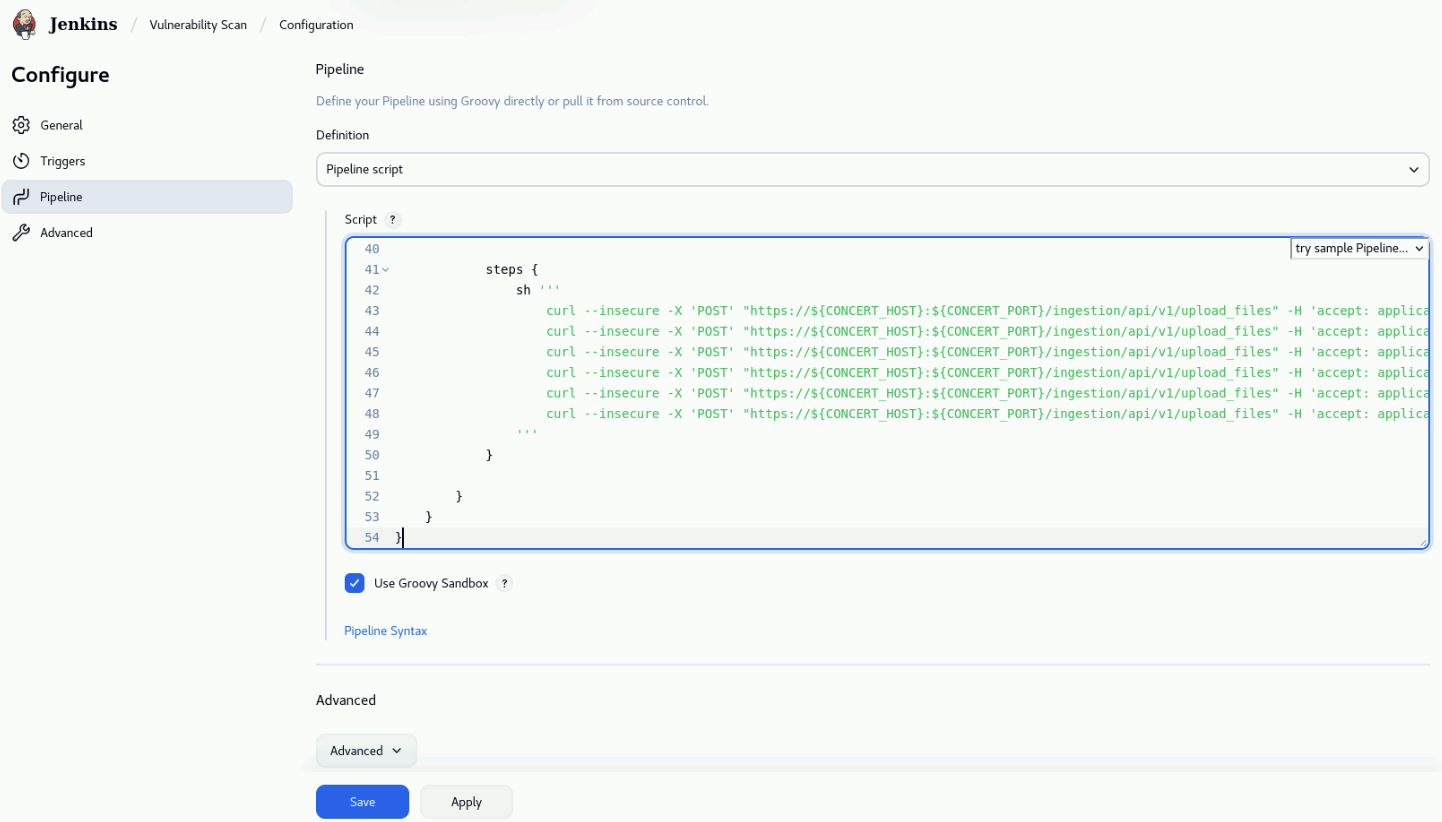
In the Configure page, select Pipeline on the left menu. Under the Pipeline section, leave Pipeline script in the Definition field and copy the following code (hover on the code and use the top-right Copy button to avoid missing code). Paste the code into the Script field. Click on Save to save the pipeline.
pipeline {
    agent any
    environment {
        CONCERT_HOST = 'https://concert.ibmdte.local'
        CONCERT_PORT = '12443'
        CONCERT_INSTANCE_ID = '0000-0000-0000-0000'

        // Update the environment variables below
        CONCERT_API_KEY = 'UPDATE'
        GHCR_USER = 'UPDATE'
        GHCR_PAT = 'UPDATE'
    }

    stages {

        stage('Vulnerability Scan') {
            steps {
                sh '''
                    export TRIVY_USERNAME=$GHCR_USER
                    export TRIVY_PASSWORD=$GHCR_PAT
                    trivy image --skip-version-check --image-src remote ghcr.io/$GHCR_USER/qotd-web:latest --format cyclonedx --scanners vuln -o cve-scan-qotd-web.json
                    trivy image --skip-version-check --image-src remote ghcr.io/$GHCR_USER/qotd-ratings-service:latest --format cyclonedx --scanners vuln -o cve-scan-qotd-ratings-service.json
                    trivy image --skip-version-check --image-src remote ghcr.io/$GHCR_USER/qotd-quote-service:latest --format cyclonedx --scanners vuln -o cve-scan-qotd-quote-service.json
                    trivy image --skip-version-check --image-src remote ghcr.io/$GHCR_USER/qotd-pdf-service:latest --format cyclonedx --scanners vuln -o cve-scan-qotd-pdf-service.json
                    trivy image --skip-version-check --image-src remote ghcr.io/$GHCR_USER/qotd-engraving-service:latest --format cyclonedx --scanners vuln -o cve-scan-qotd-engraving-service.json
                    trivy image --skip-version-check --image-src remote ghcr.io/$GHCR_USER/qotd-author-service:latest --format cyclonedx --scanners vuln -o cve-scan-qotd-author-service.json
                '''
            }
        }

        stage('Upload to Concert') {
            steps {
                sh '''
                    # sleep needed to avoid Concert v2.0.0.2 choke error
                    curl --insecure -X 'POST' "${CONCERT_HOST}:${CONCERT_PORT}/ingestion/api/v1/upload_files" -H 'accept: application/json' -H "InstanceID: ${CONCERT_INSTANCE_ID}" -H "Authorization: C_API_KEY ${CONCERT_API_KEY}" -H 'Content-Type: multipart/form-data' -F "data_type=image_scan" -F "filename=@cve-scan-qotd-web.json" -F 'metadata={"scanner_name": "trivy"}'
                    sleep 20s
                    curl --insecure -X 'POST' "${CONCERT_HOST}:${CONCERT_PORT}/ingestion/api/v1/upload_files" -H 'accept: application/json' -H "InstanceID: ${CONCERT_INSTANCE_ID}" -H "Authorization: C_API_KEY ${CONCERT_API_KEY}" -H 'Content-Type: multipart/form-data' -F "data_type=image_scan" -F "filename=@cve-scan-qotd-ratings-service.json" -F 'metadata={"scanner_name": "trivy"}'
                    sleep 20s
                    curl --insecure -X 'POST' "${CONCERT_HOST}:${CONCERT_PORT}/ingestion/api/v1/upload_files" -H 'accept: application/json' -H "InstanceID: ${CONCERT_INSTANCE_ID}" -H "Authorization: C_API_KEY ${CONCERT_API_KEY}" -H 'Content-Type: multipart/form-data' -F "data_type=image_scan" -F "filename=@cve-scan-qotd-quote-service.json" -F 'metadata={"scanner_name": "trivy"}'
                    sleep 20s
                    curl --insecure -X 'POST' "${CONCERT_HOST}:${CONCERT_PORT}/ingestion/api/v1/upload_files" -H 'accept: application/json' -H "InstanceID: ${CONCERT_INSTANCE_ID}" -H "Authorization: C_API_KEY ${CONCERT_API_KEY}" -H 'Content-Type: multipart/form-data' -F "data_type=image_scan" -F "filename=@cve-scan-qotd-pdf-service.json" -F 'metadata={"scanner_name": "trivy"}'
                    sleep 20s
                    curl --insecure -X 'POST' "${CONCERT_HOST}:${CONCERT_PORT}/ingestion/api/v1/upload_files" -H 'accept: application/json' -H "InstanceID: ${CONCERT_INSTANCE_ID}" -H "Authorization: C_API_KEY ${CONCERT_API_KEY}" -H 'Content-Type: multipart/form-data' -F "data_type=image_scan" -F "filename=@cve-scan-qotd-engraving-service.json" -F 'metadata={"scanner_name": "trivy"}'
                    sleep 20s
                    curl --insecure -X 'POST' "${CONCERT_HOST}:${CONCERT_PORT}/ingestion/api/v1/upload_files" -H 'accept: application/json' -H "InstanceID: ${CONCERT_INSTANCE_ID}" -H "Authorization: C_API_KEY ${CONCERT_API_KEY}" -H 'Content-Type: multipart/form-data' -F "data_type=image_scan" -F "filename=@cve-scan-qotd-author-service.json" -F 'metadata={"scanner_name": "trivy"}'
                '''
            }

        }
    }
}
Take a minute to review the pipeline code. Note that first, environment variables are defined for Concert host, port, API key, GitHub Container Registry (GHCR) username and PAT. Note that Trivy has been pre installed in the demo-apps VM. The pipeline has two stages:
- In the Vulnerability Scan stage, Trivy will remotely scan each container image stored in GitHub Container Registry. The scan results are saved in the CycloneDX format.
- In the Upload to Concert stage, the scan results are uploaded to Concert using the Concert file ingestion API.
After saving the pipeline, click on Configure on the left menu. On the Configure page, click on Pipeline
on the left menu. Under the Pipeline section, in the Script field, update the environment variables
CONCERT_API_KEY, GHCR_USER and GHCR_PAT with the values that you captured in the credentials.txt file during the lab preparation.
Click on Save to save the changes.
Finally, click on Build Now on the left menu to run the pipeline.
Note that it can take up to 5 minutes to run the pipeline depending on network speed as the container images are scanned remotely.
After the job is finished, you should see a green check next to the build number indicating that the build was successful.
6.5: Verifying Vulnerability Information in Concert
Once the Vulnerability Scan pipeline completes successfully, we will verify that the vulnerability information has been ingested into Concert and is visible in the Concert Vulnerability dashboard.
From the Bastion Remote Desktop, on the Firefox browser click on the Concert tab.
On the Concert dashboard, click on Dimensions -> Vulnerability on the left menu as shown below.
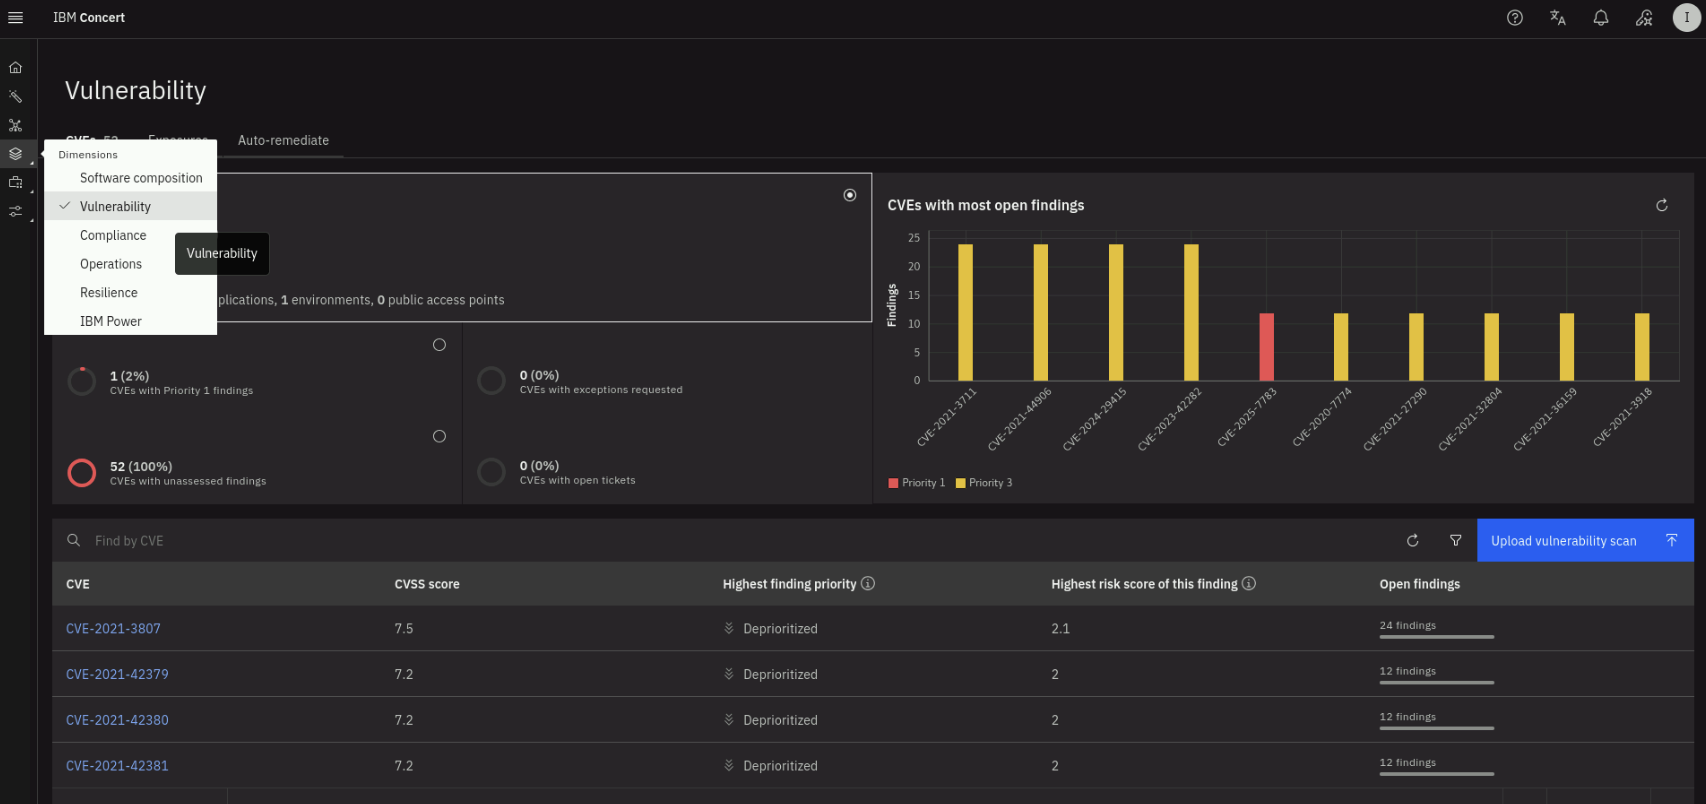
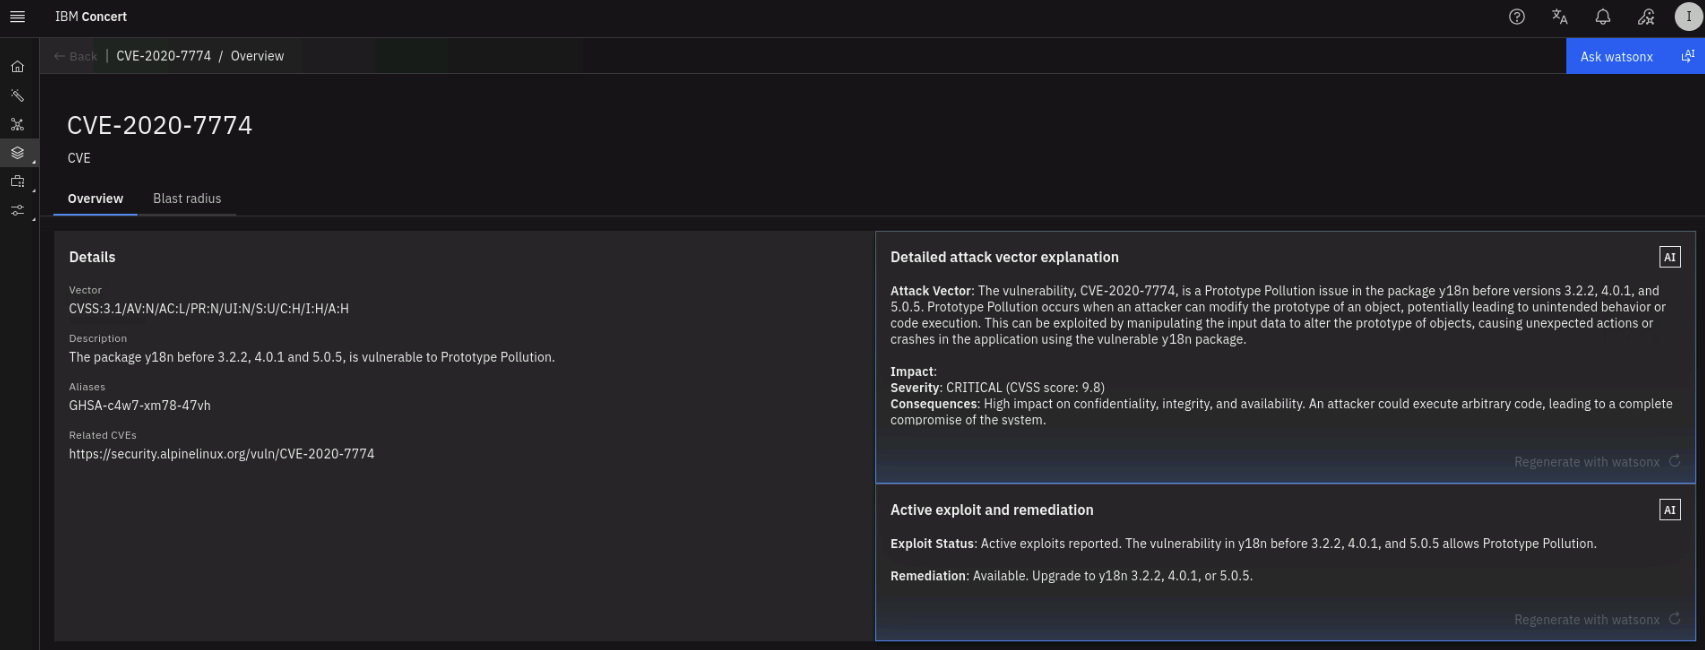
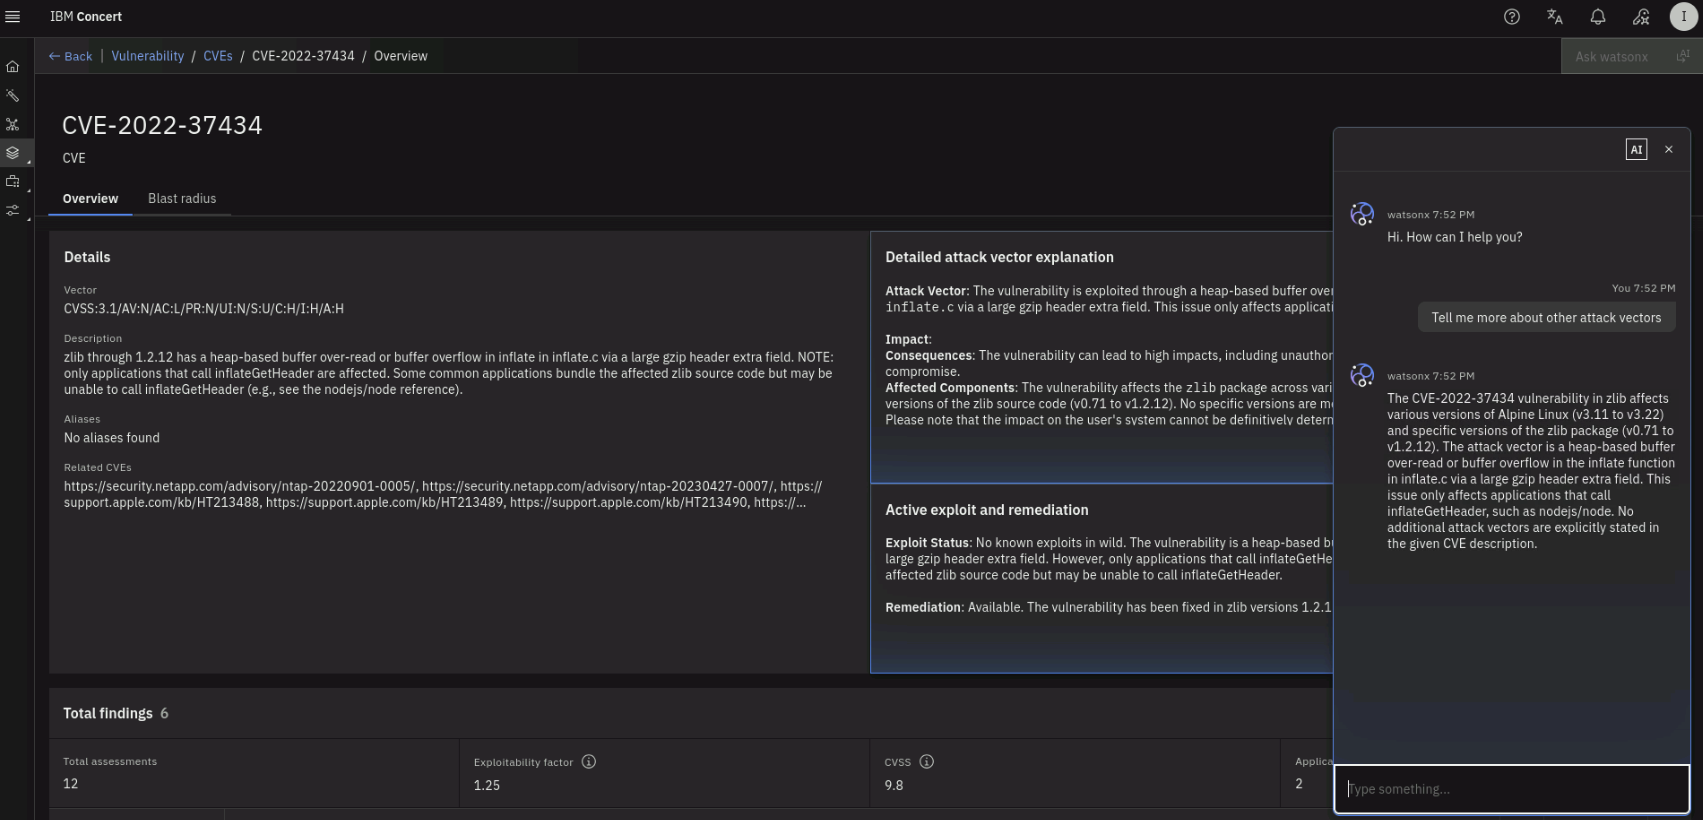
Note the total number of unique CVEs found across all images and the number of findings. Click on the Highest finding priority to sort downward to see the highest priority vulnerabilities first. Select a CVE with Priority 1 or 2 and click on it to see more details.

The CVE Details section shows the description of the vulnerability, the Detailed attack vector explanation and the Active exploit and remediation are populated by watsonx. On the top right, using the Ask watsonx button, you can ask questions about the vulnerability and get answers powered by watsonx.
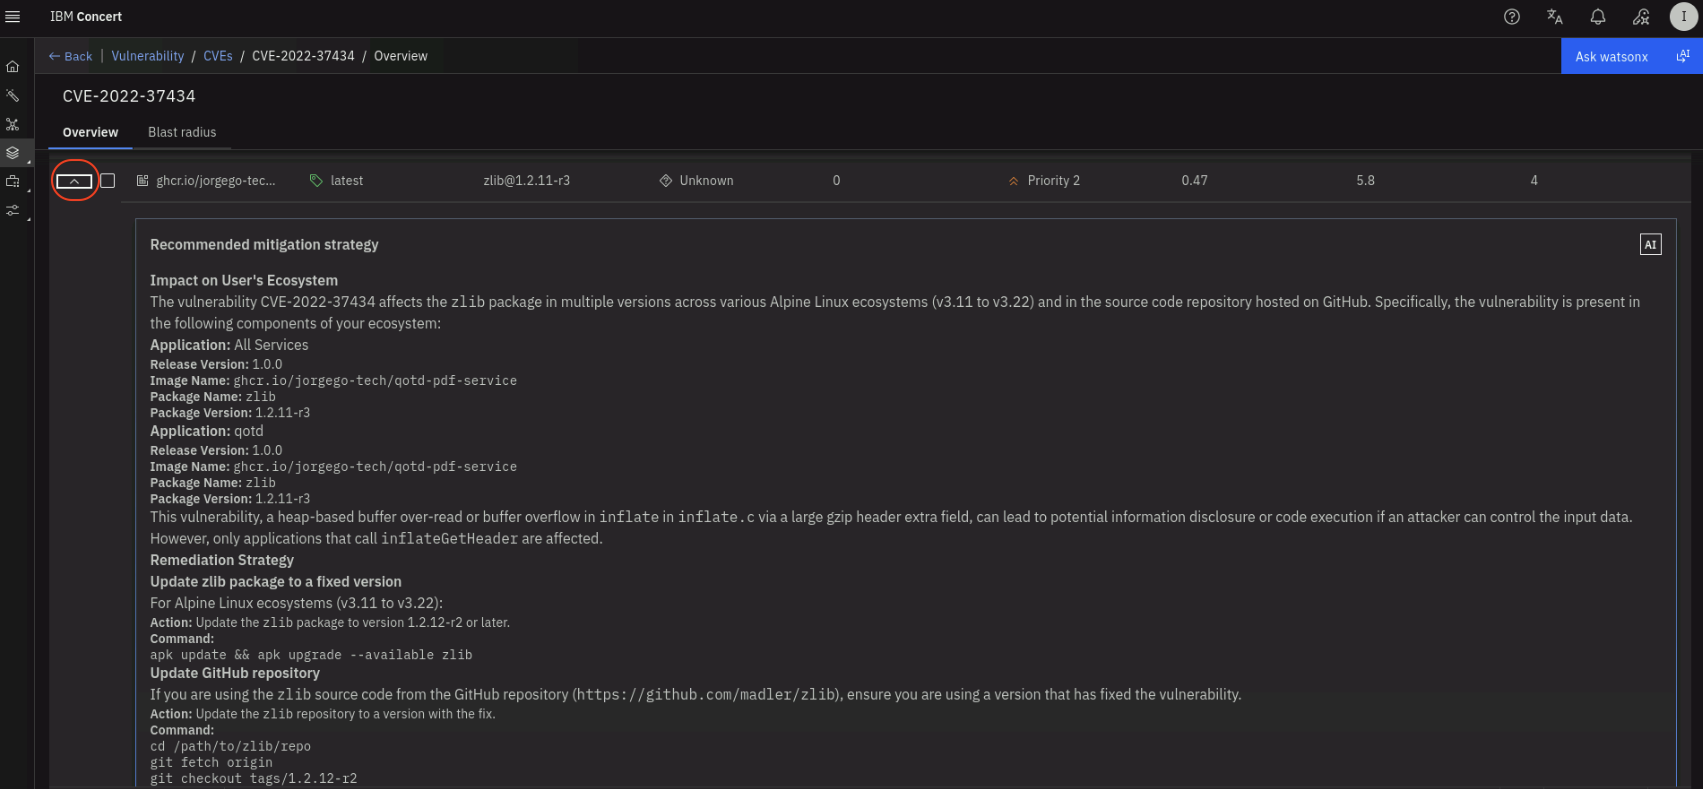
The second half of the page (the Total findings section) shows the list of images affected by this vulnerability. Click on the twistie icon on the left to see the Recommended mitigation strategy proposed by watsonx.
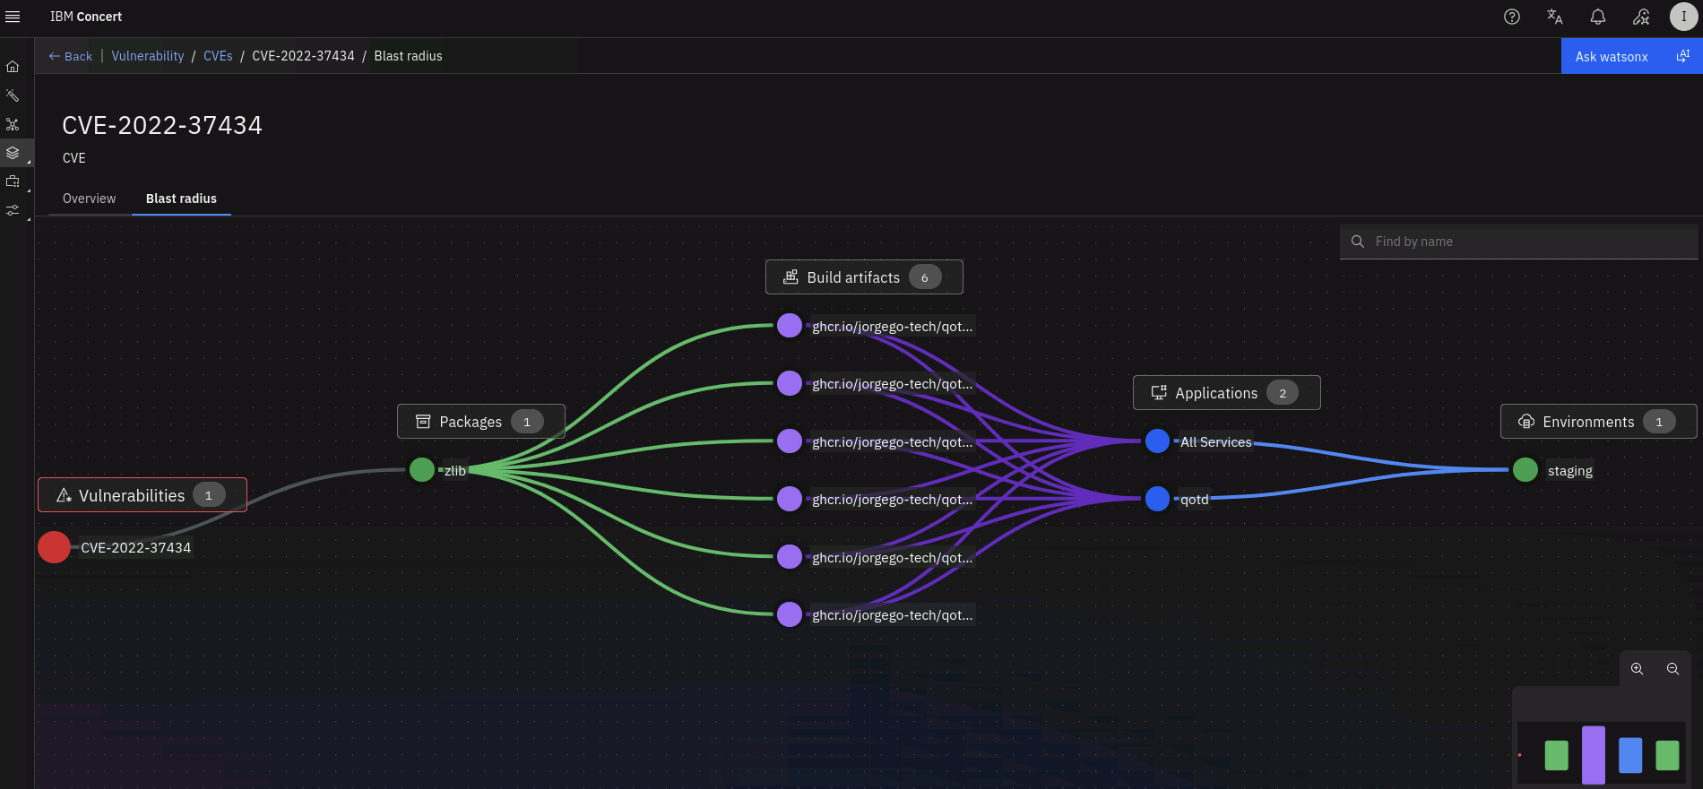
Finally, click on the Blast radius tab on the top left to see how this vulnerability can impact Packages, Build artifacts, Applications and Environments.
6.6: Verifying the Issue Creation in GitHub
We will now verify that issues have been created in GitHub for the CVEs found during the scan that have a risk score >= 4.
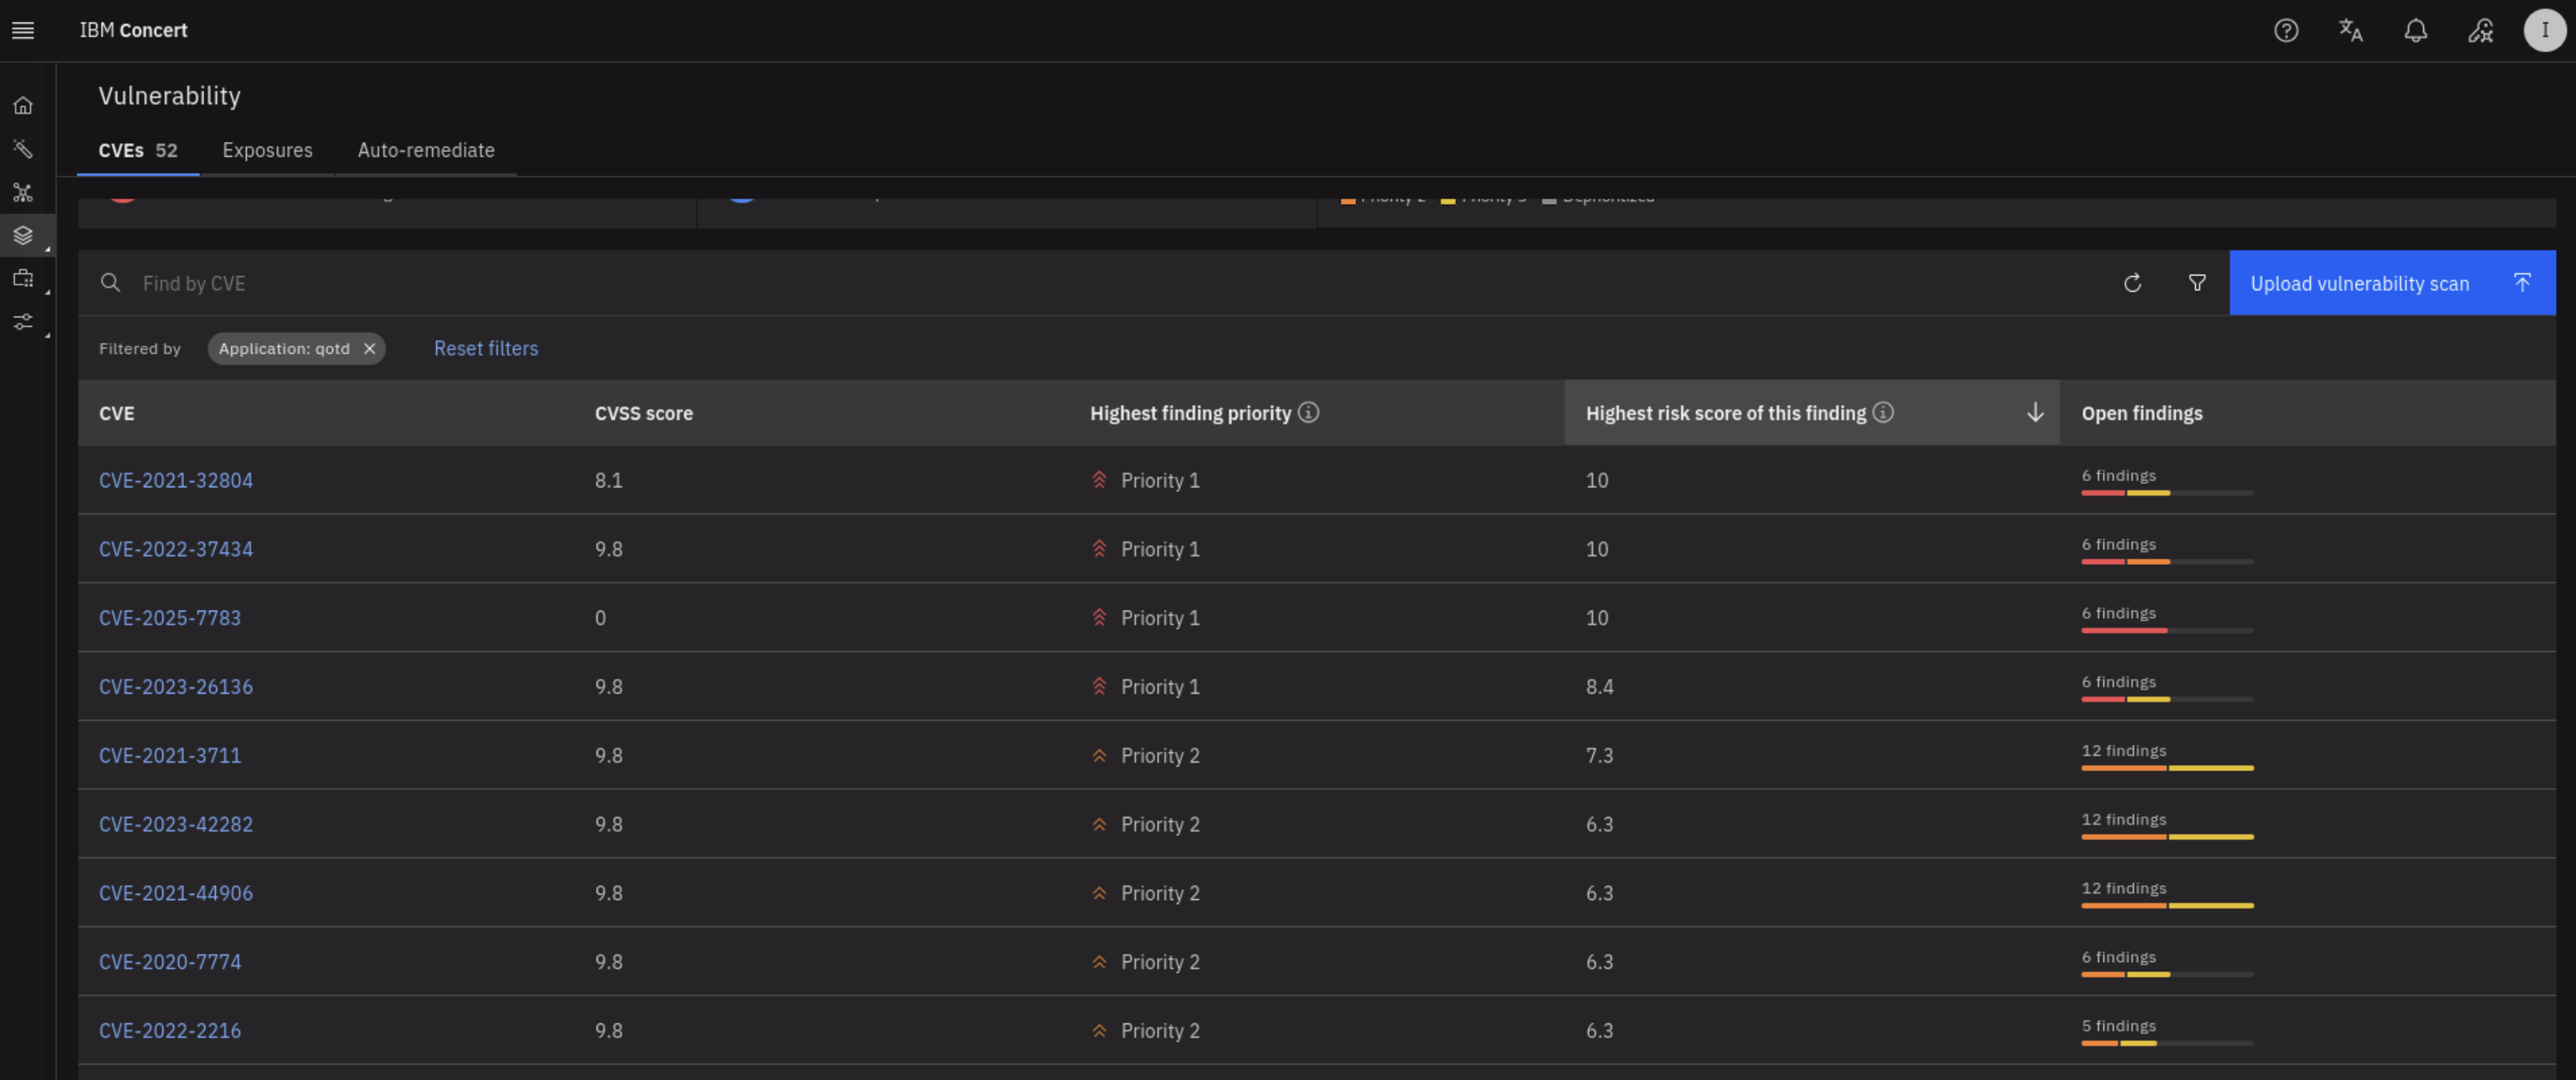
On the Vulnerability dashboard in Concert (Dimensions -> Vulnerability), click on the filter icon on the right and select the qotd application as shown below:
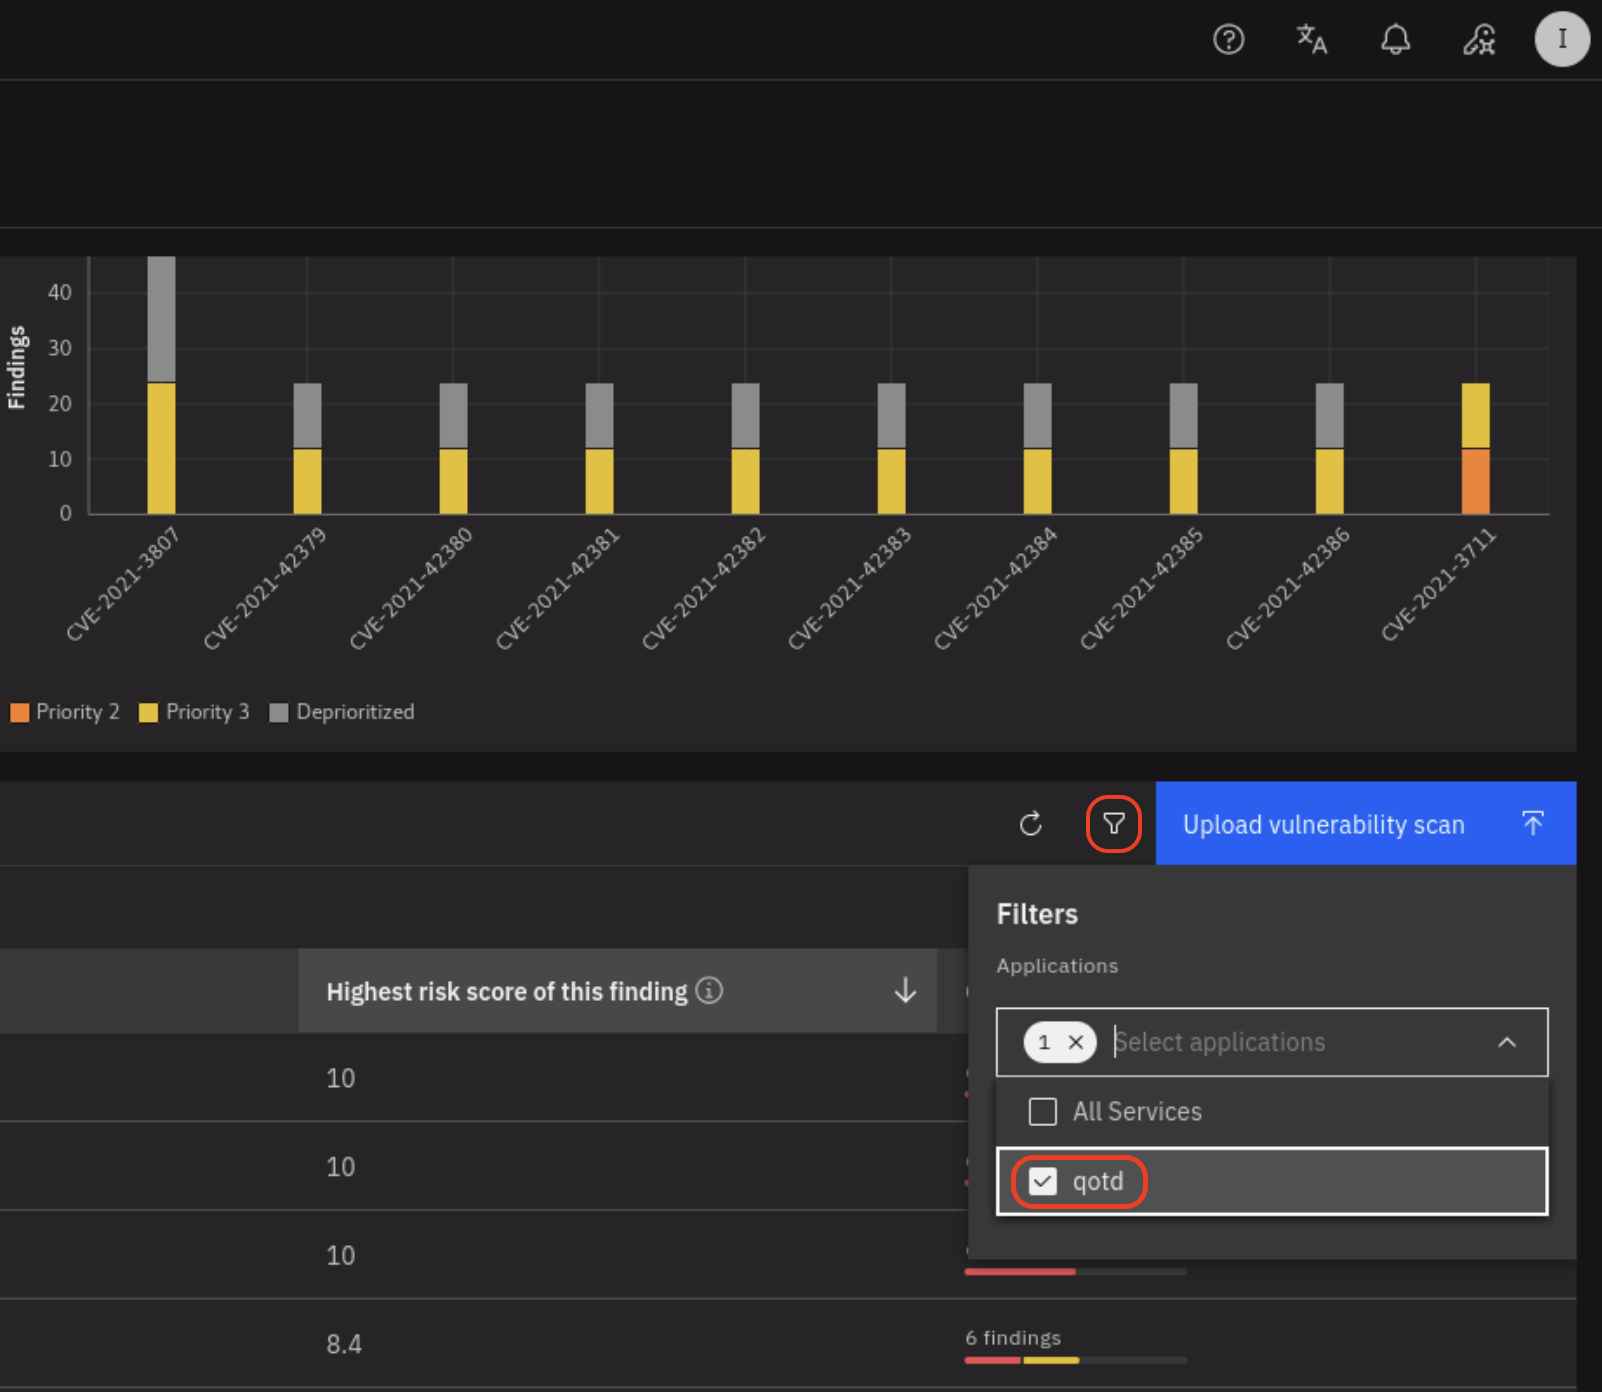
Click on the Highest risk score of this finding to sort downward (downward arrow) and see the highest risk score vulnerabilities first. Note that there are various CVEs with risk score >=4 as shown below:
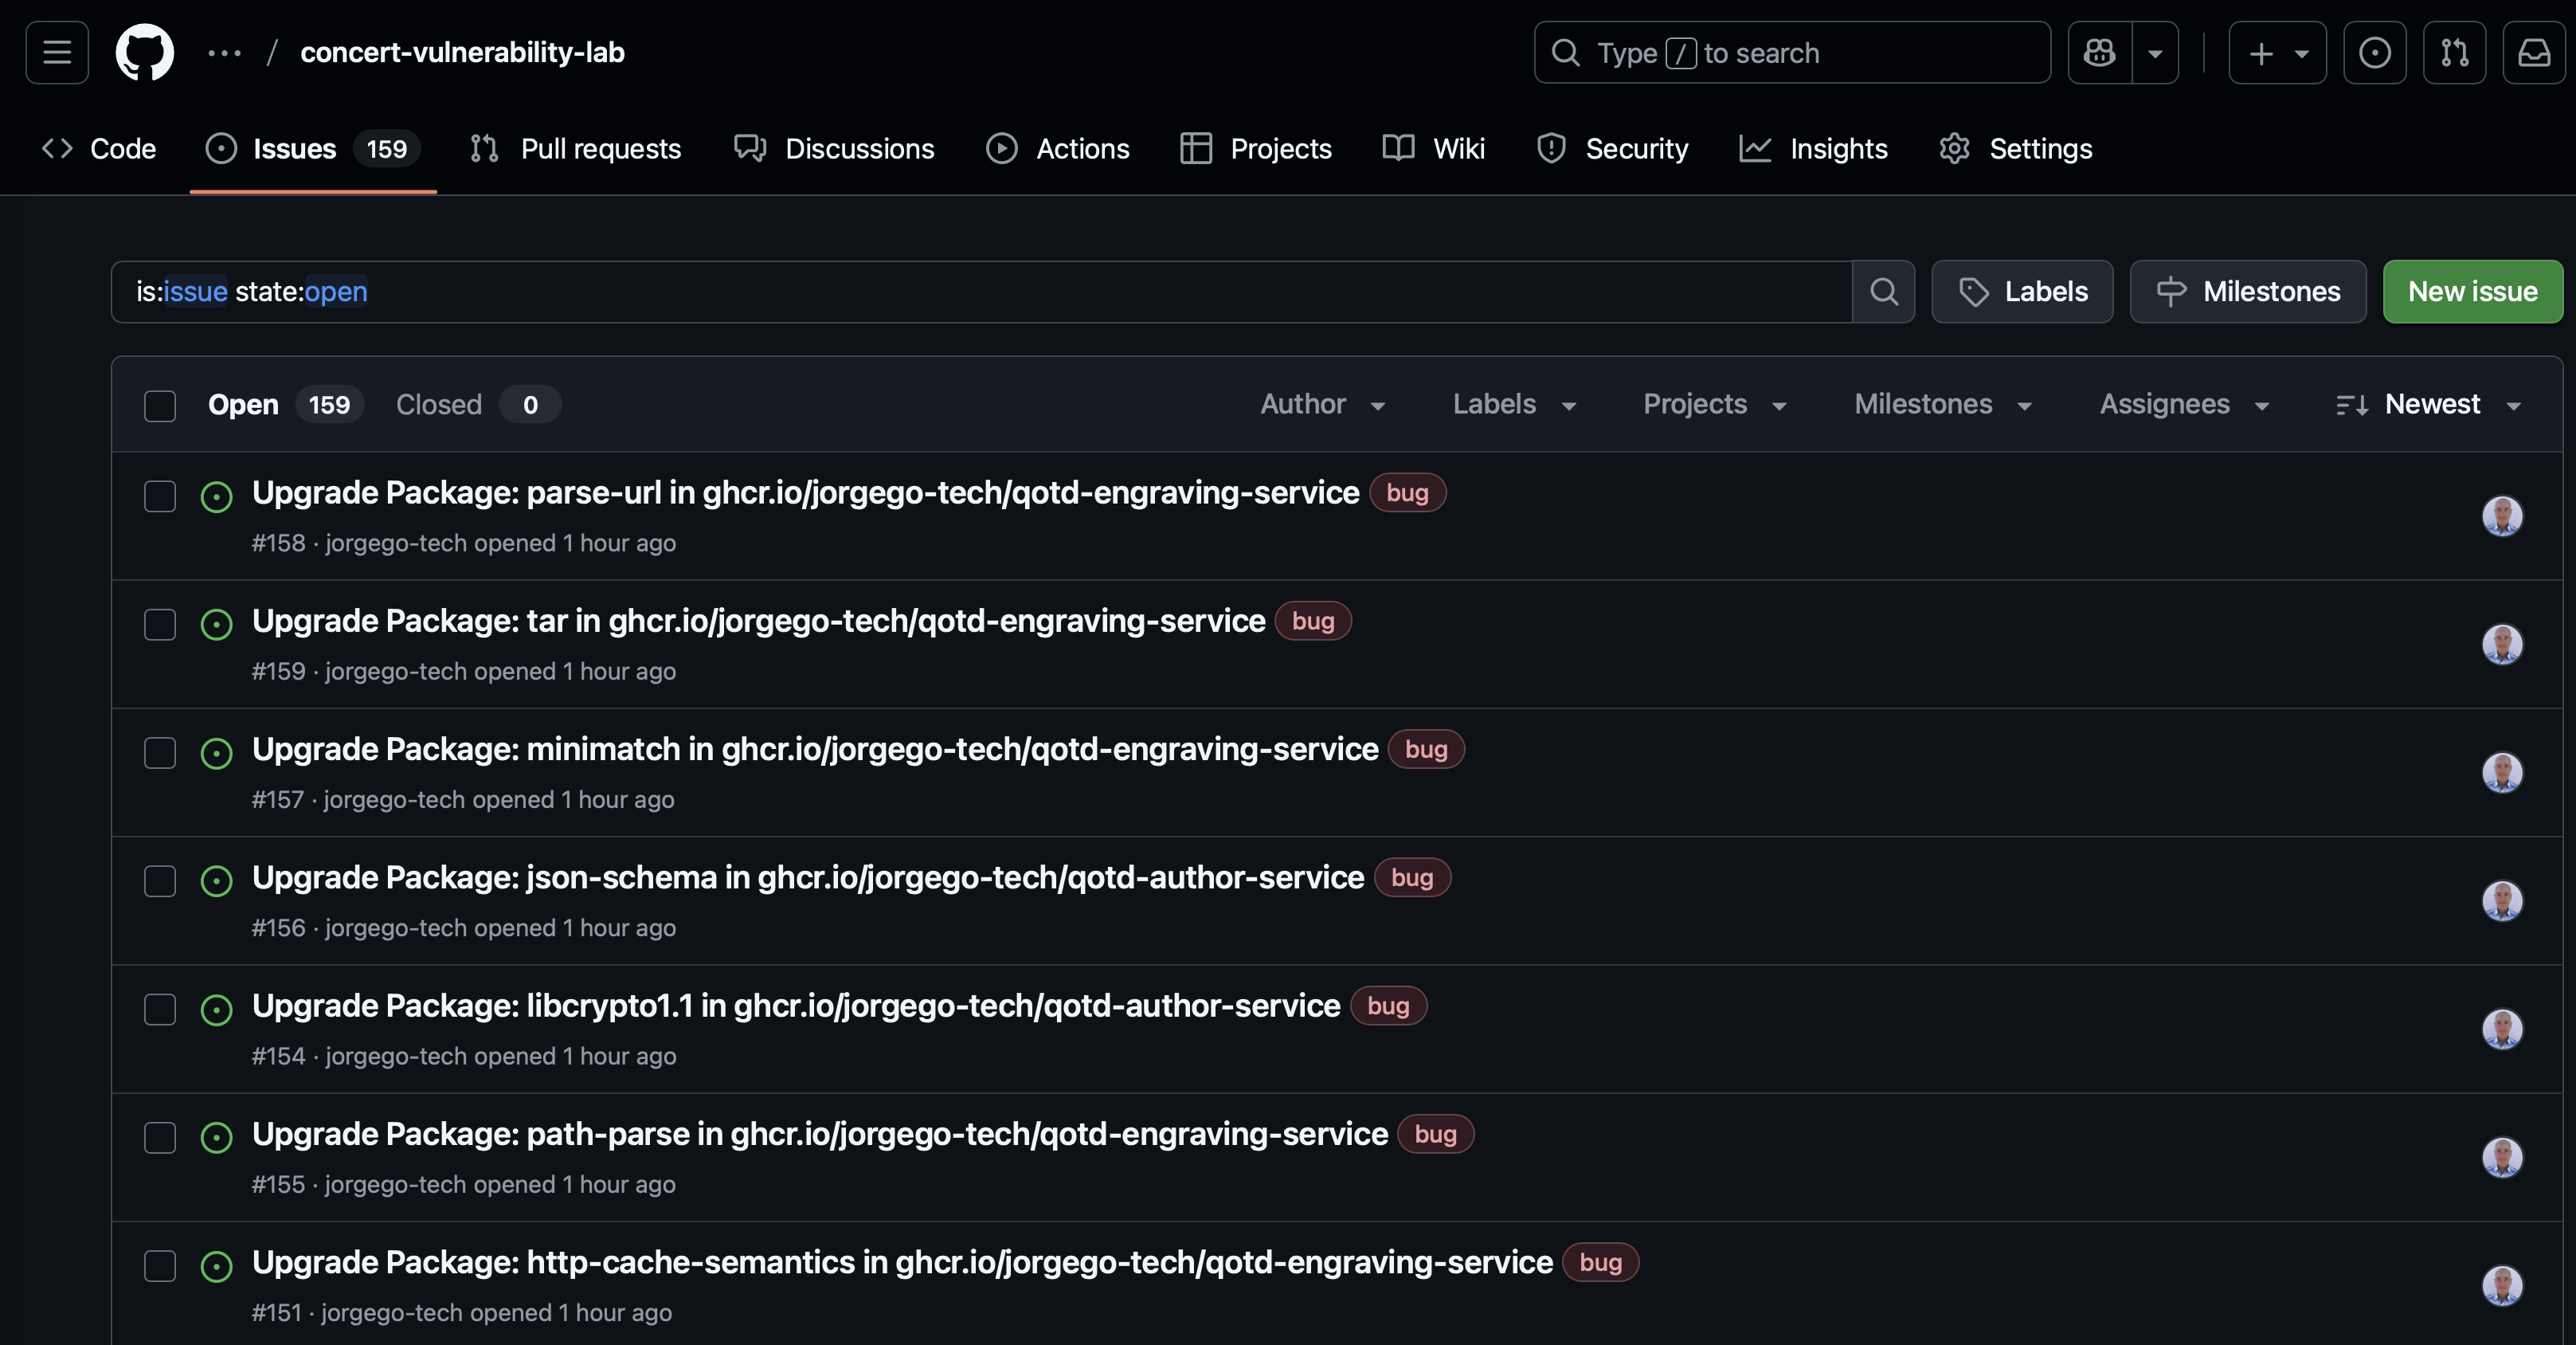
Now, on a new browser tab, login into your GitHub account and open the concert-vulnerability-lab repository. Select the Issues tab. Note that there are various issues created by Concert, one for each CVE finding.
6.7: Verifying Vulnerability Information in Instana
We will now verify that the vulnerability information is also visible in Instana. From the Bastion Remote Desktop, on the Firefox browser click on the Instana tab.
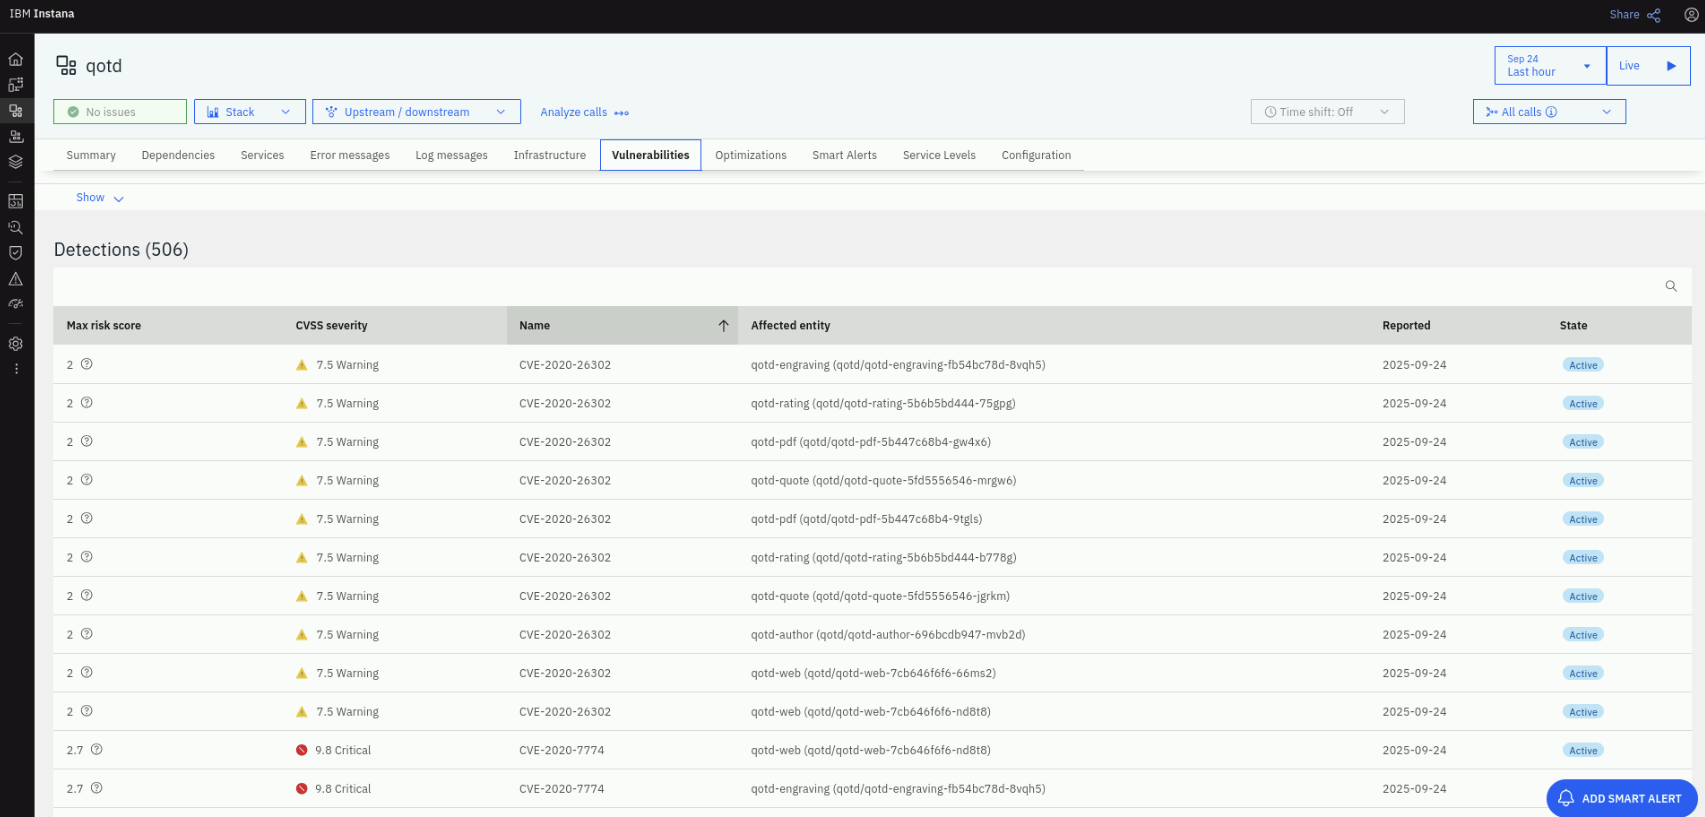
On the Instana dashboard, click on Applications on the left menu. On the Applications page, click on the qotd application. On the qotd application page, click on the Vulnerabilities tab. Note that the vulnerabilities found by the Trivy scanner are listed here as well because the Instana CVE Sensor that we have configured, pulls the vulnerability information from Concert.
If you don't see vulnerabilities listed, restart the Instana Agent deployed in the bluebox VM as described in section 4.3.1
ssh jammer@bluebox
sudo systemctl restart instana-agent
sudo systemctl status instana-agent
Then refresh the page after a couple of minutes.
Click on a CVE to see more details about the vulnerability.
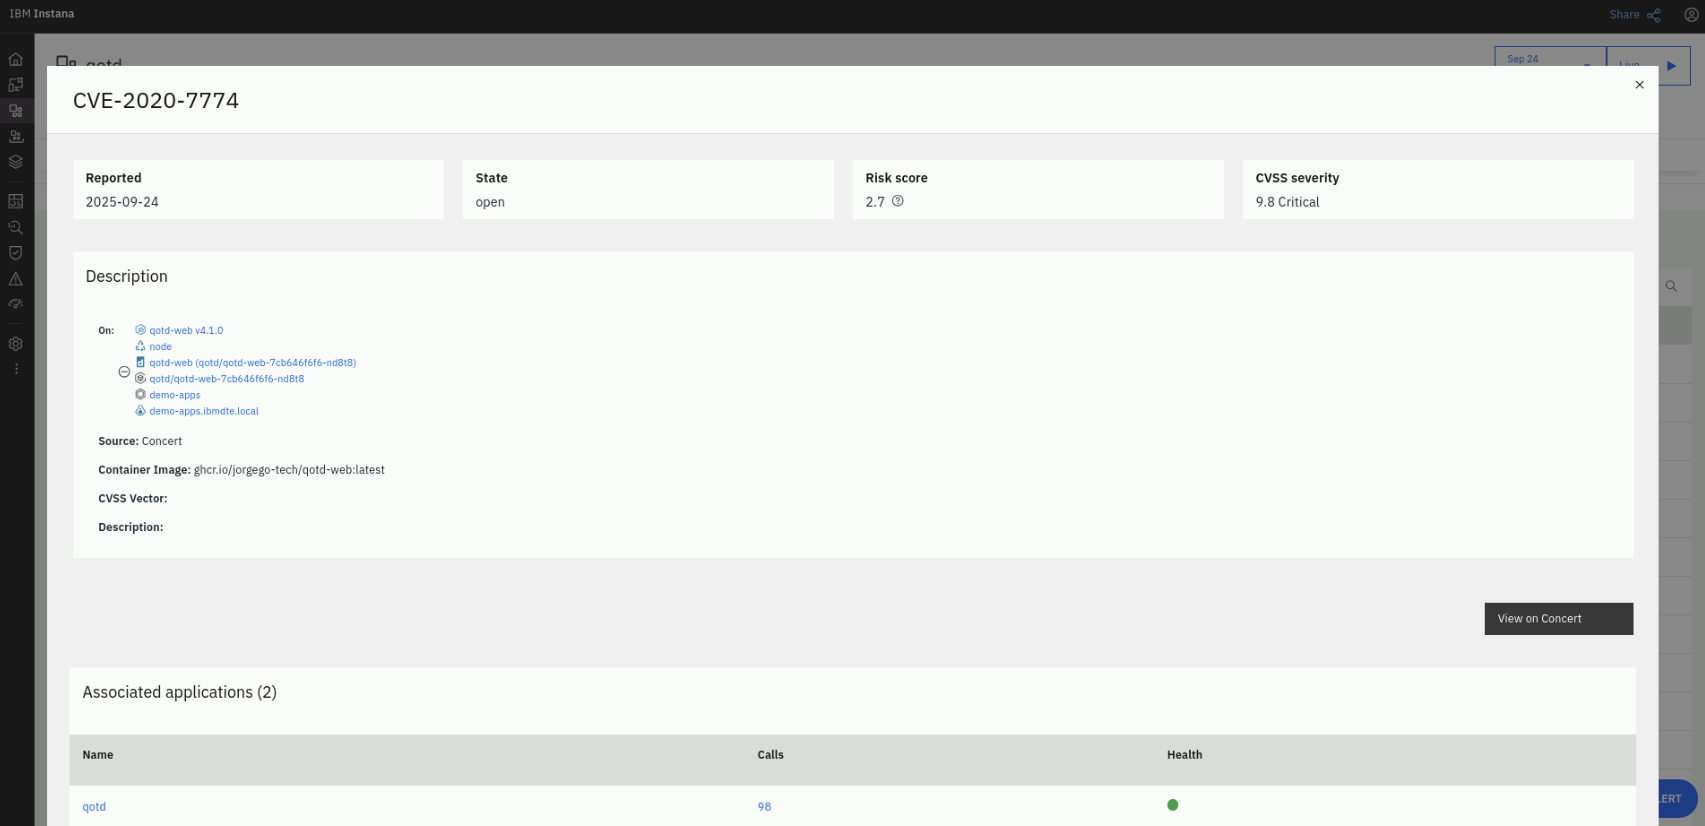
Note that you can see additional information about the vulnerability back in Concert using the View in Concert button on the right. Try it out!