Integrating IBM Application Discovery and Delivery Intelligence (ADDI) in CI/CD pipelines
Introduction
IBM® Application Discovery and Delivery Intelligence (ADDI) is a product that maps z/OS® artifacts belonging to mainframe applications, providing developers with reports and graphs that help them understand the relationships between the different z/OS components. Initially introduced to support the most common languages of the z/OS platform (COBOL, PL/I, and Assembler), ADDI has been enhanced over the last few years to support more and more artifact types: CICS® and IMS definitions, Db2® tables, JCL, job schedulers, and many more.
For IT departments using ADDI, this product has become the one-stop repository that contains all the necessary information to understand how the different components of a z/OS application work together. By providing detailed reports on cross-relationships and visual representation of artifact interconnections, ADDI facilitates the developers’ tasks, especially when it comes to discovering a new application, searching for a text string over multiple files, or performing an impact analysis before introducing a change.
ADDI builds its reference repository by scanning artifacts (COBOL, PL/I, or Assembler source code files, CICS CSD files, job scheduling plans, and so on) that are typically retrieved directly from the z/OS system. For source files, ADDI can integrate with popular legacy SCM solutions, such as Endevor or ChangeMan, and extract the necessary information or source code to perform its scan process. This step, known as a “Build” operation in ADDI, is driven by a major component of the product: the AD Build Client. To build the cross-reference database, the Build Client processes all the source files made available in the scope of an application and populates the corresponding tables in its repository.
Automating tasks in ADDI
With the growing number of projects and z/OS artifacts to manage, administrative users of ADDI raised the need for improved mechanisms to assist with their daily tasks. Originally, the Build Client was mainly a graphical interface, used for administrative tasks such as creating a project, populating it with artifacts, and building the project. To facilitate the management of ADDI and avoid manual intervention from the ADDI administration team, the Build Client was enhanced to support Batch commands. Through these additional capabilities, most (if not all) of the commands available through the graphical interface of the Build Client can be triggered through its command-line interface, which enables ADDI to be an integral part of the DevOps ecosystem. These command-line options are documented on the ADDI IBM Docs website.
Automating the scan process
The two main features that are essential to take full advantage of the ADDI product are the Build function (or Make function) and the refresh of existing source artifacts. As explained above, the Build function performed by the Build Client is processing the whole list of files that are part of a given project. This Build function is typically used when the project is created in ADDI, to correctly set the repository up and make sure all the artifacts are scanned. When the project has been correctly created, another feature is preferably used to update the project database in ADDI’s repository: the Make function. This feature, instead of processing all the files of the project, only processes the files that have changed since the last scan. Using the Make function drastically optimizes the scan process, both in terms of resources needed and elapsed time, and it is the recommended scan action for existing projects. This Make command can be called in a batch command as follows:
IBMApplicationDiscoveryBuildClient /m1 ProjectName /m2 y /m3 y
Where:
/m1is the parameter that is used to invoke the Make process.- ProjectName is the name of the project where the Make process is triggered.
/m2(y/n) refers to whether the Make process is forced or not as follows:/m2 ymeans that if another AD Component is using the project in read mode, the process starts./m2 nmeans that if another AD Component is using the project in read mode, the process does not start until the project is released.
/m3(y/n) refers to whether the status of the Make process is logged or not as follows:/m3 ymeans that the status log fileBatchMakeStatusFile_timestamp.txtis generated under the project's folder./m3 nmeans that the status log file is not generated.
Automating the refresh of source artifacts
The second important feature to leverage in this integration process is known as Upgrade Mainframe Members (UMM) in the Build Client. The purpose of this function is to refresh the source artifacts of a given project by retrieving them from their original location. For it to work properly, a Synchronization file must be created prior to using this function, in which references to storage locations for each type of artifact are declared. The ADDI documentation contains a section that details the expected content for this Synchronization file. The path of this Synchronization file must then be specified in the project’s configuration to fully enable this feature. Once the configuration is set up, this Synchronization task can be triggered through the Build Client command-line interface with the following command:
IBMApplicationDiscoveryBuildClient /umm1 ProjectName
Where:
/umm1is the parameter that is used to invoke the Synchronization process.ProjectNameis the name of the project where the Synchronization process is triggered.
Integrating ADDI with Git
As mentioned earlier, the Upgrade Mainframe Members feature is used to retrieve the latest versions of z/OS artifacts as defined by the Synchronization file. ADDI can detect new versions of files that are already on the filesystem of the machine hosting the ADDI product. This synchronization capability enables the use of Git to retrieve the source artifacts.
To support this feature, the LOCAL_REMOTE keyword option needs to be specified in the Synchronization file for the updates to be checked against the local filesystem. The LOCAL_REMOTE keyword is an option for the second field, known as “Library Type”, of each Synchronization file entry. The syntax is described in the ADDI documentation. The path of the directory containing the sources on the machine hosting ADDI must then be specified, to allow the Build Client to refresh the members that have changed since the last update. Filters can also be applied to narrow down the selection criteria. Using filters can be extremely helpful if directories contain different types of artifacts mixed together.
As described in the ADDI documentation, the LOCAL_REMOTE keyword can be used in the Synchronization file entries as follows:
MyProject, LOCAL_REMOTE, C:\IBM AD\Mainframe Sources\Local Sources, zOS Cobol, COBOL_MVS

MyProject, LOCAL_REMOTE, C:\IBM AD\Mainframe Sources\Local Sources, zOS Cobol, COBOL_MVS,
filter(*.cbl|*.cob)
With this configuration, it is not the responsibility of ADDI to retrieve the members from z/OS or from any other source, as it only checks which files have changed on the filesystem. This is where Git plays a major role to retrieve these files from a central Git provider. Assuming the source code files of a z/OS application are stored in a Git repository, a Git client installed on the machine where ADDI is hosted can retrieve the source files, by issuing Git commands such as git clone and/or git fetch.
For a demo of Git support in ADDI, please refer to the Additional resources section of this page.
Integrating ADDI in the CI/CD pipeline
The primary objective of integrating ADDI into a DevOps CI/CD pipeline is to provide the developers with valuable insights about the structure of the z/OS applications they are maintaining or enhancing. ADDI helps the developers understand the relationships between the different z/OS components, and is a powerful solution to perform impact analysis or document applications’ structures. However, it is important for developers to work on up-to-date information, and the freshness and accuracy of the data collected by ADDI plays a crucial role to ensure the analysis is correct. To keep up with all the changes occurring on z/OS source code files or artifacts, the best strategy to keep the ADDI model up to date is to implement automation, and to update and build changes in ADDI on a regular basis.
Setting up pre-requisites
In the previous sections, the integration with Git and the command-line options of the Build client were described. All the necessary pieces are now available to complete the integration of ADDI into an automated CI/CD pipeline. Before implementing the automated process to update and build ADDI projects, some technical pre-requisites must first be set up.
To enable the use of Git to synchronize source files stored in a Git repository, a Git client must be installed on the machine where ADDI is running, because the source components will be cloned there. To ensure the Git repository is accessible and can be safely cloned to the ADDI machine, a git clone operation can be manually performed. In subsequent steps, it is assumed this clone process will be performed by the CI/CD orchestrator, typically through its own mechanism.
On ADDI, a project must exist prior to the use of the Synchronization feature. It is recommended to create the project first, either through the Build Client user interface or with a command-line option. The project must then be enabled to support the Synchronization file, and this option is set through the AD Configuration Server.
The Synchronization file must exist and be populated with correct entries before running the automation process. To create the Synchronization file, the structure of the Git repository must be known: typically, each type of artifact lives in its own subdirectory in the Git repository. With this layout, each subdirectory will likely correspond to a line entry in the Synchronization file, potentially with filtering.
Although the automated process could be enabled when the above pre-requisites are met, it is highly recommended to manually test these operations beforehand. The list of tasks to perform are as follows:
- Manual
git cloneof the Git repository on the ADDI machine - Manual Upgrade Mainframe Members operation through the ADDI’s Build Client
- ADDI Build Client’s Build operation, to make sure the project can be built cleanly without any errors
- Verification of the project in ADDI’s Analyze Client
Performing a manual Build through the Build Client helps to verify the correct execution of this task, including the correct processing performed by the Batch Server in ADDI (that is, the generation of the Cross database and the creation of graphs in the GraphDB Database). At the end of this Build process, users should be able to consult reports and graphs for the given project in ADDI’s Analyze Client.
Implementing the automation process
When all the pre-requisites described in the previous section are met and verified, the automation process can be implemented and enabled. To enable the developers with fresh data, the automated update and build typically occurs when the state of a branch in the Git repository changes, as described by the recommended Git branching model for mainframe applications. In this branching model, one branch (called the main branch) reflects the history of mainline changes to the application's code base, while other branches may correspond to the application currently being in development (such as feature or epic branches), or the application currently running in production (such as a release maintenance branch). Developers may be interested in browsing the corresponding projects in ADDI, to visualize the differences between these states.
In a DevOps implementation, CI/CD pipelines are typically triggered after each change on specific branches. This mechanism can be leveraged to implement the required automation to update ADDI. In this configuration, an additional git clone action can be driven by the pipeline orchestrator to take place on the ADDI machine, and ADDI Build Client command-line interface actions can be integrated in the pipeline logic, as previously described.
Example of ADDI integration into an existing CI/CD pipeline
The following example uses the GitLab platform, but a similar implementation could easily be performed for any other CI/CD orchestrators using similar mechanisms to clone the Git repository to the Windows Virtual Machine hosting the ADDI installation, and to remotely execute commands on this machine.
Pre-requisites for the GitLab platform
As the CI/CD pipeline is driven by the GitLab CI/CD feature, a GitLab Runner must be installed on the machine where ADDI is running. The purpose of the GitLab Runner is to execute commands that are configured for the pipeline steps, including an automatic Git clone/fetch command to refresh the local clone of the project’s Git repository. The installation of the GitLab Runner is not covered in this documentation, but it is detailed in the official GitLab documentation.
Another pre-requisite is the installation of a Git client on the same machine. This Git client will be used to clone the content of the Git repository that contains the source code to analyze with ADDI. The Git client is available on many platforms and can be downloaded from the official Git website. Guidance about the installation of the Git client can be found on the Git documentation page Getting Started - Installing Git.
Setting up the pre-requisites on ADDI
The next step of the setup would be the creation of the project in ADDI. In the ADDI Build Client, navigate to File > New > New Project… to create a new project. Specify the Mainframe main languages option for the type of project to create. You are then prompted to name the project to create and the types of artifacts your project can contain:
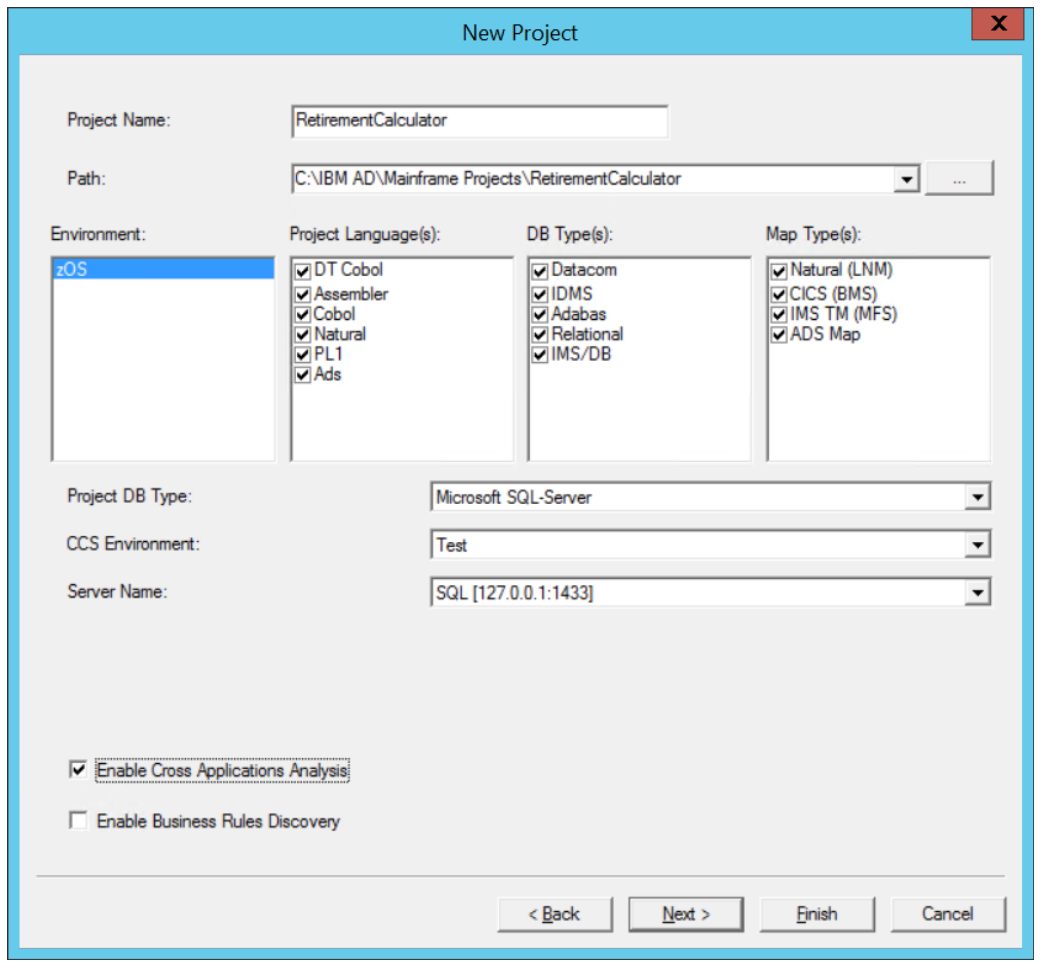
In this example, the project is called RetirementCalculator. Additional options such as the database attachment to use are also specified, along with the Cross Applications Analysis or the Business Rules Discovery. The creation of the project can now be finalized. The database for this project is then created.
The next step is to configure the project to enable the use of a Synchronization file. Using ADDI’s Administration Dashboard, select the Configure > Install Configurations tab, and navigate to the IBM Application Discovery Build Client install configuration link. On the displayed panel, the members synchronization must be enabled, and the path to a Synchronization file must be specified:

This file will contain the locations where the Build Client searches for updates on project’s source files. The contents of the file will be detailed in the next section.
To first build the project, source files must be added to the project. In the process of setting up the integration, a manual Git clone command will be run, to properly initialize the local Git repository. In this sample setup, the Git repository is made up of several branches that correspond to different states of the application. The GitLab Runner is configured to clone projects to a specific location containing the name of the branch in Git, controlled by the GIT_CLONE_PATH parameter. Using this capability, the location of the local Git repository is set to C:\Program Files\gitlab-runner\builds\RetirementCalculator\ADDI-Integration, where the branch that will be scanned through ADDI is called ADDI-Integration. The Git repository is locally cloned using a git clone command:
git clone http://gitlab.dat.ibm.com/dat/retirementCalculator.git "C:\Program Files\gitlab-runner\builds\RetirementCalculator\ADDI-Integration"

The content of the Git repository is now available on the local filesystem of the machine where ADDI runs:
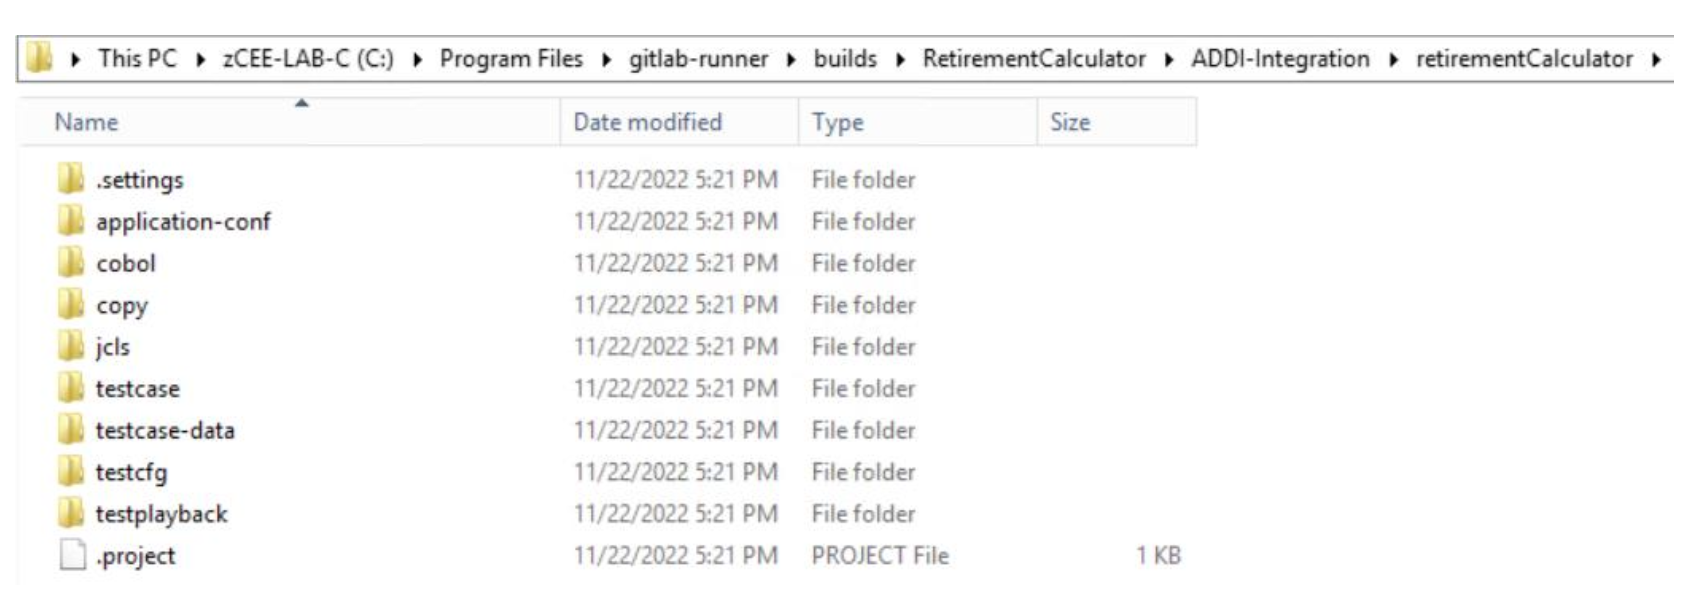
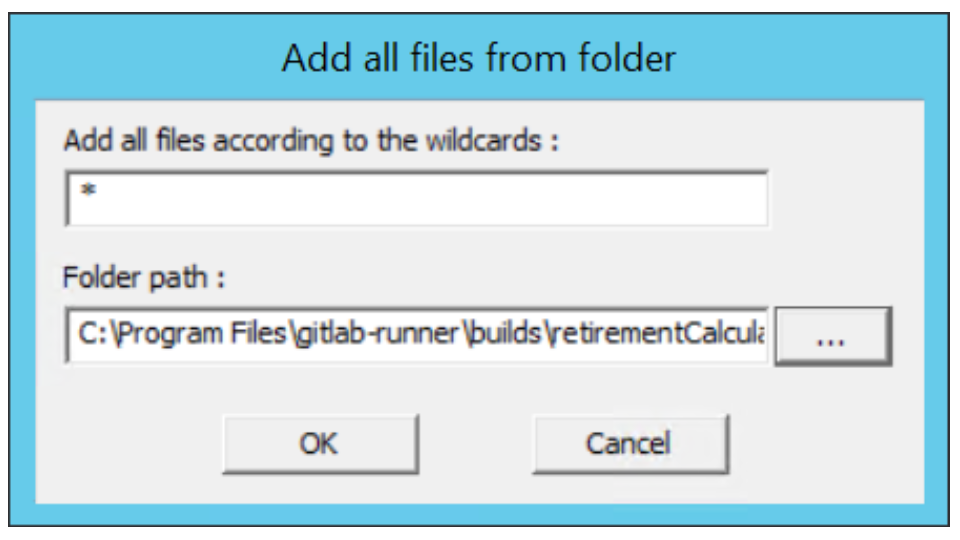
The source files can now be added to the project through the Build Client. For all the artifact types of your project, right-click on the corresponding virtual folder, and select Add all files from folder. In the next panel, specify the folder path where your source files were cloned.
In the following example image, the path C:\Program Files\gitlab-runner\builds\RetirementCalculator\ADDI-Integration\retirementCalculator\cobol is specified for the zOS Cobol virtual folder:
The same operation must be repeated for the different types of artifacts of the project. When done, the project is ready to be built with the Build Client. Select the Build > Build Project menu option to build the project. If any major error is encountered, some other artifacts may be needed to complete the build process. When the project is successfully built, the initial ADDI setup can be marked as complete.
Implementing the integration with the CI/CD pipeline
To automate the synchronization and the Make of the ADDI project, the next step is to test the command-line options of the Build Client. However, prior to running the Build Client batch commands, the Synchronization file must be correctly populated. This file contains entries that dictate where the Build Client will look for updates. Each line describes the type of artifacts to load and the folder location where these artifacts are stored.
For the sample RetirementCalculator project, the files are stored in subfolders of the C:\Program Files\gitlab-runner\builds\RetirementCalculator\retirementCalculator folder. Three main artifact types are part of this project: COBOL programs, COBOL include files, and JCLs. The Synchronization file contains 3 entries referring to this setup:
*Synchronization against LocalSources
RetirementCalculator,LOCAL_REMOTE,C:\Program Files\gitlab-runner\builds\RetirementCalculator\ADDI-
Integration\retirementCalculator\cobol,zOS Cobol,COBOL_MVS
RetirementCalculator,LOCAL_REMOTE,C:\Program Files\gitlab-runner\builds\RetirementCalculator\ADDI-
Integration\retirementCalculator\copy,Cobol Include,COPY
RetirementCalculator,LOCAL_REMOTE,C:\Program Files\gitlab-runner\builds\RetirementCalculator\ADDI-
Integration\retirementCalculator\jcls,JCL,JCL

To validate the update of source files through the Synchronization file, the following command can be used:
IBMApplicationDiscoveryBuildClient /umm1 RetirementCalculator
This command launches the Build Client with no graphical interface, to update the source files from the local filesystem.
The next command to check is the Make of the project.
IBMApplicationDiscoveryBuildClient /m1 RetirementCalculator /m2 y /m3 y
When the process is complete, a log file is created and made available in the project folder. It should show that no updates are found (since the Build was previously performed on the same source files):
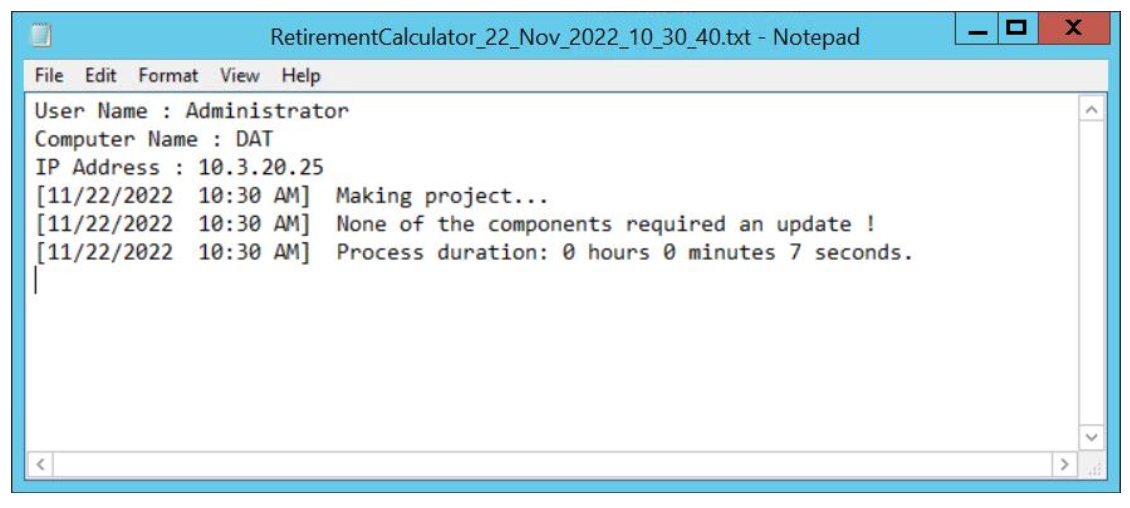
The next setup phase is to implement these two command-line actions in the CI/CD pipeline. In this example, GitLab will be used to drive the execution of the CI/CD pipeline. An additional step of the pipeline is then declared to call the ADDI Build Client with the two command-line options.
The pipeline description for GitLab is as follows:
ADDI Refresh:
    stage: Analysis
    tags: [addi]
    dependencies: []
    variables:
        ADDI_PROJECT_NAME: RetirementCalculator
    script:
        - |
            & 'C:\Program Files\IBM Application Discovery and Delivery Intelligence\IBM Application Discovery Build Client\Bin\Release\IBMApplicationDiscoveryBuildClient.exe' /umm1 ${ADDI_PROJECT_NAME}
            & 'C:\Program Files\IBM Application Discovery and Delivery Intelligence\IBM Application Discovery Build Client\Bin\Release\IBMApplicationDiscoveryBuildClient.exe' /m1 ${ADDI_PROJECT_NAME} /m2 y /m3 y
In the script section, the two Build Client commands are run in sequence, in a synchronous way. The first command will synchronize the project based on the content of the Synchronization file, and the second command will trigger the Make processing in ADDI.
The GitLab Runner has been configured to clone into a specific location, as specified by the GIT_CLONE_PATH variable. In this sample setup, this variable is set to $CI_BUILDS_DIR/$CI_PROJECT_NAME/$CI_COMMIT_REF_NAME, which resolves to C:\Program Files\gitlab-runner\builds\RetirementCalculator\ADDI-Integration on the Windows machine where ADDI is running. It is necessary to ensure that this path is consistent with the path configured in the Synchronization file, to take updates of source files into account.
After applying a change to the EBUD01 COBOL program of the RetirementCalculator project, the execution of the CI/CD pipeline shows the integration of the ADDI Refresh step. This step executed successfully and shows the following output log:
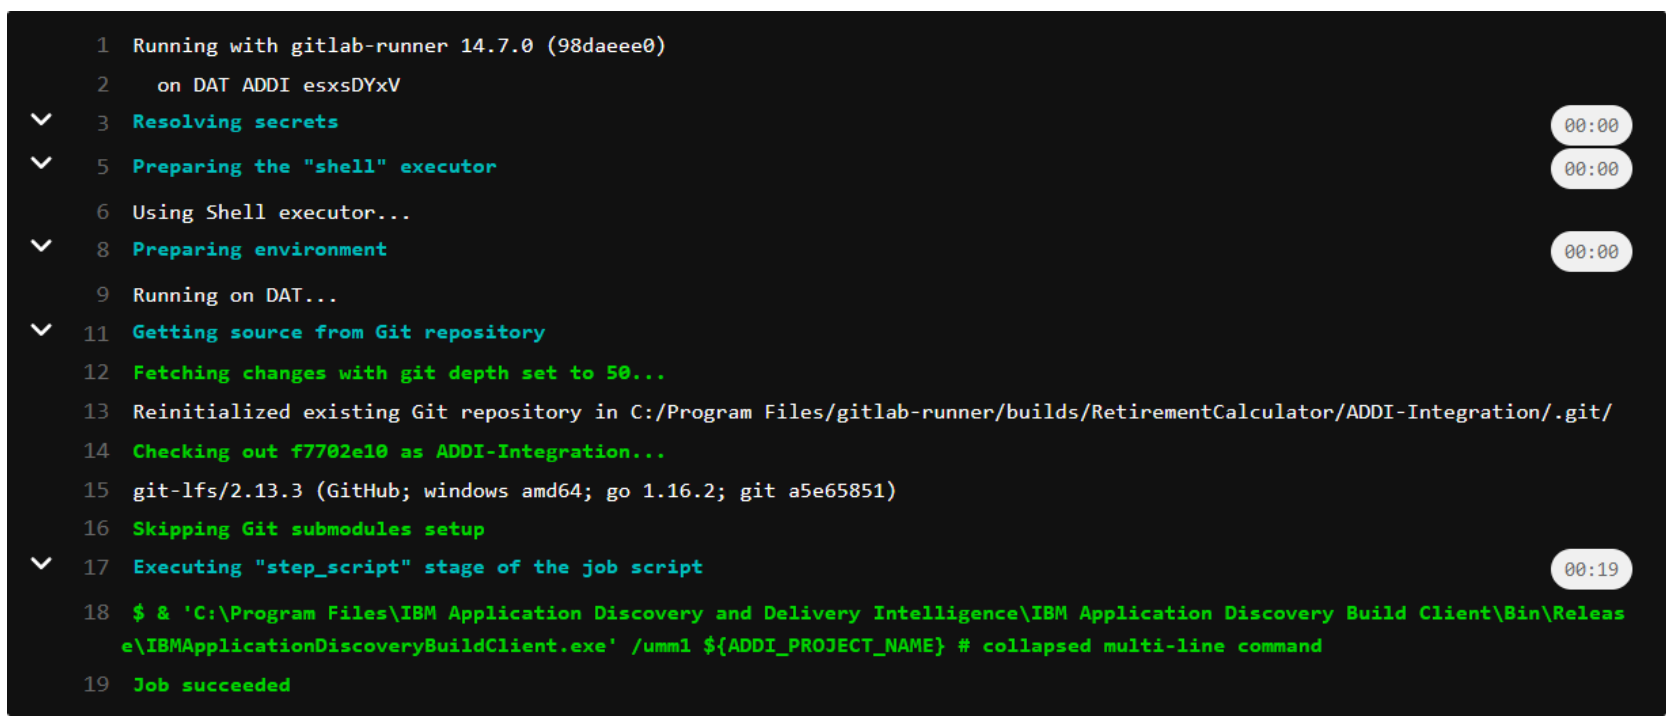
On the machine where ADDI runs, a log file is created in the ADDI project’s folder once the Make process is finished. This log file shows that the update to the EBUD01 program was correctly processed and built by ADDI:

Shortly after this successful processing, the updated analysis is available through the Analyze Client in Eclipse.
Conclusion
This documentation describes how the integration of ADDI could be performed in a CI/CD pipeline. Depending on the SCM solution and CI/CD orchestrator being used, this integration can slightly differ, thereby leveraging other provided capabilities.
In this sample implementation, only one project is created in ADDI, but it may be interesting to have different projects for different states of the same application. A project in ADDI could represent the application in its main (mainline change history) state and another project could represent the application in production. This implementation would require two distinct projects in ADDI, and some changes in the Synchronization file and the CI/CD process. In this configuration, the number of entries in the Synchronization file would double, due to configuration for the two projects referring to different locations on the filesystem where branches are checked out.
Another option for the implementation would be to optimize the execution of the ADDI Build Client commands. In the sample implementation described in this documentation, each change to the in-development branch of the Git repository triggers the pipeline to refresh ADDI. If too many updates are occurring on the application, especially in its in-development state, there may be some interest to run the update process only once a day. This can be managed by a CI/CD orchestrator or using the cron utility.
In the pre-requisites setup, it is recommended to run the creation of the project manually, along with some other Git commands to initially clone the Git repository to the local filesystem. Also, adding the files from Git to the project through the Build Client is manually performed, to ensure the sources are correctly loaded and eventually built. This whole process could also be automated as the Build Client provides command-line options to create projects and add files to the projects. However, it is safer, at least for the first project, to manually perform these operations to ensure a correct configuration. Automation could be set up once the whole process is understood and mastered.
Additional resources
The following video series demonstrates ADDI's Git support, including the local synchronization process, command-line interface commands and automation flow, and how to automatically populate and update ADDI projects in Git.
- ADDI and Git Support - Part 1:
- ADDI and Git Support - Part 2: