In this getting started tutorial, we’ll take you through how to use Event Processing to create a simple flow. The flow uses a filter node to select a subset of events.
For demonstration purposes, we use the scenario of a clothing company who want to move away from reviewing quarterly sales reports to reviewing orders in their region as they occur. Identifying large orders in real time helps the clothing company identify changes that are needed in sales forecasts much earlier. This information can also be fed back into their manufacturing cycle so that they can better respond to demand.
Building a simple flow that uses a filter node
The steps in this getting started tutorial should take you about 10 minutes to complete.
Before you begin
- This getting started scenario assumes that all the capabilities in Event Automation are installed.
- Connect with your cluster administrator and get the server address for the topic you have to access.
- Keep your instance open on the topic page because you need to use information from it when you create your flow.
- Open Event Processing in a separate window or tab.
This getting started scenario assumes that there is an order details available through a Kafka topic, and the topic is discoverable in Event Endpoint Management. For example, in this scenario, the clothing company have a topic in their Event Endpoint Management catalog called ORDERS.NEW. This topic emits events for every new order that is made.
Step 1: Create a flow
- On the Event Processing home page, click Create.
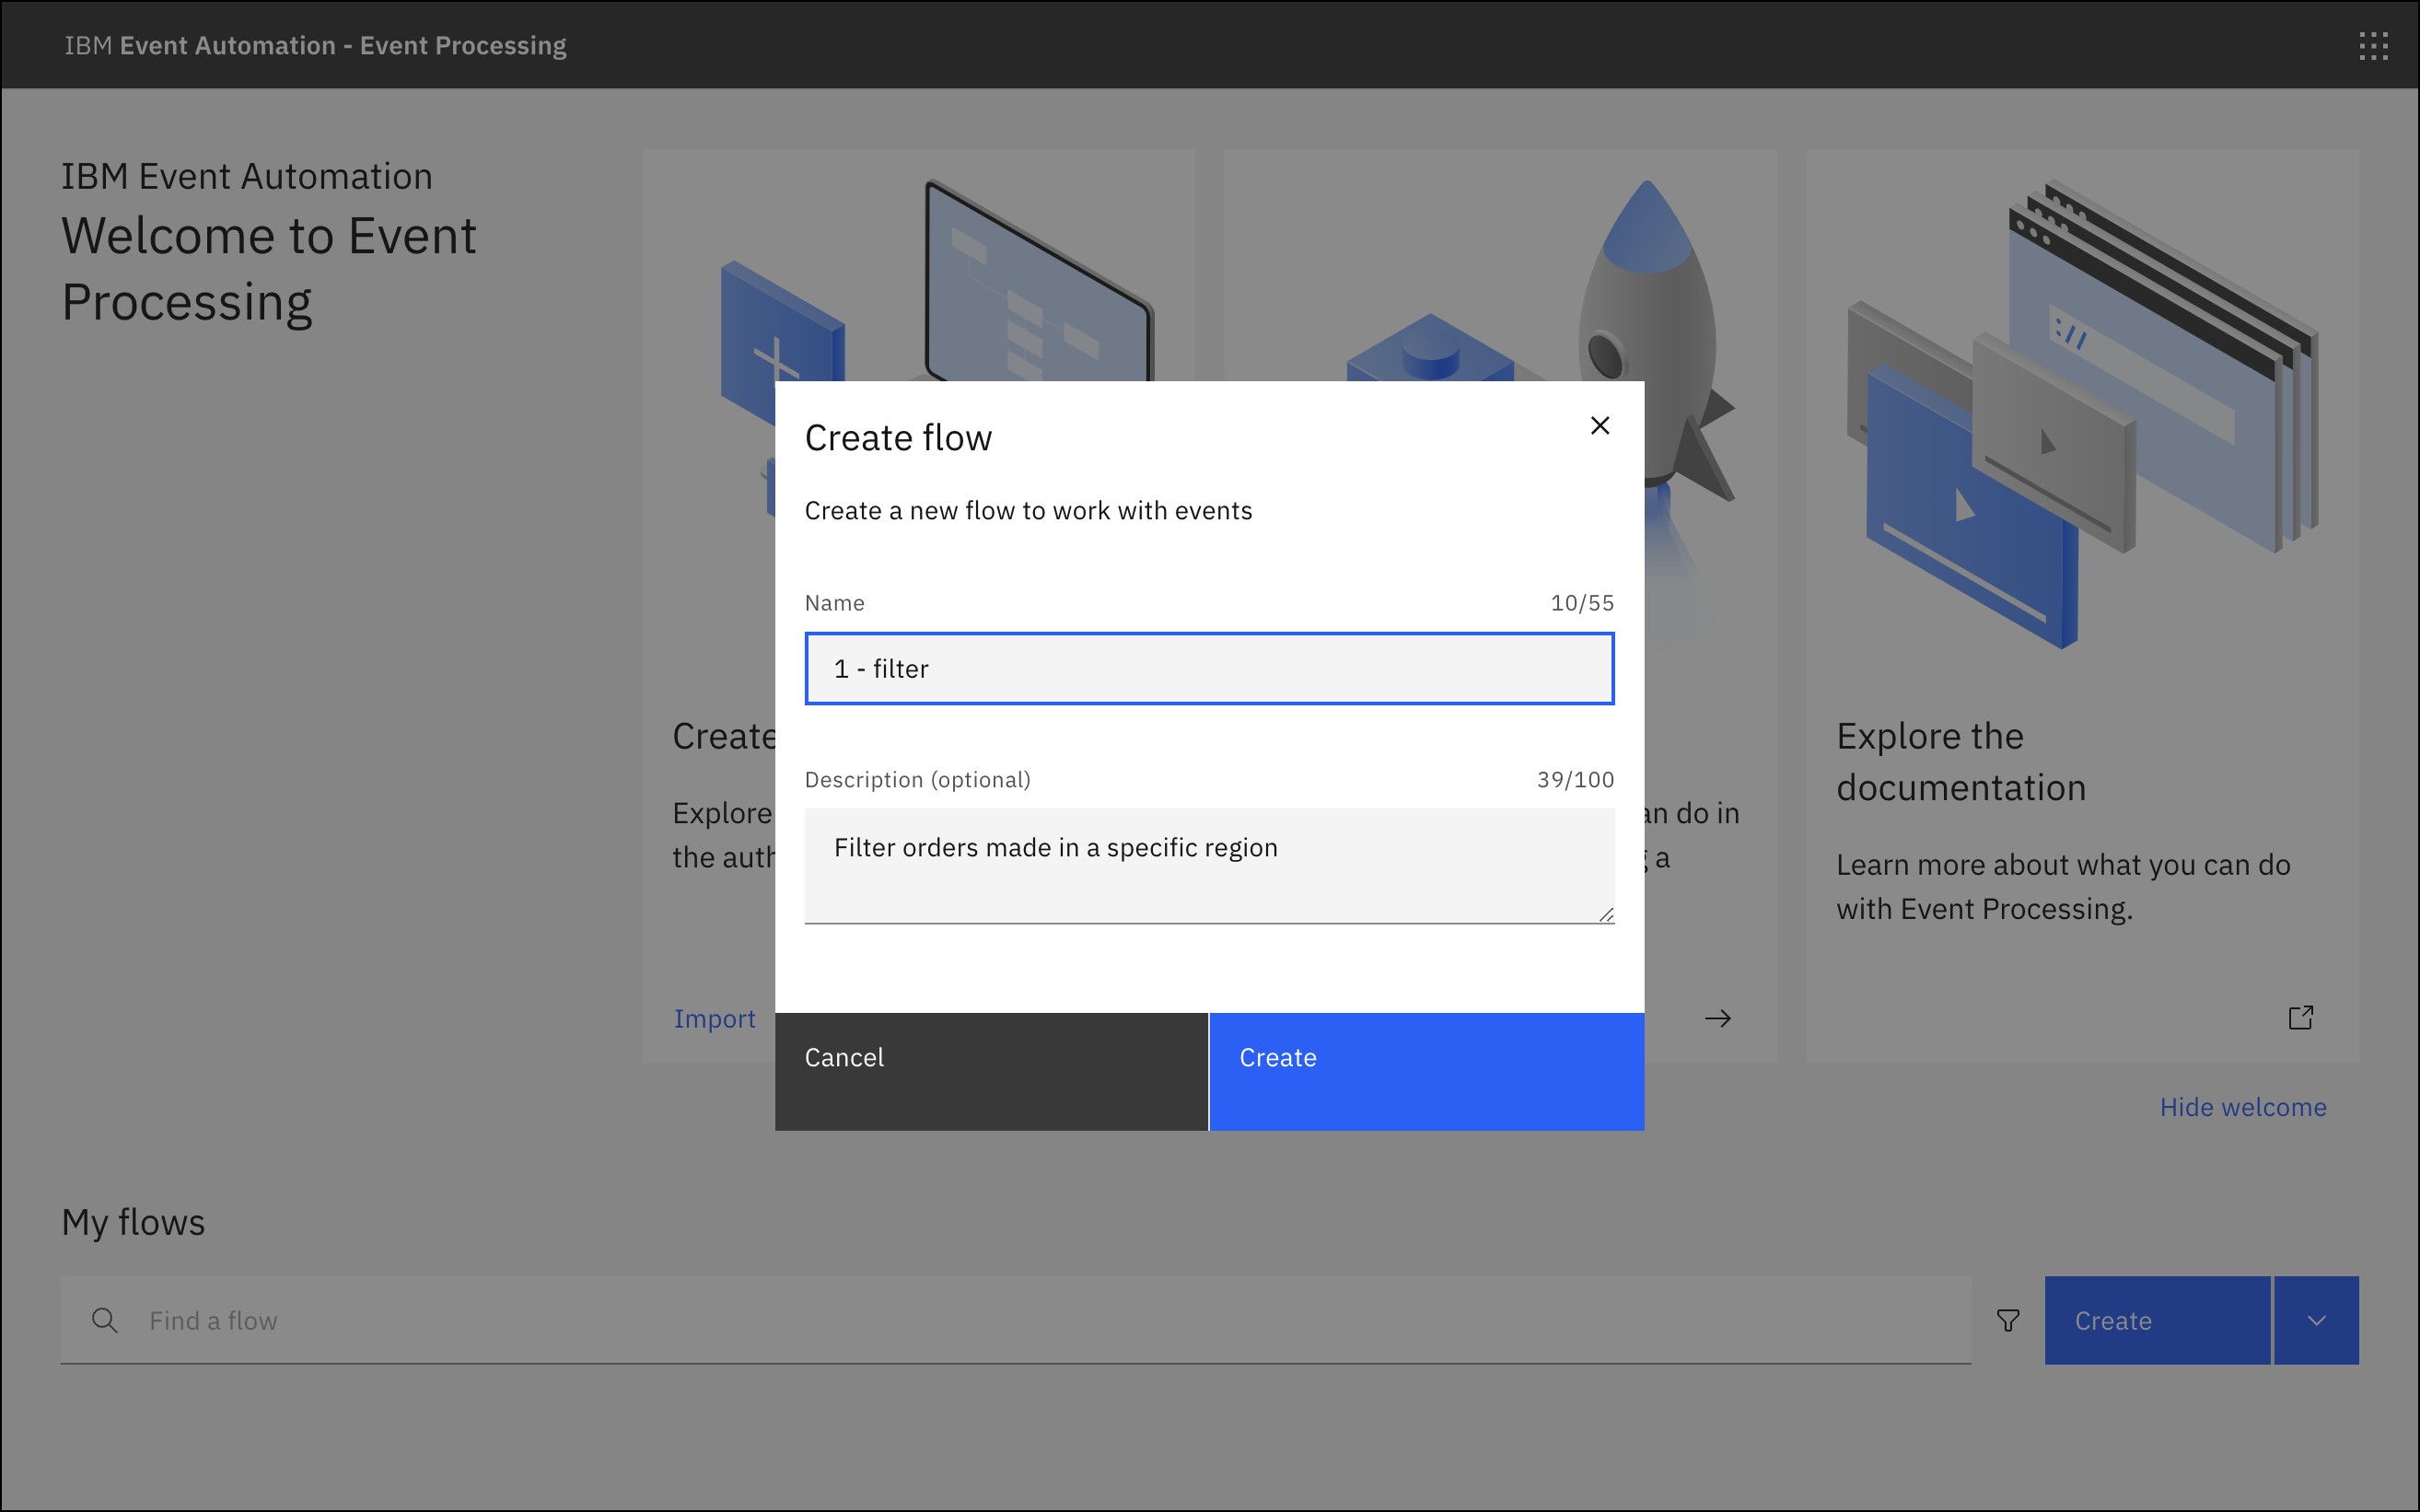
- Provide a name and optionally a description for your flow.
- Click Create. An empty canvas for your flow is displayed.
The clothing company created a flow called Filter and provided a description to explain that this flow will be used to identify orders made in a specific region.

Step 2: Add an event source node
- In the sidebar, in the Events section, drag the Event source node onto the canvas.
- Hover over the source node and click
Edit. The Configure event source window is displayed.
Step 3: Configure an event source
- You need to provide the source of events that you want to process. To do this, start by adding an event source, select Add new event source > Next.
- In the Details pane, provide a name for the node.
-
In the Connect to Kafka cluster section, provide the server address of the Kafka cluster that you want to connect to. You can get the server address for the event source from your cluster administrator.
Note: To add more addresses, click Add URL + and enter the server address.
- Click Next. The Access credentials pane is displayed.
- Provide the credentials that are required to access your Kafka cluster and topic. You can generate access credentials for accessing a stream of events from the Event Endpoint Management page. For more information, see subscribing to topics.
- Click Next. The Topic selection pane is displayed.
- Use the radio buttons to confirm the name of the topic that you want to process events from.
- Click Next. The Define event structure pane is displayed.
-
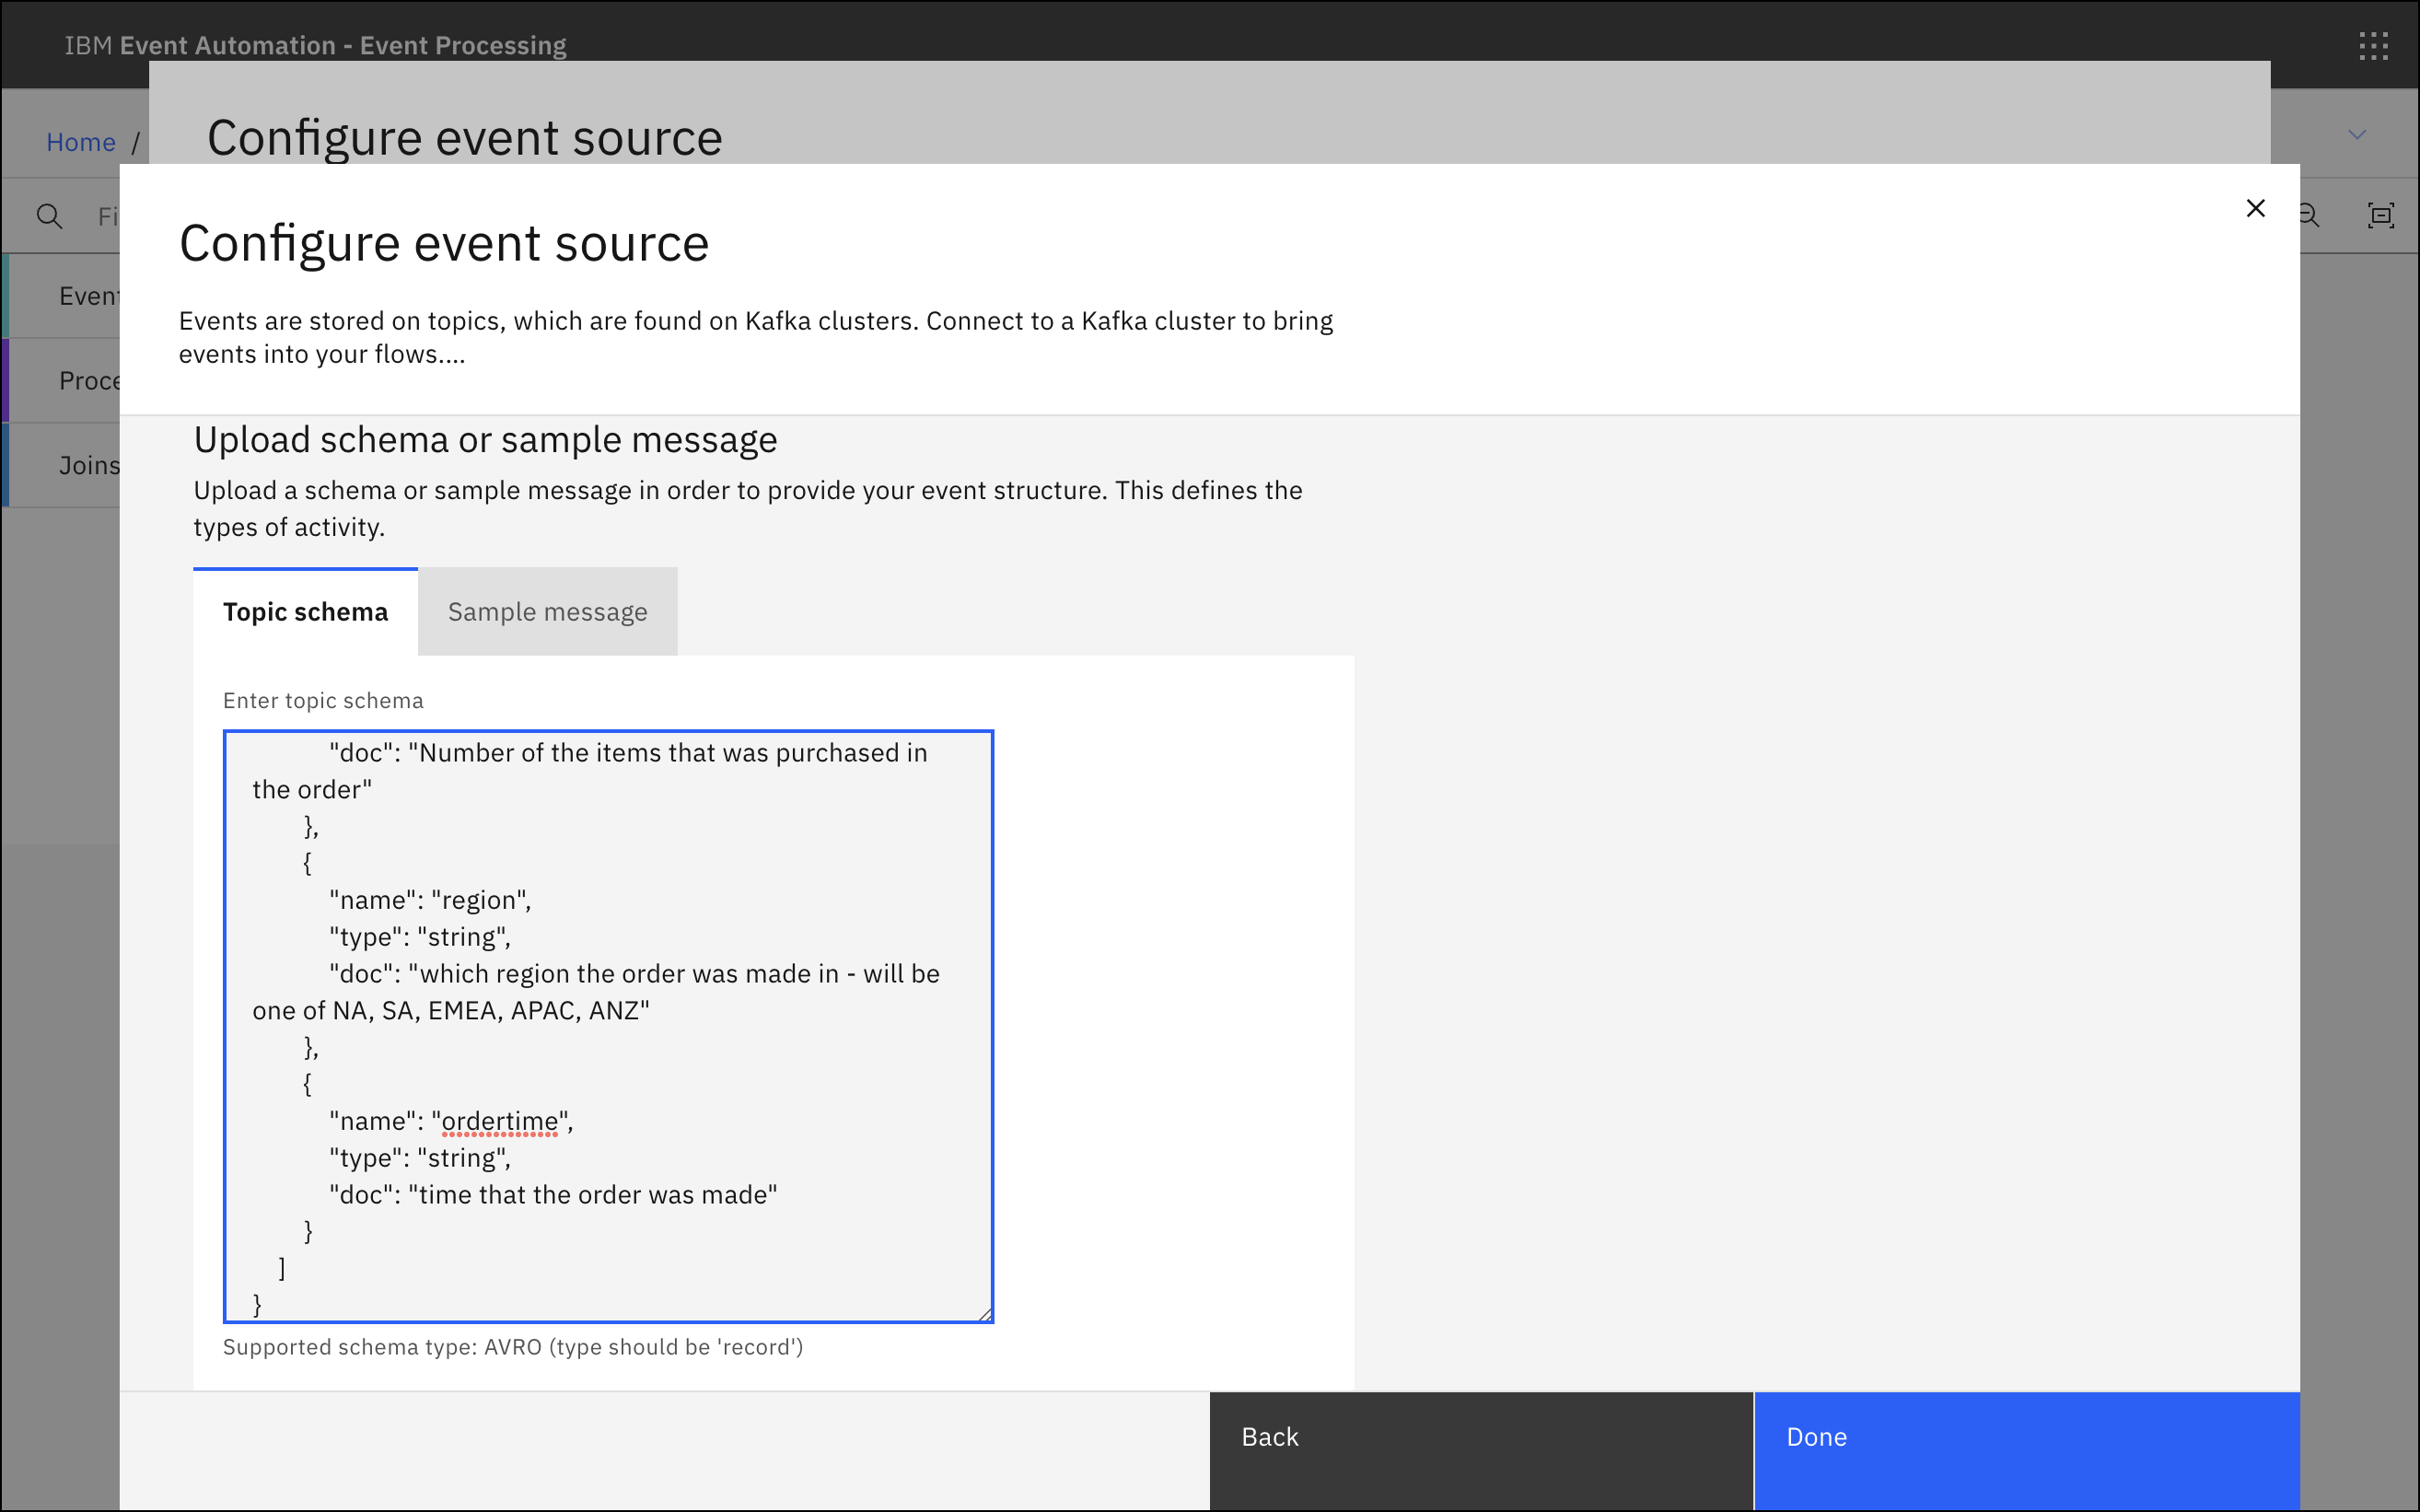
Provide a schema or sample message available from the topic. To do this, click Upload a schema or sample message + and paste a valid schema into the Topic schema or the Sample message tab.
Enter an Avro schema in the Topic schema tab, or click the Sample message tab and enter the sample message in JSON format. For more information, see Event information.
- Set an event time and leave the event source to be saved for later reuse. Saving the connection details makes creating similar event sources a lot quicker because there is no need to enter the same details again.
- Click Configure. The canvas is displayed and your event source node has a green checkmark, which indicates that the node has been configured successfully.

- Saving
 indicates that saving is in progress.
 - Saved
 confirms success.
 - Failed
 indicates that there are errors. If an action fails to save automatically, you receive a notification to try the save again. Click Retry to re-attempt the save. When a valid flow is saved, you can proceed to run the job.
If you are running versions earlier than 1.0.5, click Save in the navigation banner to save the flow.
The clothing company called their event source Orders and used the schema for their Order events topic in Event Endpoint Management to update the topic schema tab in Event Processing.

Step 4: Add a filter
- On the Palette, in the Processors section, drag a Filter node onto the canvas.
- Drag the output port on the event node to the input port on the filter to join the two nodes together.
- Hover over the source node and click
Edit.
The Configure filter window is displayed.
Step 5: Configure the filter
- Now, you need to configure the filter that defines the events that you are interested in. To do this, in the Details section, provide a name for the filter node.
- Click Next. The Define filter pane is displayed.
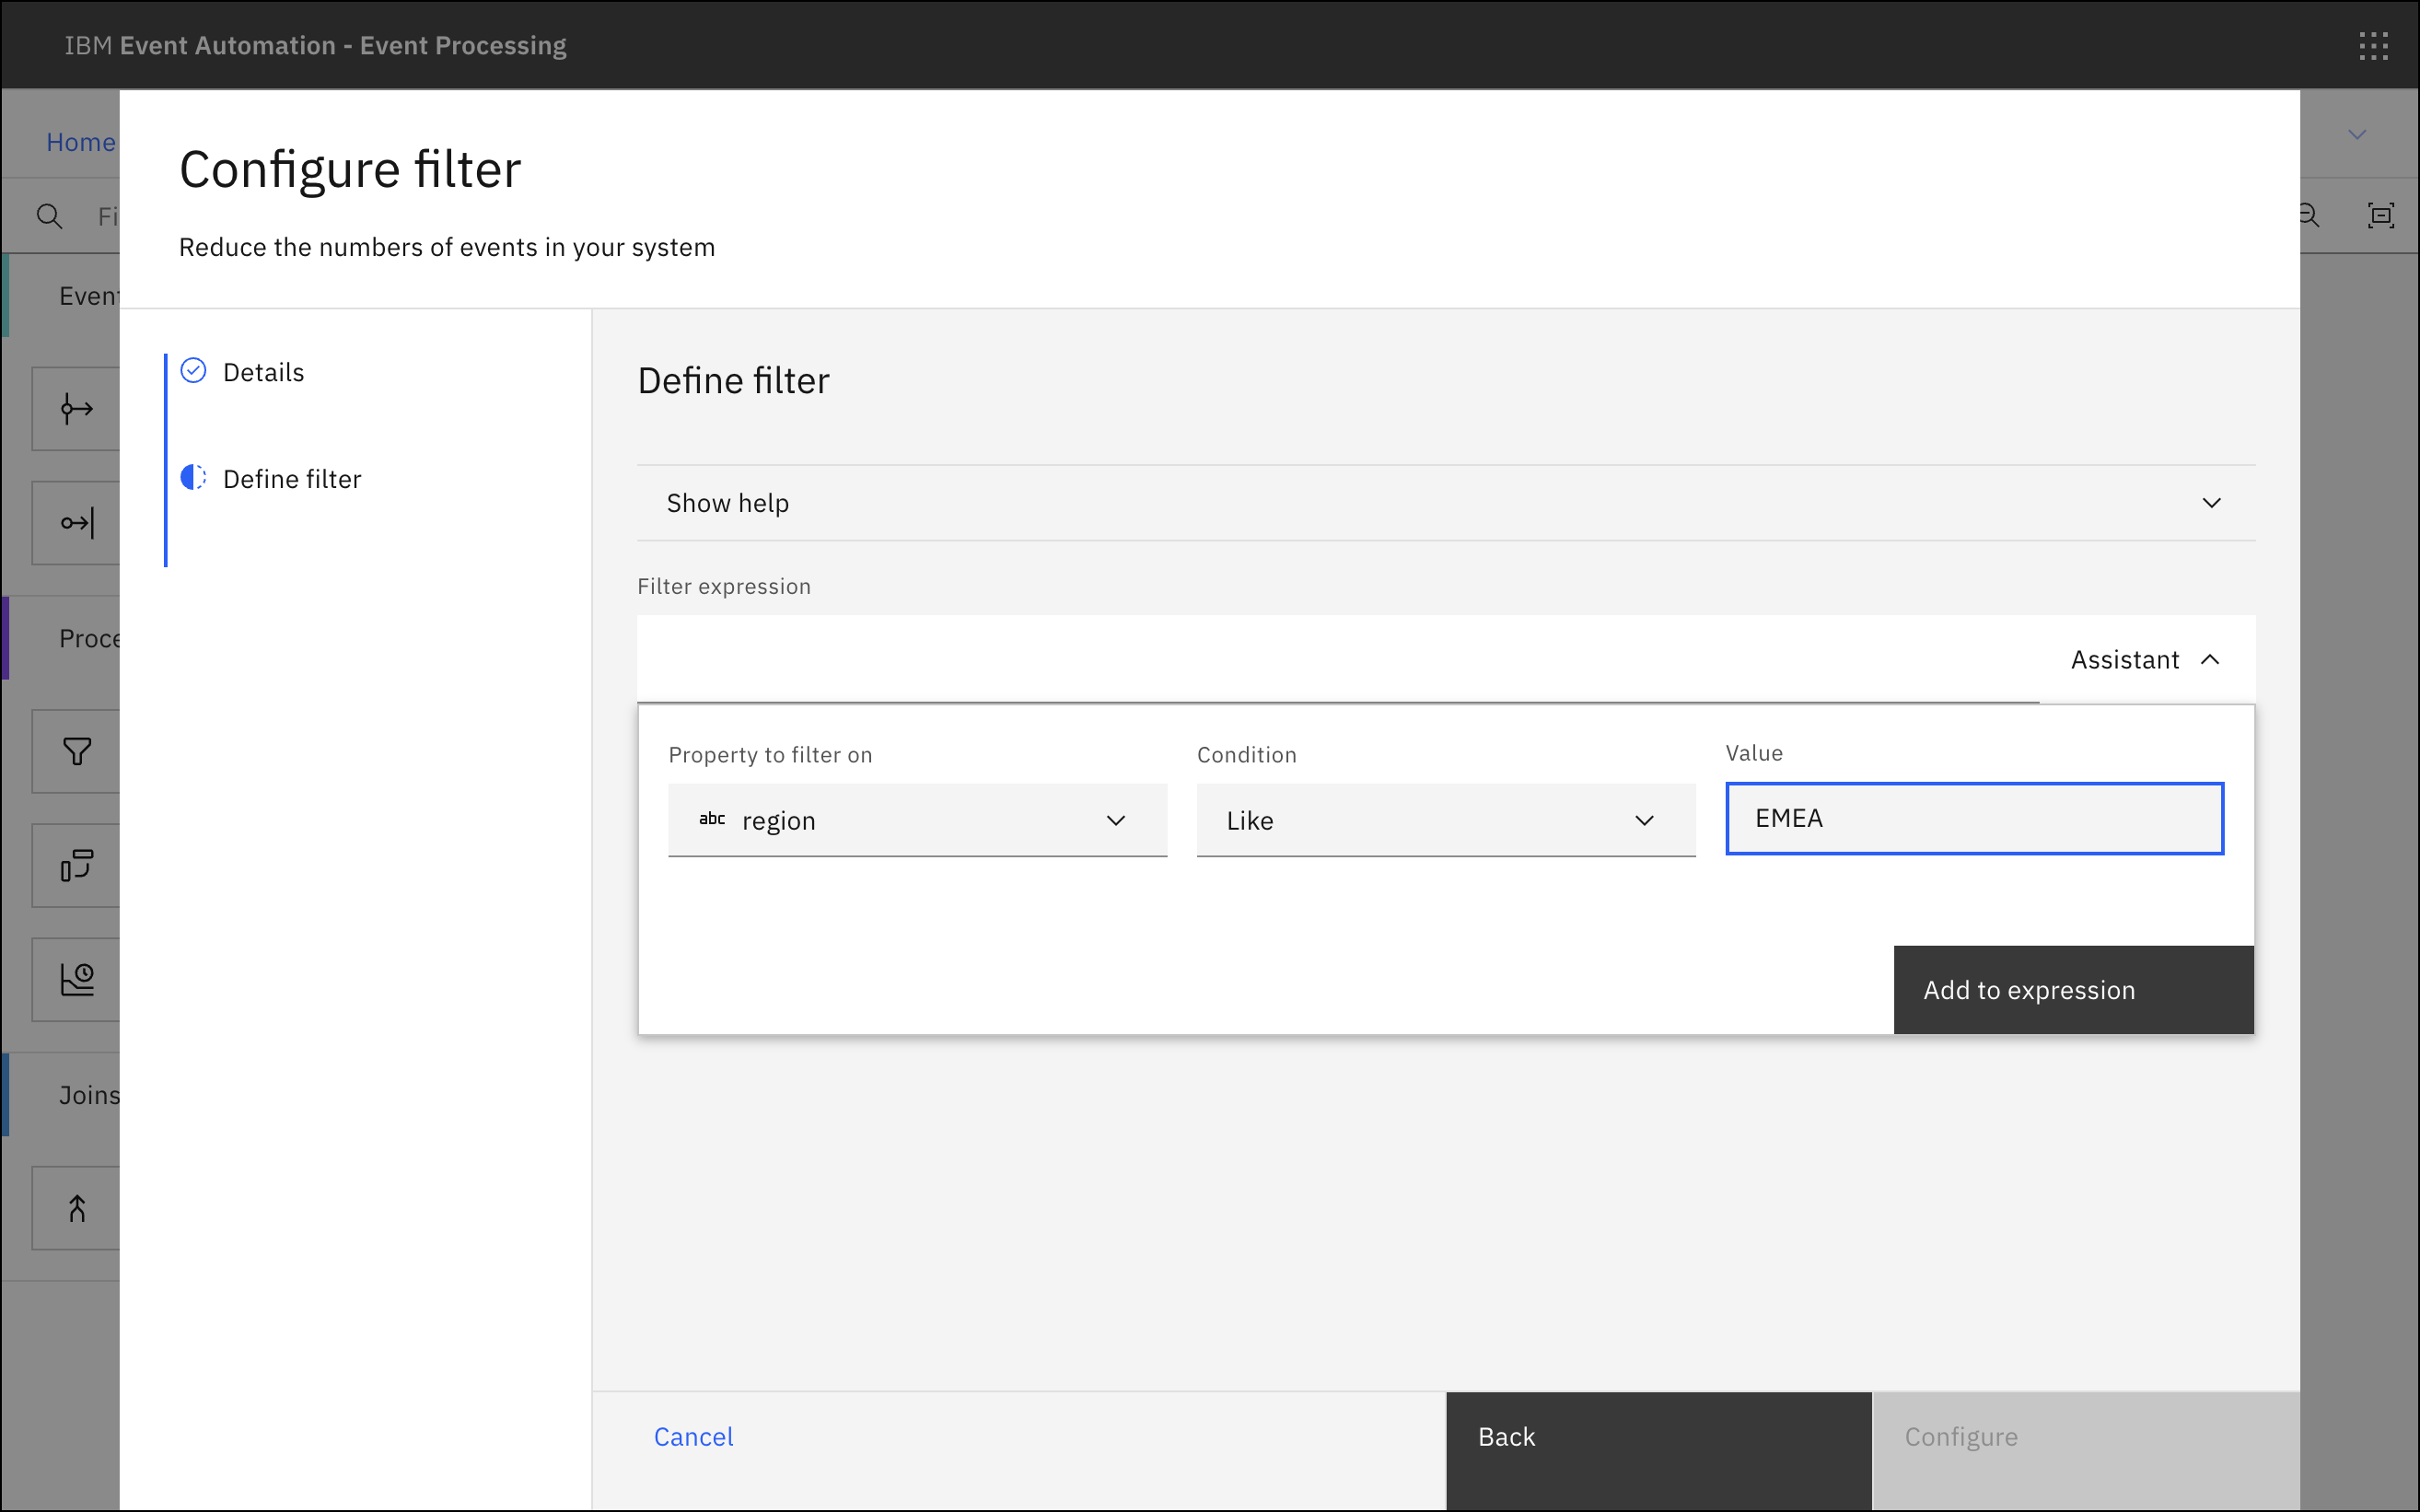
- Use the Assistant to define a filter with your requirements by updating the Property to filter on, Condition, and Value fields.
- Click Add to expression.
- Click Configure. The canvas is displayed and your Filter node has a green checkmark, which indicates that the node has been configured successfully.
The clothing company called their filter EMEA orders and defined a filter that matches events with a region value of EMEA.

Step 6: Run the flow
- The last step is to run your Event Processing flow and view the results.
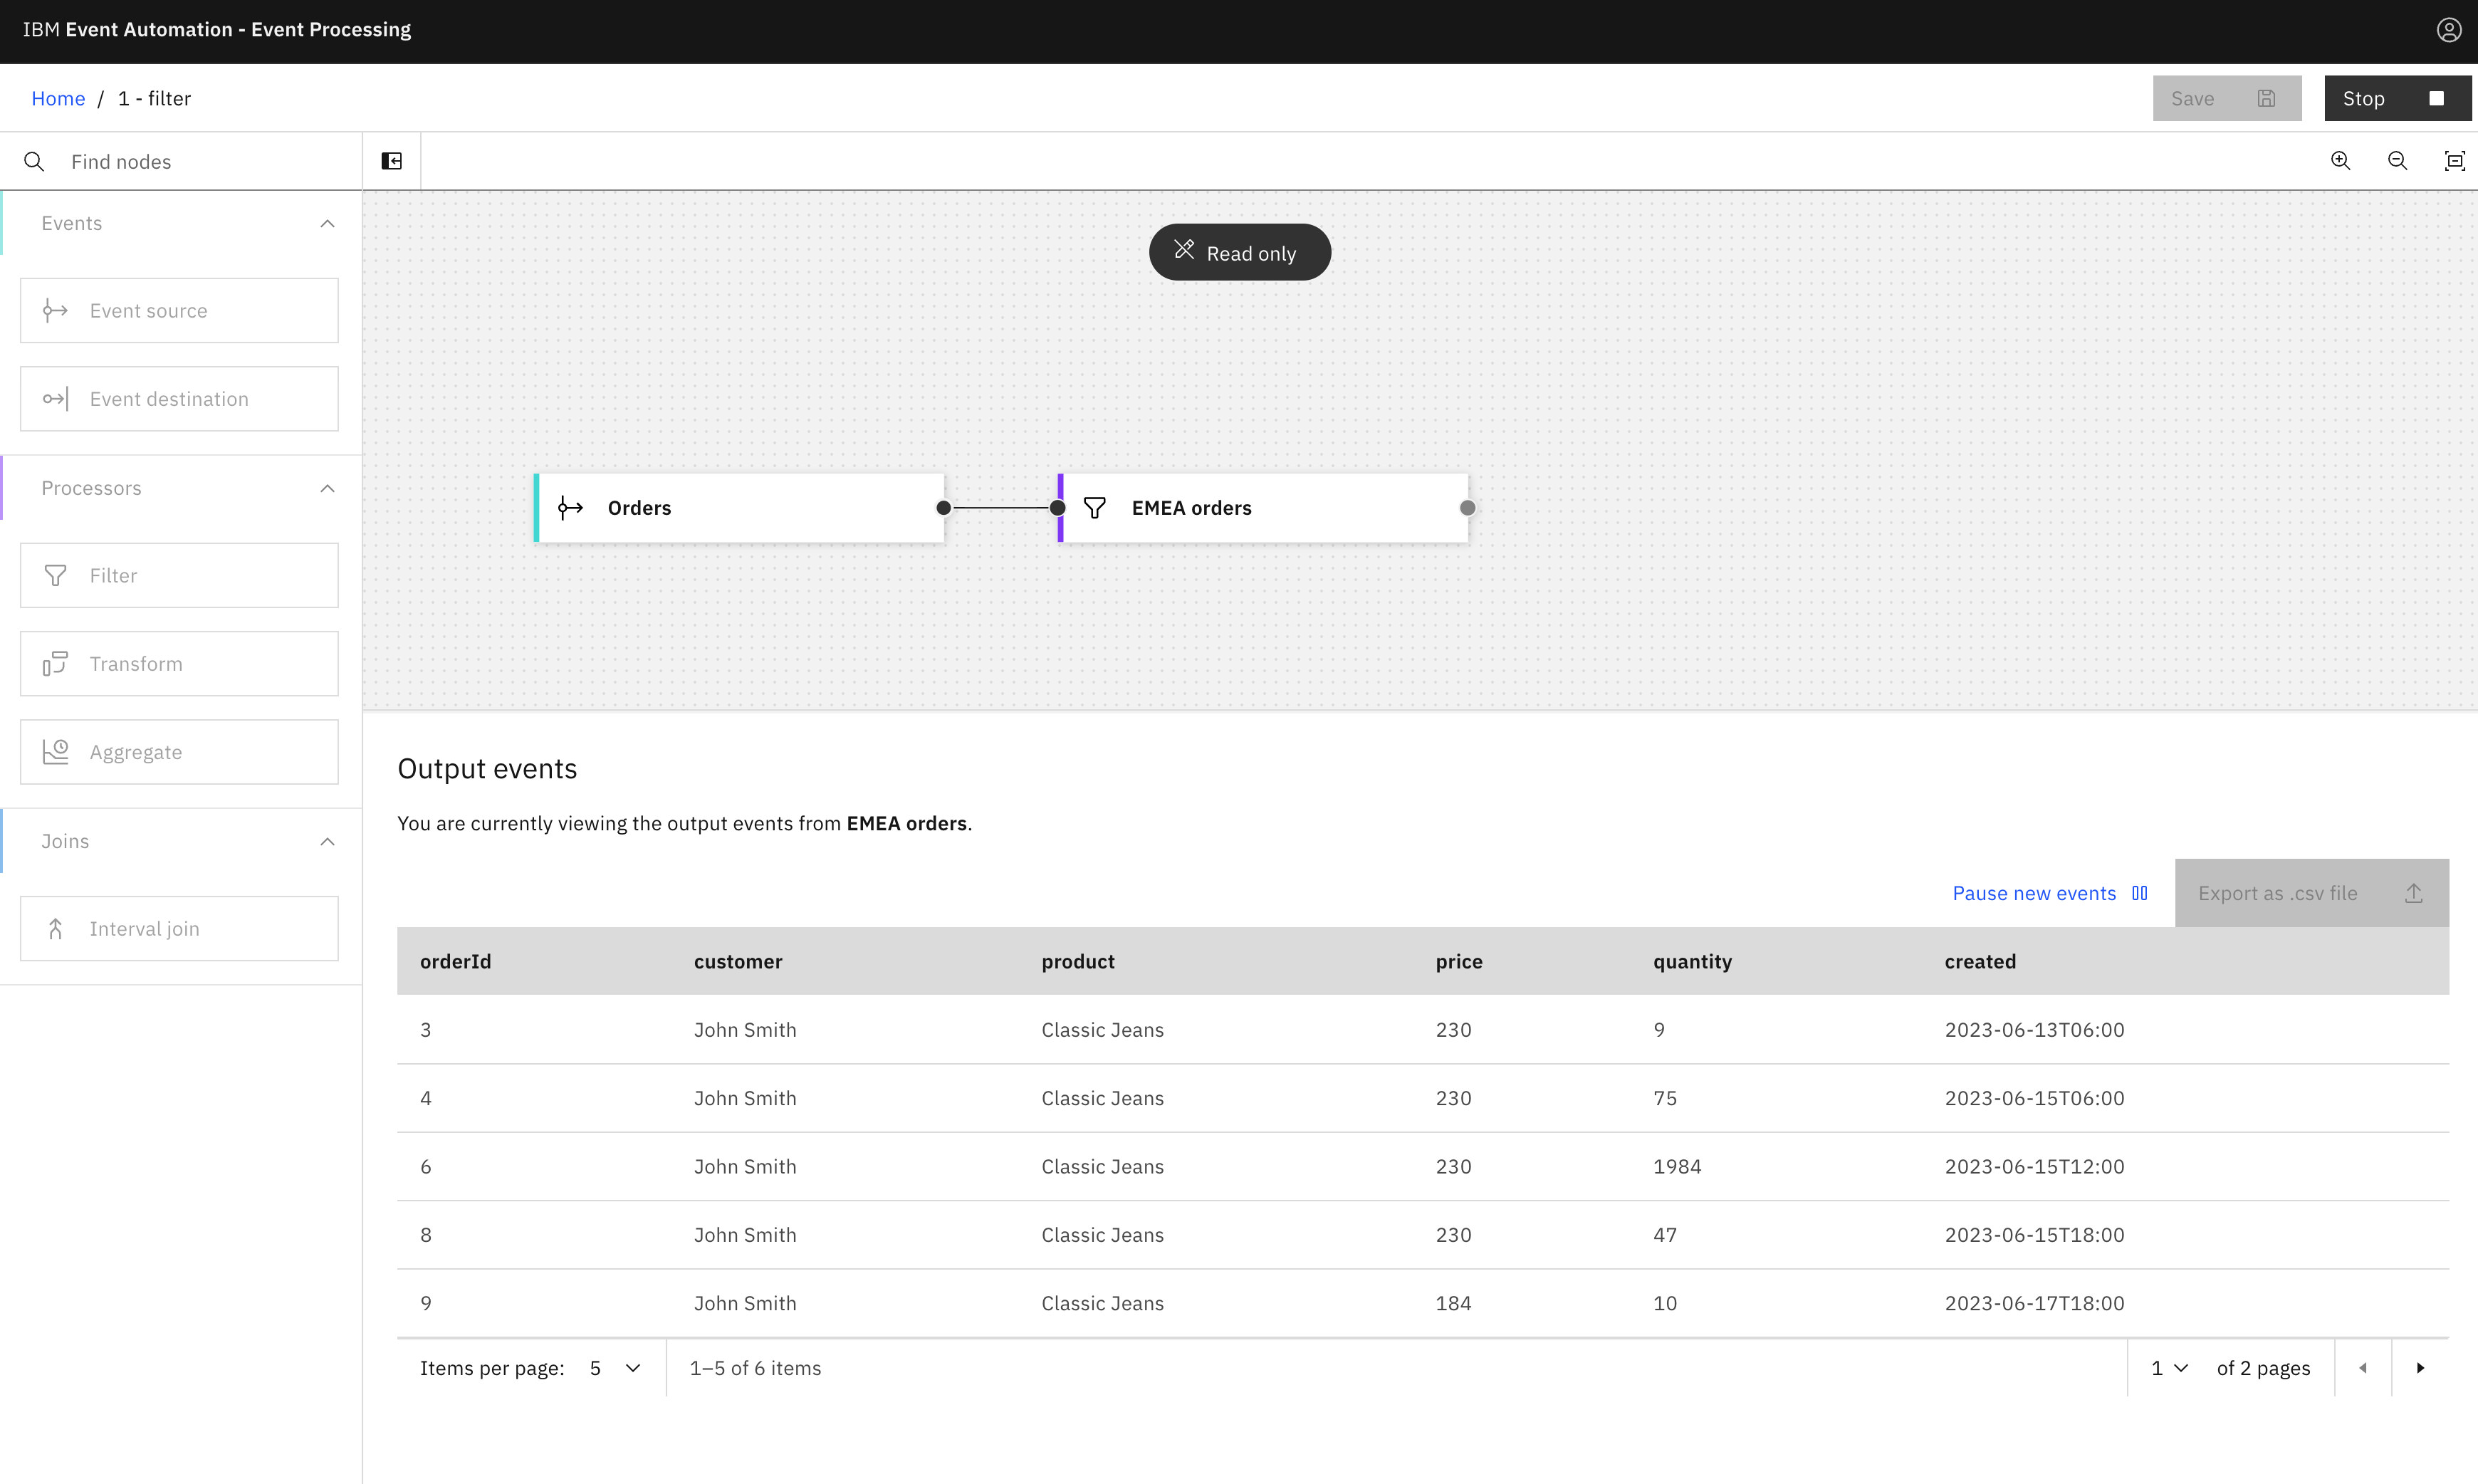
- In the navigation banner, expand Run and select either Events from now or Include historical to run your flow.

If you are running versions earlier than 1.0.4, click the filter node to see a live view of results from your filter. This is updated as new events are emitted onto your chosen Event Endpoint Management topic.
Tip: Include historical is useful while you are developing your flows because you don’t need to wait for new events to be produced to the topic. You can use all the events already on the Kafka topic to check that your flow is working the way that you want.
In the navigation banner, click Stop to stop the flow when you finish reviewing the results.
The clothing company selected Include historical to run the filter on the history of order events available on their Order events topic. All the orders from the EMEA region are displayed. This provides the company real-time information about orders placed in the region, and helps them review orders as they occur.

