Exercise 3 - Deploy the Guestbook app with Istio Proxy
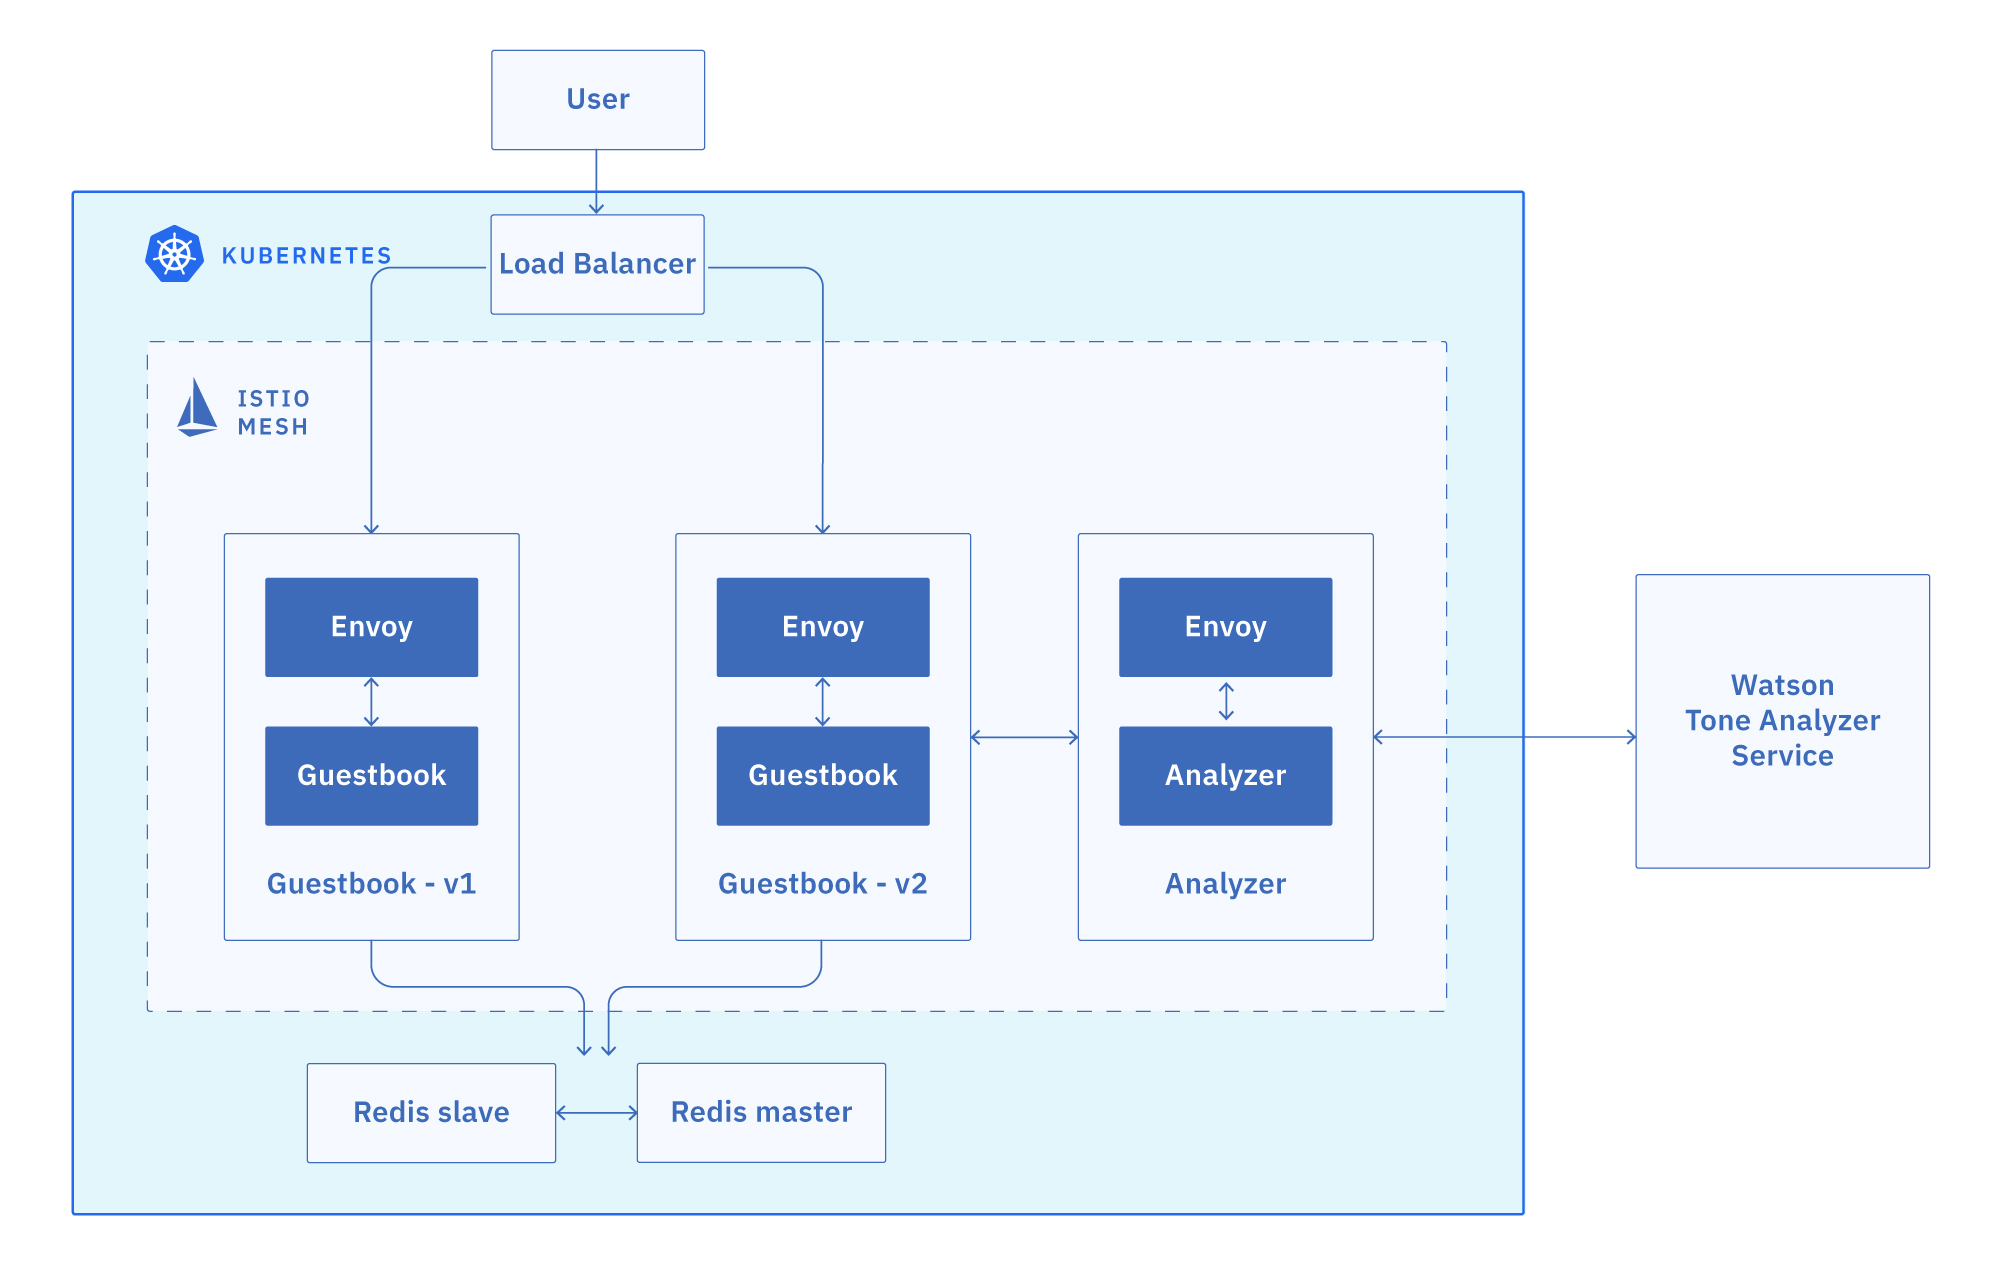
The Guestbook app is a sample app for users to leave comments. It consists of a web front end, Redis master for storage, and a replicated set of Redis slaves. We will also integrate the app with Watson Tone Analyzer which detects the sentiment in users' comments and replies with emoticons.
Download the Guestbook app
-
Clone the Guestbook app into the
workshopdirectory.git clone https://github.com/IBM/guestbook -
Navigate into the app directory.
cd guestbook/v2
Enable the automatic sidecar injection for the default namespace
In Kubernetes, a sidecar is a utility container in the pod, and its purpose is to support the main container. For Istio to work, Envoy proxies must be deployed as sidecars to each pod of the deployment. There are two ways of injecting the Istio sidecar into a pod: manually using the istioctl CLI tool or automatically using the Istio sidecar injector. In this exercise, we will use the automatic sidecar injection provided by Istio.
-
Annotate the default namespace to enable automatic sidecar injection:
kubectl label namespace default istio-injection=enabled -
Validate the namespace is annotated for automatic sidecar injection:
kubectl get namespace -L istio-injectionSample output:
NAME             STATUS   AGE    ISTIO-INJECTION
default          Active   271d   enabled
istio-system     Active   5d2h
...
Create a Redis database
The Redis database is a service that you can use to persist the data of your app. The Redis database comes with a master and slave modules.
-
Create the Redis controllers and services for both the master and the slave.
kubectl create -f redis-master-deployment.yaml kubectl create -f redis-master-service.yaml kubectl create -f redis-slave-deployment.yaml kubectl create -f redis-slave-service.yaml -
Verify that the Redis controllers for the master and the slave are created.
kubectl get deploymentOutput:
NAME READY UP-TO-DATE AVAILABLE AGE redis-master 1/1 1 1 2m16s redis-slave 2/2 2 2 2m15s -
Verify that the Redis services for the master and the slave are created.
kubectl get svcOutput:
NAME TYPE CLUSTER-IP EXTERNAL-IP PORT(S) AGE redis-master ClusterIP 172.21.85.39 <none> 6379/TCP 5d redis-slave ClusterIP 172.21.205.35 <none> 6379/TCP 5d -
Verify that the Redis pods for the master and the slave are up and running.
kubectl get podsOutput:
NAME                            READY     STATUS    RESTARTS   AGE
redis-master-4sswq              2/2       Running   0          5d
redis-slave-kj8jp               2/2       Running   0          5d
redis-slave-nslps               2/2       Running   0          5d
Install the Guestbook app
-
Inject the Istio Envoy sidecar into the guestbook pods, and deploy the Guestbook app on to the Kubernetes cluster. Deploy both the v1 and v2 versions of the app:
kubectl apply -f ../v1/guestbook-deployment.yaml
kubectl apply -f guestbook-deployment.yaml
These commands deploy the Guestbook app on to the Kubernetes cluster. Since we enabled automation sidecar injection, these pods will be also include an Envoy sidecar as they are started in the cluster. Here we have two versions of deployments, a new version (
v2) in the current directory, and a previous version (v1) in a sibling directory. They will be used in future sections to showcase the Istio traffic routing capabilities. -
Create the guestbook service.
kubectl create -f guestbook-service.yaml -
Verify that the service was created.
kubectl get svcOutput:
NAME TYPE CLUSTER-IP EXTERNAL-IP PORT(S) AGE guestbook LoadBalancer 172.21.36.181 169.61.37.140 80:32149/TCP 5d ... -
Verify that the pods are up and running.
kubectl get podsSample output:
NAME                            READY   STATUS    RESTARTS   AGE
guestbook-v1-98dd9c654-dz8dq    2/2     Running   0          30s
guestbook-v1-98dd9c654-mgfv6    2/2     Running   0          30s
guestbook-v1-98dd9c654-x8gxx    2/2     Running   0          30s
guestbook-v2-8689f6c559-5ntgv   2/2     Running   0          28s
guestbook-v2-8689f6c559-fpzb7   2/2     Running   0          28s
guestbook-v2-8689f6c559-wqbnl   2/2     Running   0          28s
redis-master-577bc6fbb-zh5v8    2/2     Running   0          4m47s
redis-slave-7779c6f75b-bshvs    2/2     Running   0          4m46s
redis-slave-7779c6f75b-nvsd6    2/2     Running   0          4m46s
Note that each guestbook pod has 2 containers in it. One is the guestbook container, and the other is the Envoy proxy sidecar.
Use Watson Tone Analyzer (Optional)
Watson Tone Analyzer detects the tone from the words that users enter into the Guestbook app. The tone is converted to the corresponding emoticons.
-
Create Watson Tone Analyzer in your account.
ibmcloud resource service-instance-create my-tone-analyzer-service tone-analyzer lite us-south -
Create the service key for the Tone Analyzer service. This command should output the credentials you just created. You will need the value for apikey & url later.
ibmcloud resource service-key-create tone-analyzer-key Manager --instance-name my-tone-analyzer-service -
If you need to get the service-keys later, you can use the following command:
ibmcloud resource service-key tone-analyzer-key -
Open the
analyzer-deployment.yamland find the env section near the end of the file. ReplaceYOUR_API_KEYwith your own API key, and replaceYOUR_URLwith the url value you saved before. YOUR_URL should look something likehttps://gateway.watsonplatform.net/tone-analyzer/api. Save the file. -
Deploy the analyzer pods and service, using the
analyzer-deployment.yamlandanalyzer-service.yamlfiles found in theguestbook/v2directory. The analyzer service talks to Watson Tone Analyzer to help analyze the tone of a message. Ensure you are still in theguestbook/v2directory.kubectl apply -f analyzer-deployment.yaml kubectl apply -f analyzer-service.yaml
Great! Your guestbook app is up and running. In Exercise 4, you'll be able to see the app in action by directly accessing the service endpoint. You'll also be able to view Telemetry data for the app.