
| DEMO OVERVIEW | |
|---|---|
| Scenario overview | Enhancing business automation with integration 300-level live demo |
| Demo products | Cloud Pak for Business Automation (CP4BA); Cloud Pak for Integration (CP4I) |
| Demo capabilities | Workflow (Cloud Pak for Business Automation); Application integration (Cloud Pak for Integration) |
| Demo intro slides | Download the Introduction and Overview slides here. This is a short deck of customer-facing slides that sets the context for the demo. |
| Demo script | A complete demo script is on the second tab above. You can download a printer-ready PDF of the demo script here. This demo script has multiple tasks that each have multiple steps. In each step, you have the details about what you need to do (Actions), what you can say while delivering this demo step (Narration), and what diagrams and screenshots you will see. This demo script is a suggestion, and you are welcome to customize based in your sales opportunity. Most importantly, practice this demo in advance. If the demo seems easy for you to execute, the customer will focus on the content. If it seems difficult for you to execute, the customer will focus on your delivery. |
| Required versions | Cloud Pak for Integration 2023.4.1 |
| How to get support | • Open a support case at IBM Technology Zone Help regarding issues with reserving and provisioning Tech Zone environments. • IBMers, contact #ba-techlcd-support regarding issues with setting up and running this demo. • Please note, this demo is offered as-is with little to no support. Instructions/screenshots based on the Cloud Pak for Business Automation (Windows VM) have not been updated to the latest environment. |
INSTALL THE DEMO: Cloud Pak for Integration
1 - Provision a Red Hat OpenShift cluster
To provision your own Red Hat OpenShift cluster for the Cloud Pak for Integration, follow these steps:
-
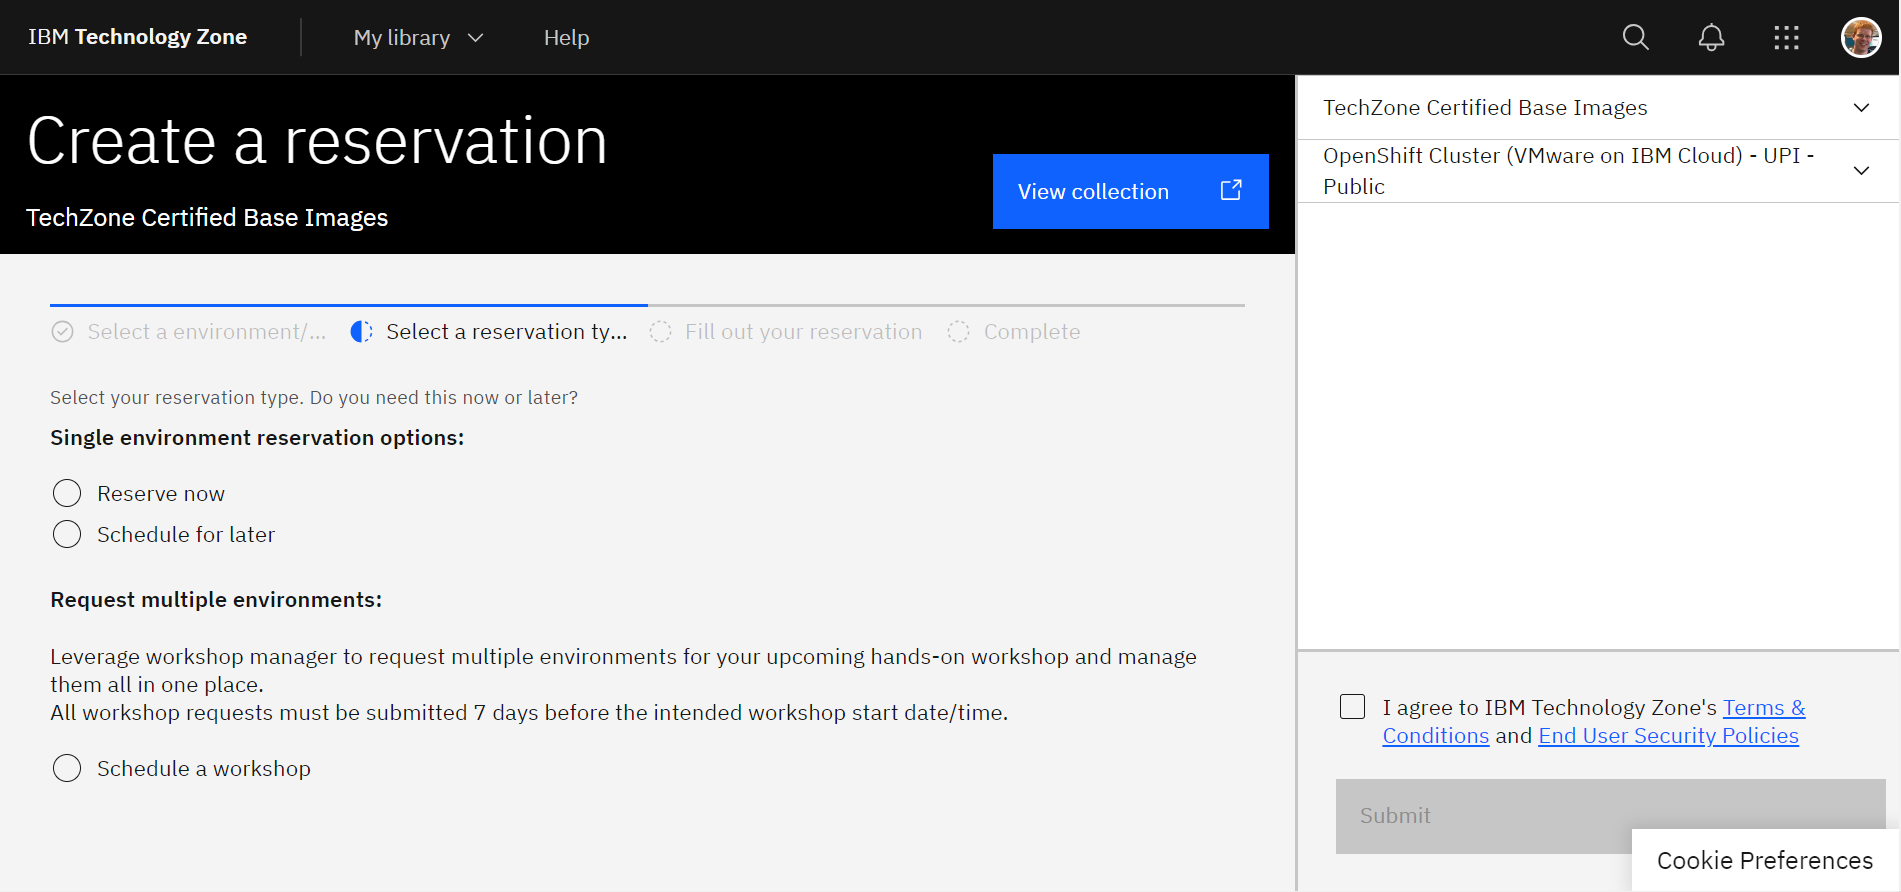
To deploy a Red Hat OpenShift cluster, go here. Select if you prefer to make a reservation now or schedule for later.
-
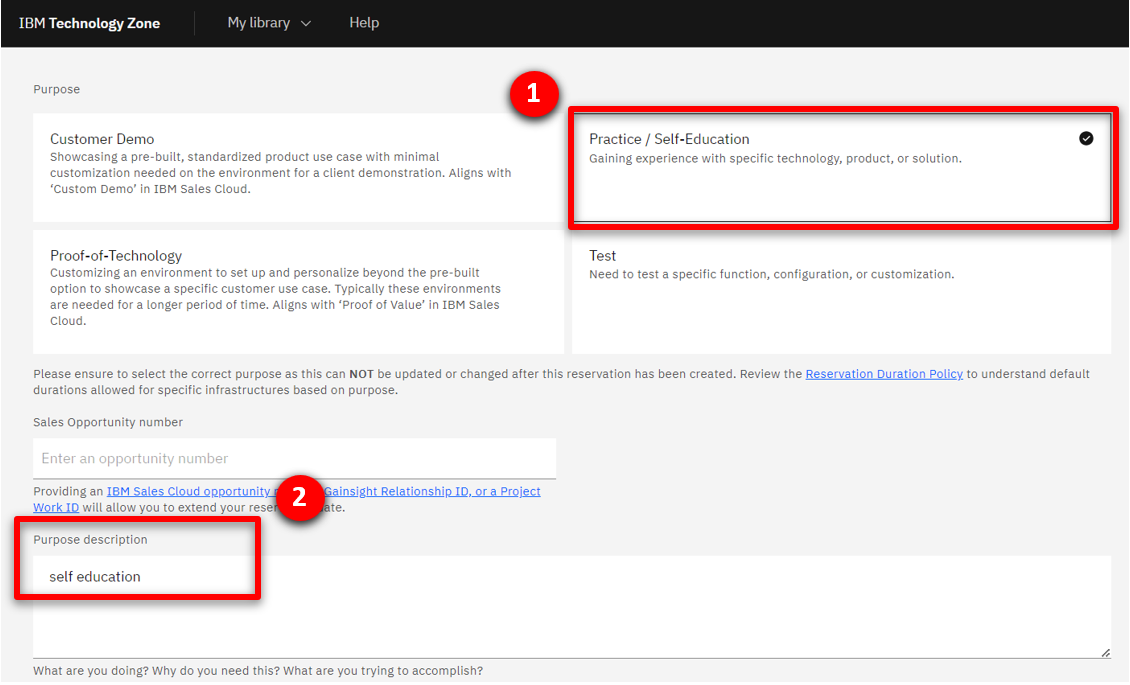
If you do not have a sales opportunity, select the purpose Practice / Self-Education (1) for a 2-day reservation (which can be extended without any approvals to 6 days) and fill in the Purpose description (2).
-
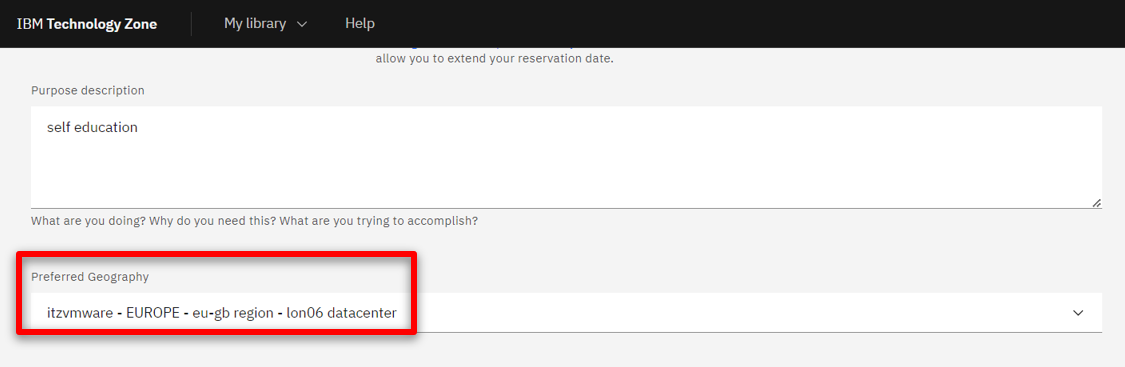
Select the Preferred Geography.
-
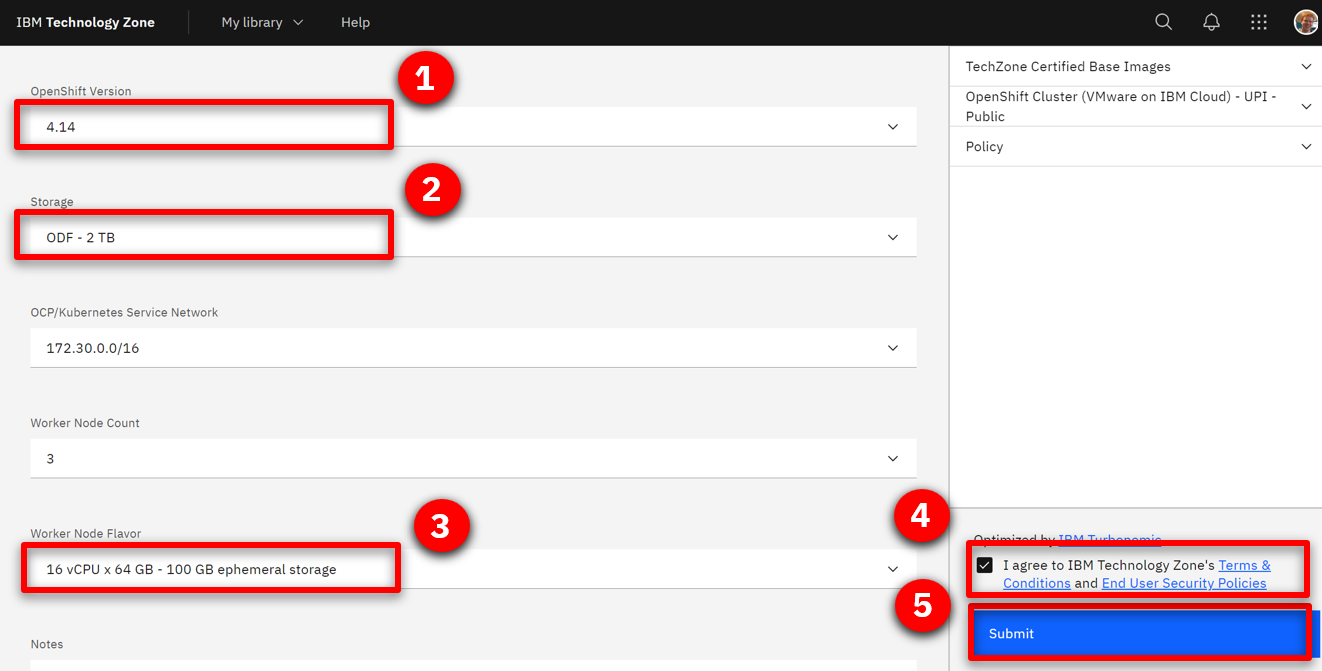
Several additional fields will appear. Select 4.14 (1) as the OpenShift version, ODF - 2TB (2) for the storage, 16 vCPU x 64 GB - 100 GB ephemeral storage (3) as the worker node flavor, accept the terms and conditions (4) and click Submit.
-
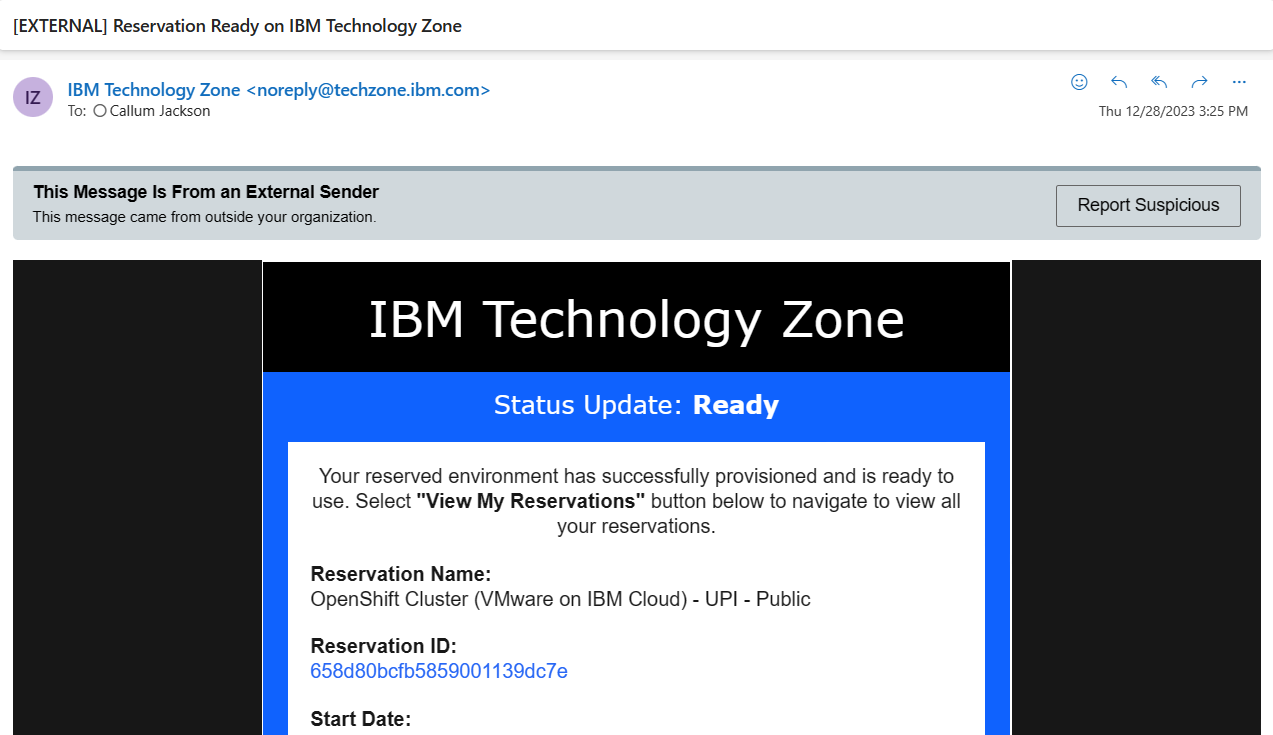
You will receive a few emails as the provisioning process continues. You should expect the final email to be sent after an hour. The final email should look similar to the following.
2 - Access your OpenShift cluster and install the command line
In this section, you access your OpenShift cluster and install the OpenShift command line tool.
-
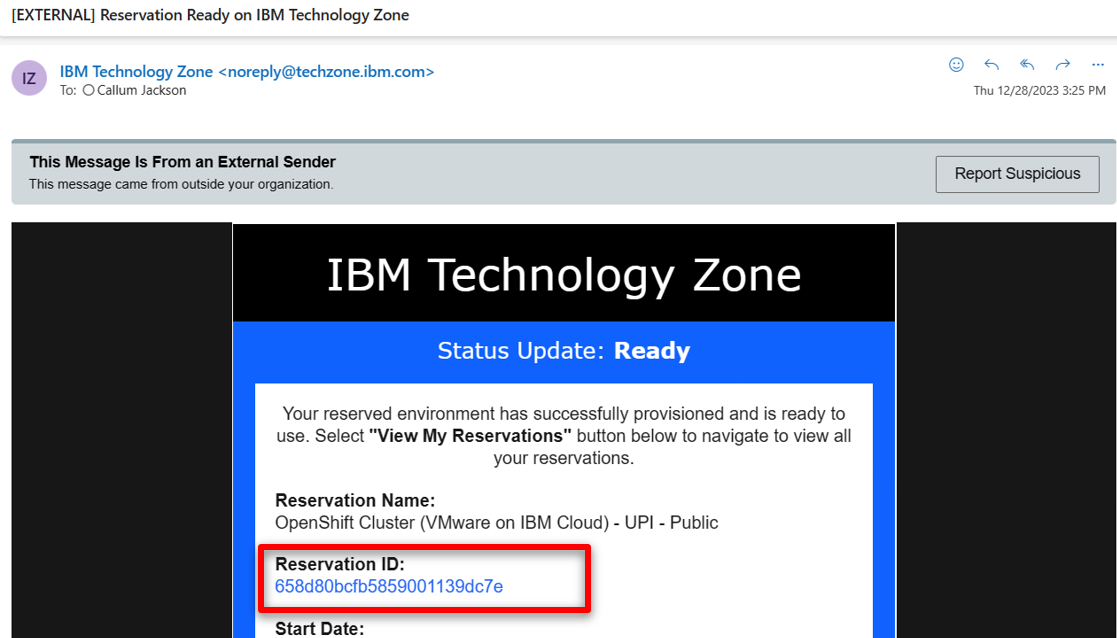
Open the Reservation ID link that was included in the “Reservation Ready on IBM Technology Zone” email.
-
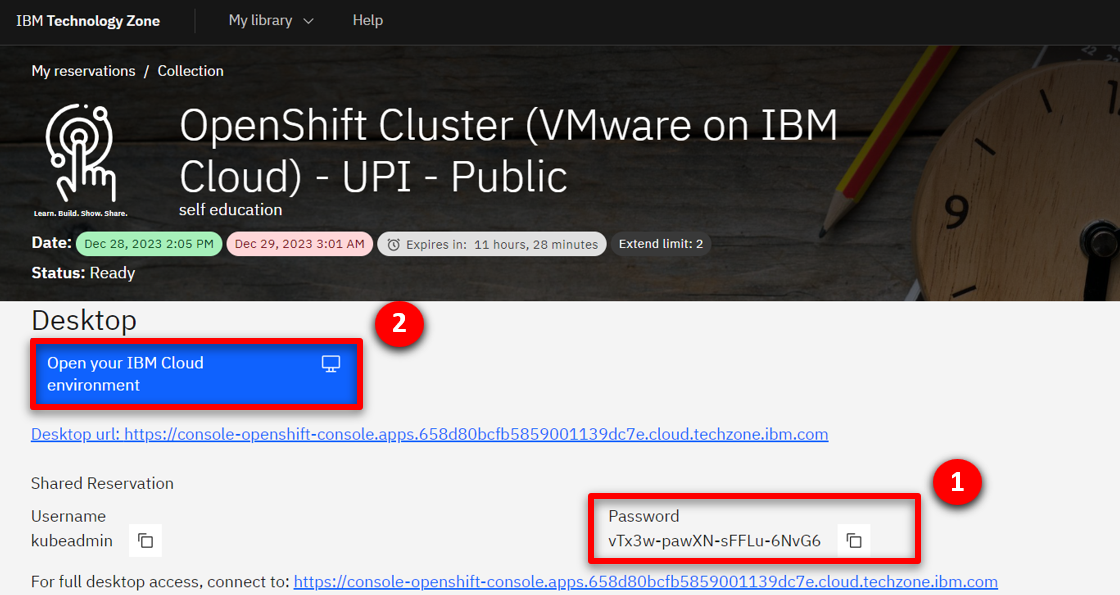
Copy the kubeadmin Password (1) and open the OpenShift console by clicking on Open your IBM Cloud environment (2).
-
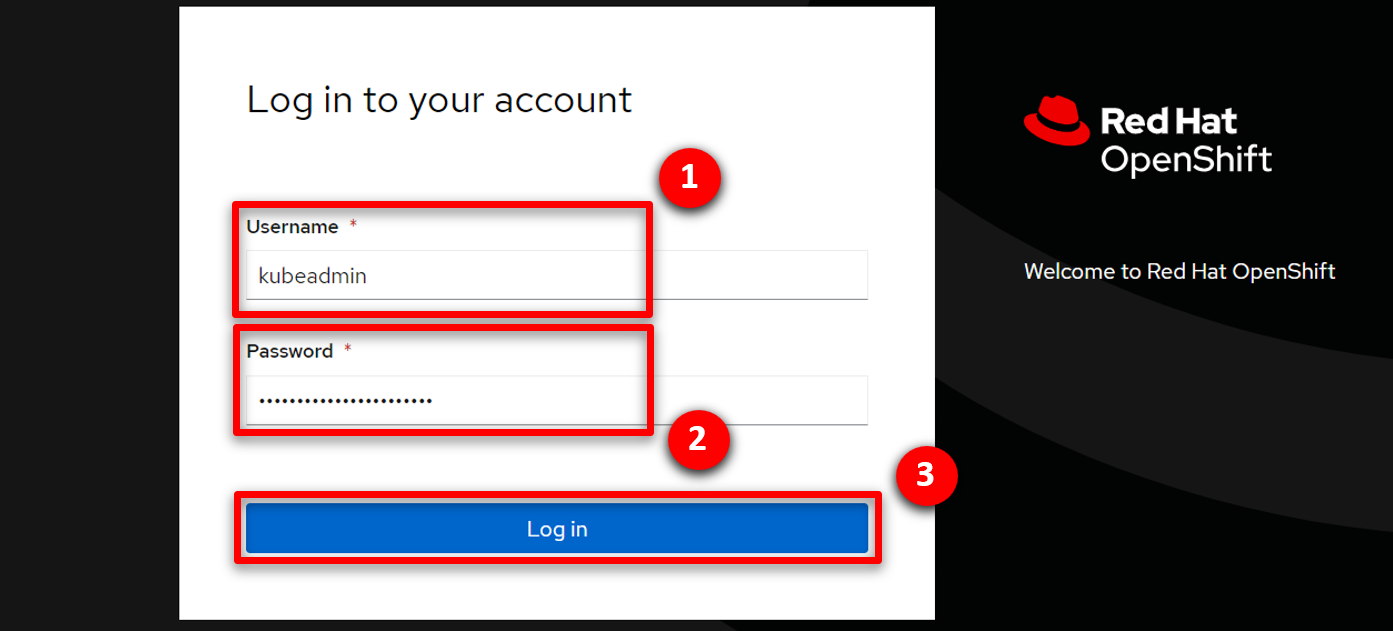
Use kubeadmin (1) as the user, paste the Password (2) and click Login (3).
-
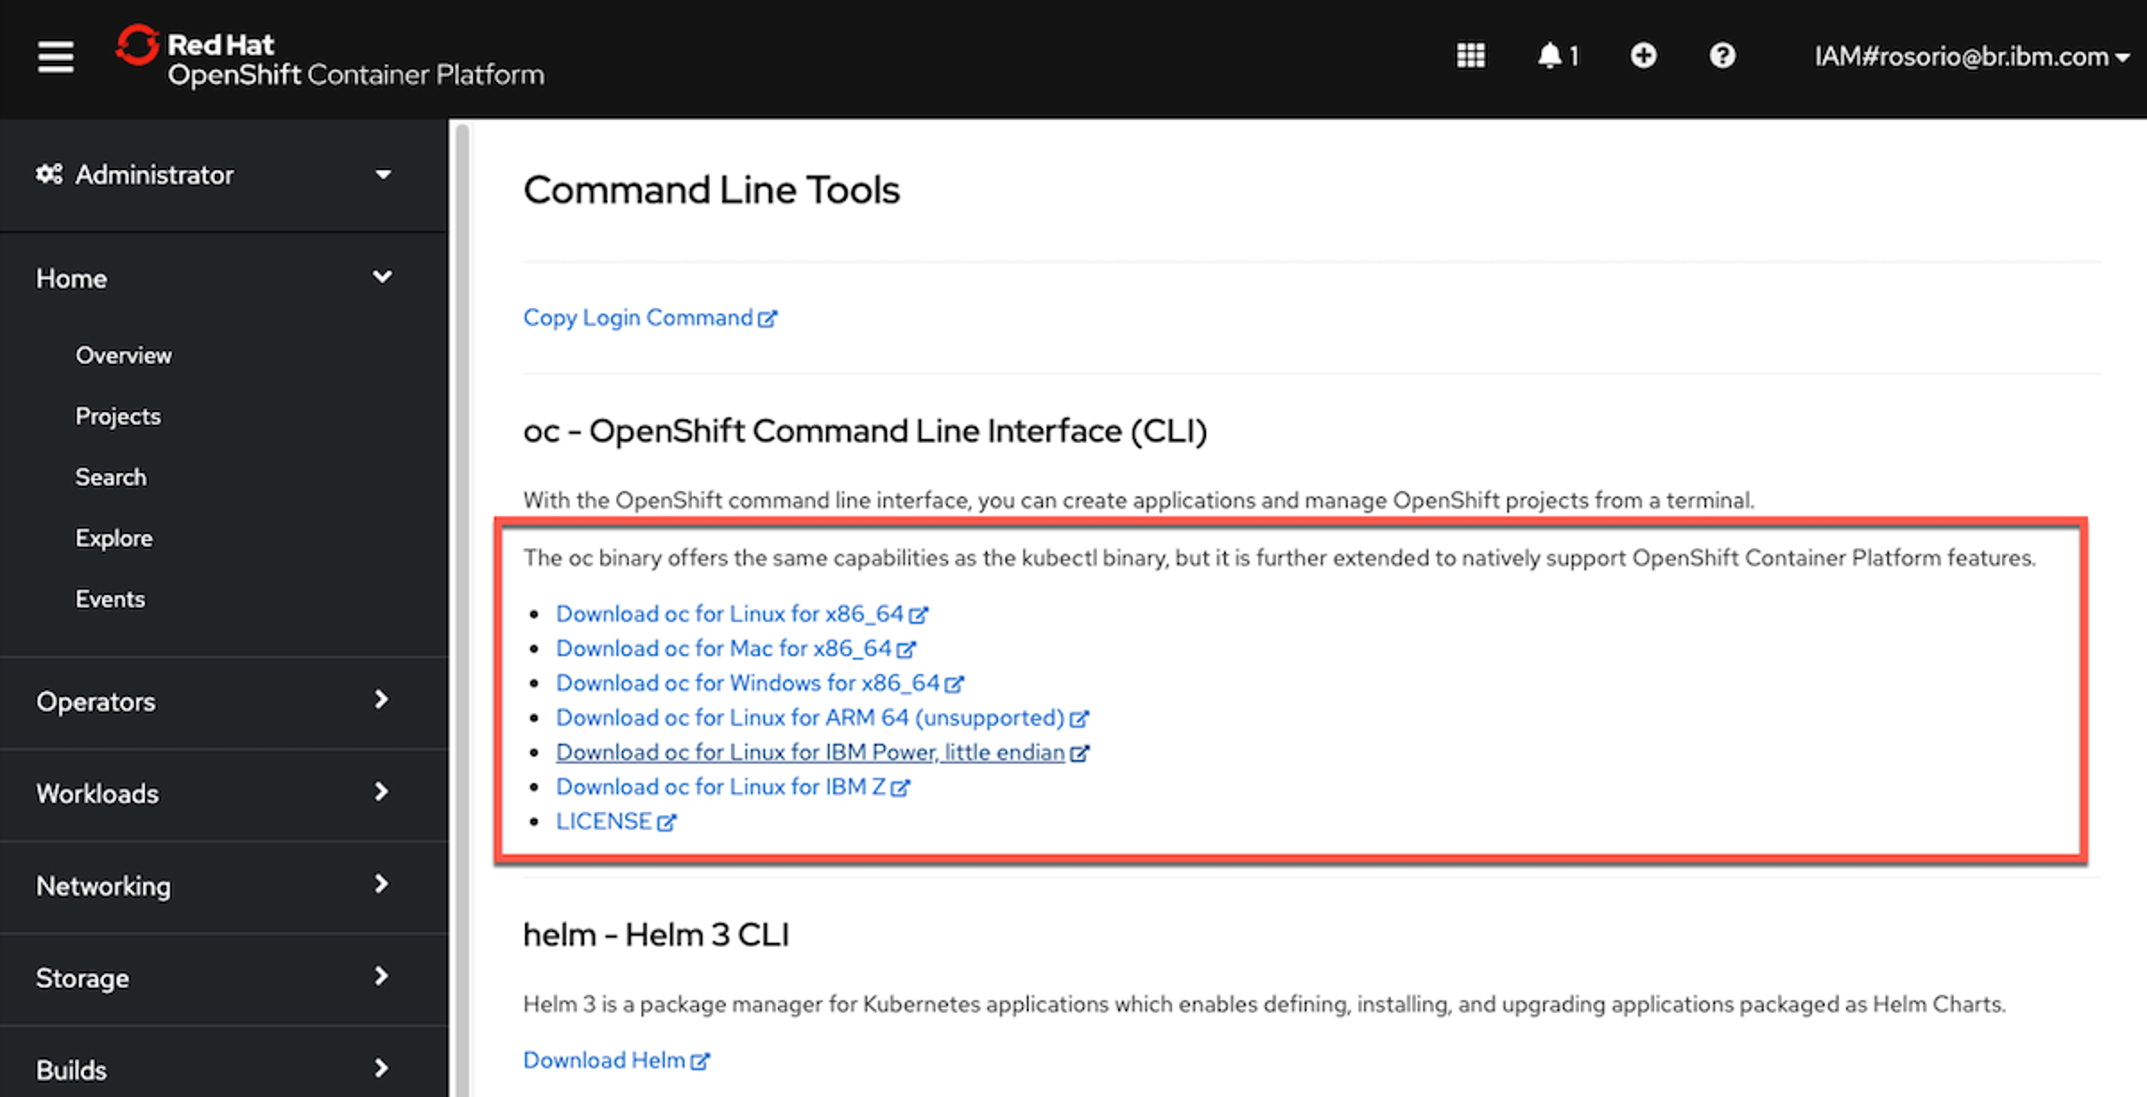
On the web console page, click ? (1), and select Command line tools (2).

-
Follow the links to install the OpenShift Command Line Interface (CLI) for your Operating System.
-
To configure the command line on your machine, click on the down arrow to the right of kubeadmin (1) and select Copy login command.
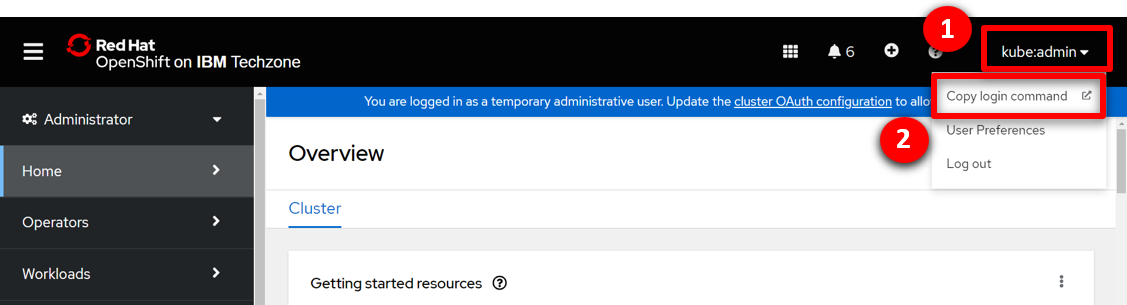 </br>
</br> -
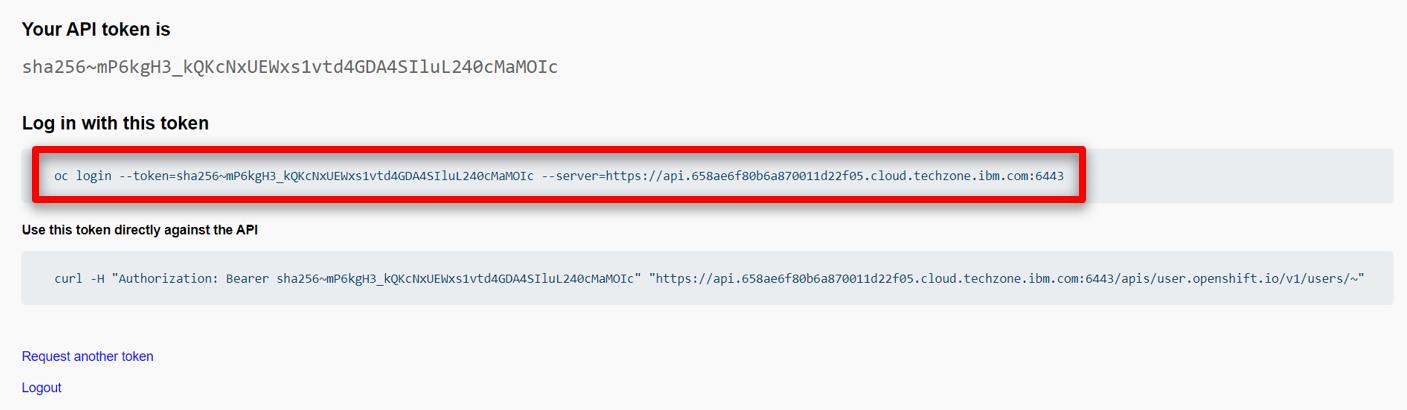
Click on Display token.
-
Copy the Login with this token and run in the command line.
 </br>
</br>
You have successfully configured the Openshift command line on your machine.
3 - Clone the demo assets from a GitHub repository
To copy the repository you will need to have the Git CLI on your machine. If you don’t have it, follow the installation steps described in this page, based on your operating system.
-
To download the scripts to install the demo, create a new directory, change to this newly created directory, and run the following command:
git clone https://github.com/IBM/platinum-demo-code-cp4icp4ba.git -
Change to the new platinum-demo-code-cp4icp4ba/cp4i/ directory:
cd platinum-demo-code-cp4icp4ba/cp4i/
4 - Install the demo
-
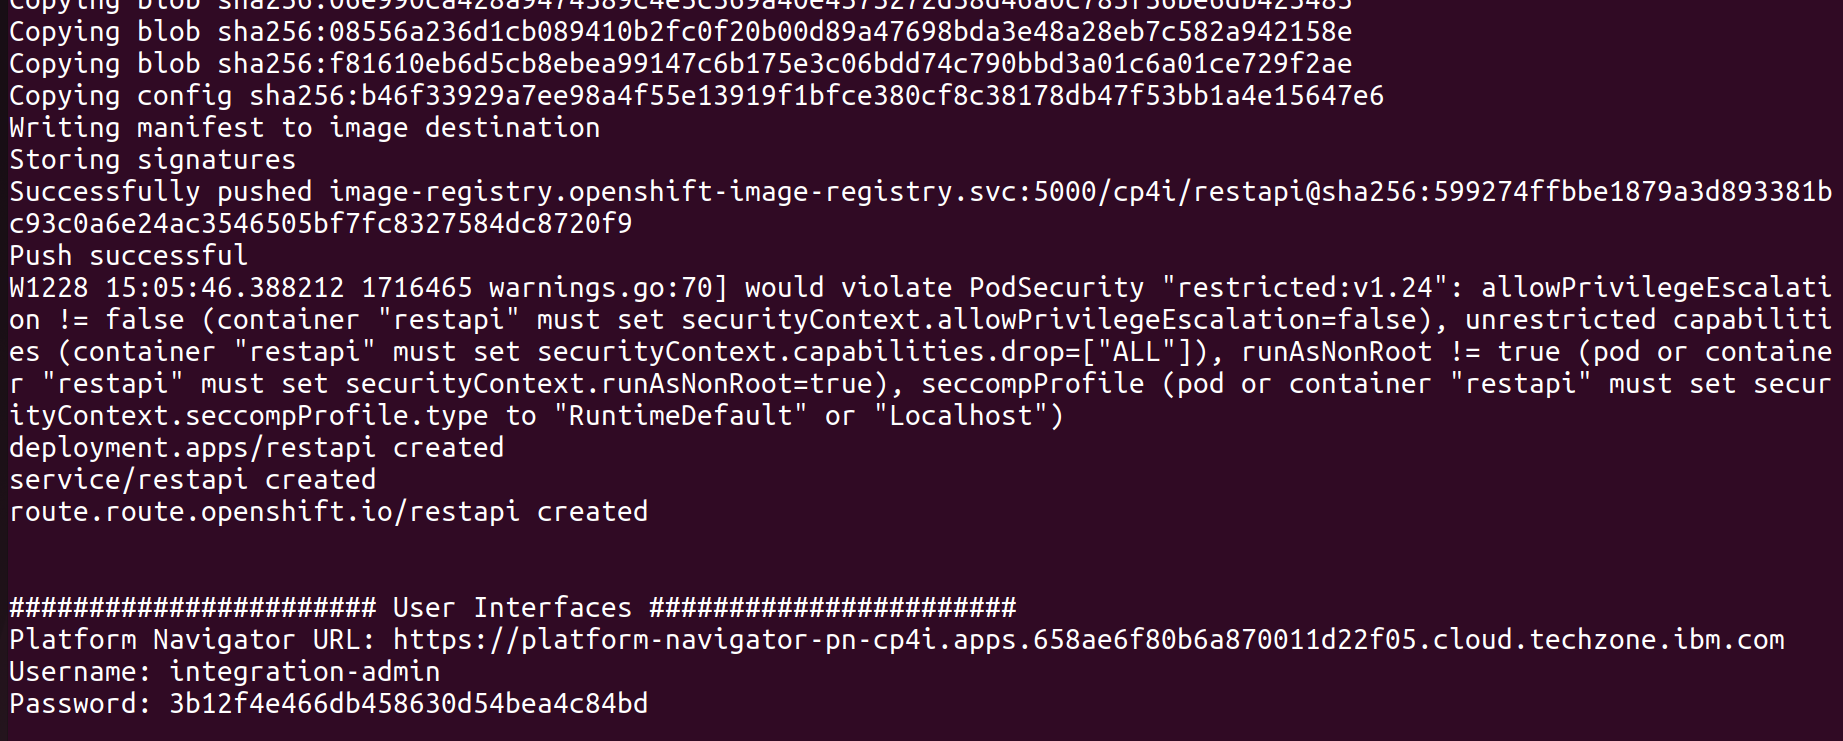
To deploy the demo run:
./deploy.shThis will automatically deploy the resources into the CP4I namespace.
-
The deployment will take approximately 30-45 minutes to install. Wait for the deployment to complete. The URL and credentials will be shown once the installation is complete.
Your have installed the Cloud Pak for Integration ready to be configured.
5 - Prerequisites and preparing your Cloud Pak for Integration environment
Connect Cloud Pak for Integration to your endpoints
Now, let’s configure our services endpoints in Cloud Pak for Integration.
-
Return to the command line and access the Platform Navigator using the provided URL. Copy and paste the Username (1) and Password (2) from the command line output, and click Sign In (3).
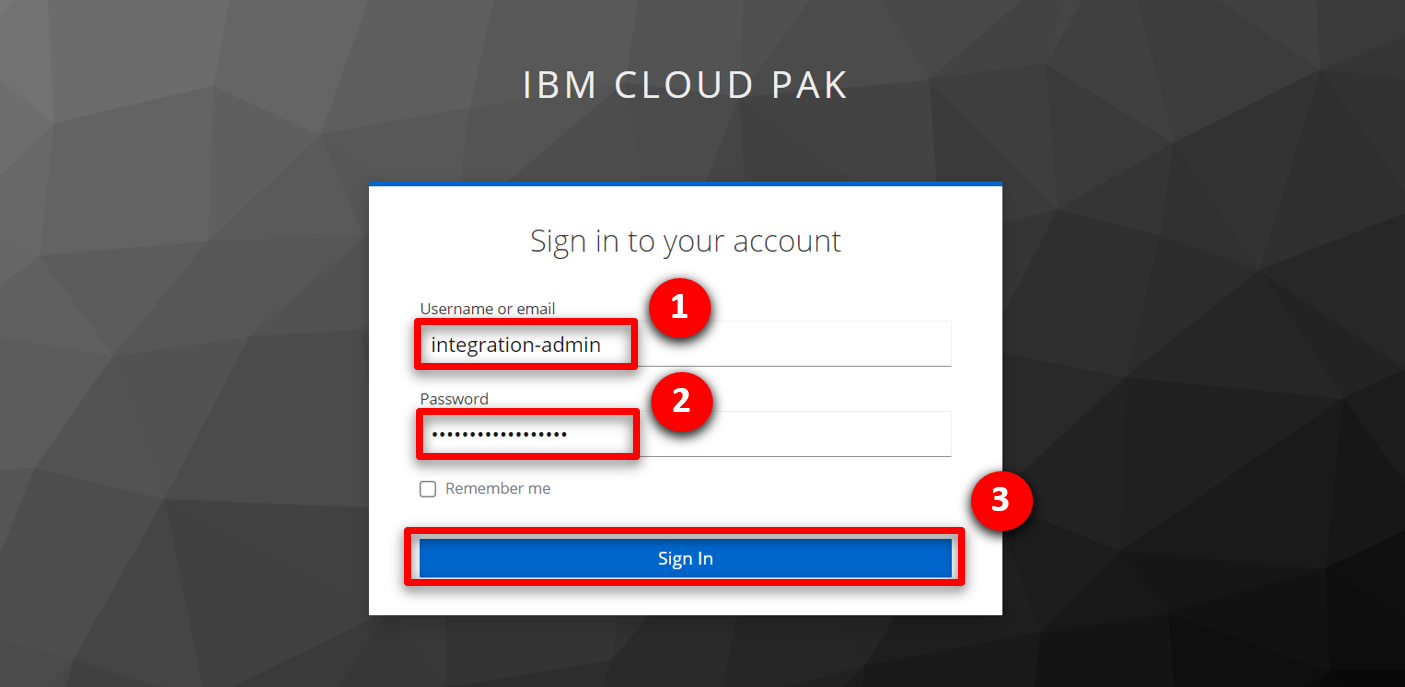
-
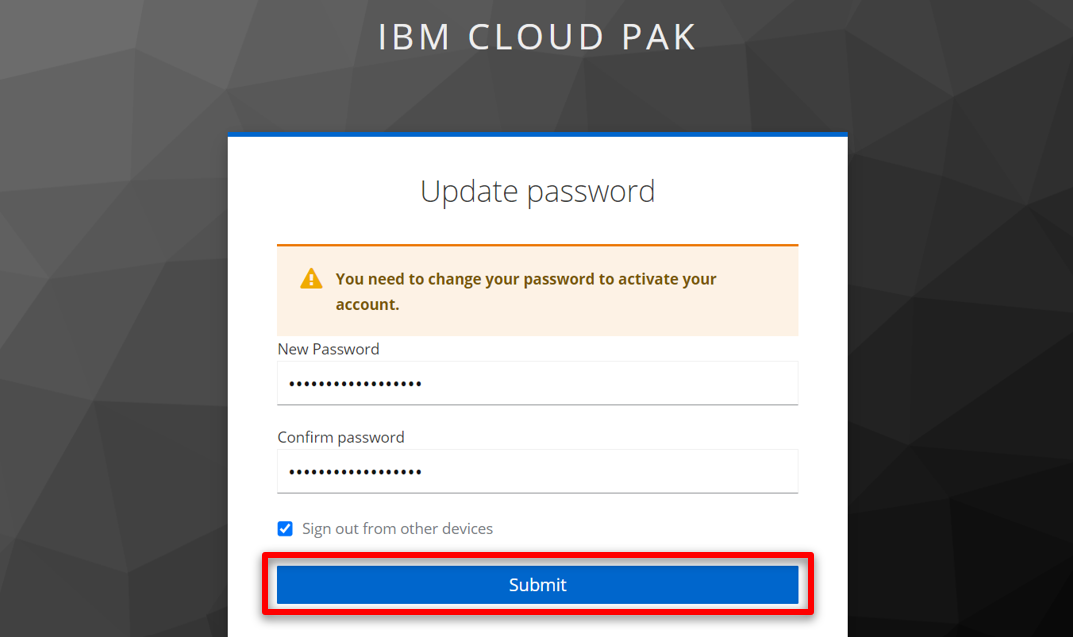
You will be asked to provide a new password as you are using a temporary password. Provide a new password and click Submit.
-
In the menu on the top left, open the Design folder (1) and select Integrations (2).
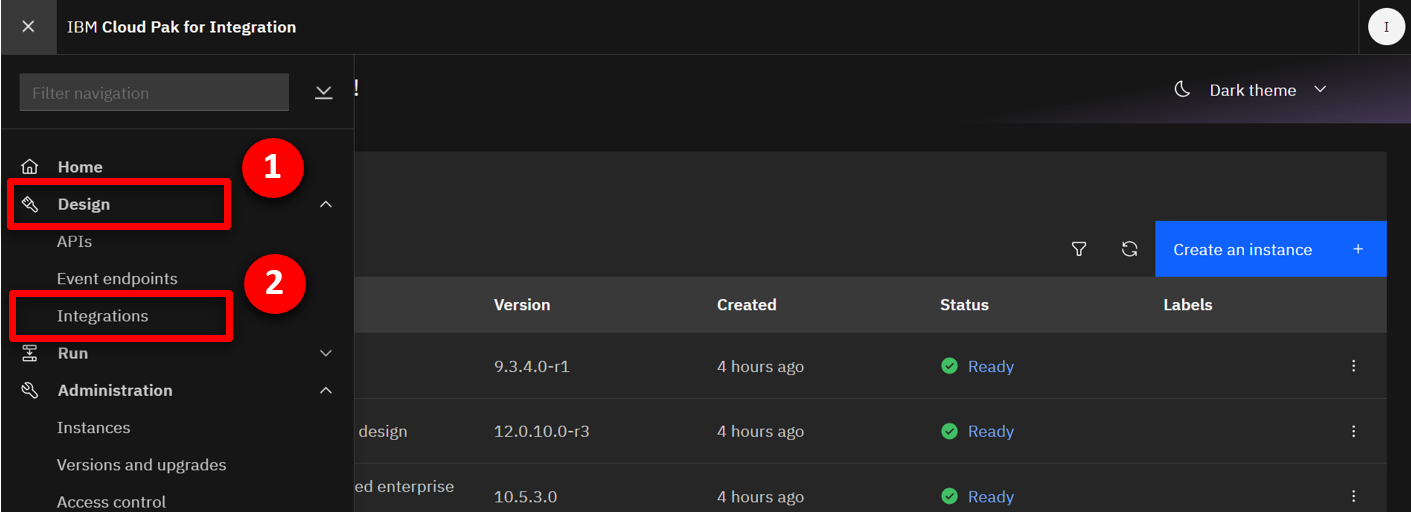
-
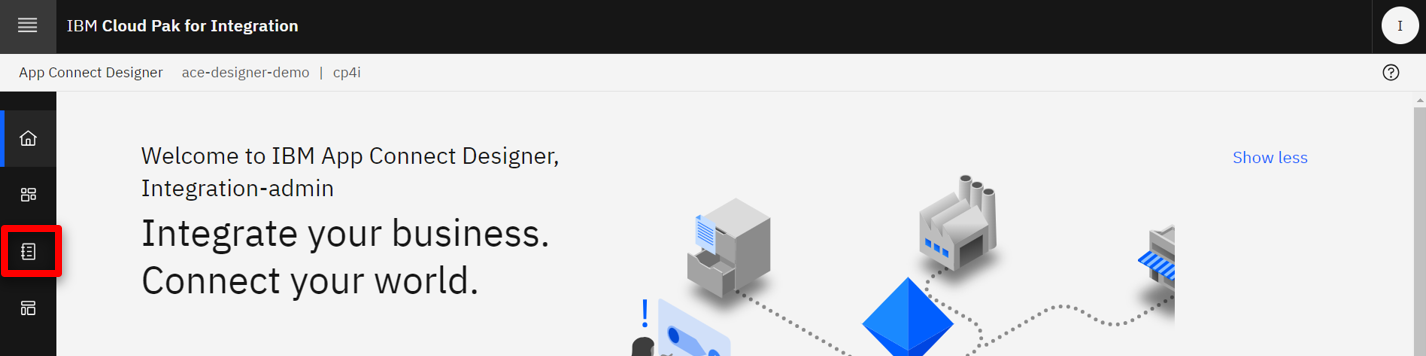
Click on the ace-designer-demo entry.

-
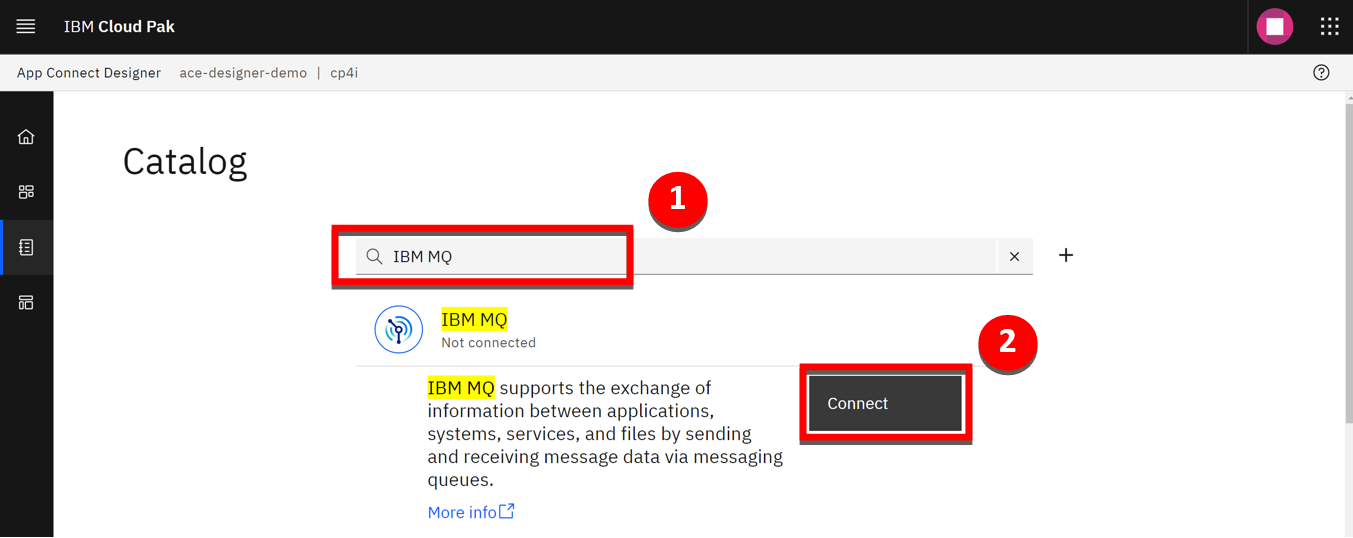
Click the Catalog icon to see a list of the available connectors.
-
To configure the MQ connection, search for ‘IBM MQ’ (1) and click Connect (2).
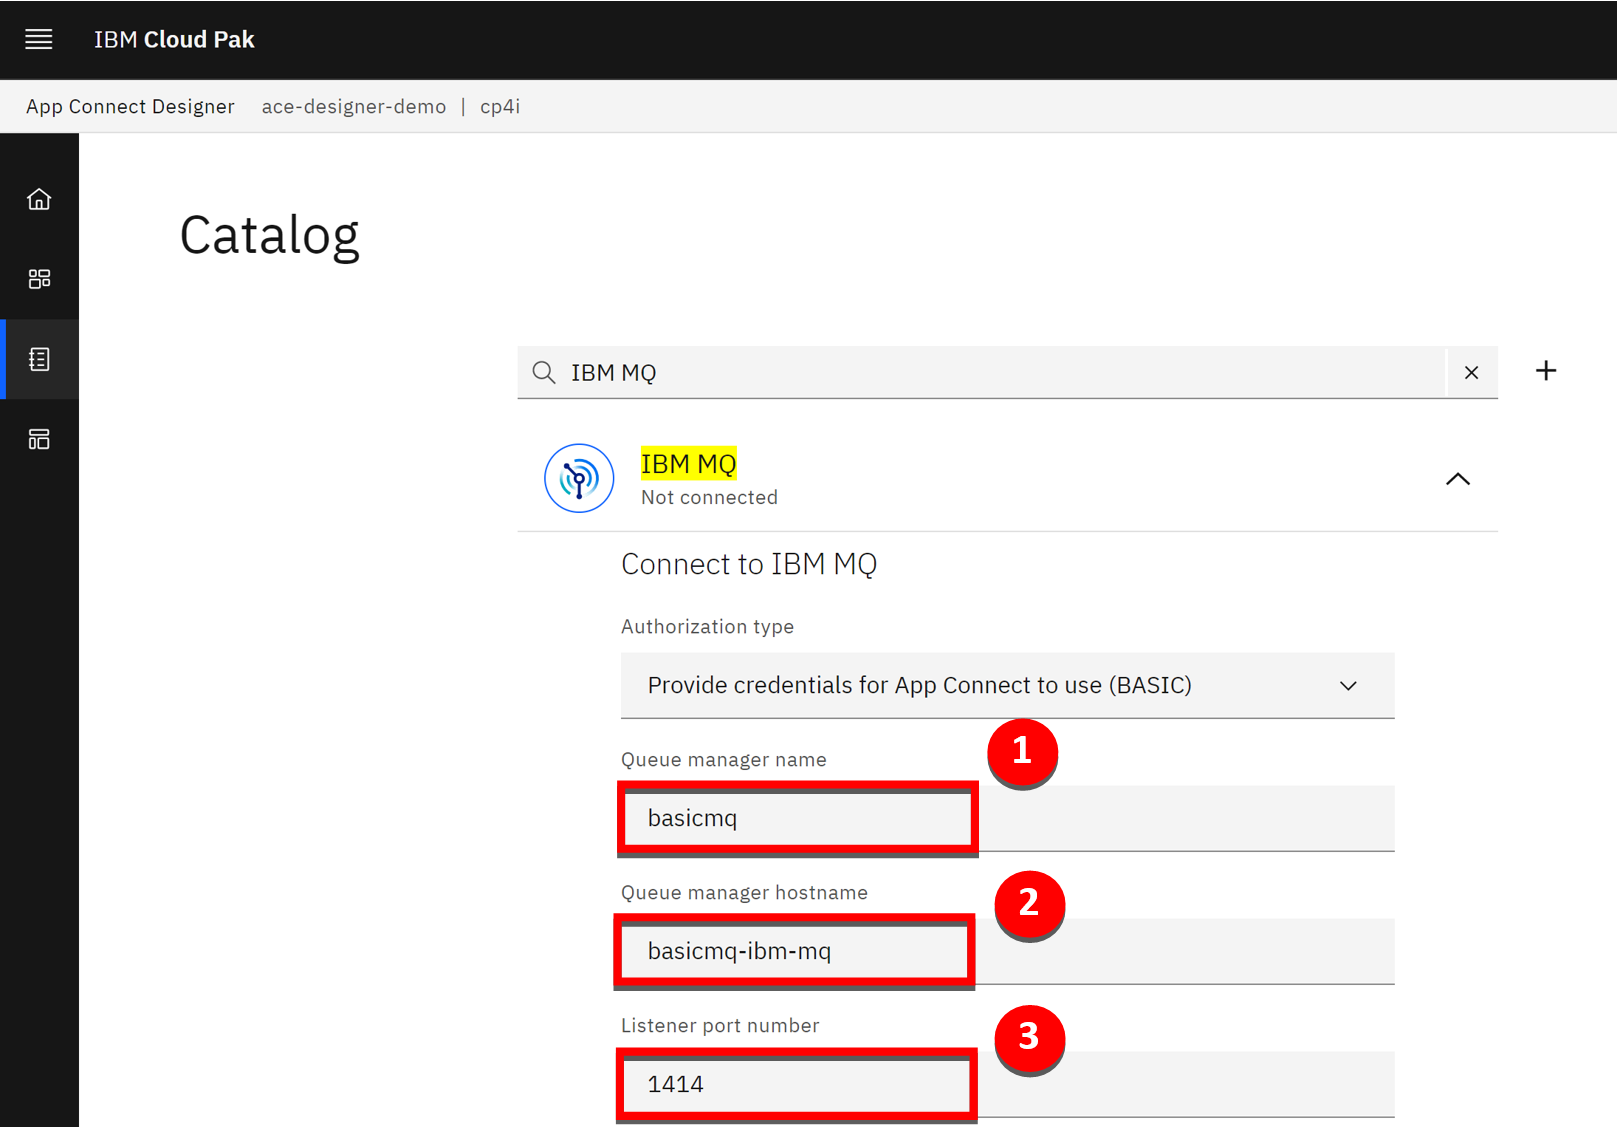
-
Enter ‘basicmq’ for the Queue manager name (1), ‘basicmq-ibm-mq’ for the Queue manager hostname (2), and ‘1414’ for the Listener port number (3).
-
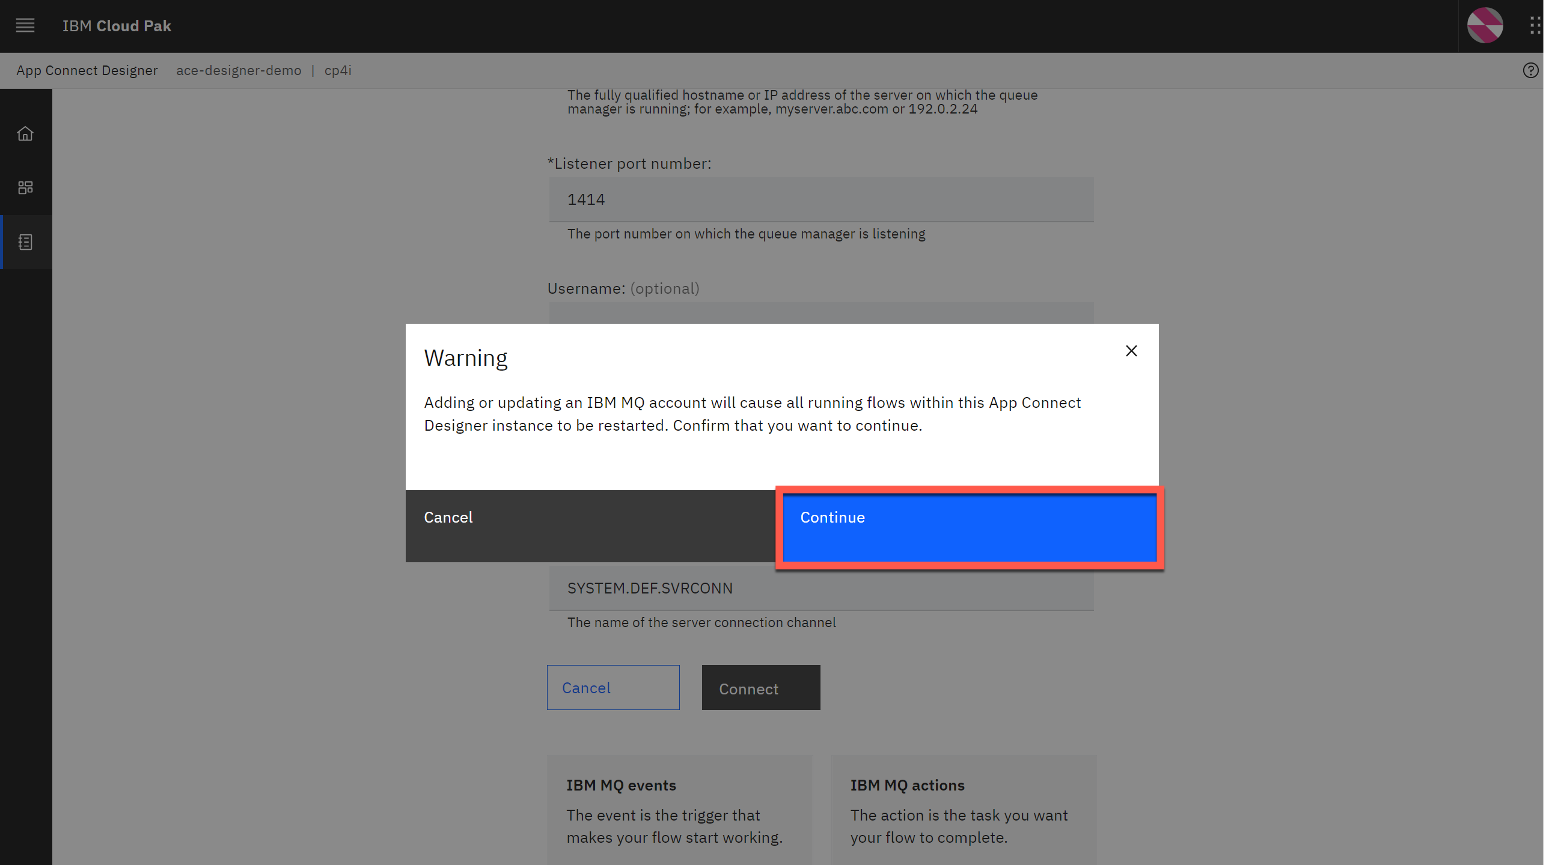
Enter ‘SYSTEM.DEF.SVRCONN’ for the Channel name (1), and click Connect (2).

-
Click Continue.
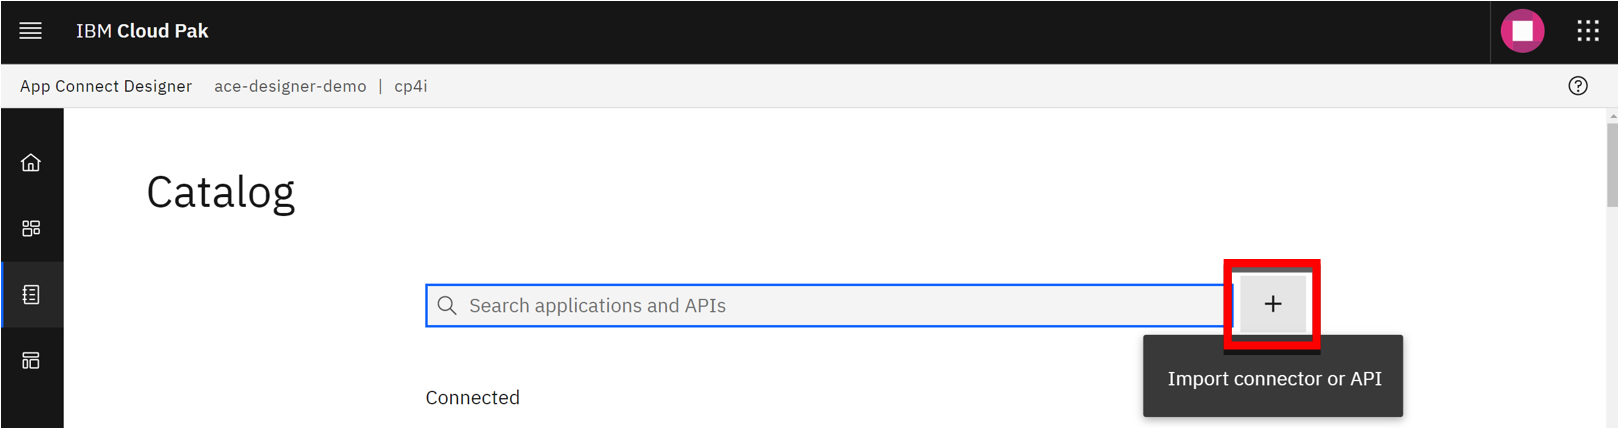
-
Scroll to the top of the page, and click the + button to the right of the search bar.
-
Access the API definition for the external account service here. Download the file using File –> Save Page as.
-
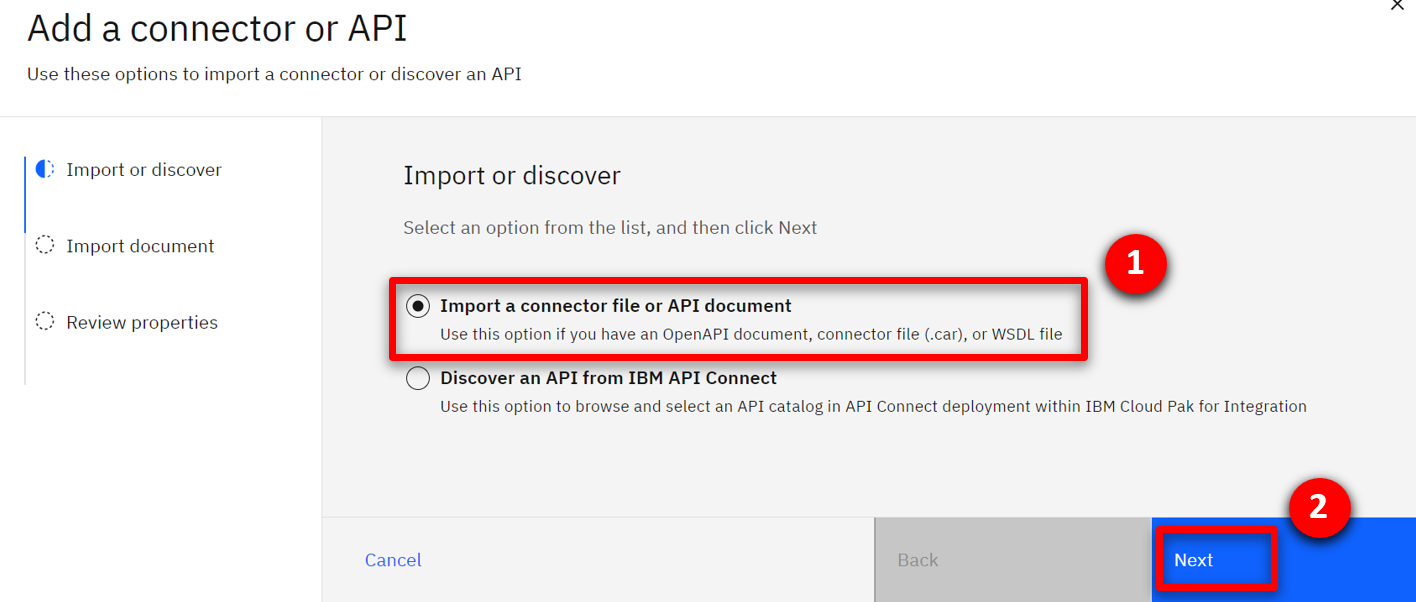
Assure Import a connector file or API document (1) is selected and select Next (2).
-
Select OpenAPI (1) for the Document type, use the downloaded CustomerAccountOpenAPIJSONServer.yaml file (2), and click Next (3).

-
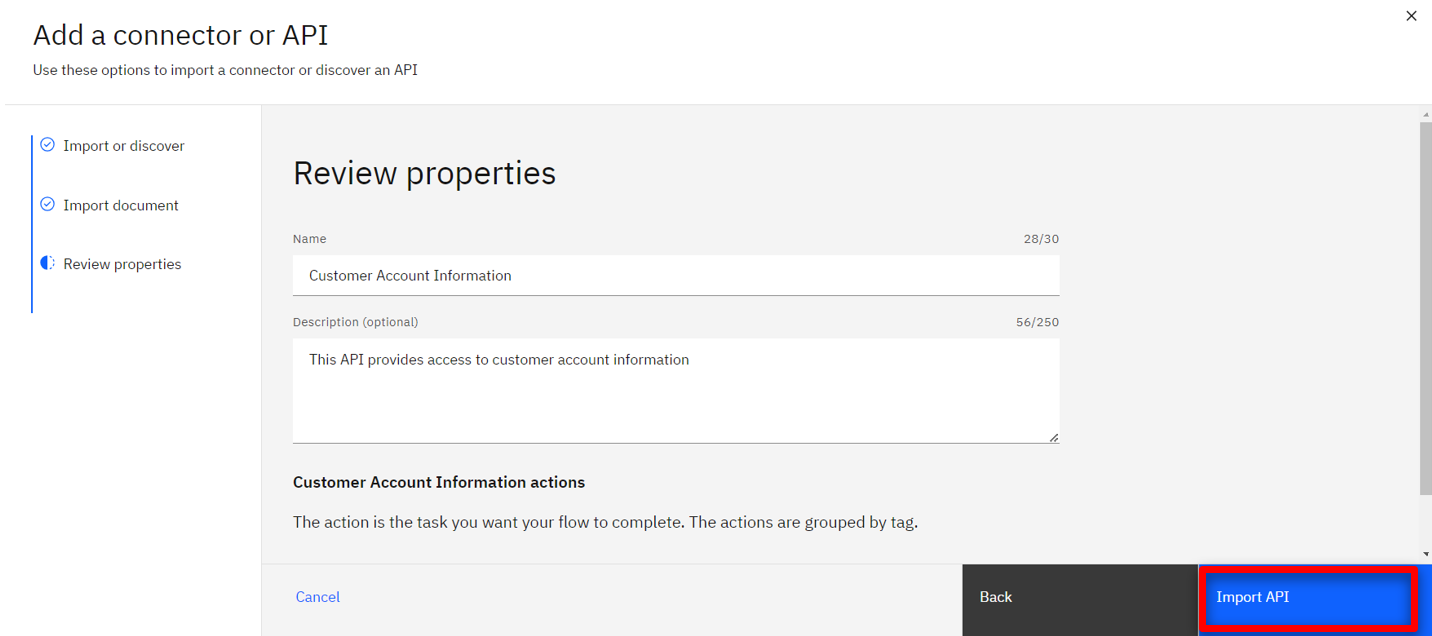
Click Import API.
-
Search for Customer Account (1), and click Connect (2).

-
Scroll down and click Connect.
Import flows to App Connect Designer
-
Download the following two files:
• MQ flow to simulate the acquired bank
• Accounts API flow that workflow will use -
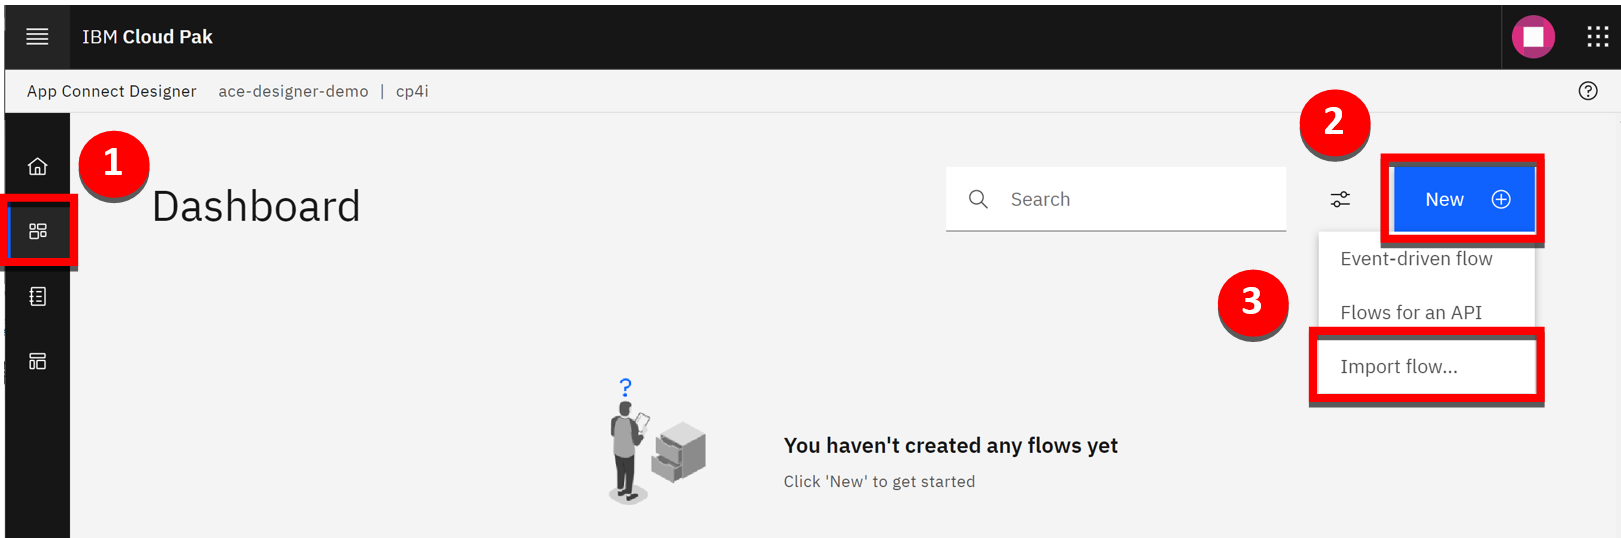
Import the MQExternalProvider.yaml file by clicking the Dashboard icon (1), then New (2), and then Import flow… (3).
-
Use the downloaded MQExternalProvider.yaml file (1), and click Import (2).

-
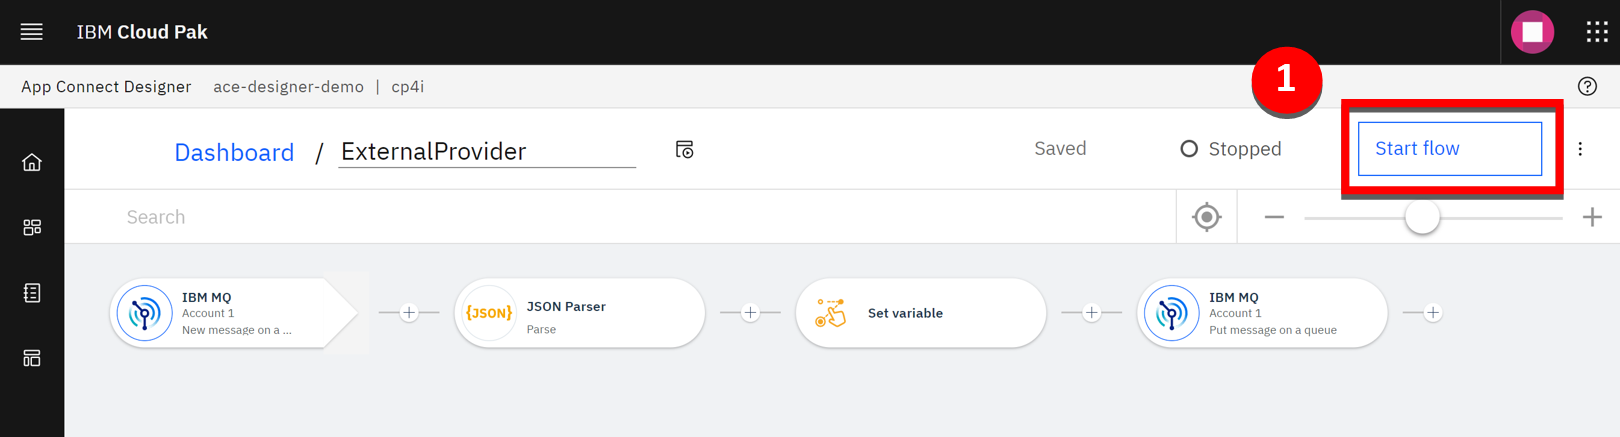
Start the imported flow by selecting Start flow (1).
-
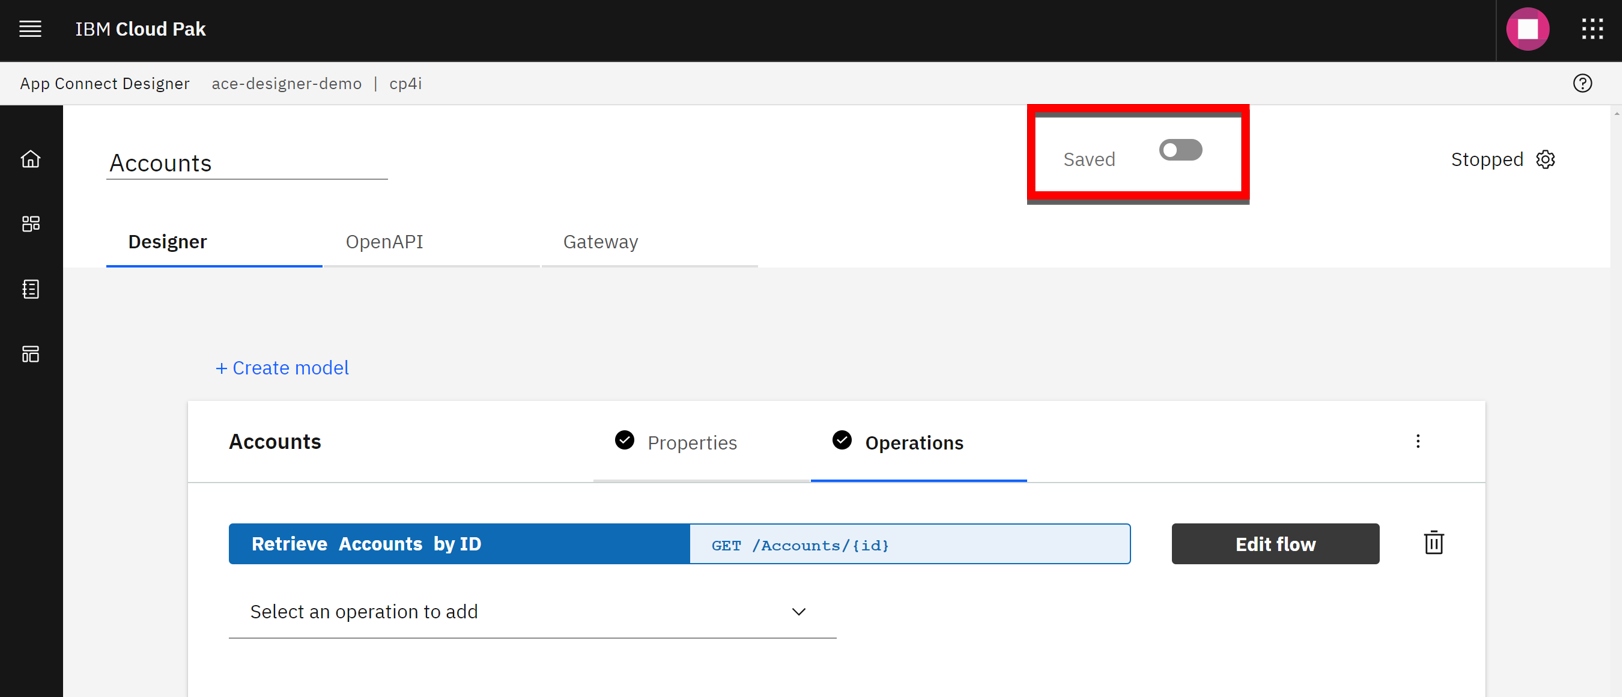
Repeat steps 2 - 4 for the Accounts.yaml file. This time, the flow is started by switching the toggle from Stopped to Started.
Test the flow
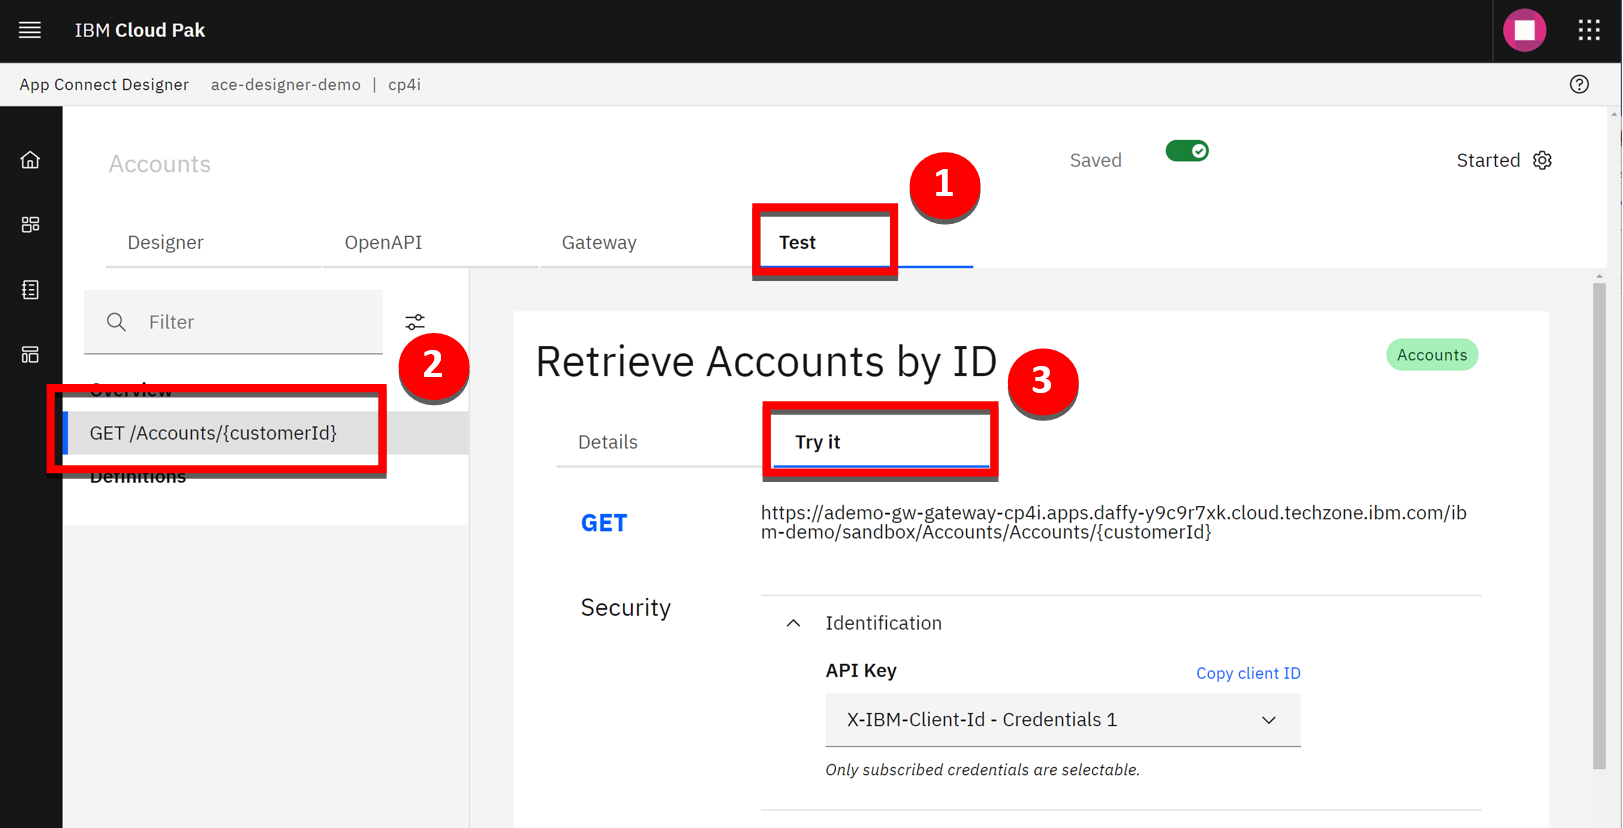
-
Select the Test tab (1), Get /Accounts/{customerId} operation (2), and then the Try it tab (3).
-
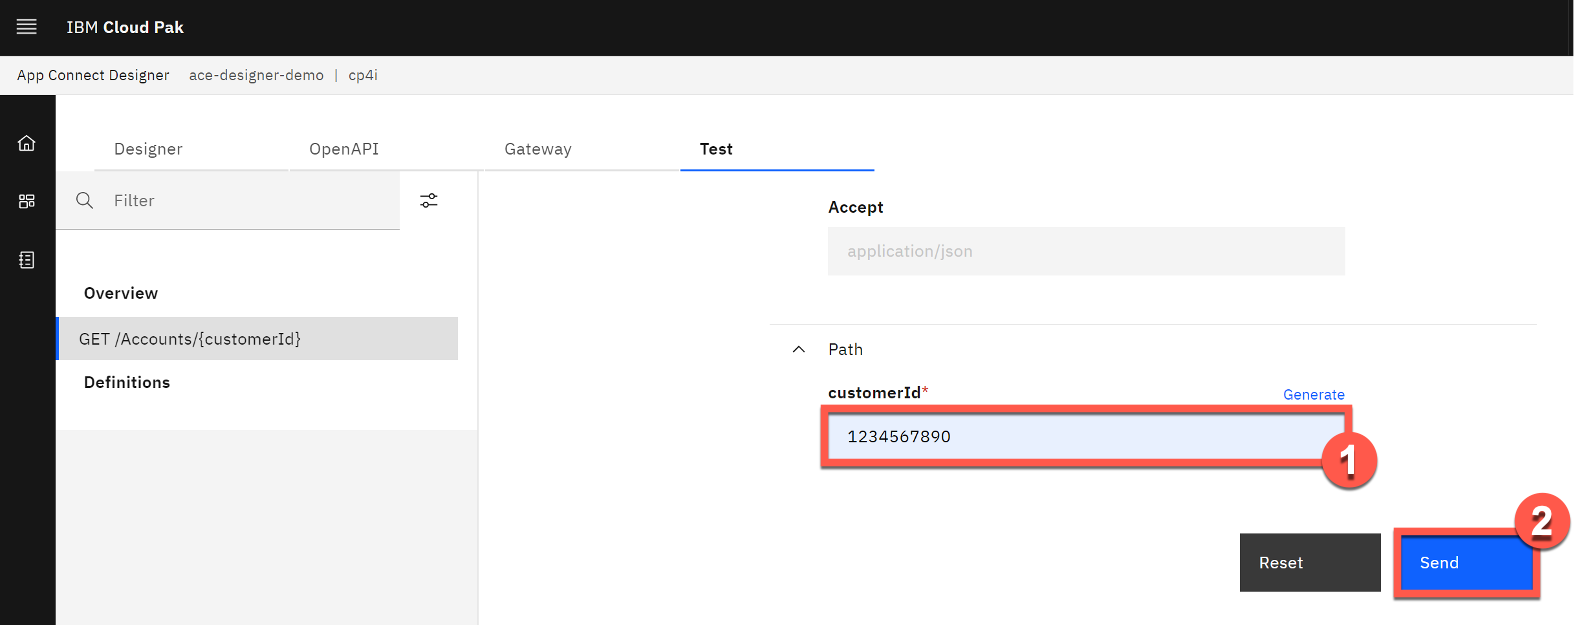
Scroll down and enter ‘1234567890’ in the customerId field (1), and click Send (2).
-
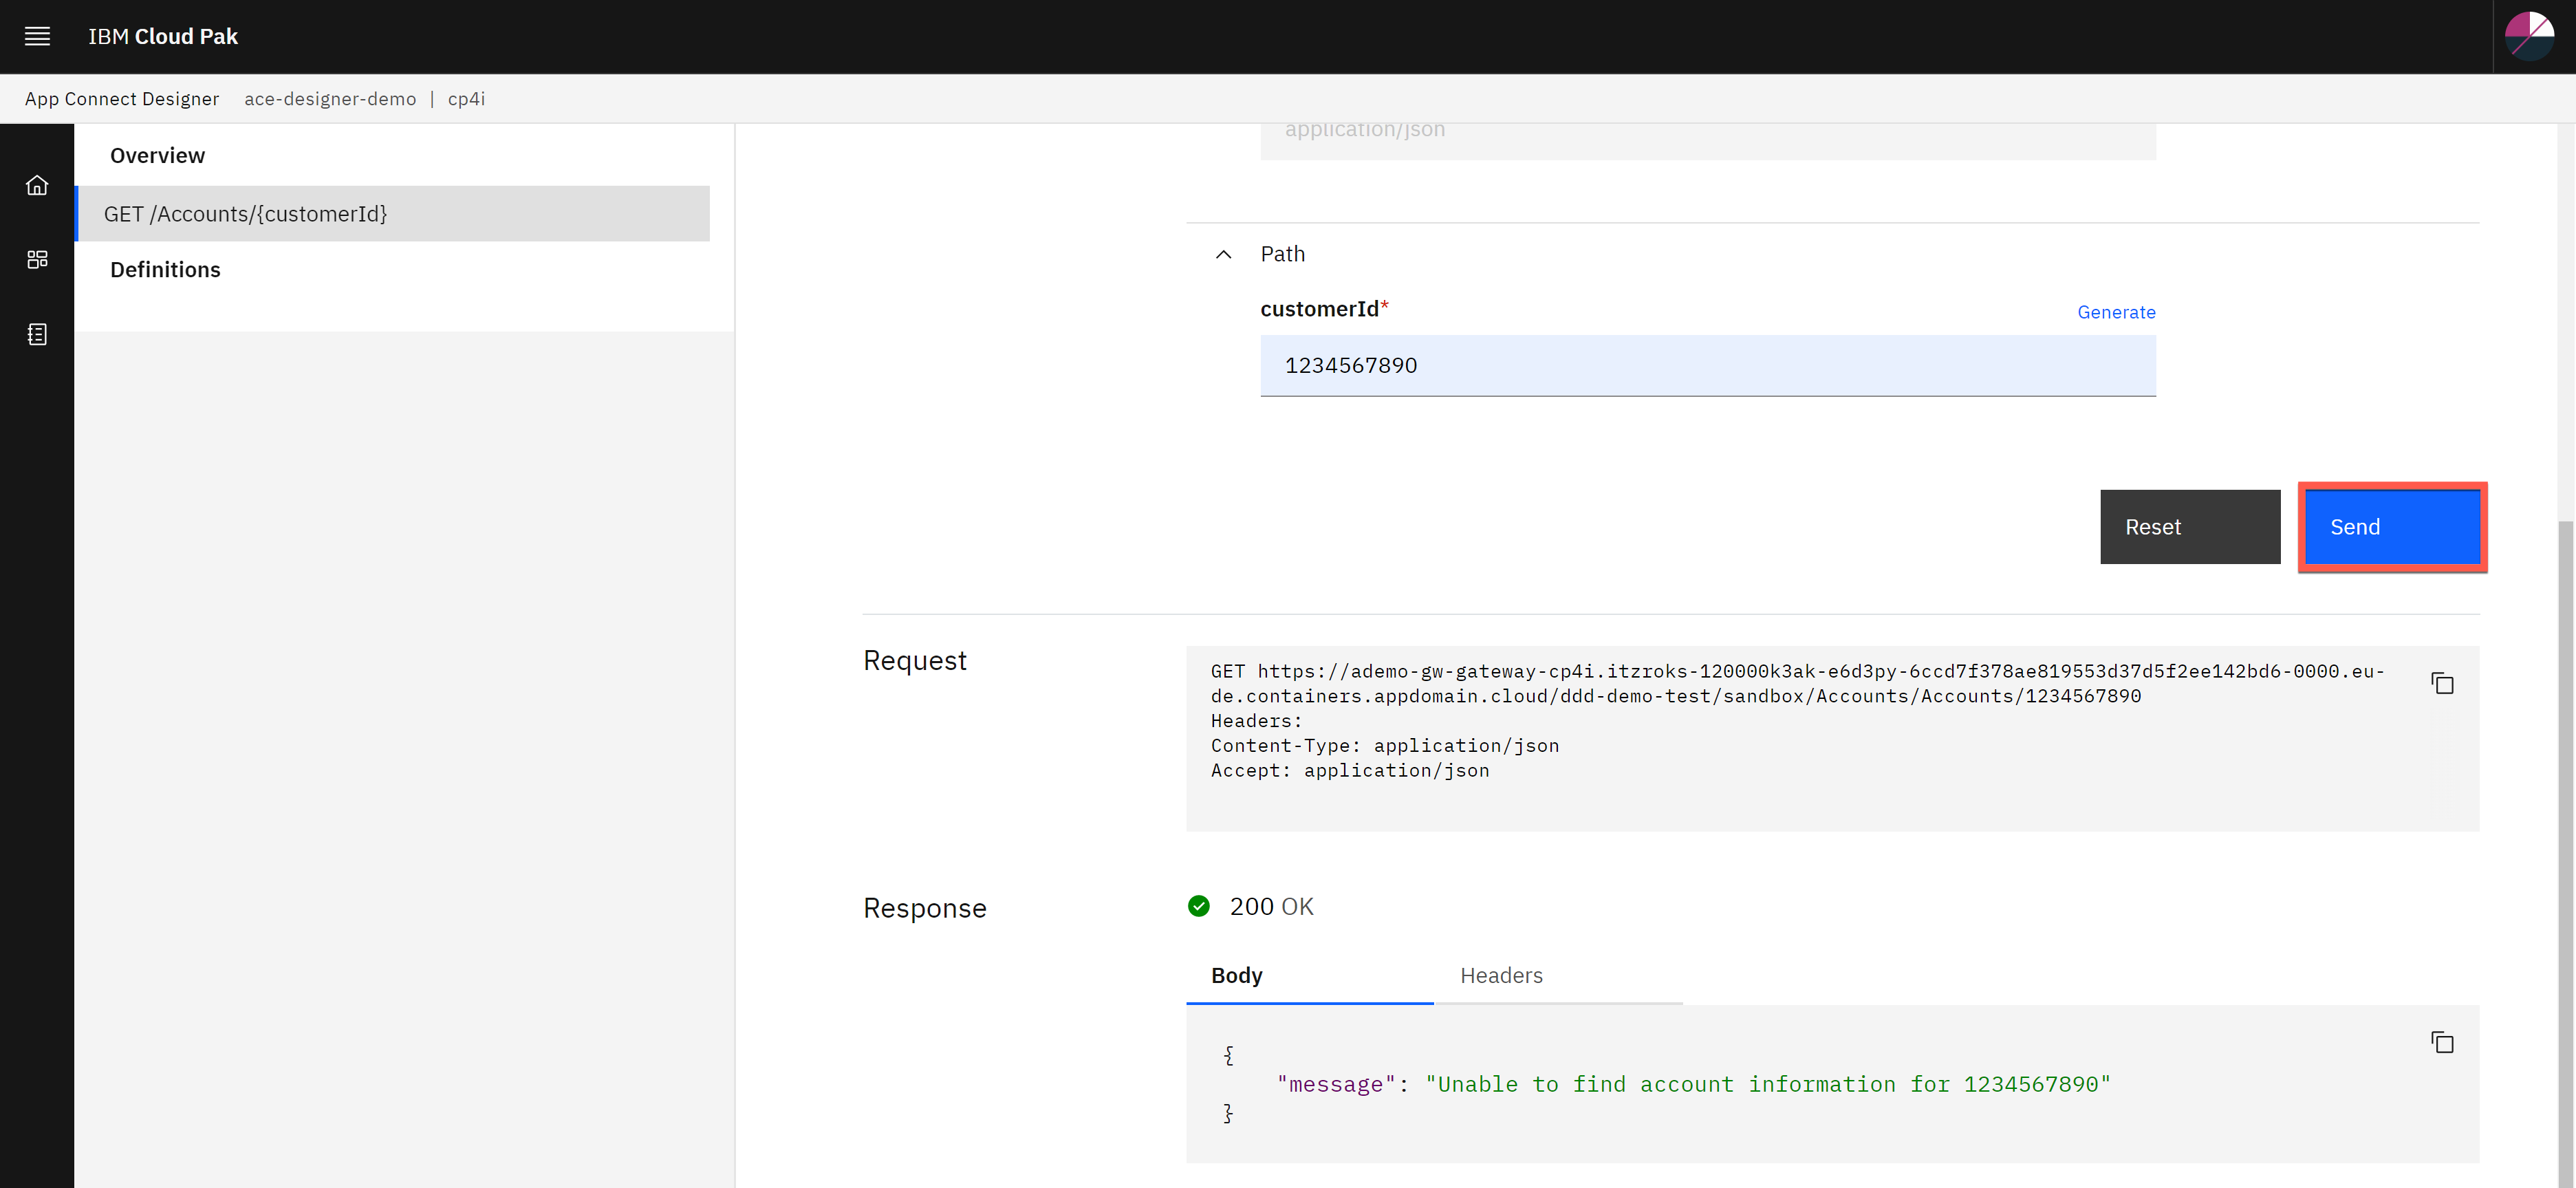
The first test will fail due to a known timeout issue with the error shown in the screenshot below. Click Send a second time to receive the correct response.
-
You will see the following correct response.

-
Three environmentally specific pieces of information are required to integrate the API into the workflow: the API URL, client ID and hostname.
Scroll to the top of the screen and save the API URL (1) and client ID (2).
The hostname is contained within the API URL. It is the portion between “https://” and the next “/”.
The hostname will look like this: ademo-gw-gateway-cp4i.itzroks-120000k3ak-vzlud5-4b4a324f027aea19c5cbc0c3275c4656-0000.eu-de.containers.appdomain.cloud
Save the hostname, API URL and client ID.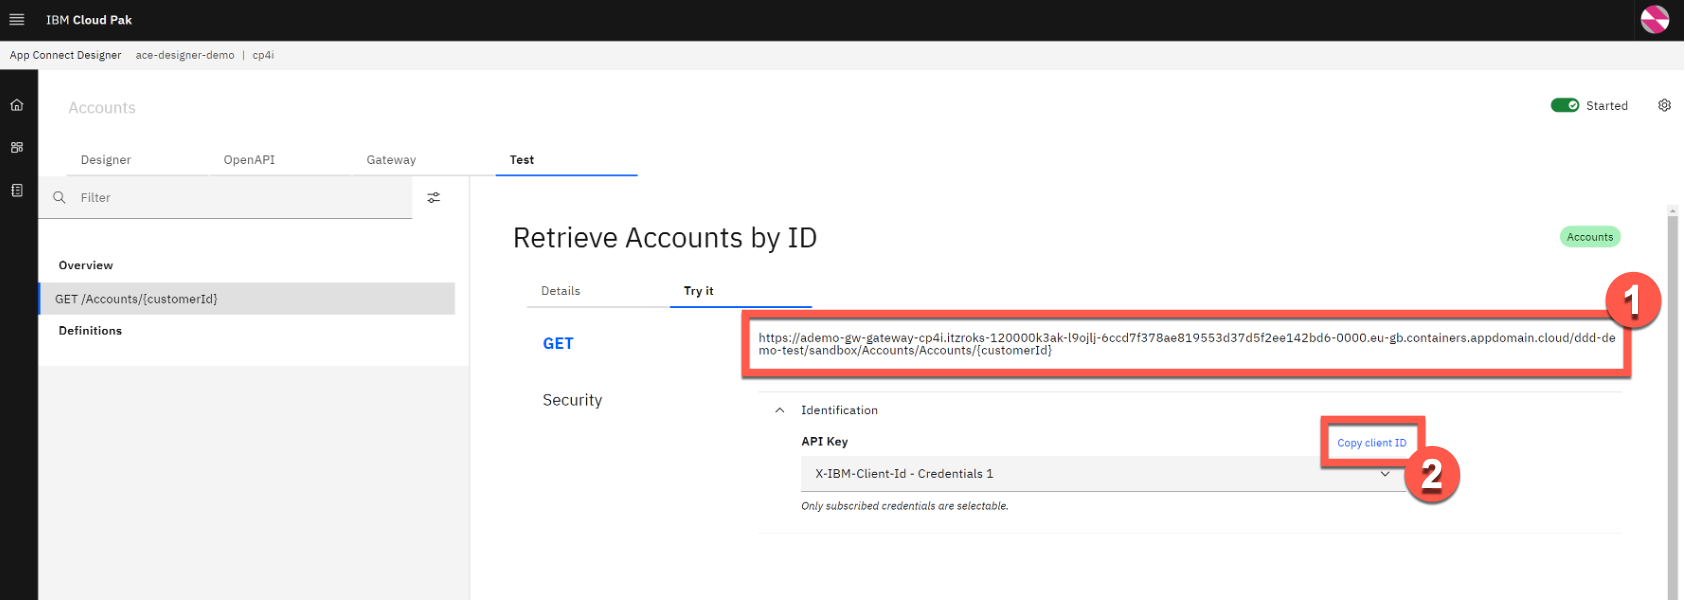
INSTALL THE DEMO: Cloud Pak for Business Automation (Windows VM)
1 - Provision a Technology Zone demo environment
-
Reserve a Technology Zone demo environment here.
-
Wait until your reservation status is Ready on the IBM Technology Zone’s My Library → My Reservations page. (You can either keep refreshing the My Reservation page or wait for a confirmation email.)
When your reservation is Ready, click the reservation tile to view the reservation details.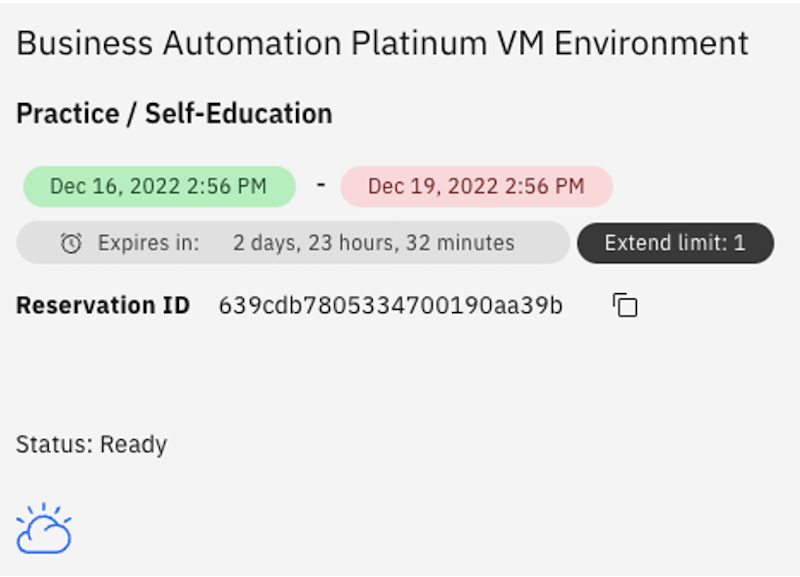
-
On the reservation details page, copy or bookmark the Published services links for BAW Workflow Center and BAW Process Portal.
When your reservation is Ready, click the reservation tile to view the reservation details.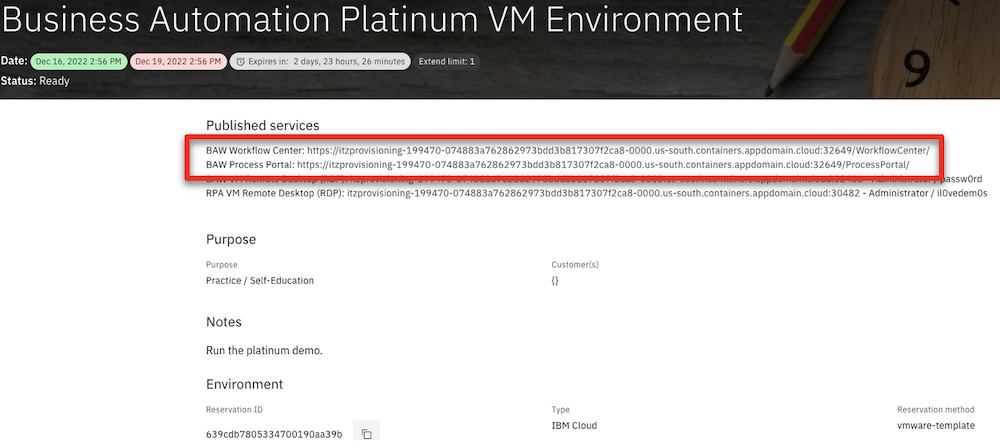
2 - Import the signer certificate for Cloud Pak for Integration
-
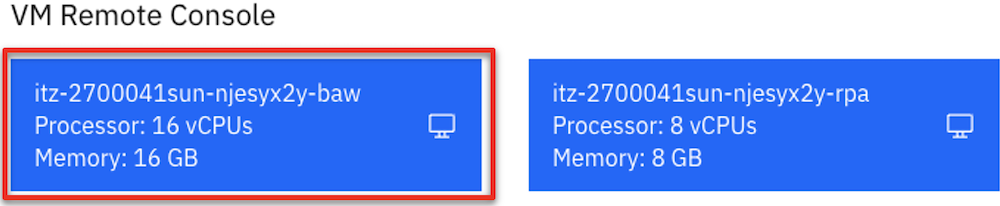
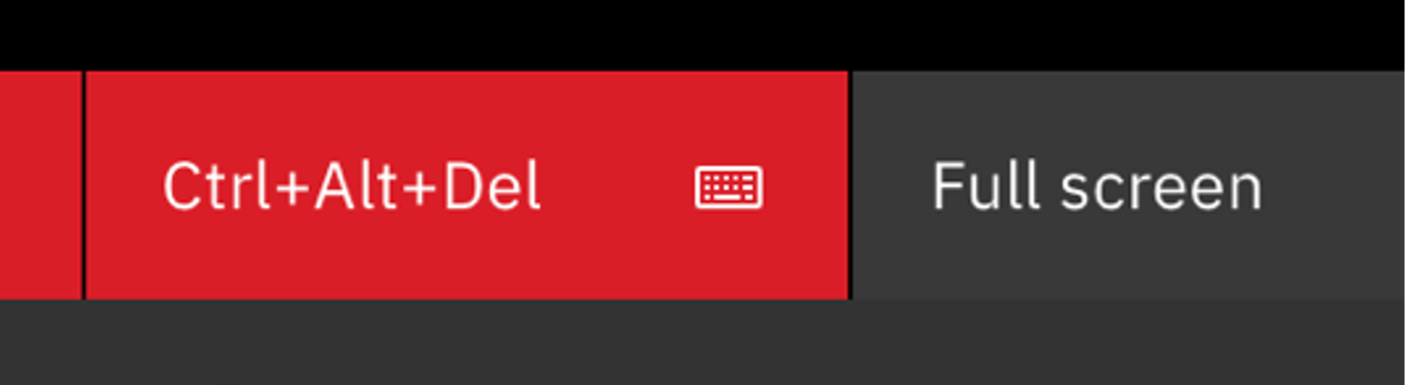
Open the BAW VM Remote Console. Use the links on the reservation page. Open the link on the left. Then click to open the console in Full screen.
-
Click the red Ctrl+Alt+Del button.
-
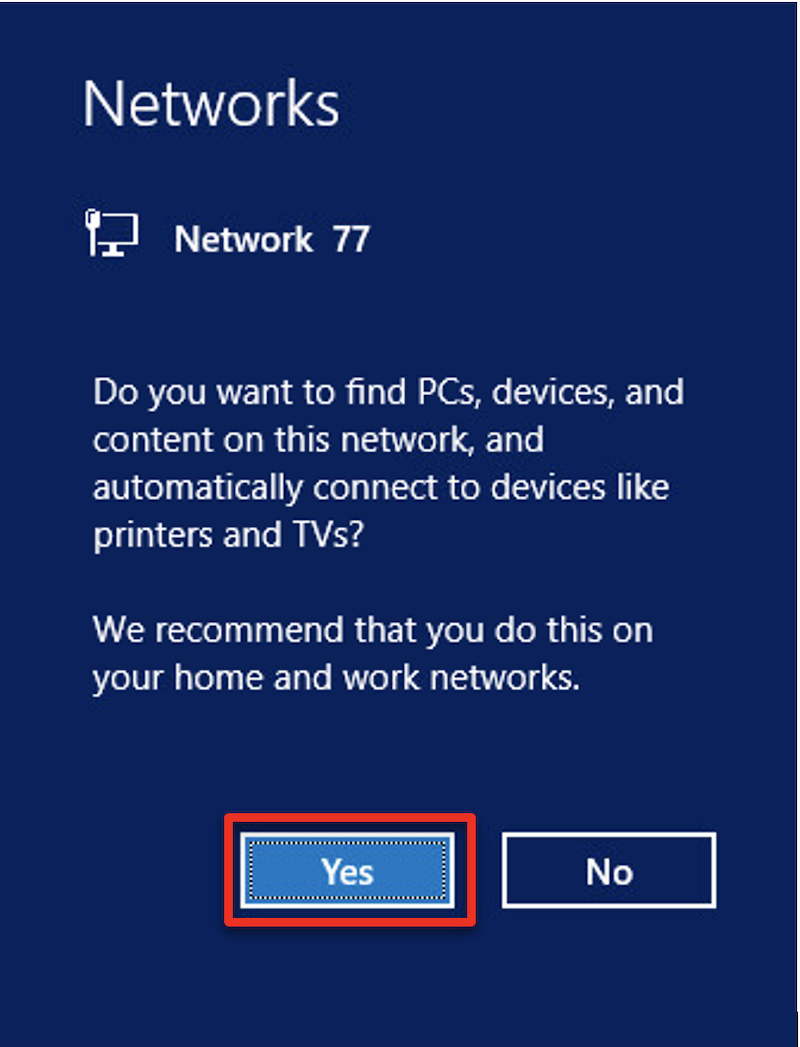
Click Yes on the Networks dialog box.
-
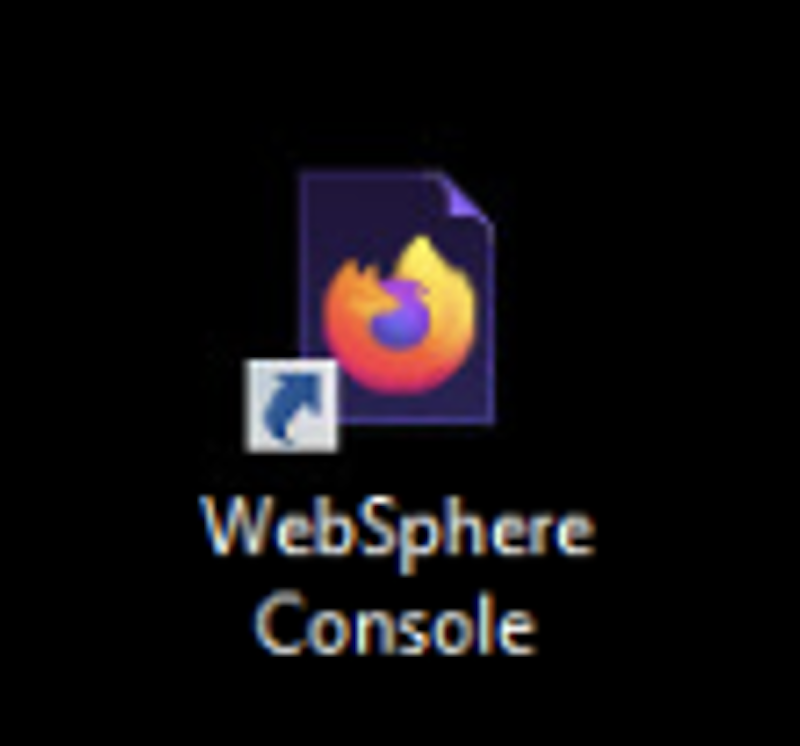
On the Windows desktop, double-click the WebSphere Console shortcut to open the WebSphere Console.
-
Click Advanced…, then Accept the Risk and Continue to continue past the security warning.
-
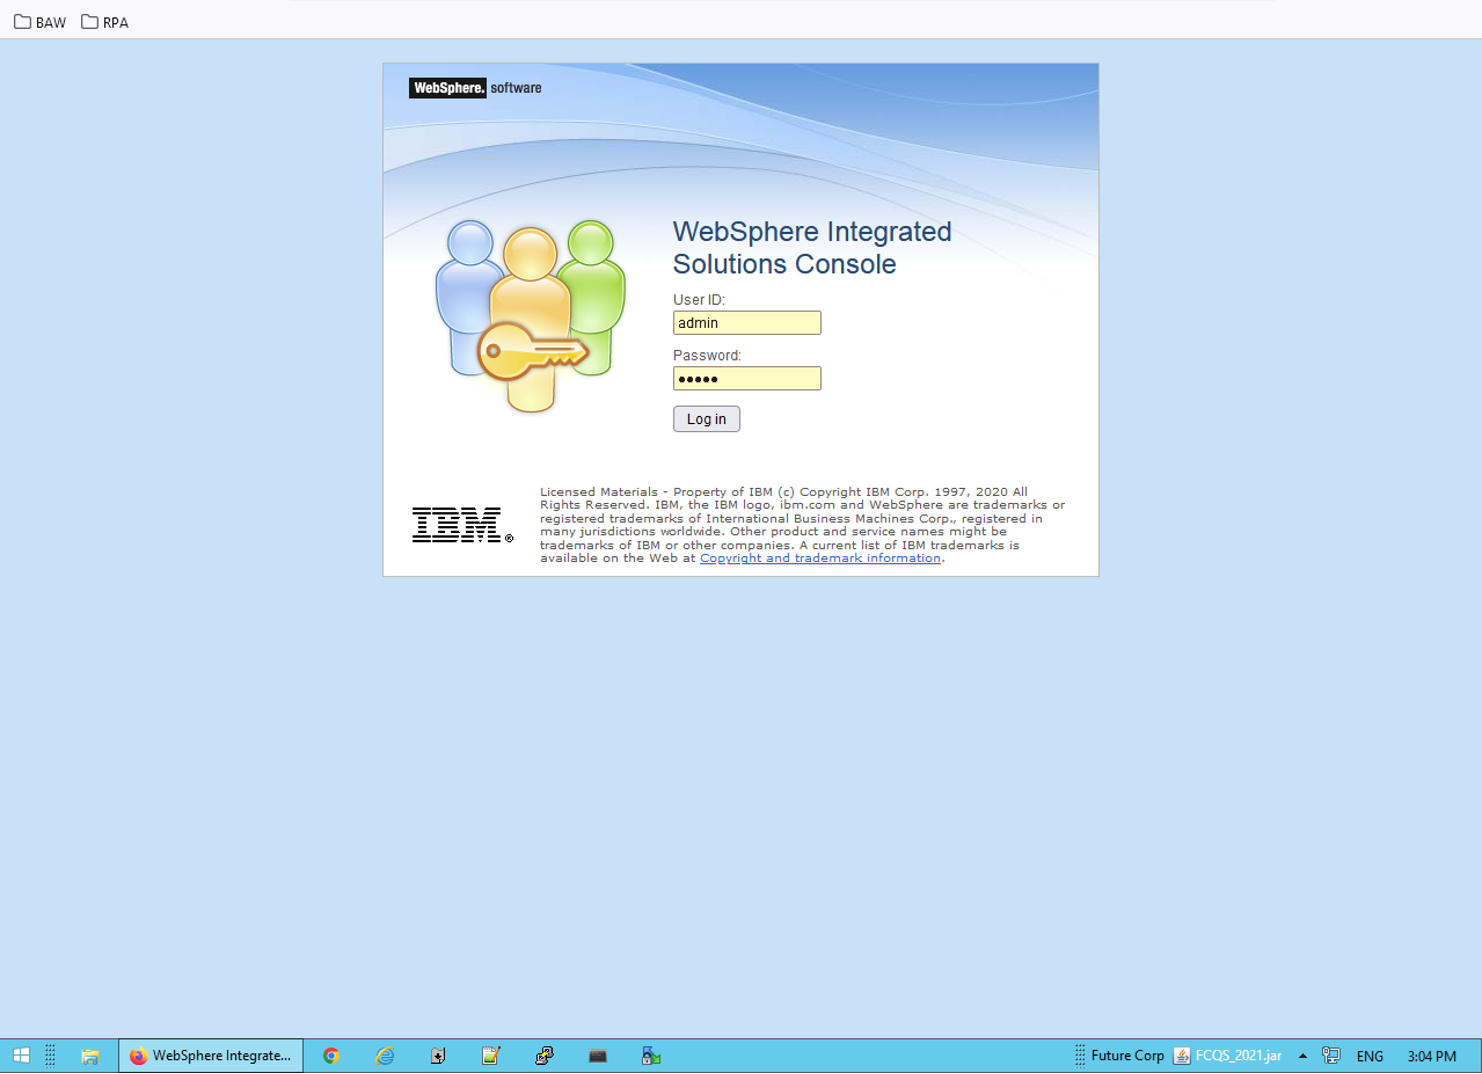
Enter ‘admin’ as the User ID and ‘admin’ as the Password.
-
Open Security (1) and click SSL certificate and key management (2).
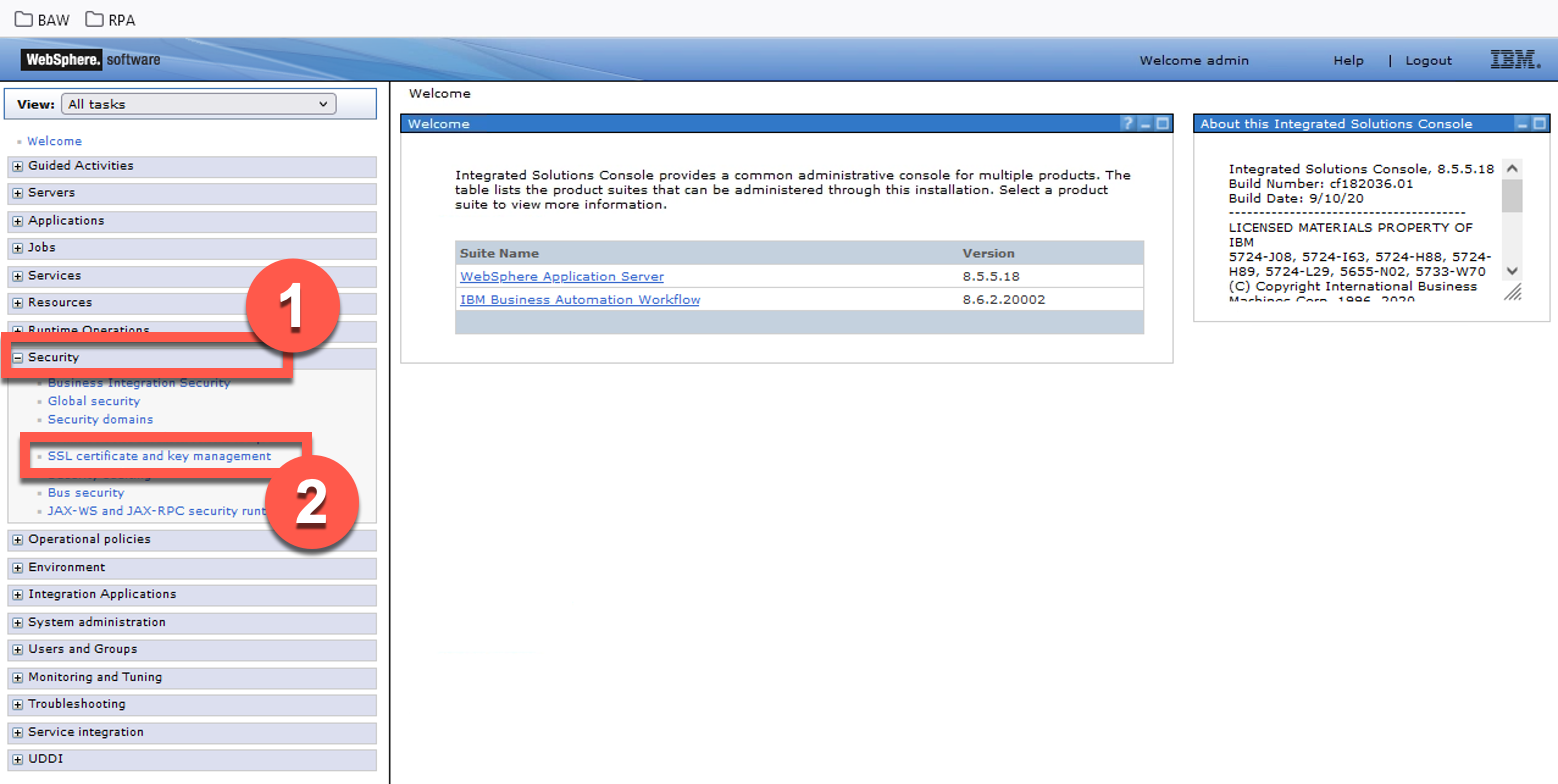
-
Click Key stores and certificates.
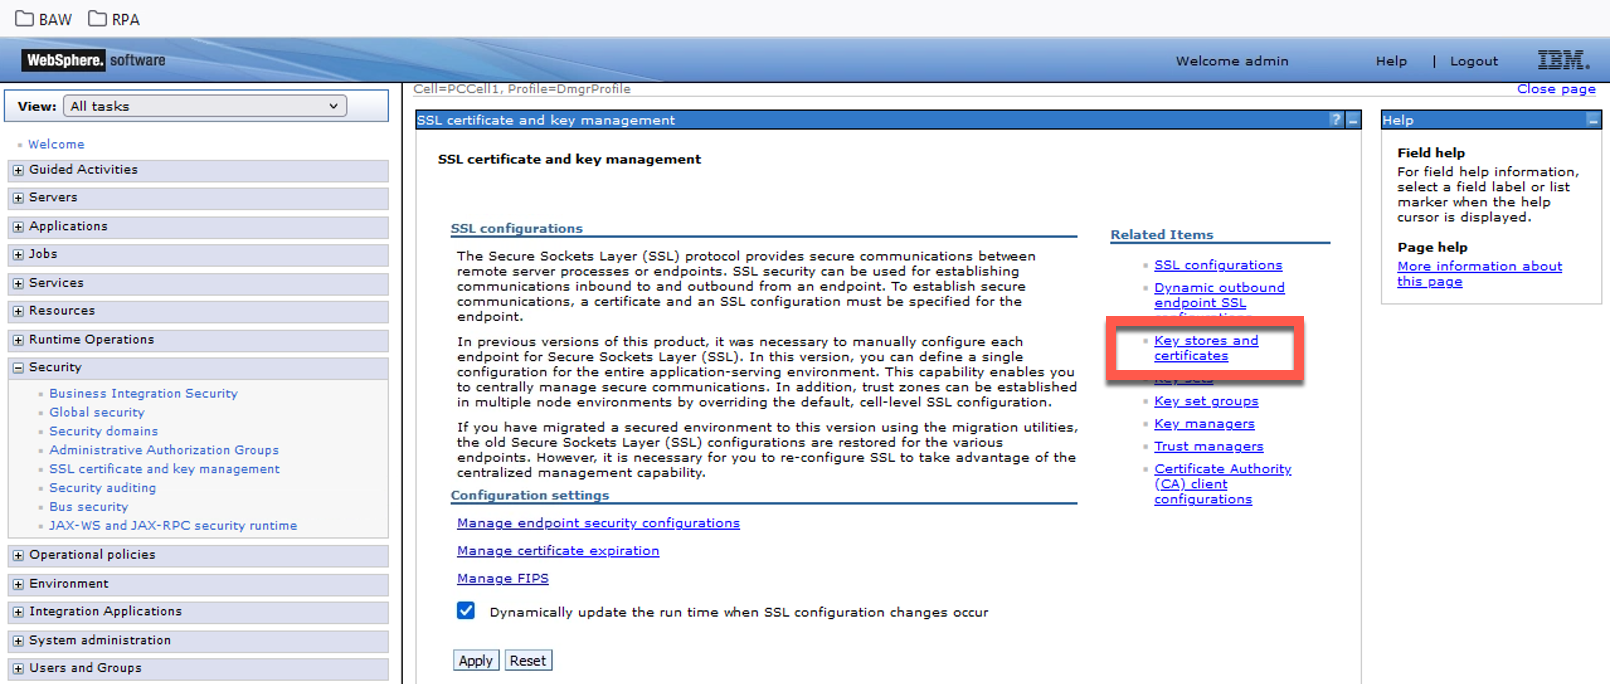
-
Click CellDefaultTrustStore.
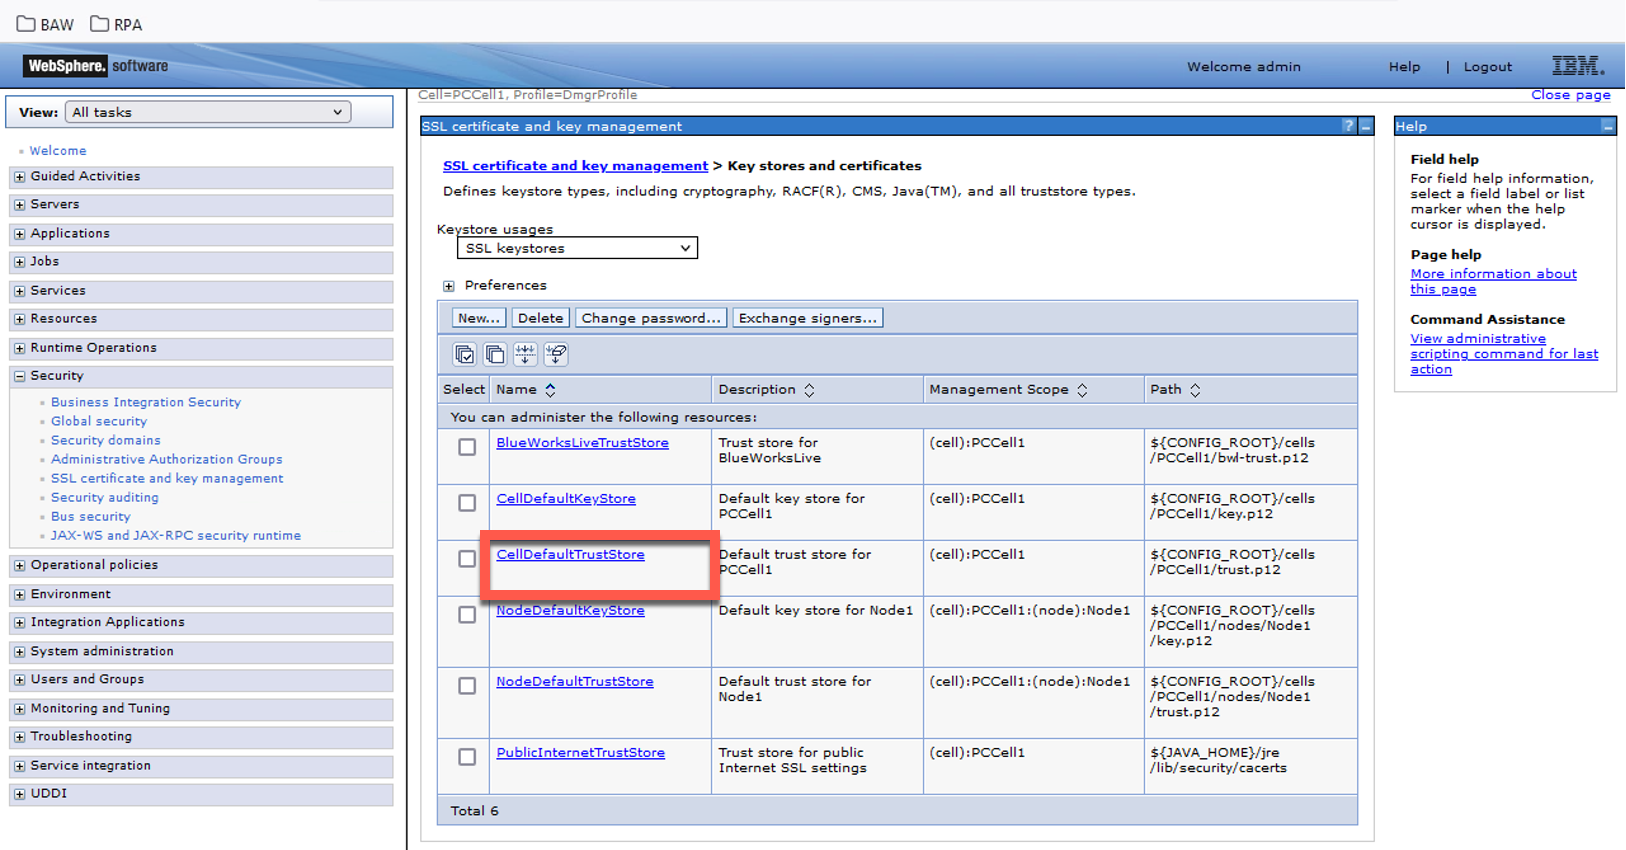
-
Click Signer certificates.
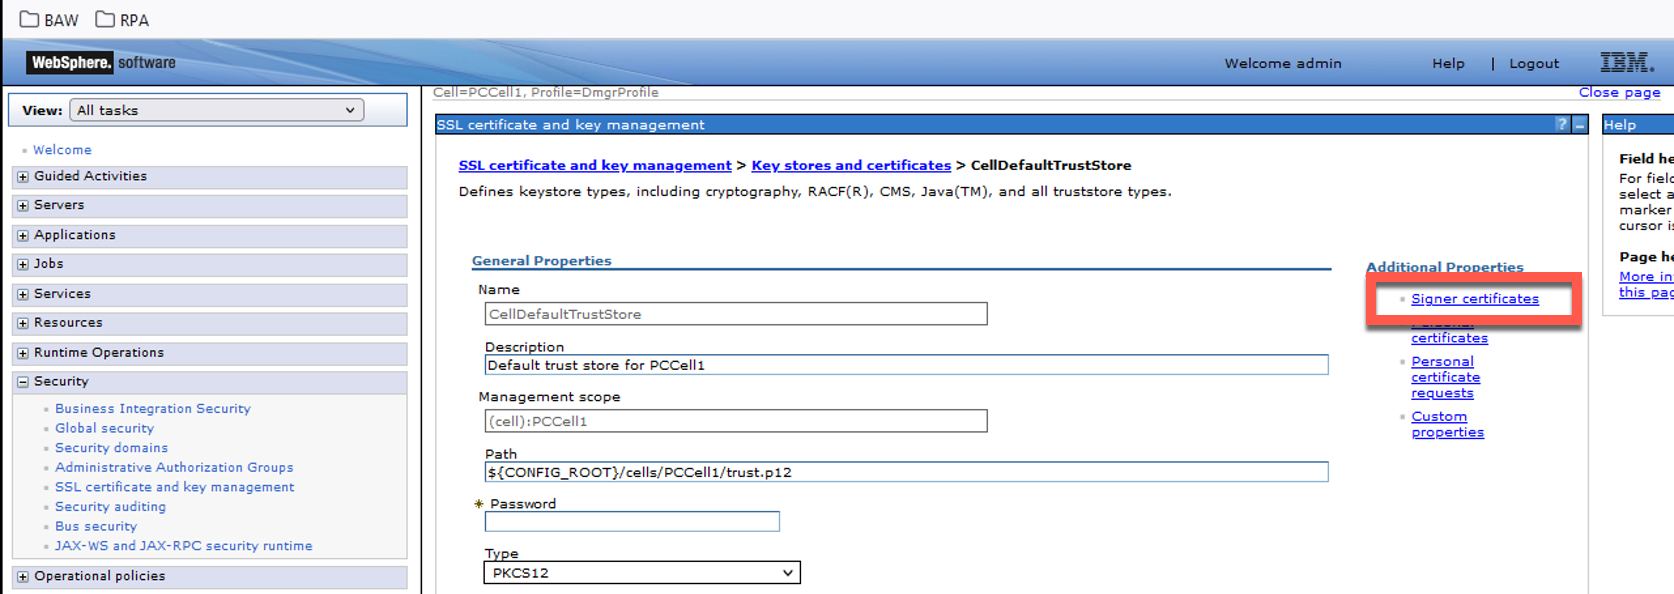
-
Click Retrieve from port.
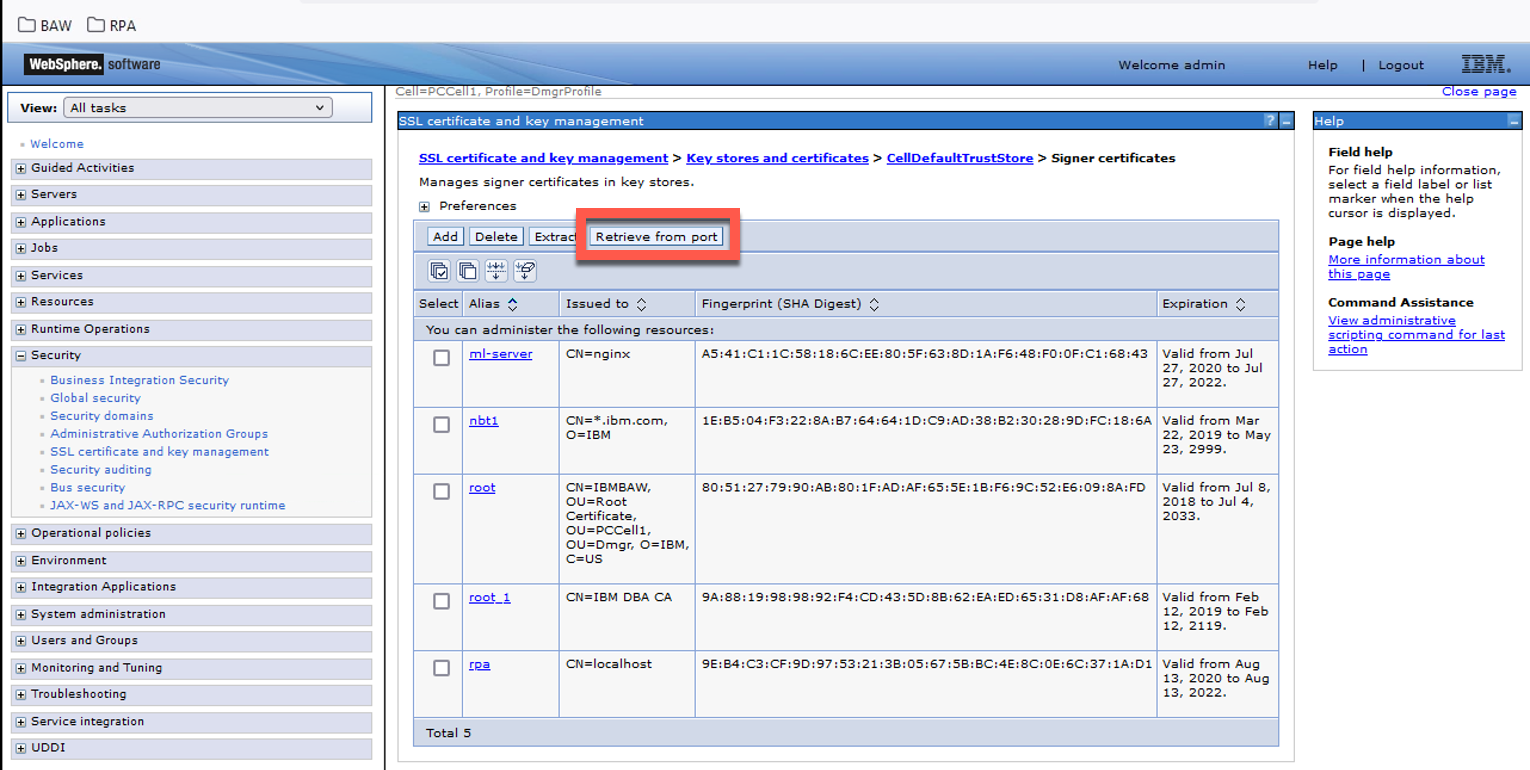
-
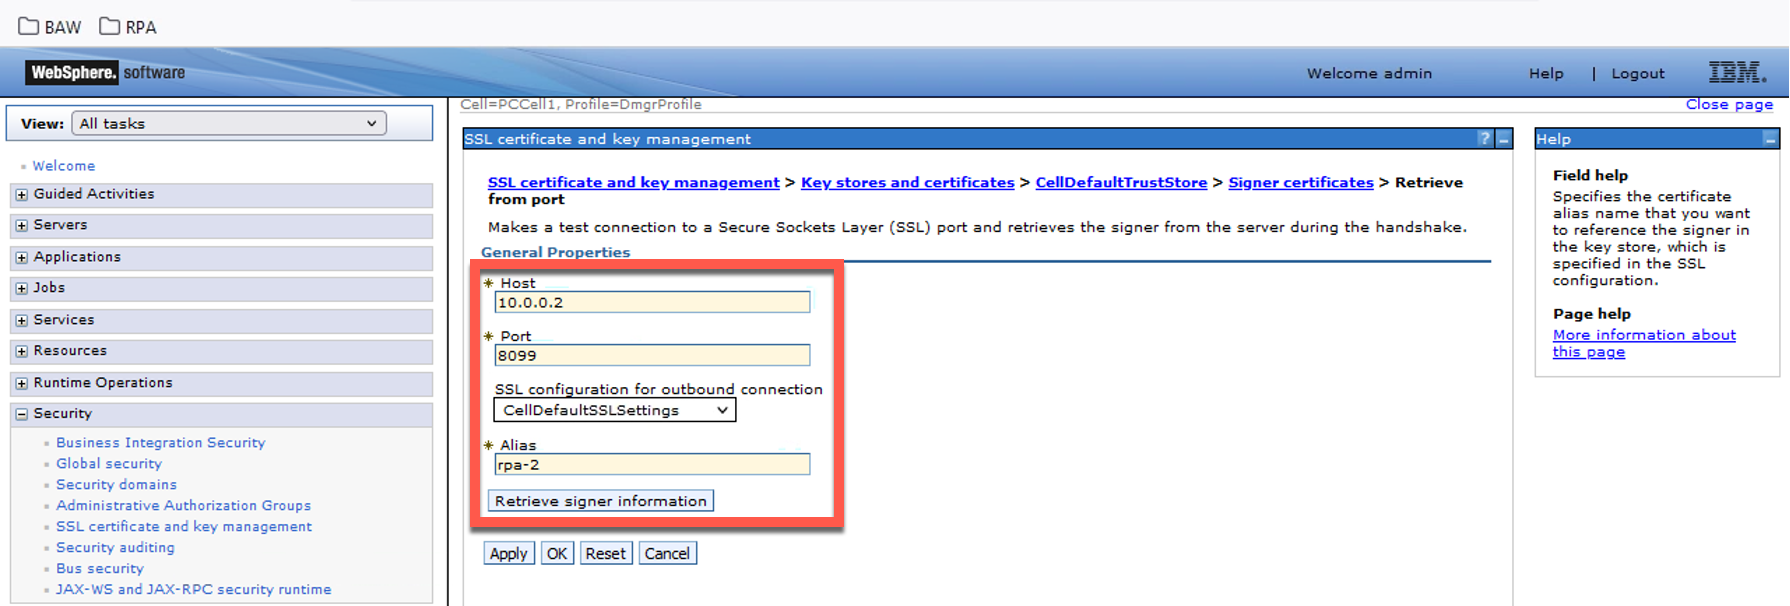
For Host, enter your Cloud Pak for Integration ROKS hostname. For Port, enter ‘443’. For Alias, enter ‘integration-1’. Click Retrieve signer information.
-
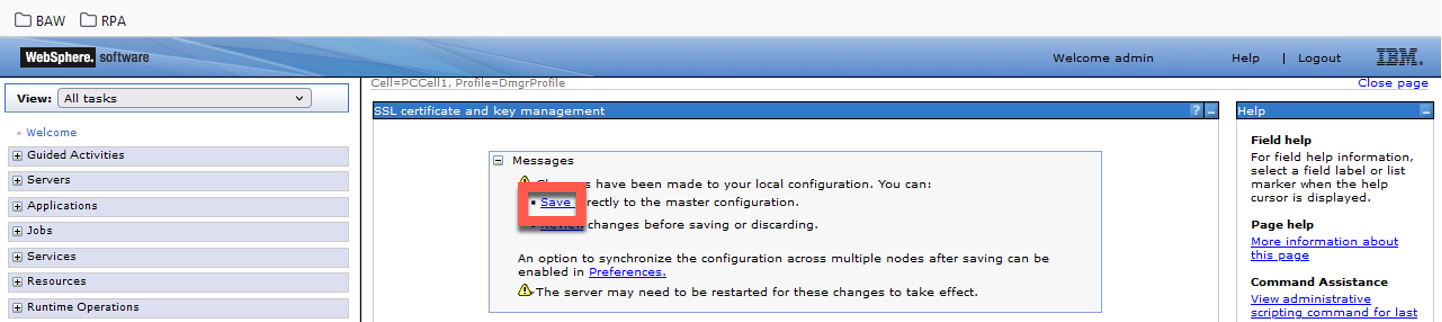
Click Apply.

-
Click Save.
-
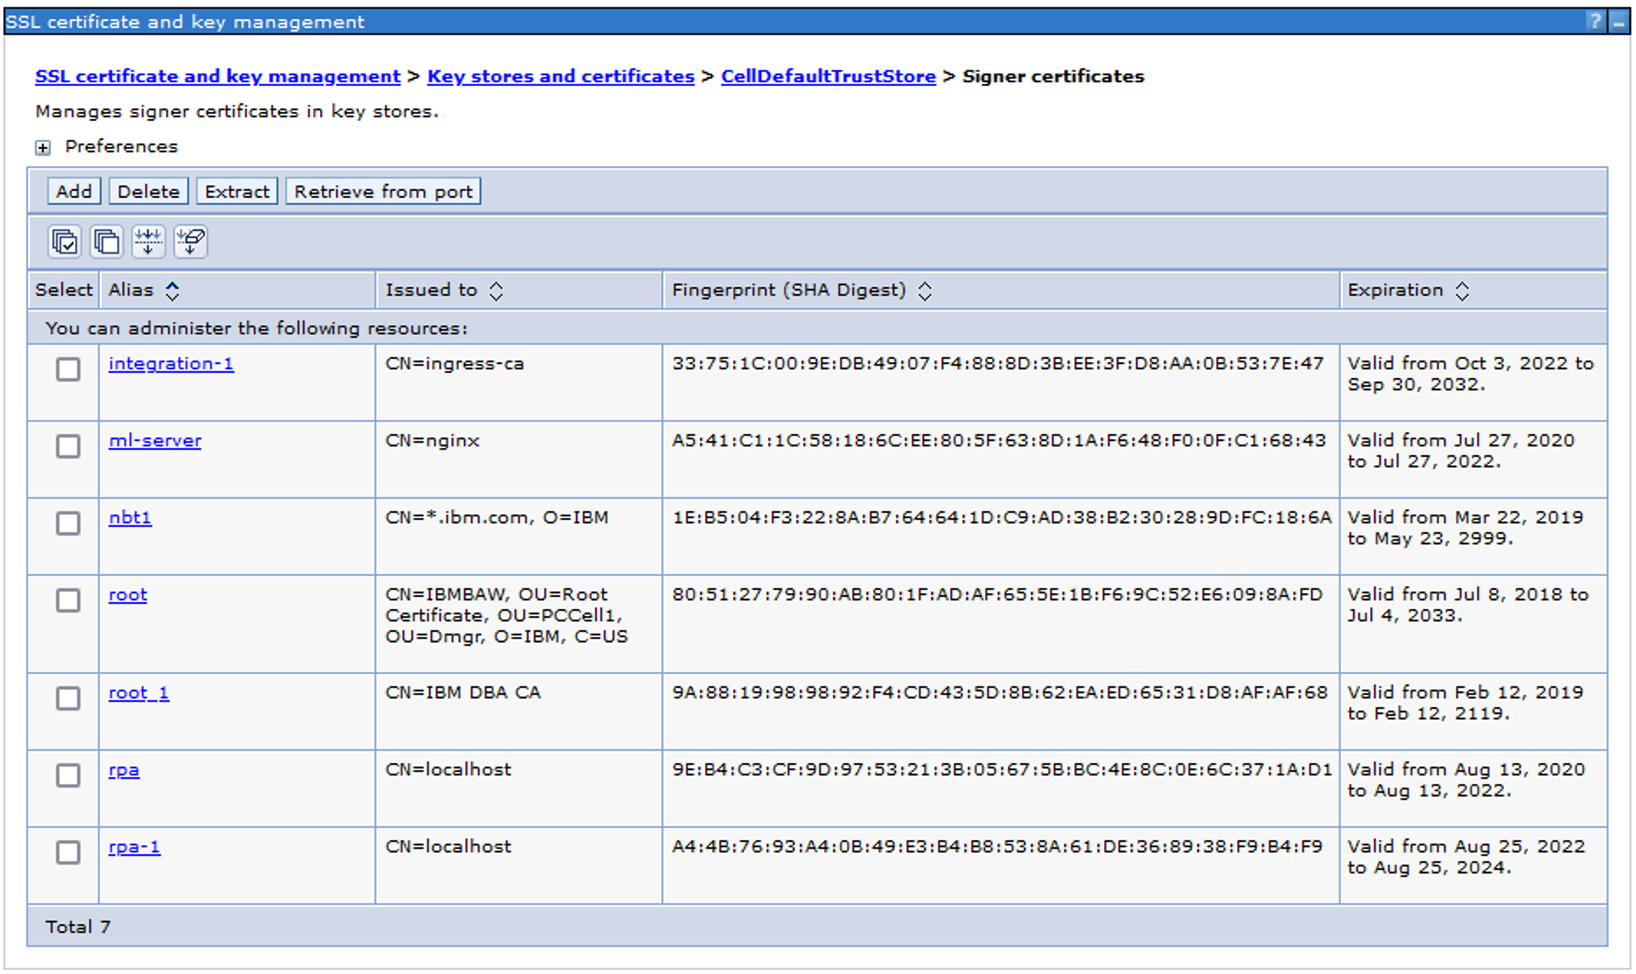
The new certificate is now added.
You can now close the BAW VM console window.
3 - Import the process app and update the 'AccountsServer' hostname in the process app settings
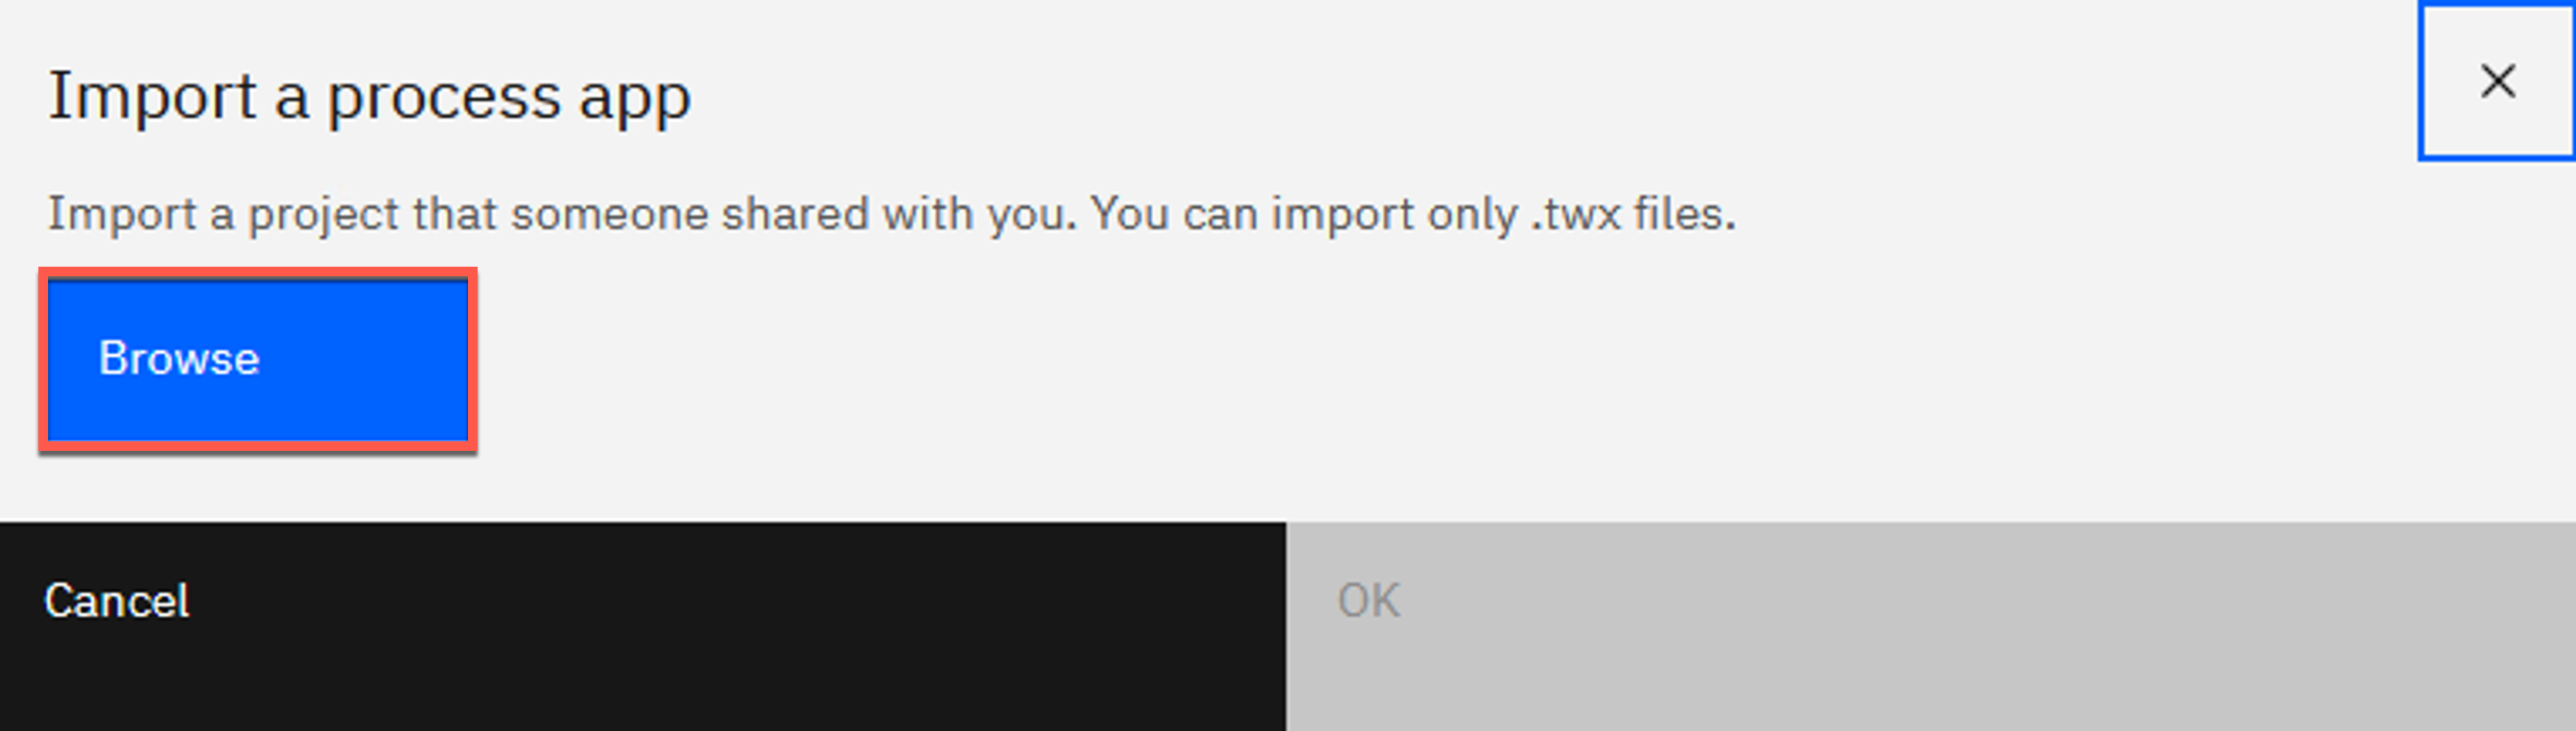
Before completing this section, download the Select the New Account Opening.twx file.
-
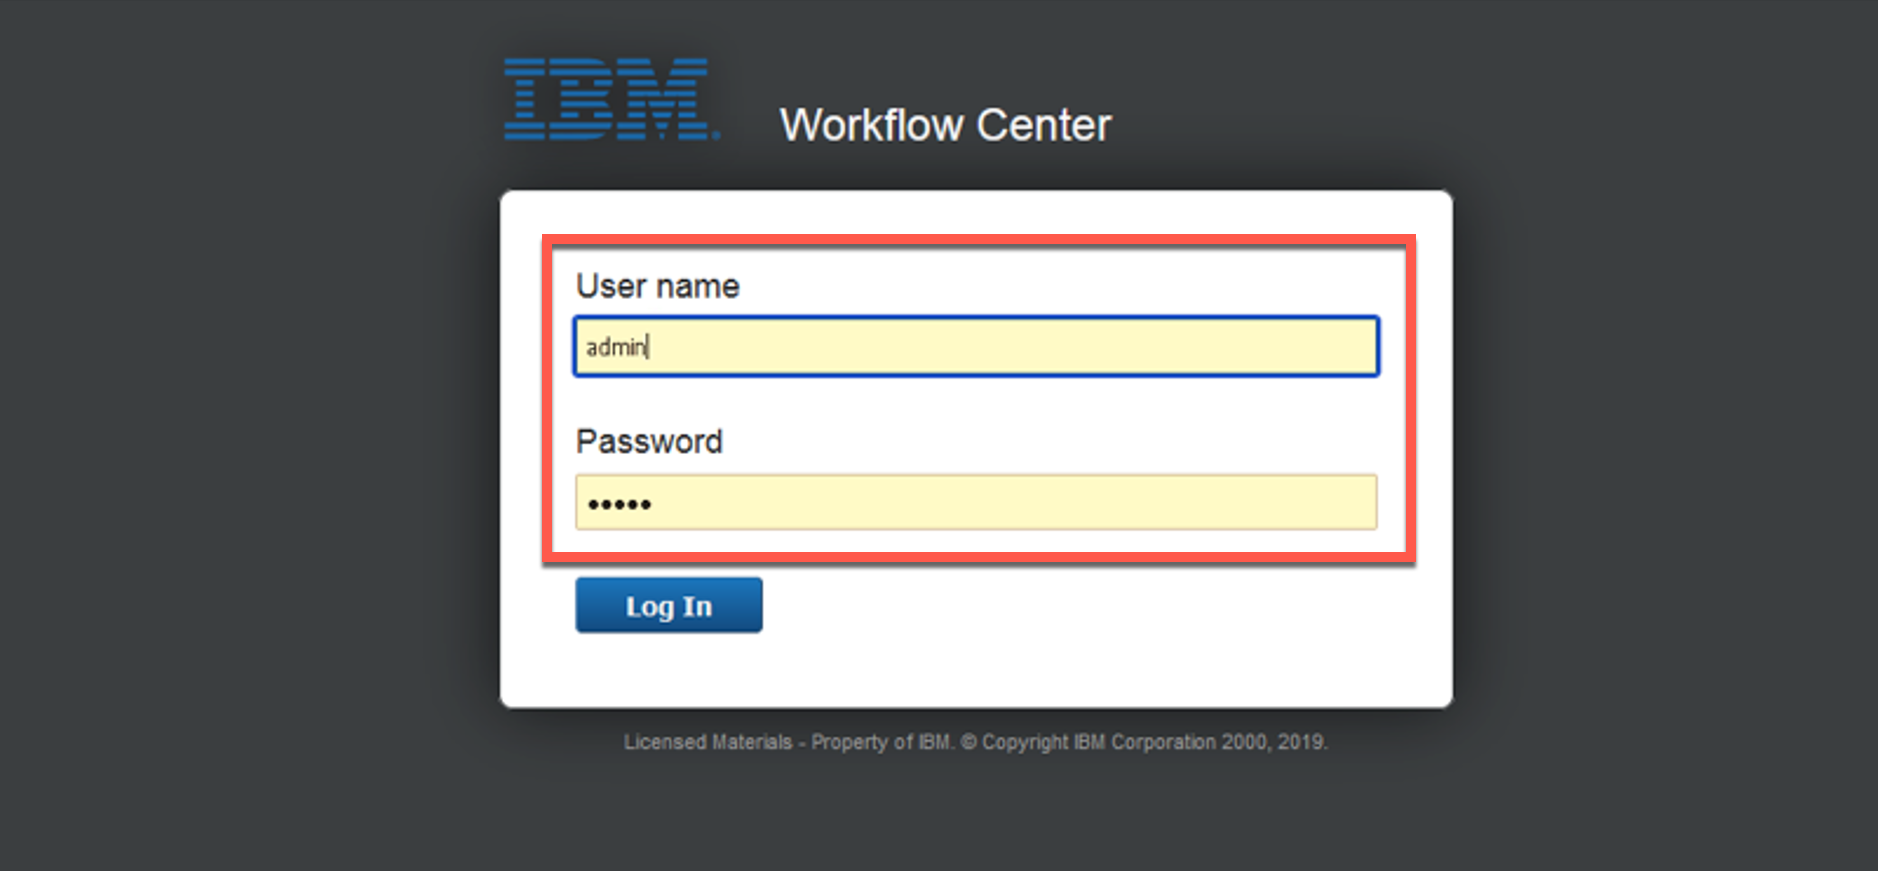
Using a browser on your local computer, open BAW Workflow Center using the Published Services link from the top of the Technology Zone reservation page.
-
Log in to Workflow Center using ‘admin’ as both the User name and Password.
-
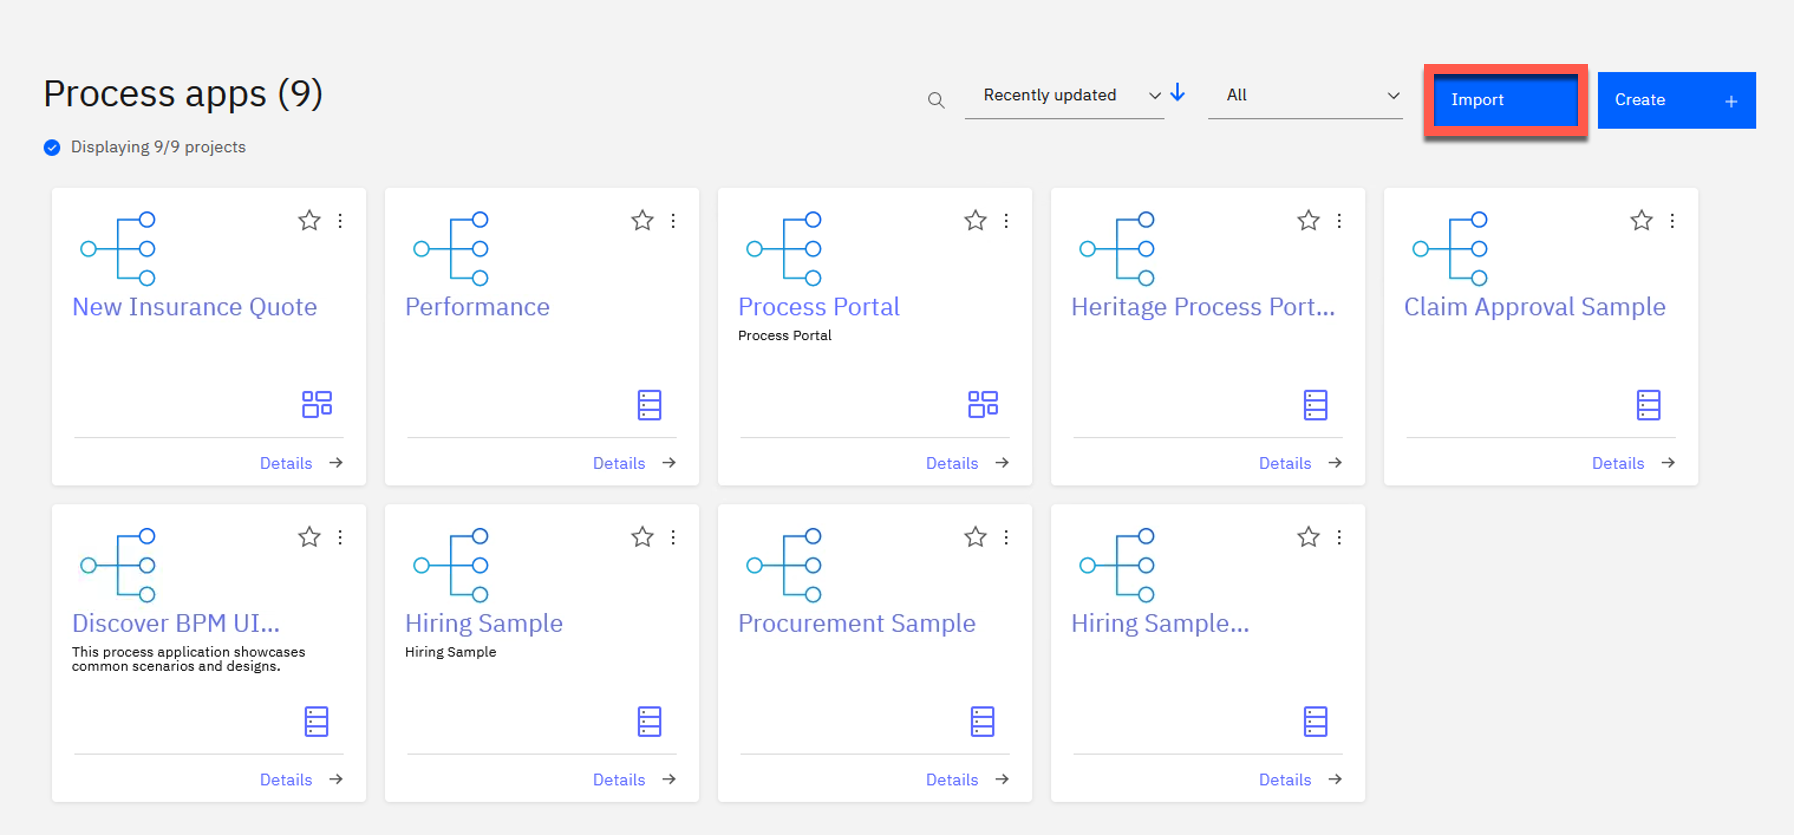
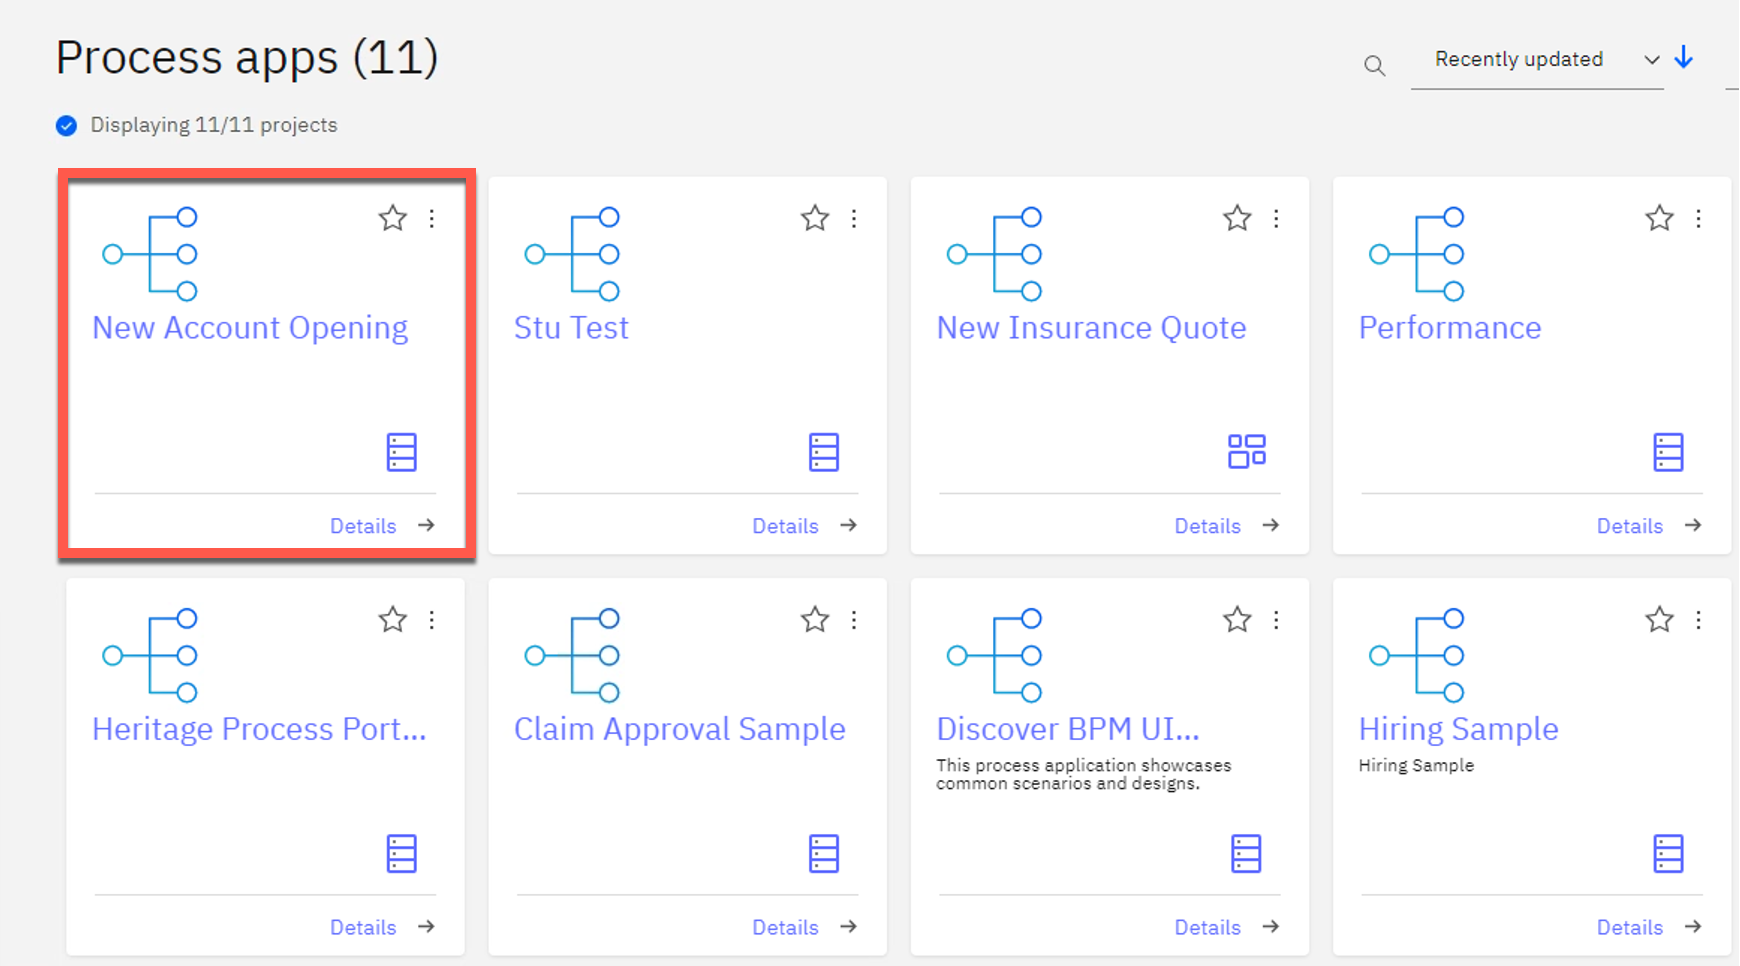
Click Process Apps.
-
Click Import.
-
Click Browse.
-
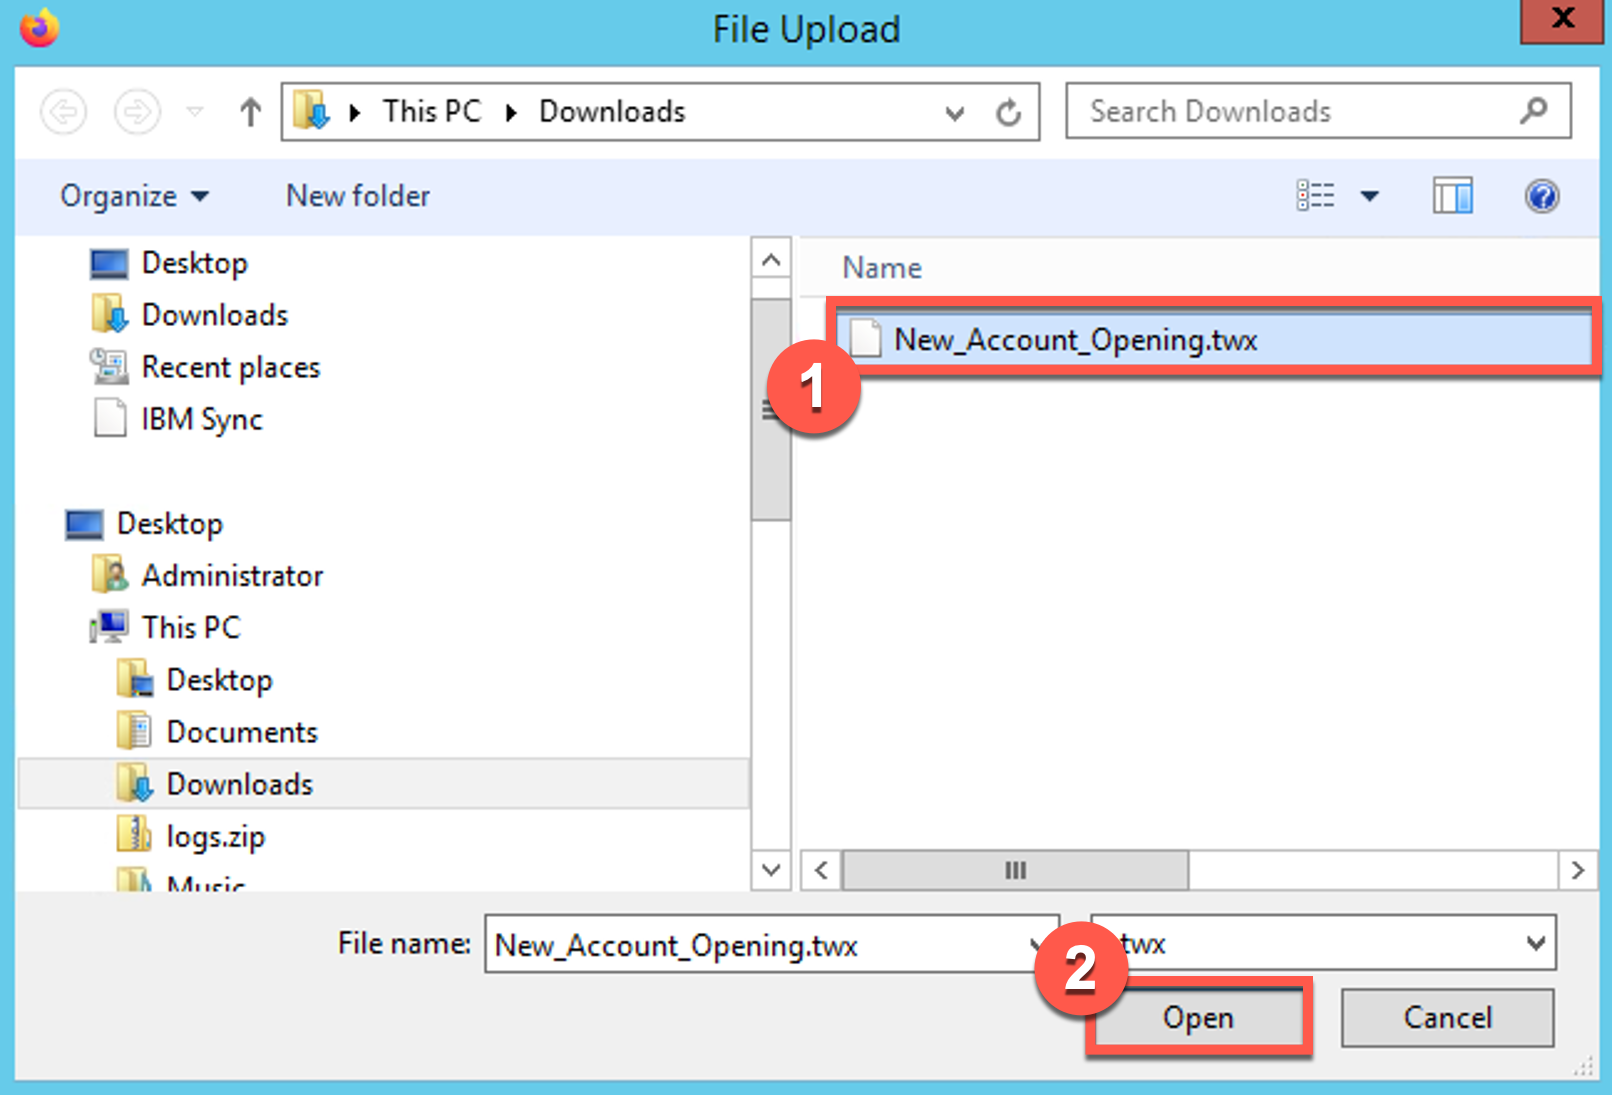
Select the New_Account_Opening.twx file (1). Click Open (2).
-
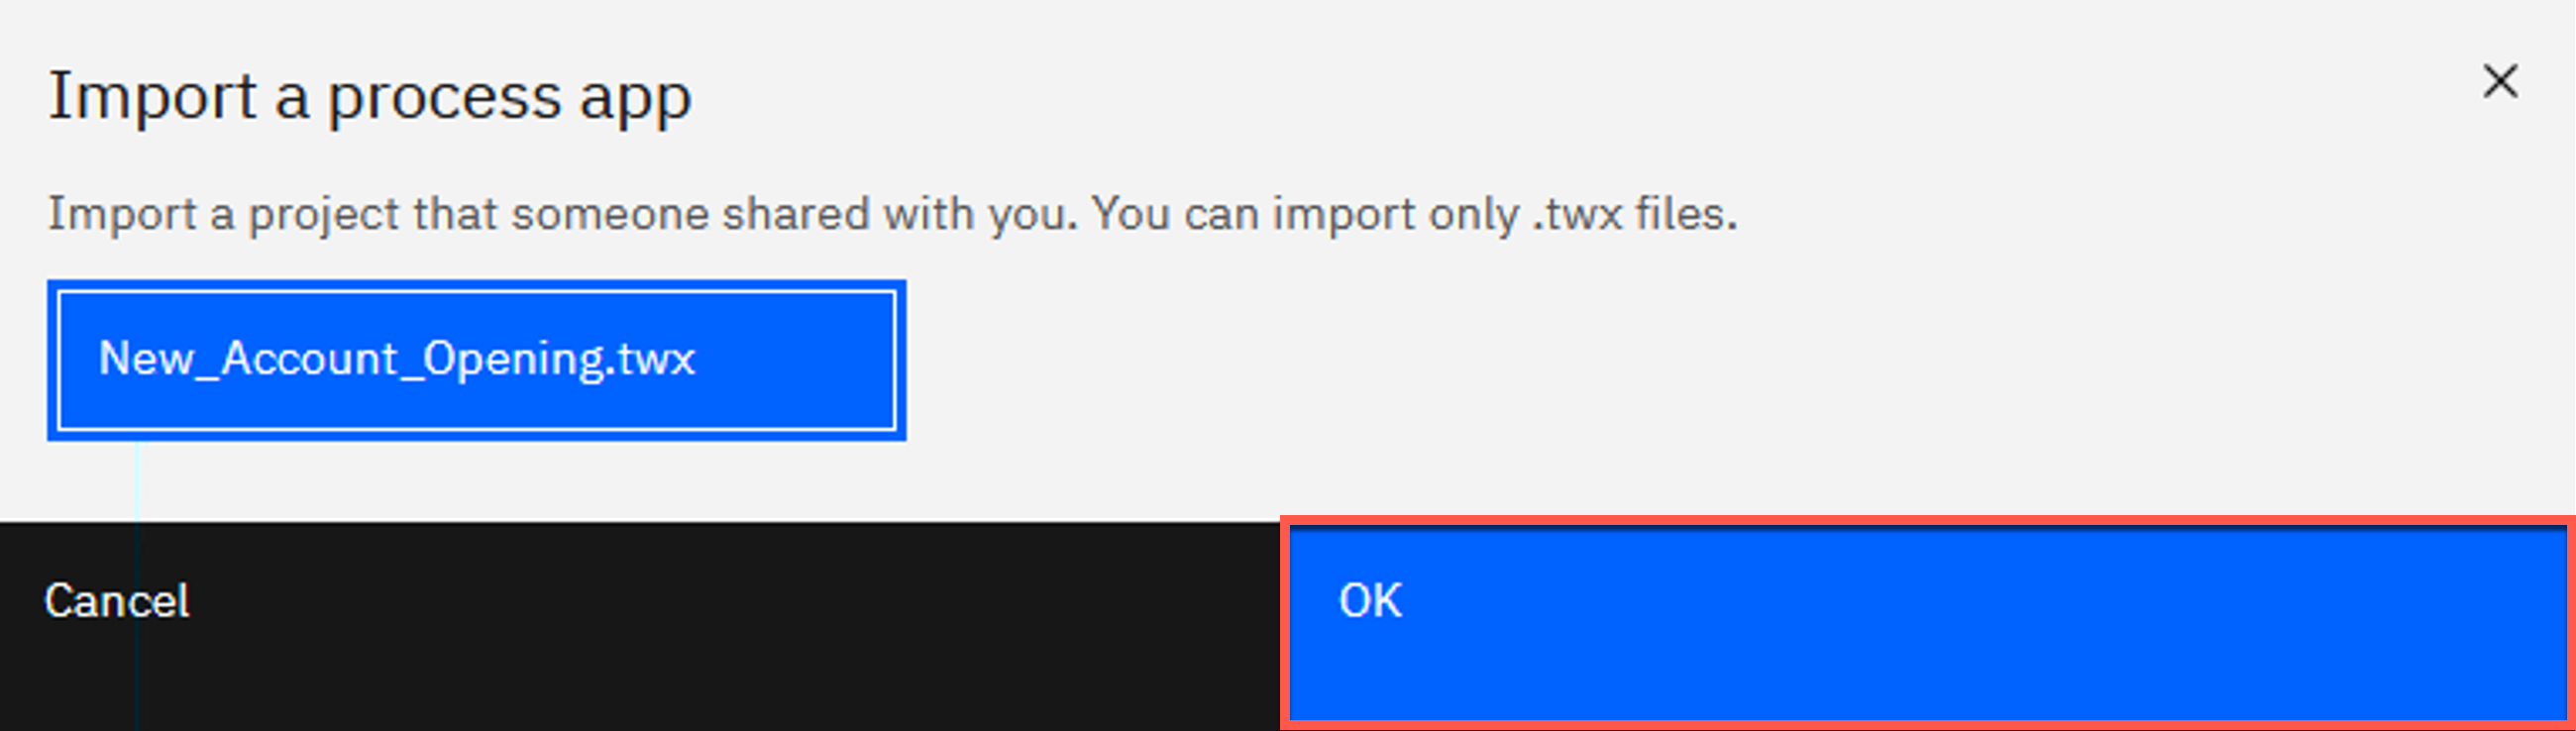
Click OK.
-
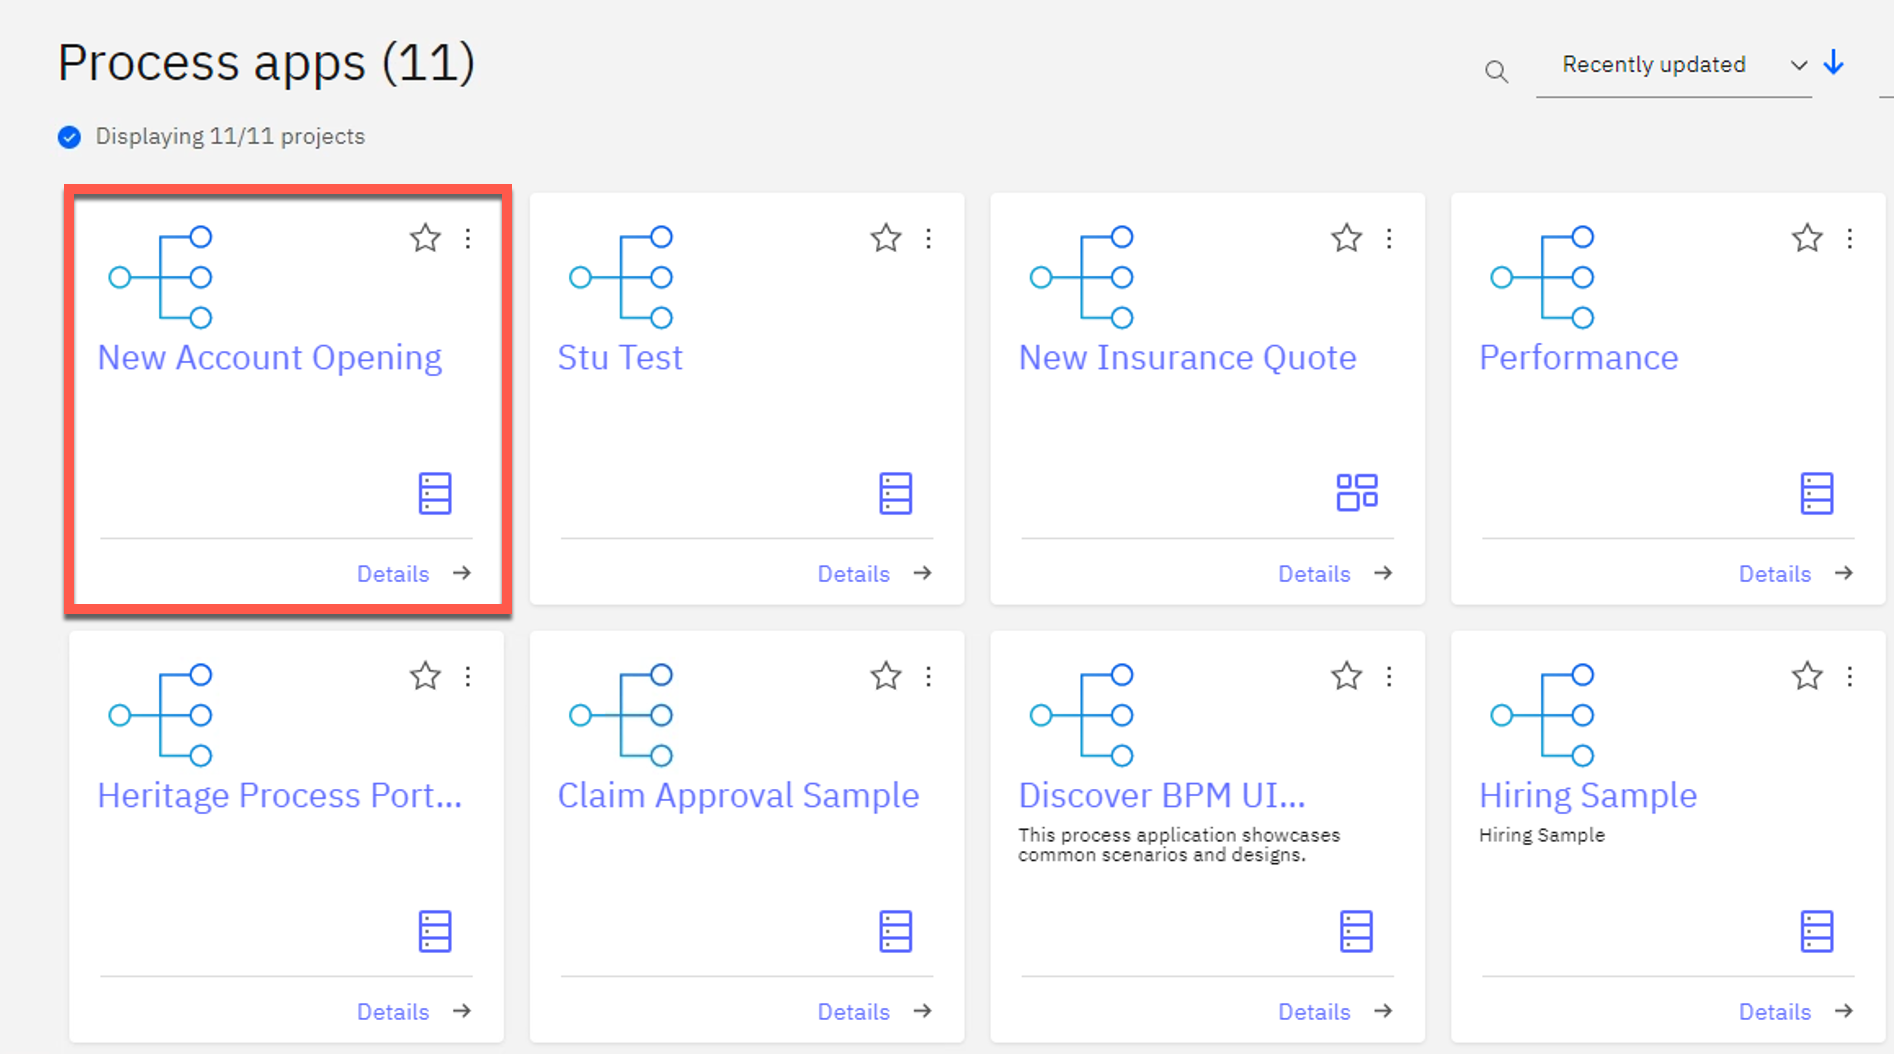
Wait for the import to complete. Click New Account Opening.
-
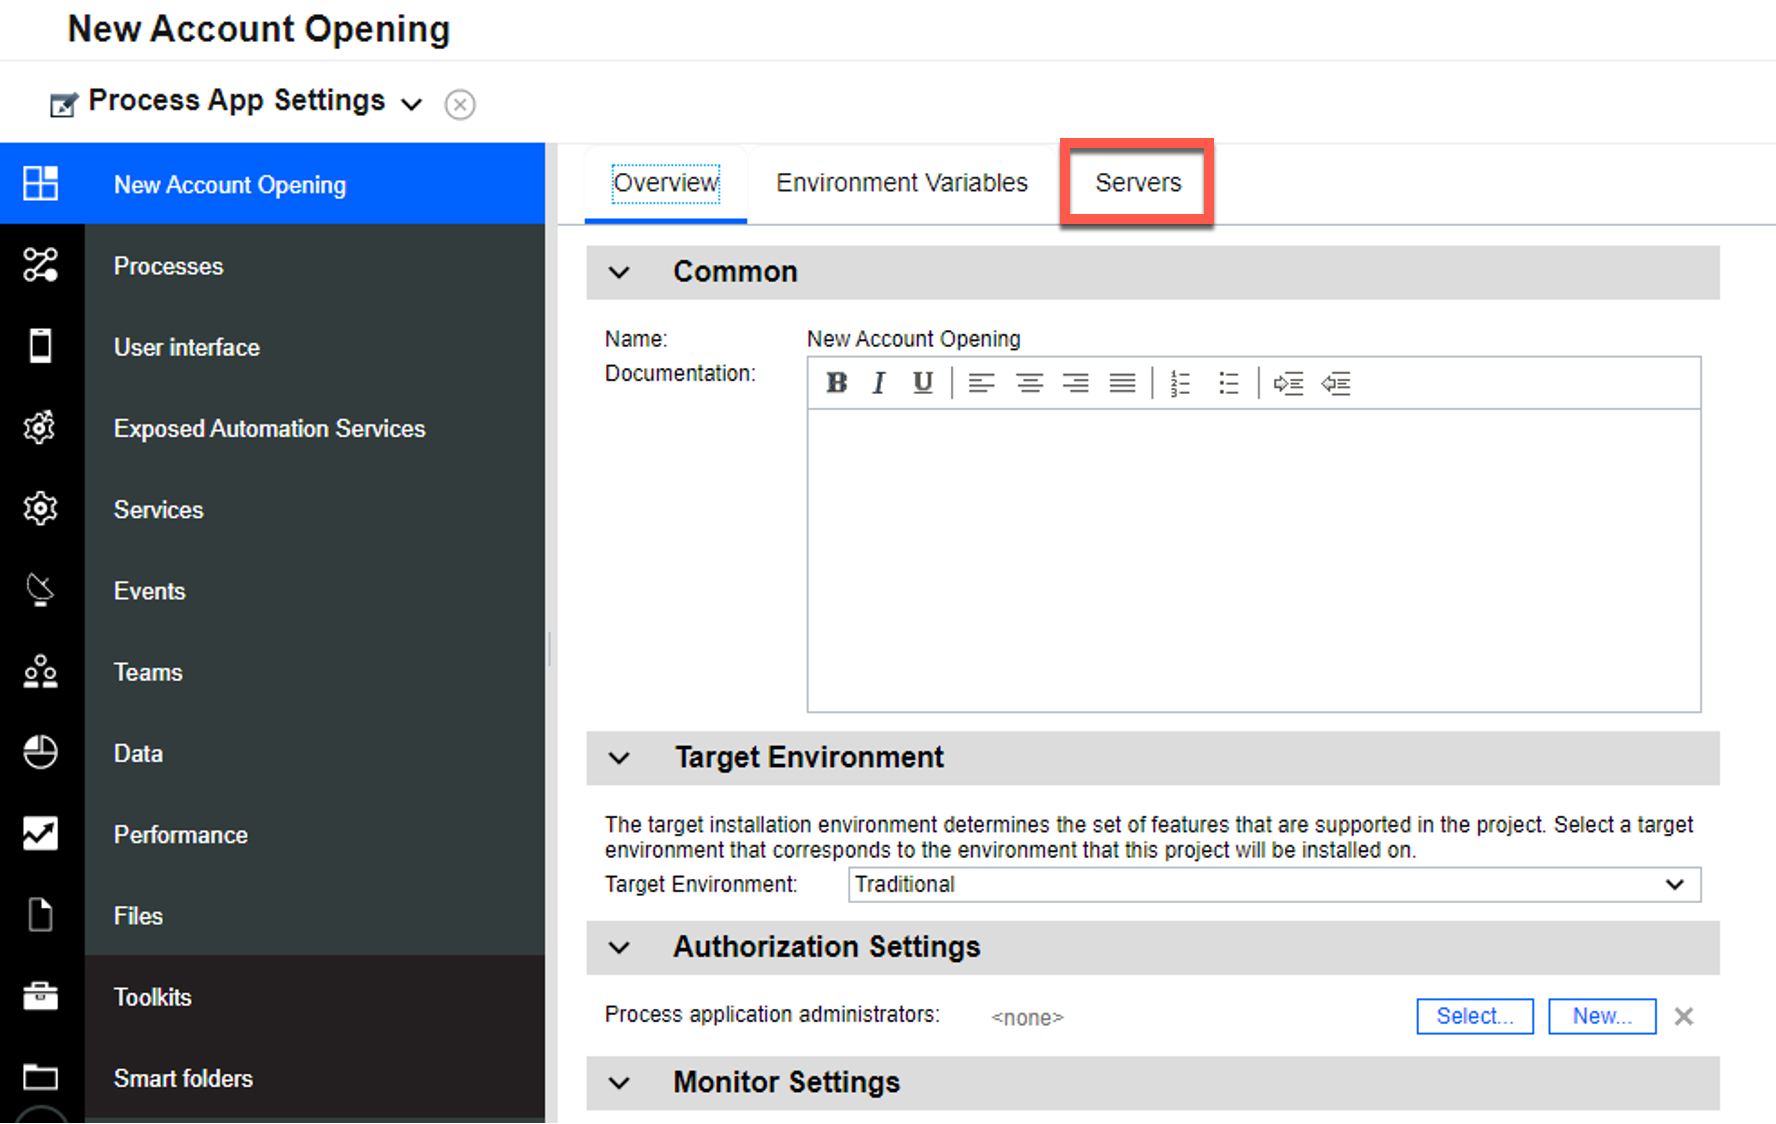
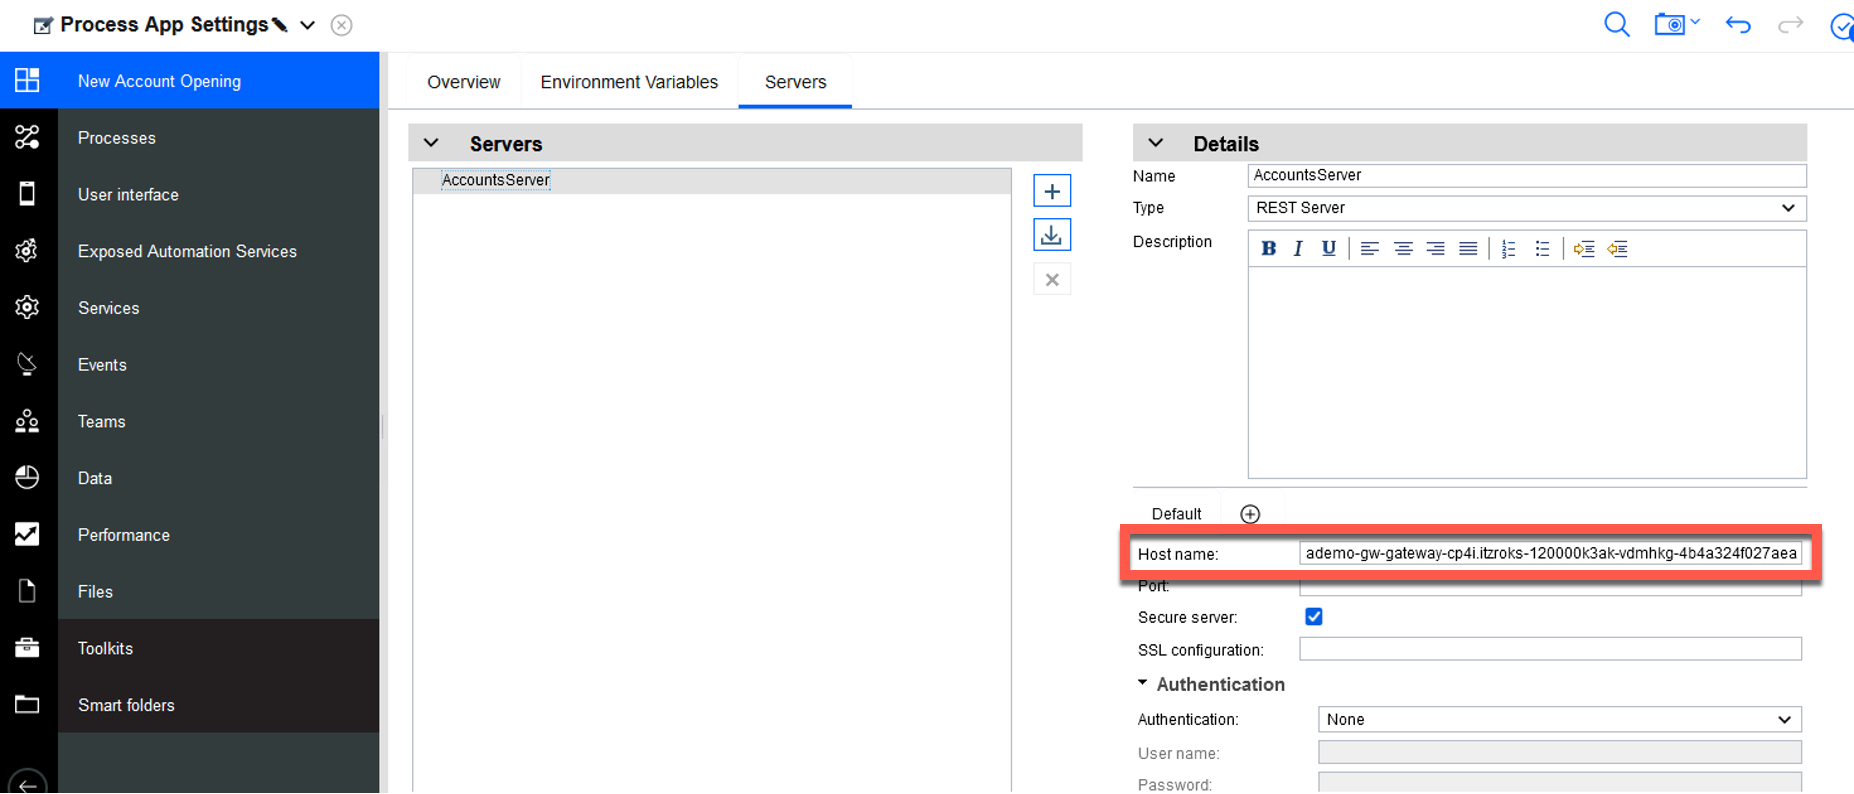
Click the Servers tab.
-
In Process App Settings, AccountsServer must be updated with the hostname of your Cloud Pak for Integration ROKS environment. Set Hostname to the hostname of your Cloud Pak for Integration ROKS environment.
PREPARE TO GIVE THE DEMO
1 - Log into Cloud Pak for Integration
-
Open Cloud Pak for Integration using your username (1), credentials (2) and click Login (3).
-
In the menu on the top left, open the Design folder (1) and select Integrations (2).
-
Click on the ace-designer-demo entry.
2 - Open the account opening process in Process Designer
- Using Firefox on your local computer, open BAW Workflow Center using the Published Services link from the top of the Technology Zone reservation page.
-
Log in to Workflow Center using ‘admin’ as both the User name and Password.
-
Click Process Apps.
-
Click New Account Opening.
-
Click Processes (1) and then New Account (Current Workflow) (2).
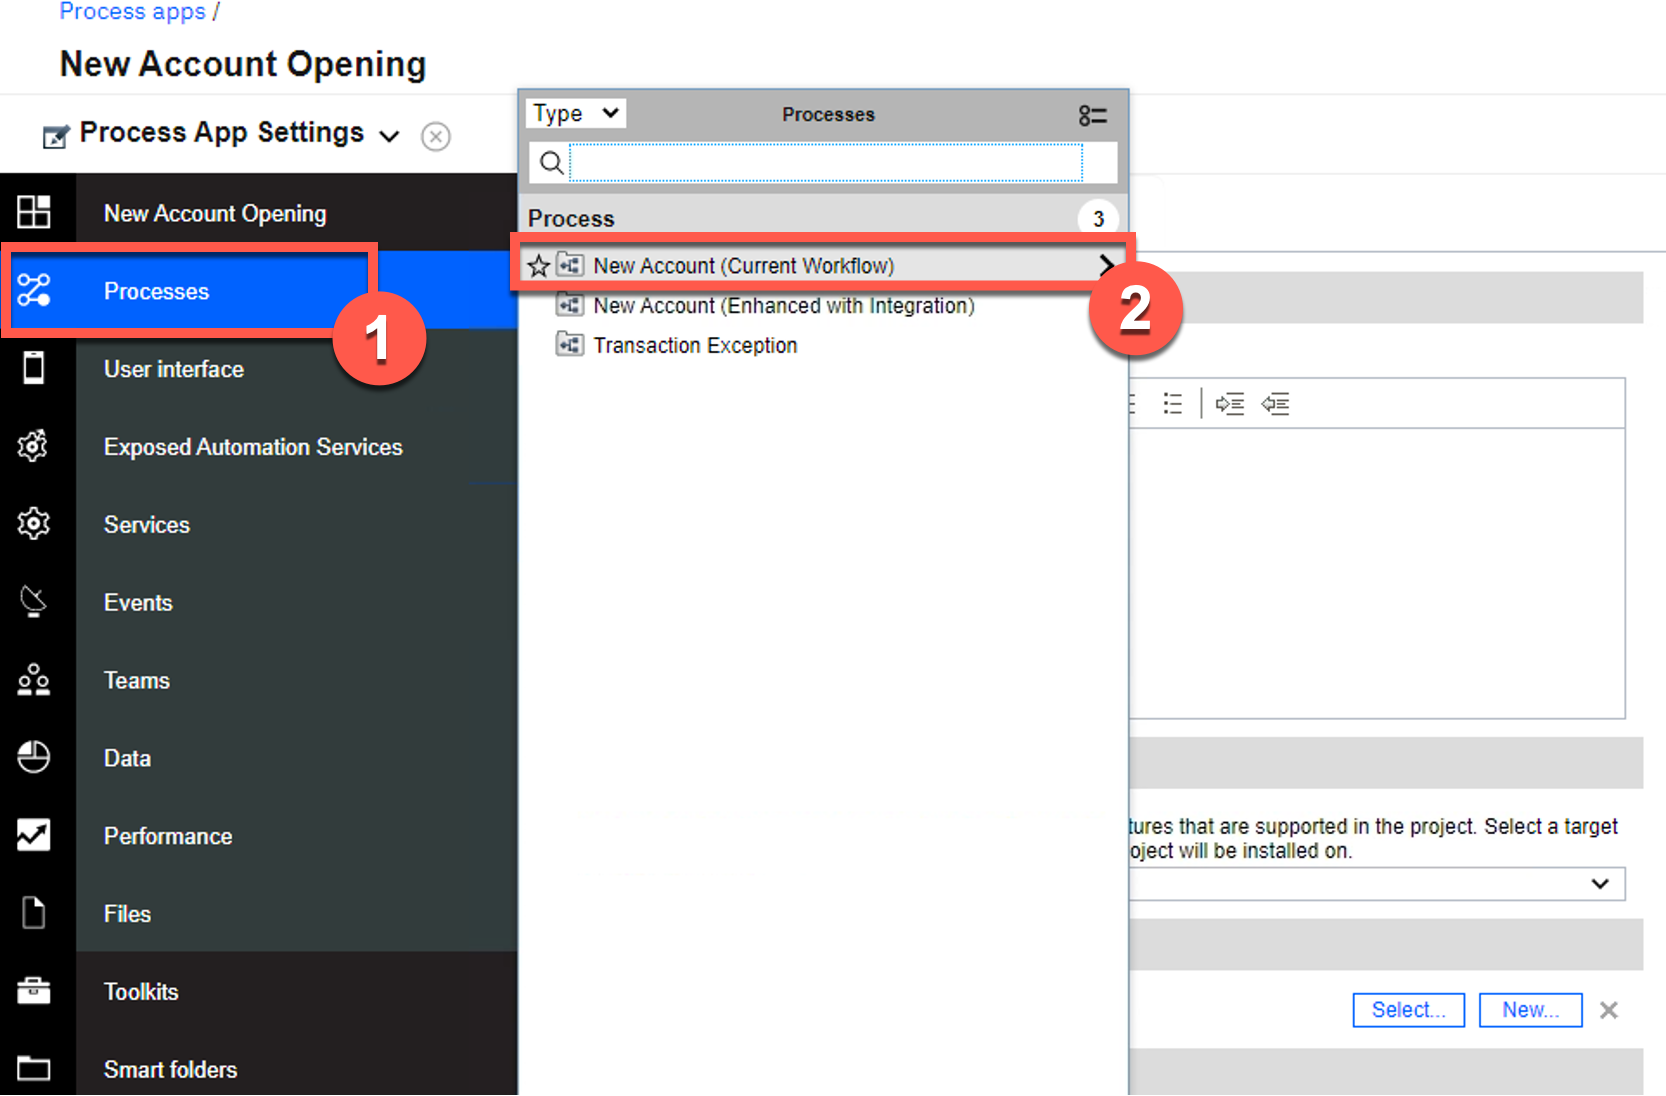
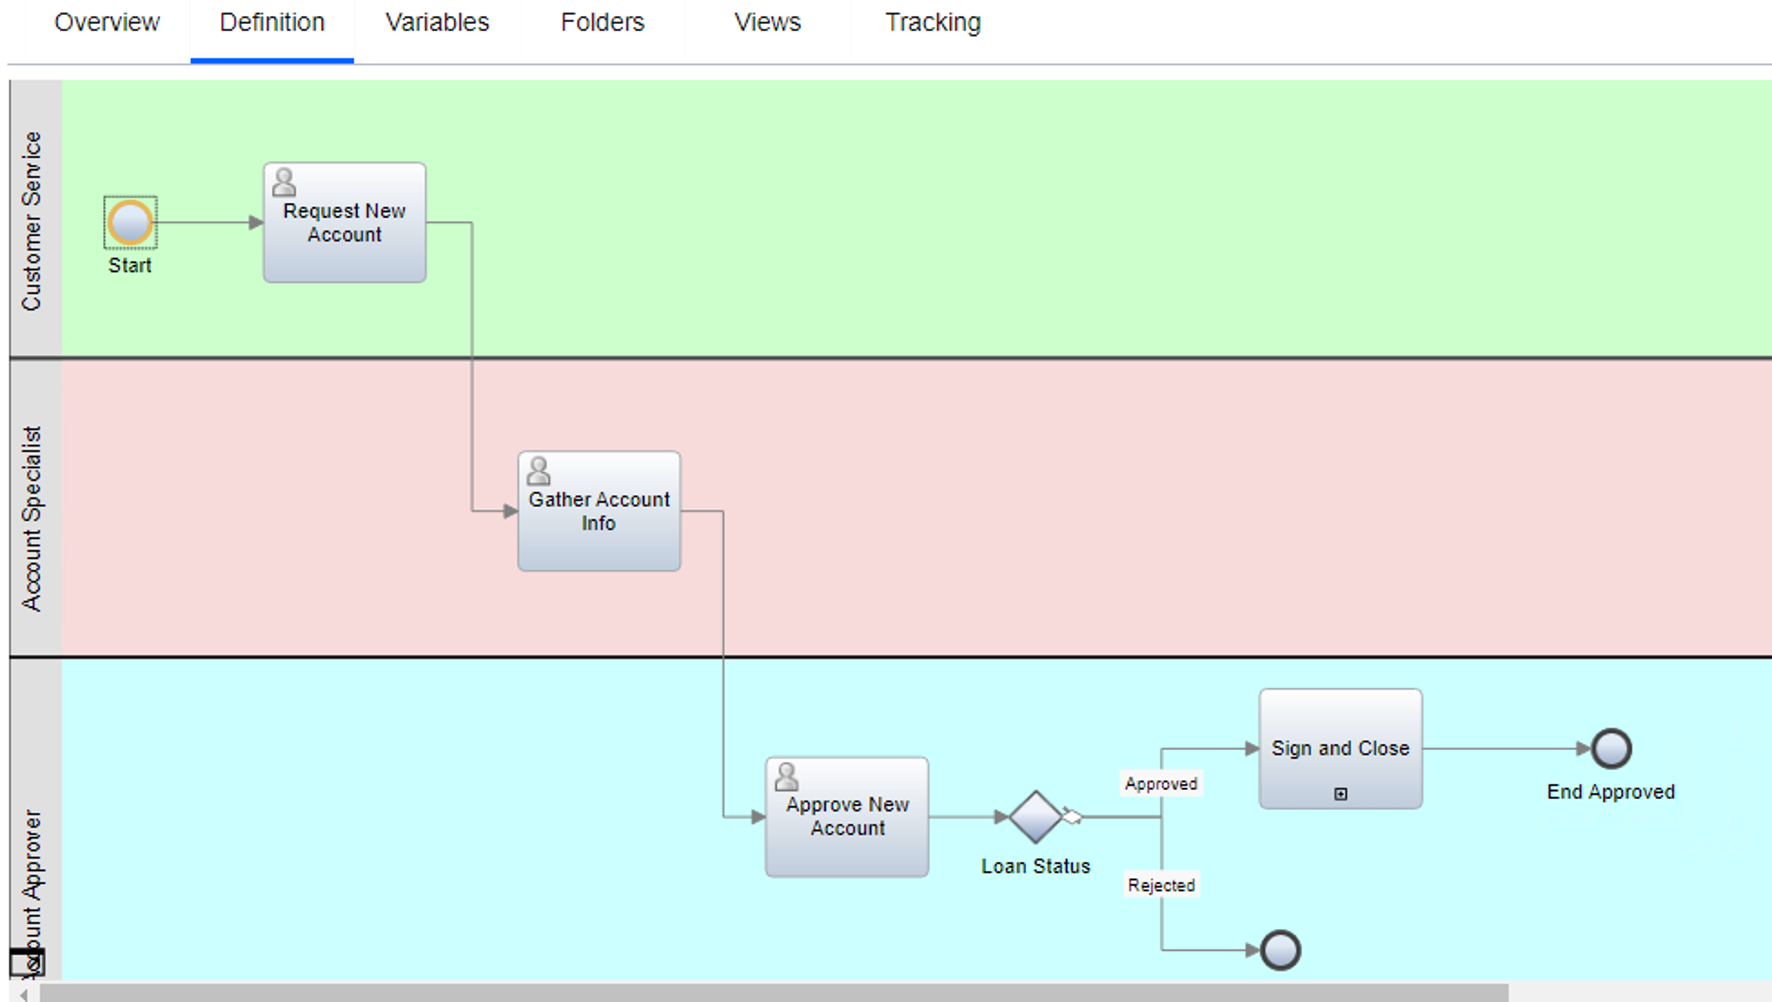
- The New Account (Current Workflow) process definition is now open.
3 - Log into Process Portal
- Using Chrome on your local computer, open BAW Process Portal using the Published Services link from the top of the Technology Zone reservation page.
-
Log in with ‘assistant’ as the Username and ‘passw0rd’ as the Password.

- Process Portal is now open.
4 - Have the API key handy
The very last step of the Cloud Pak for Integration installation (above) required you to save the API key (client ID).
In the demo script, you will be required to enter the Cloud Pak for Integration API key into the process application. Make sure the API key is easily accessible.
5 - Have the YAML file handy
In the demo script, you will be required to use the OpenAPI 3.0 YAML file to discover the API. Download the YAML file here.
Click here to go to the Demo script on the next tab.