
Introduction
Today we will combine workflow and integration to streamline the data-gathering needed to complete a new account opening process. We’ll add application integration to an account opening process that has already been automated with workflow.
We’ll see how integration capabilities enable seamless access to critical back-end systems, regardless of their location and complexity. Integration provides the flexibility to change the back-end systems without impacting the workflow.
We’ll aggregate data from multiple sources into a single API that can be used by workflow. Then we’ll show how business users can configure and test those APIs without writing code, and can graphically wire them into the workflow.
Let’s see how it works.
(Demo intro slides here)
(Printer-ready PDF of demo script here)
1 - Automating the account opening workflow
| 1.1 | Introduce the account opening workflow (without integration) |
|---|---|
| Narration | Focus Bank, a regional full-service bank, is looking to further automate its core banking processes. Over the years, the bank has grown dramatically via acquisitions. The bank recently acquired the smaller Corner Bank. This has caused an increase in the amount of manual work needed to gather information across their disparate IT systems. Let’s look at how Focus Bank currently fulfills new account requests. In the existing process, every ‘new account’ opening request must be routed to an account specialist. |
| Action 1.1.1 | Show the process diagram for the New Account (Current Workflow) in Process Designer, which you opened during the demo preparation. 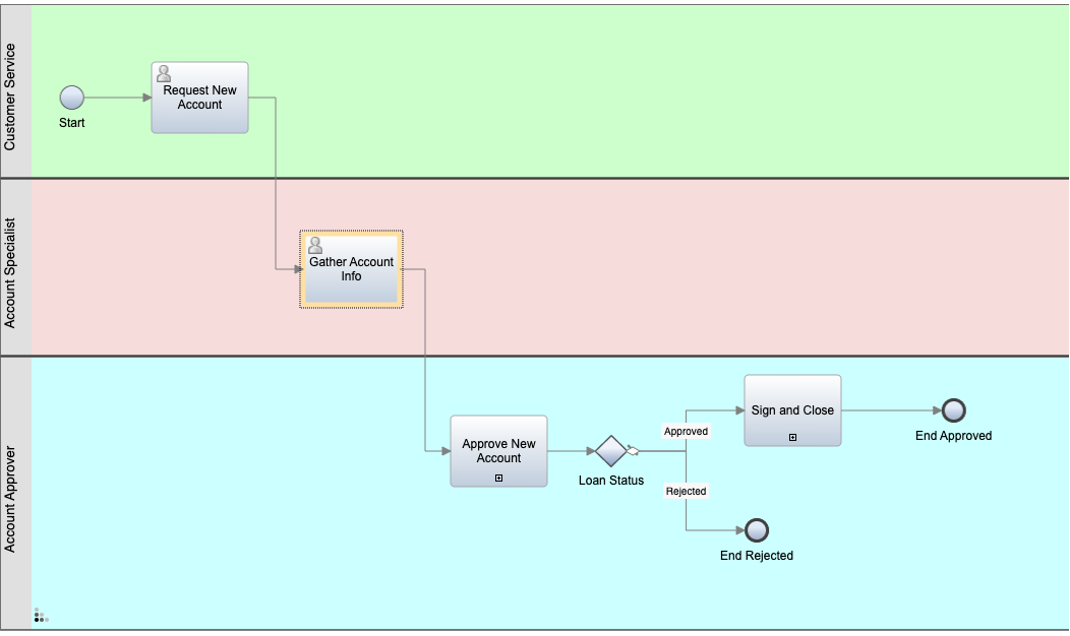 |
| Narration | This is the current process diagram for Focus Bank’s account opening process, which they built using Process Designer. Within this low-code environment, the process diagram manages and controls the execution of each new account opening request. The bank used Process Designer’s drag-and-drop tooling to build the process diagram from a palette of components. From there, the bank was able to complete the implementation and testing of the process application. |
| 1.2 | Execute the account opening workflow (without integration) |
|---|---|
| Narration | Process Portal is the portal used by customer service agents to launch new account opening requests and work on assigned tasks. |
| Action 1.2.1 | Show the Process Portal window you opened during the demo preparation. 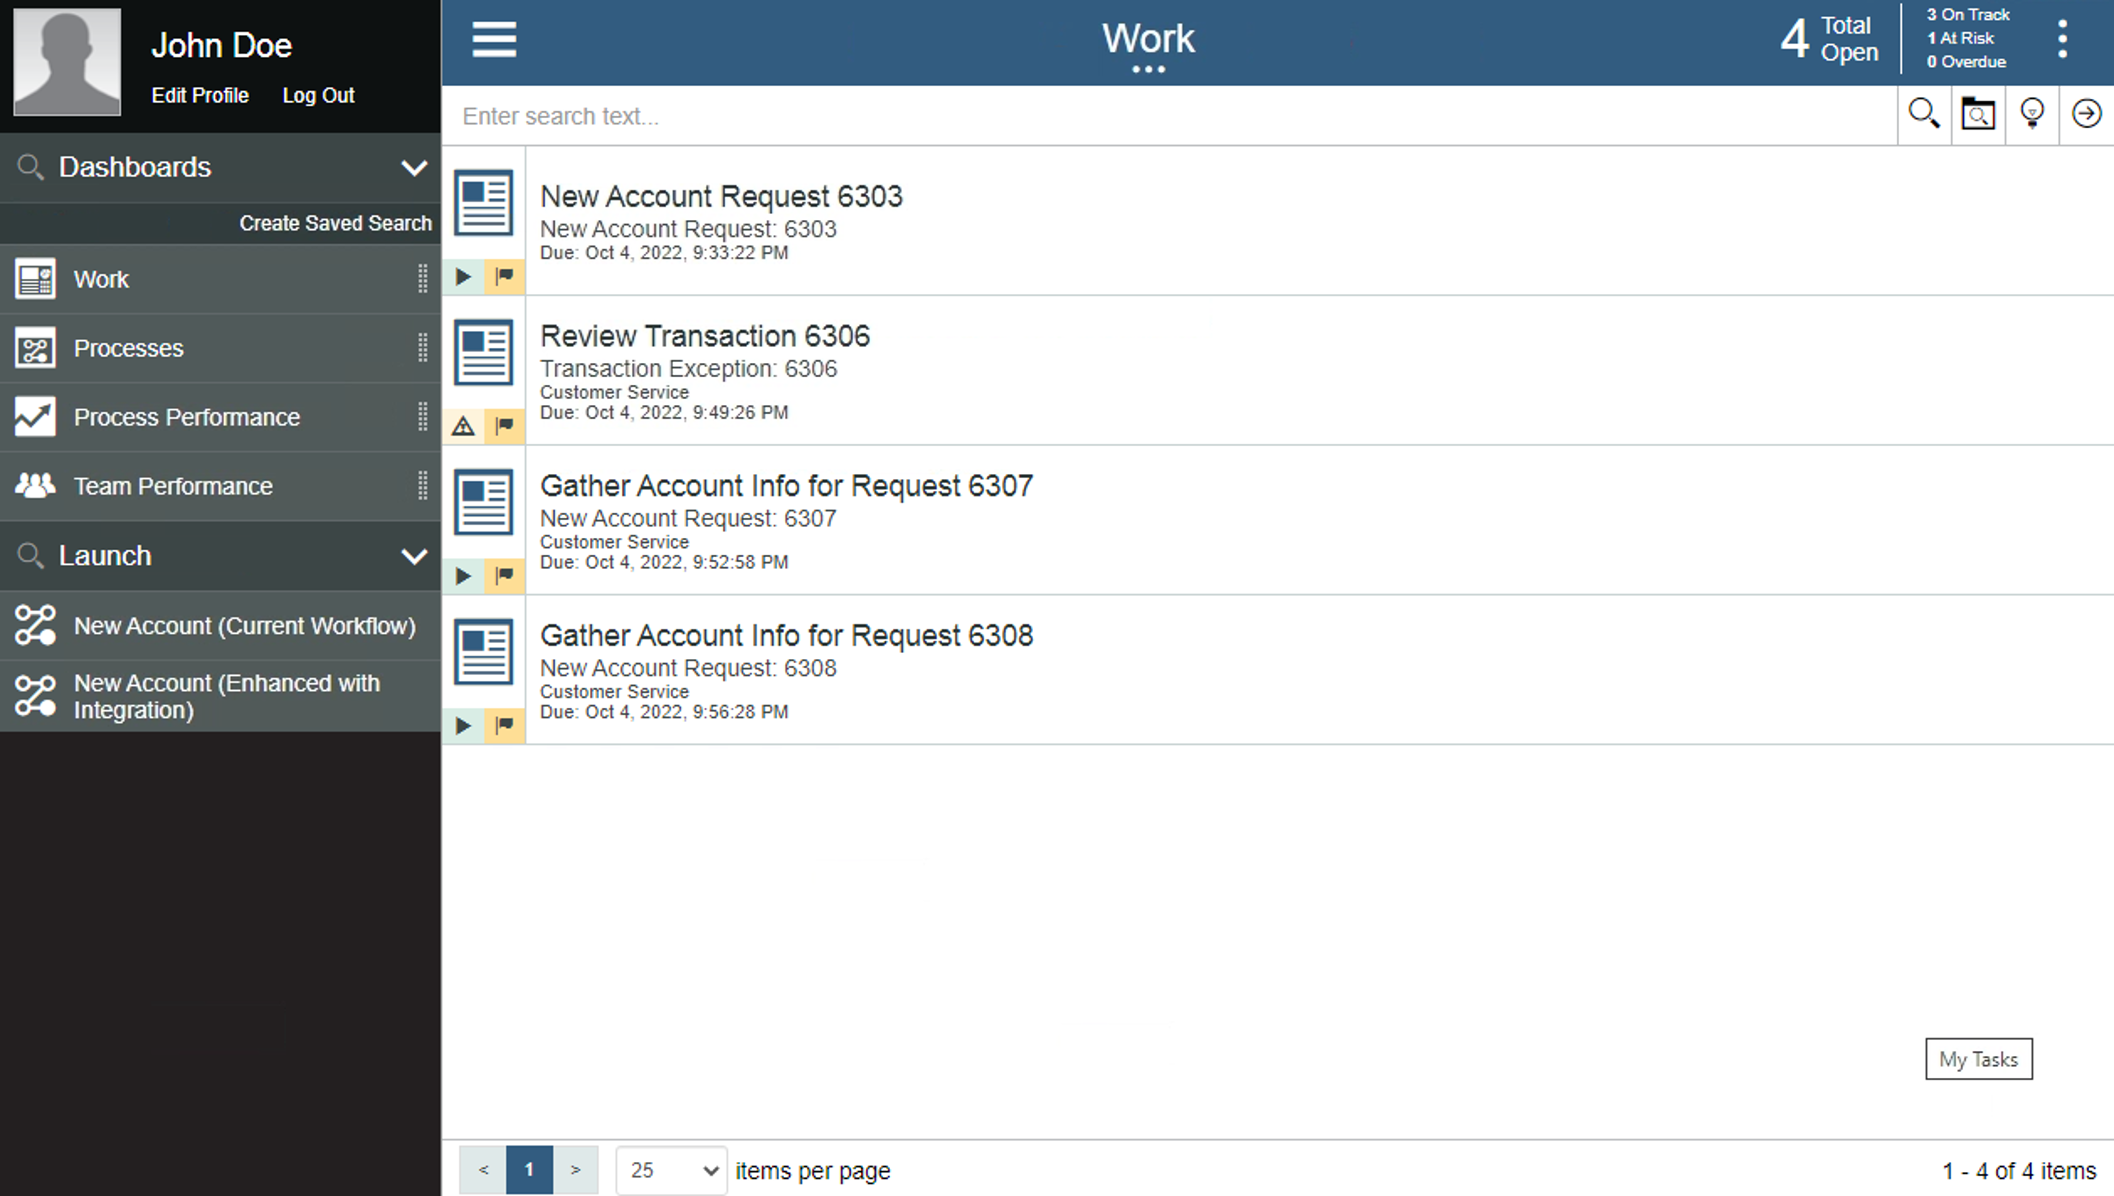 |
| Narration | Process Portal is highly customizable to fit each organization’s look and feel. The responsive user interface provides flexibility to get work done anywhere on any device - from a desktop in the office to a mobile device at home or at a customer site. Process Portal can be configured through a set of options without having to customize the application itself. To open a new account, a customer service representative initiates a new account request and enters the customer’s information. |
| Action 1.2.2 | Under Launch, click New Account (Current Workflow). 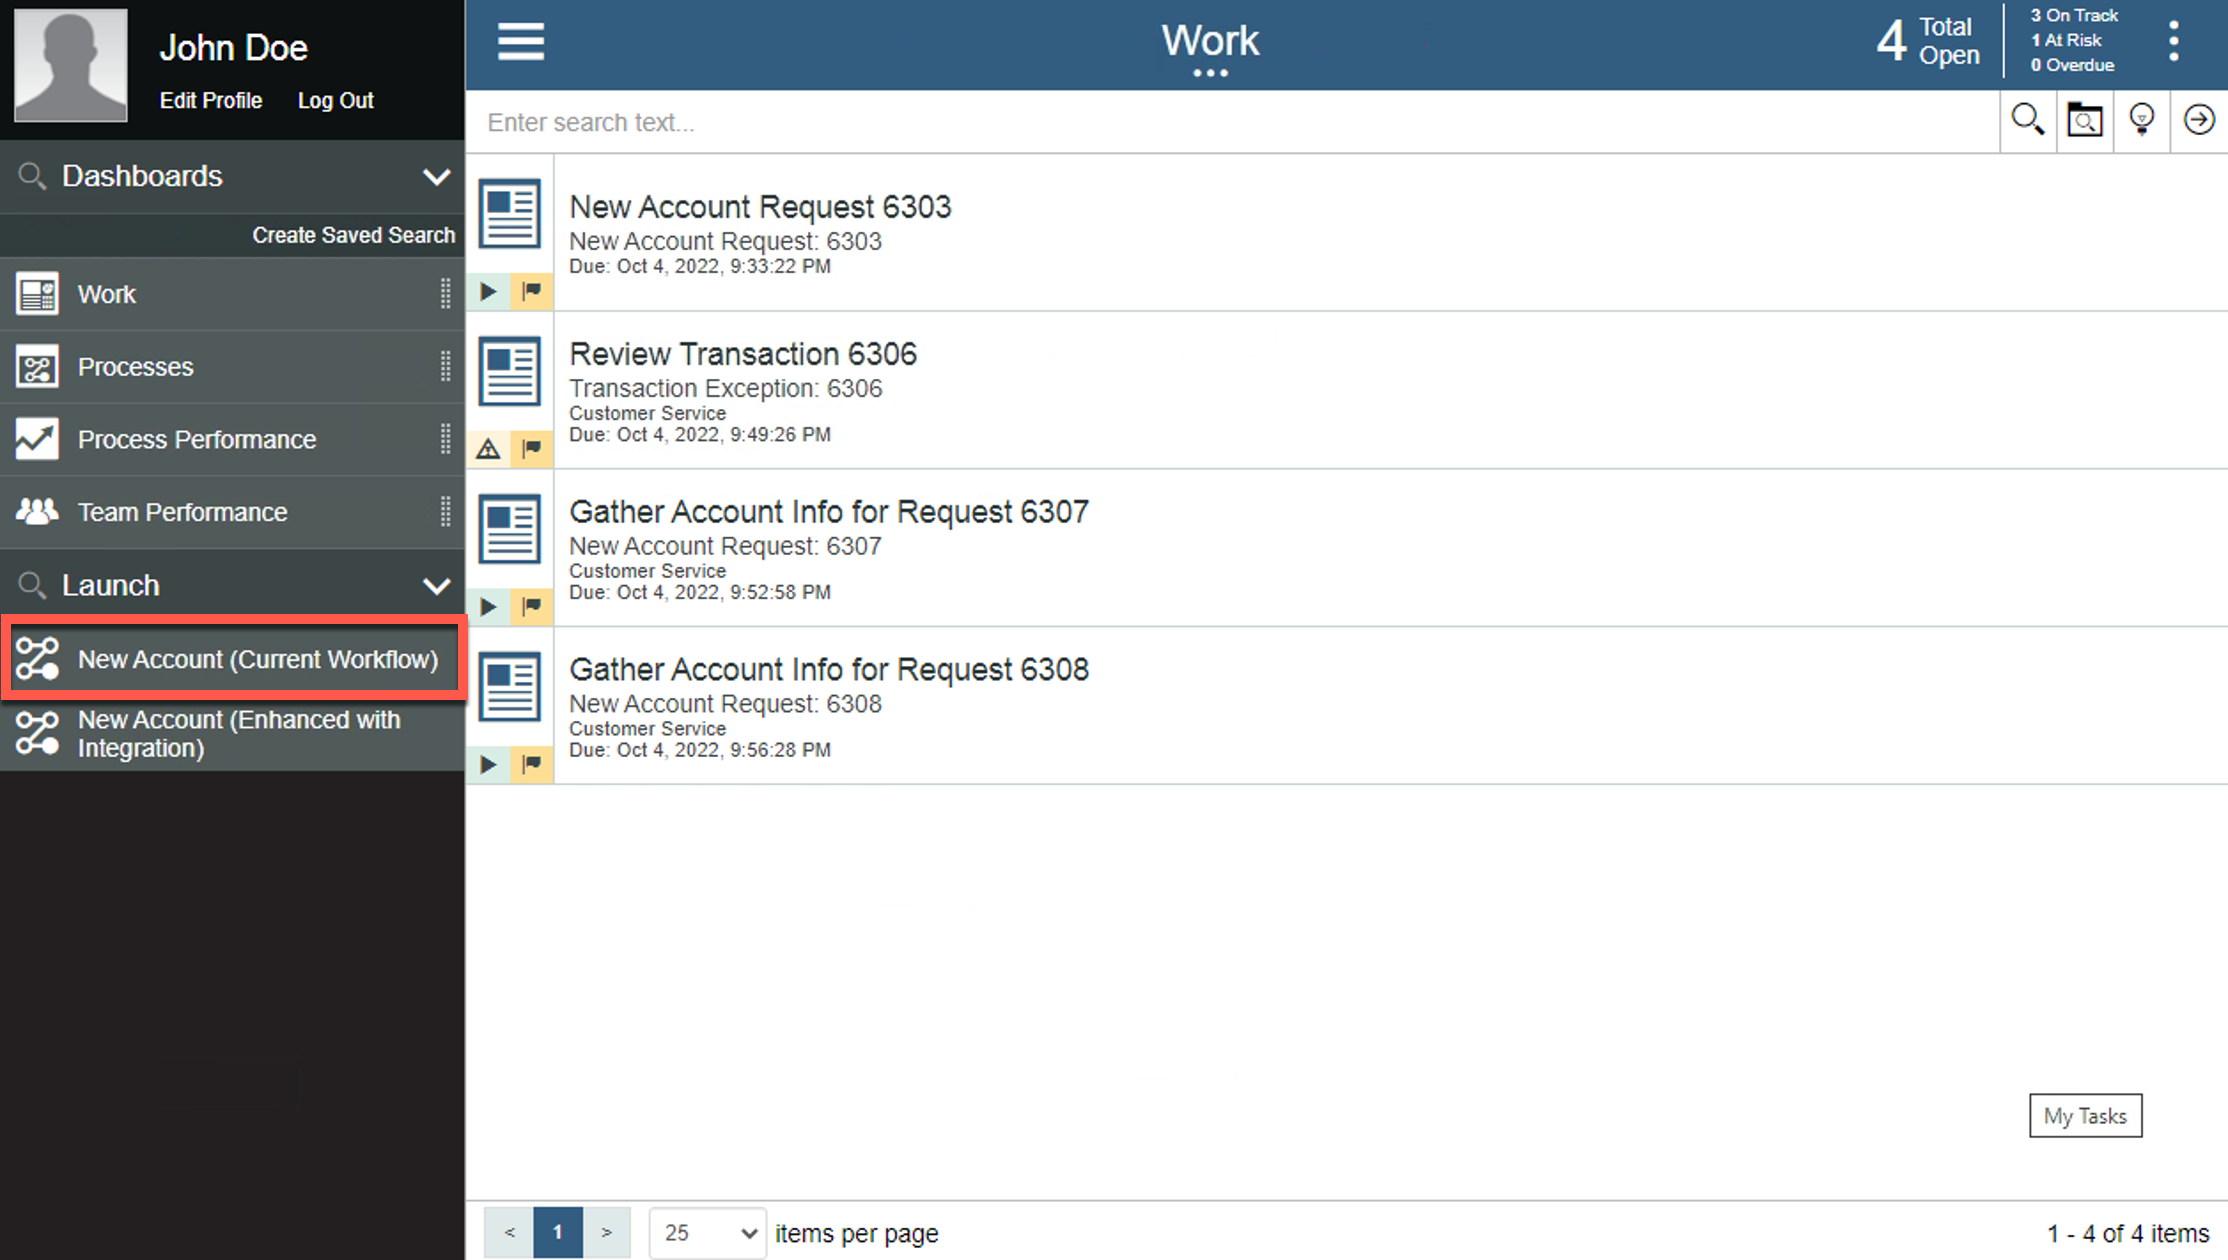 |
| Action 1.2.3 | Select the Account Type and enter the Customer Account Number, First Name, and Last Name (1). Click Next (2). 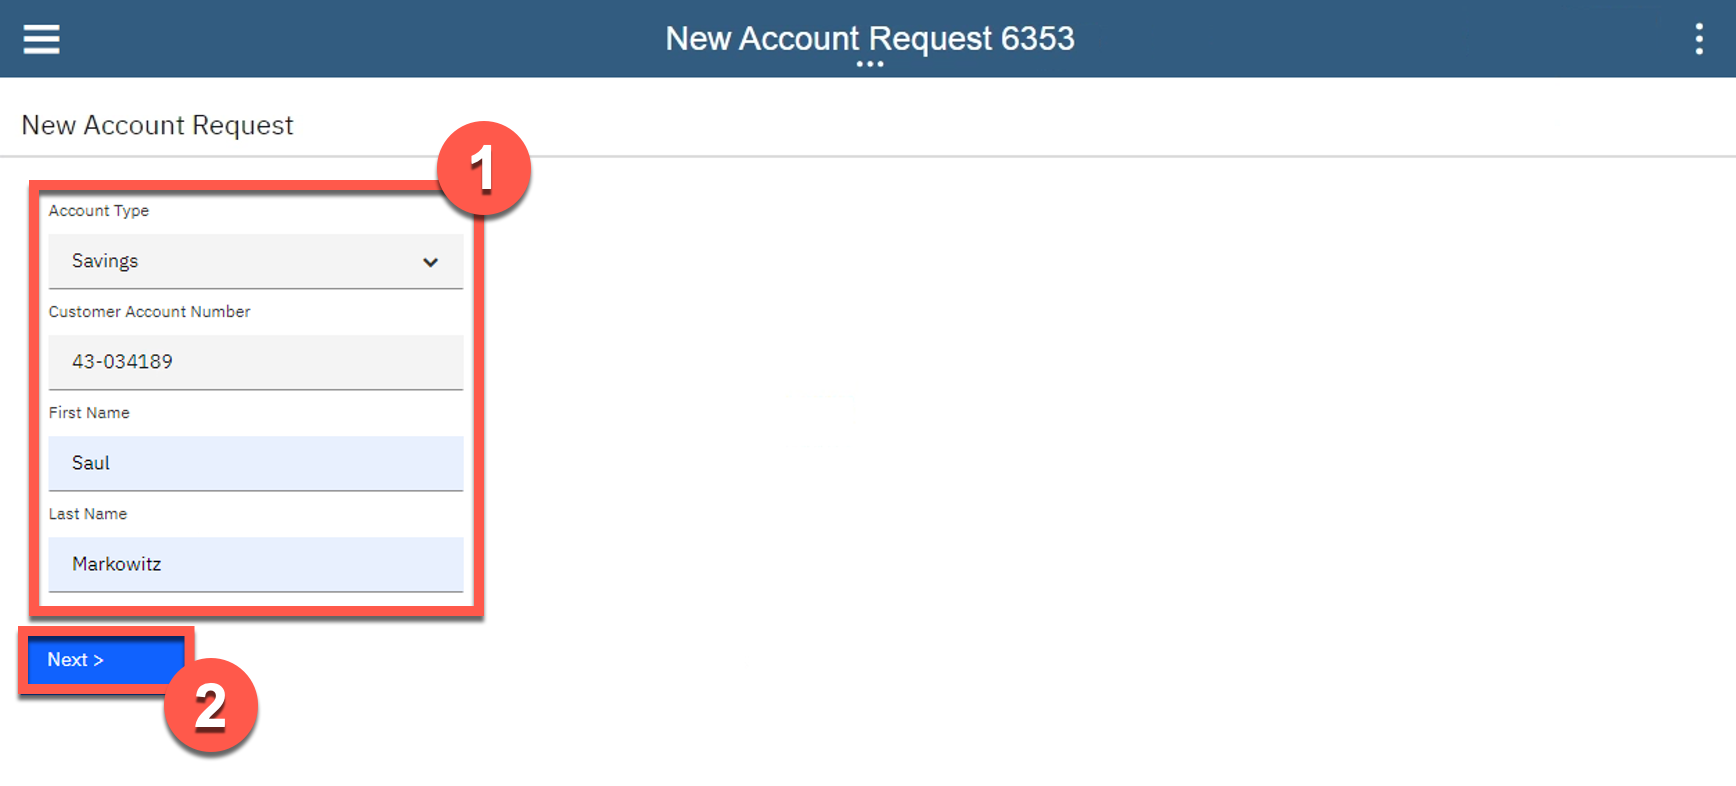 |
| Action 1.2.4 | Click Done. 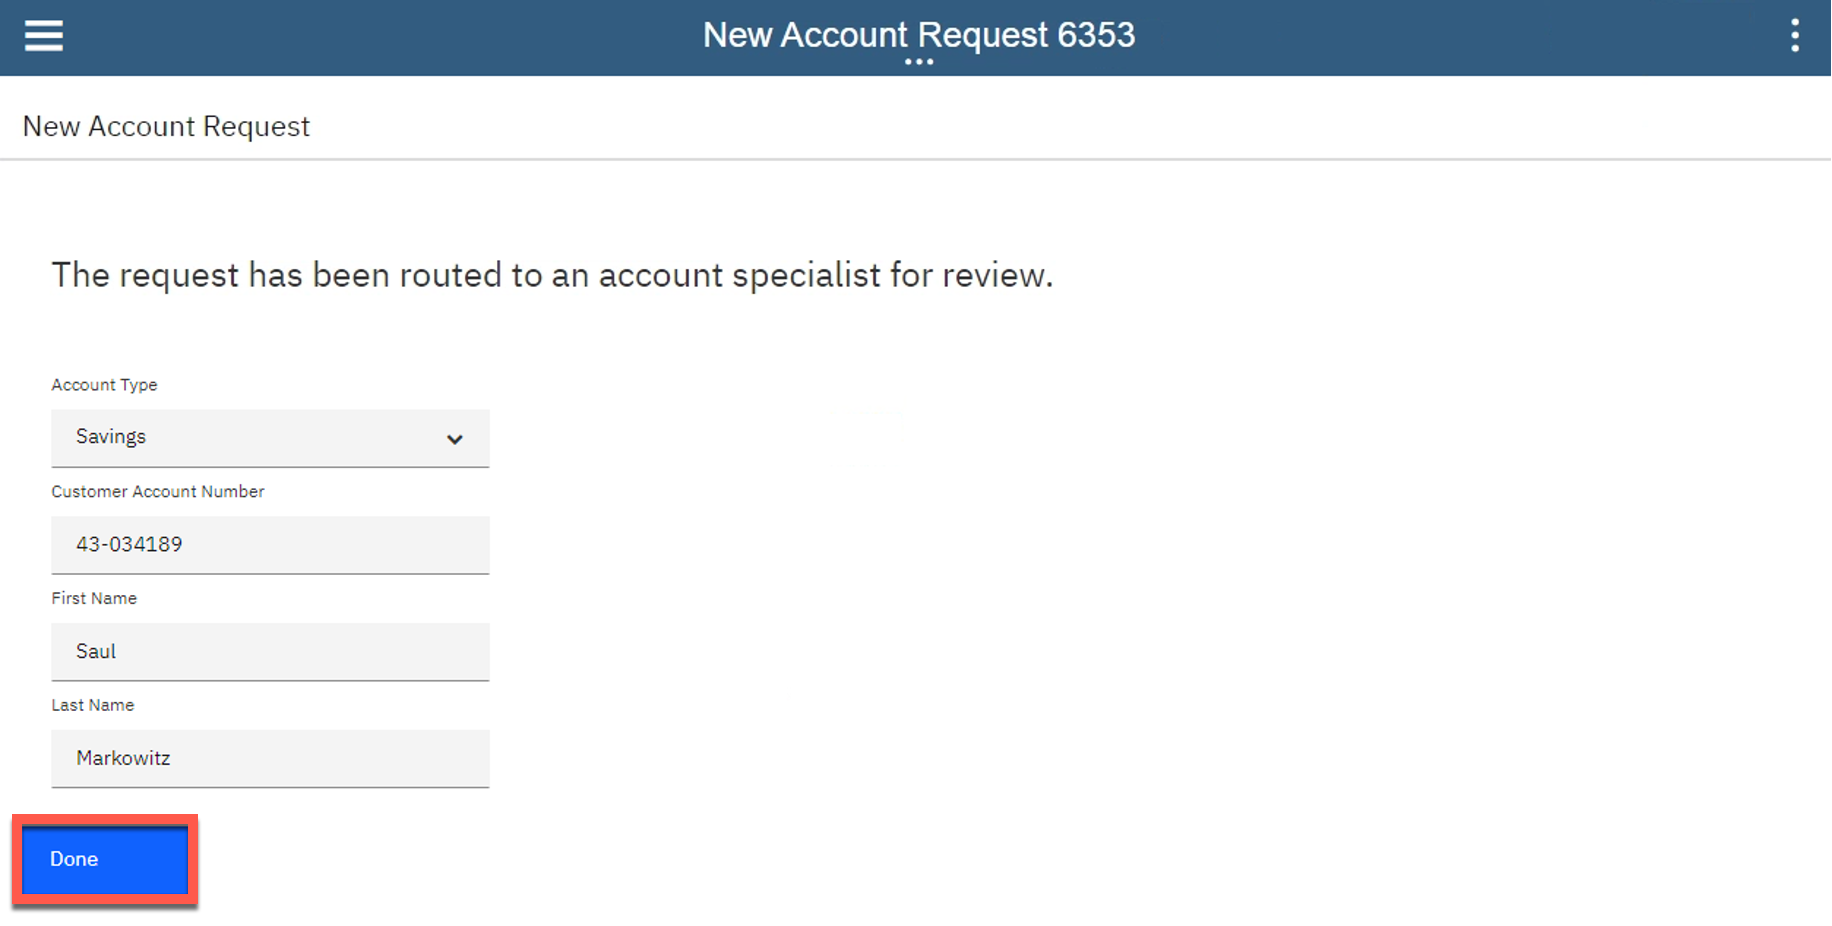 |
| Narration | The bank’s account specialists are back-office clerical workers who use Process Portal to organize and work on tasks assigned to them. Our specialist has received a new task to gather the customer’s account info. For each new account request, the account specialist manually gathers the customer’s existing list of accounts. The specialist must log in to three different systems and manually enter the account info into the request. This is both time-consuming and error-prone, as the specialist must go field-by-field to copy-and-paste all the customer’s account data into the new account request. Behind the scenes, the new account process is managed by workflow. Once the account specialist completes this task, the system routes the request for approval. |
| Action 1.2.5 | Run the most recent Gather Account Info task by clicking its corresponding Name. 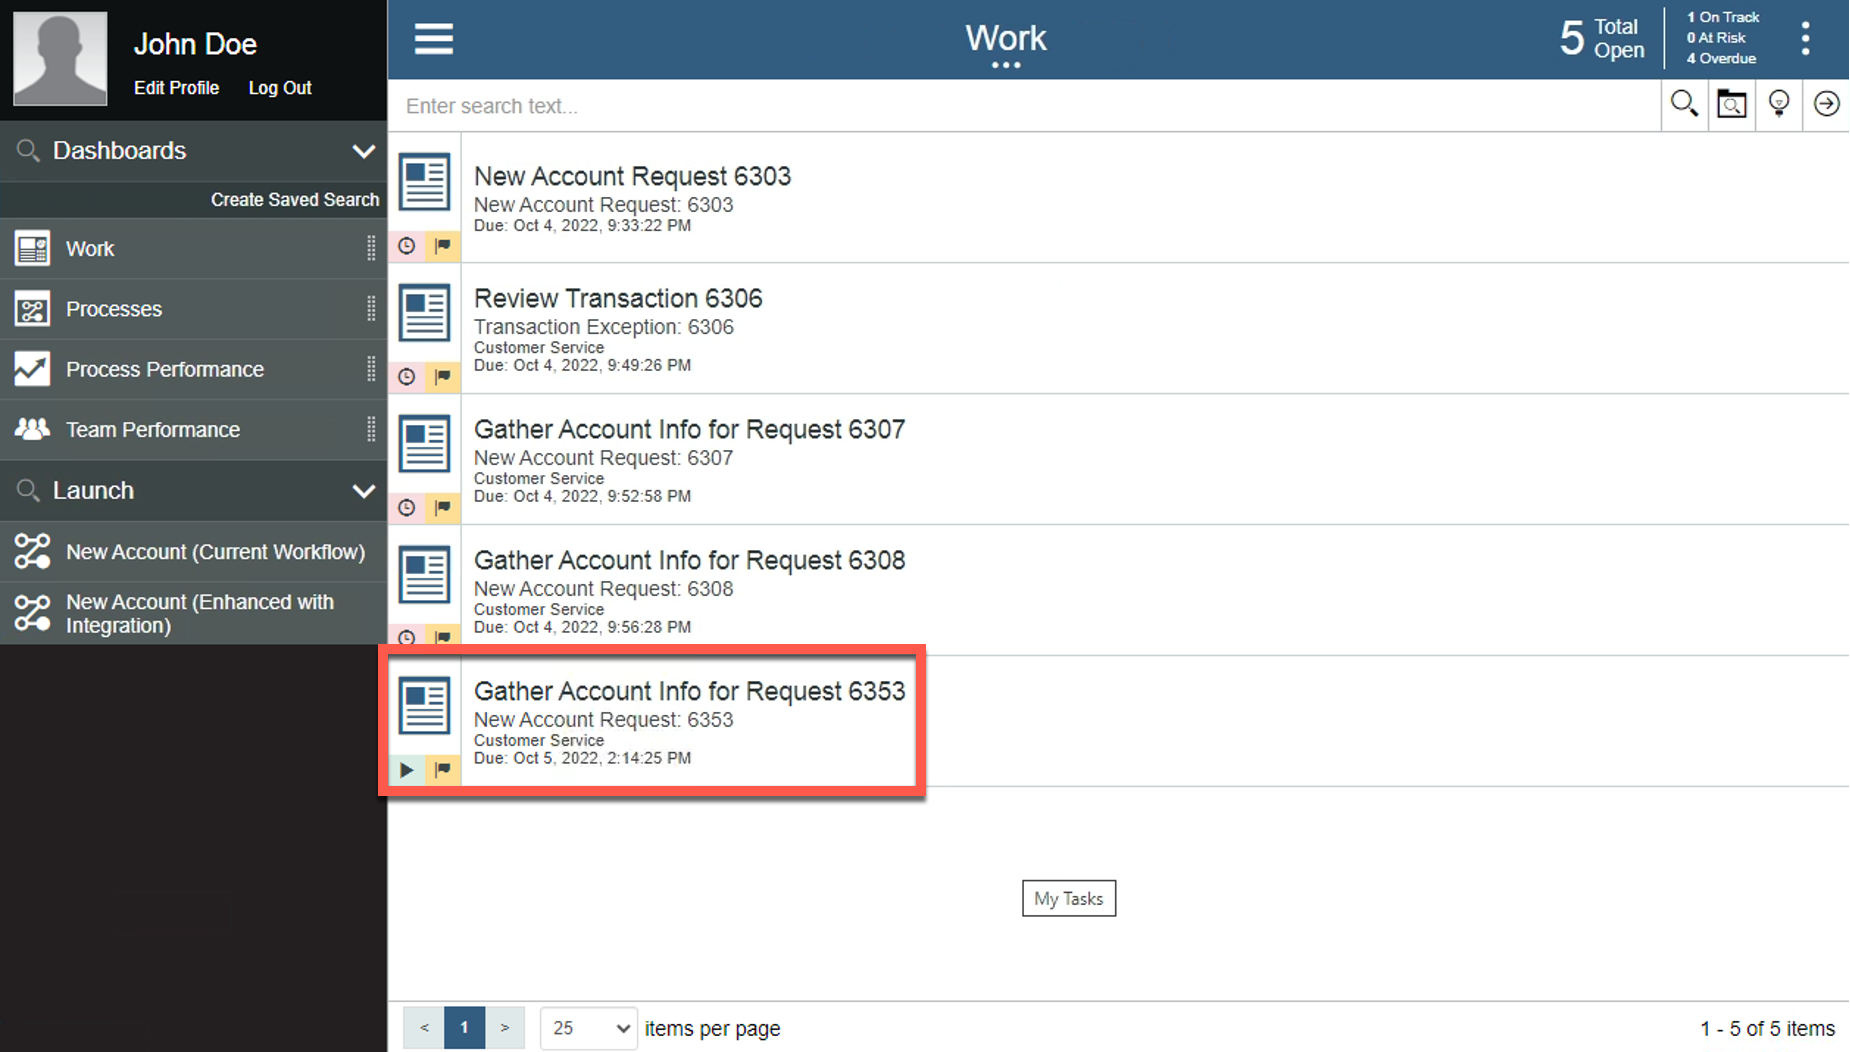 |
| Action 1.2.6 | Manually enter the customer’s information.  |
2 - Using integration to gather and consolidate customer account data
| 2.1 | Review the integration flow |
|---|---|
| Narration | The bank has created an integration flow that retrieves the existing Focus Bank accounts (using an HTTP API) and the new accounts from Corner Bank (using IBM MQ). Corner Bank has a separate network and therefore, the communication is considered bank-to-bank. Focus Bank built the integration using the Designer tooling within the Cloud Pak for Integration. They created API integration flows to manage connectivity to services and endpoints. The two integration flows for this demo have already been built and are in the Recently edited integrations section. Let’s navigate into the Accounts flow. |
| Action 2.1.1 | Under Recently edited integrations, click the Accounts tile. 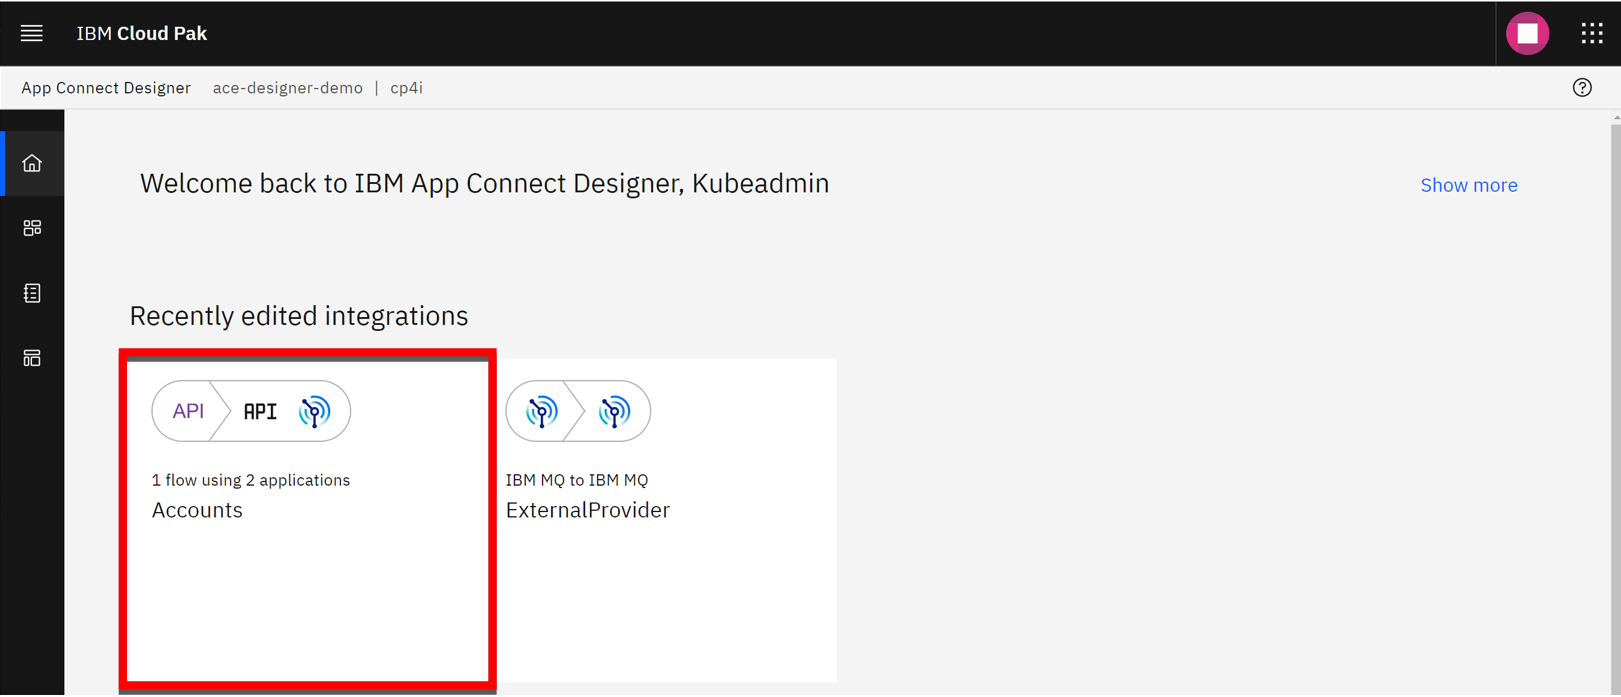 |
| Narration | The bank uses App Connect Designer to build the API. They don’t need to worry about OpenAPI specs or Swagger editors; they’re all built in. On the screen, we see the fields we’re going to use for the API (e.g., customerId, checkingAccount). Note that we tell the API which field is the key. This causes the key to be populated with the last segment of the URL. Which parameter is populated is highlighted based on the icon in the ‘ID’ column. |
| Action 2.1.2 | Select the Properties view. 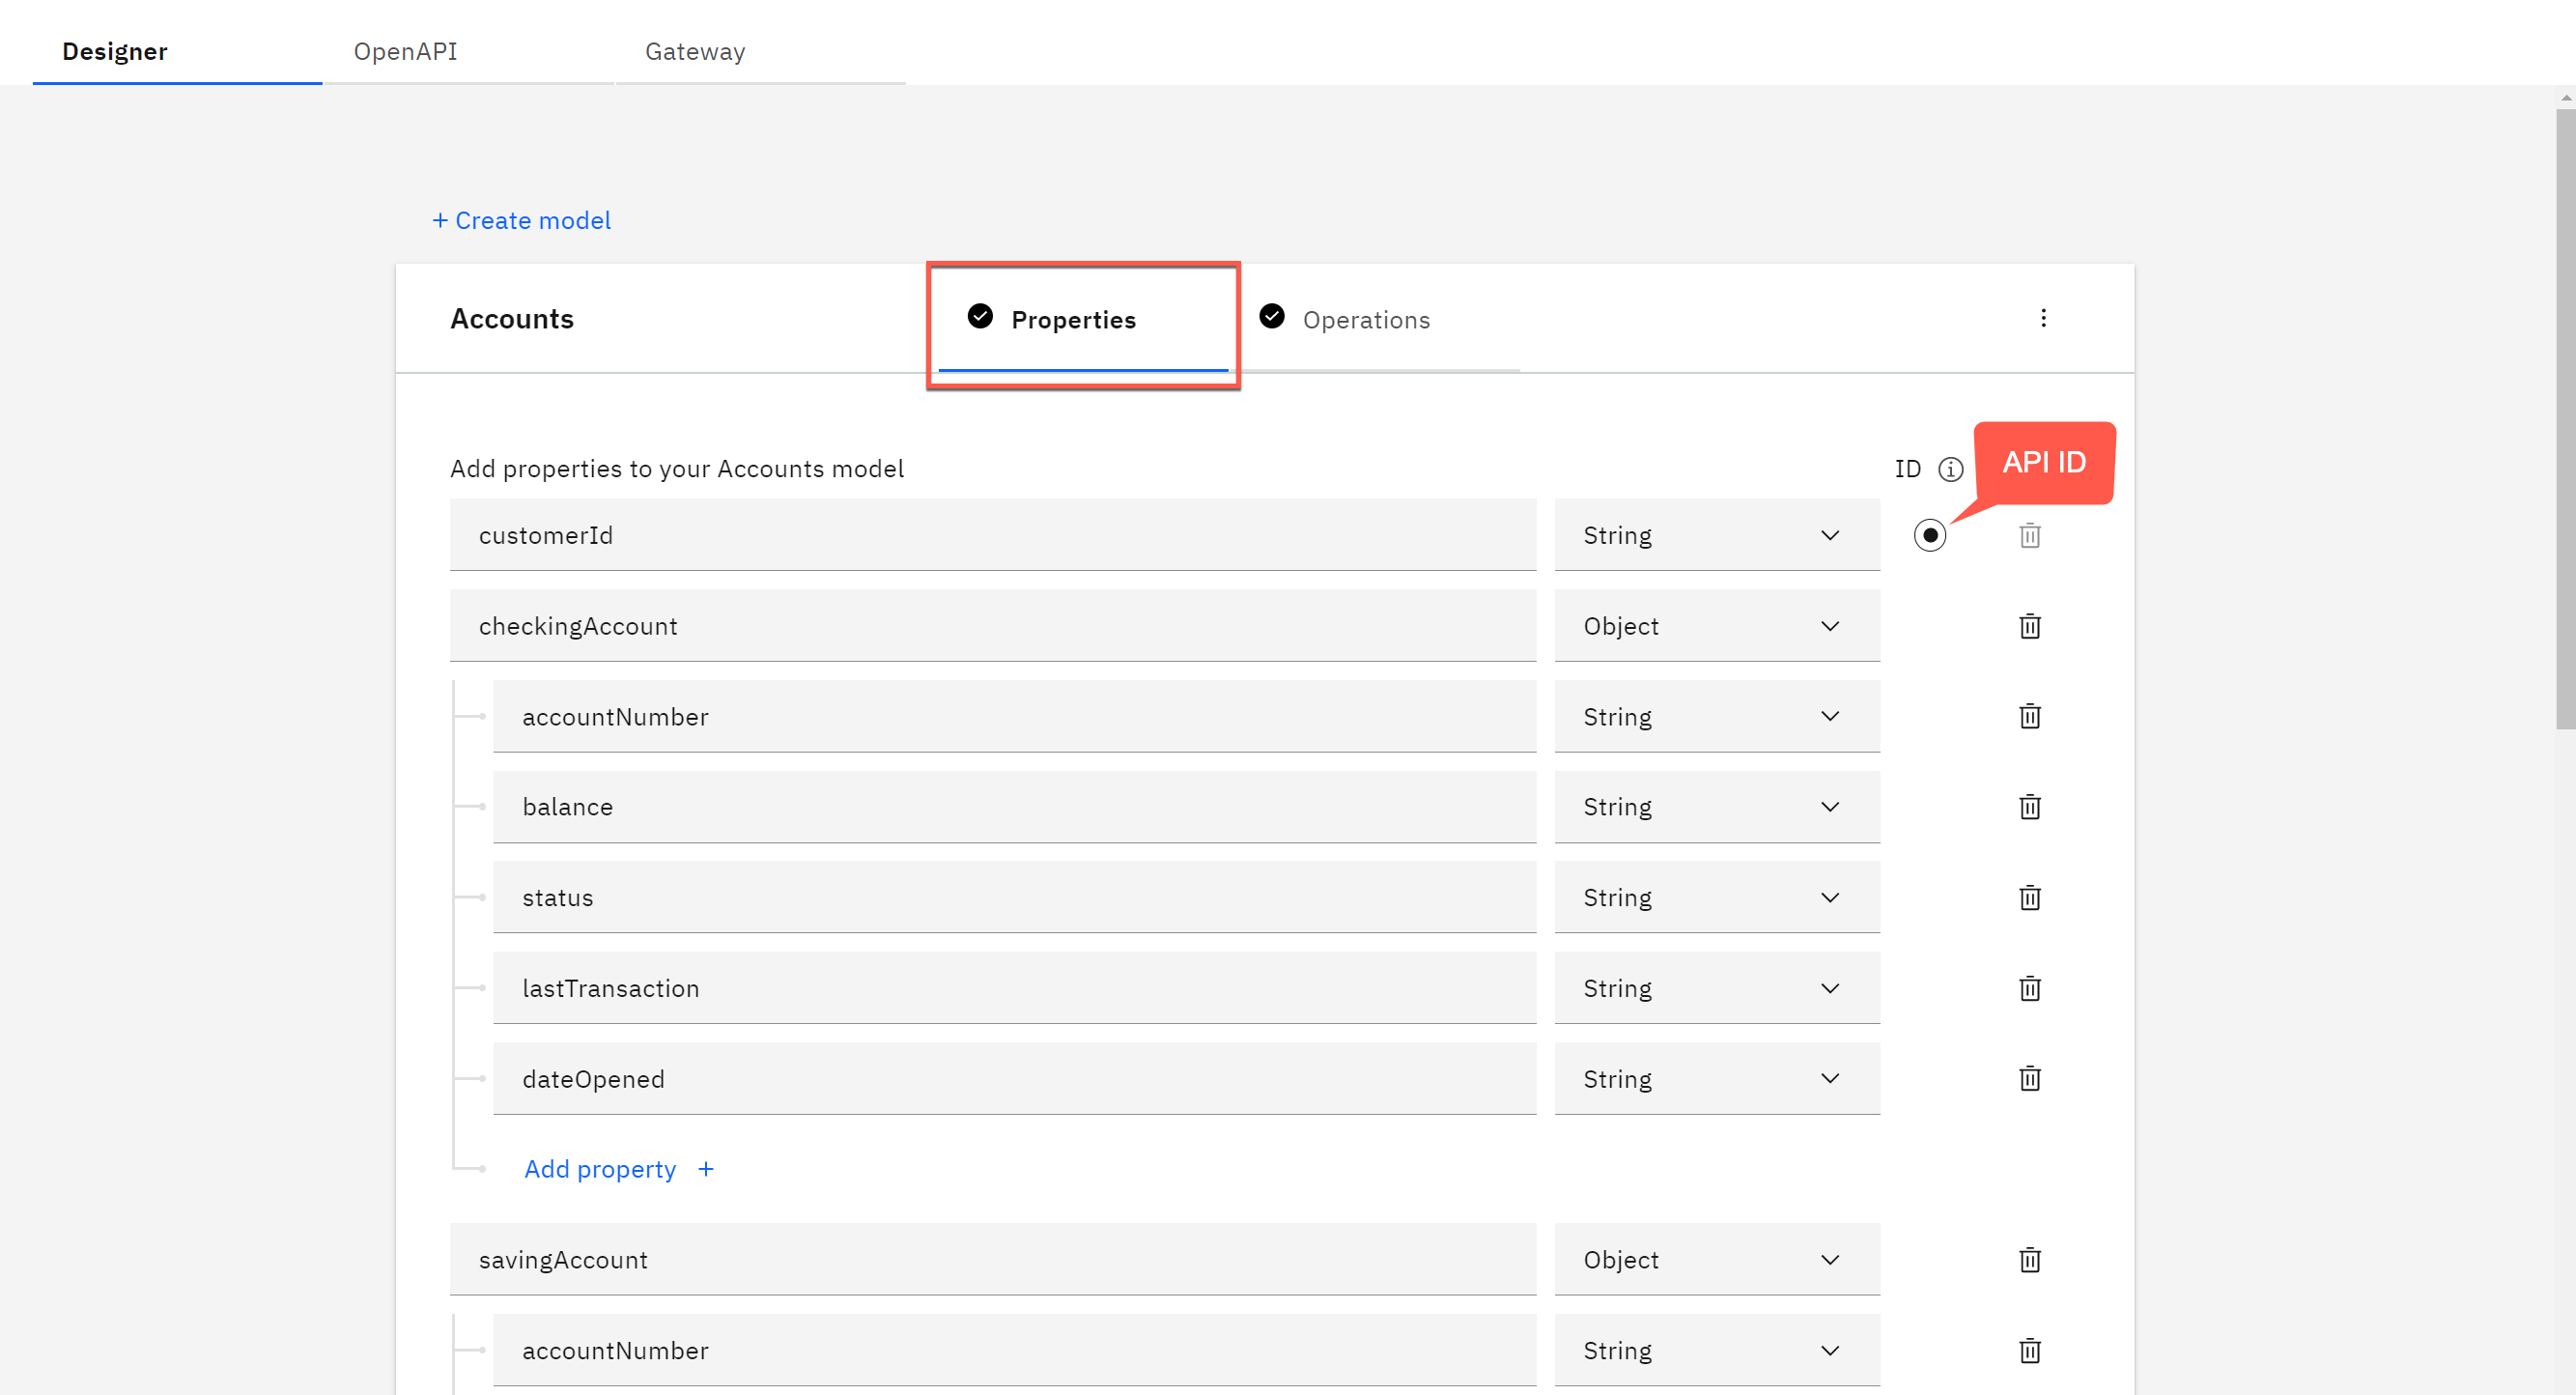 |
| Action 2.1.3 | Point out the Properties, as highlighted in the screenshot below. 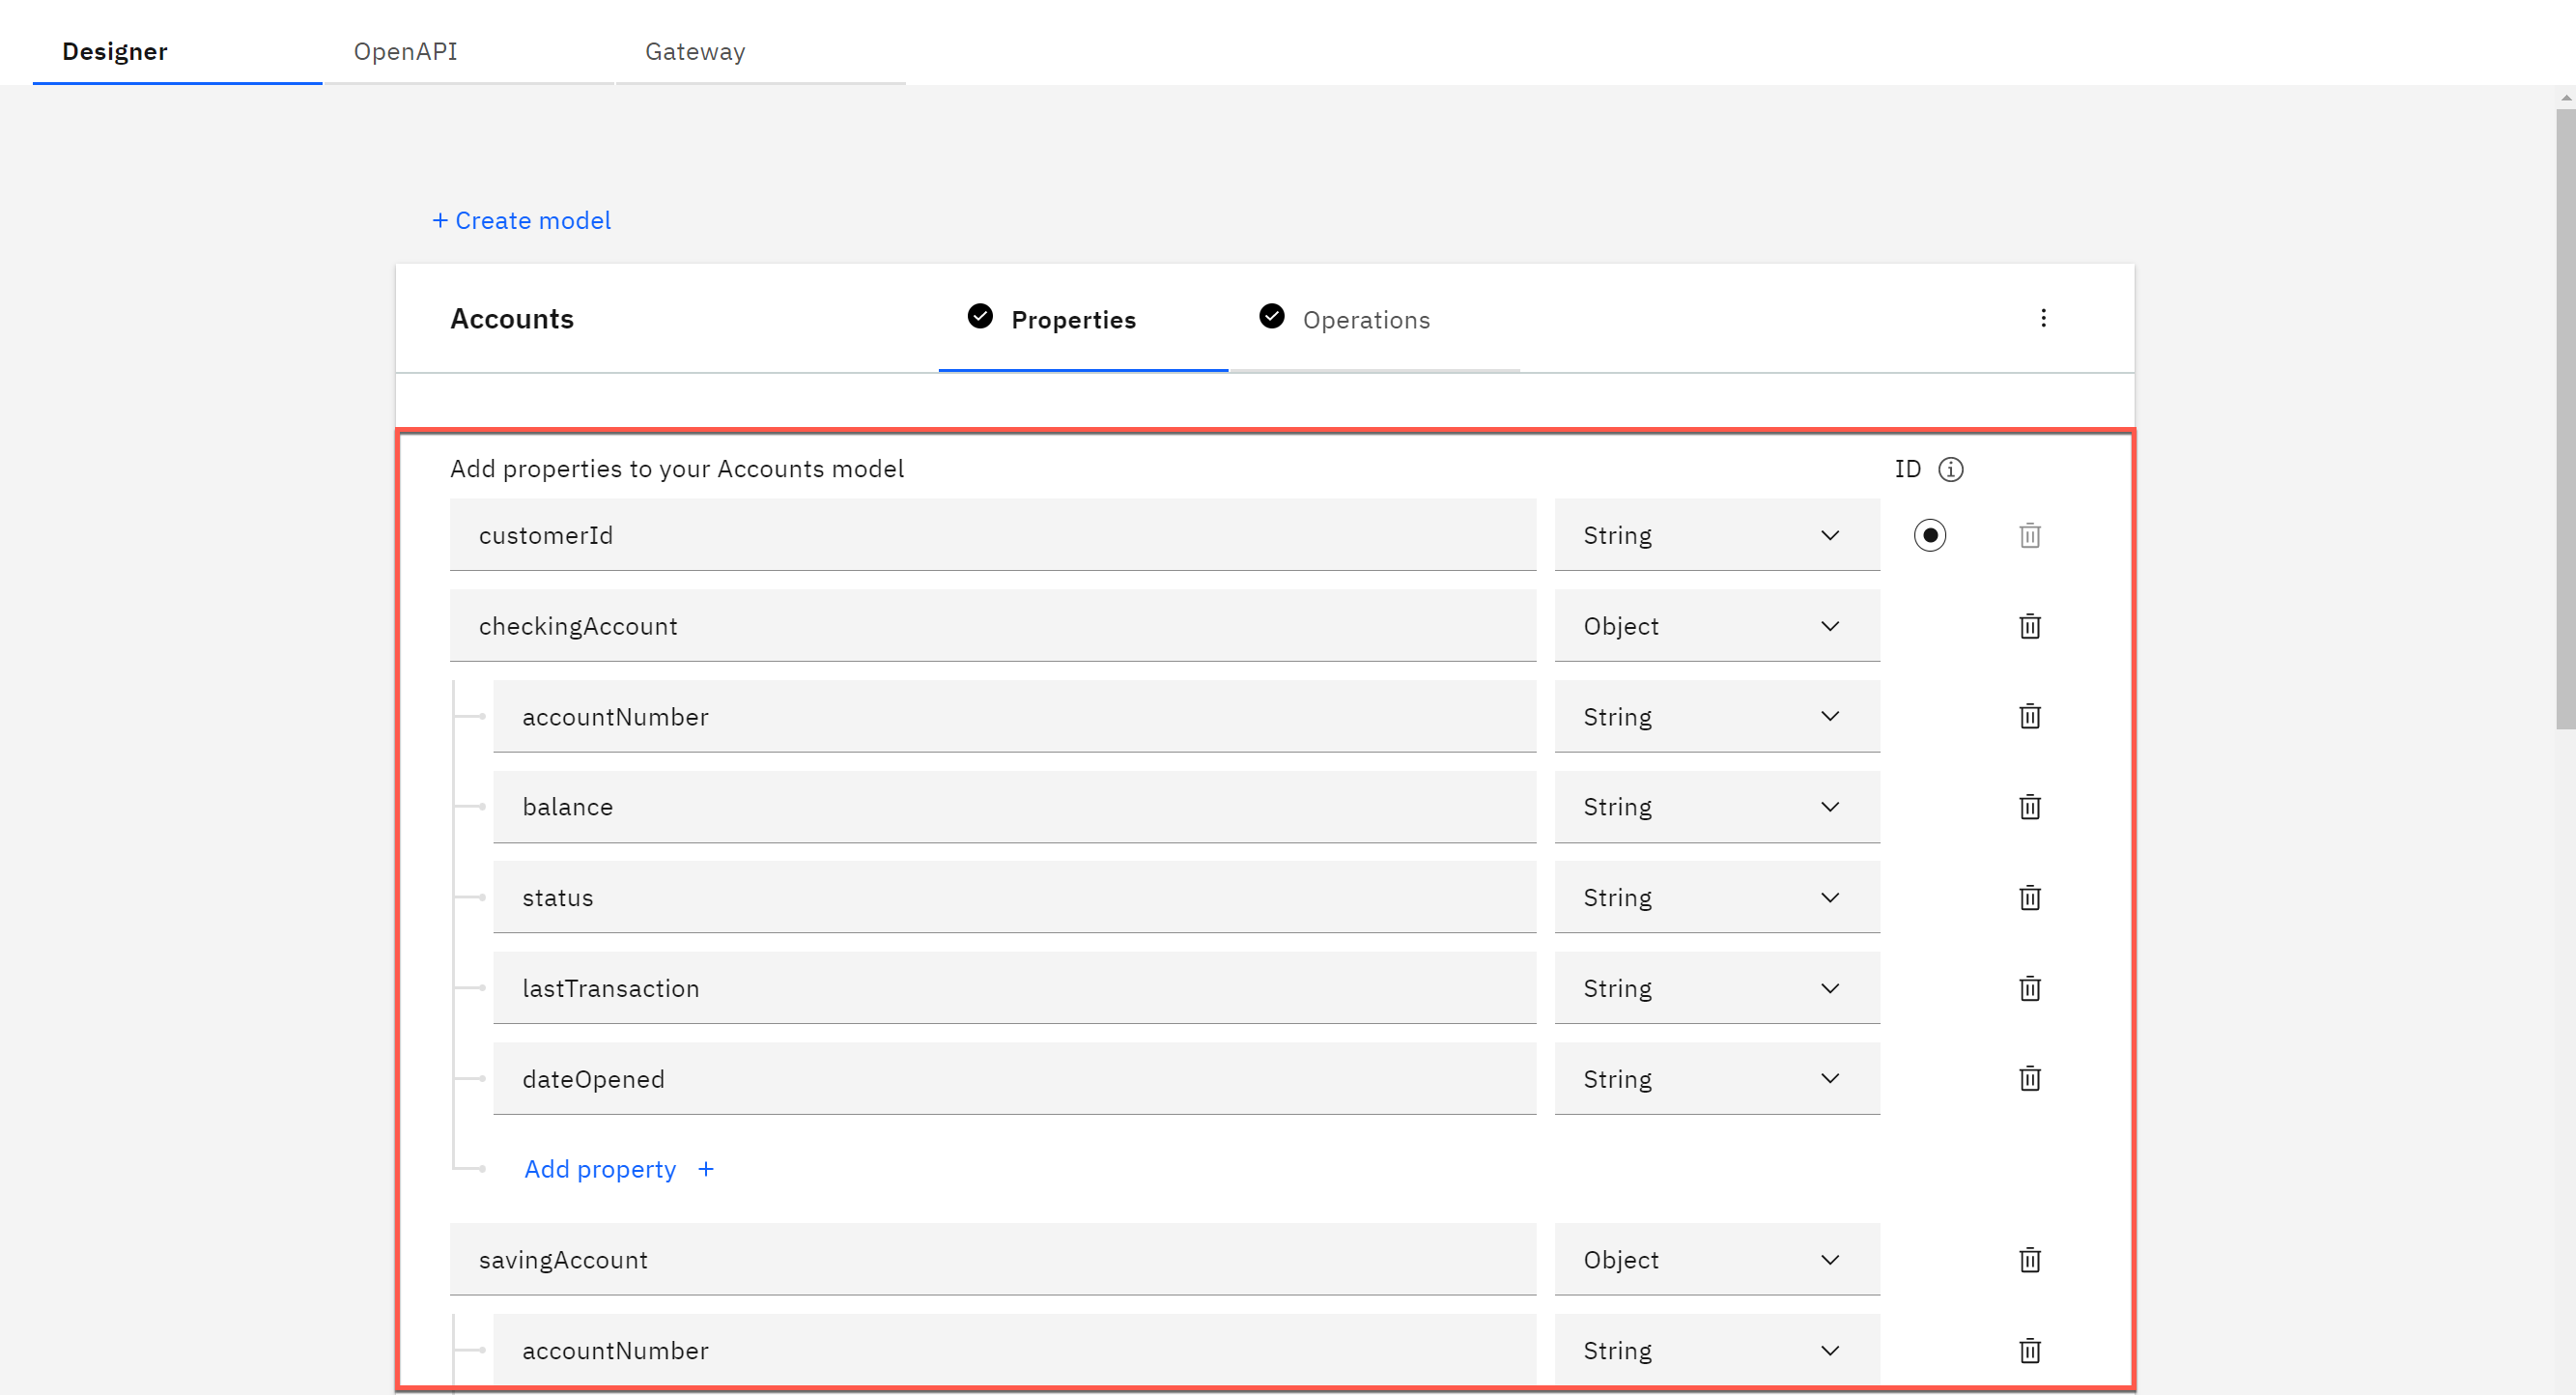 |
| Action 2.1.4 | Select the Operations view. 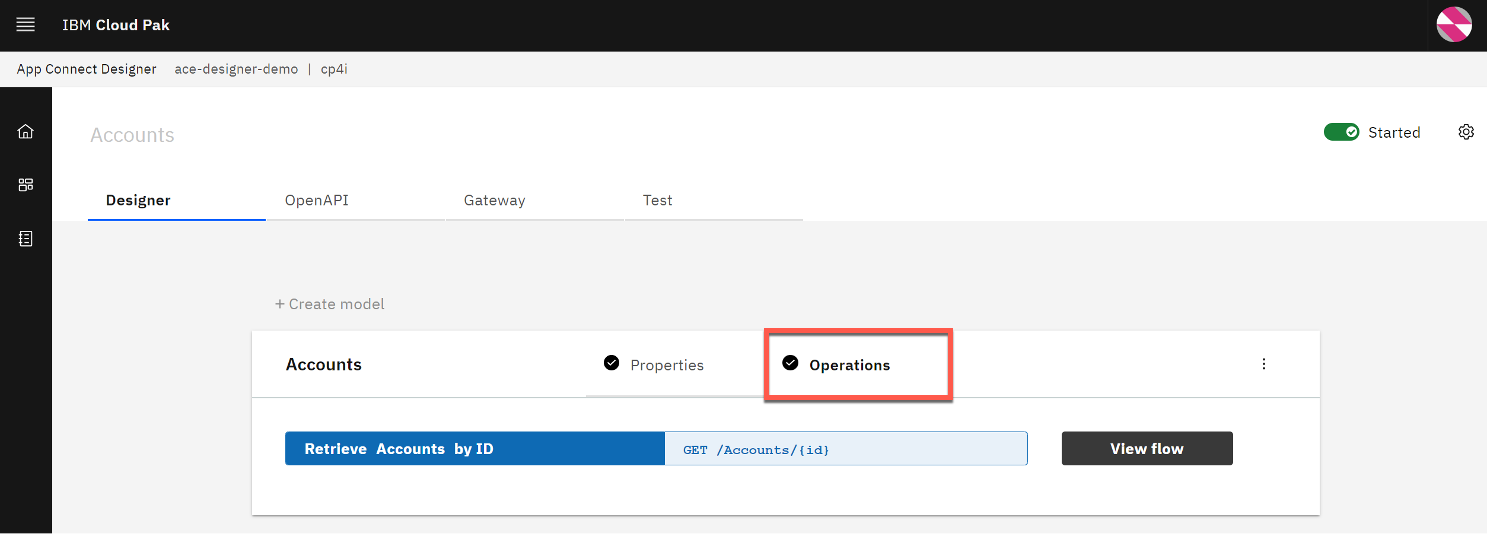 |
| Narration | In the Operations view, we see the actions that the API exposes, along with the data. The bank implements the ‘Retrieve Accounts by ID’ operation. Let’s look at the flow logic. |
| Action 2.1.5 | Click View flow. 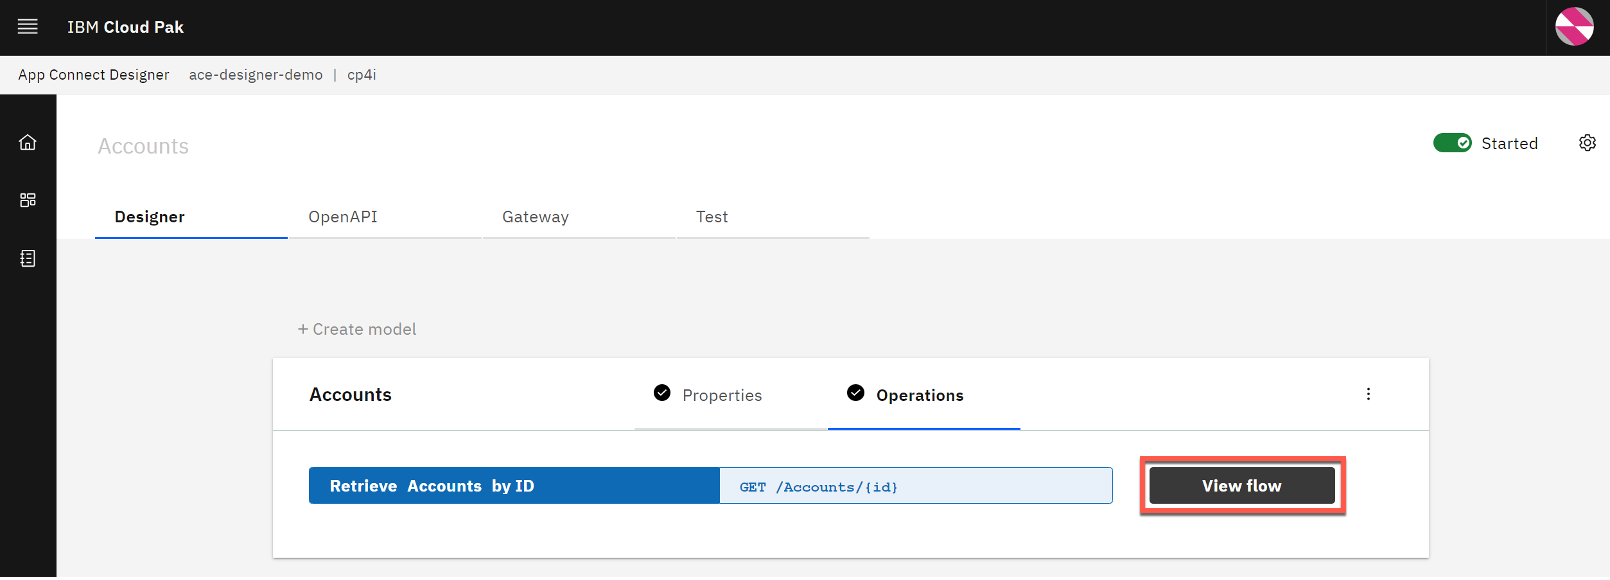 |
| Narration | Here is the bank’s integration flow. The App Connect Designer flow editor allows us to view, edit, and change the flow. The API enables a single view of the customer accounts across both banks. The flow calls an HTTP API to retrieve the accounts from Focus Bank, and it uses IBM MQ for the accounts from Corner Bank. The responses are combined, formatted and returned. |
| Action 2.1.6 | Click the Request step to show the request. 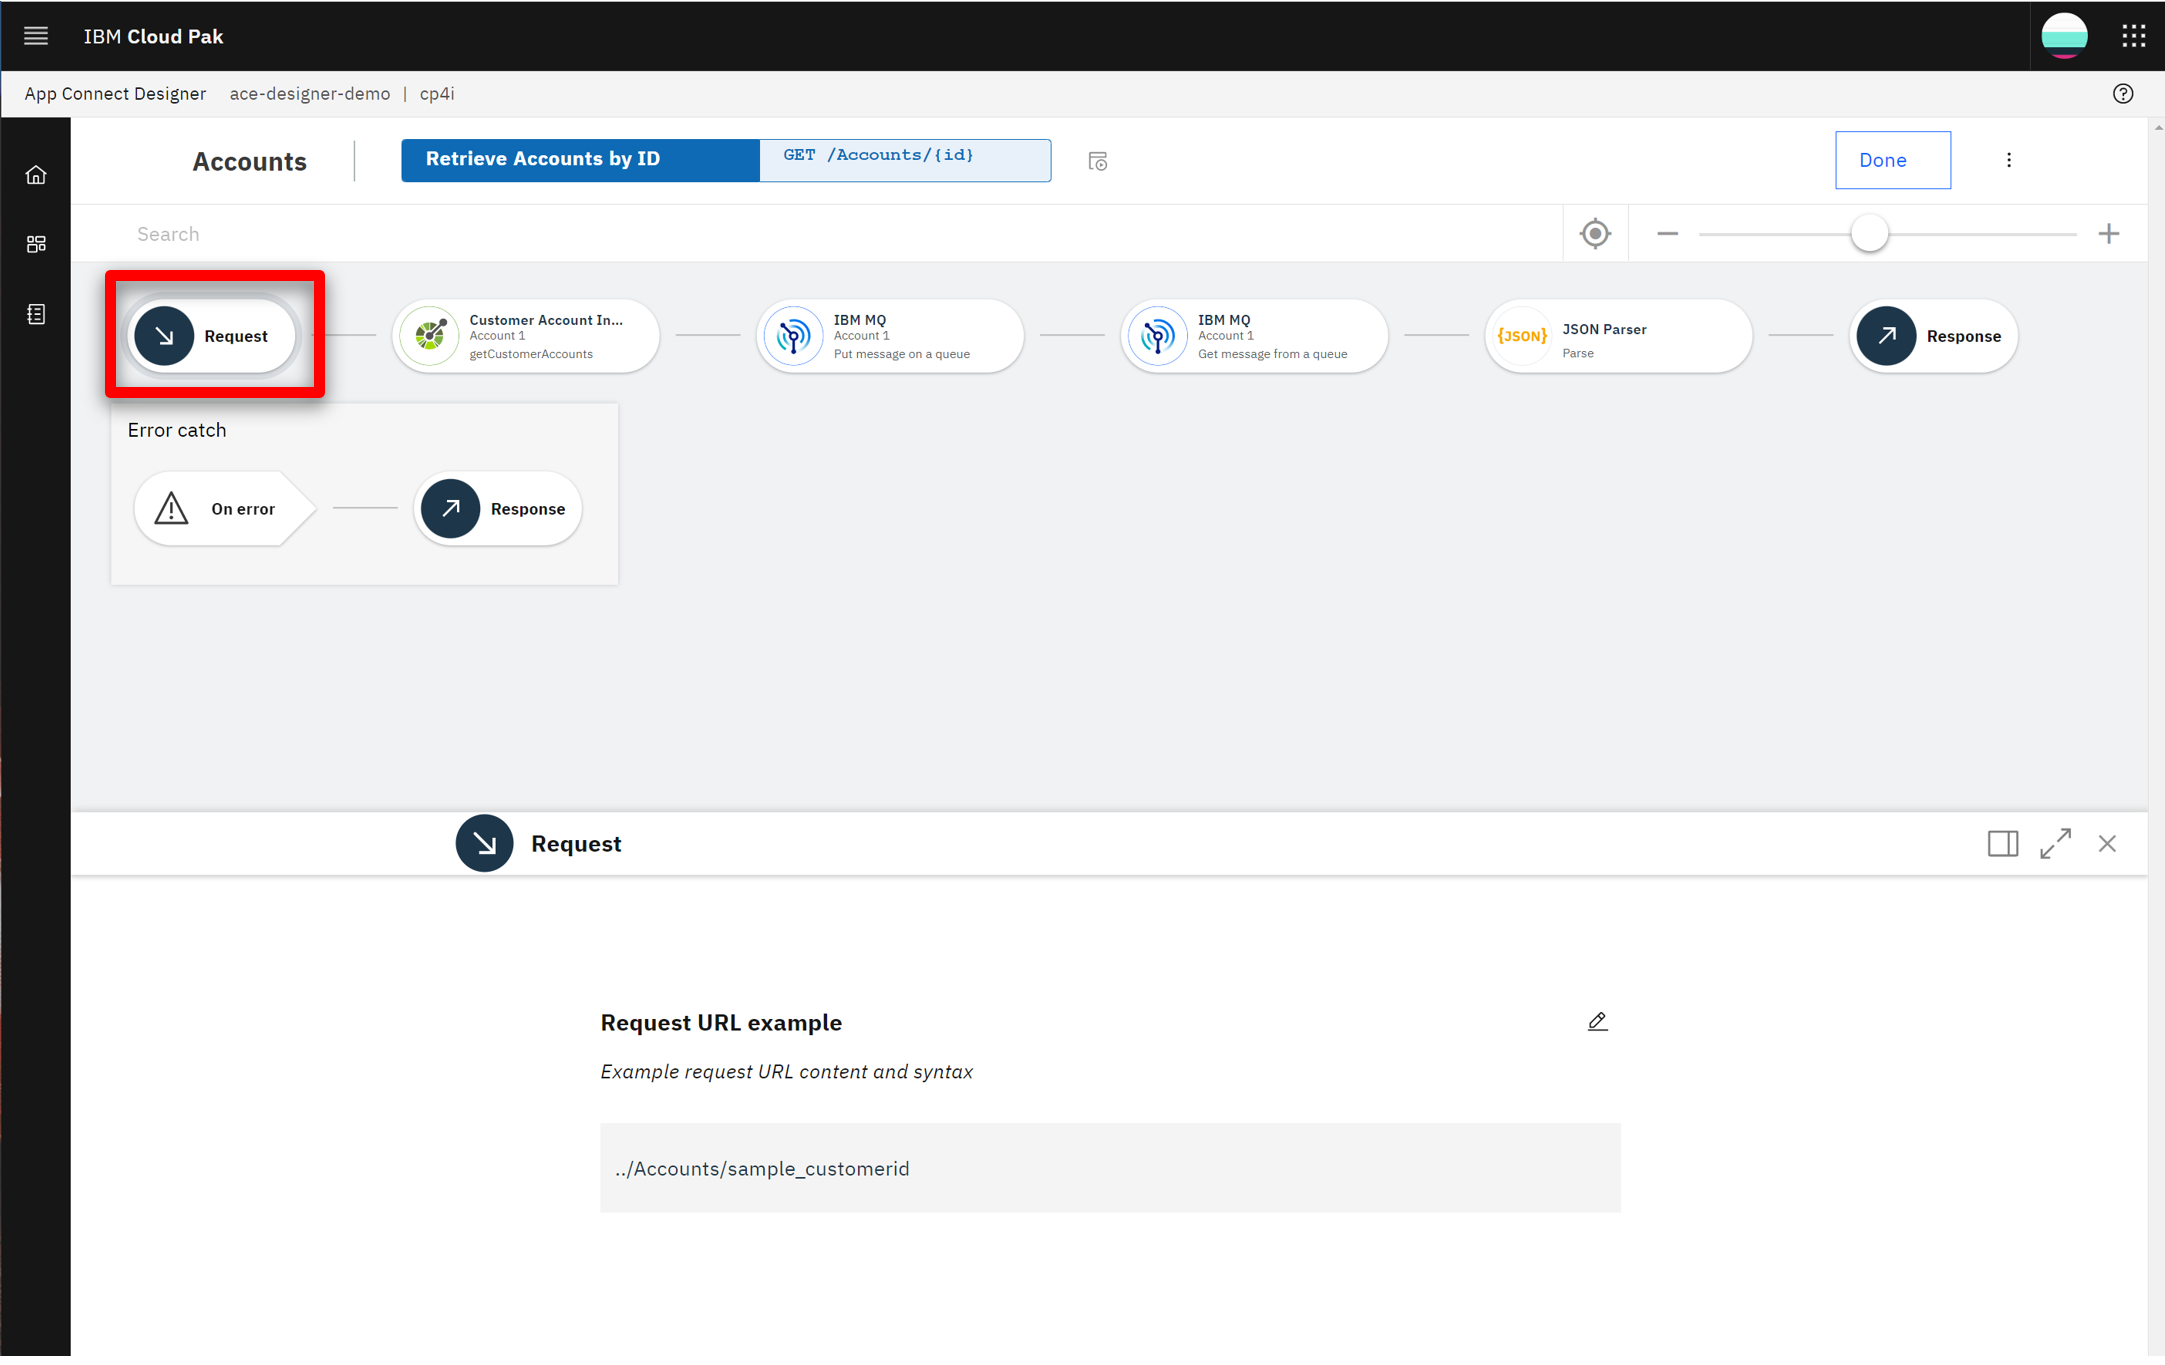 |
| Narration | The bank’s flow starts by receiving the customerId as part of the API URL. App Connect Designer automatically creates an API ‘request’ and ‘response’ for the API flow. Next, the customer account retrieval API is invoked. The customerId is passed in from the inbound request. |
| Action 2.1.7 | Click the Customer Account step to show the customer account information. 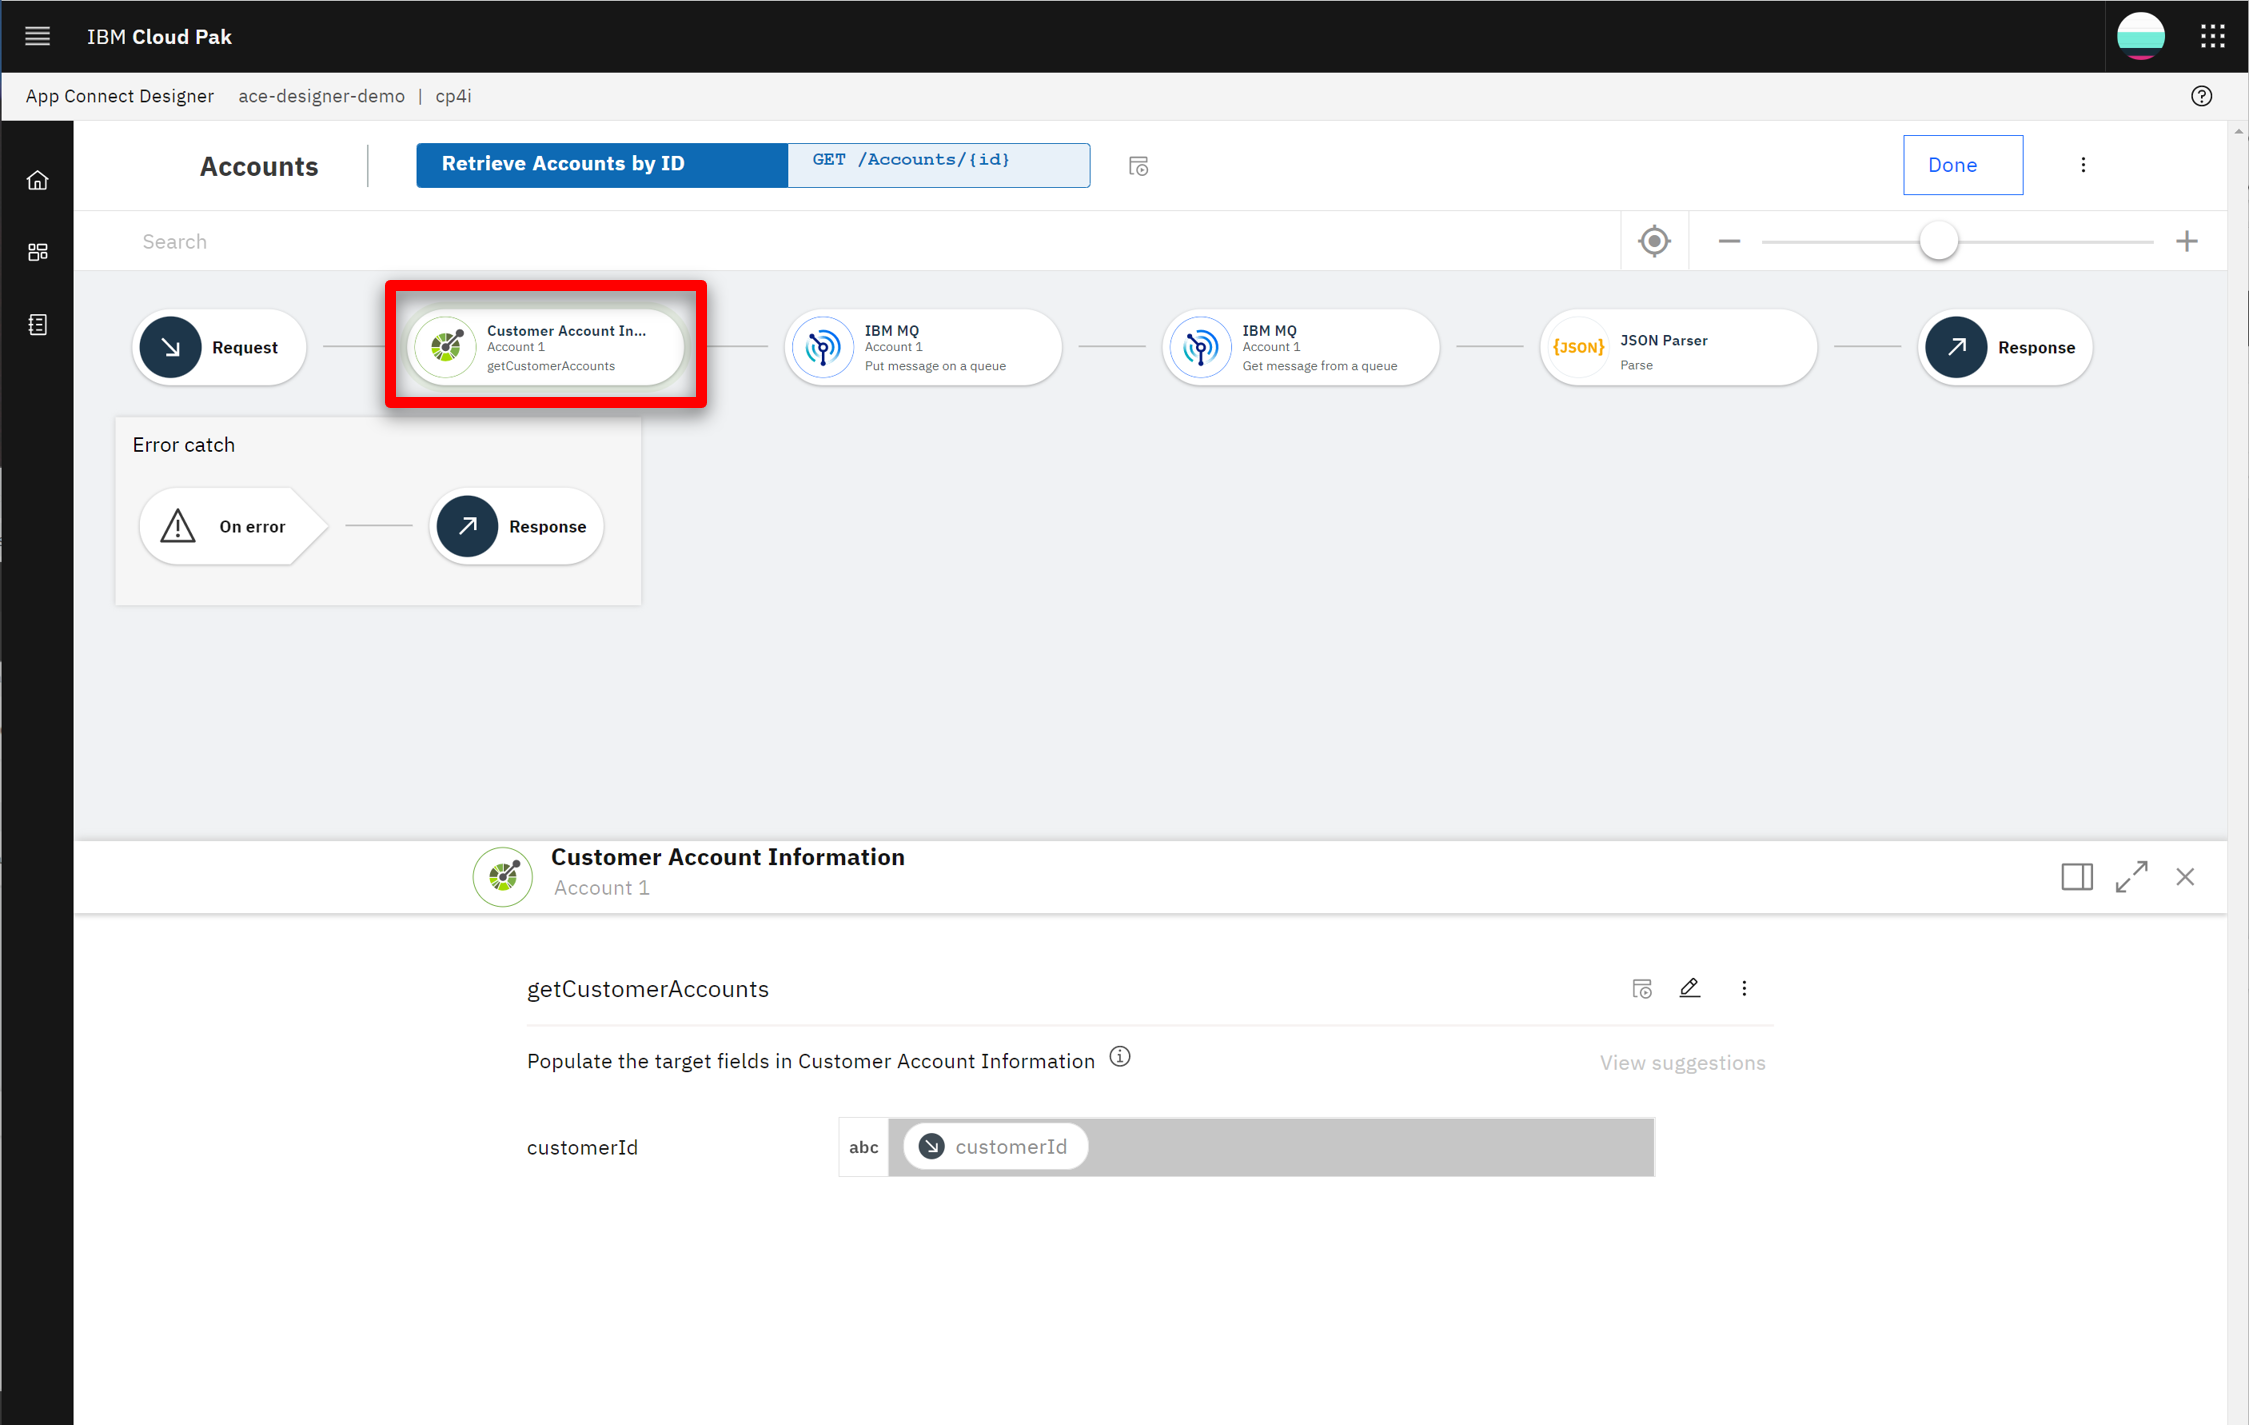 |
| Narration | The accounts from the acquired bank (Corner Bank) are retrieved using IBM MQ. Using a connector for IBM MQ, the payload of the request message is created, which includes the customerId. Additionally, a queue name is specified for where the message will be sent. Corner Bank’s application will receive the request from this queue. |
| Action 2.1.8 | Click the highlighted IBM MQ step to show the target fields. 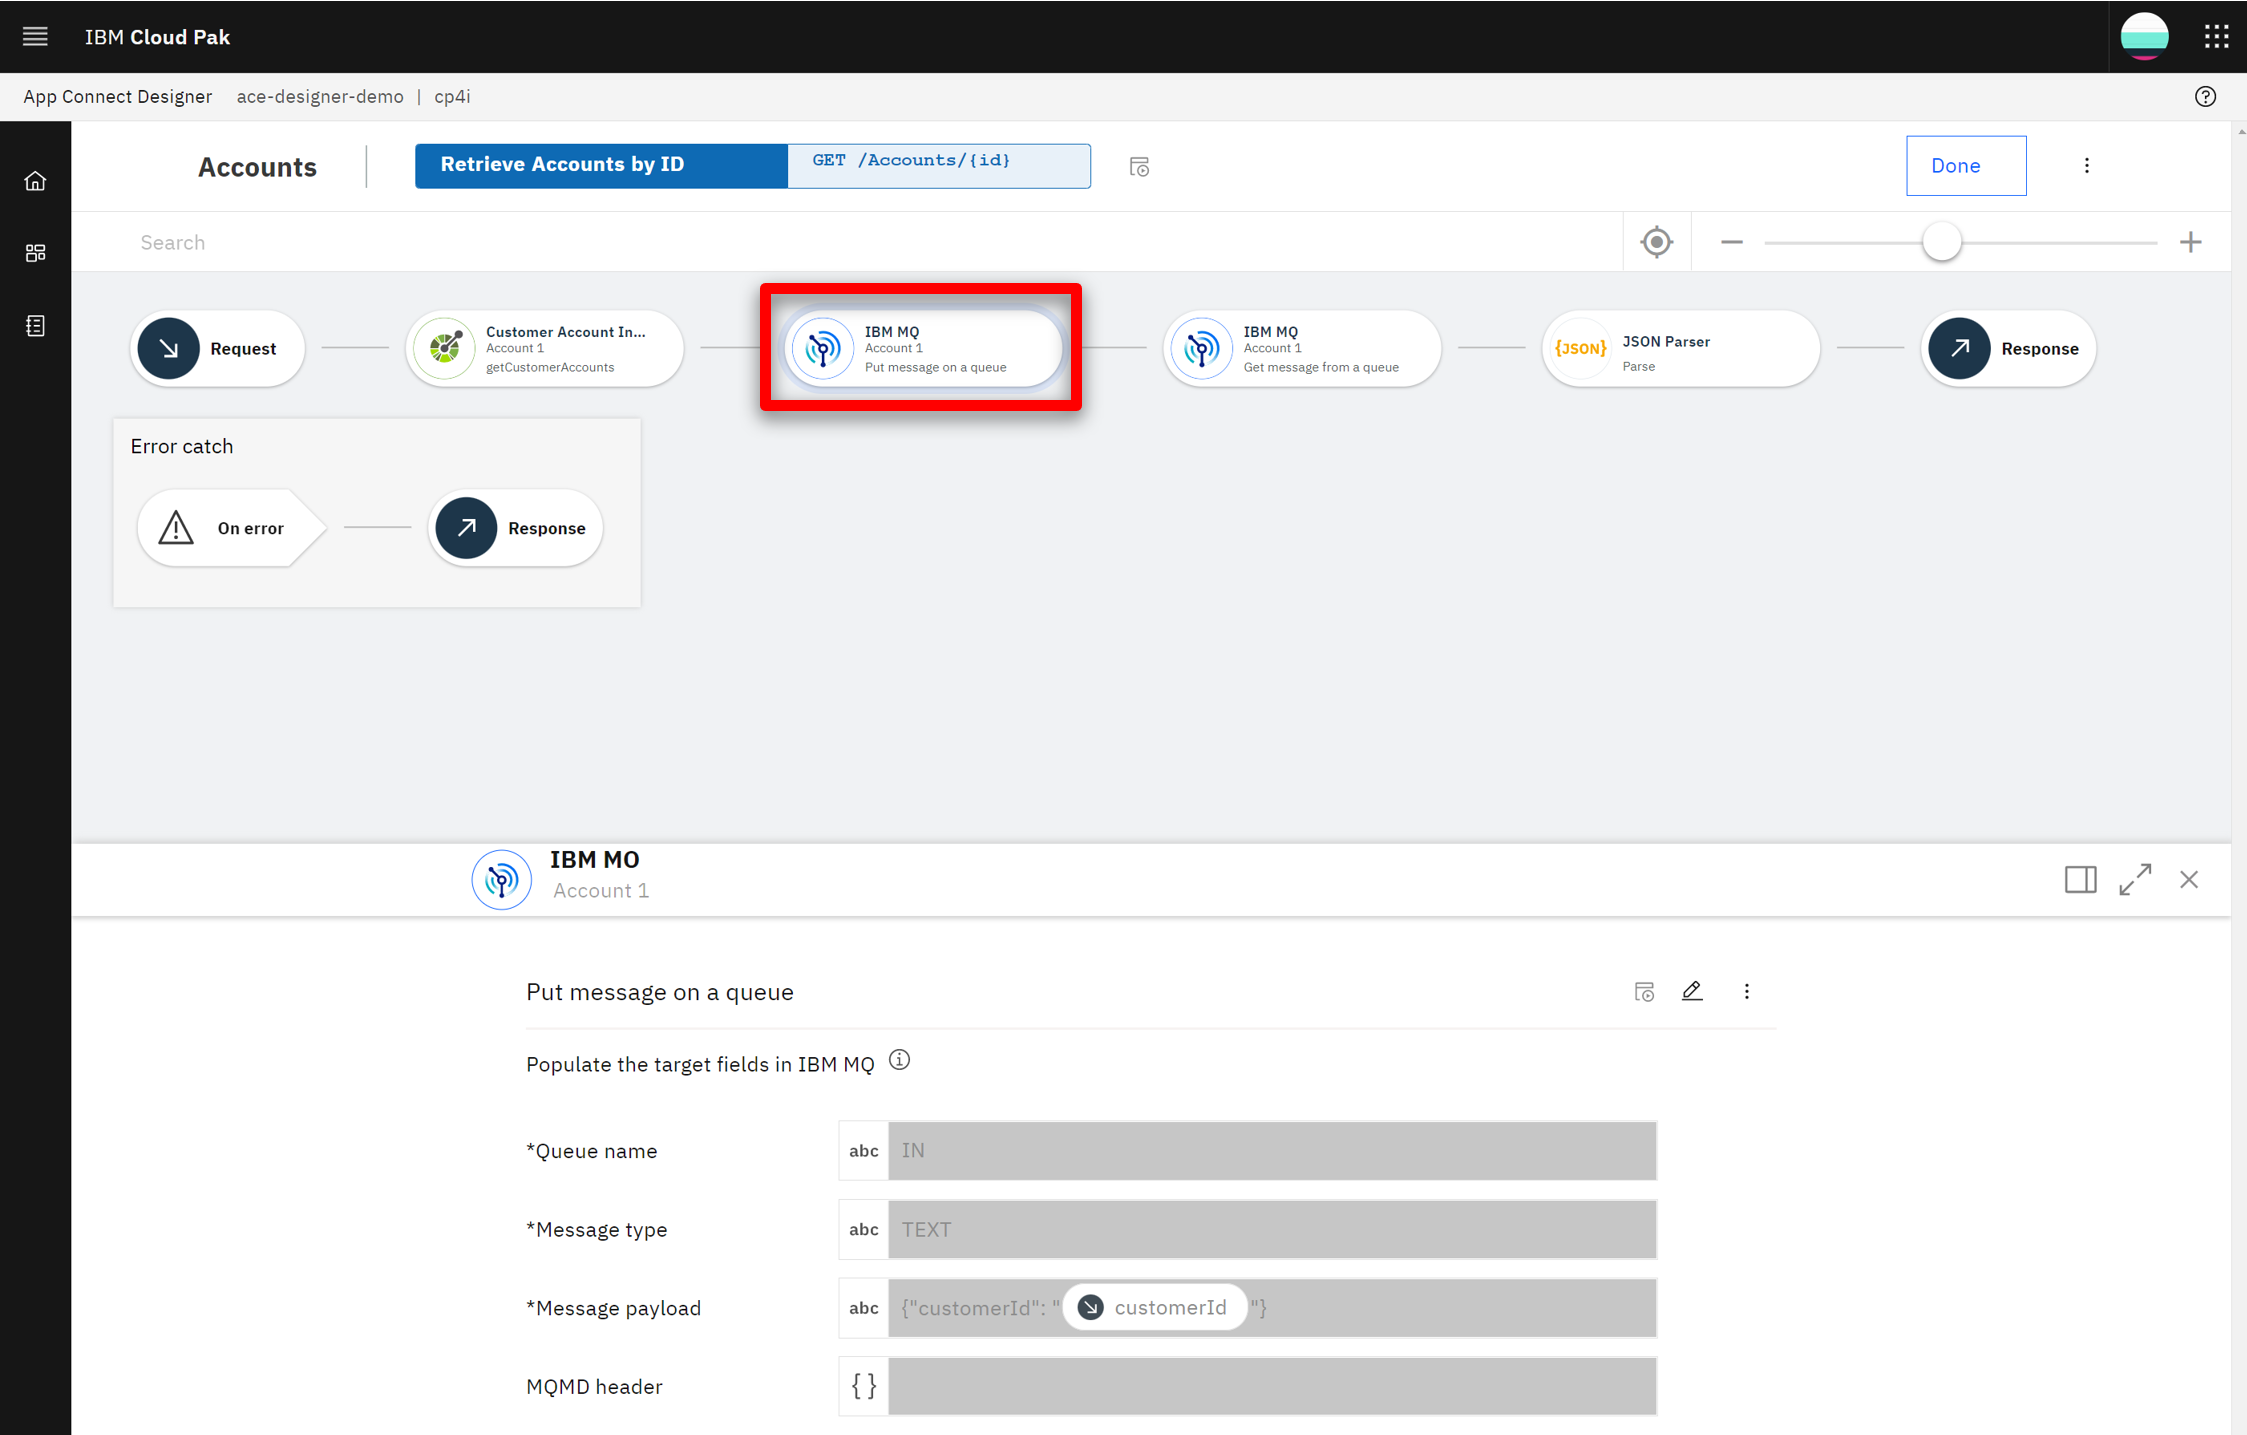 |
| Narration | Focus Bank uses a connector for IBM MQ to get the response message. To receive the response message, a separate queue (OUT) is used. |
| Action 2.1.9 | Click the second IBM MQ step in the flow to show the target fields. 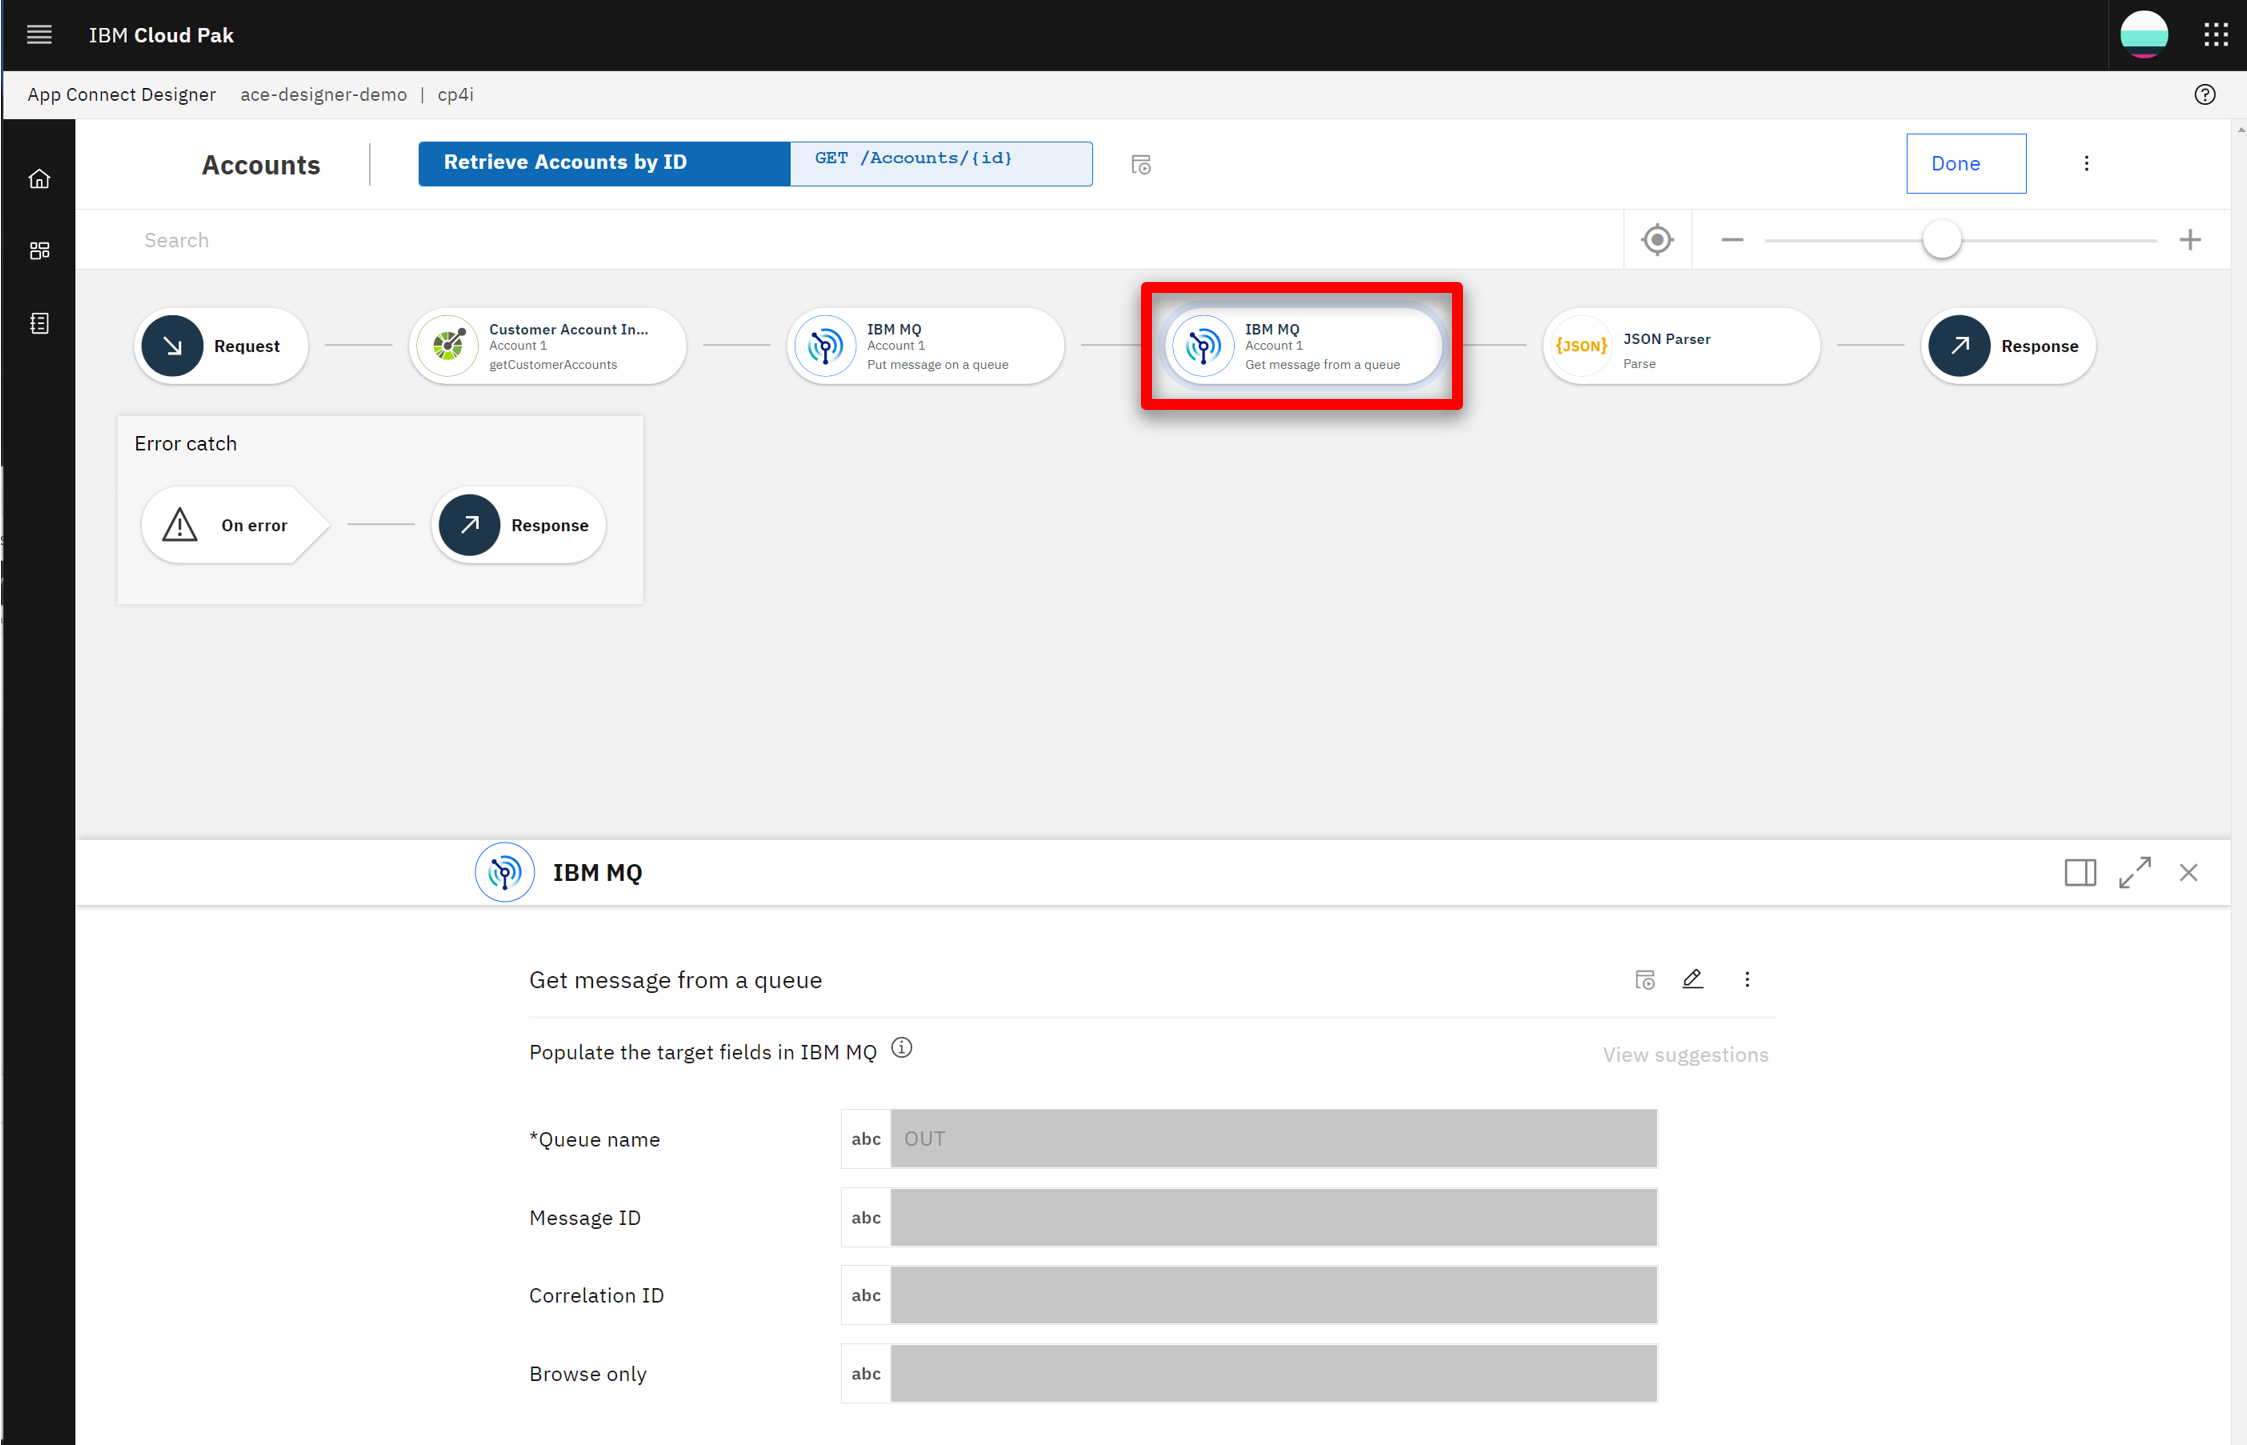 |
| Action 2.1.10 | Click the JSON Parser step to show the details. 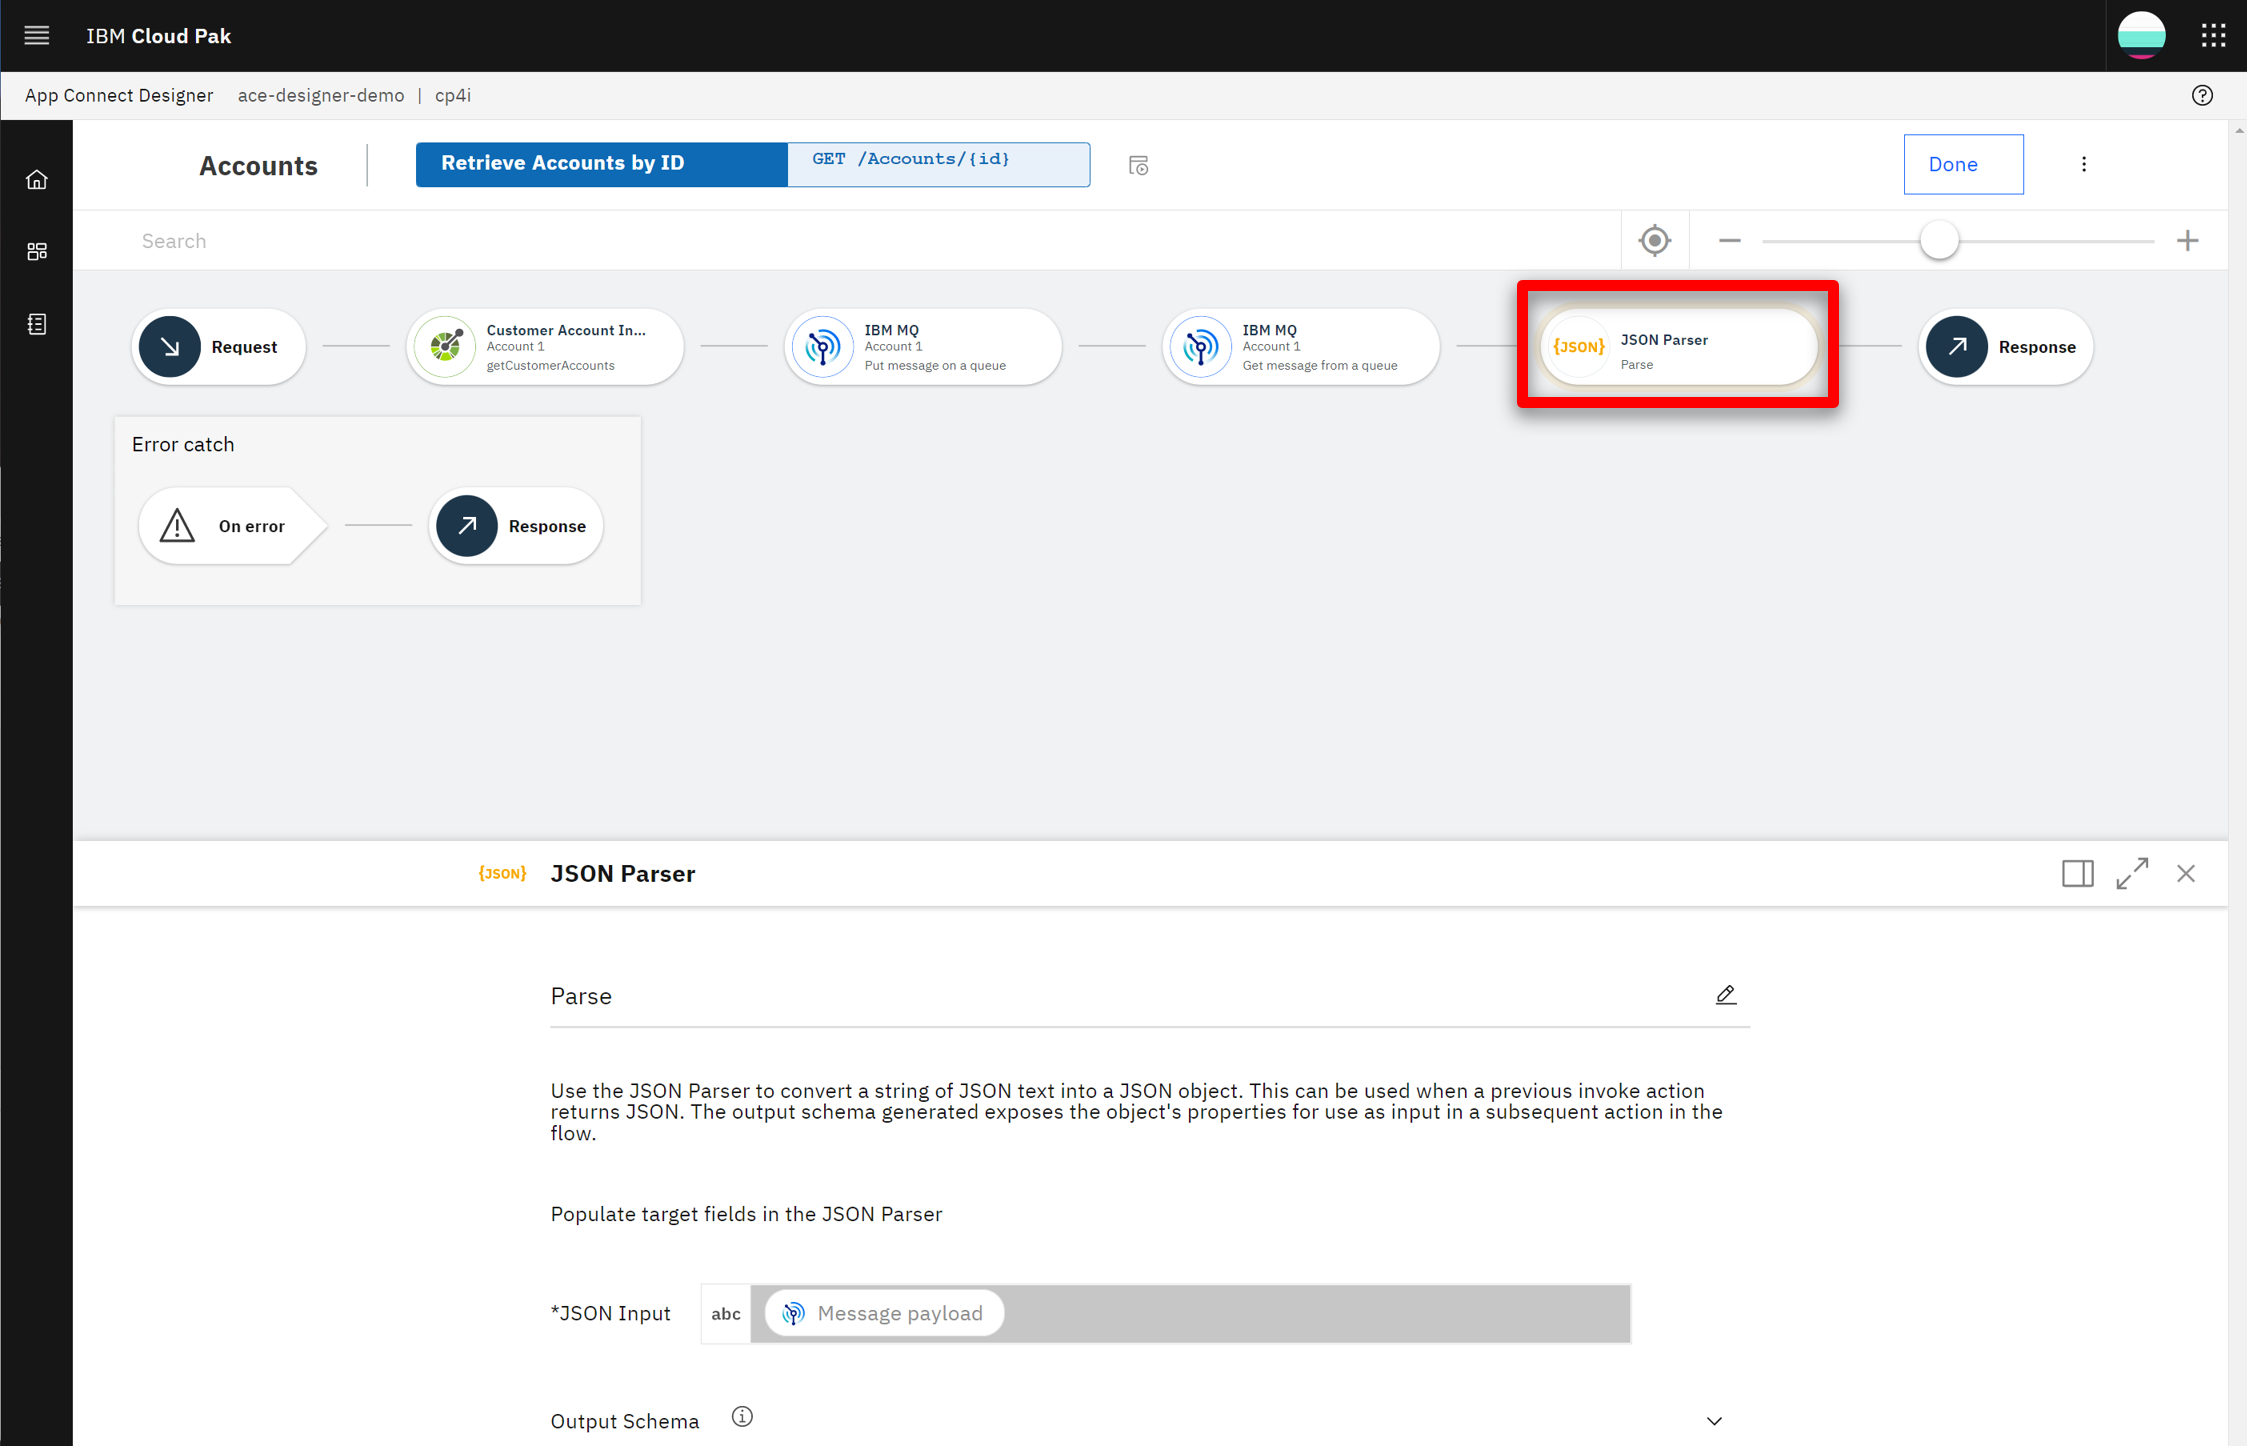 |
| Narration | A JSON Parser action is used to parse the response data from MQ. The bank teaches the JSON Parser the expected structure of the JSON using an example, avoiding the need to learn and create a formal JSON schema. |
| Action 2.1.11 | Click the Response step to show the response. 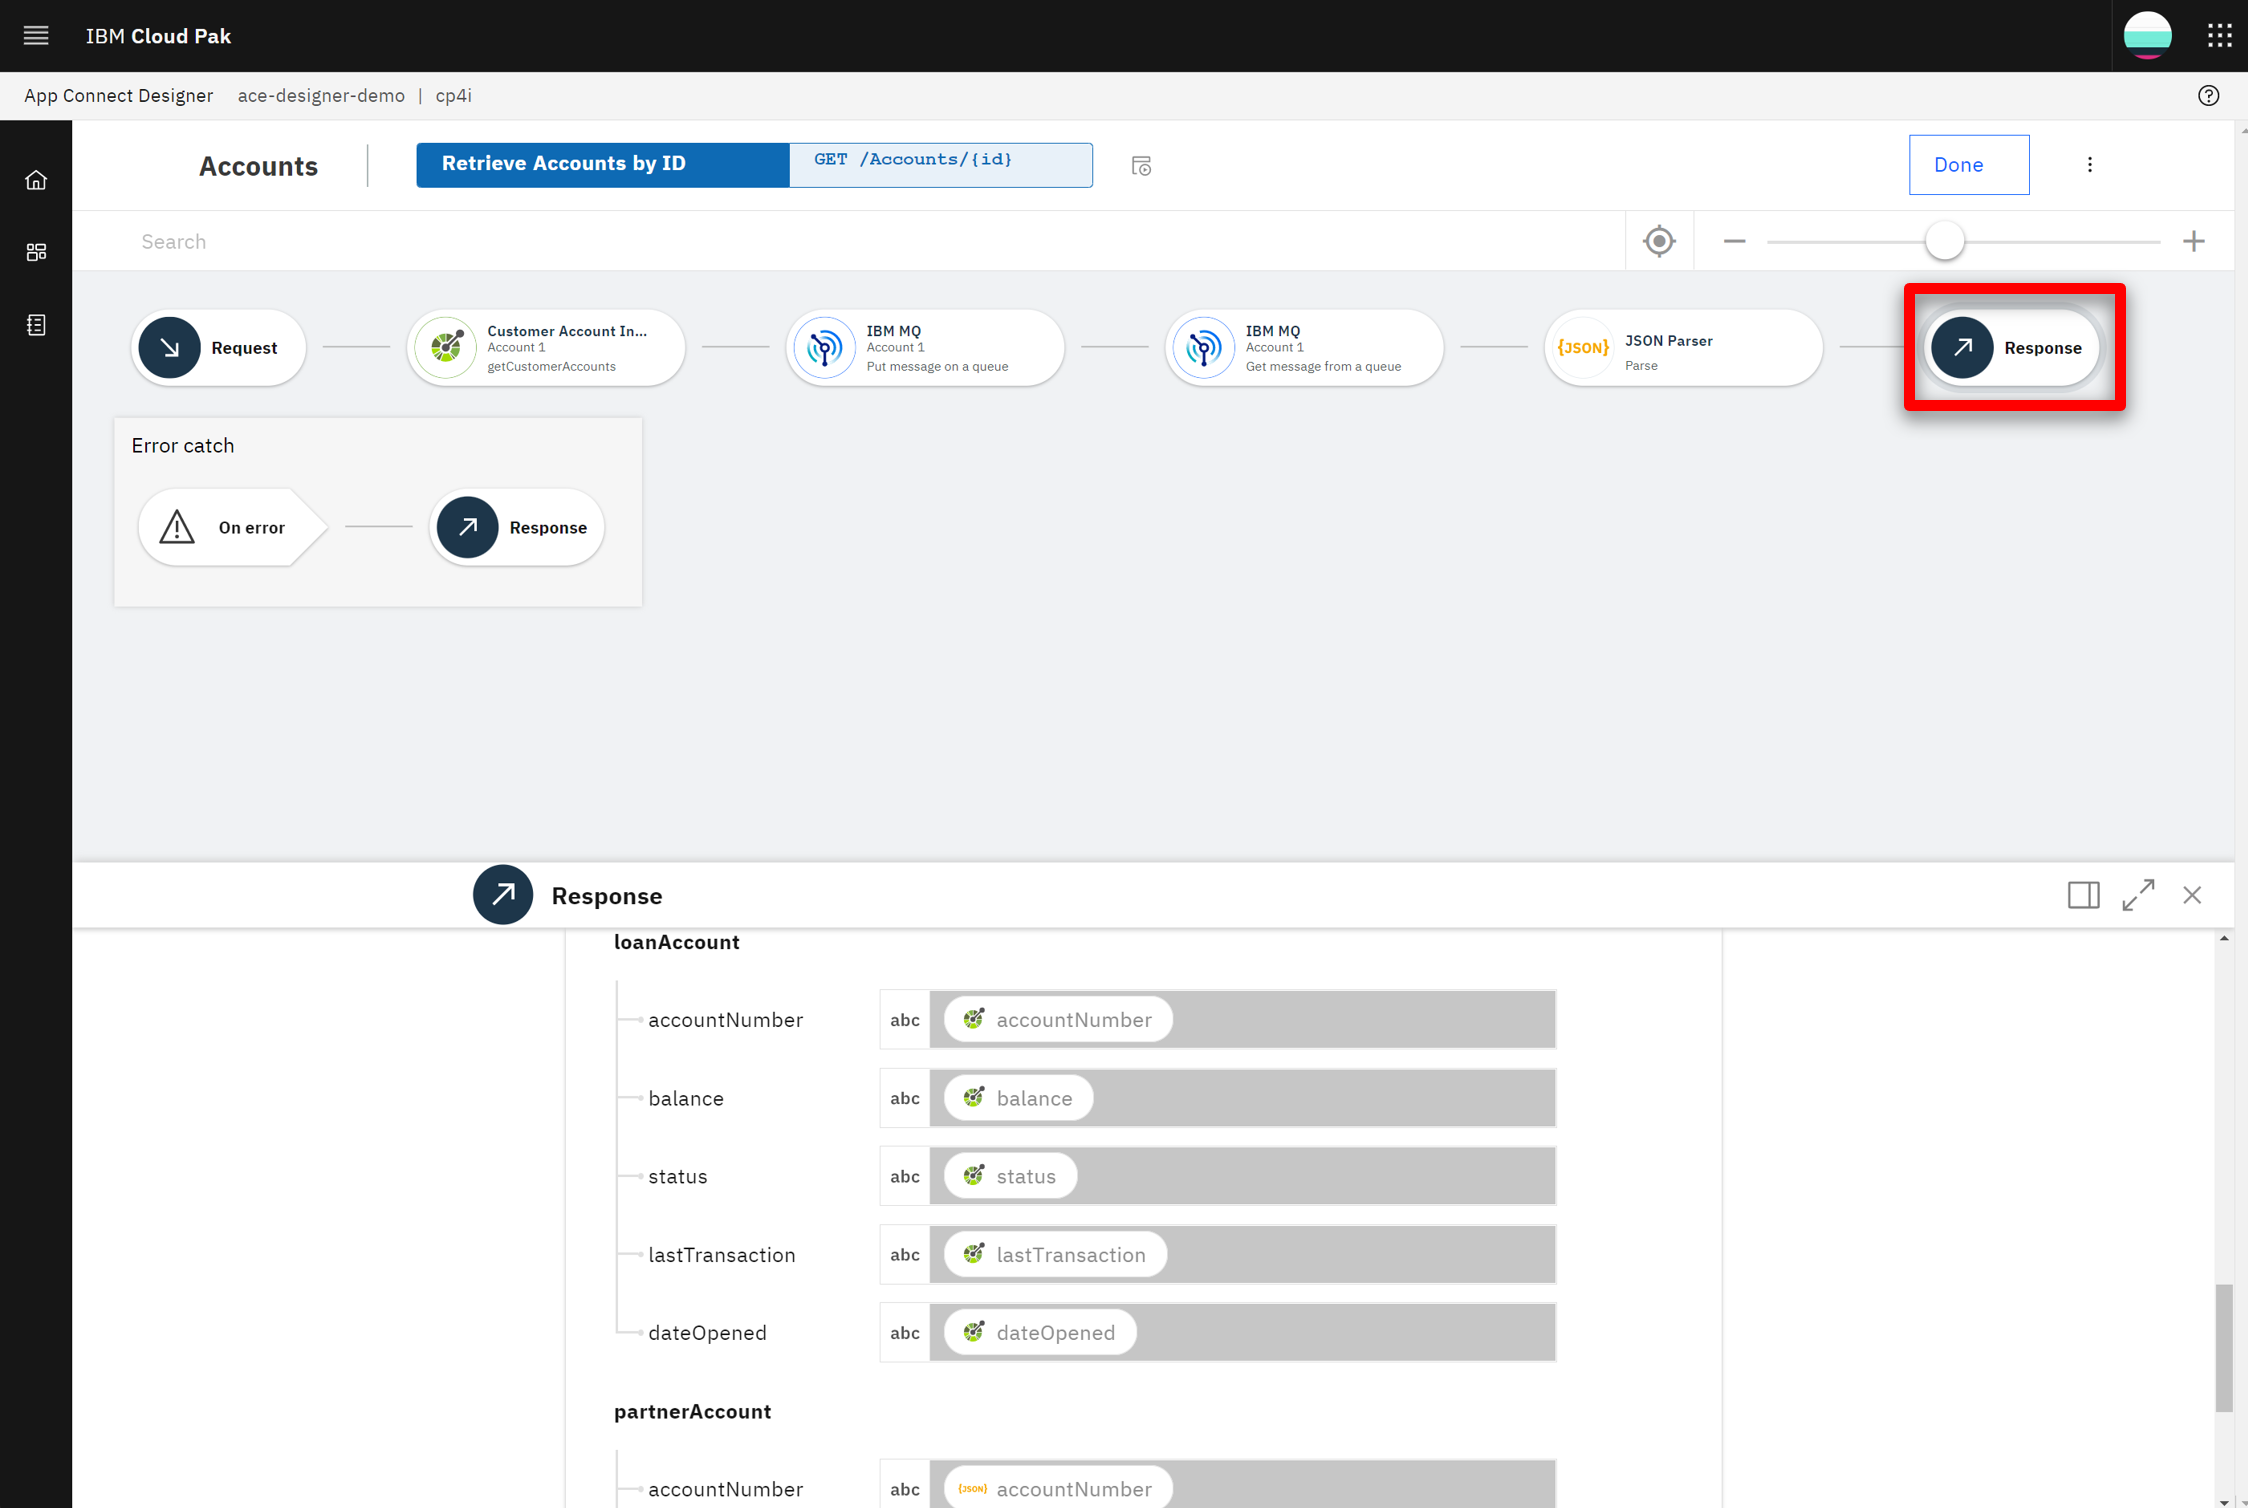 |
| Narration | The response message is created using the data returned from both banks. In the response mapping, Corner Bank’s account details are mapped into the ‘partnerAccount’ section of the response. |
| Action 2.1.12 | Click Done.  |
| 2.2 | Test the flow |
|---|---|
| Narration | APIs can be tested in various ways, and we will perform two different tests: one in the Designer tool now, and another later when our API is called from the workflow. In the ‘Test’ tab, the bank gets all the details to test their API - for example, endpoint and credentials. They can easily test the flow here; they just need to enter a valid customer ID and submit it. They receive the expected response with the combined bank account details, which proves to the bank that the integration works. |
| Action 2.2.1 | Select the Test tab (1). Click GET /Accounts/{customerId} (2) and then Try it (3). 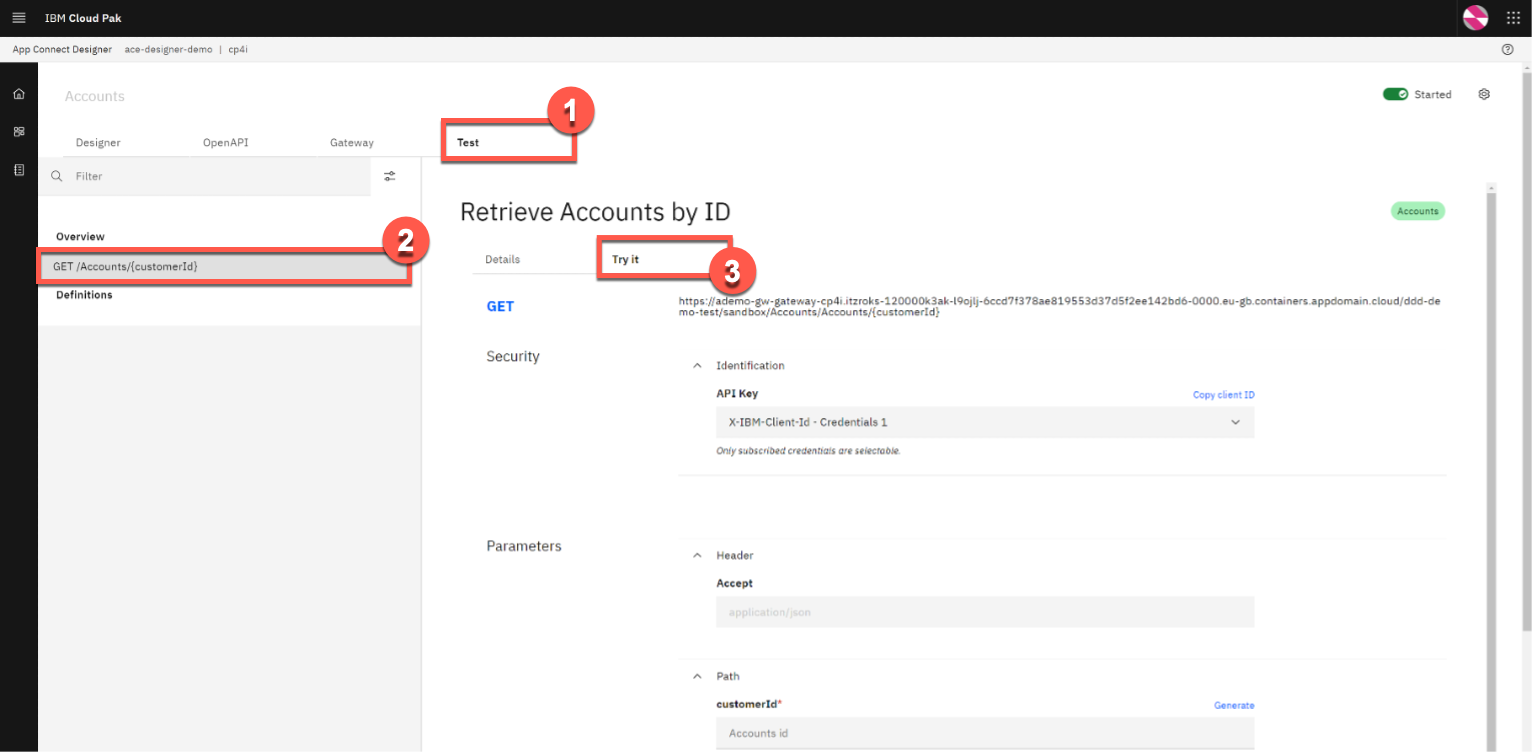 |
| Action 2.2.2 | Enter ‘1234567890’ as the customerId (1), and click Send (2). 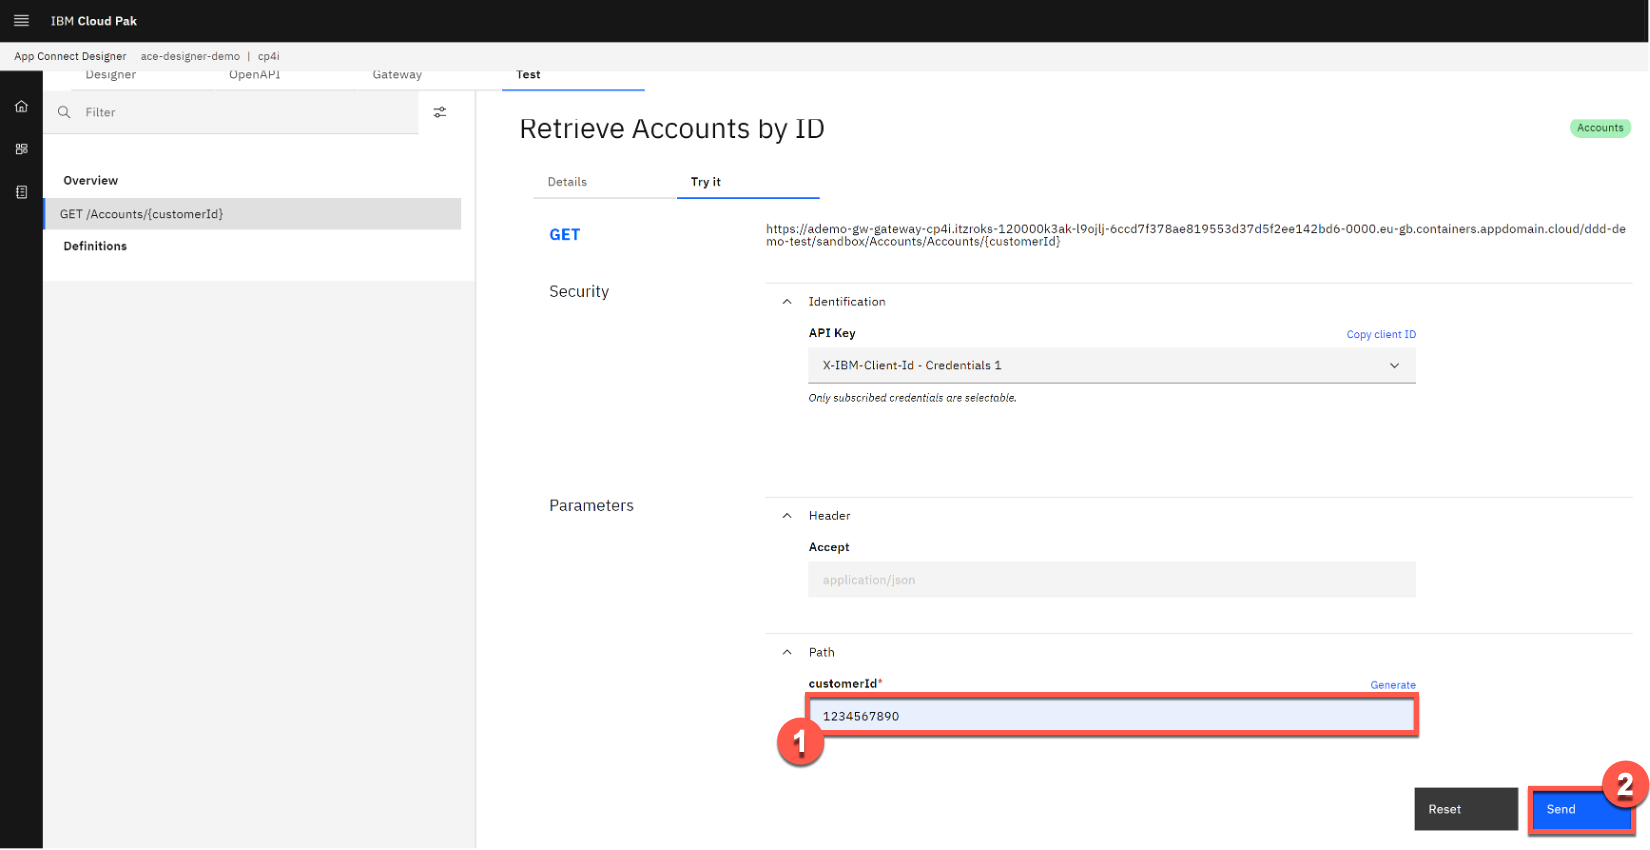 |
| Action 2.2.3 | Point out the Response details, as highlighted in the screenshot below. 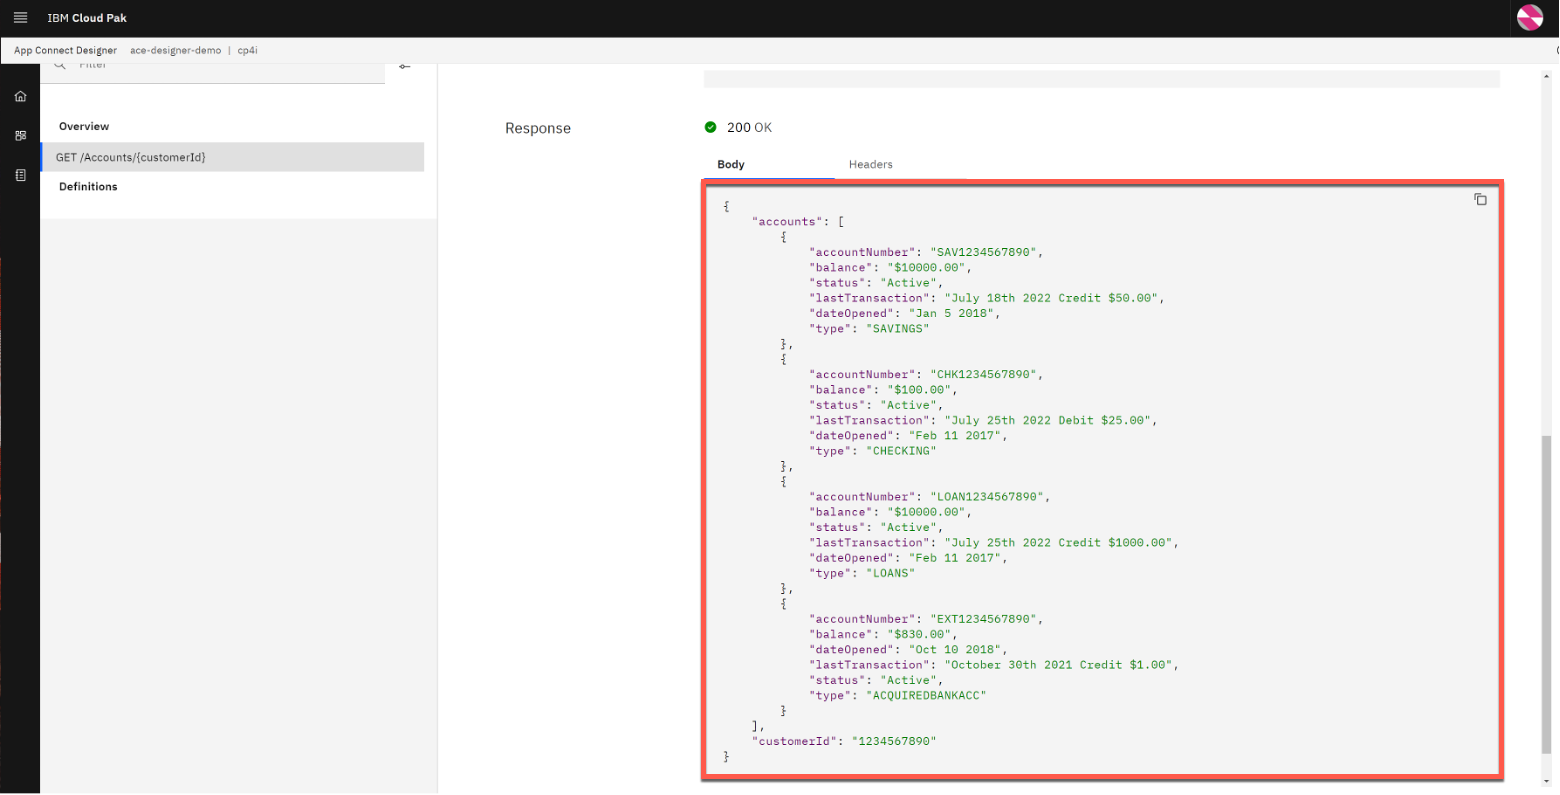 |
| 2.3 | Export the API definition for the Cloud Pak for Business Automation |
|---|---|
| Narration | The accounts API has been tested locally in the Cloud Pak for Integration and the bank is ready to export it to the workflow. It only takes the bank a couple of clicks to export the API definition so it can be consumed by the workflow. |
| Action 2.3.1 | Open the Designer Dashboard (1). Click the Menu icon (2). Click Export (3). 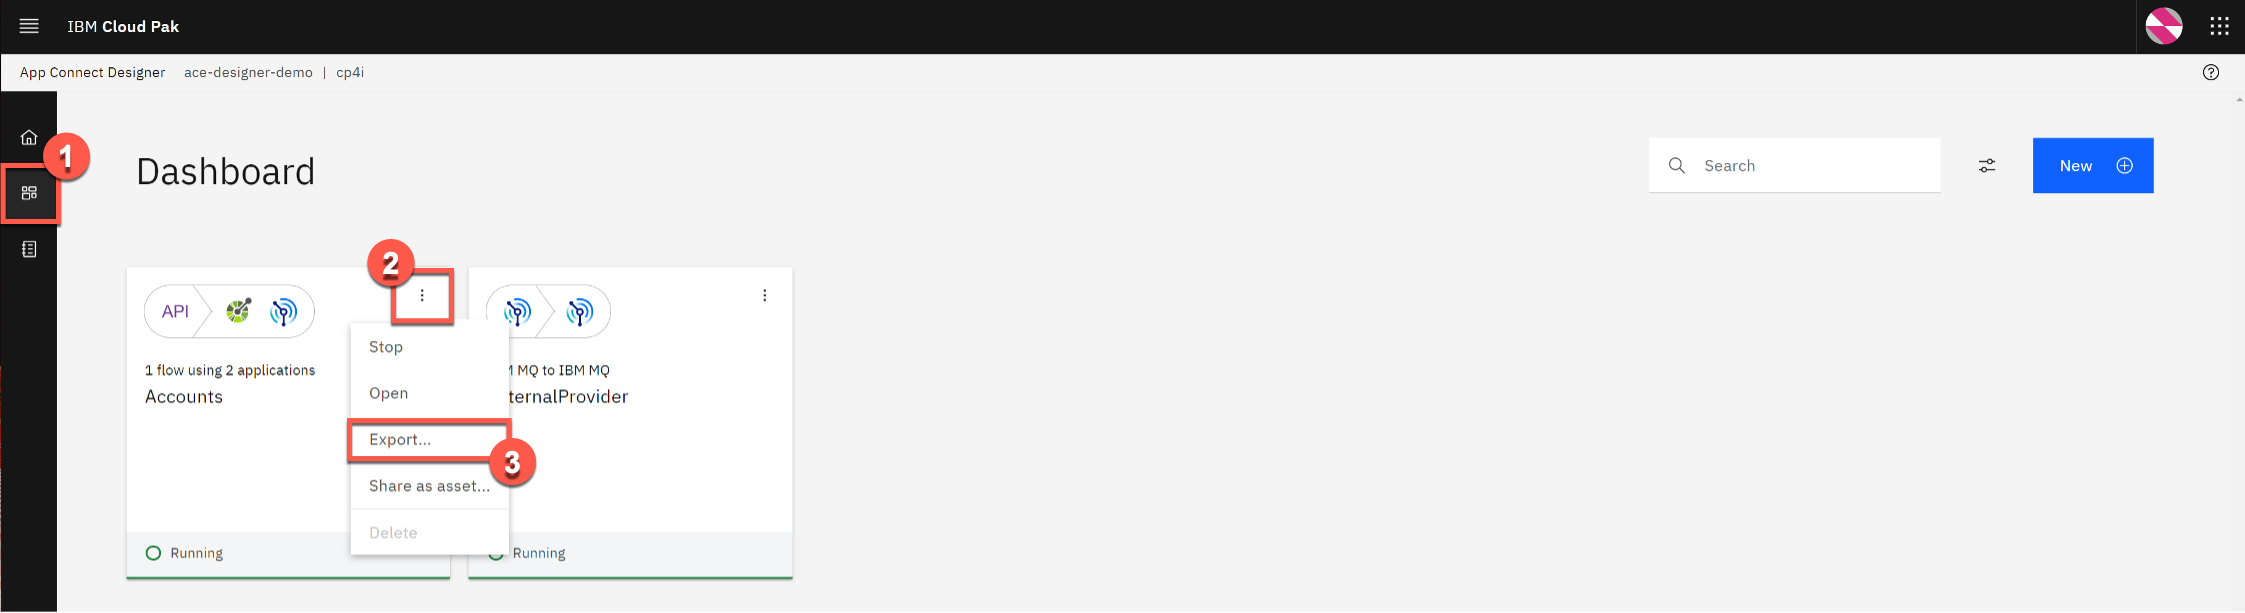 |
| Action 2.3.2 | Select OpenAPI V3.0 (YAML) (1) and click Export (2). 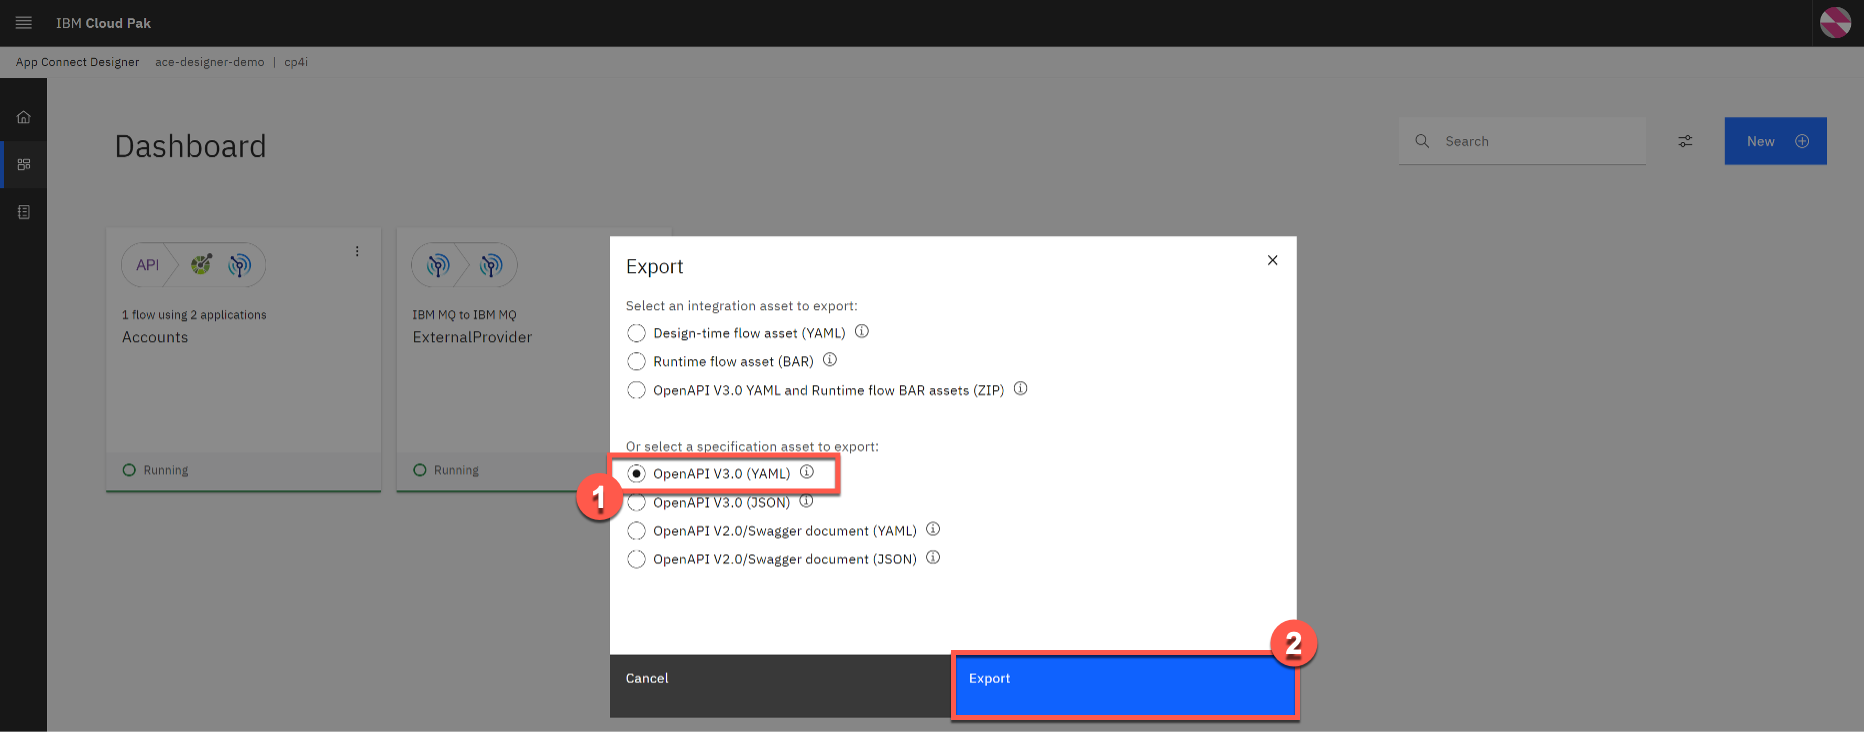 |
3 - Combining integration with workflow to streamline the end-to-end process
| 3.1 | Introduce the workflow process WITH integration |
|---|---|
| Narration | Now let’s look at how the bank incorporates the integration they just built into the workflow in Cloud Pak for Business Automation. |
| Action 3.1.1 | Click Processes (1) and then New Account (Enhanced with Integration) (2) to open the enhanced workflow for the account opening process in Process Designer. 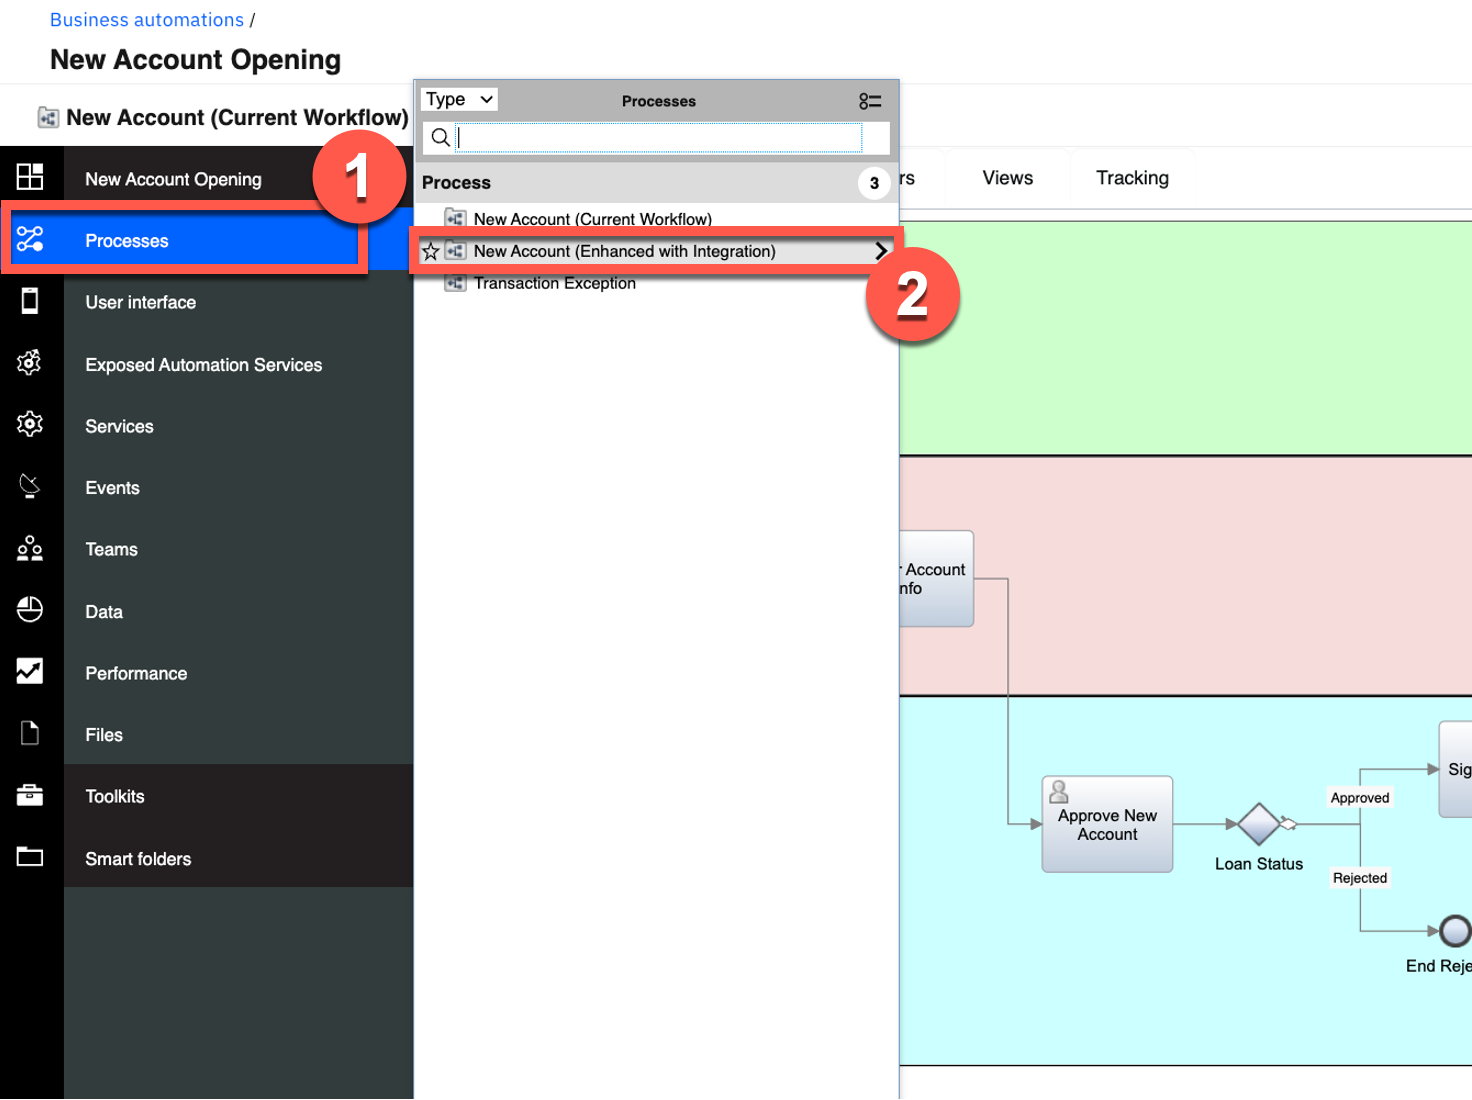 You will see the following process diagram.  |
| Narration | Here’s a new version of the workflow. The middle swim lane has been changed from a human swim lane to a system swim lane. Instead of assigning the Gather Account Info task to an account specialist, the system will now automatically invoke the integration to gather the customer account information. |
| 3.2 | Create the workflow integration service |
|---|---|
| Narration | Using the low-code authoring environment, the bank can easily incorporate the integration into the workflow. The bank uses an external service to call the integration. Let’s see how the bank uses the discovery mechanism in Process Designer to automatically generate the external service component. |
| Action 3.2.1 | Click Services (1). Click the Add icon (2) and then External Service (3).  |
| Narration | The bank connects to the Accounts service using the REST API that was just created in the Cloud Pak for Integration. |
| Action 3.2.2 | Click Next. 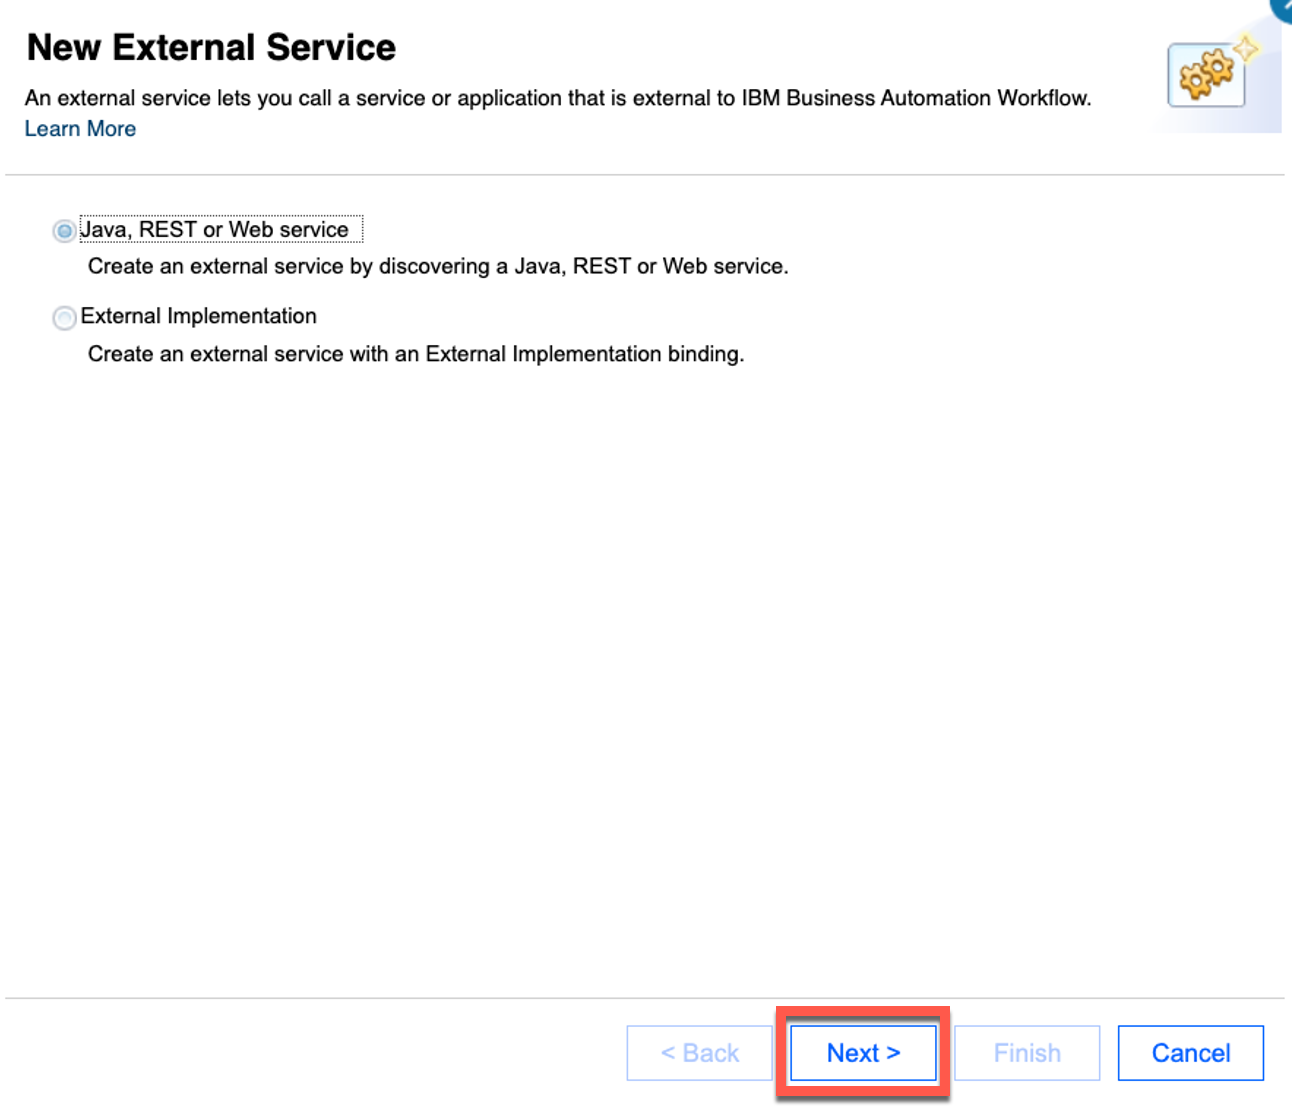 |
| Narration | The bank uses the API definition stored in the OpenAPI (YAML) file to discover the REST service. They’re able to graphically consume the REST service and incorporate it into the workflow without needing to write any code. |
| Action 3.2.3 | Click the File icon (1) and select the Accounts-openapi.yaml file you downloaded during the demo preparation. Click Next (2). 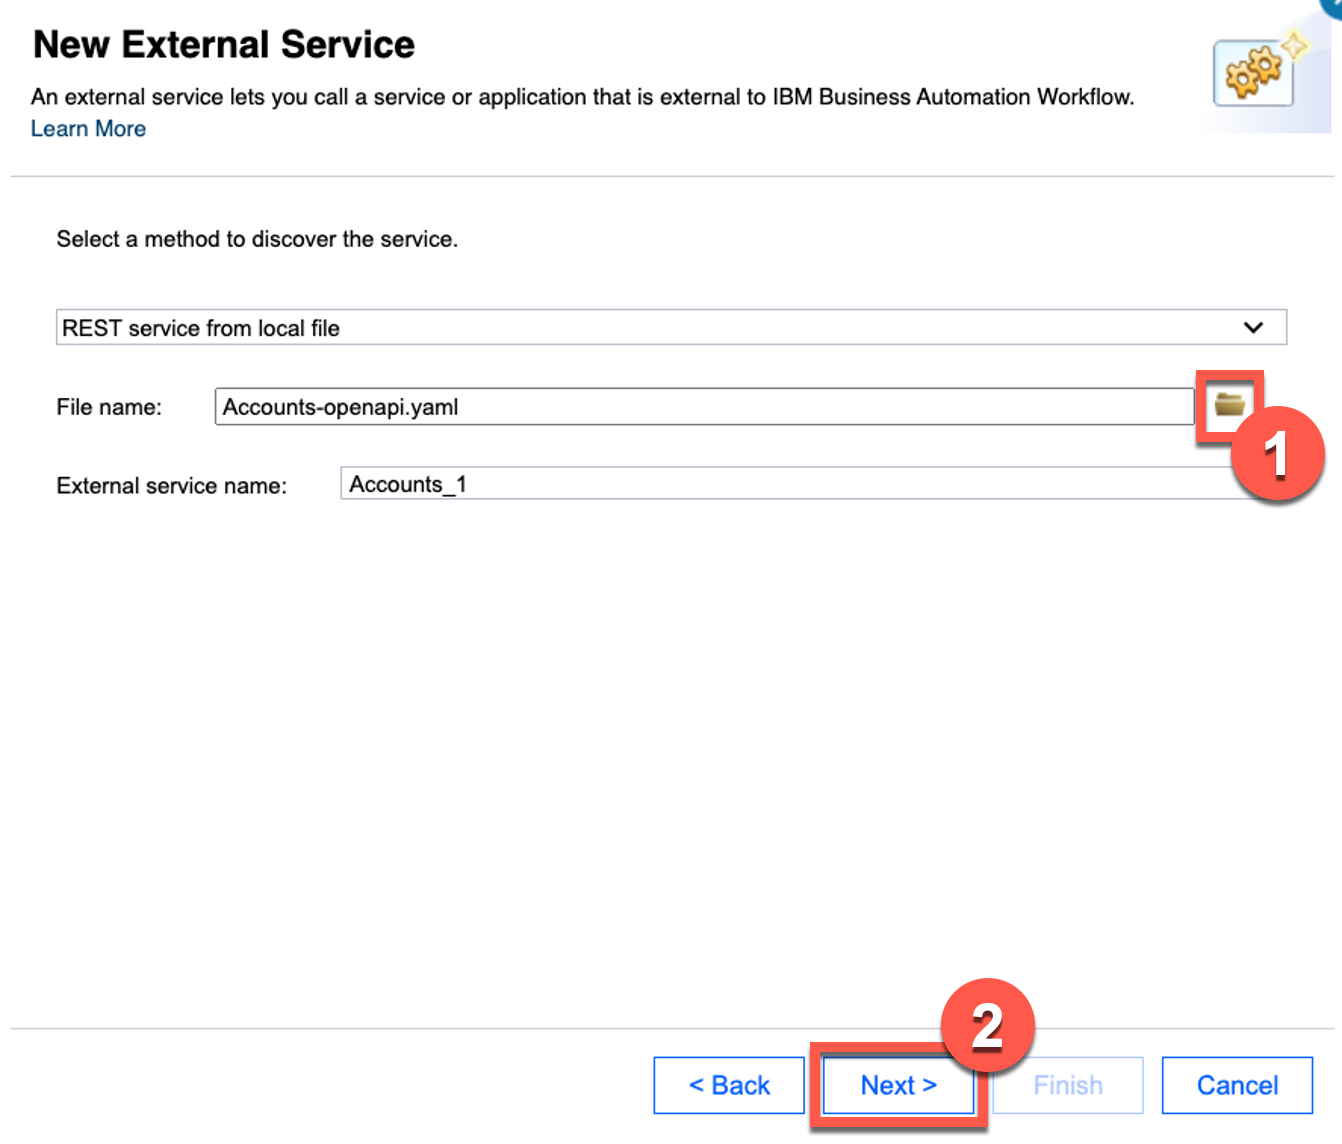 |
| Action 3.2.4 | Click Next to skip over Operations with warnings.  |
| Action 3.2.5 | Click Next. 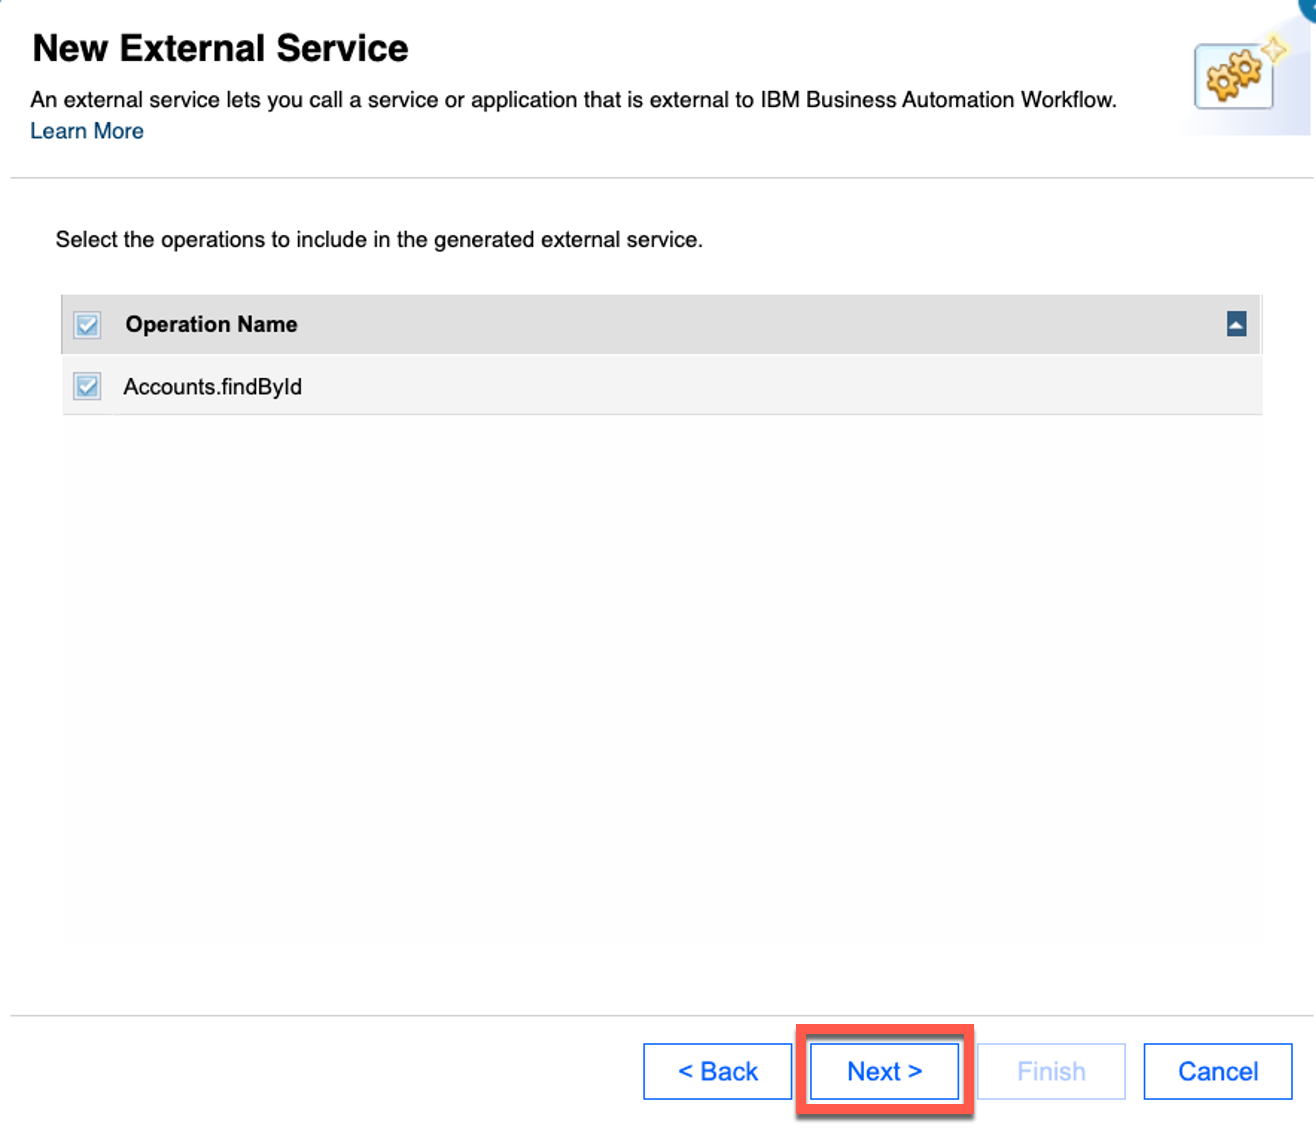 |
| Narration | The operation is automatically discovered. An external service component is automatically generated, which the bank wires into the workflow. The external service is bound to a server containing the information needed to connect to the integration. If any of the inputs and outputs use complex objects, the objects will be automatically generated and inserted into the workflow library. |
| Action 3.2.6 | Click Cancel. 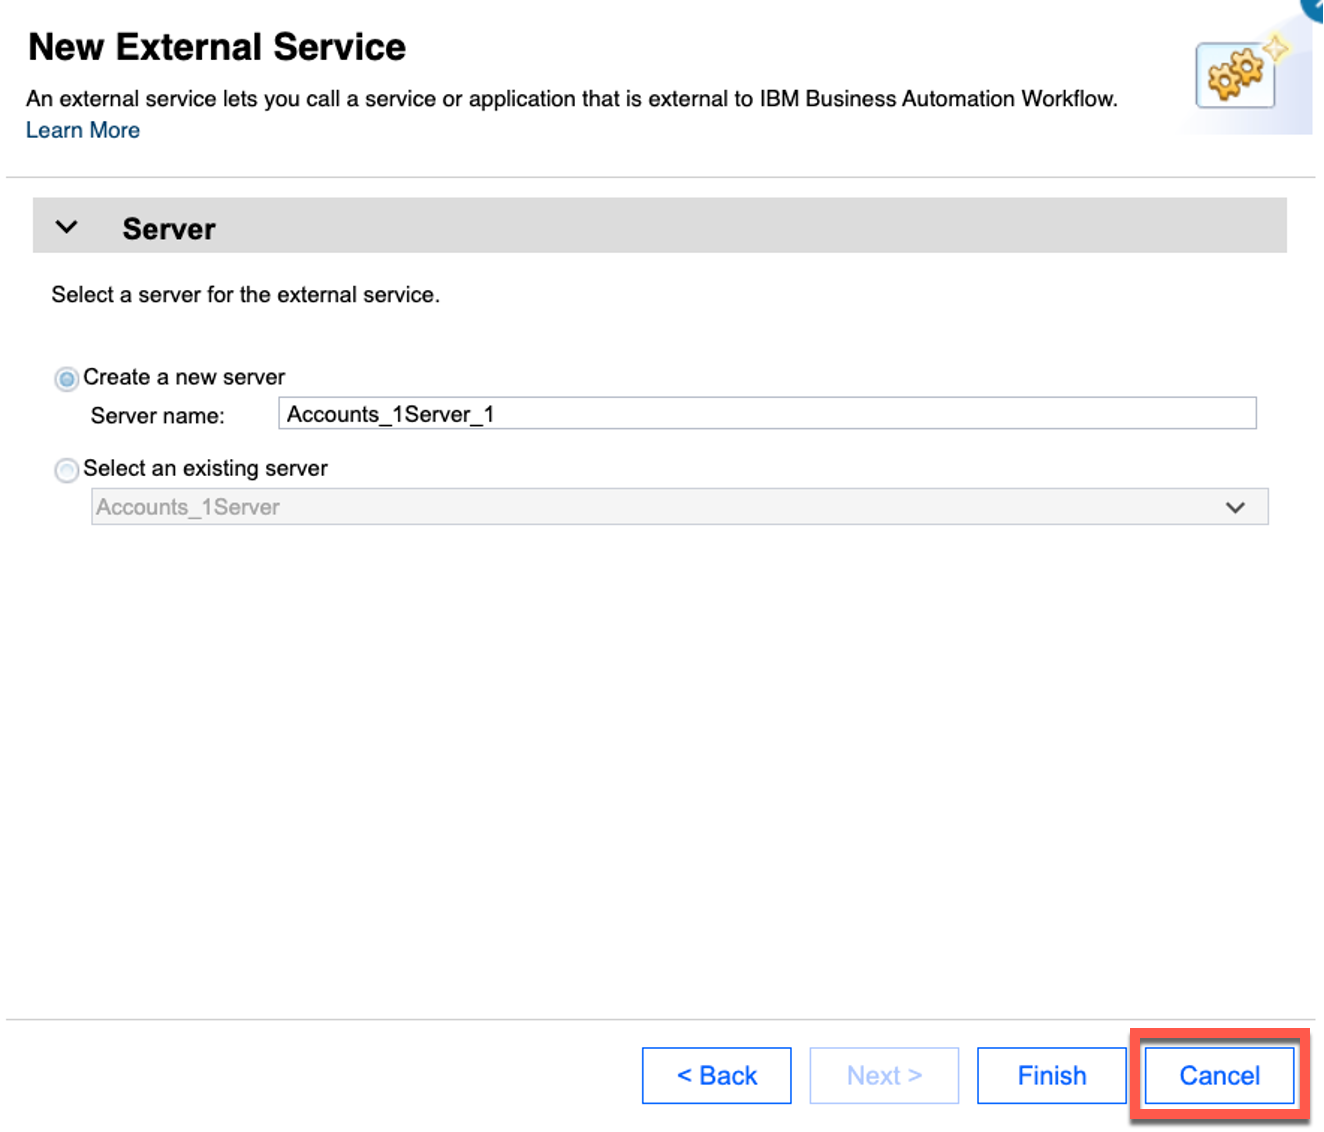 |
| Narration | We’ll cancel the wizard since the external service was already created in the process library. |
| Action 3.2.7 | Click the existing external service named Accounts in the process library to show the external service that was previously generated. 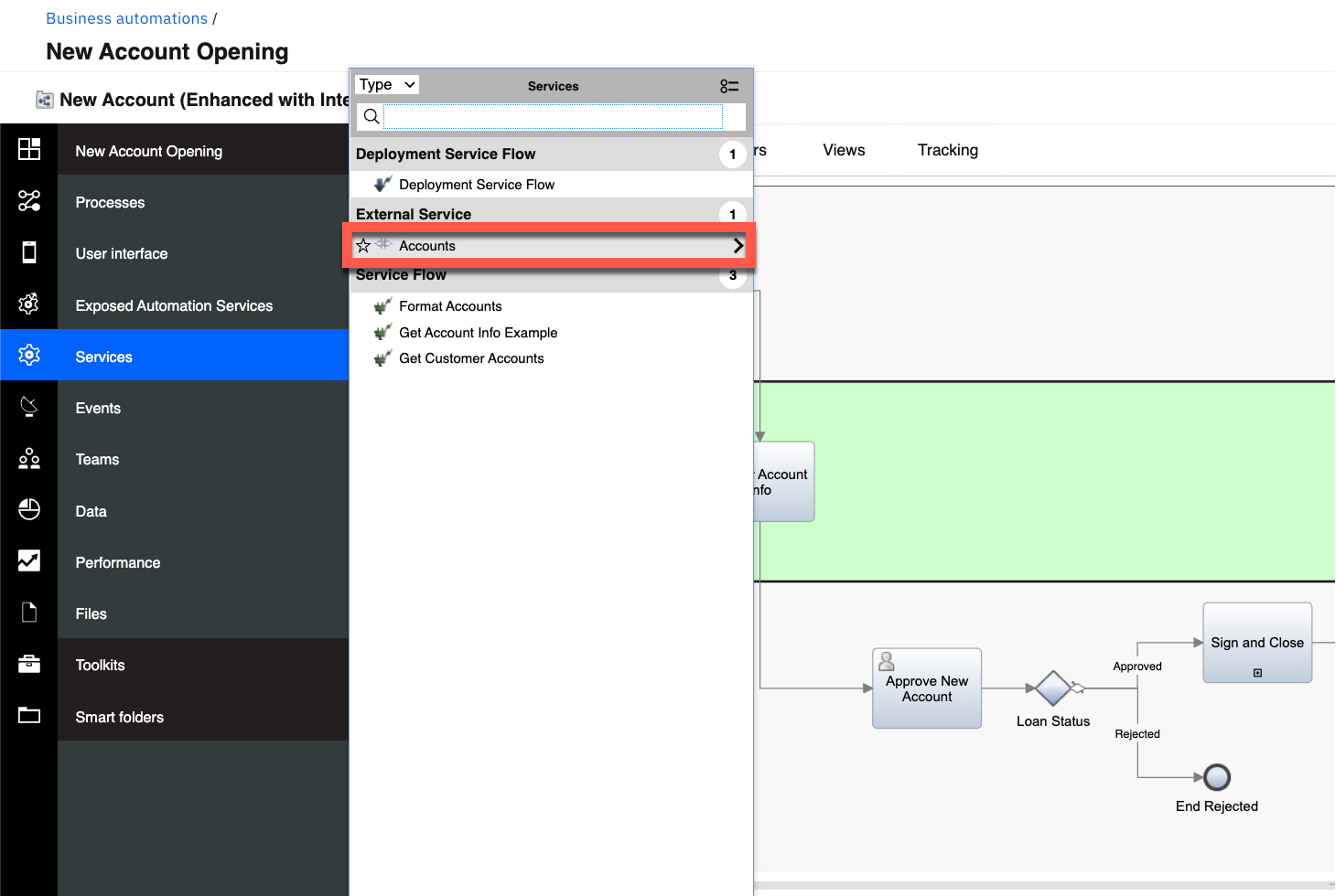 You will see the following screen. 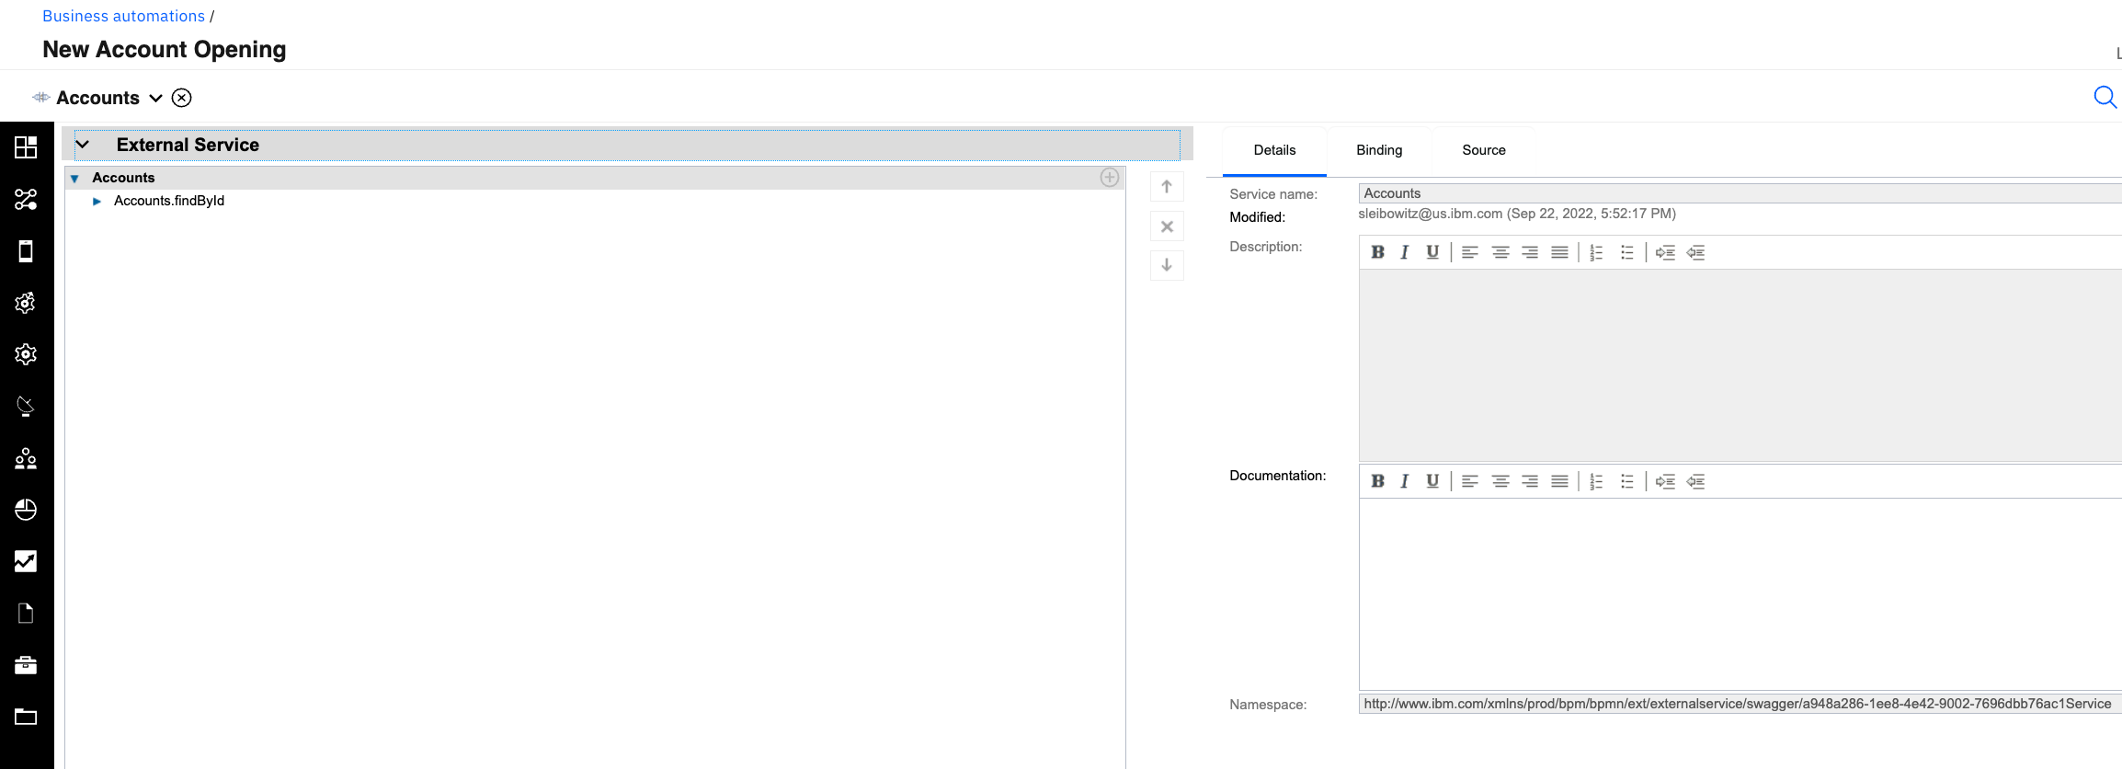 |
| Narration | This is the external service that was automatically generated. The input of the REST call is the customerId of type string and the output is the account info of type Accounts. The complex type Accounts was automatically created. |
| Action 3.2.8 | Click the Arrow icons next to Accounts, Accounts.findByld, Input, and Output (1) to show the inputs and outputs. Click the output Accounts_findById and show that the output is a complex object (2). 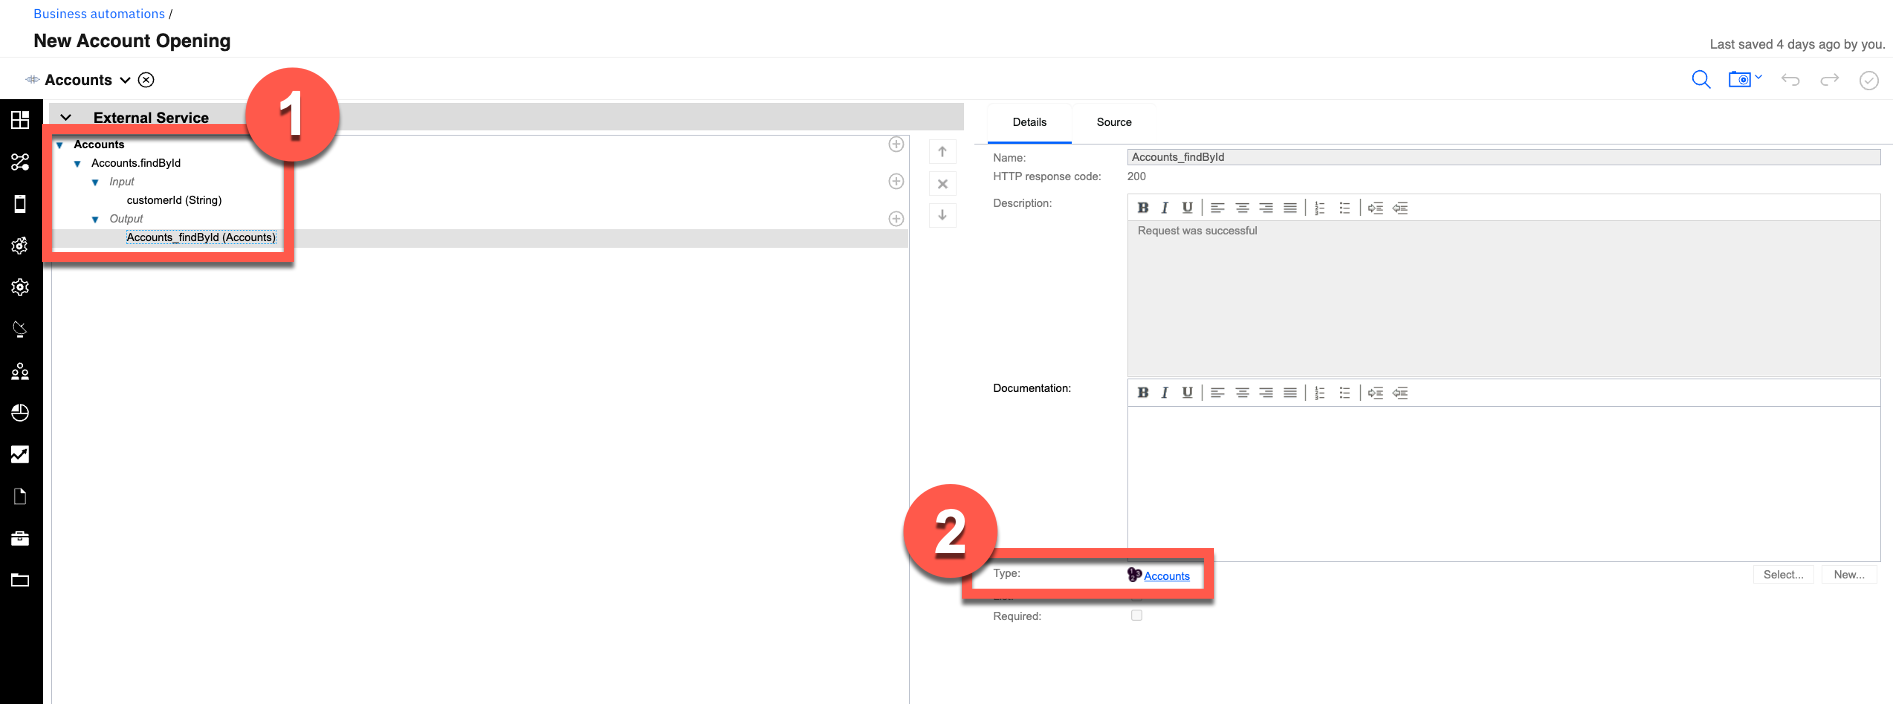 |
| Narration | The bank is now ready to use the integration in the workflow. They wire it into the first step of the process, so the customer account info will be automatically gathered in real time. Let’s go back to the workflow definition. |
| Action 3.2.9 | Click Processes (1) and then New Account (Enhanced with Integration) (2) to re-open the enhanced workflow for the account opening process in Process Designer.  You will see the following process diagram. 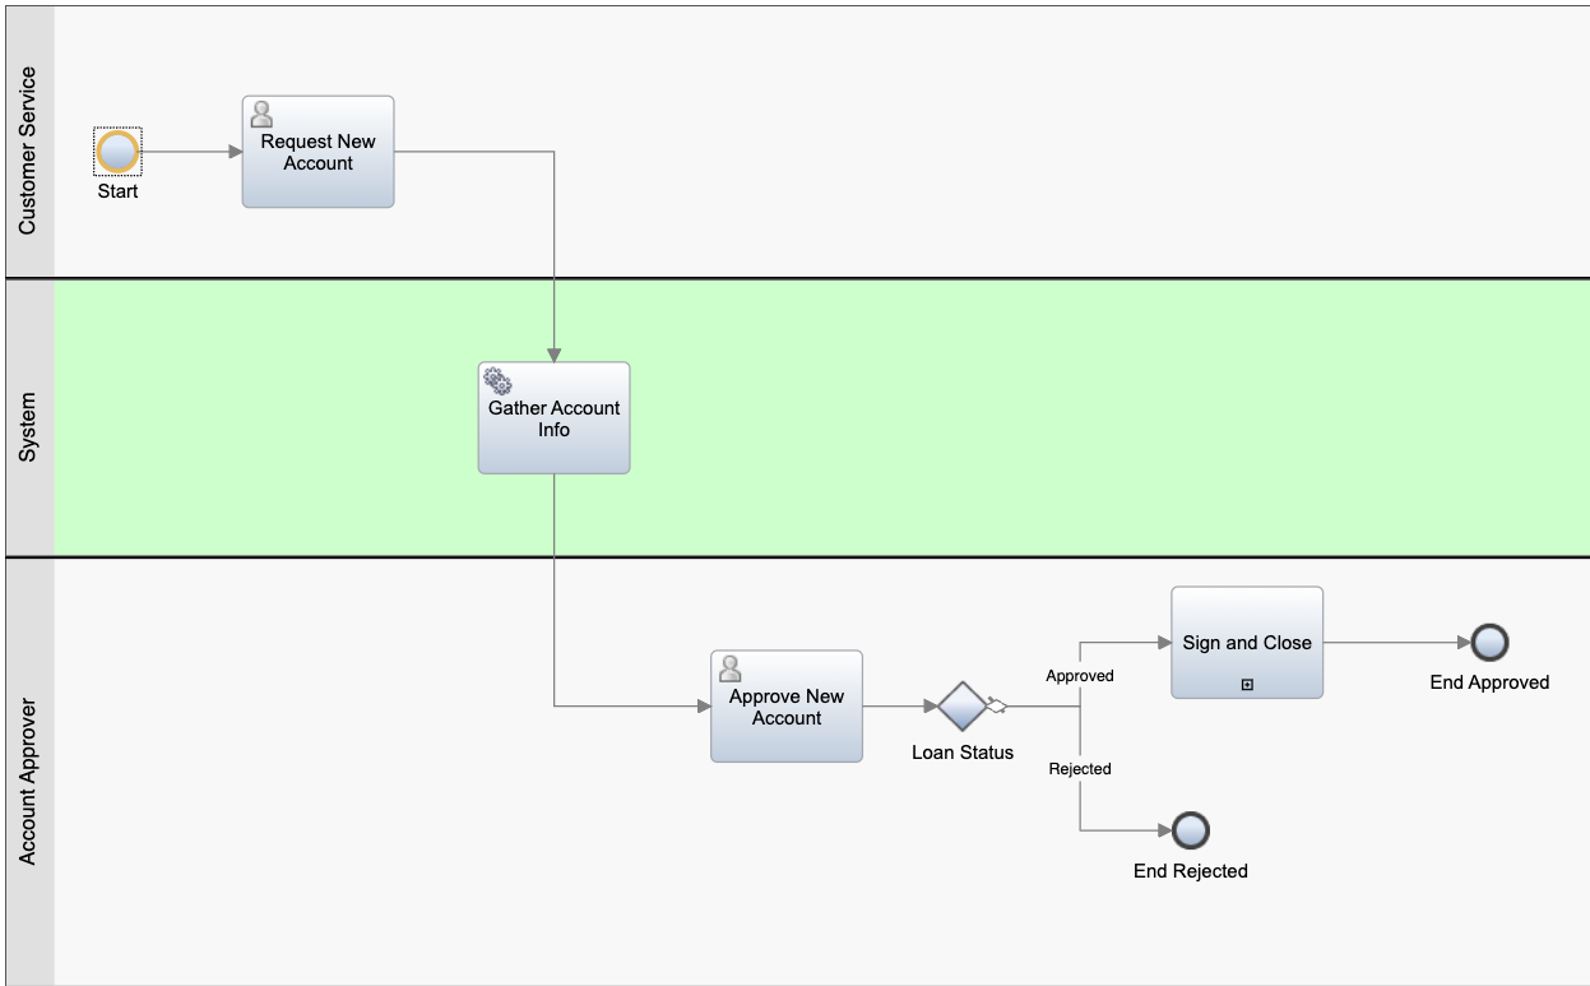 |
| Narration | Next, the bank implements a workflow activity to invoke the REST call. Note that the Gather Account Info activity is in the System swim lane, meaning it will be automatically executed. |
| Action 3.2.10 | Click the Gather Account Info activity (1) to display the property sheets below. At the bottom of the General tab, under Implementation, click New (2). 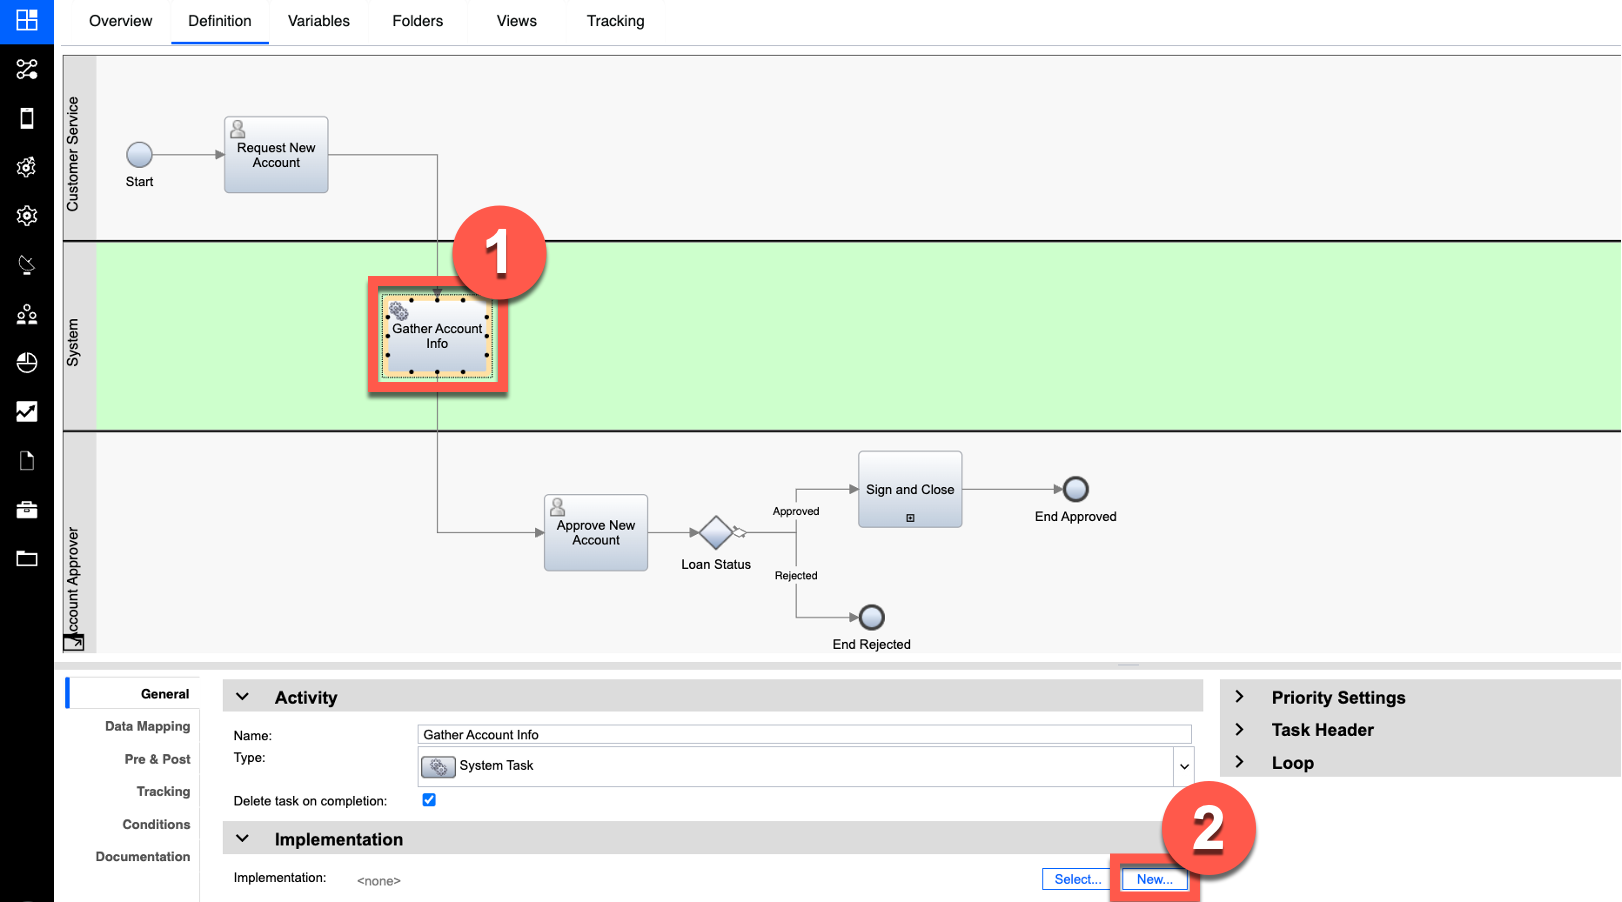 |
| Action 3.2.11 | Name the new service ‘Get Customer Accounts’ (1). Click Finish (2). 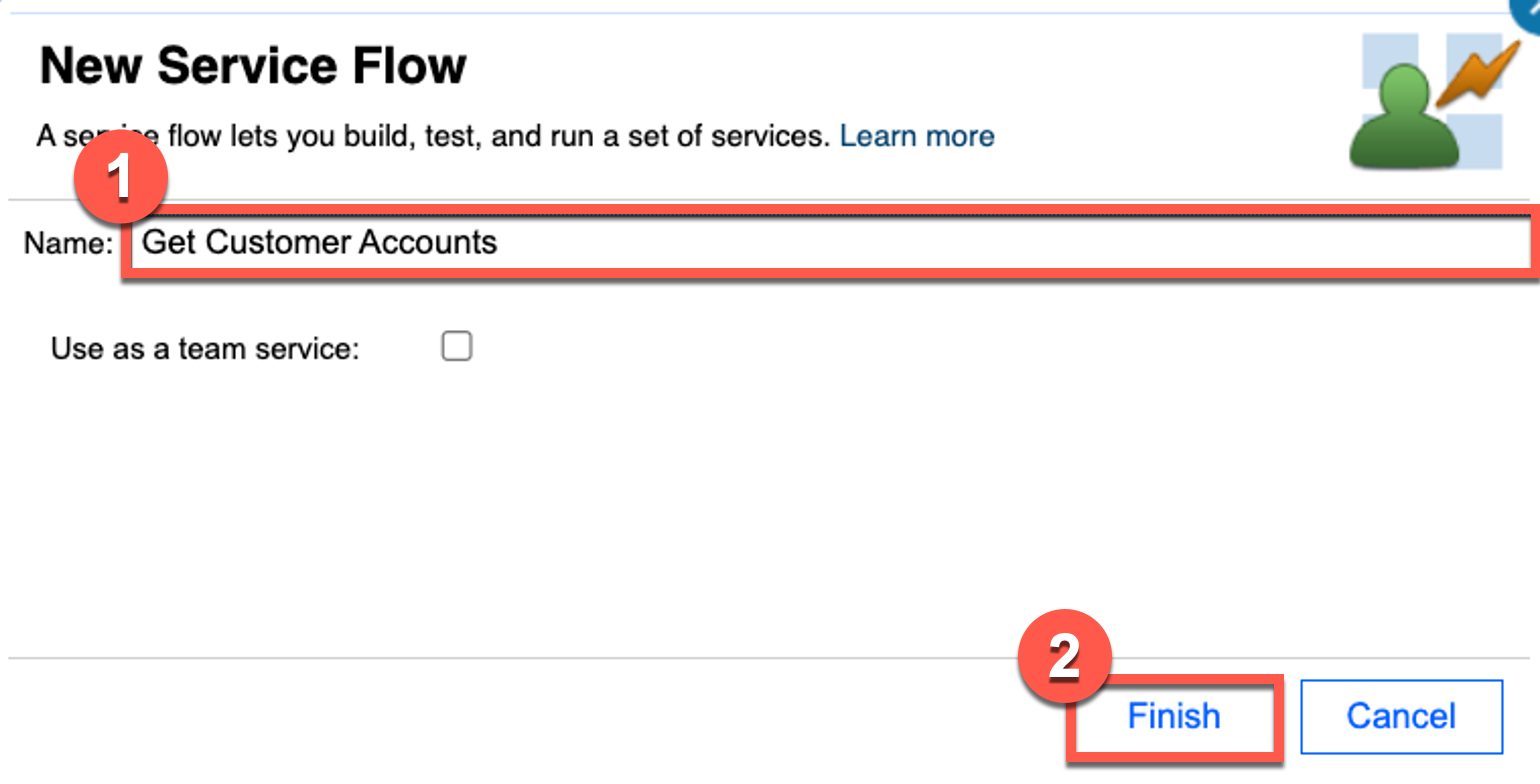 |
| Narration | Next, they drag the external service into the service flow. |
| Action 3.2.12 | From the process library, click Services (1). Under External Service, drag Accounts (2) into the new service definition (3). 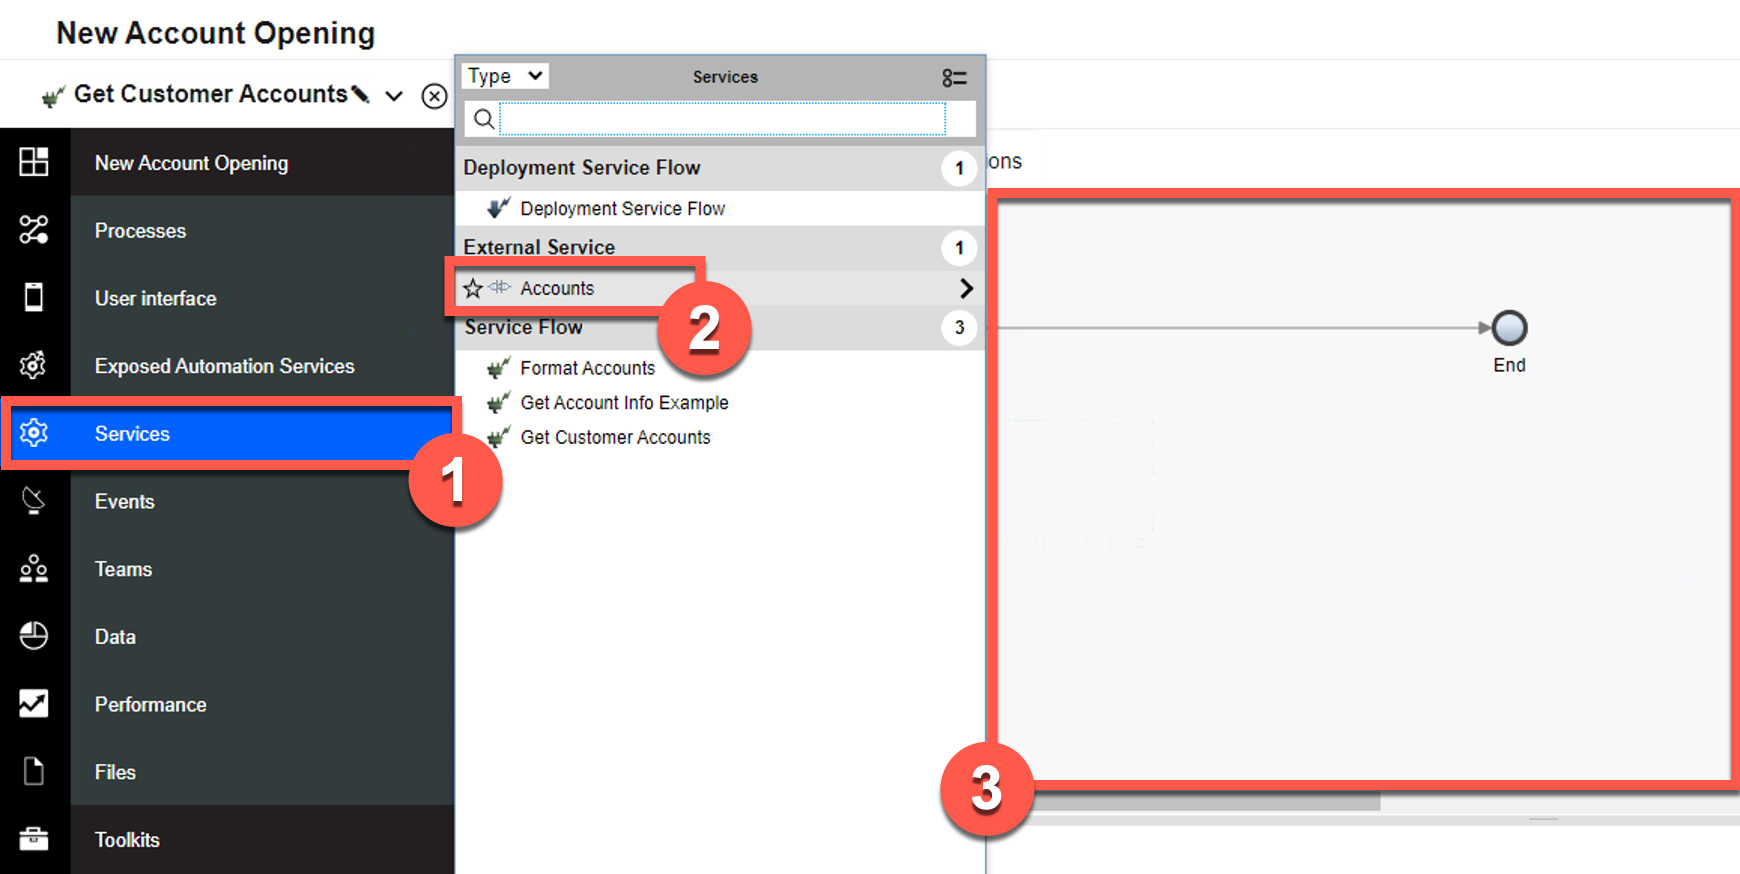 |
| Action 3.2.13 | To wire Accounts into the service flow, move the arrow at the end of the flow (1) so it connects Start to Accounts (2). 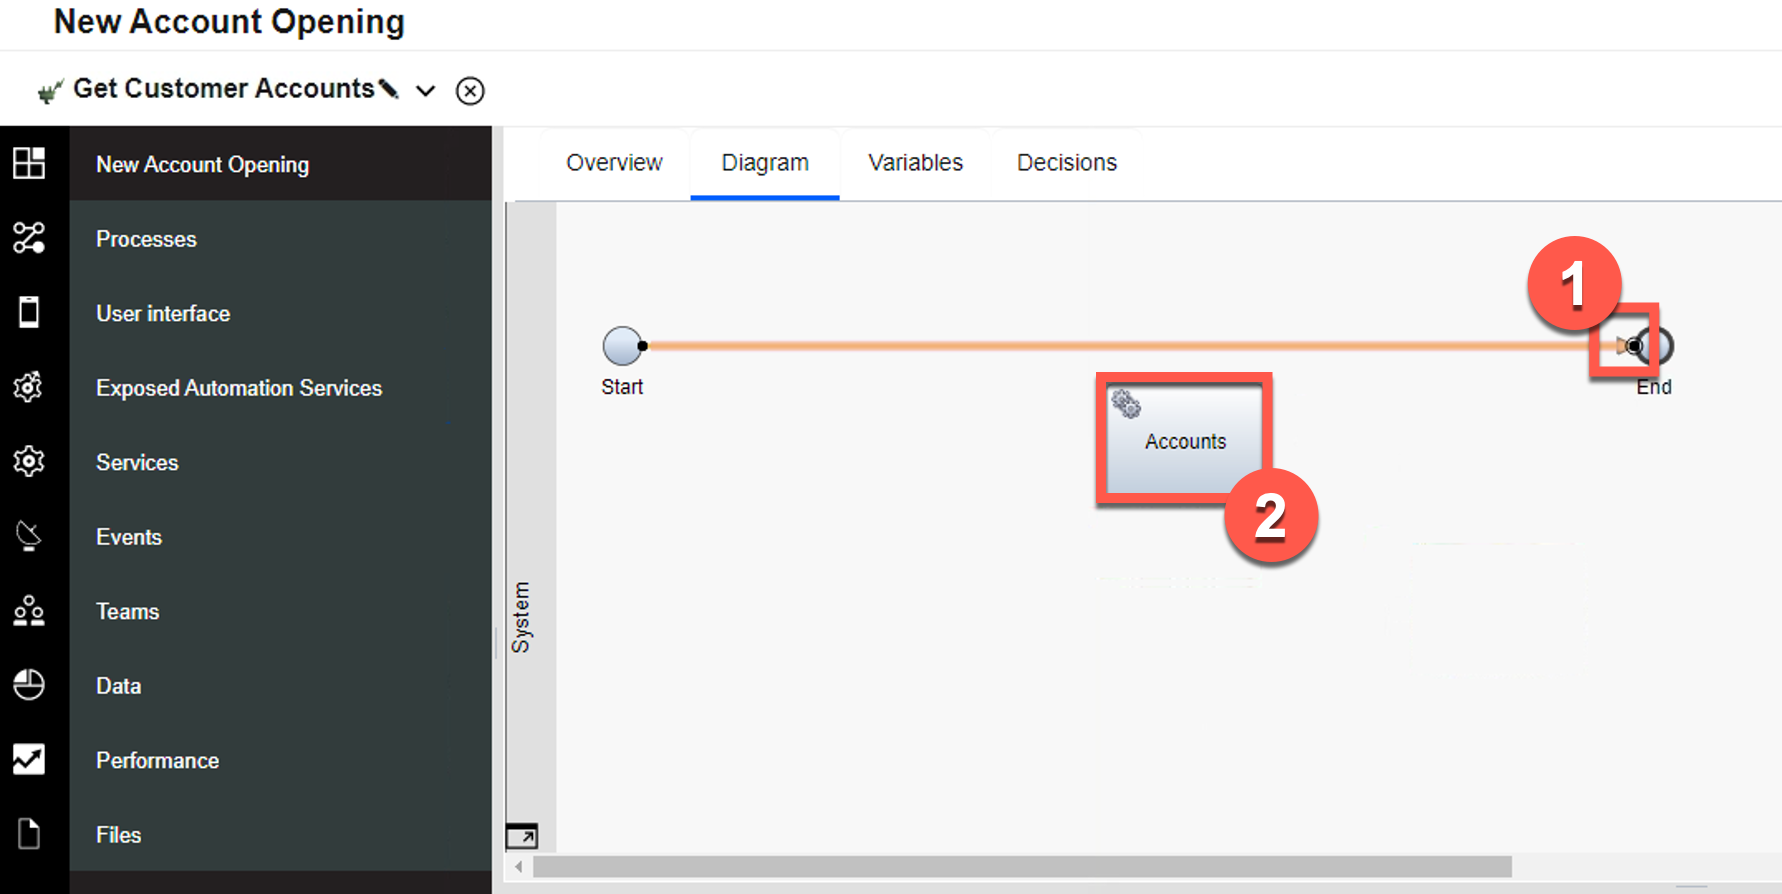 The service flow will now look like this: 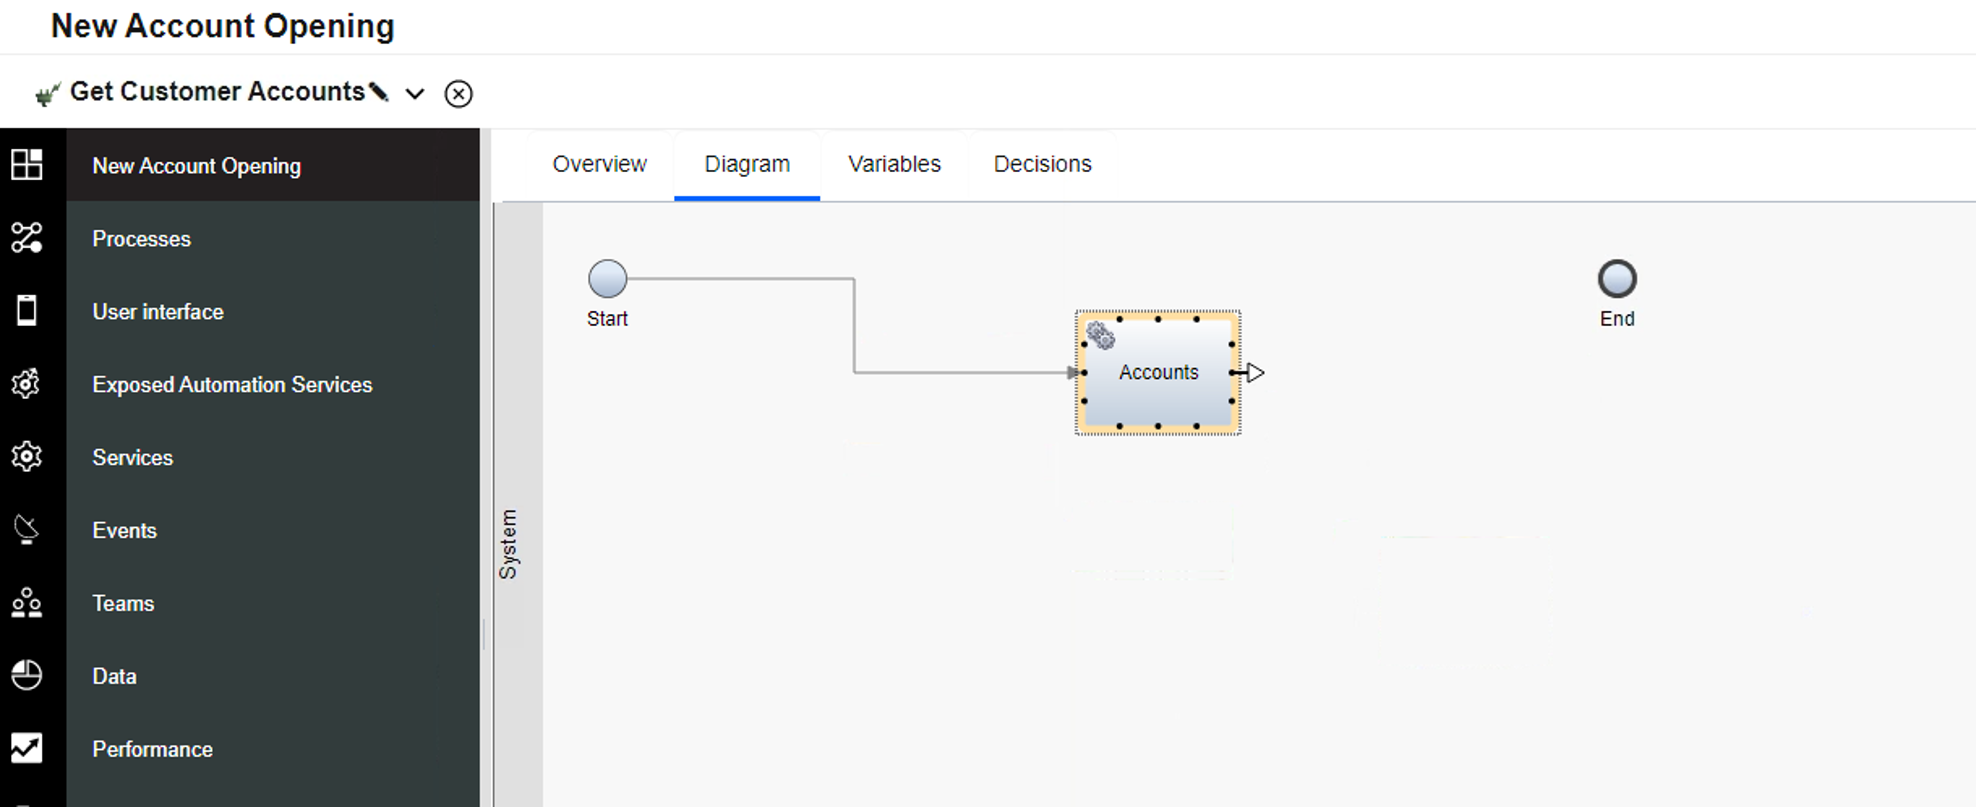 |
| Action 3.2.14 | Draw a new arrow from Accounts (1) to the End component (2). 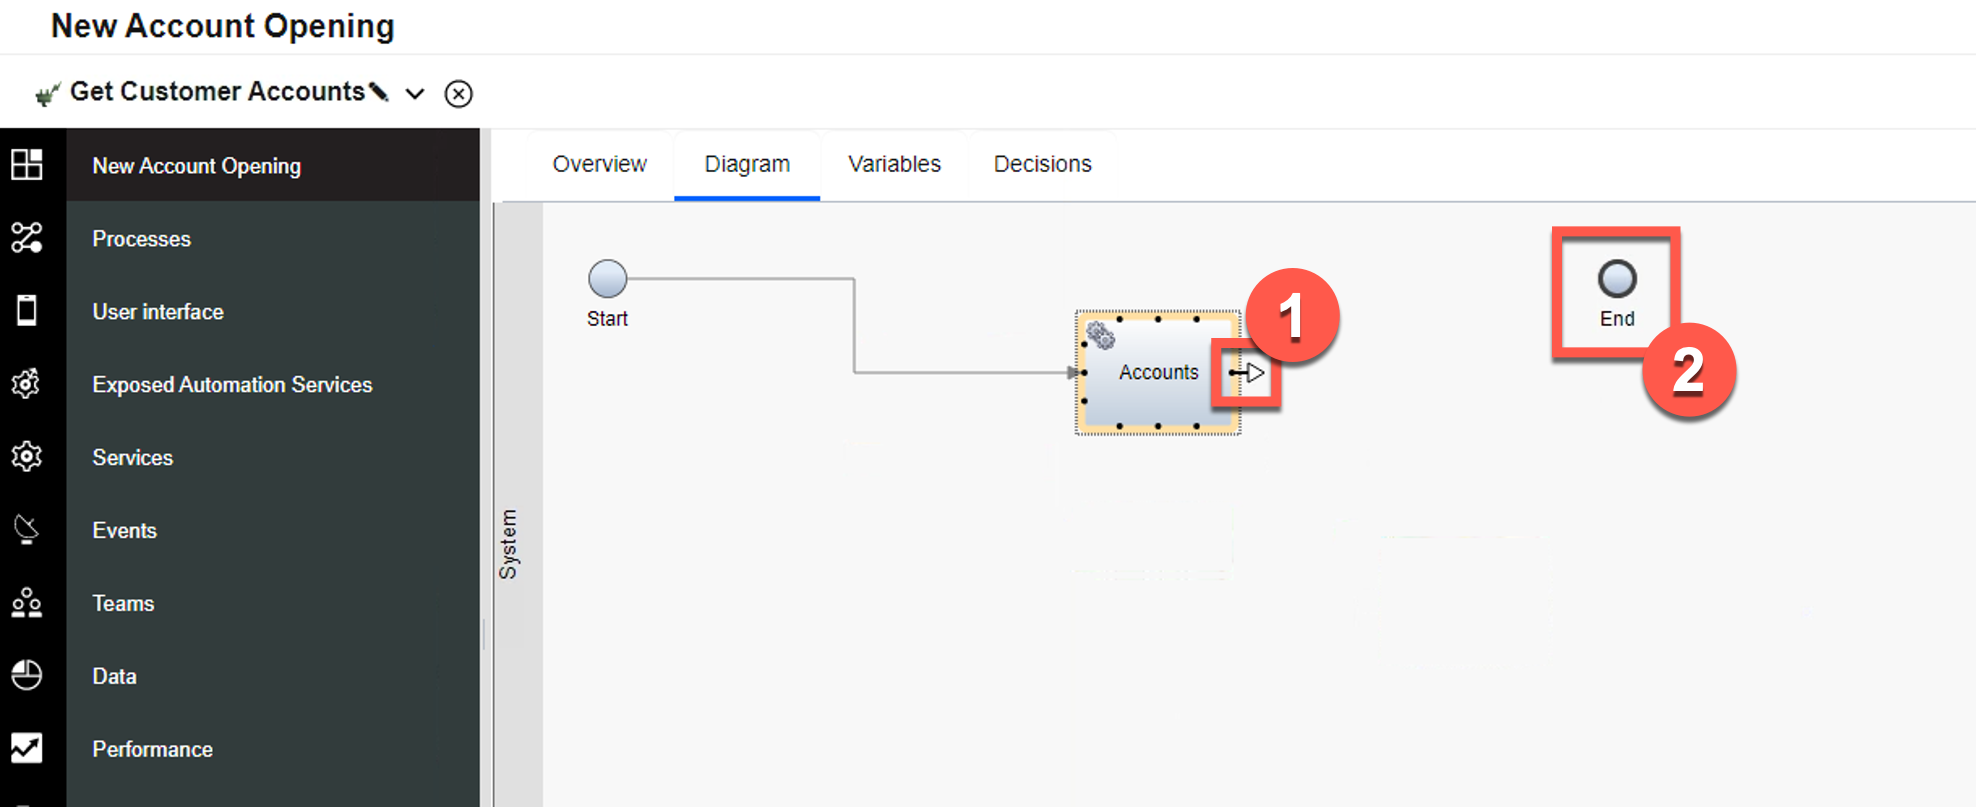 The service flow will now look like this: 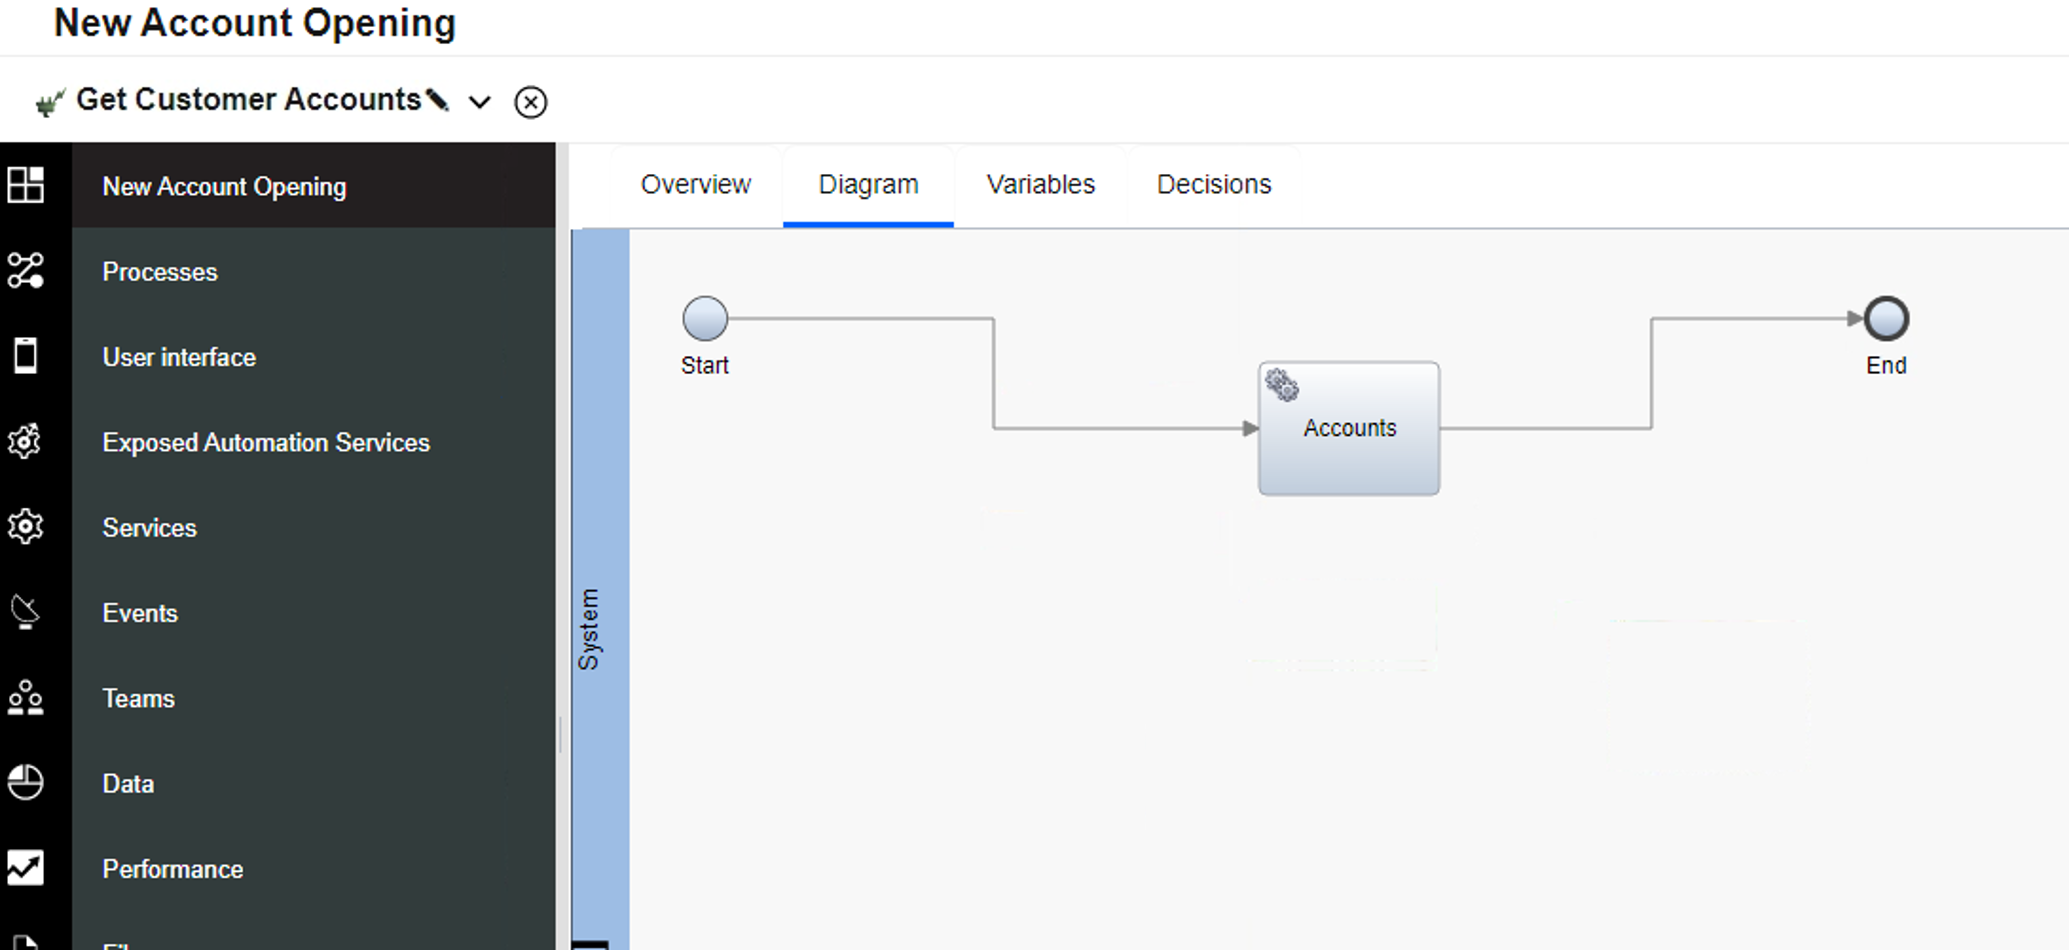 |
| Action 3.2.15 | Right-click on the canvas, and select Layout diagram. 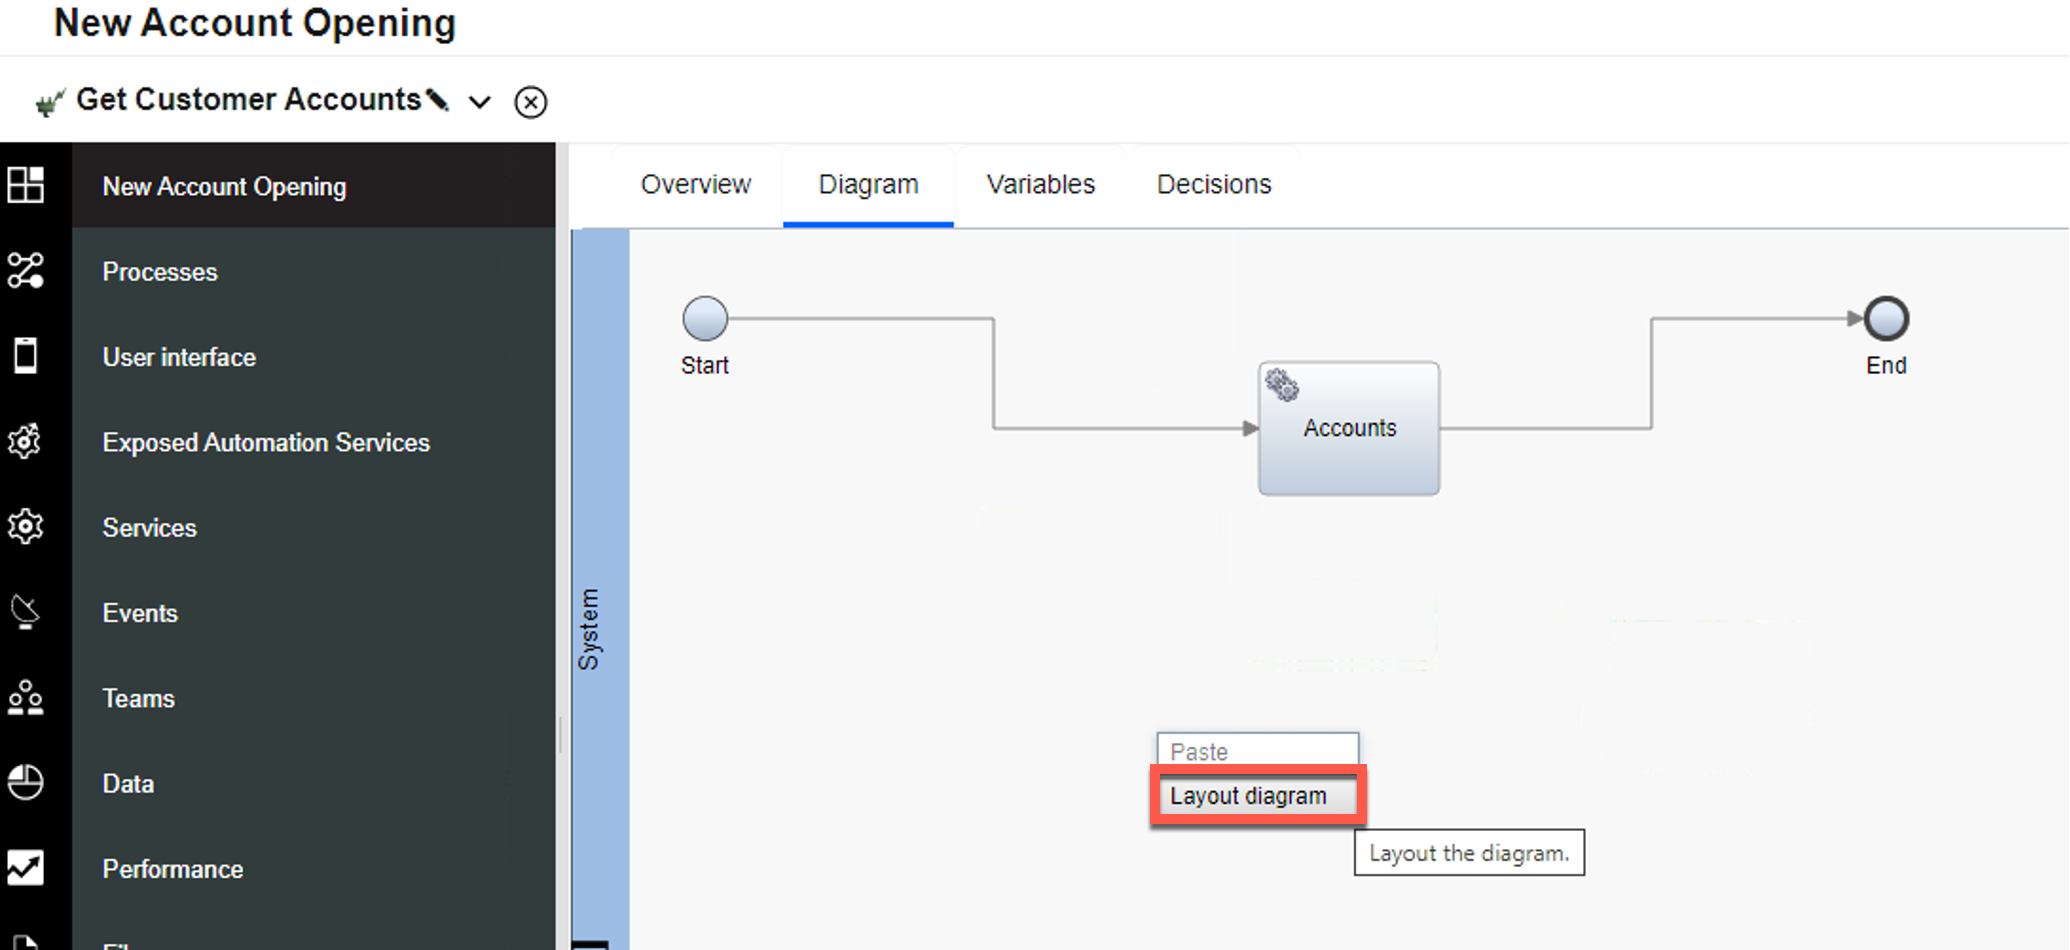 The service flow will now look like this: 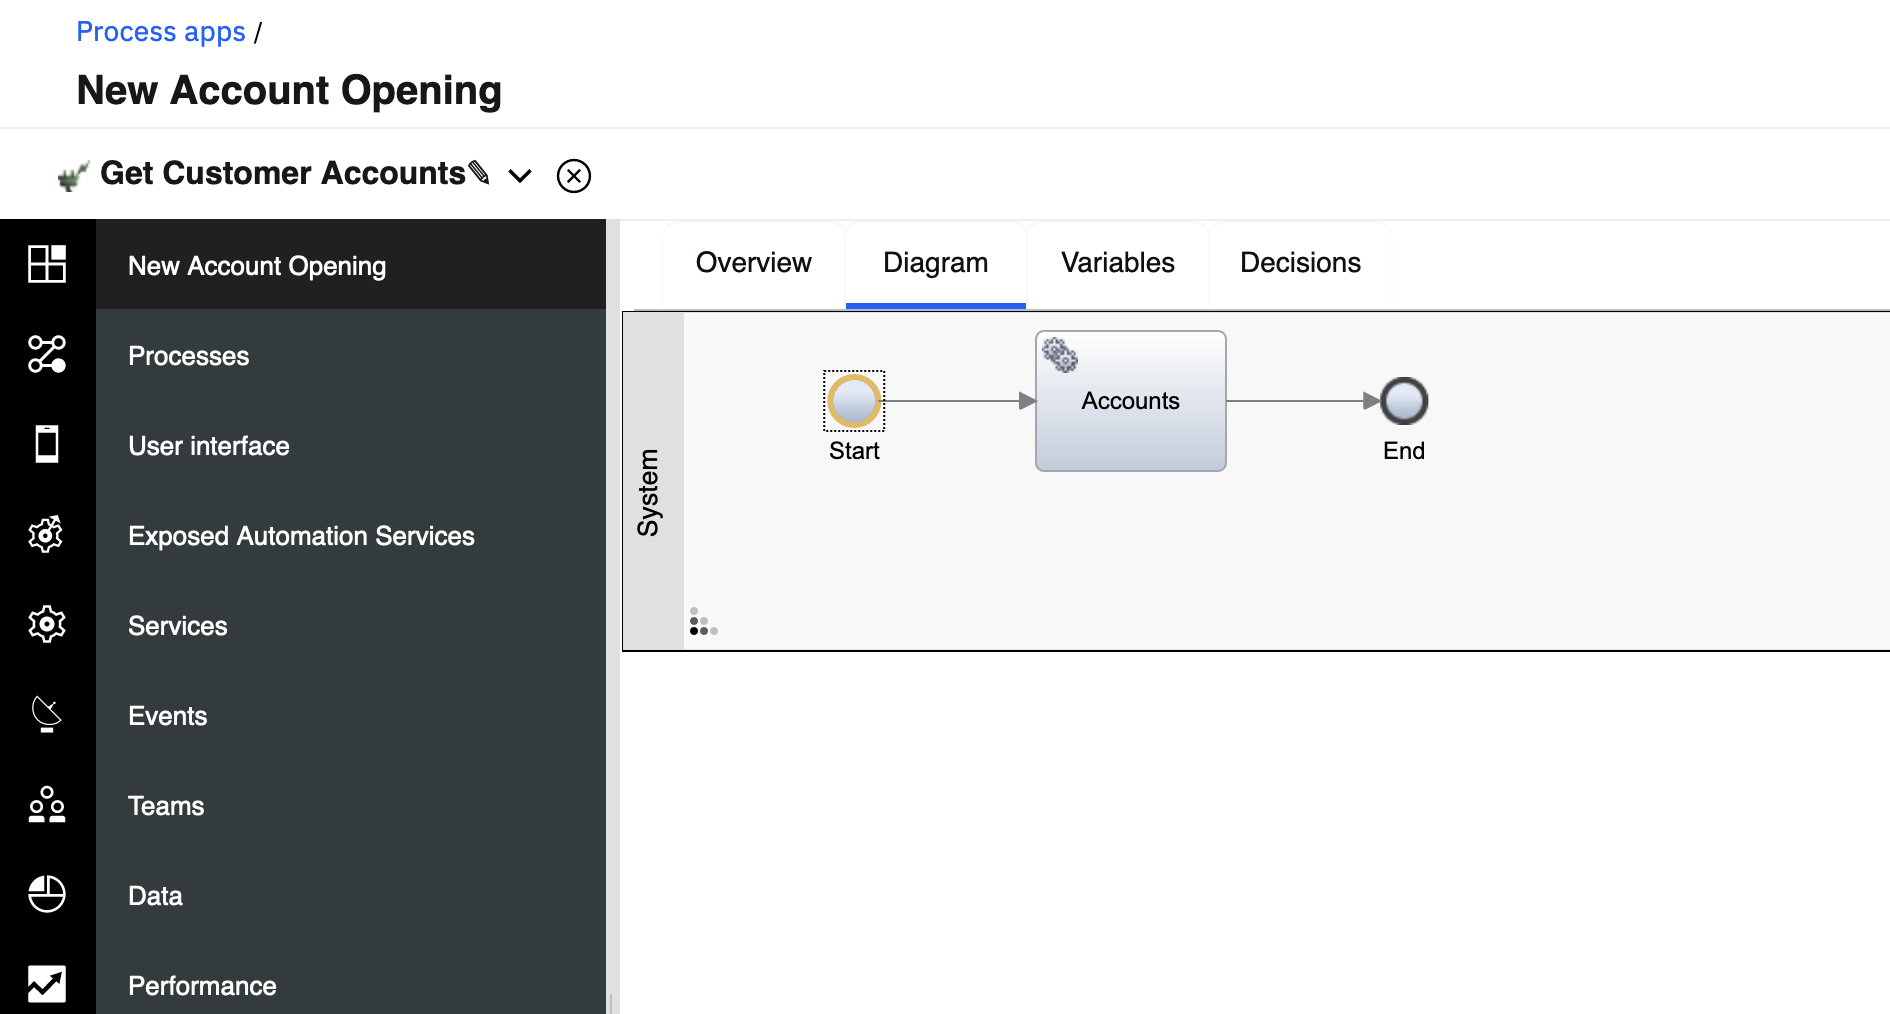 |
| Narration | The bank simply selects the operation and maps the input and output for the call. |
| Action 3.2.16 | Click the Accounts component (1) to display the property sheet below. Click the Implementation tab (2) and set the Operation to ‘Accounts.findById’ (3). 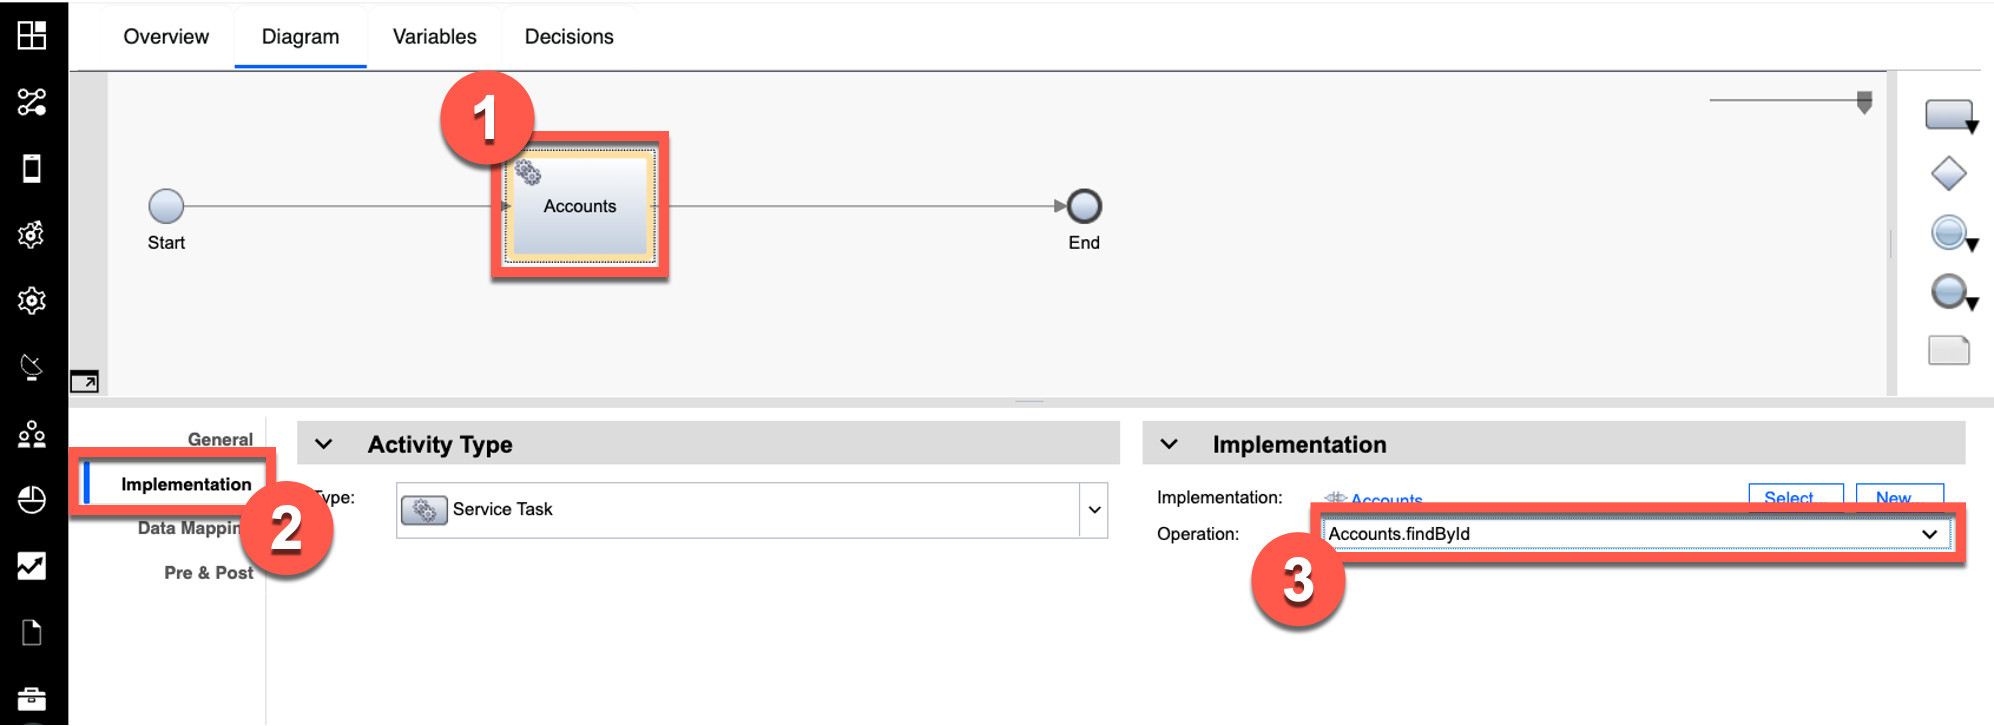 |
| Action 3.2.17 | Click the Data Mapping tab (1). Click the Automap icon (2) under Input Mapping. 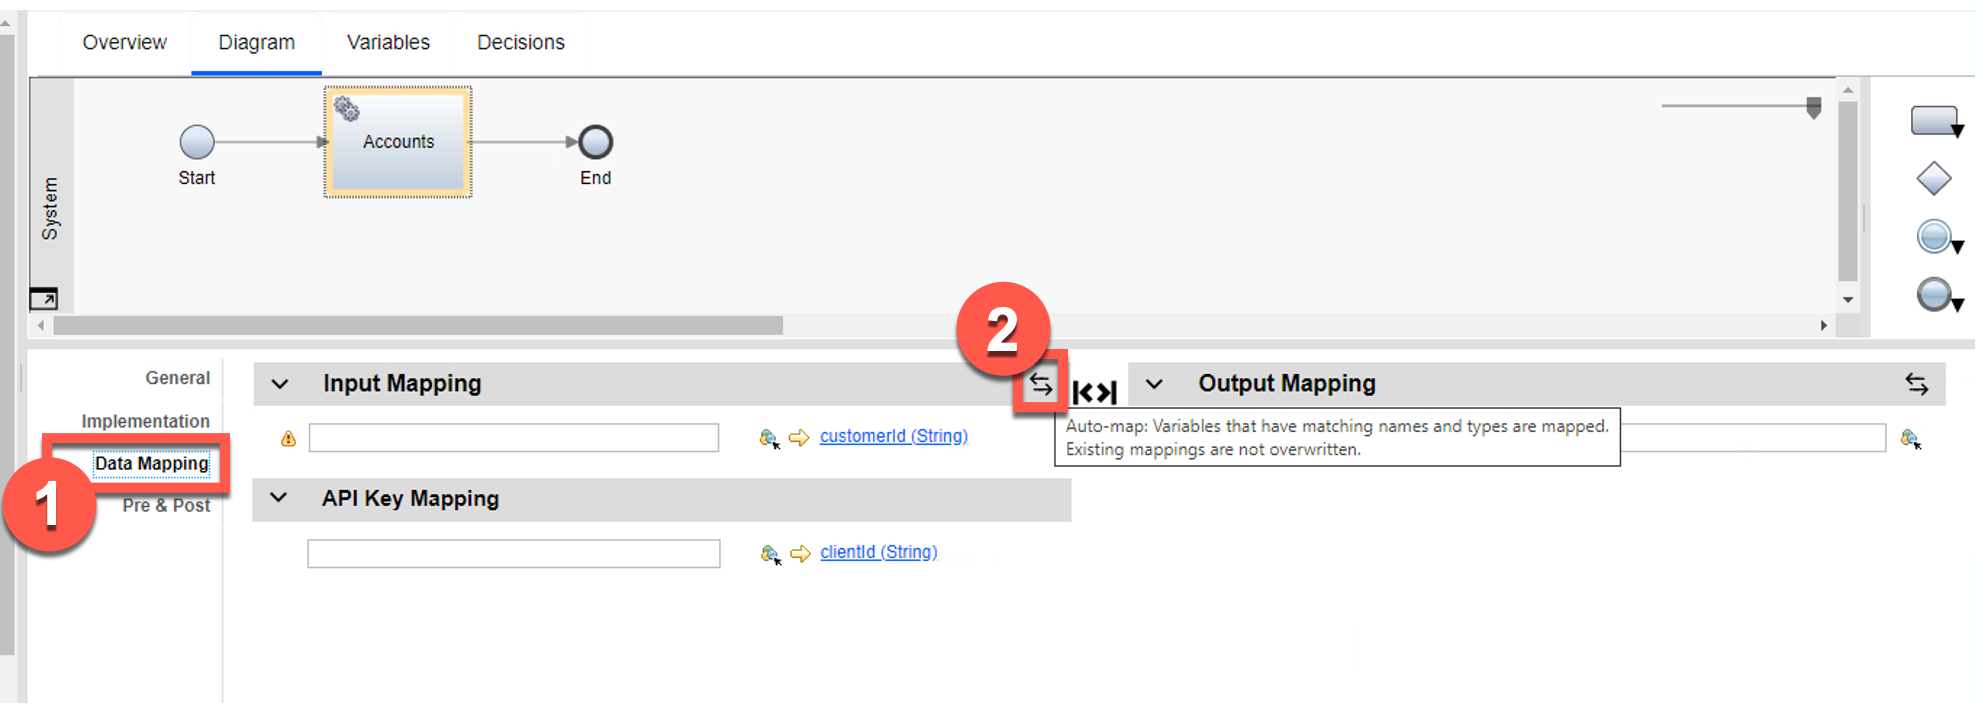 |
| Action 3.2.18 | To map the customerId input, check the box under Input (1). Click Finish (2). 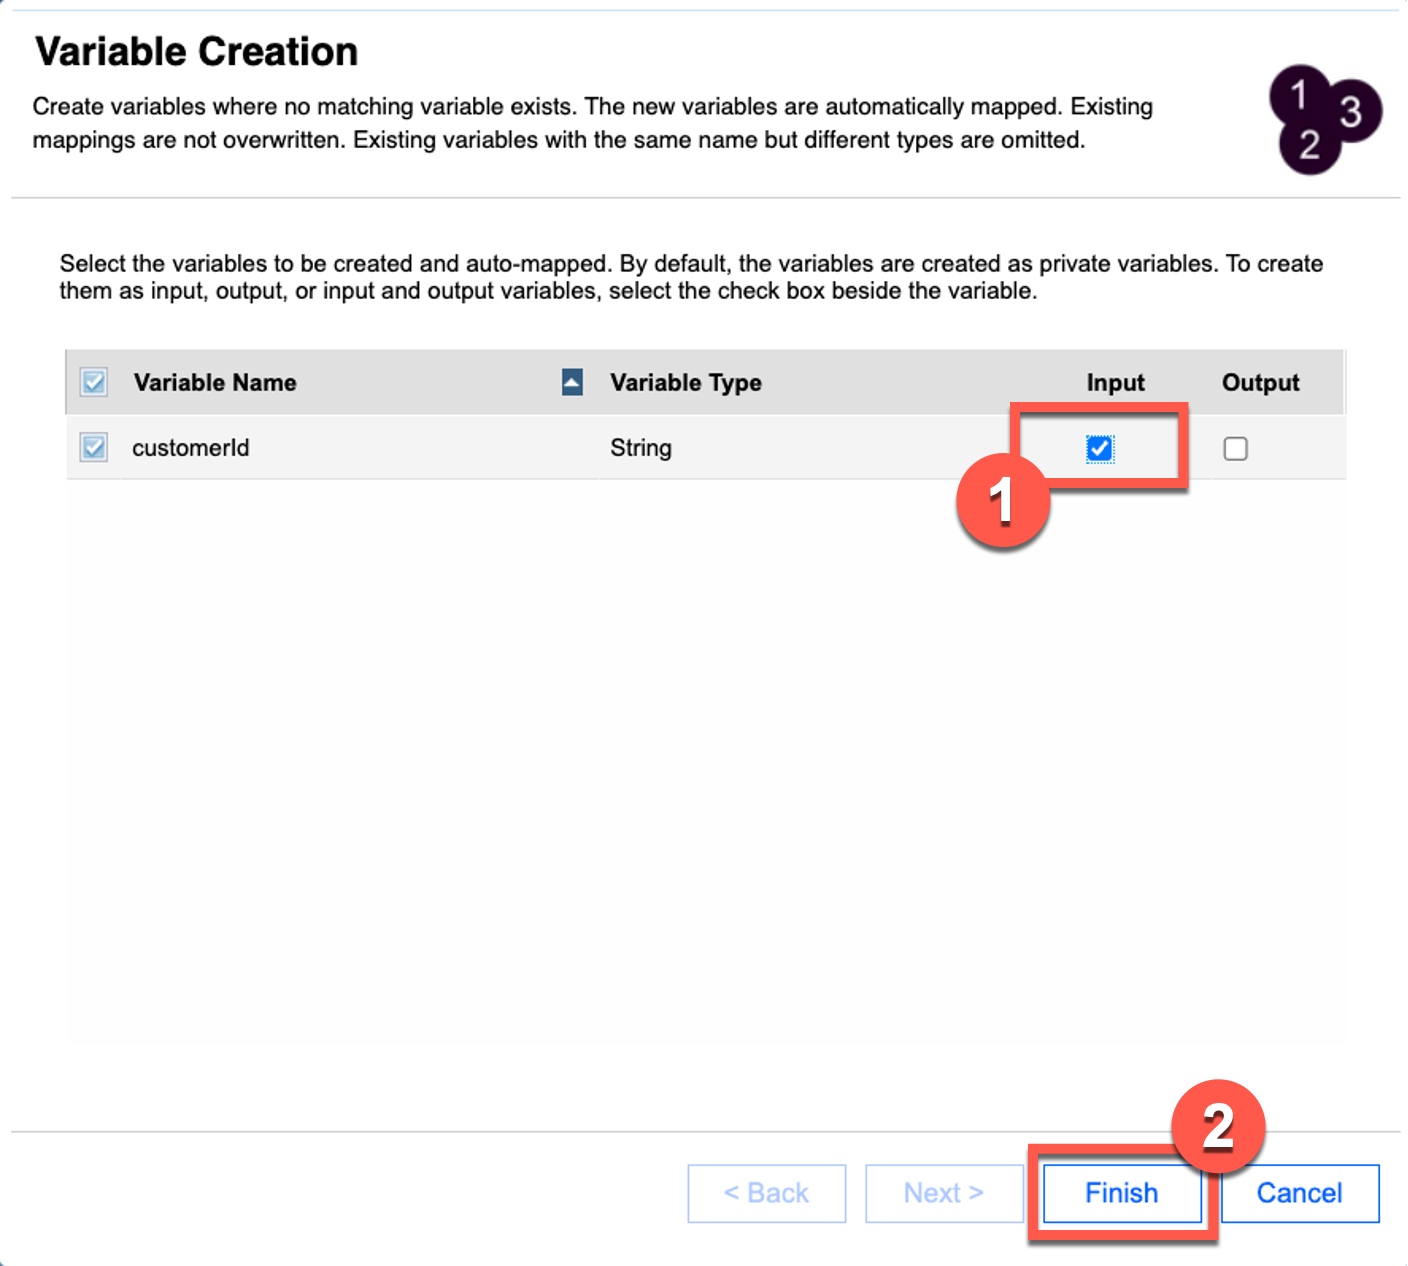 |
| Action 3.2.19 | Click the Automap icon under Output Mapping. 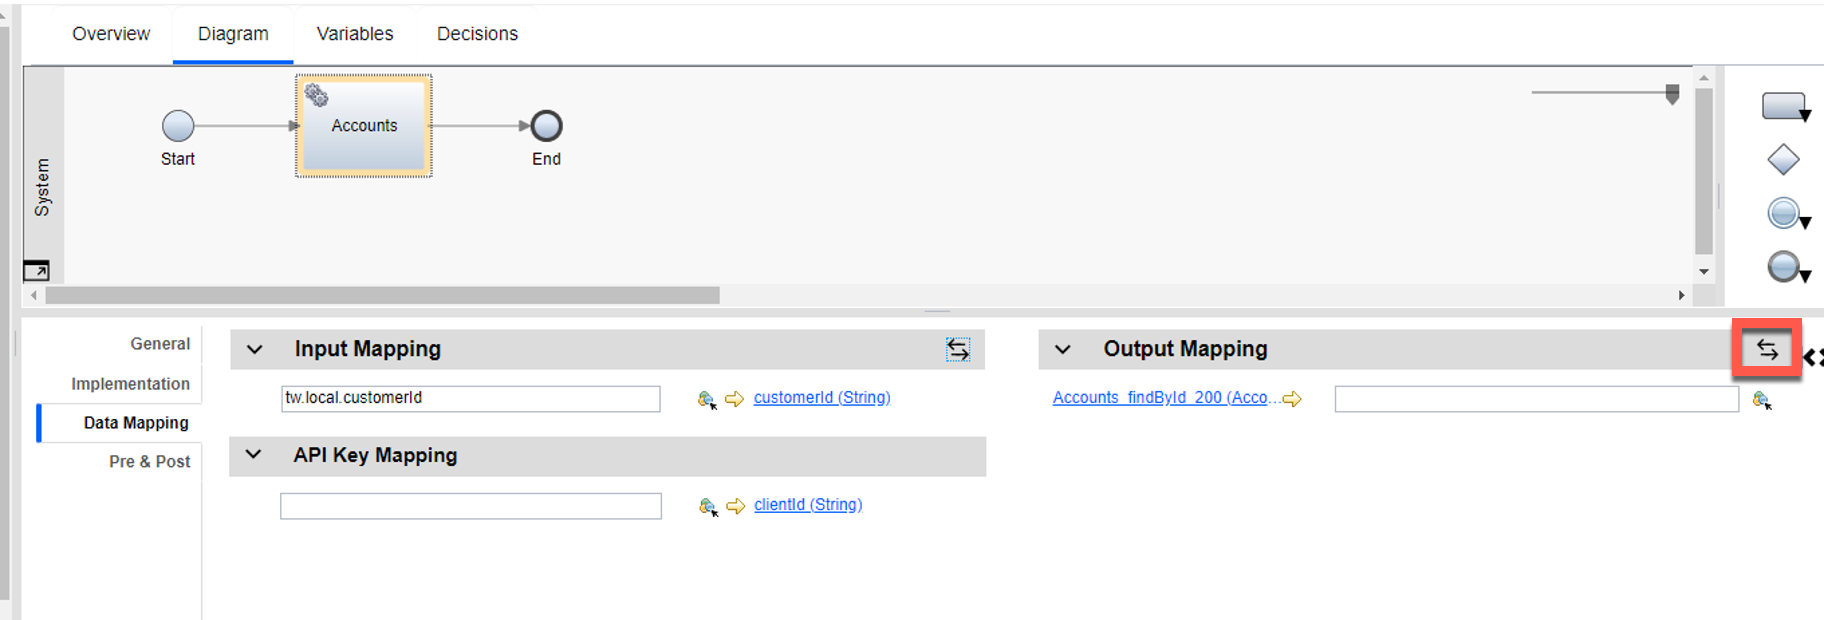 |
| Action 3.2.20 | For Accounts_findById, check the box under Output (1). Click Finish (2). 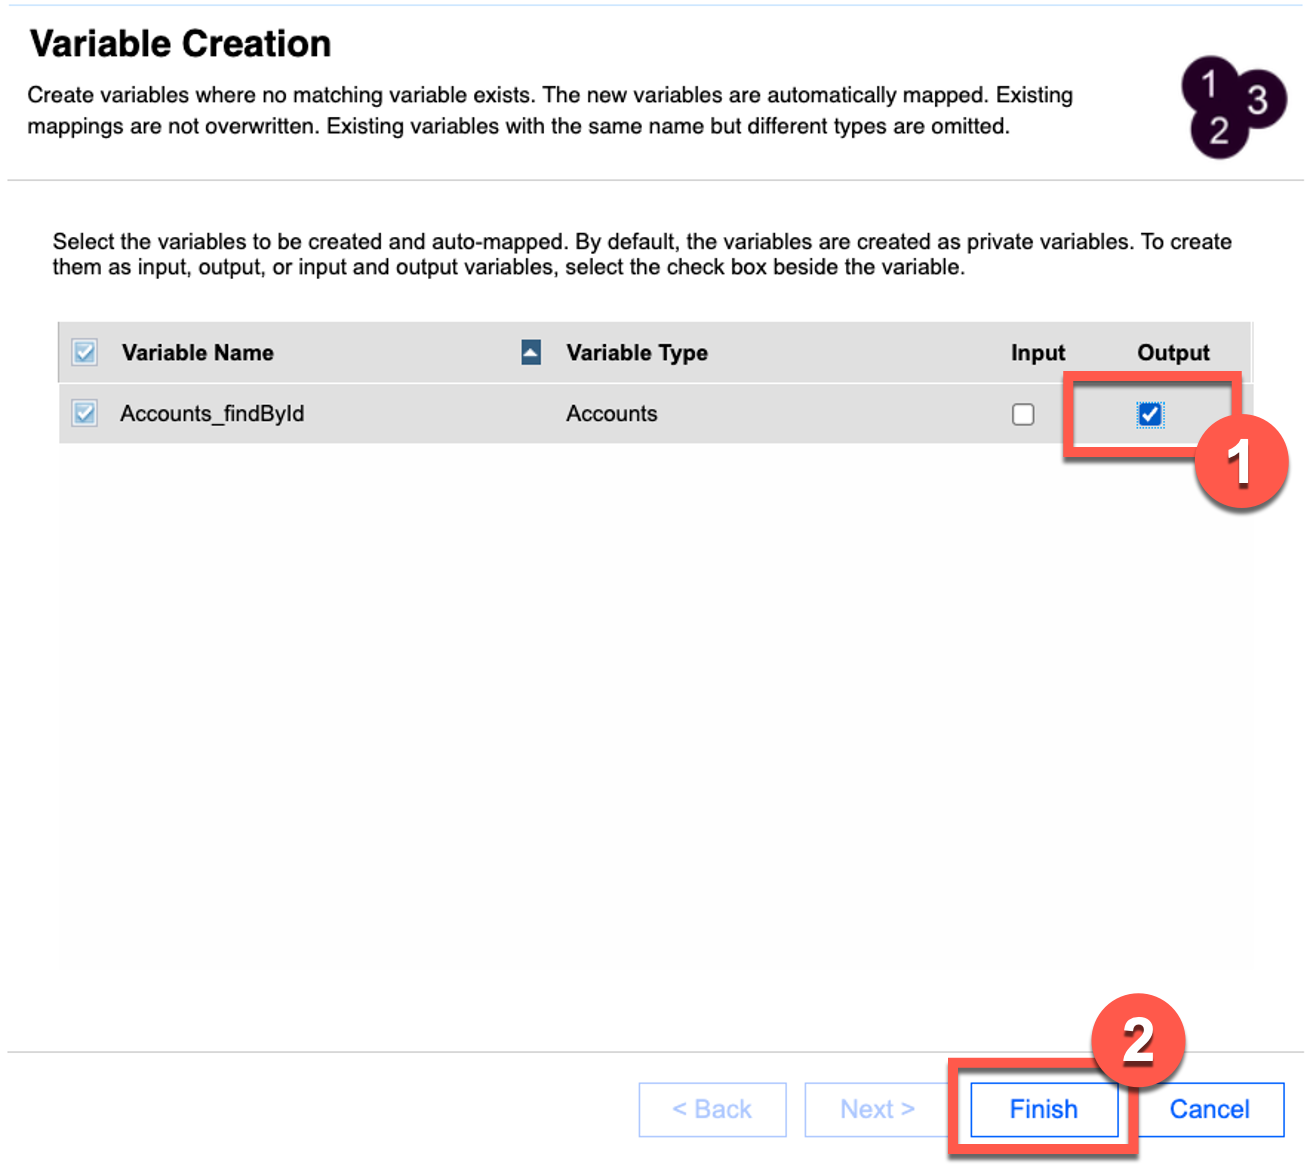 |
| Narration | For now, we’ve just hard-coded the API key. In their real deployment, the bank would pass the API key using an environment variable. |
| Action 3.2.21 | Under API Key Mapping, enter the API key surrounded by double quotes (e.g., “API-KEY-GOES-HERE”). 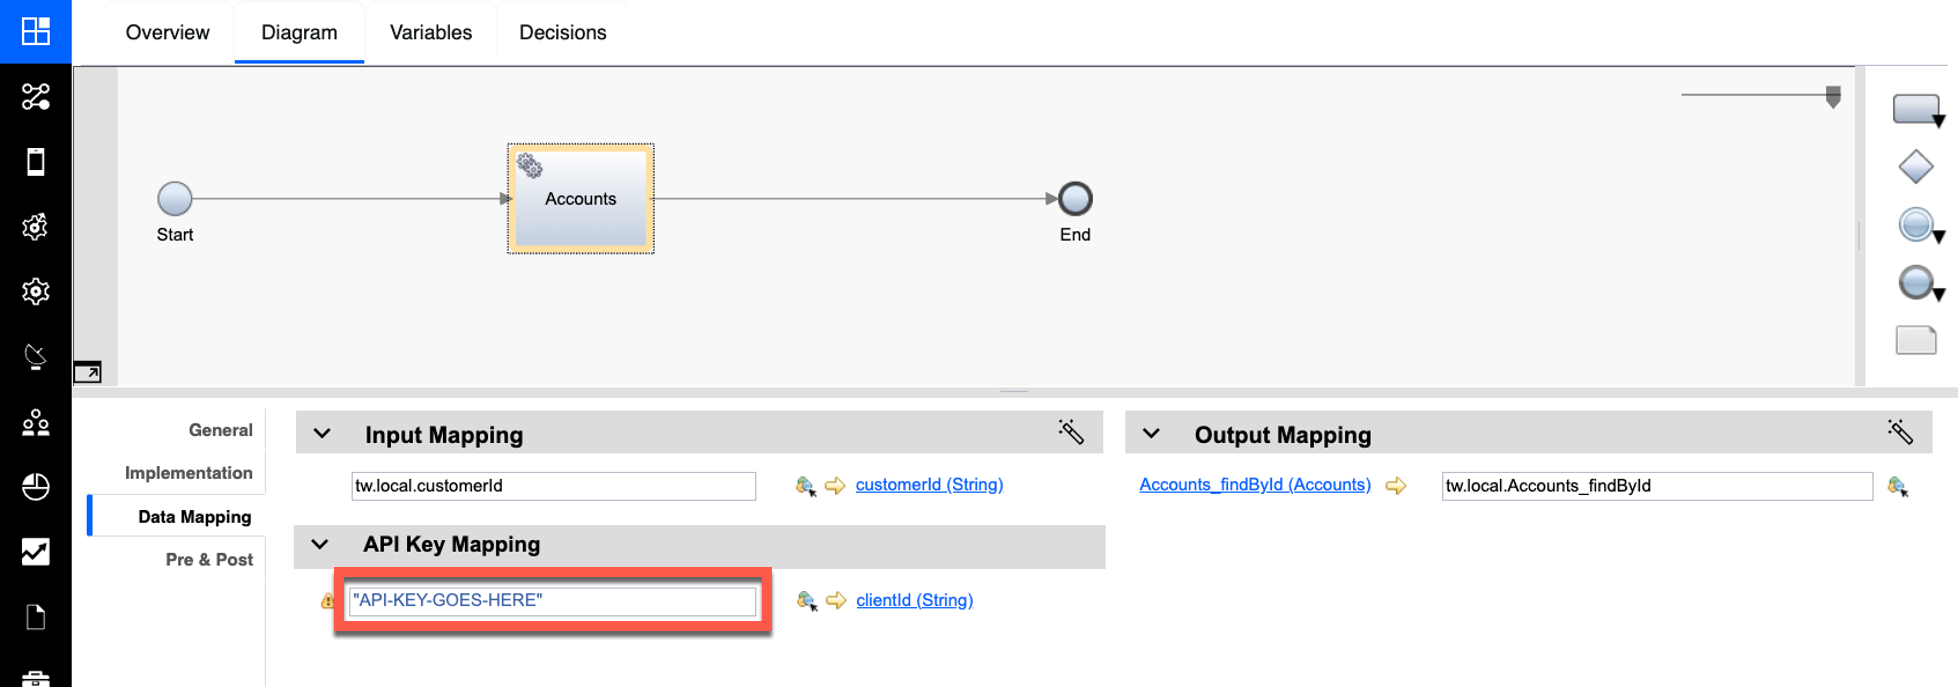 |
| Narration | To test the service, the bank enters a default value for the ‘customerId’ variable. |
| Action 3.2.22 | Select the Variables tab (1). Under Variables and Input, select customerId (2). Set the default value of the customerId to ‘1234567890’ (3). 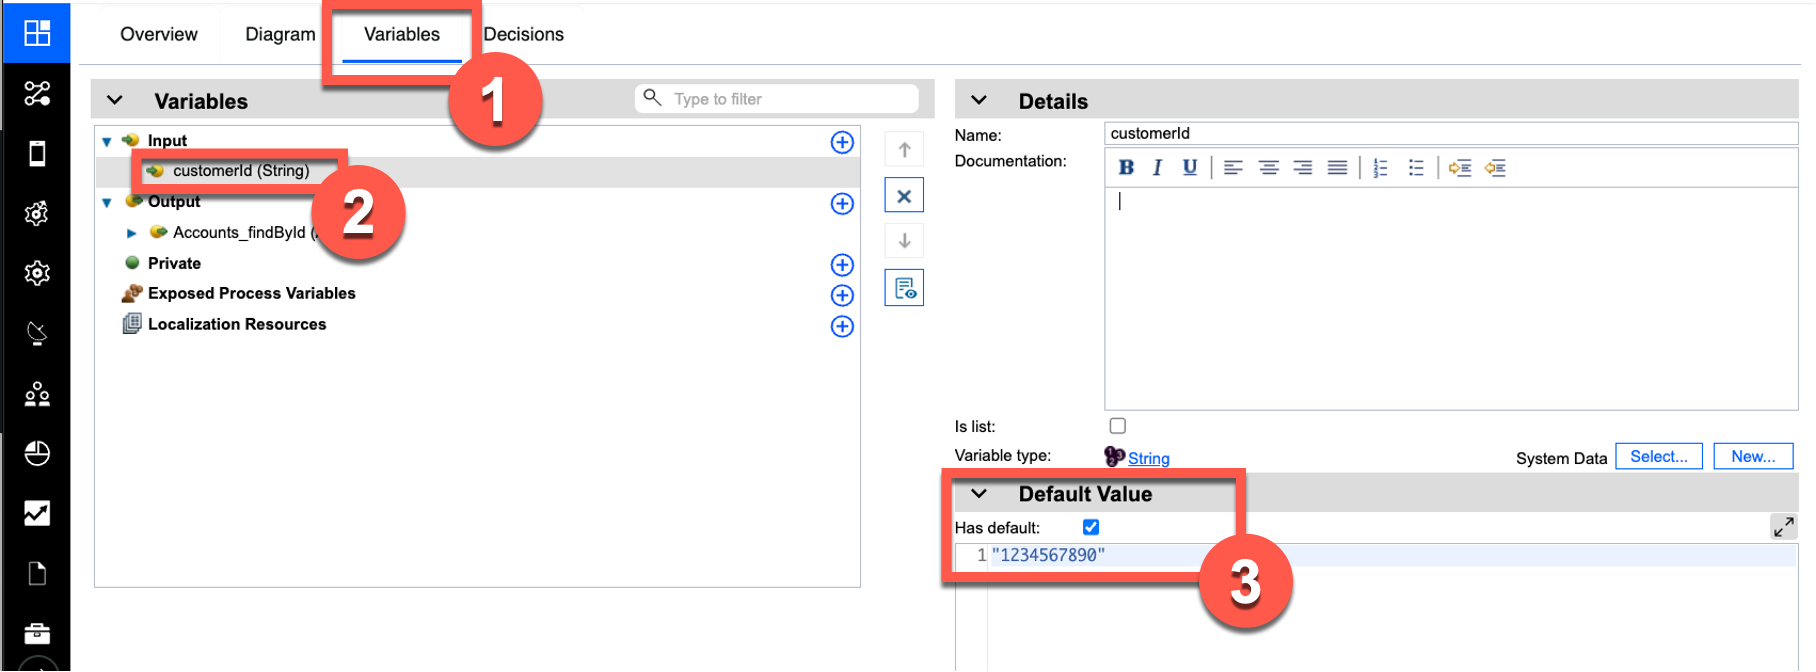 |
| Narration | The bank can run, test, and debug processes and services in the Process Inspector. The bank tests that the integration is working as expected. They start the service and step into the first component. |
| Action 3.2.23 | Test the new service by clicking the Debug icon. 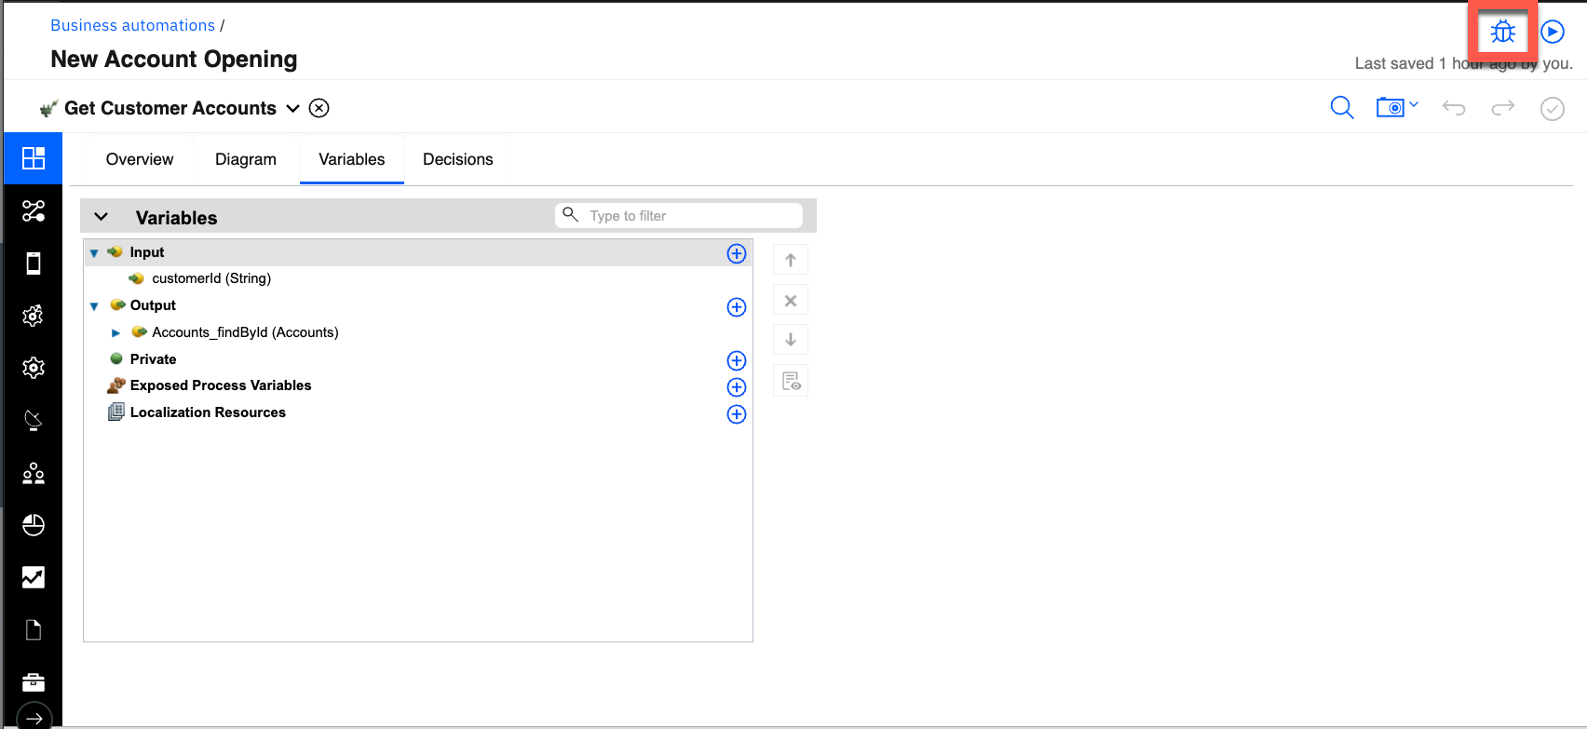 |
| Action 3.2.24 | Click the Step over icon. 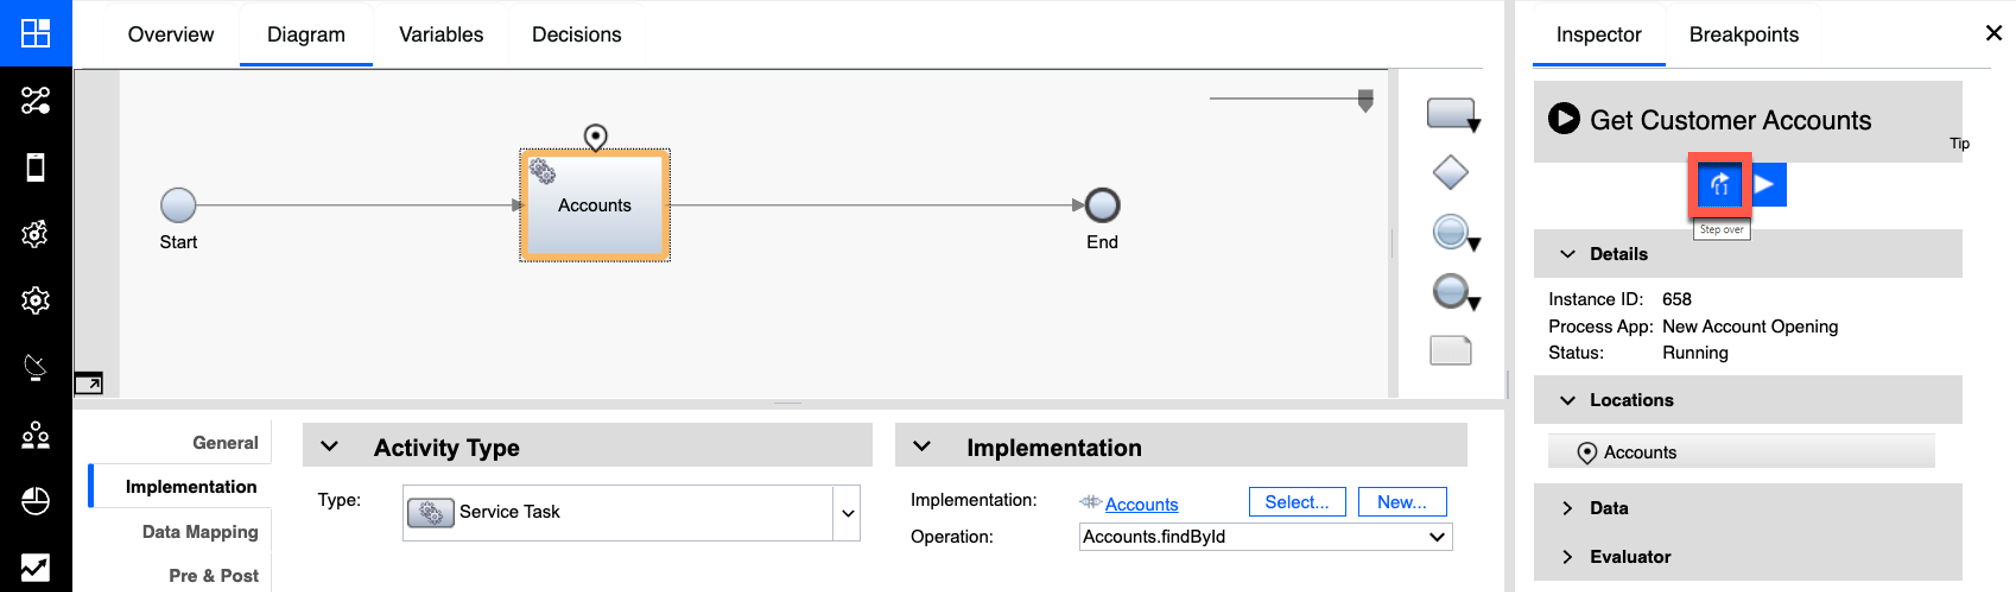 |
| Narration | The service has invoked the REST API to gather all the customer account data. As we see here, the integration is working. It has successfully returned the list of accounts for this customerId. |
| Action 3.2.25 | Click Data (1) to open the variables. Click the Accounts_findById variable and then the savingAccount property (2) to show that the integration returned the customer account information. 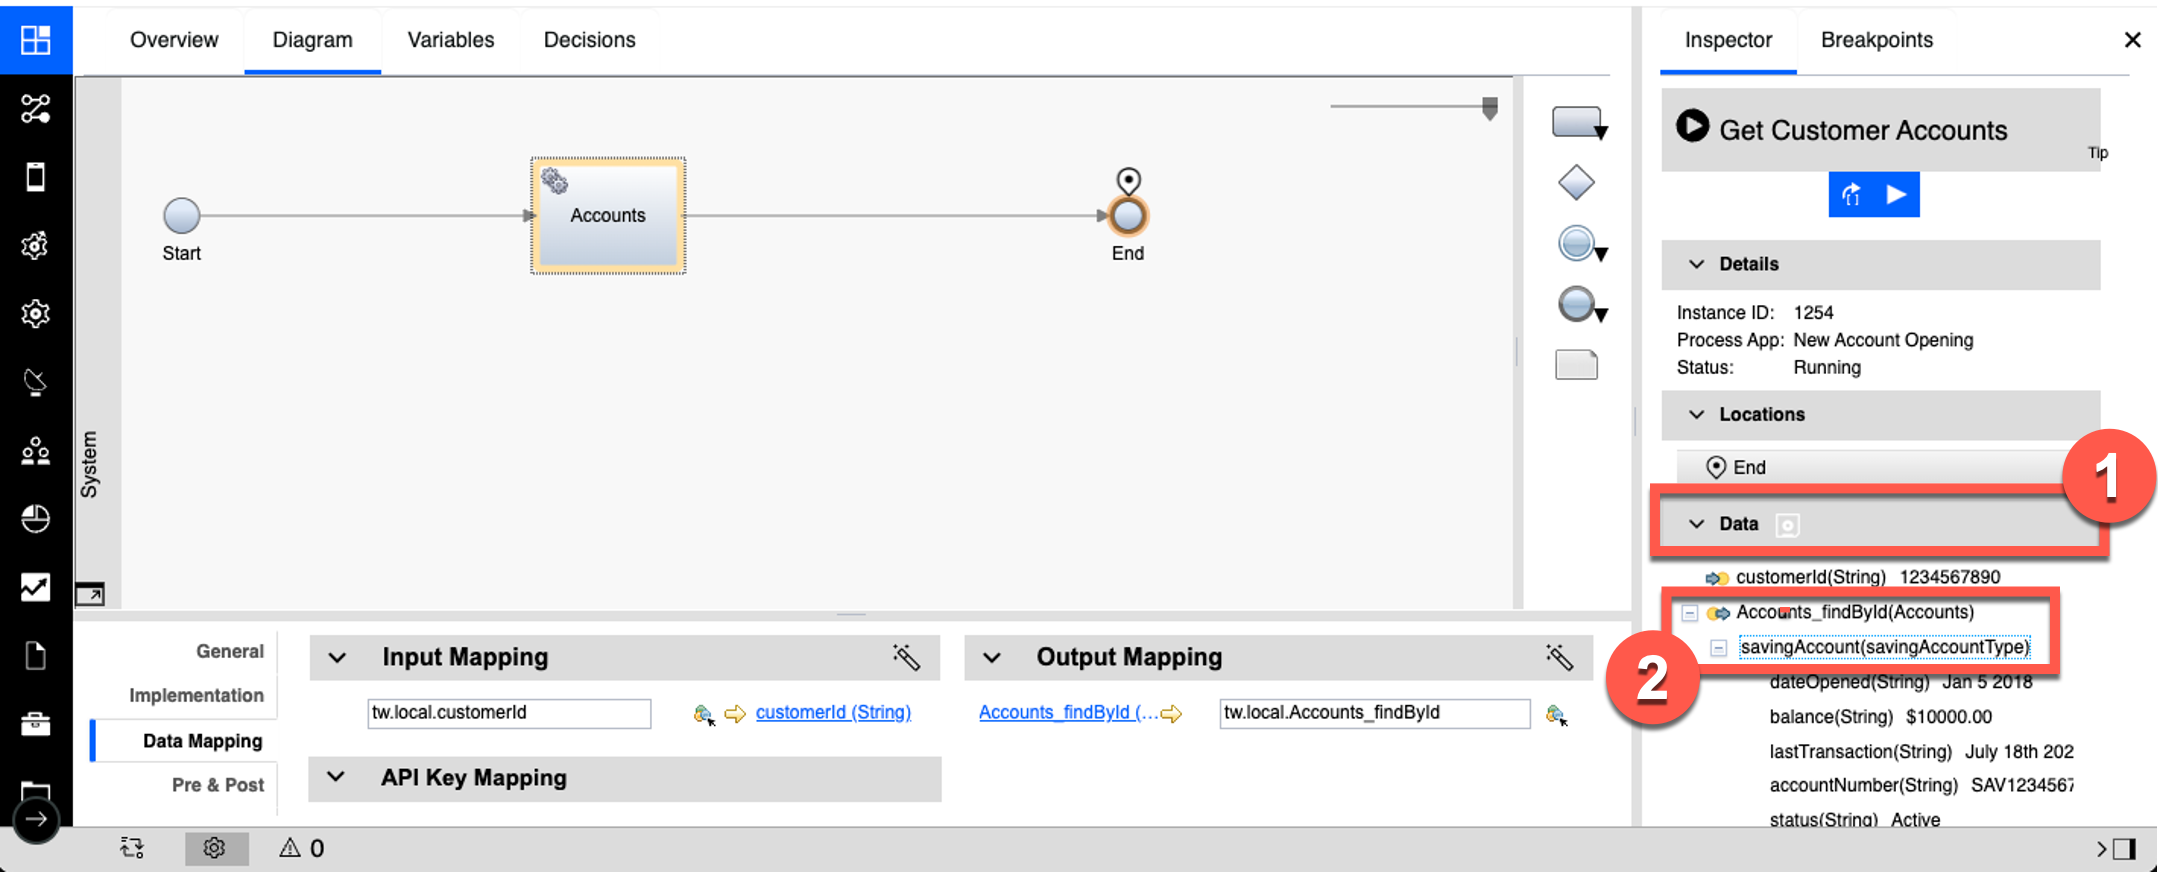 |
| Narration | Now that the bank has successfully tested the integration, they go back to the process diagram to map the inputs and outputs of the call into the workflow. |
| Action 3.2.26 | In the process library, click Processes (1) and then New Account (Enhanced with Integration) (2). 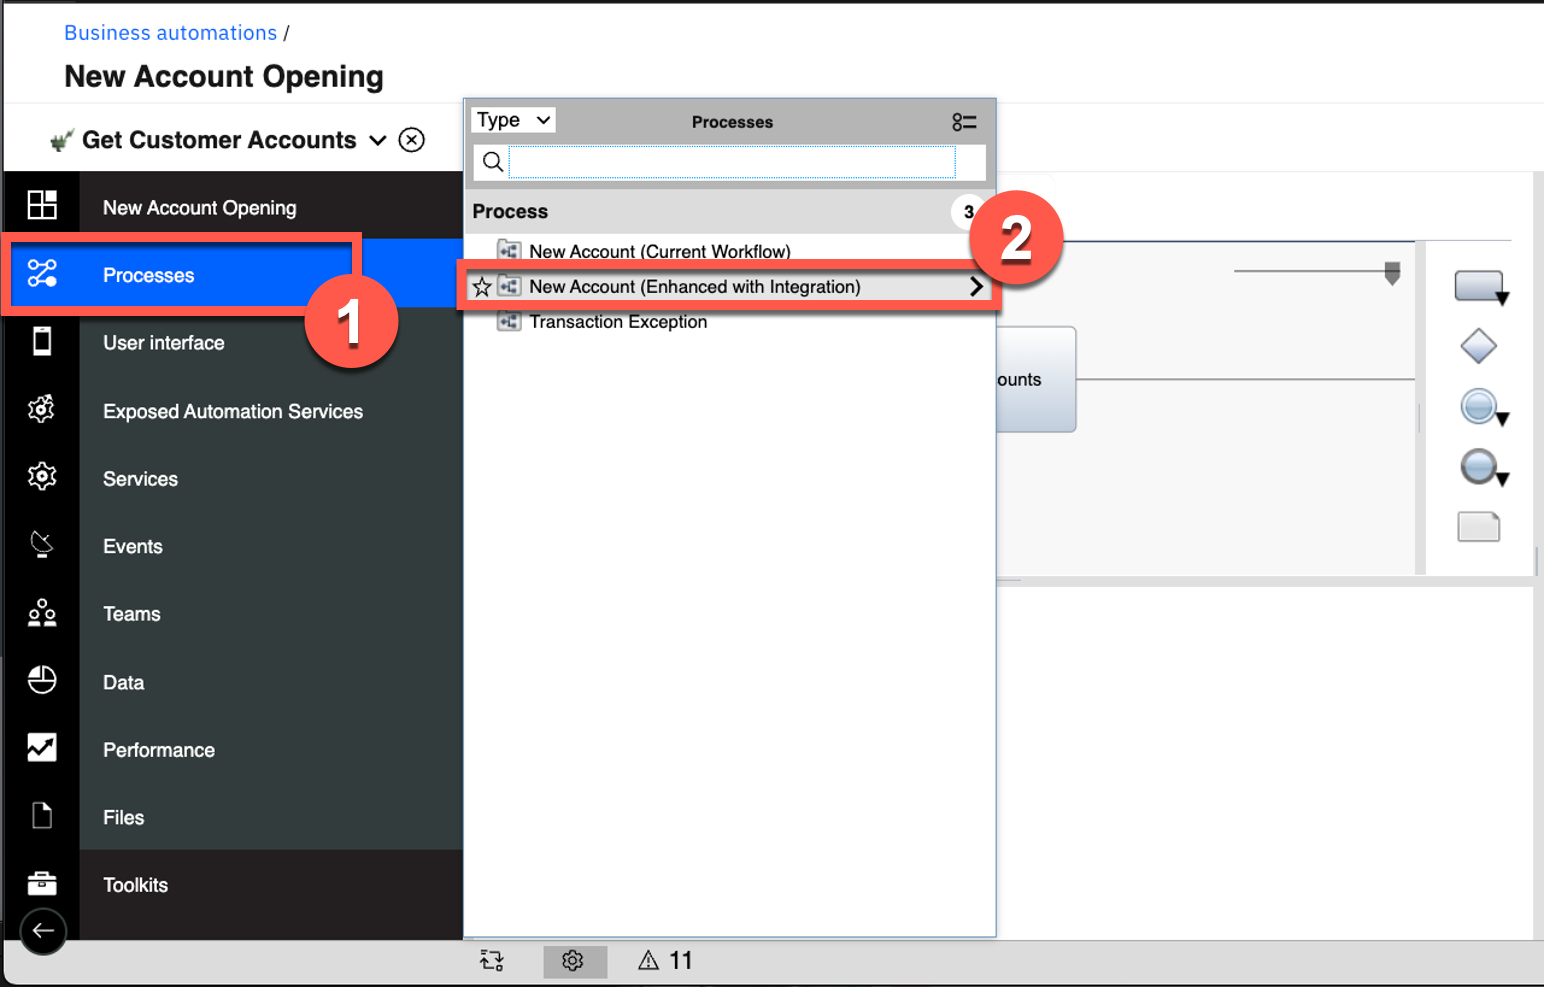 |
| Action 3.2.27 | Click the Gather Account Info activity. 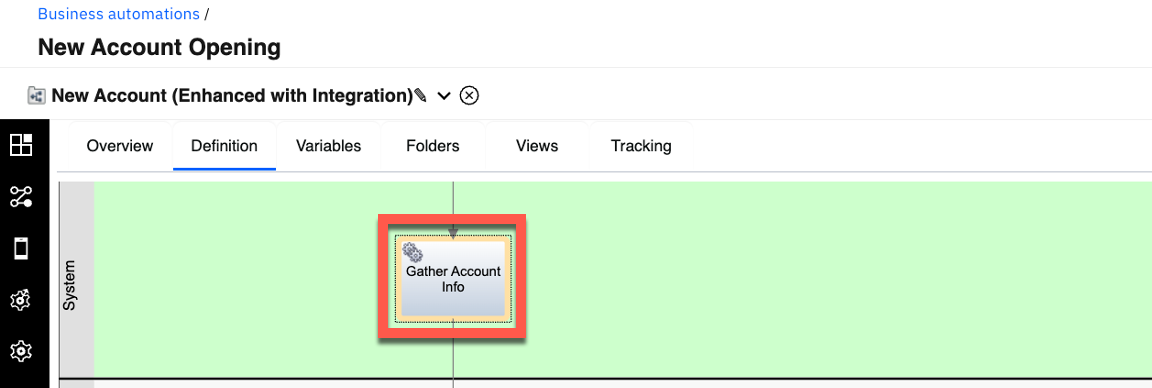 |
| Action 3.2.28 | Select the Data Mapping tab (1). Under Input Mapping, click the Variable Picker icon (2). Open request (3). Click customer and then id (4). 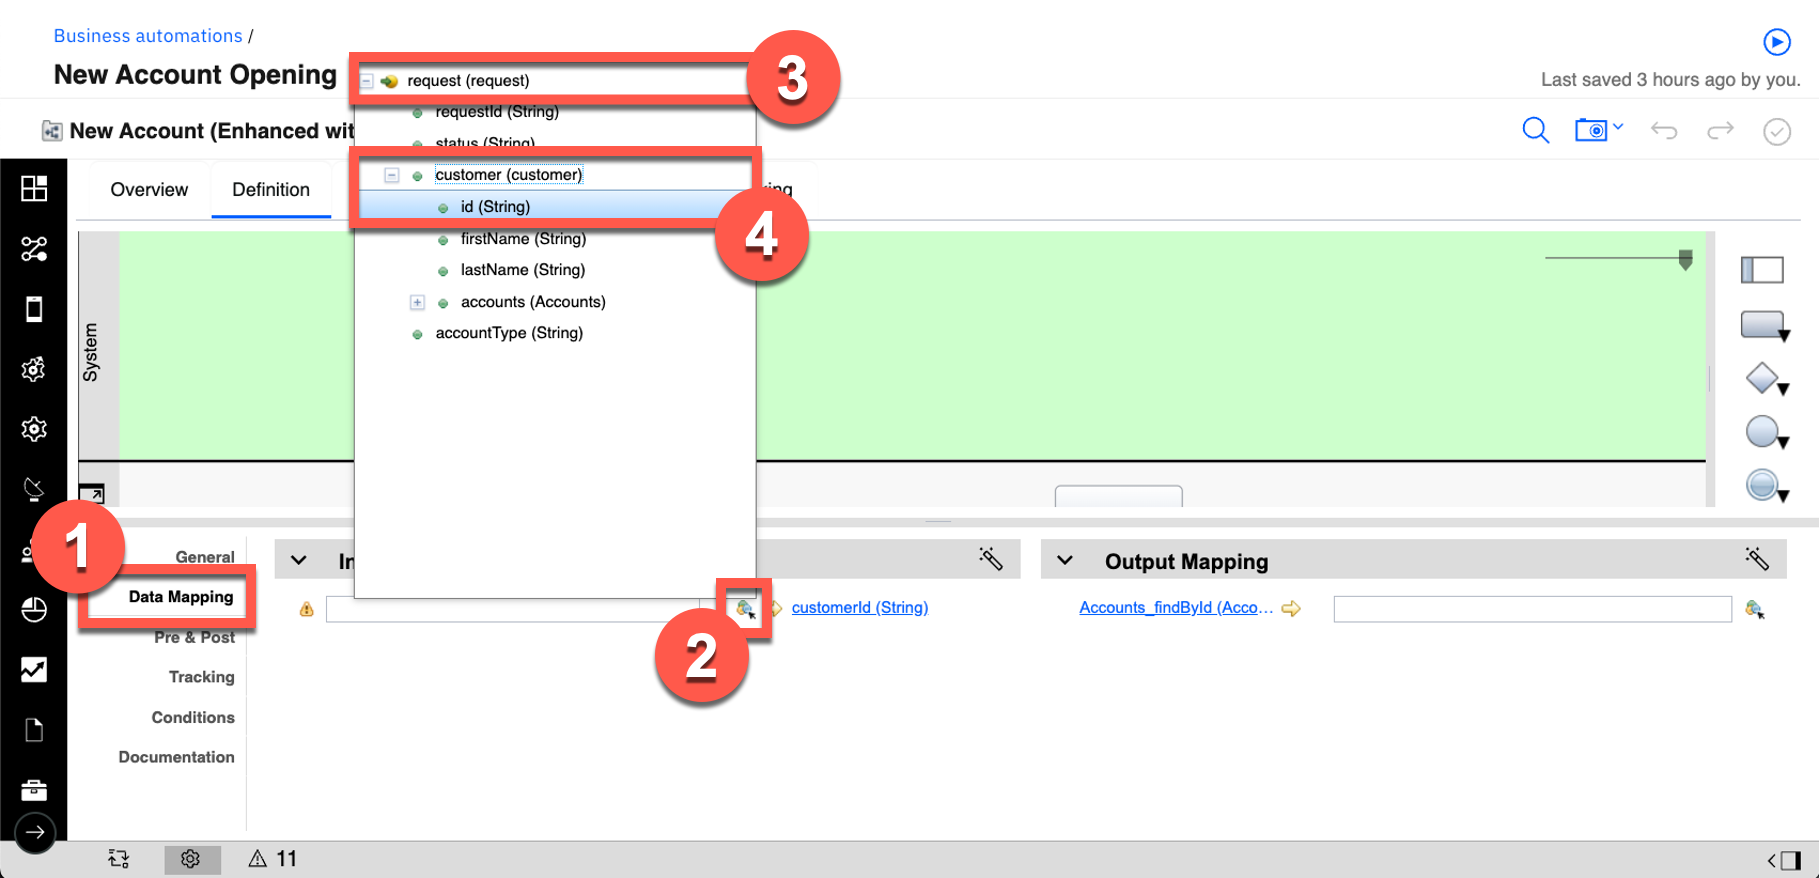 |
| Action 3.2.29 | Under Output Mapping, click the Variable Picker icon (1). Open request (2) and then customer (3). Select accounts (4). 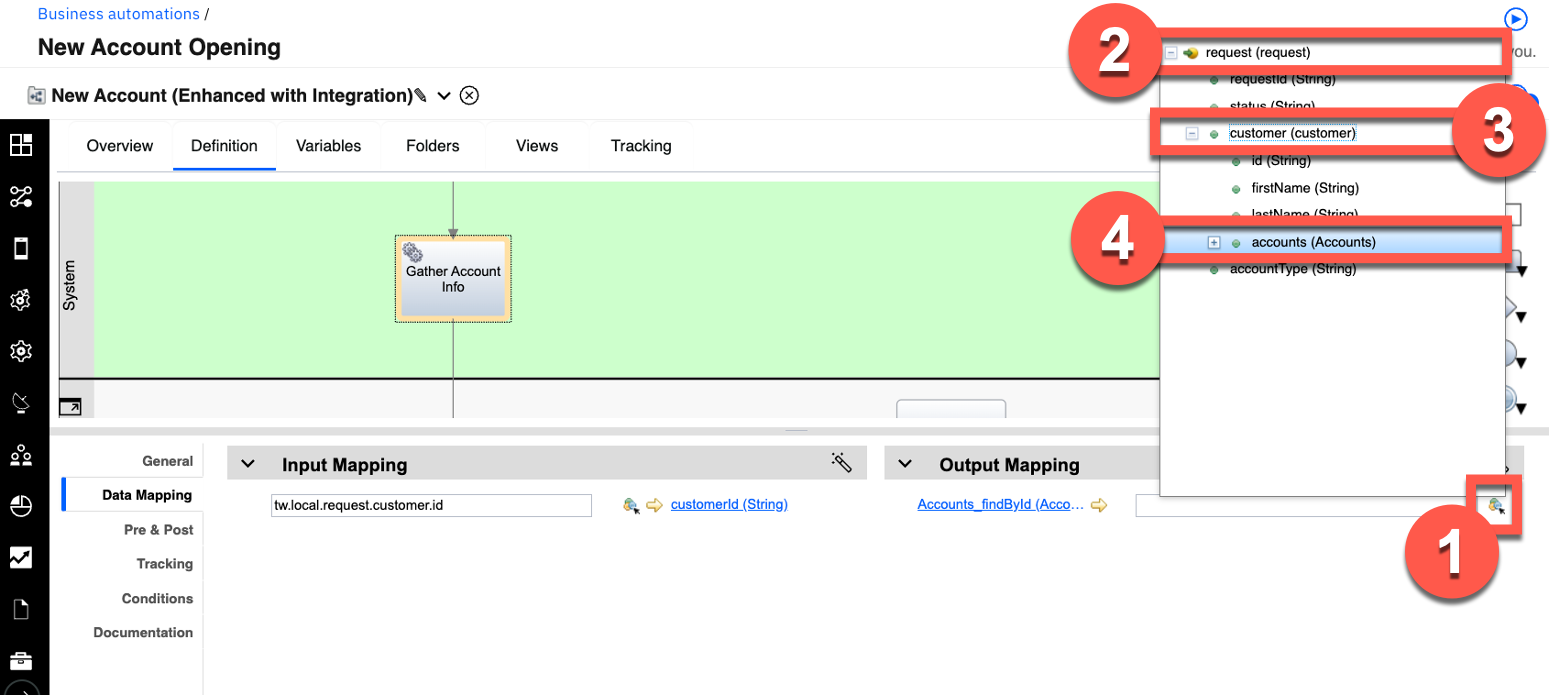 The resulting data mapping is displayed. 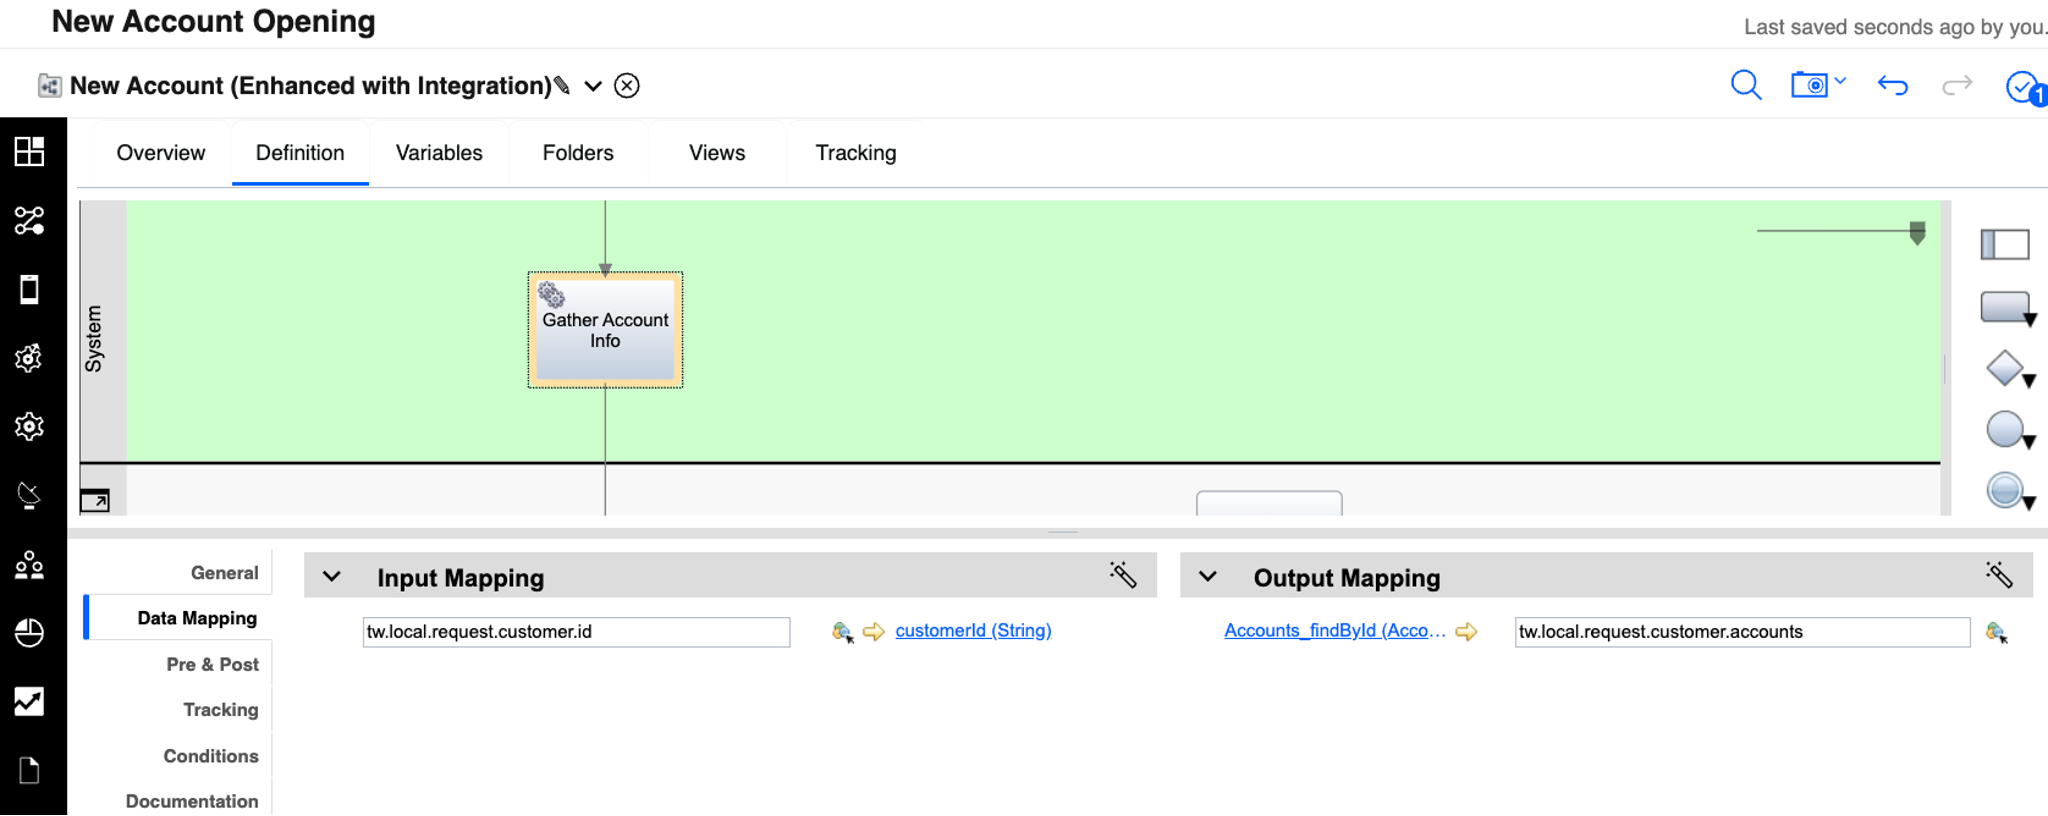 |
| Narration | The bank has now added the integration to the workflow. They are ready to run the new workflow with the integration. |
4 - Executing the fully automated process
| 4.1 | Execute the new account process with integration |
|---|---|
| Narration | The bank is ready to do end-to-end testing of the new workflow. They use Process Portal to initiate a new account request. |
| Action 4.1.1 | Return to the Process Portal window. Under Launch, click New Account (Enhanced with Integration). 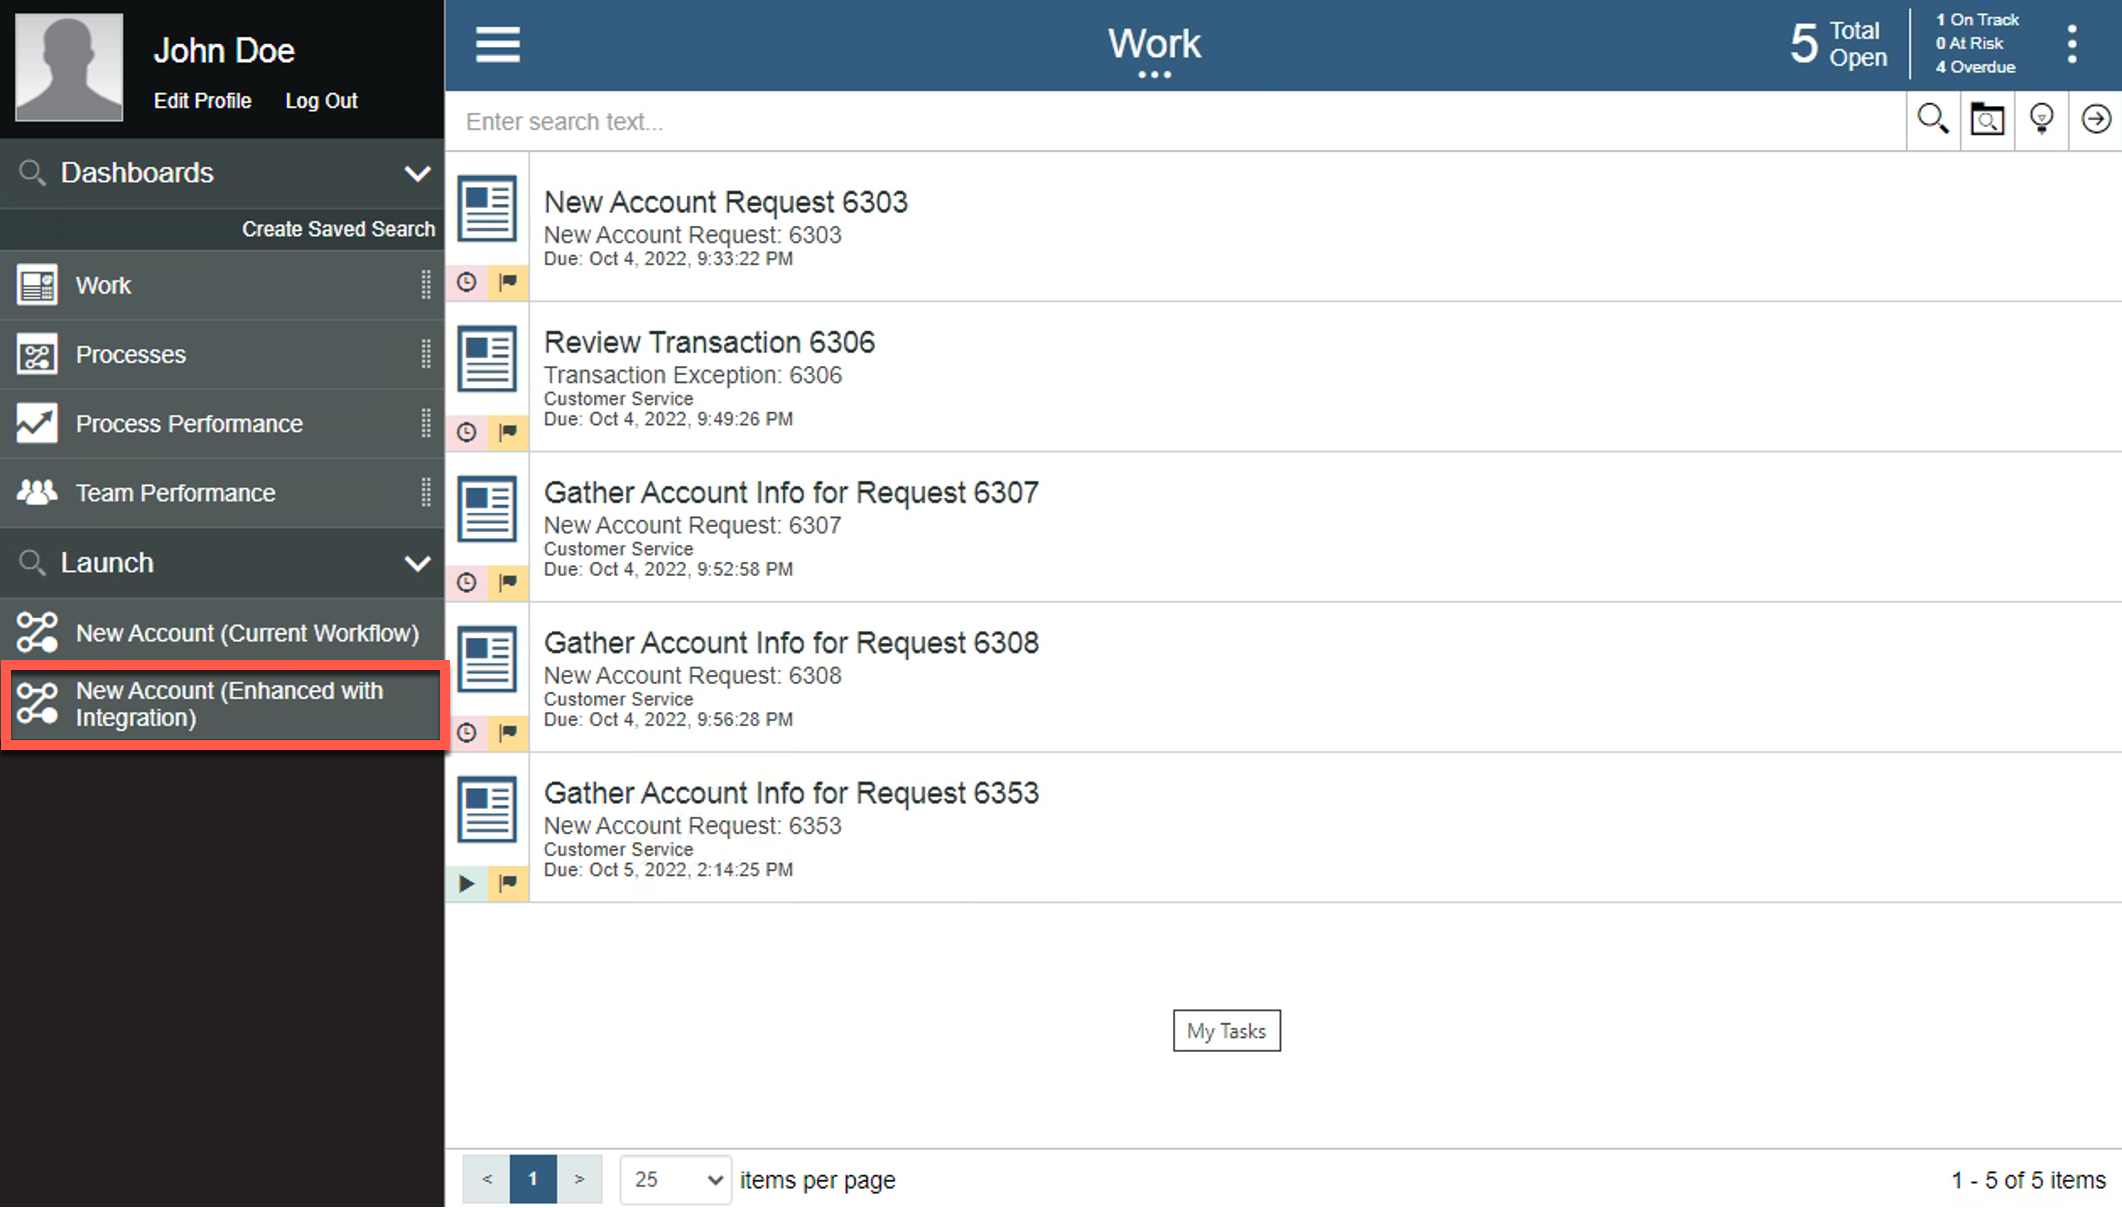 |
| Action 4.1.2 | Select the Account Type and enter the Customer Account Number, First Name, and Last Name (1). Click Next (2). 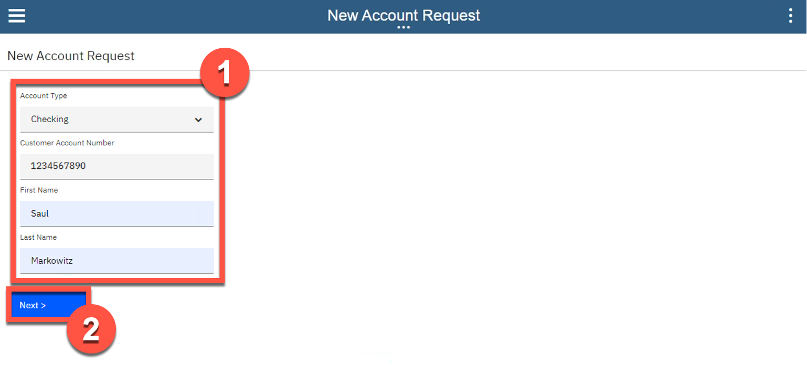 |
| Action 4.1.3 | Click Done.  |
| Narration | The request is now routed directly for approval. Account specialists no longer need to manually gather the account info. |
| Action 4.1.4 | Run the most recent Approve New Account Request task by clicking the task name. 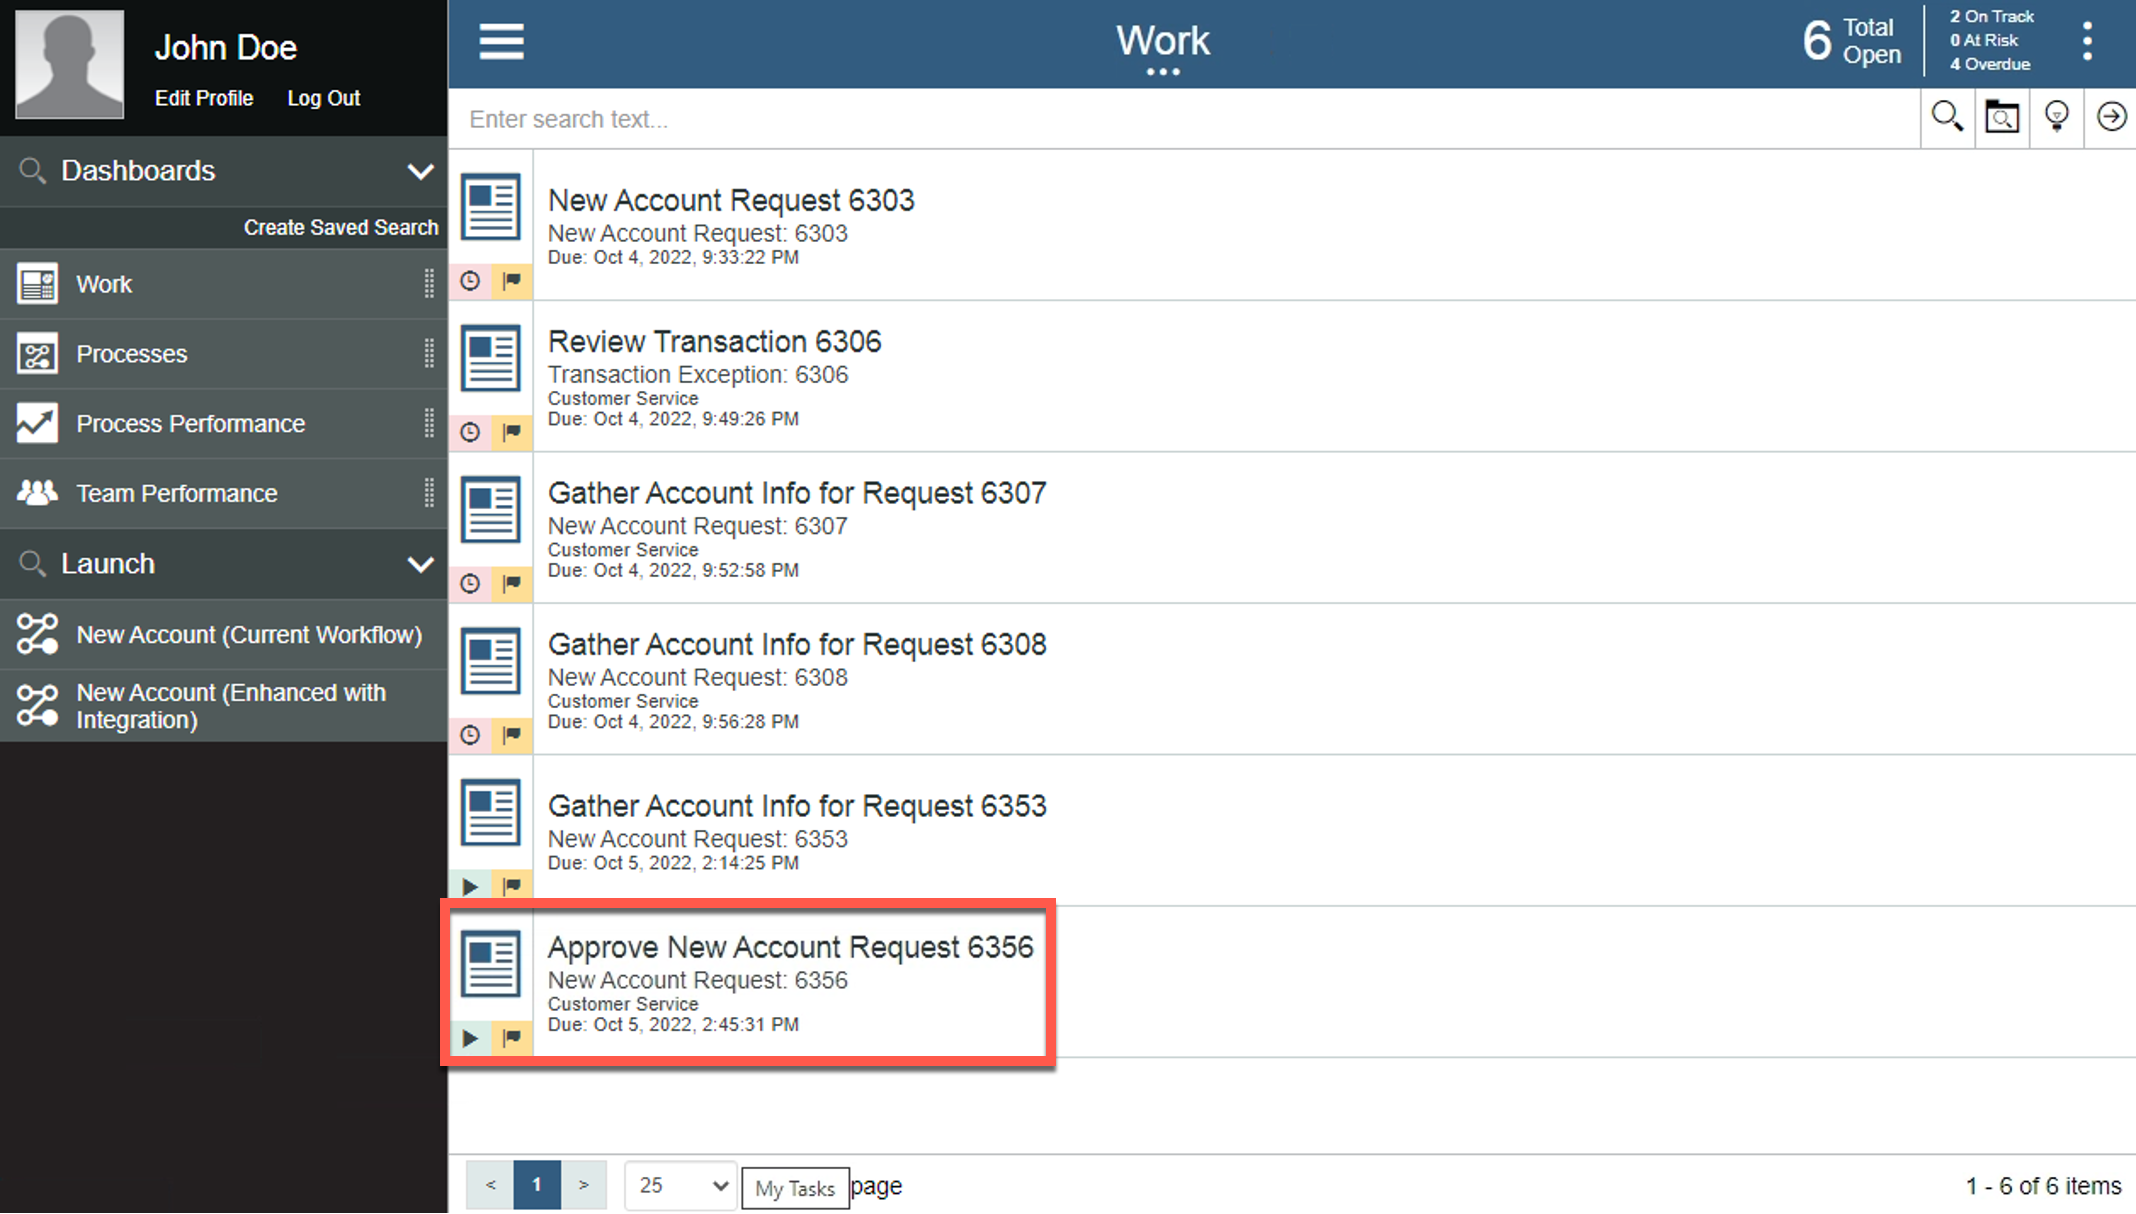 |
| Narration | Within the Approve Request task, the bank sees the combined account information that was automatically gathered using the integration. The combined account details were automatically retrieved from two back-end systems. This avoided the need for an account specialist to log in to each of them individually and manually collect this information. As Focus Bank grows and acquires additional banks, the integration can be extended and deployed without modification to the workflow. |
Summary
By combining the Cloud Pak for Business Automation and Cloud Pak for Integration, Focus Bank enhanced their account opening process, resulting in lower costs, reduced turnaround time, and increased customer satisfaction.
Thank you for attending today’s demonstration.