
1 – Introduction
This demo shows you how to present watsonx Orchestrate’s core capabilities and its value proposition using a business scenario set in an insurance sales office. You’ll see how individual skills are used, take a brief look at decision automation, then implement an upsell process for a hypothetical insurance brokerage by combing skills together into a sequence called a skill flow.
In this hypothetical insurance brokerage, sales agents spend their time across many tasks while constantly context switching between multiple applications to do their jobs. A large part of any successful insurance seller’s time should be spent servicing existing clients, but an important part of being a great sales agent is finding new business and building pipeline.
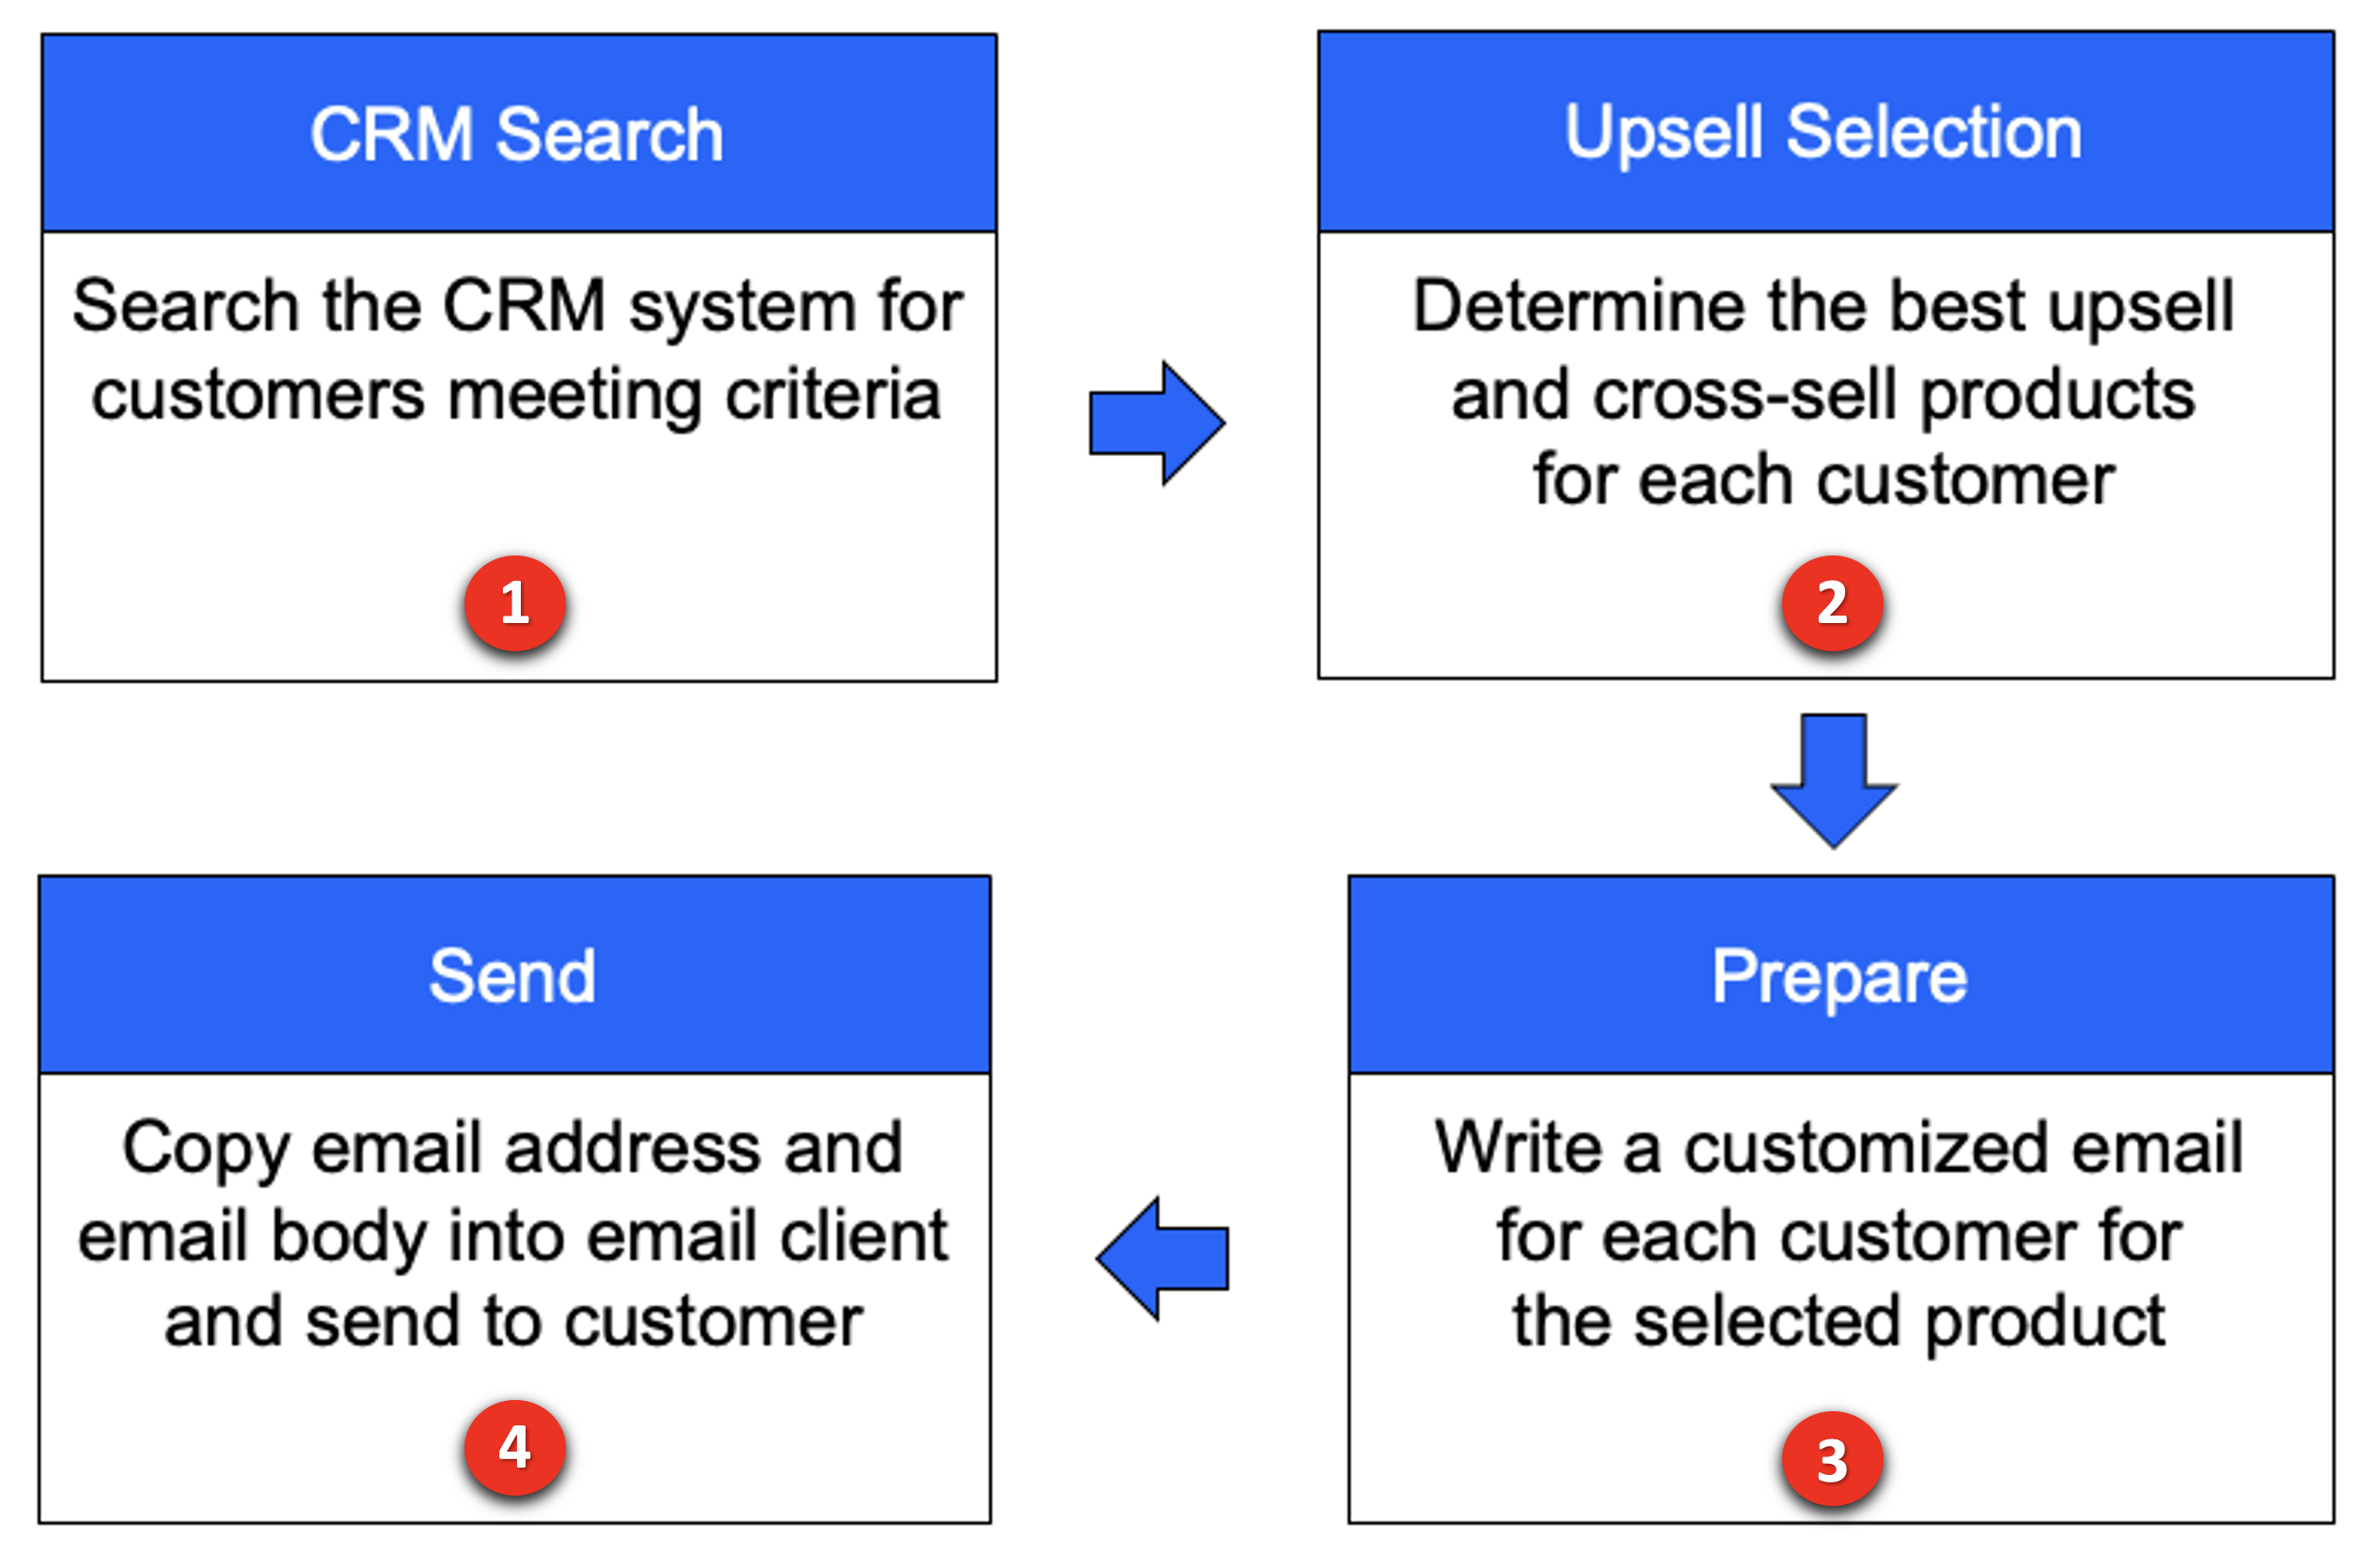
Prior to watsonx Orchestrate, agents in this insurance office dedicated a few hours per week to sending prospecting emails for upsell and cross-sell opportunities, as well as building pipeline. To do this, a typical insurance seller would:
- Search the customer relationship management (CRM) system for customers that meet certain cross-sell criteria.
- Determine the best cross-sell products to offer each customer.
- Write a customized email from a template.
- Send the email to the selected customer.
Unfortunately, agents in this office are facing several challenges that prevent them from performing at their best:- Effectively searching their CRM system for sales opportunities is time consuming and requires a lot of skill… skills that not everyone on the team possesses, especially new hires who need to be trained.
- Matching customer circumstances to the most optimal and competitive products is time consuming and requires expert product knowledge. The information about products, customers, and policies is spread over multiple systems and spreadsheets.
- Multiple systems and applications are used to perform customer outreach (a CRM search, Outlook, and so on). It takes time to switch between these applications to find the required information. Data is copied and pasted between applications and inevitably errors are made.
- Multiple systems and applications are used to perform customer outreach (a CRM search, Outlook, and so on). It takes time to switch between these applications to find the required information. Data is copied and pasted between applications and inevitably errors are made.
- There isn’t time to create a personalized email for each customer. Instead, sellers use templates…but they know that the emails that are produced this way are often ignored by their customers because they are not engaging.
- Effectively searching their CRM system for sales opportunities is time consuming and requires a lot of skill… skills that not everyone on the team possesses, especially new hires who need to be trained.
This demo shows how the prospecting work in this scenario can be done more effectively with watsonx Orchestrate by creating a sequence of skills that perform the multiple steps of the upsell process using a skill flow. A skill flow is a sequence of skills where the inputs and outputs of individual skills are wired together to reduce data entry.
Here is what this demonstration highlights:
- First, data is extracted from a system that leverages a pre-configured search to find customers with recent life events.
- Then, these customers are matched to the most suitable and competitive products by using an AI-infused automation that represents the digitized business knowledge of a product expert.
- Finally, instead of using an email template, a built-in skill that uses the IBM Granite generative AI model is used to create a marketing email. This model is designed for the enterprise and trained on trusted enterprise data, so it can be trusted to produce content suitable for business use cases.
Let’s get started.
2 – Review individual skills
| Narration | IBM watsonx Orchestrate comes with a catalog of out-of-the-box skills, such as Workday, Monday, Outlook, etc. Additional skills can be added to the catalog that work with existing services using OpenAPI or run on IBM Cloud Pak for Business Automation. Let’s begin by opening the catalog. |
| Action 2.0.1 | Click the navigation hamburger menu icon (A), then select Skill catalog (B) from the left menu.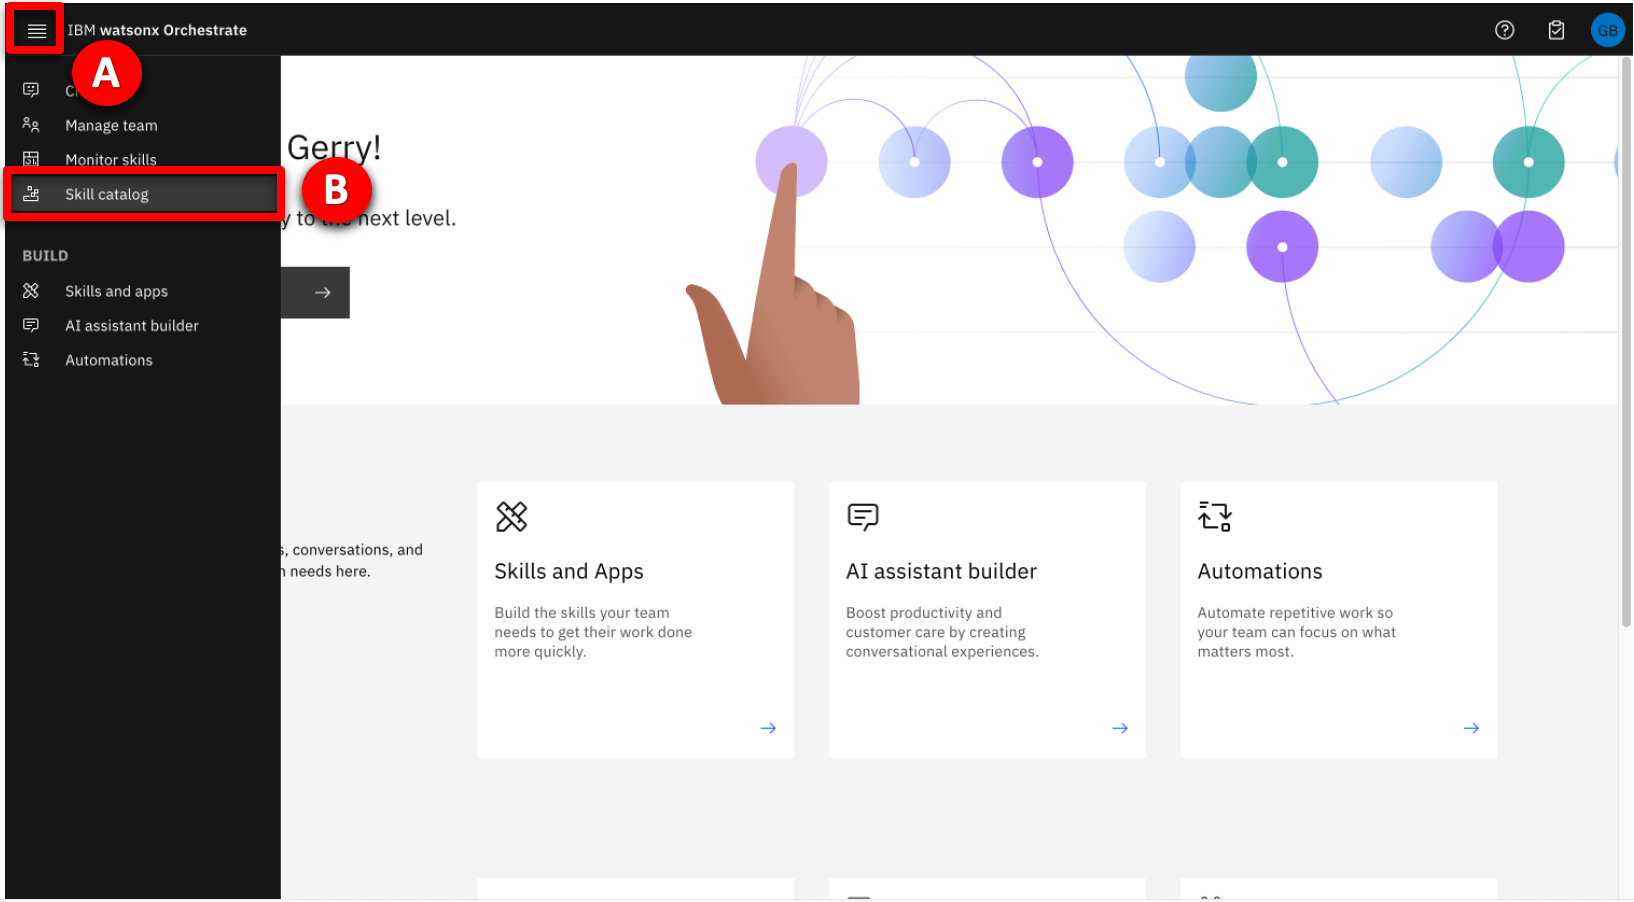 |
| Action 2.0.2 | When the Choose a skill set to view skill catalog window opens, select the Personal skills tile (A), then click Go to skill catalog (B).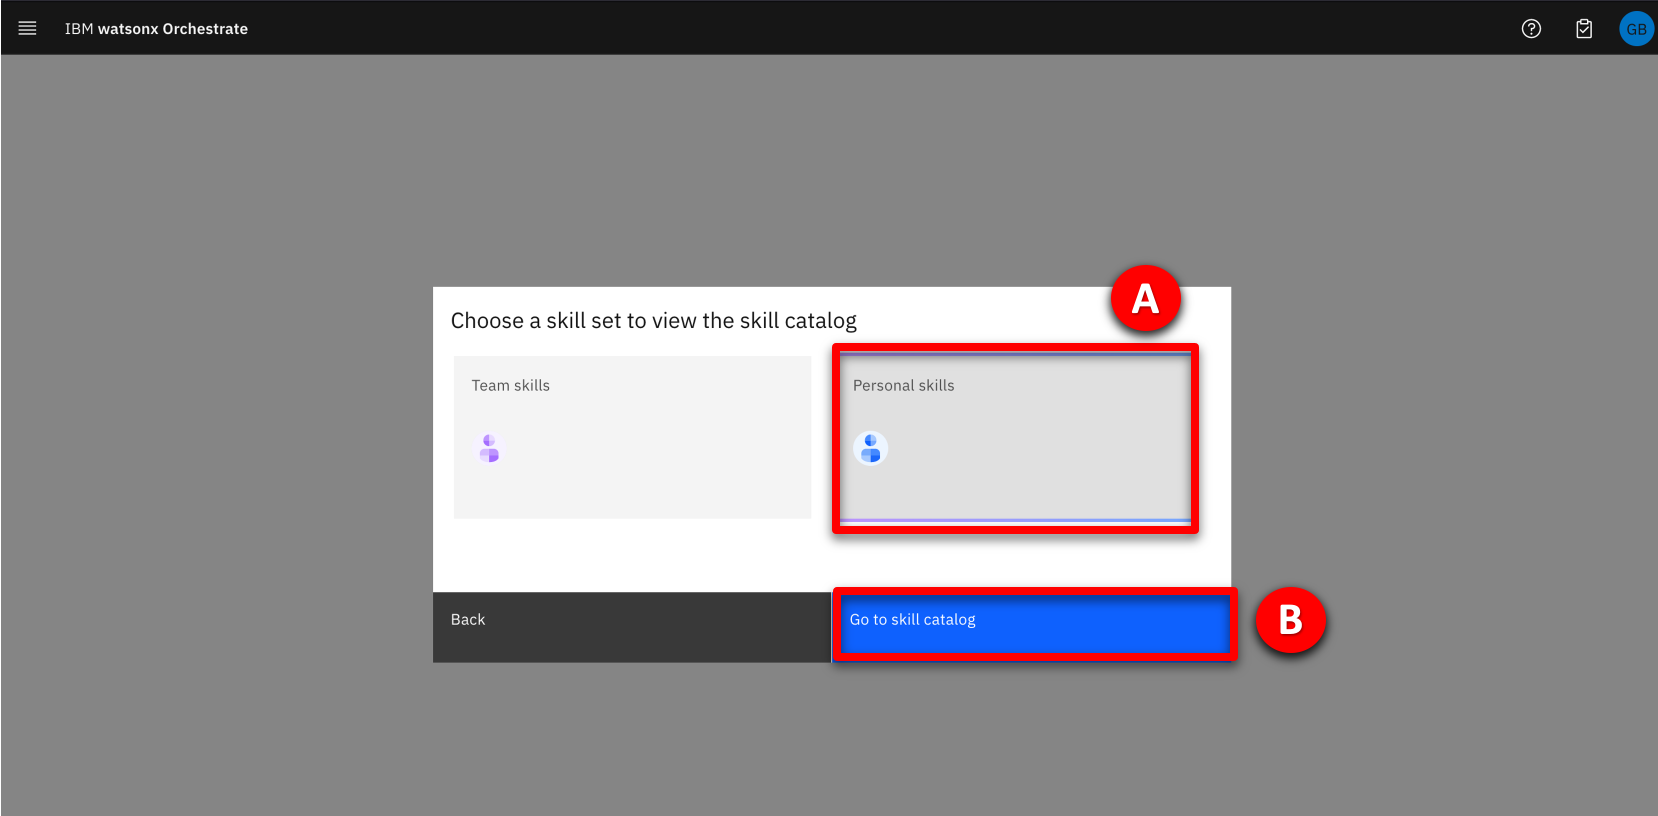 |
| Narration | Skills are grouped by application, such as Microsoft Teams or Salesforce. New skills are added to the watsonx Orchestrate catalog with each release. When an out-of-the-box skill is not available, builders can create new skills from several sources, including: 1. Open APIs: Skills are generated from OpenAPI specifications. 2. Embedded Automations: Decision and workflow skills are created by using the built-in automation builder. 3. IBM Cloud Pak for Business Automation/RPA: Skills are generated for automation services and robotic process automation (RPA) bots. 4. Composite skill flows: Individual skills are combined into a sequence. OpenAPI is a specification for documenting and standardizing the design and behavior of web APIs. An OpenAPI file provides the detailed outline of how a particular API works, including its operations, endpoints, data types, request and response formats and authentication methods. Decision automations and skill flows are covered in a later section, but first you’ll see how an individual skill based on an OpenAPI performs a customer search in this fictitious insurance company used at the start of the upsell process. |
| 2.1 | Customer search |
|---|---|
| Narration | The first task in the upsell process is to perform a predefined search against the customer system to find customers that have recent life events. This functionality is provided to users through the Get a list of customers skill. Let’s open the chat window to run this skill. |
| Action 2.1.1 | Click the hamburger navigation menu icon (A) and select Chat (B) from the left menu. |
| Action 2.1.2 | Click the Skills menu and select Personal skills if not already selected. 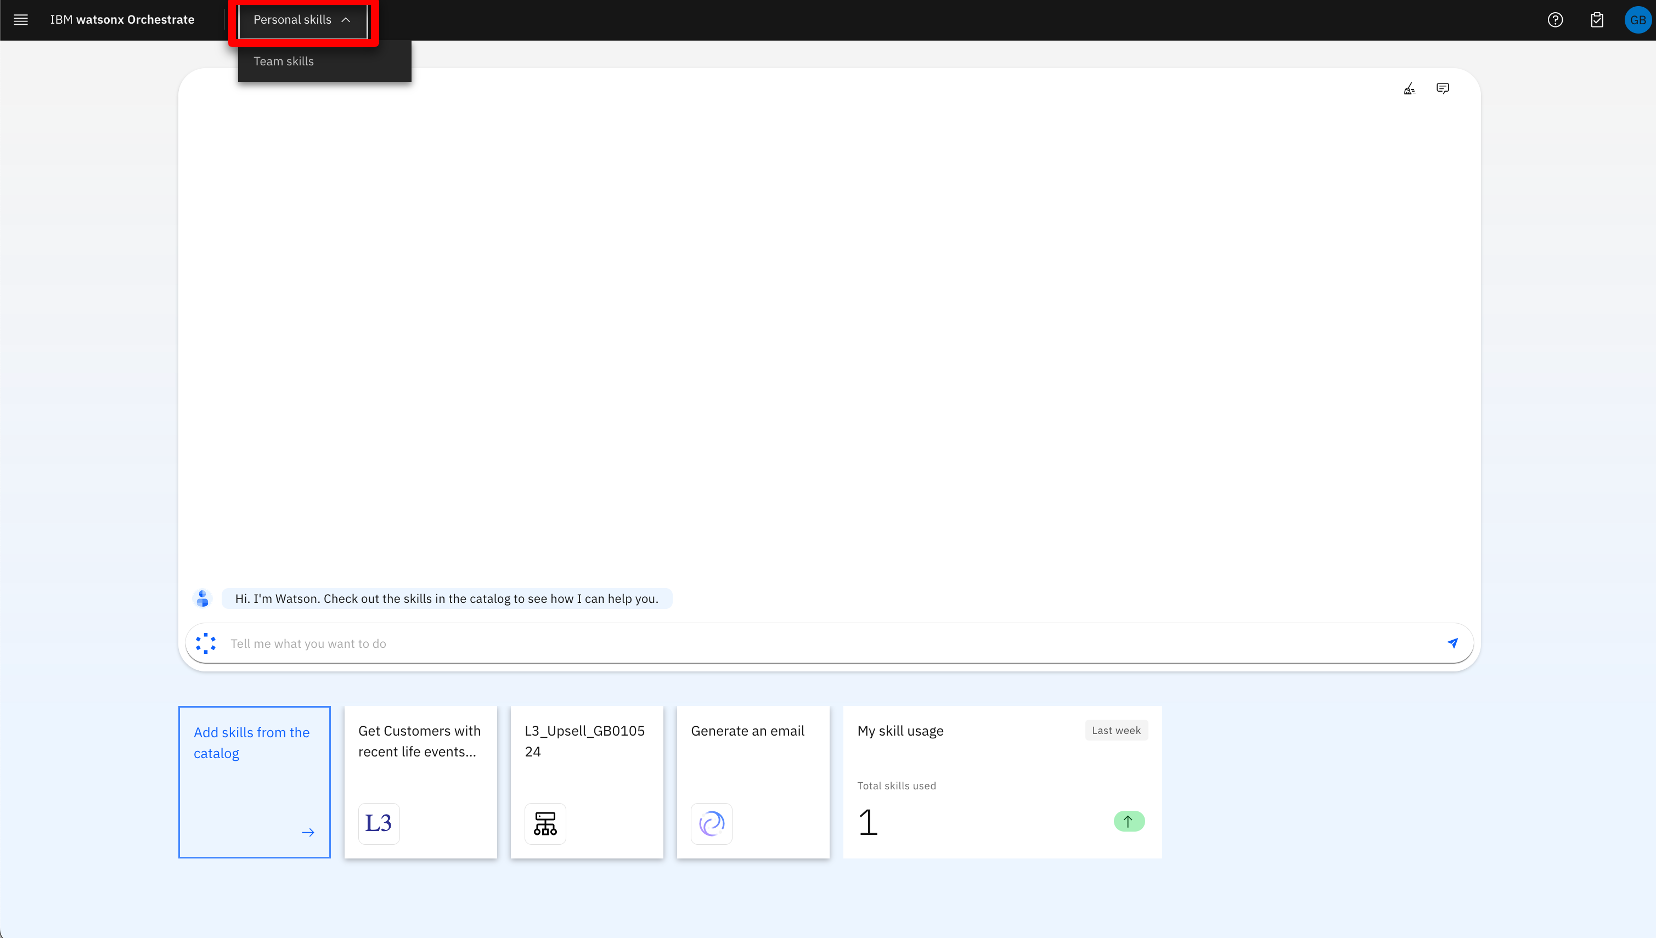 |
| Narration | In watsonx Orchestrate, skills are organized into apps. Users can click on their app tiles to run the skills they contain, or they can type a phrase to run the skill, such as Write an upsell email for my customers. |
| Action 2.1.3 | Click on the tile Get a list of customers with … tile to run the skill and fetch customers from the CRM system. |
| Narration | The results from this skill are shown in a table. All the listed customers have recent life events that could be used for cross-sell and upsell purposes. This skill has used a predefined search against the CRM system and provides an insurance seller with a list of potential upsell opportunities. This took just a few seconds and was done without having to use the CRM system directly or require CRM expertise. This skill is already useful as a standalone skill, but as we will soon see, combining its output with other skills can make it far more useful and powerful.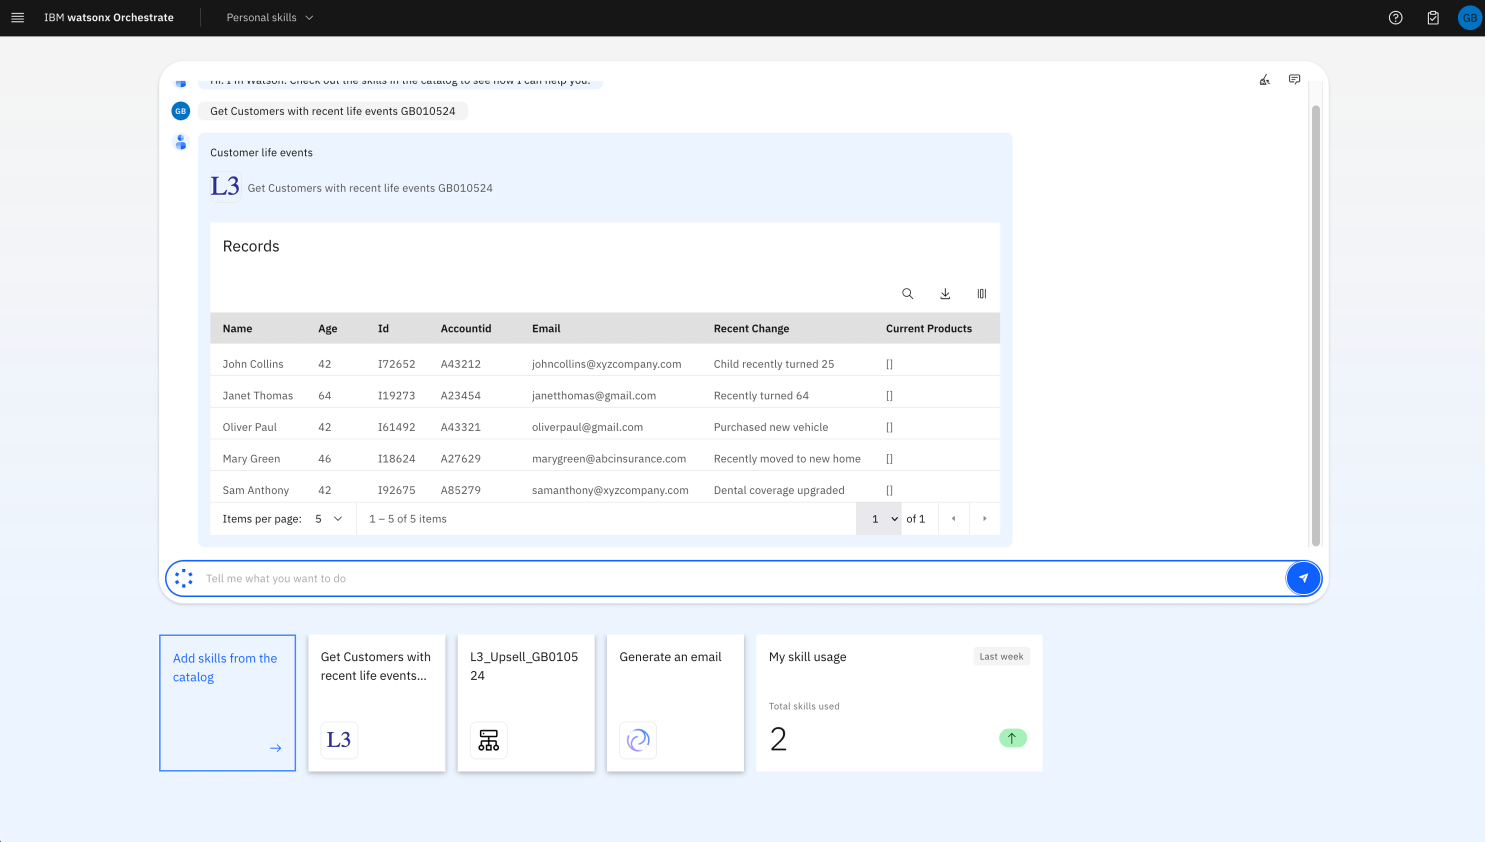 |
| 2.2 | Product upsell automation |
|---|---|
| Narration | The next skill is the upsell skill. This skill uses an embedded decision automation engine to match customers to upsell and cross-sell offers. This skill is run by clicking on its corresponding tile or by entering a prompt such as “upsell” into the chat window. |
| Action 2.2.1 | Enter “upsell” into the chat prompt and press Enter key (A). Alternatively click on the tile associated with the skill (B). 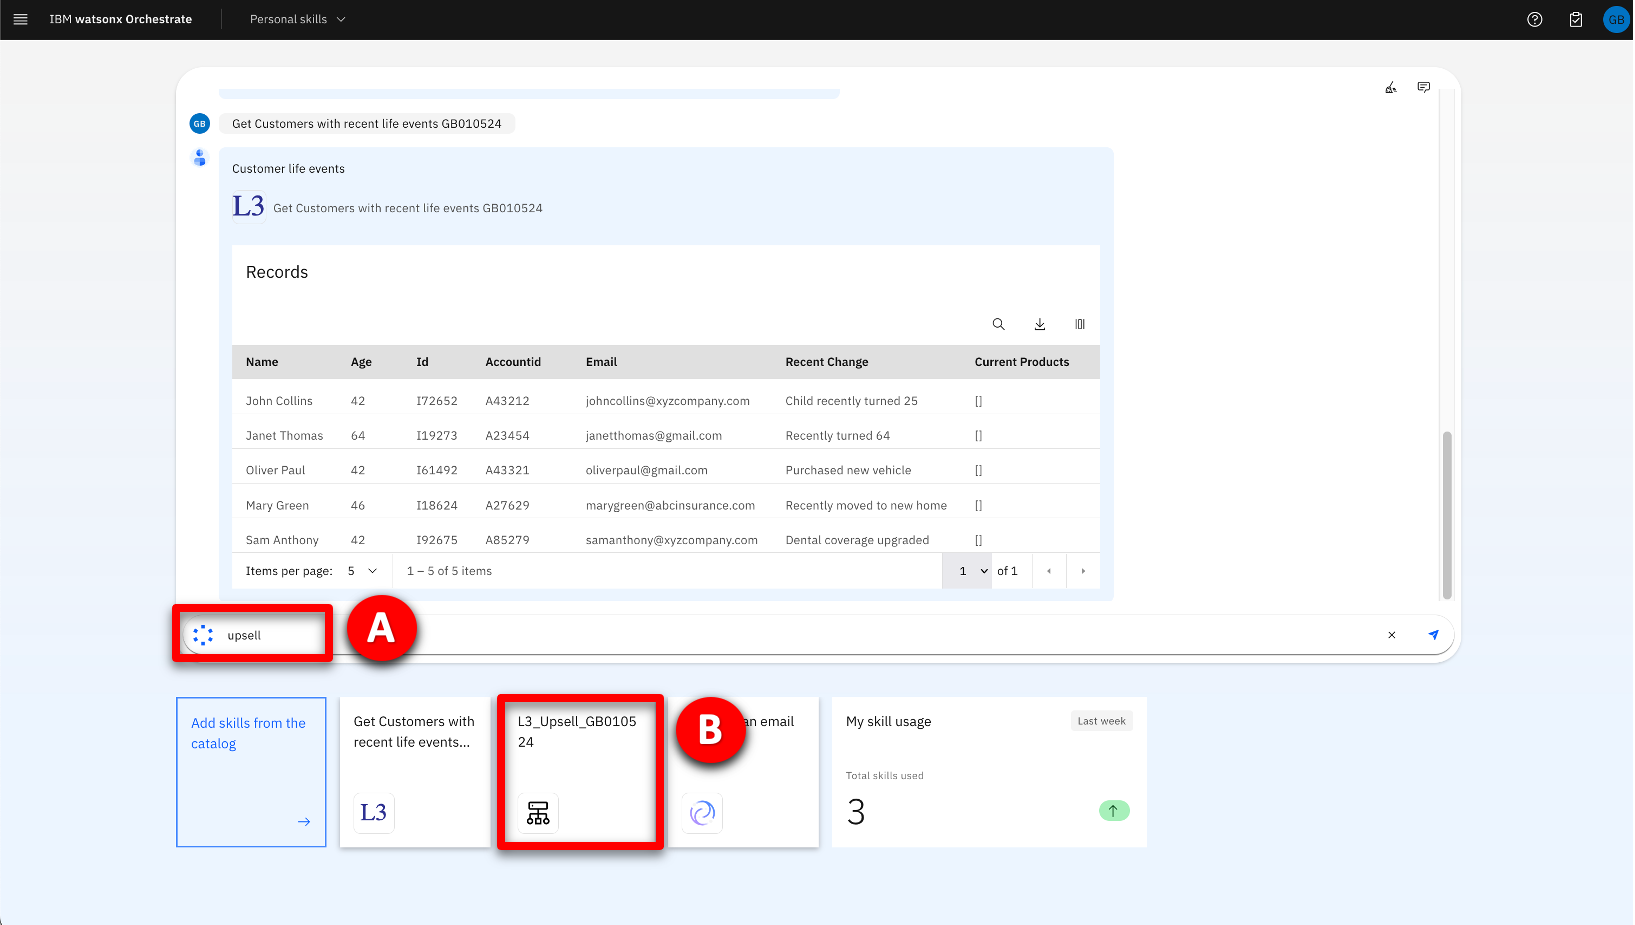 |
| Narration | To use this skill, the user must enter details about a customer, such as a recent life event, their age, and any current products they have purchased. In this example, just the name is provided so that a default response is returned. |
| Action 2.2.2 | Enter a person’s name into the name field (A), then click the Apply button (B). 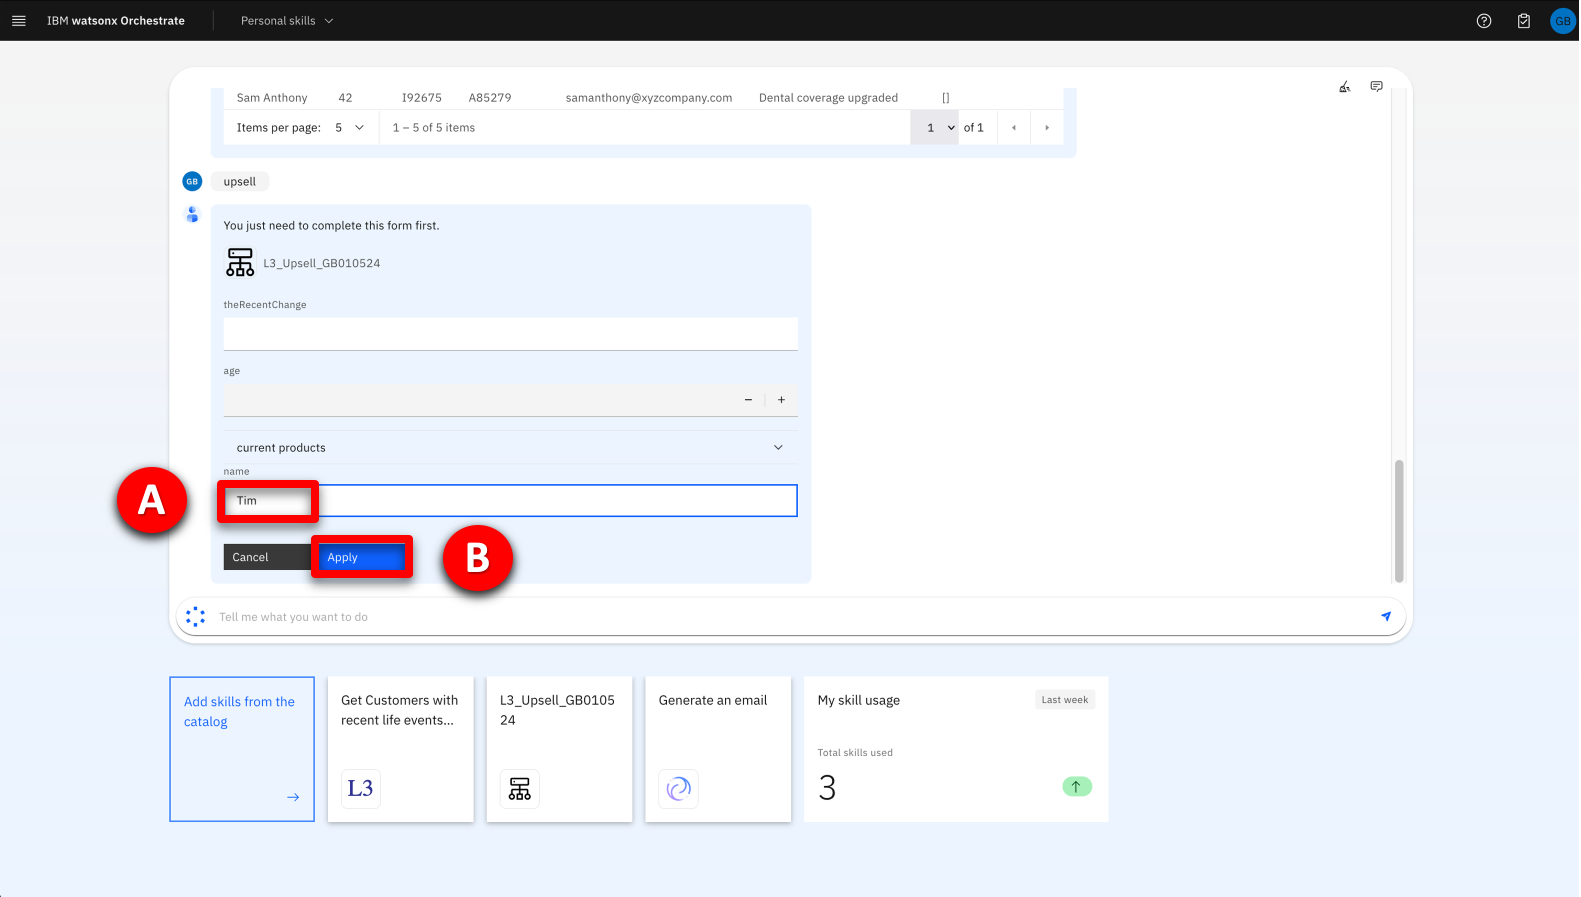 |
| Narration | The results from the ‘Product Upsell’ automation are displayed. These results contain a product recommendation for the selected customer and were provided almost instantly. This is another huge time saving for the sales agent; but in addition to the product recommendation the results also contain a prompt that can be used by a foundation model such as IBM Granite, to generate a personalized marketing email. Just like the customer search skill, the value of this skill is obvious, because manual data entry is time consuming and can introduce errors, the full value of this skill isn’t realized… but watsonx Orchestrate can autofill this information once the skill is part of a skill flow. 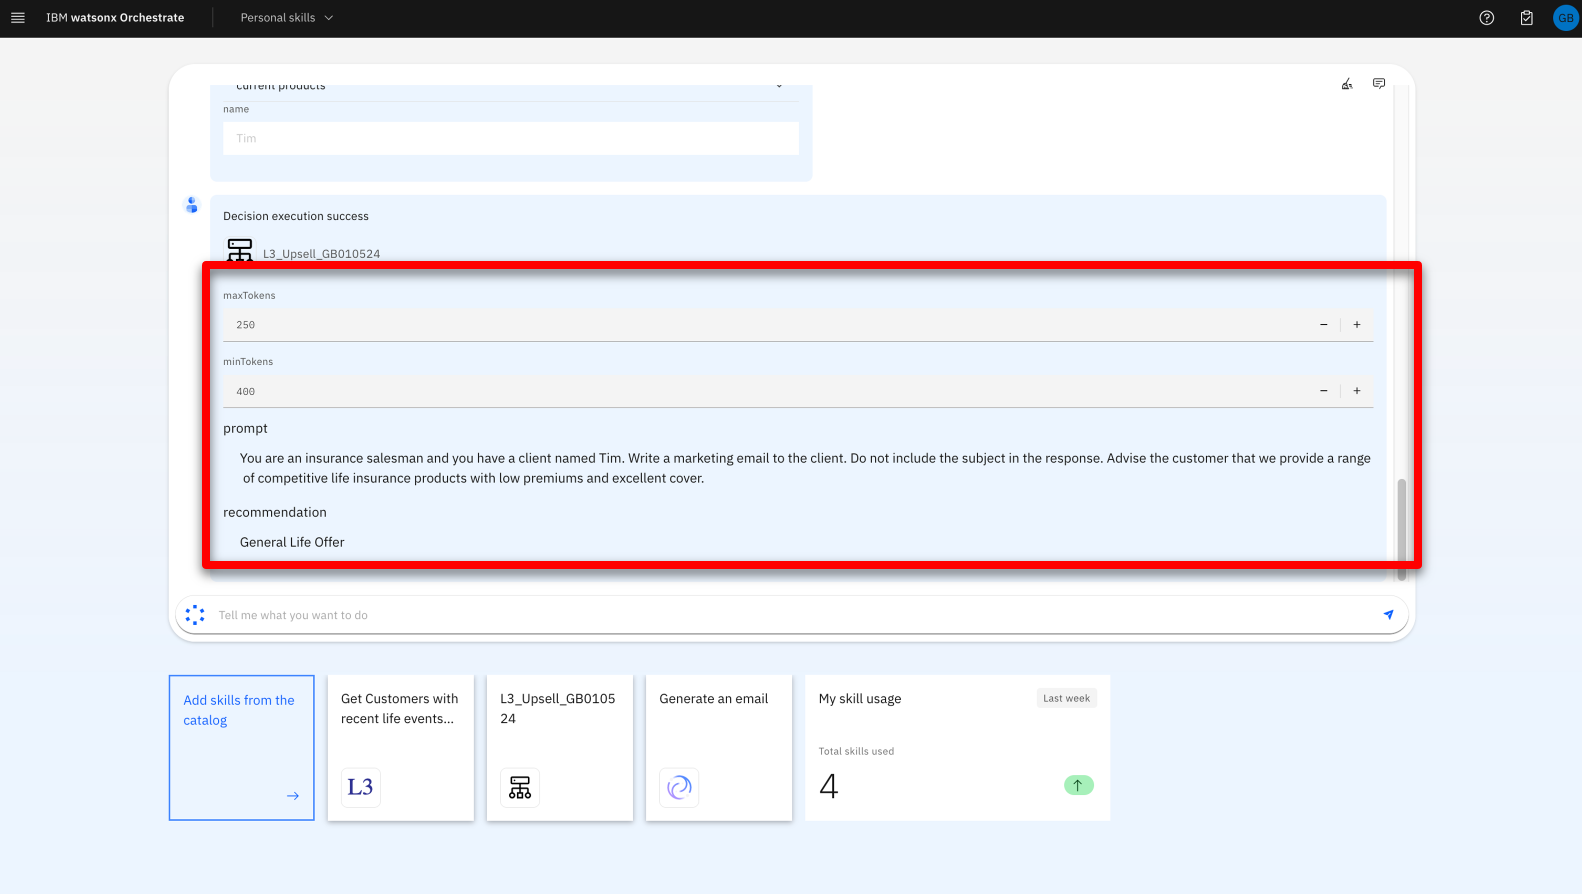 |
| 2.3 | Email generation |
|---|---|
| Narration | The last individual skill is Generate an email. This skill uses the IBM Granite foundation model to generate an email based on a prompt. This skill is run by clicking on its corresponding tile or by entering a prompt such as “generate an email” into the chat window. |
| Action 2.3.1 | Enter “generate an email” into the chat prompt and press Enter key (A). Alternatively click on the tile associated with the skill (B). 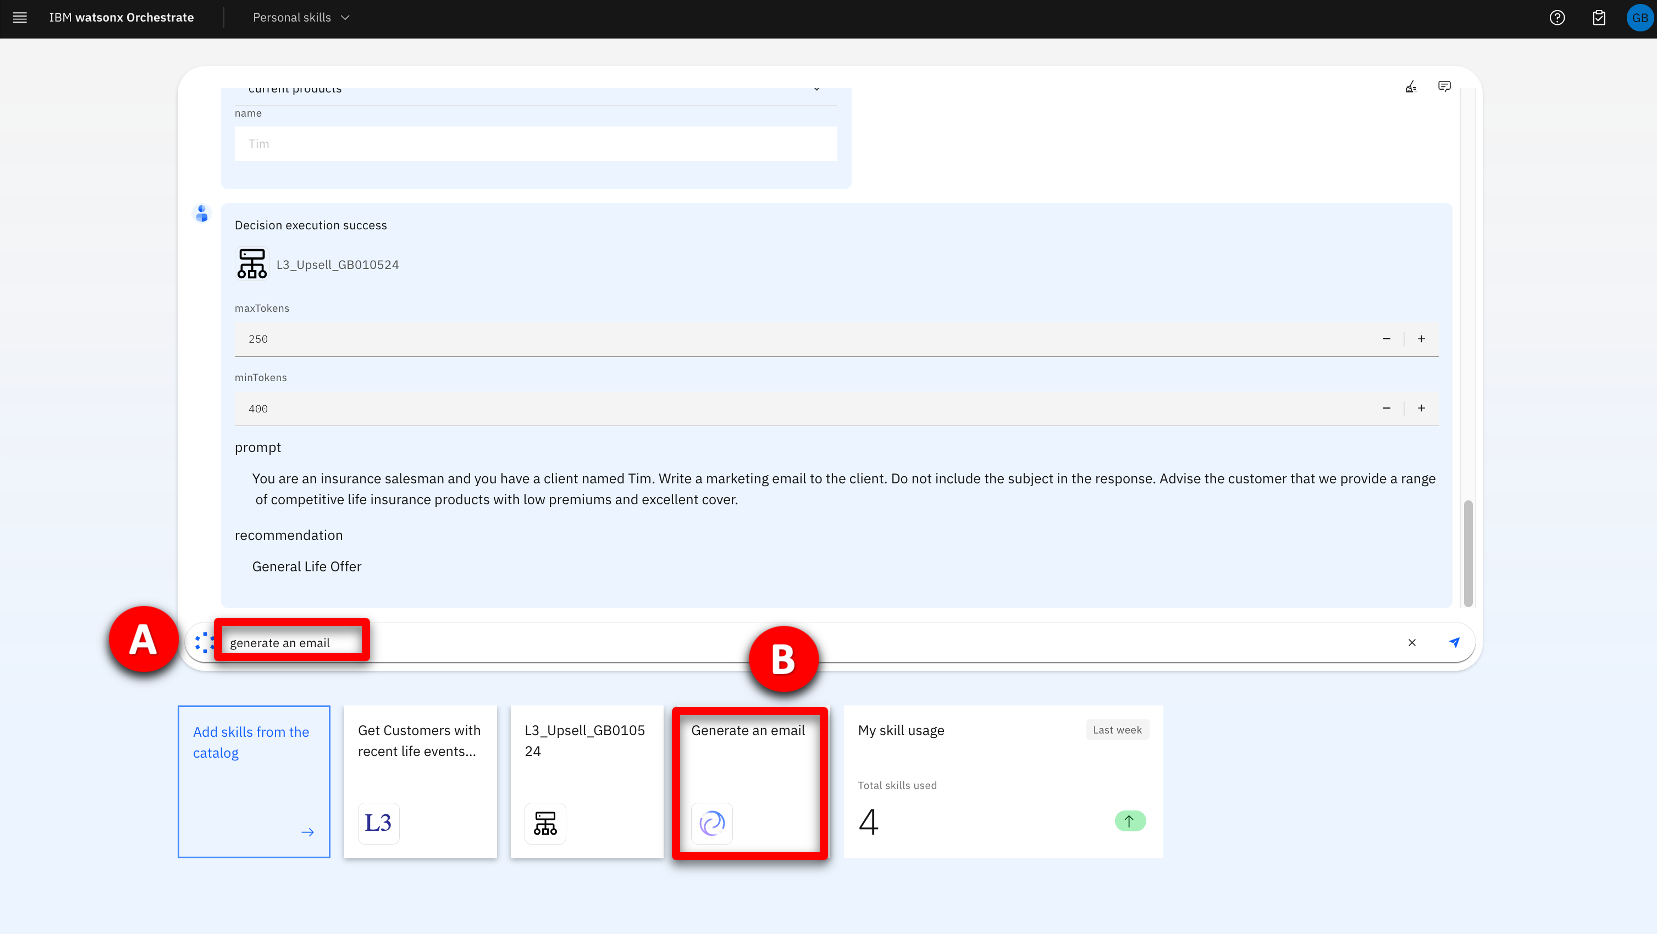 |
| Action 2.3.2 | Copy the prompt text produced by the L3_Upsell skill (A) and paste it into the Input instruction panel (B), then click Apply (C). 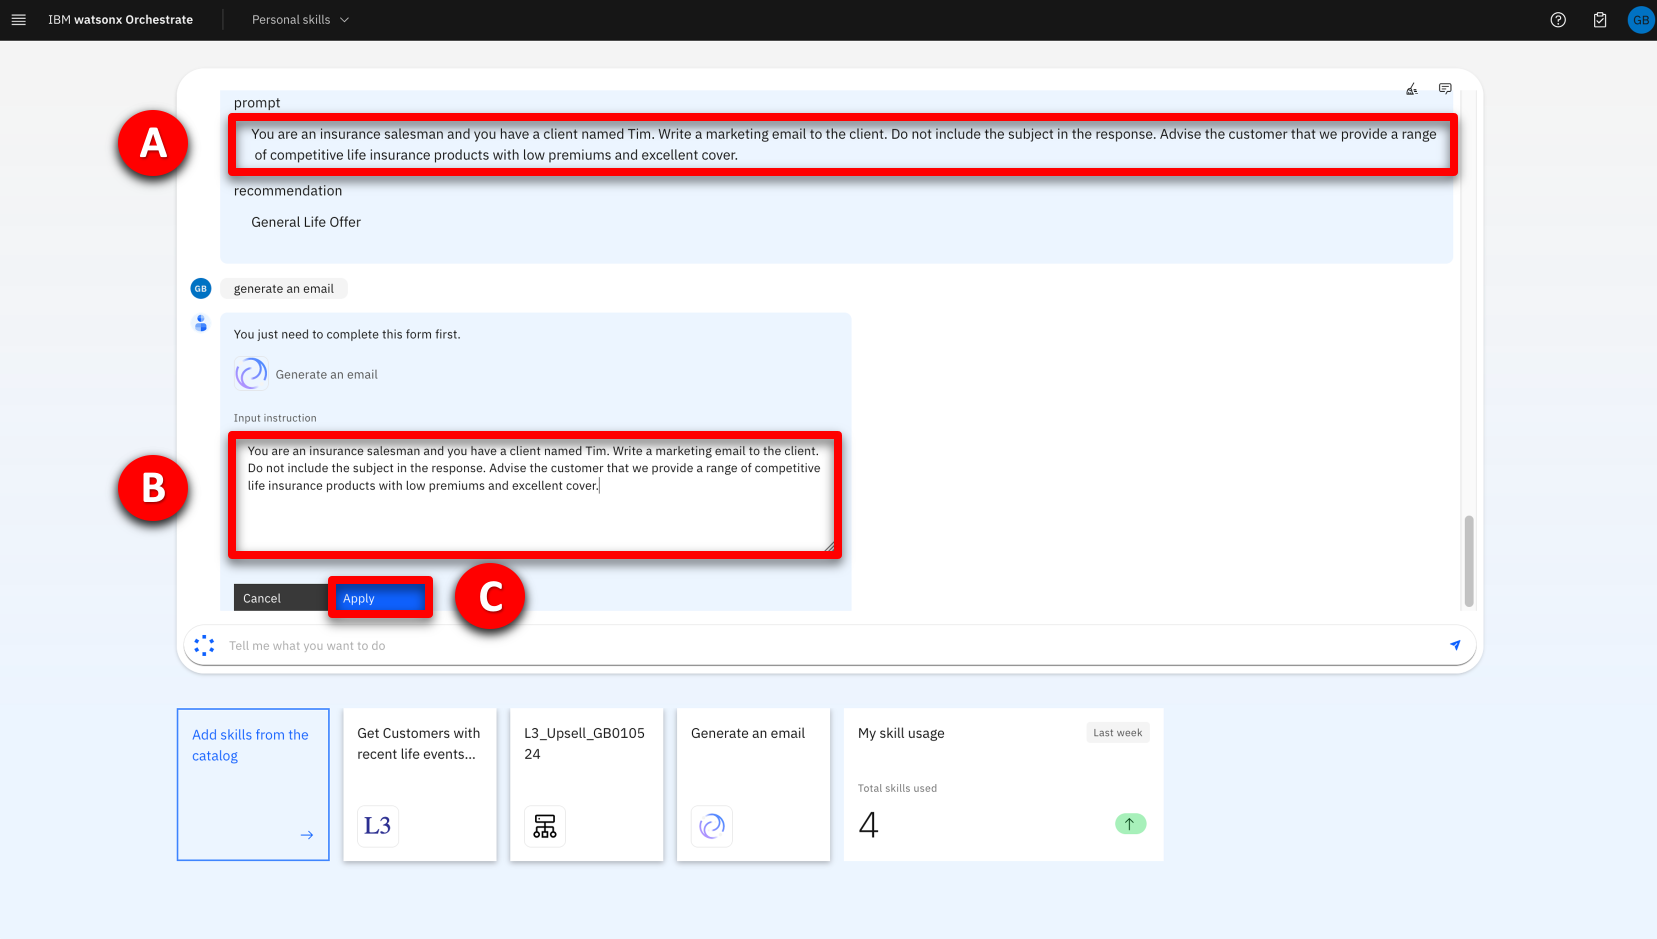 |
| Narration | Content generation will take approximately 30 seconds. IBM watsonx Granite is used to generate the email body. This model is trained on trusted enterprise data, with additional layers of protection, so you can be certain it will not produce harmful or inappropriate content. The generated email is displayed, and also confirmation that it came from the IBM Granite model.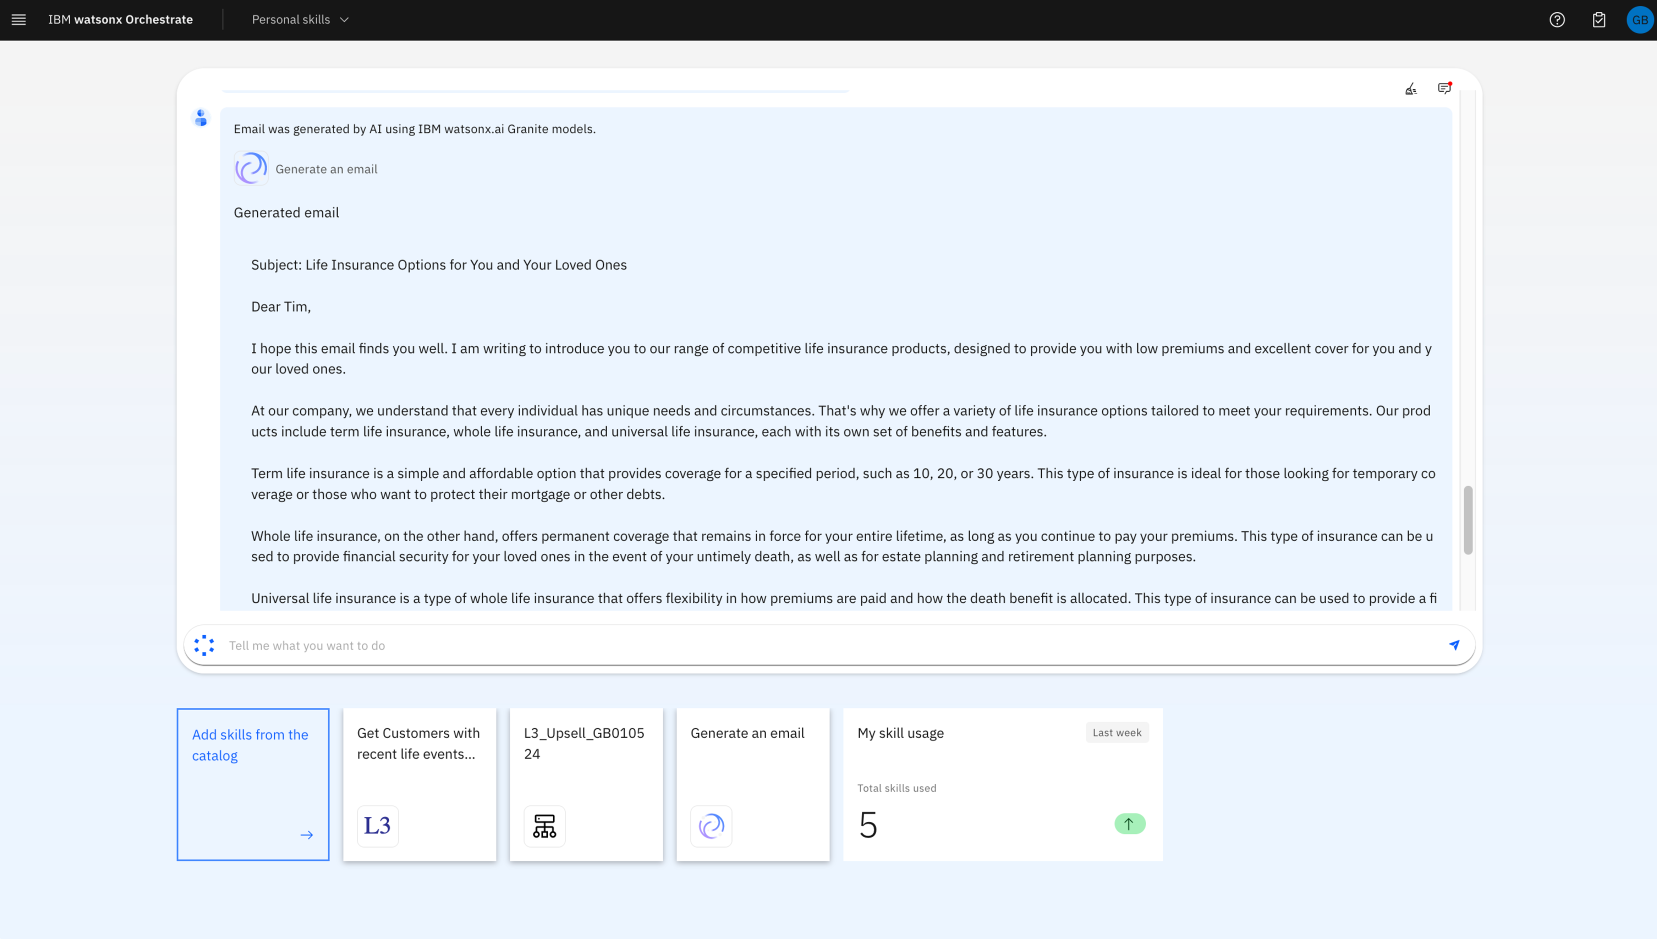 |
3 – Explore decision automation
| Narration | The ‘L3_Upsell’ automation skill represents the digitized knowledge of a product expert and matches customers to upsell and cross-sell offers. It does this using prescriptive AI, where the decision-making process used by an expert has been transformed into a decision model. Within the decision model, the product upsell logic is represented in natural language and decision tables that ensures that the logic remains clear and simple to non-technical users. Furthermore, the no-code tools in watsonx Orchestrate Automation Builder enable non-technical users to create, test and maintain the decision logic to adapt to changing circumstances. Let’s see how this skill’s business logic is managed with watsonx Orchestrates’ Automation Builder. |
| Action 3.1 | Click the hamburger navigation menu icon (A), then select Skill studio (B) from the left menu.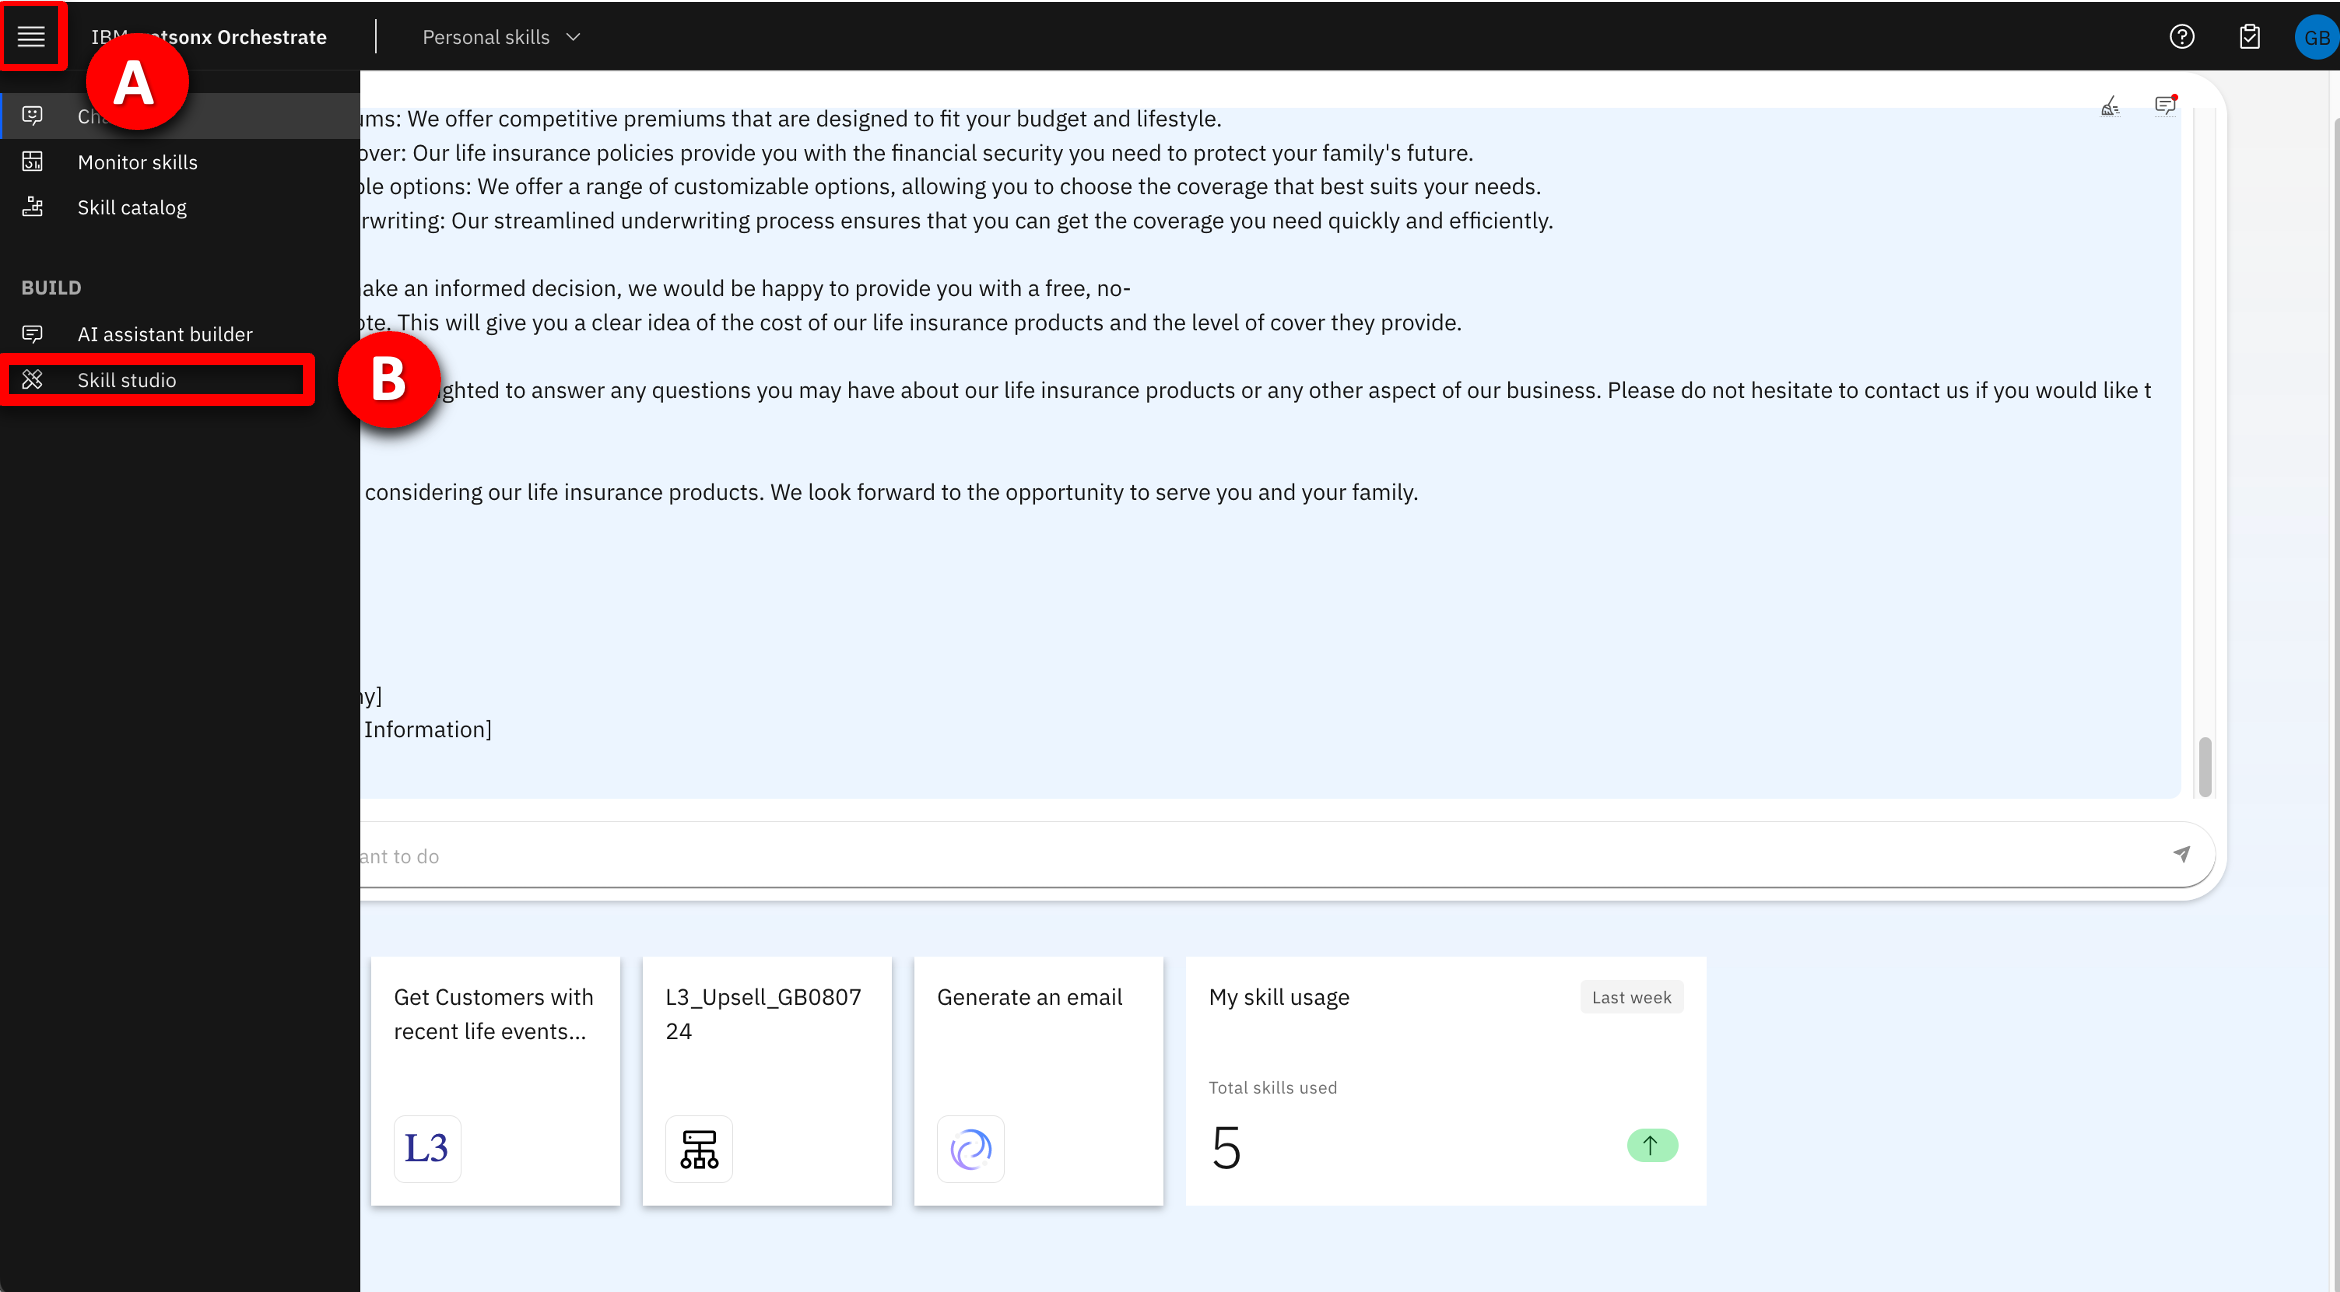 |
| Action 3.2 | Select the Projects tab (A), then enter the unique reference “XXddmmyy” that corresponds to your decision model in the search field (B) and press Enter, then click on the tile that corresponds to your automation (C).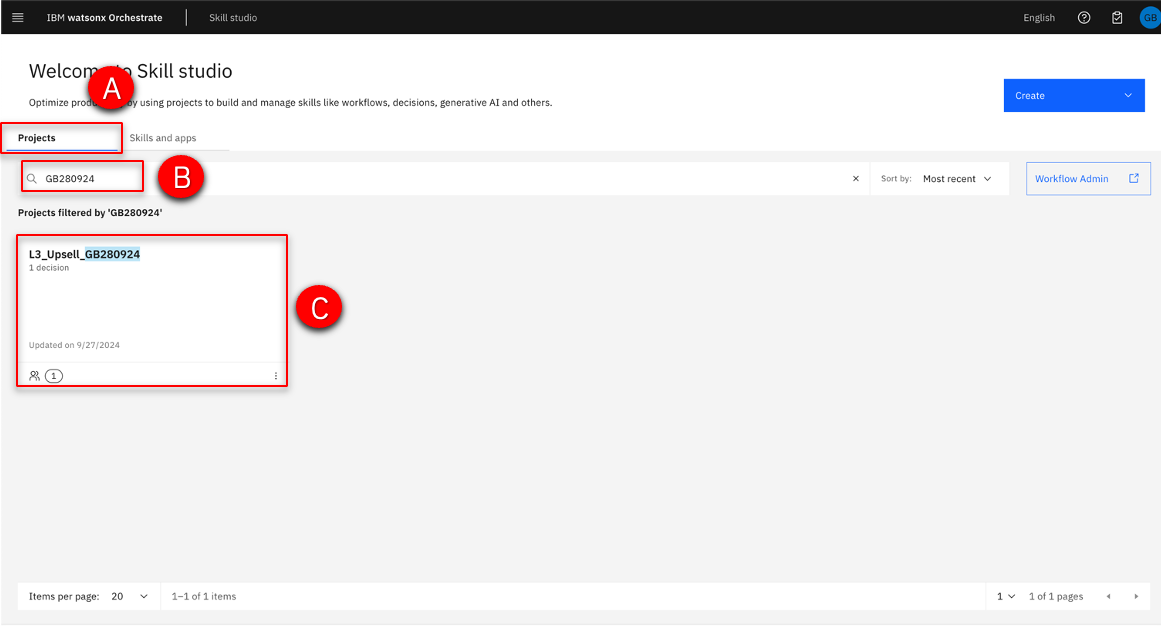 |
| Narration | This decision model shows the structure of the decision-making process. Data feeding the model is shown at the bottom of the diagram and represented by the green input nodes. In this example, the input data is the customer record and the recent change. This data passes through intermediate decision nodes that incrementally infer new information by using business rules. The output decision node is shown with a dark blue line and produces the decision result. In this example, the decision model determines the best product for the selected customer and produces a GenAI prompt along with some tuning parameters so that a generative AI model can create a marketing outreach email. The decision nodes contain the business rules that perform the logic to build the prompt. The ‘Initial Instruction’ node uses the customer’s name to form the instructions that are passed to the generative model such as ‘You are an insurance salesman, write a marketing email for your customer John Collins’. The Product Recommendation node determines the most appropriate product to recommend to the customer based on their age, recent life events and existing products they hold. The output from these intermediate decision nodes is brought together in the top node called Upsell prompt. This node produces the final output from the decision model based on the intermediate results. 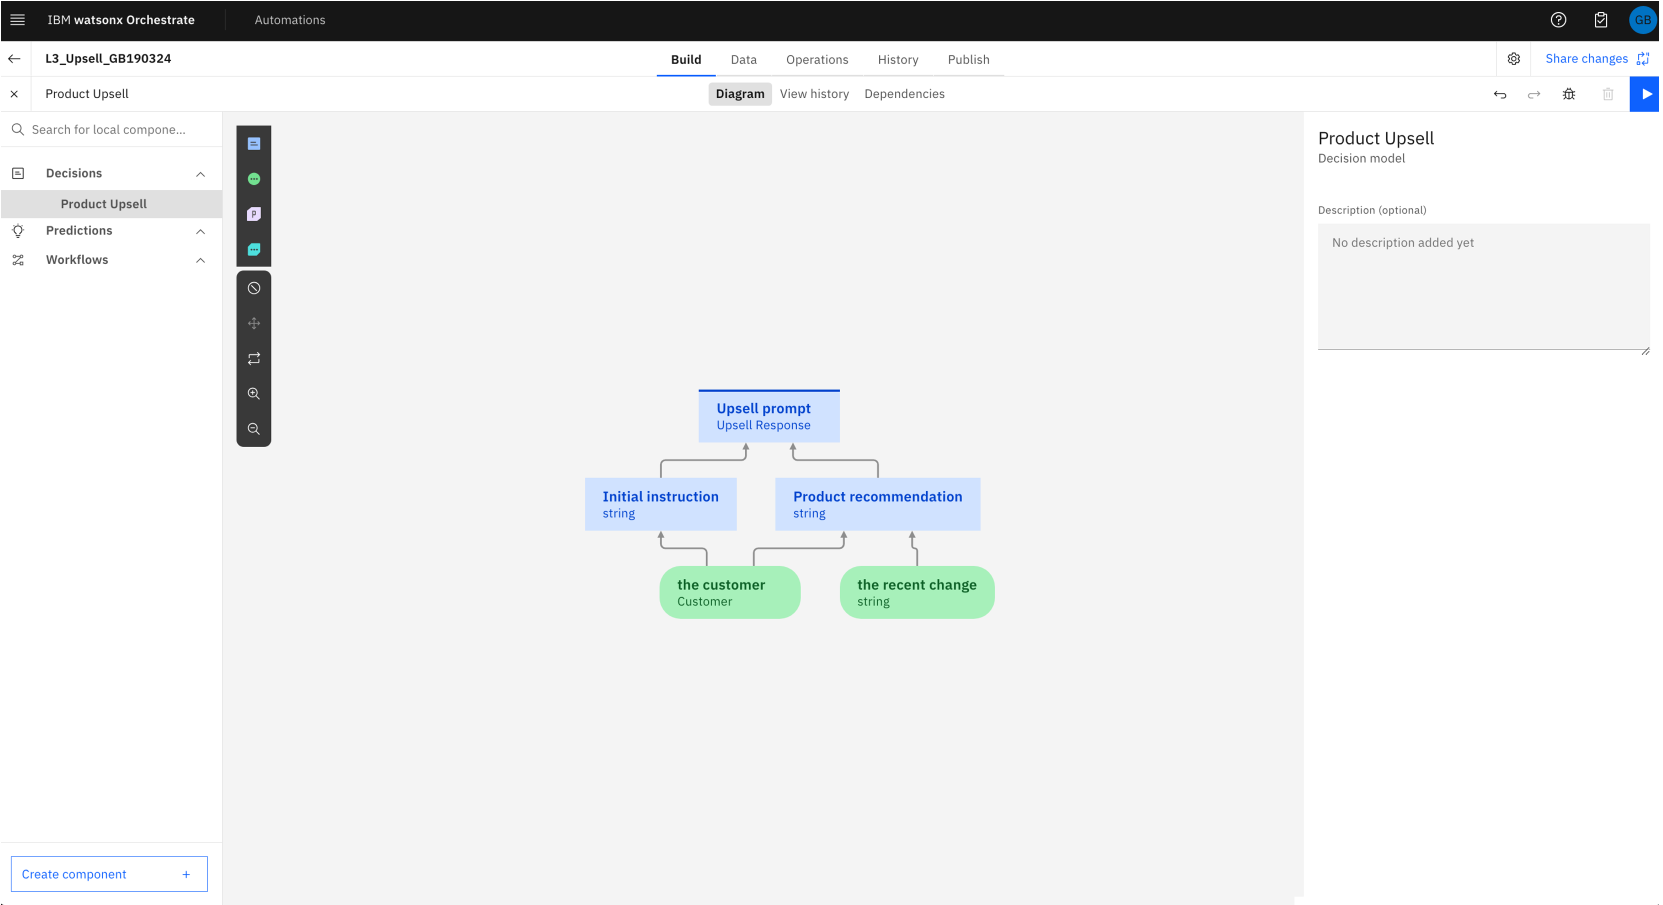 The palette on the left of the canvas is used to add additional nodes to the model. These can be additional decisions and inputs. They can also include predictive models enabling you to blend prescriptive business rules and predictive models together, for example the predictive model could use a regression model to predict a best price, but then prescriptive business rules could be used as guardrails to ensure the price stayed within a certain range. Decision models can also include nested models, and you can also include generative AI. Let’s take a closer look at the product recommendation logic. |
| Action 3.3 | Click the Product recommendation node (A) then select the Logic tab (B) in the Product recommendation section that appears on the right. |
| Narration | The rules that are applied in this decision node are shown on the right of this screen. Note how there is a decision table called Product recommendation. This table houses the main logic, a business rule to check for duplicate recommendations for products already held, and a default rule that will apply if no other product recommendations can be made. Let’s take a closer look at the product recommendation decision table. |
| Action 3.4 | Click the Product recommendation decision table.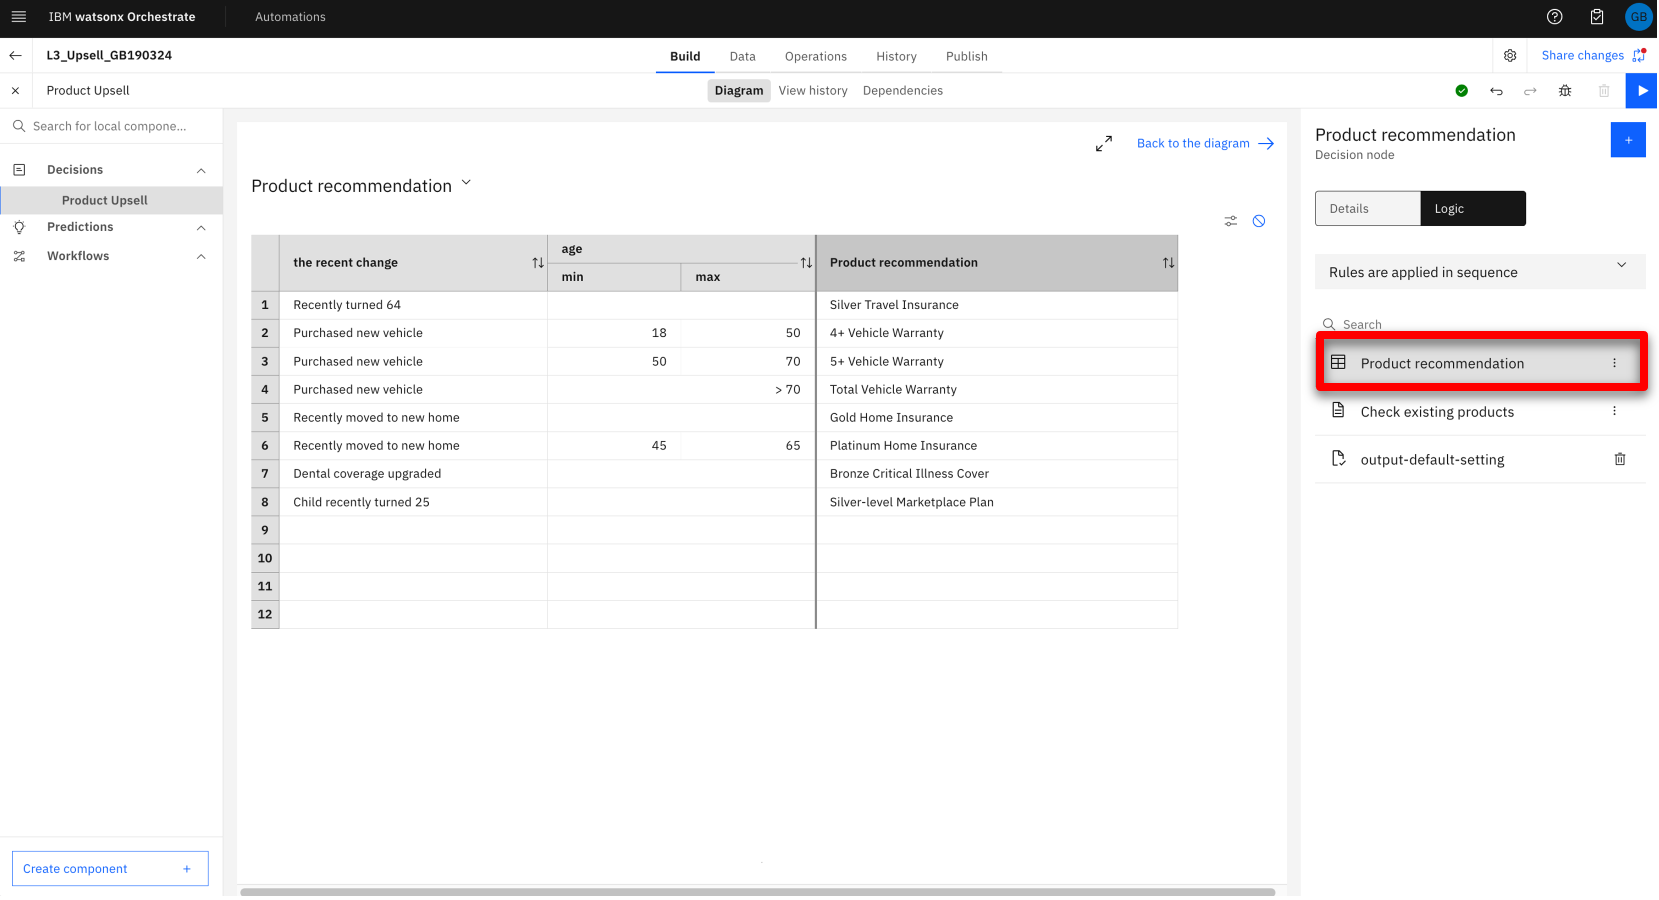 |
| Narration | Decision tables are useful when many rules will share the same structure and it is helpful to view them together. In this example, every row in the table represents a rule that reasons over the customers recent change, along with their age, to determine a product recommendation. In this example, the recent change and customer age are both used as condition columns and shown on the left. The column on the right is the action column and provides the product recommendation. Decision tables can contain more condition columns and multiple action columns to represent complex logic, but the logic will remain clear and maintainable. Many decision tables can work together to implement very complex logic, whilst keeping the logic clear and readable to non-technical users. IBM watsonx Orchestrate’s Automation builder also includes a preview capability to test the results produced by the decision model. Clicking the Play icon in the top-right corner opens the preview window. |
| Action 3.5 | Click the Play icon in the top-right corner of the screen. 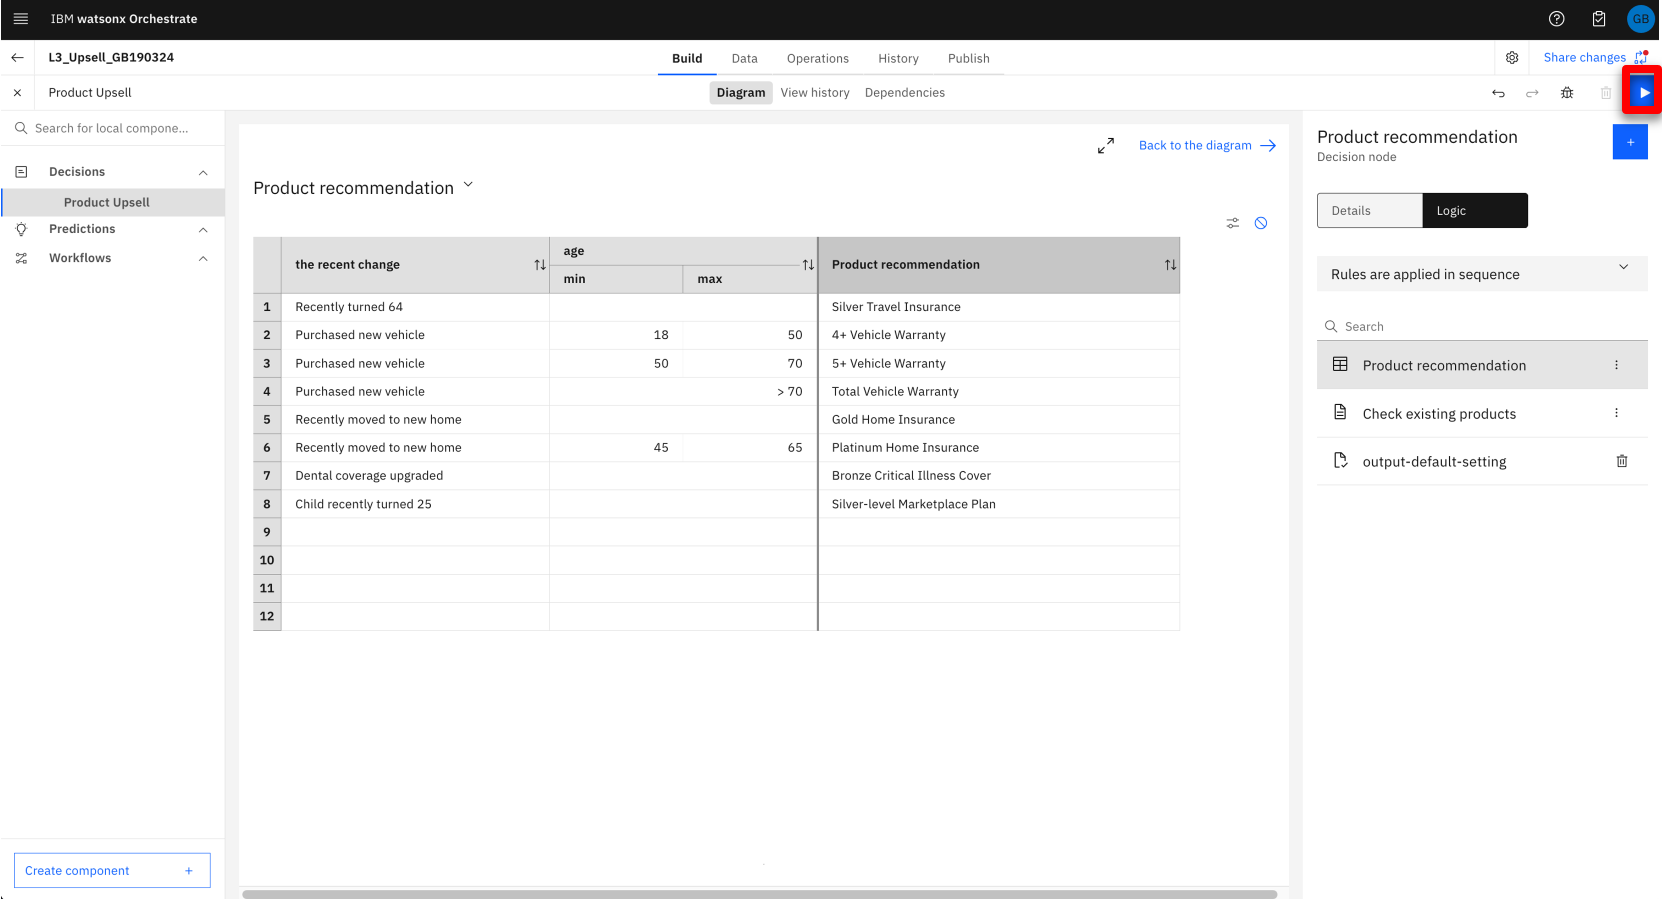 |
| Narration | Run a test scenario. |
| Action 3.6 | Click the Preview button.  |
| Narration | The rules are run, and the results are displayed. At the top is the final output, but below this we can also see all the intermediate results as the data passed through the decision model. By clicking the show more link, we can expand the final output and see the complete information returned from the decision. This contains the product recommendation, the GenAI prompt and the min/max tokens that control the content length. |
| Action 3.7 | Click the Show more button. 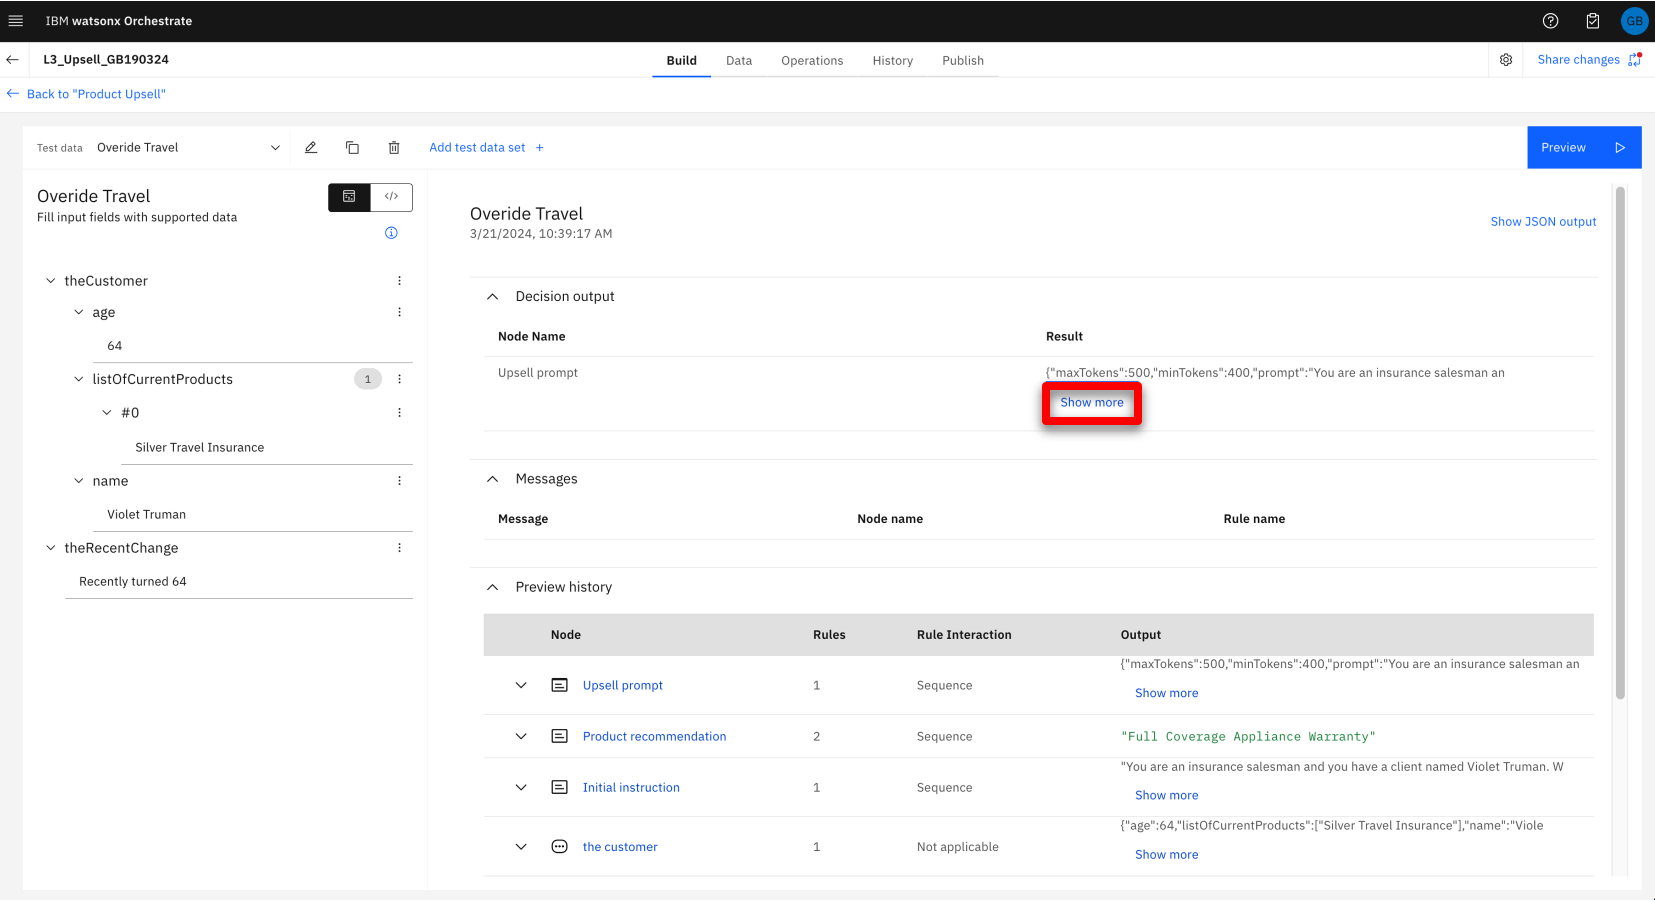 |
| Narration | Many test scenarios can be created, these are run by selecting them and pressing preview. |
| Action 3.8 | Click the drop-down arrow (A) in the Test data section and select another scenario, then click the Preview button (B).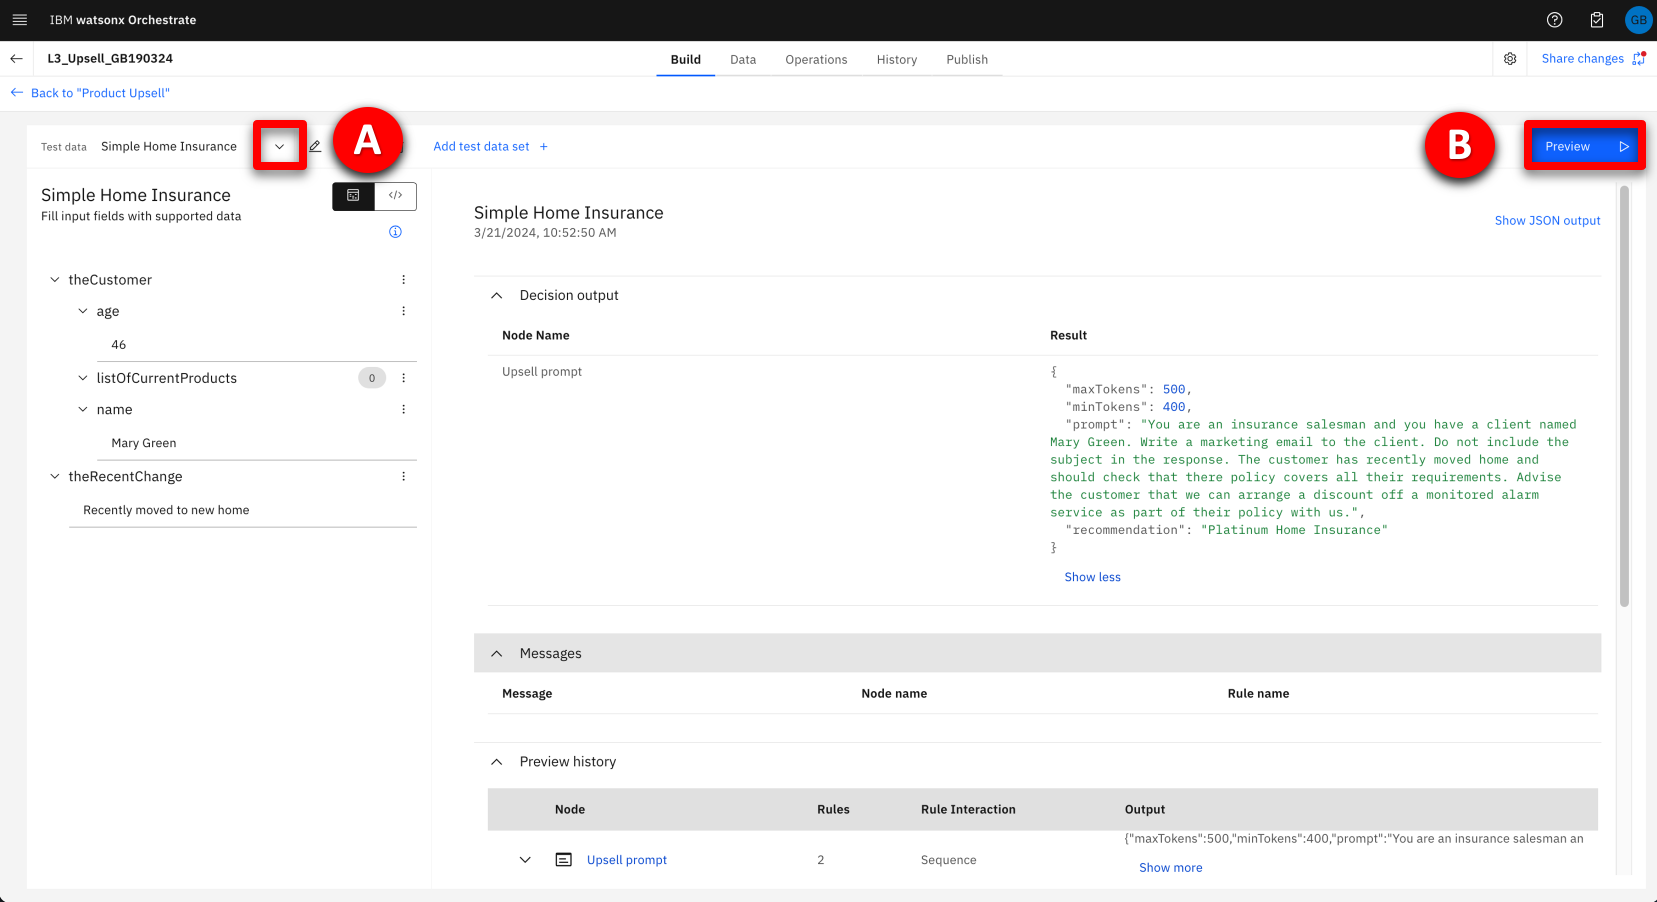 |
| Narration | Once the business logic is ready, it is deployed as a skill that can be invoked from the chat window directly, or it can be combined with other skills in a skill flow. |
4 – Combining skills into skill flows
| Narration | Individual skills can be useful when used in isolation, but greater value can be unlocked when they are combined into skill flows. |
| Action 4.1 | Click the hamburger navigation menu icon (A) and select Skill studio (B) from the left menu.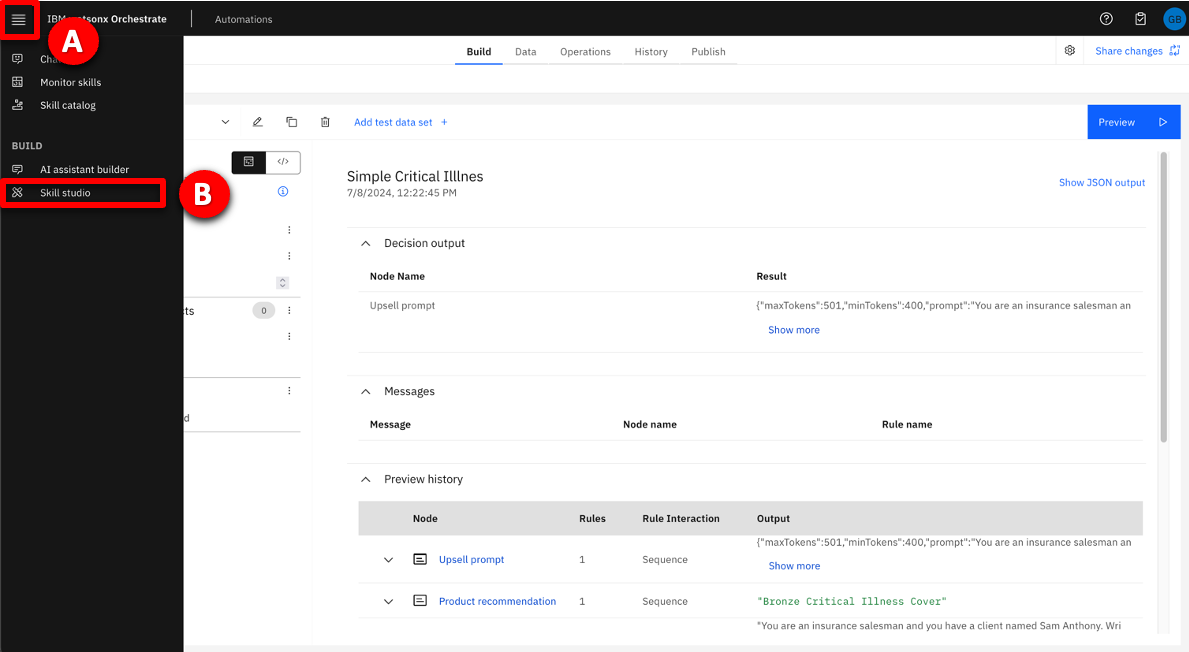 |
| Narration | IBM watsonx Orchestrate provides access to a broad range of skills that help users perform their daily tasks. It comes with a collection of out-of-the-box, ready-to-use skills that range from working with productivity tools to providing deep analytical insights. IBM watsonx Orchestrate developers, called ‘Builders,’ can create customized skills like the customer search and product upsell skills described earlier. As individual skills they are useful on their own, but combining them together can save an insurance sellers time, avoid errors, and produce better results. Skill flows connect multiple skills together by using a low-code flow editor. In this example, a skill flow is created to combine the customer search skill with the product upsell decision and then generate a marketing email for a selected customer. Let’s create the skill flow now. |
| Action 4.2 | Click on Create skill (A), then select Skill Flow (B).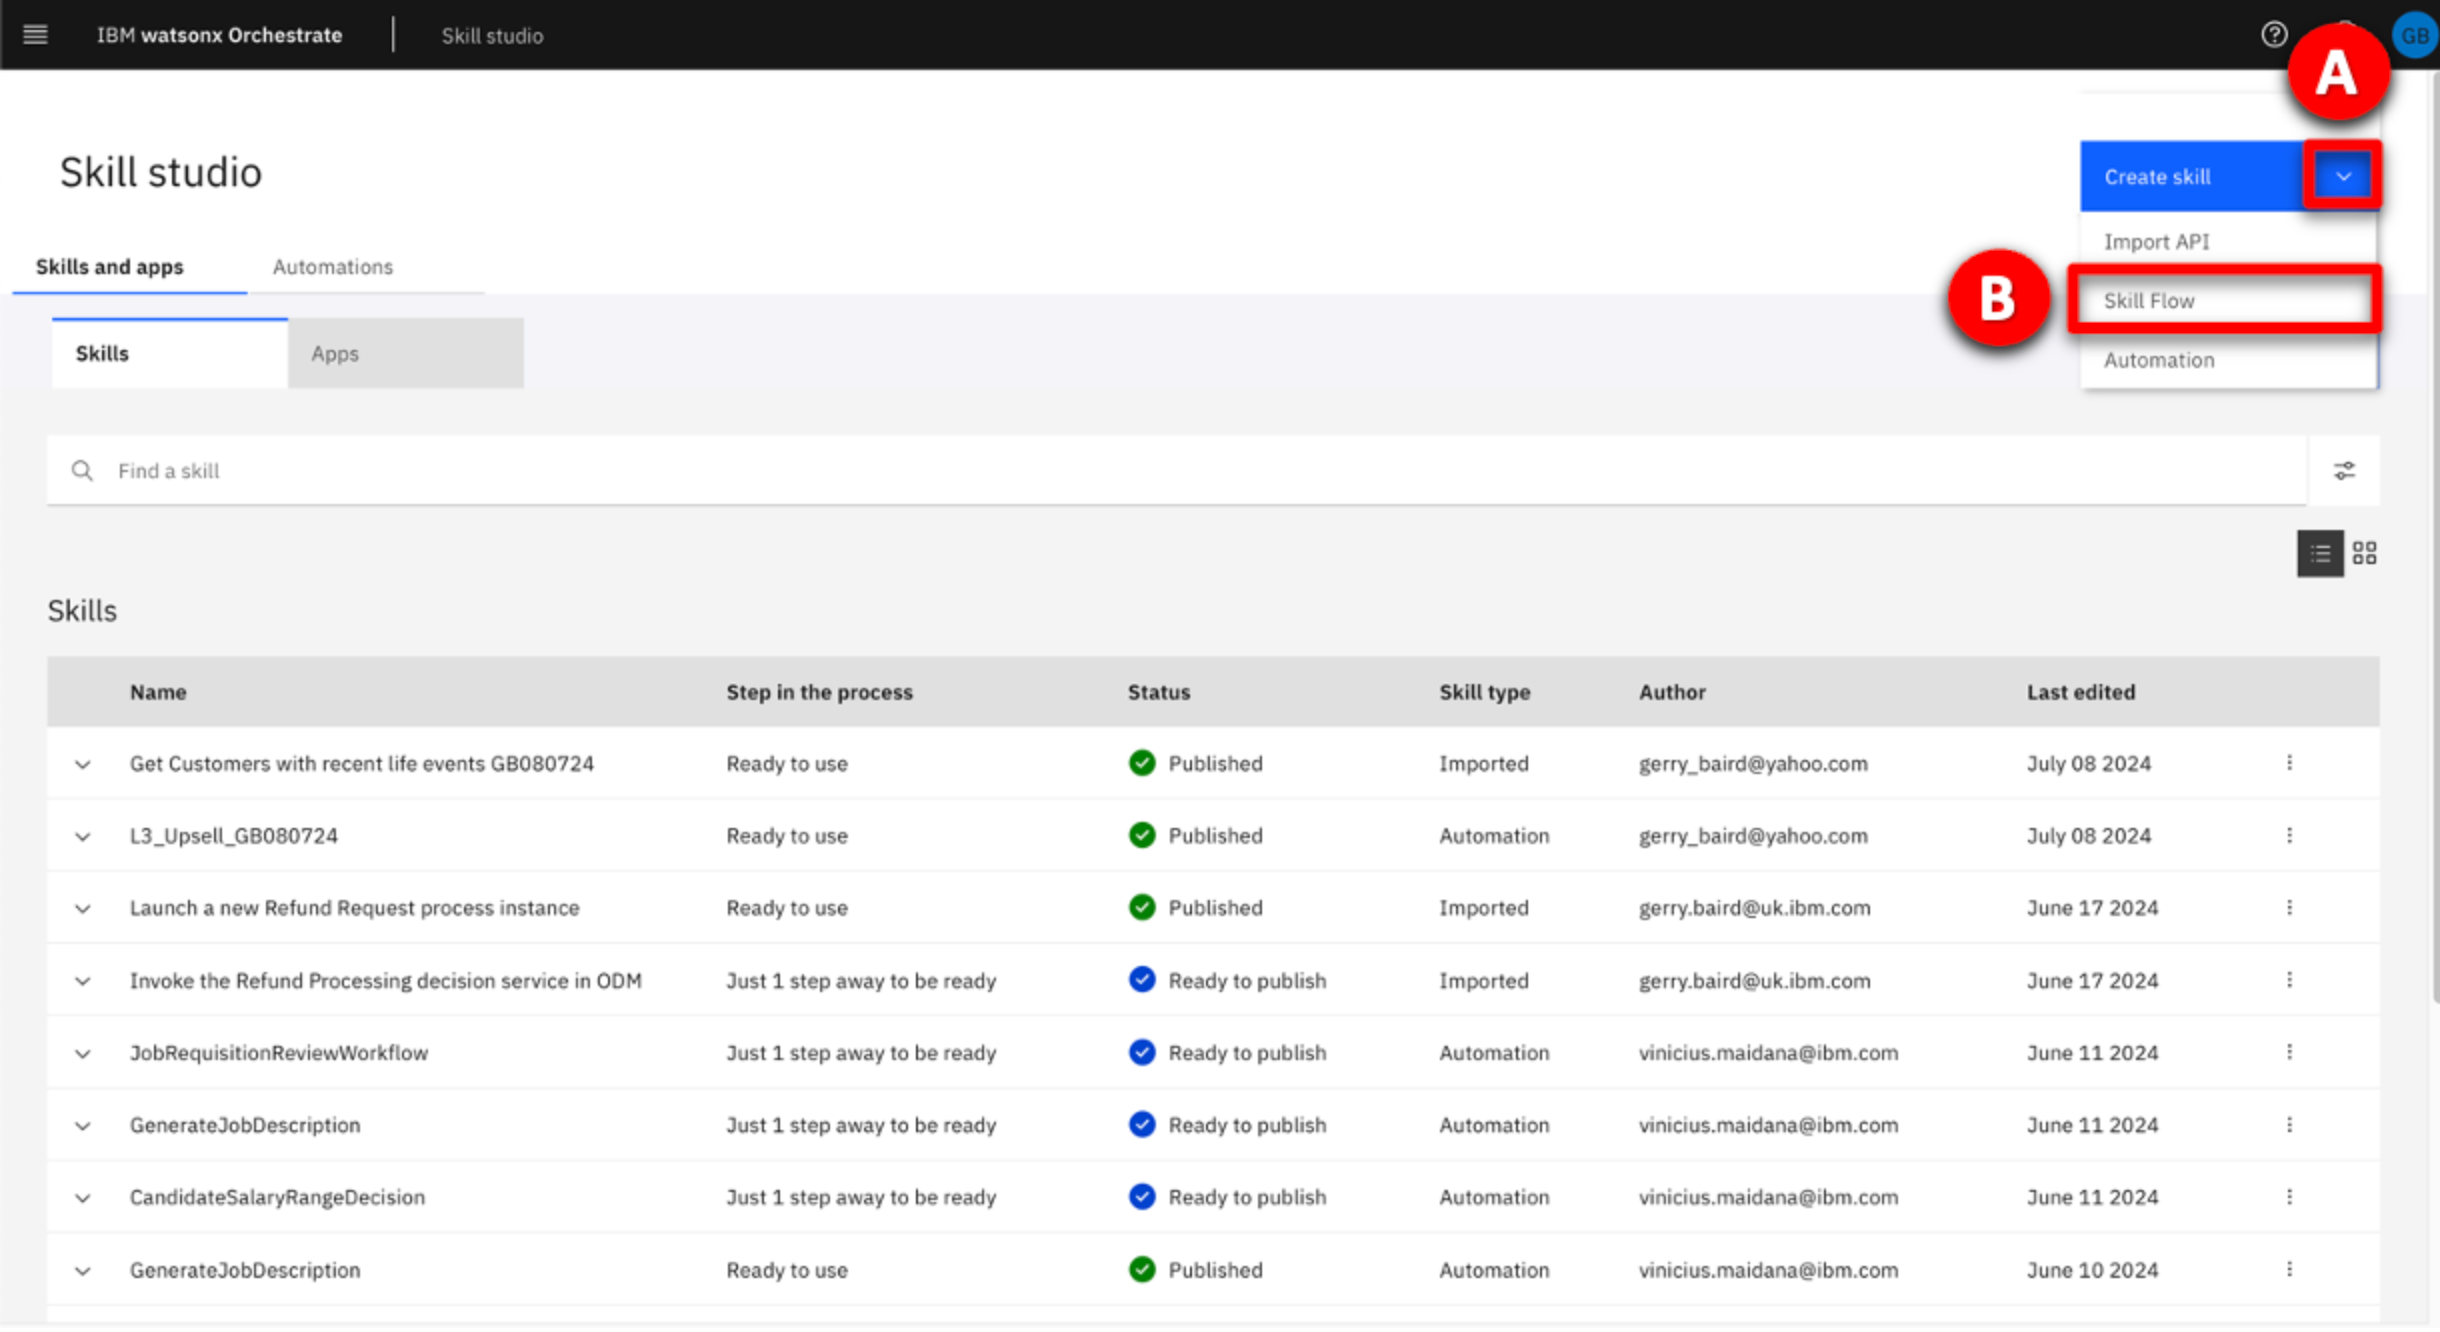 |
| Narration | The skill flow requires a unique name. |
| Action 4.3 | Click the horizontal layout icon (A). Click the Pencil icon (B) and when the Edit Skill flow details section opens on the right, enter a name for the skill flow using the template Upsell XXddmmyy (C). Now click the Save button (D). 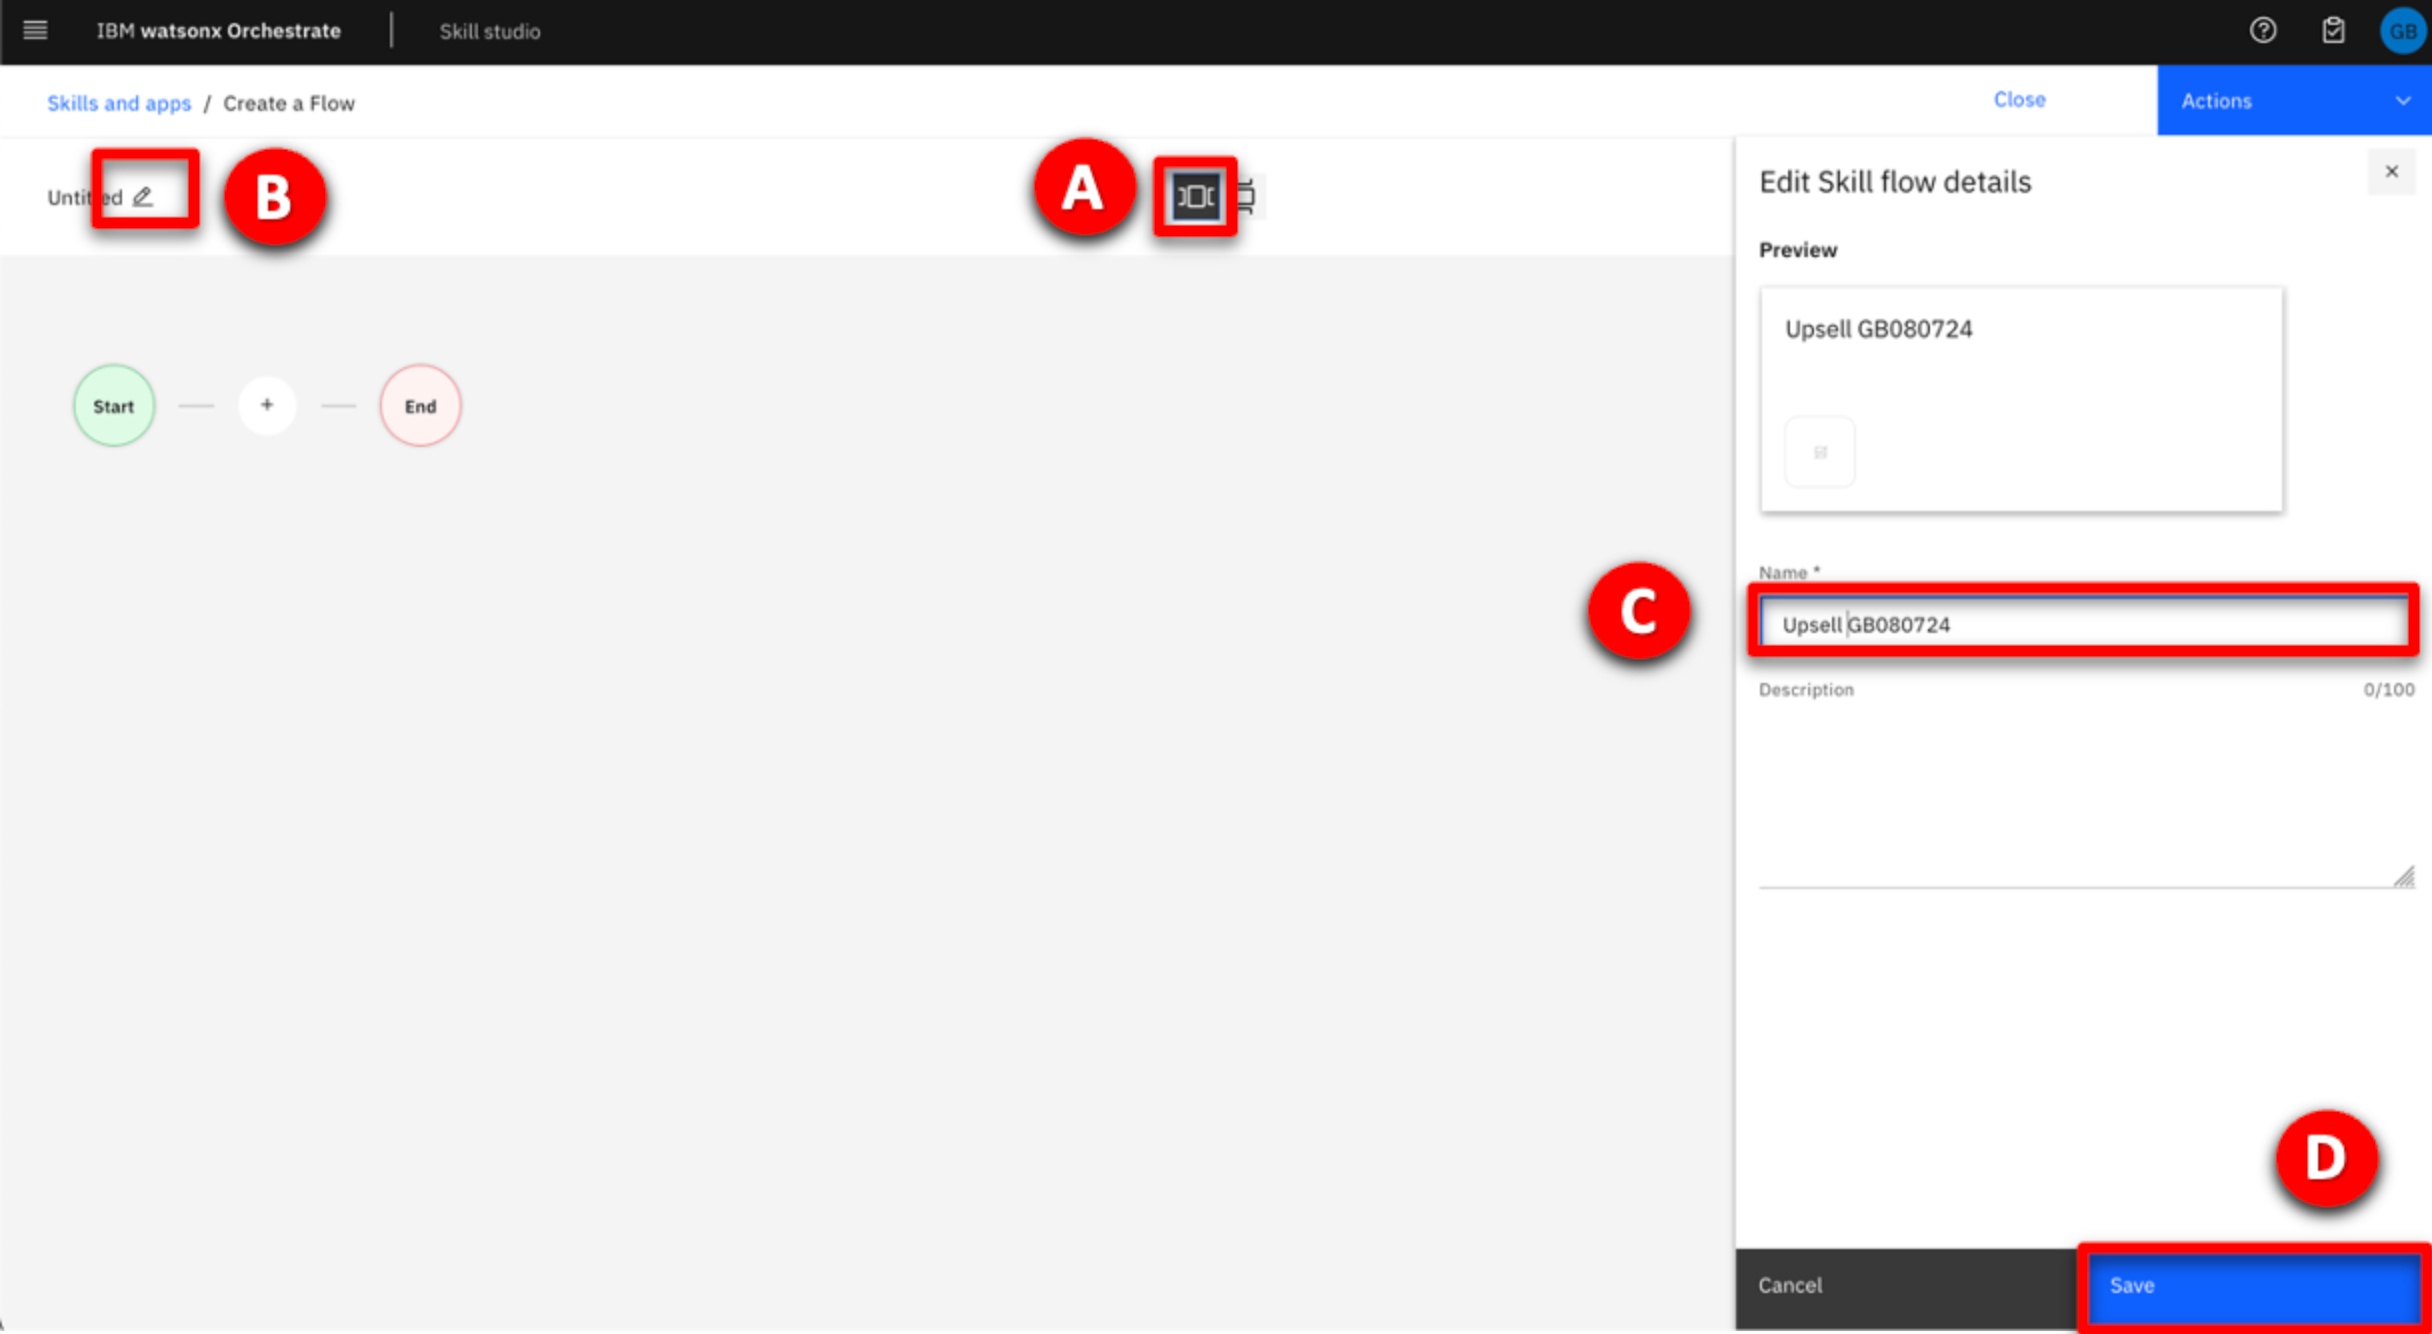 |
| Narration | To add a skill, click the plus icon. |
| Action 4.4 | Click the + icon. 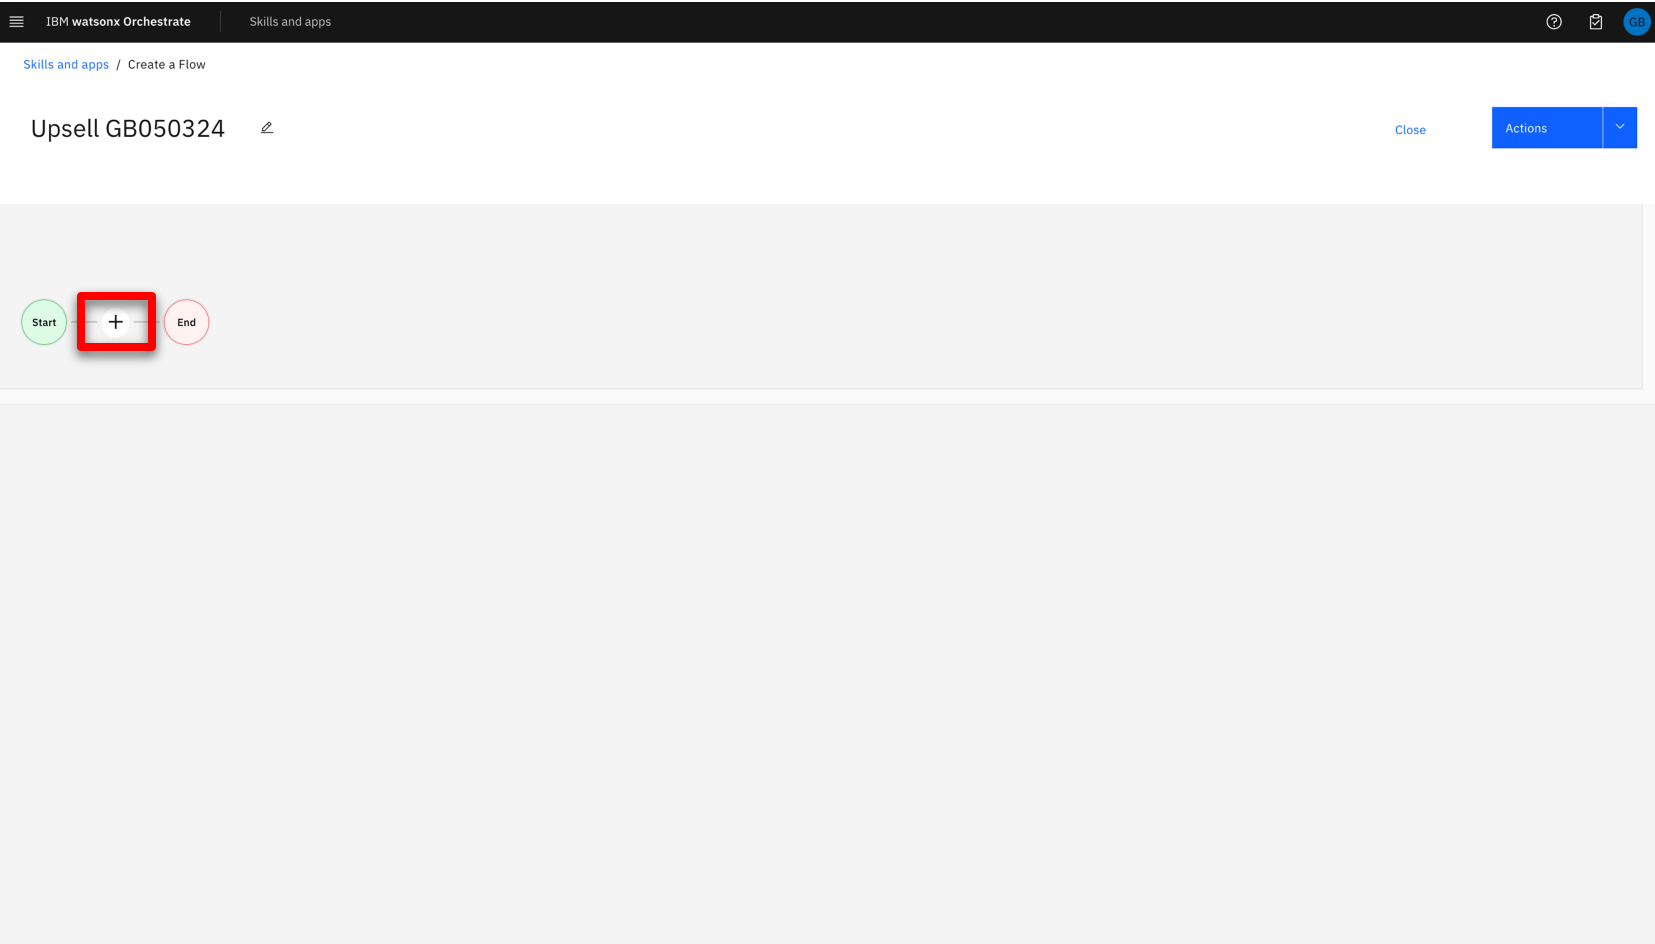 |
| Narration | On demo tenants a unique reference is used to locate the demo skills in the catalog. (This is only necessary on demo tenants, ordinarily these skills would be found by using just their name.) |
| Action 4.5 | Enter the unique reference for your skills (XXddmmyy) into the filter panel and press Enter to filter the results.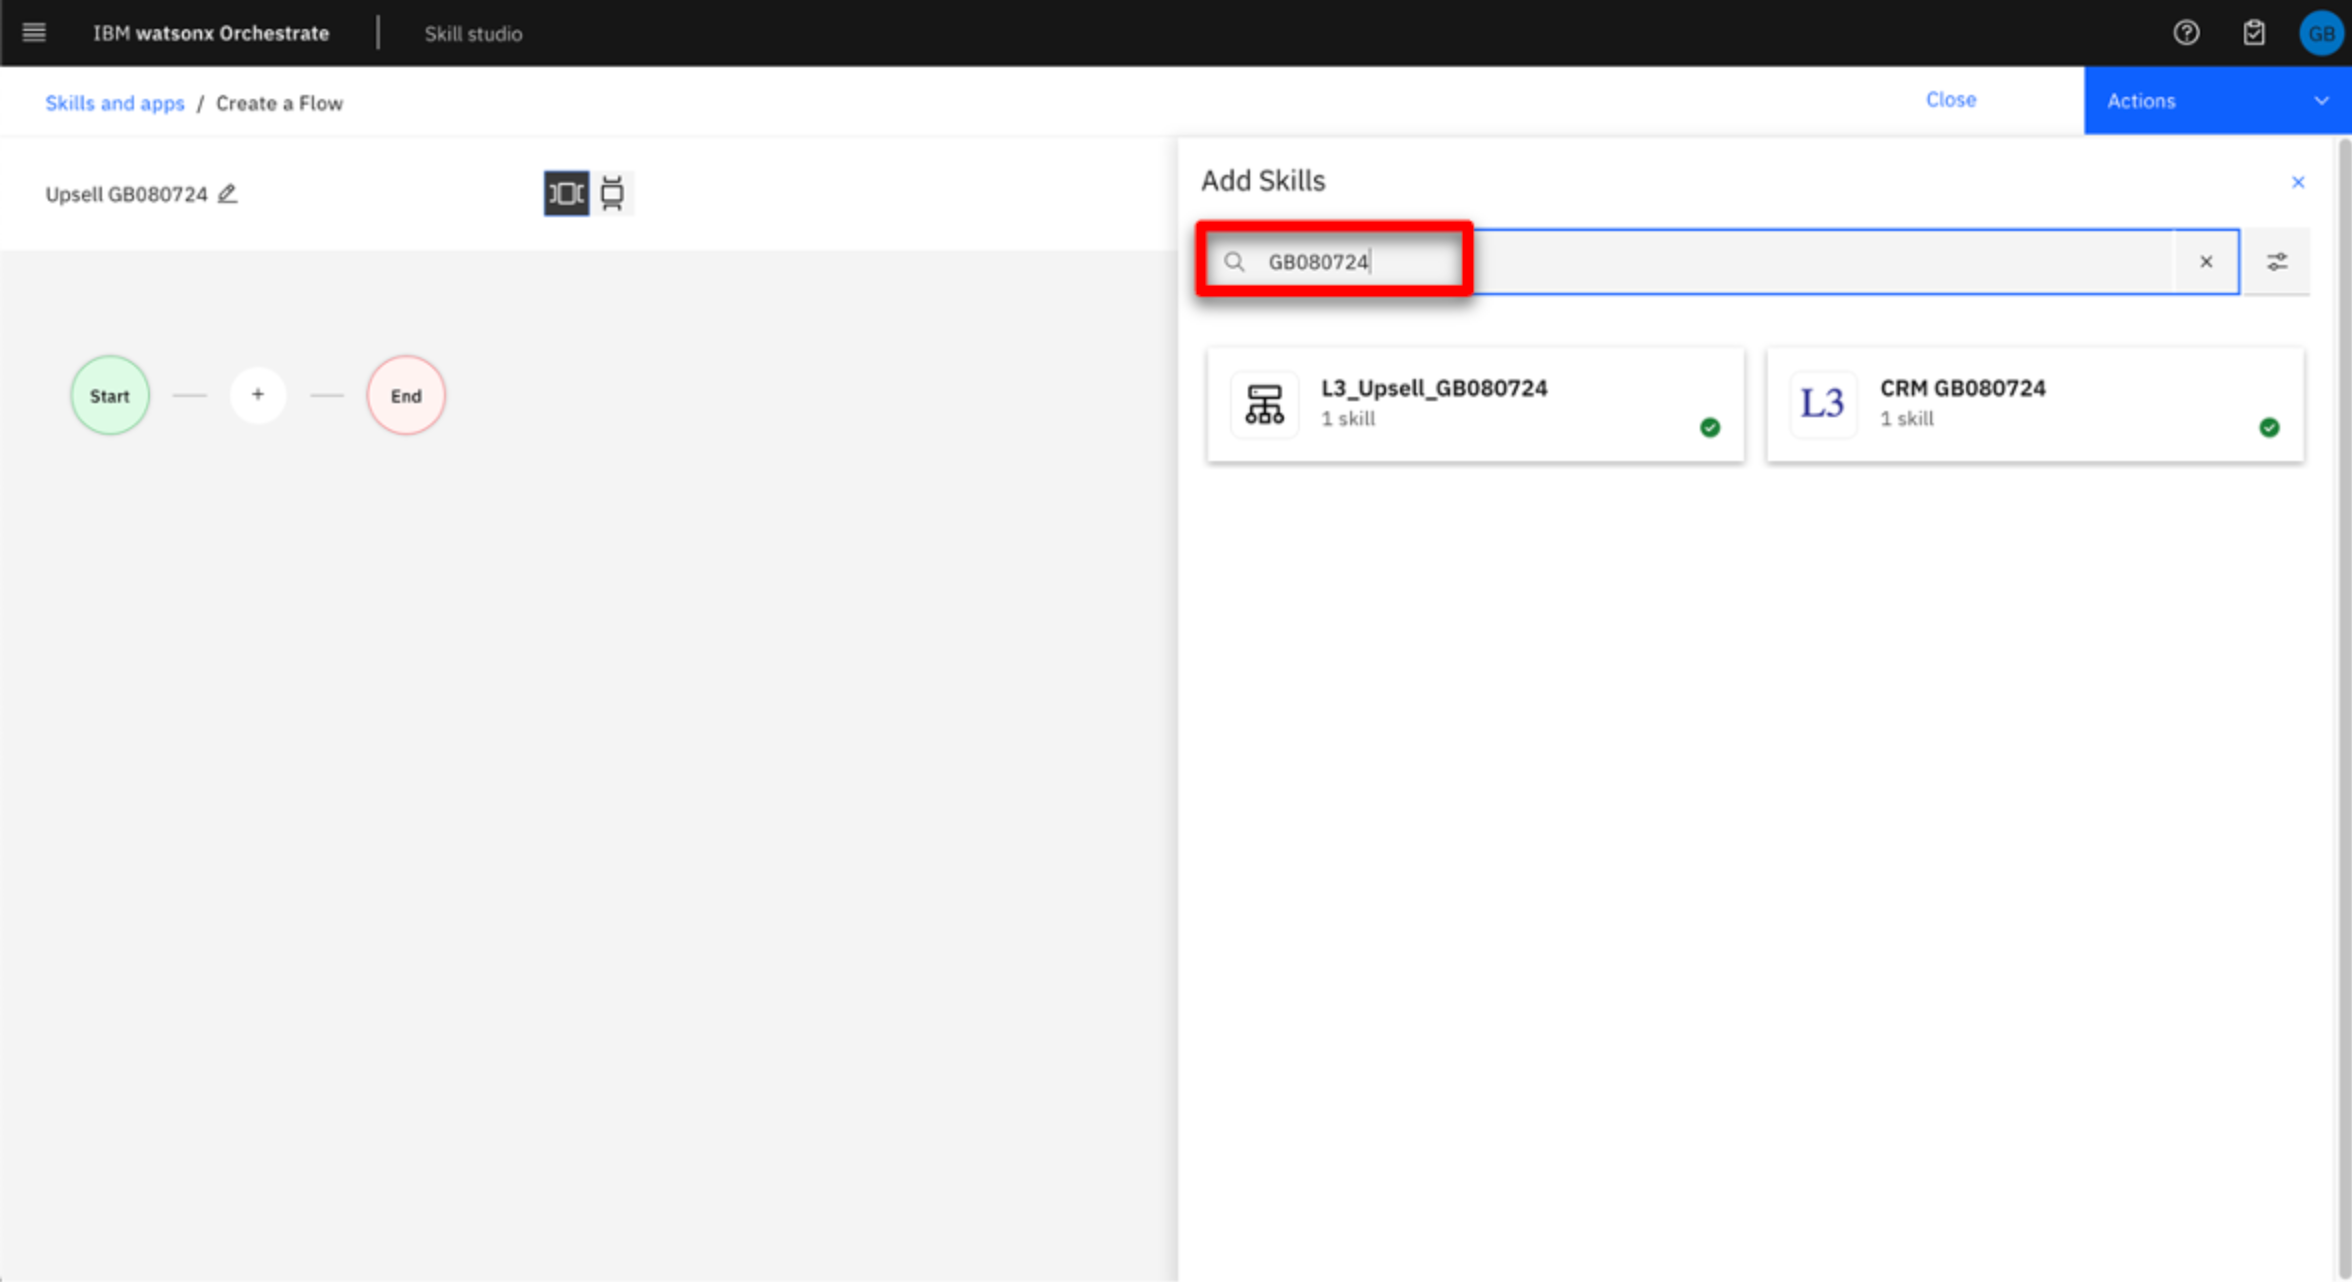 |
| Narration | The first skill we need performs a customer search and it’s contained in the CRM tile. |
| Action 4.6 | Click the CRM tile. 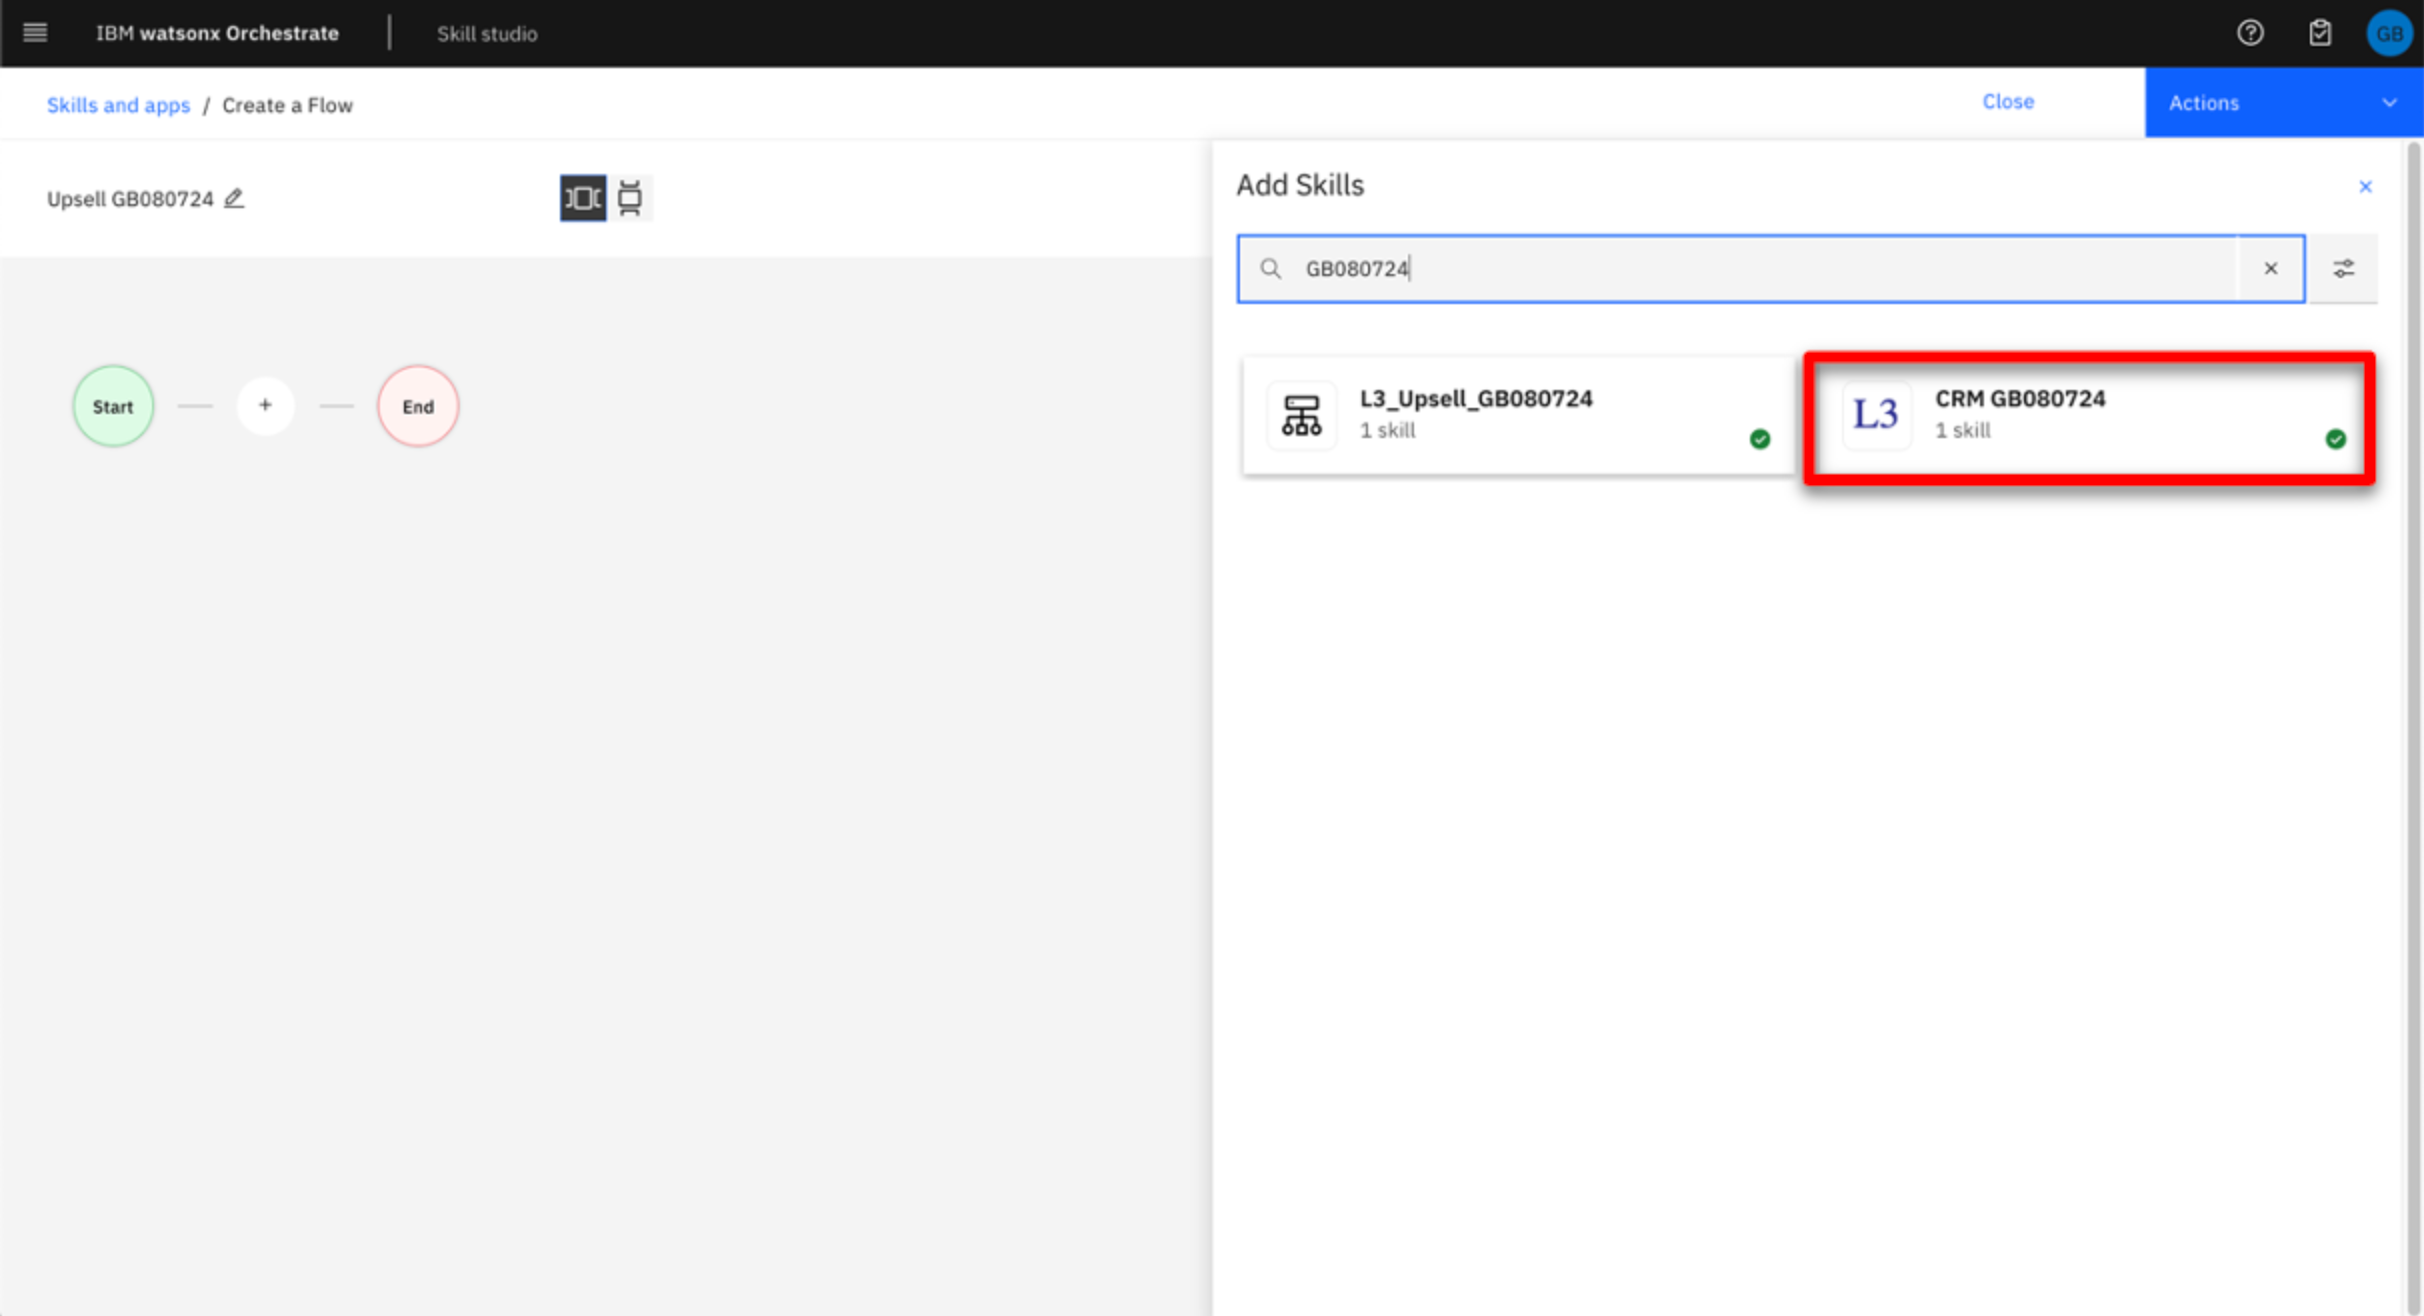 |
| Narration | Add the skill. |
| Action 4.7 | Click Add Skill within the Get Customers with recent life events … tile. |
| Narration | Add the next skill by clicking the Plus icon again, searching with the unique reference, then adding the skill. |
| Action 4.8 | Click the + icon to the left of the end node.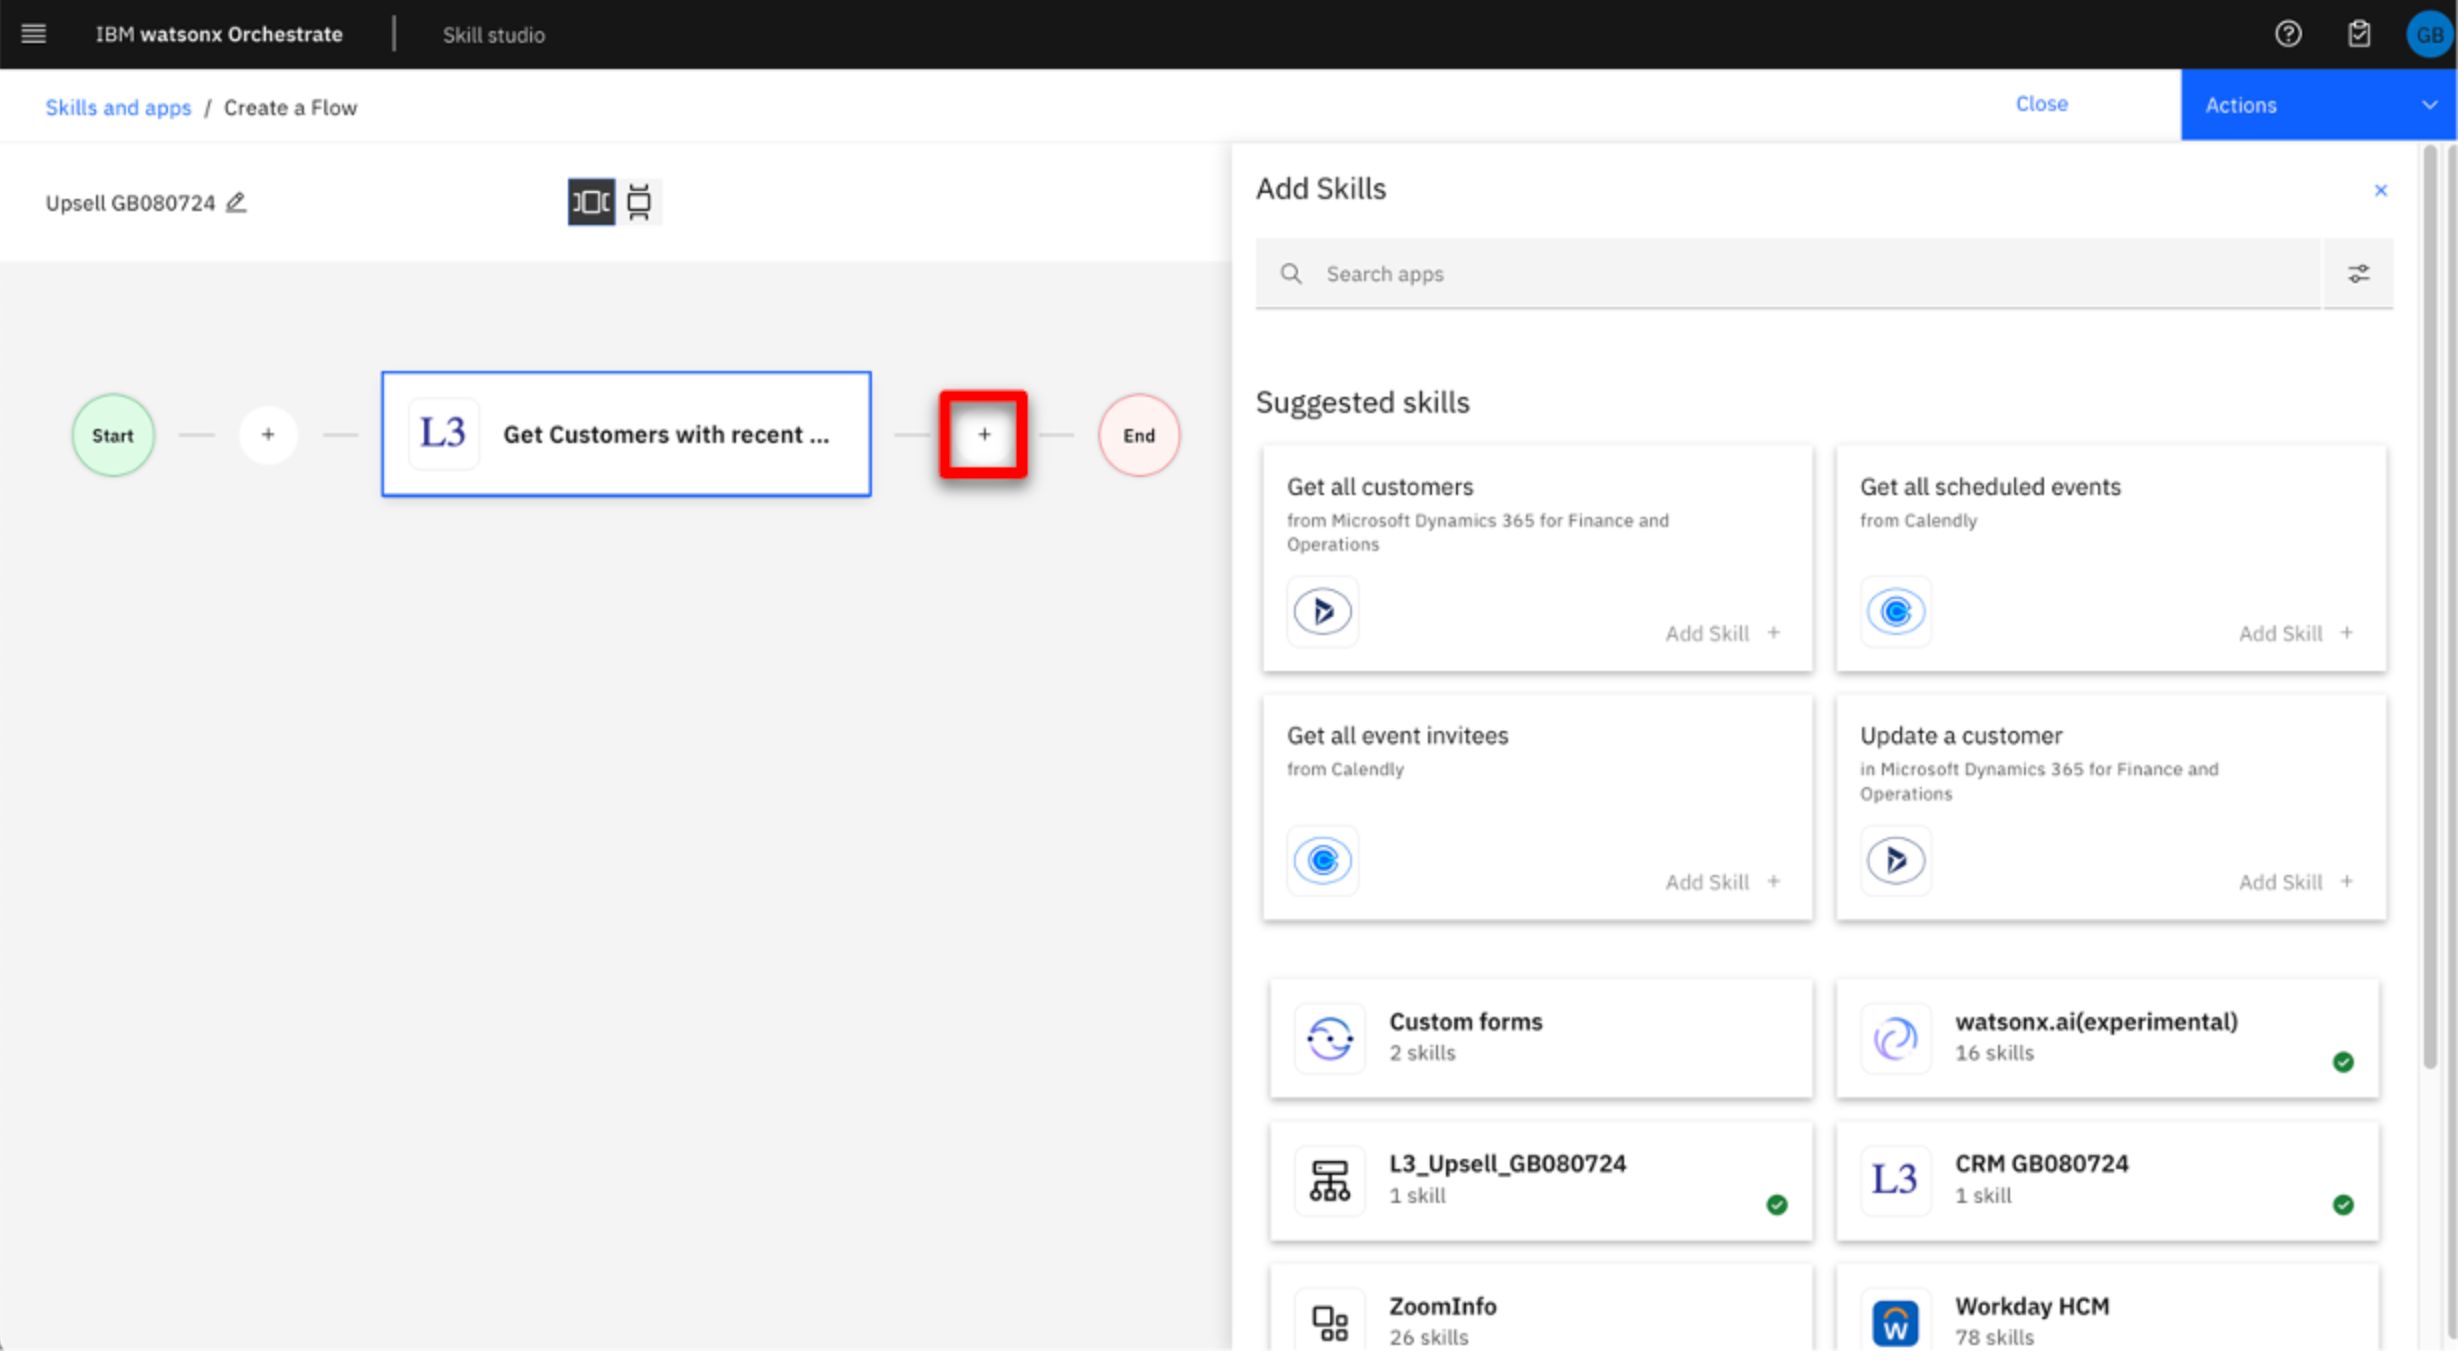 |
| Action 4.9 | Enter the unique identifier for your skills (XXddmmyy) and press Enter to filter the results. 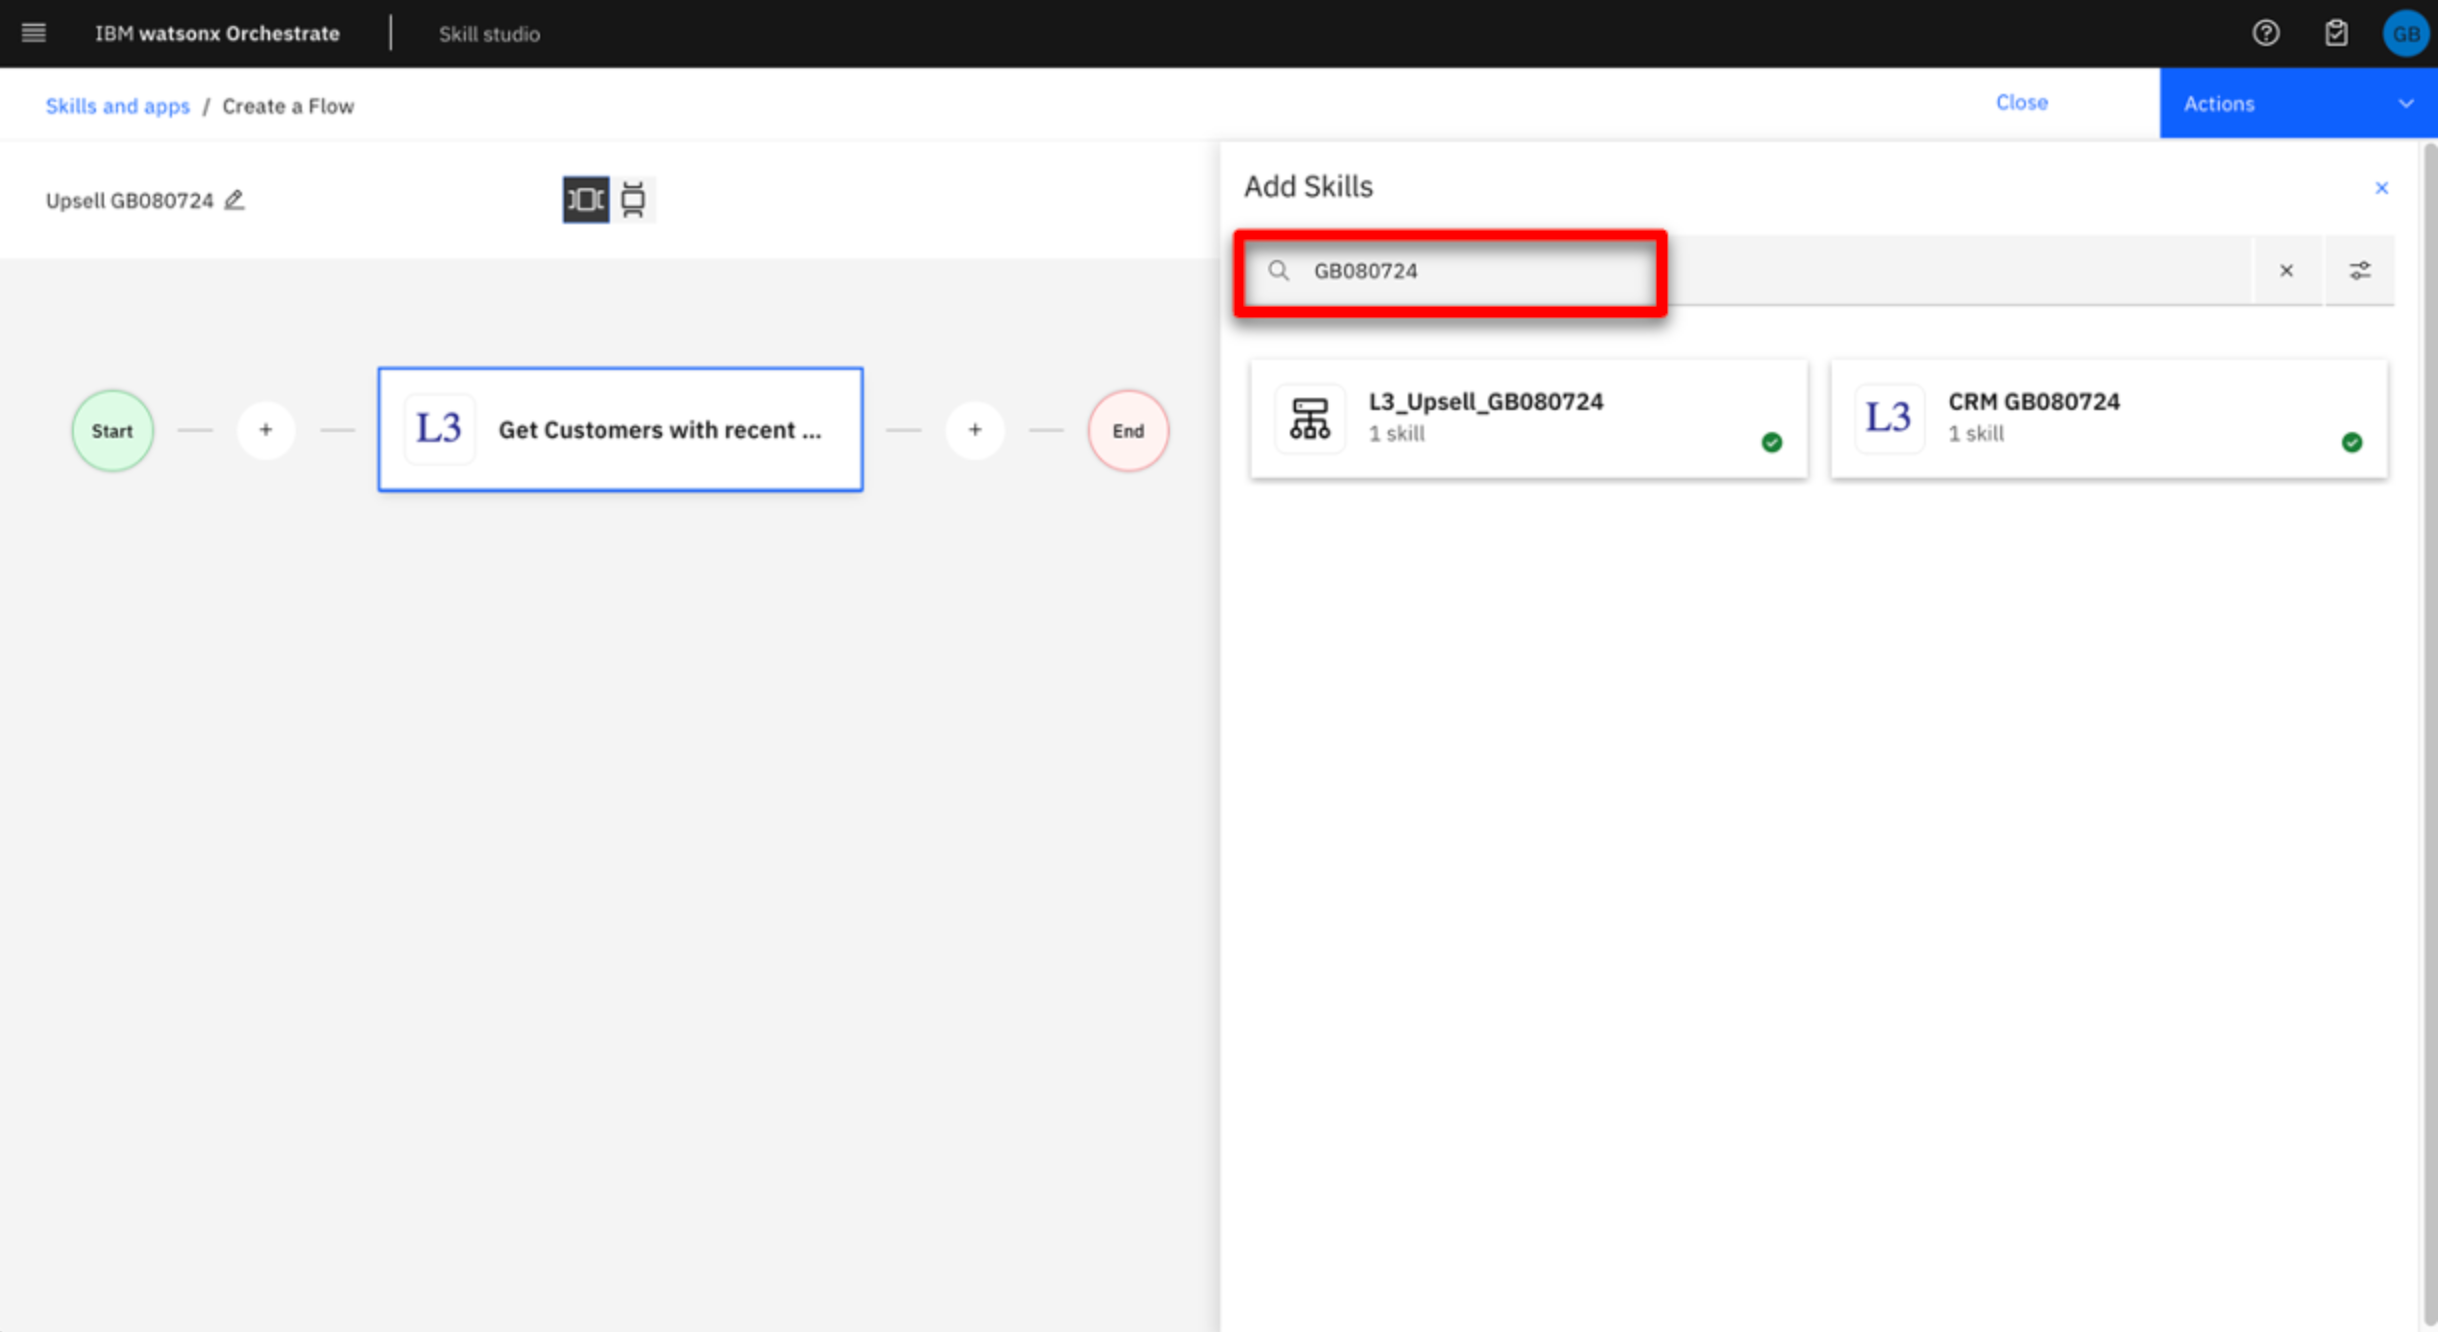 |
| Narration | Add the upsell skill. |
| Action 4.10 | Click on the L3_Upsell tile with the unique reference you used.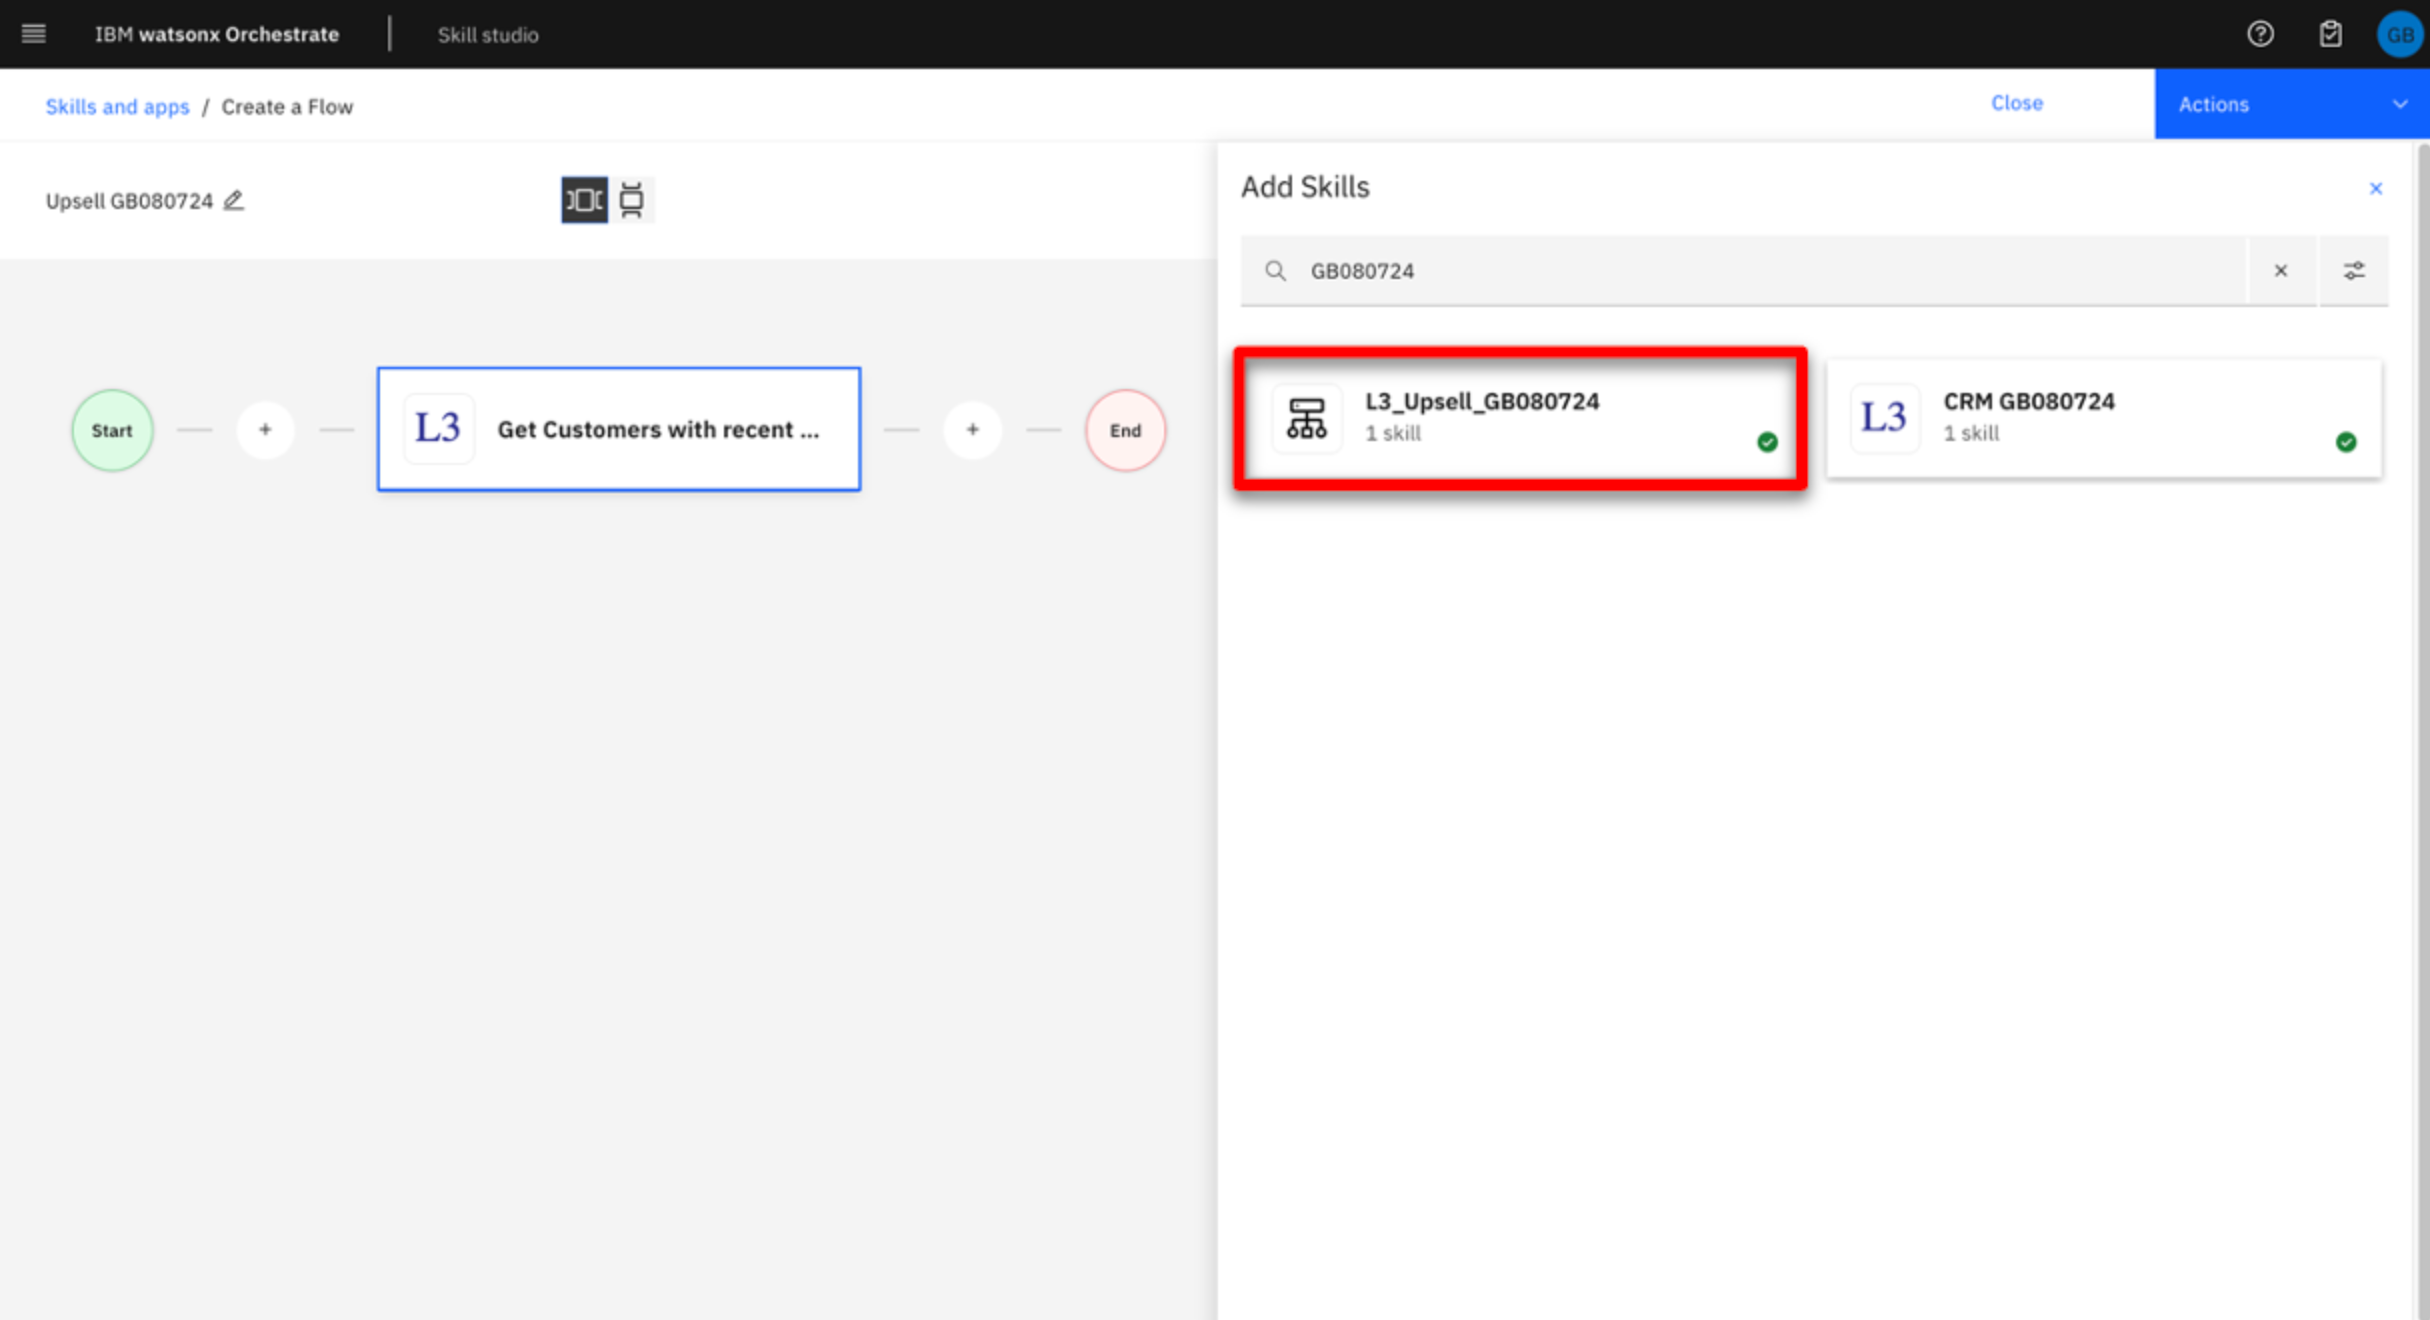 |
| Action 4.11 | On the L3_Upsell_XXddmmyy tile, click Add skill.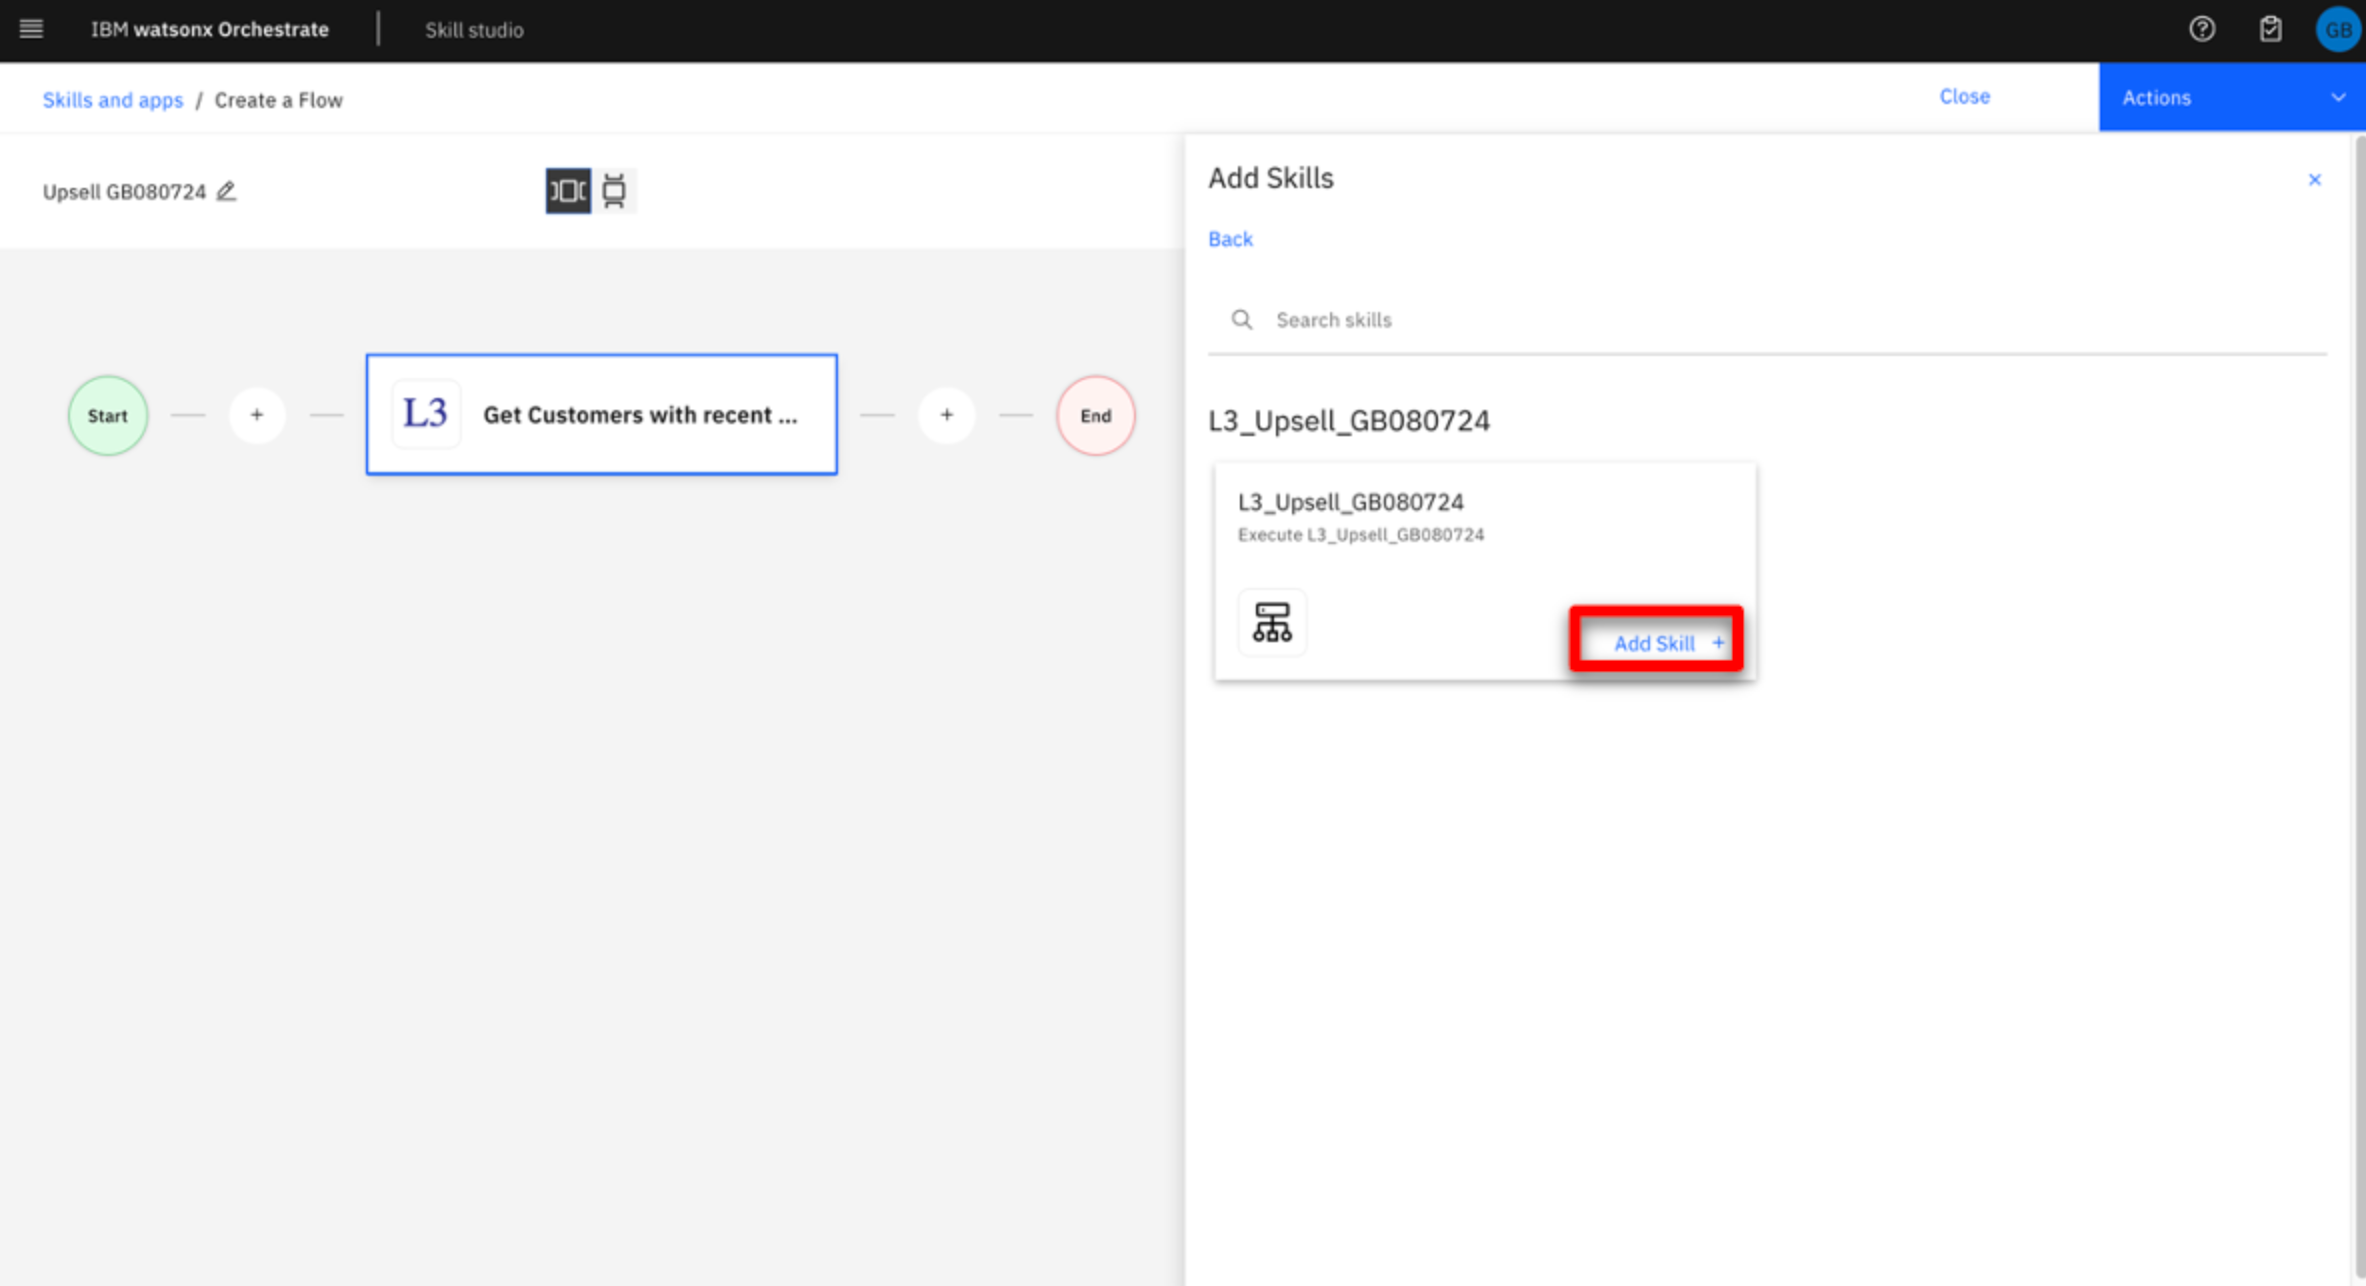 |
| Narration | Add the third skill by clicking the Plus icon again. |
| Action 4.12 | Click the + icon to the left of the end node.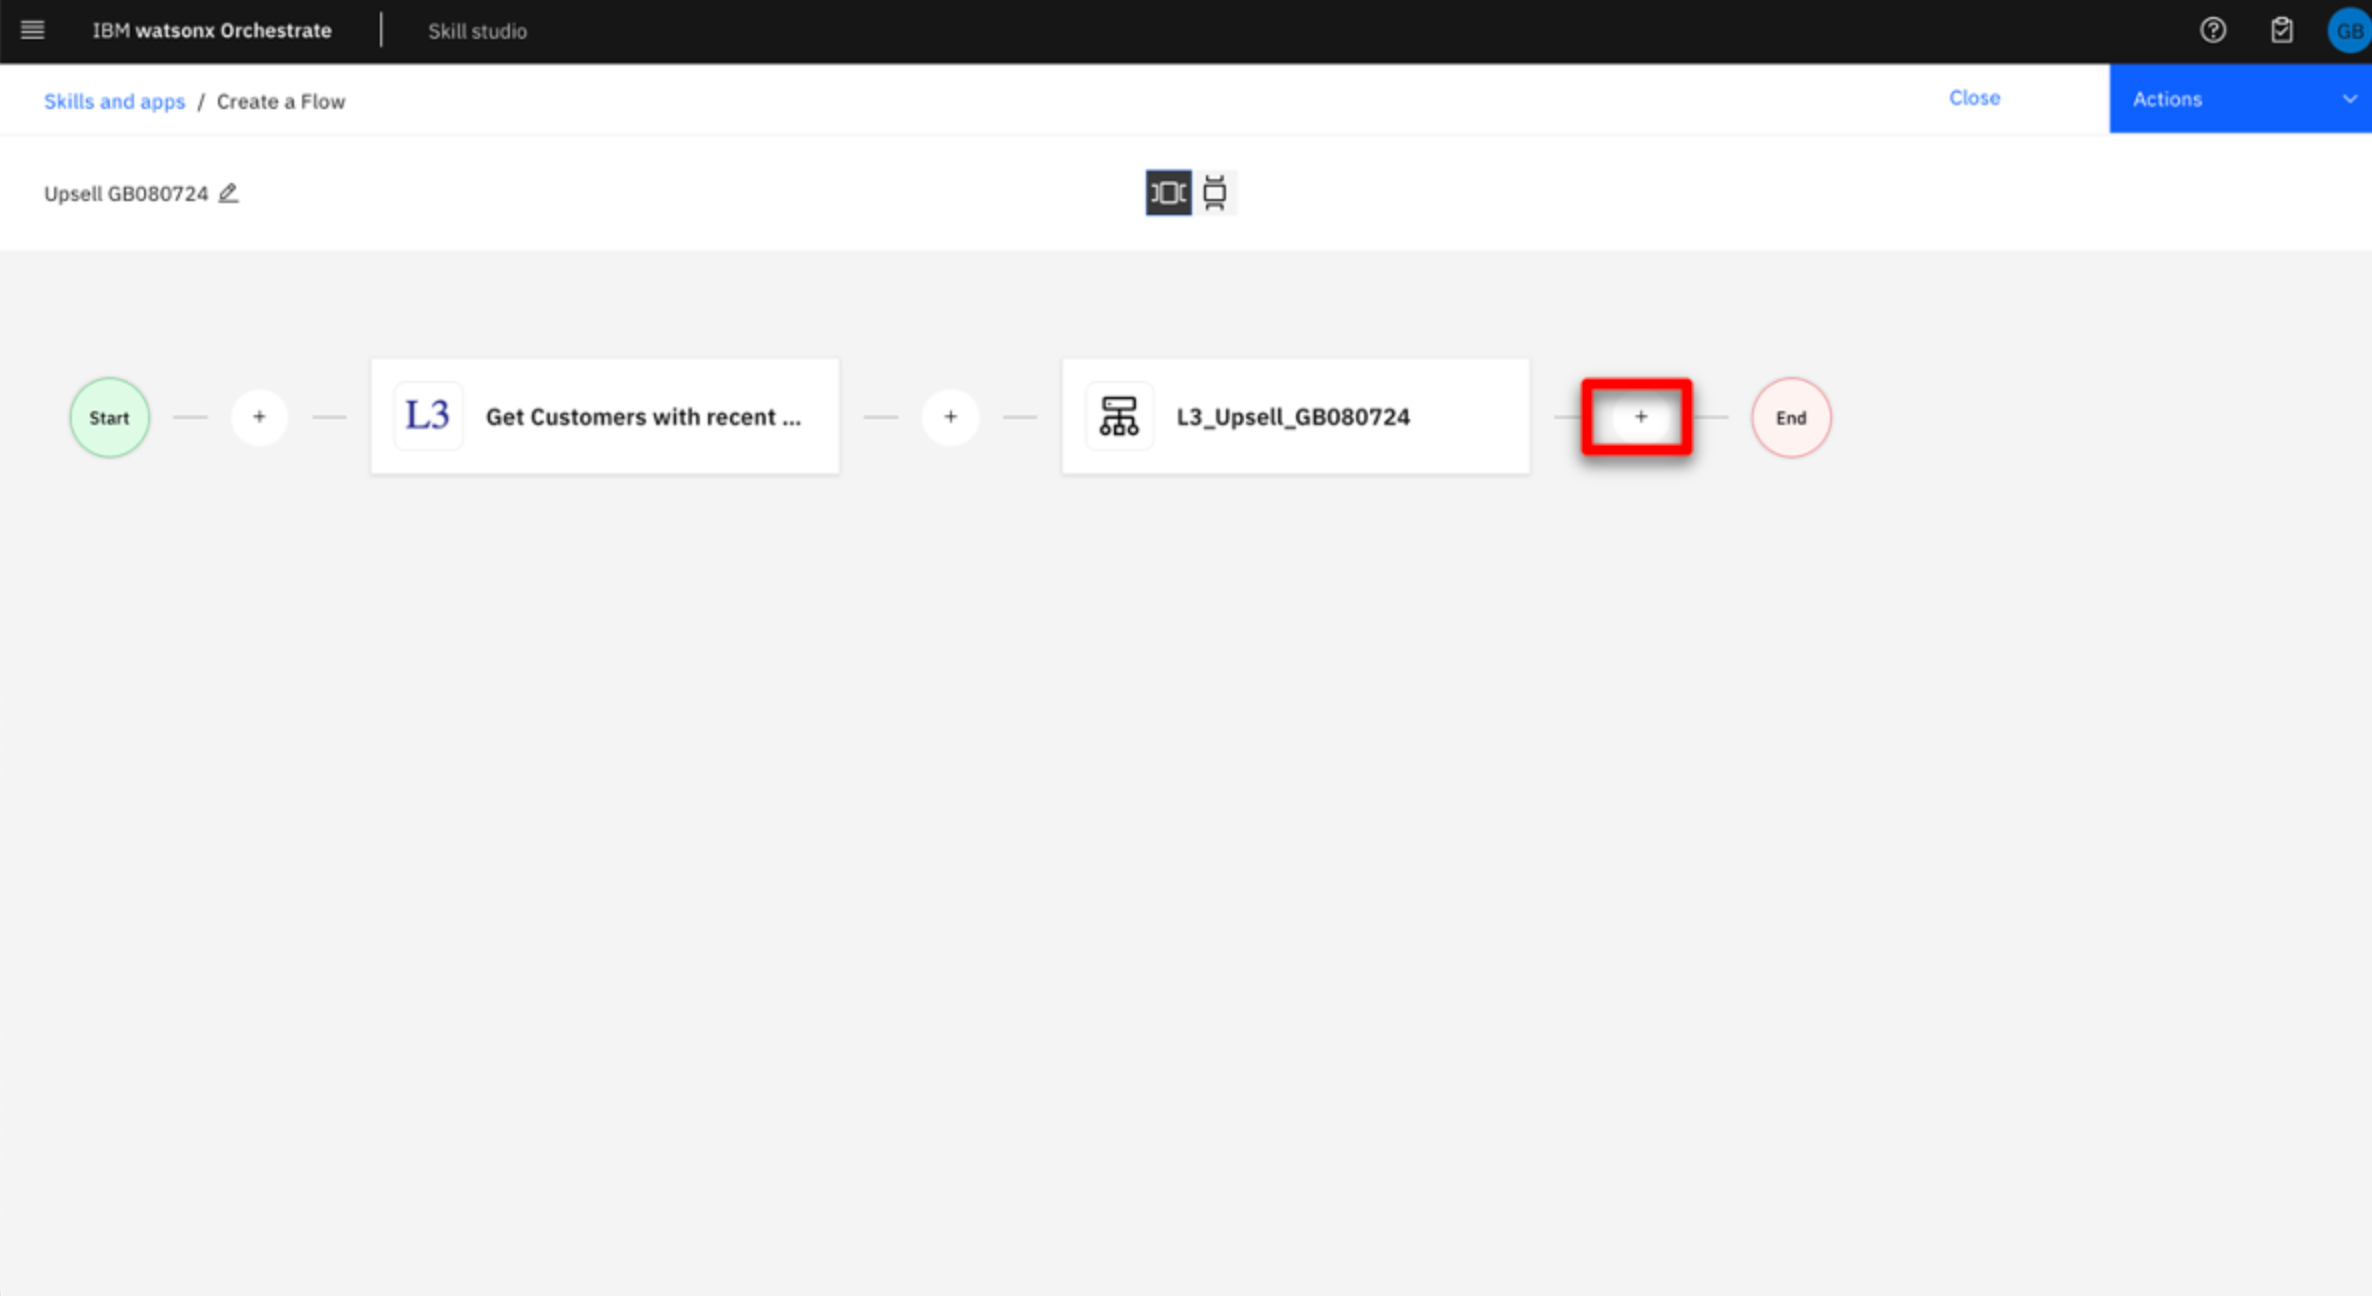 |
| Action 4.13 | Enter “watsonx” into the Search field and press Enter to filter the results. |
| Action 4.14 | Click the watsonx.ai collection tile.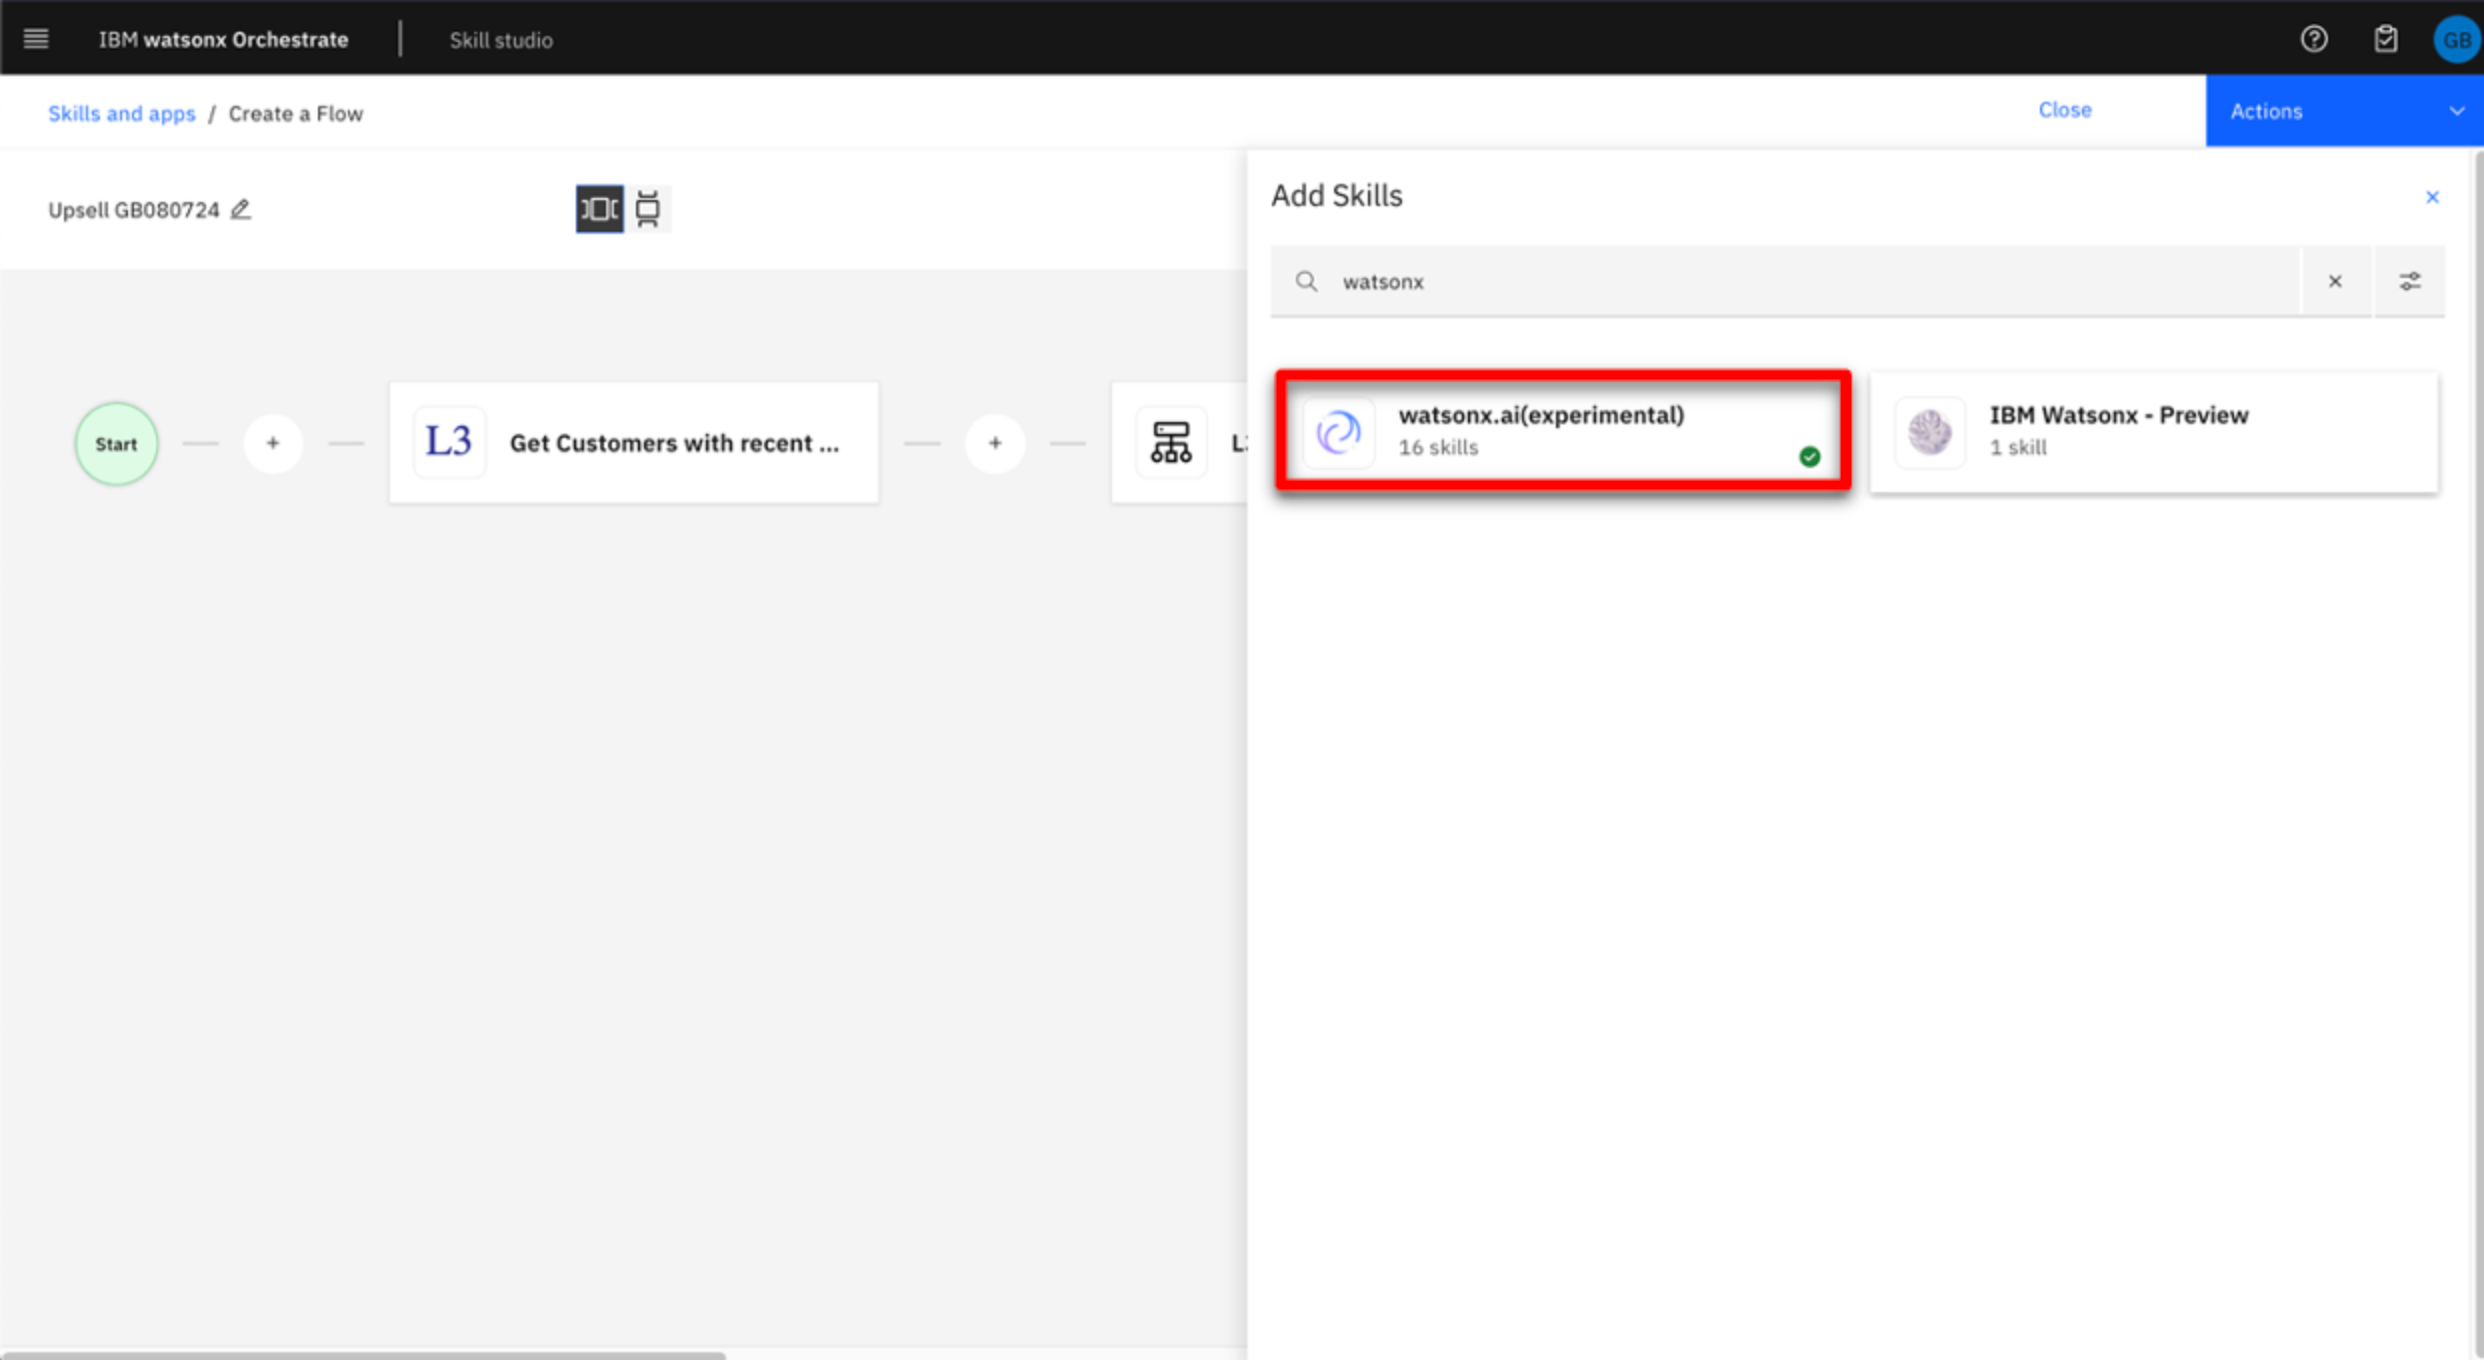 |
| Narration | Add the third skill. |
| Action 4.15 | Click Add Skill within the Generate an email tile. |
| Narration | In this demo, an input form is used instead of one of the built-in email skills. This is done to avoid some additional setup, but from the user’s perspective the results are the same. The input form contains the same fields as the built-in email skill and allow us to map the various skill outputs together to build the final output. Let’s add the custom form. |
| Action 4.16 | Click the + icon to the left of the end node.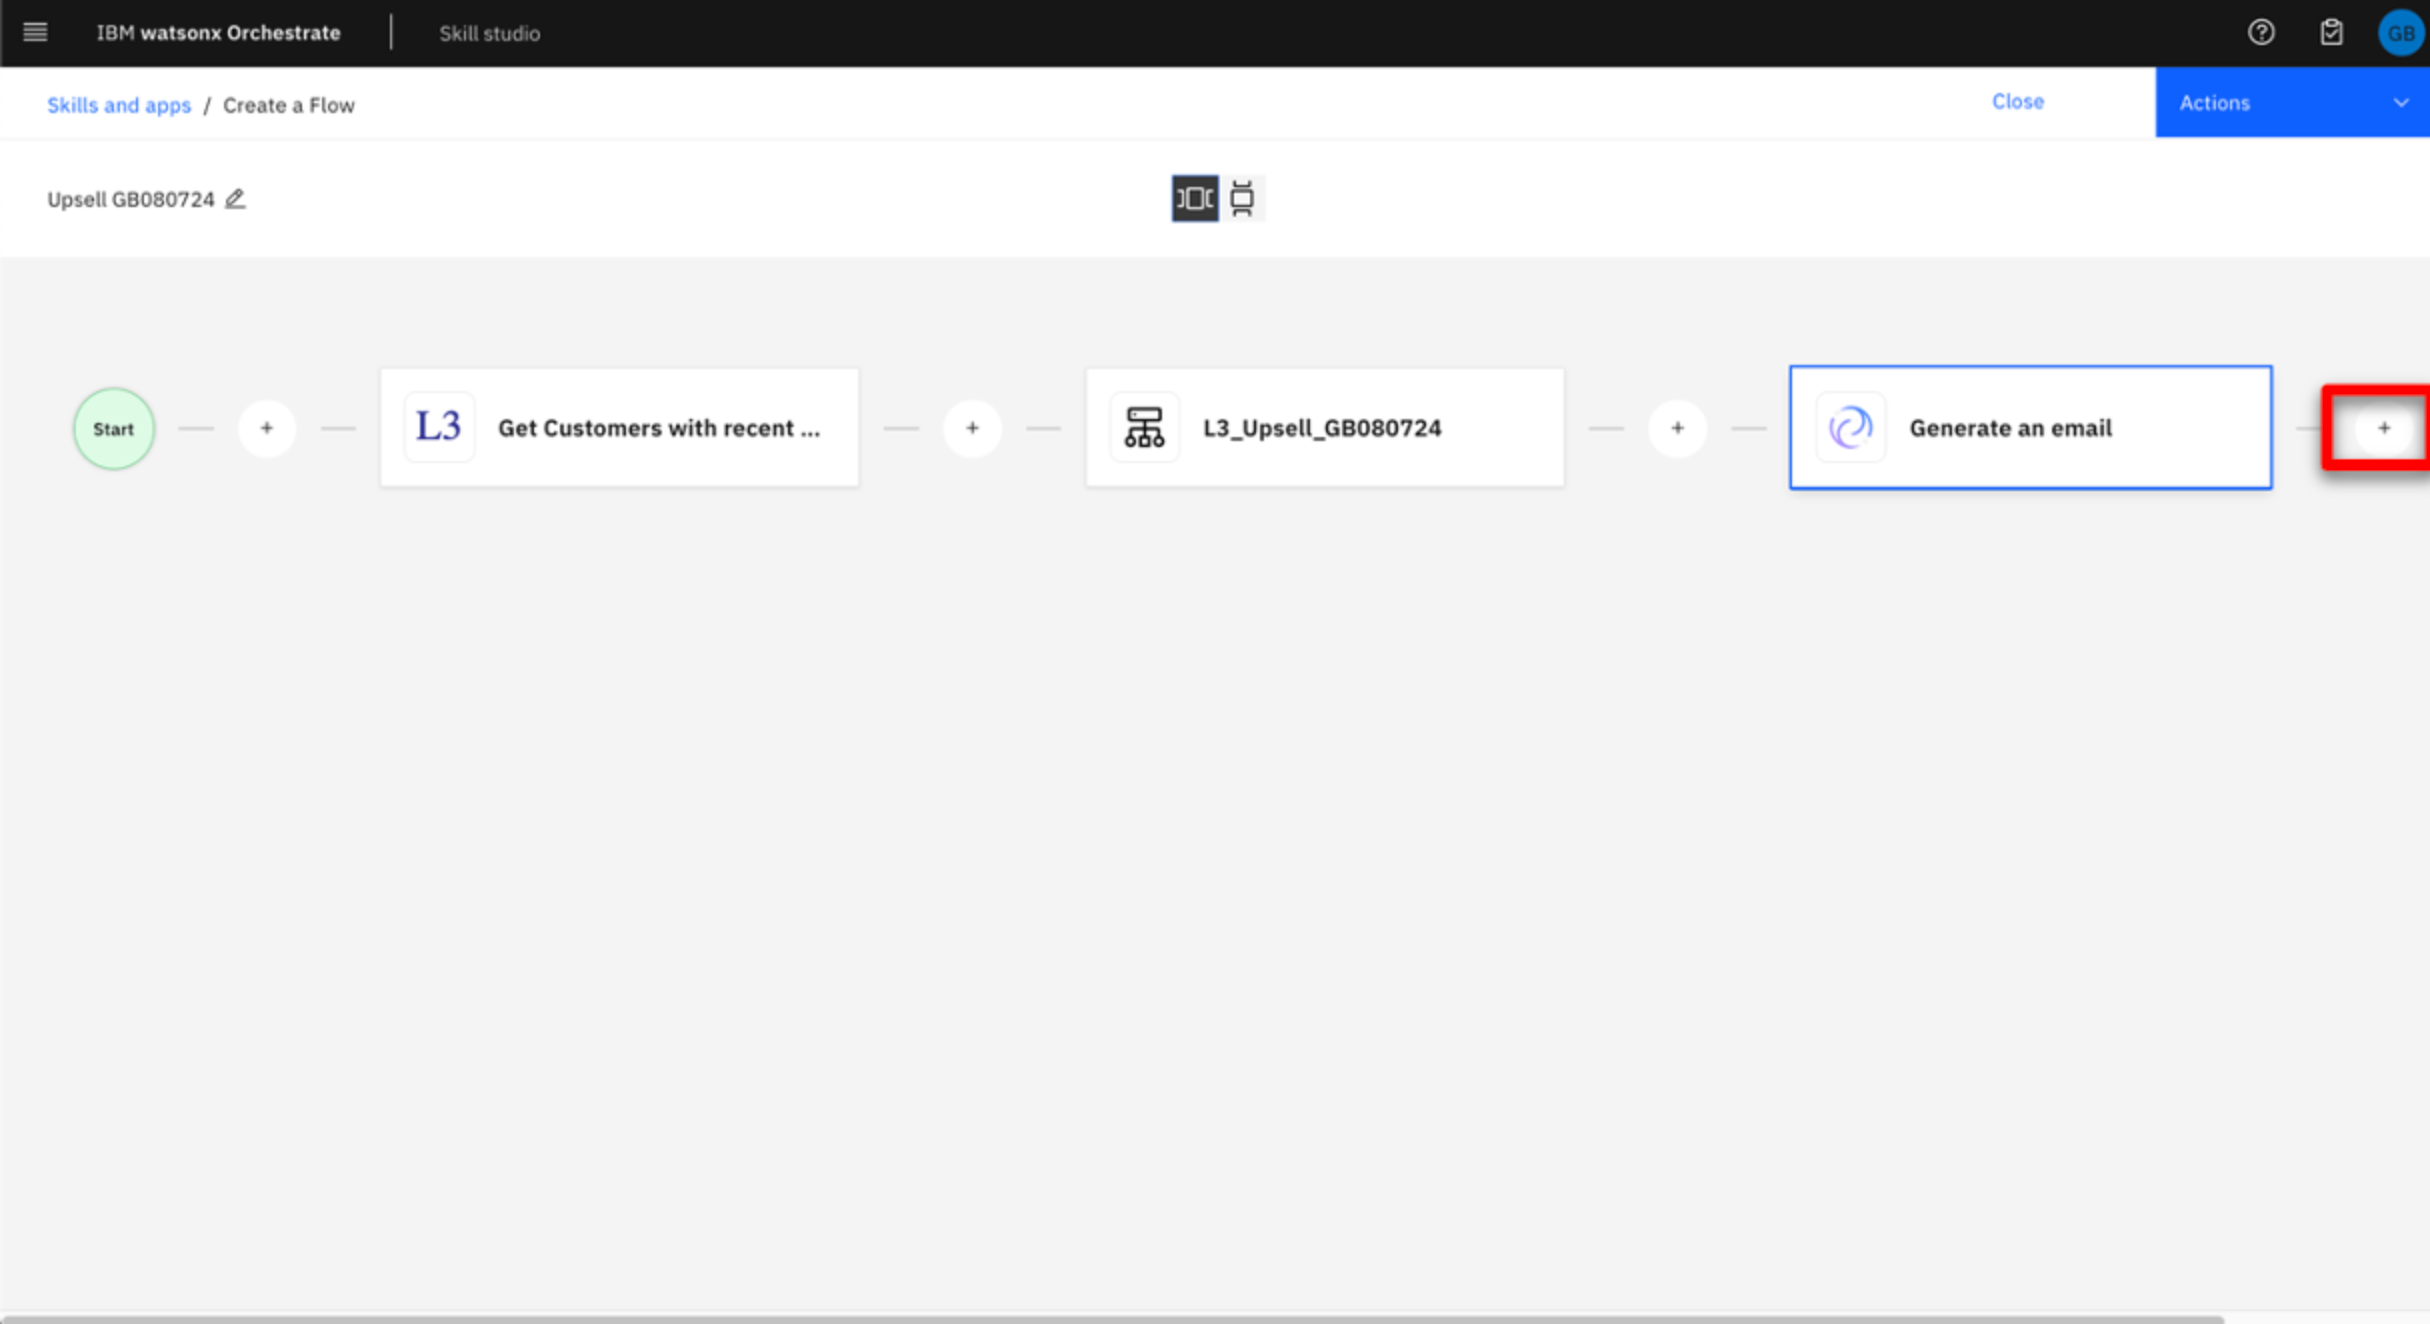 |
| Action 4.17 | Type “forms” and press Enter to filter the results (A), click Custom forms (B).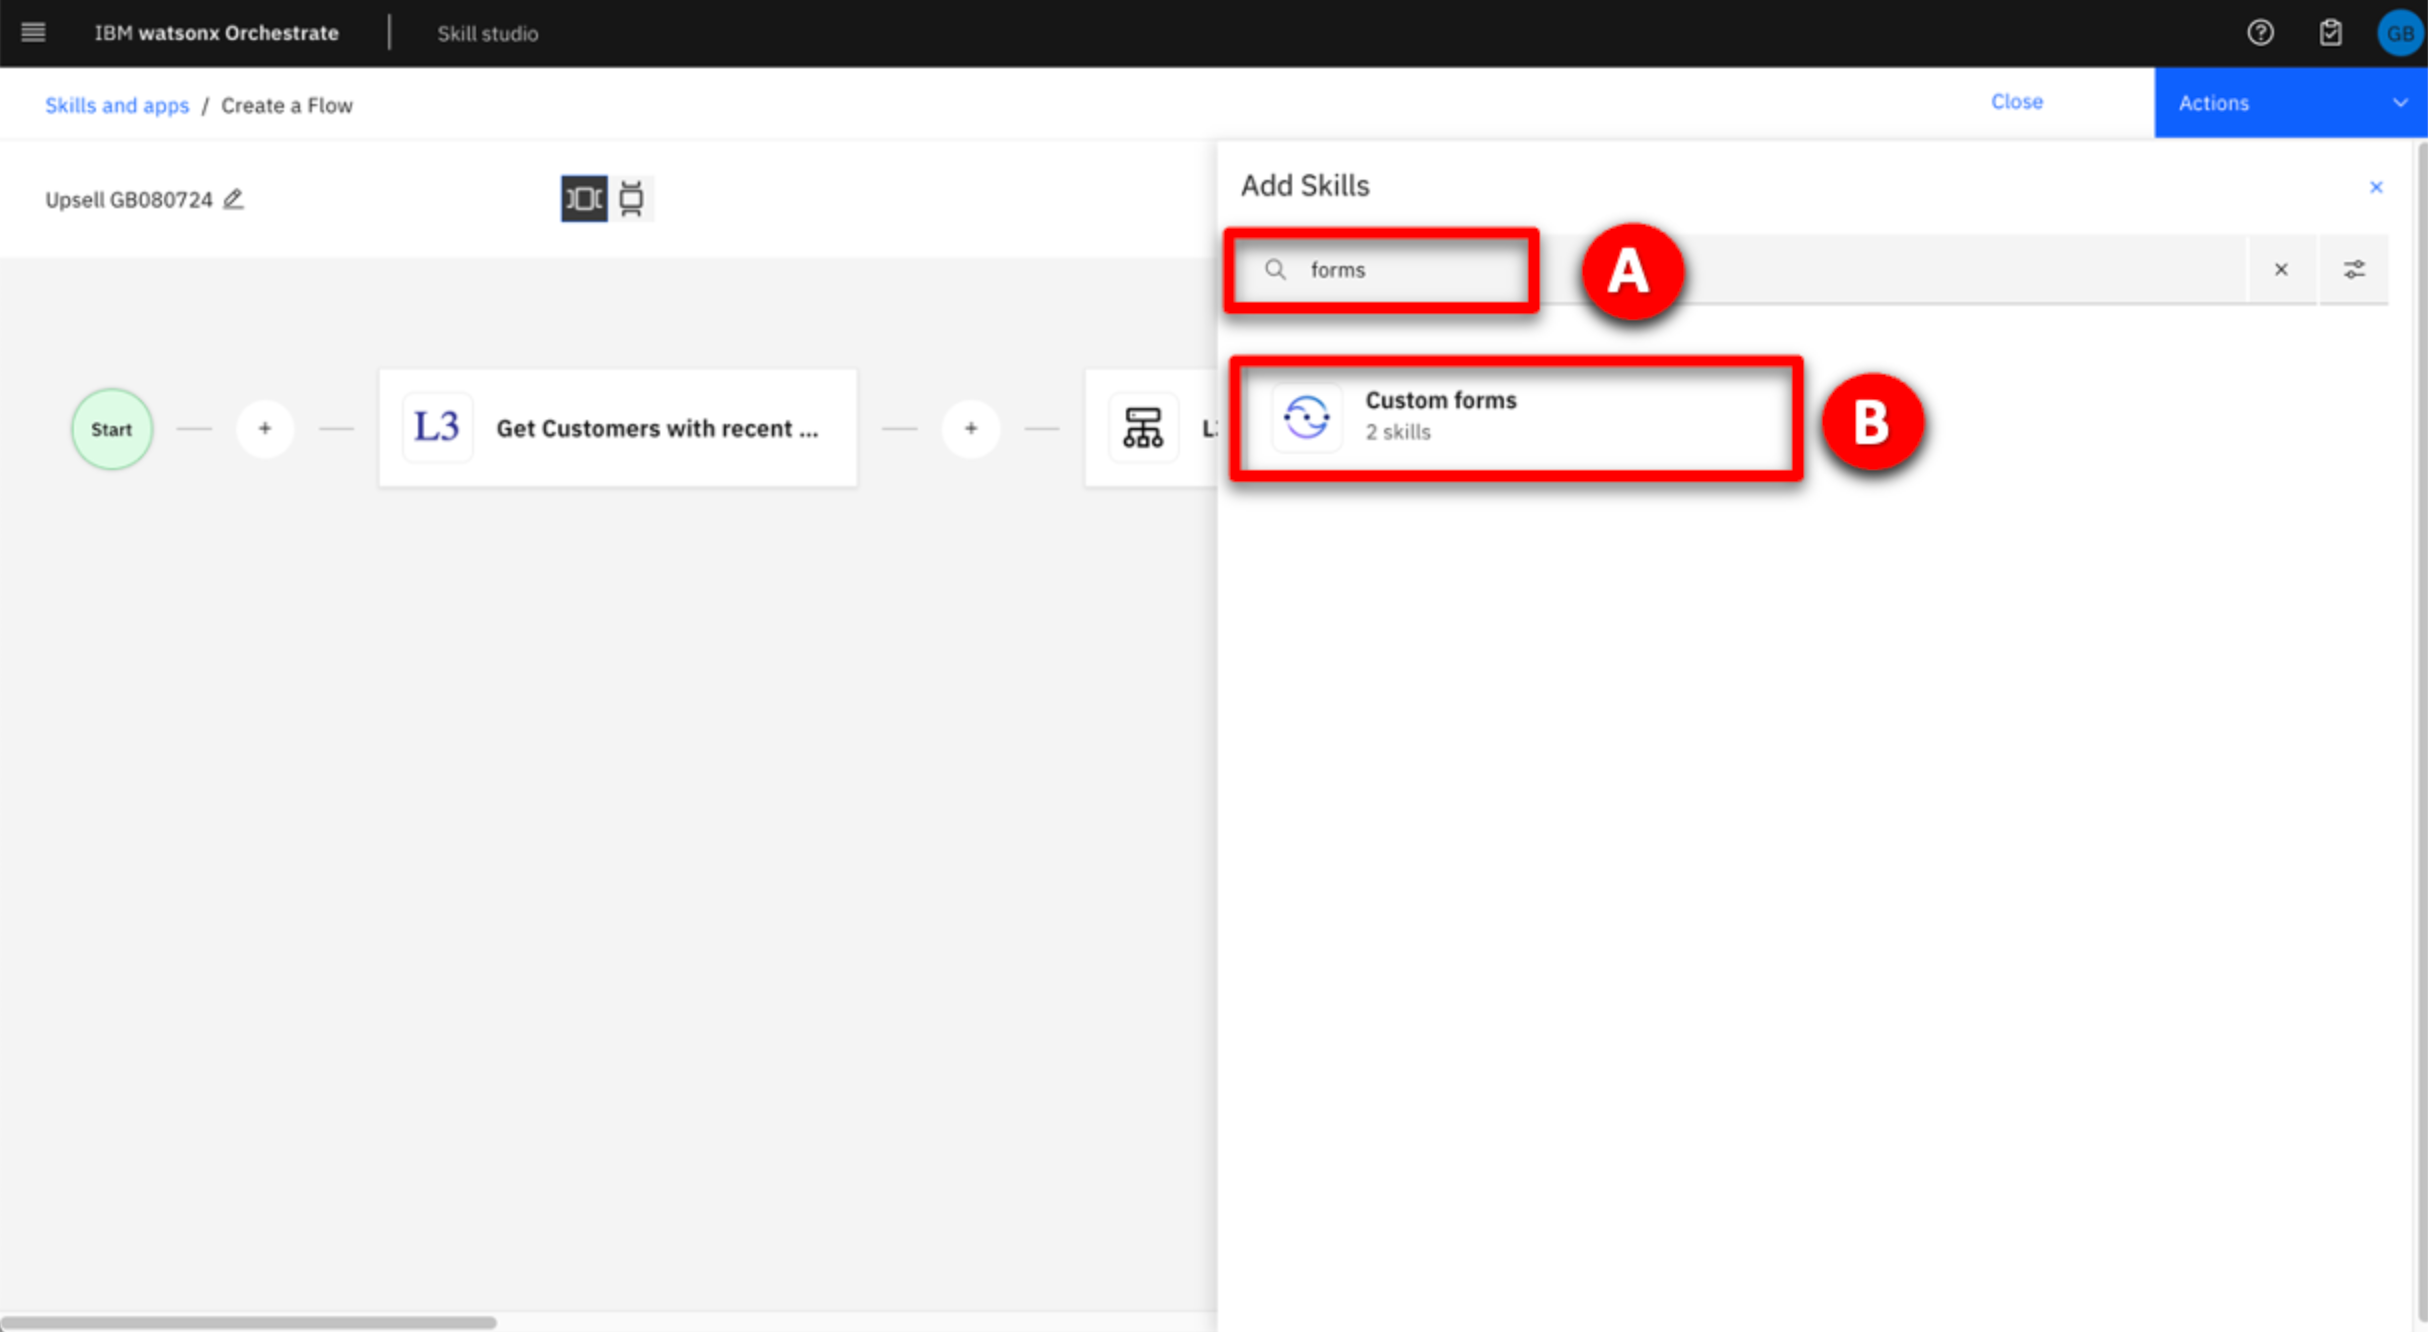 |
| Action 4.18 | Click Add skill within the Input form tile.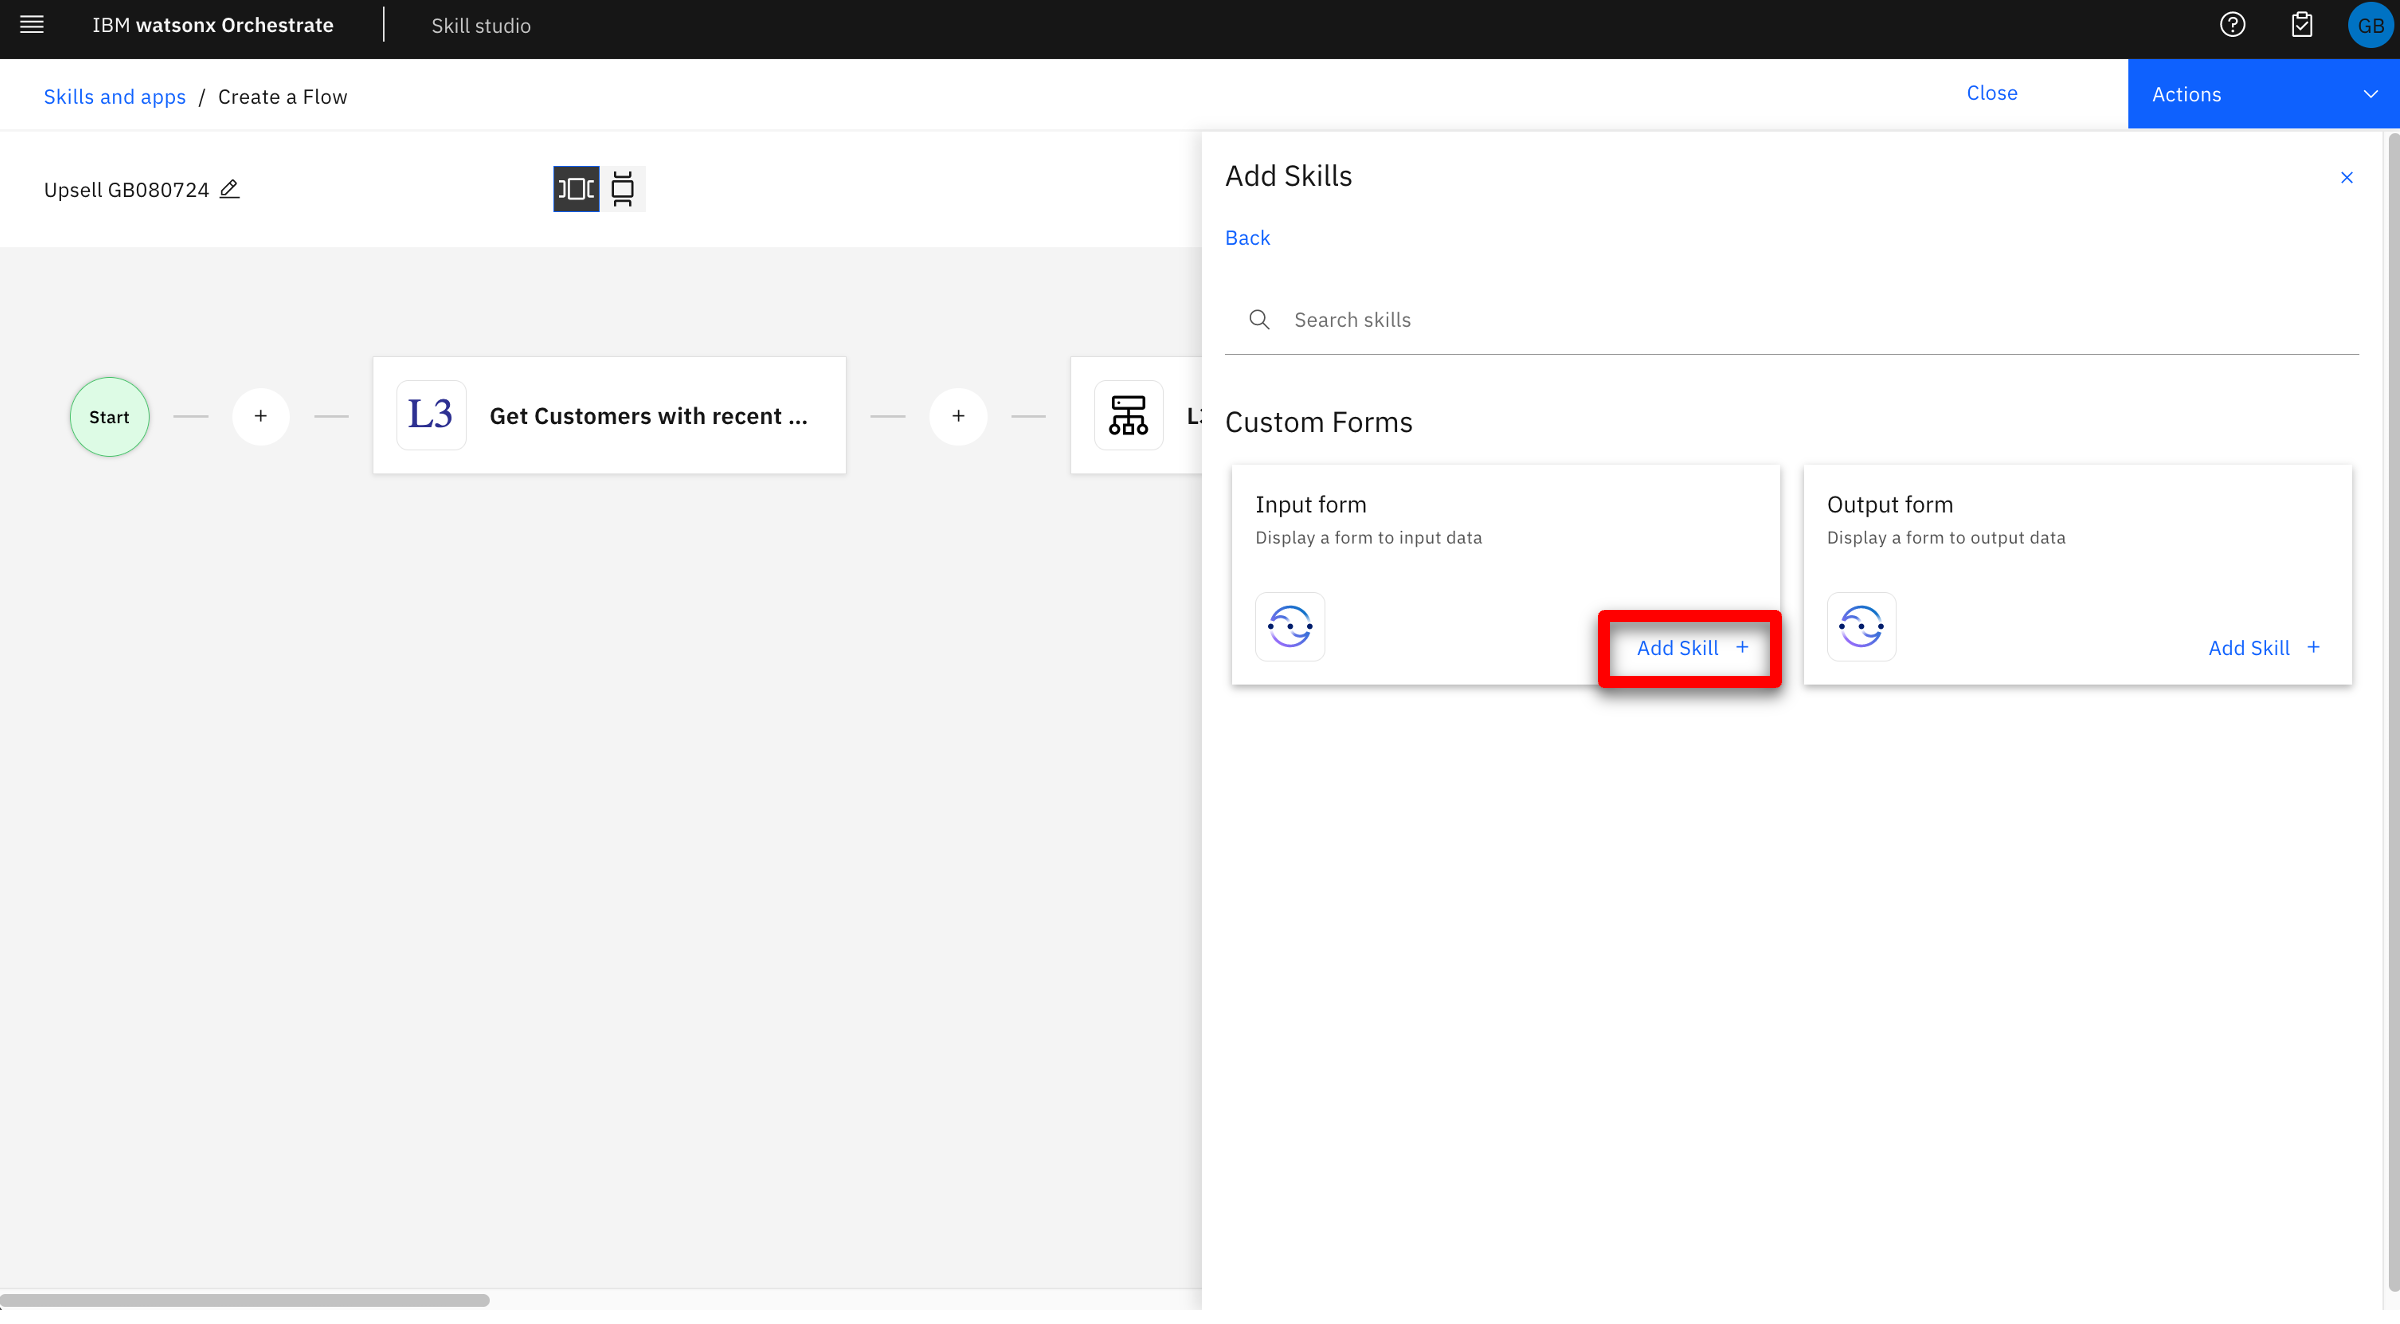  |
| Narration | Each skill can have one or more inputs and outputs. The skill flow editor allows builders to easily map the output from one skill into another. The first skill in this skill flow (Get a list of customers with recent life events) doesn’t require any configuration. But, the L3_Upsell skill needs to be configured to map the output from the Get a list of customers skill into its appropriate inputs. |
| Narration | The input form for this skill will also be hidden. |
| Action 4.19 | Configure the input form for L3_Upsell skill by performing the following steps: A. Select the L3_Upsell_Master tile. B. Click Input to select the input form. C. Turn on the Hide this input form from the user option.  |
| Narration | Now the data can be mapped, starting with the customer’s age. |
| Action 4.20 | Map the customer age input field of the skill by performing the following steps: A. Click the field theCustomer.age. B. Select Get a list of customers with recent life events from the available mappings. 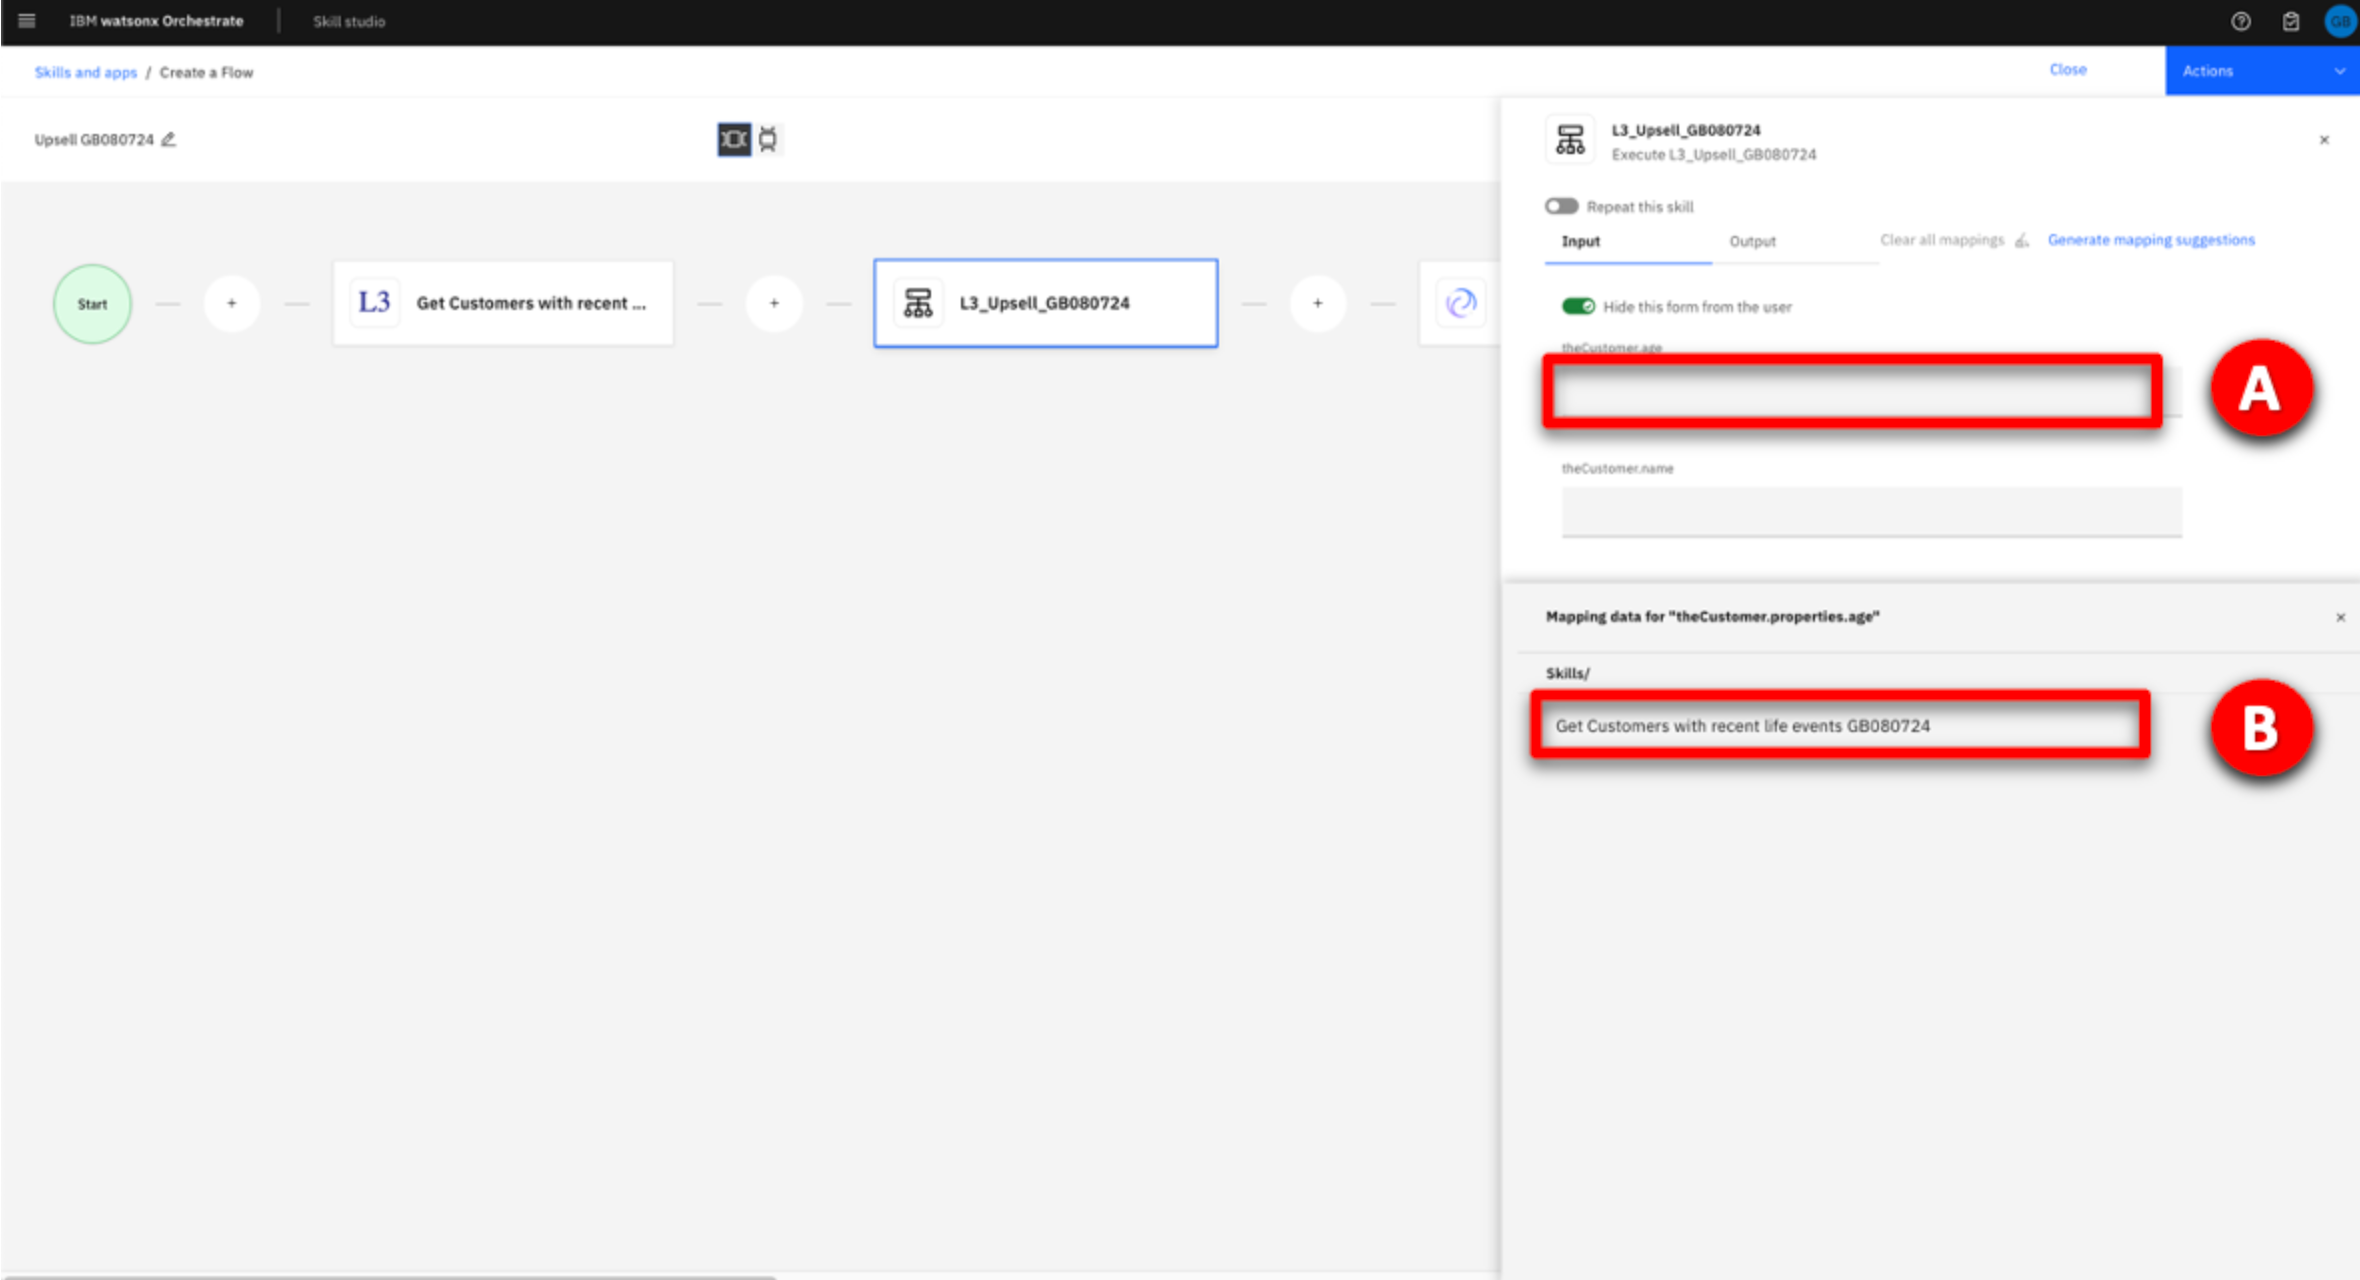 |
| Action 4.21 | Scroll down and select age.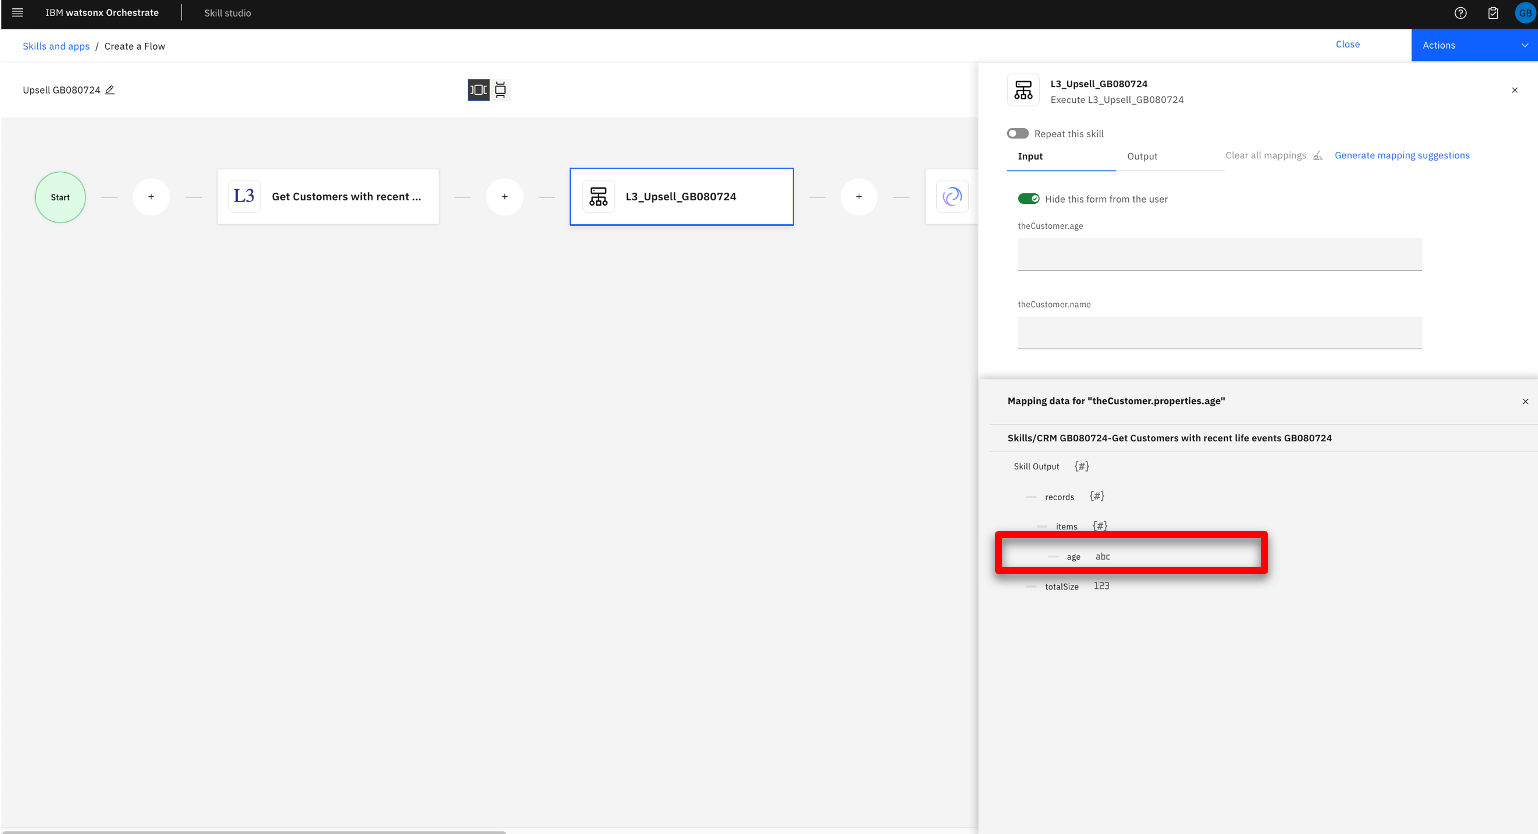 |
| Narration | Mapping data can be done manually, but in some cases it’s easier to let the skill flow editor generate mapping suggestions for you. |
| Action 4.22 | Click Generate mapping suggestions (this can take up to 30 seconds).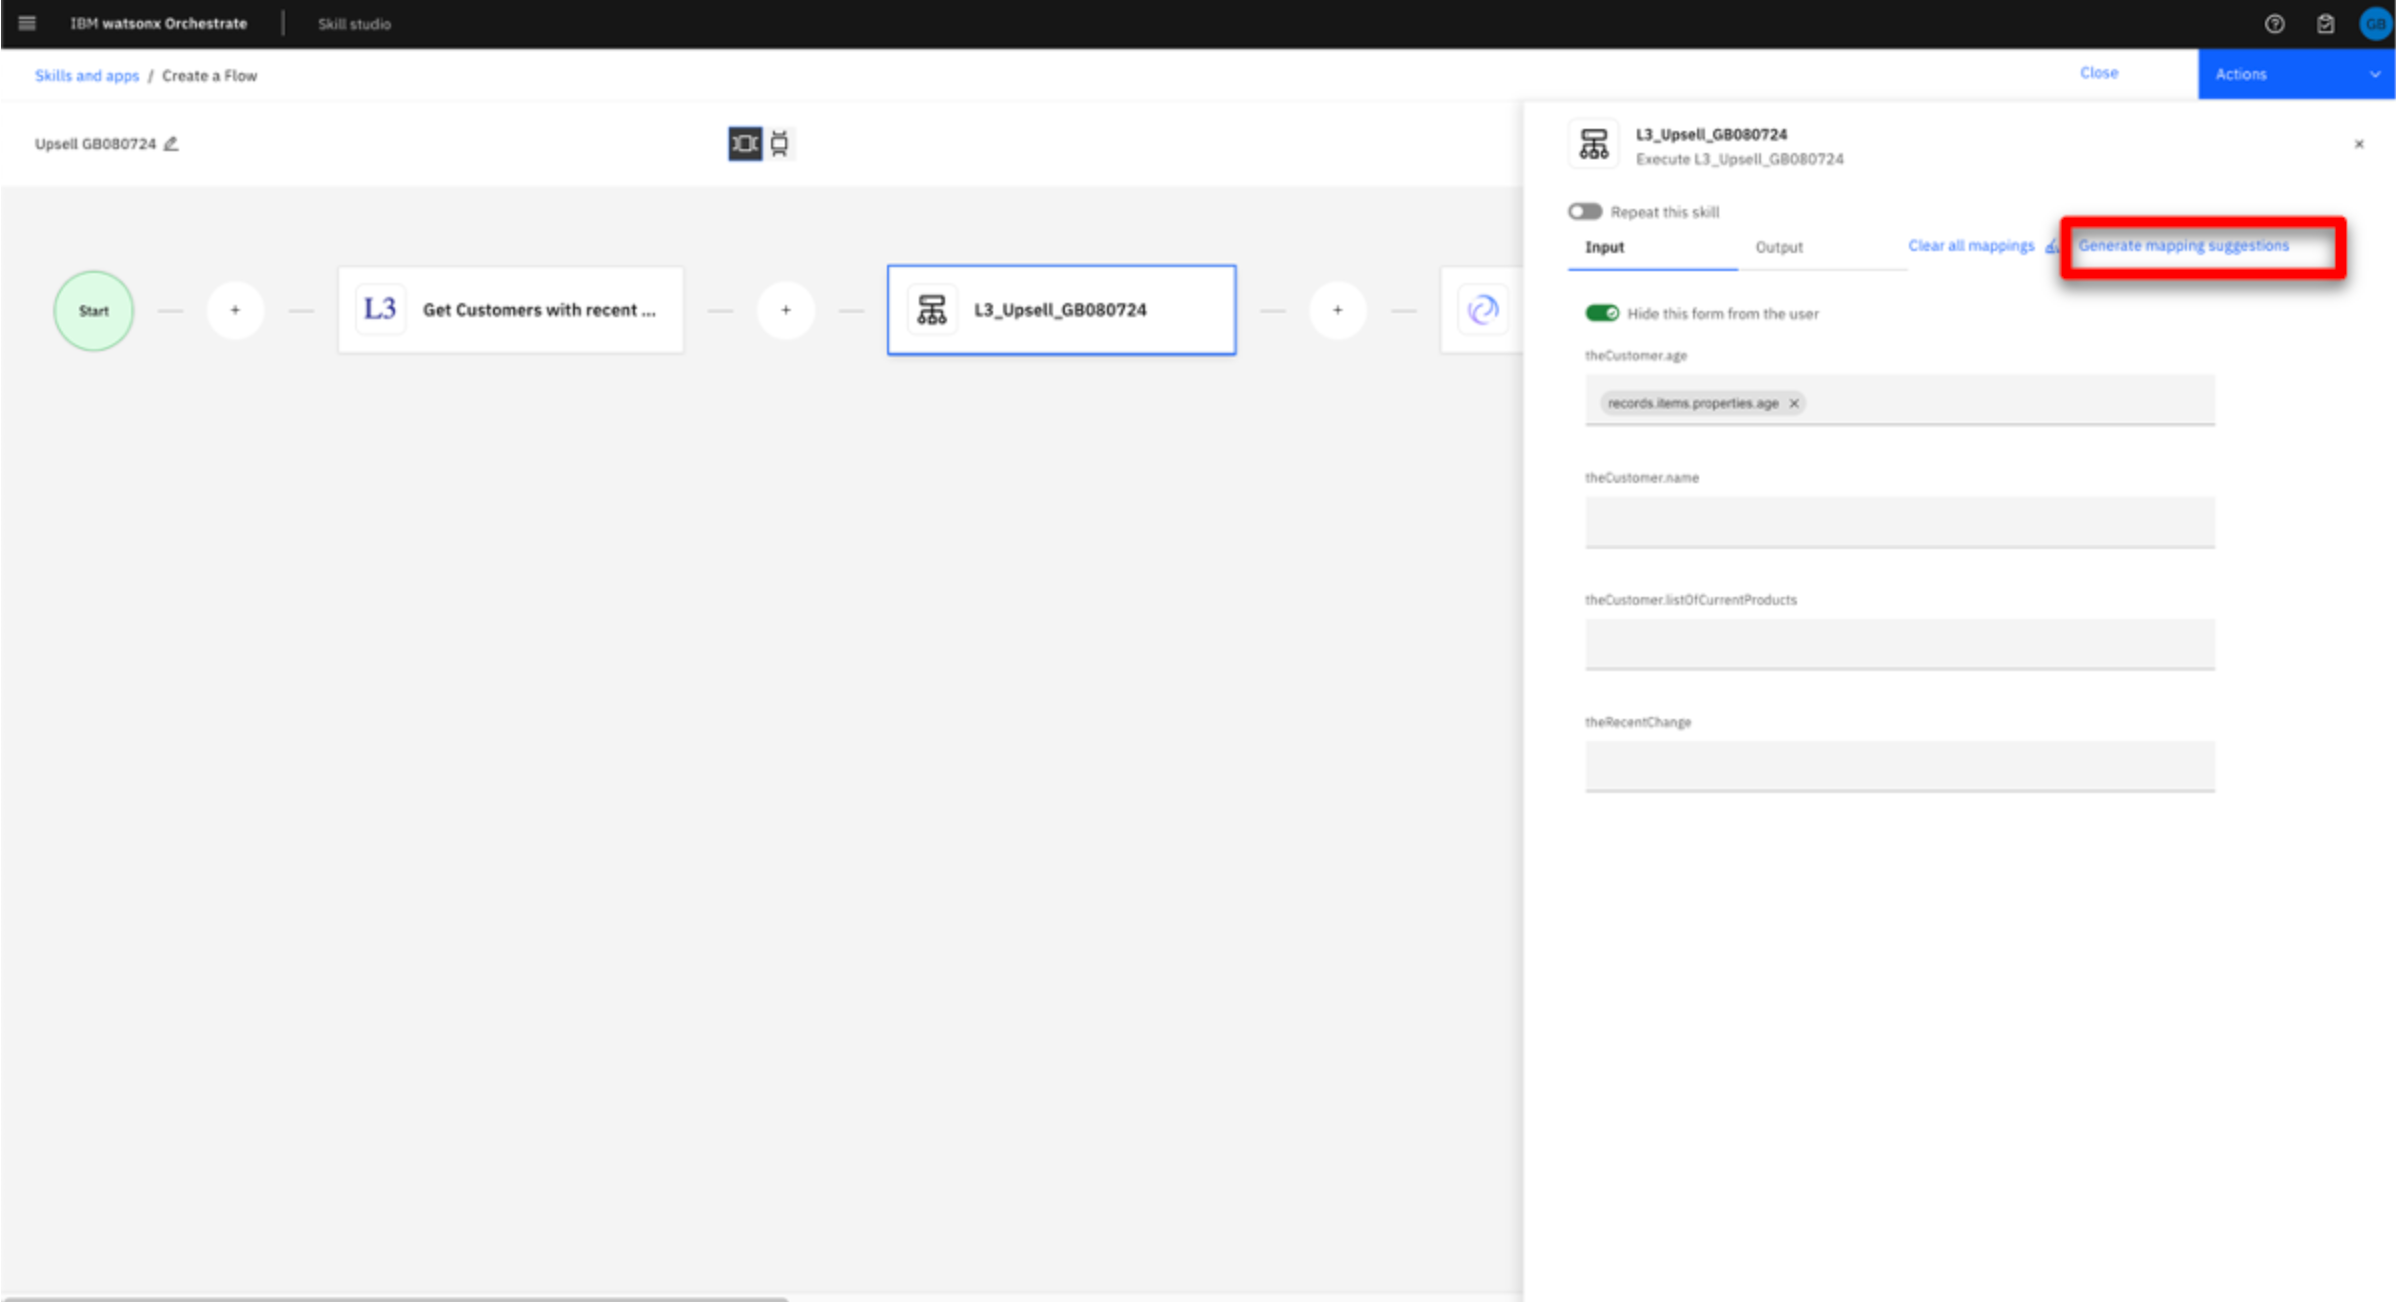 |
| Narration | Not all mappings can be generated. Later in the skill flow there will be multiple options, and as such, manual mapping will be required. Let’s complete the final mapping for this skill and map the list of current products. |
| Action 4.23 | Map the remaining field. Scroll down and click theCustomer.listOfCurrentProducts (A).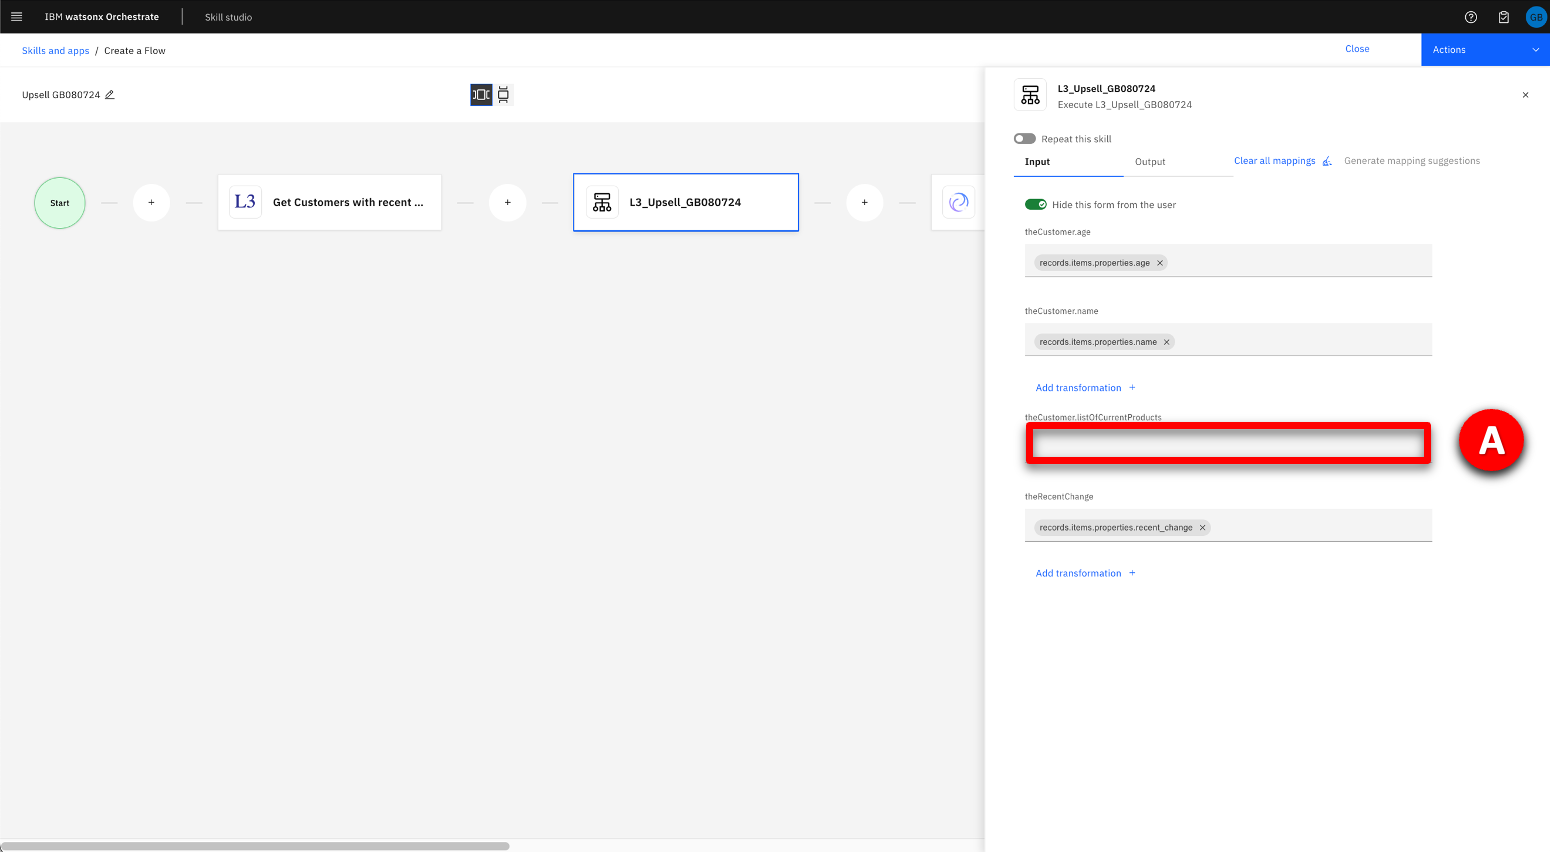 |
| Action 4.23a | Select Get a list of customers with recent life events from the mappings panel (A). 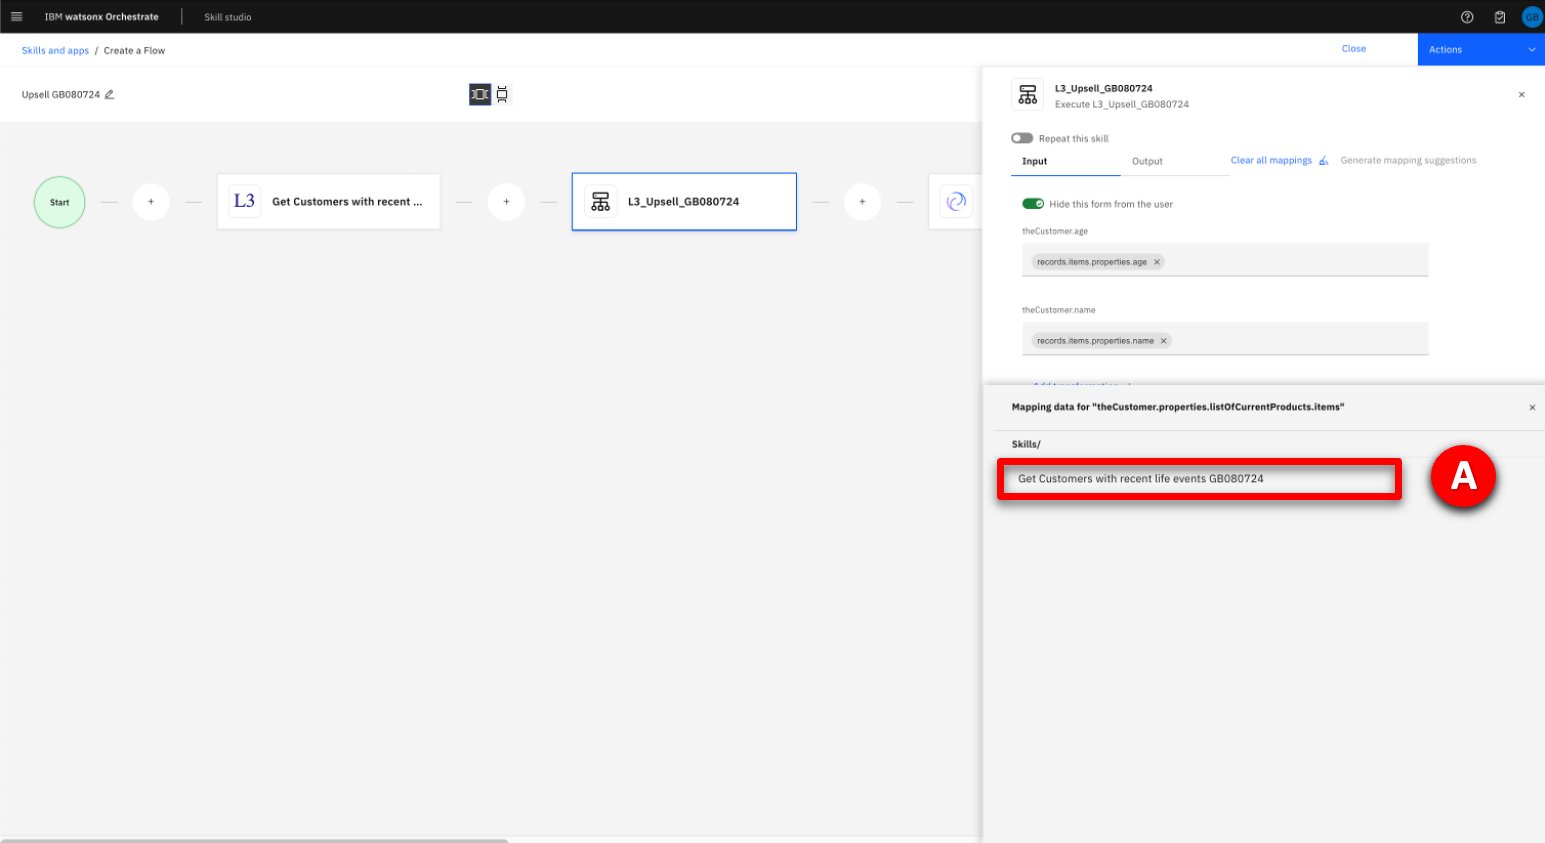 |
| Action 4.24 | Scroll and select current_products from the list of available mappings (A), then click the cross to close the mapping panel (B).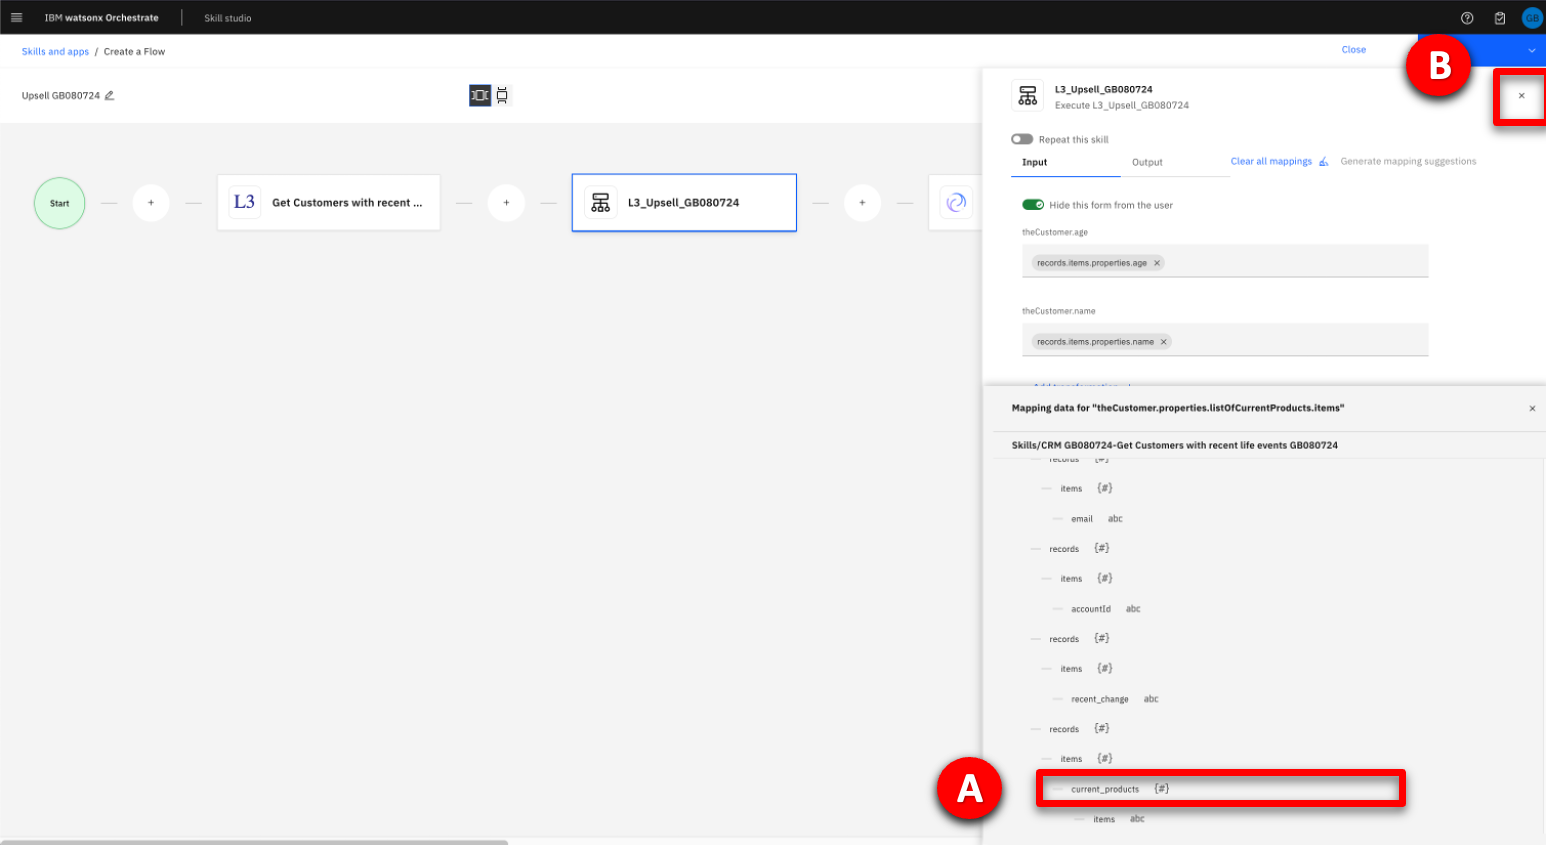 |
| Narration | The output form for the L3_Upsell skill requires no configuration, but typically this output would be hidden as the user doesn’t need to see or edit the results. It will be left visible in this demo so that when the skill flow runs the output will be available for review. The Generate an email skill creates the email body from the prompt received from the L3_Upsell decision skill. |
| Action 4.25 | Select the Generate an email tile in the skill flow (A).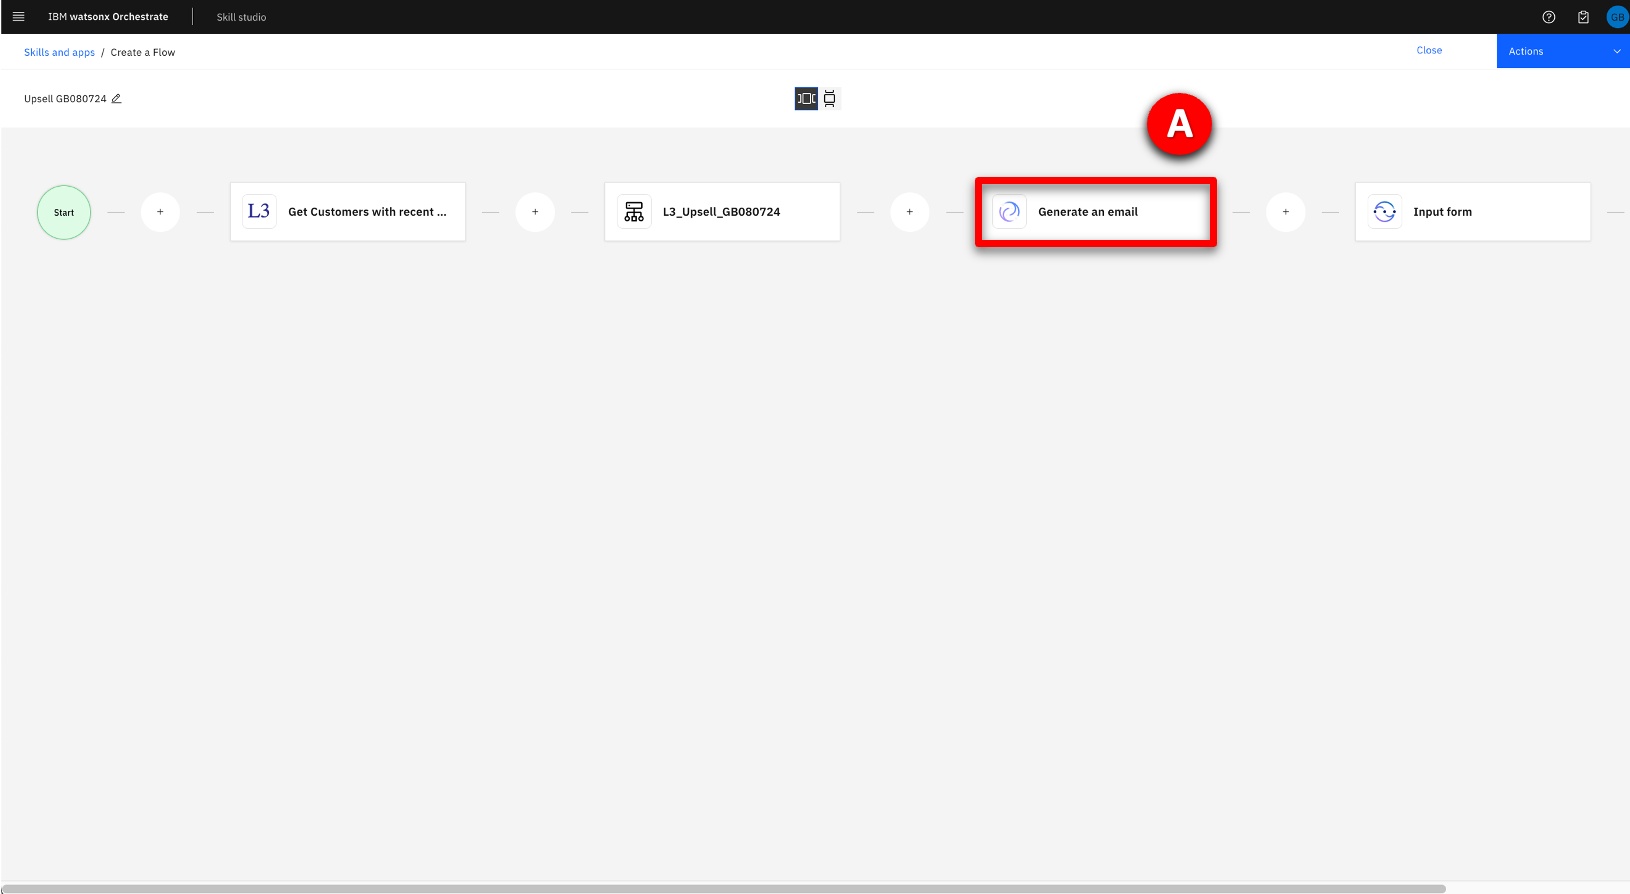 |
| Narration | Map the input field to take the prompt from the L3_Upsell skill. |
| Action 4.26 | Map the Input instruction field by performing the following steps: A. Click on the Input tab. B. Click on the Input instruction field. C. From Available Mappings Skills select the L3_Upsell skill. 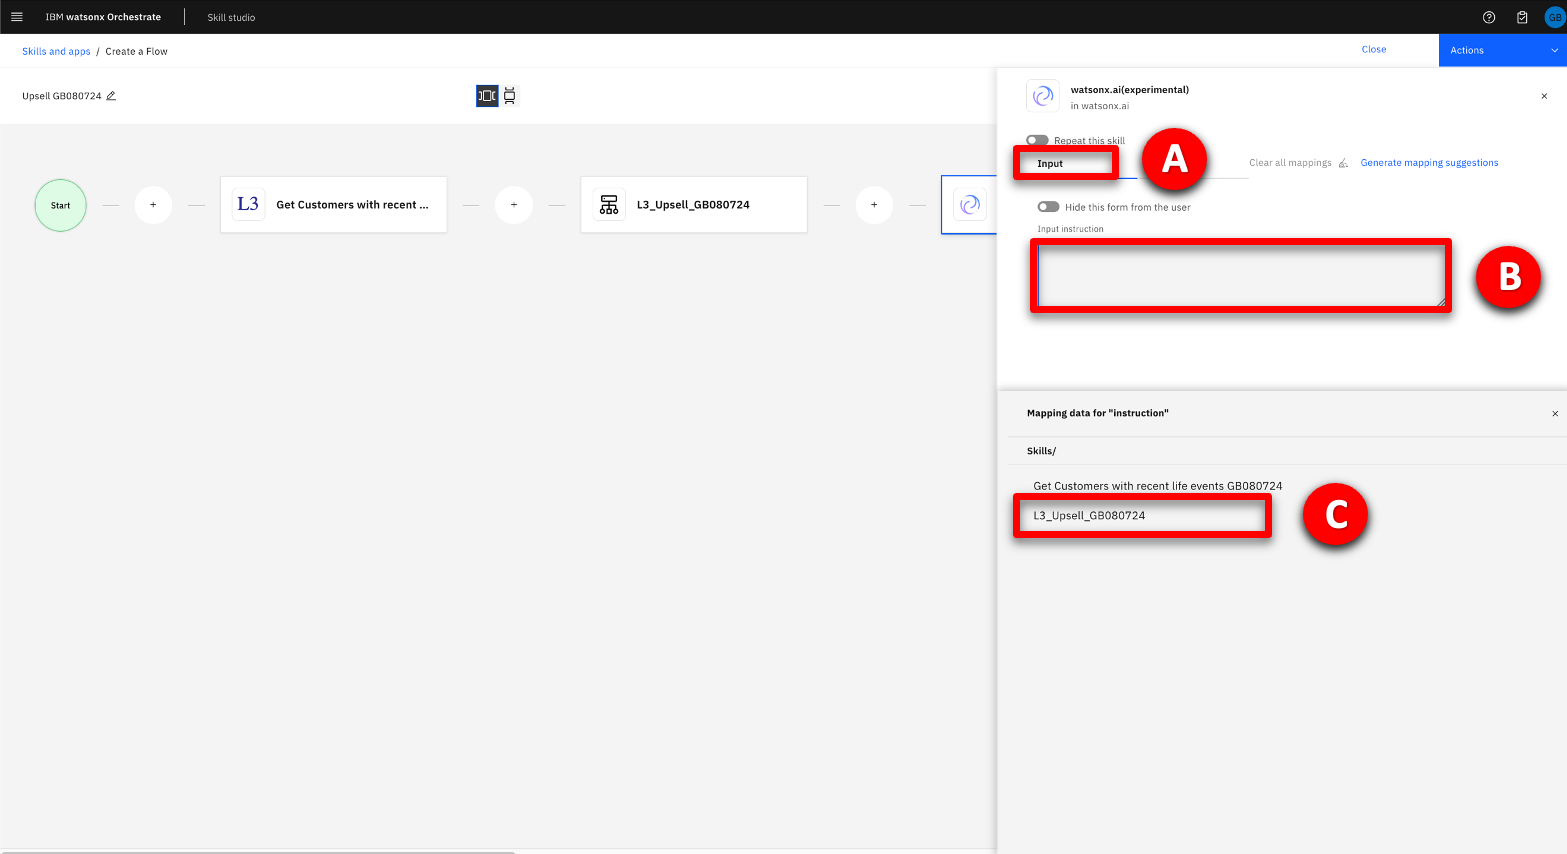 D. Select prompt. 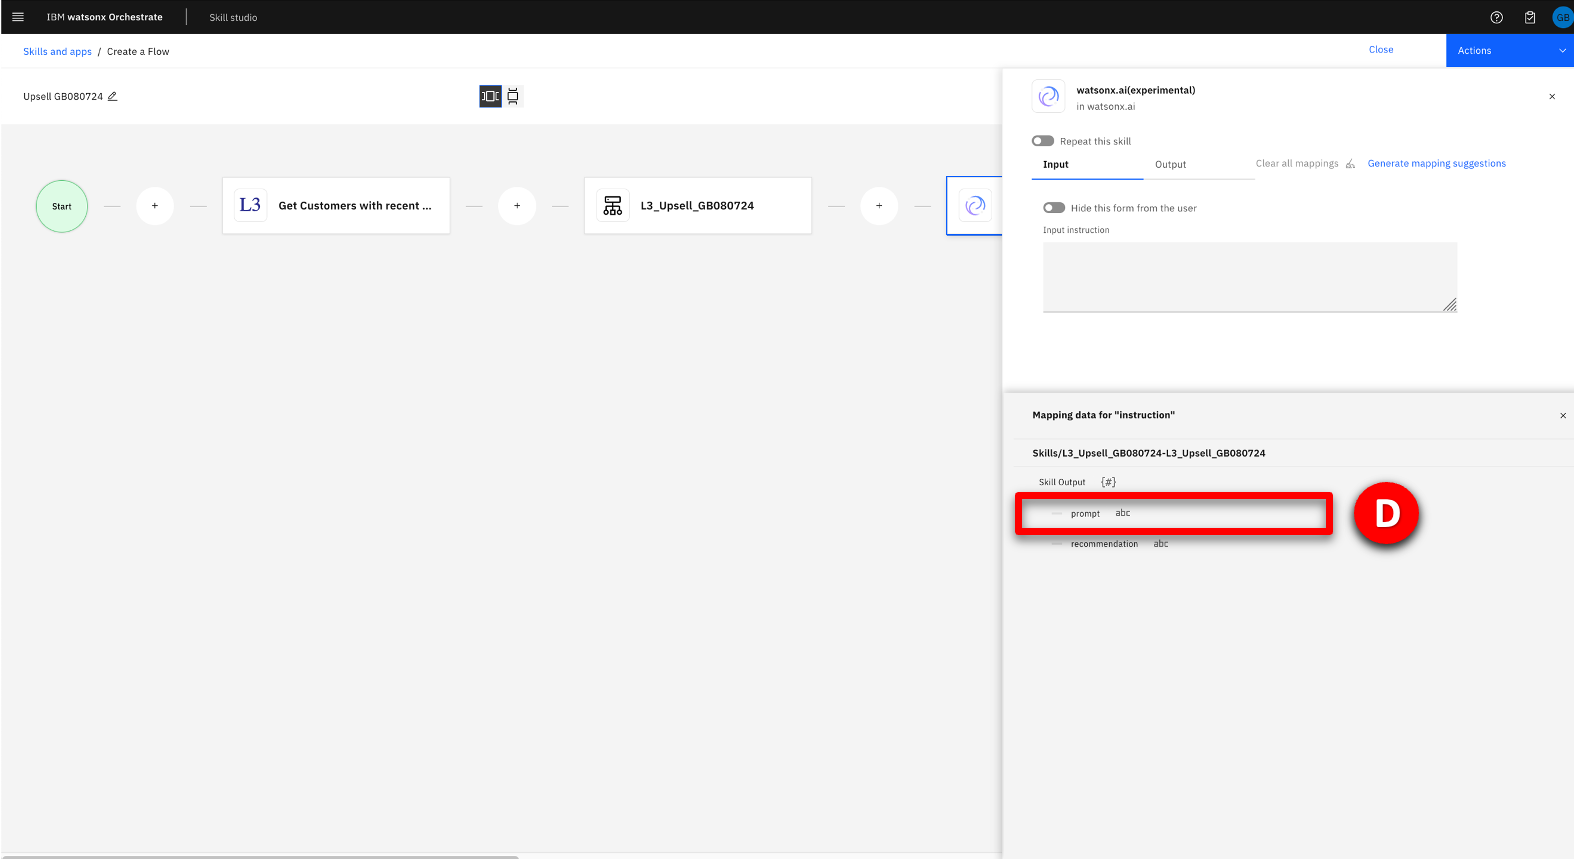 |
| Narration | The Generate an email output form can be hidden as the output will be available to view in the next skill. |
| Action 4.27 | Configure the Generate an email output form by performing the following steps: A. Select the Output tab to select the output form. B. Turn on the Hide this input form from the user option. C. Click the cross to close the mapping panel. 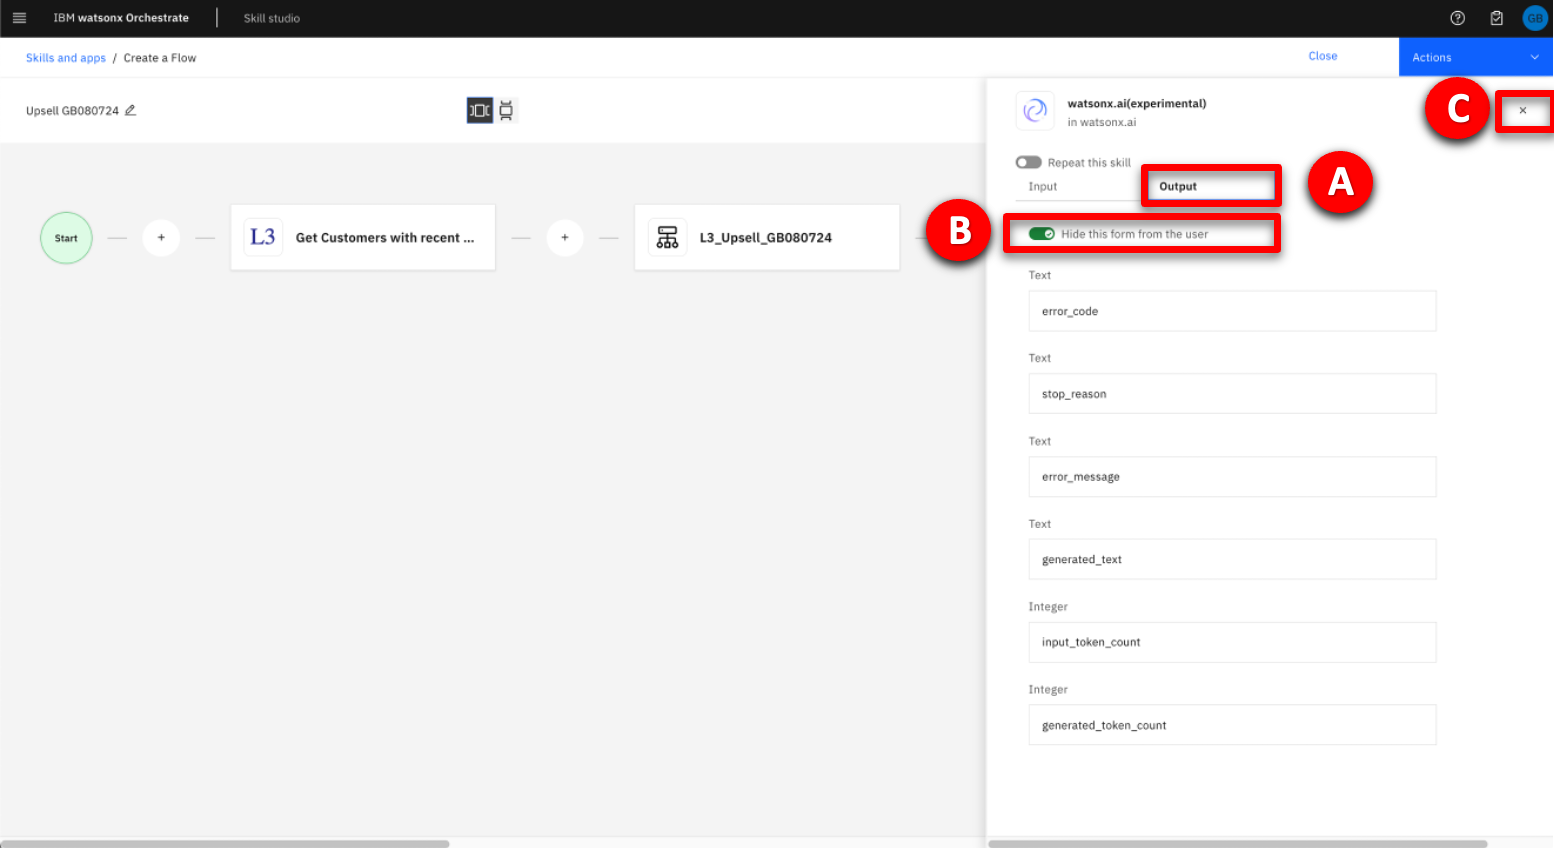 |
| Narration | Following email content generation, an input form will be used to display the output and allow the sales agent to check the output for accuracy. The agent can also make any modifications before the response is sent to their customer. The form is built by repeatedly adding input fields. |
| Action 4.28 | Configure the input form by performing the following steps: A. Scroll to the right to display the Input form. B. Select the Input form tile from the skill flow at the top of the screen. 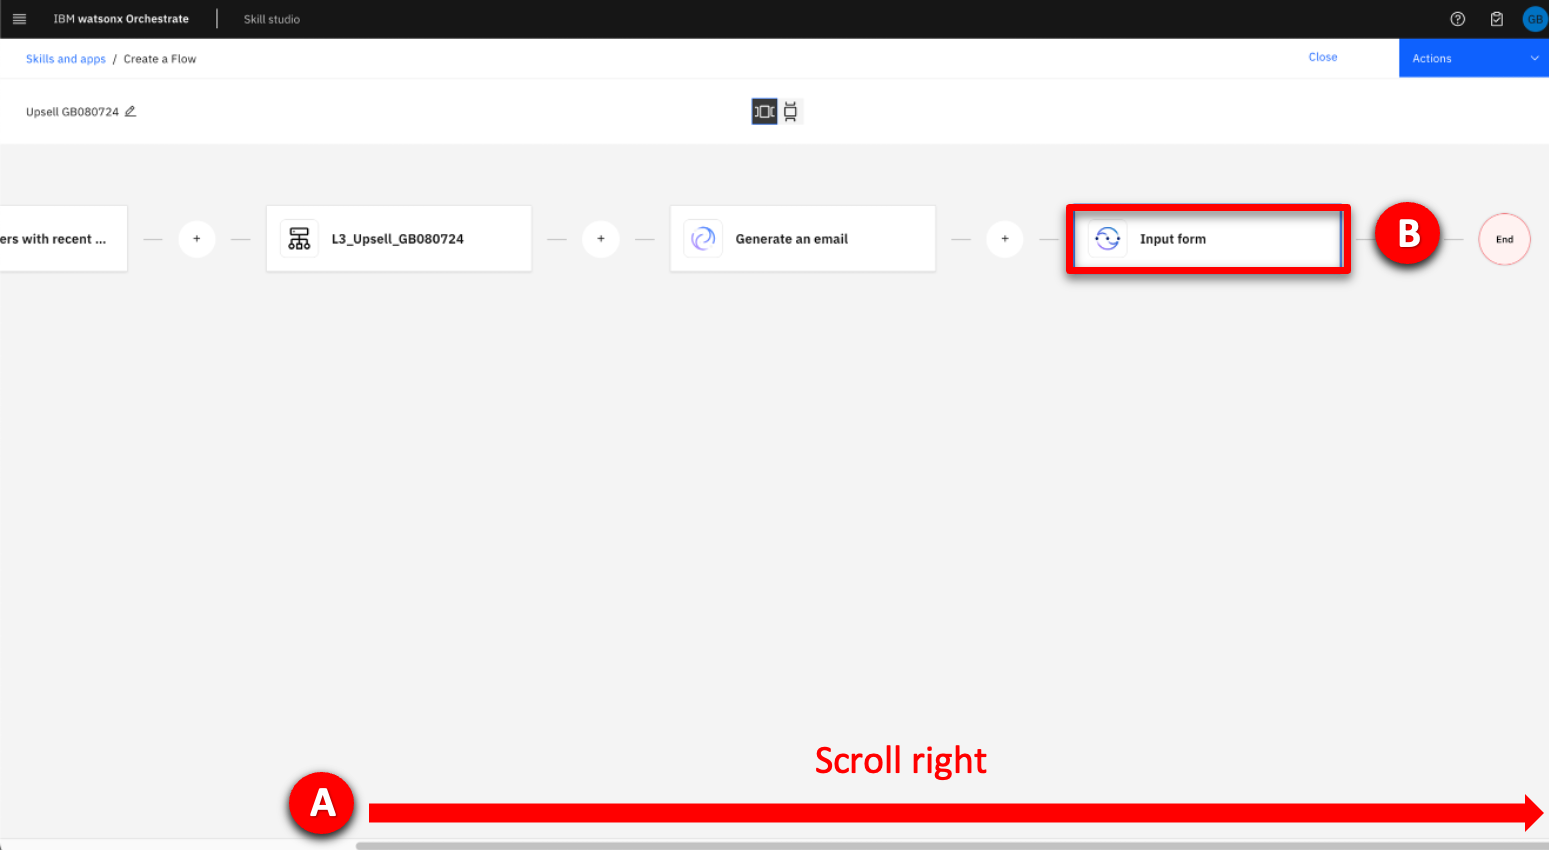 |
| Action 4.28a | Enter a title for the form in the Form title field, for example “Send email”.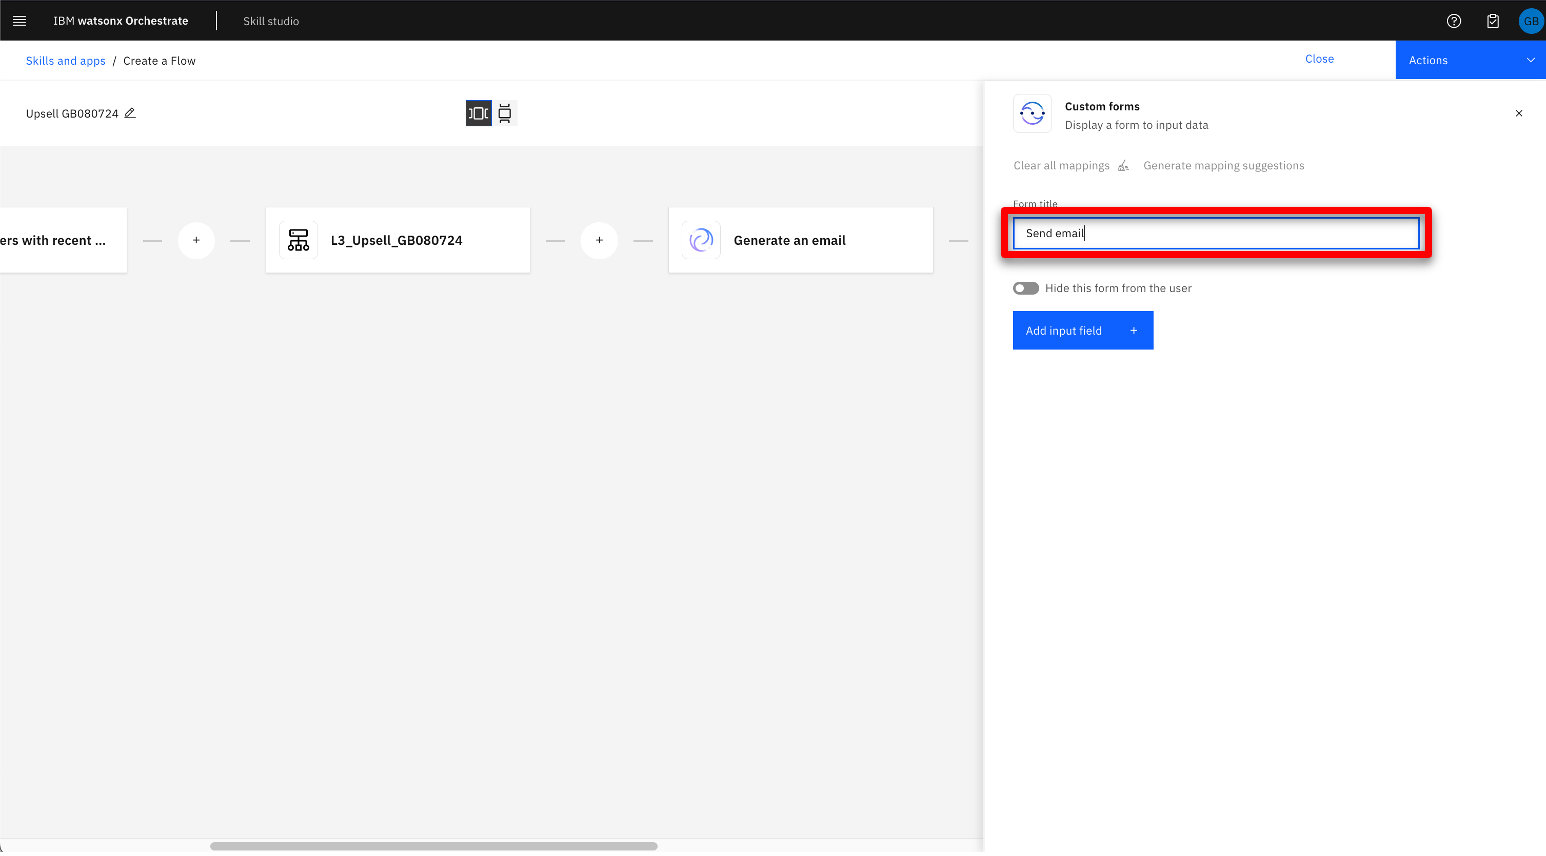 |
| Narration | The form is built by repeatedly adding input fields. |
| Action 4.29 | Add a field to the form by performing the following steps: A. Click Add input field. B. Select the Single line text option under the Add input field section that appears on the right side of the screen C. Click the Next button. 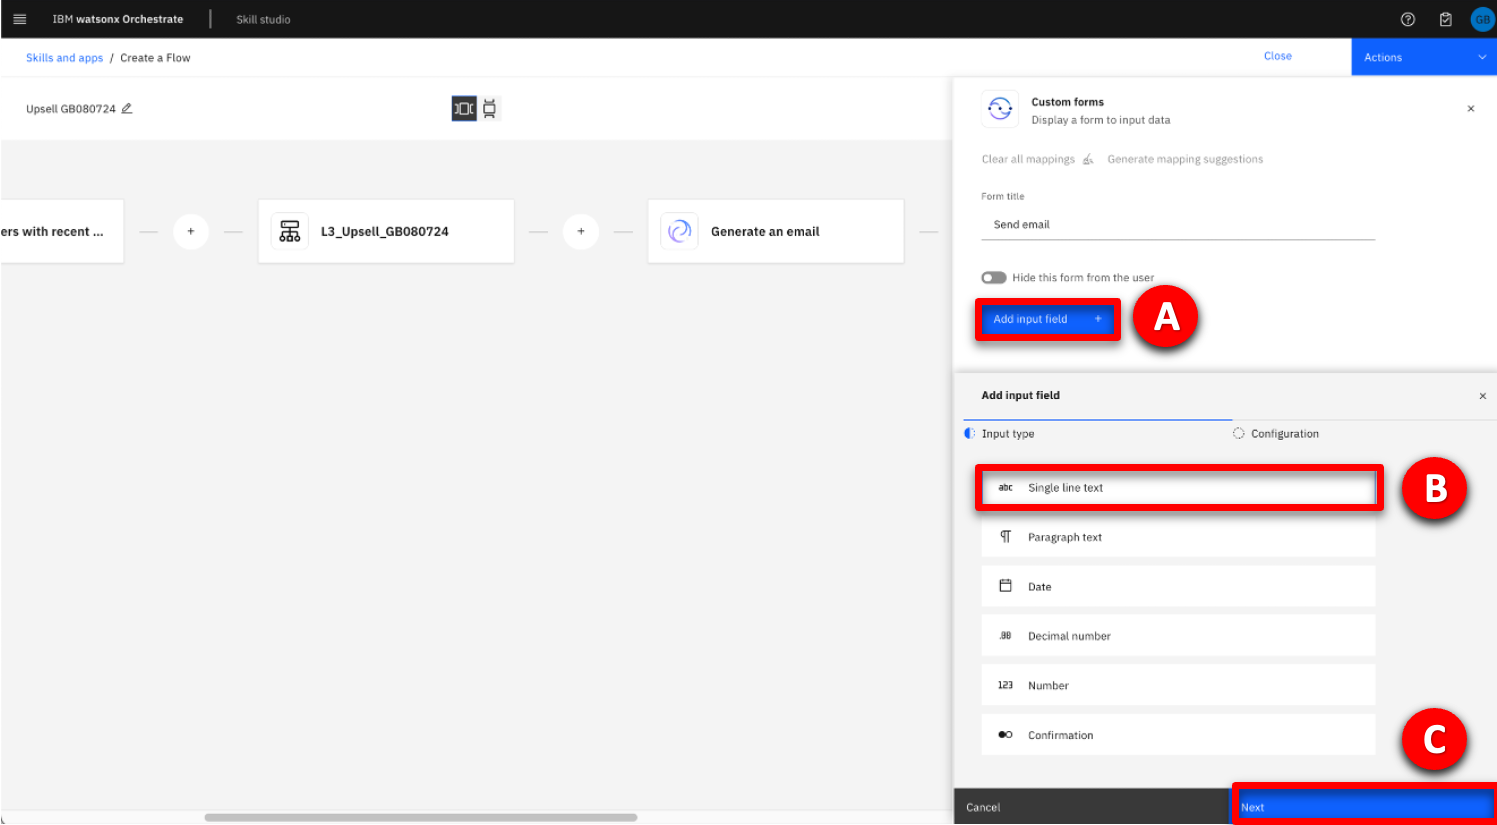 |
| Narration | The new input field will receive the email address of the selected customer. |
| Action 4.30 | Label the input field by performing the following steps: A. Enter the value “To” into the Display text field in the Add input field section on the right side of the screen. B. Click the Apply button. 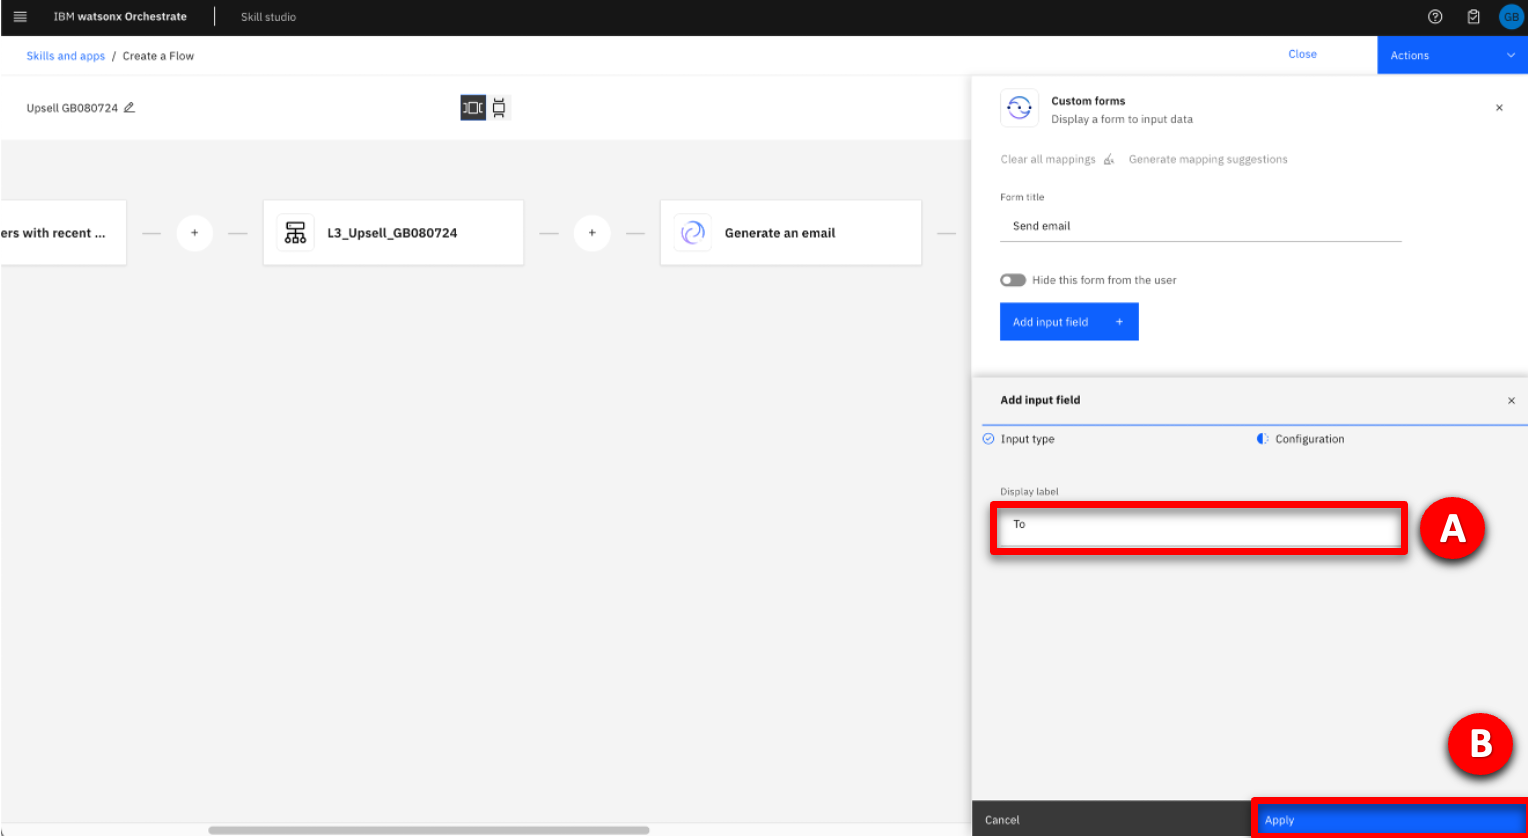 |
| Narration | The subject field can now be added to the form by repeating the same steps. |
| Action 4.31 | Repeat steps 4.29 and 4.30 to create a Subject field. |
| Action 4.31a | Click Add input field.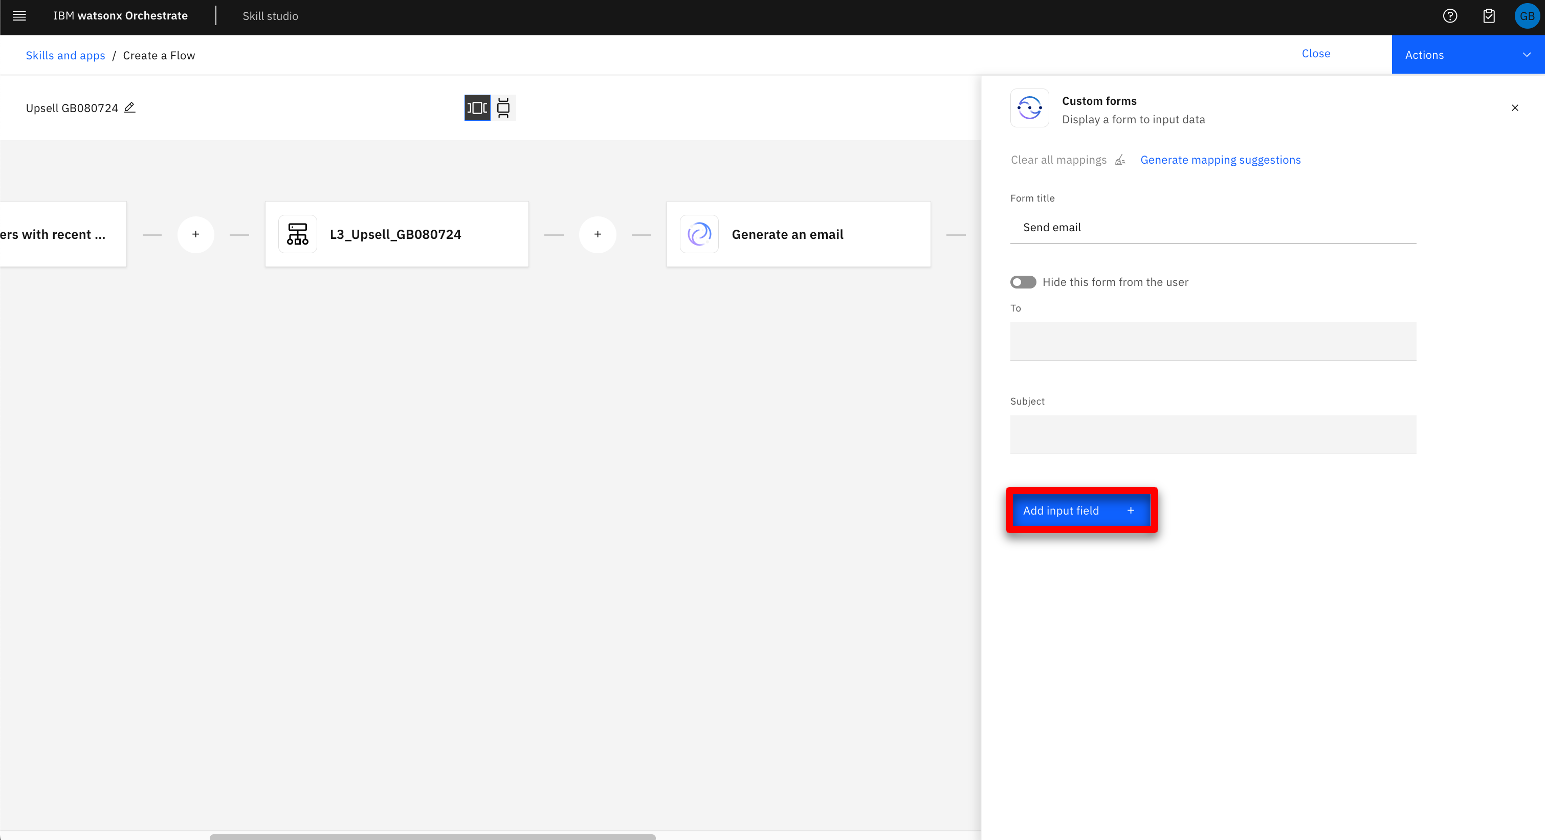 |
| Narration | Next, a field for the email body is added to the form, this field will be a Paragraph text field. |
| Action 4.32 | Add a field to the form by performing the following steps: A. Select the Paragraph text option in the Add input field section on the right side of the screen. B. Click the Next button. 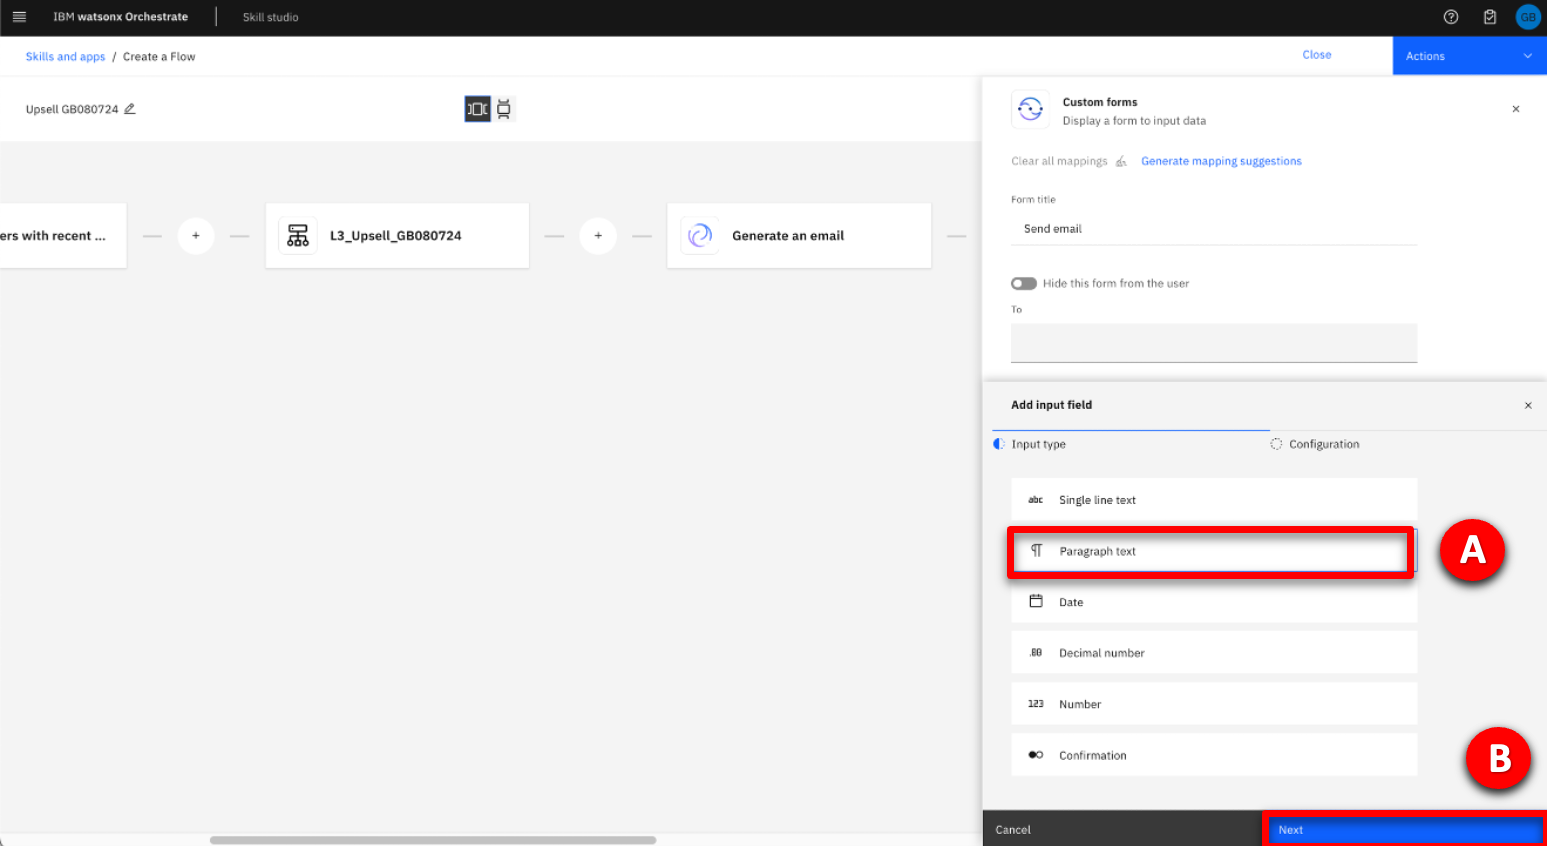 |
| Narration | This input field will receive the email body generated by watsonx.ai. |
| Action 4.33 | Label the input field by performing the following steps: A. Enter the value “Email body” into the Display text field. B. Click the Apply button. 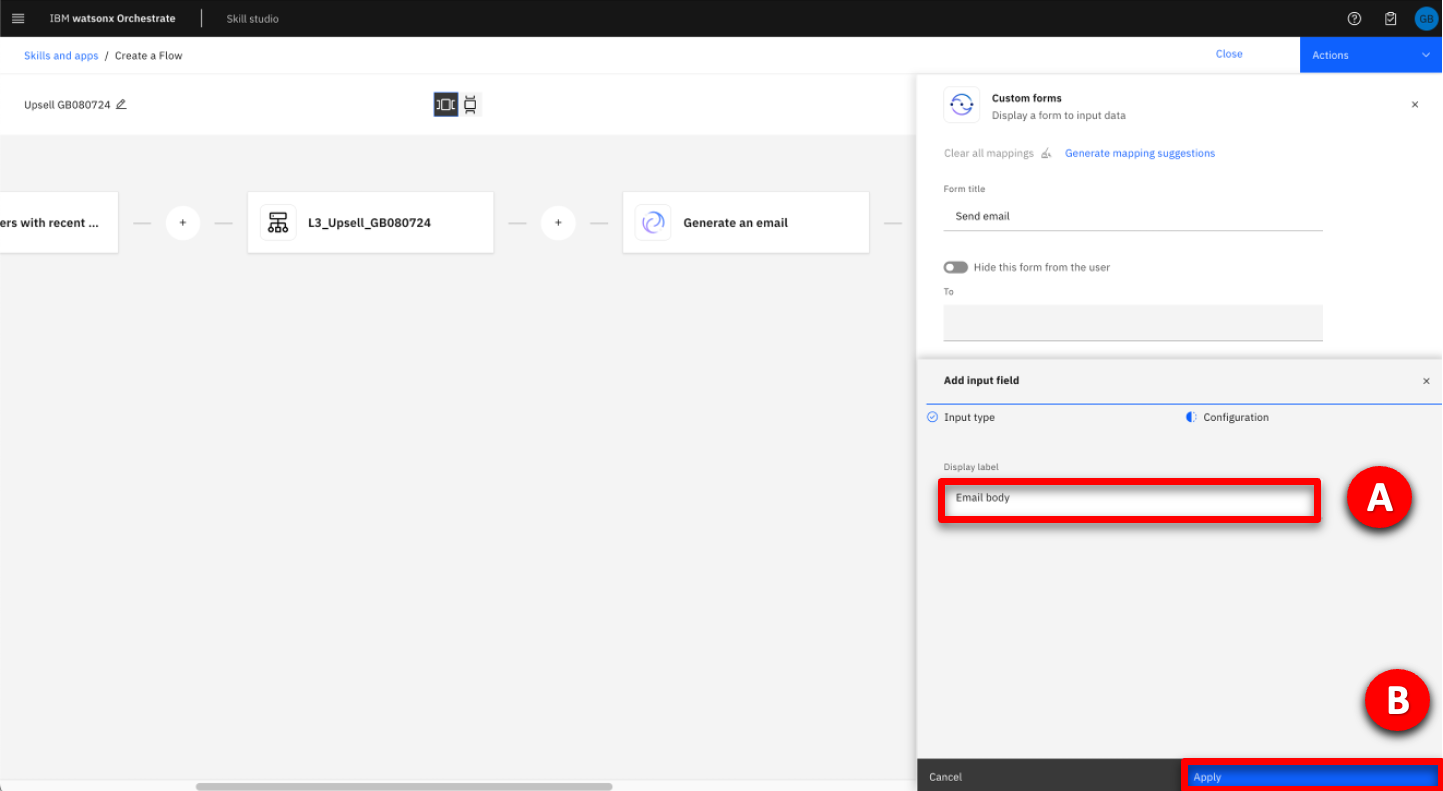 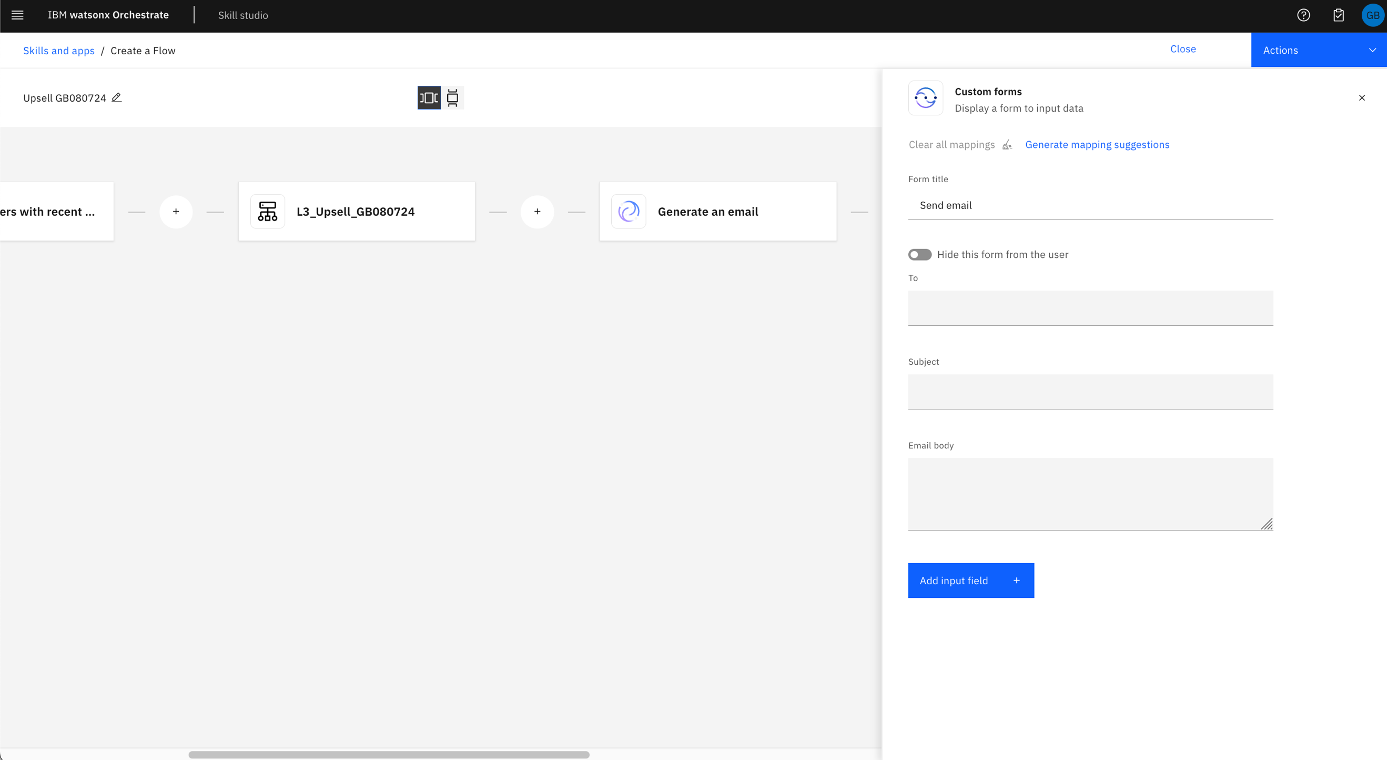 |
| Narration | To complete the form the mappings must be added. |
| Action 4.34 | Configure the mappings for the input form by performing the following steps: A. Click the To field. B. From Available Mappings, select Get a list of customers with recent life events XXddmmyy. 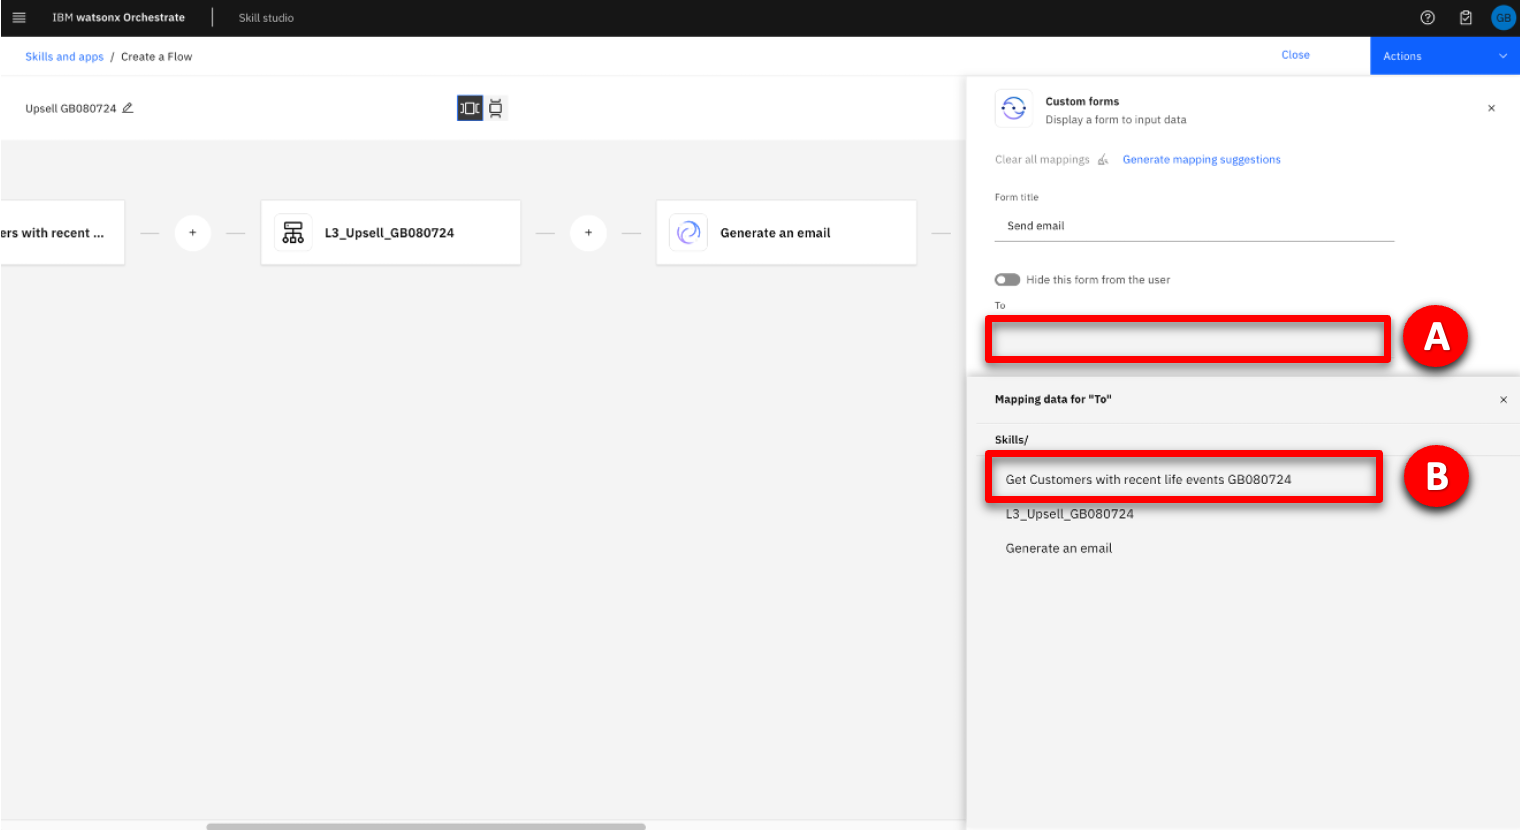 C. Select the email mapping. 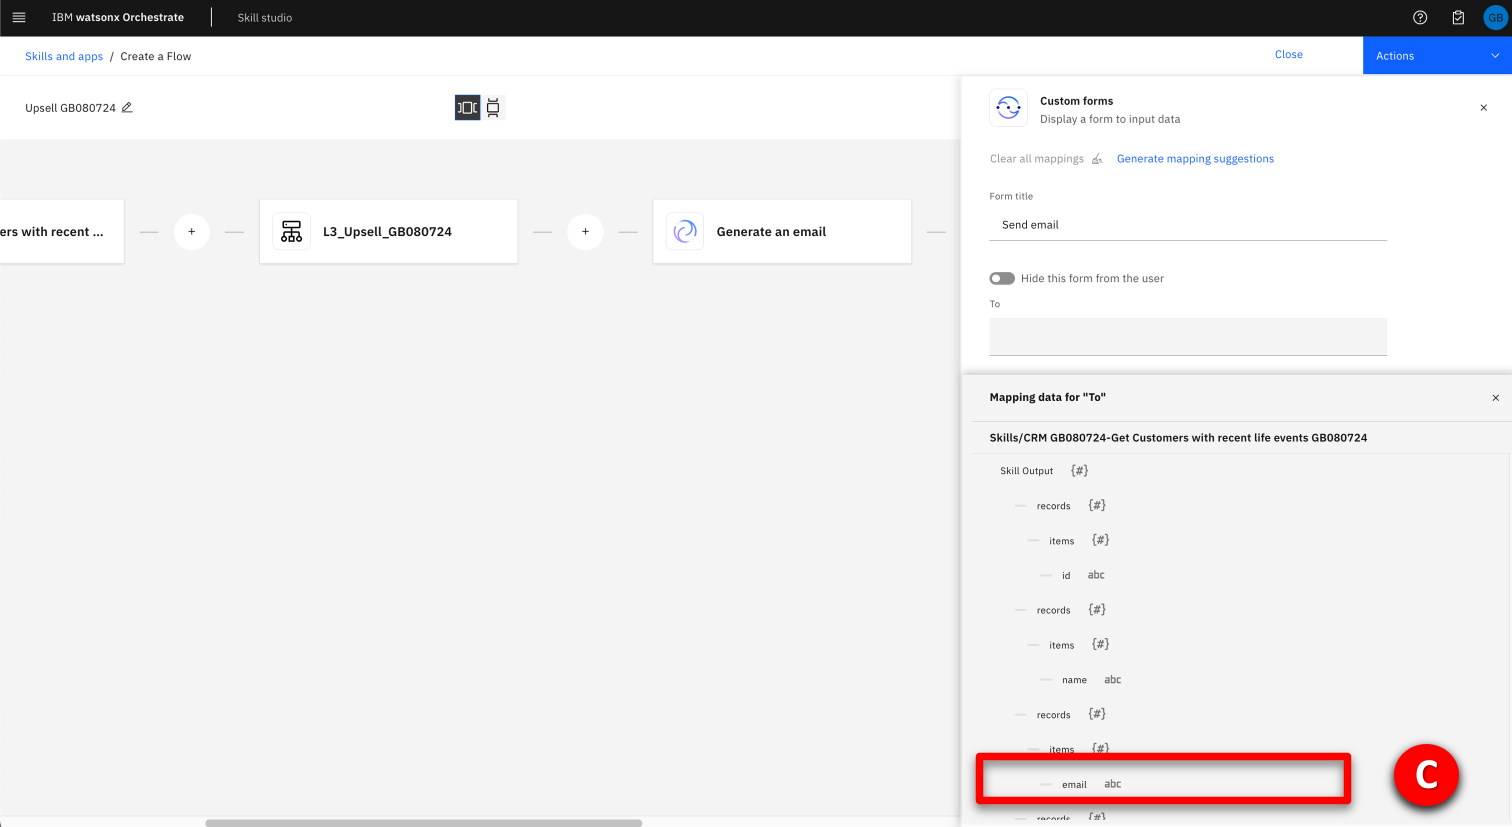 |
| Narration | A default value will be used to populate the Subject field. |
| Action 4.35 | Provide a default value for the Subject field by performing the following steps: A. Hover to the right of the Subject field and click the corresponding Pencil icon when it appears. 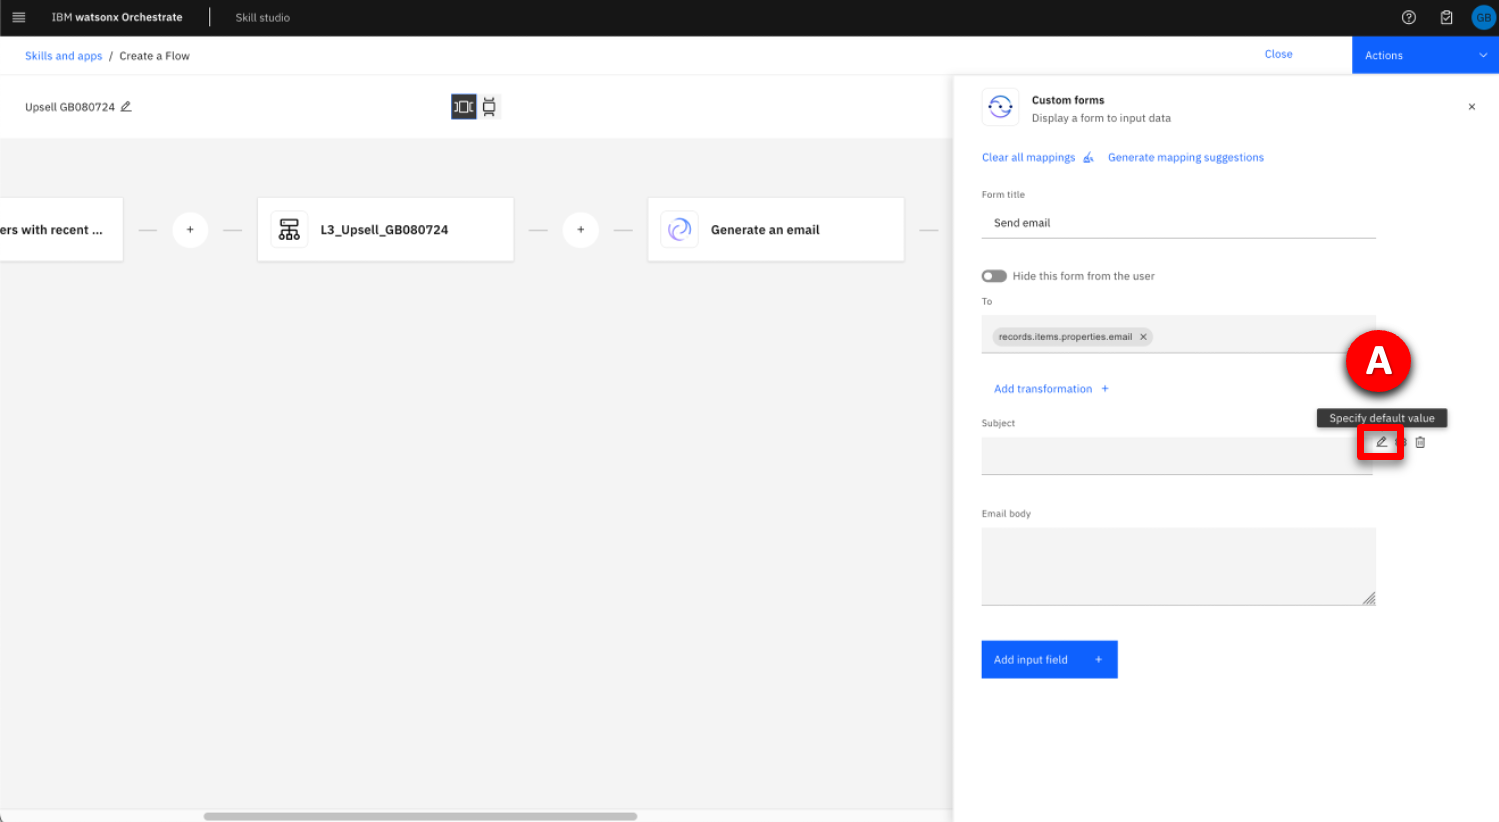 B. Under Subject, enter a default value, “Your insurance”. 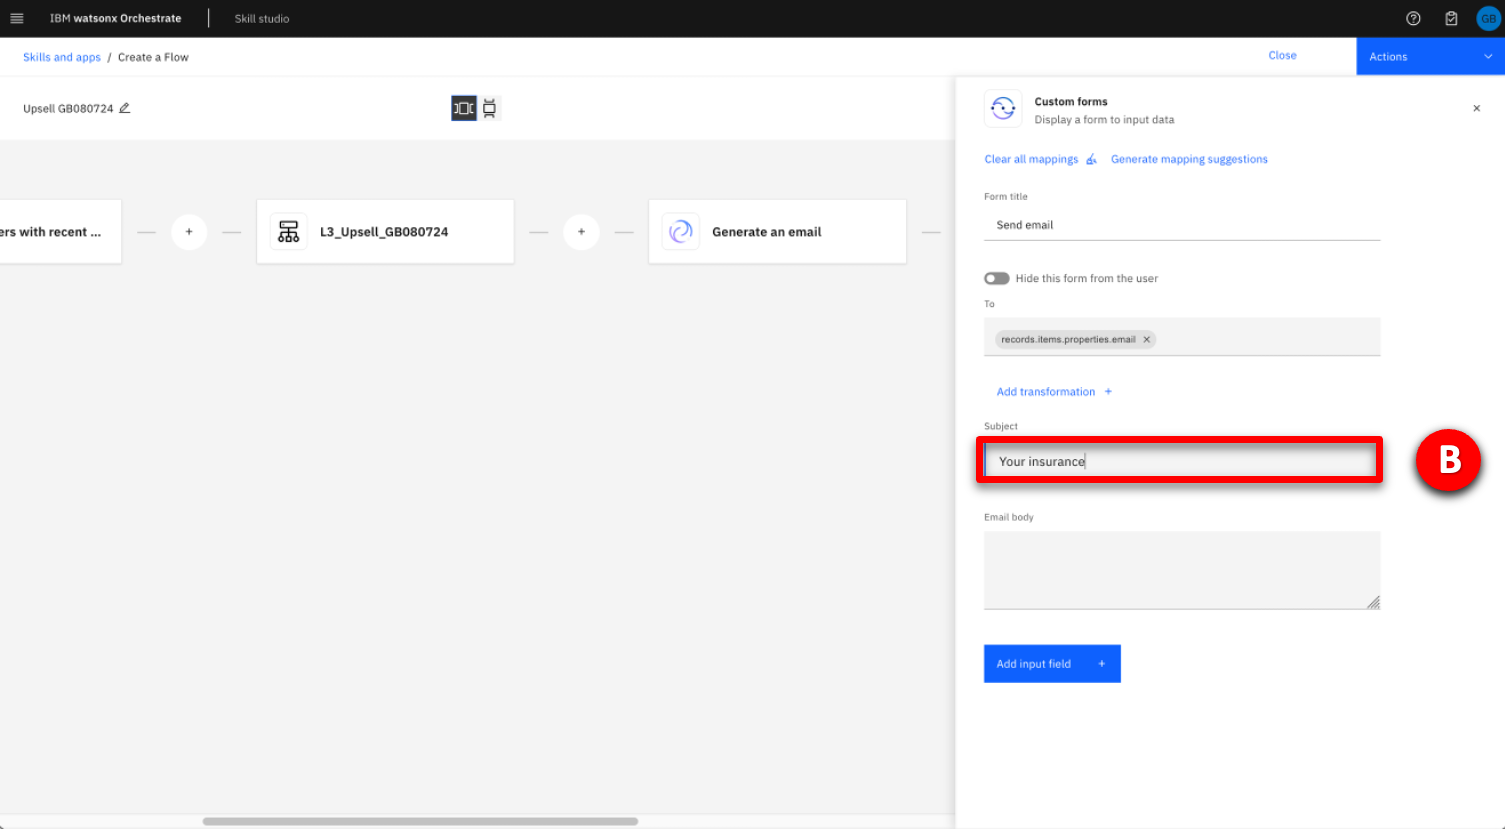 |
| Narration | The text produced from the Generate an email skill will be used to populate the Email body field. |
| Action 4.36 | Map the value for the Email body by performing the following steps: A. Click on the Email body field. 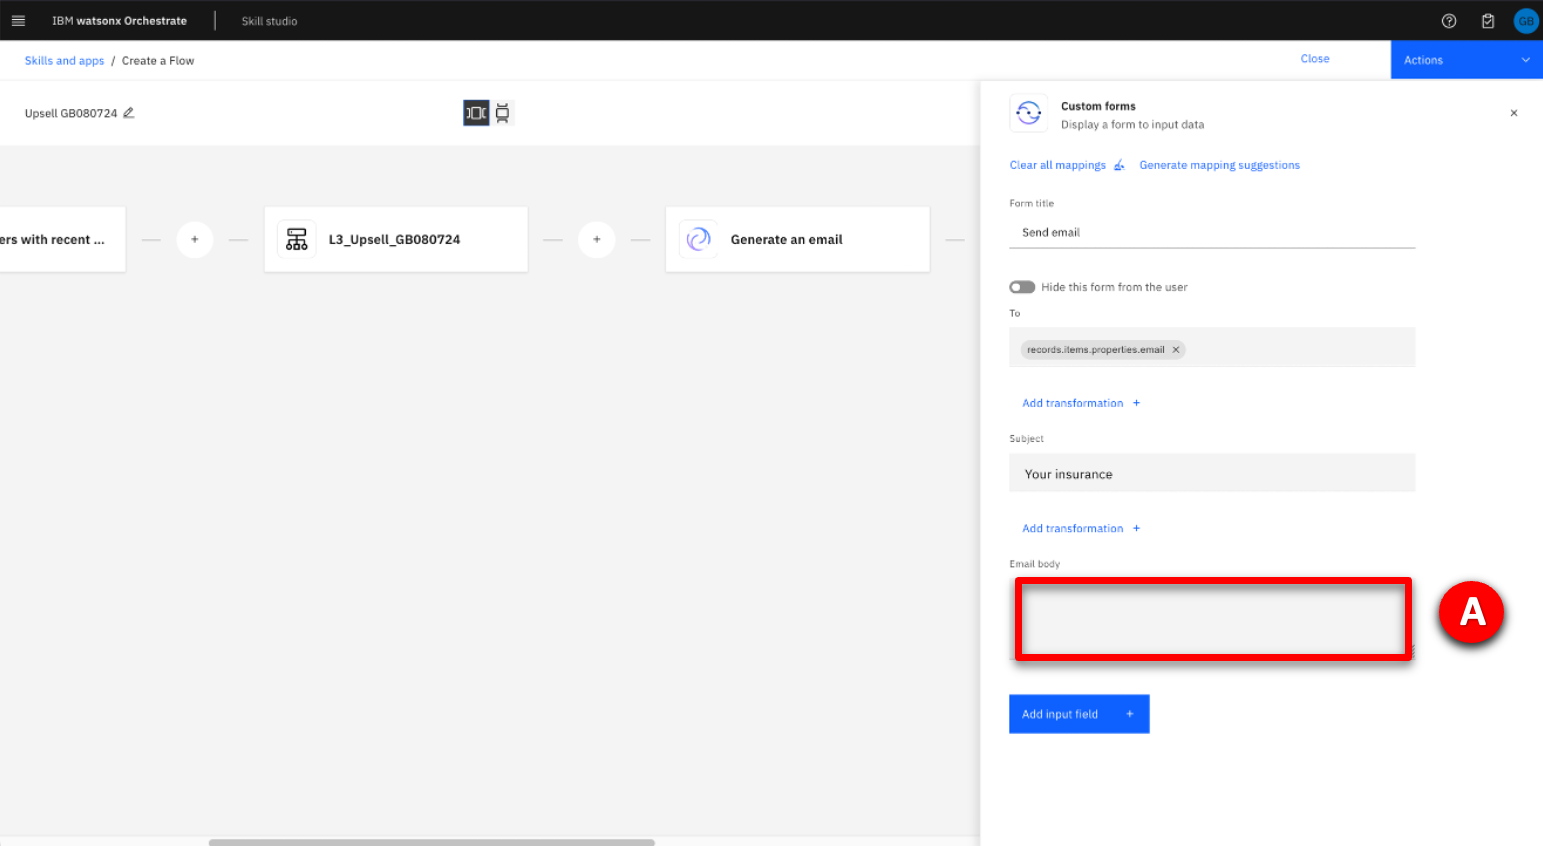 B. In the Available mappings section, select Generate an email. 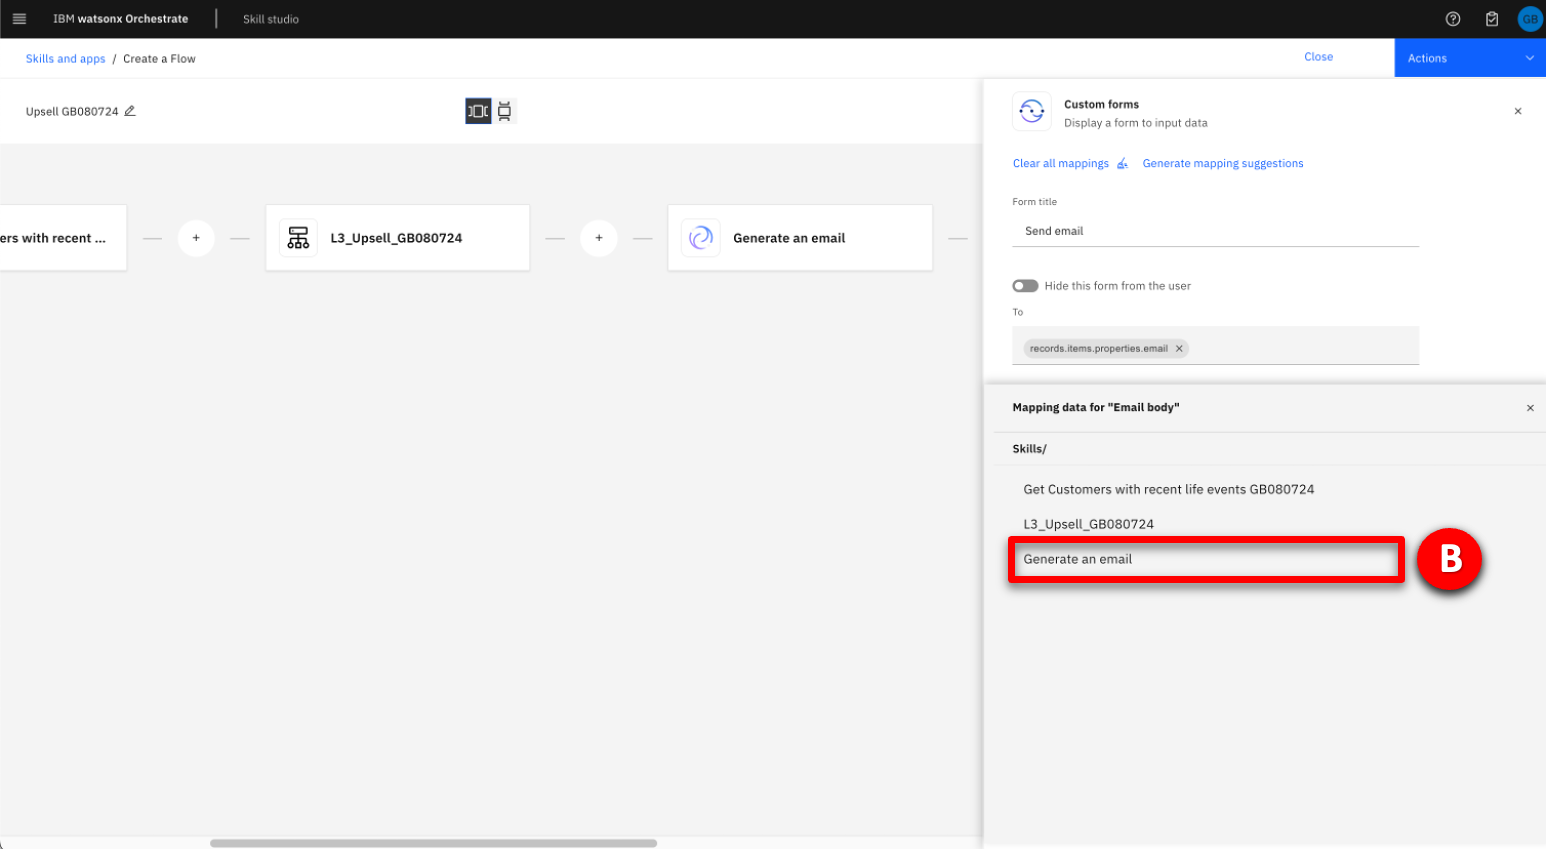 C. Select generated_text. 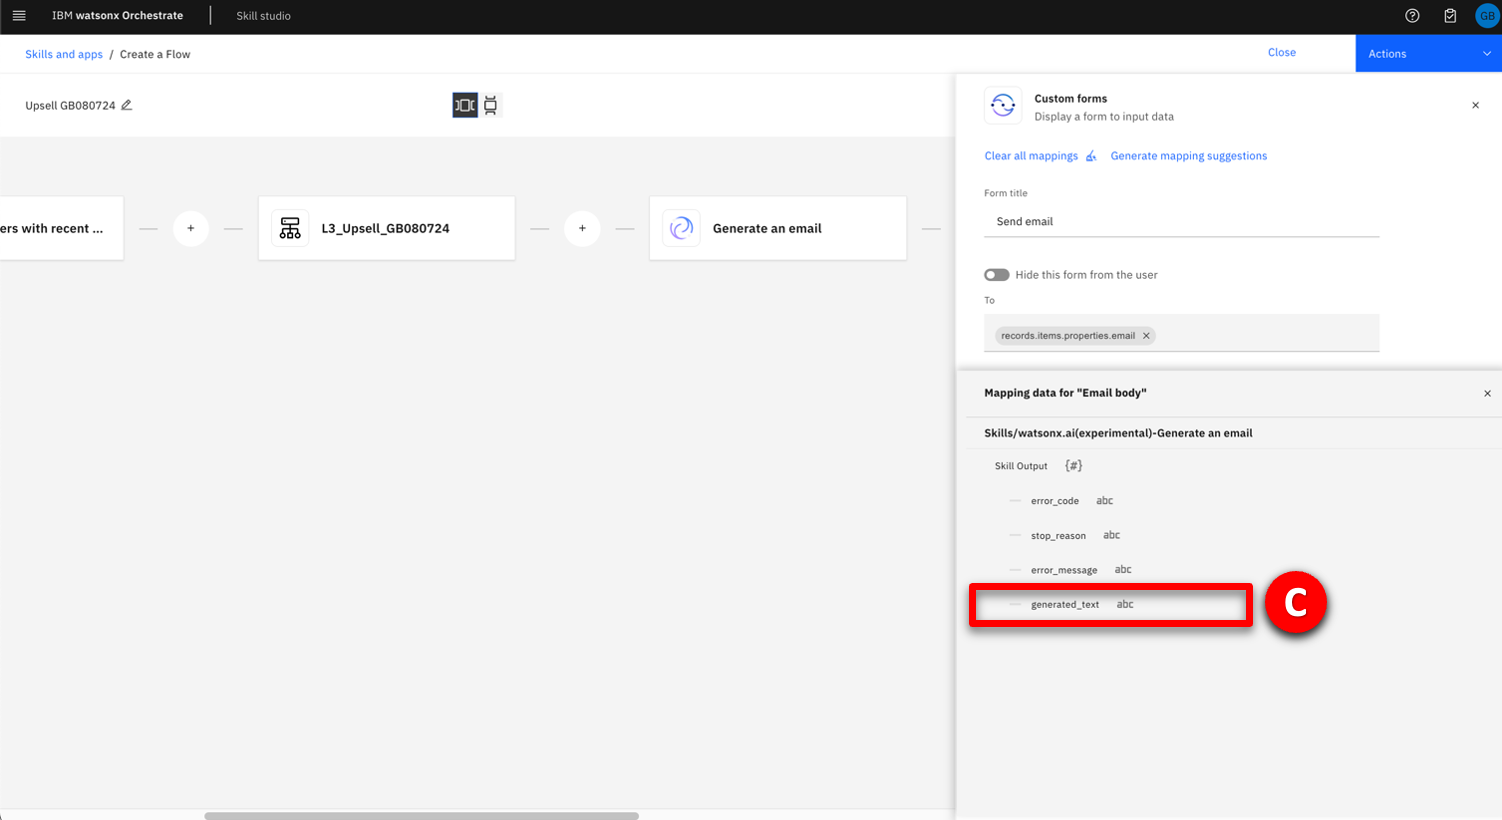 |
| Narration | This completes the skill flow creation. In the next section, you will save this skill flow and then publish it, so it is available for use by any seller at the insurance company. |
5 – Saving and publishing the skill flow
| Narration | Before the new skill flow can be used, it must be enhanced and published. Enhancement allows you to fine-tune how the skill is presented and train the conversational interface to recognize when the skill should be used. First, save the skill flow. |
| Action 5.1 | A. Scroll to the top of the page and click on the Actions button drop down. B. Select Save or Save as draft.  |
| Narration | Next use the Enhance window to enter training phrases and publish the skill flow. |
| Action 5.2 | Open the Enhance window by performing the following steps: A. Click the Actions button drop down. B. Select Enhance. 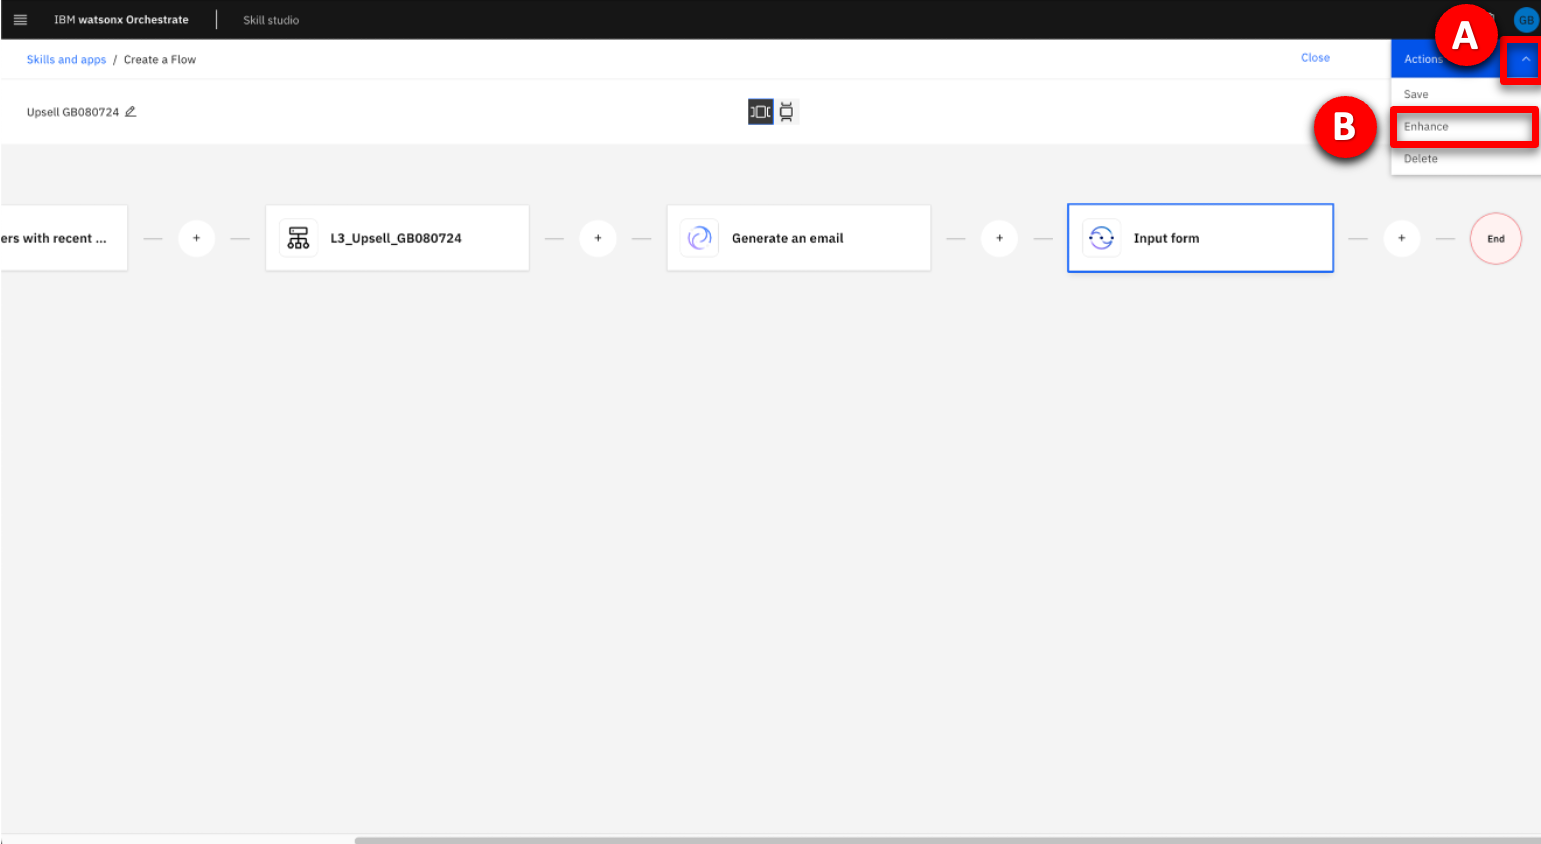 |
| Narration | Using the Enhance window, phrases are entered that are used to train the conversational interface to recognize when the skill should be used. Multiple phrases can be entered to train the conversational interface. In a real project, several alternative phrases would be used to train the AI to ensure the skill is activated. |
| Action 5.3 | Enter a training phrase by performing the following steps:> A. Select the Phrases tab. 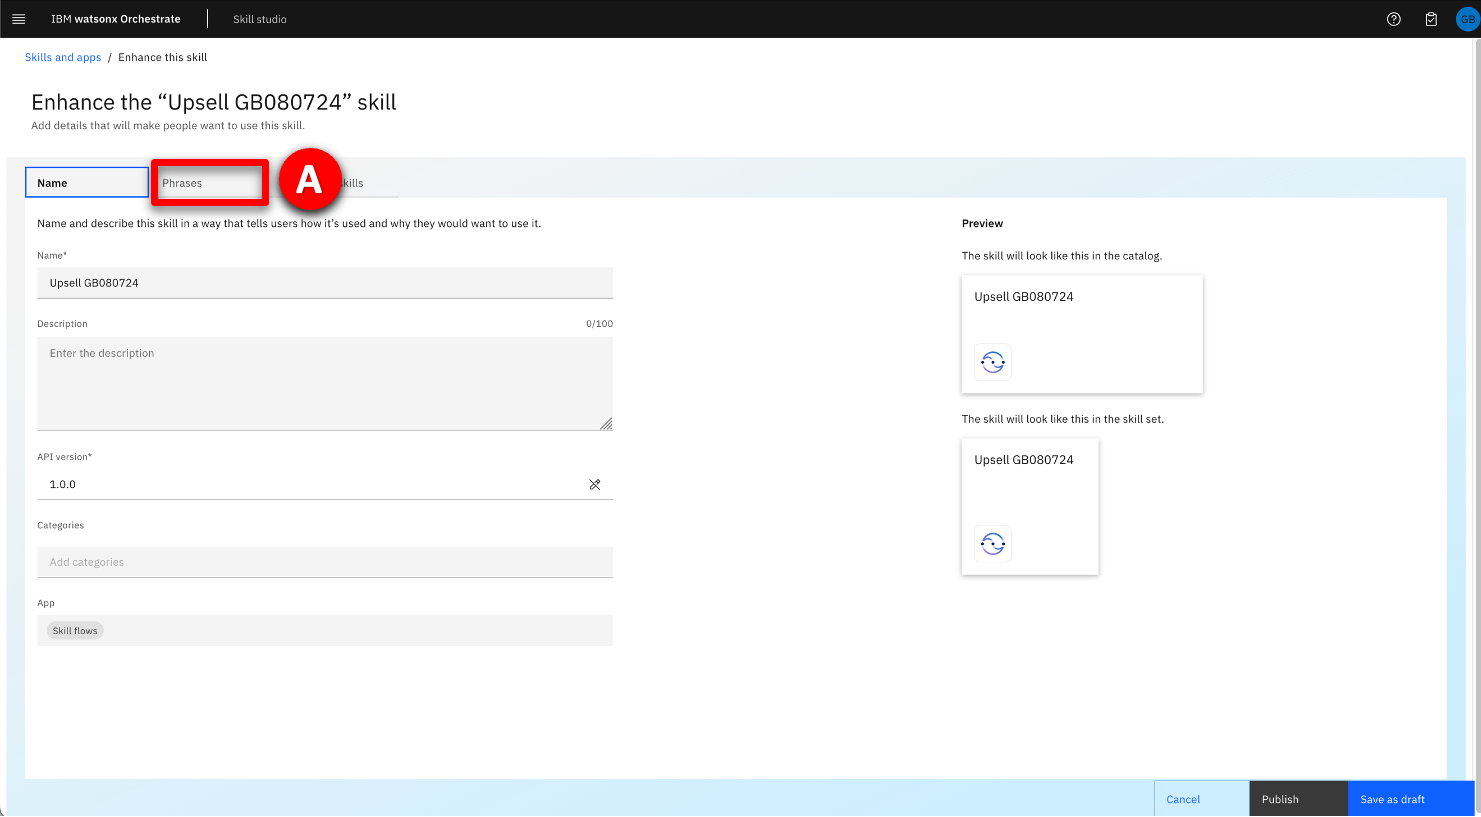 B. Enter a phrase to trigger the skill flow, for example: “write an upsell email to my customers” (B), then click Publish (C). 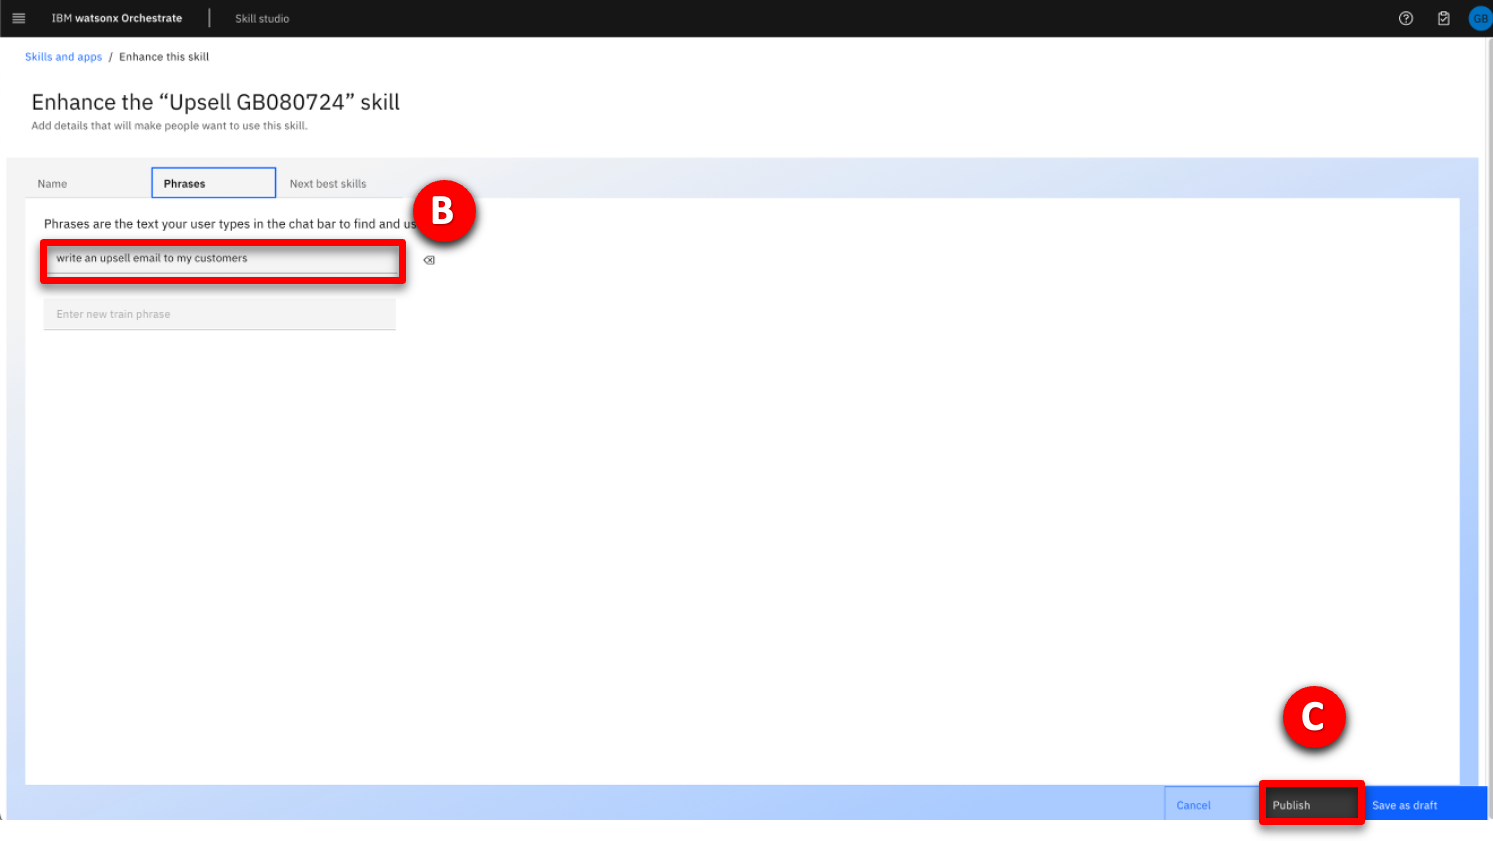 |
| Narration | Before the skill flow can be run, it must be added into your personal skill set from the skill catalog. |
| Action 5.4 | Click the hamburger navigation menu icon (A) and click Skills catalog (B) from the left menu. 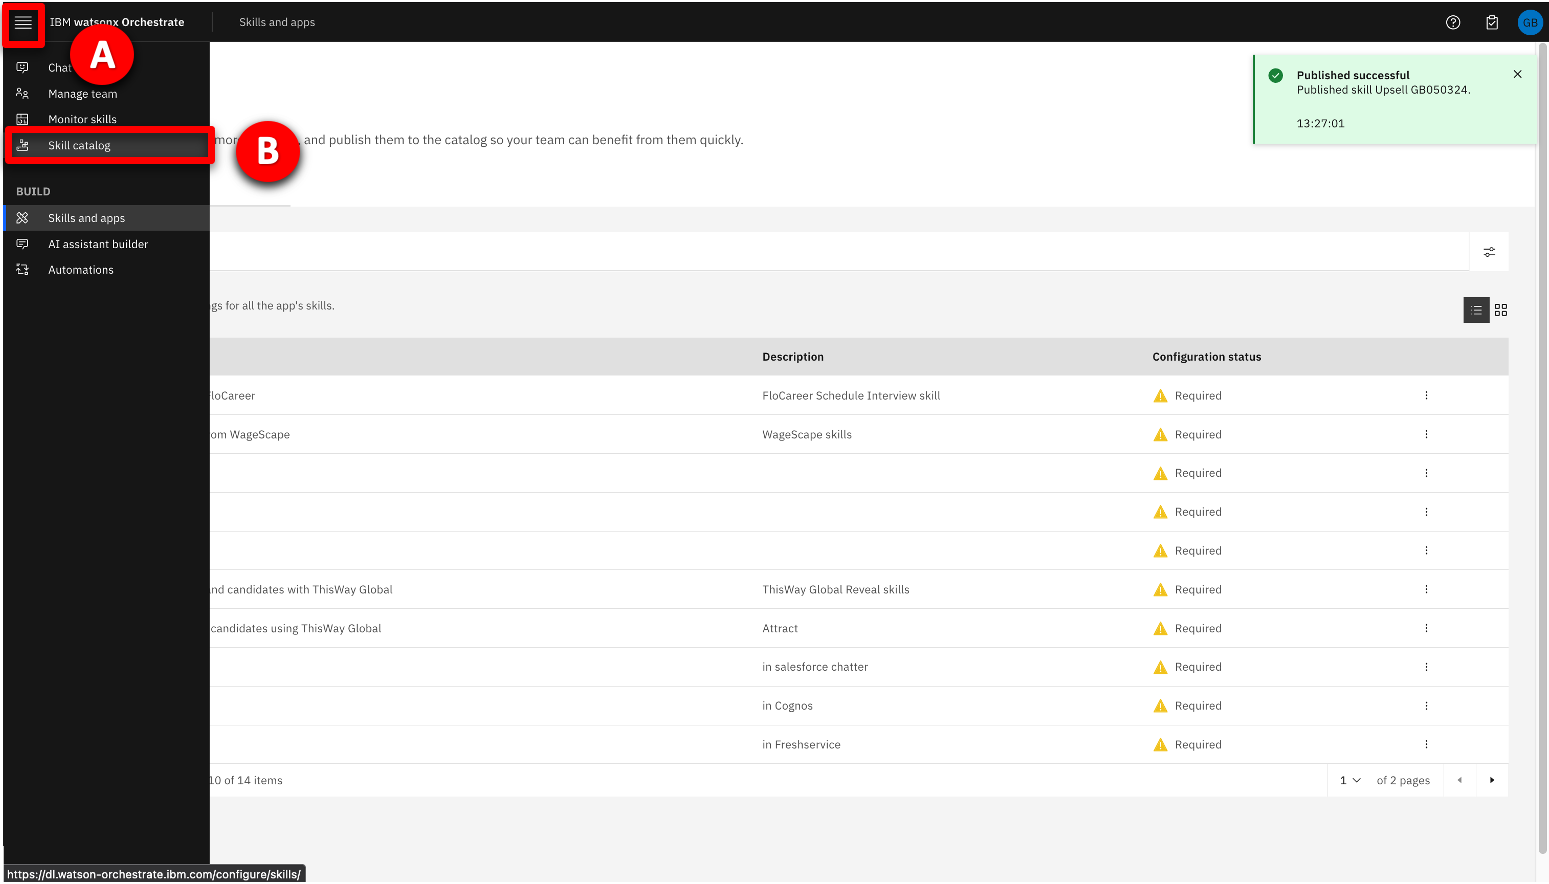 |
| Narration | The unique reference used to name the skill flow can be used to find it in the skill catalog. |
| Action 5.5 | Find the skill flow by performing the following steps: A. Enter your unique skill reference (XXddmmyy) in the Search panel and press Enter. B. Click the Skill flows tile in the Apps section. 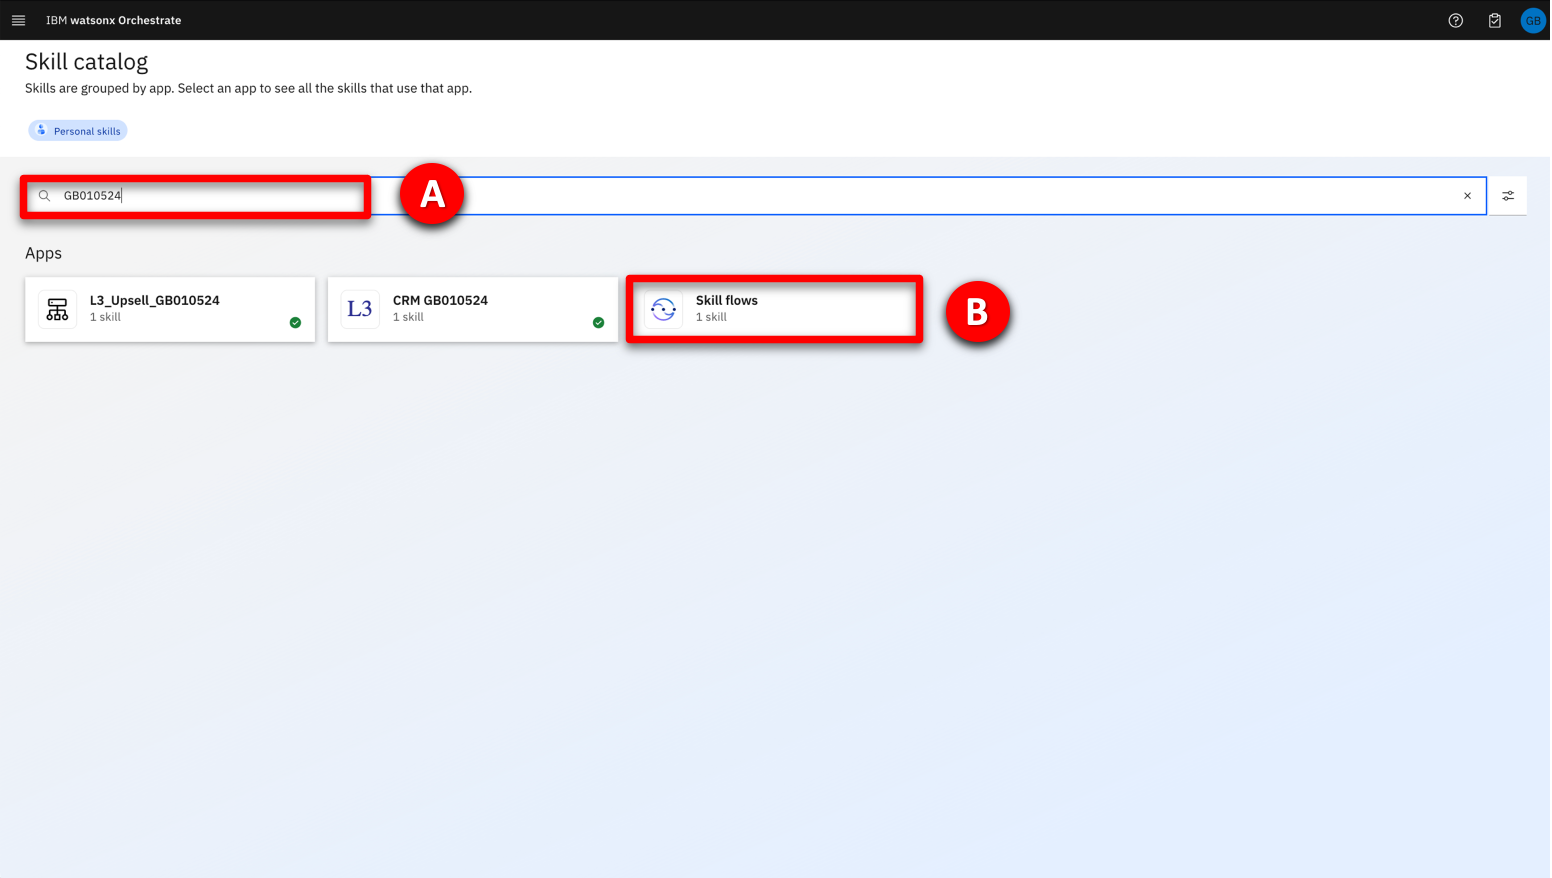 |
| Narration | When the catalog entry for skill flows is displayed, the unique reference can be used again. |
| Action 5.6 | Add the skill flow by performing the following steps: A. Enter your unique skill reference (XXddmmyy) in the Search panel again and press Enter. B. Click Add skill. 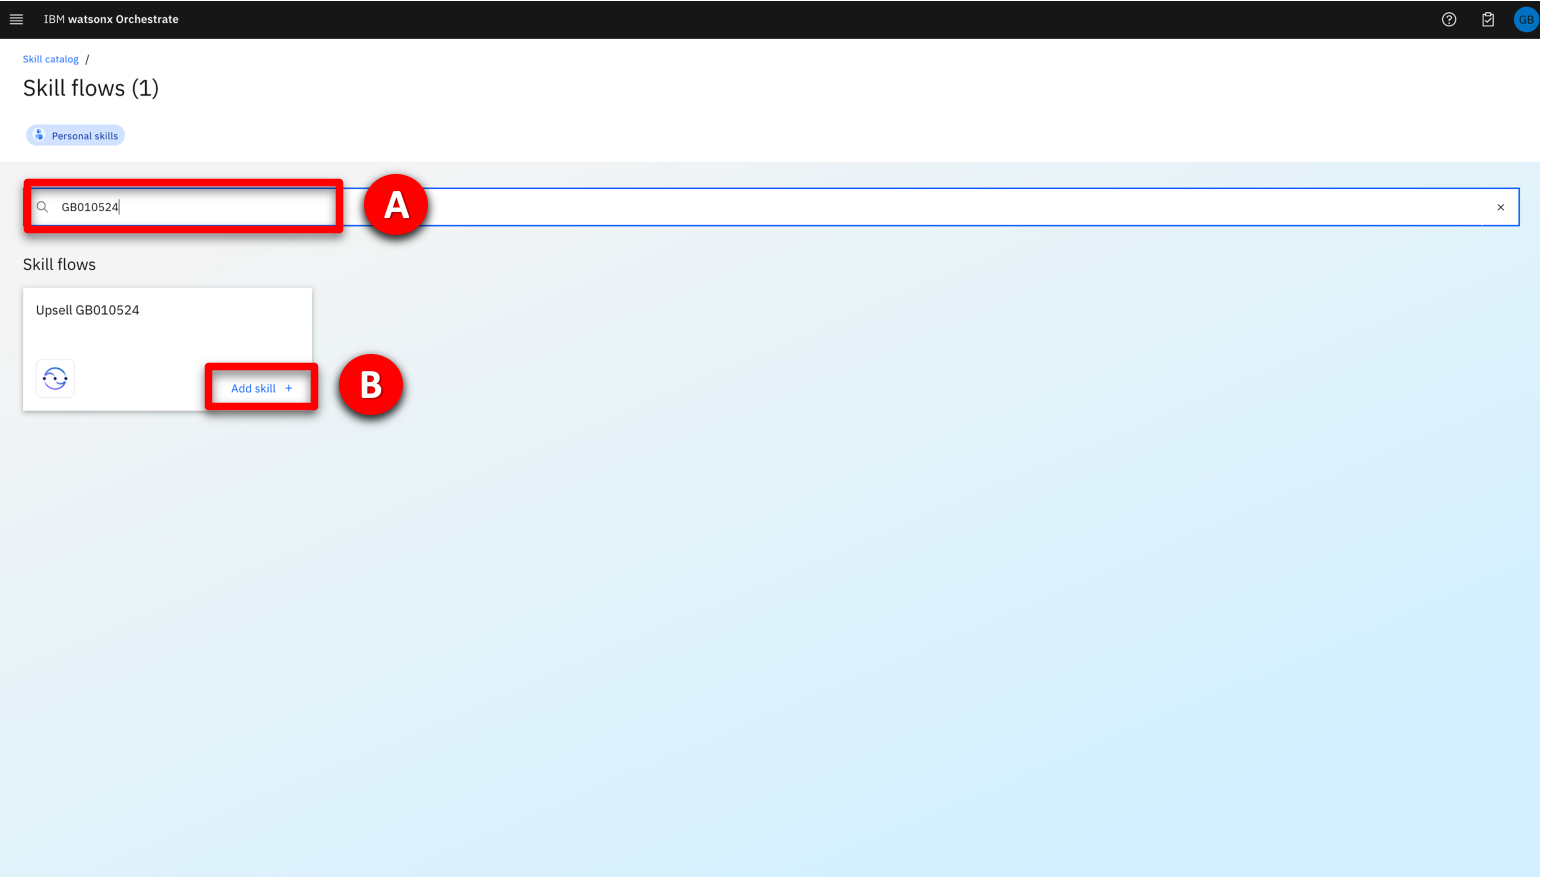 |
| Narration | The skill flow has been added to the personal skills collection and should be available in the main chat window. |
| Action 5.7 | Return to the Chat window by performing the following steps:> A. Click the hamburger navigation menu icon from the left menu. B. Select Chat. 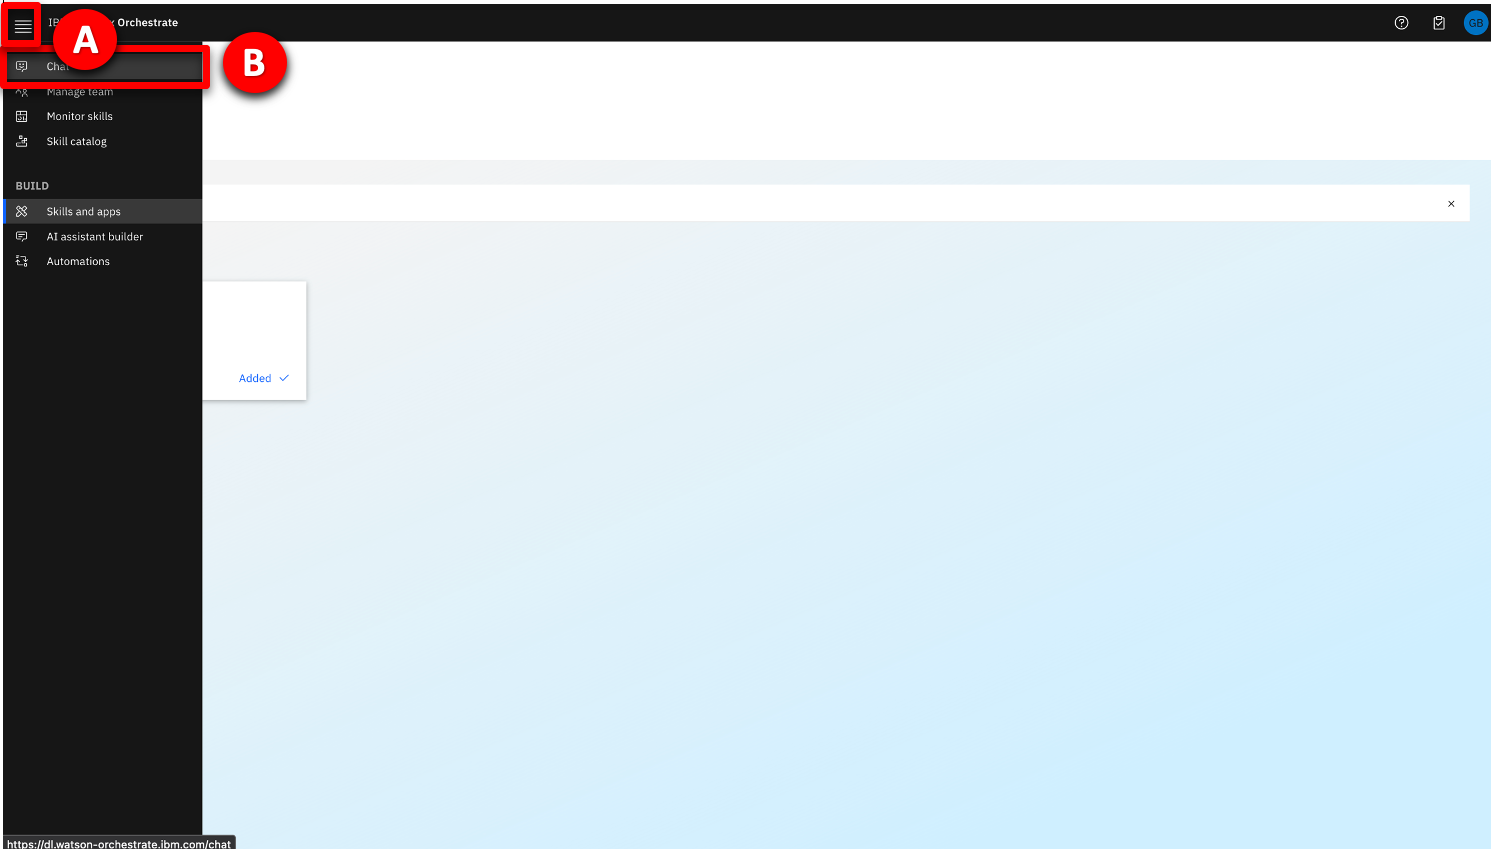 C. Confirm that a tile representing your skill flow has been added 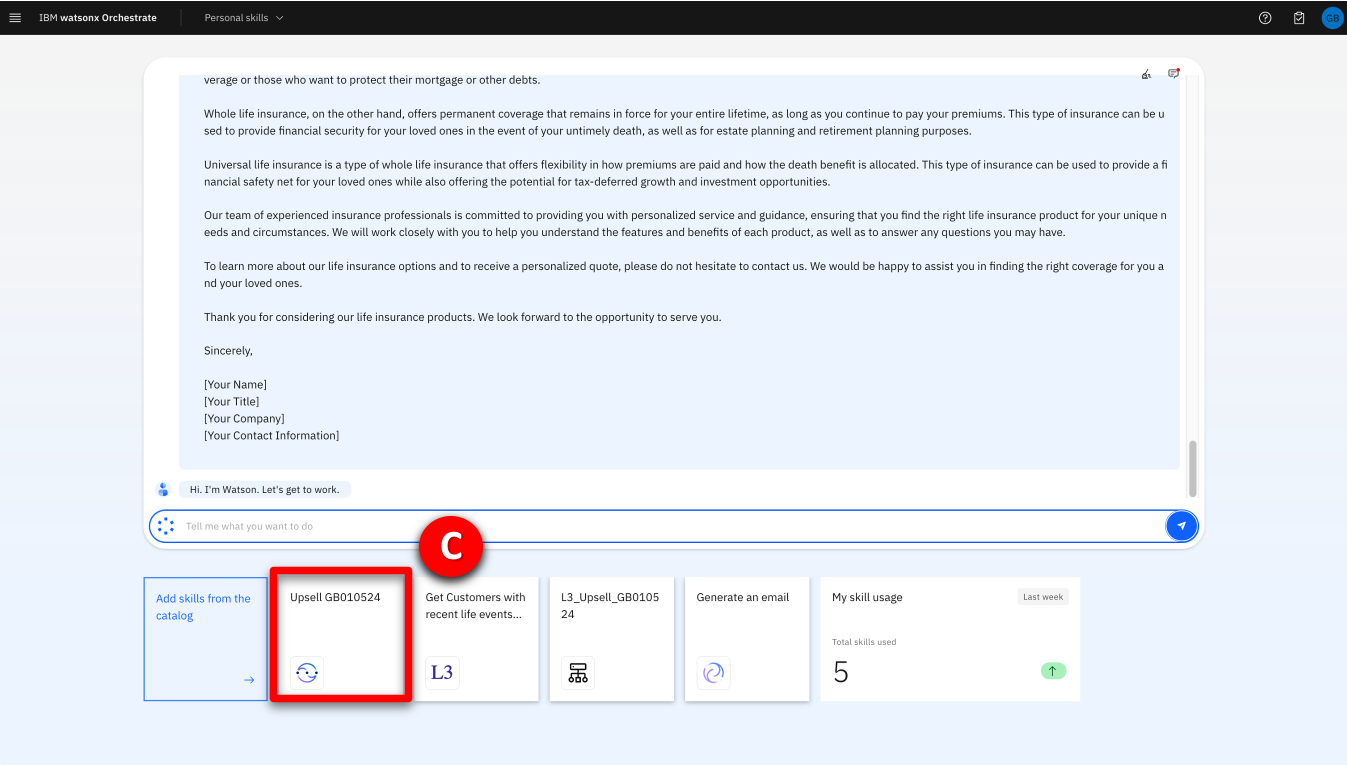 |
6 – Using the skill flow
| Narration | Before you run the new skill flow let’s summarize what you’ve seen so far: - Individual skills performing useful but isolated functions, such as customer search and product upsell. - A brief look into decision automation, and how business logic can be represented with a decision model. - Implemented a simple workflow using skill flows to connect skills together. The skill flow is complete and published for sales agents to use. Now let’s assume the persona of an insurance seller to see how the upsell process has been transformed with watsonx Orchestrate. |
| Action 6.1 | Open the Chat window (if not already open) by clicking the hamburger navigation menu icon (A) and select Chat (B) from the left menu. 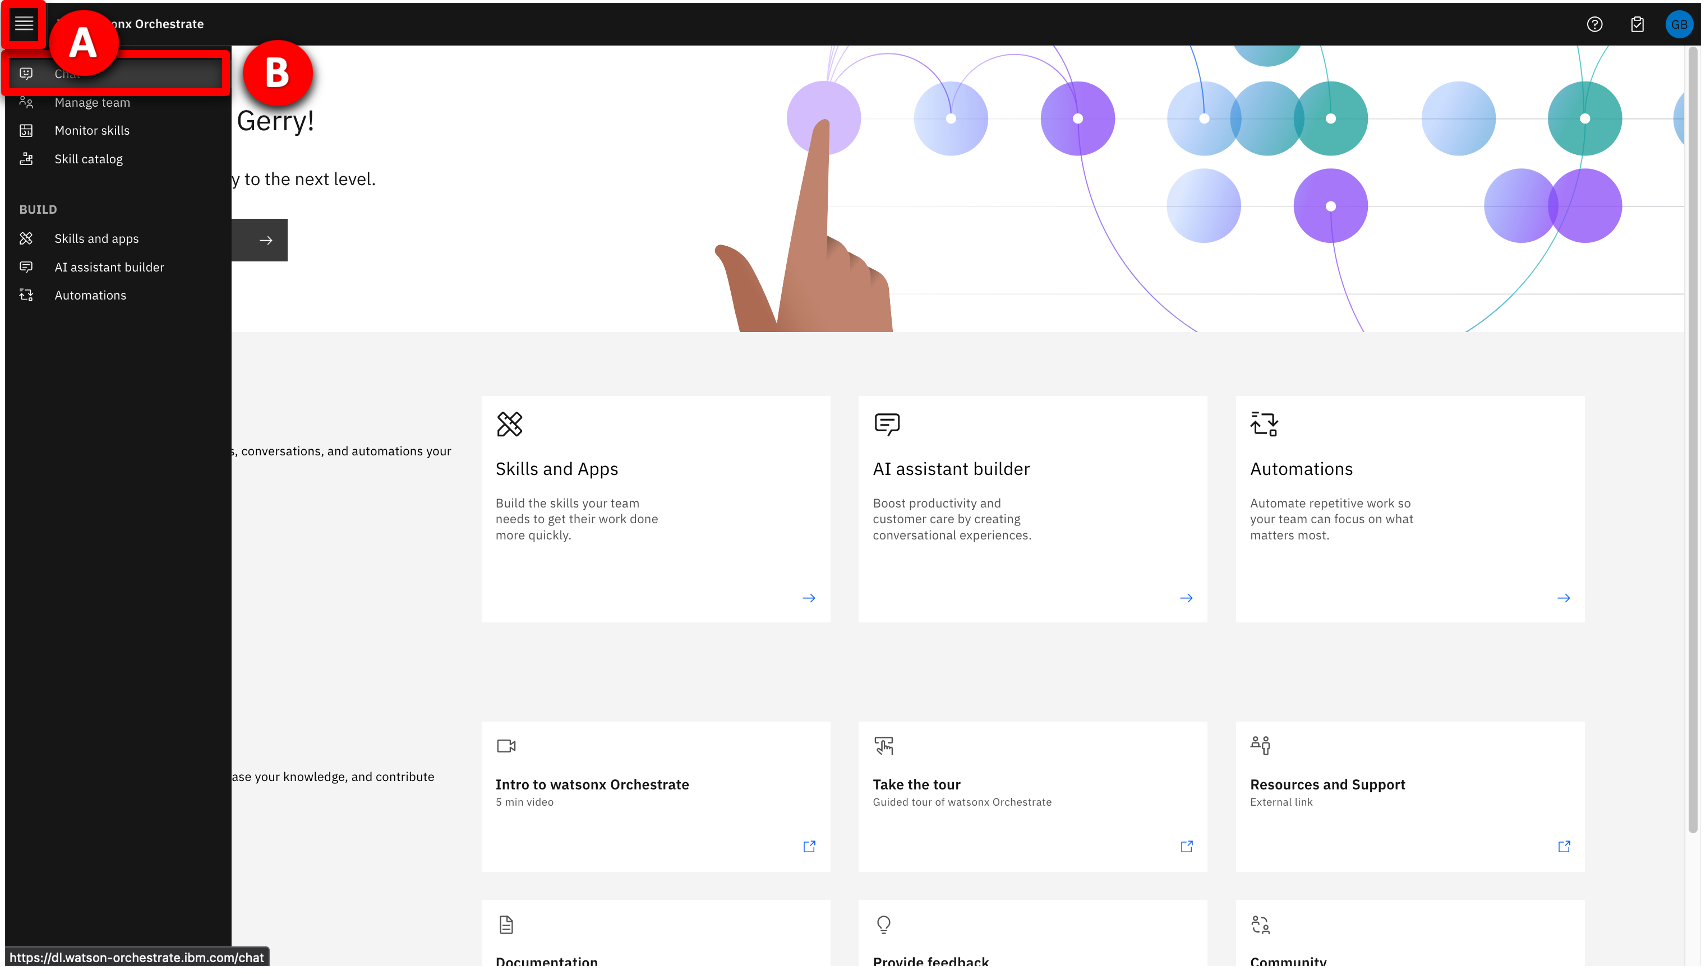 |
| Action 6.2 | Perform the following steps: A. Type the command “write an upsell email to my customers”. B. Click the Send arrow. 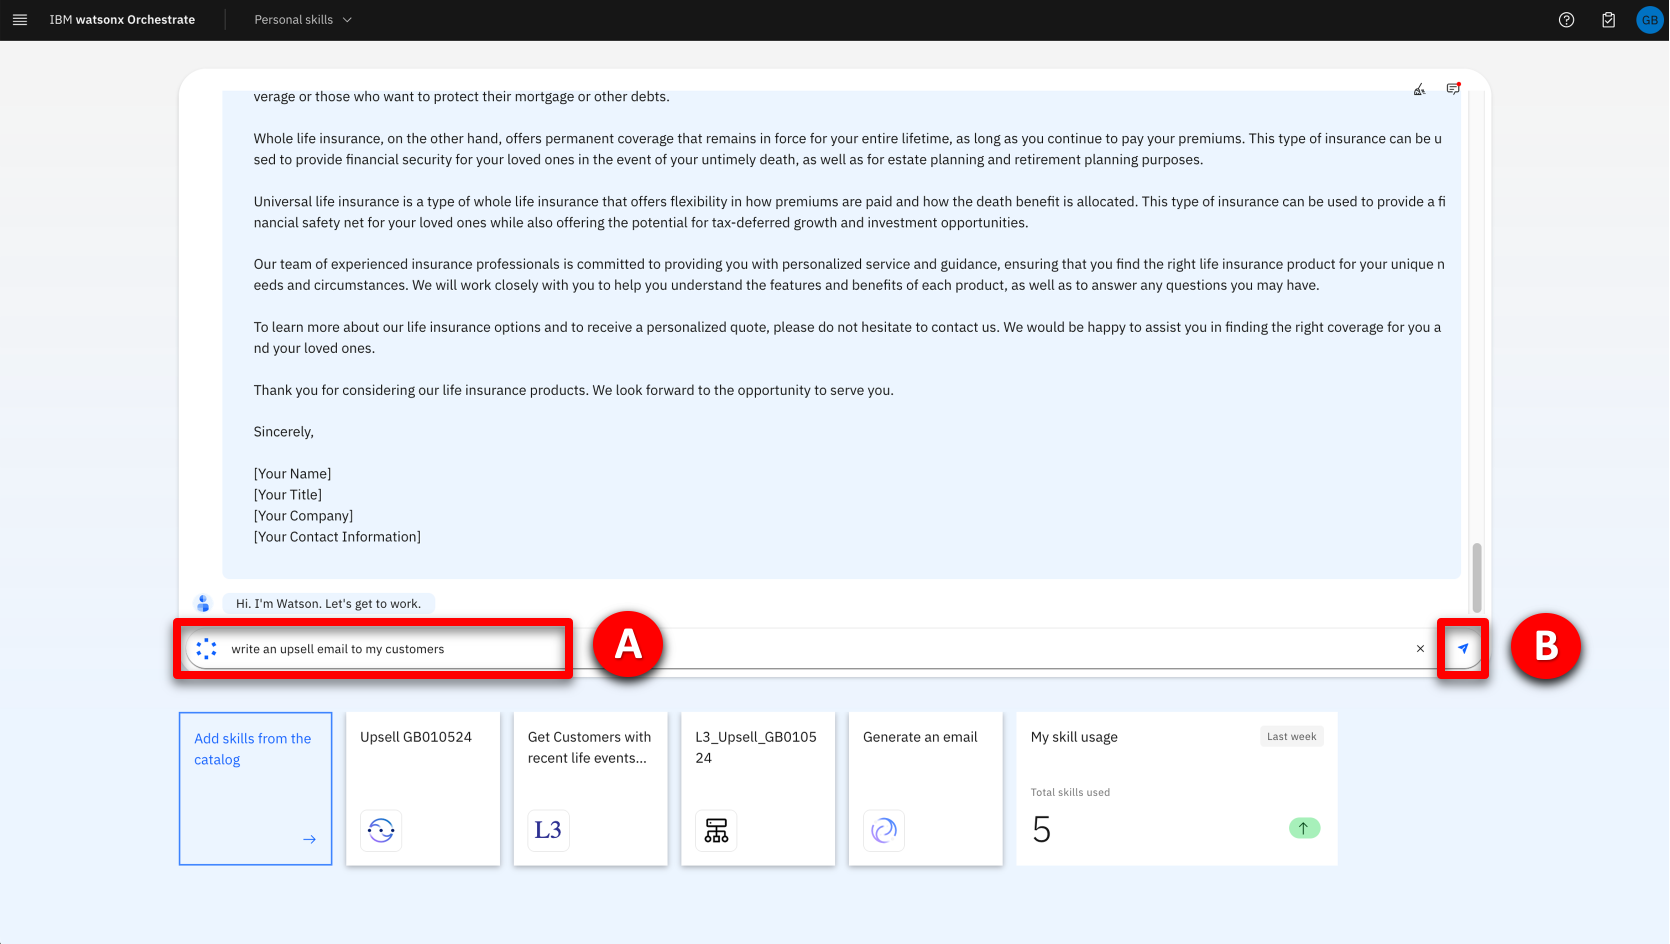 |
| Narration | IBM watsonx Orchestrate runs the skill flow, retrieving a list of customers with recent life events. The retrieved customer data is neatly displayed in a table within the chat interface. The agent reviews the list of customers and pursues a cross-sell opportunity with Janet Thomas, who has recently turned 64, as depicted in the Recent Change field. |
| Action 6.3 | Select the radio button associated with Janet Thomas (A) from the table.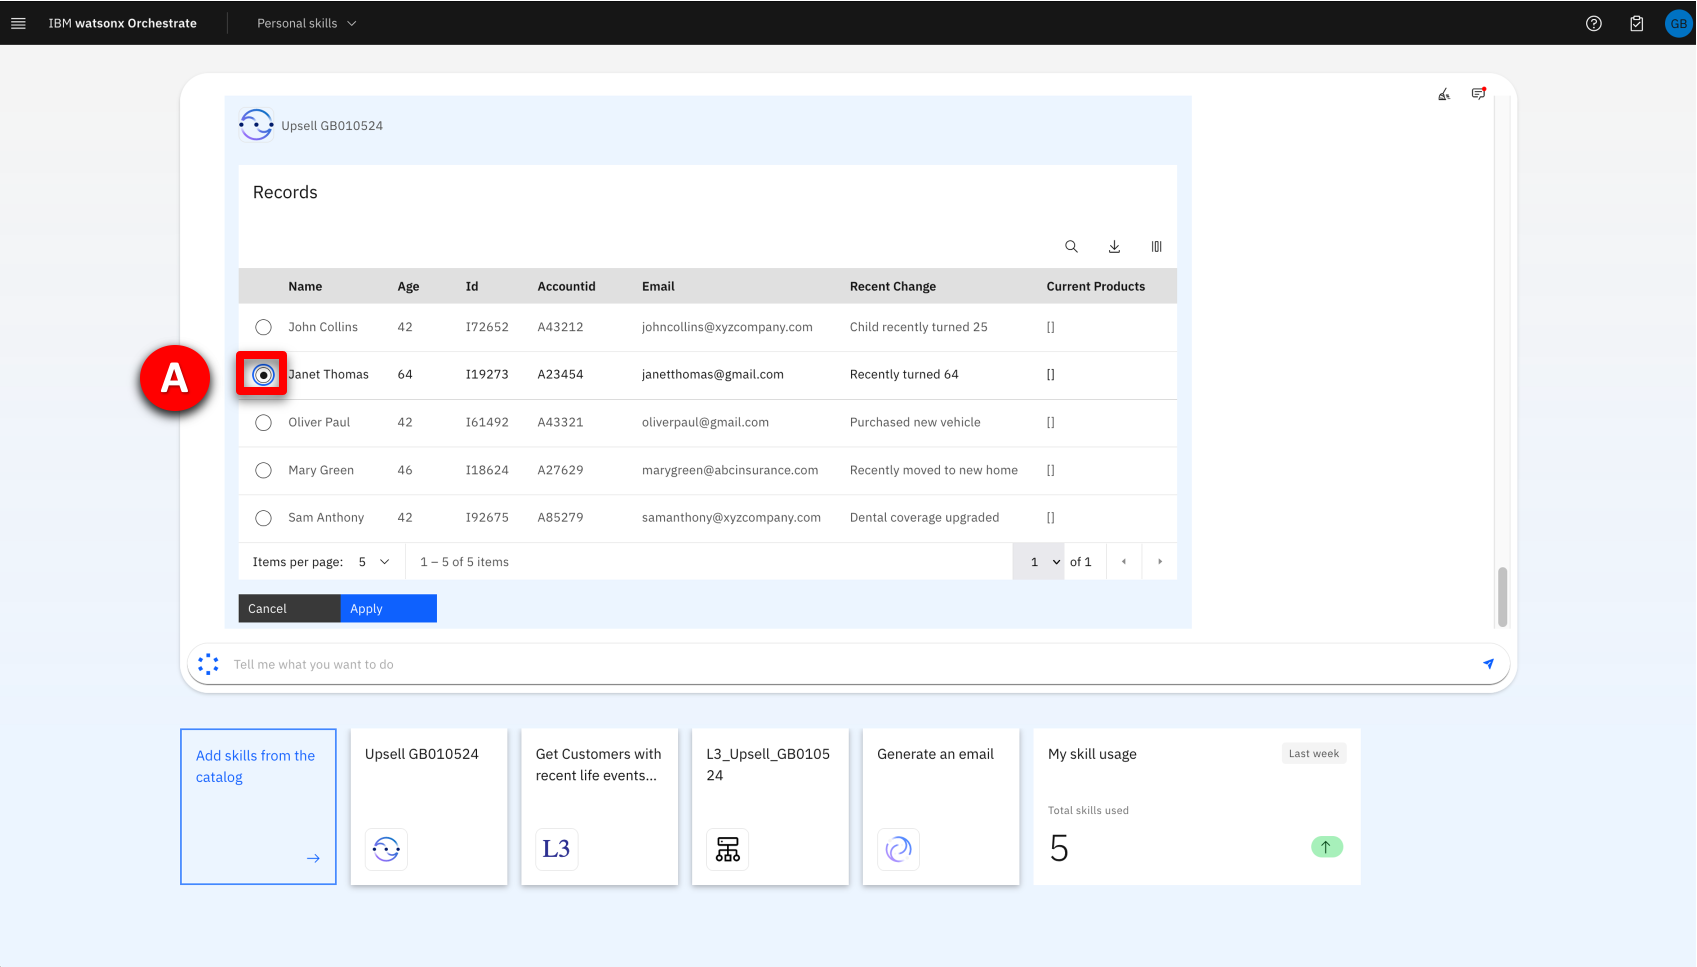 |
| Narration | Next, the agent needs to determine which products to recommend for Janet based on her circumstances and recent life event. The customer details from the CRM system are automatically submitted into watsonx Orchestrate’s built-in decision engine and the upsell recommendations are displayed. Behind the scenes, the decision engine applies business logic that considers many different attributes specific to this customer (Janet Thomas), such as age, life event, and current coverage to determine the best product that the insurance agent should suggest to this customer. |
| Action 6.4 | Click the Apply button. 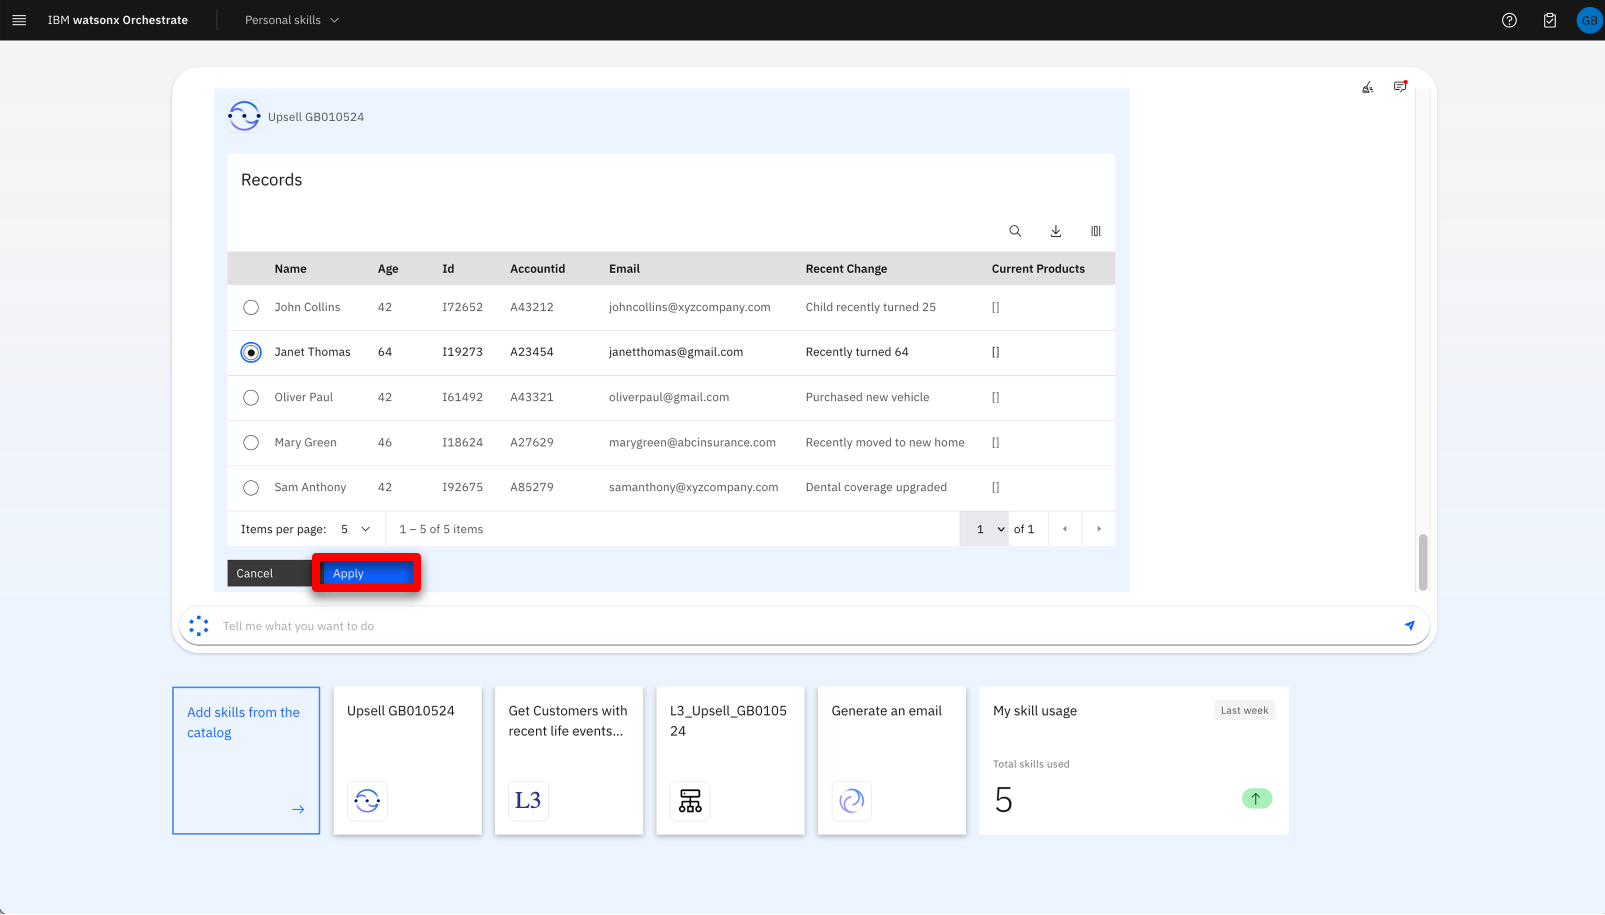 |
| Action 6.5 | Two skills have run in quick succession, scroll back so that the upsell decision output is displayed.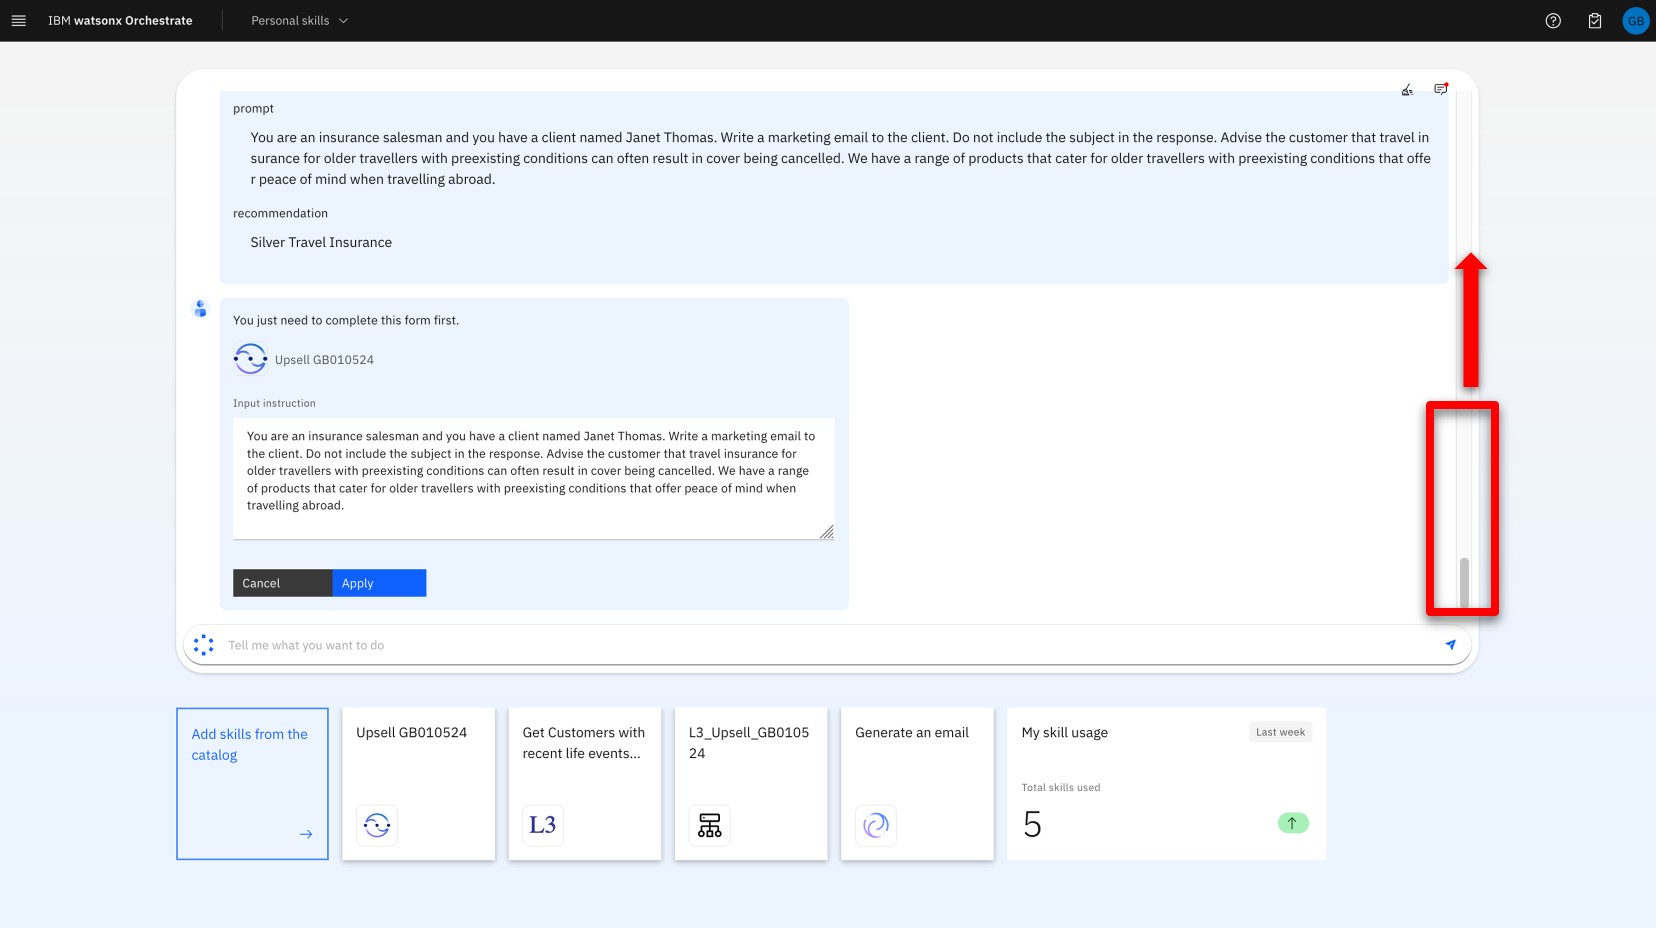 |
| Narration | In this case, the decision engine recommended the Silver Travel Insurance Plan, and based on this, it has also created a prompt for a generative AI model to create the marketing upsell email. |
| Action 6.6 | Review the prompt then scroll to the bottom of the chat window to review the input for the generative AI model.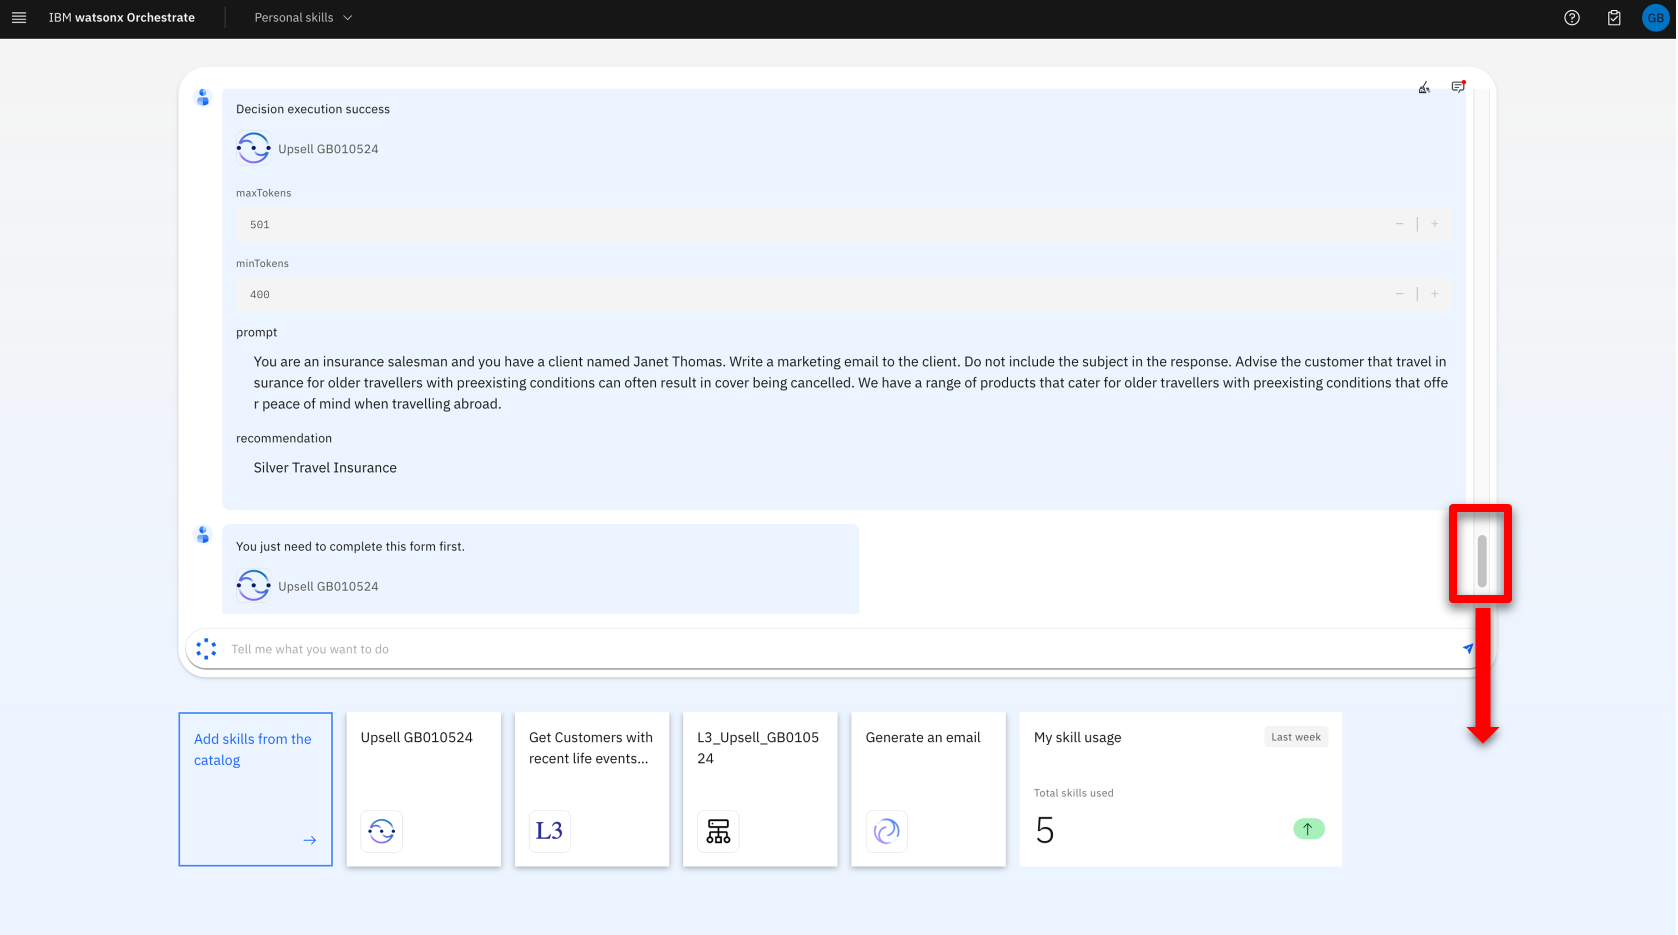 |
| Action 6.7 | Perform the following steps: A. Review the prompt created for the customer (Janet Thomas). B. Click the Apply button. 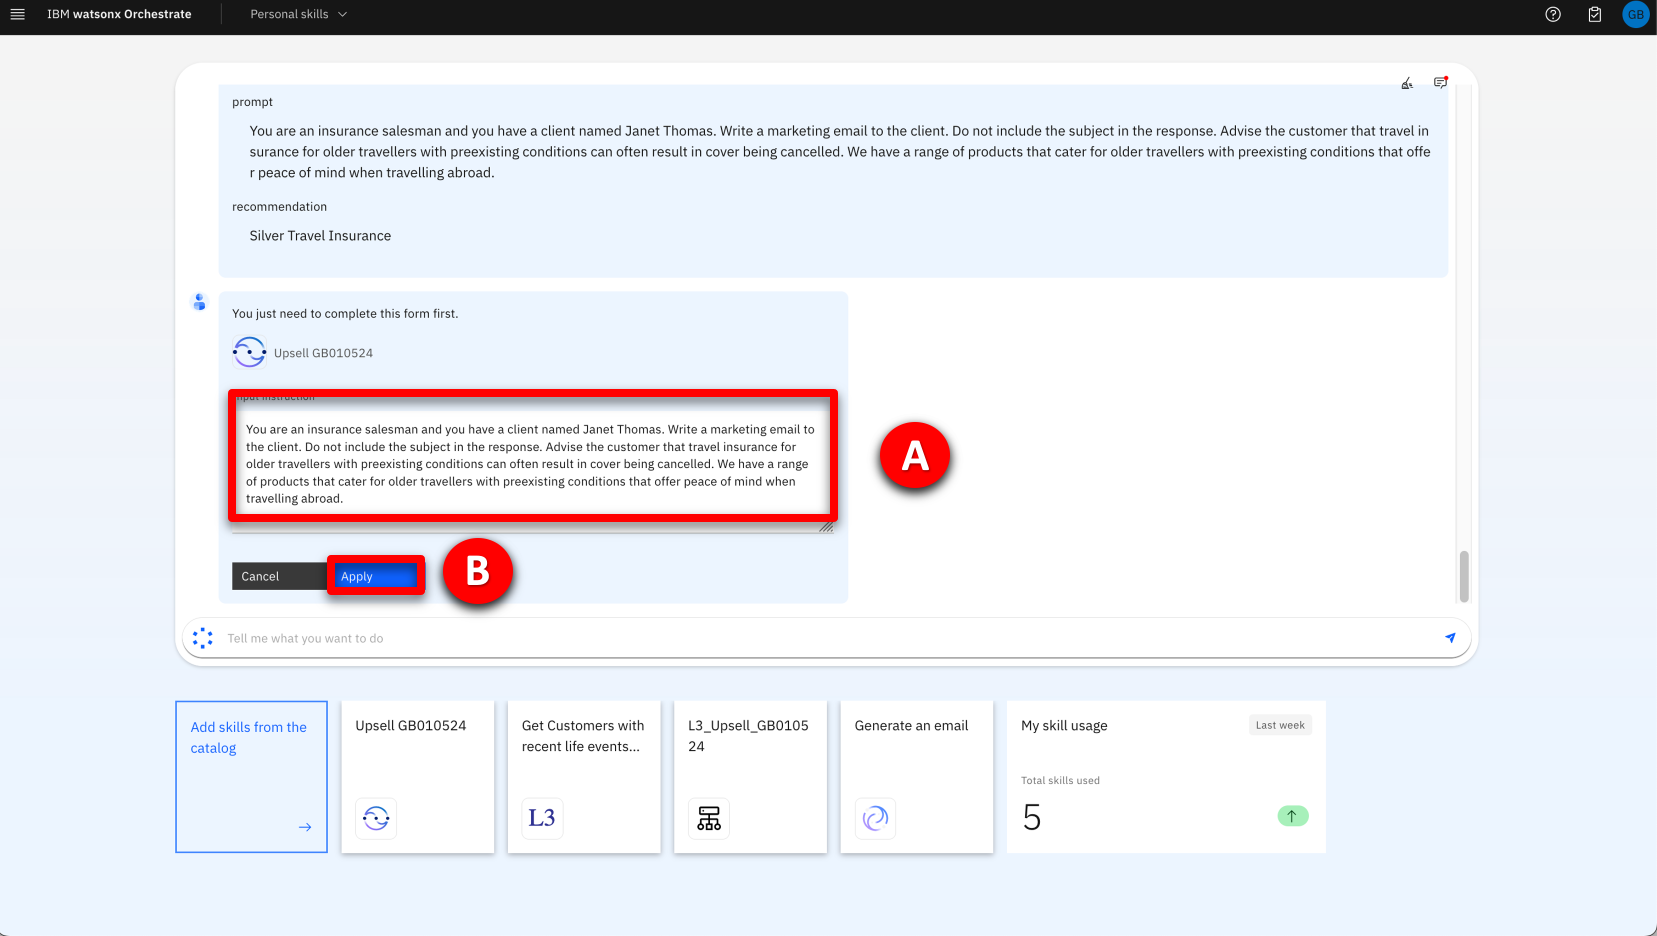 |
| Narration | Clicking Apply, submits the prompt into the Generate an email skill, and this will take approximately thirty seconds to complete. For this particular skill, watsonx Orchestrate is working asynchronously, it’s not blocking and waiting for a response that may otherwise time-out. Instead, it is notified by the long running activity when the work is finished and then resumes the skillflow. During this waiting time, the user is able to do other work, and can jump back to this task once the response is received. The response created for the customer (Janet Thomas) is returned and displayed. The customer email address, subject and email body are pre-filled, allowing the user to review the generated content for accuracy and add any further information to ensure the proposal is relevant to the customer. |
| Action 6.8 | Review the generated email. 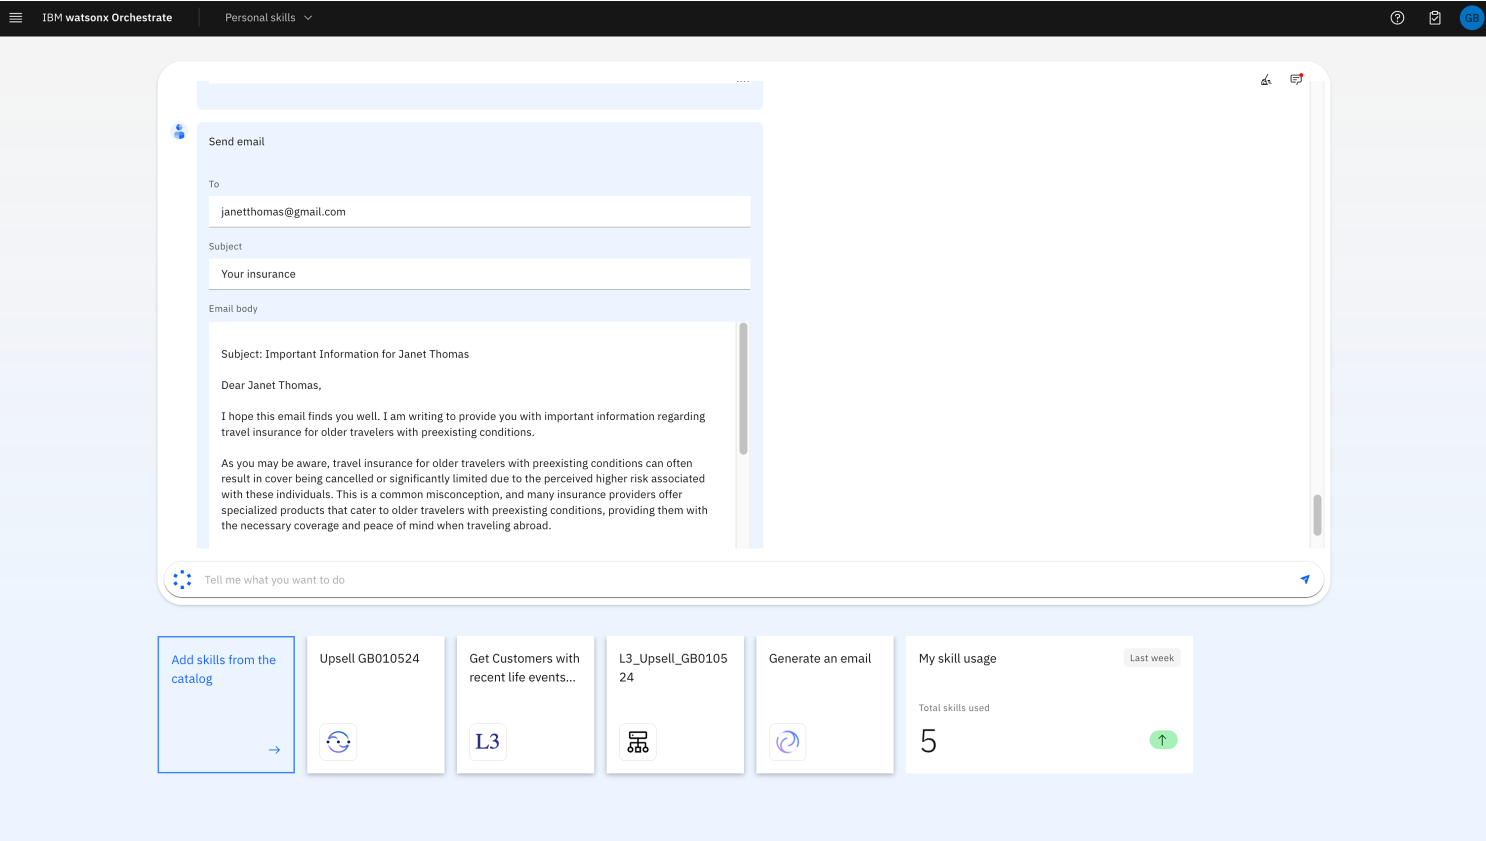 |
7 – Summary
Using an upsell/cross-sell example, this lab showed how watsonx Orchestrate provides a conversational interface for insurance sales agents to perform daily repetitive tasks and reduce the time it takes to complete common business tasks, such as searching through CRM reports for sales opportunities.
A pre-configured CRM search saved time and helped agents find upsell opportunities. Product expertise was used to create a watsonx Orchestrate automation that provides optimal product recommendations based on client circumstances. It then combined these recommendations with client details into a prompt that was submitted into an IBM generative AI model. The result was a client proposal derived from accurate client data, expert product knowledge and a trusted foundation model trained on enterprise data, ready for the agent for review.
By providing a catalog of skills, watsonx Orchestrate eliminated the need for this insurance agent to manually move data and context switch between different back-end applications. IBM watsonx Orchestrate streamlined this agent’s work by sequencing a series of skills within a skill flow, boosting their productivity, reducing errors, and enabling them to focus on higher value work.
8 – After your demo
The watsonx Orchestrate environment used for the demo is shared by many users. After completing your demo, it is important to take a few minutes to remove any skills or automations you created during the demo.
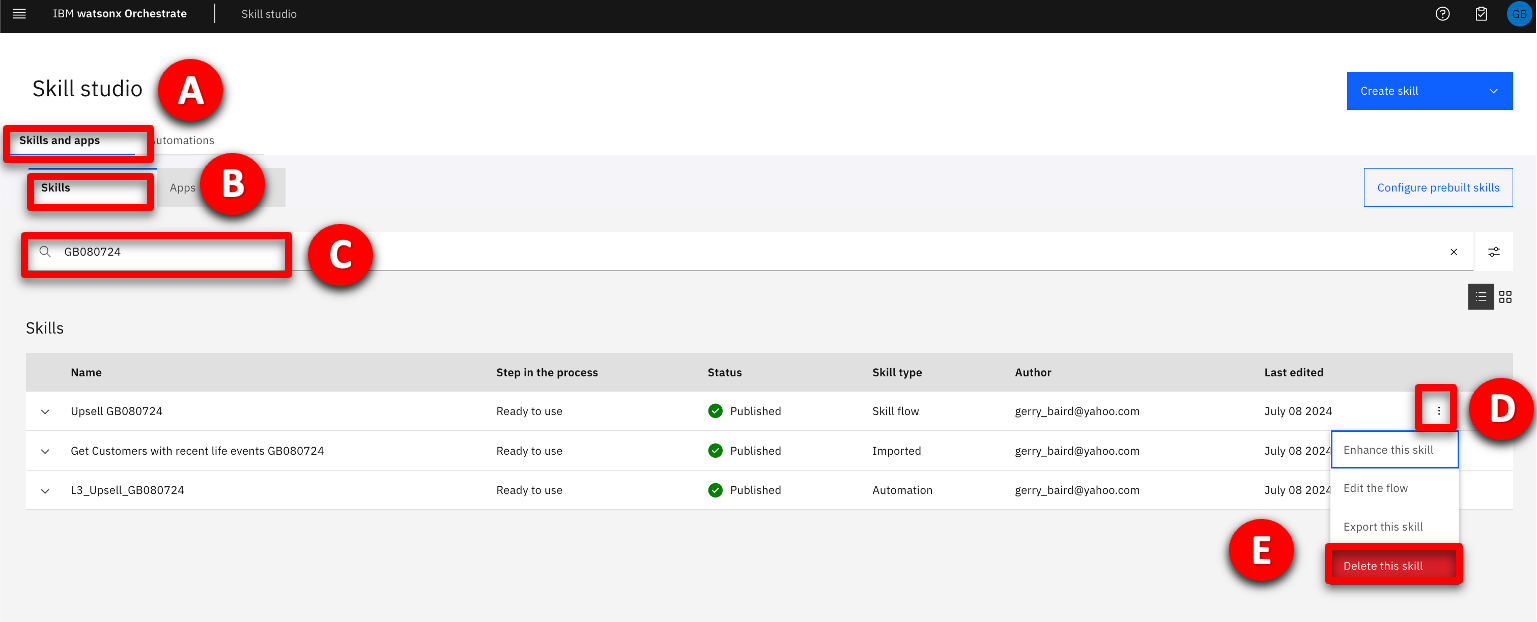
- Click the hamburger navigation menu icon (A), then click on Skill studio (B) from the left menu.

- Select Skills and apps (A), Skills (B), enter your unique reference, then press Enter (C). After completing this demo there should be three skills. Click the ellipsis (three vertical dots) in the right-hand column for each skill (D) and select Delete this skill (E). Take care to ensure you are only deleting your skills.
- Click the Automations tab (A). Enter your skill reference in the search panel and press Enter (B). Click the ellipsis (three vertical dots) (C) and select Delete (D).
