Introduction
Today we will see how Focus Corp, an online retailer, uses real-time transaction data to capitalize on time-sensitive revenue opportunities.
Focus Corp has a goal of driving more revenue from its first-time customers. The marketing team want to send a high-value promotion to first-time customers immediately after a large initial order.
Focus Corp uses IBM MQ to coordinate transactions between its order management system and its payments gateway. We’ll see how these transactions can be harvested to generate an Apache Kafka event stream and exposed to other teams for reuse. The marketing team will use these event streams to precisely identify when, and to which customers, to send its highest-value promotional offers.
Let’s get started!
(Demo intro slides here)
(Printer-ready PDF of demo script here)
1 - Creating an event stream from a message queue
Focus Corp’s integration team exposes the enterprise’s data using event streams. This allows application teams to subscribe to the data without impacting the backend system, decoupling development, and lowering risks. The integration team has received a request to access customer orders. The order management system and its payment gateway exchange customer orders over IBM MQ. The integration team will tap into this communication, clone each of the orders and publish the messages into an event stream.
| 1.1 |
Configure a new queue in IBM MQ for the cloned order messages |
| Narration |
Focus Corp’s integration team logs into the IBM MQ console. They create a new queue called TO.KAFKA to store the cloned order messages before they are published to Apache Kafka. |
| Action 1.1.1 |
In the IBM MQ console, click on Manage (1) and Queues (2).
 |
| Action 1.1.2 |
Define a new queue by clicking on the Create button.
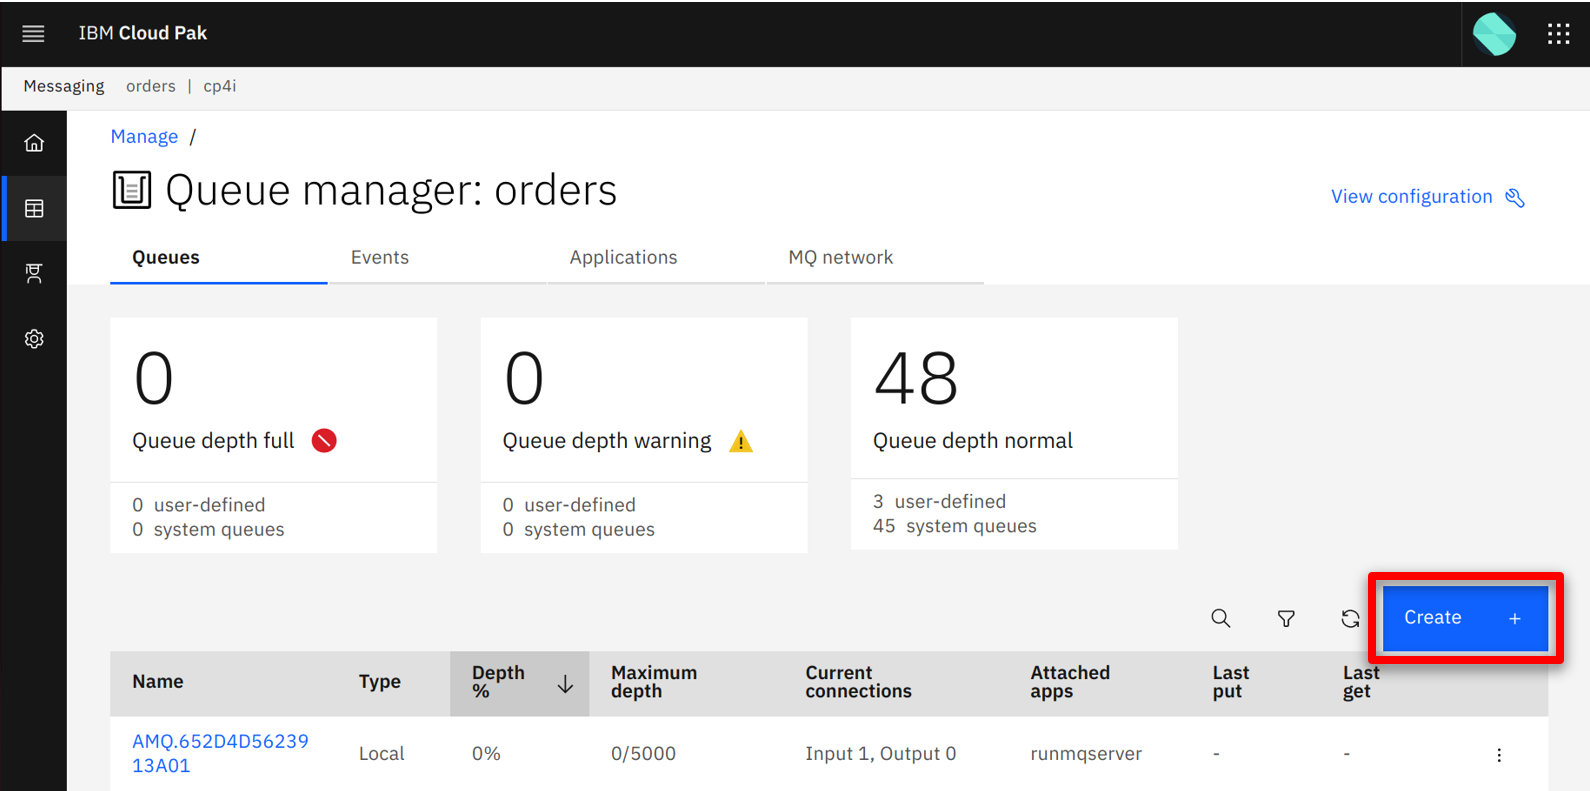 |
| Action 1.1.3 |
Click on the Local tile.
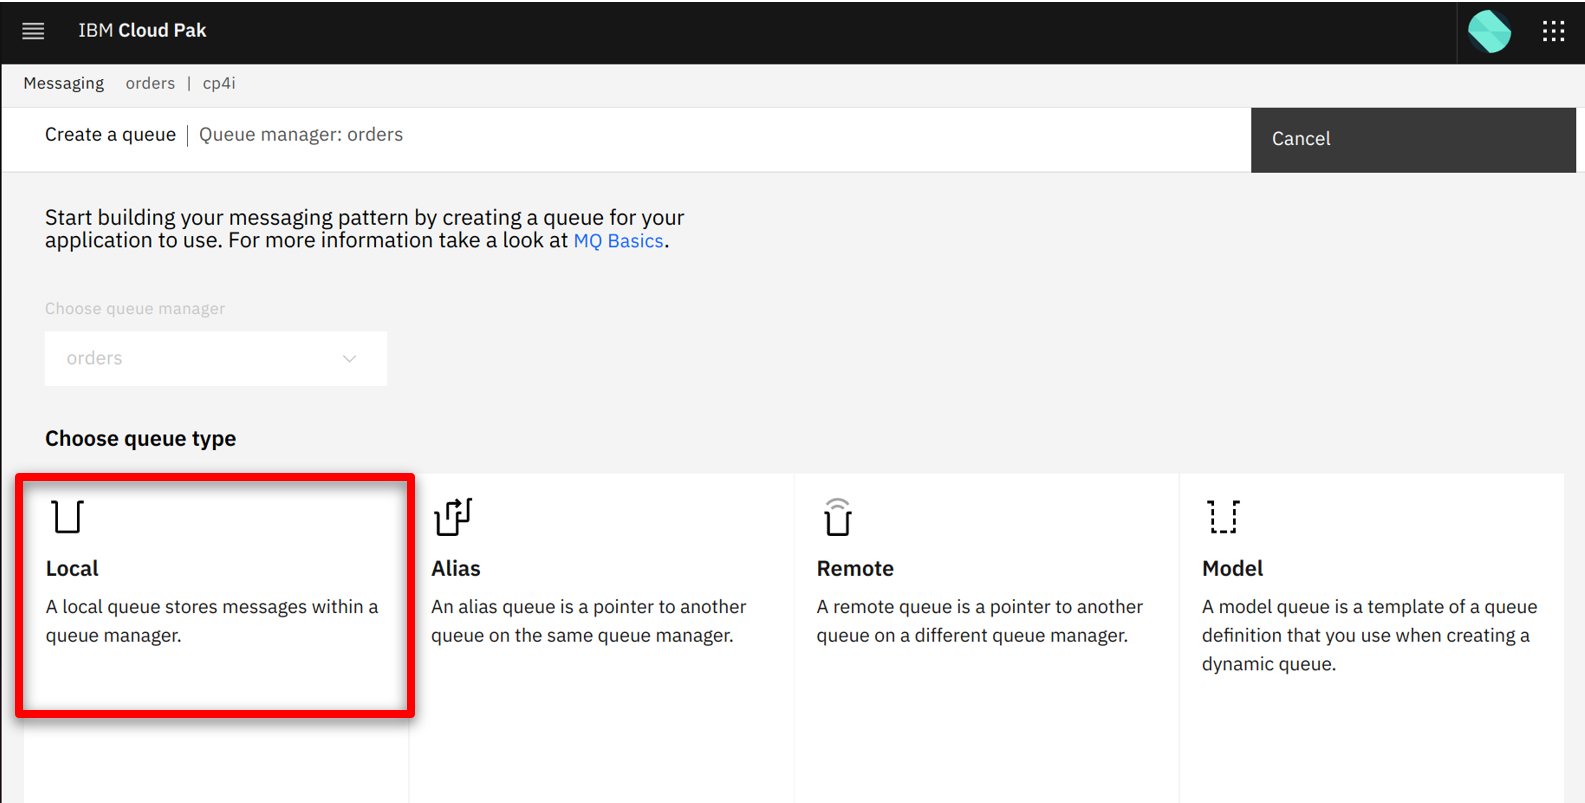 |
| Action 1.1.4 |
Fill in TO.KAFKA (1) as the queue name and click Create (2).
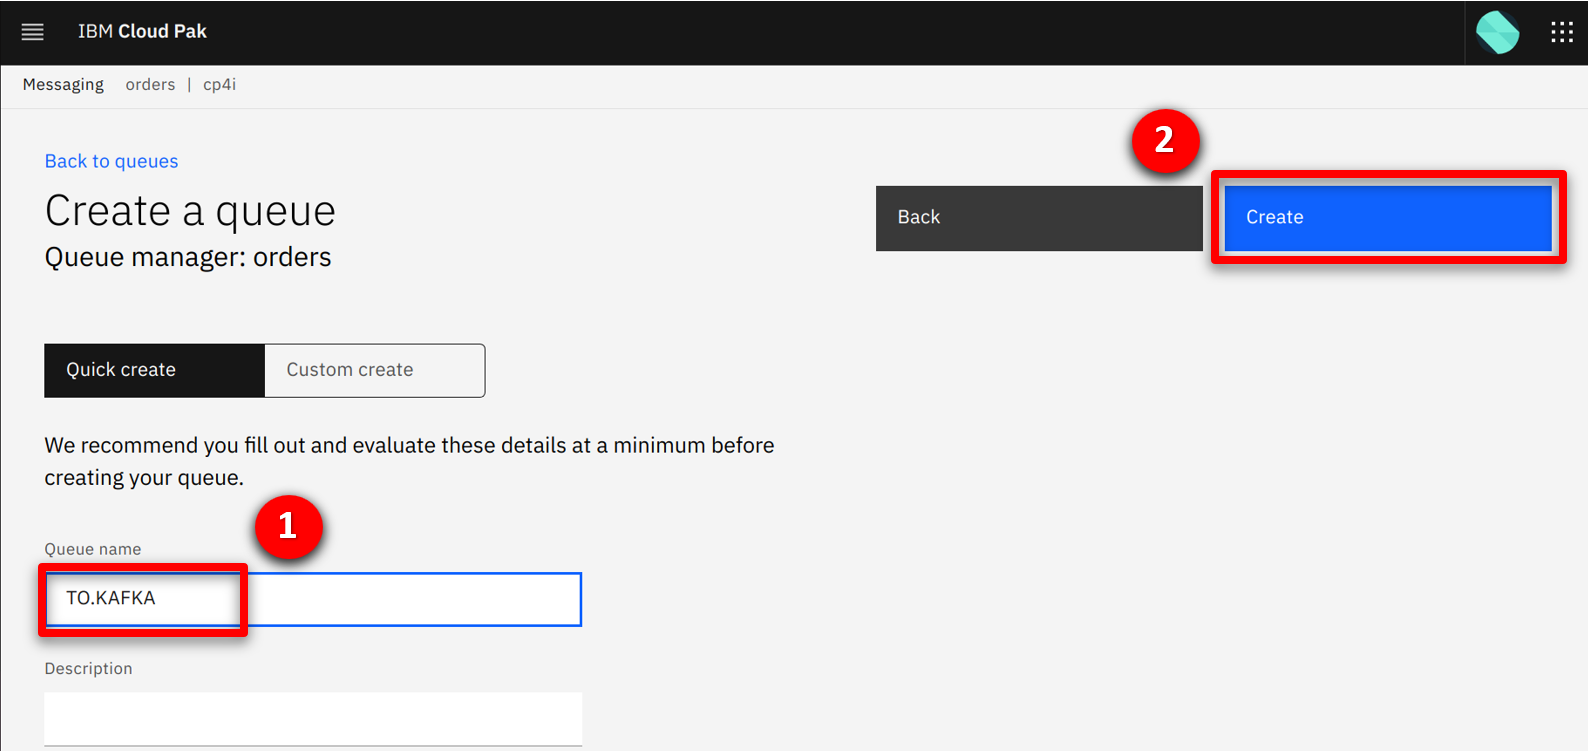 |
| Action 1.1.5 |
See the new queue in the table.
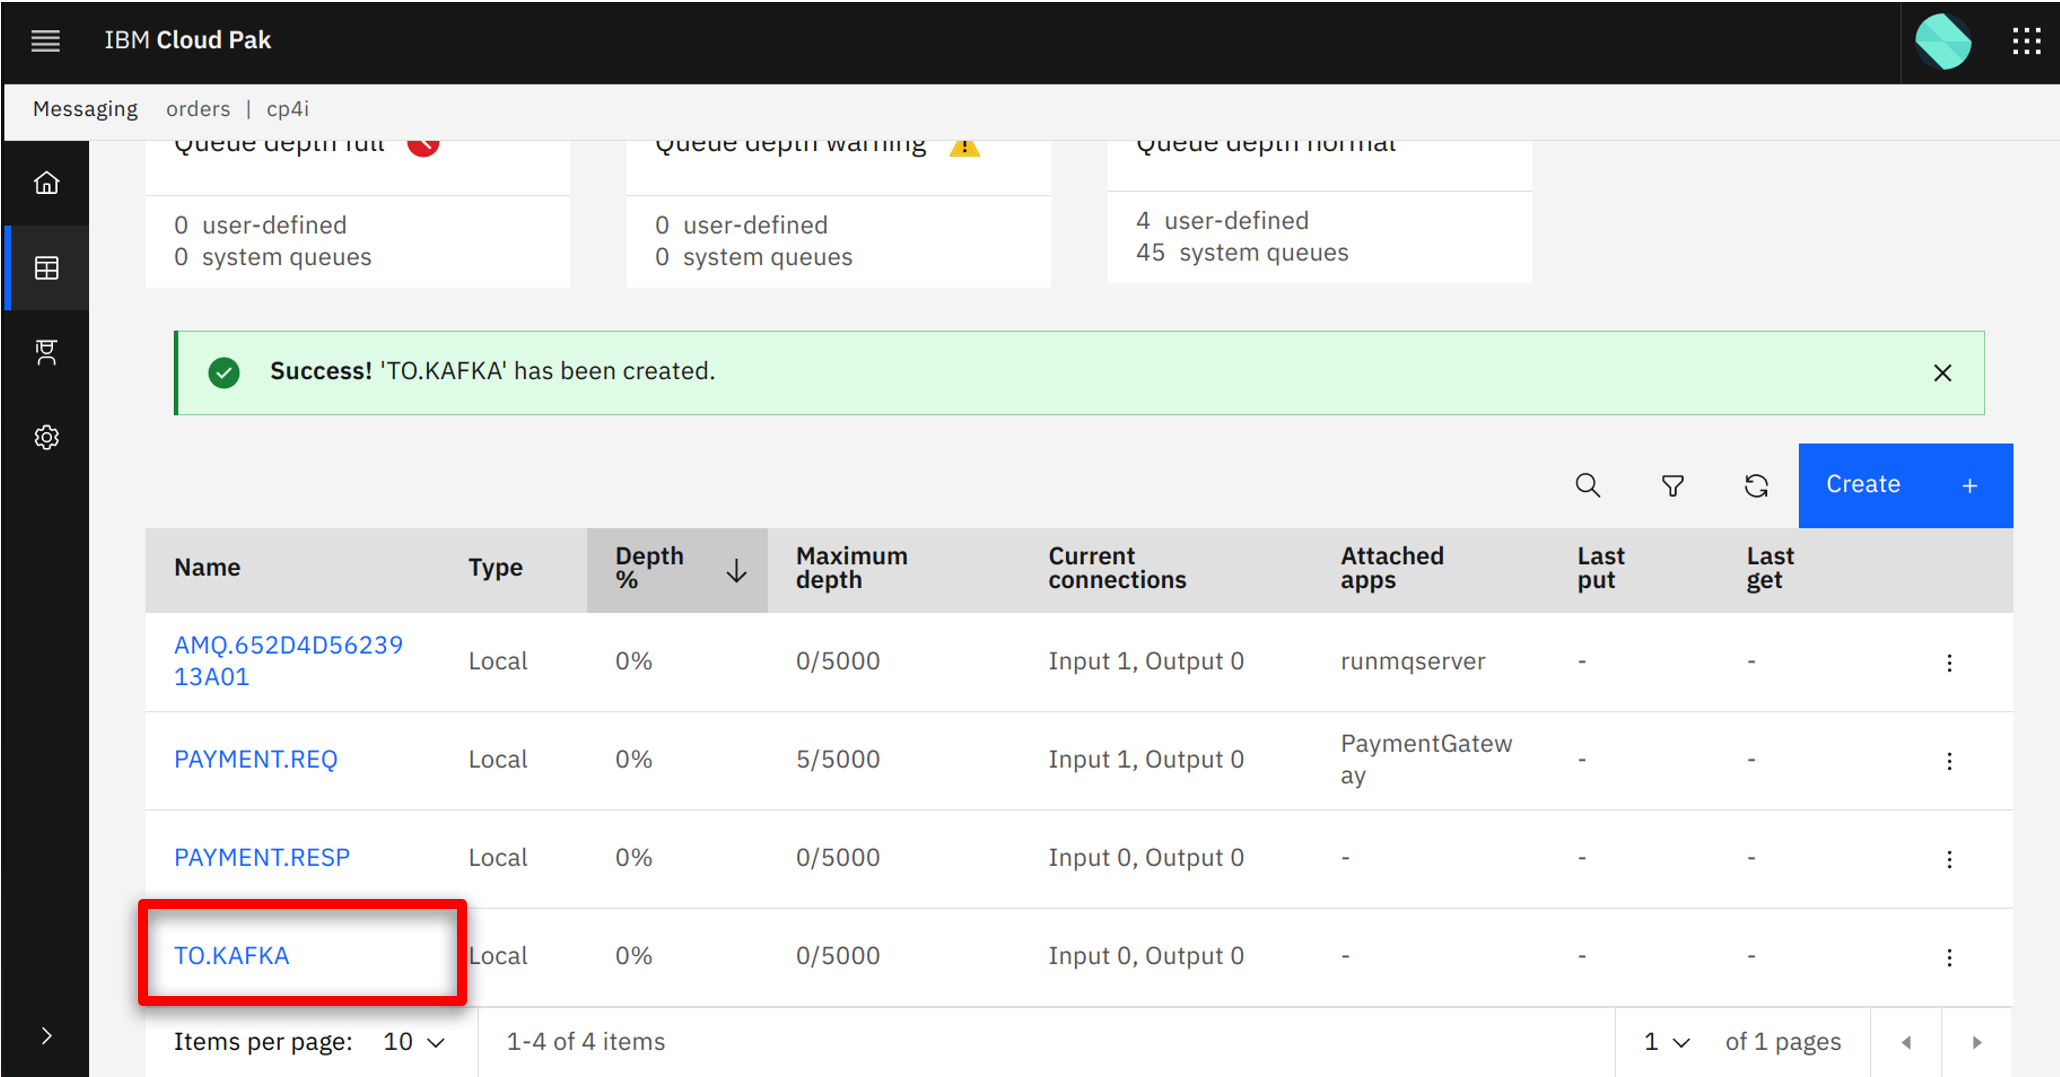 |
| 1.2 |
Configure IBM MQ to clone the orders |
| Narration |
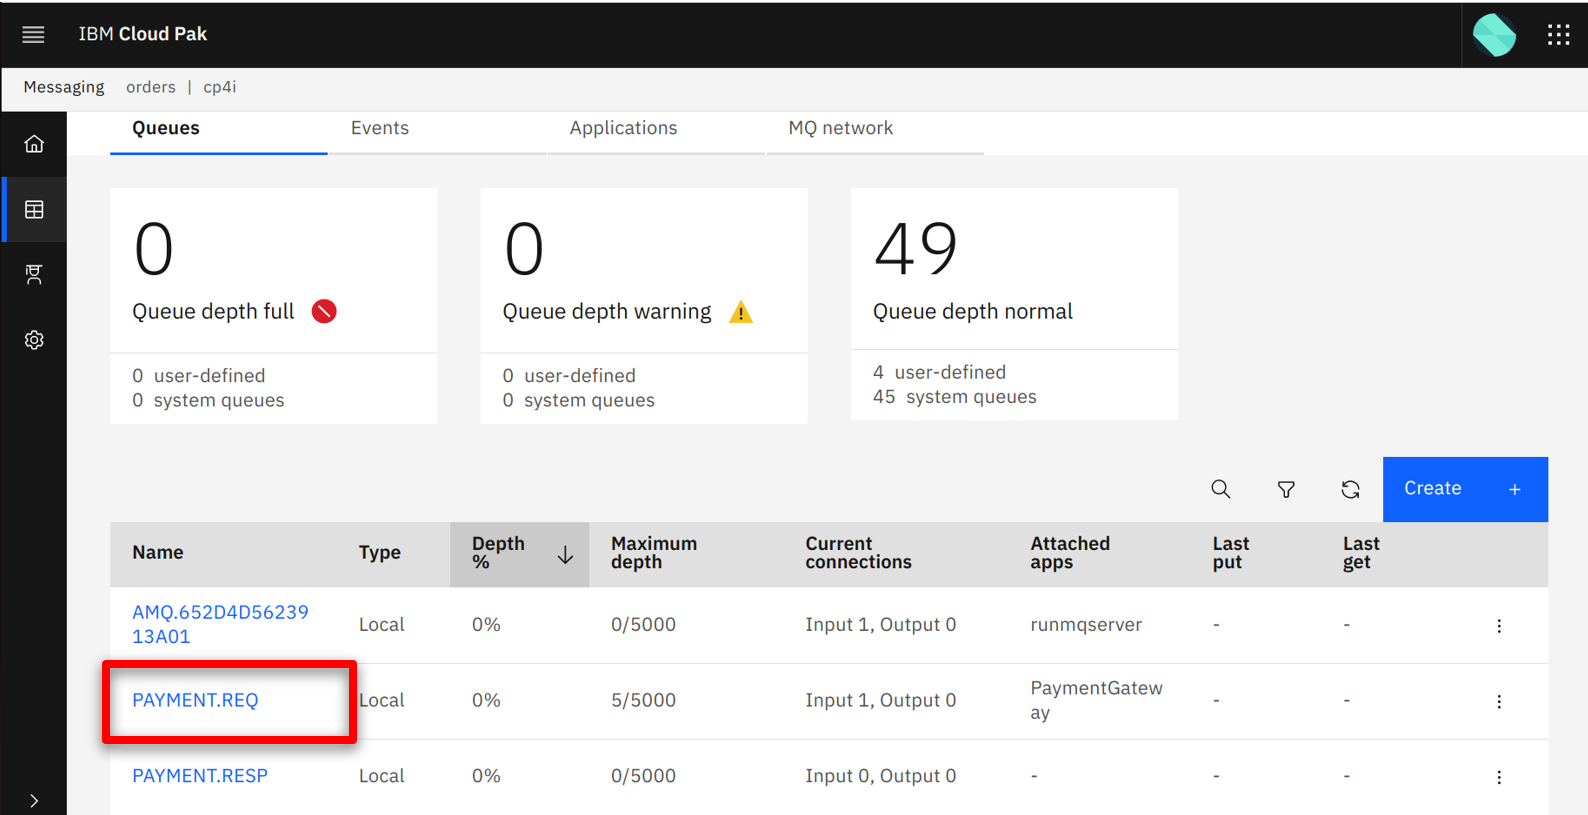
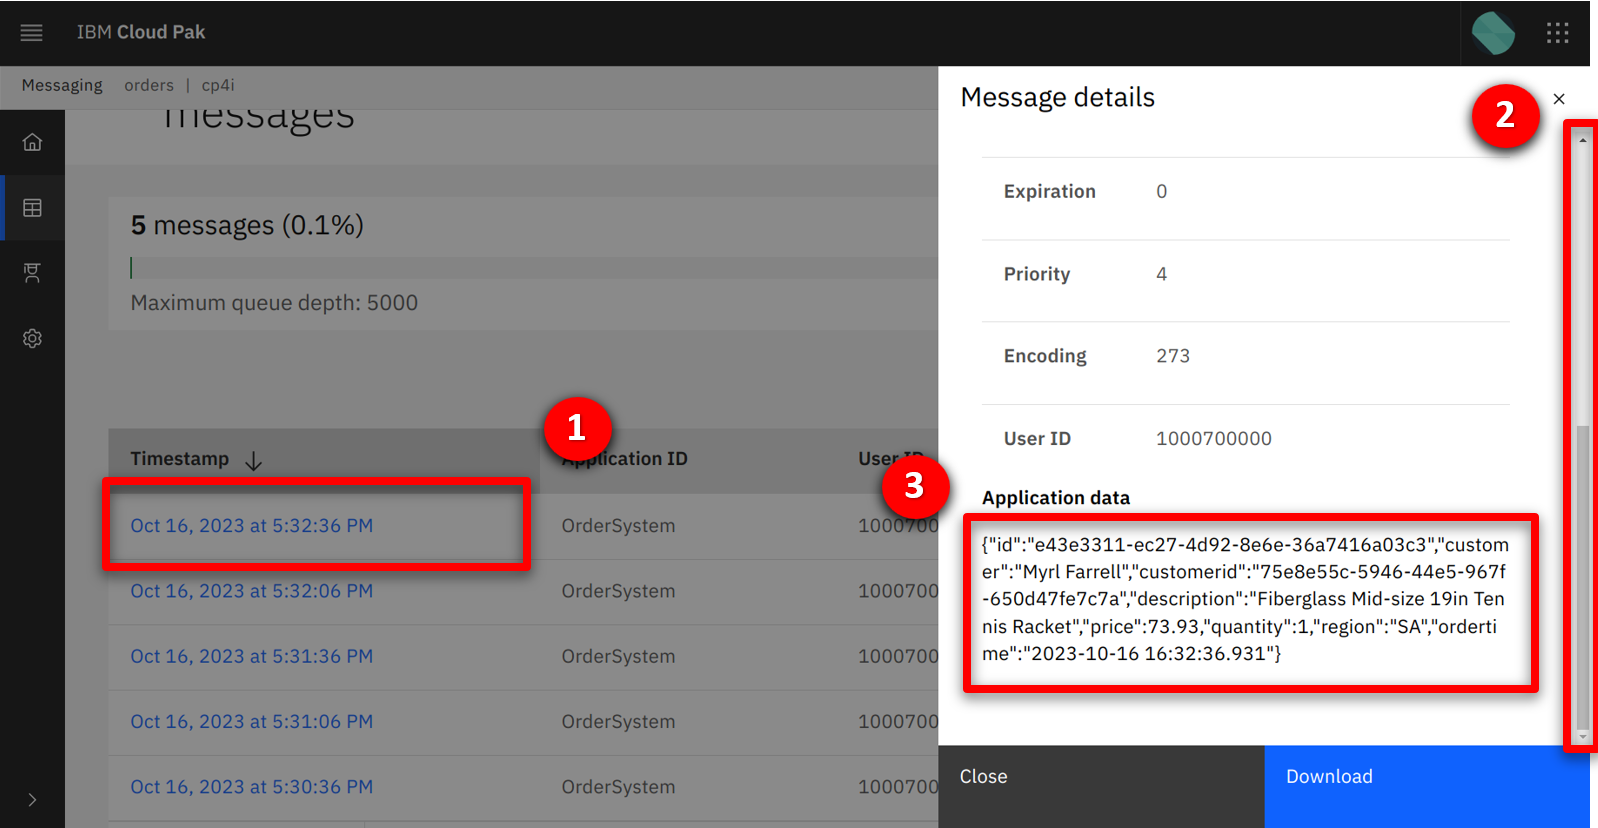
Next the integration team identifies the queue that connects the order management system to the payment gateway. They review the messages as they are passing through MQ to verify they contain the expected payload. |
| Action 1.2.1 |
Click on the PAYMENT.REQ queue.
 |
| Action 1.2.2 |
Click on a message (1), scroll down (2) and show the order details (3).
 |
| Action 1.2.3 |
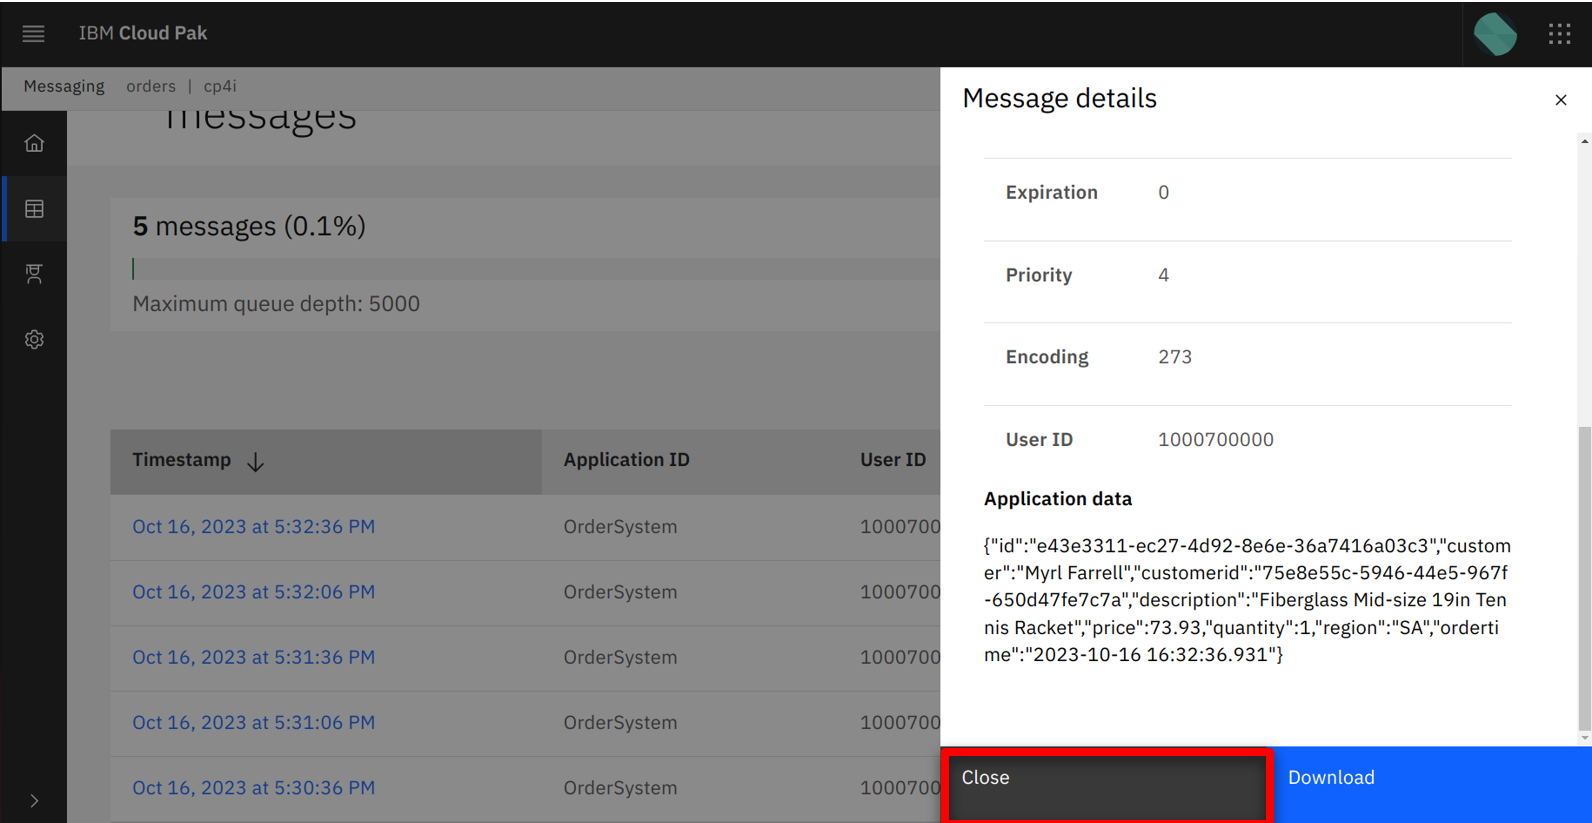
Click Close.
 |
| Narration |
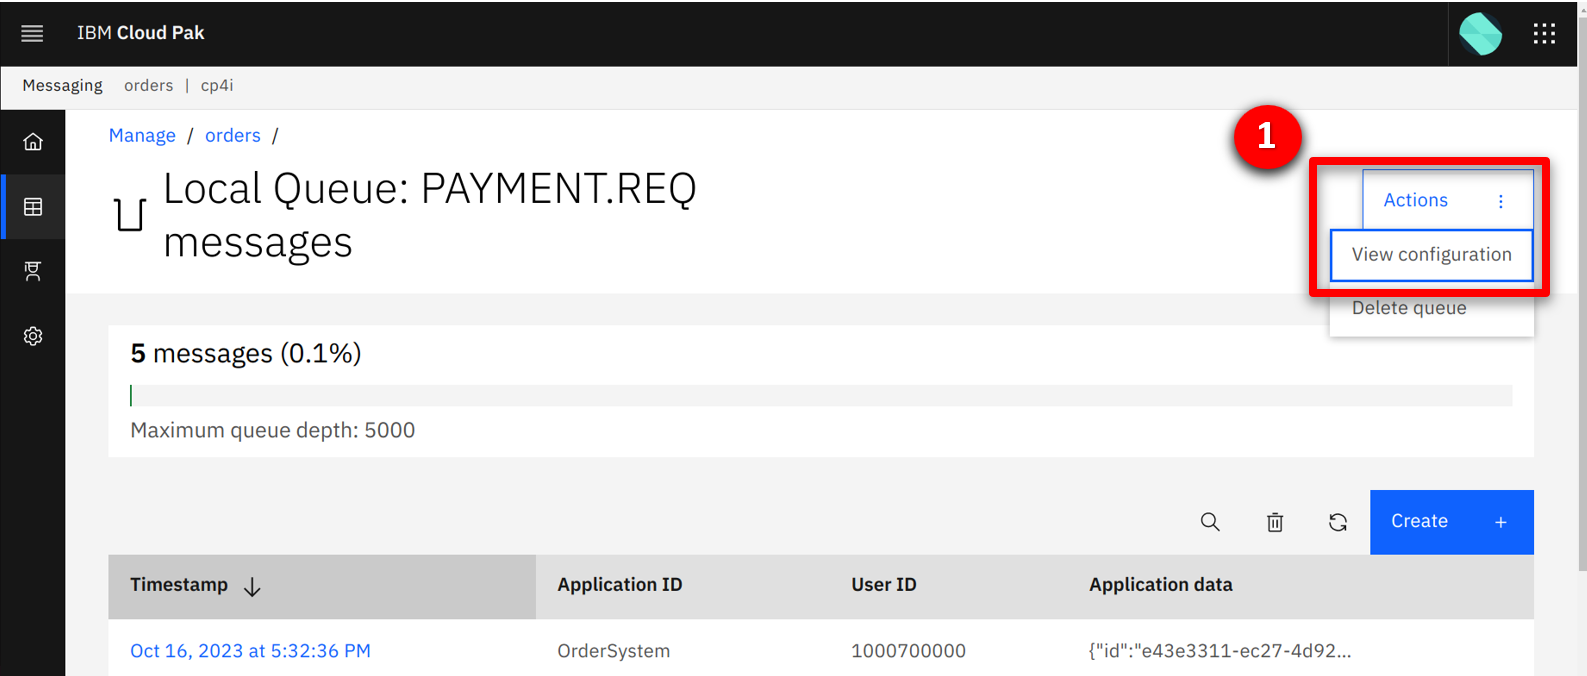
They update the configuration to specify TO.KAFKA as the streaming queue. This causes IBM MQ to clone new messages to the PAYMENT.REQ queue. |
| Action 1.2.4 |
Click the Actions button and select View configuration.
 |
| Action 1.2.5 |
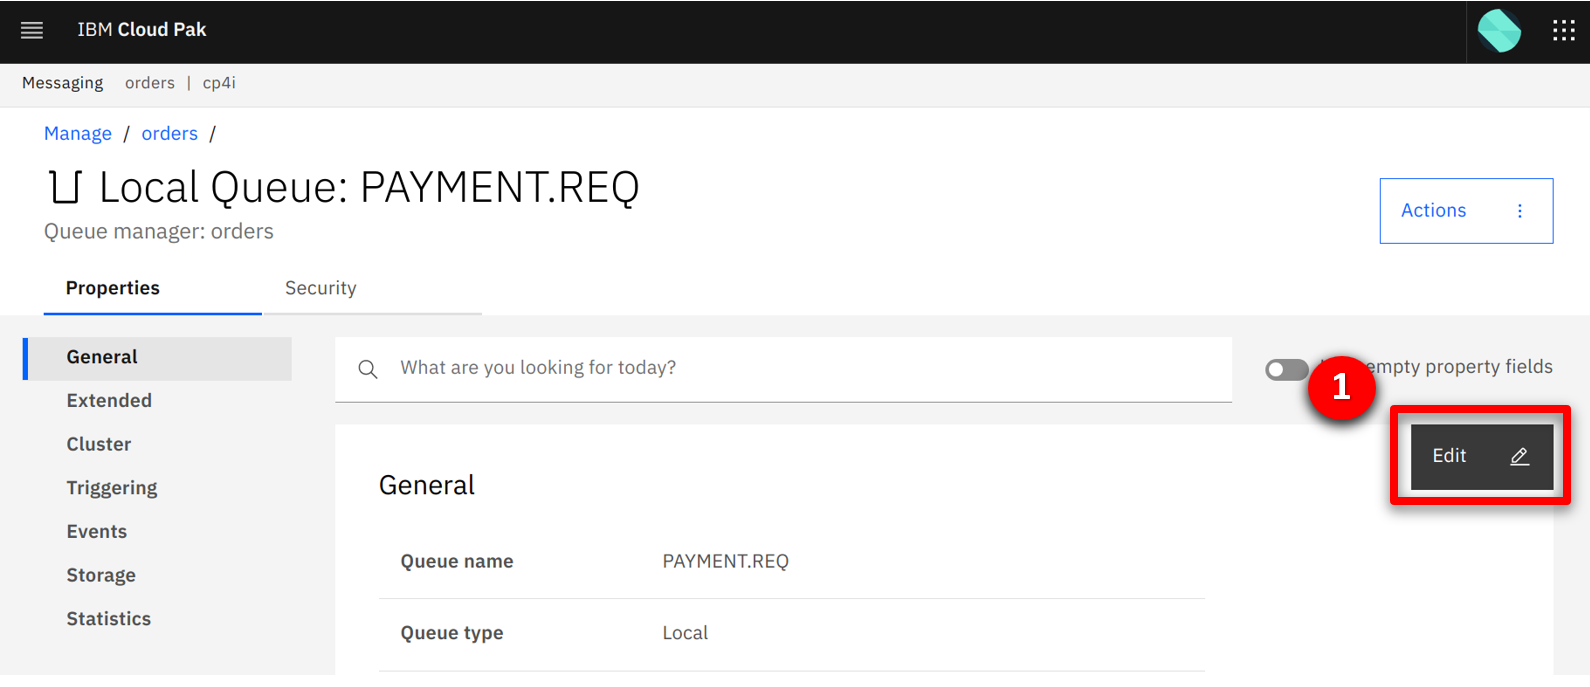
Click the Edit button.
 |
| Action 1.2.6 |
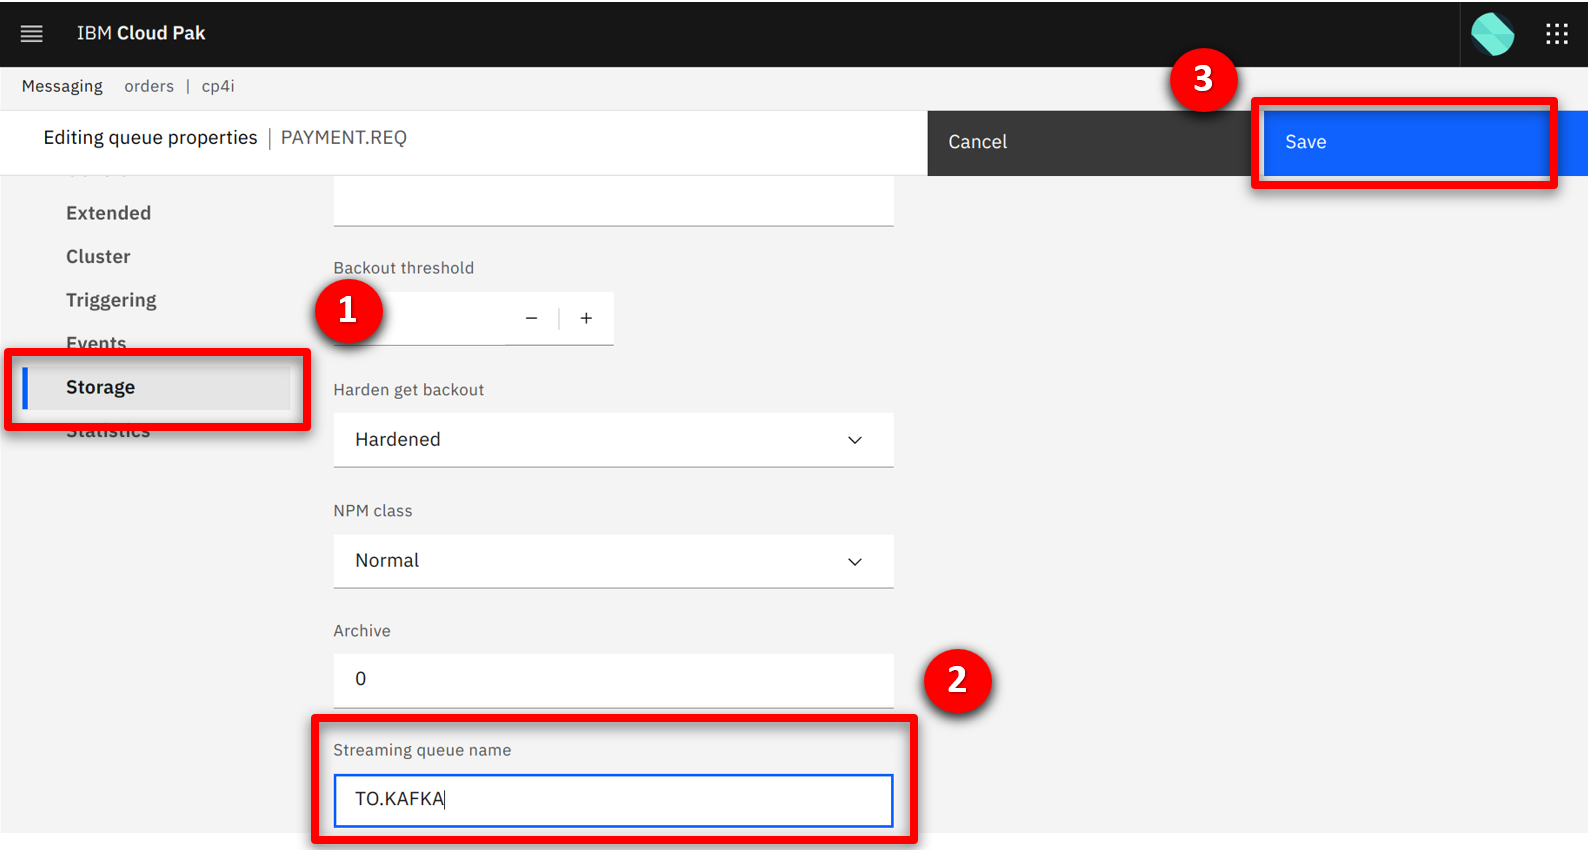
Select the Storage (1) section. In the Streaming queue name field type TO.KAFKA (2), and click Save (3).
 |
| Narration |
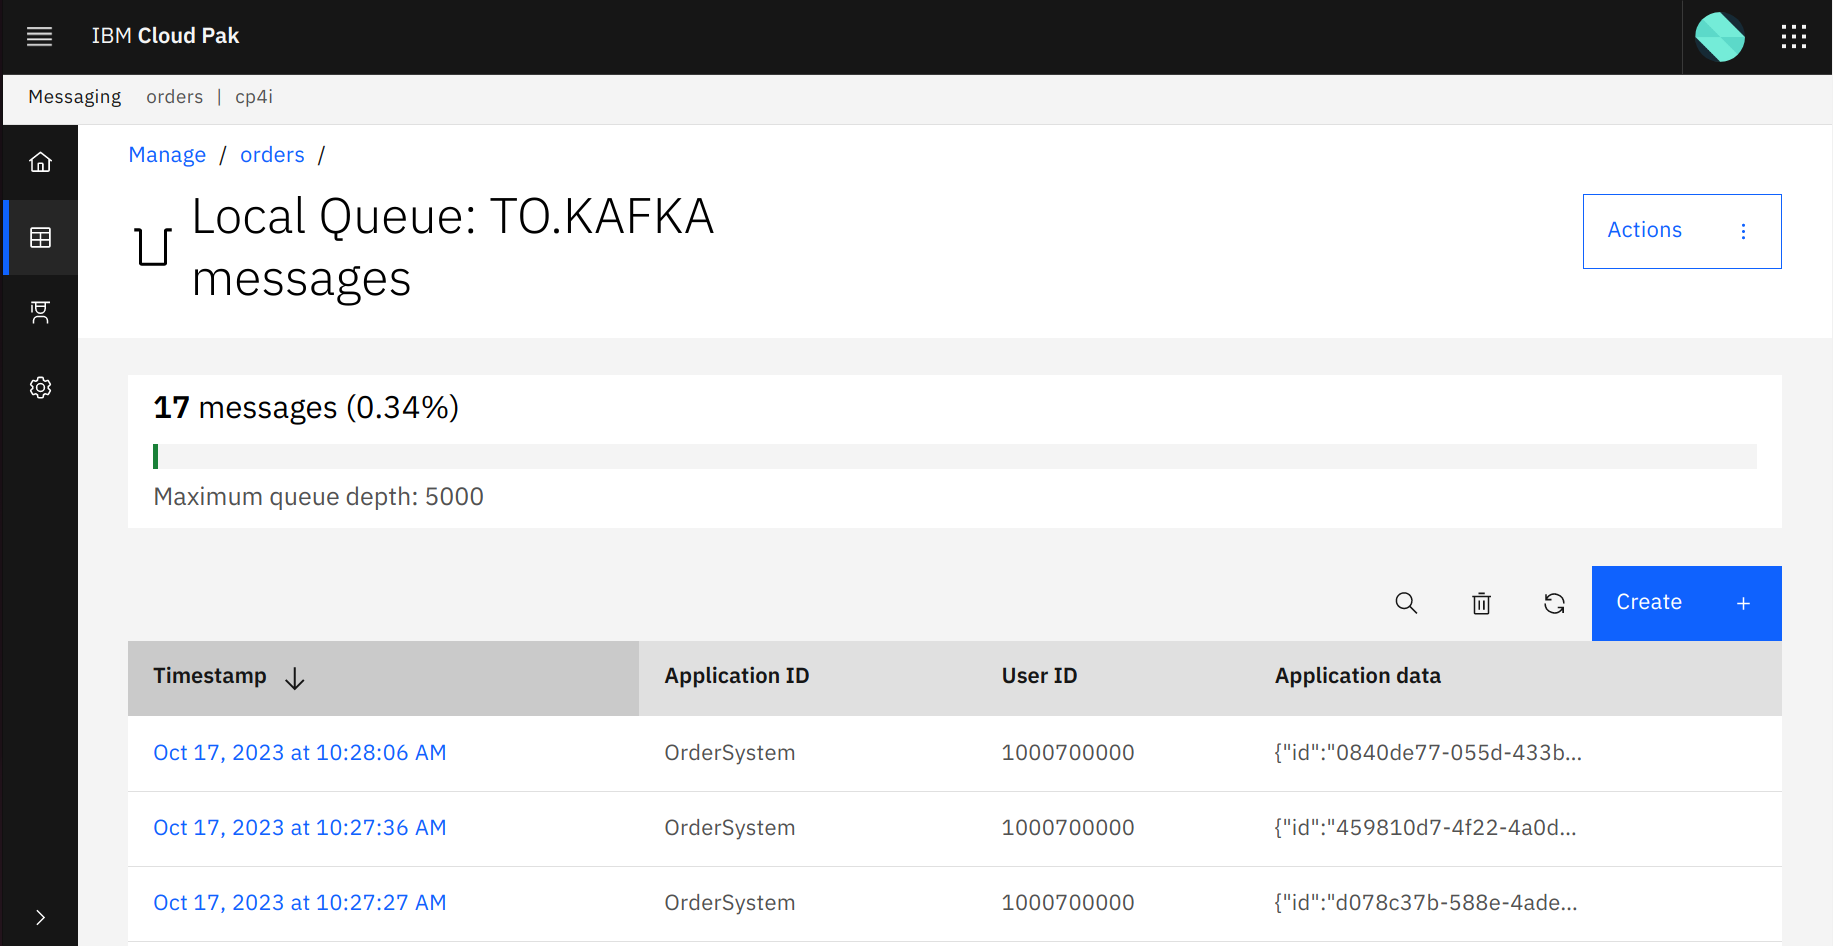
Once saved the new configuration is live, and the integration team can see cloned order messages in the TO.KAFKA queue. |
| Action 1.2.7 |
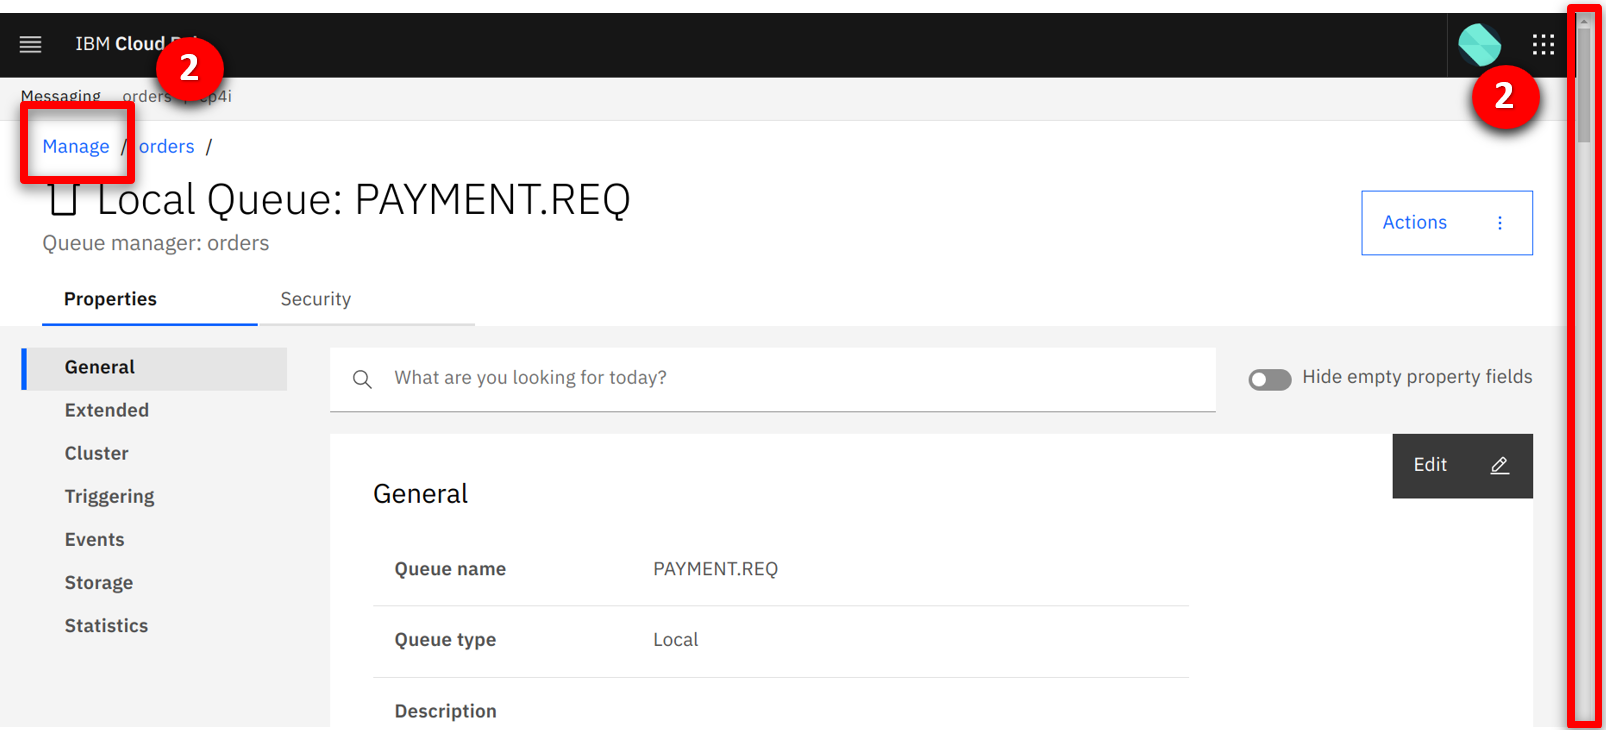
Scroll to the top of the page (1), and select Manage (2).
 |
| Action 1.2.8 |
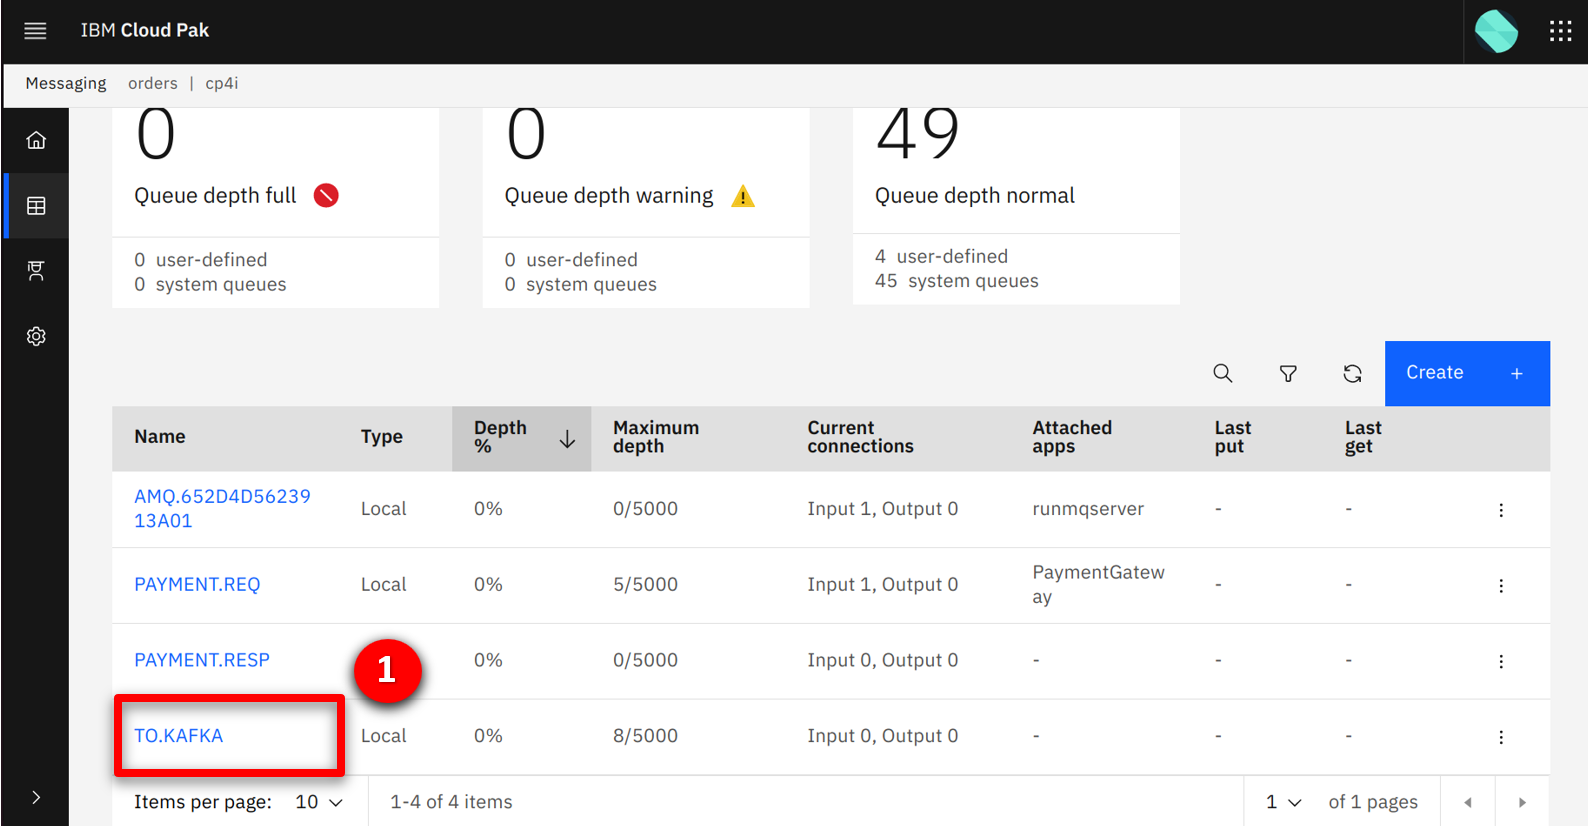
Click on the TO.KAFKA (1) queue.
 |
| Action 1.2.9 |
View the order messages building up on the queue.
 |
| 1.3 |
Define the Orders event stream |
| Narration |
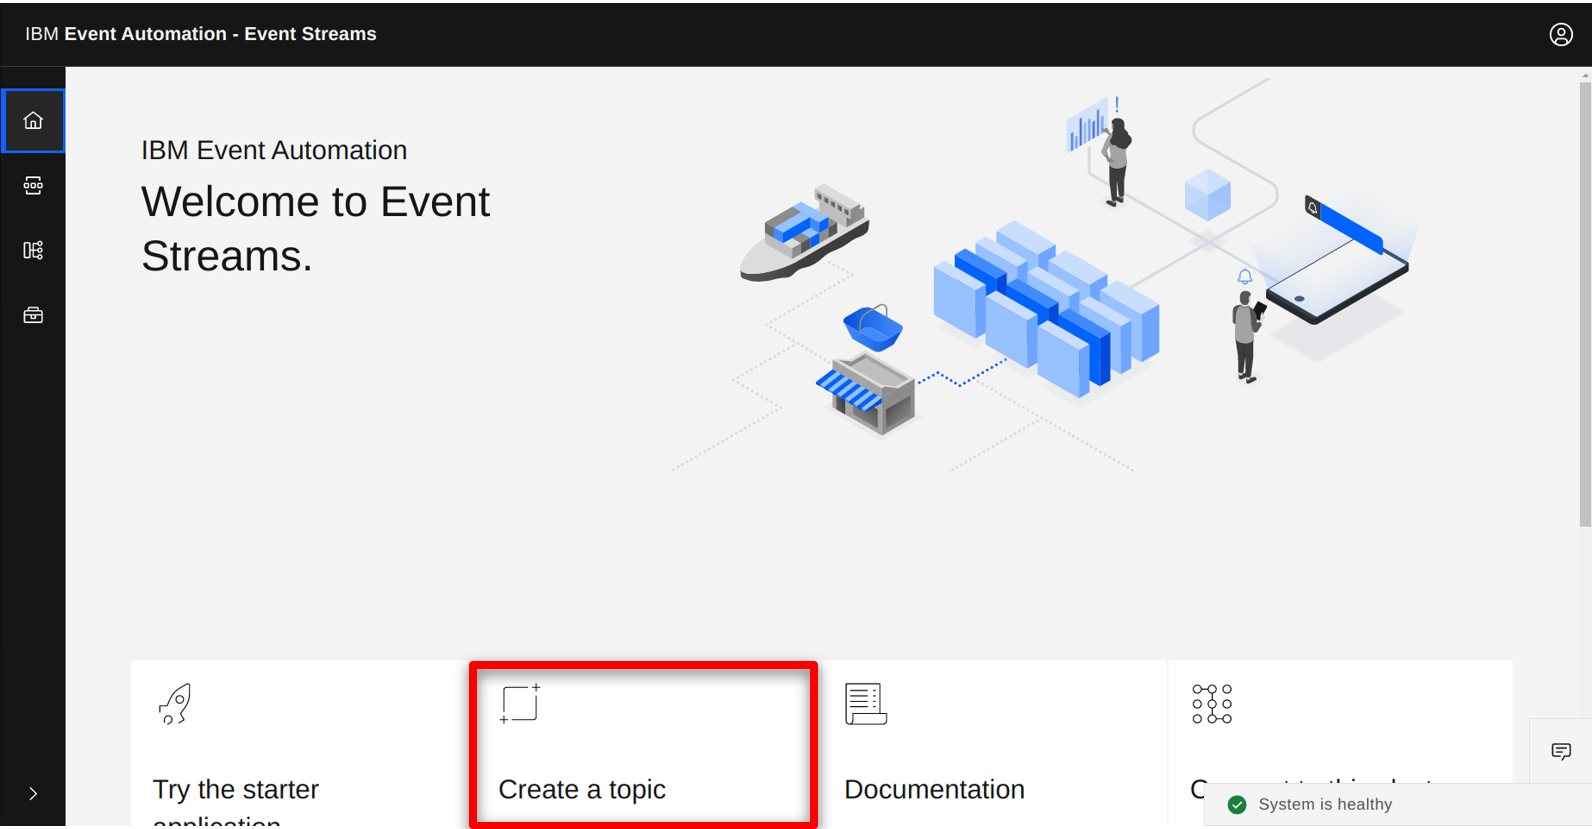
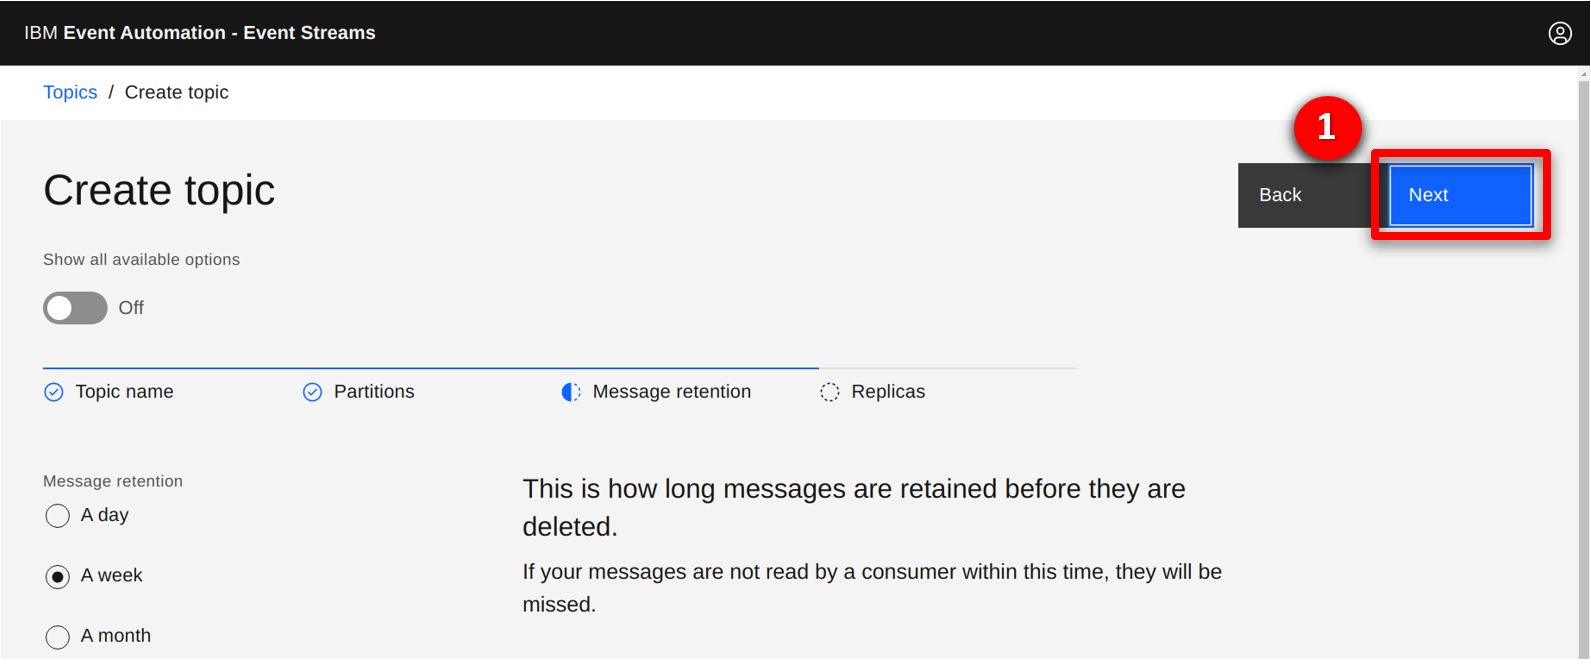
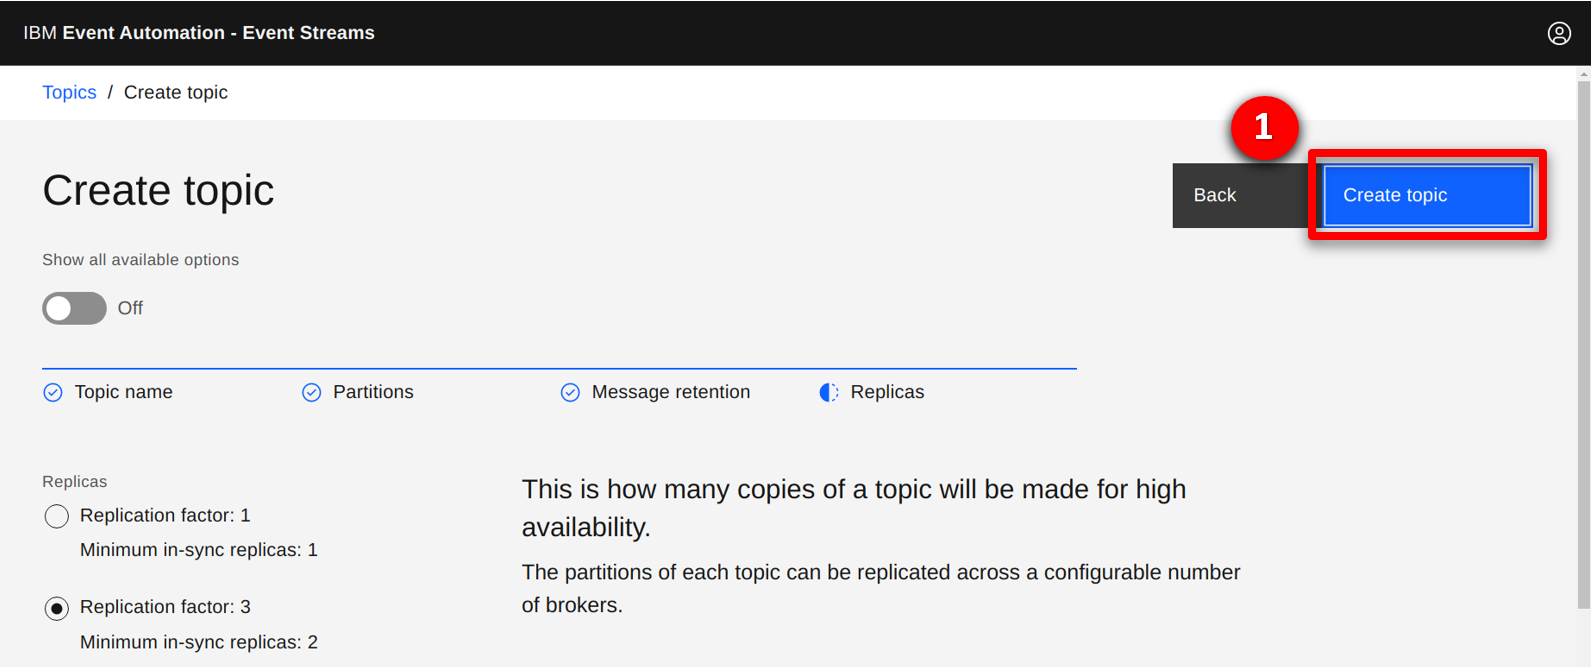
Next the integration team opens the IBM Event Streams console to create the Orders stream where messages will be published. Options are provided to customize the data replication and retention settings. The team uses the default values, as their standard policy is to retain data for a week and to replicate for high availability. |
| Action 1.3.1 |
In the IBM Event Streams console, click on the Create a topic tile.
 |
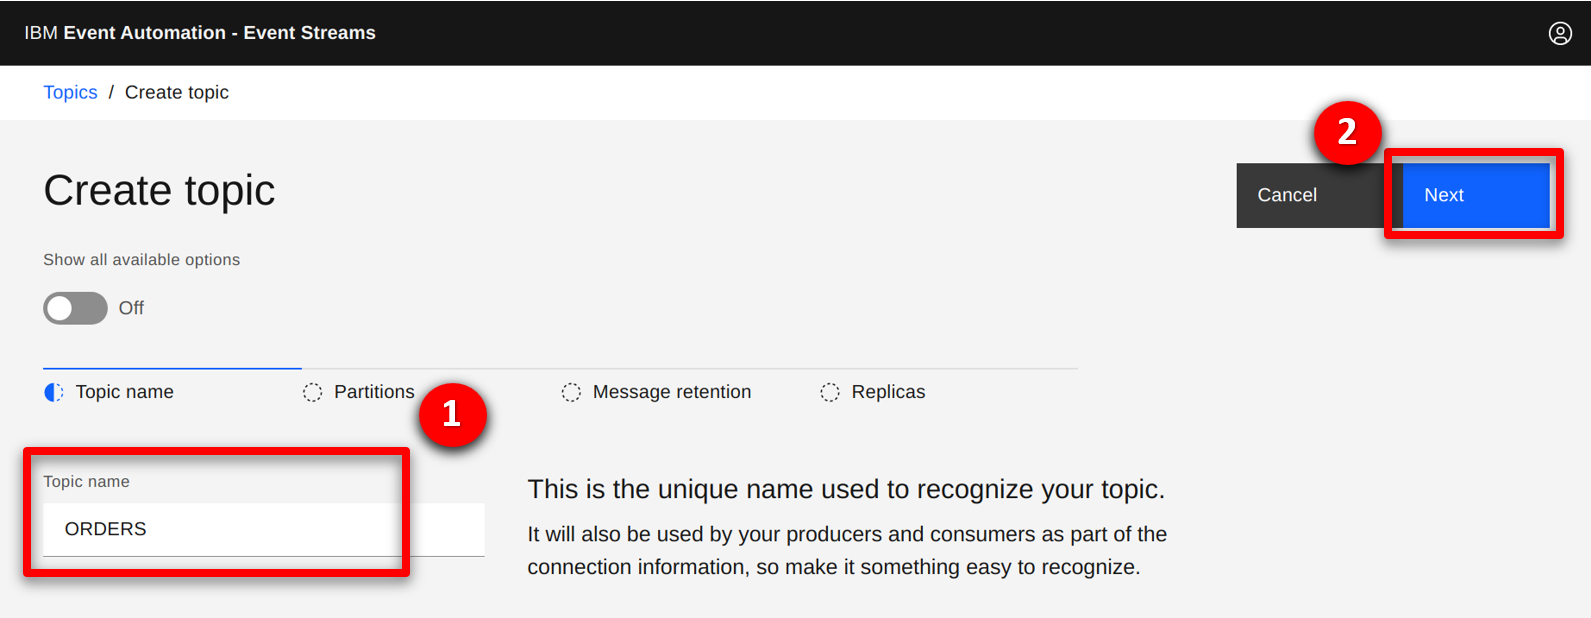
| Action 1.3.2 |
Specify ORDERS (1) as the Topic name, and click Next (2).
 |
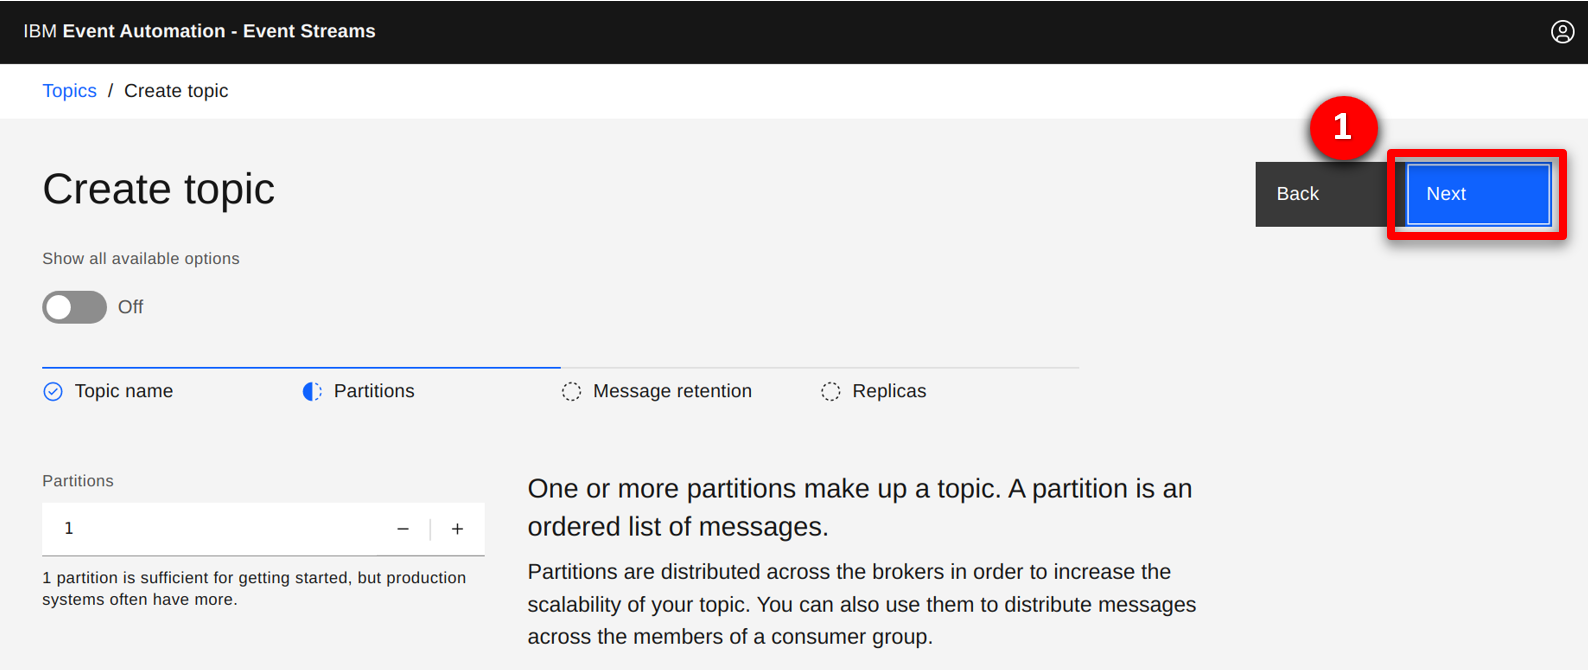
| Action 1.3.3 |
Leave the number of partitions as the default, and click Next (1).
 |
| Action 1.3.4 |
Leave the retention settings as the default, and click Next (1).
 |
| Action 1.3.5 |
Leave the replication settings as the default, and click Create topic (1).
 |
| 1.4 |
Configure the IBM MQ to IBM Event Streams bridge |
| Narration |
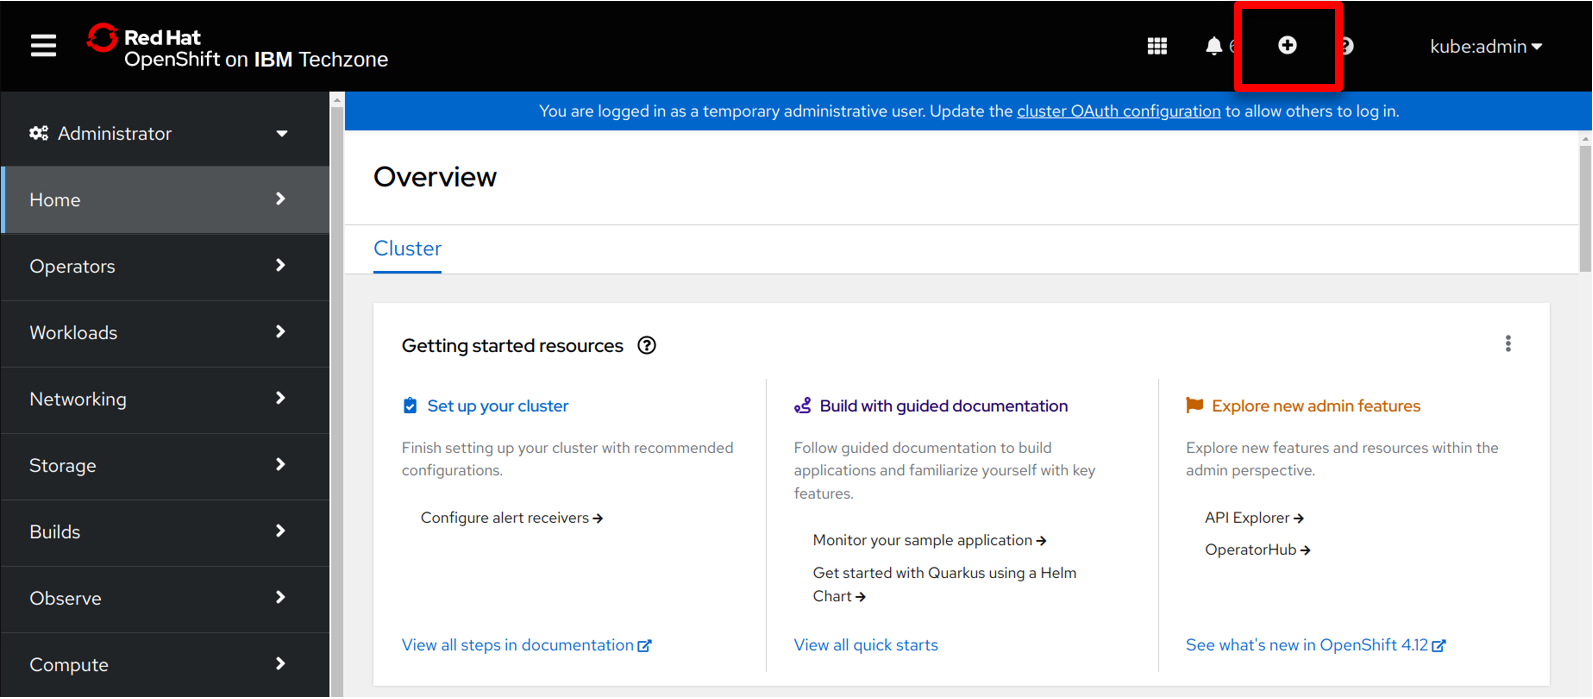
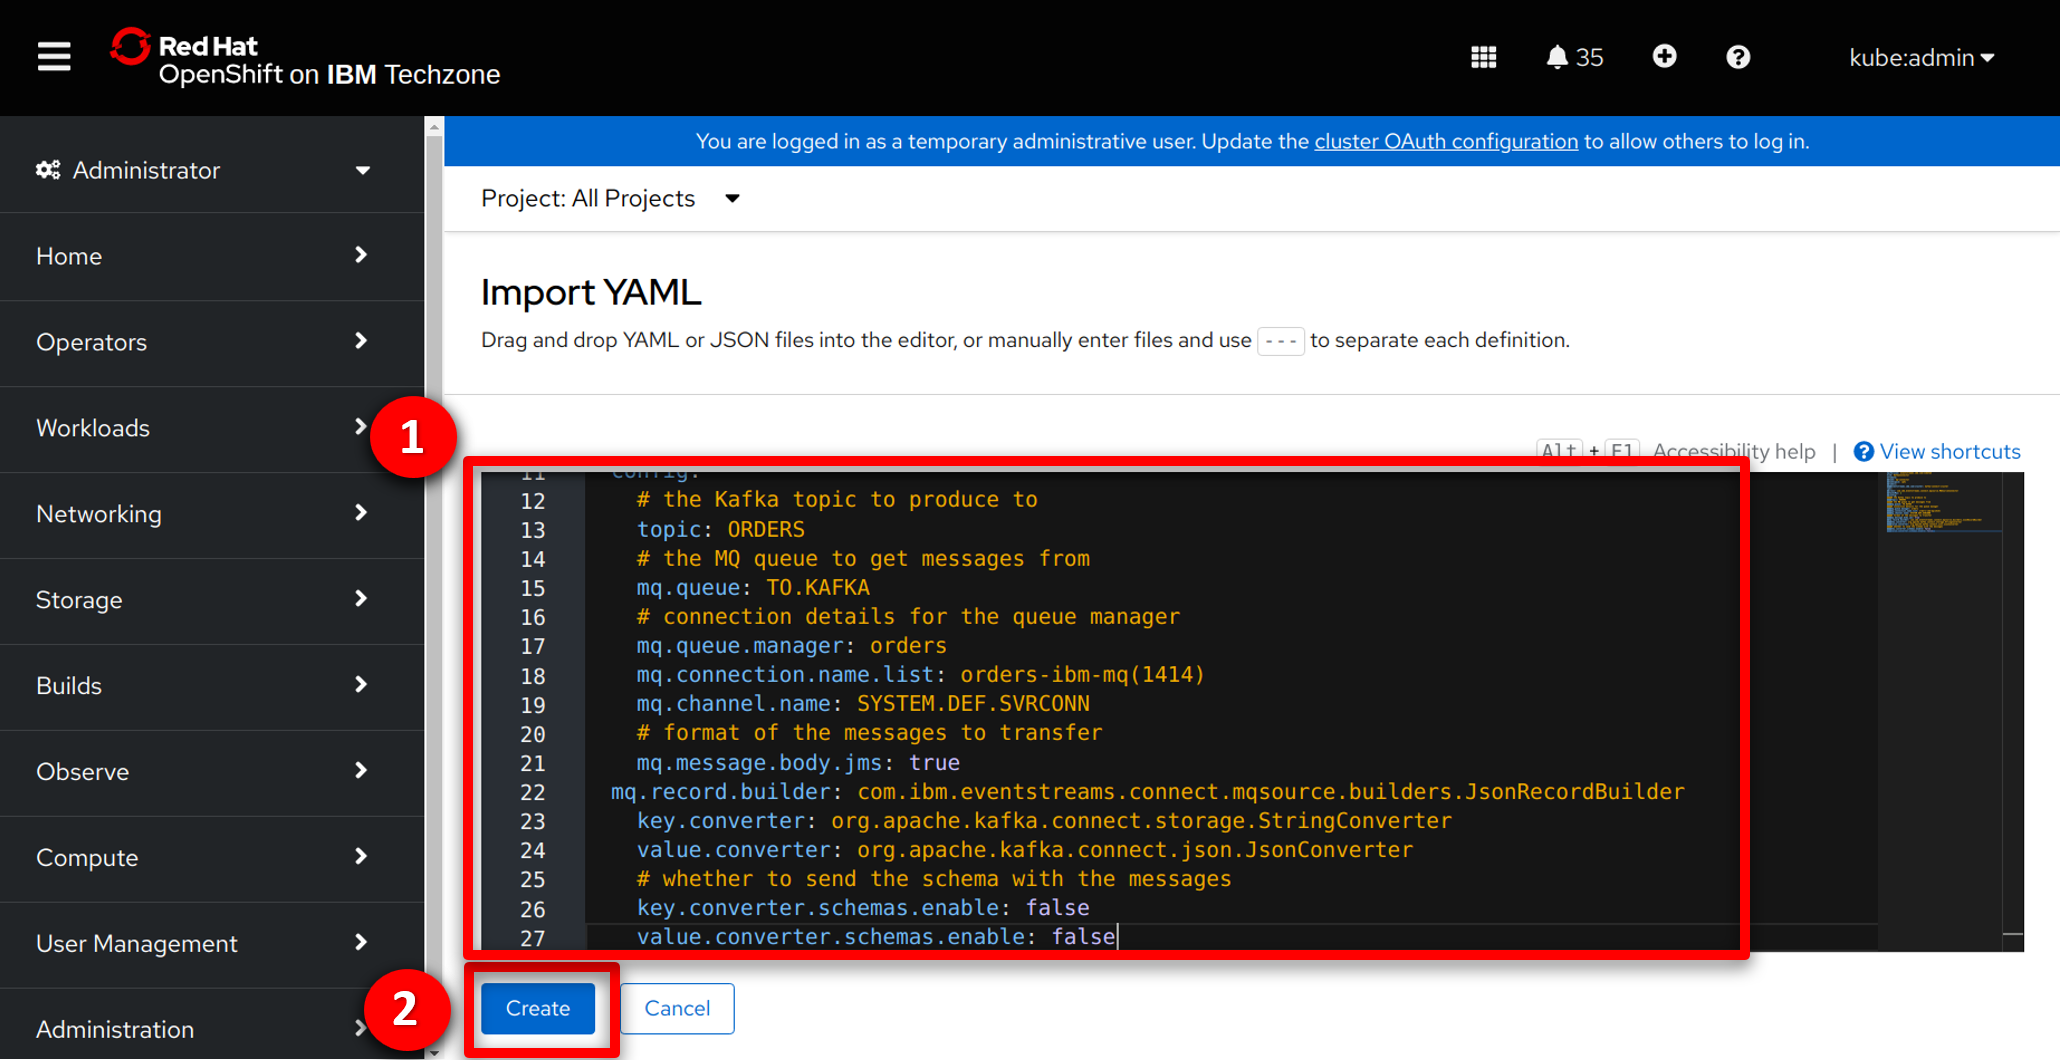
Next the integration team open the Red Hat OpenShift console to configure the MQ to IBM Event Streams bridge. The bridge is supplied and supported by IBM and built on the Apache Kafka connector framework. The configuration includes the connectivity details for both IBM MQ and IBM Event Streams. Once created, the connector reads messages from the TO.KAFKA queue and publishes to the Order stream. |
| Action 1.4.1 |
In the Red Hat OpenShift console, click on the + button in the top right.
 |
| Action 1.4.2 |
The configuration snippet to create the MQ to Kafka bridge is shown below. Copy this configuration snippet and paste (1) into the Red Hat OpenShift console, and click Create (2).
 |
| 1.5 |
View the orders in the stream |
| Narration |
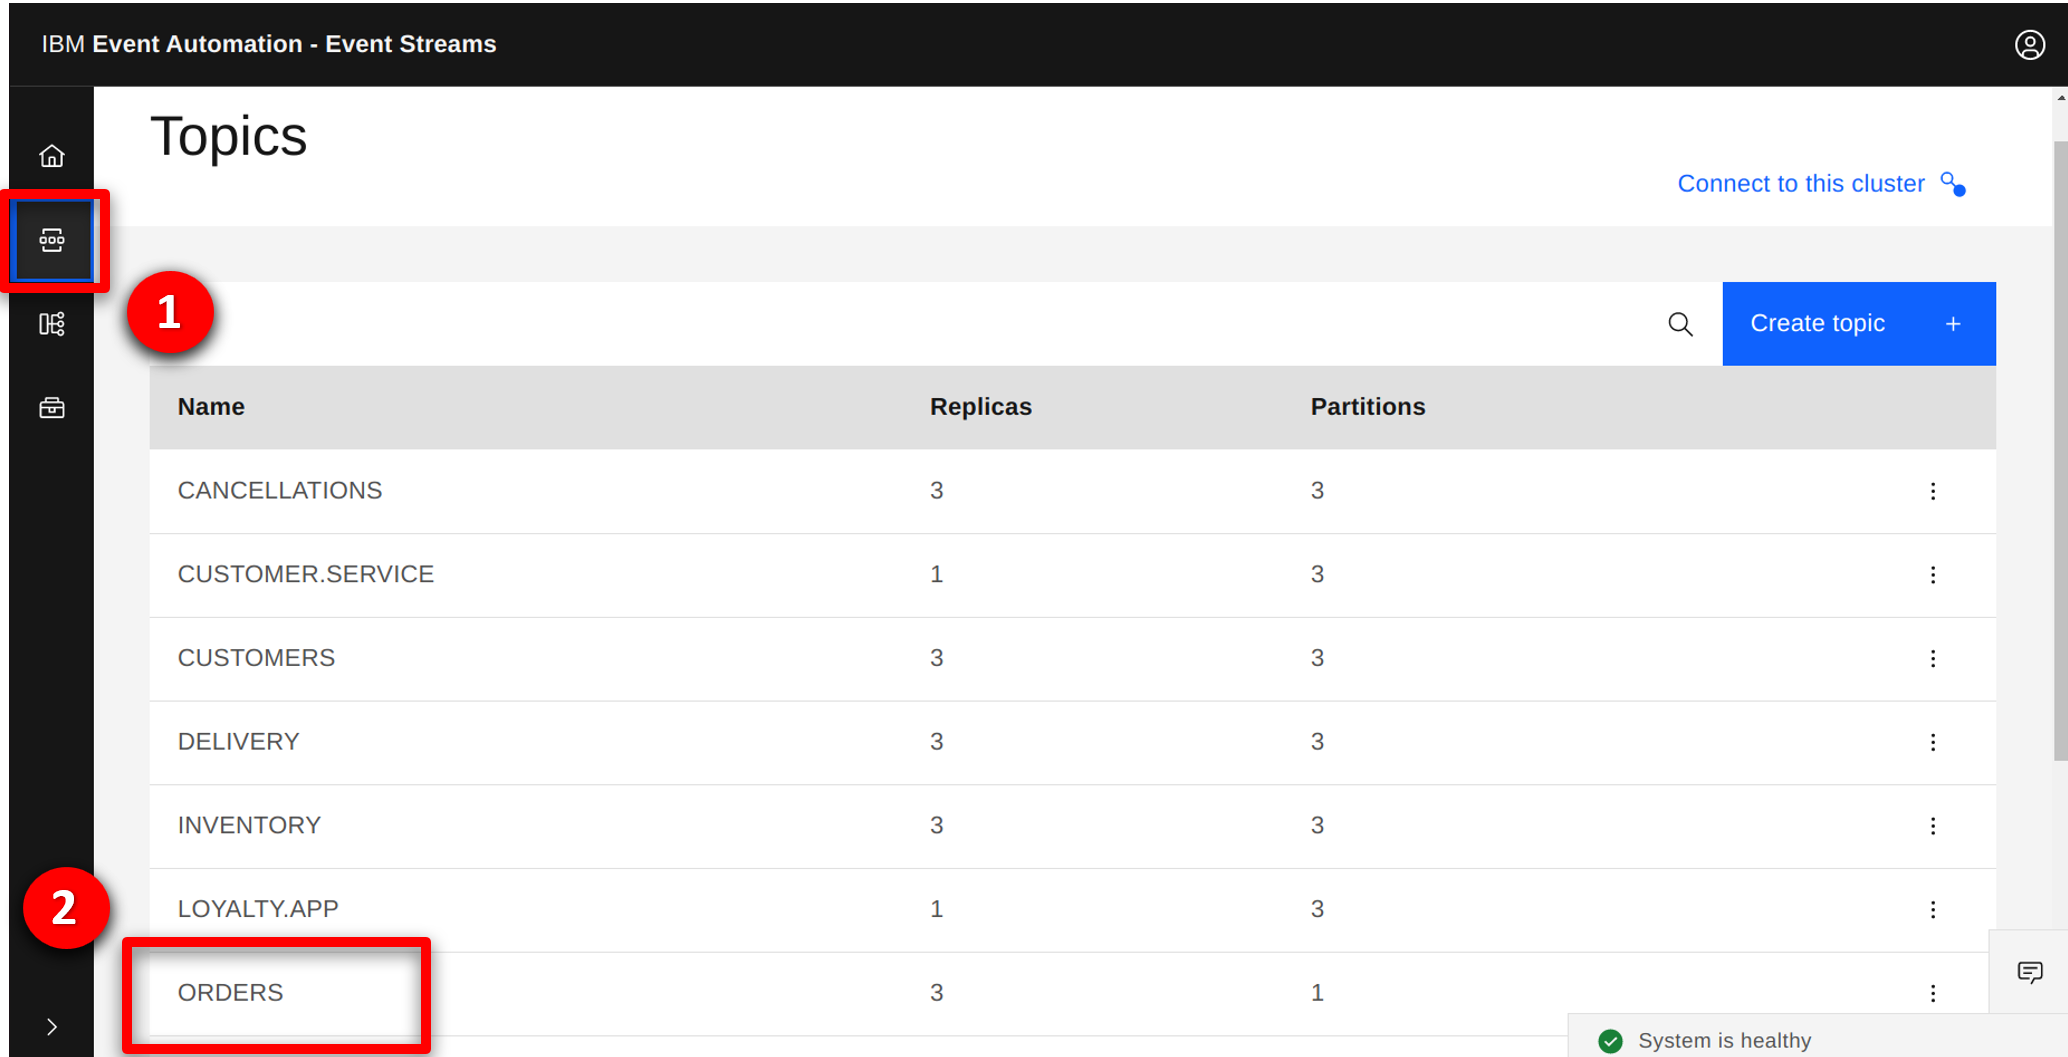
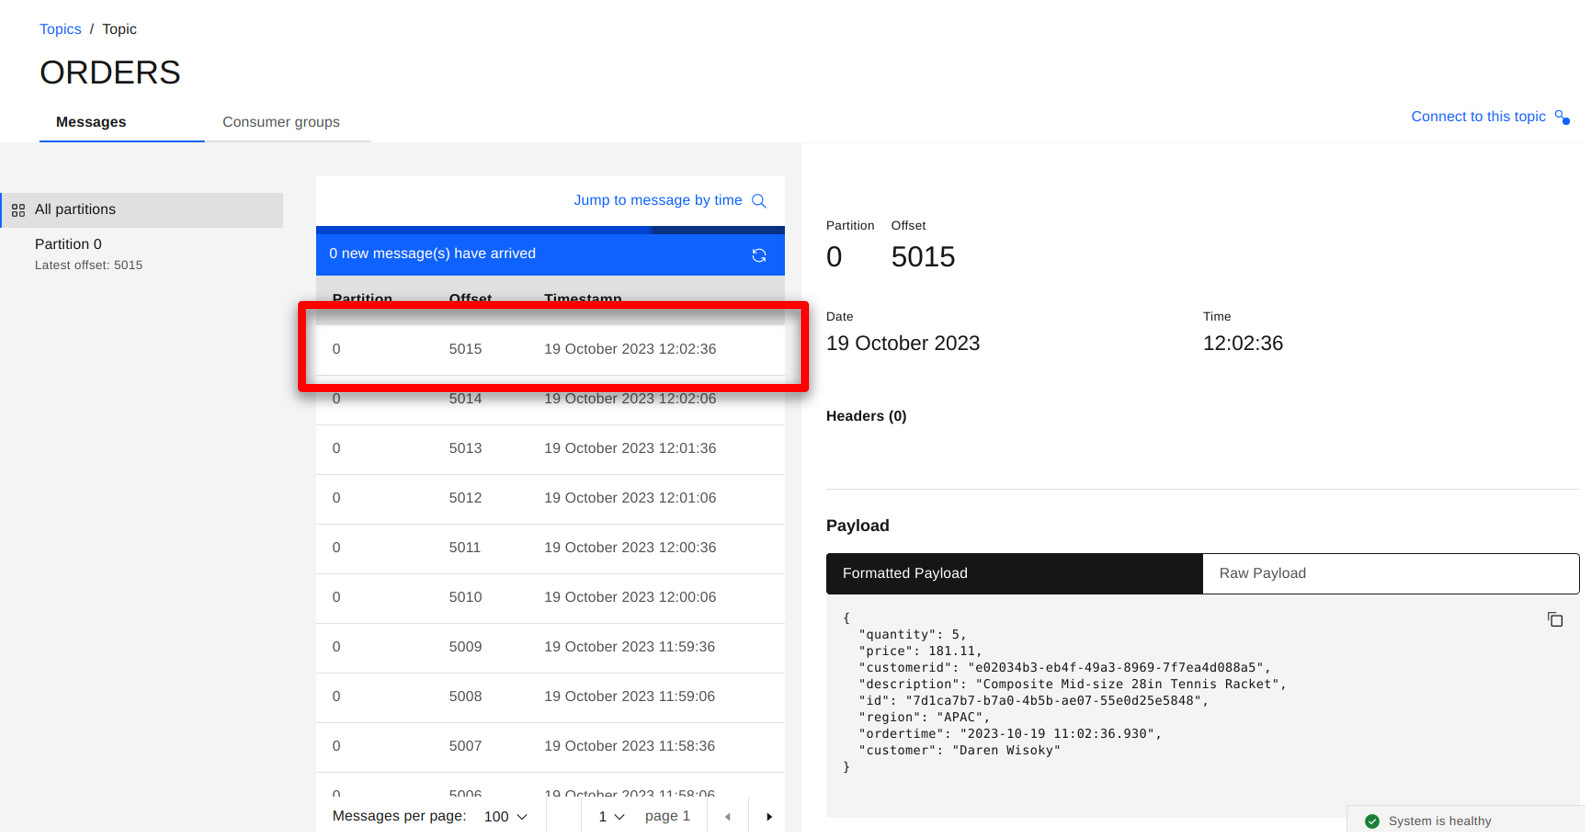
The integration team returns to the IBM Event Streams console to view the orders. They see the events that have been generated since they configured the streaming queue in IBM MQ. |
| Action 1.5.1 |
Return to the IBM Event Streams console and show that the messages are being streamed into the topic. Click the topic icon (1), and select the ORDERS (2) topic.
 |
| Action 1.5.2 |
All messages since the MQ streaming queue configuration update are seen. Click on one to view the details.
 |
| 1.6 |
Importing the streams into IBM Event Endpoint Management |
| Narration |
Next the integration team open the IBM Event Endpoint Management console. The console supports two usages, one for teams publishing event streams, and a second for those consuming. The integration team wants to import the order and customer streams by discovering the topic on IBM Event Streams. As this is the first time they have imported from IBM Event Streams they need to register the cluster. |
| Action 1.6.1 |
In the IBM Event Endpoint Management console, click on the topic (1) icon and select the Add topic (2) button.
 |
| Action 1.6.2 |
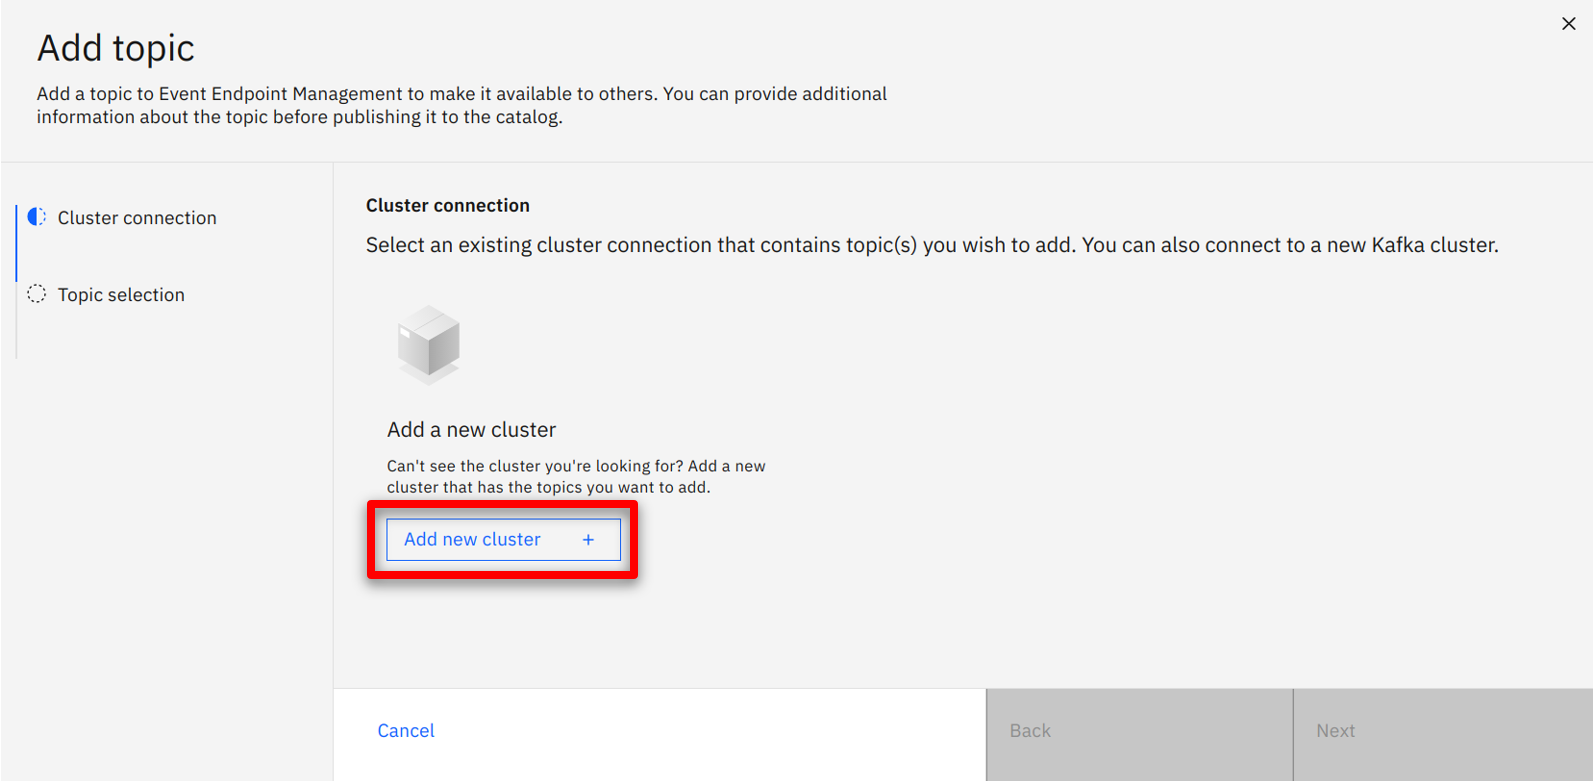
Click Add new cluster.
 |
| Action 1.6.3 |
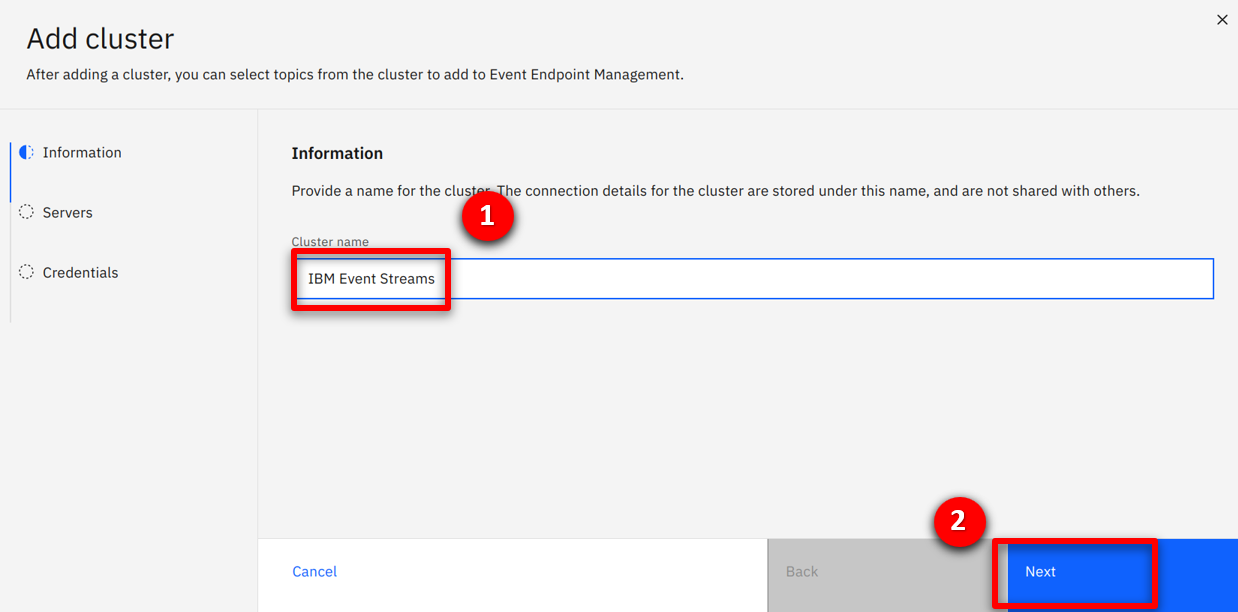
Specify IBM Event Streams (1) for the cluster name and click Next (2).
 |
| Narration |
They enter the cluster connectivity details including the endpoint, certificates for secure communication and username / password credentials. |
| Action 1.6.4 |
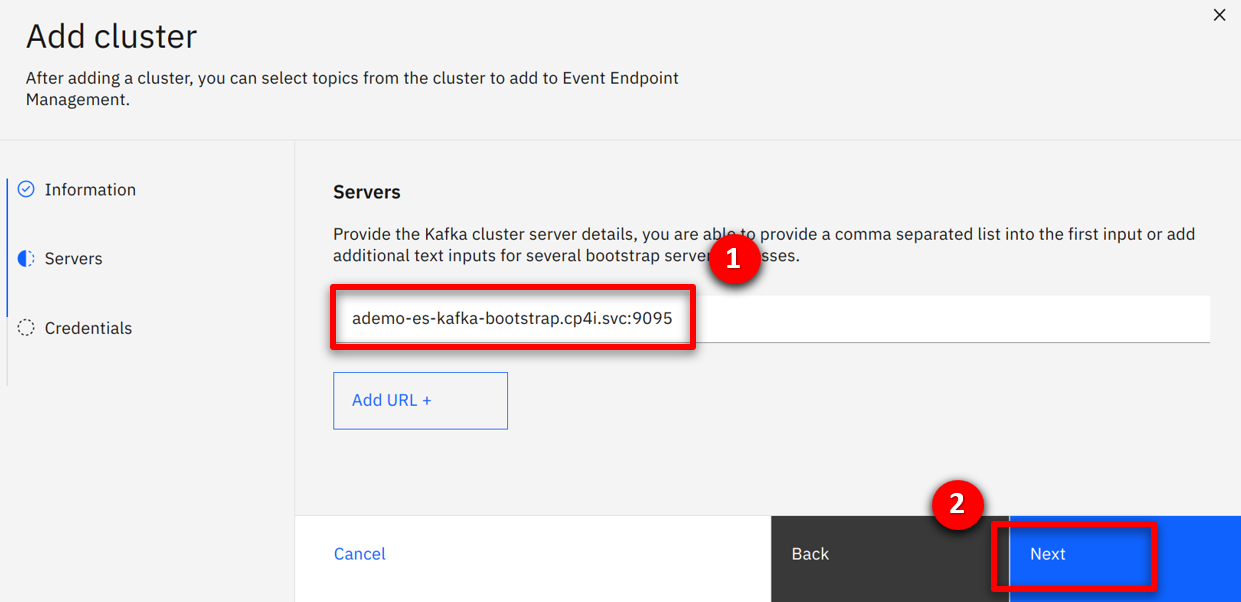
Specify ademo-es-kafka-bootstrap.cp4i.svc:9095 (1) for the servers field and click Next (2).
 |
| Action 1.6.5 |
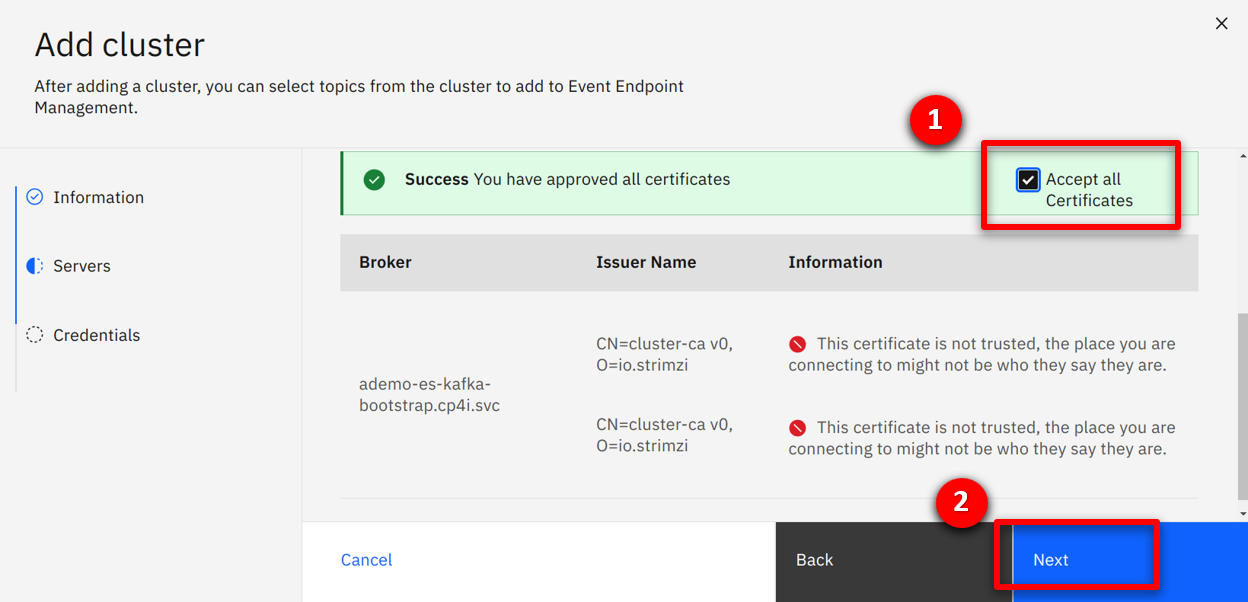
Check the Accept all certificates (1) box and click Next (2).
 |
| Action 1.6.6 |
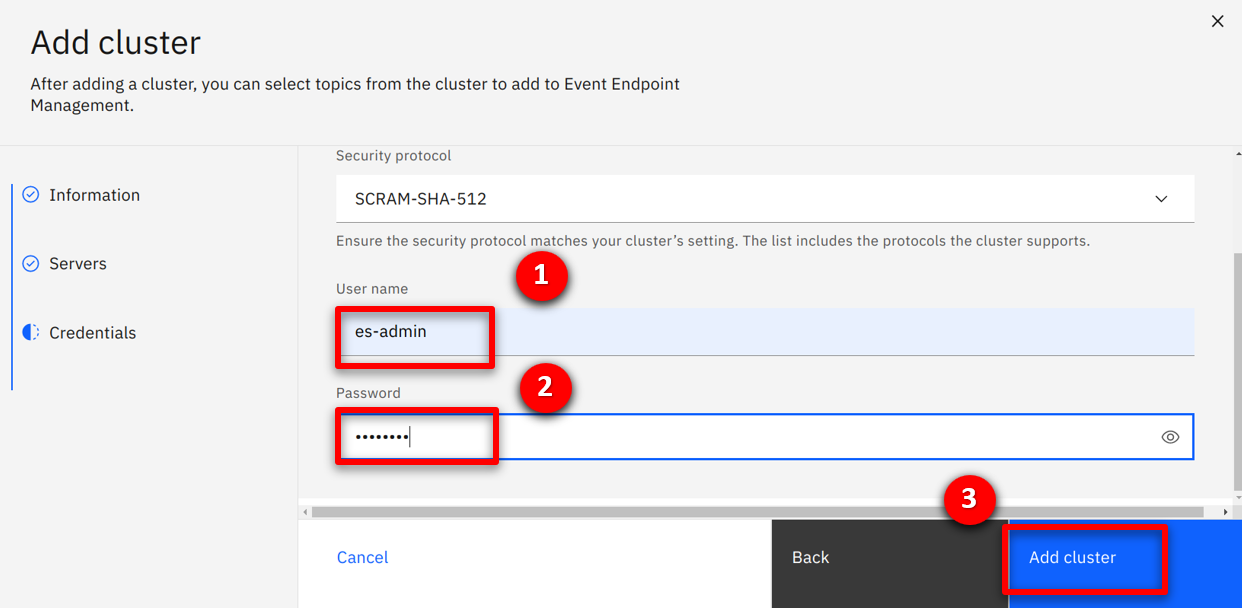
Specify es-admin (1) for the username, use the value outputted in the preparation section for the password (2), and click Add cluster (3).
 |
| Narration |
The available topics are discovered, and the team imports both the CUSTOMERS and ORDERS streams. |
| Action 1.6.7 |
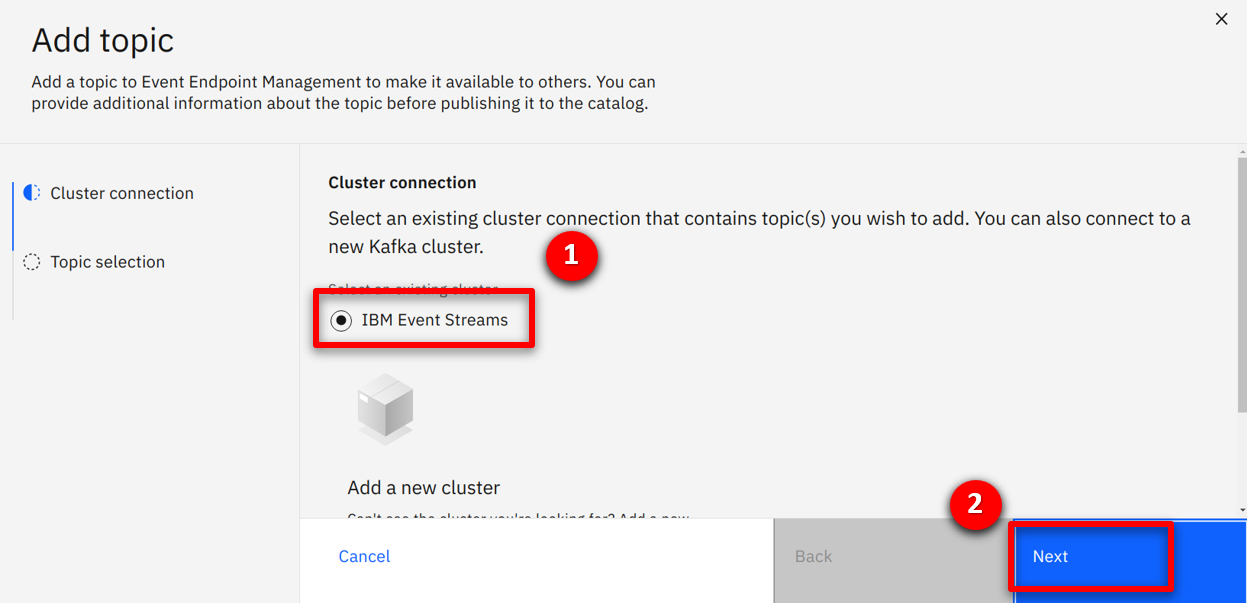
Select IBM Event Streams (1) and click Next (2).
 |
| Action 1.6.8 |
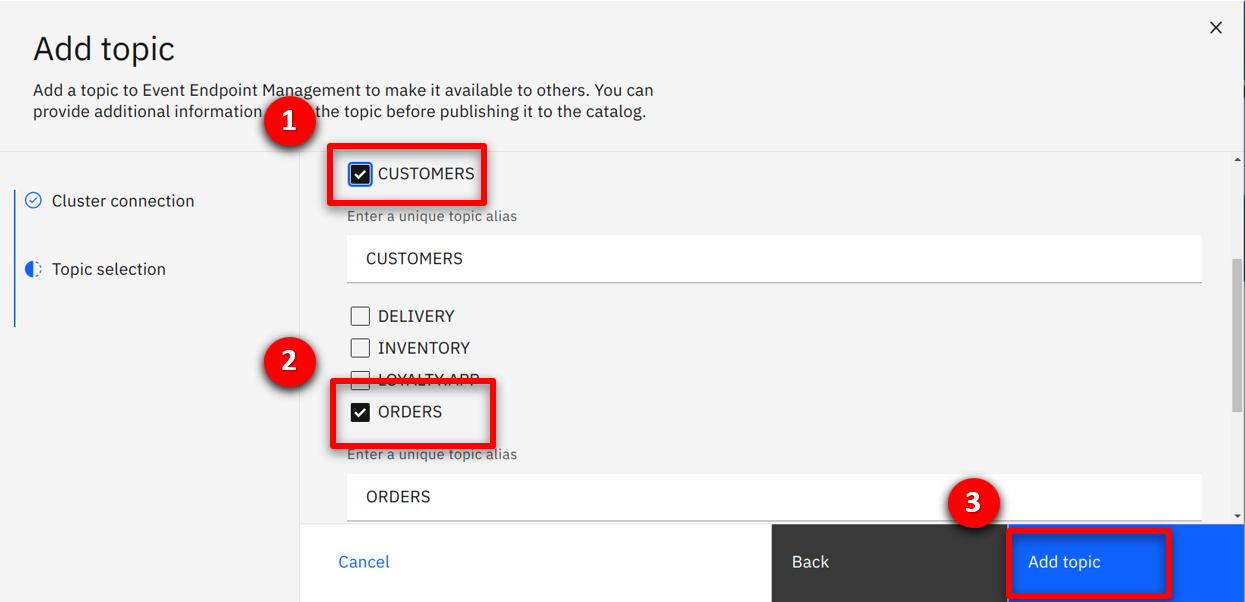
Check CUSTOMERS (1) and ORDERS (2), and click Add topic (2).
 |
| 1.7 |
Describe and publish the streams into IBM Event Endpoint Management |
| Narration |
Next the integration team describes the streams, providing a description and example message. This information is displayed to consumers when they discover and subscribe to the event stream. They start by editing the CUSTOMERS stream. |
| Action 1.7.1 |
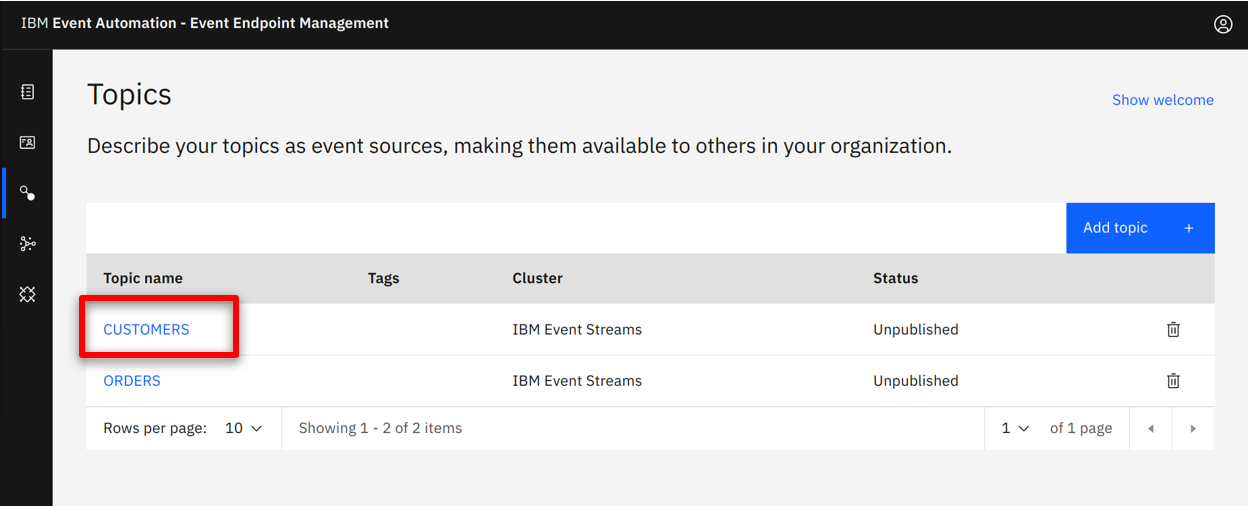
Click on the CUSTOMERS (1) topic.
 |
| Action 1.7.2 |
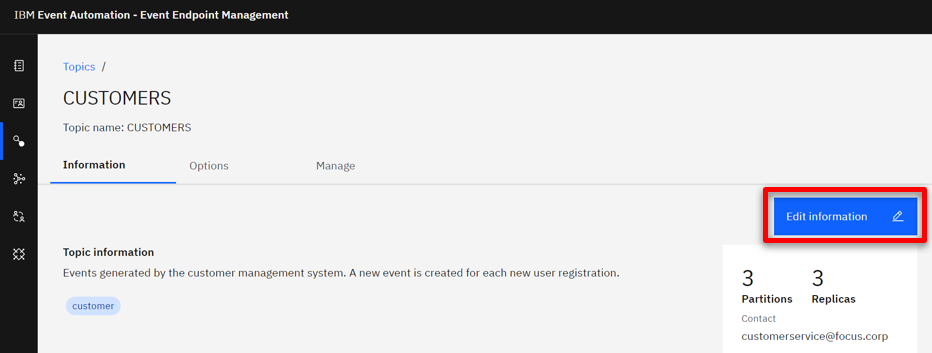
Click on the Edit information (1) button.
 |
| Action 1.7.3 |
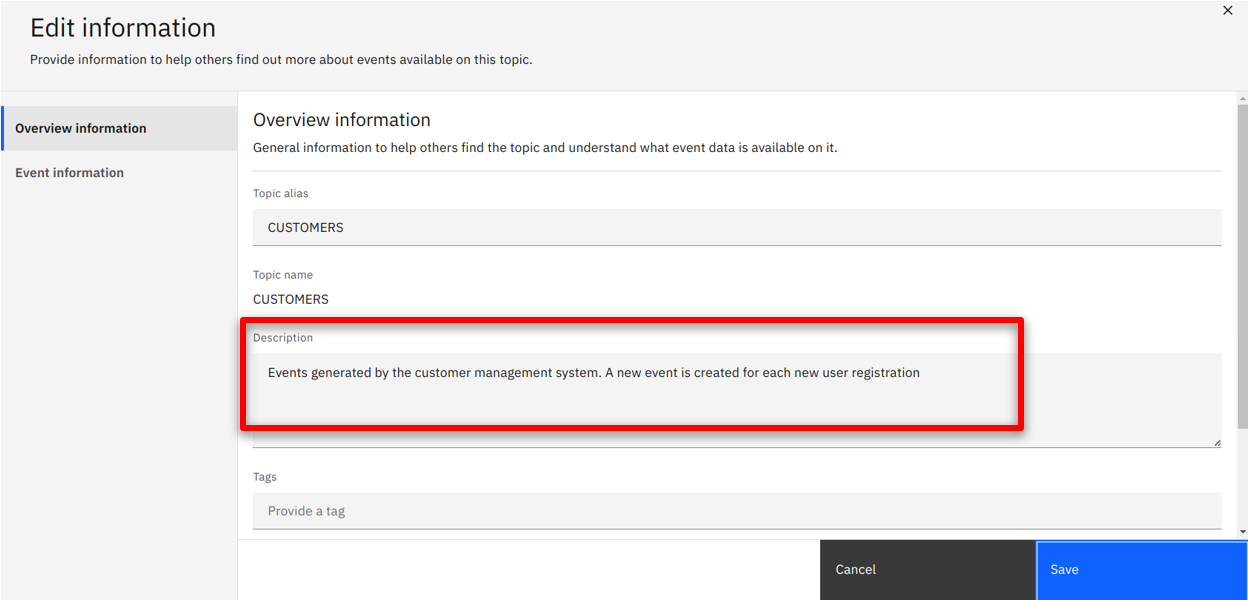
Enter Events generated by the customer management system. A new event is created for each new user registration. (1) as the description.
 |
| Action 1.7.4 |
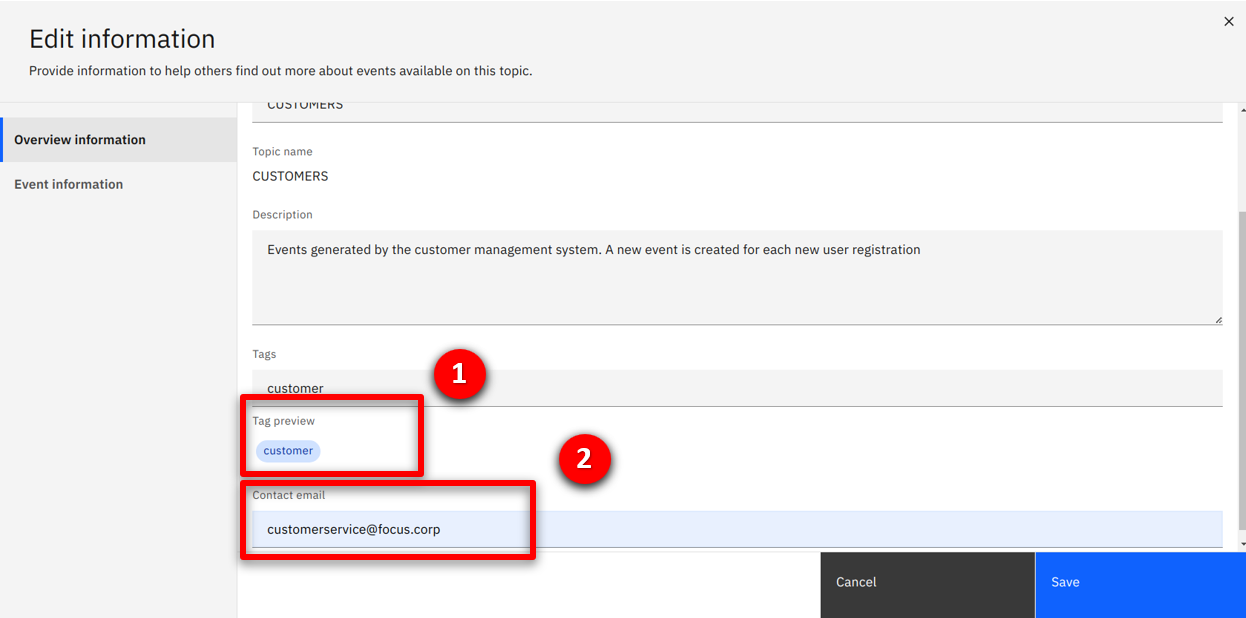
Scroll down and enter customer (1) as a tag and customerservice@focus.corp as the contact email (2).
 |
| Action 1.7.5 |
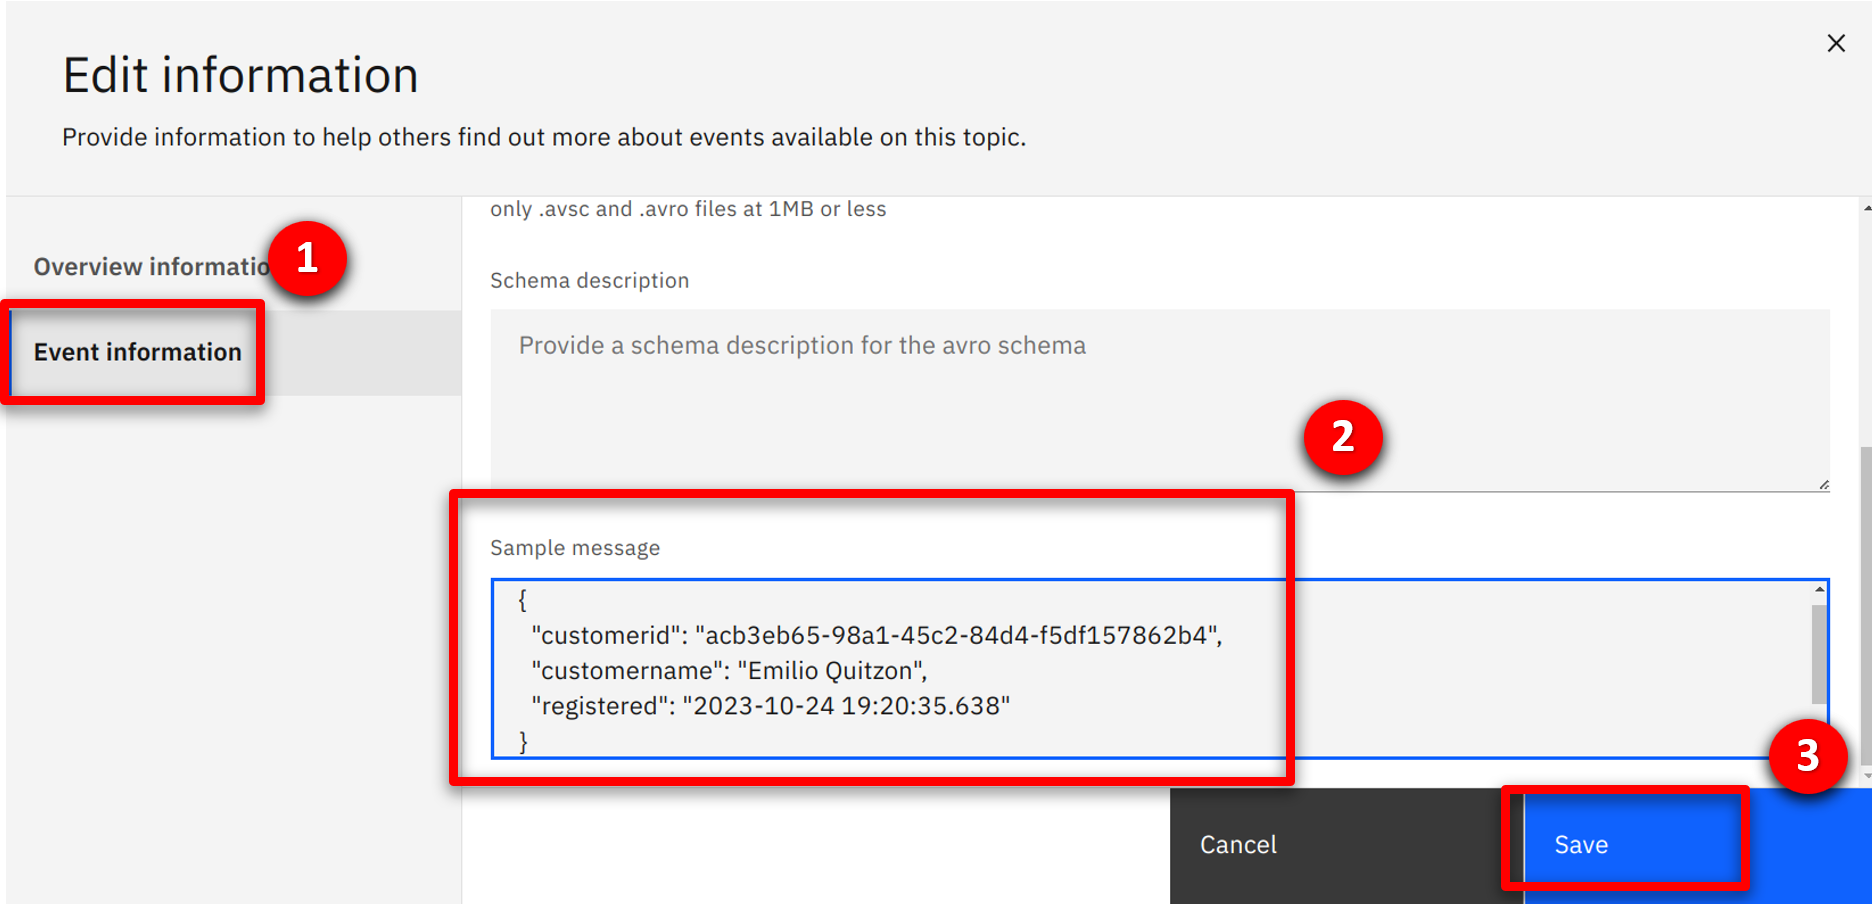
Select the Event information tab, scroll down to the sample message text box (2) and copy the content from below, and click Save (3).
 |
| Narration |
The integration team publishes the event stream, which allows consumers to view and subscribe. |
| Action 1.7.6 |
Select the Options (1) tab and click on the Create Option + (2) button.
 |
| Action 1.7.7 |
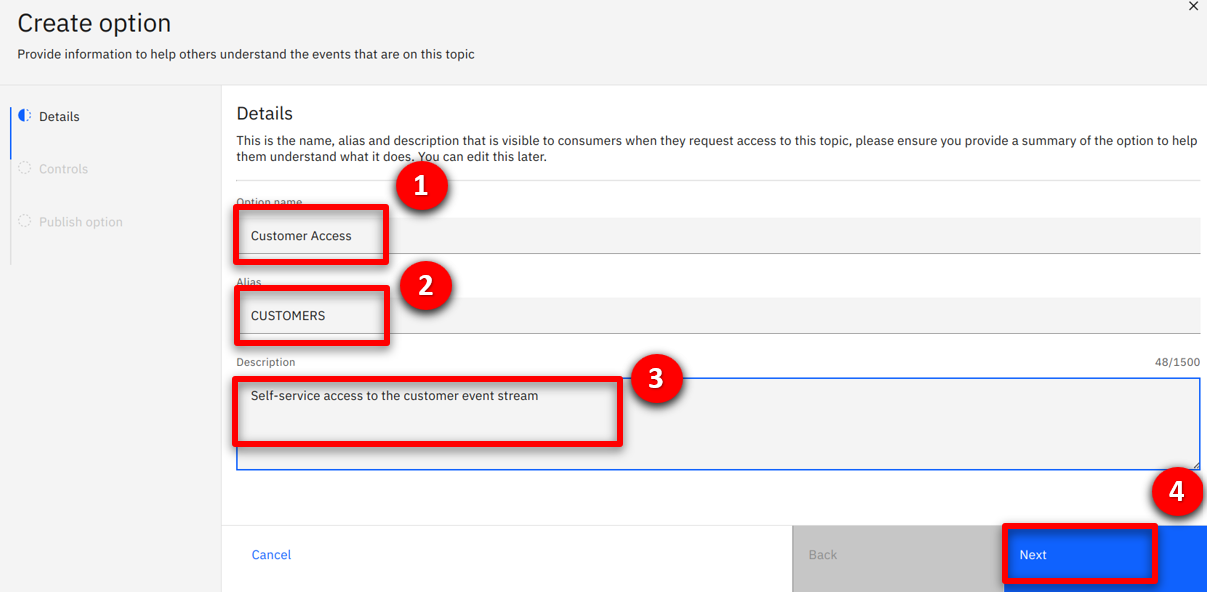
Enter Customer Access (1) as the option name, CUSTOMERS (2) as the alias, Self-service access to customer event stream (3) as the description and click Next (4).
 |
| Action 1.7.8 |
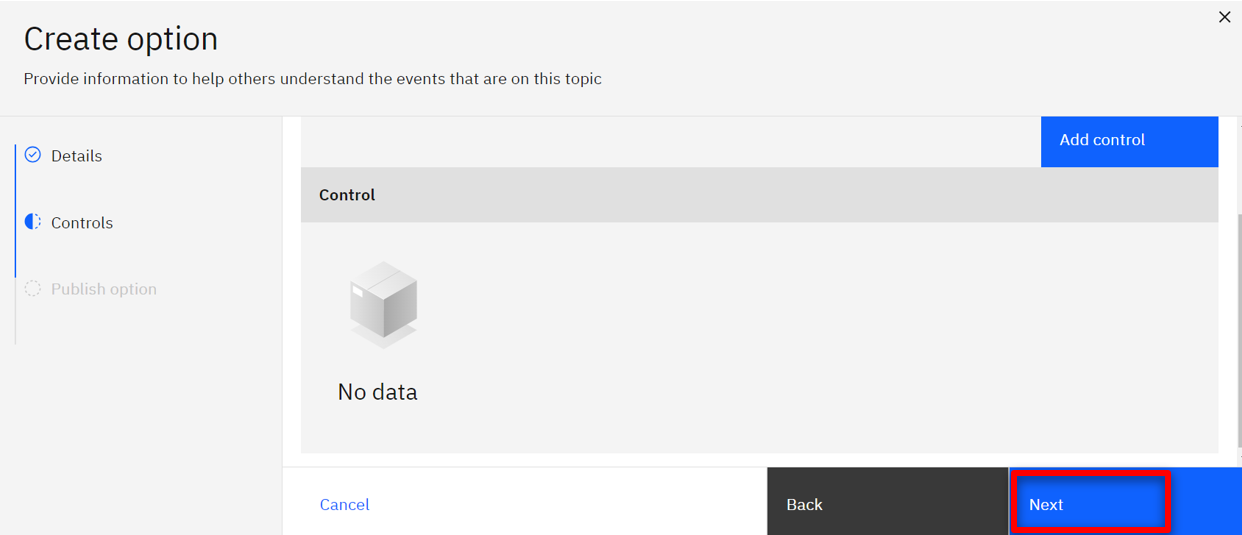
Click Next.
 |
| Action 1.7.9 |
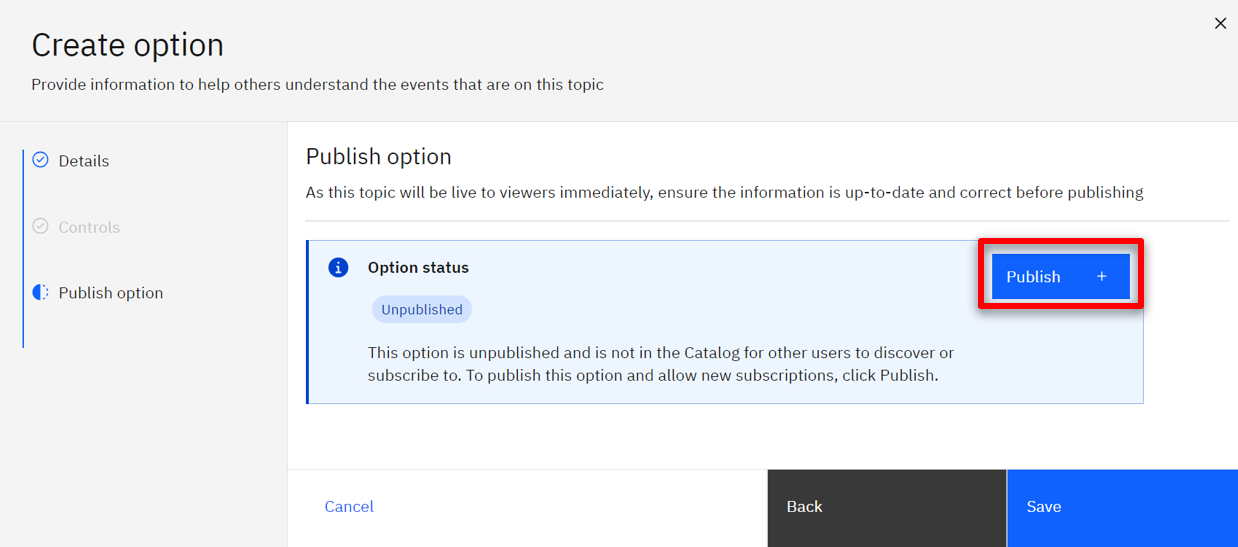
Click Publish.
 |
| Action 1.7.10 |
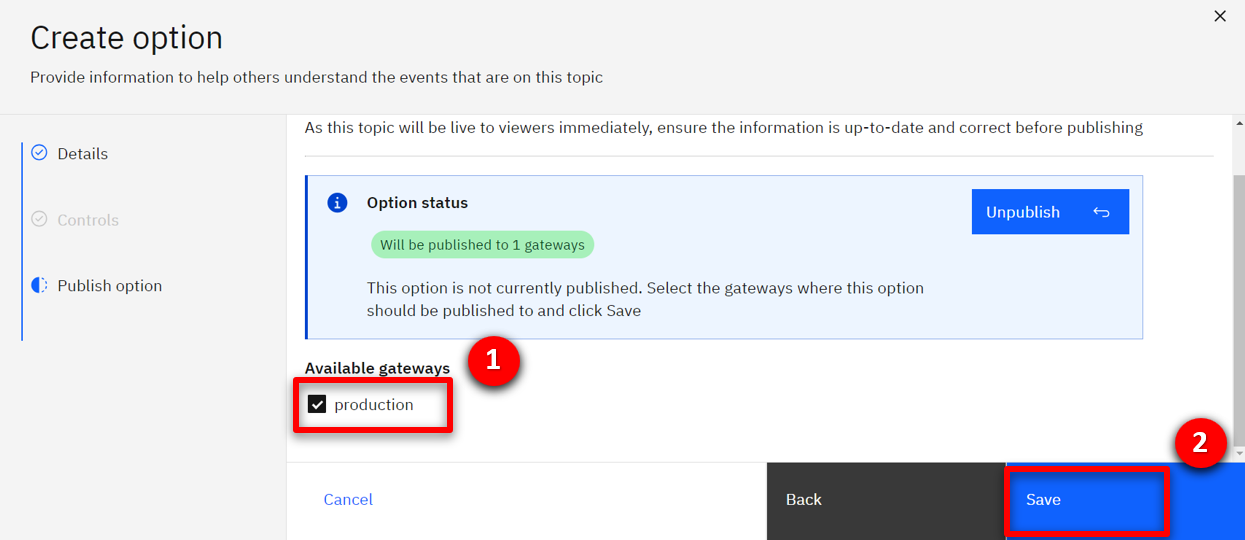
Check the production (1) checkbox and click Save (2).
 |
| Narration |
They repeat the same process for the ORDERS stream. |
| Action 1.7.11 |
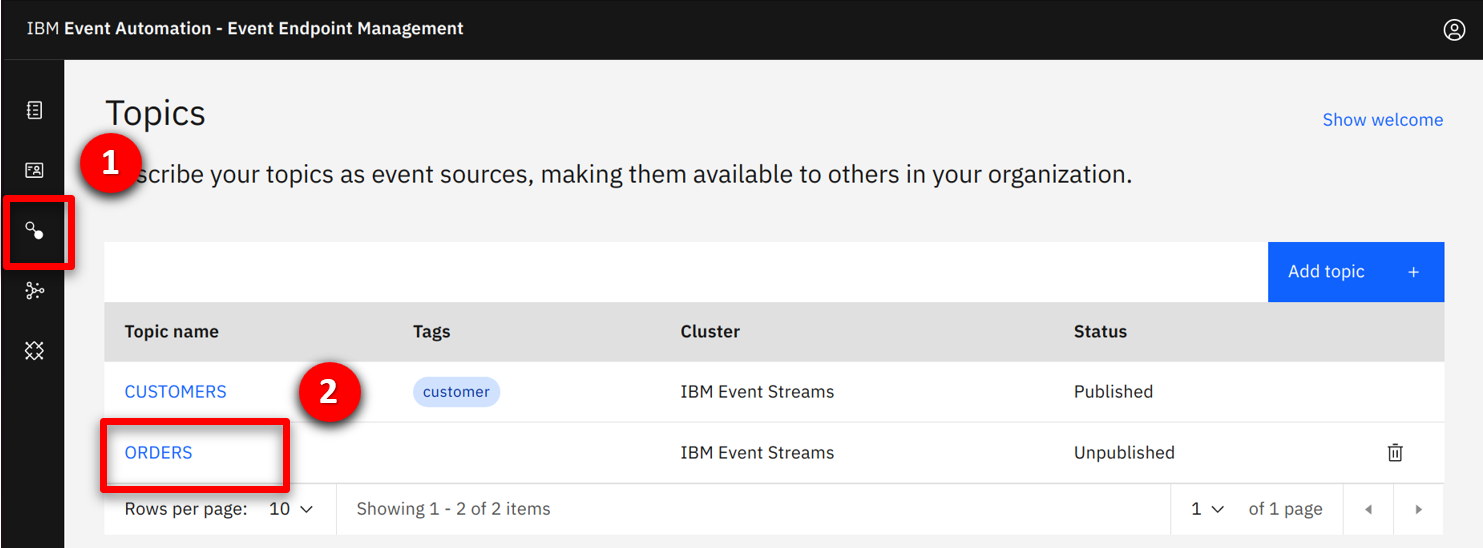
Select the topics (1) icon and click on the ORDERS (2) topic.
 |
| Action 1.7.12 |
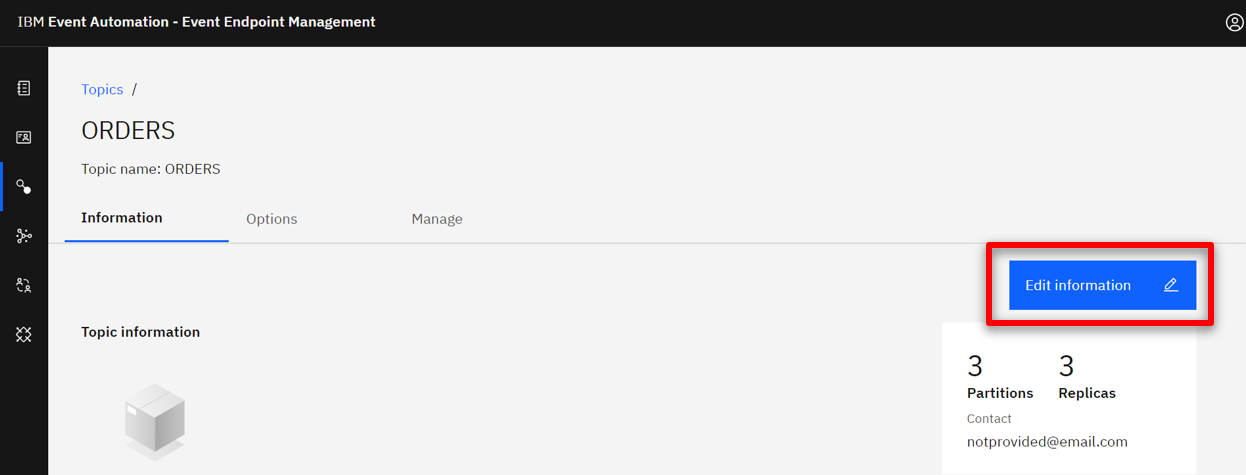
Click on the Edit information (1) button.
 |
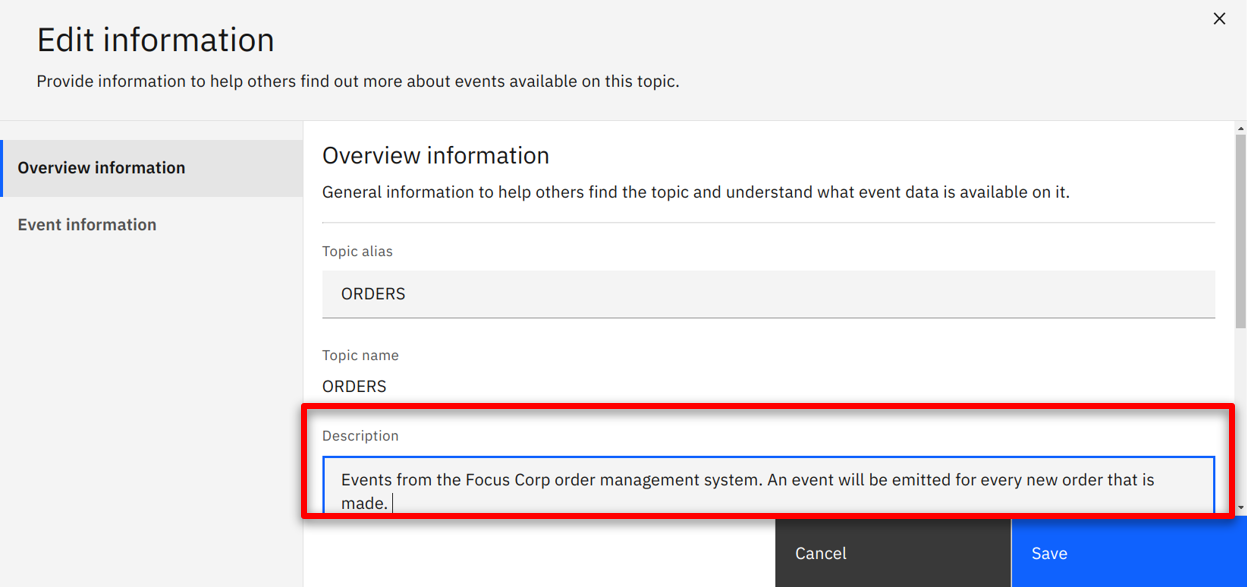
| Action 1.7.13 |
Enter Events from the Focus Corp order management system. An event will be emitted for every new order that is made. (1) as the description.
 |
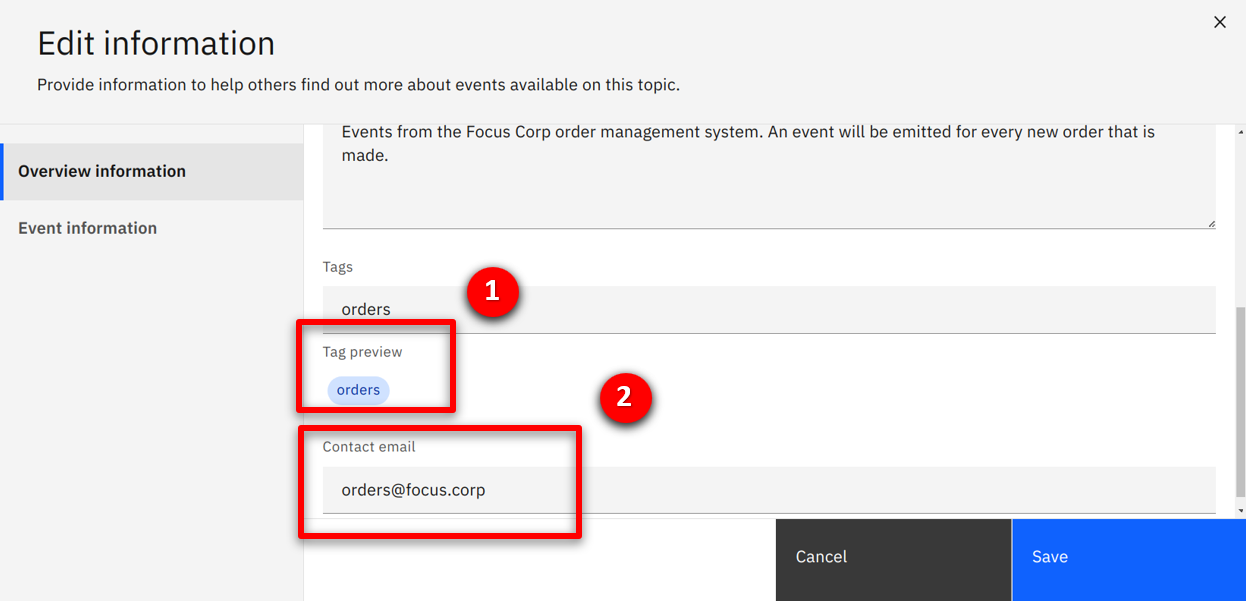
| Action 1.7.14 |
Scroll down and enter order (1) as a tag and orders@focus.corp (2) as the contact email.
 |
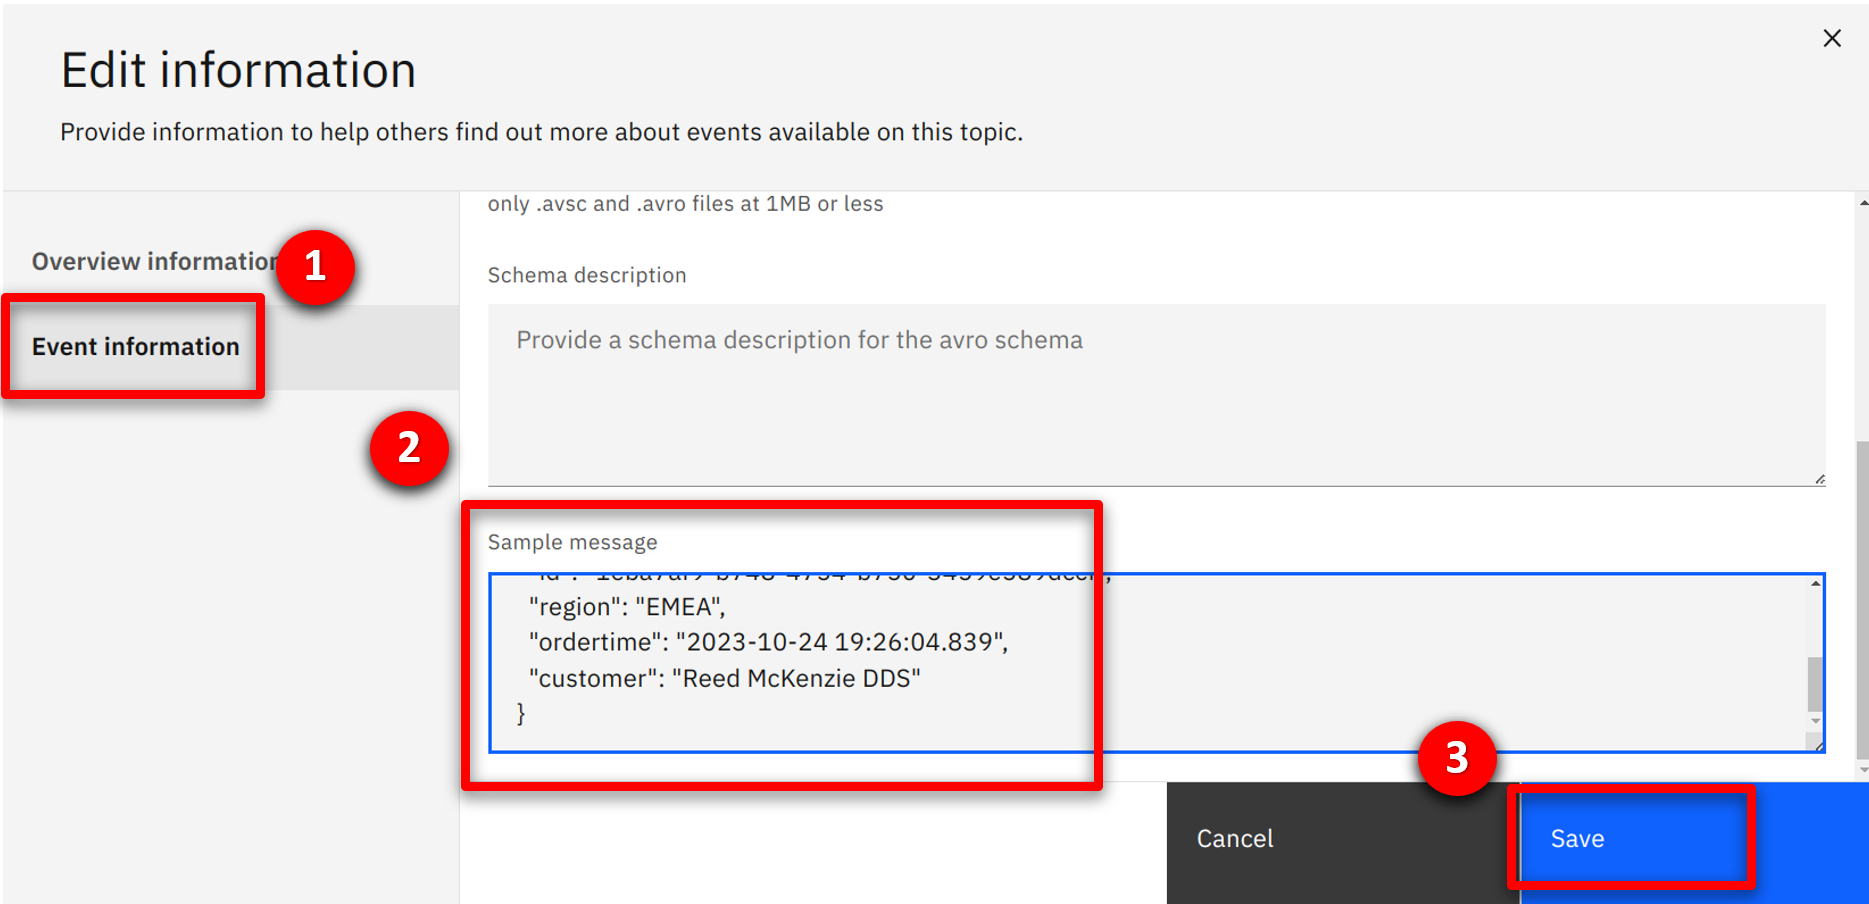
| Action 1.7.15 |
Select the Event information tab, scroll down to the sample message text box (2) and copy the content from below, and click Save (3).
 |
| Action 1.7.16 |
Select the Options (1) tab and click on the Create Option + (2) button.
 |
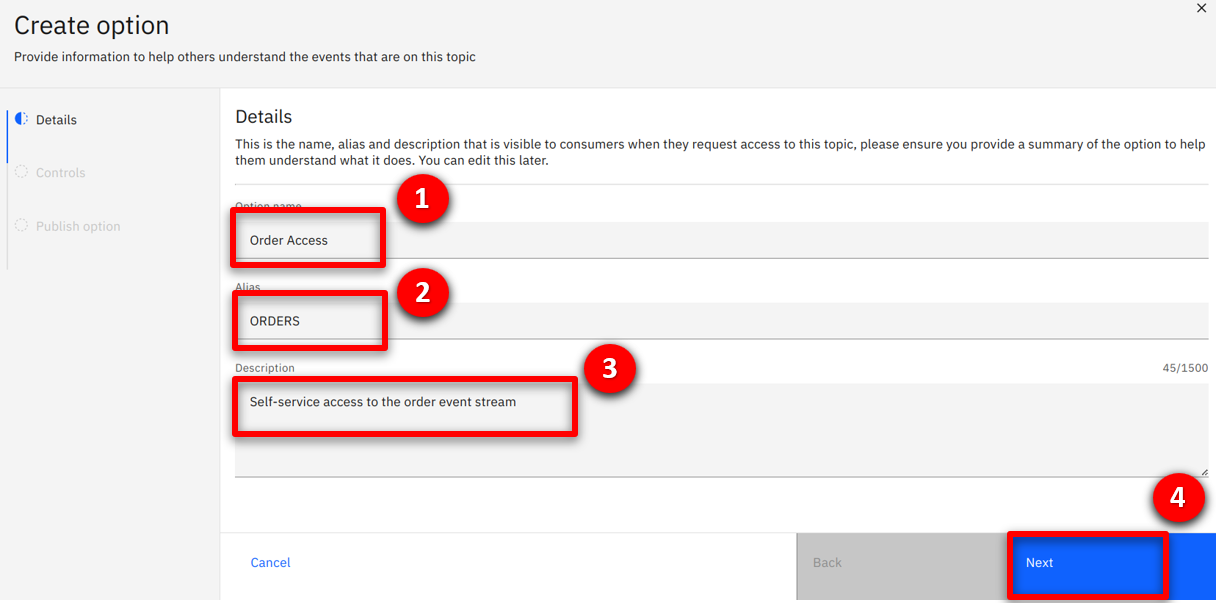
| Action 1.7.17 |
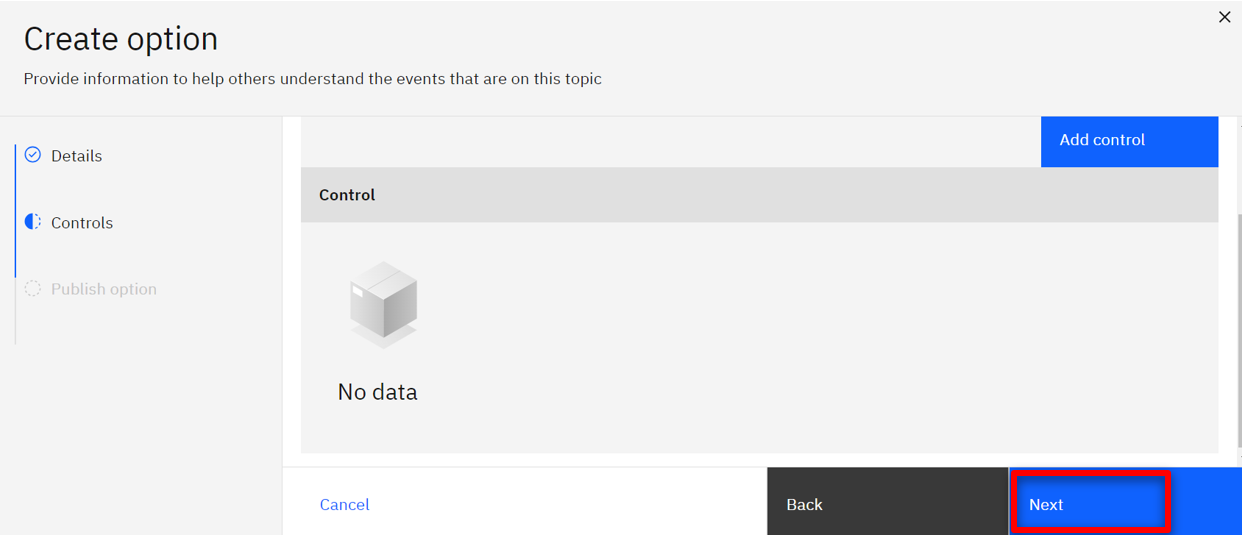
Enter Order Access (1) as the option name, ORDERS (2) as the alias, Self-service access to orders event stream (3) as the description and click Next (4).
 |
| Action 1.7.18 |
Click Next.
 |
| Action 1.7.19 |
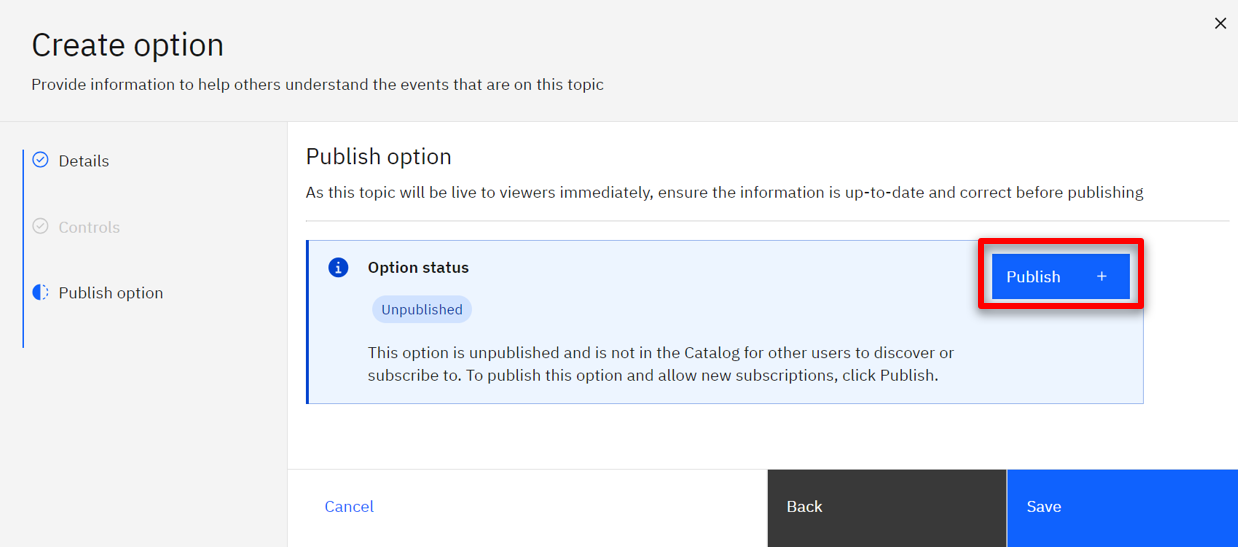
Click Publish.
 |
| Action 1.7.20 |
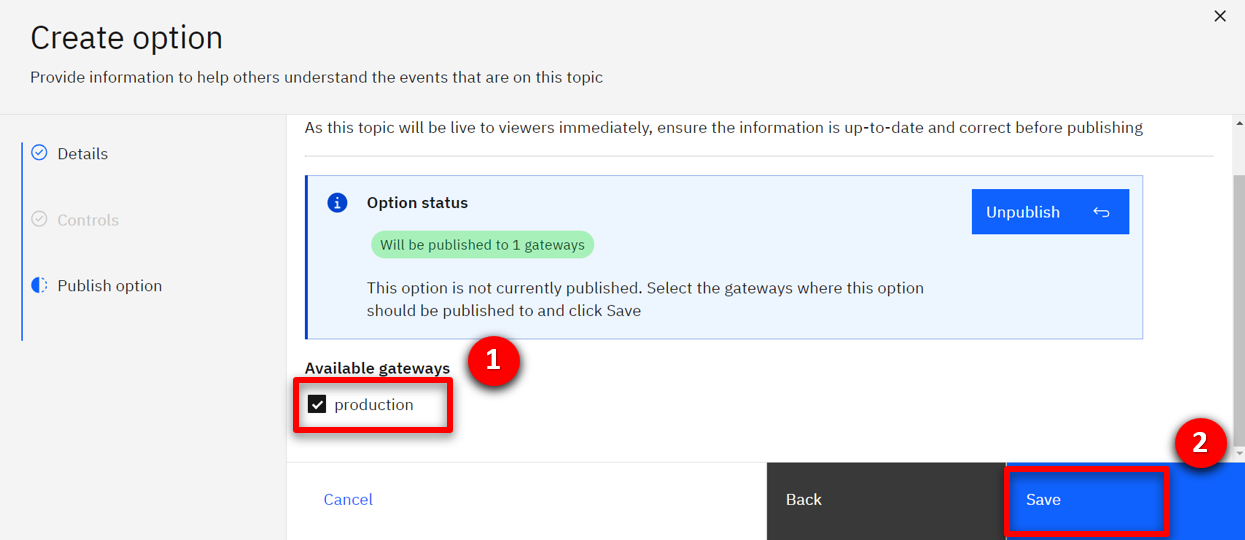
Check the production (1) checkbox and click Save (2).
 |
Go to top
2 - Browsing the self-service event stream catalog
Focus Corp’s marketing team wants to offer a high-value promotion to specific first-time customers immediately after their initial order.
| 2.1 |
Subscribe to the Customer and Order topics |
| Narration |
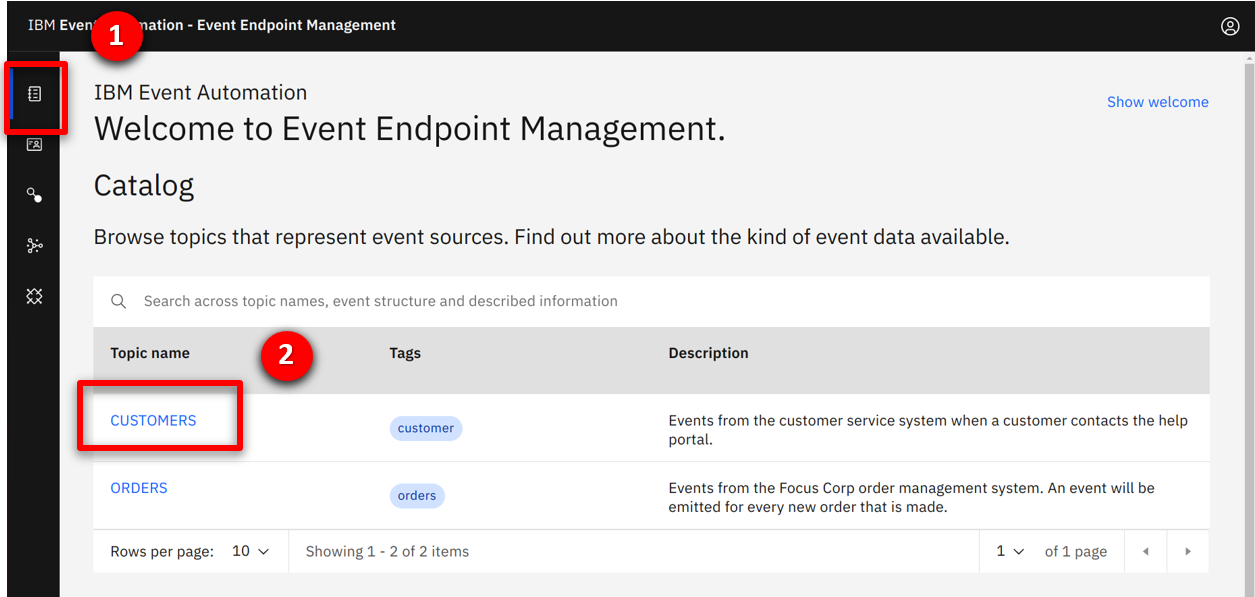
The marketing team browses the self-service catalog to find the event streams they need. |
| Action 2.1.1 |
Open the IBM Event Endpoint Management console. Select the catalog (1) icon and click on CUSTOMERS (2).
 |
| Narration |
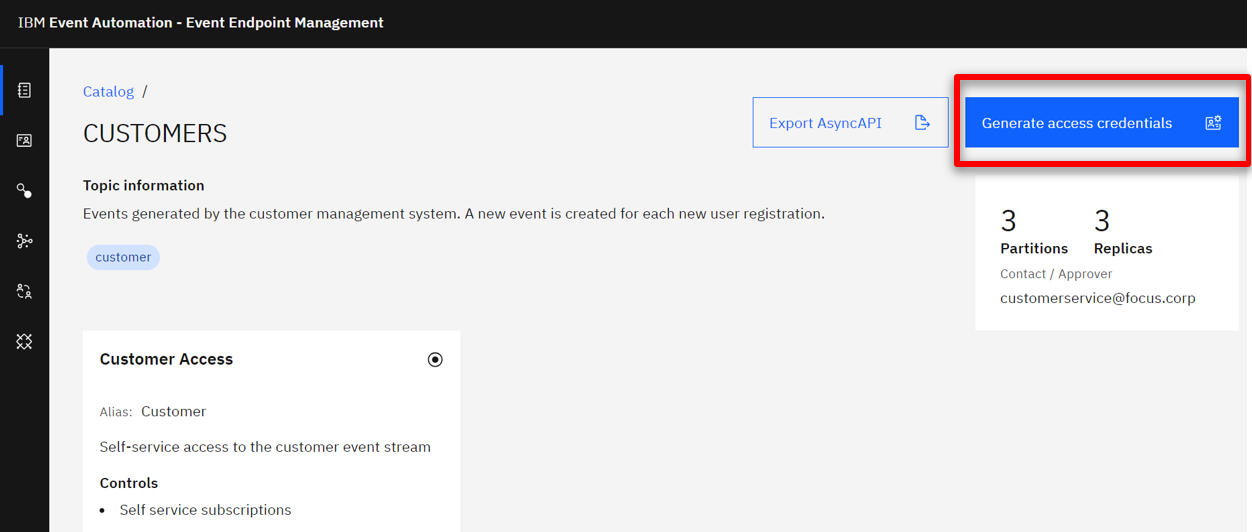
They see the CUSTOMERS stream description, sample message and connectivity details. They confirm this provides an event for each new customer who registers. They generate security credentials for their application to access the stream. |
| Action 2.1.2 |
Show the description, sample message and connection details. Click on the Generate access credentials.
 |
| Action 2.1.3 |
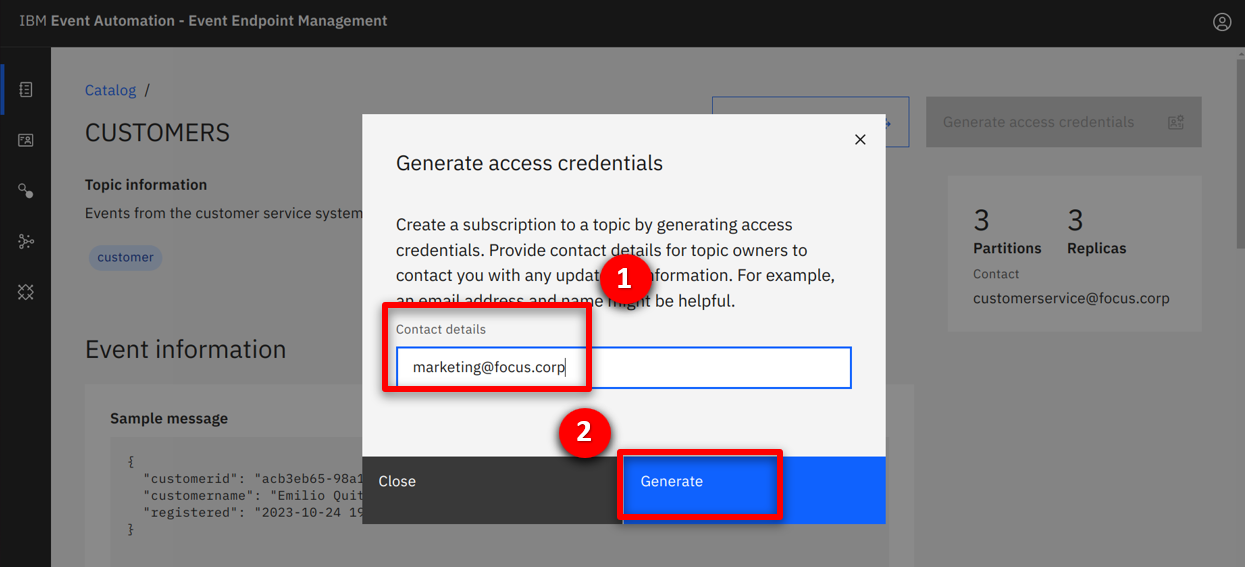
Fill in marketing@focus.corp (1) as the contact details, and click Generate.
 |
| Narration |
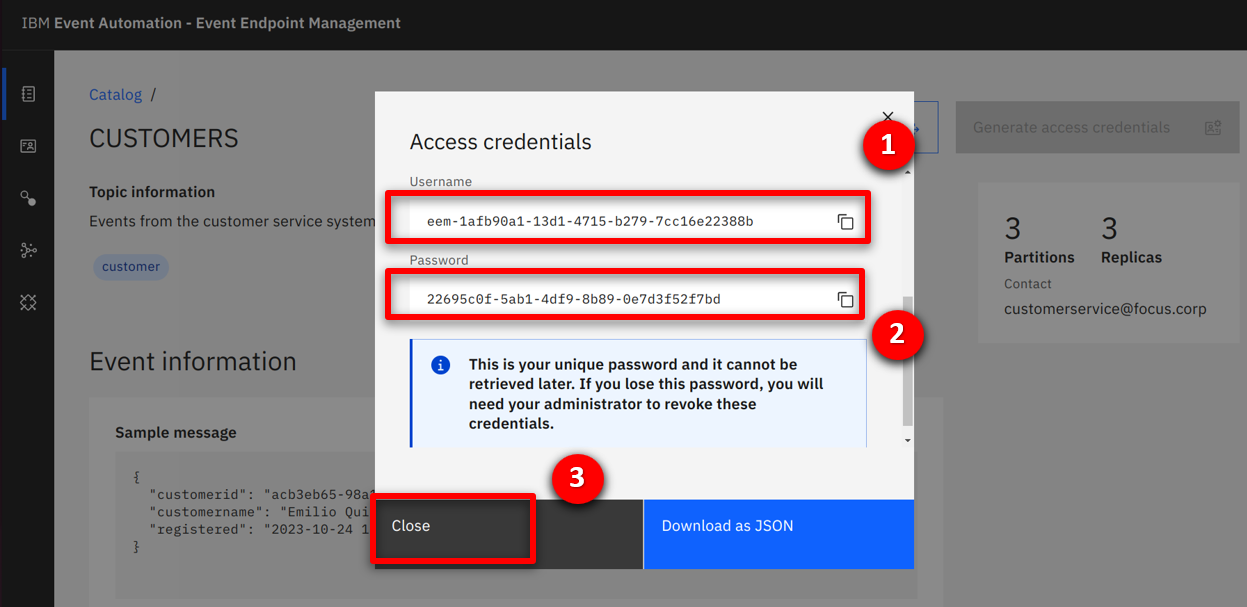
The credentials are immediately created, which the team safely store. |
| Action 2.1.4 |
Save the Username (1) and Password (2) to a safe location before clicking on Close (3).
 |
| Narration |
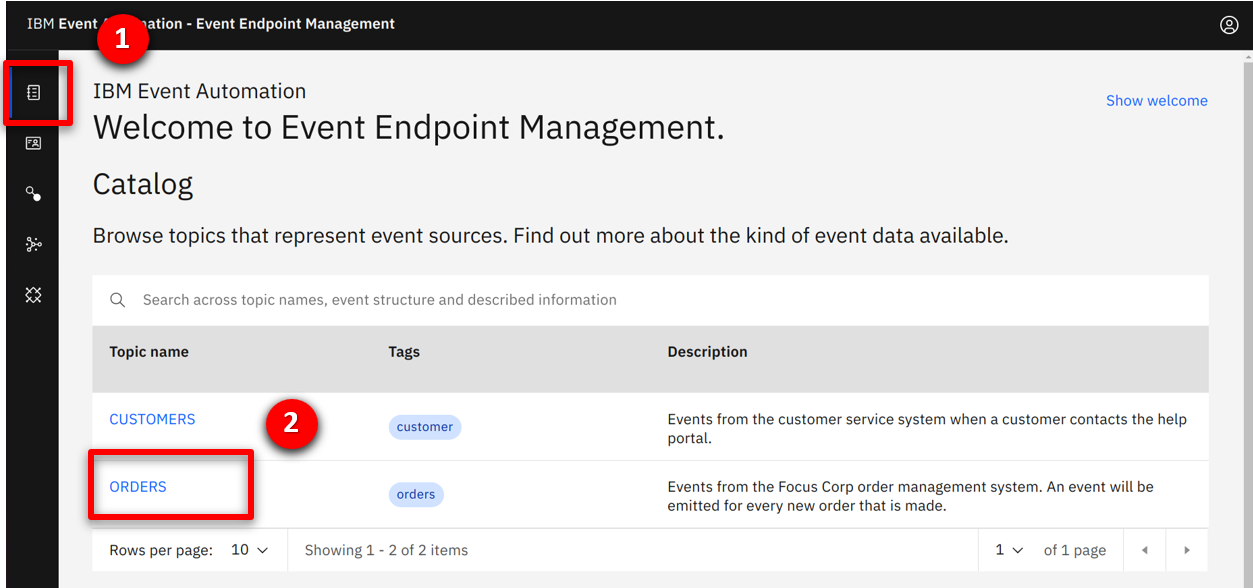
The marketing team discover the ORDERS stream that provides an event for each new order. They complete the same process to generate credentials for this stream. |
| Action 2.1.5 |
Complete the same process for the Order topic. Select the catalog (1) icon and click on ORDERS (2).
 |
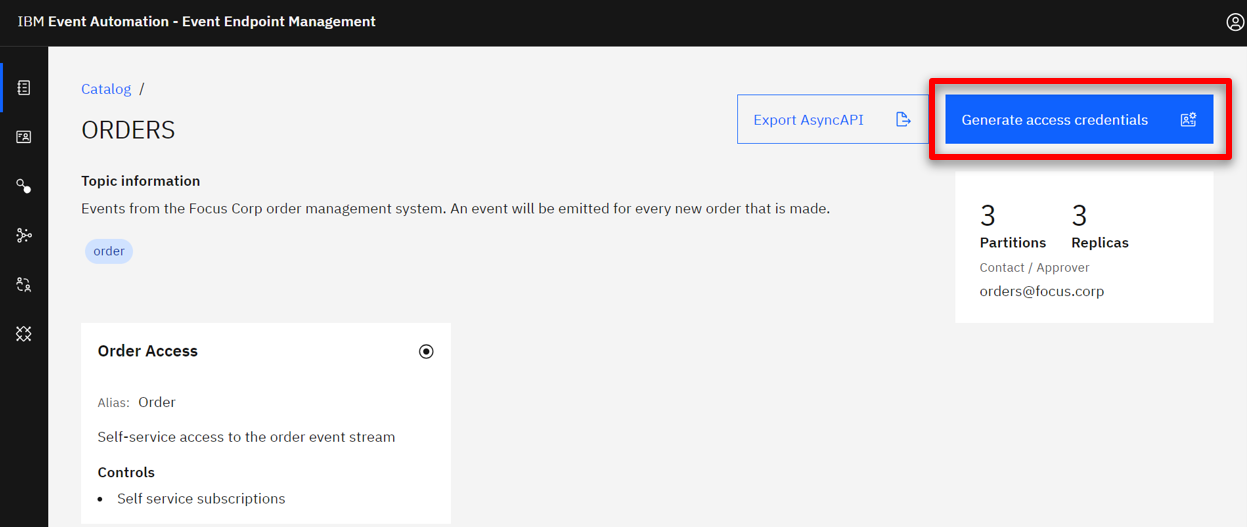
| Action 2.1.6 |
Show the description, sample message and connection details. Click on the Generate access credentials.
 |
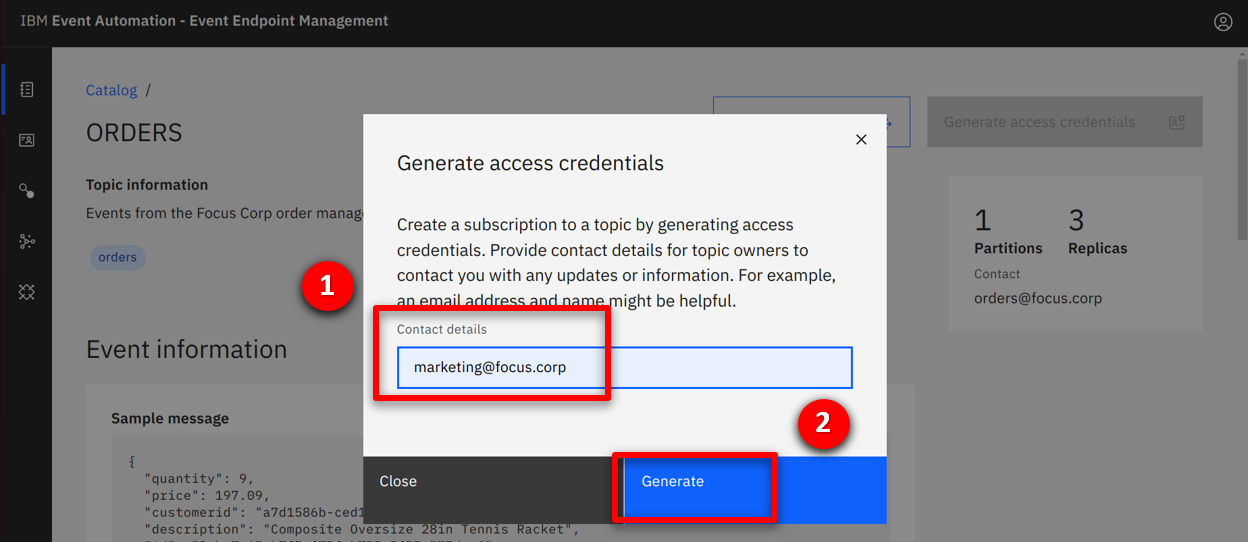
| Action 2.1.7 |
Fill in marketing@focus.corp (1) as the contact details, and click Generate (2).
 |
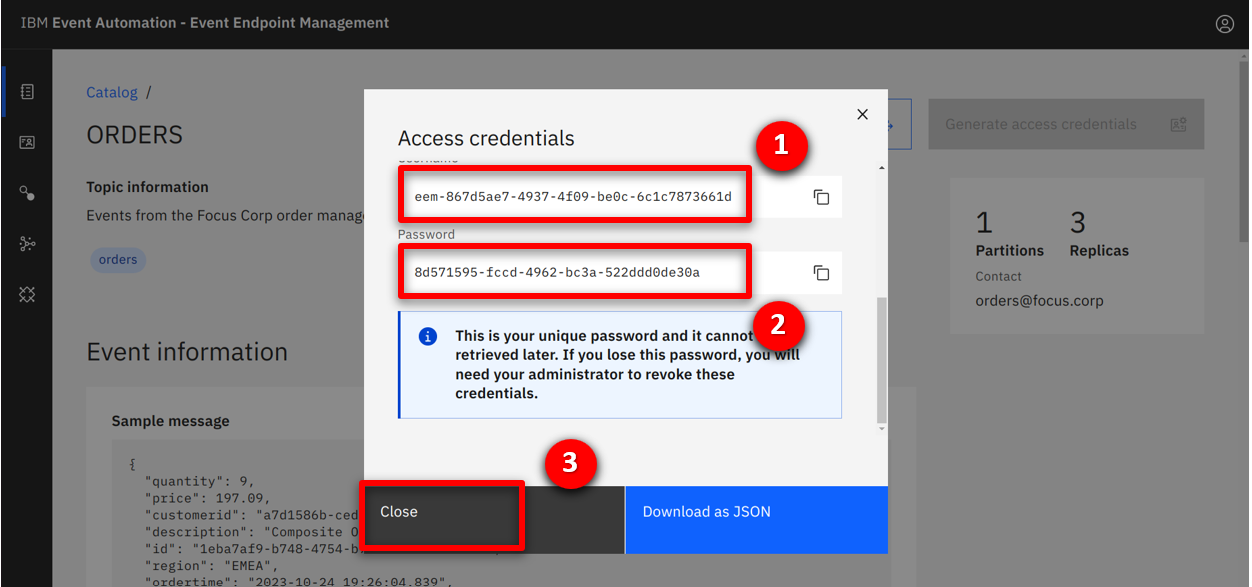
| Action 2.1.8 |
Save the Username (1) and Password (2) to a safe location before clicking on Close (3).
 |
Go to top
3 - Using the no-code editor to configure the solution
The marketing team’s business requirement is to correlate newly created customer accounts with orders of over 100 dollars within a 24-hour window.
| 3.1 |
Configure an event source for the Order events |
| Narration |
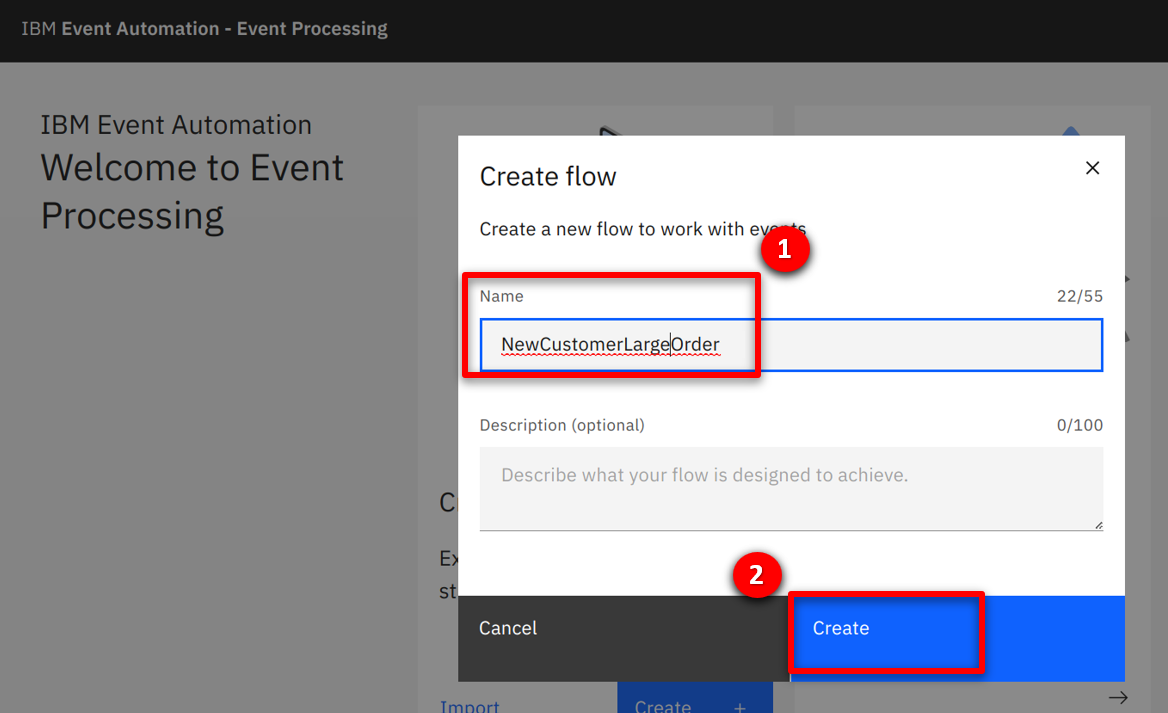
The team will use an event flow to detect when a new customer creates an order over $100. They start by creating a new flow called NewCustomerLargeOrder. |
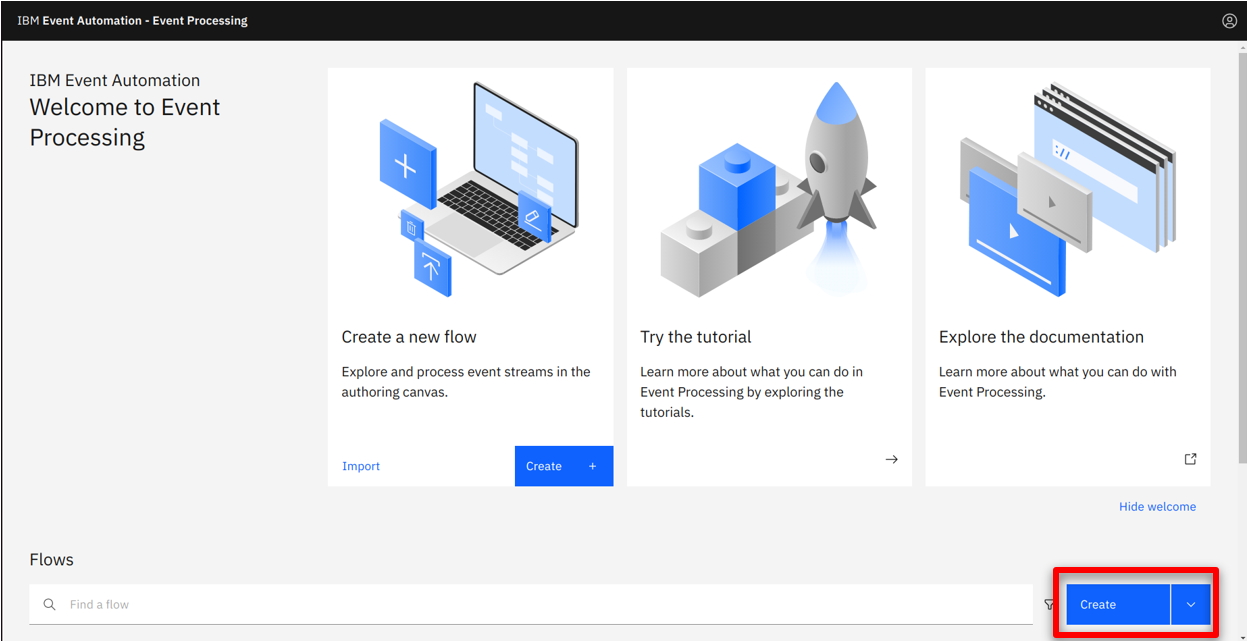
| Action 3.1.1 |
Open the IBM Event Processing console, dismiss the tutorial if it appears and click Create (1) to start authoring a new flow.
 |
| Action 3.1.2 |
Specify NewCustomerLargeOrder (1) for the flow name and click Create (2).
 |
| Narration |
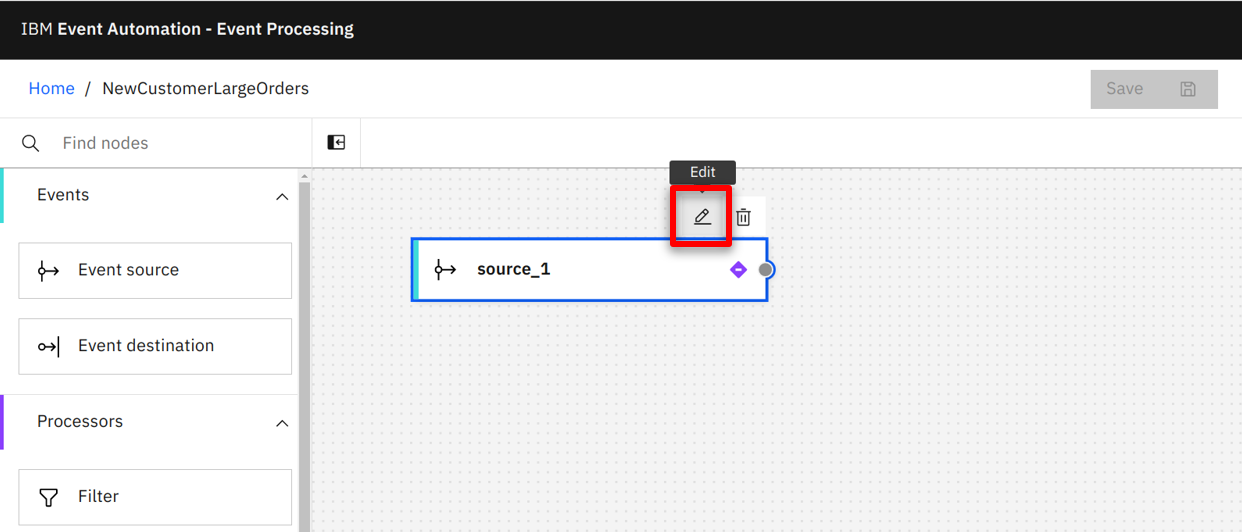
A flow starts with one or more event sources, which represent the inbound events. The marketing team starts defining the ORDERS event source using the pre-created node. They configure the event source, starting with the connectivity details they discovered in the event management console. |
| Action 3.1.3 |
Hover over the added node and select the Edit icon.
 |
| Action 3.1.4 |
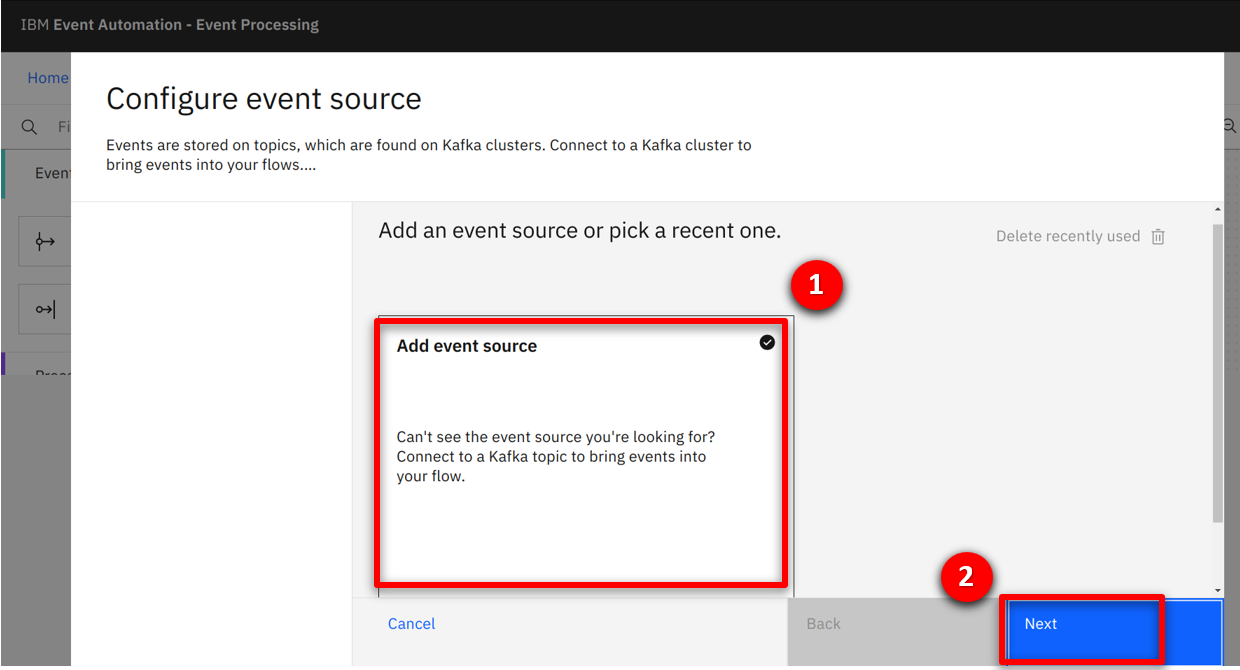
Select the Add event source (1) tile and click on Next (2).
 |
| Action 3.1.5 |
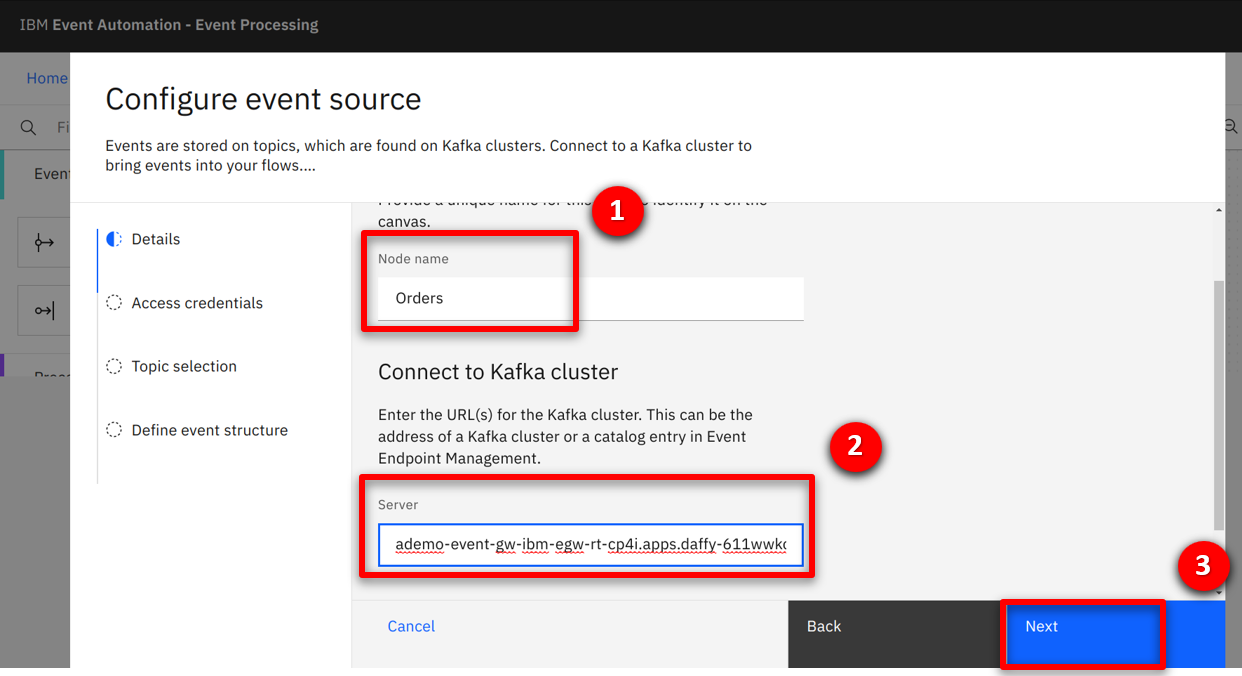
Return to the Event Endpoint Management console and scroll down to the ‘Access information’ section. Copy the server address details.
 |
| Action 3.1.6 |
Type Orders (1) for the node name, paste the server address into the Server (2) field, and click Next (3).
 |
| Narration |
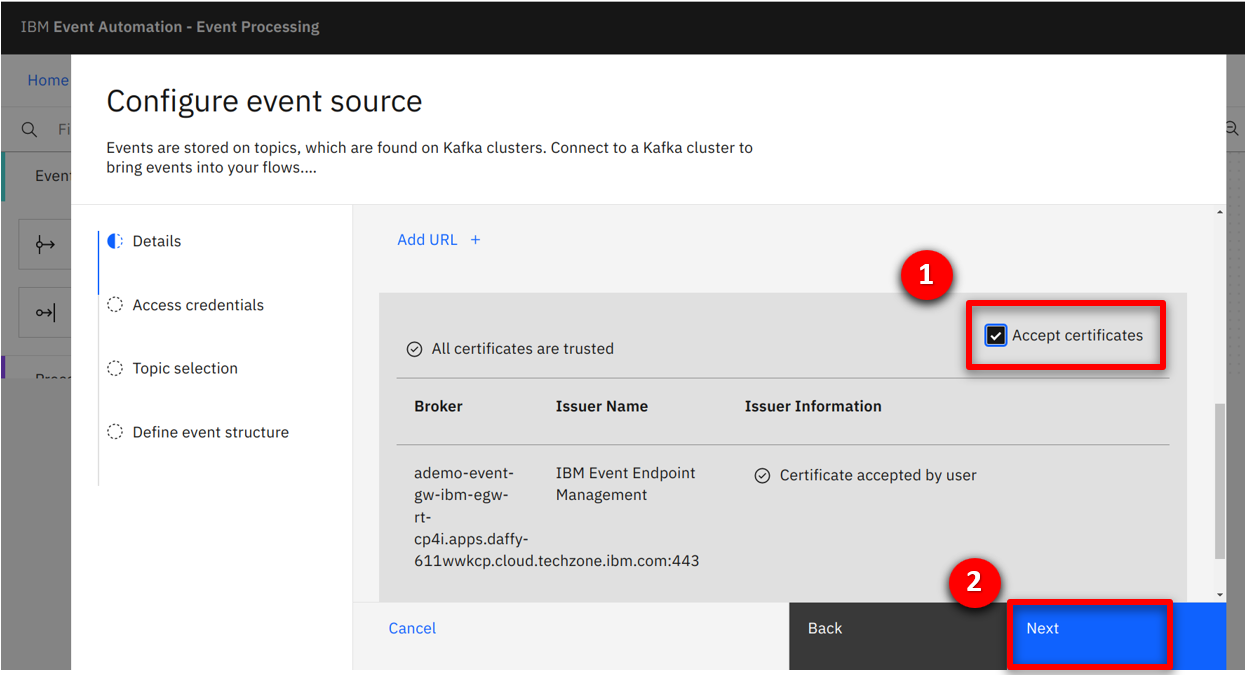
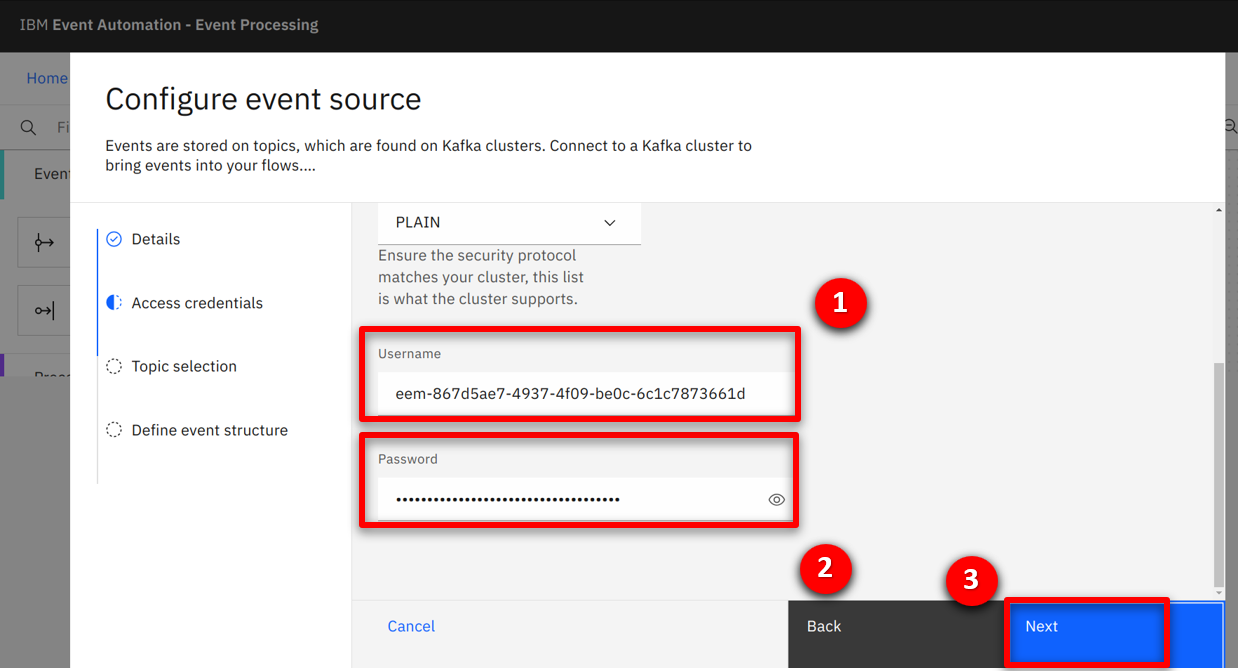
They configure the security details, accepting the certificates being used by the event stream. Then they specify the username / password credentials that they generated in the event management console. |
| Action 3.1.7 |
Check the Accept certificates (1) box and select Next (2).
 |
| Action 3.1.8 |
Copy the username (1) and password (2) from step 2.1.8, and click Next (3).
 |
| Narration |
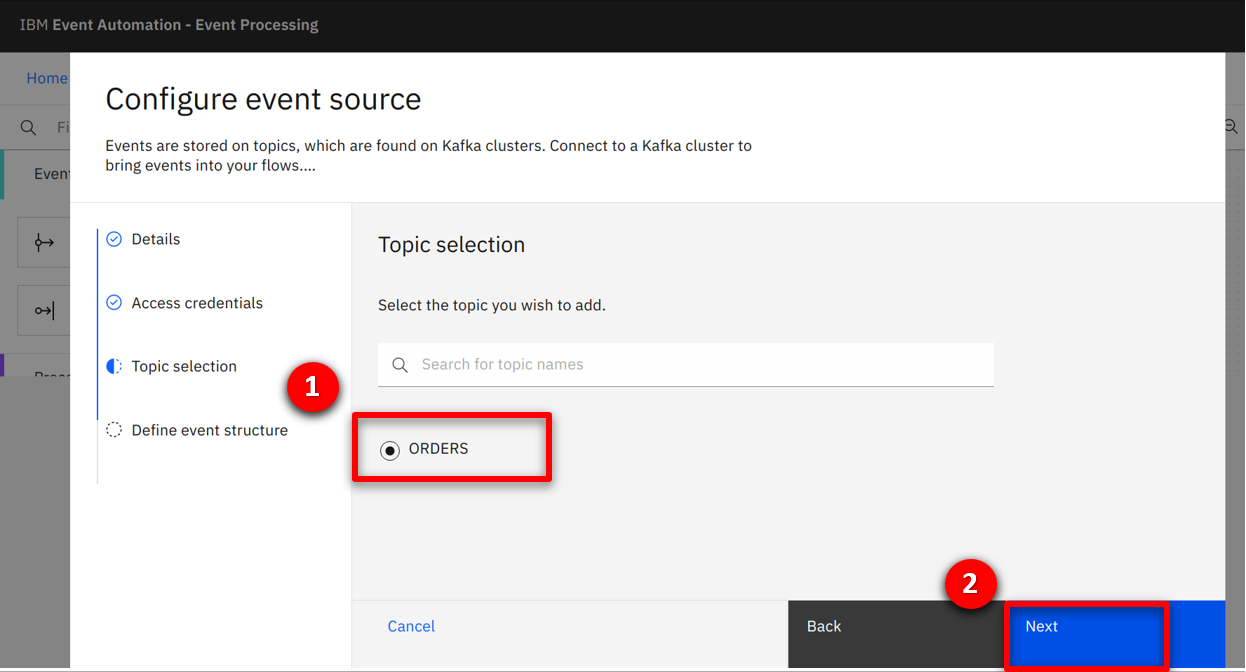
The system connects to the event stream and queries the available topics for the provided credentials. A single ORDERS topic is found and selected by the team. |
| Action 3.1.9 |
Check ORDERS (1) and click Next (2).
 |
| Narration |
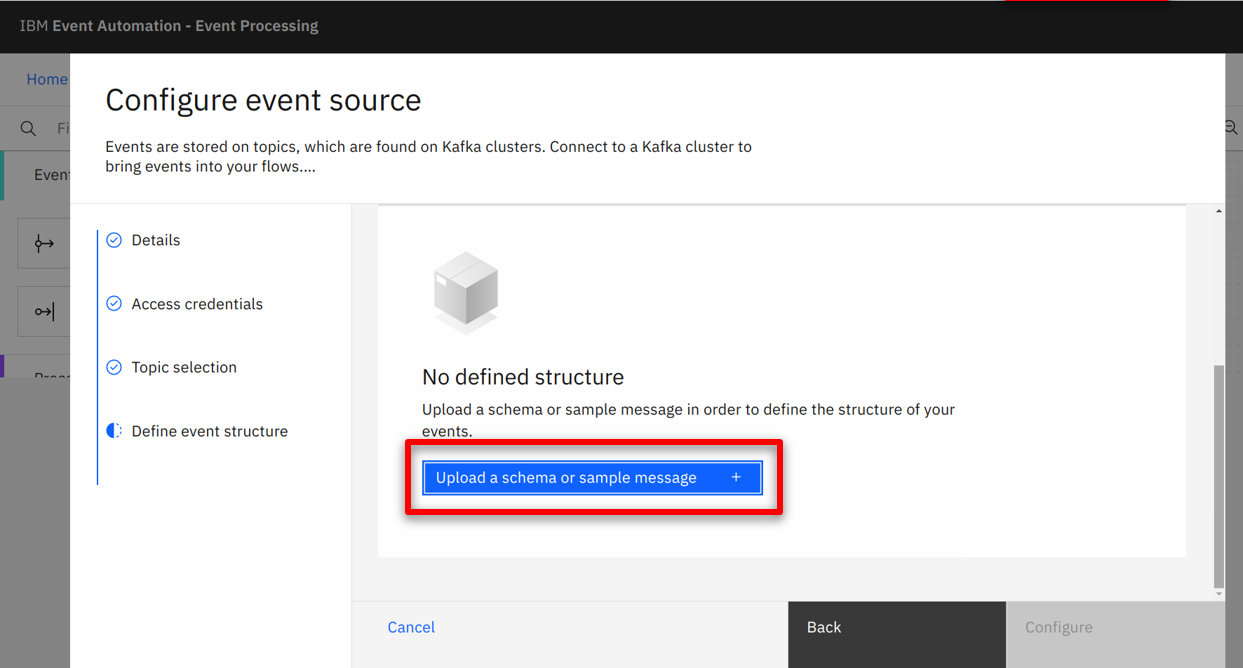
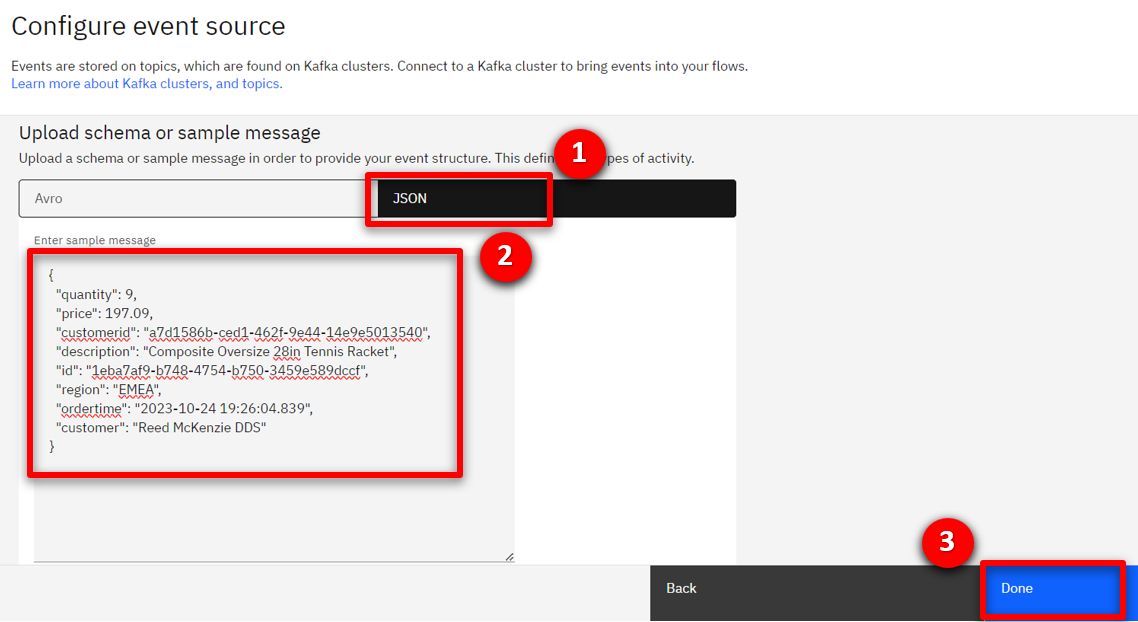
The data structure for the events needs to be defined. For simplicity, the team decide to copy the sample message from the Event Management console. |
| Action 3.1.10 |
Click on Upload a schema or sample message (1).
 |
| Action 3.1.11 |
Select the JSON (1) tab, copy the text below into the Enter sample message (2) box, and click Done (3).
 |
| Action 3.1.12 |
Click on Configure.
 |
| 3.2 |
Configure an event source for the New Customer events |
| Narration |
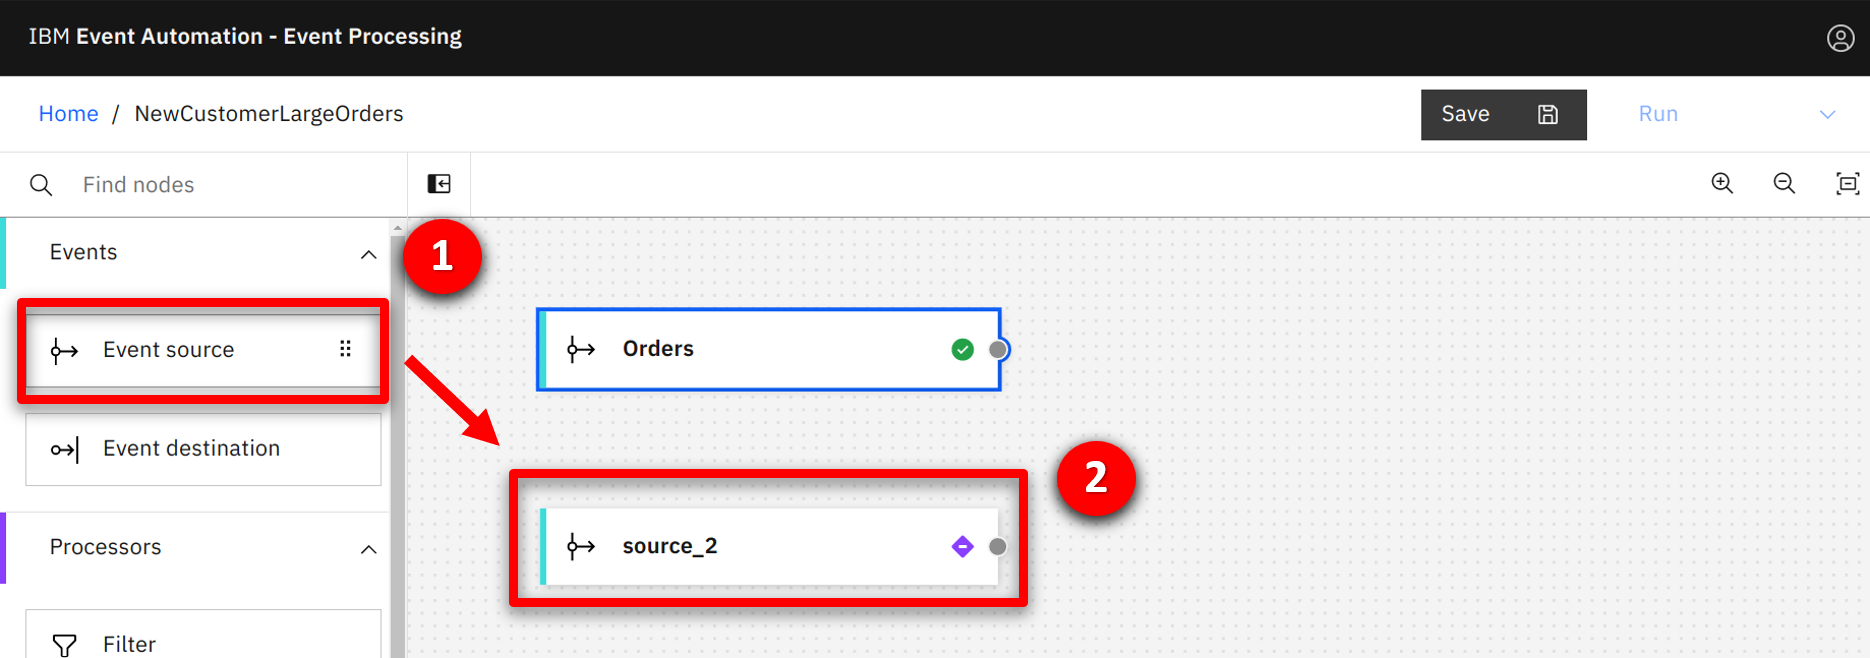
The marketing team require a second event source for the New Customer events. They drag and drop an event source node onto the canvas. |
| Action 3.2.1 |
Press and hold the mouse button on the Event source (1) node, and drag onto the canvas (2).
 |
| Narration |
Similar to before, the team configure the event source starting with the connectivity details they discovered in the event management console. |
| Action 3.2.2 |
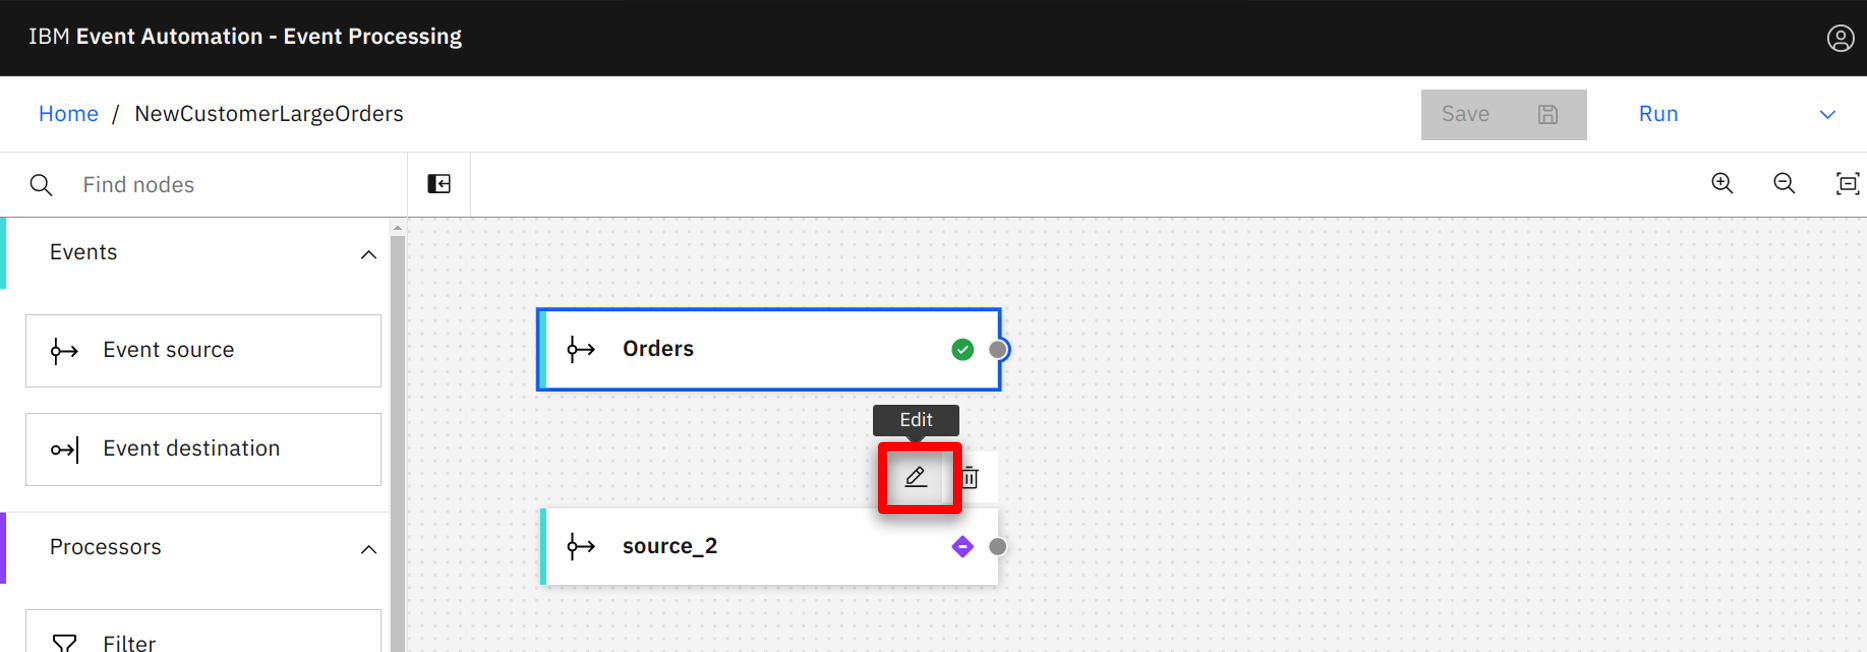
Hover over the added node and select the Edit icon.
 |
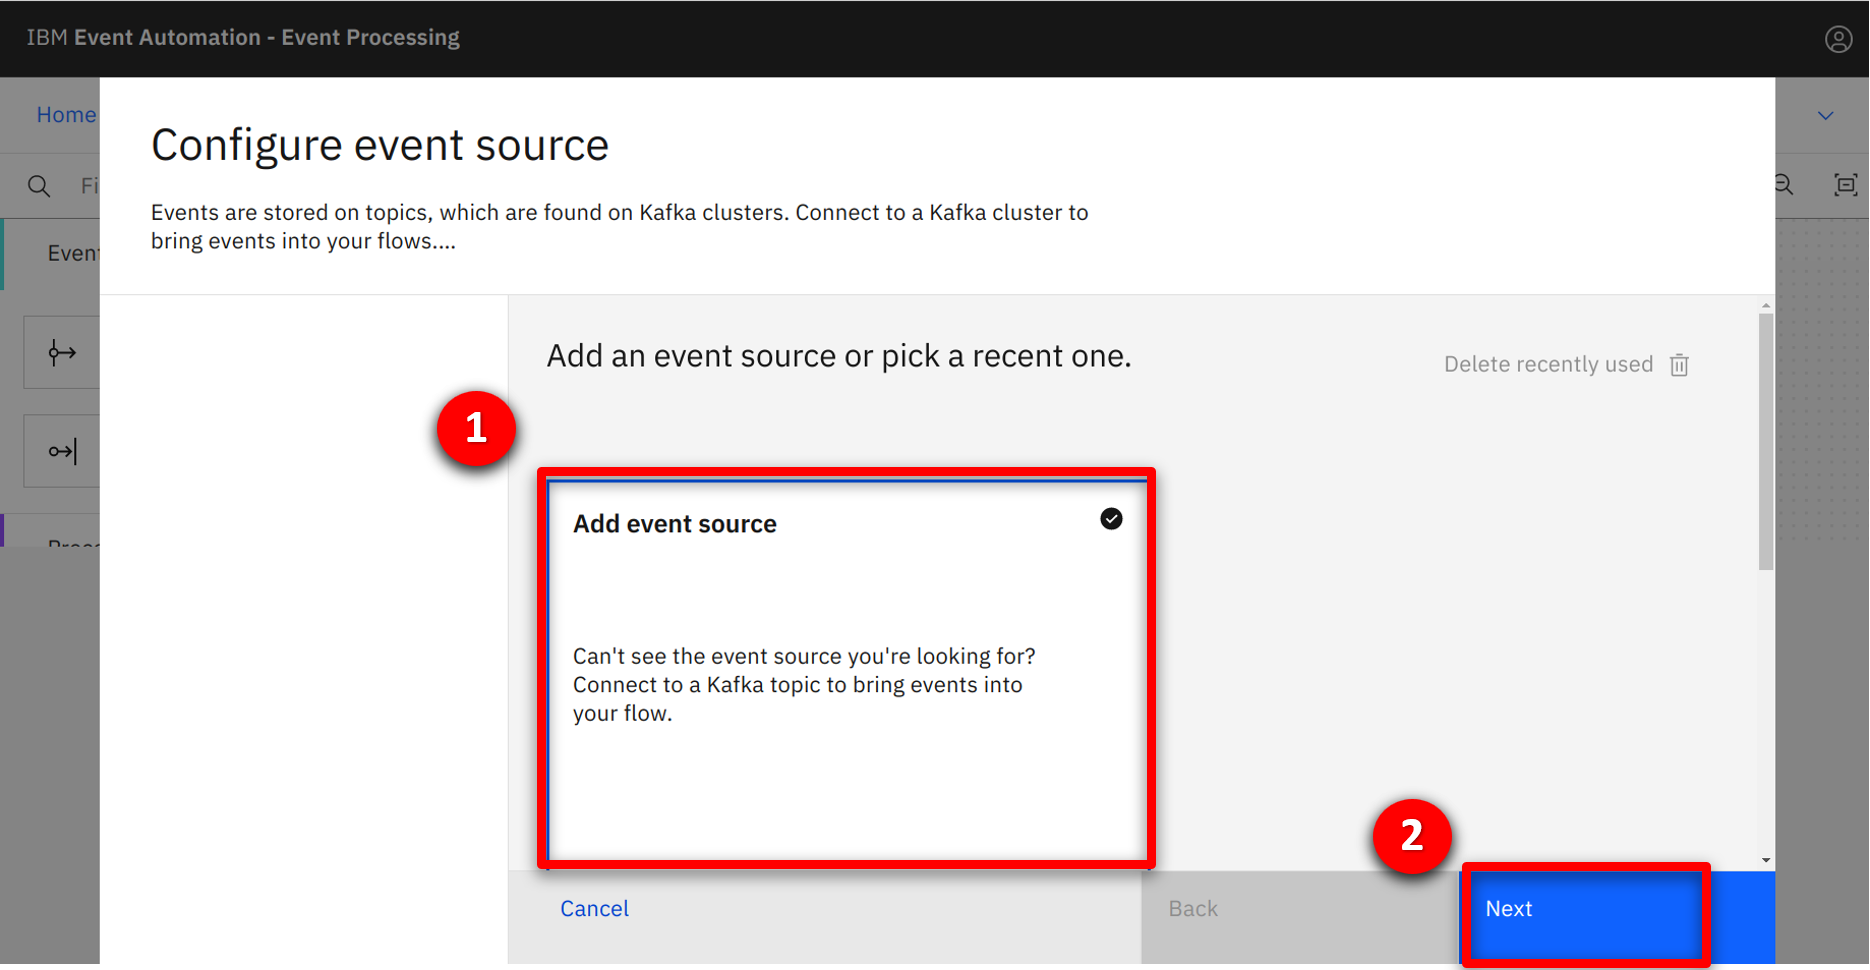
| Action 3.2.3 |
Select the Add event source (1) tile and click on Next (2).
 |
| Action 3.2.4 |
Return to the Event Endpoint Management console and scroll down to the ‘Access information’ section. Copy the server address details.
 |
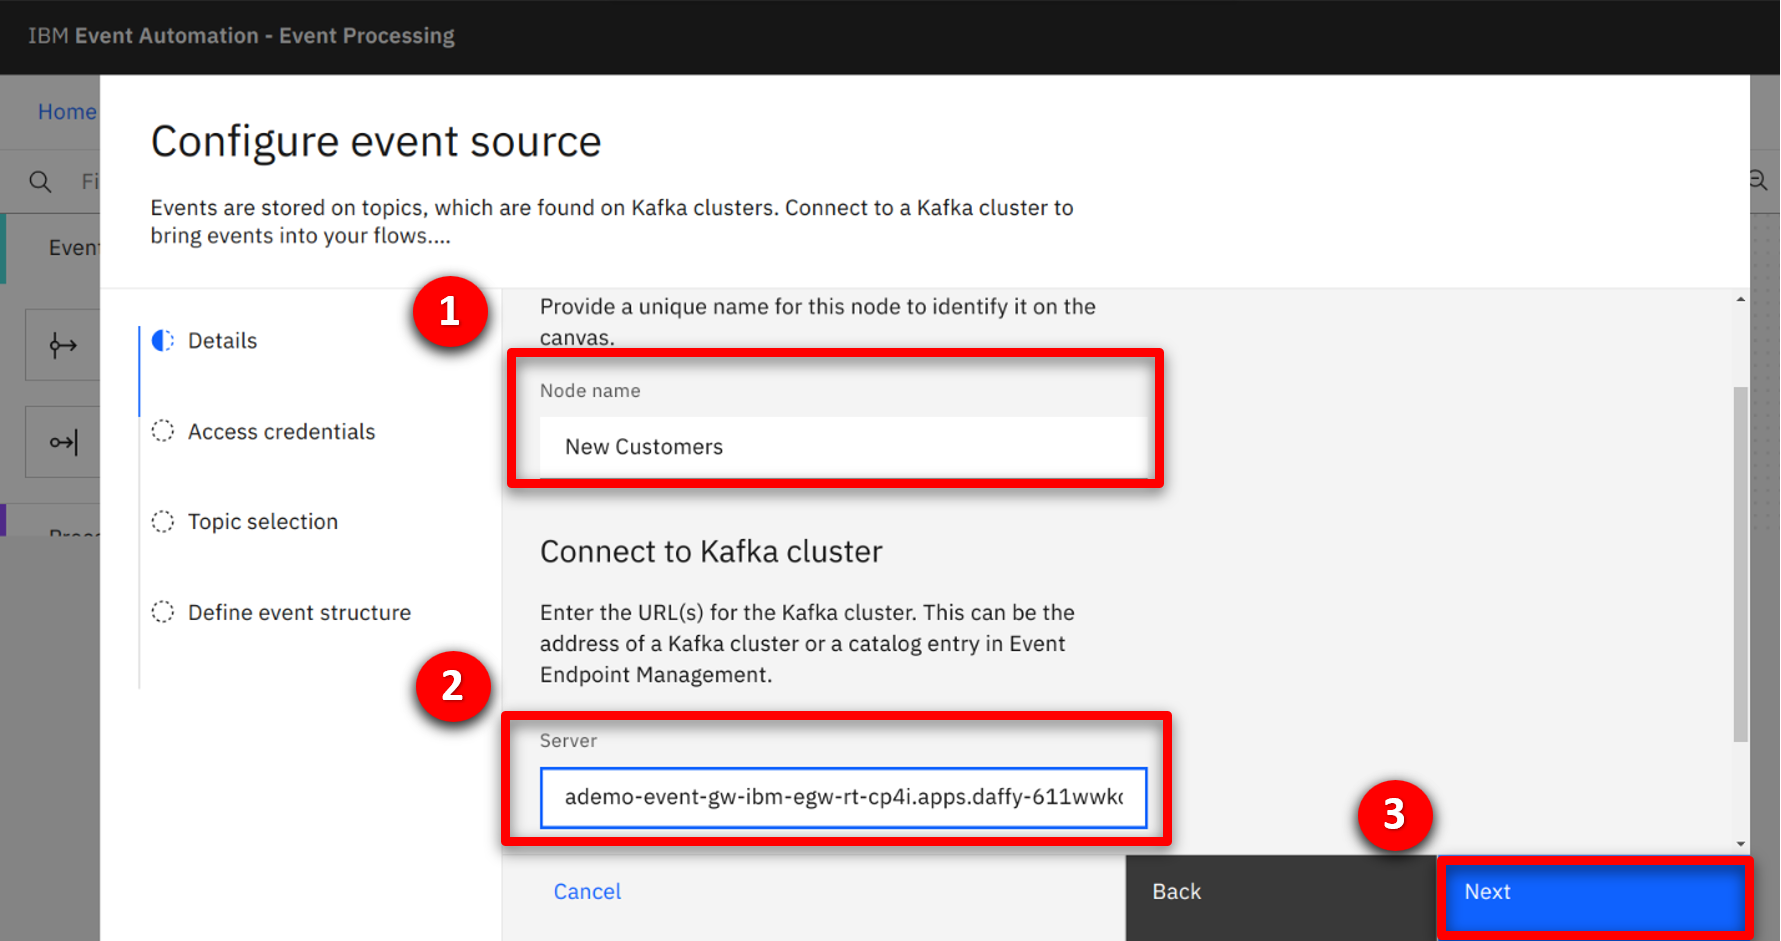
| Action 3.2.5 |
Type New Customers (1) for the node name, paste the server address into the Server (2) field, and click Next (3).
 |
| Narration |
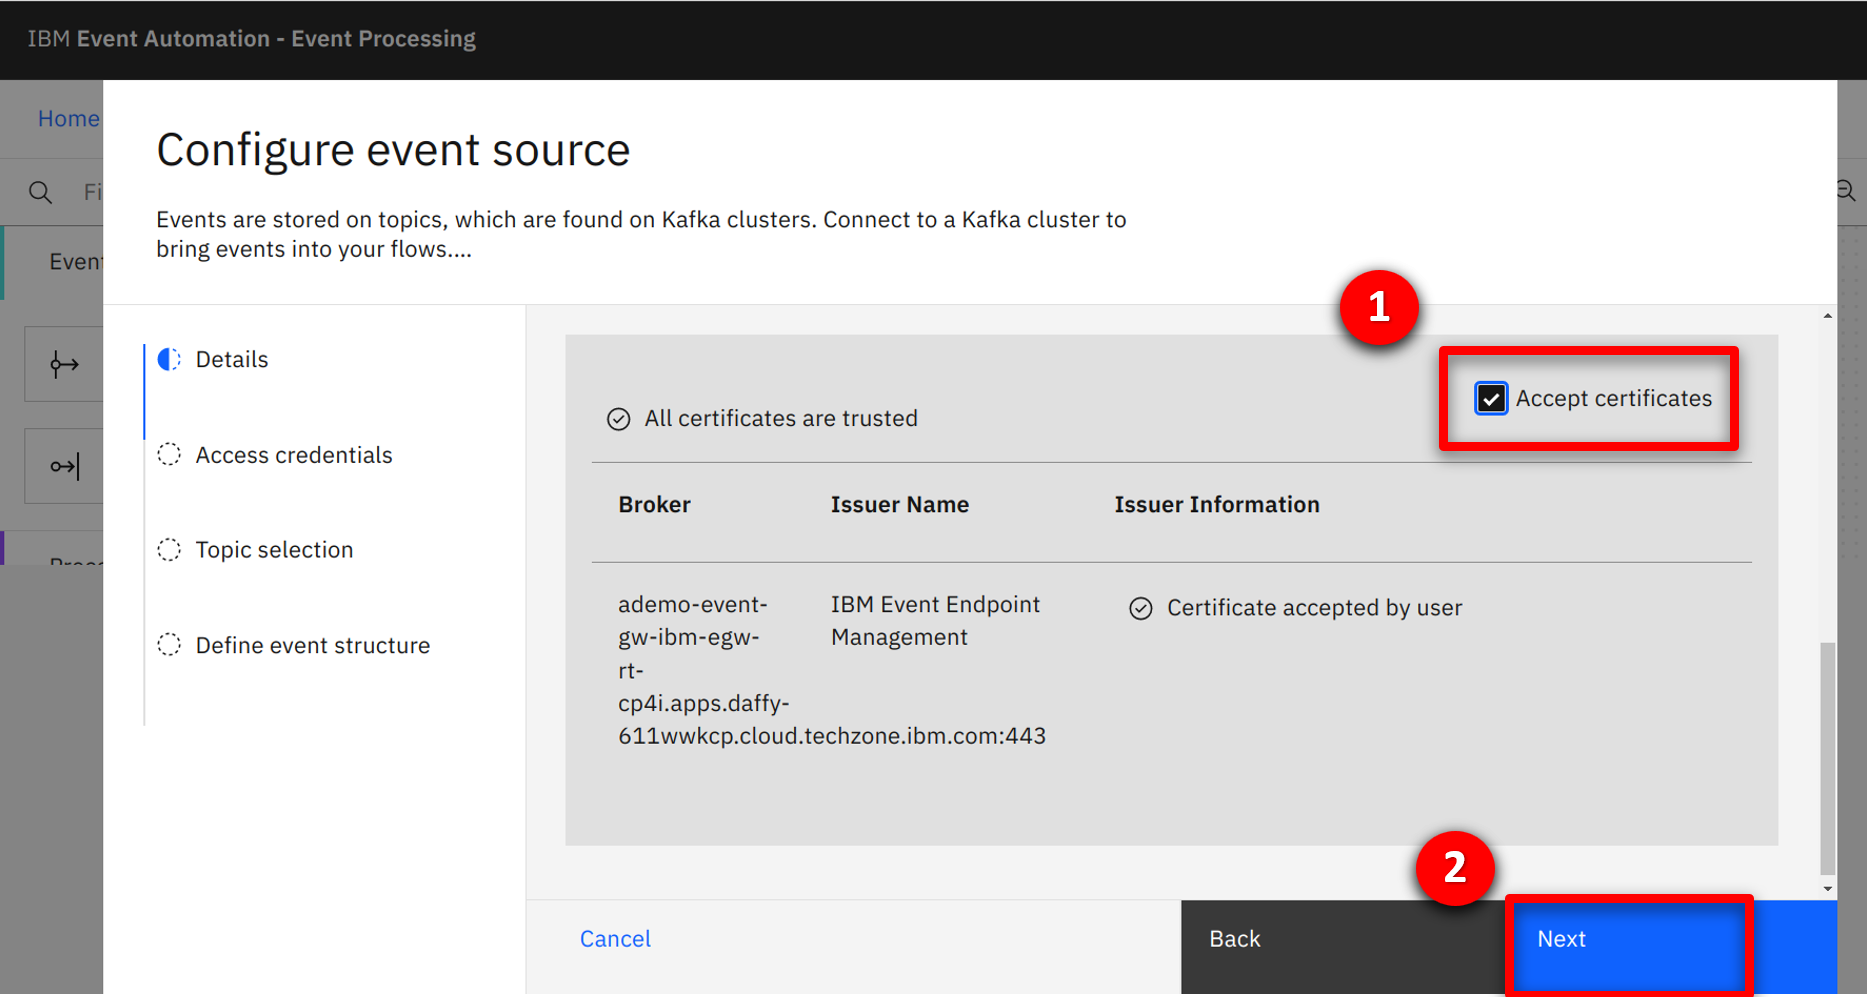
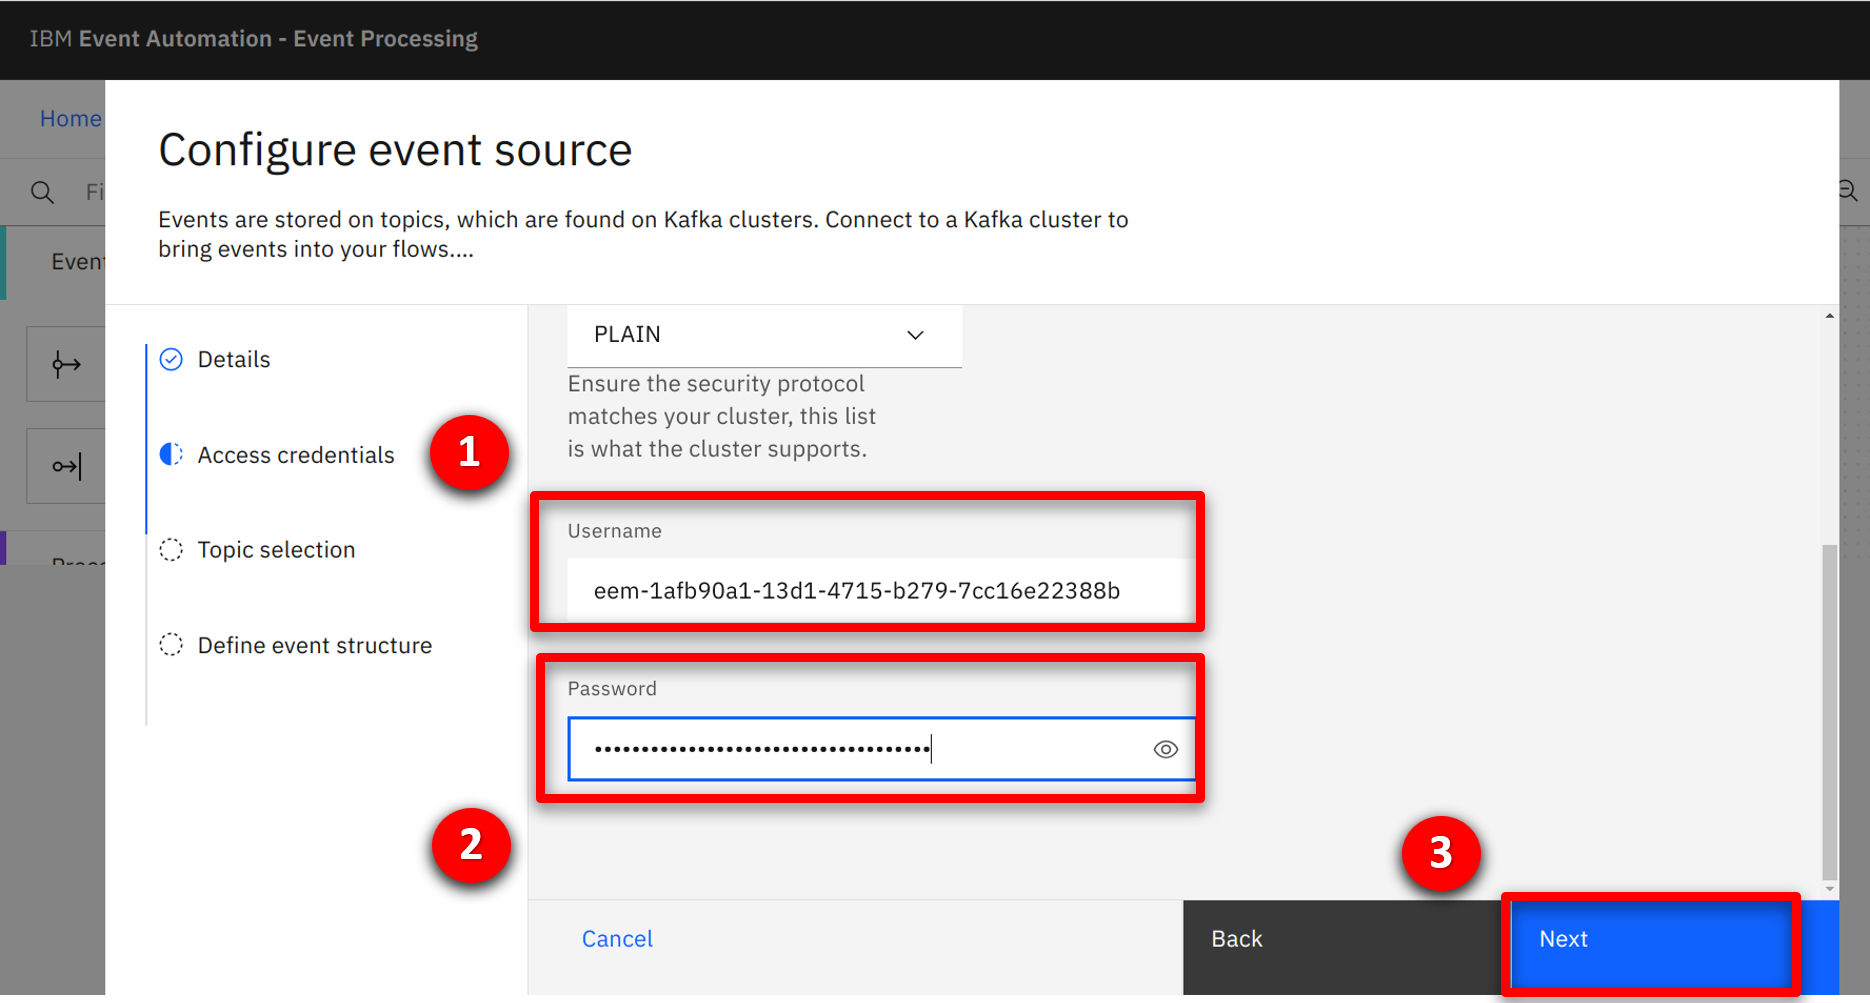
They configure the security details, accepting the certificates being used by the event stream. Then they specify the username / password credentials that they generated in the event management console. |
| Action 3.2.6 |
Check the Accept certificates (1) box and select Next (2).
 |
| Action 3.2.7 |
Copy the username (1) and password (2) from step 2.1.4, and click Next (3).
 |
| Narration |
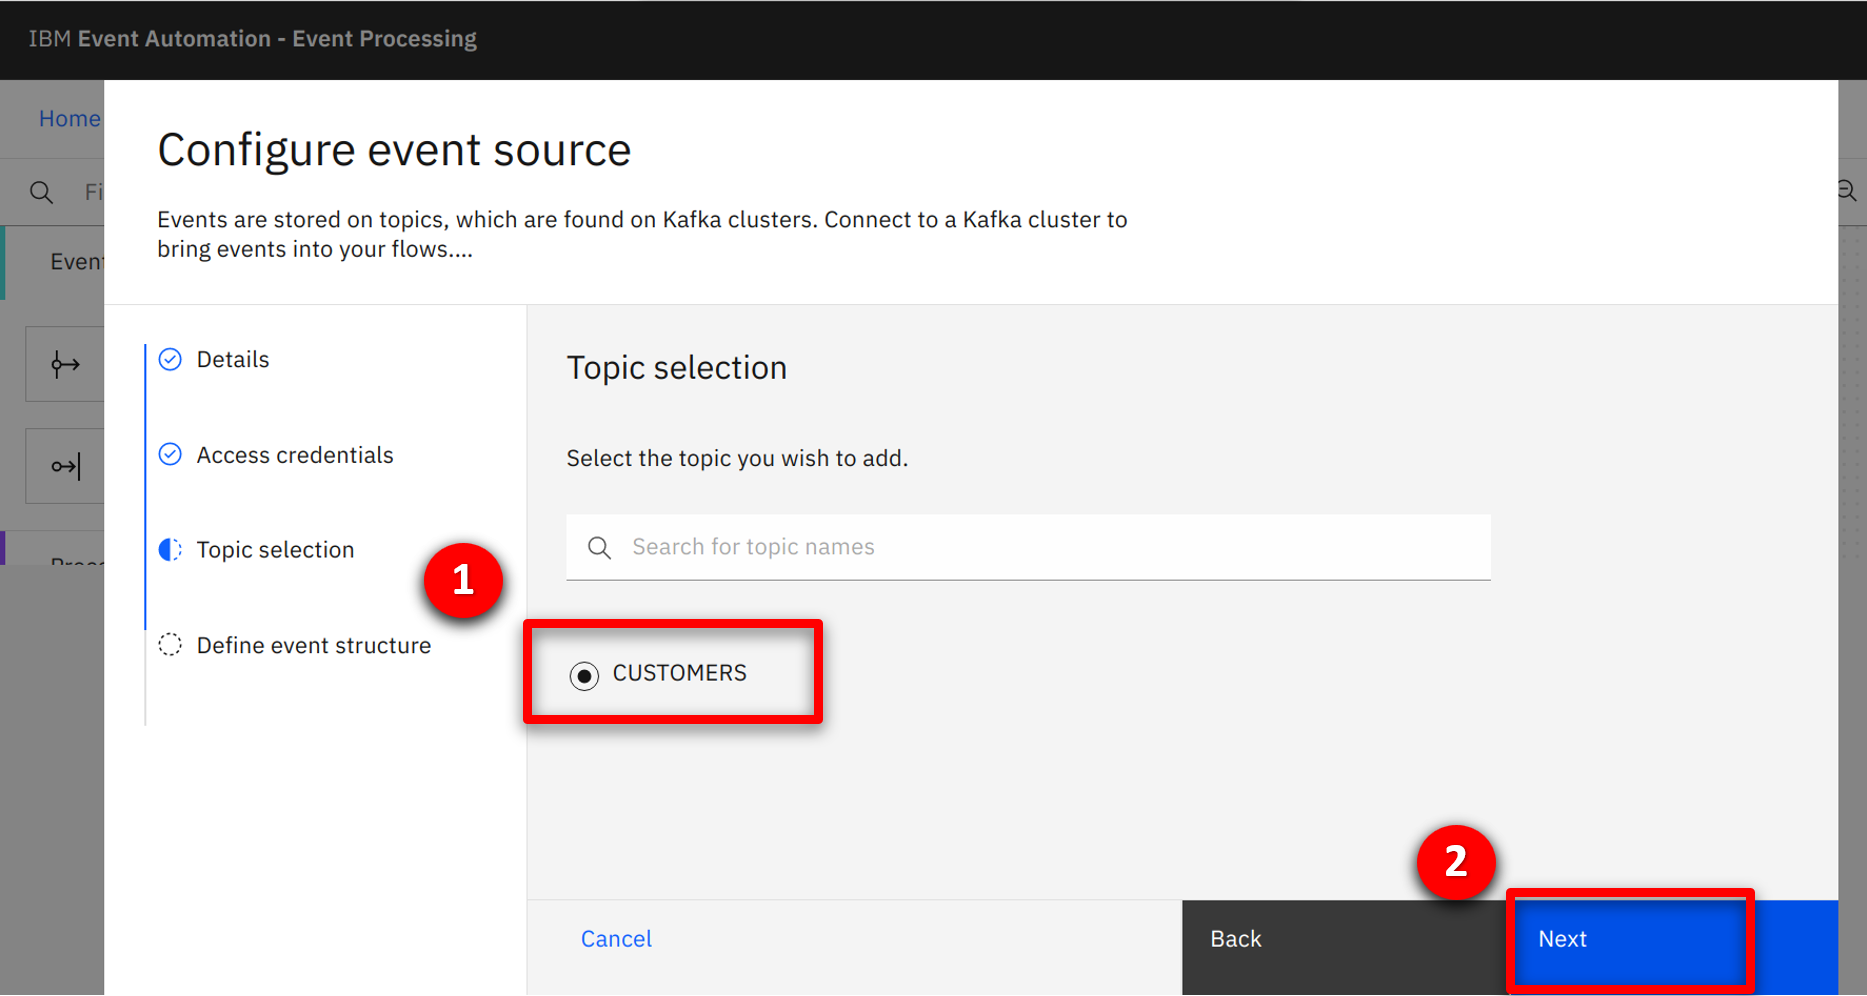
The system connects to the event stream and queries the available topics for the provided credentials. A single CUSTOMERS topic is found and selected by the team. |
| Action 3.2.8 |
Check CUSTOMERS (1) and click Next (2).
 |
| Narration |
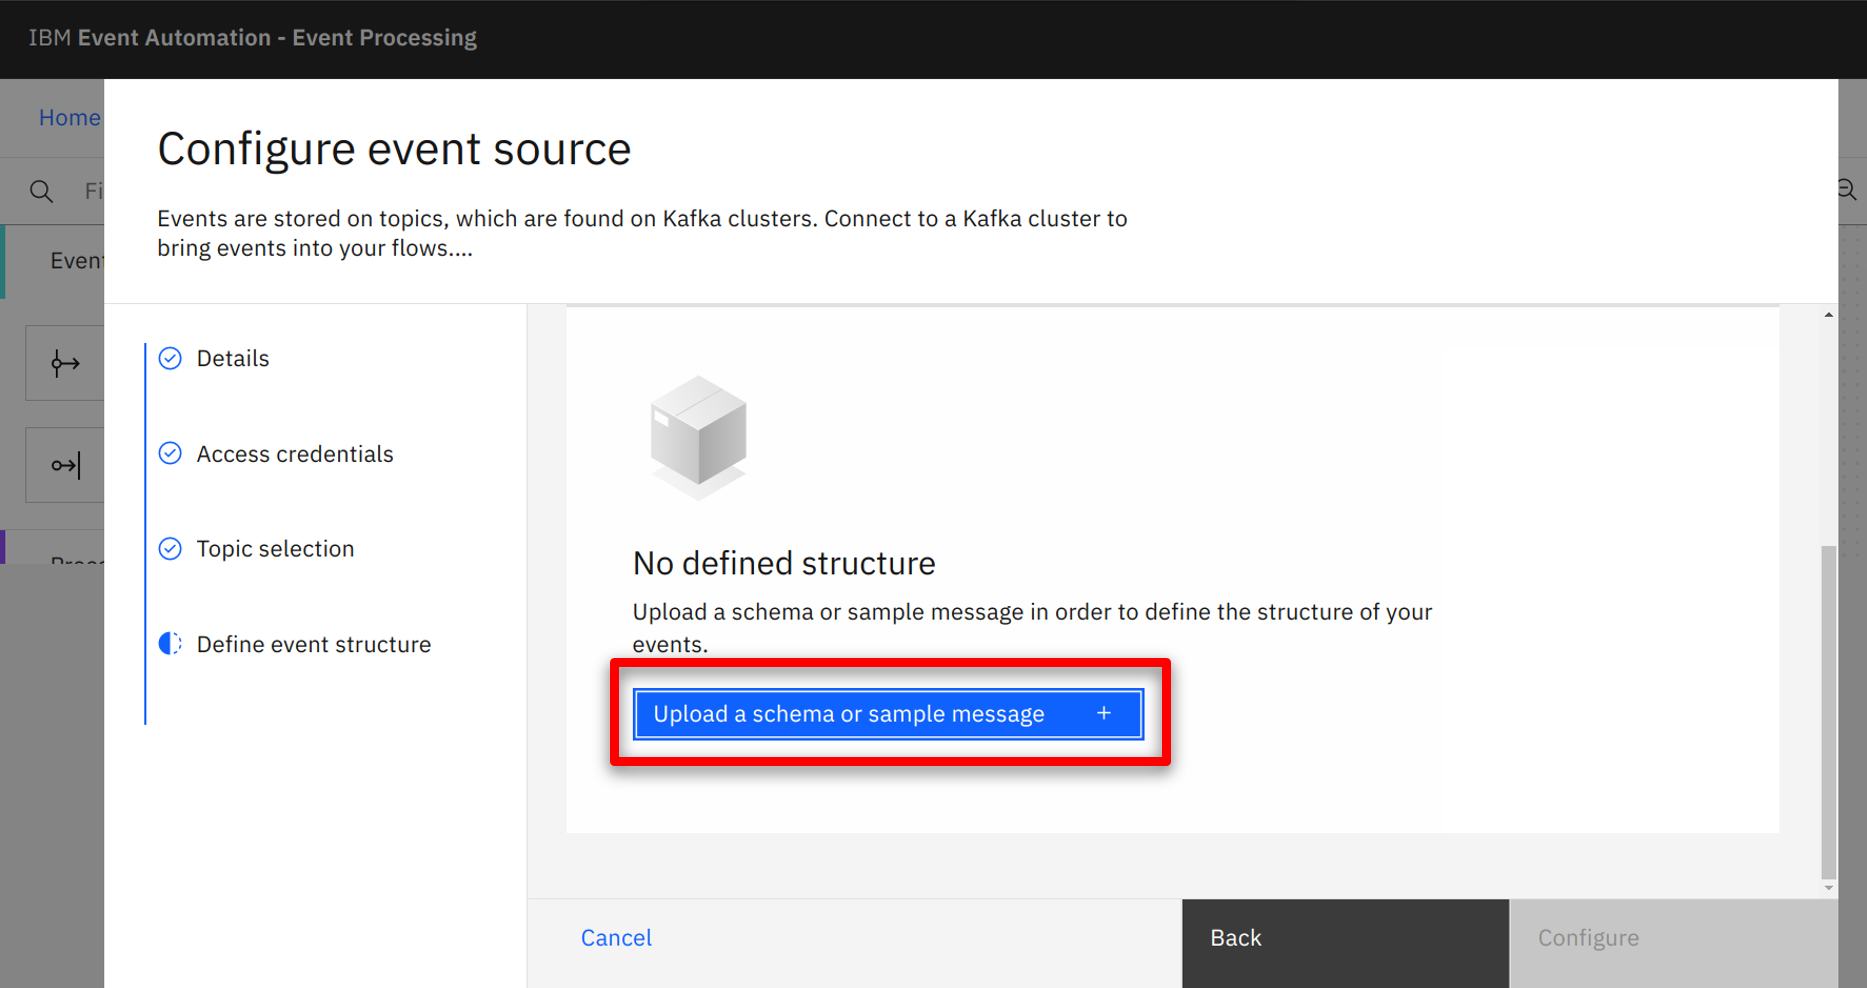
The data structure for the events needs to be defined. For simplicity, the team decide to copy the sample message from the Event Management console. |
| Action 3.2.9 |
Click on Upload a schema or sample message.
 |
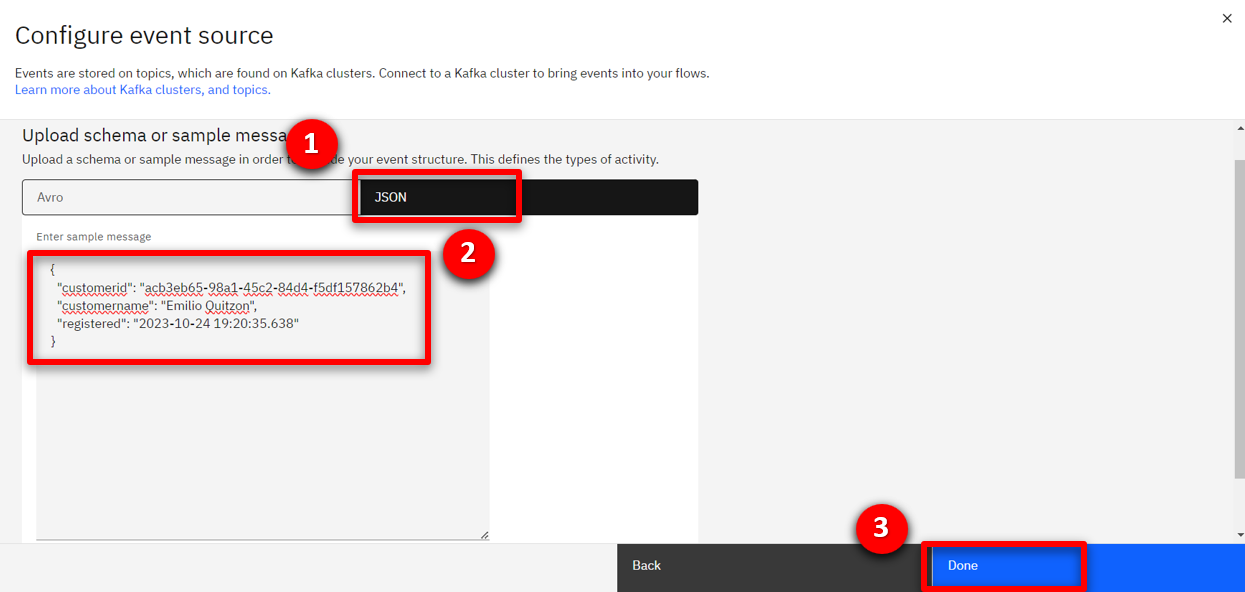
| Action 3.2.10 |
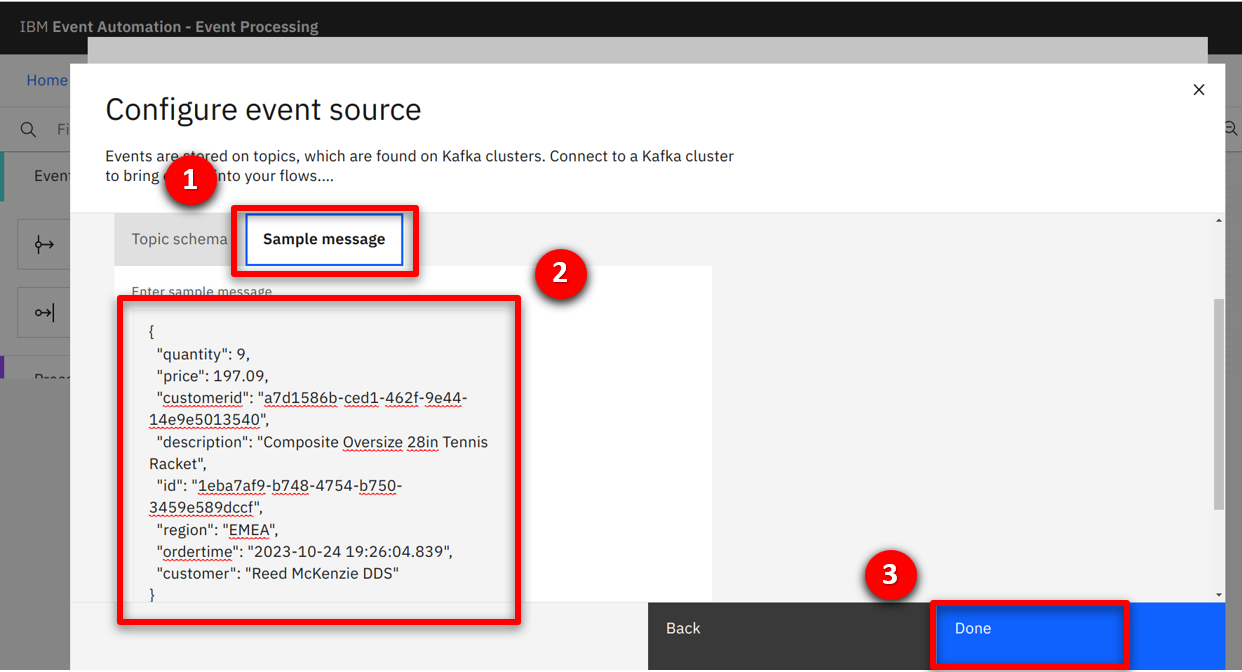
Select the JSON (1) tab, copy the text below into the Enter sample message (2) box, and click Done (3).
 |
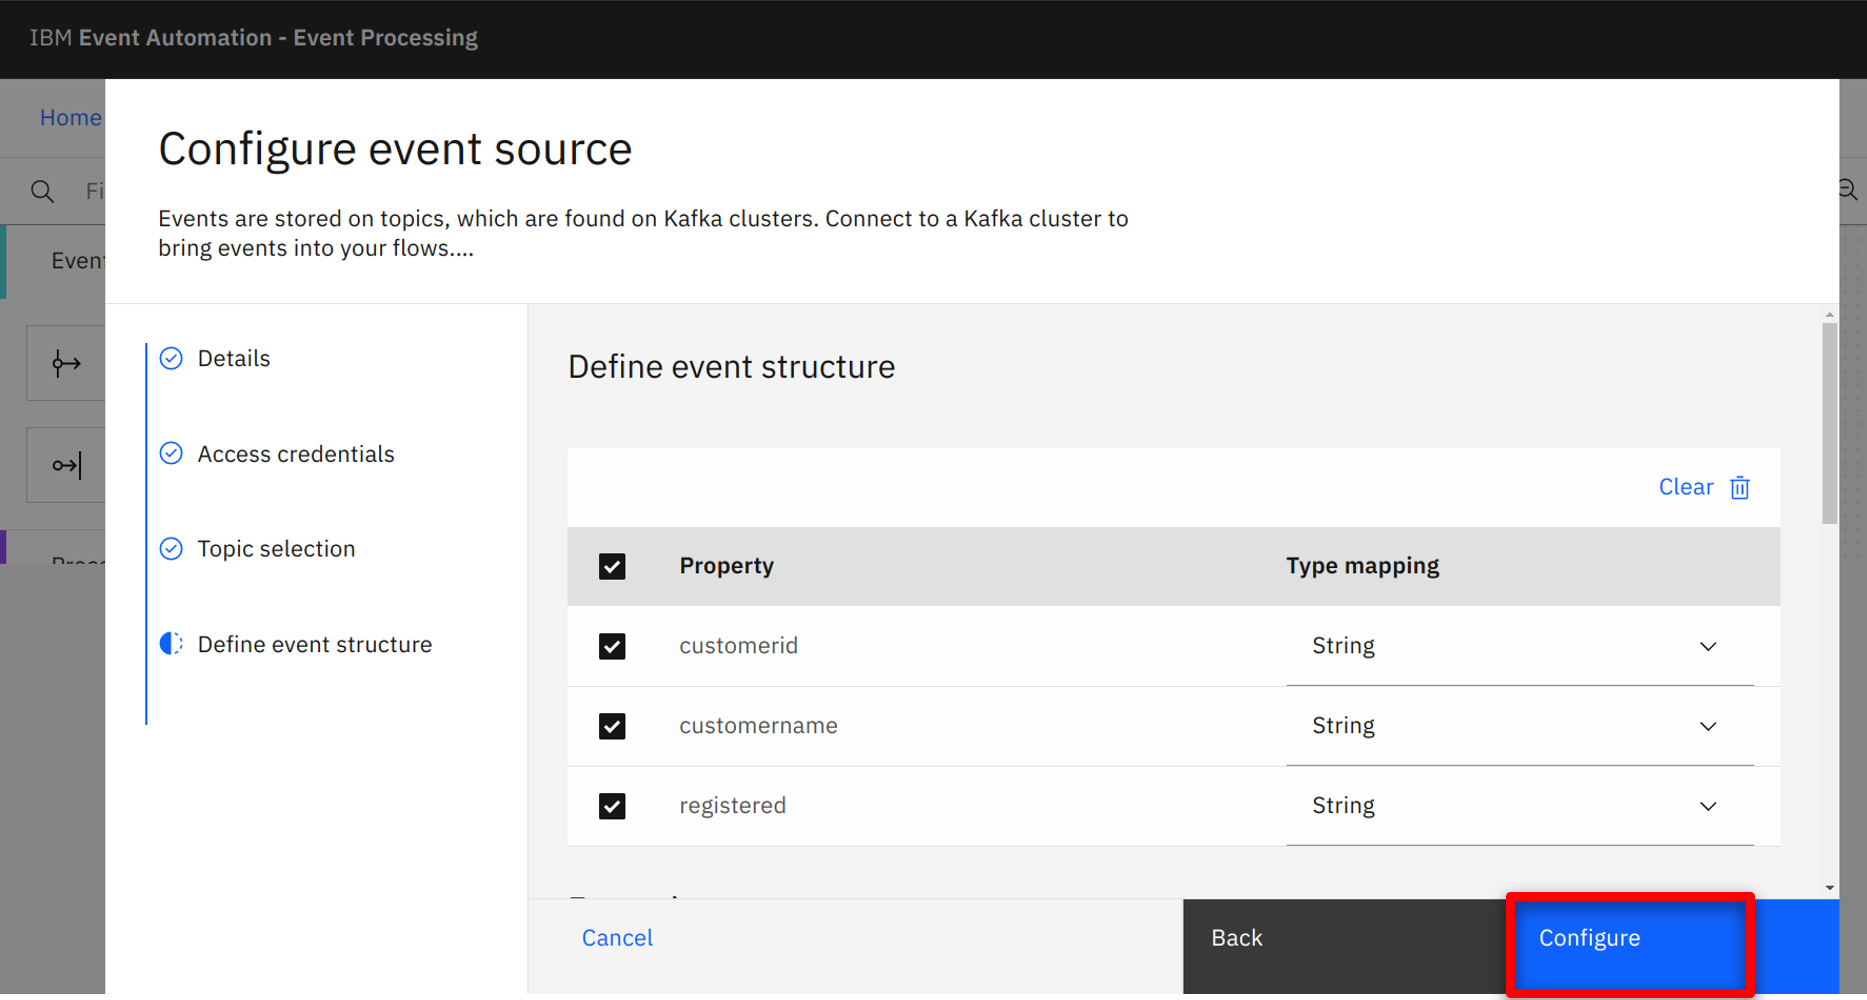
| Action 3.2.11 |
Click on Configure.
 |
| 3.3 |
Filter orders over 100 dollars |
| Narration |
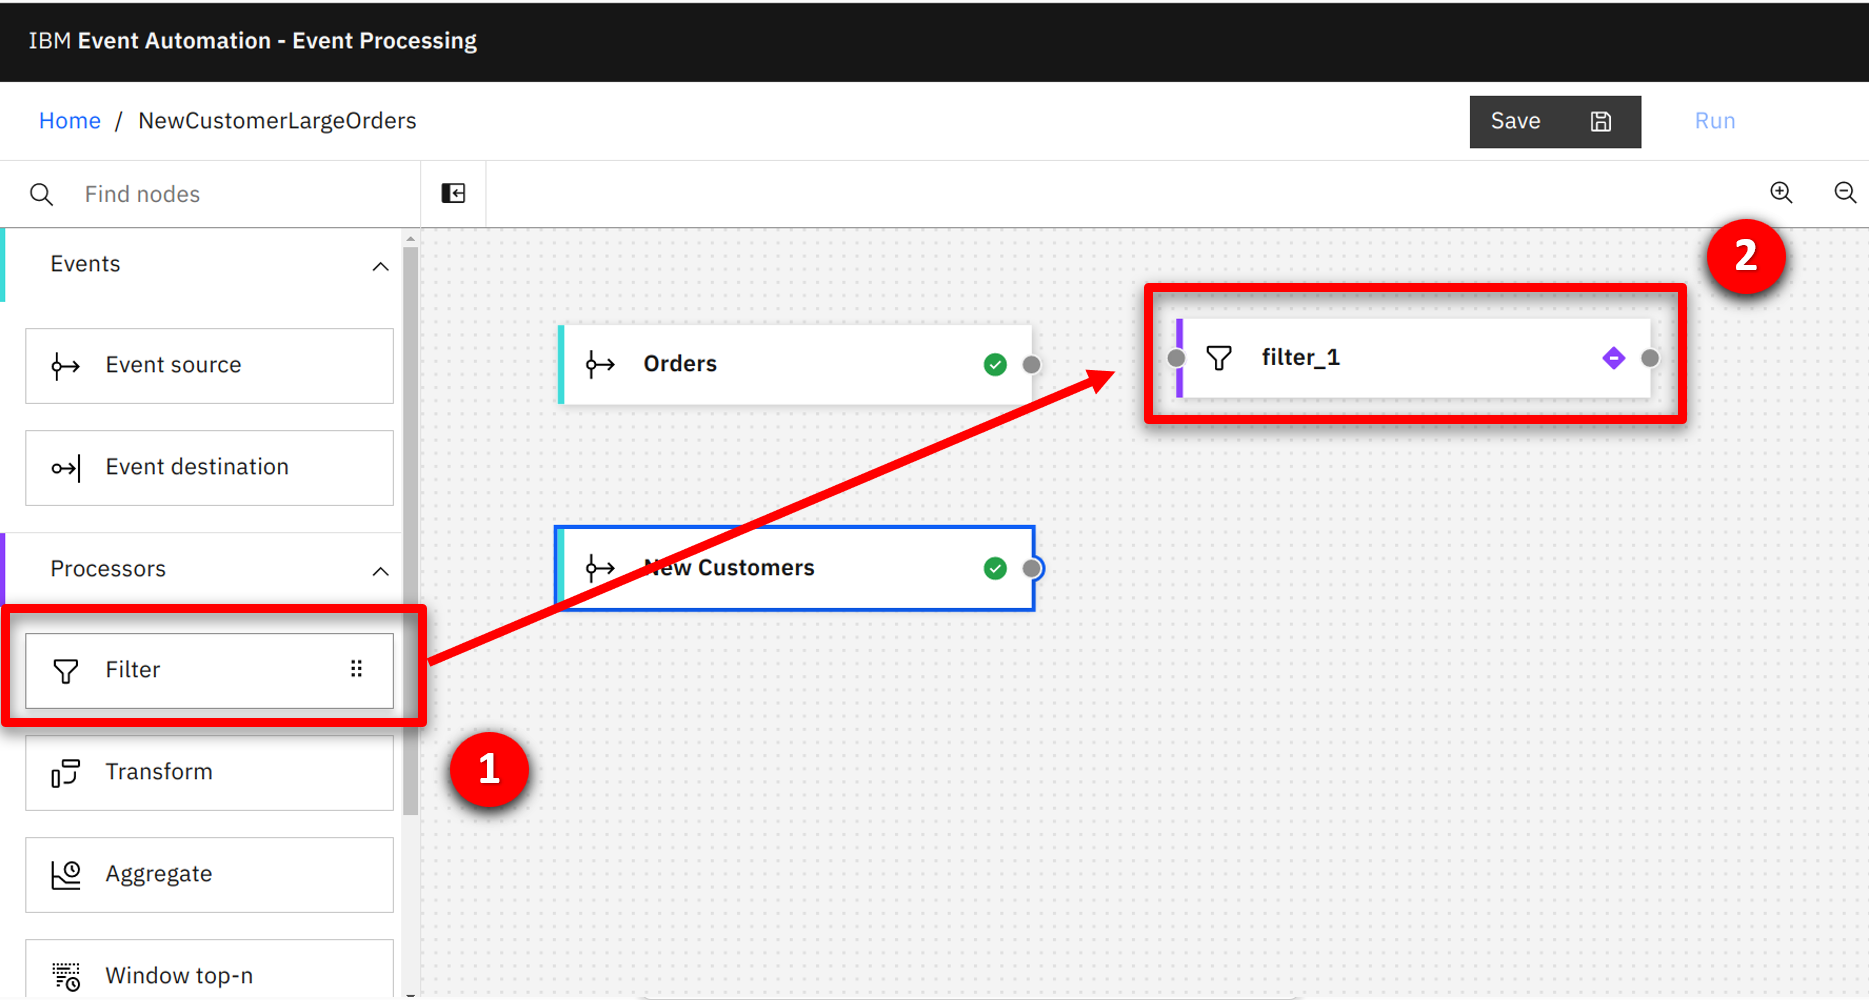
The ORDERS stream provides an event for each order; however the marketing team only wants to identify orders over $100. They use a Filter node to disregard the unnecessary events. They drag and drop the node onto the canvas. |
| Action 3.3.1 |
Press and hold the mouse button on the Filter (1) node and drag onto the canvas (2).
 |
| Narration |
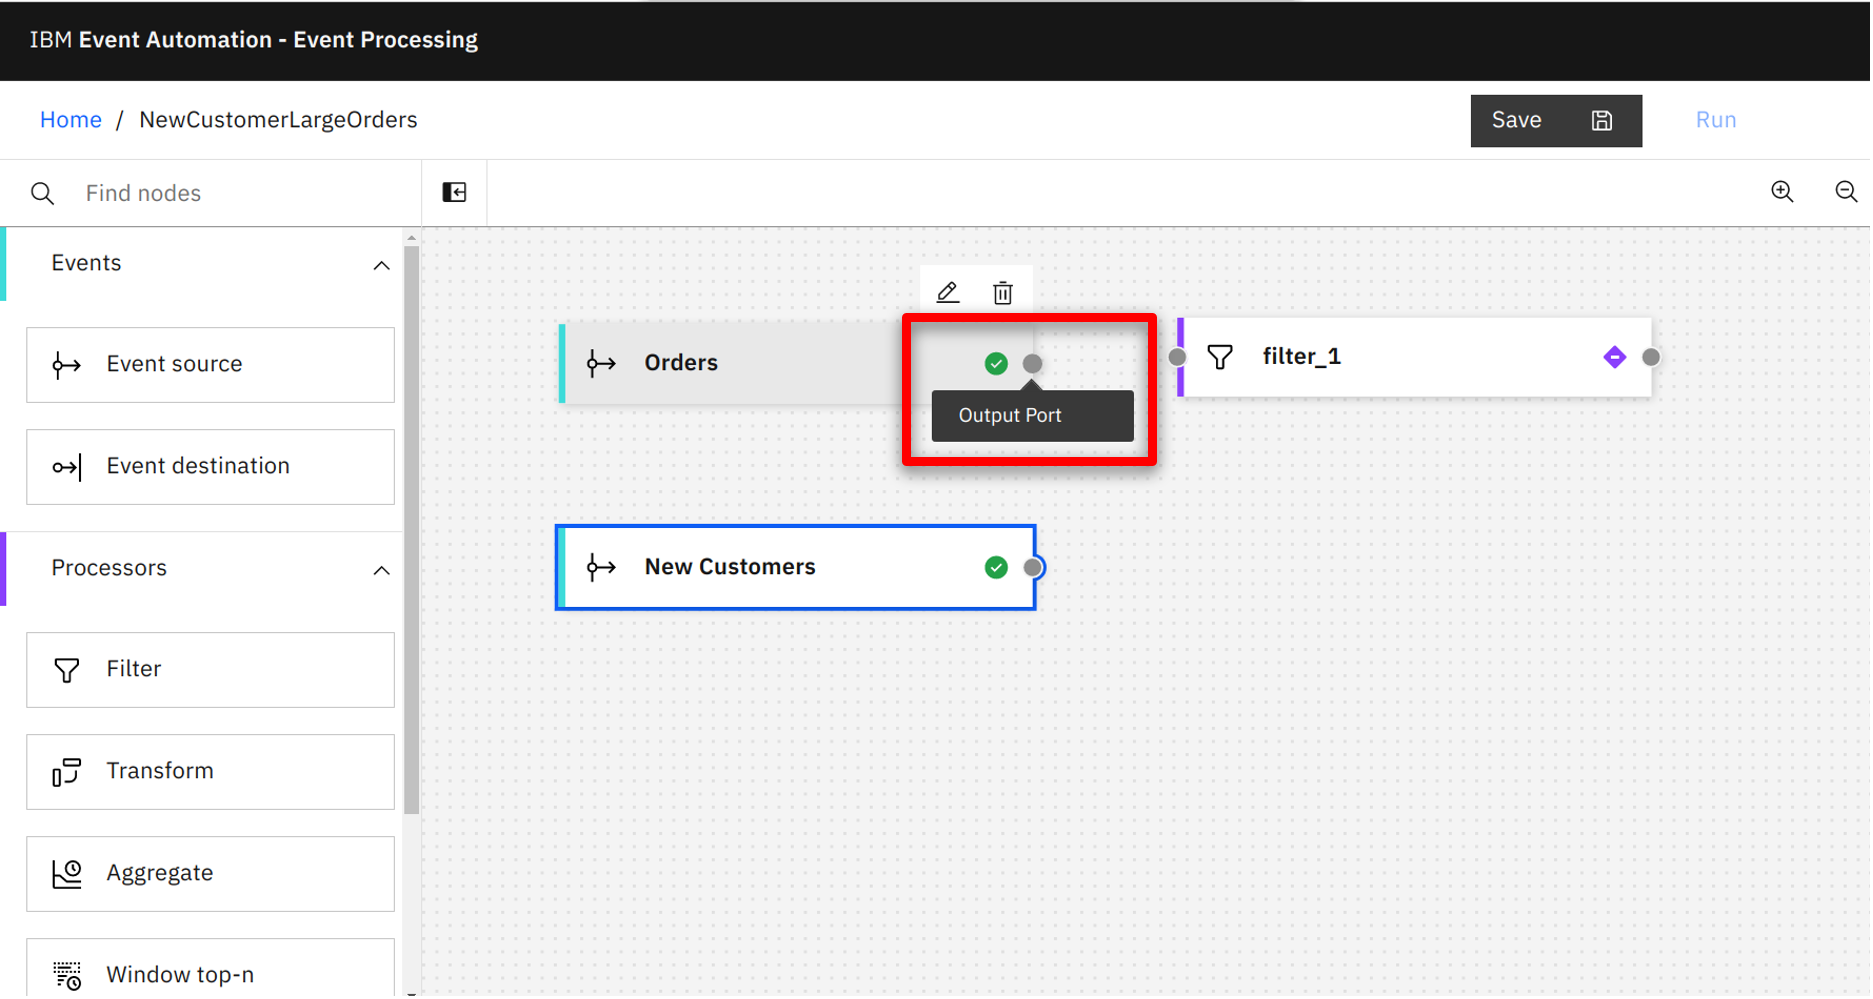
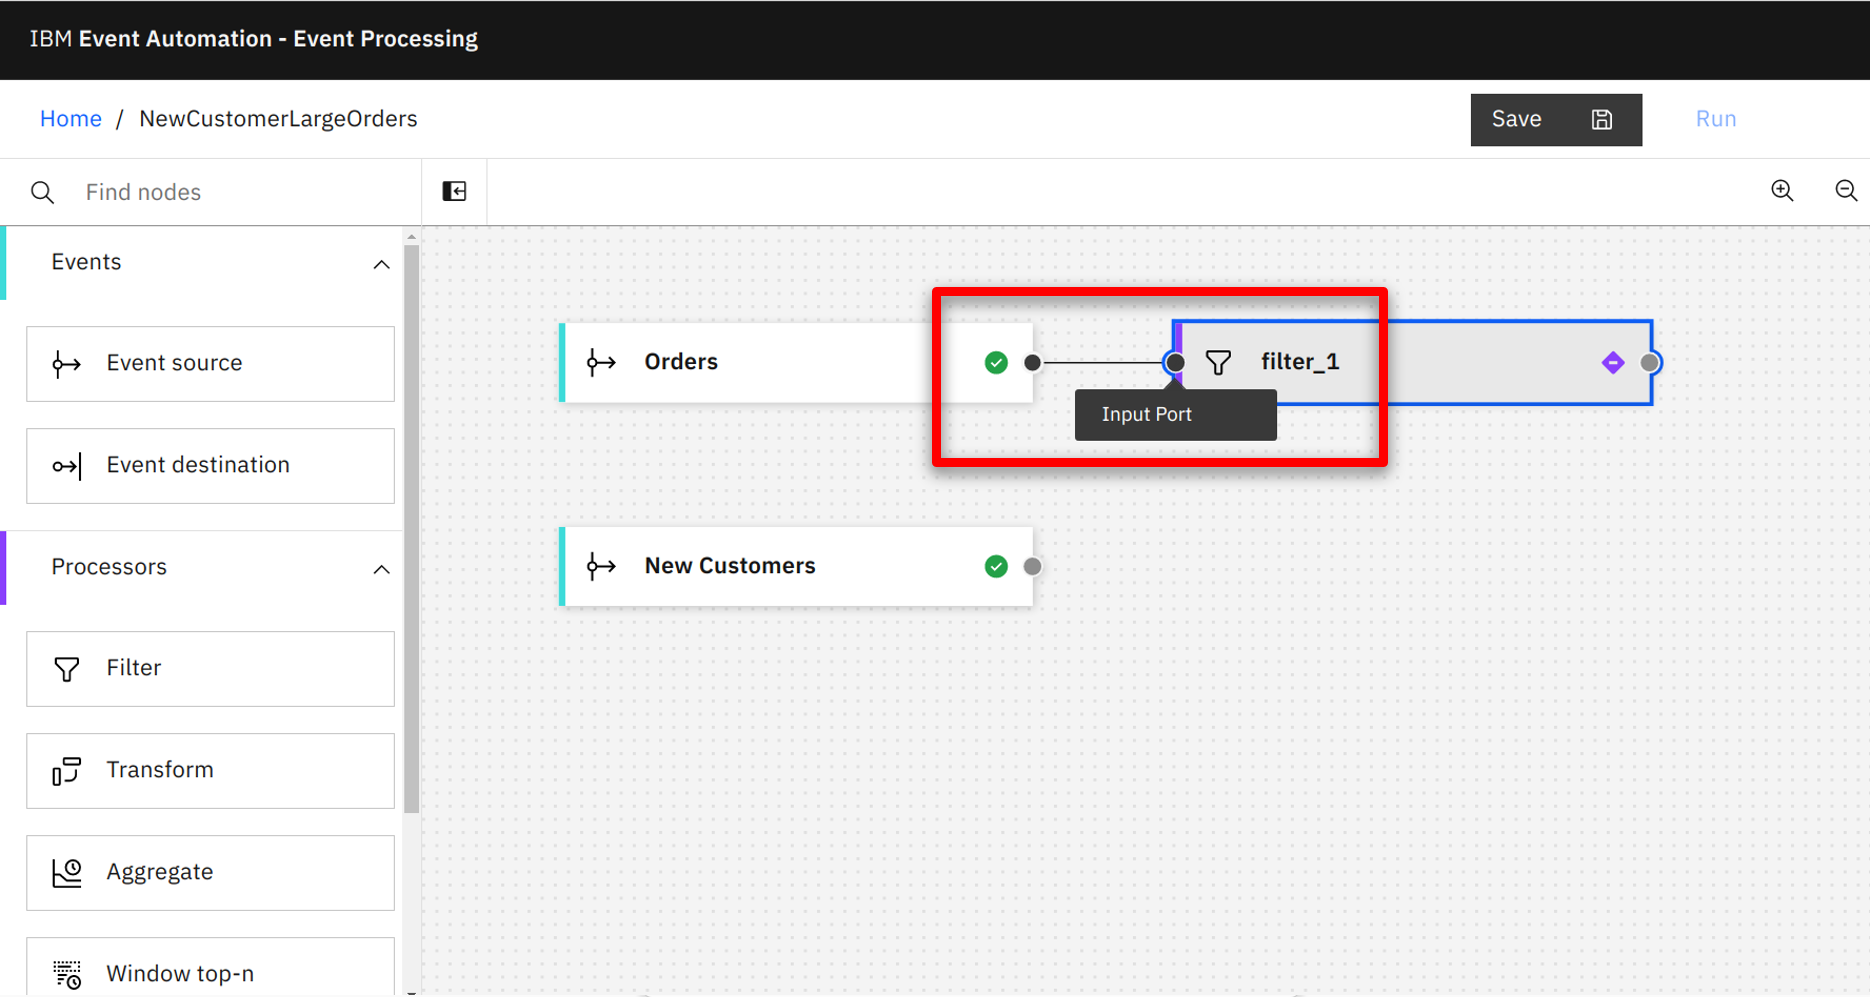
The team connects the ORDERS output terminal of the Filter node. |
| Action 3.3.2 |
Hover over the Orders output terminal and hold the mouse button down.
 |
| Action 3.3.3 |
Drag the connection to the Filter’s input terminal and release the mouse button.
 |
| Narration |
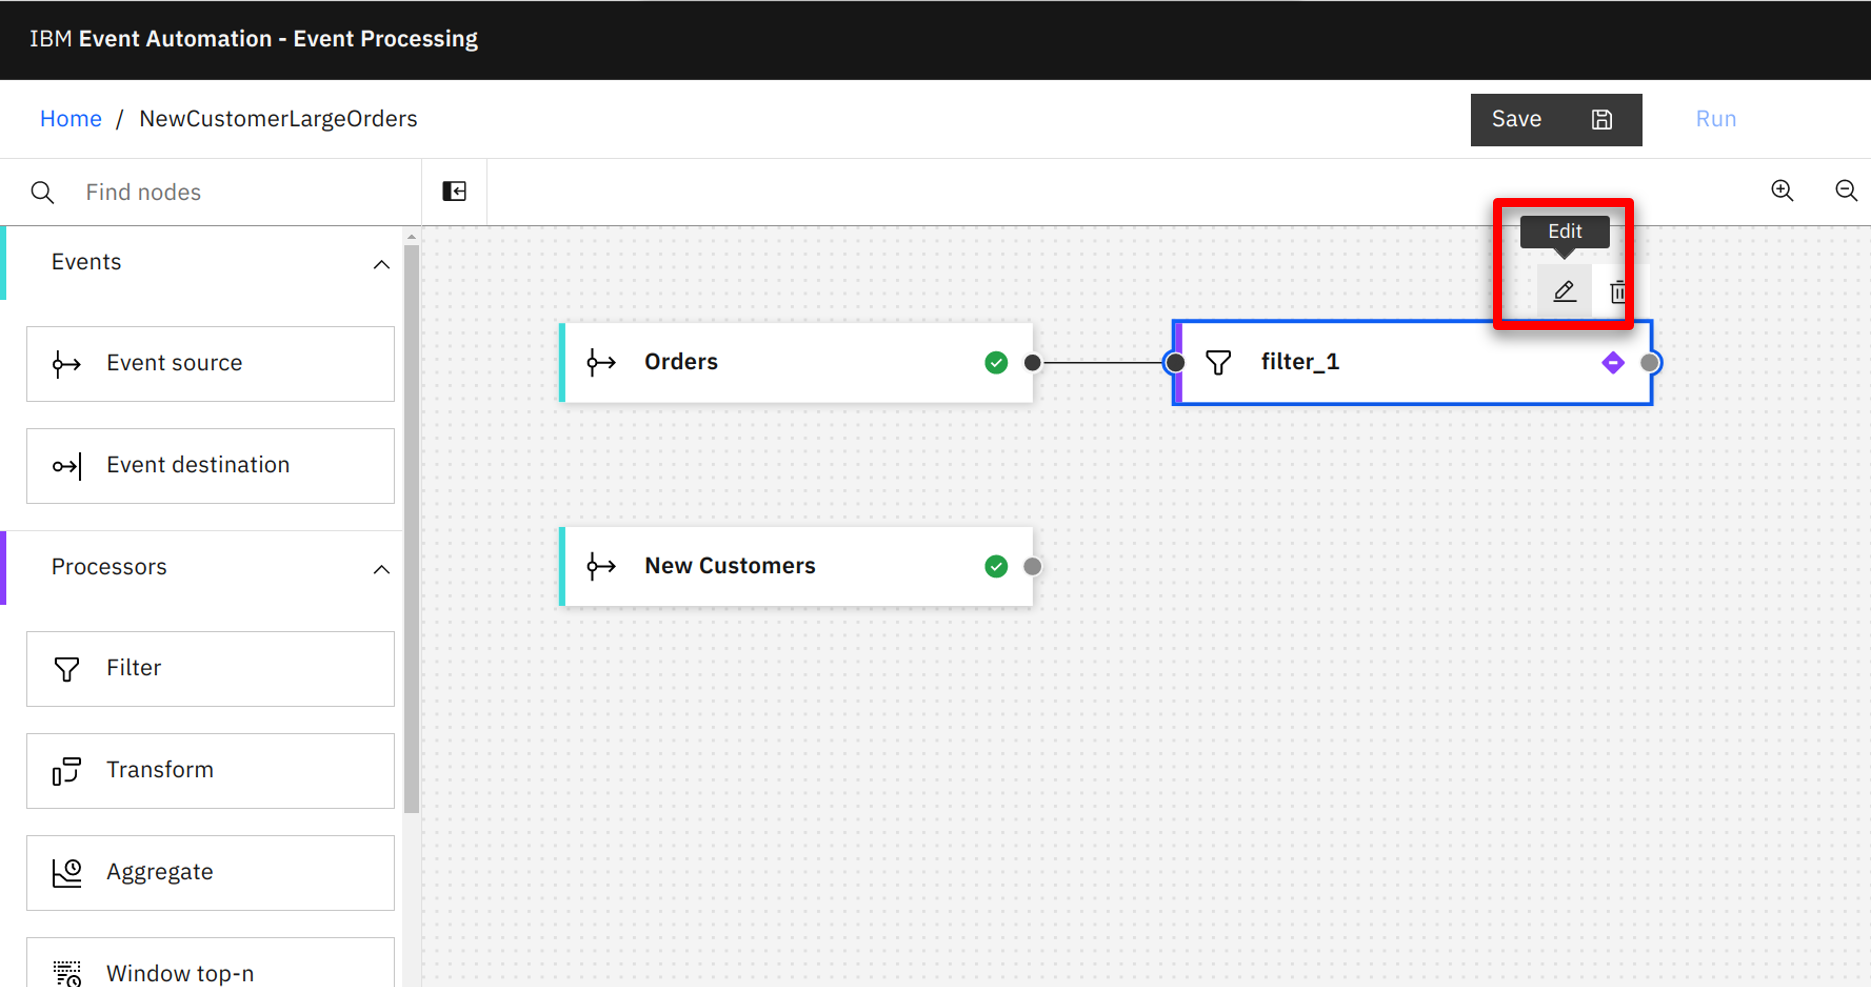
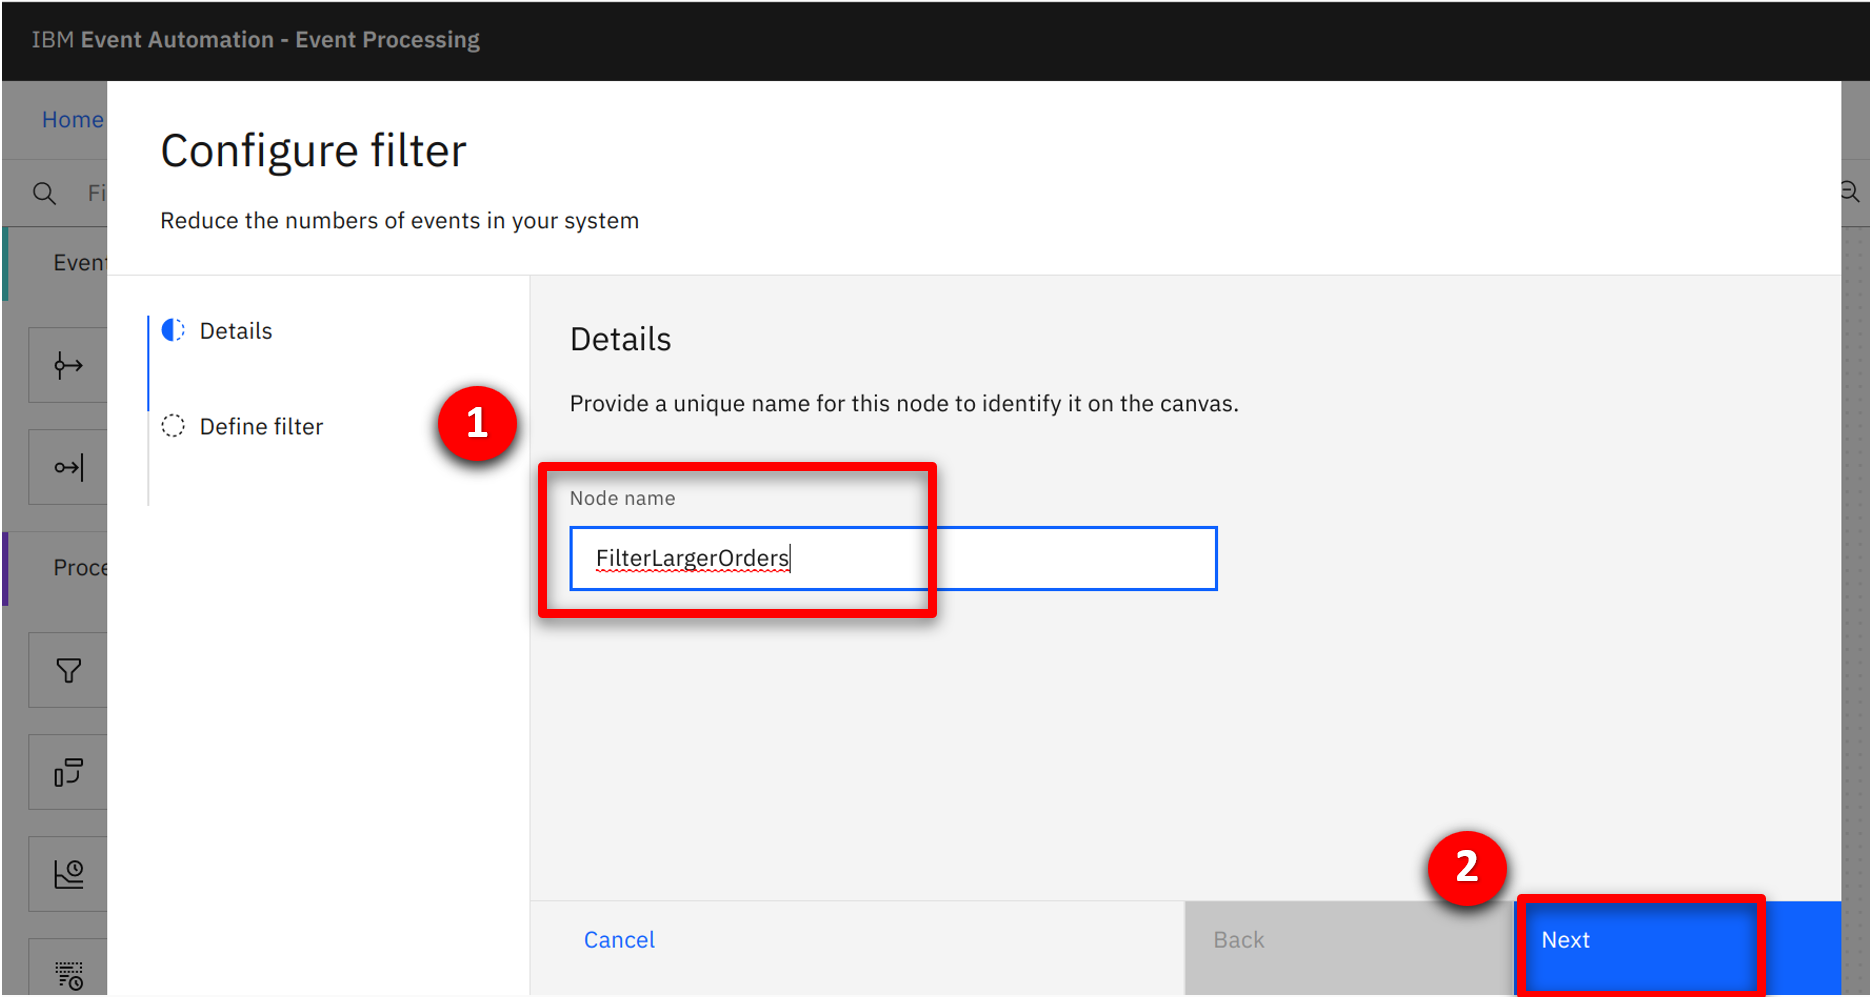
The Filter node provides an expression builder that makes it easy for the marketing team to Filter out orders under $100. |
| Action 3.3.4 |
Hover over the Filter node and select the edit icon.
 |
| Action 3.3.5 |
Enter FilterLargeOrders (1) for the node name and click Next (2).
 |
| Action 3.3.6 |
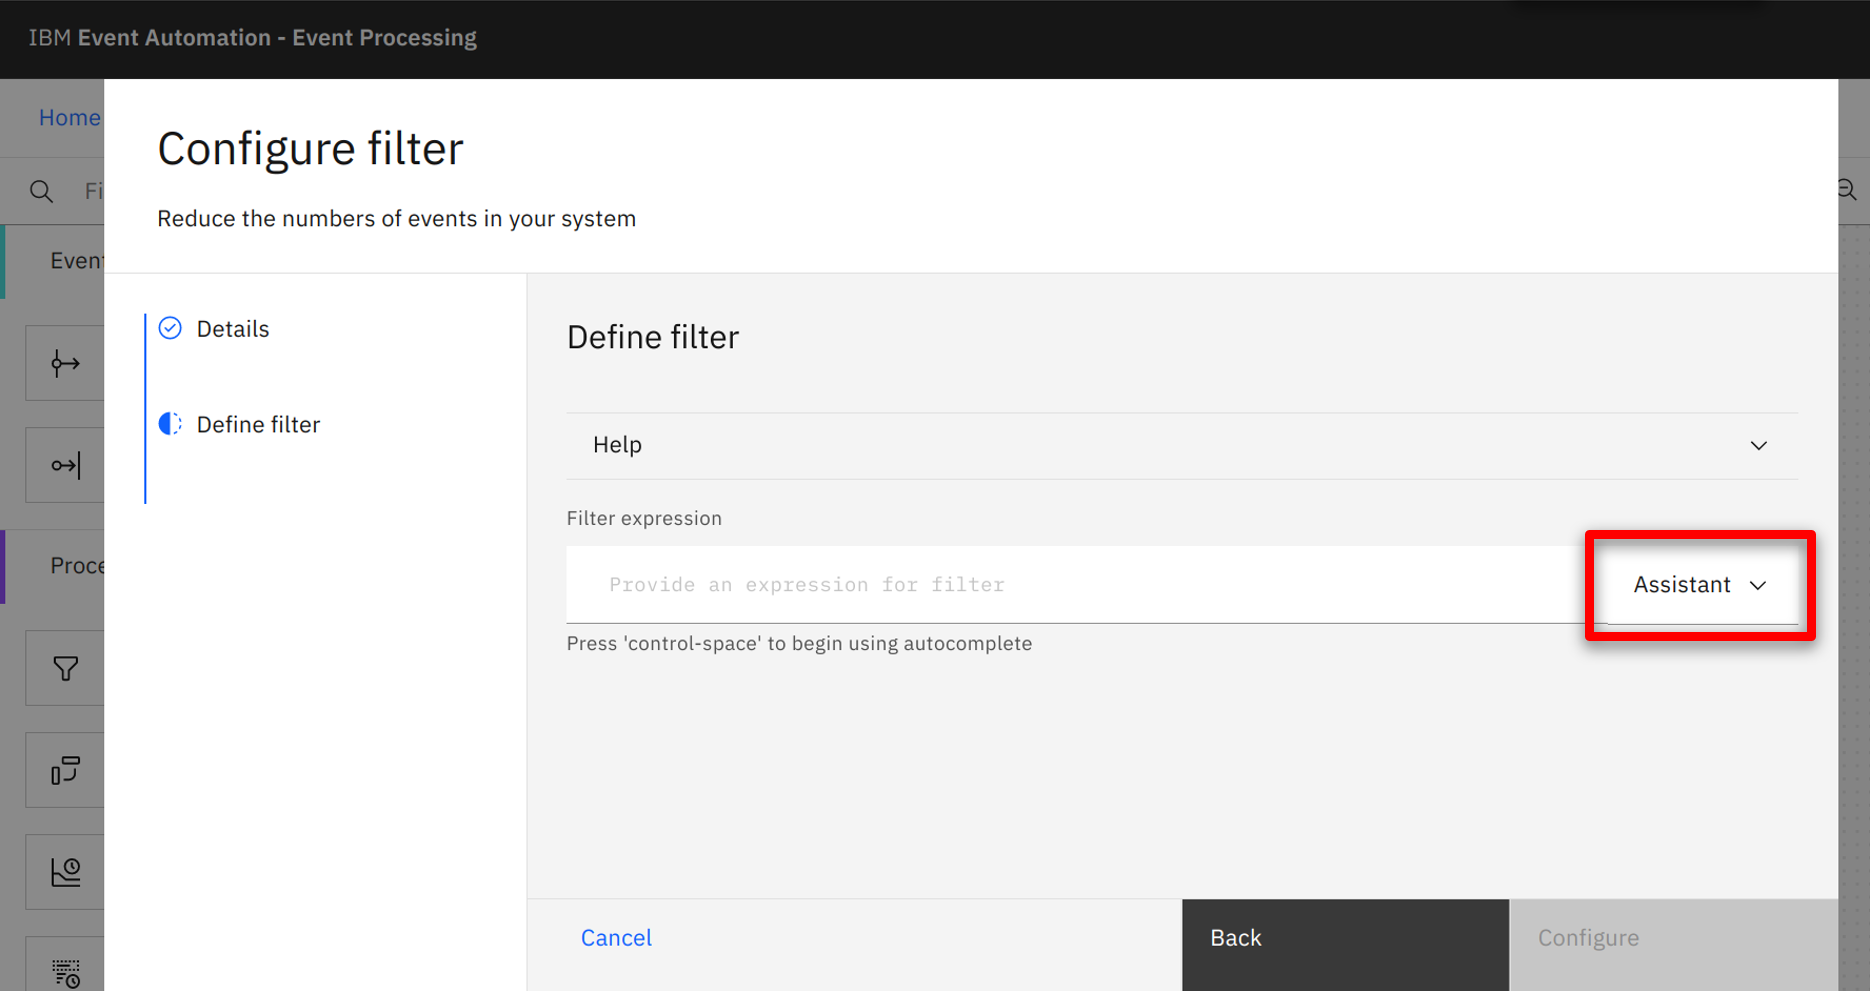
Click on the Assistant pull down.
 |
| Action 3.3.7 |
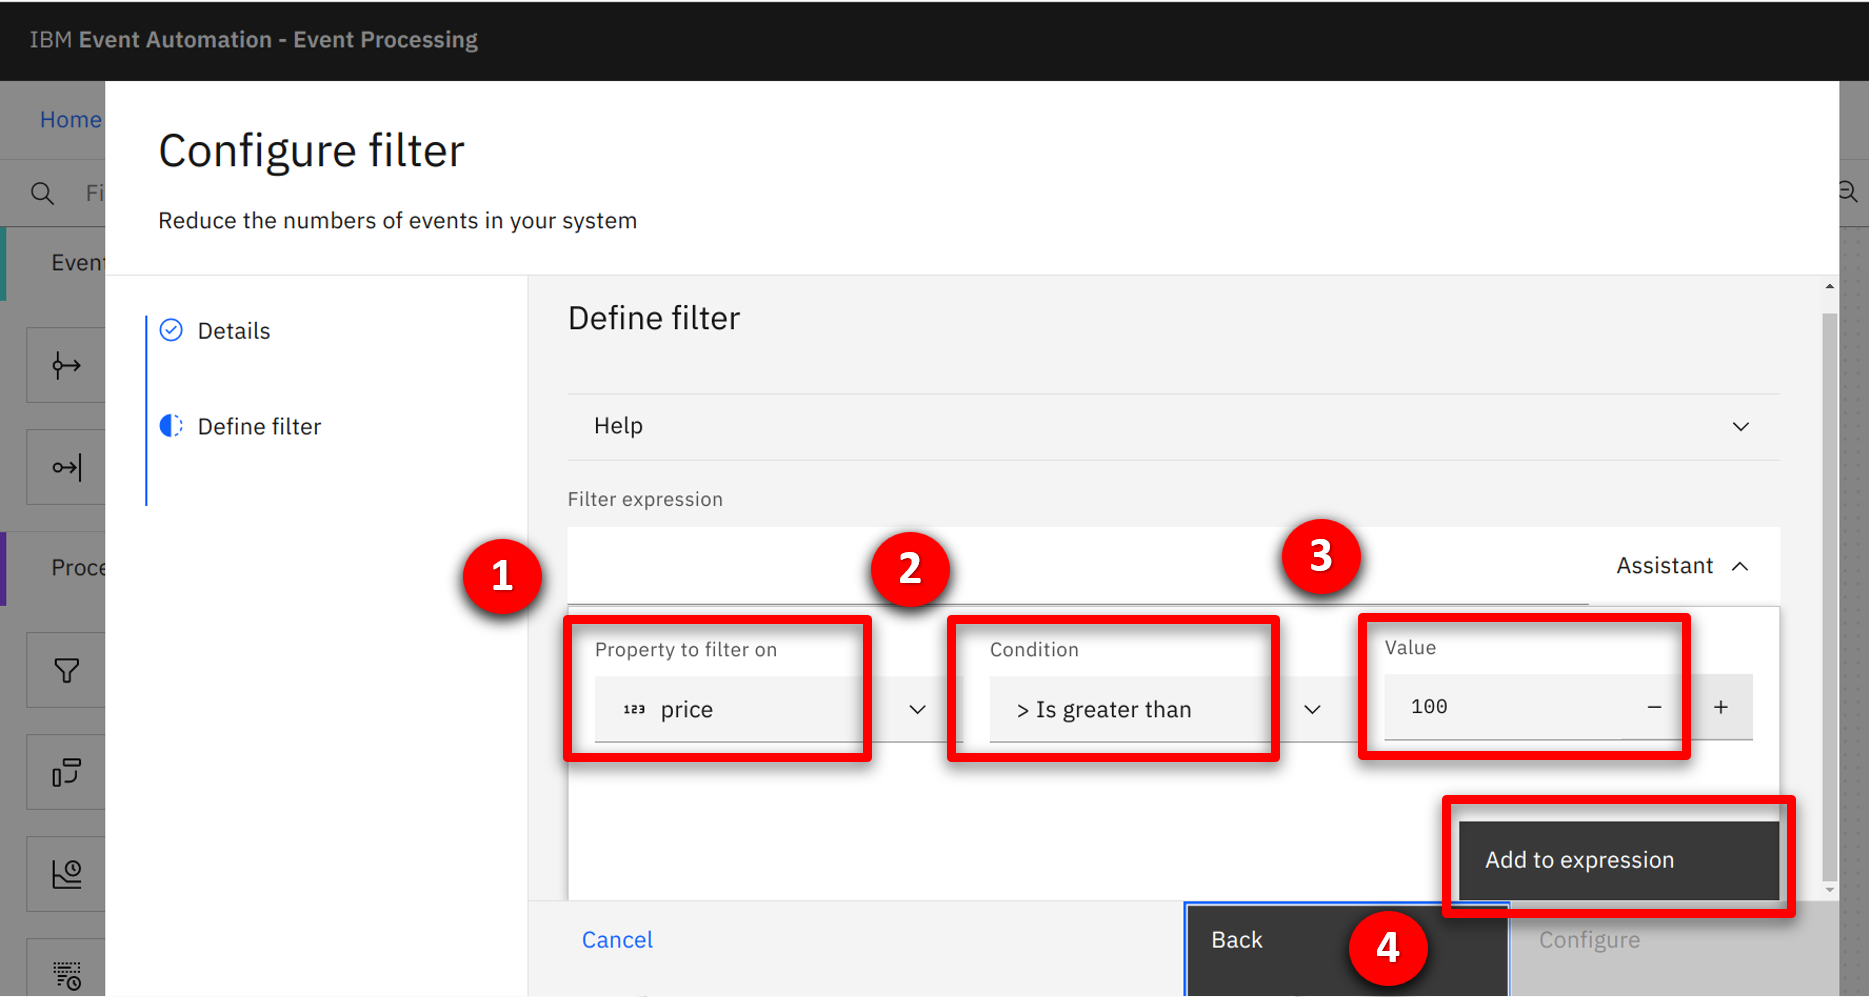
Select price (1) for the property, > Is greater than (2) for the condition and enter 100 (3) for the value. Click on Add to expression (4) to complete .
 |
| Action 3.3.8 |
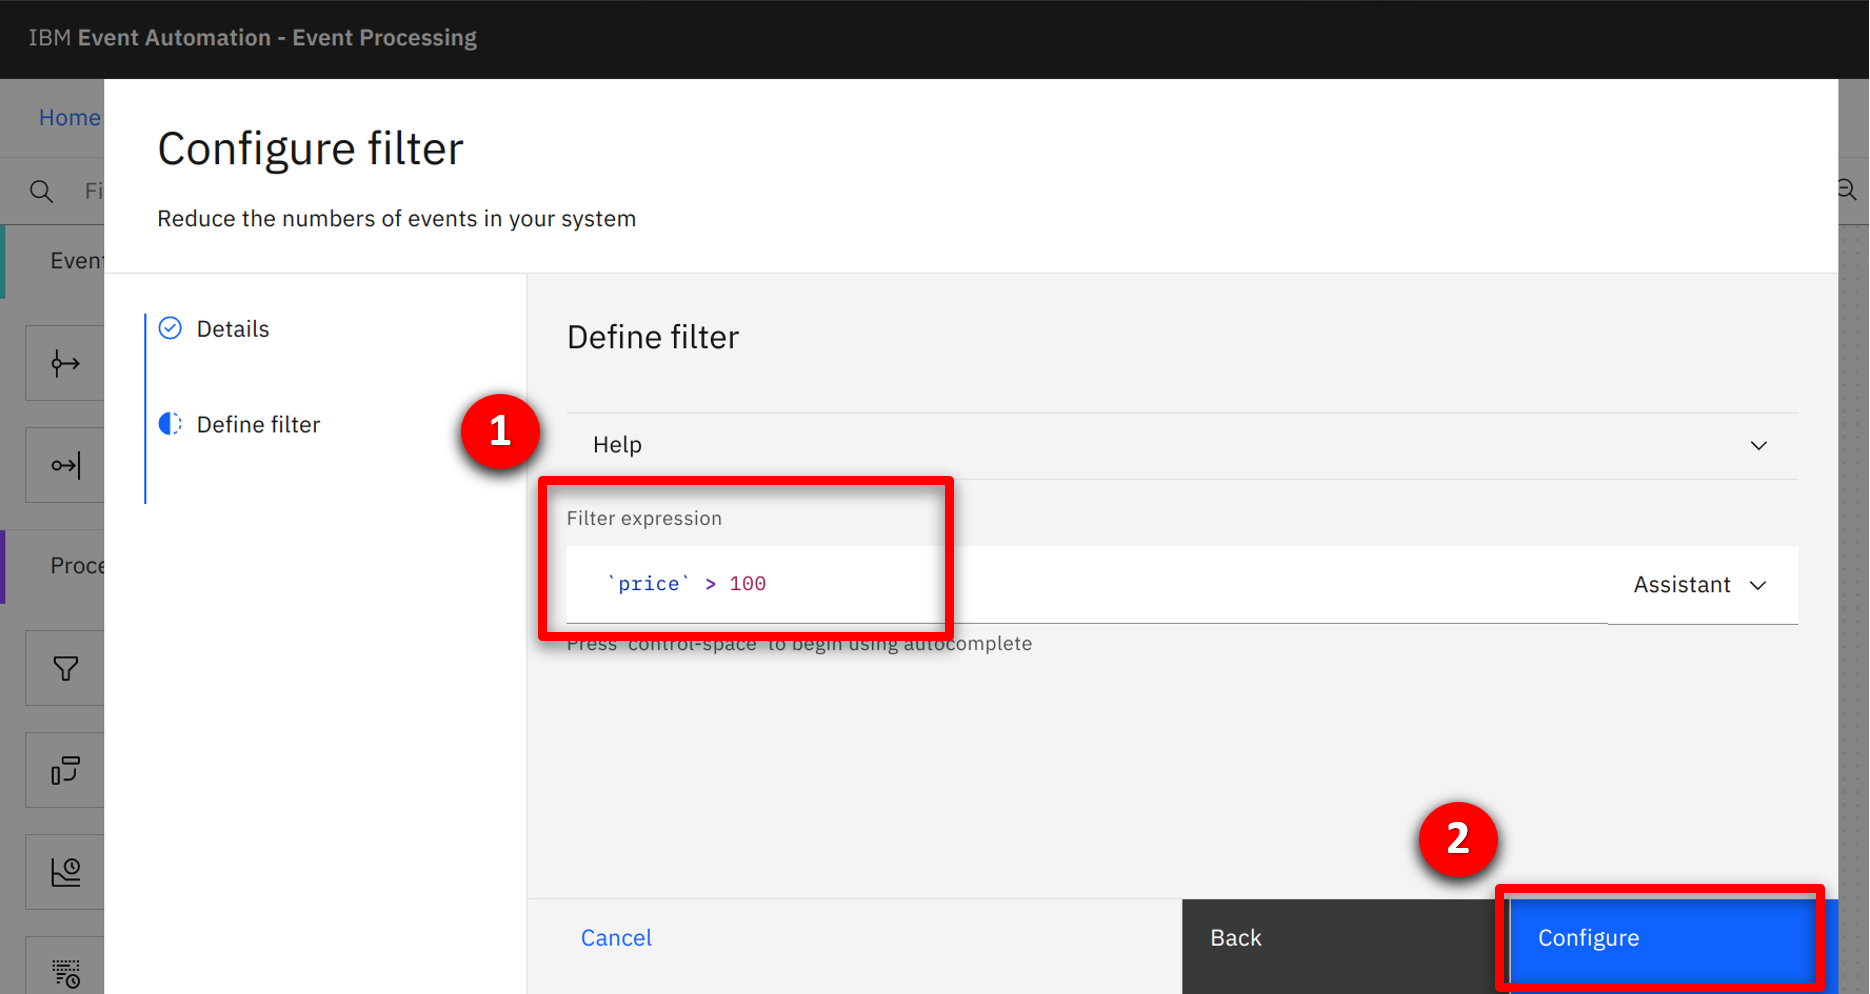
The completed conditions will be shown (1), click on Configure (2).
 |
| 3.4 |
Identify new customer order over 100 dollars |
| Narration |
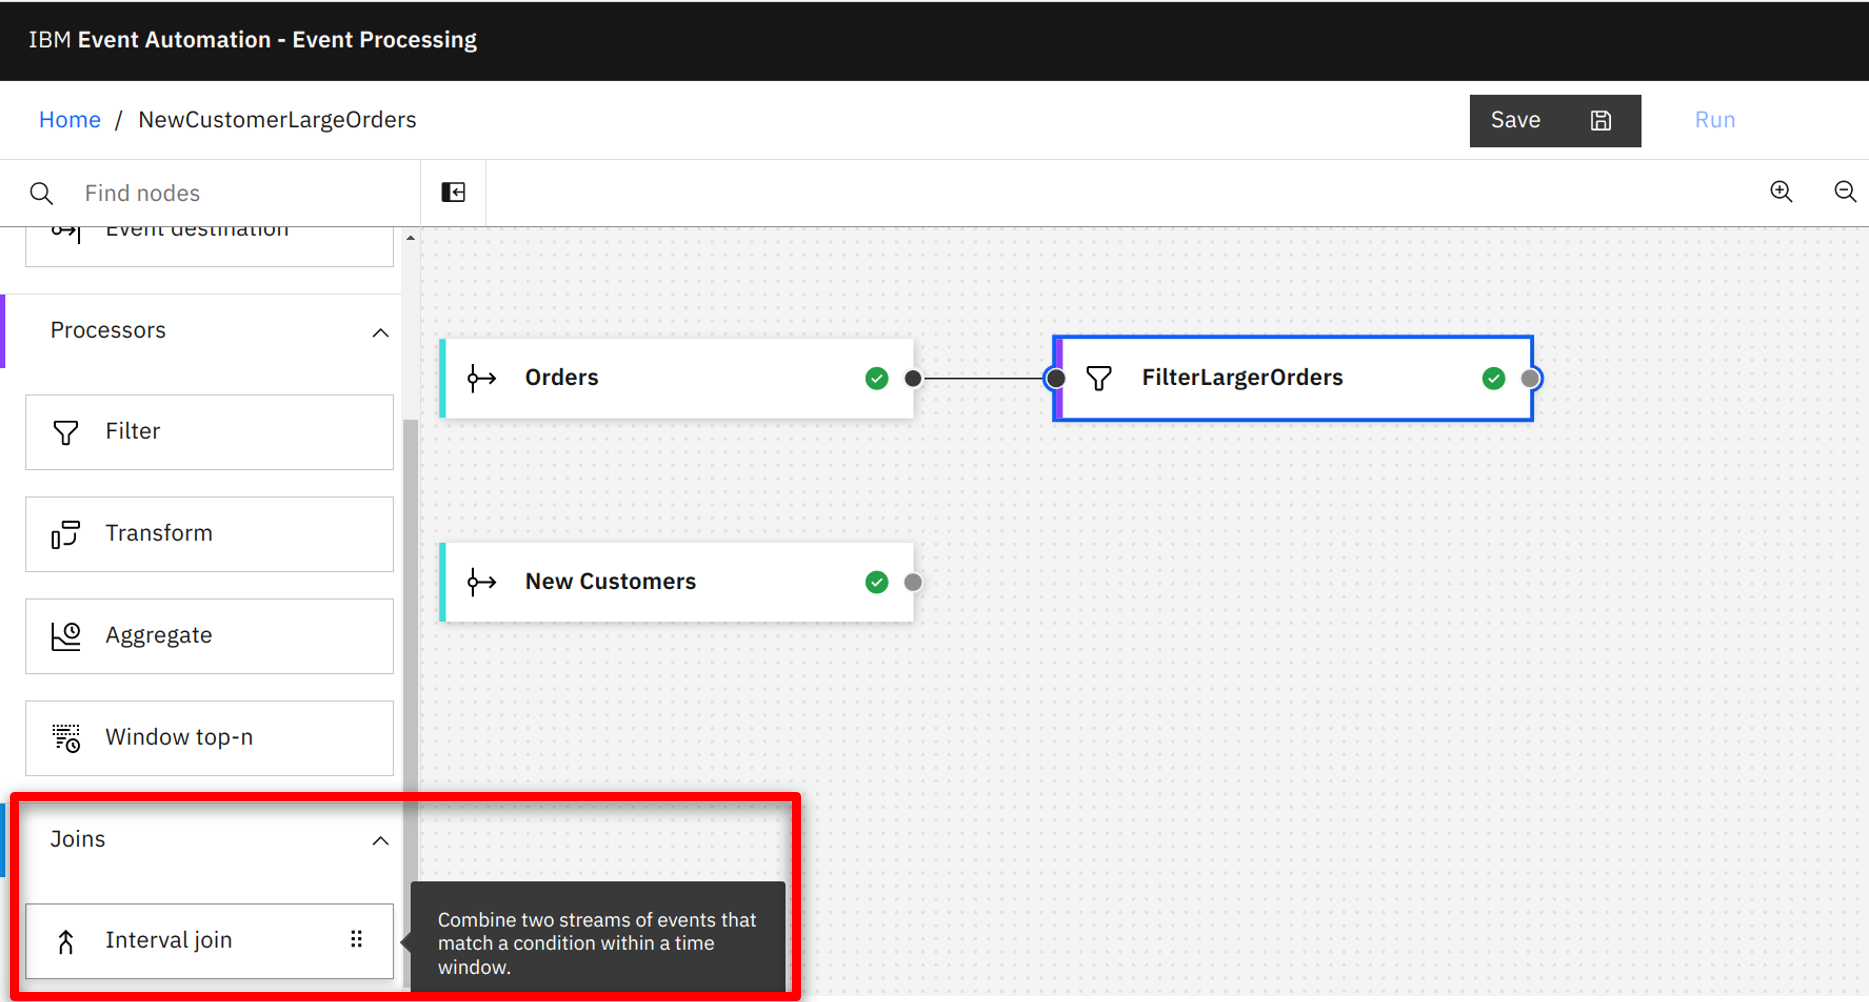
The team wants to join the New Customer and filtered Order streams together, detecting when a new customer has placed a large order within 24 hours of opening a new account. To detect this situation, a JOIN node is used. The team drags and drops the node onto the canvas. |
| Action 3.4.1 |
Press and hold the mouse button on the Interval join node and drag onto the canvas.
 |
| Narration |
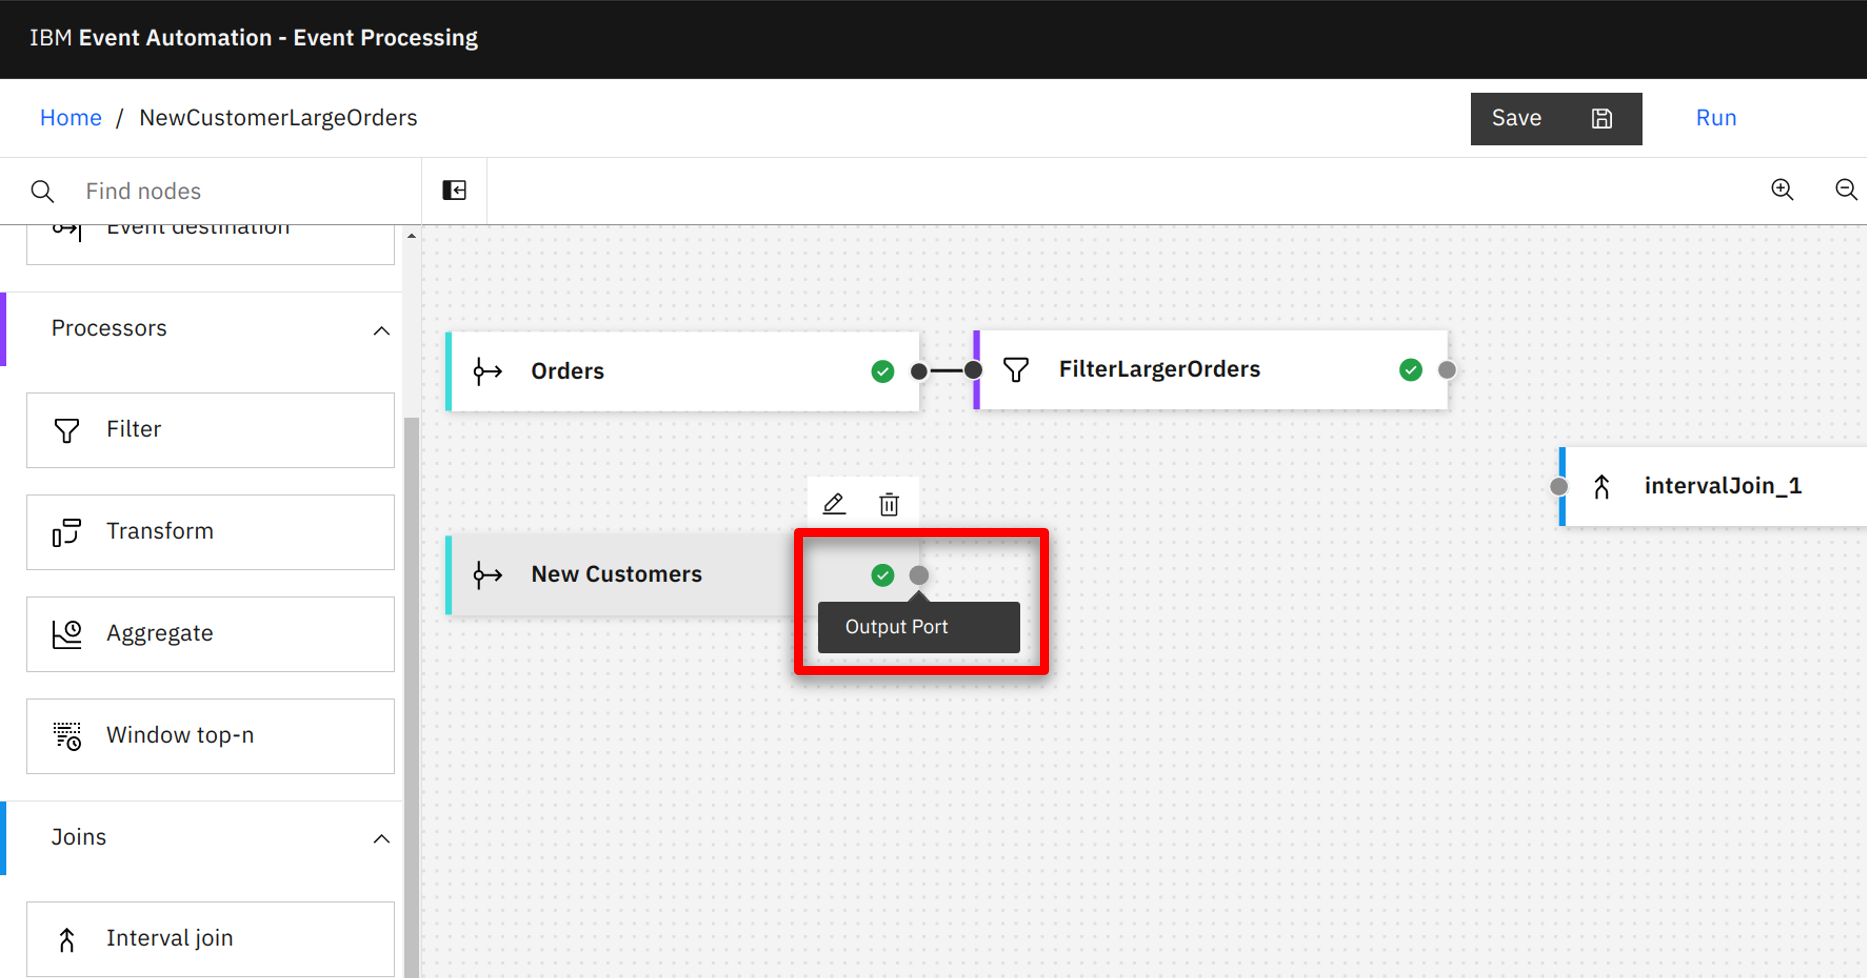
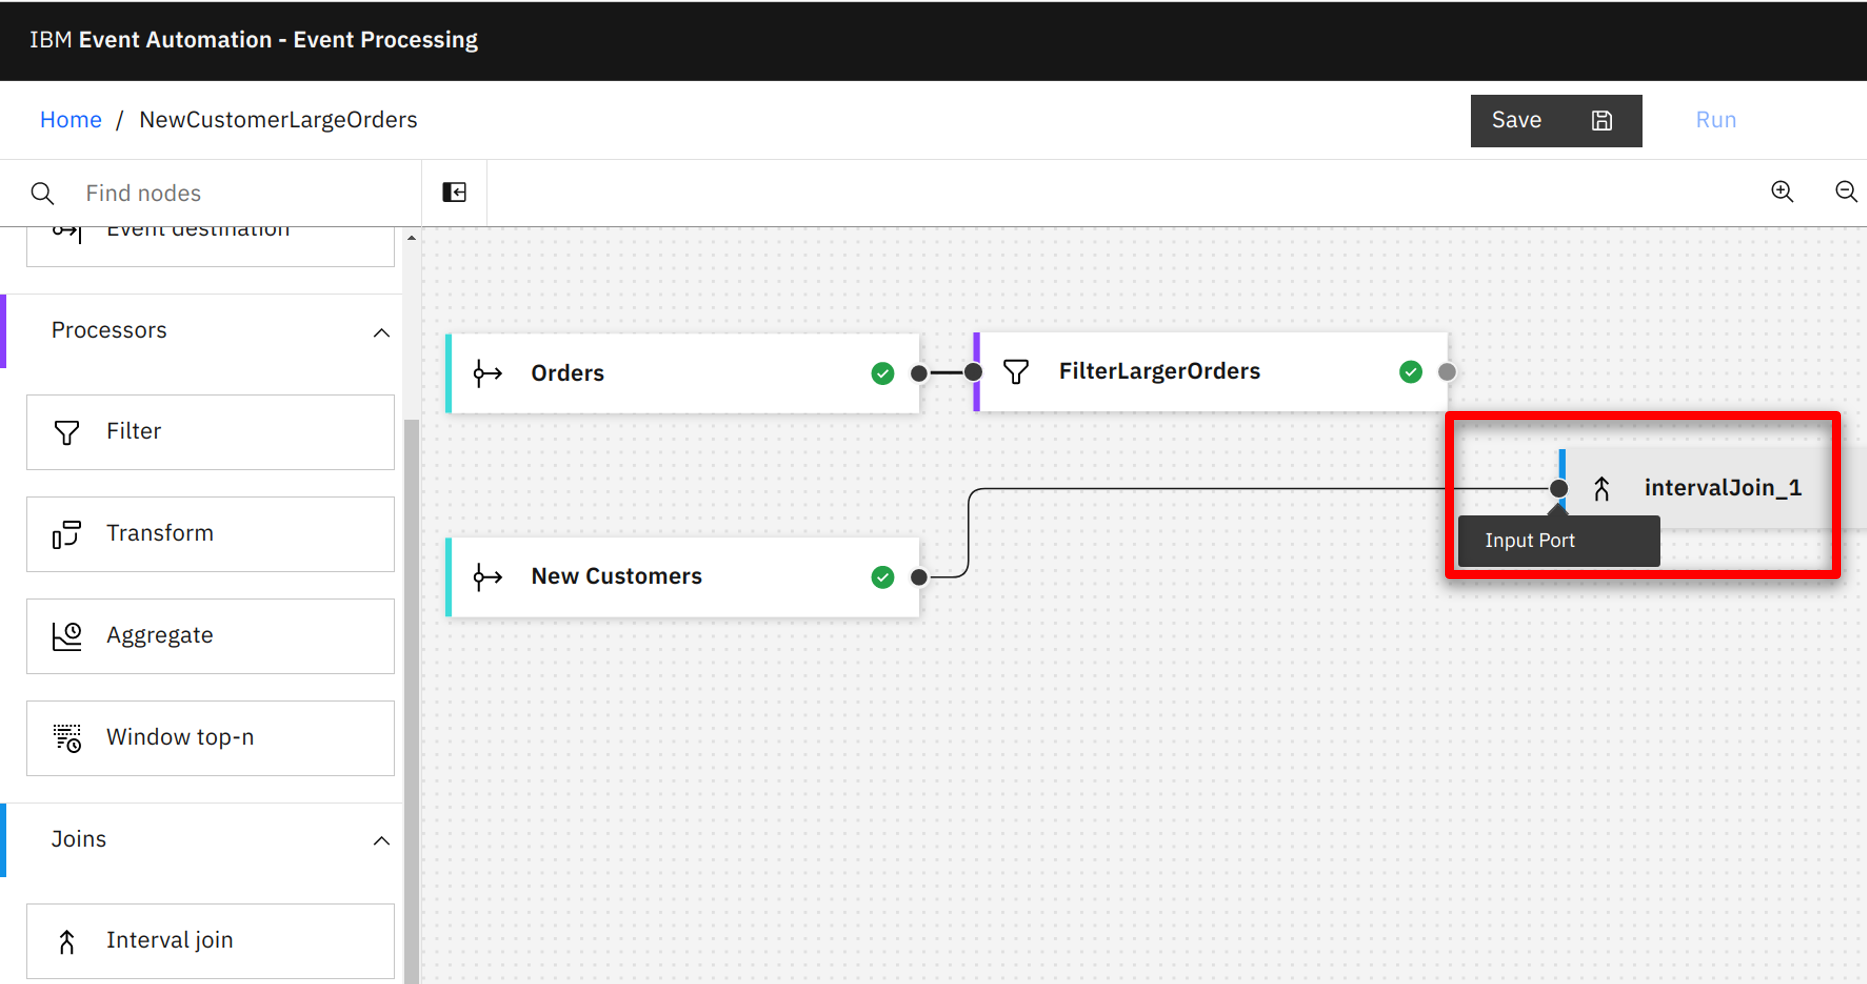
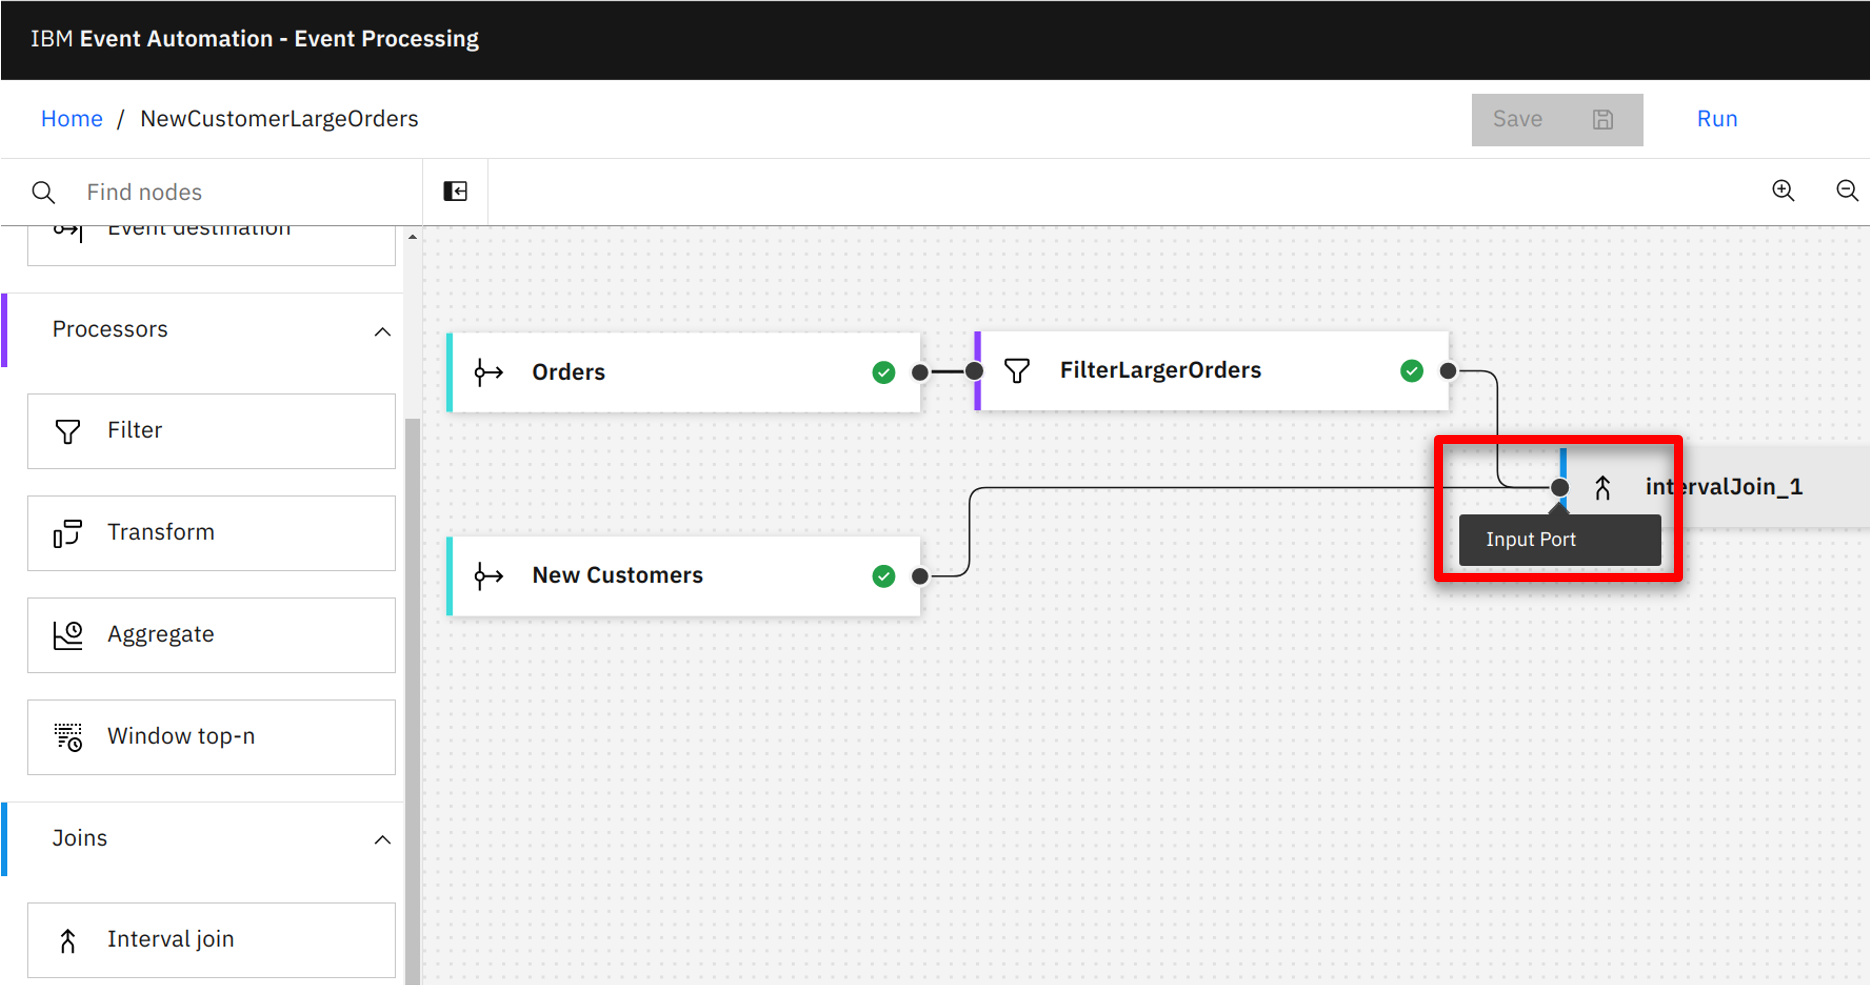
The JOIN node takes two input streams. The marketing team connects the filtered Order event and New Customer event to the input terminal of the JOIN node. |
| Action 3.4.2 |
Hover over the New Customers output terminal and hold the mouse button down.
 |
| Action 3.4.3 |
Drag the connection to the intervalJoin_1 input terminal and release the mouse button.
 |
| Action 3.4.4 |
Complete the same process to connect the FilterLargeOrders output terminal.
 |
| Narration |
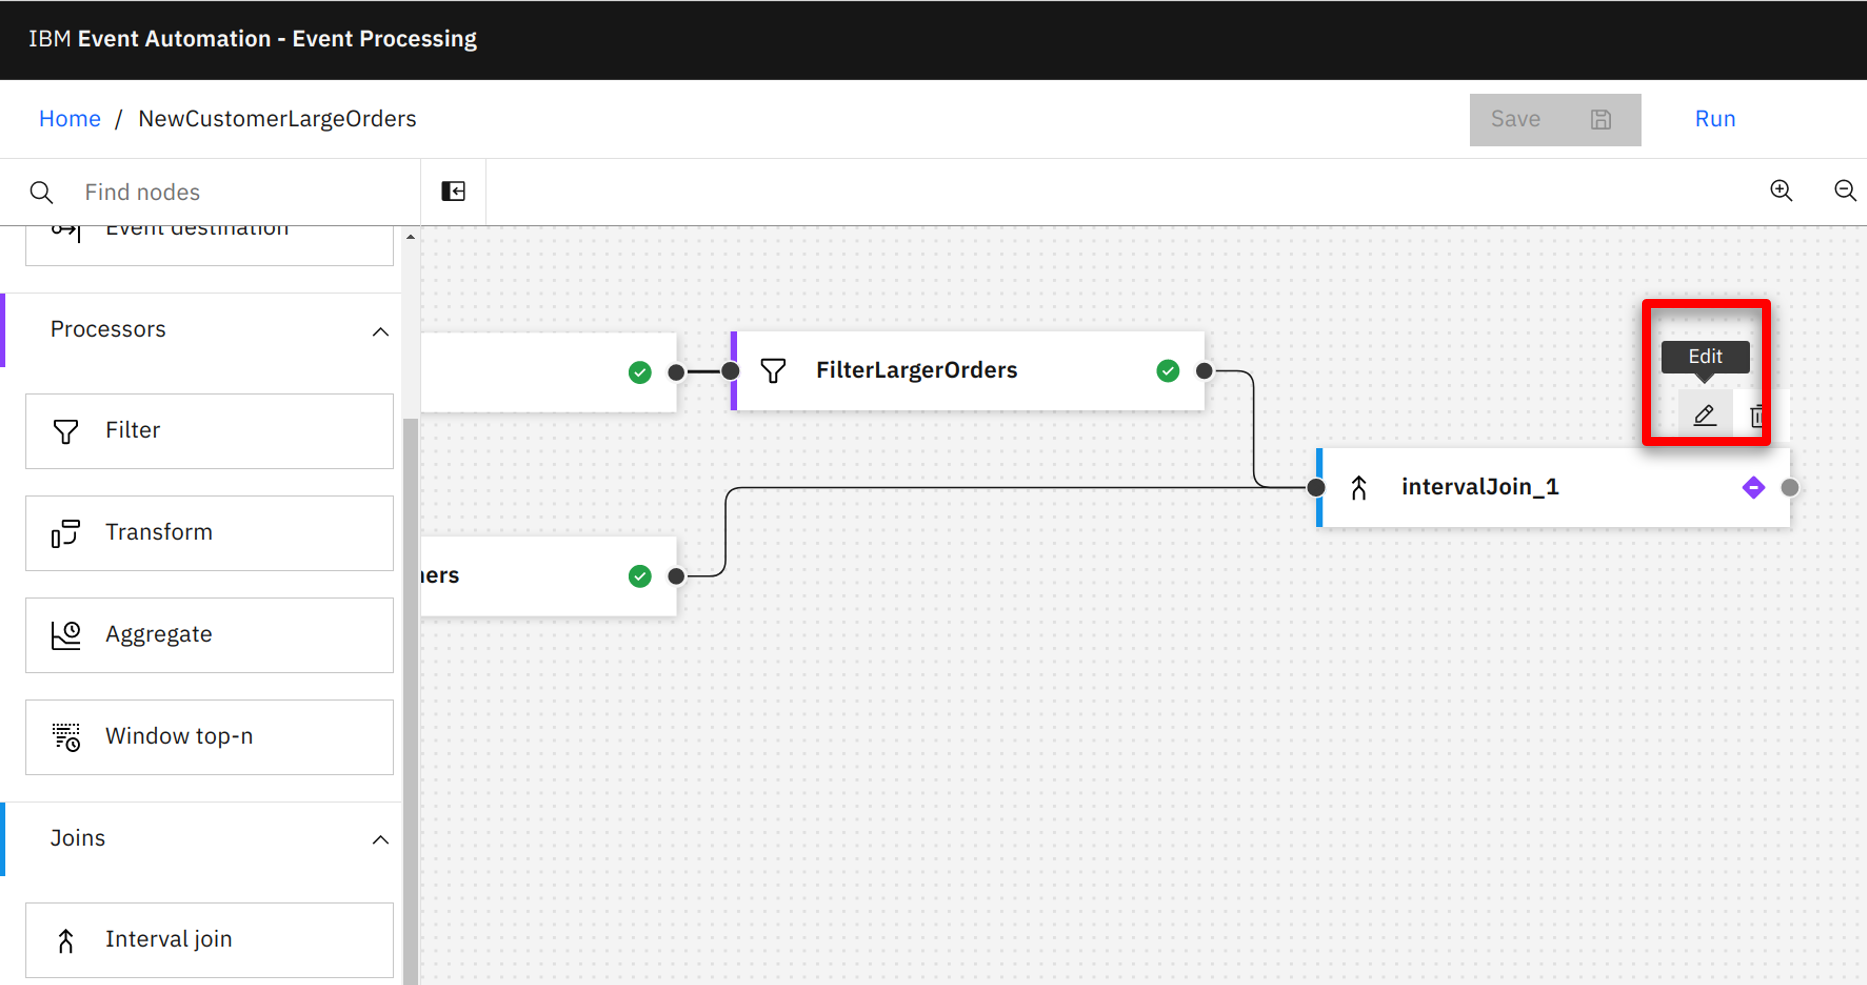
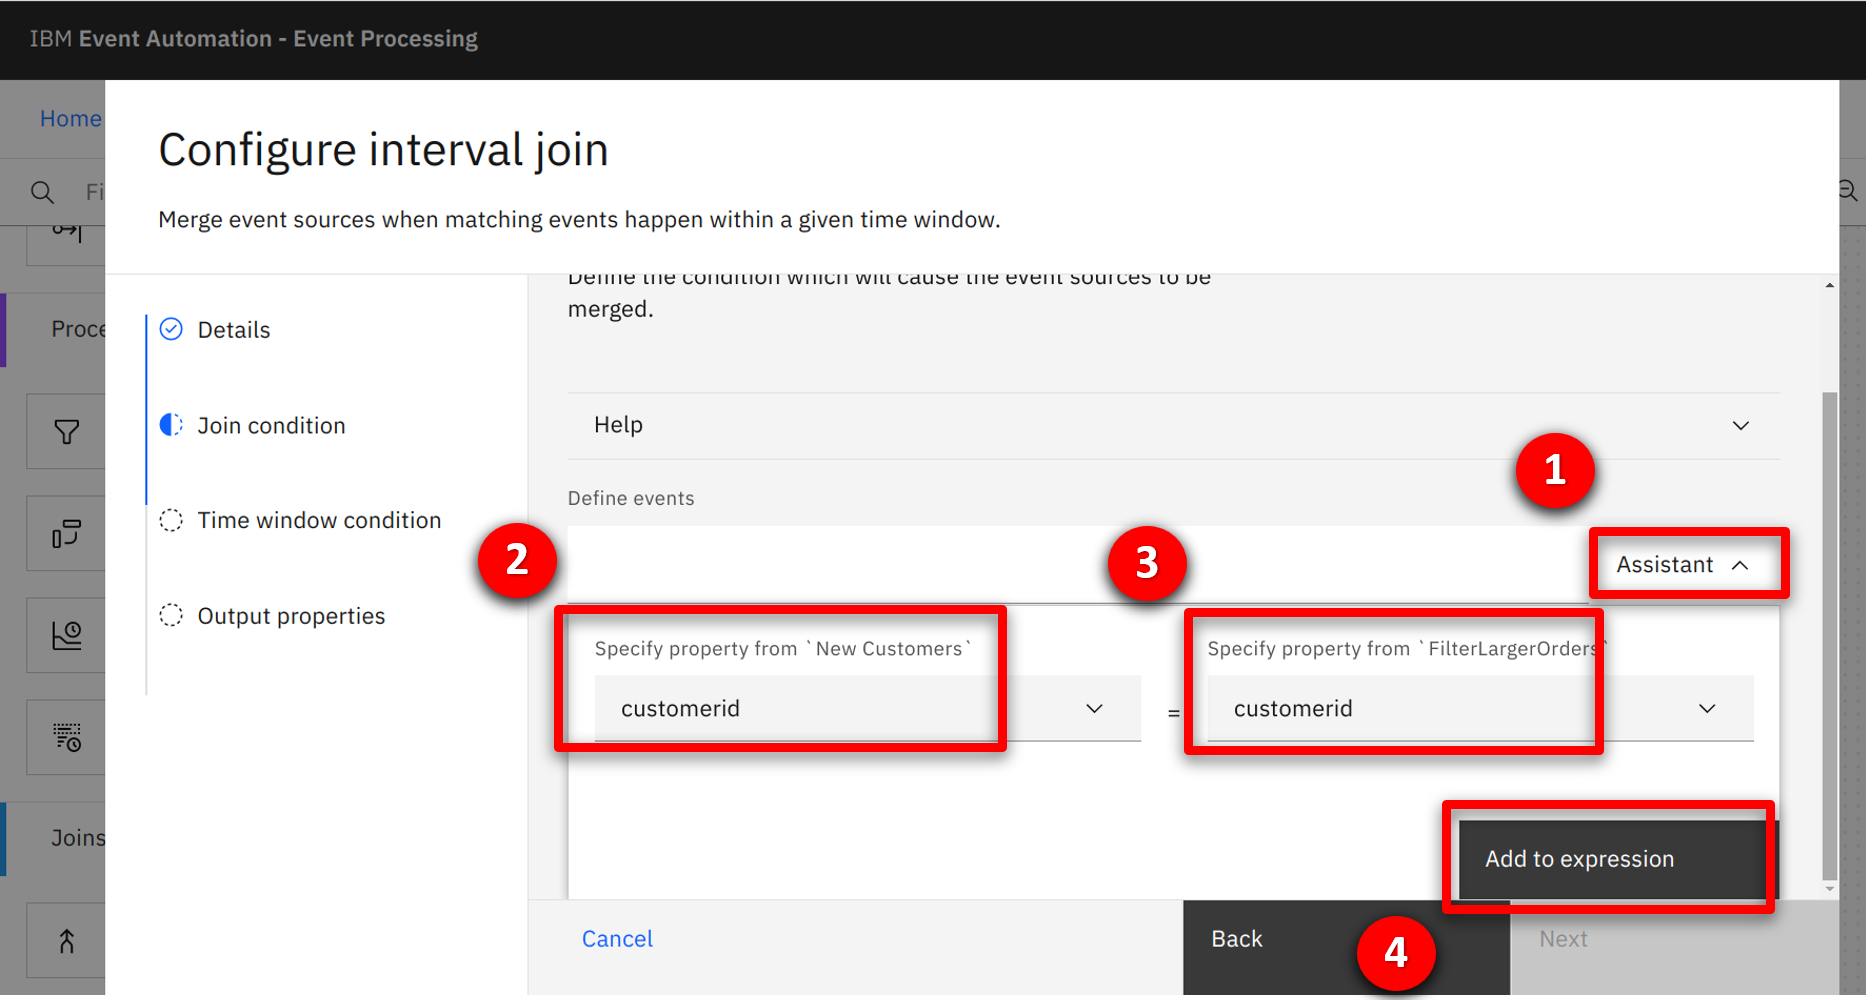
To detect a common event across the two streams, the team needs to configure how the JOIN node can match events. The marketing team uses the ‘expression builder’ to correlate events based on the common customerid field within the two events. |
| Action 3.4.5 |
Hover over the intervalJoin_1 node and select the edit icon.
 |
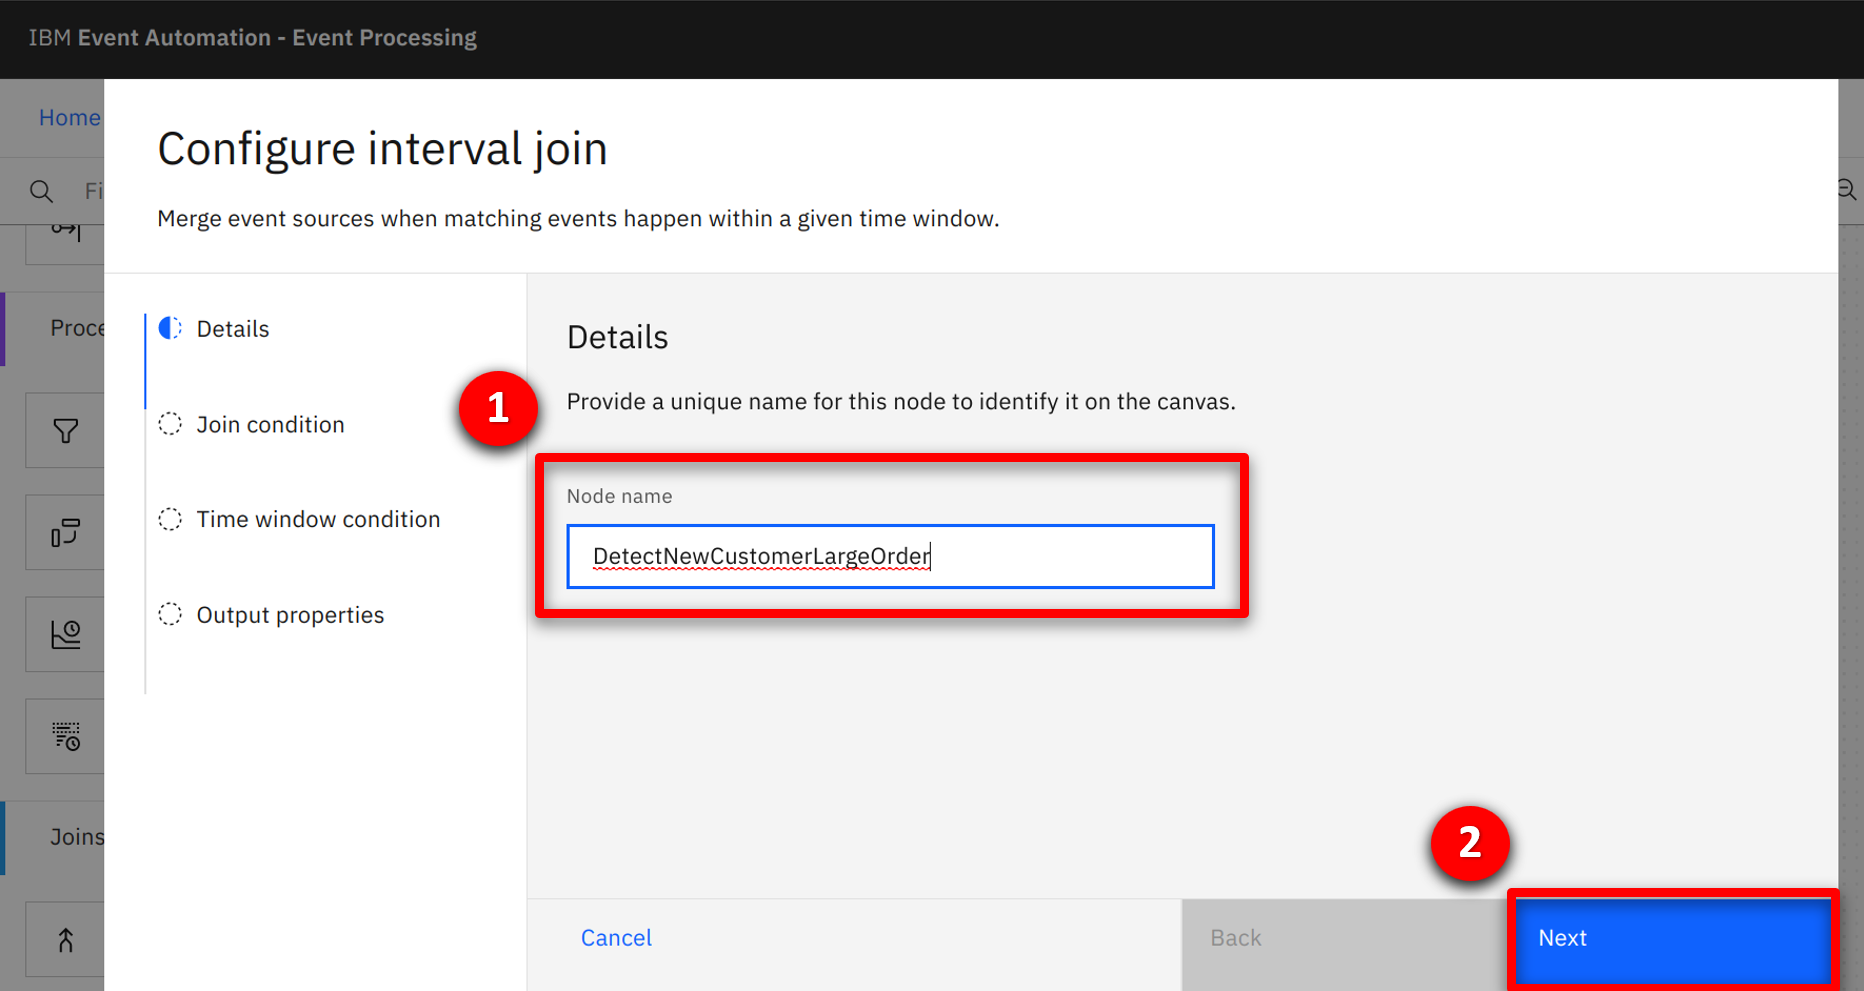
| Action 3.4.6 |
Enter DetectNewCustomerLargeOrder (1) for the node name and click Next (2).
 |
| Action 3.4.7 |
Click on the Assistant (1) pull down. Select customerid (2 + 3) from both pull downs and click Add to expression (4) to complete.
 |
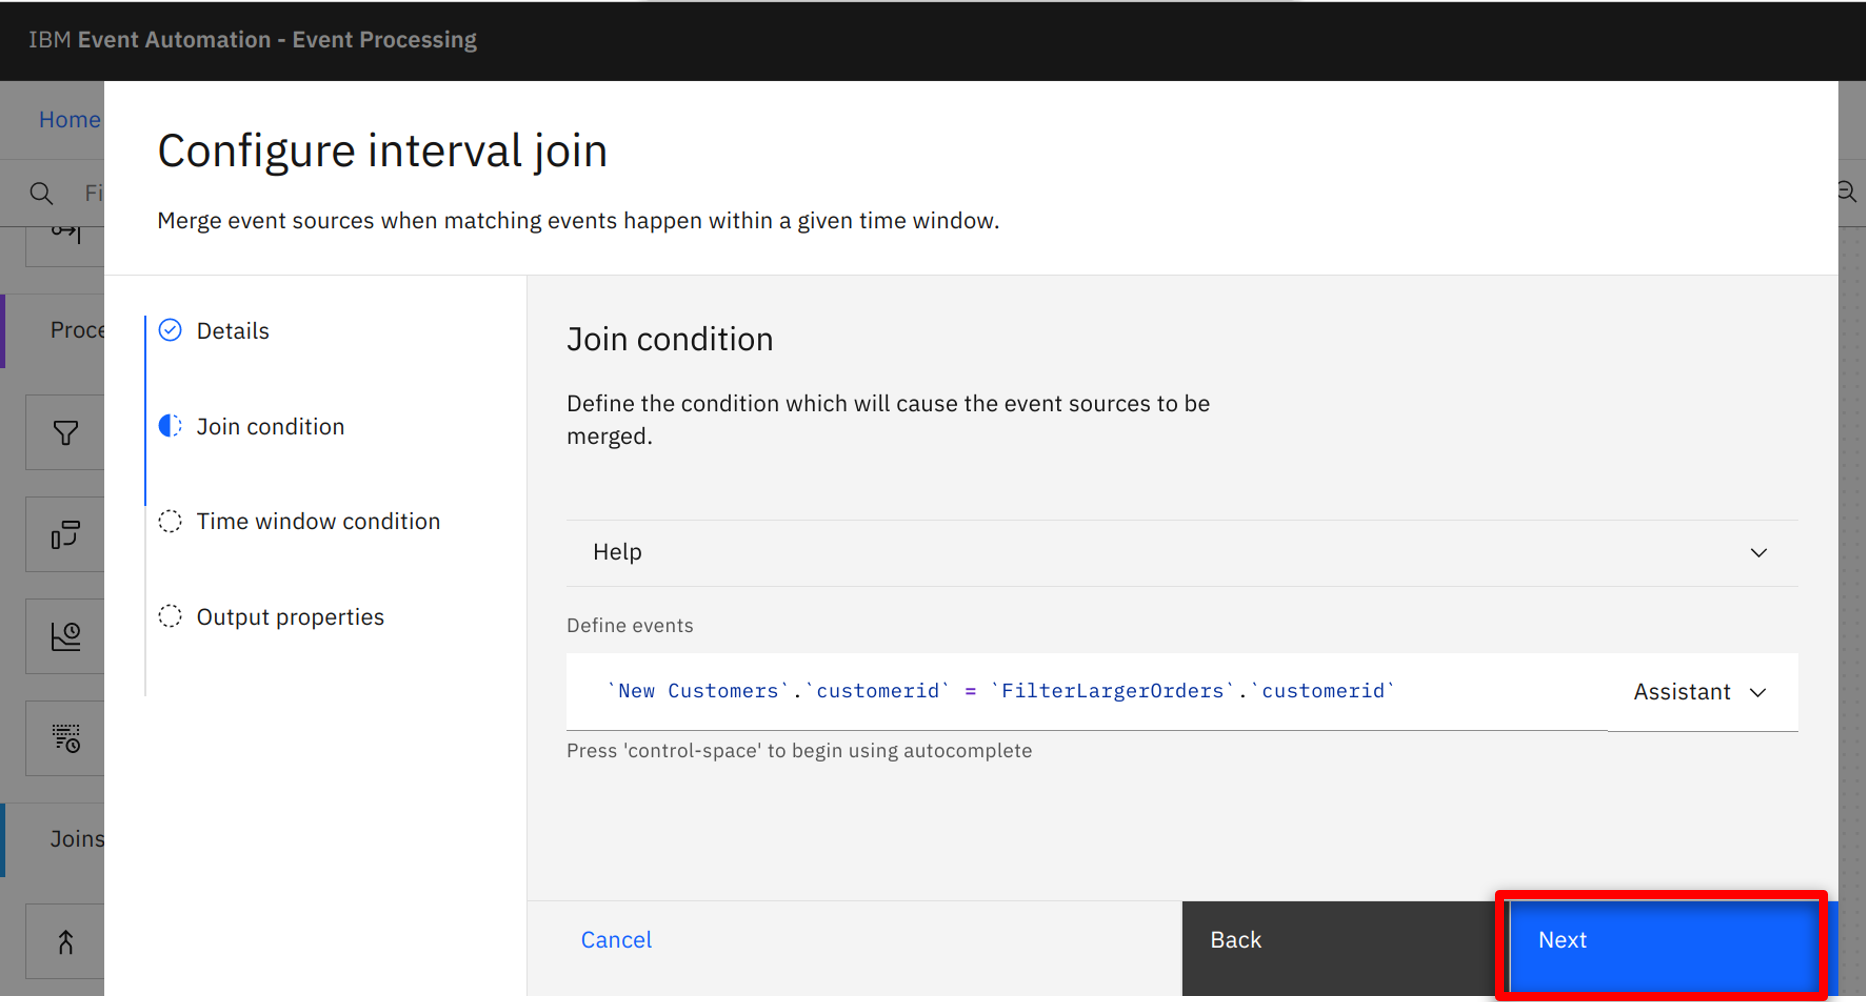
| Action 3.4.8 |
The completed condition will be shown, click on Next.
 |
| Narration |
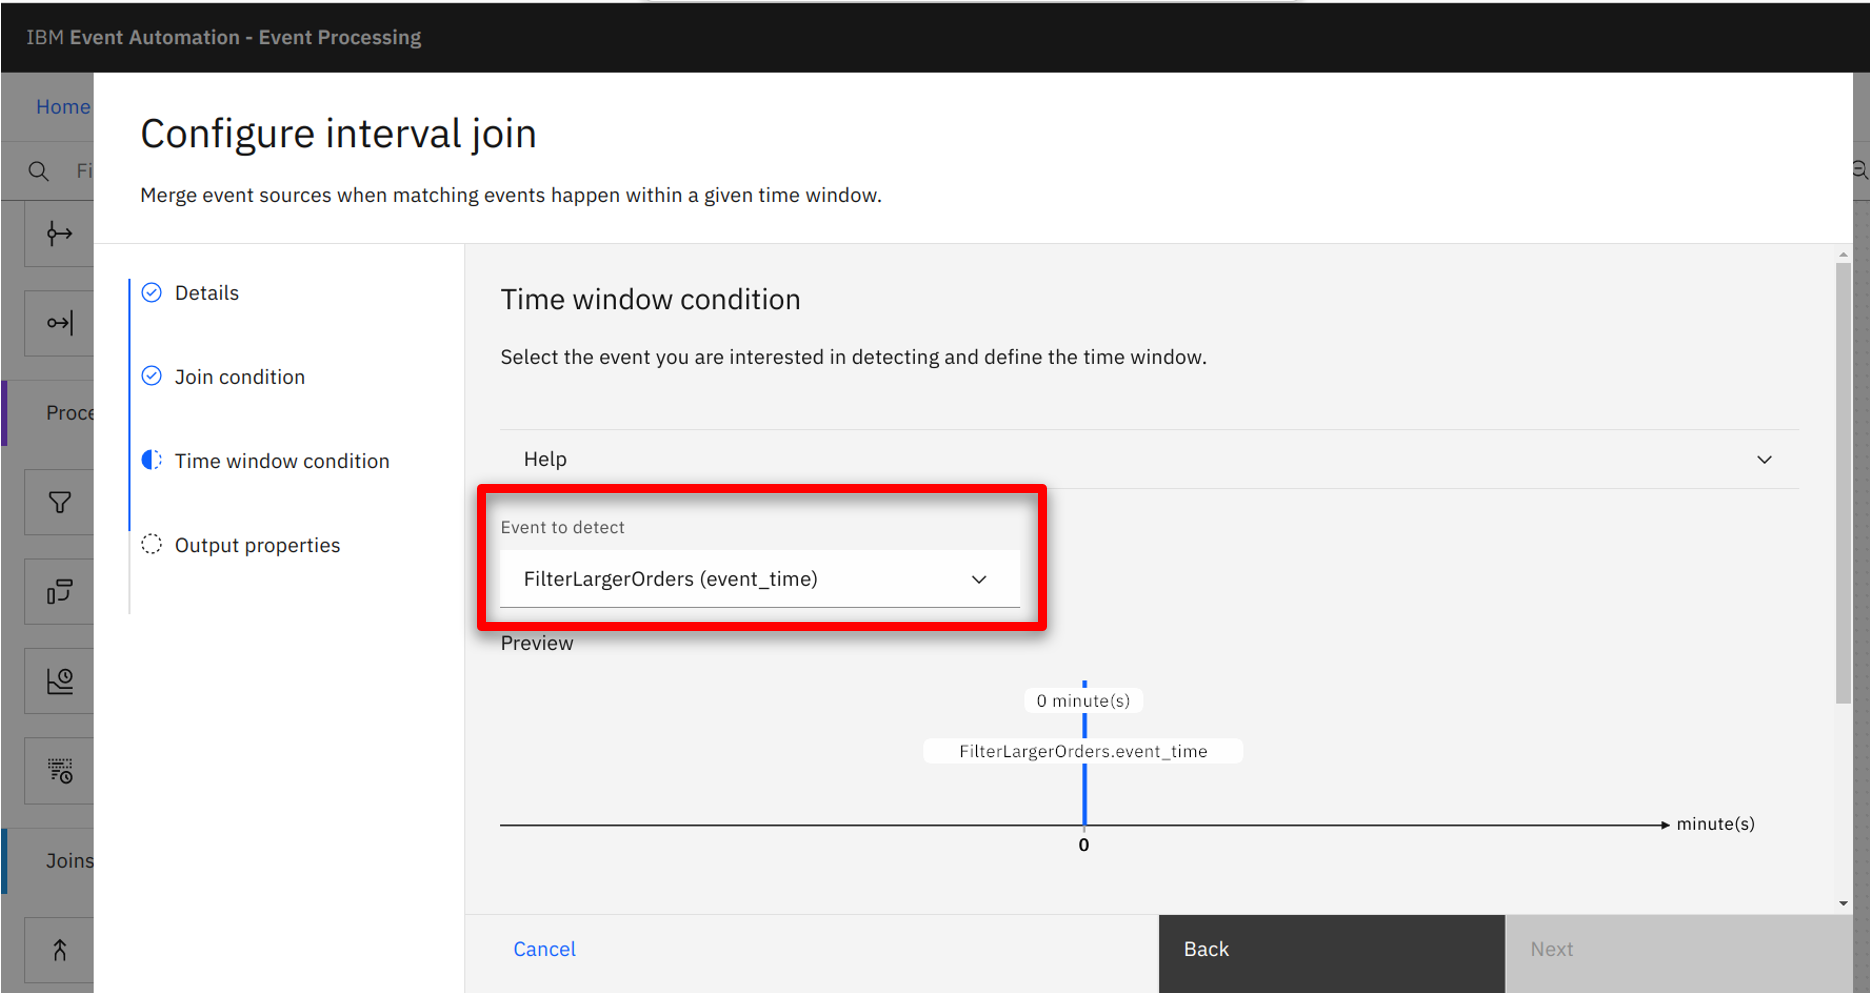
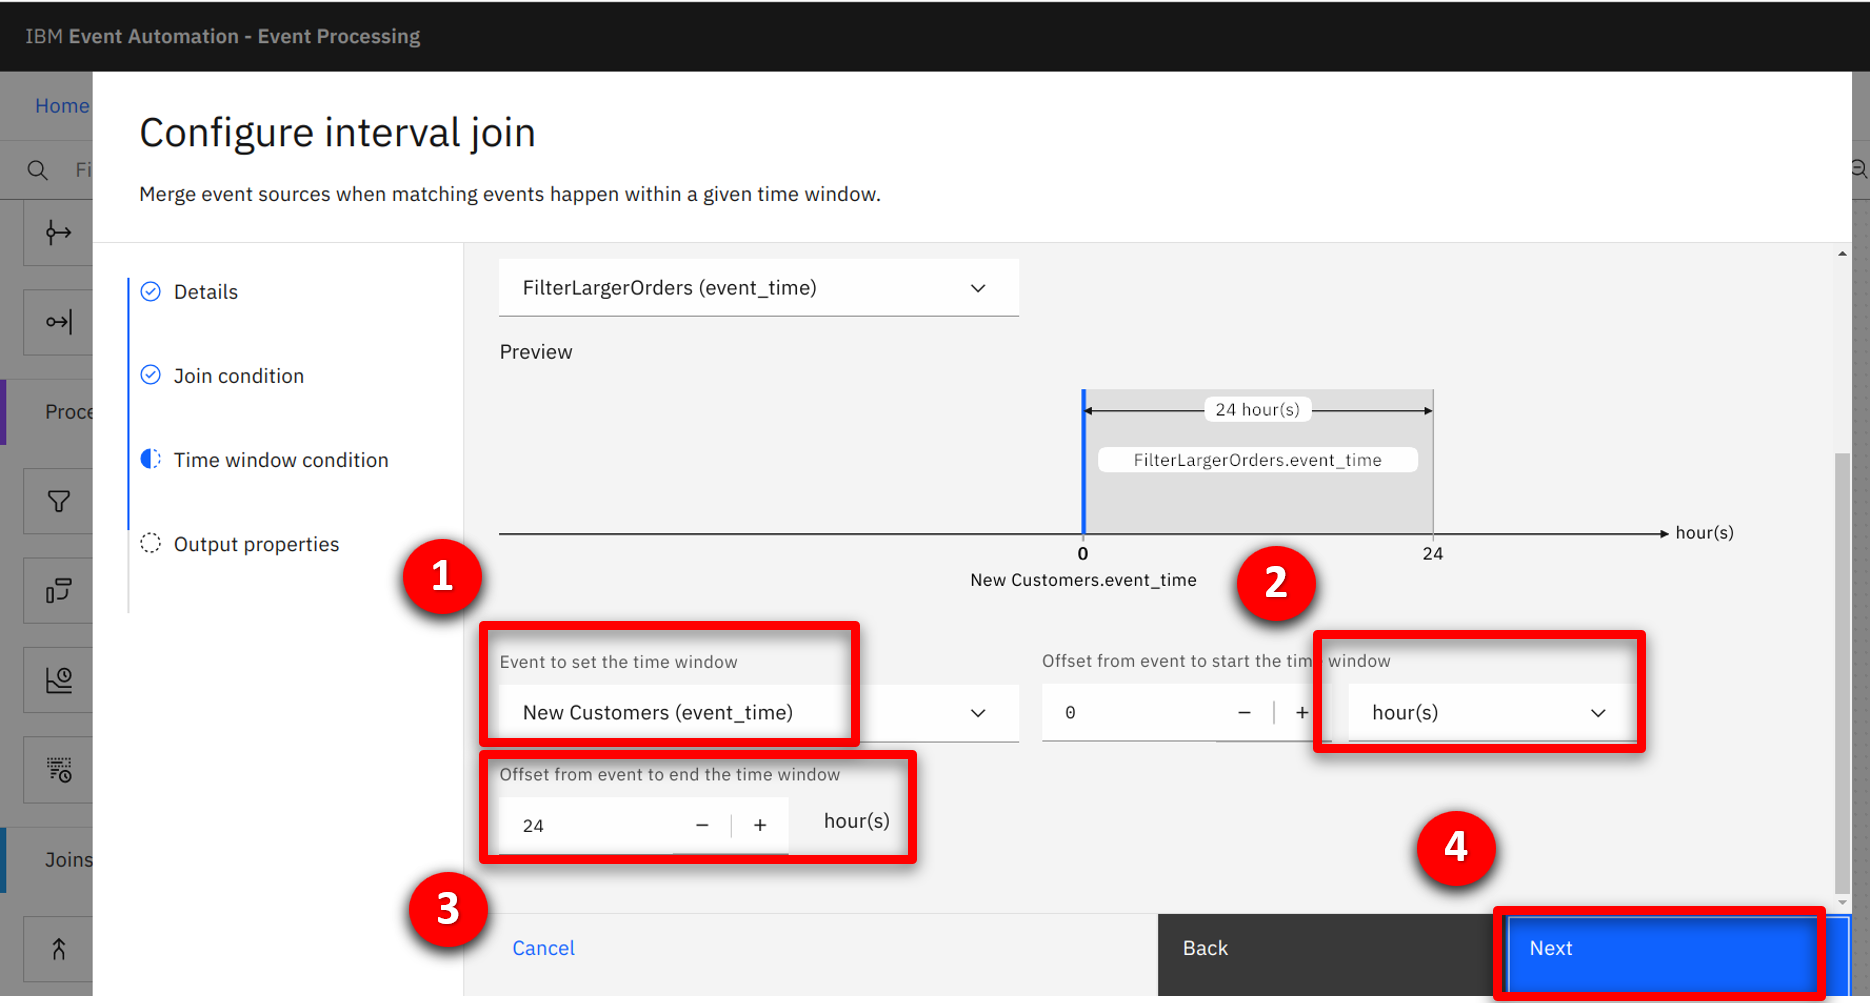
The JOIN node uses a time window to detect a situation. There are two events involved: a triggering event that starts the time window, and a second event that detects the situation. For the marketing team’s requirement, the New Customer event is the triggering event as this must always happen first, and the Order event represents the situation being detected. The team specifies this in the UI. |
| Action 3.4.9 |
Select FilterLargeOrders (event_time) for the event to detect.
 |
| Action 3.4.10 |
Select New Customers (event_time) (1) for the event to start the time window, change the metric to hours (2), number of hours to 24 (3), and click Next (4).
 |
| Narration |
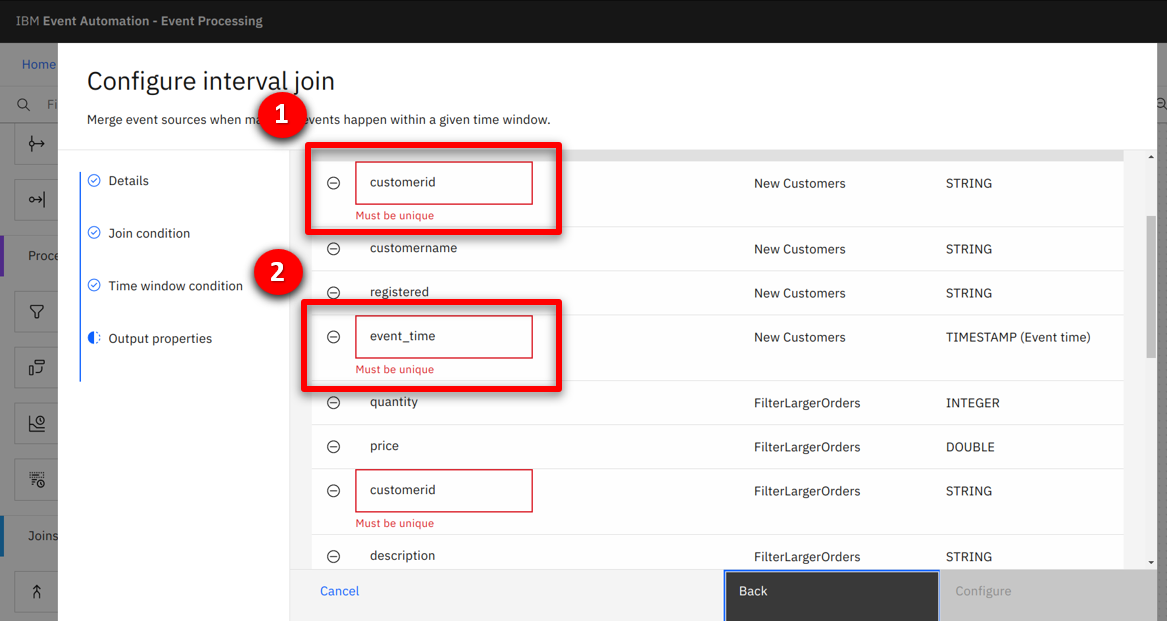
The output data from the JOIN node will be a combination of the fields from the two events. Because the two events have been merged, there are two duplicate fields (customerid and event_time). This can be resolved by either renaming or removing the fields. As these are duplicates, the marketing team deletes the fields. |
| Action 3.4.11 |
Remove the duplicate fields by clicking on the ‘-‘ sign: customerid (1), event_time (2).
 |
| Action 3.4.12 |
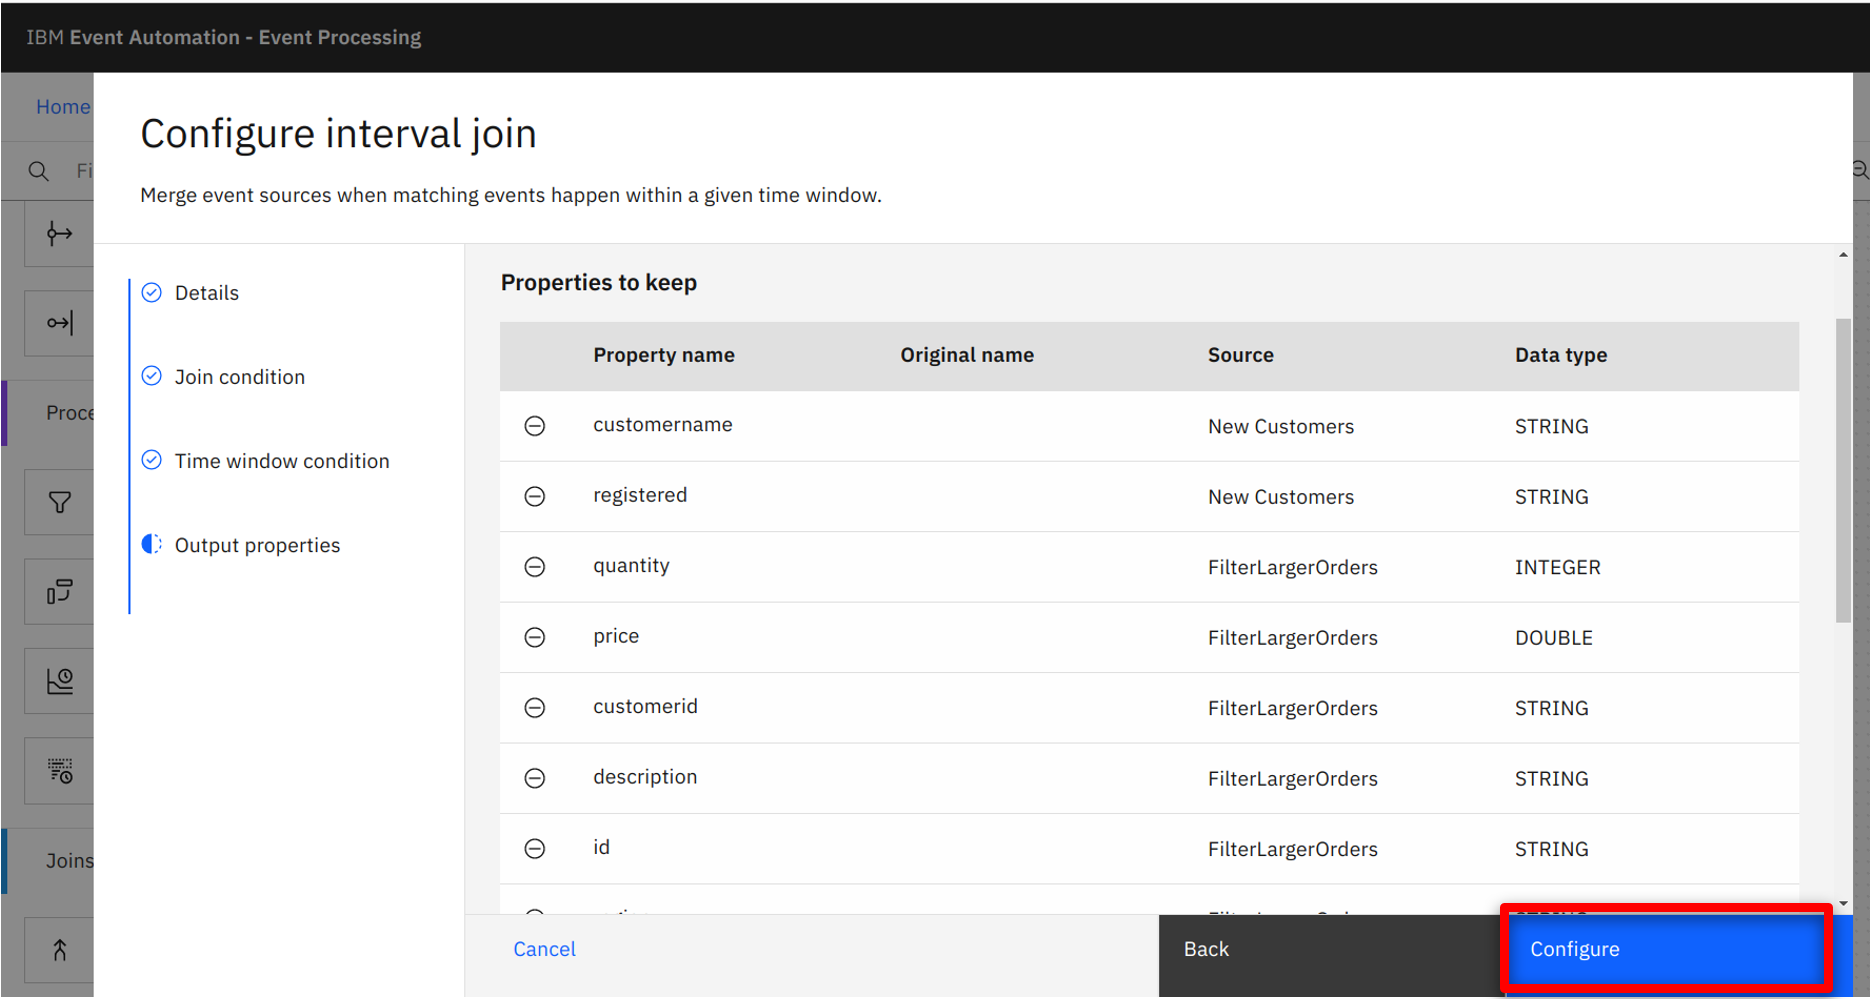
Click Configure.
 |
Go to top
4 - Sending the output to the marketing application
| 4.1 |
Configure an event destination for the output stream |
| Narration |
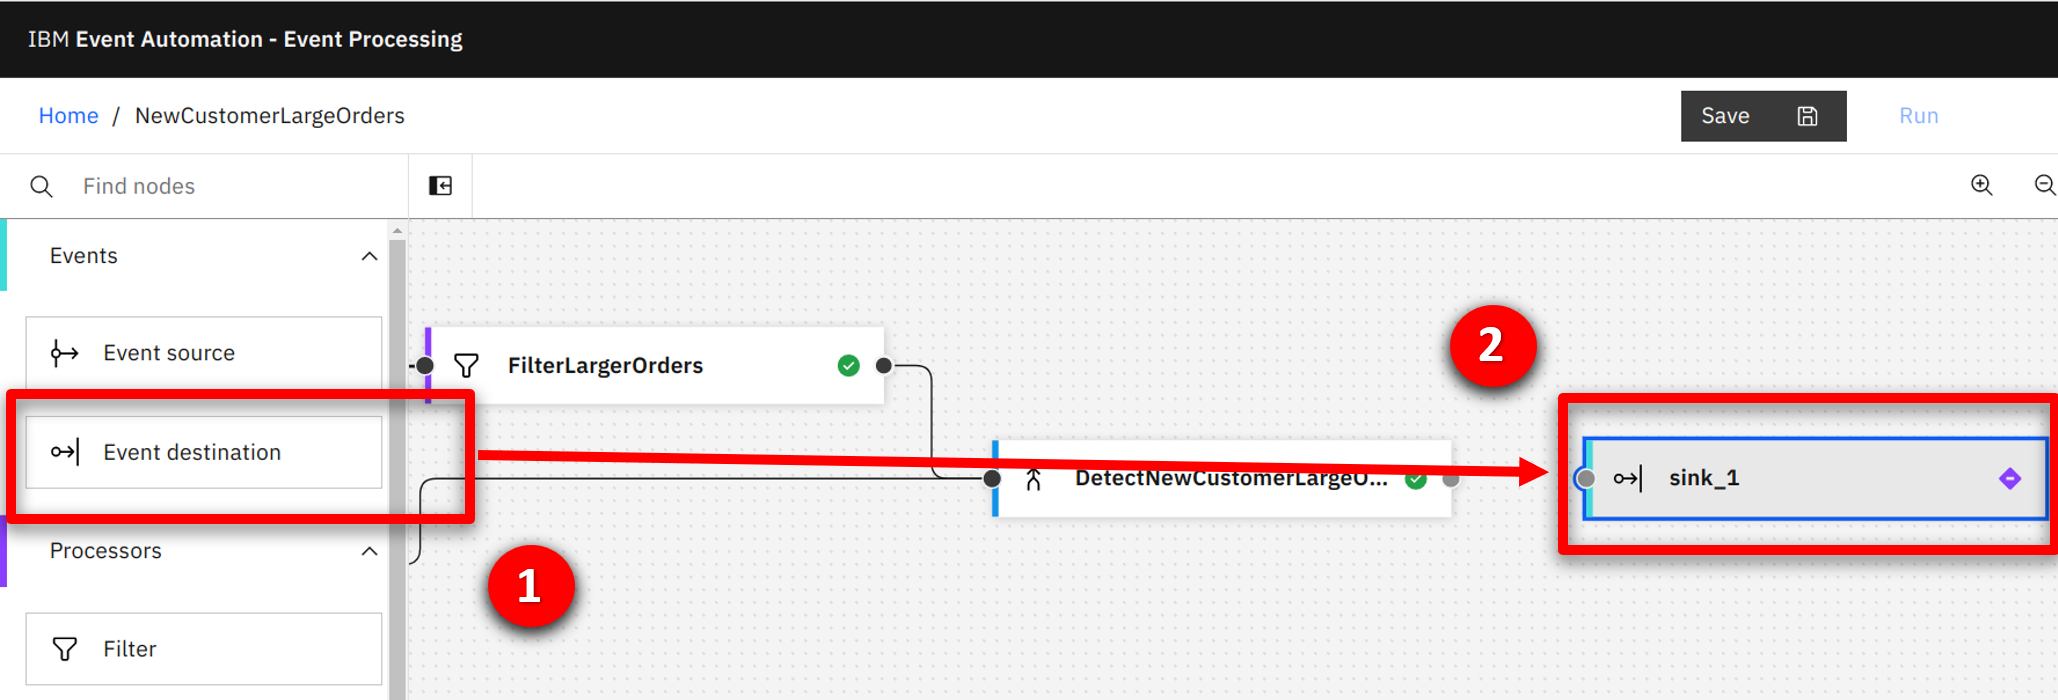
The marketing team wants to emit the detected events to the loyalty app. The app will then send a promotion to the customer. They drag and drop an ‘Event destination’ node onto the canvas. The node is automatically called sink_1. The term ‘sink’ is used by kafka to refer to a resource, such as a topic that can receive incoming events. |
| Action 4.1.1 |
Press and hold the mouse button on the Event destination (1) node and drag onto the canvas (2).
 |
| Narration |
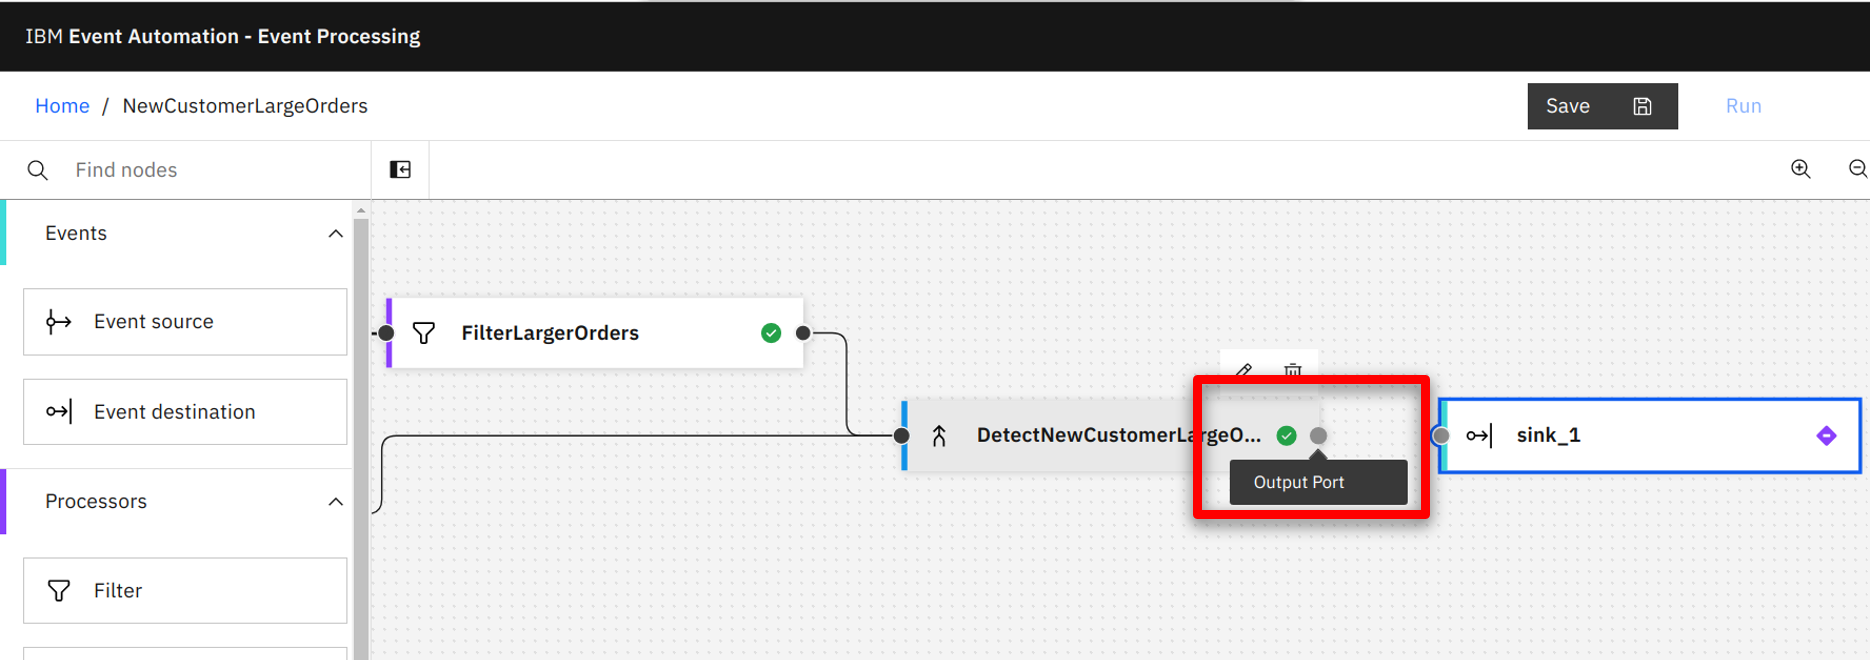
They connect the DetectNewLargeOrder output terminal to the ‘Event destination’ input terminal. |
| Action 4.1.2 |
Hover over the DetectNewLargeOrder output terminal and hold the mouse button down.
 |
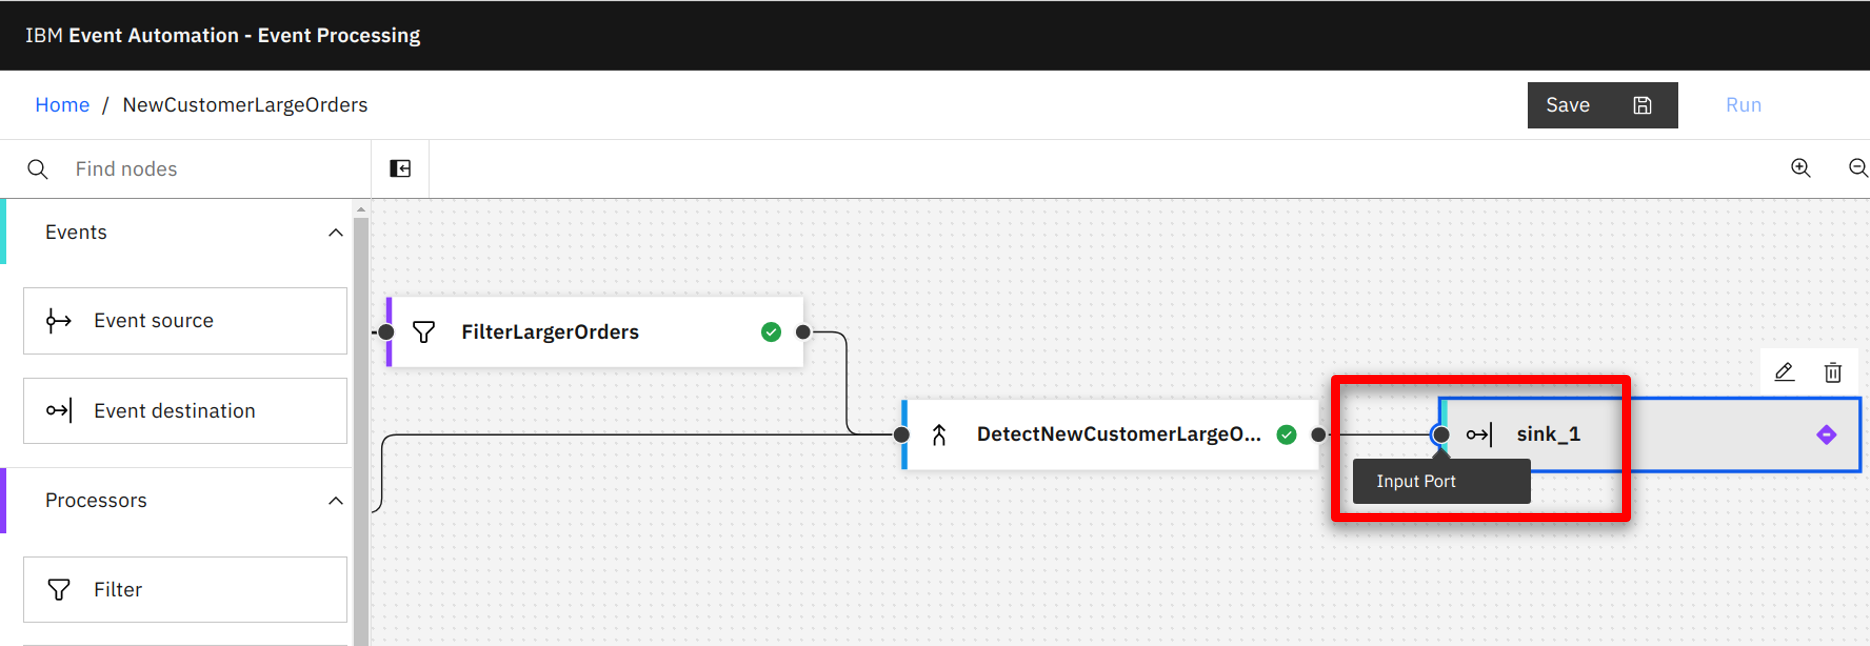
| Action 4.1.3 |
Drag the connection to the sink_1 input terminal and release the mouse button.
 |
| Narration |
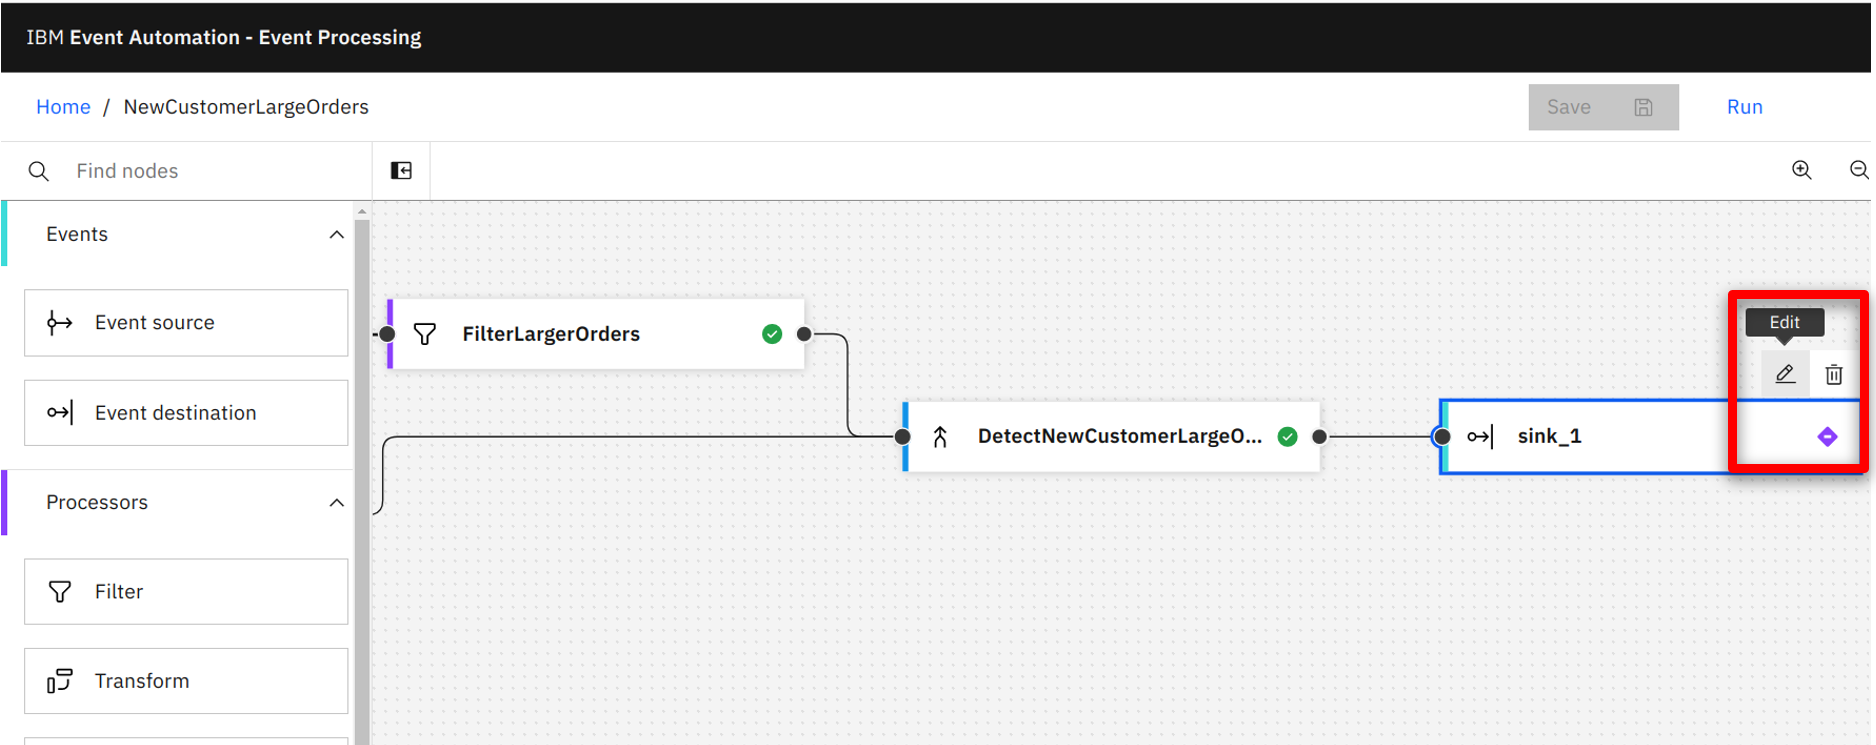
The marketing team edits the node configuration to specify the name and network address of the output stream. |
| Action 4.1.4 |
Hover over the sink_1 node and select the edit icon.
 |
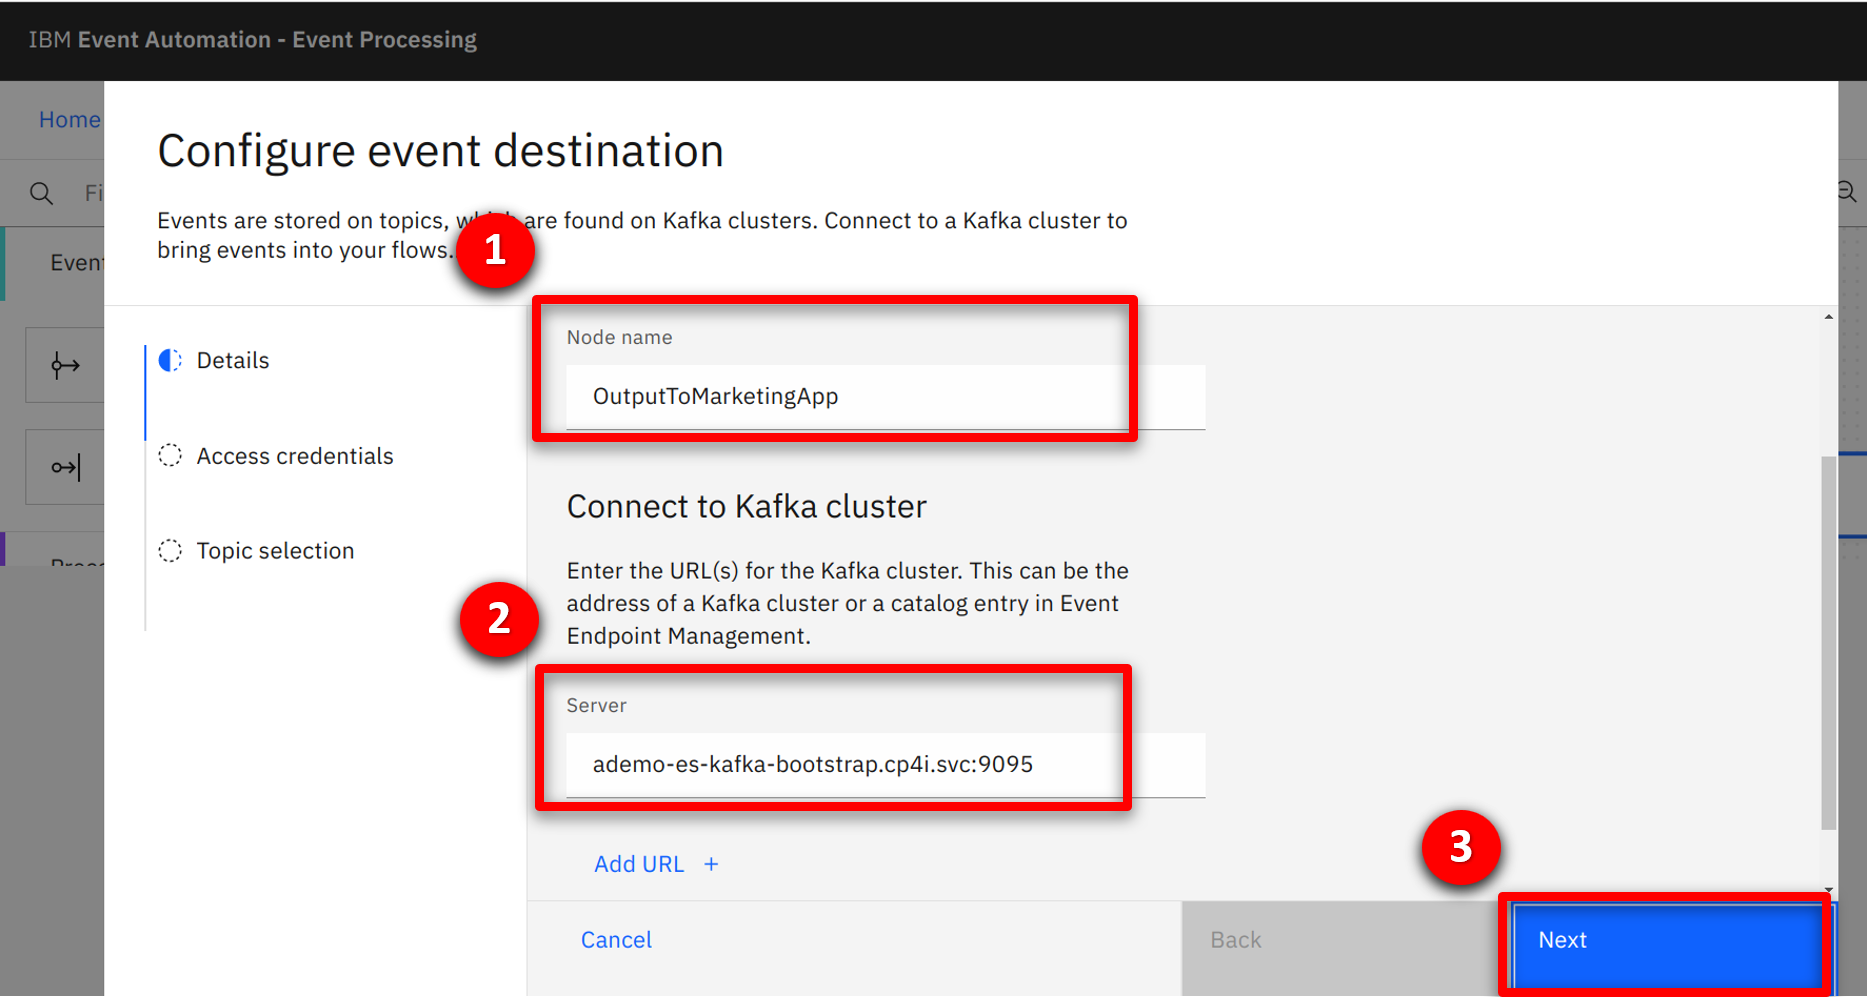
| Action 4.1.5 |
Enter OutputToMarketingApp (1) for the node name, ademo-es-kafka-bootstrap.cp4i.svc:9095 (2) in the server field and click Next (3).
 |
| Narration |
They configure the security details, accepting the certificates being used by the event stream. They specify the username / password credentials to access the event stream. |
| Action 4.1.6 |
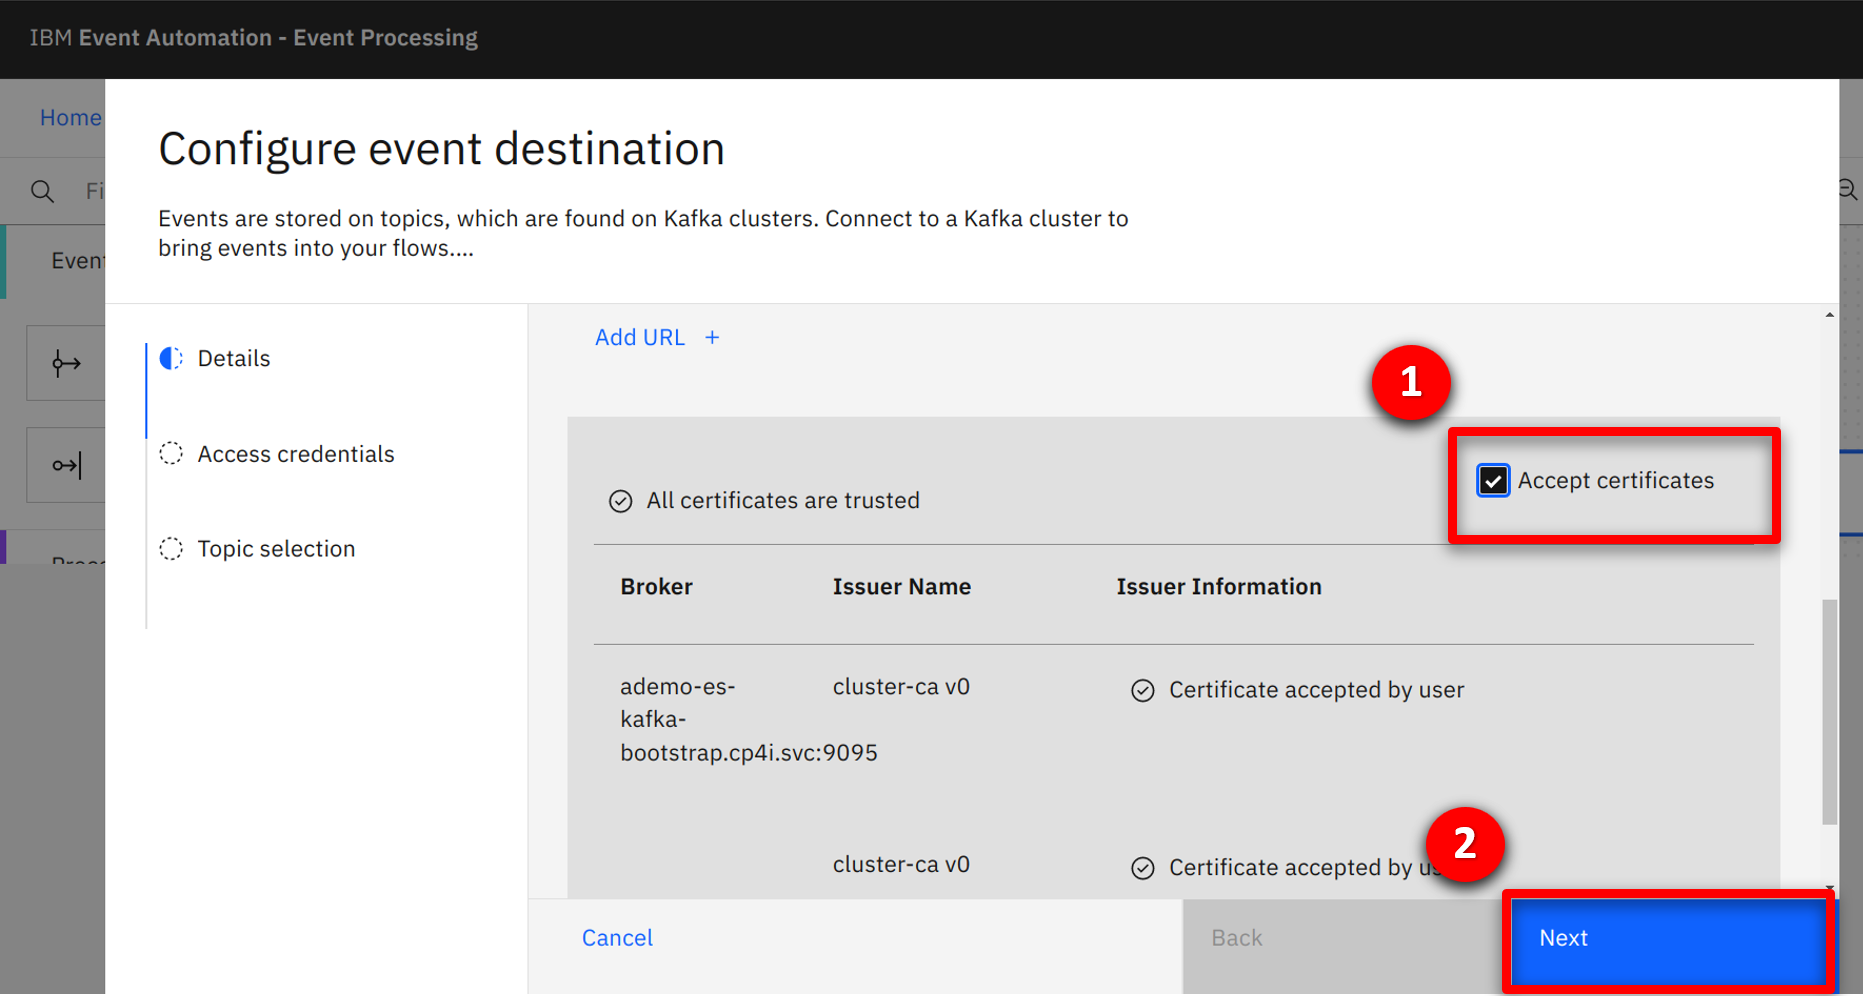
Check Accept certificates (1) and click Next (2).
 |
| Action 4.1.7 |
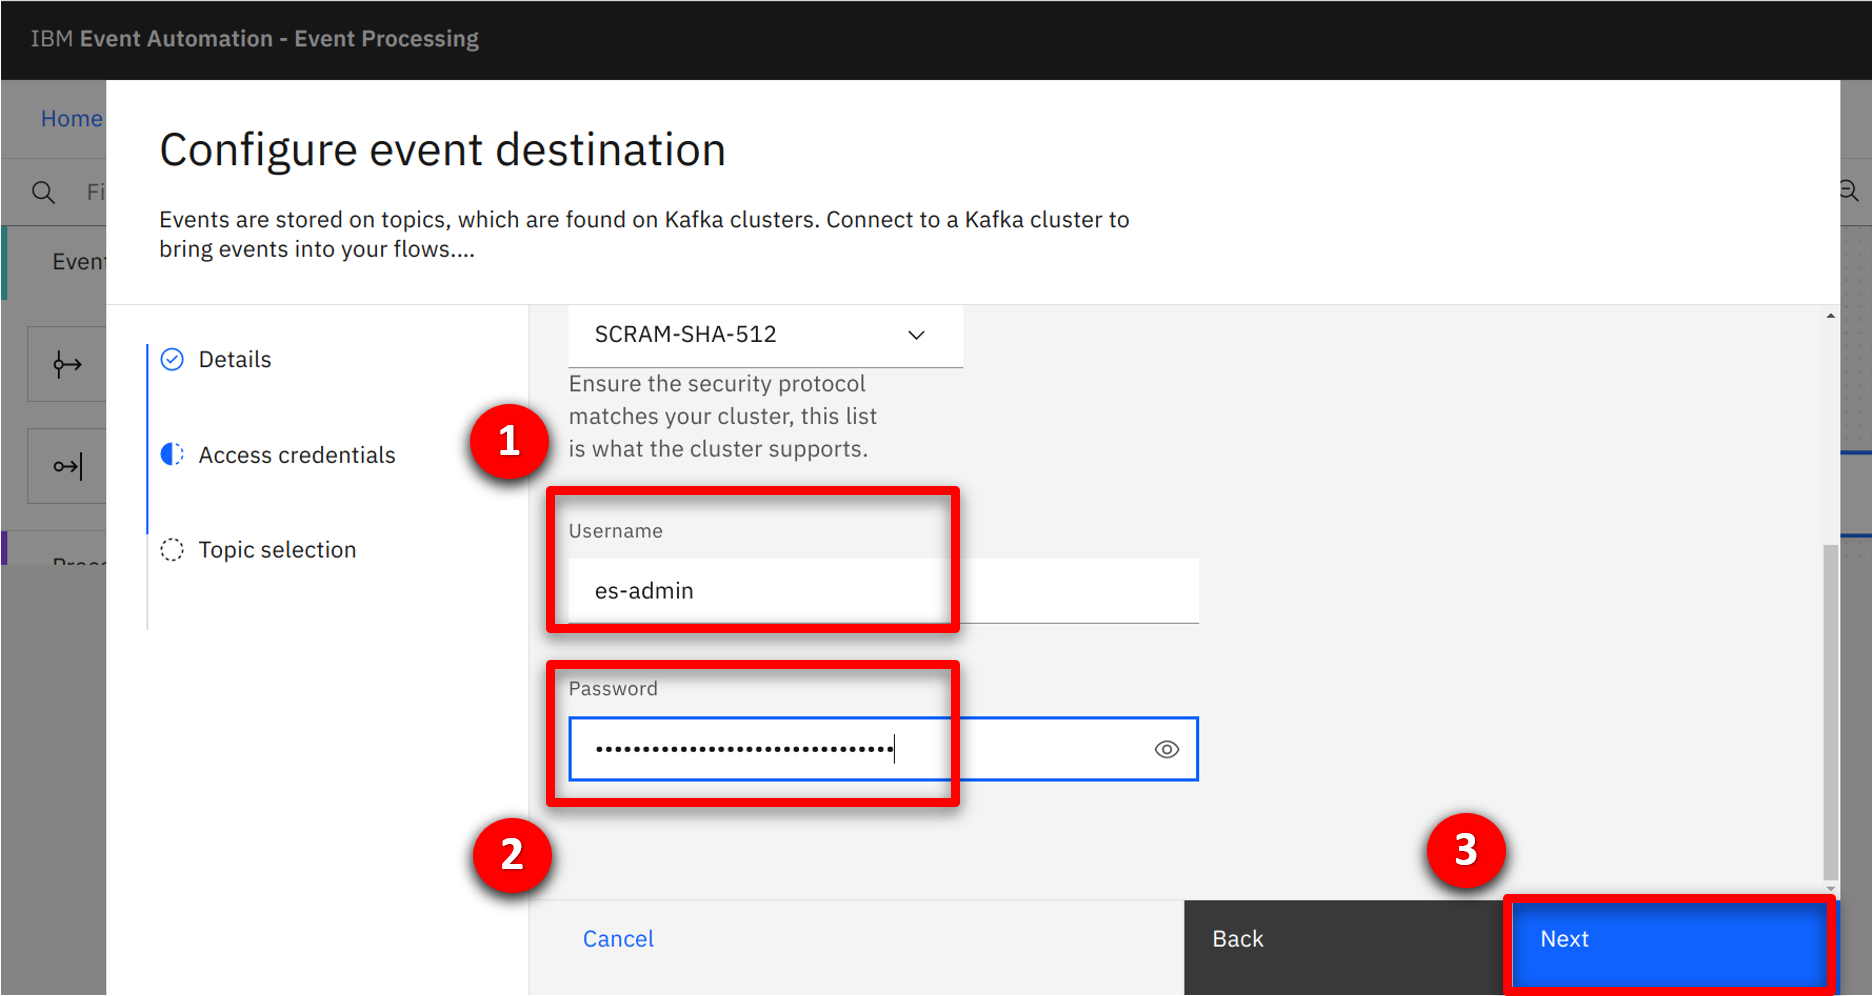
Specify es-admin (1) for the username, the password (2) value was outputted in the preparation section and click Next (3).
 |
| Narration |
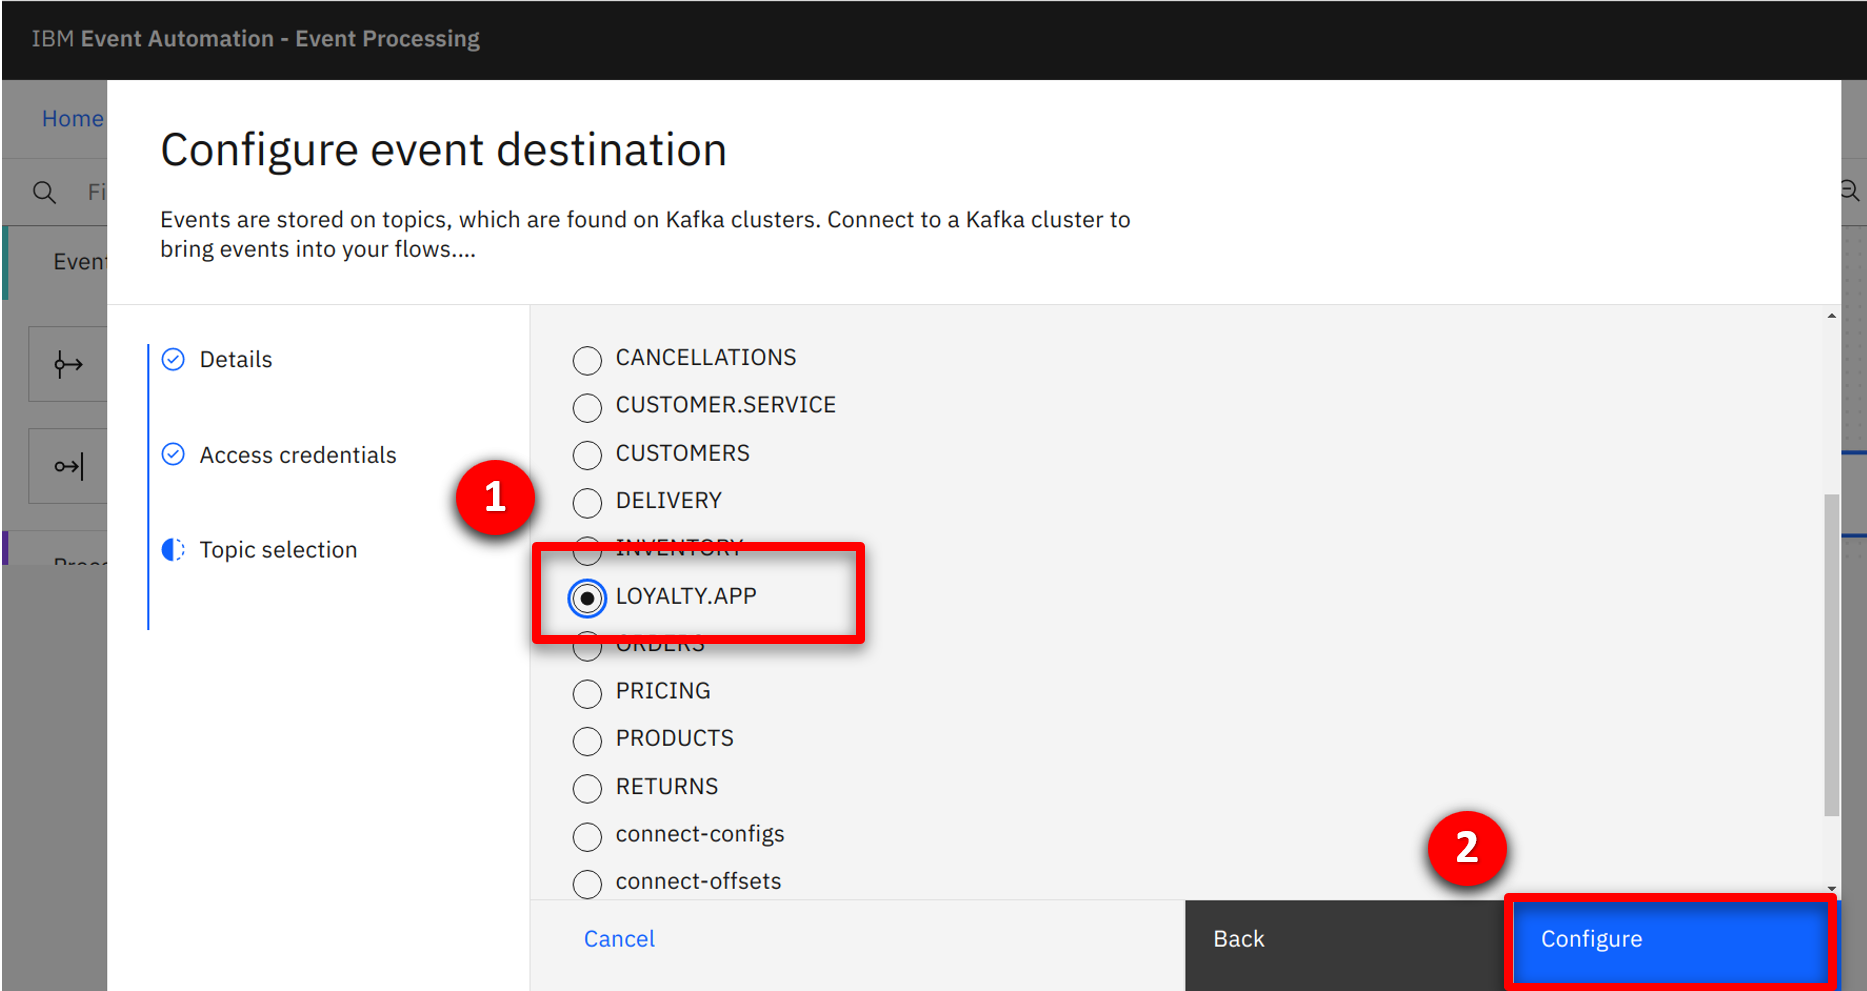
The system connects to the event stream and queries the available topics for the provided credentials. The marketing team selects the LOYALTY.APP event stream. |
| Action 4.1.8 |
Select LOYALTY.APP (1) and click Configure (2).
 |
| 4.2 |
Testing the flow with historical events |
| Narration |
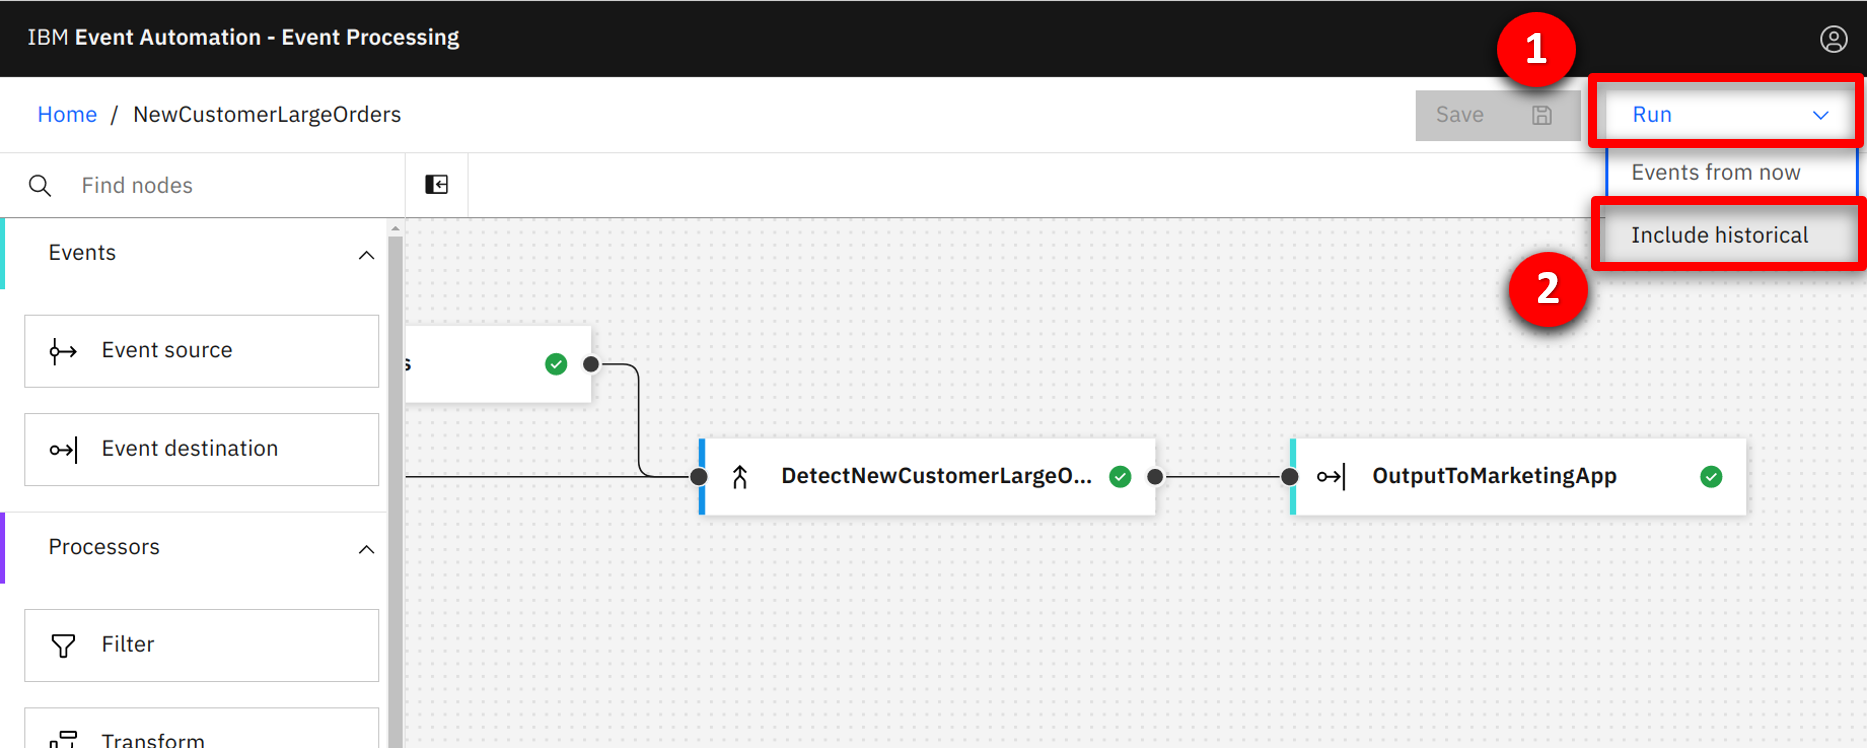
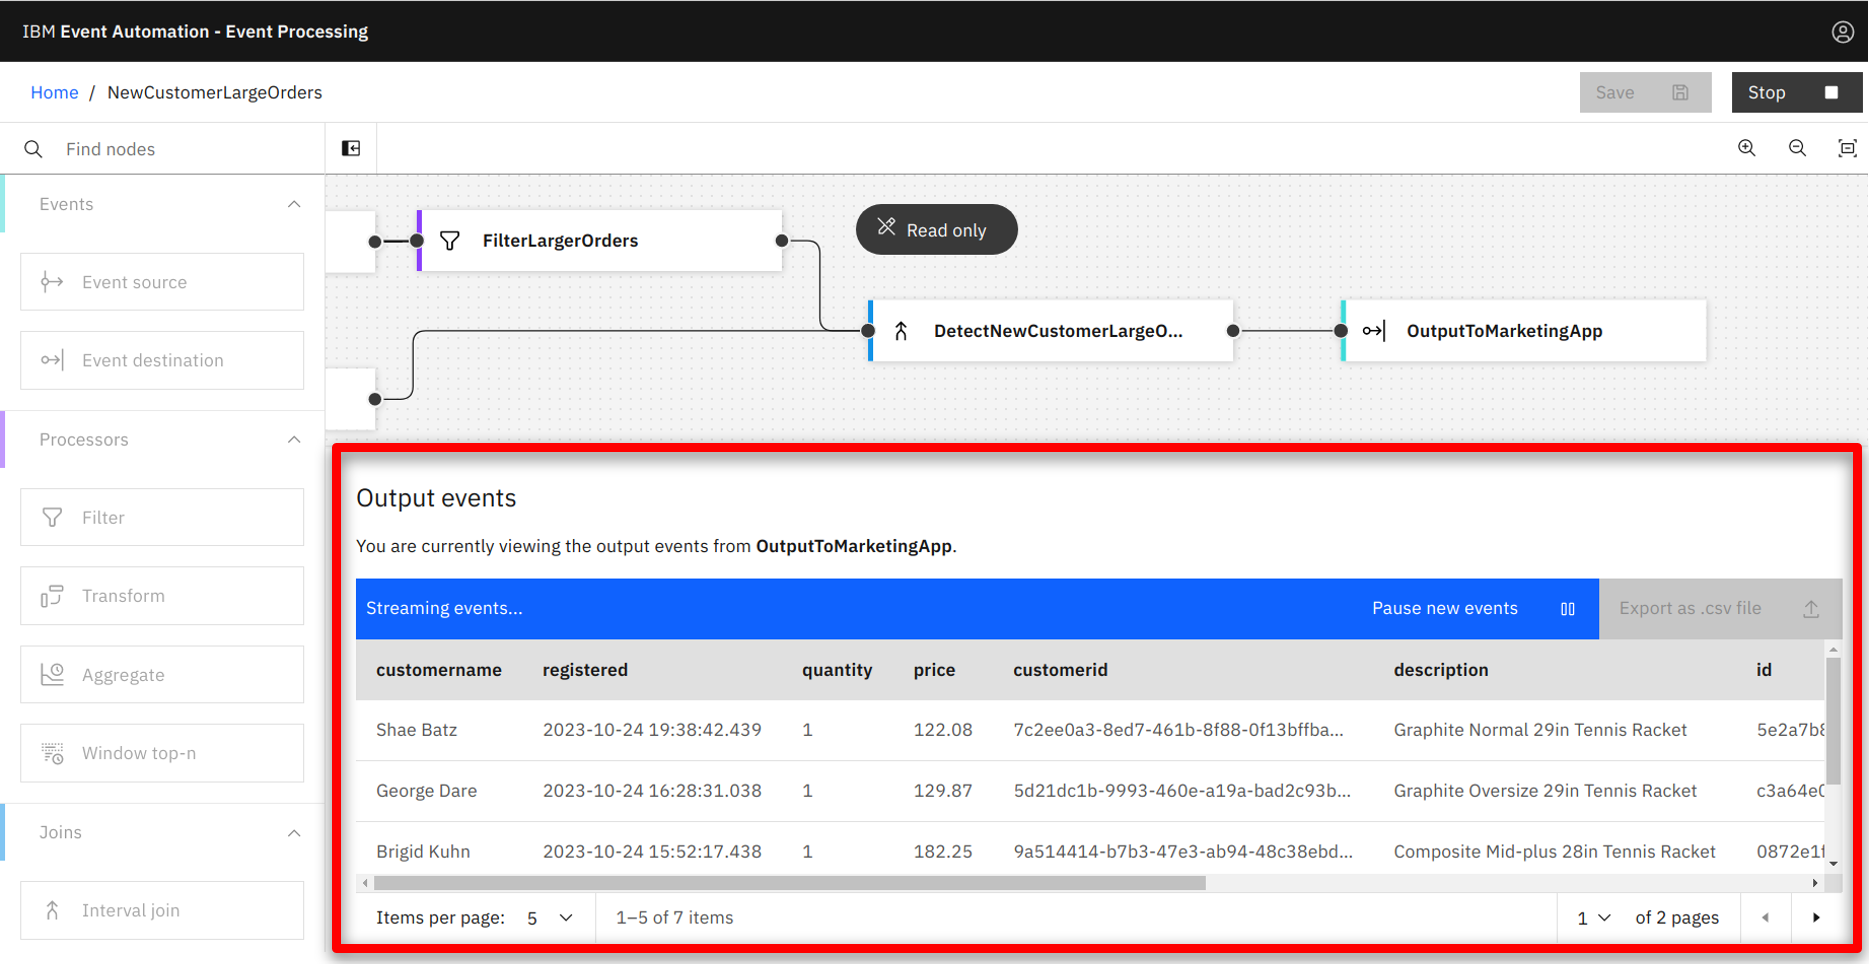
The team are able to test the flow with historical data in the event streams. They immediately see the flow working as expected and several new customers who are eligible for the discount detected. |
| Action 4.2.1 |
Select the Run (1) pull down and click Include historical.
 |
| Action 4.2.2 |
View the detected events.
 |
| 4.3 |
Sending the output stream to the marketing application |
| Narration |
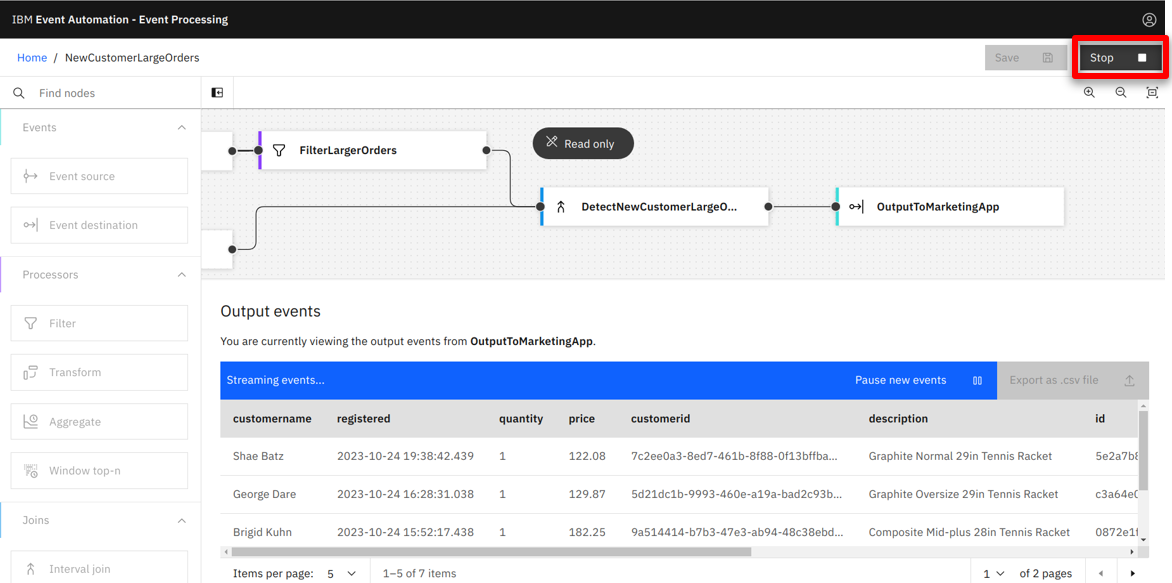
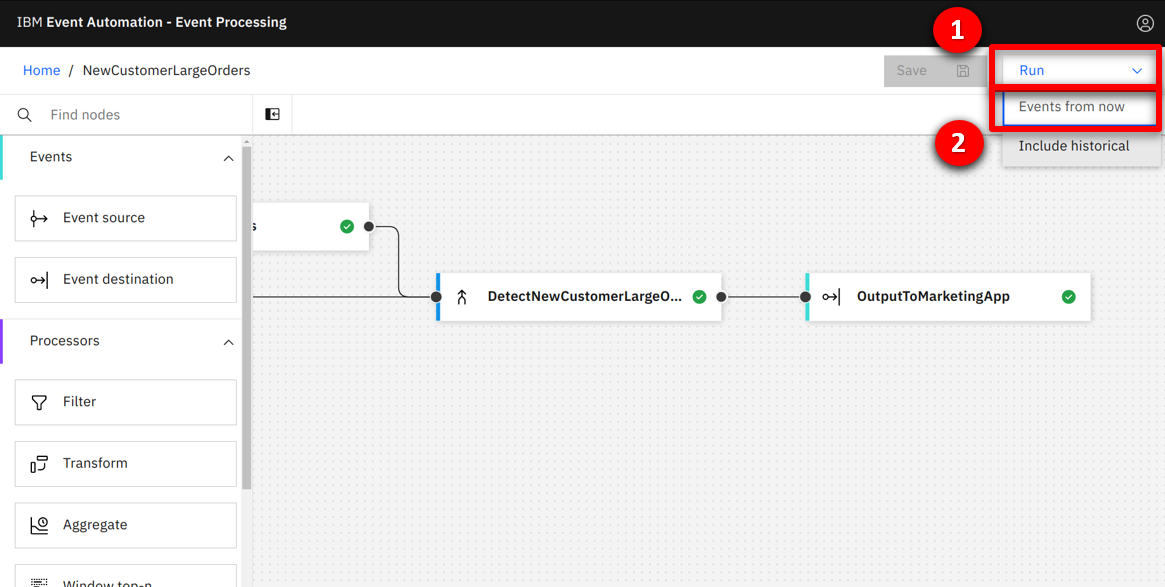
The team verify the detected events and stop the flow. They are now ready to reconfigure the event destination for the production environment. They follow the same process as before to configure the event destination to the production output event stream. This time they run the flow without historical data to process new events in real-time. |
| Action 4.3.1 |
Select Stop.
 |
| Action 4.3.2 |
We are not re-showing how to configure the event destination as it is the same process as previously demonstrated. Select the Run (1) pull down and click Events from now (2).
 |
Go to top
Summary
In this demo we showed how Focus Corp used IBM MQ and IBM Event Automation to capitalize on time-sensitive revenue opportunities. Specifically, we saw the integration team configure IBM MQ to clone messages, and IBM Event Automation set up to publish them to an event stream. This and other streams were published to an Event Catalog that allowed non-technical consumers, like the marketing team, to easily discover and subscribe to the streams. The marketing team then used these streams to build an event processing flow, using a no-code editor. The flow detects in real-time which customers should receive the highest value discounts. This has transformed how quickly the marketing team can create new features and frees them from needing to rely on the integration team for access to this valuable business data.
Thank you for attending today’s presentation.
Go to top


