6. Certificate Renewal
6.1: Overview
In this section, we will configure the certificate renewal workflow to update a certificate in the Apache Tomcat Java KeyStore, then ingest the new certificate into Concert. We will also verify that the new certificate is visible in Concert's Operations Dimension UI and confirm that the corresponding GitHub issue has been updated with a closing comment and marked as closed.
6.2: Configuring the Certificate Renewal Workflow
Let's configure user variables values for Linux_Keystore_Cert_Renewal Workflow by using Authentications created in previous section.
For each default value shown below, confirm that begins and ends with a double quote (").
-
Click on the Workflows tab on the top and select the Workflows tile
-
Click on the certificateRenewal folder
-
Click Linux_Keystore_Cert_Renewal workflow. You will now confirm that the Workflow input parameters are using the authentications you created previously plus other configuration information.
- Under ansibleAuth name, for Default value, confirm it's
"ibmconcert/Ansible-apacheTomcat" - Under passwordMap name, for Default value, confirm it's
"ibmconcert/CertConfigData" - Under caOrSelfSigned name, for Default value, confirm it's
"ca" - Under caServerAnsibleAuth name, for Default value, confirm it's
"ibmconcert/Ansible-cfssl" - Under caType name, for Default value, confirm it's
cfssl - Under tomcatServerAnsibleAuth name, for Default value, confirm it's
"ibmconcert/Ansible-apacheTomcat" - Under sFtpsrcFilePath name, for Default value, confirm it's
"/opt/cfssl/cfssl-pki/all-certs/fullchain.pem" - Under sFtpdestFilePath name, for Default value, confirm it's
"/tmp/fullchain.pem" - Under keyStoreFileName name, for Default value, confirm it's
"server.jks" - Under gitHubCredentials name, for Default value, confirm it's
"ibmconcert/GitHub" - Under gitHubOwner name, for Default value, STOP, here you have to type your GitHub username
"<replace with your GitHub username>" - Under gitHubRepo name, for Default value, STOP, here you have to copy or type
"concert-operations-lab" - Under gitHubIssueState name, for Default value, confirm it's
"open" - Under gitHubIssueLabel name, for Default value, confirm it's
"approved" - Under concertAuth name, for Default value, confirm it's
"ibmconcert/ConcertAPIKey" - Under commonSSHcfssl name, for Default value, confirm it's
"ibmconcert/SSH-cfssl" - Under commonSSHTomcat name, for Default value, confirm it's
"ibmconcert/SSH-apacheTomcat"
- Under ansibleAuth name, for Default value, confirm it's
-
Click the Save icon on top right area to apply and save the workflow with the configurations

6.3: Manually Run the Renewal Workflow
Now we will run the certificate renewal workflow which:
- will see what issues has been label as approved. Remember we did this in the previous section
- collect the certificate information from the issue
- renew the certificate using the private CA
- install the new certificate
- restart Apache Tomcat
- remove the expired certificate metadata from Concert
While on the Linux_Keystore_Cert_Renewal workflow, click on the Run button.
After the run finish, verify the logs. You will see run log similar to the screenshot below. The run log shows that the workflow completed successfully for the certificate with serial number value.

In GitHub, you will see the github issue for the certificate with serial number selected for renewal is marked as Closed.
You will also notice that there are comments for the issue added by Concert Automation.
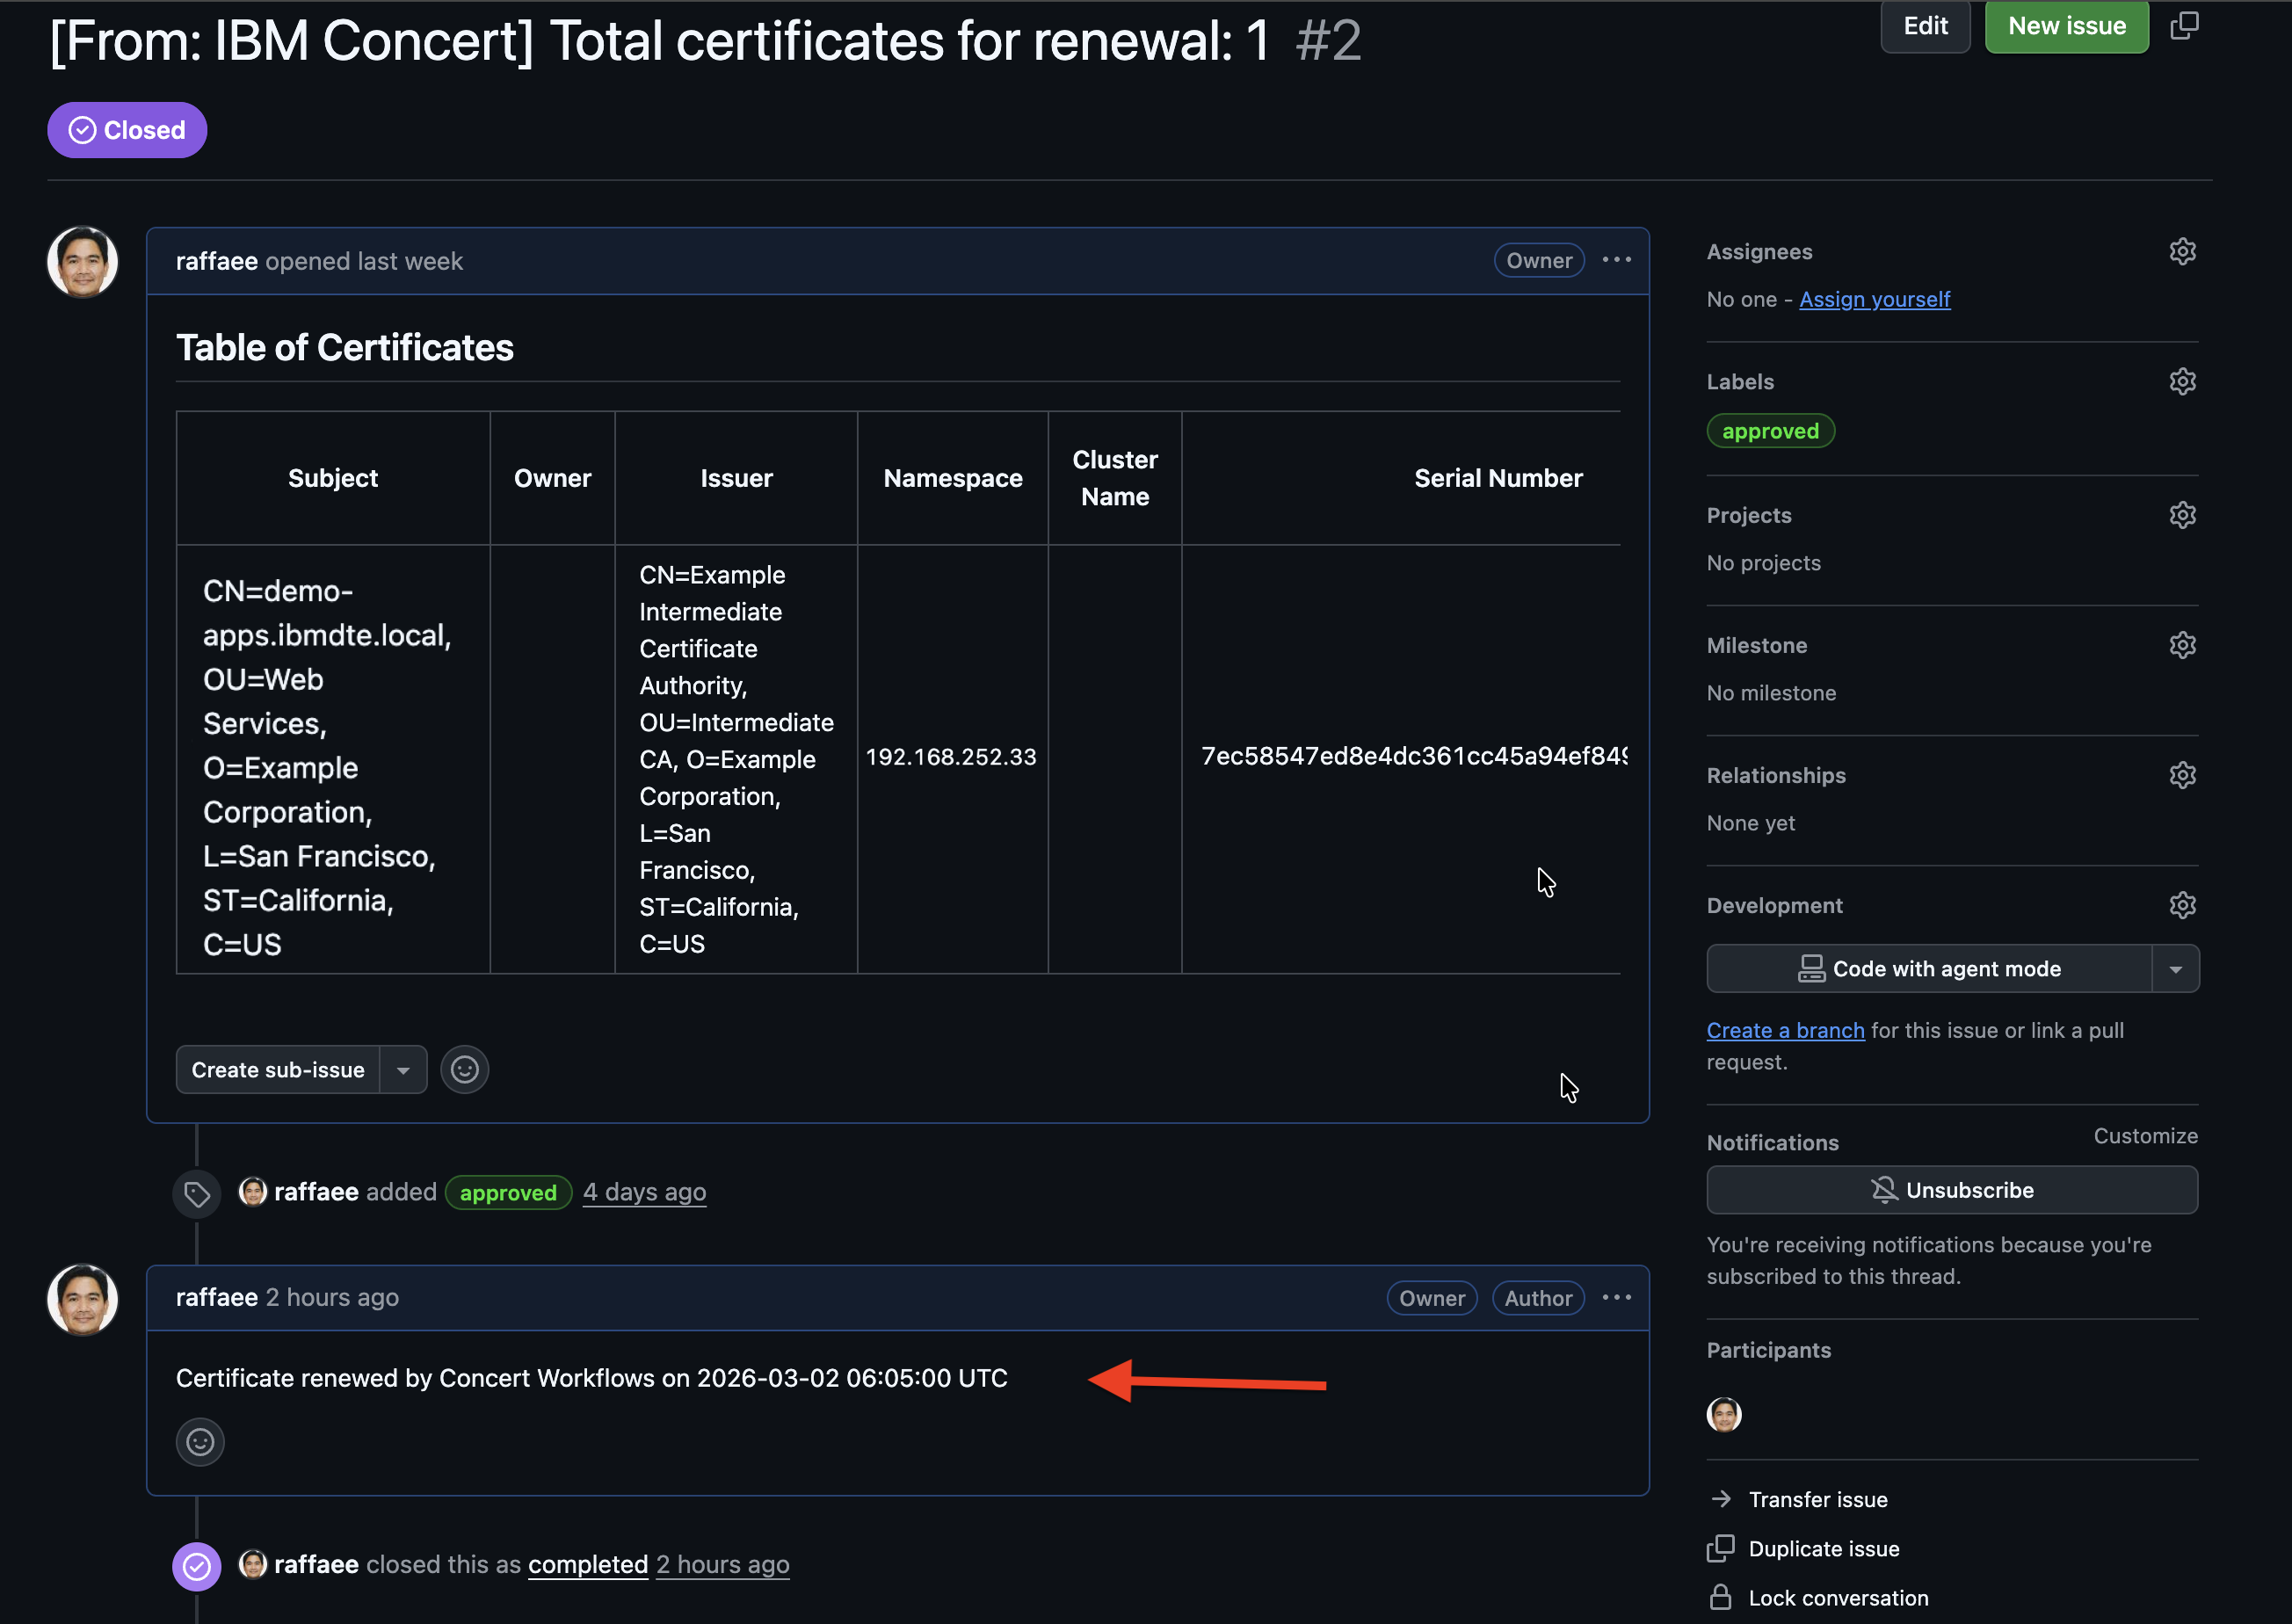
The github issue for the certificate that has not expired yet is still Open and has no changed.
6.4: Performing the Certificate Discovery Again
After a certificate in Apache Tomcat Java Keystore has been renewed, you will now run Linux_Keystore_Cert_Discovery Workflow to discover certificates from Apache Tomcat Java KeyStore, then ingest them into Concert. This discovery step is essential for importing the renewed certificate into Concert.
In a customer environment, the Linux_Keystore_Cert_Discovery Workflow is configured to run automatically as a job through a workflow job scheduler. In this lab exercise, however, it is executed manually to demonstrate how it works.
- Click on the Workflows tab on the top and select the Workflows tile
- Click the certificatesDiscovery folder
- Click the Linux_Keystore_Cert_Discovery workflow
- Click on the Run button

- The workflow will complete its execution and return 202 Accepted as message in Logs section below
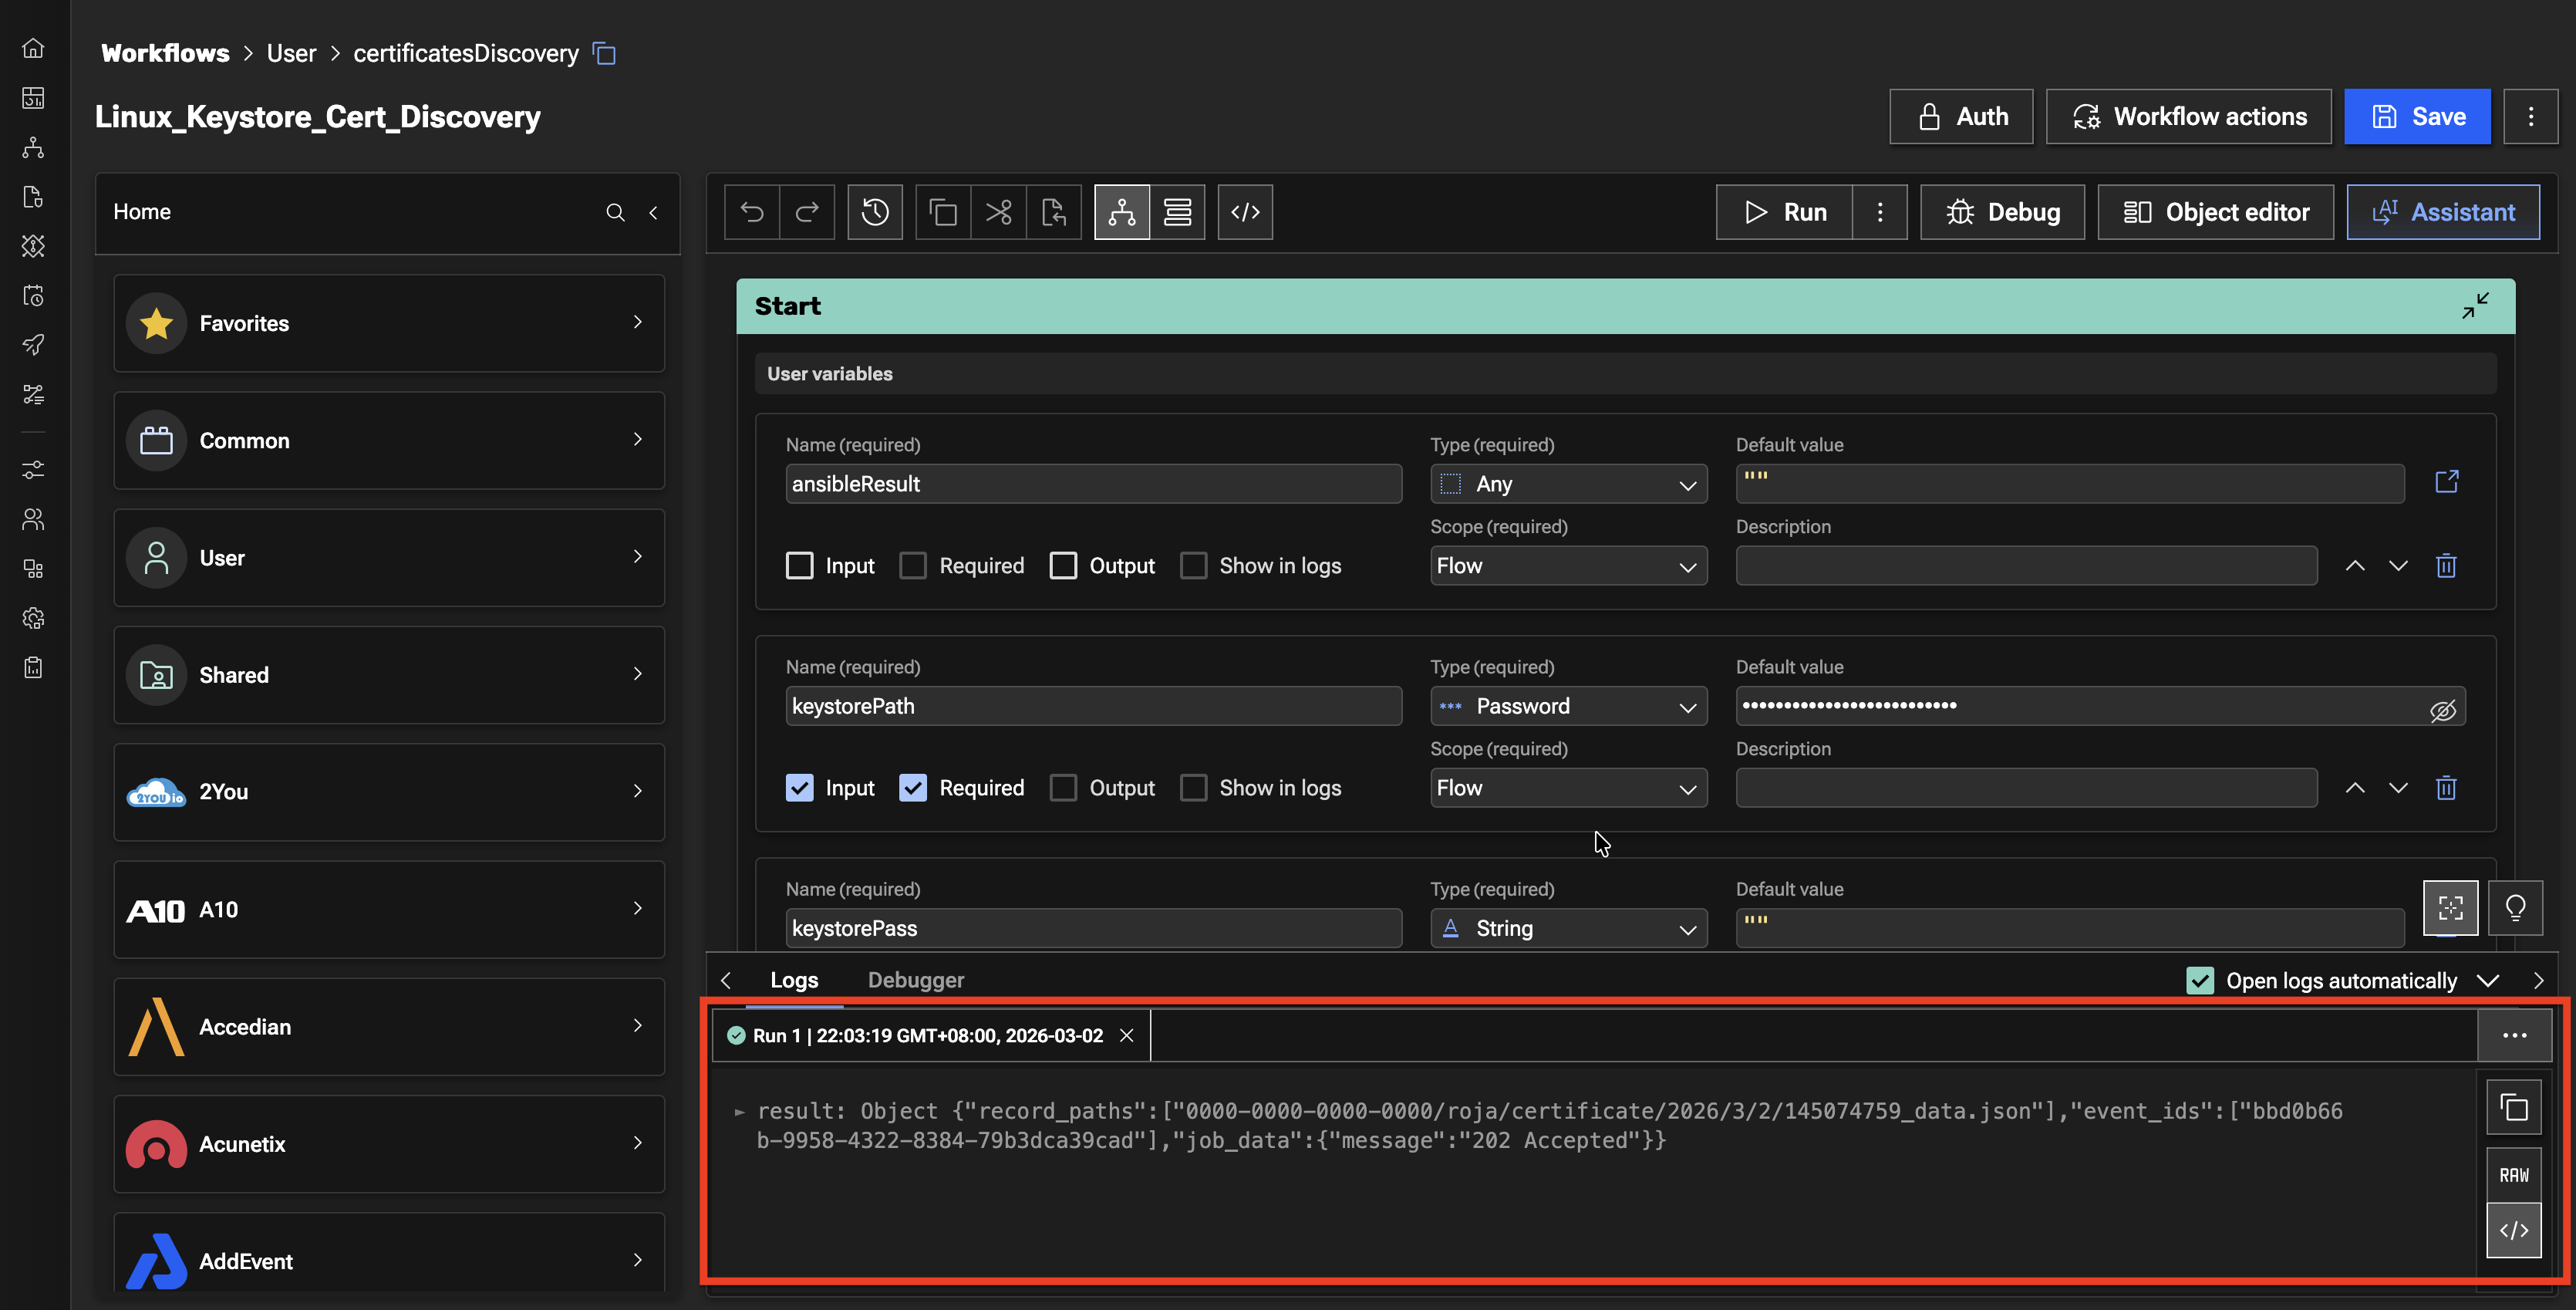
Let's verify the Discovery Workflow execution in Concert UI.
-
Click on the Resilience tab on top and select Dimensions -> Operations on the left side. Make sure to refresh the page to see the updates.
-
On the Certificates tab, you will see total number of Certificates in the development environment is 3, where :
- Two Certificate are now valid,
- One Certificate is still nearing expiration.
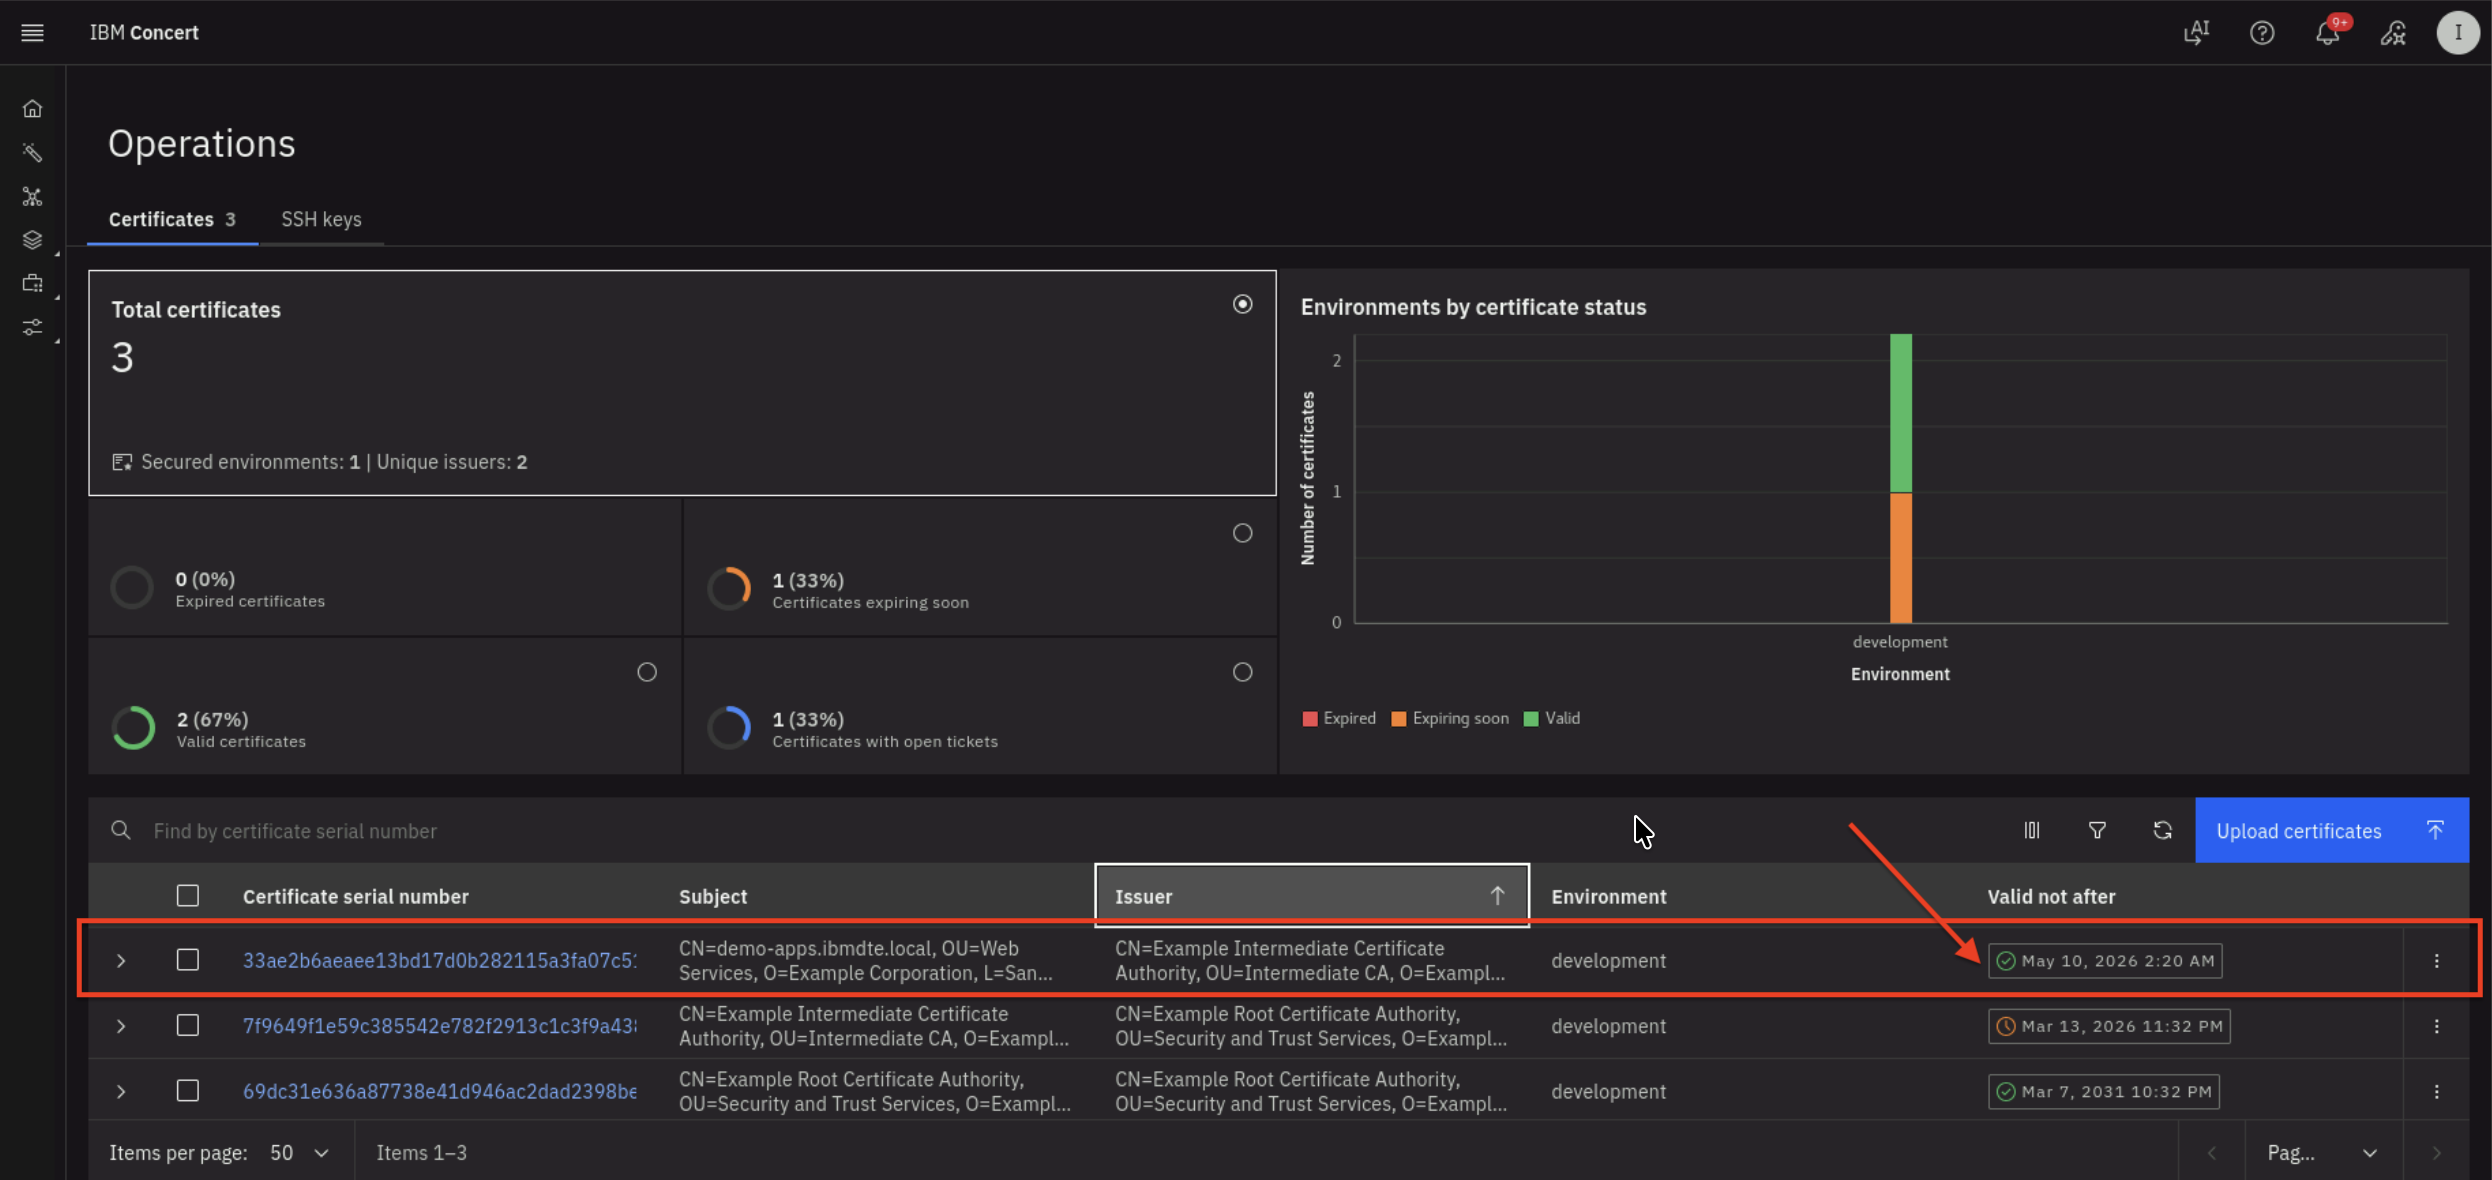
- The renewed certificate is highlighted in the above screenshot where the expiry date is + 2 months from present date
6.5: Get Certificate Metadata via Concert API
Let's use Concert API to search for the new Apache Tomcat Certificate using Certificate Serial Number.
From the Bastion SSH, run the curl command, after replacing the following two values:
- Replace the value after search= with the actual Certificate Serial Number obtained from the Concert Certificate UI with expiry date + 2 months from present date
- Replace the value after C_API_KEY: with your Concert API Key.
curl -sk \
  --request GET https://concert.ibmdte.local:12443/core/api/v1/certificates?search=<CERTIFICATE_SERIAL_NUMBER> \
  --header 'Authorization: C_API_KEY: <YOUR_CONCERT_API_KEY>' \
  --header 'InstanceId: 0000-0000-0000-0000' \
  --header 'accept: application/json' \
  --header 'content-type: application/json-patch+json' | jq
This is an example of the expected output:
{
  "pagination": {
    "total_count": 1,
    "total_pages": 1,
    "page_size": 2000,
    "page_number": 1
  },
  "certificates": [
    {
      "id": "1eb38c4b-2cd9-440b-8672-b24c81fd4b02",
      "subject": "CN=demo-apps.ibmdte.local, OU=Web Services, O=Example Corporation, L=San Francisco, ST=California, C=US",
      "issuer": "CN=Example Intermediate Certificate Authority, OU=Intermediate CA, O=Example Corporation, L=San Francisco, ST=California, C=US",
      "serial_number": "33ae2b6aeaee13bd17d0b282115a3fa07c51e33",
      "certificate_type": "keystore",
      "validity_start_date": 1773210000,
      "validity_end_date": 1778394000,
      "auth_user_role": "admin",
      "namespaces": [
        "192.168.252.33"
      ],
      "last_updated_on": 1773211082,
      "last_updated_by": "ibmconcert",
      "is_archived": false,
      "metadata": "{\"api_server\": \"192.168.252.33-/opt/tomcat/ssl/server.jks\"}",
      "additional_data": "{\"policy_check_result\": {\"issuer_compliant\": true, \"key_length_compliant\": false, \"hash_algorithm_compliant\": false}, \"192.168.252.33-/opt/tomcat/ssl/server.jks-tomcat\": {\"alias\": \"tomcat\", \"server\": \"192.168.252.33\", \"keystore_path\": \"/opt/tomcat/ssl/server.jks\"}}",
      "status": "valid",
      "environment": {
        "id": "c6f75900-d53e-4b90-b75c-824f95a48306",
        "name": "development"
      },
      "issues": [],
      "access_points": [],
      "table_data": null
    }
  ]
}
From the json output, you will notice that the issues block is empty which indicates that there is no GitHub issue associated with the certificate because it is valid and not expiring.
6.6: Confirm the Certificate in Java Keystore has a New Expiration Date
Let's use Java Keytool command to verify the Apache Tomcat certificate in Java Keystore now has new Expiration Date.
From the Bastion SSH, connect to demo-apps:
ssh jammer@demo-apps
Run the following to list all Certificates in Apache Tomcat Java Keystore:
sudo keytool -list -v -keystore /opt/tomcat/ssl/server.jks -storepass tomcat
The command output should display Certificate[1], Certificate[2], and Certificate[3] and certificate properties for each certificate as shown below.
- Certificate[1] is the Apache Tomcat certificate
- Certificate[2] is the Intermediate CA
- Certificate[3] is the Root CA
Check the Valid from property under Certificate[1], which shows that the certificate is now valid for the next two months. This confirms that Apache Tomcat certificate has been renewed successfully.
Be aware that the certificate serial number in your lab environment may differ from the one shown in the screenshot.
Example keytool command output:
Keystore type: JKS
Keystore provider: SUN

Your keystore contains 1 entry

Alias name: tomcat
Creation date: Mar 11, 2026
Entry type: PrivateKeyEntry
Certificate chain length: 3
Certificate[1]:
Owner: CN=demo-apps.ibmdte.local, OU=Web Services, O=Example Corporation, L=San Francisco, ST=California, C=US
Issuer: CN=Example Intermediate Certificate Authority, OU=Intermediate CA, O=Example Corporation, L=San Francisco, ST=California, C=US
Serial number: 7a32b7683d18a1416b923c2b8f2b63434b87b4ce
Valid from: Wed Mar 11 05:15:00 UTC 2026 until: Sun May 10 05:15:00 UTC 2026
Certificate fingerprints:
	 SHA1: 96:0B:14:3C:84:3C:D1:38:36:29:27:C0:12:FC:A1:5C:18:4B:B6:3C
	 SHA256: DF:AD:6F:64:8B:CD:2E:C4:ED:7C:5B:EB:D7:06:CE:46:12:8B:61:35:11:49:C3:8C:06:7E:5A:9F:A6:5D:29:E2
Signature algorithm name: SHA512withRSA
Subject Public Key Algorithm: 2048-bit RSA key
Version: 3

Extensions:

#1: ObjectId: 2.5.29.35 Criticality=false
AuthorityKeyIdentifier [
KeyIdentifier [
0000: 73 21 3A 93 49 58 BA 1A   73 E3 58 A4 84 1A 56 81  s!:.IX..s.X...V.
0010: 28 A9 A7 68                                        (..h
]
]

#2: ObjectId: 2.5.29.19 Criticality=true
BasicConstraints:[
  CA:false
  PathLen: undefined
]

#3: ObjectId: 2.5.29.37 Criticality=false
ExtendedKeyUsages [
  serverAuth
]

#4: ObjectId: 2.5.29.15 Criticality=true
KeyUsage [
  DigitalSignature
  Key_Encipherment
]

#5: ObjectId: 2.5.29.17 Criticality=false
SubjectAlternativeName [
  DNSName: myserver.example.com
  DNSName: demo-apps.ibmdte.local
  IPAddress: 192.168.252.33
]

#6: ObjectId: 2.5.29.14 Criticality=false
SubjectKeyIdentifier [
KeyIdentifier [
0000: EB 73 E0 12 DC 15 A1 4C   FE 0F 94 B2 A1 D6 24 66  .s.....L......$f
0010: CC 78 F4 47                                        .x.G
]
]

Certificate[2]:
Owner: CN=Example Intermediate Certificate Authority, OU=Intermediate CA, O=Example Corporation, L=San Francisco, ST=California, C=US
Issuer: CN=Example Root Certificate Authority, OU=Security and Trust Services, O=Example Corporation, L=San Francisco, ST=California, C=US
Serial number: 7f9649f1e59c385542e782f2913c1c3f9a43808e
Valid from: Mon Mar 09 03:32:00 UTC 2026 until: Sat Mar 14 03:32:00 UTC 2026
Certificate fingerprints:
	 SHA1: C9:B8:FB:94:D3:D3:ED:1C:BB:8D:C5:76:5F:33:BB:9A:D3:2A:F4:05
	 SHA256: E4:83:54:6C:36:8B:50:B8:47:BB:49:36:A5:04:85:58:F7:58:AD:3A:2D:24:FB:56:8E:A1:25:76:B7:51:F7:0A
Signature algorithm name: SHA512withRSA
Subject Public Key Algorithm: 4096-bit RSA key
Version: 3

Extensions:

#1: ObjectId: 2.5.29.35 Criticality=false
AuthorityKeyIdentifier [
KeyIdentifier [
0000: B8 C9 34 FC ED A1 88 87   6B 9C 43 CF 81 18 8B 87  ..4.....k.C.....
0010: A9 3B 98 85                                        .;..
]
]

#2: ObjectId: 2.5.29.19 Criticality=true
BasicConstraints:[
  CA:true
  PathLen: no limit
]

#3: ObjectId: 2.5.29.15 Criticality=true
KeyUsage [
  Key_CertSign
  Crl_Sign
]

#4: ObjectId: 2.5.29.17 Criticality=false
SubjectAlternativeName [
  IPAddress: 127.0.0.1
]

#5: ObjectId: 2.5.29.14 Criticality=false
SubjectKeyIdentifier [
KeyIdentifier [
0000: 73 21 3A 93 49 58 BA 1A   73 E3 58 A4 84 1A 56 81  s!:.IX..s.X...V.
0010: 28 A9 A7 68                                        (..h
]
]

Certificate[3]:
Owner: CN=Example Root Certificate Authority, OU=Security and Trust Services, O=Example Corporation, L=San Francisco, ST=California, C=US
Issuer: CN=Example Root Certificate Authority, OU=Security and Trust Services, O=Example Corporation, L=San Francisco, ST=California, C=US
Serial number: 69dc31e636a87738e41d946ac2dad2398be484d8
Valid from: Mon Mar 09 03:32:00 UTC 2026 until: Sat Mar 08 03:32:00 UTC 2031
Certificate fingerprints:
	 SHA1: 93:EF:C1:83:5C:FE:0D:1F:B4:8A:43:3D:E9:B3:89:28:C5:3F:53:99
	 SHA256: 43:5D:D9:62:FD:6E:67:2B:E7:80:B1:26:E2:F0:40:87:26:57:D0:D9:AB:F7:3B:D6:52:FC:8E:35:05:DE:4E:23
Signature algorithm name: SHA512withRSA
Subject Public Key Algorithm: 4096-bit RSA key
Version: 3

Extensions:

#1: ObjectId: 2.5.29.19 Criticality=true
BasicConstraints:[
  CA:true
  PathLen: no limit
]

#2: ObjectId: 2.5.29.15 Criticality=true
KeyUsage [
  Key_CertSign
  Crl_Sign
]

#3: ObjectId: 2.5.29.14 Criticality=false
SubjectKeyIdentifier [
KeyIdentifier [
0000: B8 C9 34 FC ED A1 88 87   6B 9C 43 CF 81 18 8B 87  ..4.....k.C.....
0010: A9 3B 98 85                                        .;..
]
]


*******************************************
*******************************************
6.7: Make the Firefox Browser to Trust the Certificates
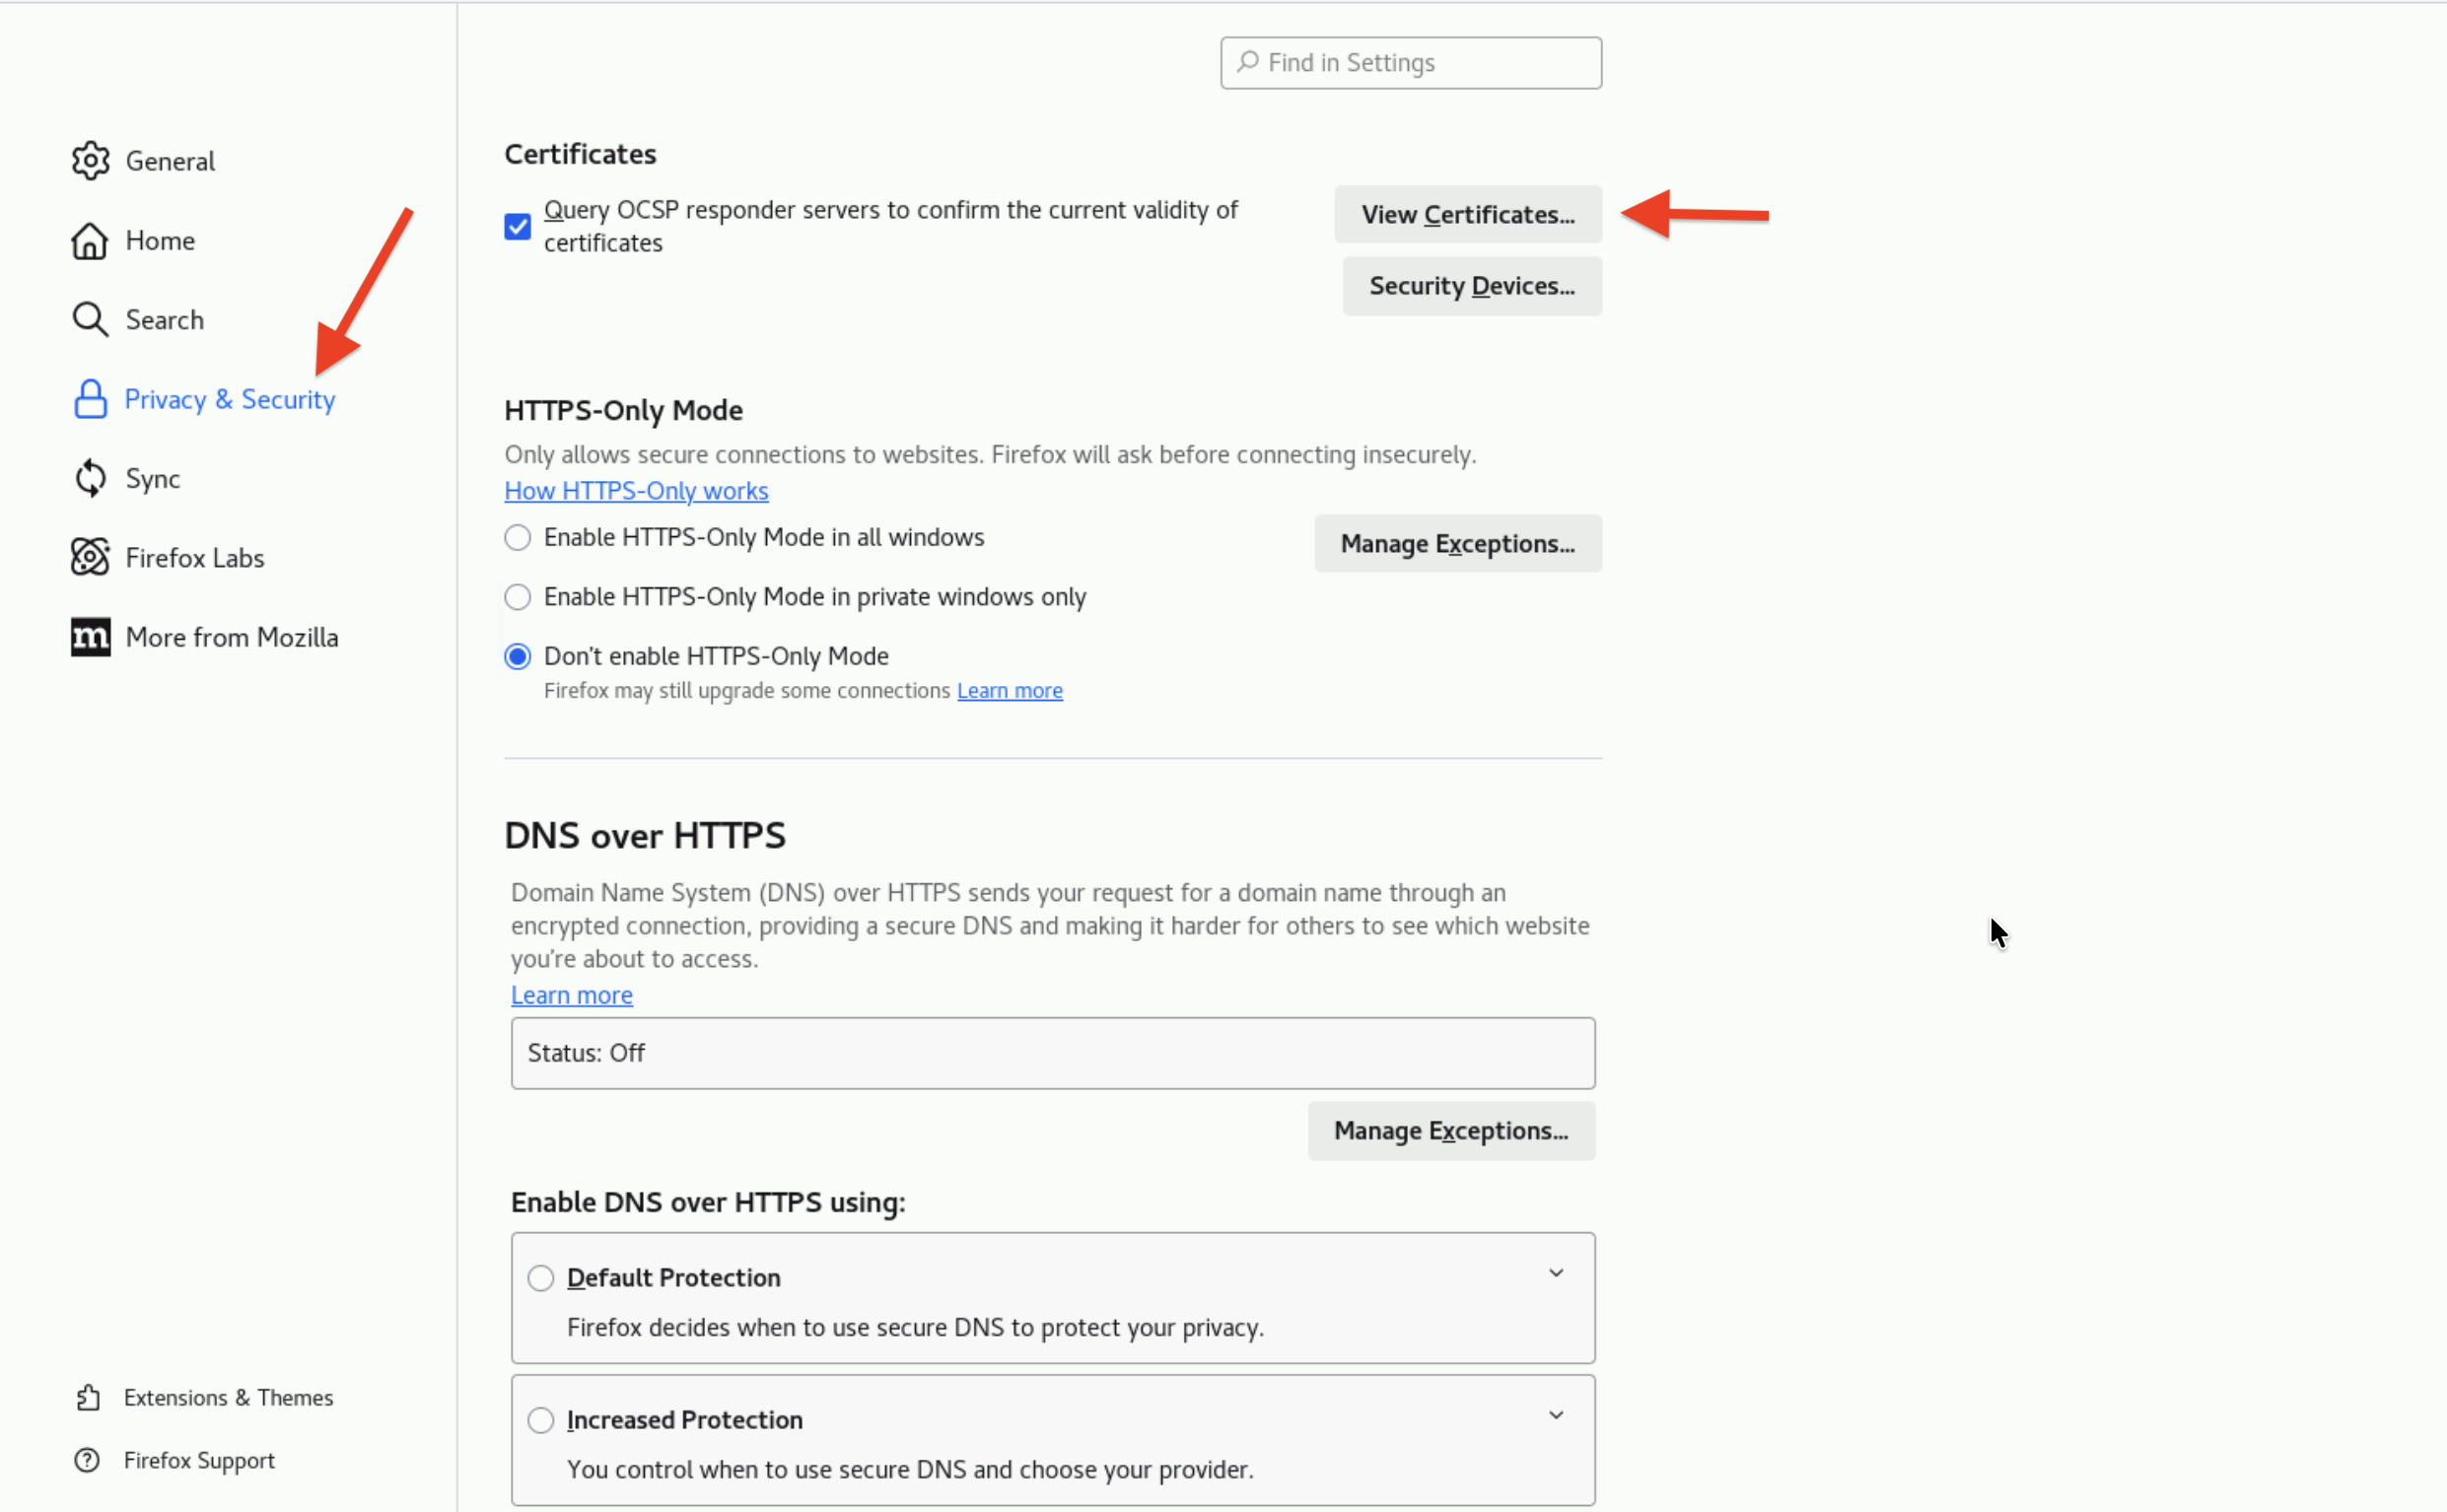
Finally, let's update the Firefox browser settings to trust the Intermediate CA and Root CA produced by CFSSL as the internal private Certificate Authority.
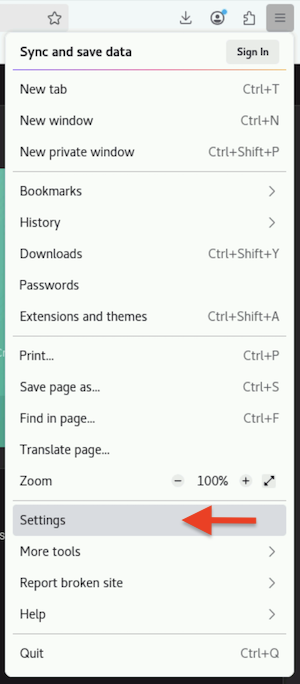
From the Bastion Remote Desktop, on the Firefox browser click on the burger menu on the top right corner.
- Click Settings
- Click Privacy & Security section on left panel
- Click View Certificates... button
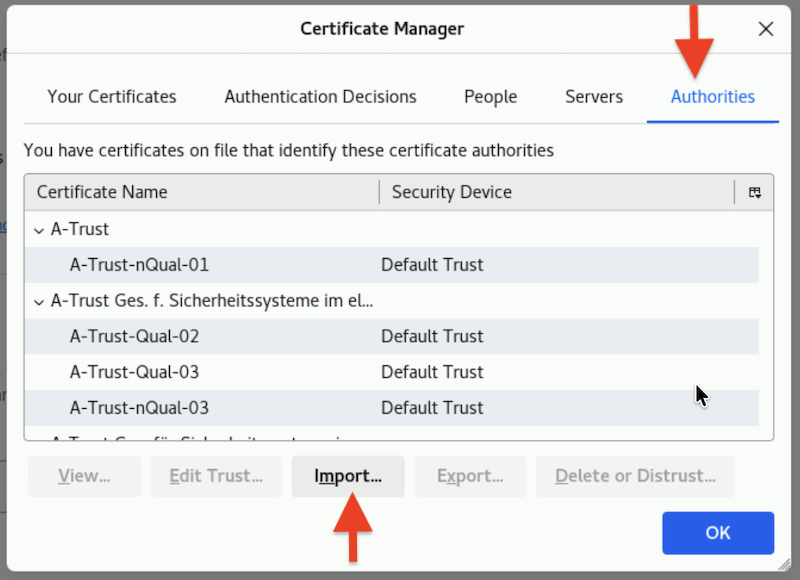
- Click Authorities tab
- Click Import button
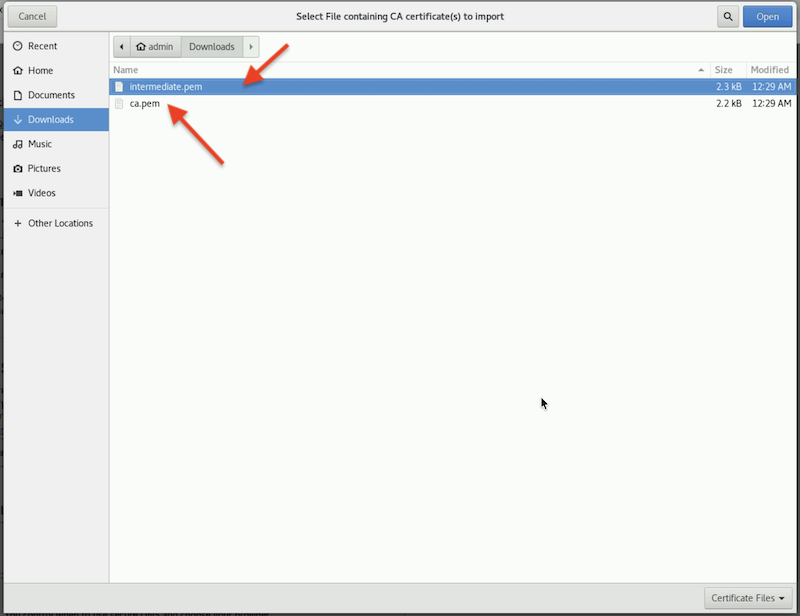
- Browse to Downloads folder
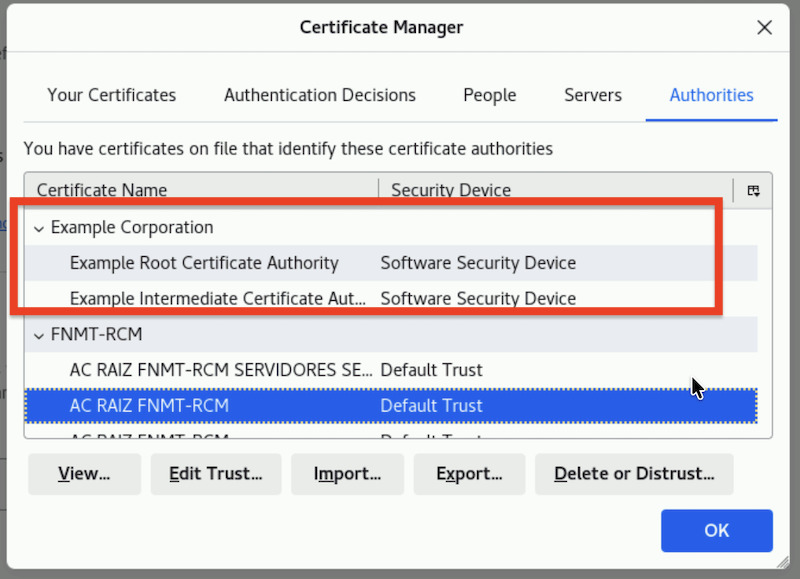
- Select intermediate.pem and ca.pem to import
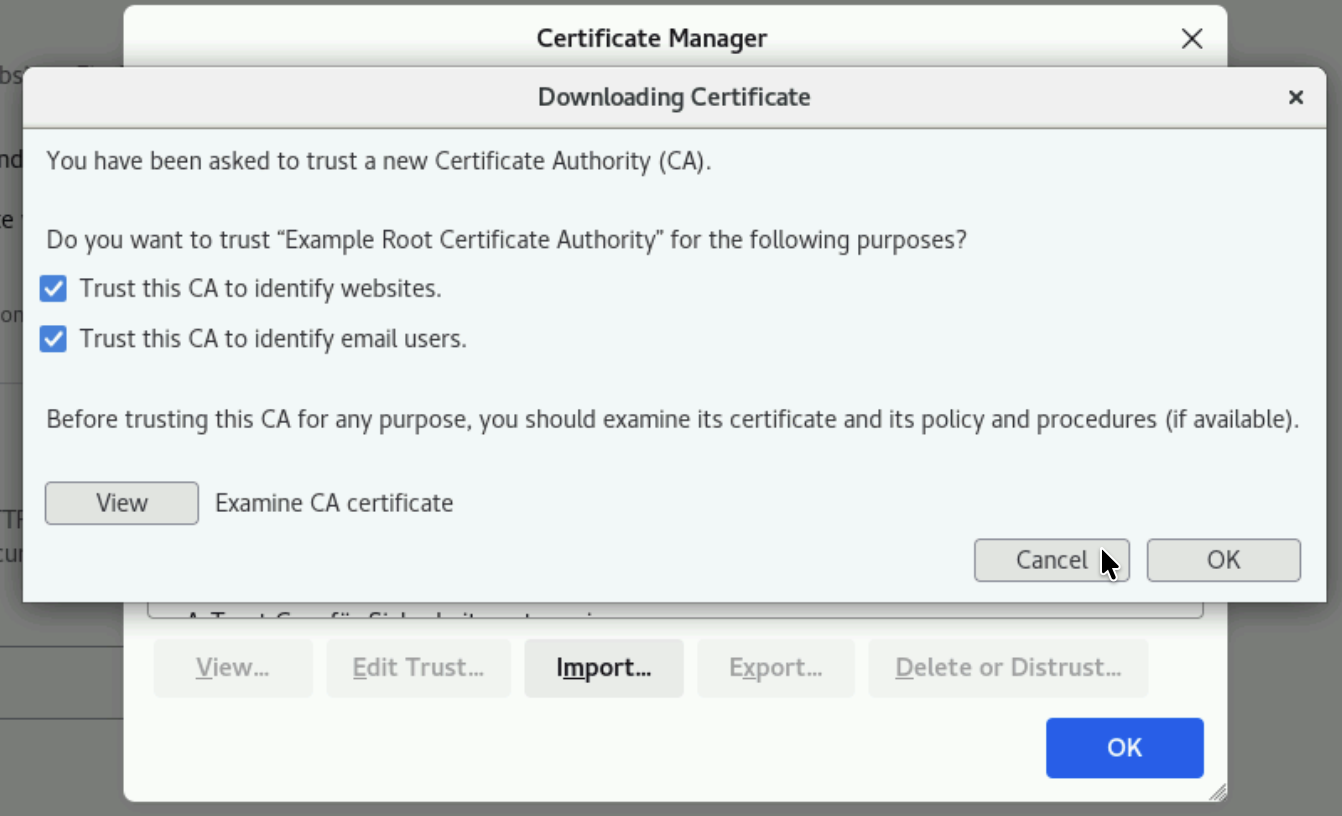
- Click the two check boxes appear in the dialog box
- Trust this CA to identify websites.
- Trust this CA to identify email users.
You will see the 2 certificates imported successfully similar to the screenshot below.
- Finally, open the URL
https://demo-apps.ibmdte.local:8443in the Firefox browser.
You will see a padlock icon with a locked status, indicating a secure, encrypted HTTPS connection. This is the result of the steps you performed earlier, which enabled Firefox to trust the two certificates you imported.
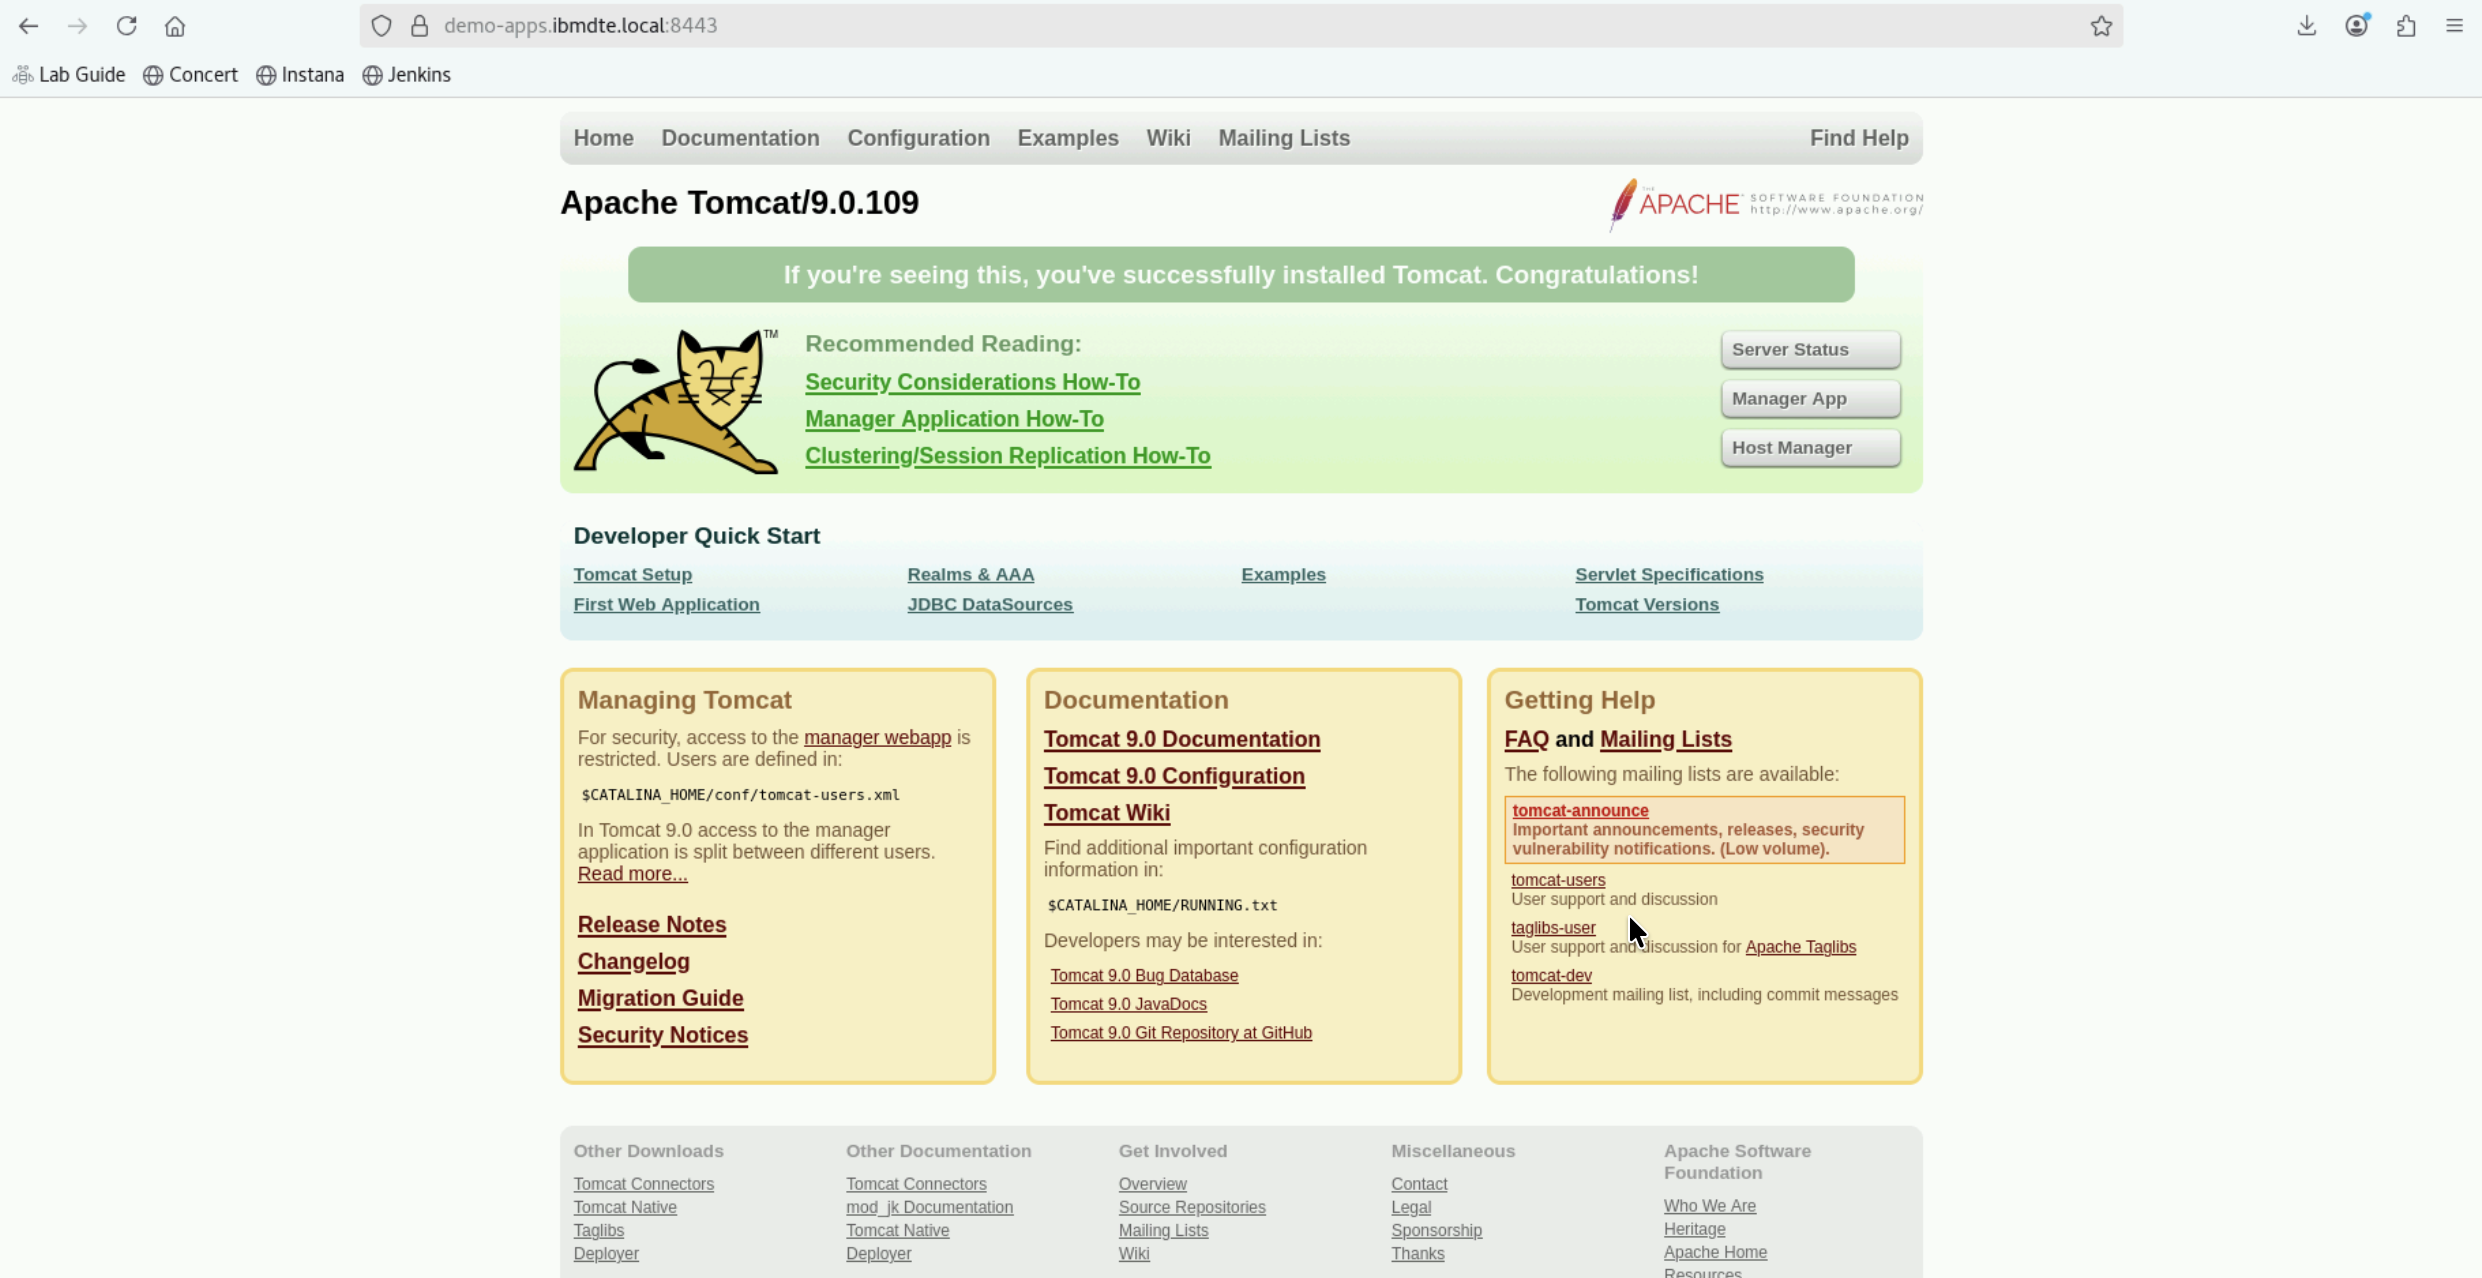
You can also view the new certificate for Apache Tomcat via Firefox browser by clicking the padlock icon and navigate to Connection secure -> More information -> View Certificate
6.8: Summary
In this section, you have been able to accomplish the following:
- Have configured parameter values for Certificate Renewal workflow.
- Have scheduled Certificate Renewal workflow using Concert Workflows Jobs.
- Have verified the new Certificate for Apache Tomcat with new expiry date.
- Have queried Concert API using curl for a Certificate Serial Number.
- Have imported two certificates which CFSSL in the lab produces.
================================
Congratulations! You have completed the Lab
We encourage you to provide feedback on this lab to help us improve future versions. Tell us what you liked, what you didn't like, and any suggestions for improvement. You can provide feedback on the Slack channel listed under the Support section.