3. Lab Preparation
3.1: Overview
Make sure to complete the Lab preparation steps from this section before proceeding with the Lab.
You may get prompted for software updates during the lab. Please ignore these prompts and do NOT install any updates to avoid disrupting the lab environment.
If you get a security warning (Warning: Potential Security Risk Ahead) when accessing the Concert, Apache Tomcat UIs, please ignore it and proceed to the UI (click on Advanced and then Accept the Risk and Continue).
3.1.1: Using the Bastion Host Terminal and UI
This is for information only. Later in this page you will be instructed to run the actual commands. This Lab has both Concert and Workflows installed:
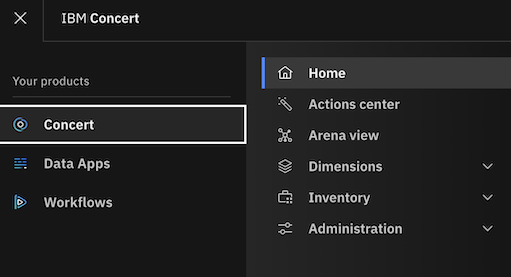
- To access the Concert UI, click on the burger menu on the top left corner and select Concert -> Home.
- To access the Workflows UI, click on the burger menu on the top left corner and select Workflows -> Home.
Note that from the Bastion SSH, you can ssh into each other VM with the commands below:
# Access the Concert VM
ssh jammer@concert
# Access the CFSSL VM
ssh jammer@bluebox
# Access the Apache Tomcat VM
ssh jammer@demo-apps
3.1.2: Capturing the Lab Credentials
You will need to capture multiple pieces of information from the Concert and Apache Tomcat UIs to complete the lab.
To facilitate this process, we will capture this information into a single text file. From the Bastion Remote Desktop,
on the left panel click on Show Applications, select Text Editor, paste the content below into a new
file named credentials.txt and save it. Keep this window open for easy access later.
Bookmarks:
  Lab guide:        https://ibm.github.io/waiops-tech-jam/labs/concert/introduction/
  Concert:          https://concert.ibmdte.local/
  Apache Tomcat:    https://demo-apps.ibmdte.local:8443/

Concert URL:        https://concert.ibmdte.local
Concert API Key:
concert_username:
concert_password:

Apache Tomcat URL:                   https://demo-apps.ibmdte.local:8443
Java Keystore Password:              tomcat

GitHub Repository URL:               https://github.com/<github-username>/concert-operations-lab
GitHub Repository Name:              concert-operations-lab
GitHub API Endpoint:                 https://api.github.com/
GitHub Username:
GitHub Personal Access Token (PAT):

########################################

demo-apps IP address:
Private Key value for "jammer" user on demo-apps VM (copy the value BELOW this line)


########################################

bluebox IP address:
Private Key value for "jammer" user on bluebox VM (copy the value BELOW this line)
From the Bastion SSH, run the command below:
cat demo-details.yml | grep -E 'concert'
Just to have the users and passwords handy together, copy these values below to the credentials file:
- concert_username:
- concert_password:
3.2: Obtaining the IBM Concert API Key
From the Bastion Remote Desktop, open the Firefox browser and click on the Concert bookmark to open the Concert UI.
- To access the Concert UI, click on the burger menu on the top left corner and select Concert -> Home.
Login to the Concert UI with the credentials recorded in the credentials file (concert_username: and concert_password:).
If prompted, make sure to select Skip in the Welcome to IBM Concert dialog.
- In the Concert UI, on the top right corner, click on the API Key icon.
- Click Generate API key.
- After the API key is generated, save the value under API key into the credentials file.
- Click on the X to close the window.
3.3: Establishing a connection between Concert and watsonx.ai
Concert leverages the capabilities of watsonx.ai to provide advanced AI features. To enable this integration, you need to configure the connection between Concert and an existing instance of watsonx.ai that is used to support Concert Labs.
DO NOT use these watsonx.ai credentials for any other purpose outside this lab.
From the Bastion SSH, run the following command to login to the Concert host with the user 'jammer'. If this is your first time connecting, you may need to accept the host key fingerprint.
ssh jammer@concert
Once logged in, run the following command:
export INSTALL_DIR=/opt/ibm/concert/ibm-concert
Obtain the required credentials for connecting to watsonx.ai. Open this Box Note, copy the three lines and run them in the Concert host Terminal to set the environment variables.
# use the exports from the Box Note, they should look similar to this:
export WATSONX_API_KEY=...
export WATSONX_API_PROJECT_ID=...
export WATSONX_API_URL=...
Just to confirm the four env. variables are set, run this command and make sure each line shows a value:
echo "INSTALL_DIR=$INSTALL_DIR"
echo "WATSONX_API_KEY=$WATSONX_API_KEY"
echo "WATSONX_API_PROJECT_ID=$WATSONX_API_PROJECT_ID"
echo "WATSONX_API_URL=$WATSONX_API_URL"
Run the commands below to apply the watsonx.ai configuration into the file local_config.env:
echo "WATSONX_API_KEY=$WATSONX_API_KEY" >> $INSTALL_DIR/ibm-concert-std/etc/local_config.env
echo "WATSONX_API_PROJECT_ID=$WATSONX_API_PROJECT_ID" >> $INSTALL_DIR/ibm-concert-std/etc/local_config.env
echo "WATSONX_API_URL=$WATSONX_API_URL" >> $INSTALL_DIR/ibm-concert-std/etc/local_config.env
Finally, run the two commands below one by one to restart the py-utils service to apply the changes:
In the last start_service command, you can ignore one or more warnings WARN[0000] Failed to mount subscriptions ...
$INSTALL_DIR/ibm-concert-std/bin/stop_service ibm-roja-py-utils
$INSTALL_DIR/ibm-concert-std/bin/start_service ibm-roja-py-utils
3.4: Configuring GitHub
You will need a GitHub account to complete the lab. If you do not have one, please create one at GitHub.
3.4.1: Creating new GitHub repository
You will need to create a new repository for your GitHub account. We will use this repository to demonstrate Change Management process created by Concert Automation Rules.
- Login to your GitHub account and open the following repository URL on the browser
https://github.com/<github-username>
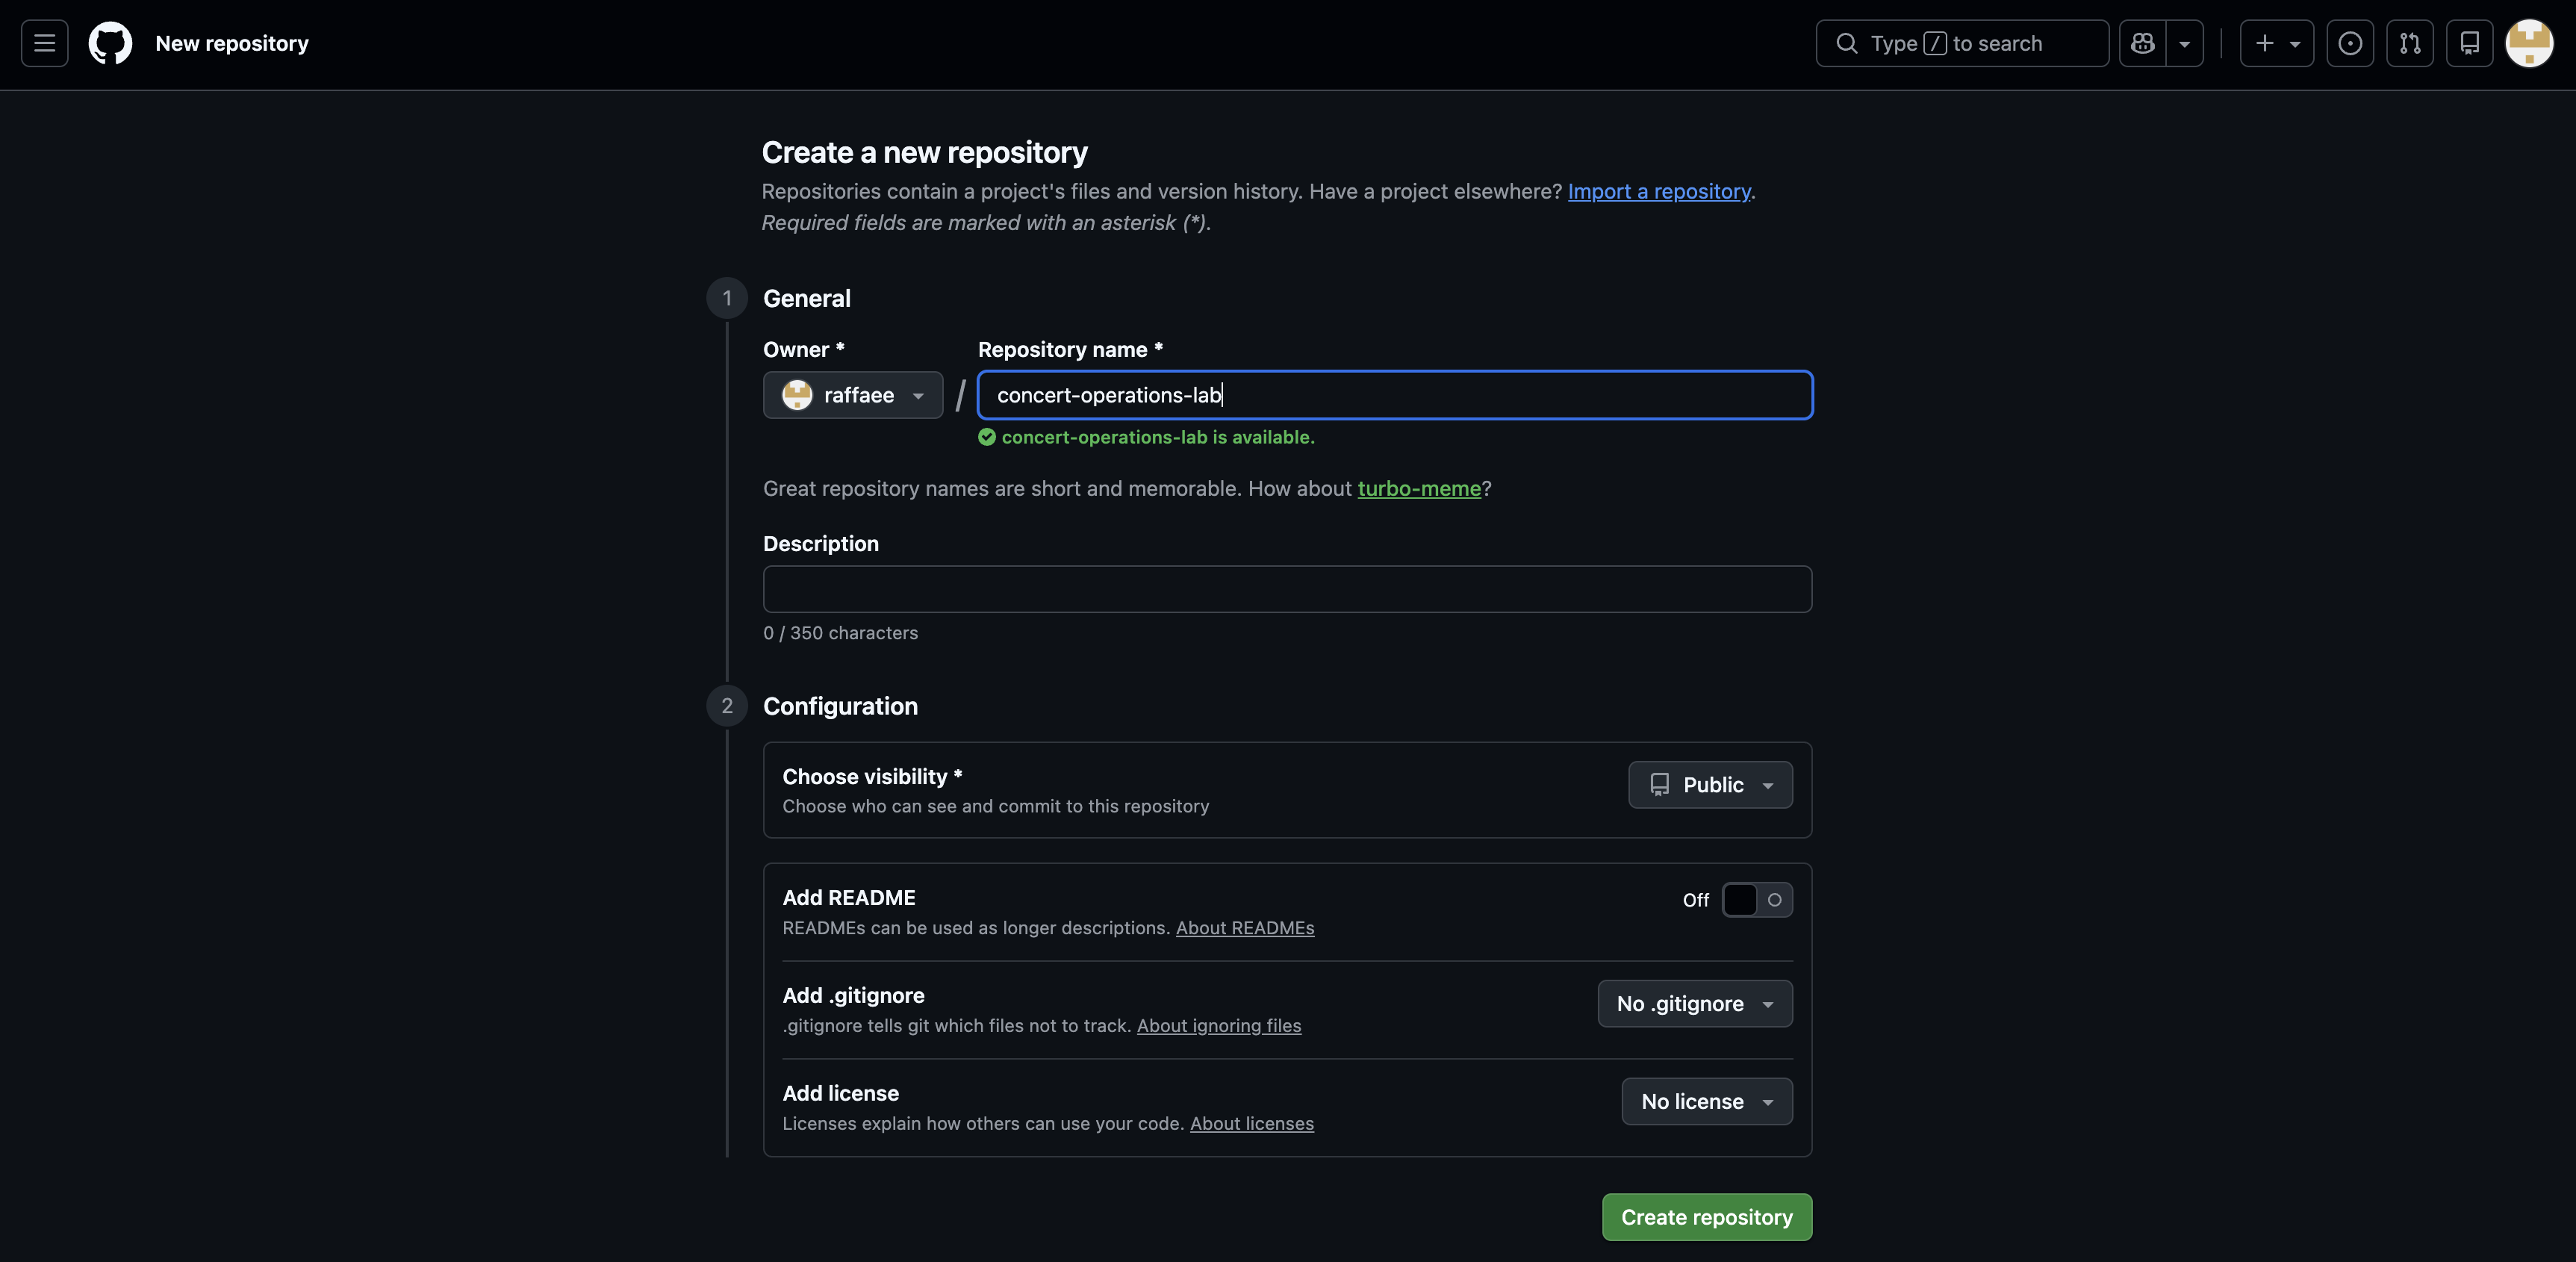
- On the Repository menu option, click on the New button to create a new repository in your GitHub account.
- Enter
concert-operations-labas the name for your new repository. - You can skip the description for the repository.
- Click on the Create repository button to create the new repository.
- Copy the URL of your new repository and save it into the credentials file after GitHub Repository URL. You will need it later to configure GitHub connection from Concert. The URL should look similar to:
https://github.com/<github-username>/concert-operations-lab
3.4.2: Enabling GitHub issues
You will enable GitHub issues in your new repository to allow Concert to create issues for the expiring and expired Certificates.
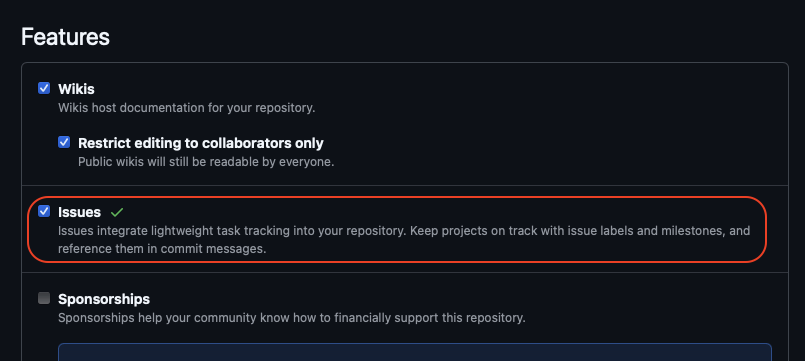
- In your new repository, click on the Settings tab.
- Under the General section, scroll down to the Features section and select the checkbox for Issues as shown below:
3.4.2: Creating GitHub labels
You will create 2 new labels for GitHub issues in your new repository to allow Concert Workflows to handle renewal for the expiring and expired Certificates.
- In your new repository, click on the Issues tab.
- From the Issues tab, click the Labels button on the right.
- Click New label button in Green color on right side.
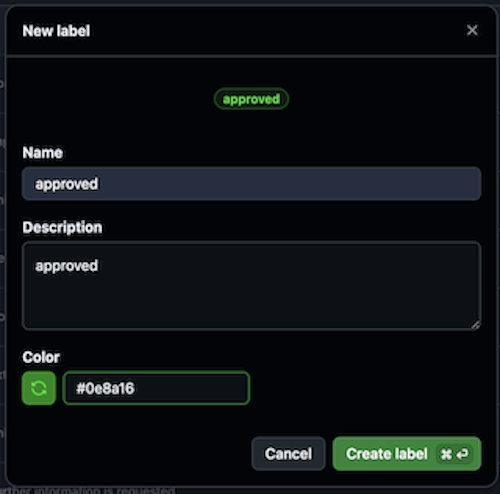
First, create approved label with the following values :
- Assign Name : approved
- Assign Description : approved
- Assign Color :
#0e8a16 - Click Create label button
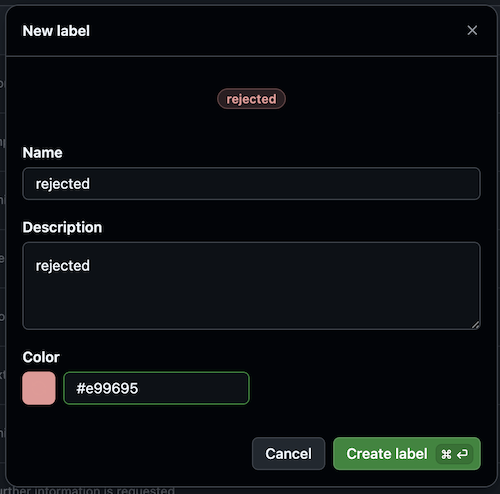
Second, create rejected label with the following values :
- Assign Name : rejected
- Assign Description : rejected
- Assign Color :
#e99695 - Click Create label button
3.4.3: Creating a Personal Access Token (PAT)
You will create a Personal Access Token (PAT) in GitHub to allow Concert to connect to your new repository and create issues for the expiring and expired Certificates
- In your GitHub account, click on your profile picture on the top right corner of the page and select Settings.
- In the left navigation menu, scroll all way down and click Developer settings.
- In the left navigation menu, click Personal access tokens > Tokens (classic).
- Click Generate new token > Generate new token (classic).
- Under Note, enter a name for your token, such as concert-lab.
- Under Expiration, select 90 days.
- Select the following scopes:
- repo (Full control of private repositories)
- write:packages (to push/pull images)
- delete:packages (to delete images)
- user (Update ALL user data)
- Click Generate token on the bottom.
- Copy the generated token into the credentials file after GitHub Personal Access Token (PAT). You will need it later to configure GitHub Authentication in Concert Workflows.
Make sure to save the credentials file!. Keep the window open for easy access during the Lab.
3.5: Creating a target environment in Concert
An environment in Concert groups related applications and inventory data. We will define a new environment to capture certificates coming from Apache Tomcat.
- In the Concert UI, select Inventory > Environment inventory.
- Click Define environment > From resources.
- Enter
developmentas the Name for the environment. - From the Type drop down menu, select Other.
- Select the Purpose of this environment as Development.
- Click Next.
- As there are no Build Artifacts to include in your environment definition, we will skip this step.
- Click Next.
- Review the summary of your entries, then click Create.
3.6: Creating GitHub connection from Concert
You will use the personal access token that you created previously to configure a GitHub Connection. Concert will leverage this connection to create GitHub issues for the expiring and expired Certificates in the Concert defined environment.
From the Bastion Remote Desktop, on the Firefox browser click on the Concert tab.
- Go to Administration > Integrations.
- Select the Connections tab.
- Click on Create connection.
- Search for GitHub and click on the GitHub tile.
- Enter a unique Name for the connection such as
github-connection. - Skip the Description field.
- Under Parameters, provide the following details:
- Host:
https://api.github.com/ - Personal Access Token: the GitHub Personal Access Token (PAT) you created during the previous step.
- Host:
- Click on Validate connection to verify the connection is successful.
- Click Create.
3.7: Creating Automation Rules in Concert
Concert reports all Certificates present in an Environment and classifies them into four categories such as Valid Certificates, Expired Certificates, Certificates Expiring Soon and Certificates with Open Ticket. Using automation rules, we will automate the issue/ticket creation in GitHub to quickly address expiring and expired Certificates impacting an Environment. Note that Concert can also integrate with other ticketing systems such as Jira, Salesforce, ServiceNow, etc.
In addition to automation rules, Concert can leverage ingestion jobs to pull data from external issue tracking systems in order to automatically update ticket status. This configuration is out of scope for this lab.
From the Bastion Remote Desktop, on the Firefox browser click on the Concert tab.
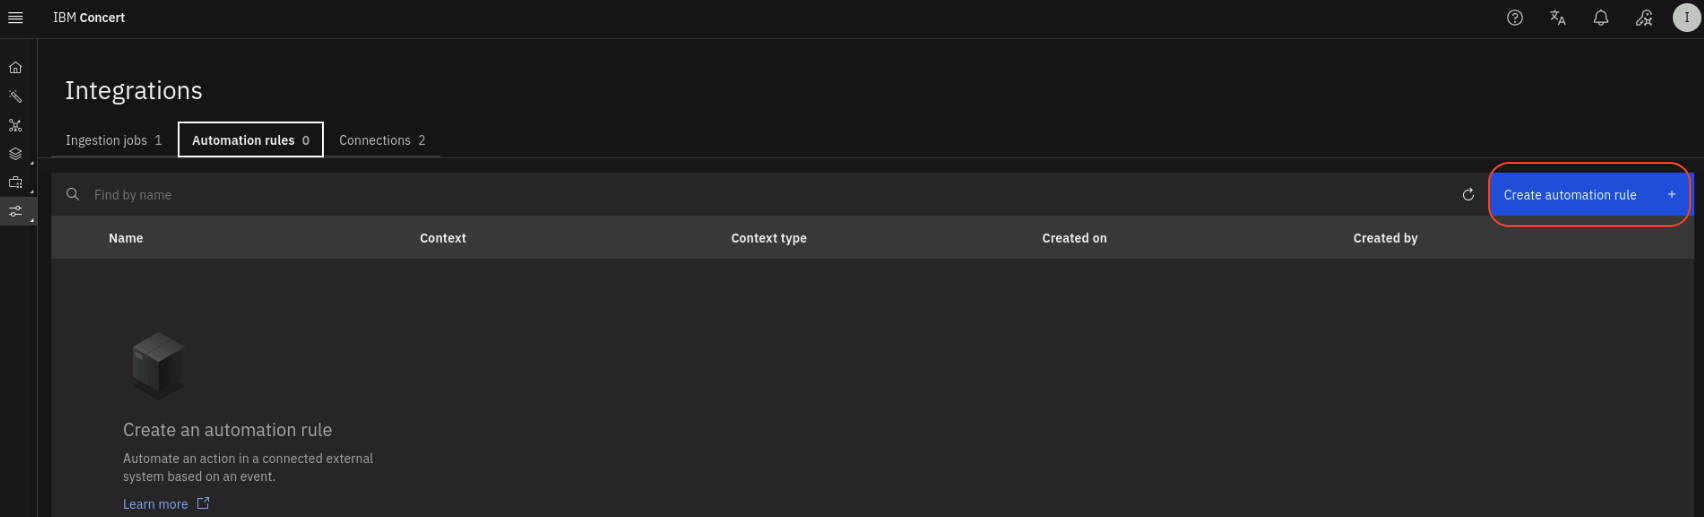
- Click Administration > Integrations.
- Select the Automation rules tab.
- Click the Create automation rule button on the right.
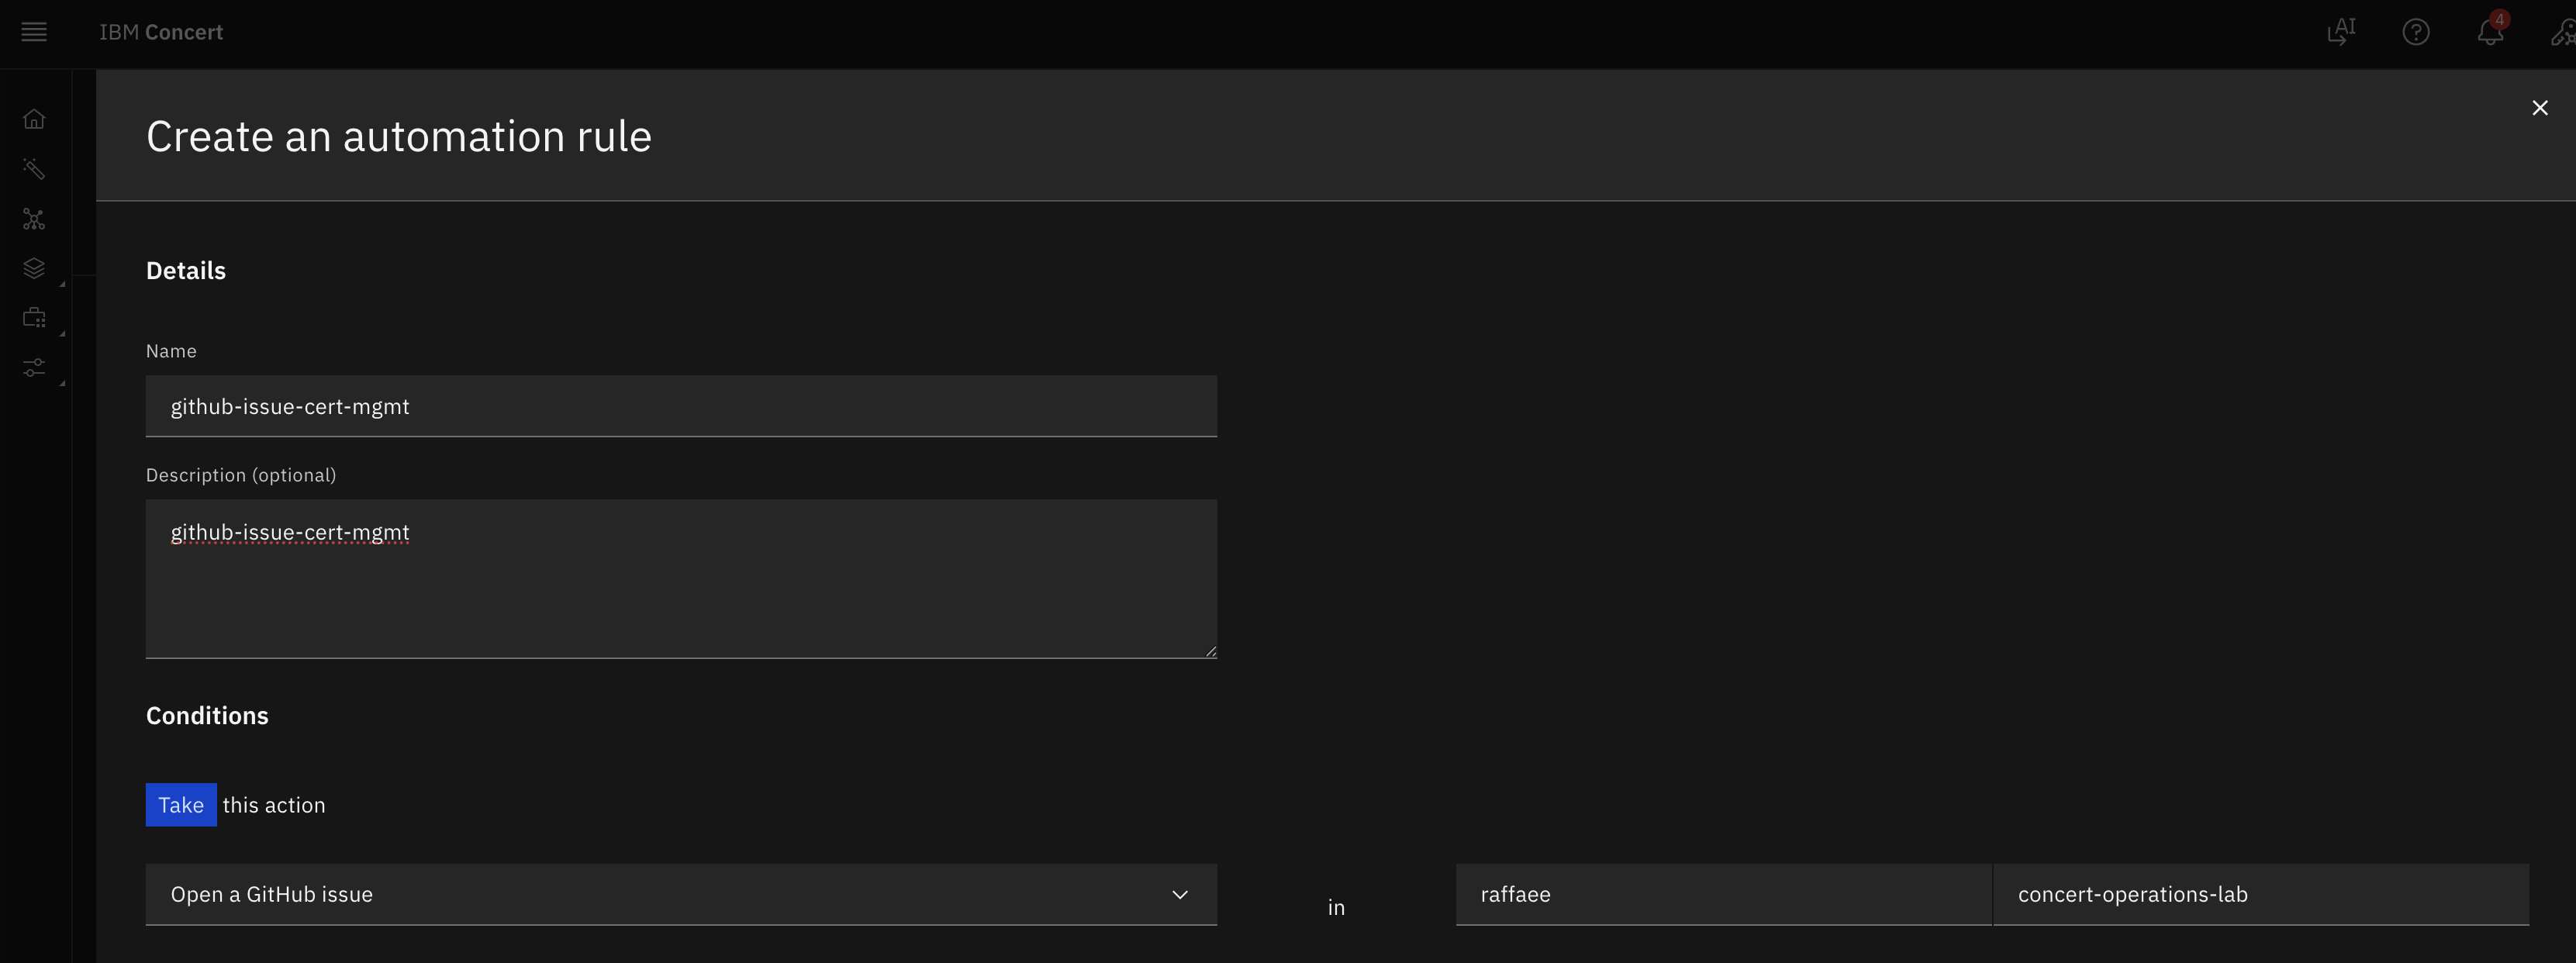
- Enter a Name for the automation rule such as
github-issue-cert-mgmt. - Skip the Description for the automation rule.
- Under Take this action:
- Select Open a GitHub issue
- In Enter target organization type your GitHub username.
- In Enter target repository type
concert-operations-lab.
- Under Using this connection:
- Select the GitHub connection created during the previous step.
- For assign to, leave empty or undefined.
- Under When this condition occurs:
- Select An expiring or expired certificate is detected.
- For affecting, select development from the list of environments.
developmentis the Concert environment which all Certificates will be discovered.
- Under With the following threshold values:
- For Certificates expiring within, select 7 days from the drop down list. This is the only condition that will trigger the issue creation.
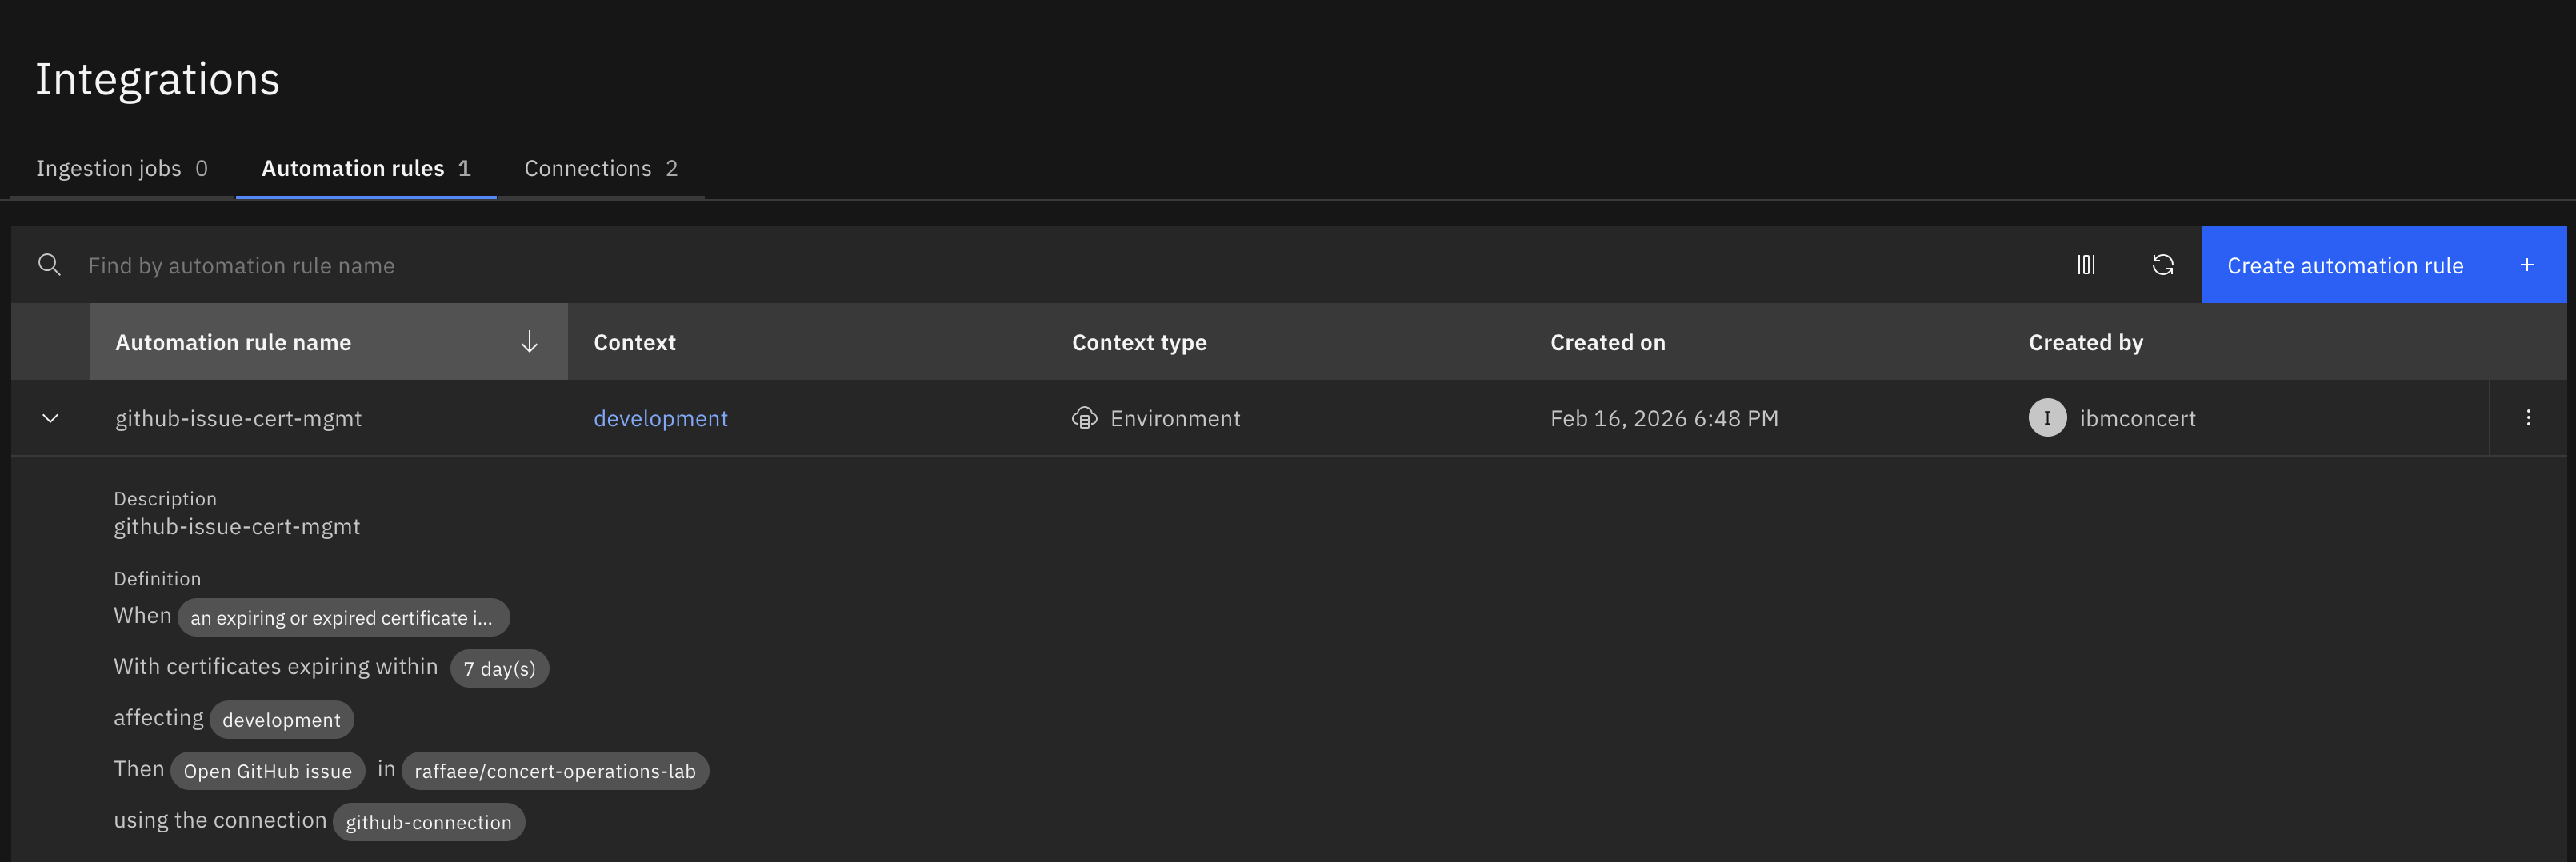
Your configuration should look similar to the screenshot below. Your github name will be different:
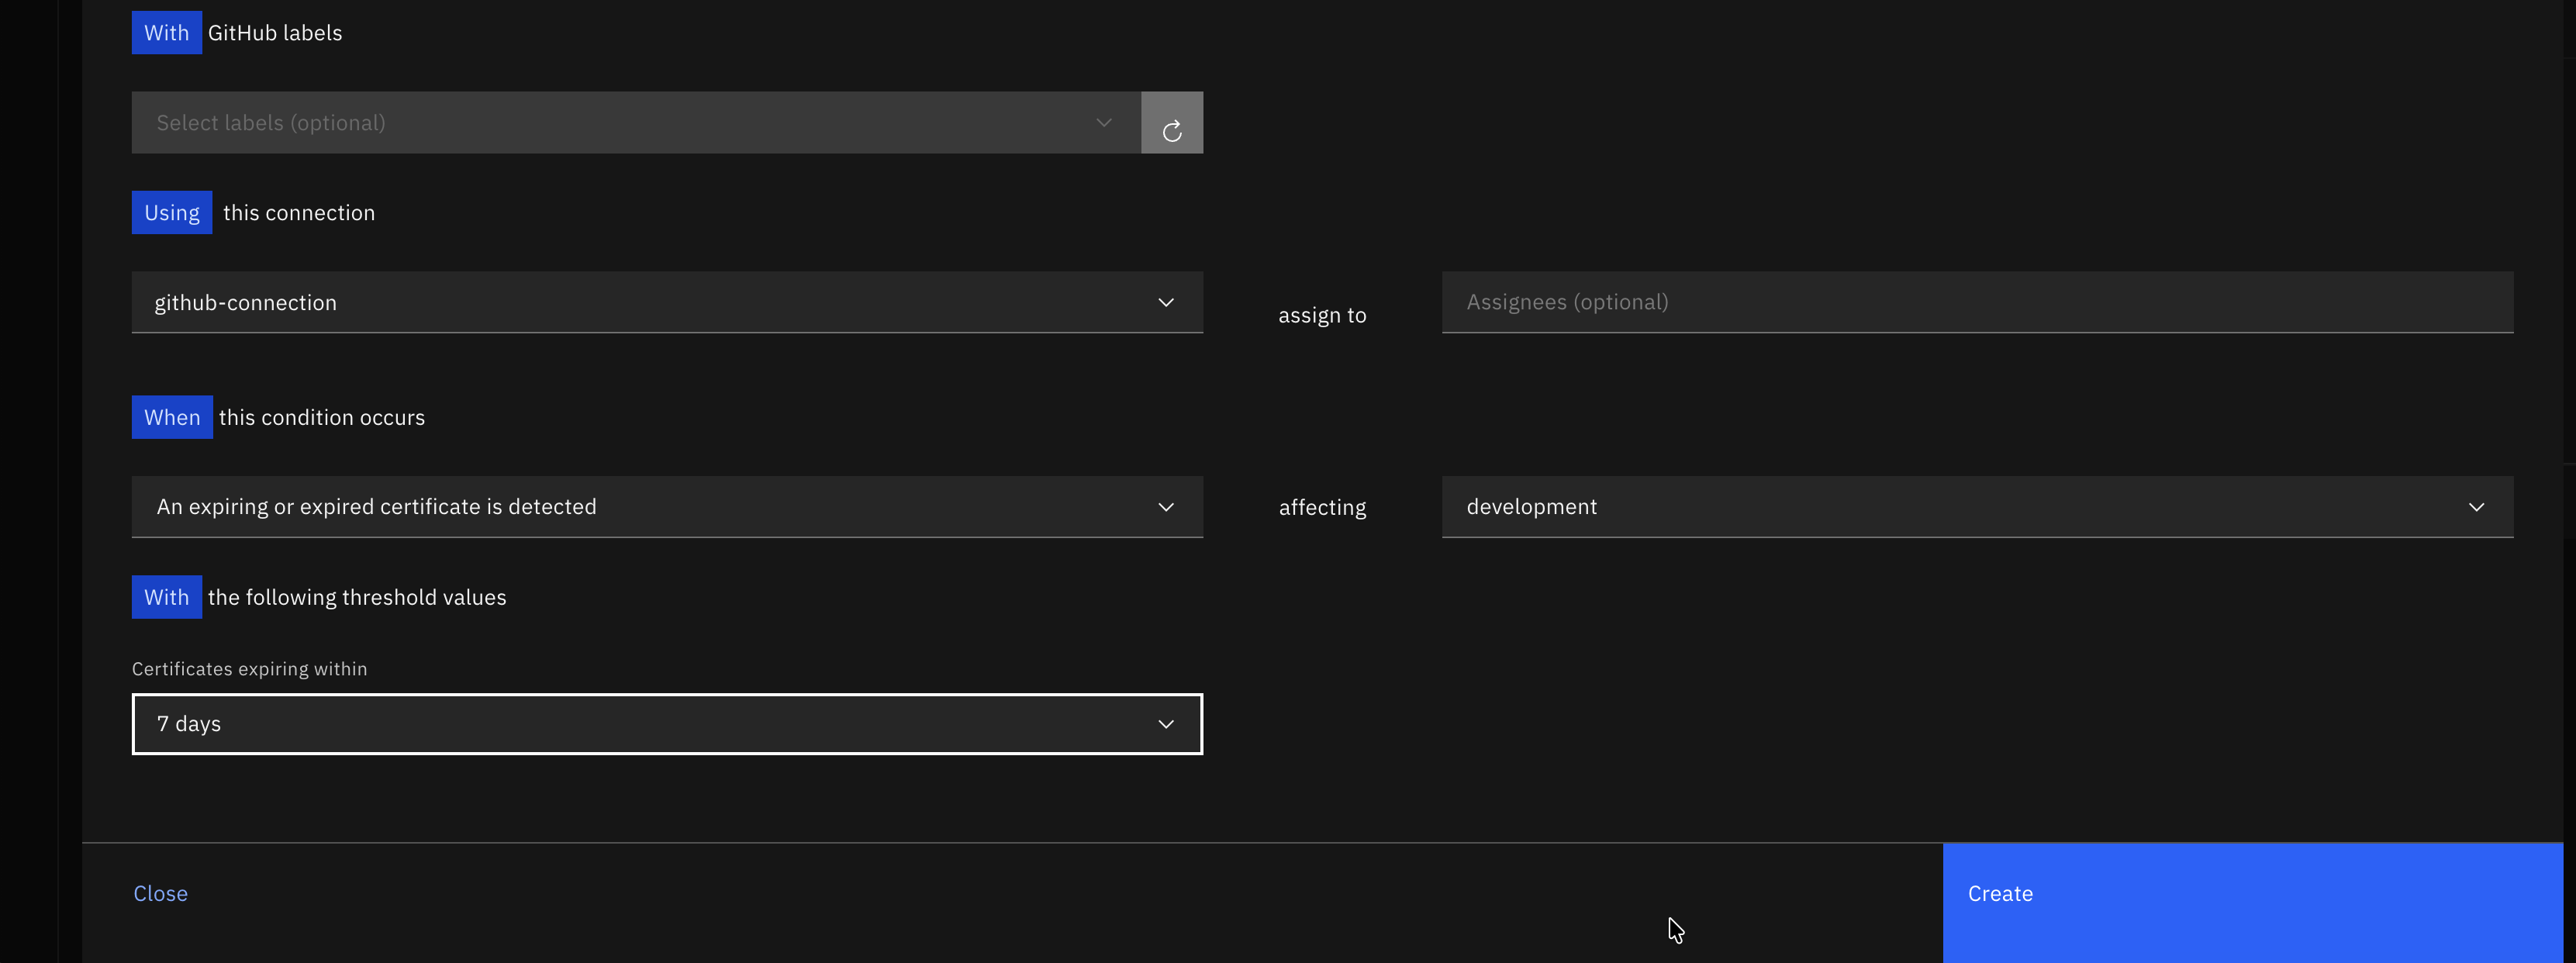
- Click Create to create the automation rule.
After the rule is created, it will appear in the list of automation rules. Click on the twistie before the rule name to expand the section and see more details. Review the conditions that will trigger the issue creation.
3.8: Installing the Workflows
You will download custom Workflows from a public Box folder and save them on the Bastion local disk. Later you will upload them to Concert Workflows.
From the Bastion Remote Desktop, open a new tab in the Firefox browser.
- Open the link https://ibm.box.com/v/certificate-lab
- In the Box folder, you will find three Workflows :
- Linux_Keystore_Cert_Discovery.zip
- Linux_Keystore_Cert_Renewal.zip
- updateGitHubIssueWithALabel.zip
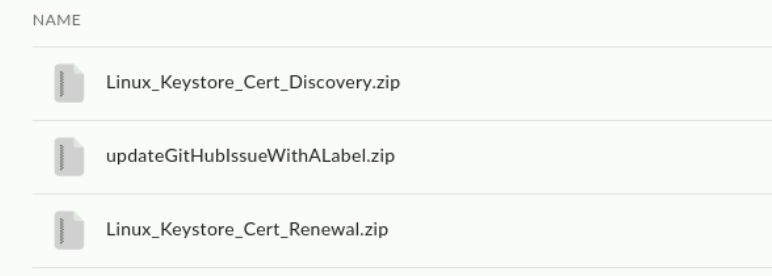
- Download all three Workflows and save them on Bastion's Downloads folder.

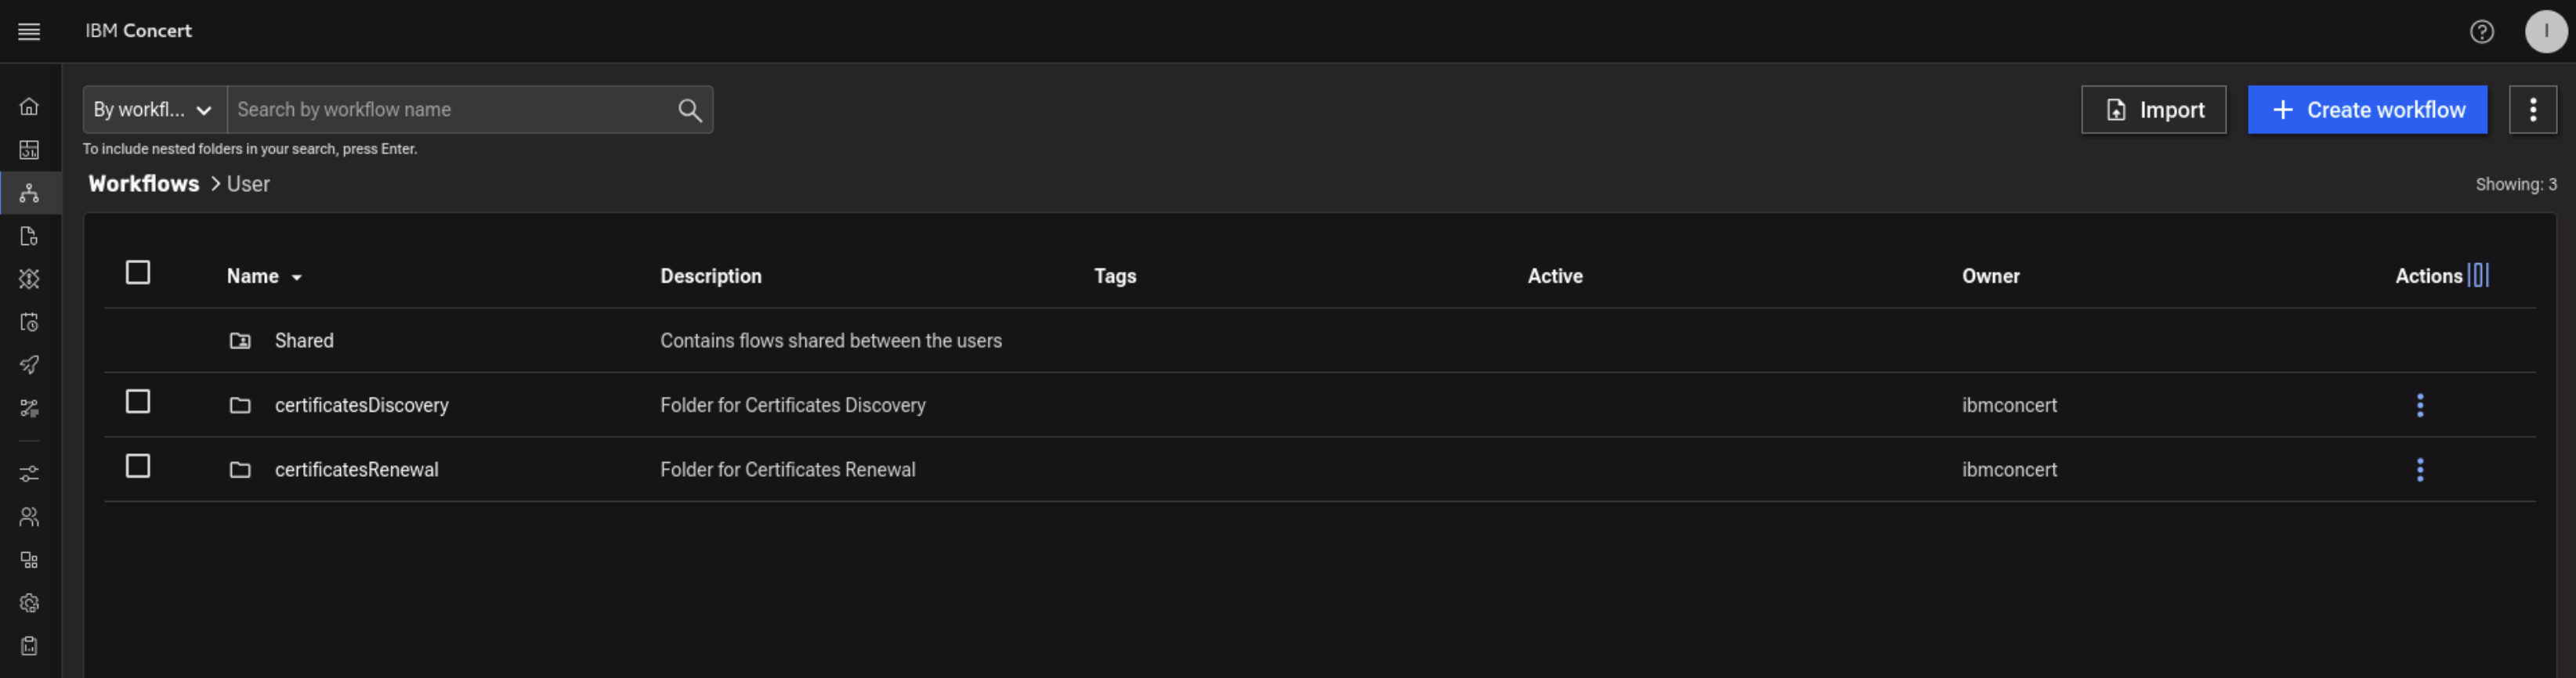
Next, you will create two new Folders in Concert Workflows for these 3 Workflows.
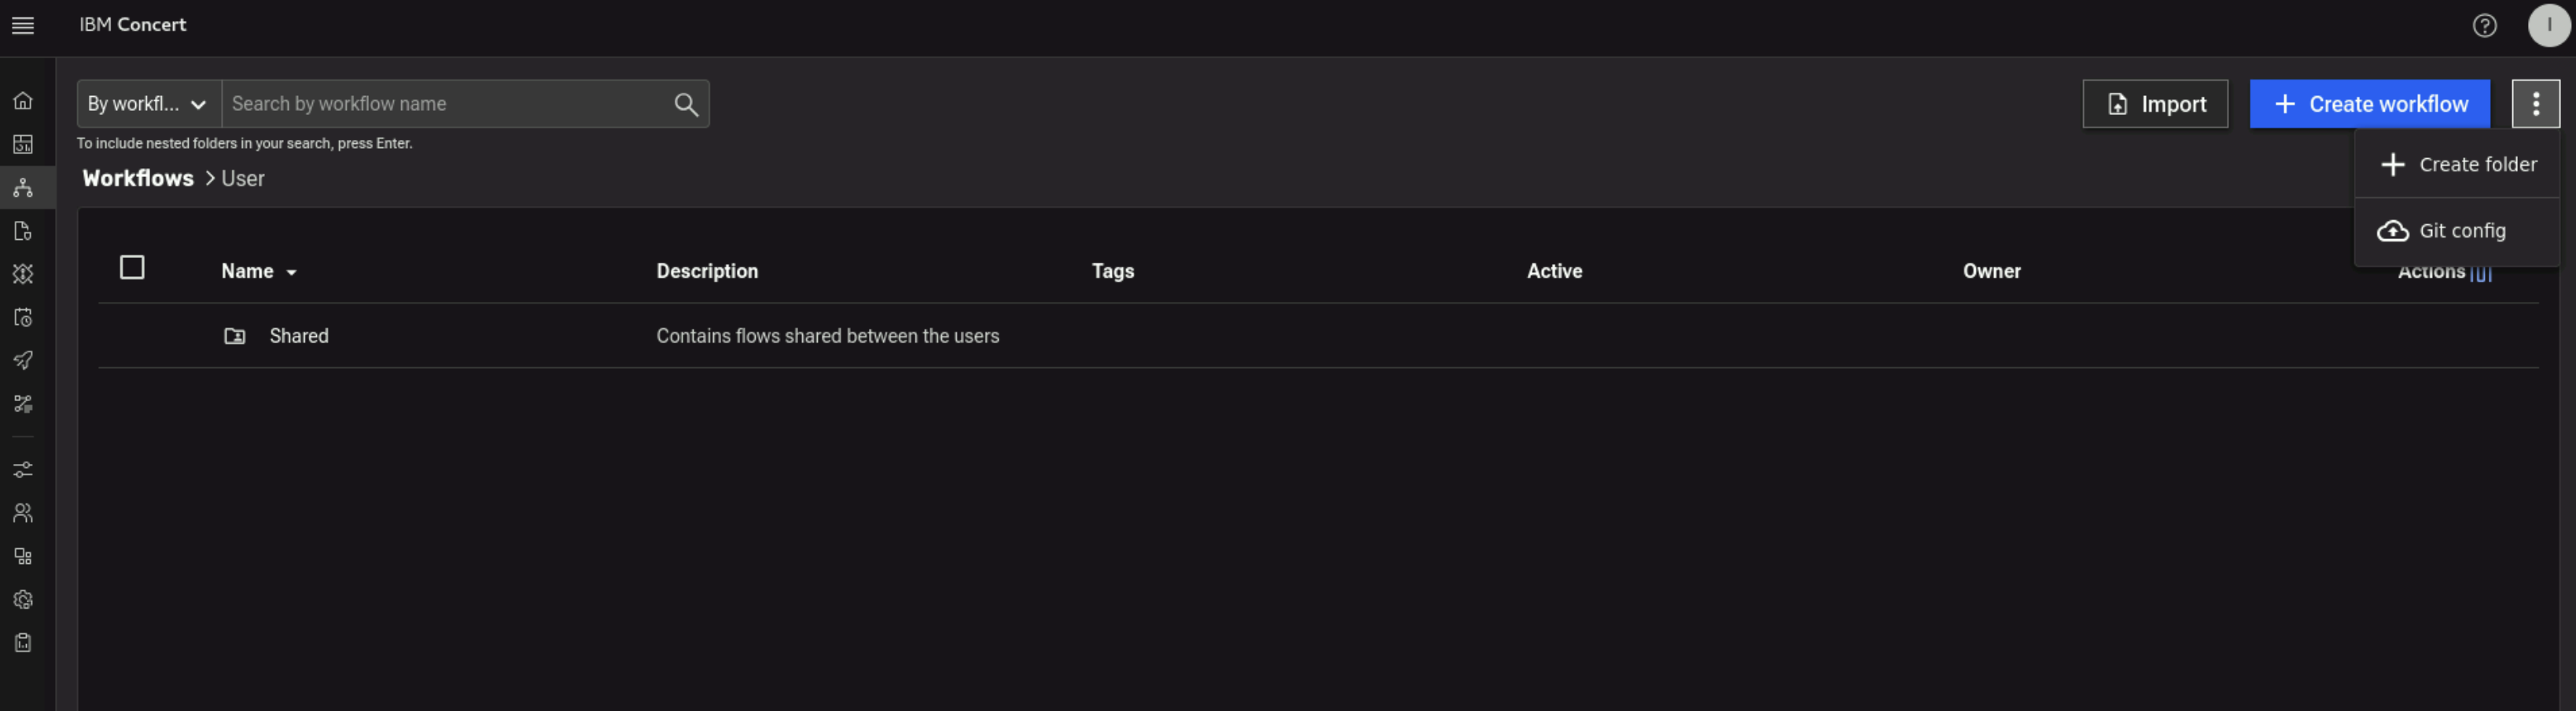
From the Bastion Remote Desktop, on the Firefox browser click on the Concert tab.
- Click on the burger menu on the top left corner and select Workflows -> Workflows
- Click on the three vertical dots on the top right corner and select Create folder
- Enter a name for the folder such as
certificatesDiscovery - Enter a description for the folder such as
Folder for Certificates Discoveryand click on Create button.

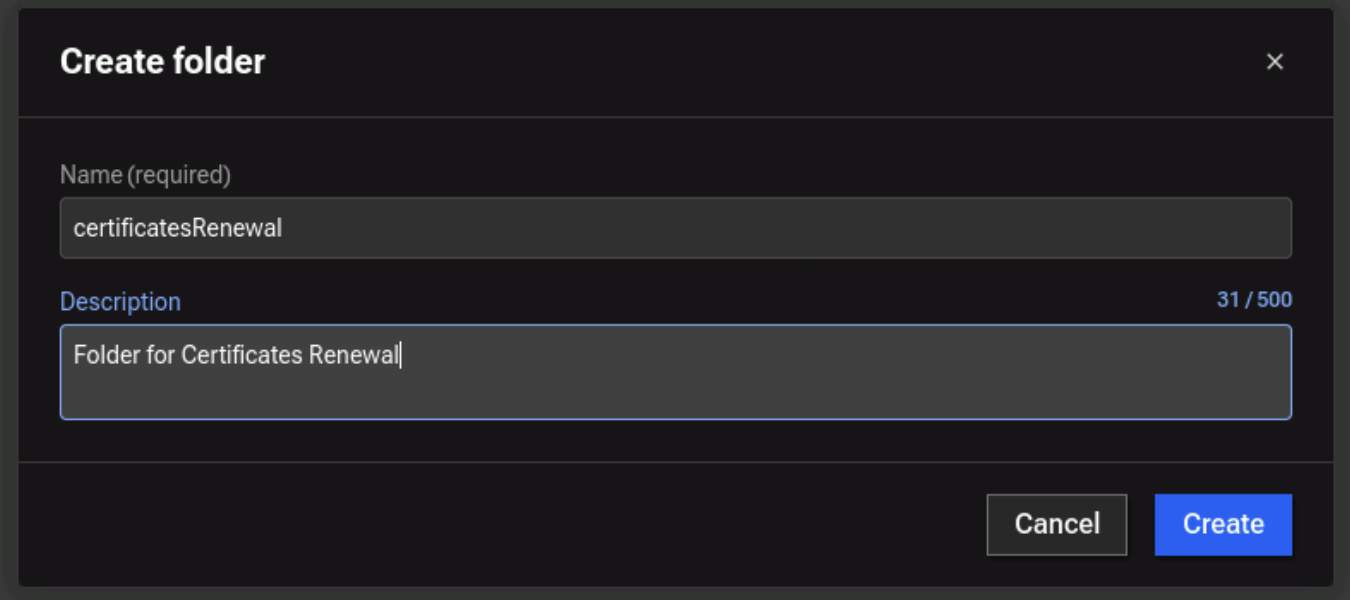
- Click on the three vertical dots on the top right corner and select Create folder
- Enter a name for the folder such as
certificatesRenewal - Enter a description for the folder such as
Folder for Certificates Renewaland click on Create button.
At this stage, you will have 2 new Folders created Concert Workflows.
Finally, you will import the Workflows from Bastion's Downloads folder:
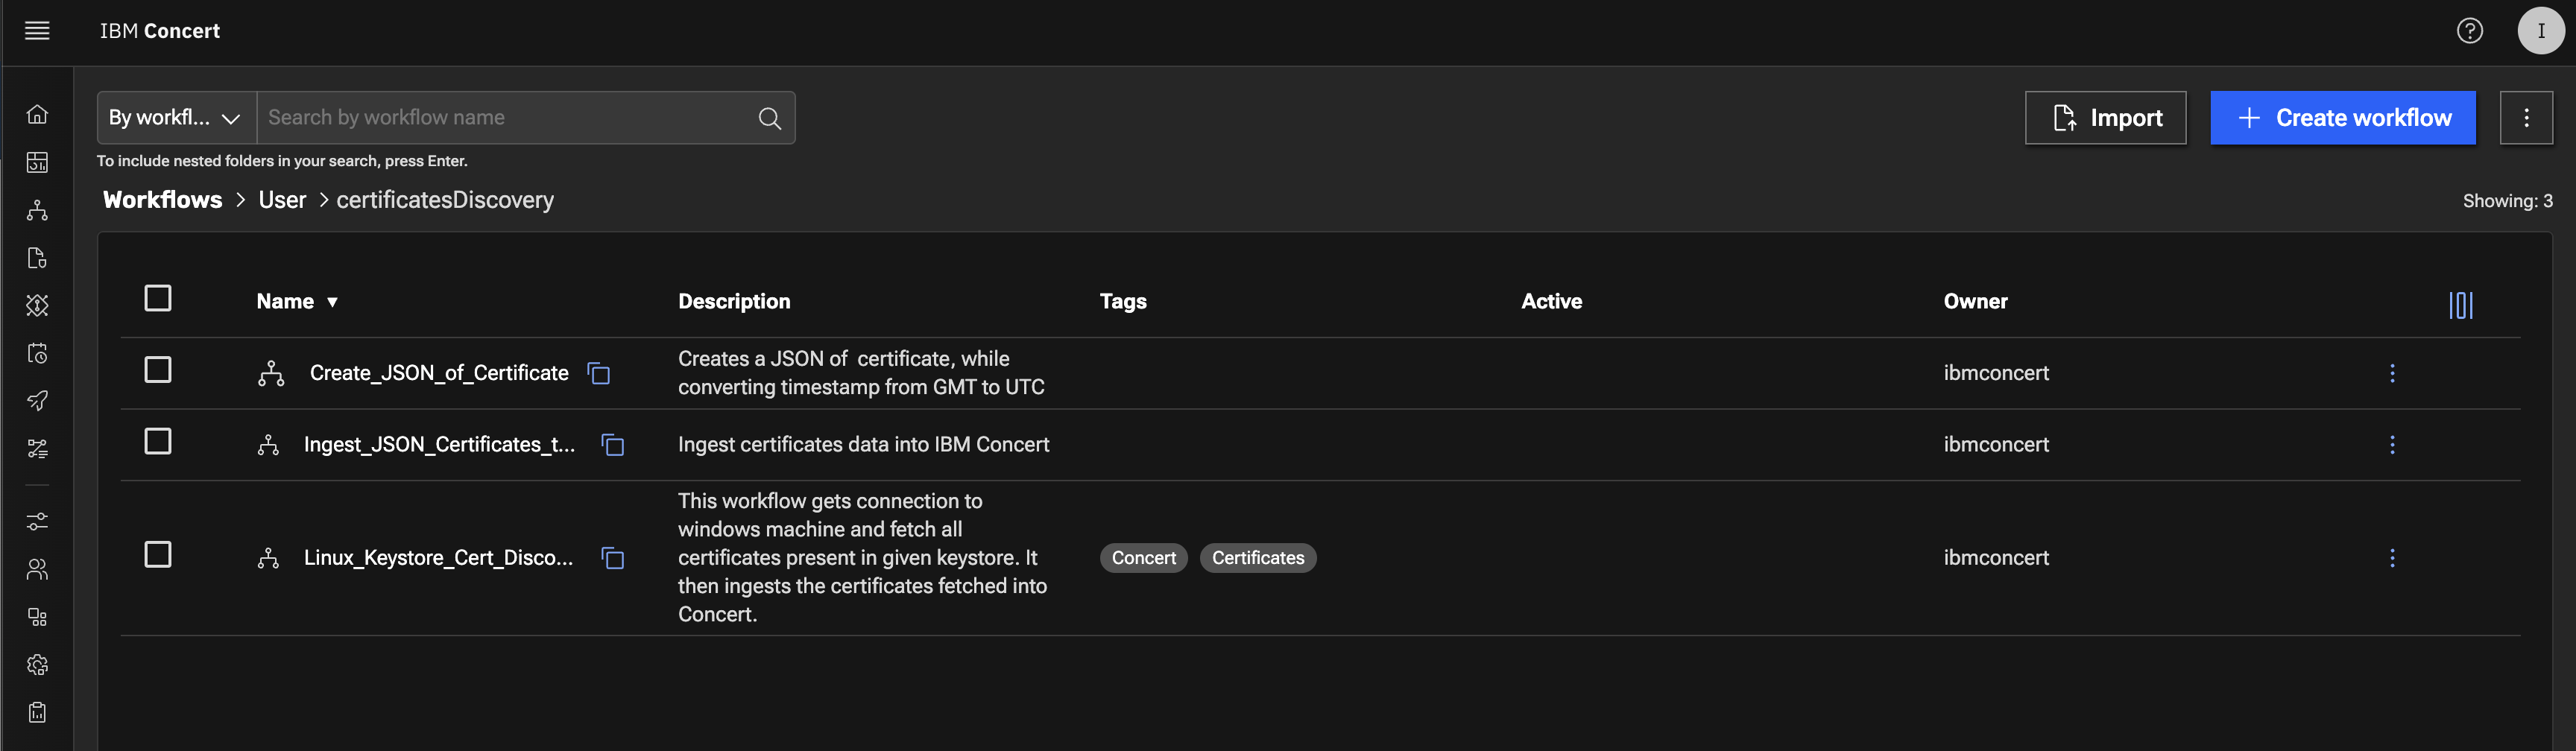
- Click on certificatesDiscovery folder in Concert Workflows
- Click on Import button in Concert Workflows, navigate to Bastion's Downloads folder, choose Linux_Keystore_Cert_Discovery.zip and click Open button to complete the Import
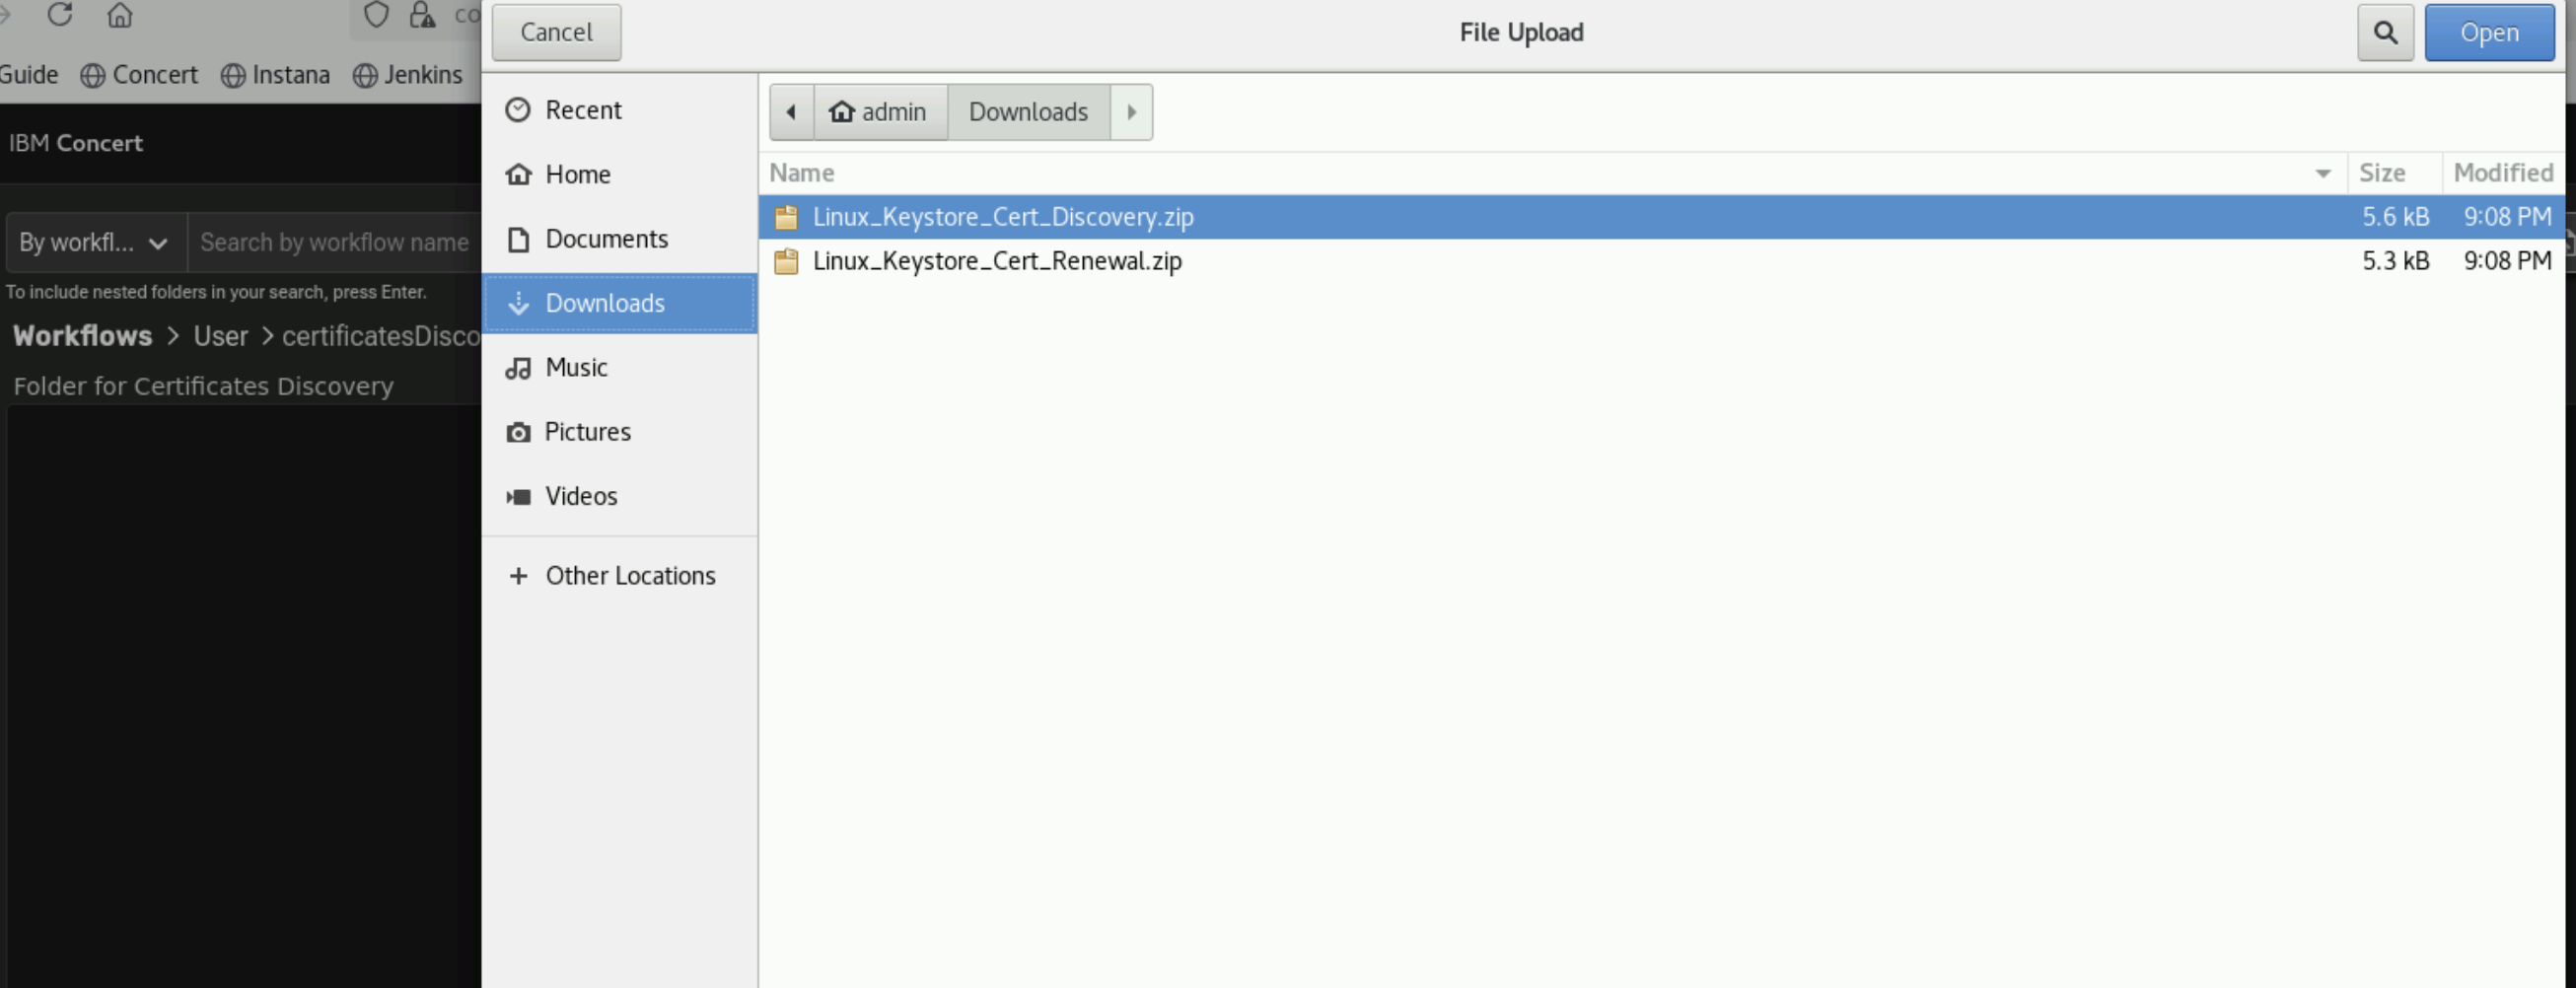
- At this stage, you will have Linux_Keystore_Cert_Discovery workflow imported to certificatesDiscovery folder
Next, you will upload Linux_Keystore_Cert_Renewal workflow imported to certificatesRenewal folder.
- Go up one level to the main folder in Concert Workflows by clicking on User.
- Click on certificatesRenewal folder in Concert Workflows
- Click on Import button in Concert Workflows, navigate to Bastion's Downloads folder, choose Linux_Keystore_Cert_Renewal.zip and click Open button to complete the Import
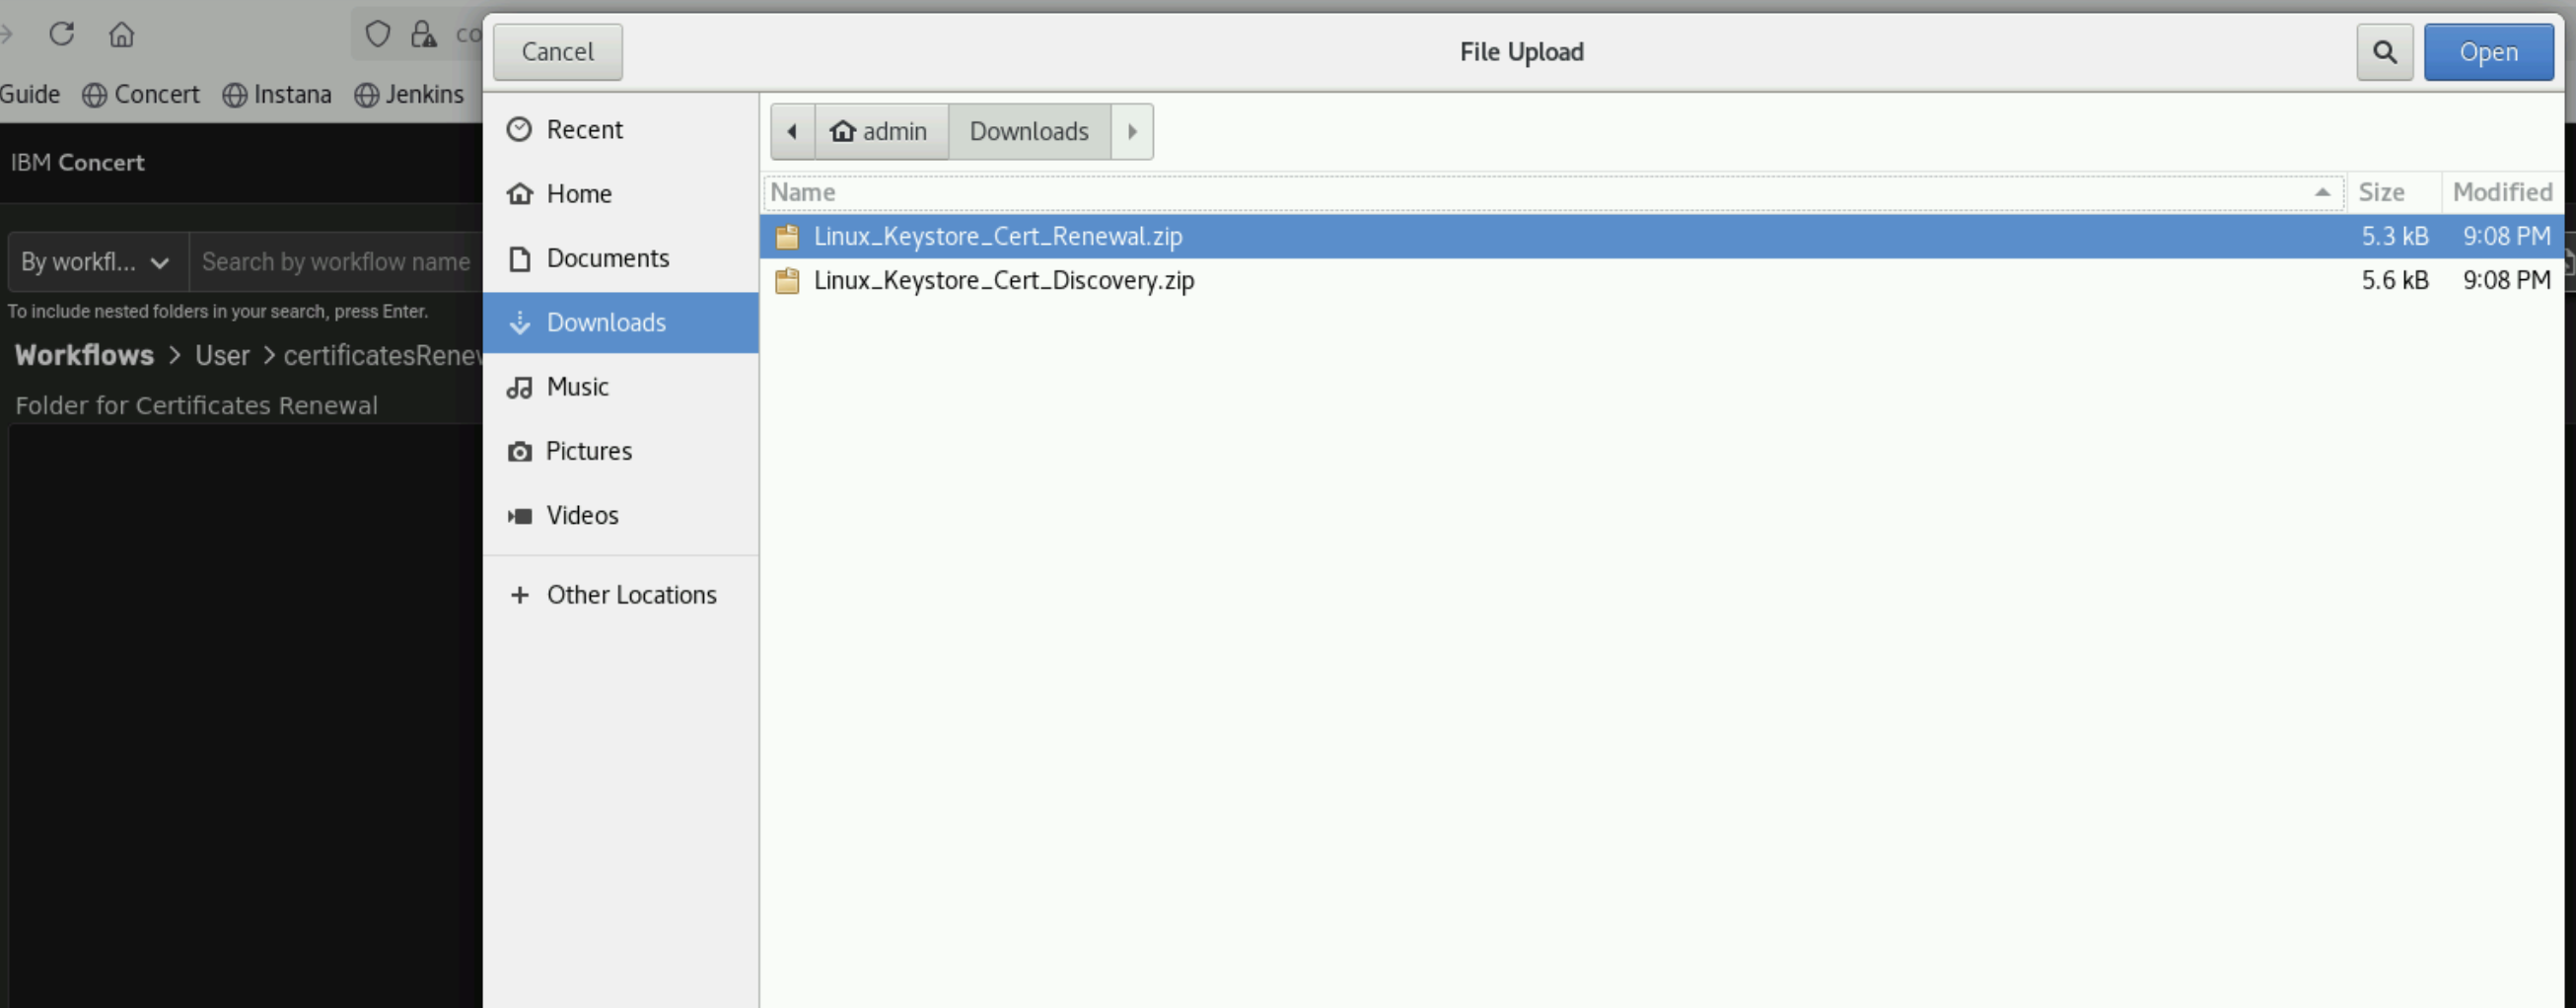
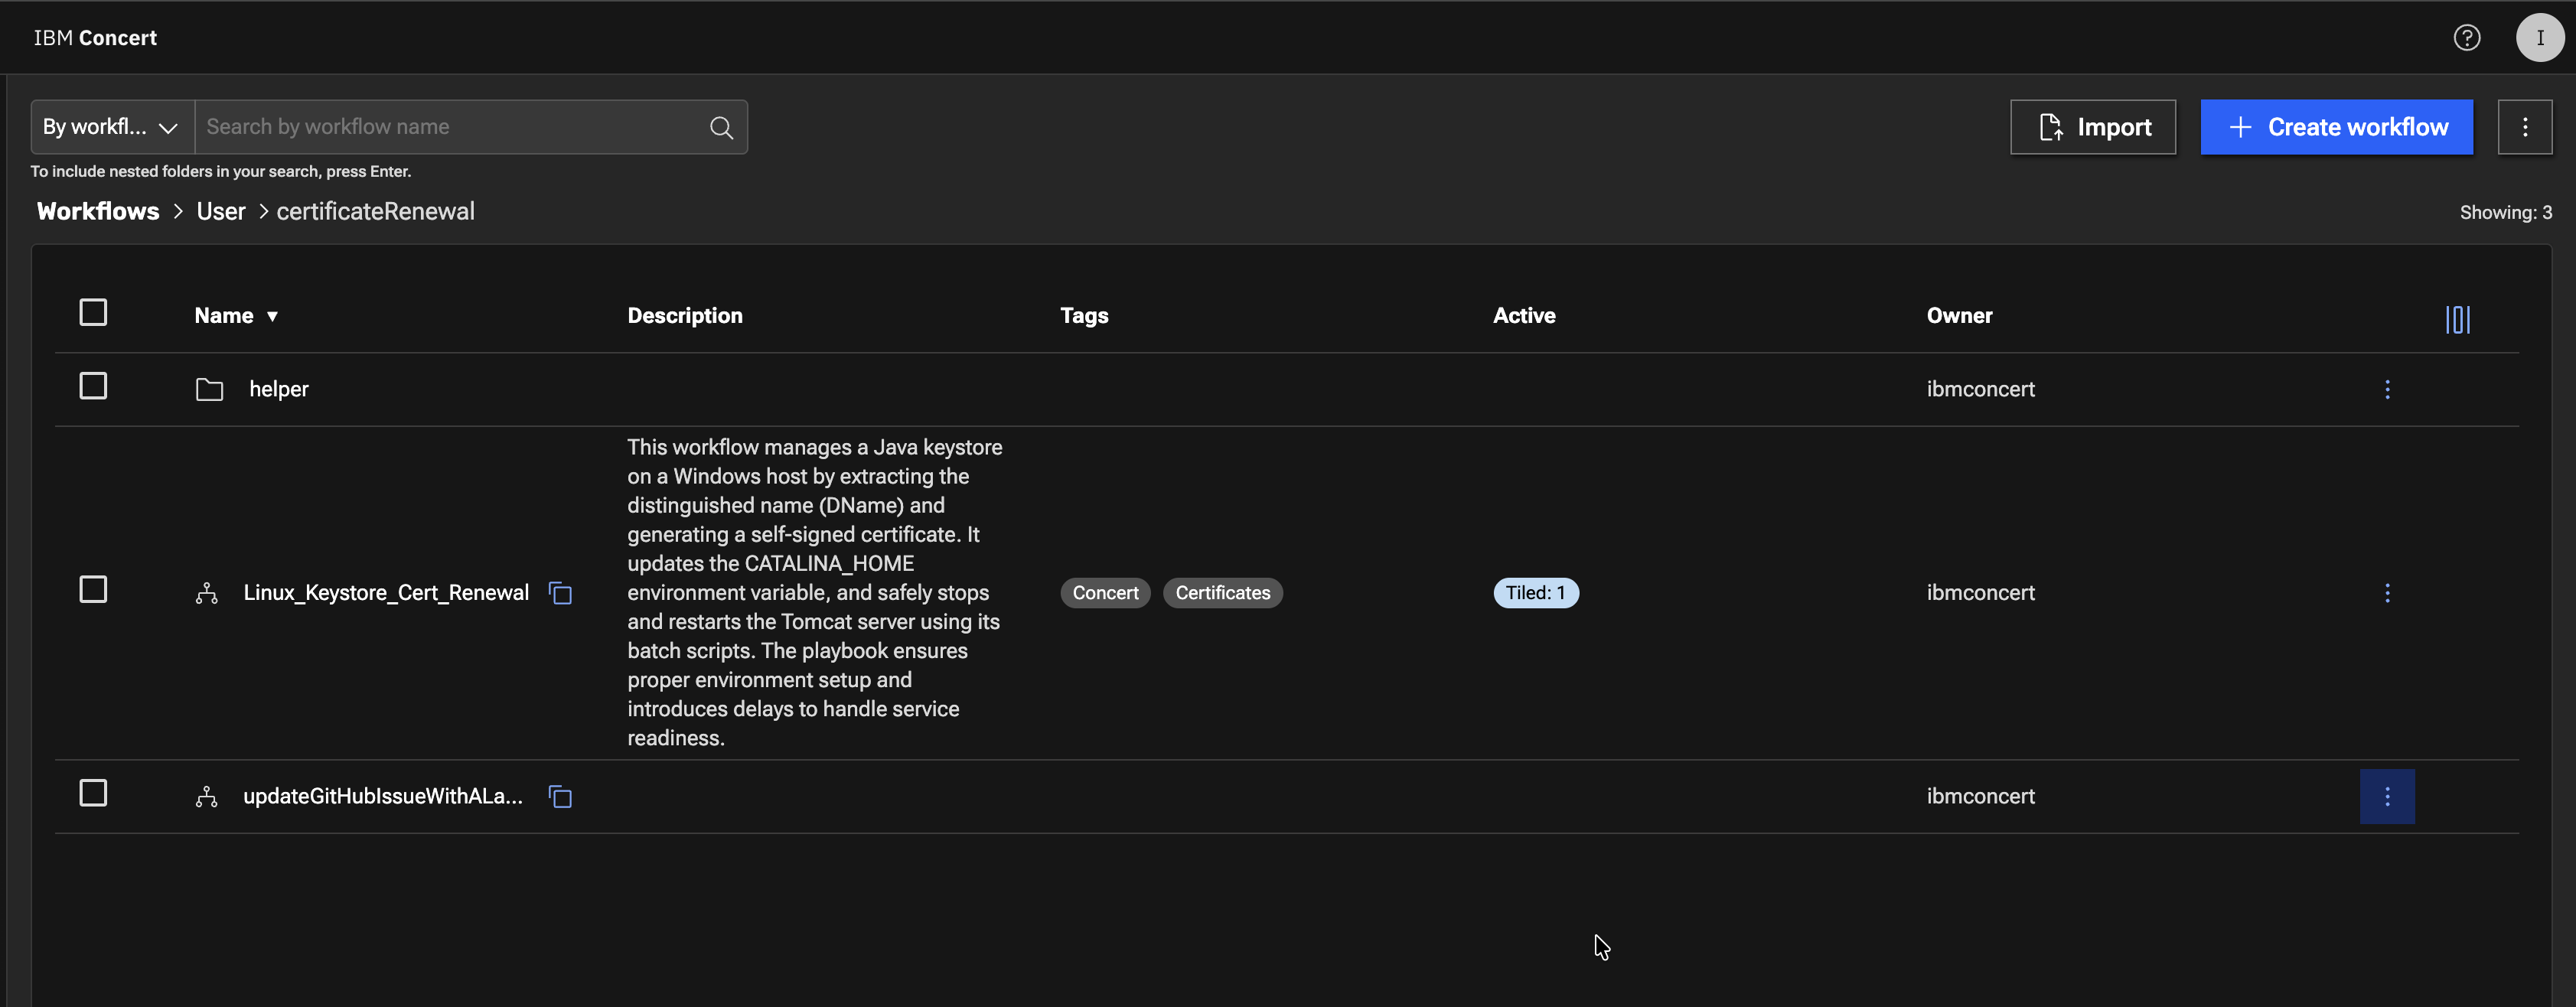
- At this stage, you will have Linux_Keystore_Cert_Renewal workflow imported to certificatesRenewal folder

- Still on certificatesRenewal folder in Concert Workflows, click again on Import button in Concert Workflows, navigate to Bastion's Downloads folder, choose updateGitHubIssueWithALabel.zip and click Open button to complete the Import
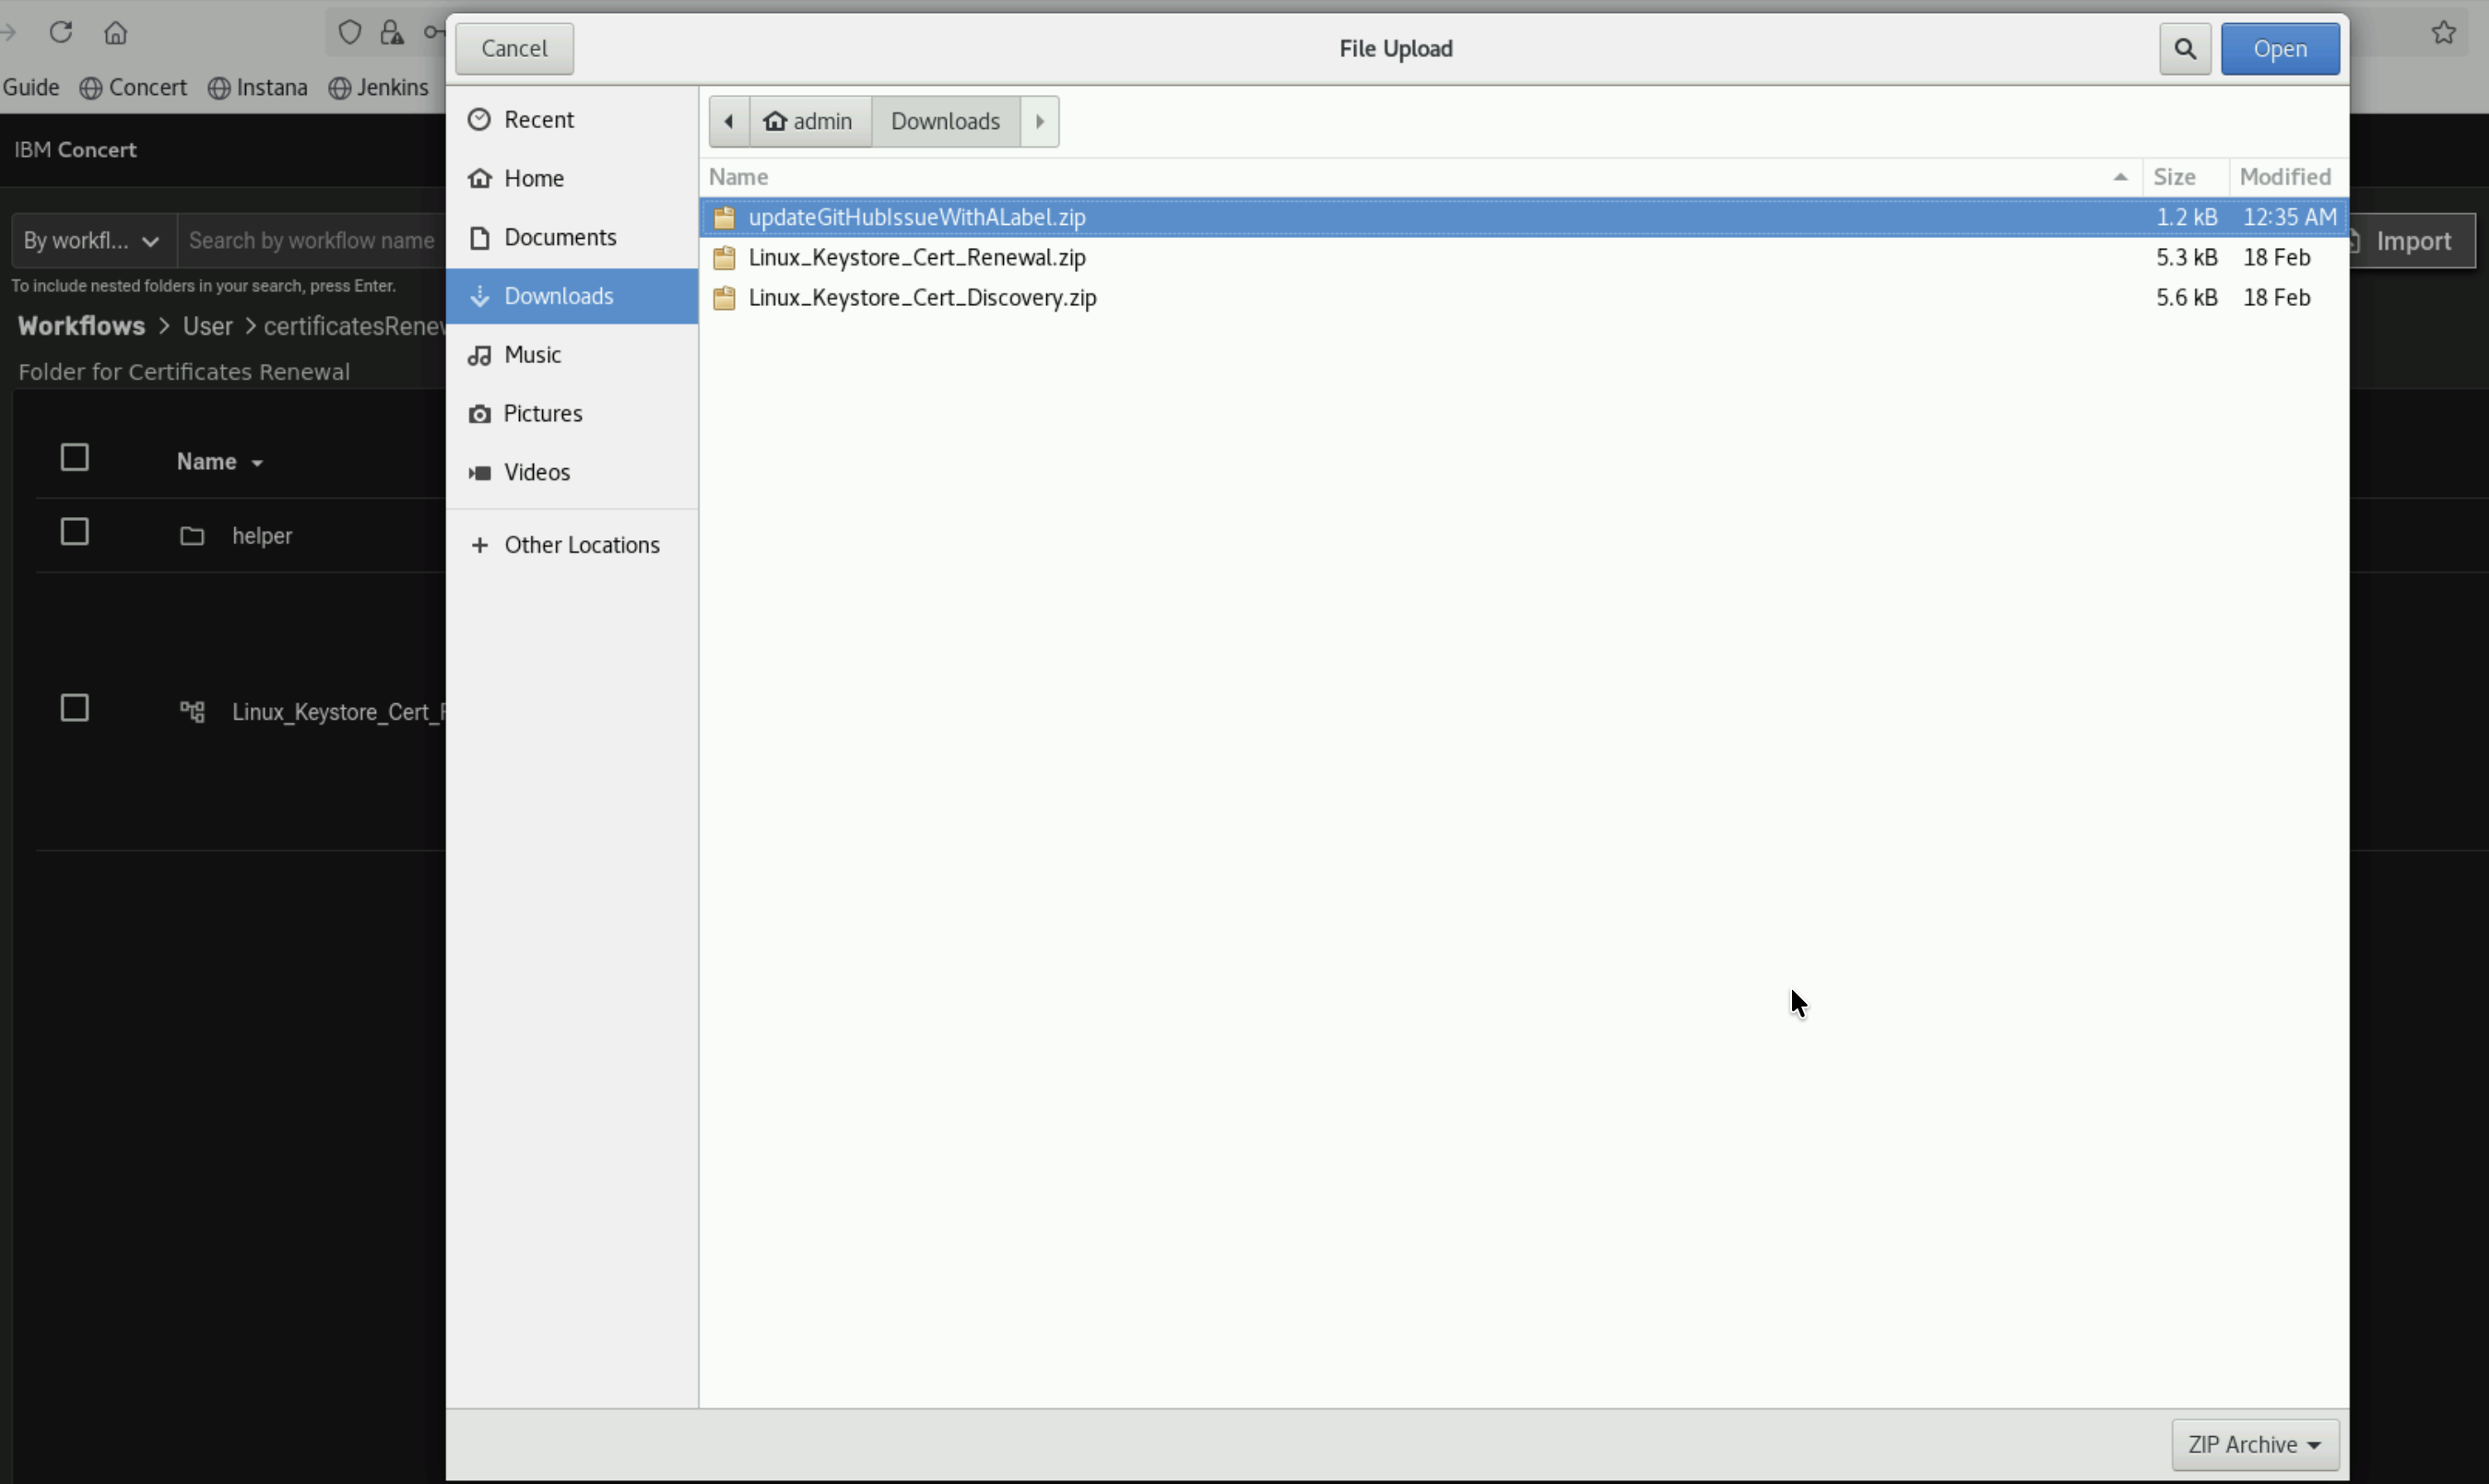
- At this stage, you will have updateGitHubIssueWithALabel workflow imported to certificatesRenewal folder
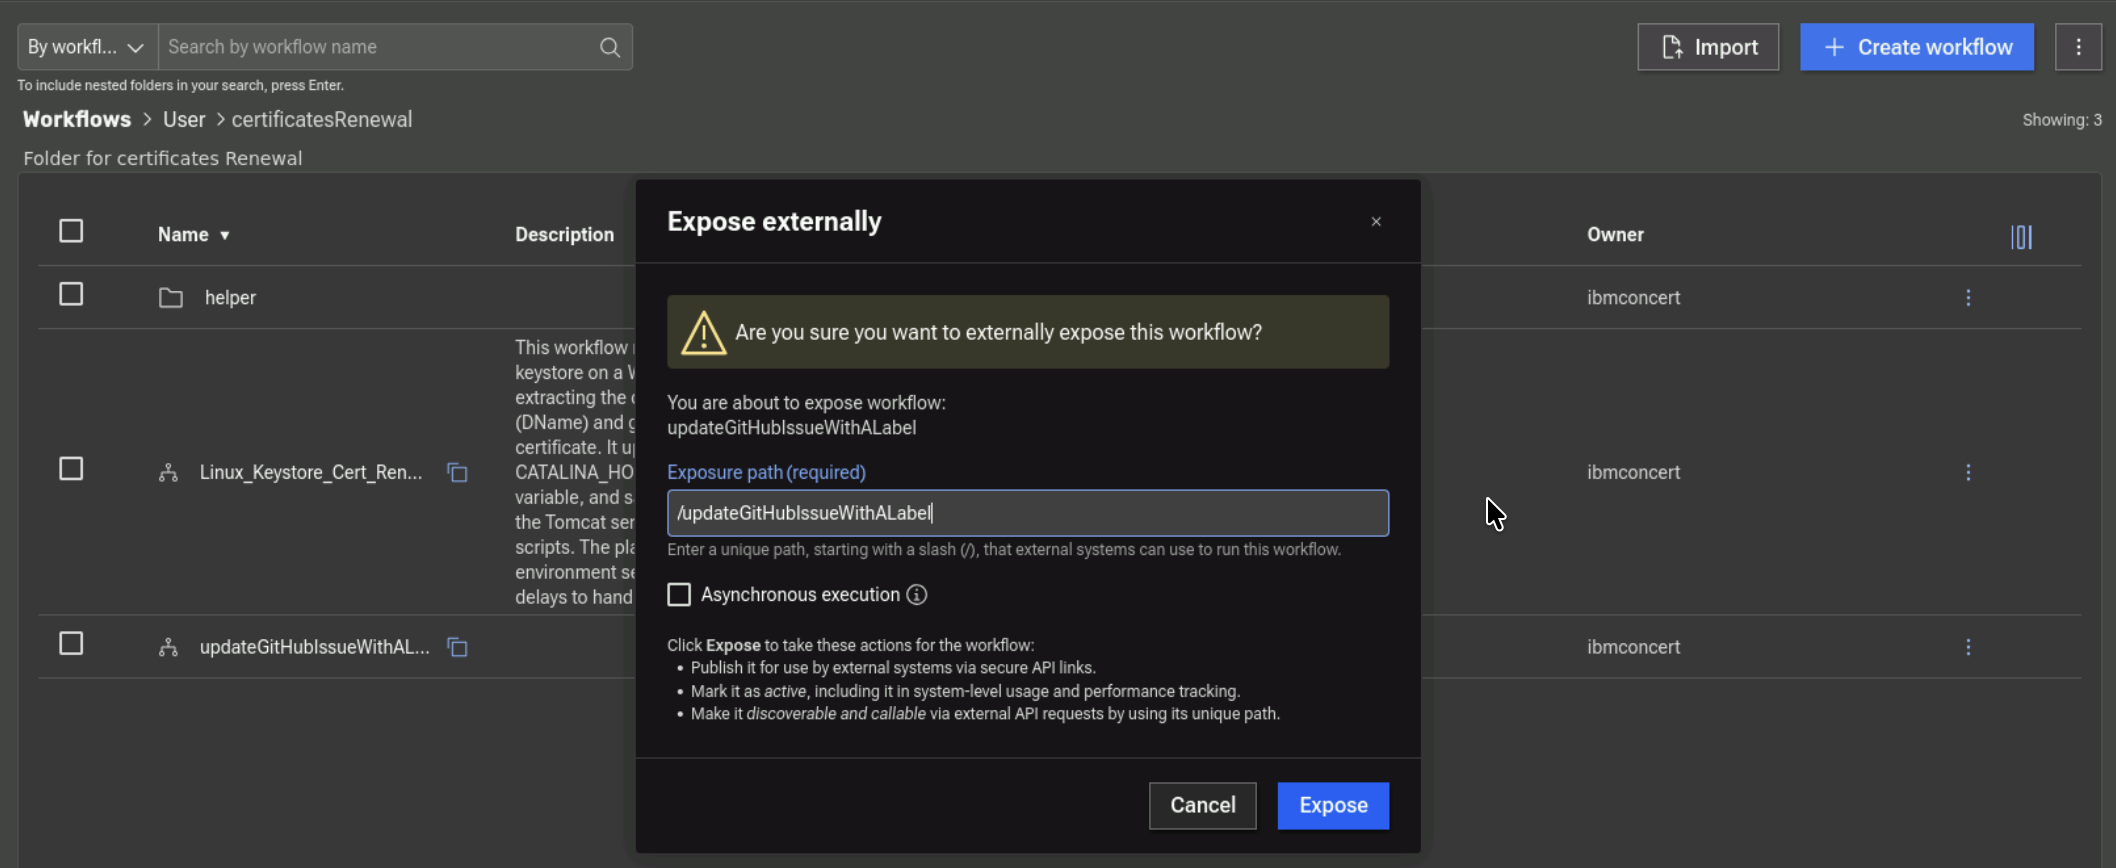
- Click on 3 vertical dots on updateGitHubIssueWithALabel workflow and click Expose externally to expose the workflow.
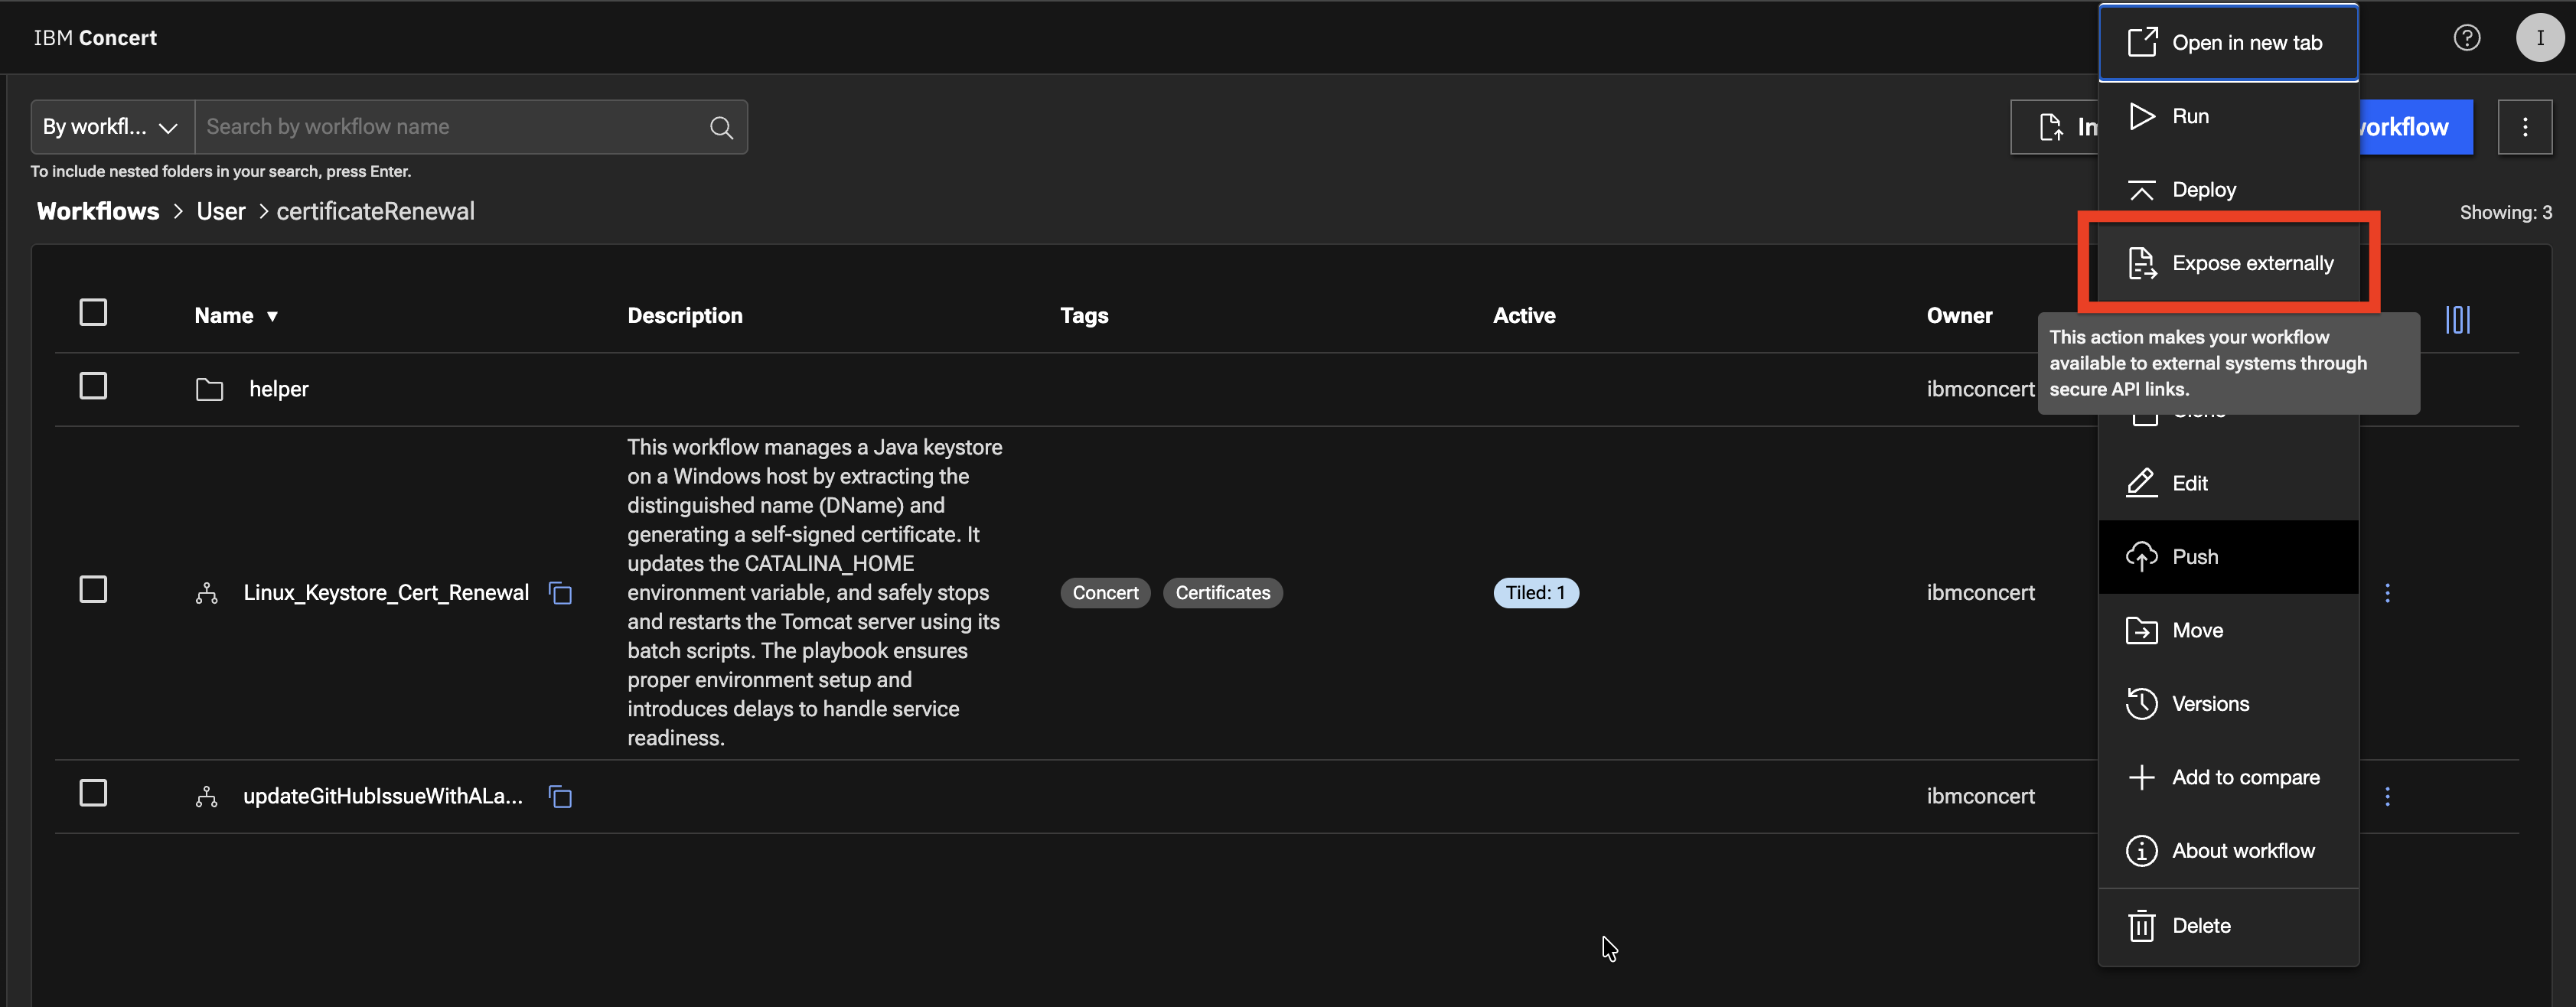
- On the Expose externally pop-up, click on the Expose button.
We need the updateGitHubIssueWithALabel workflow to be exposed so it can be called within the Concert UI certificate Renew menu option.
Now, you have all 3 Workflows uploaded to specific folders in Concert Workflows. In the next section, you will configure the Workflows and execute them.
3.9: Summary
So far you have been able to accomplish the following:
- Have enabled GitHub issues and created new labels.
- Have created a GitHub connection from Concert.
- Have created one Automation Rule in Concert.
- Have uploaded new Workflows in Concert Workflows.
Please continue to the next section of the lab.