4. Workflows Configuration
4.1: Overview
In this section of the lab, we will create the required Authentications in Concert Workflows.
The Authentication UI in IBM Concert Workflows, is the configuration area where users securely define and manage credentials used by workflows to connect to external systems (such as GitHub, REST APIs, CFSSL or servers).
The Authentication UI typically allows you to:
- Create authentication profiles (e.g., API Key, SSH, Bearer Token, Basic Auth, OAuth)
- Name and categorize credentials for reuse across workflows
- Securely store secrets (tokens, usernames/passwords, certificates)
- Associate authentication profiles with specific workflow steps or integrations
- Control access permissions so only authorized roles can use or edit credentials
4.2: Creating Authentications in Concert Workflows
Let's create the Authentications used by the Workflows imported in the previous section.
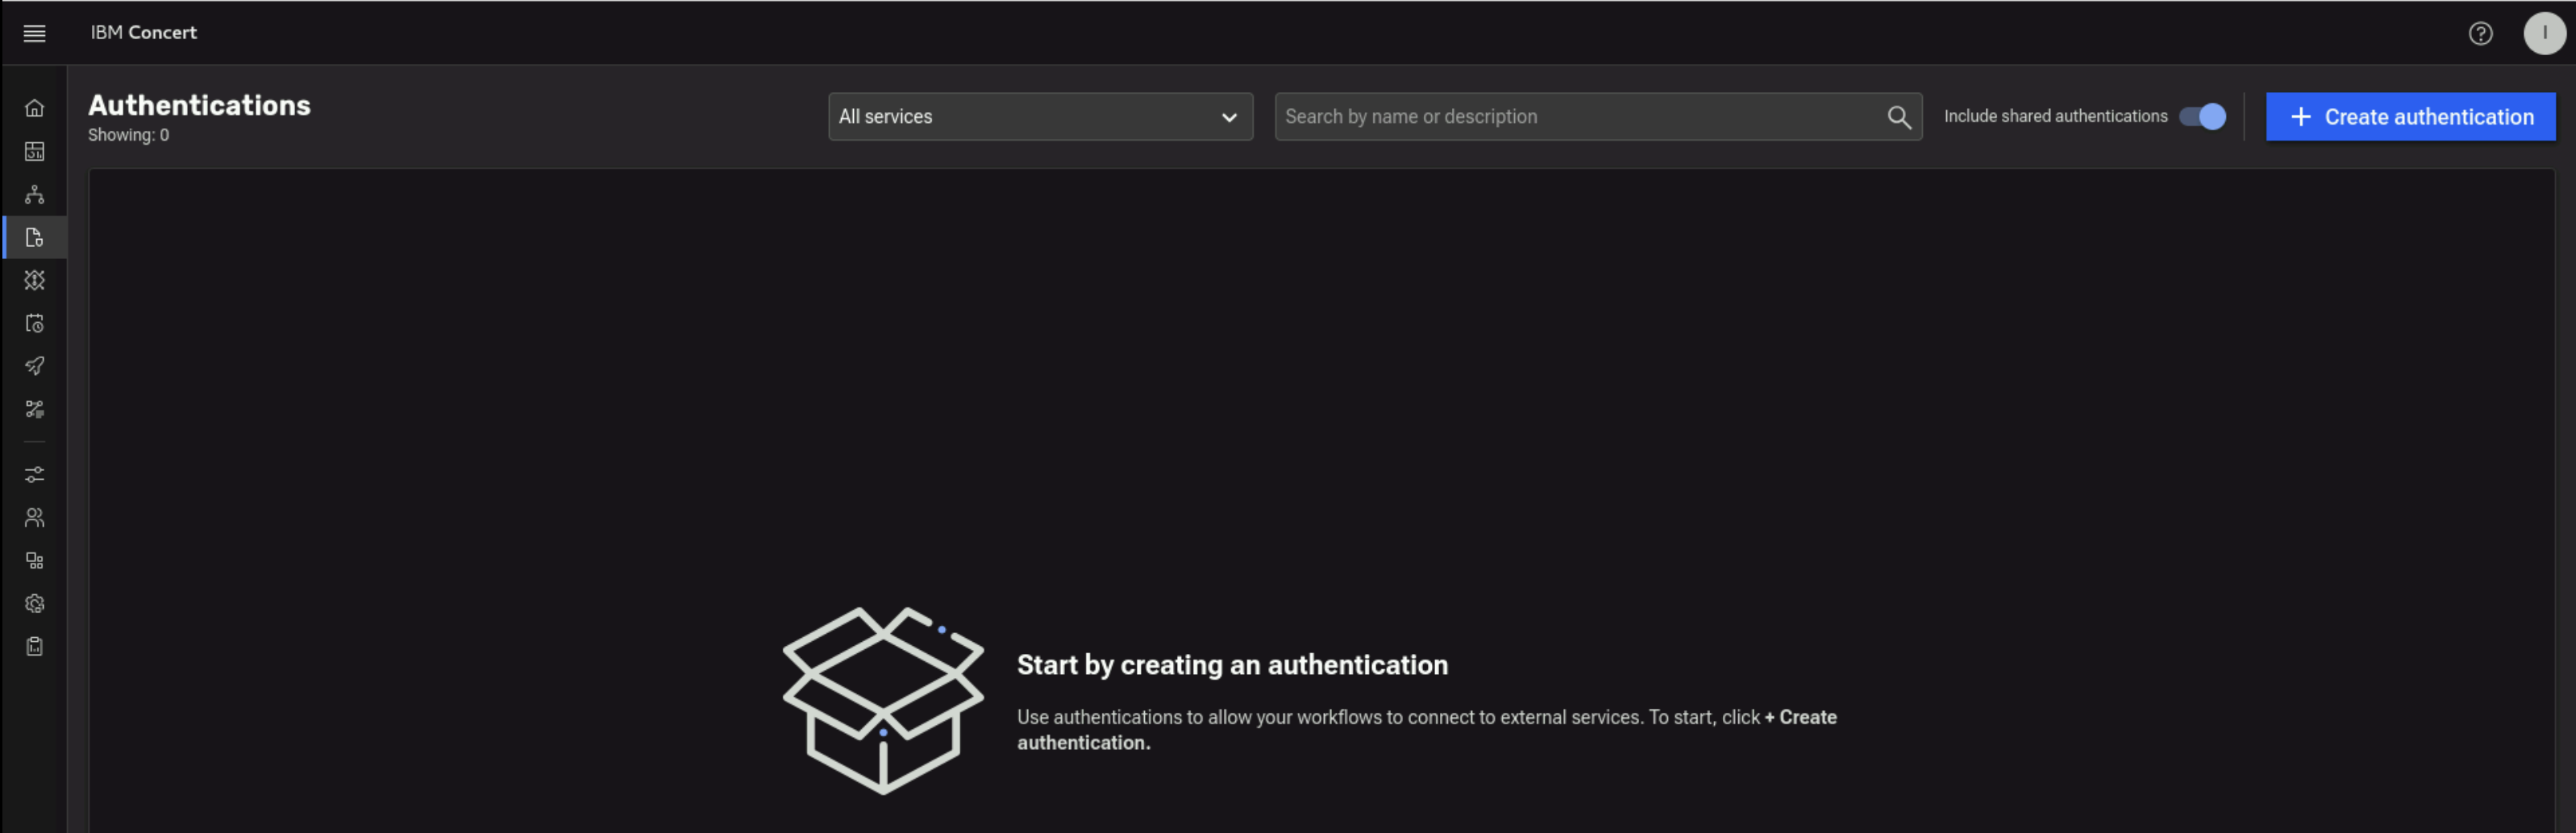
From the Bastion Remote Desktop, on the Firefox browser click on the Concert tab.
- Click on the burger menu on the top left corner and select Workflows -> Authentications will bring you to below UI
4.2.1: Creating Ansible Authentication to Apache Tomcat on demo-apps VM
In this section we'll show you how to create an Ansible Authentication to Apache Tomcat on demo-apps VM. Later, we will use this authentication to run Workflows.
From the Terminal window, use the ping command to capture demo-apps VM IP Address. Save the value after demo-apps IP address in the credentials file.
ping demo-apps.ibmdte.local
PING demo-apps.ibmdte.local (192.168.252.33) 56(84) bytes of data.
64 bytes from demo-apps.ibmdte.local (192.168.252.33): icmp_seq=1 ttl=64 time=0.063 ms
64 bytes from demo-apps.ibmdte.local (192.168.252.33): icmp_seq=2 ttl=64 time=0.101 ms
64 bytes from demo-apps.ibmdte.local (192.168.252.33): icmp_seq=3 ttl=64 time=0.089 ms
Now let's capture Private Key value for jammer user on demo-apps VM which will be used later.
Use the terminal to login to the demo-apps host:
ssh jammer@demo-apps
When prompted if you want to continue connecting, type: yes
Use cat command to print Private Key file content. Copy the file content into the credentials file under Private Key value for "jammer" user on demo-apps VM. Make sure to save the credentials file.
cat $HOME/.ssh/id_rsa
-----BEGIN OPENSSH PRIVATE KEY-----
b3BlbnNzaC1rZXktdjEAAAAABG5vbmUAAAAEbm9uZQAAAAAAAAABAAACFwAAAAdzc2gtcn
...intentionally truncated...
eh1P3+vZ/B/f5uuVE8+DZFRtmLec486FWWN2T7iV5xfdkdzts7SAciGrn3Gs854QwPYlrP
BIFFCJ0ELxE5AAAAFWFkbWluQGJhc3Rpb24tZ3ltLWxhbgECAwQF
-----END OPENSSH PRIVATE KEY-----
Now that you have the Private Key value for jammer user and demo-apps VM ipAddress ready, you are ready to create a new Ansible Authentication.
- Click on + Create authentication button to start creating a new Authentication
- Under Name, type
Ansible-apacheTomcat - Under Description, type
Ansible-apacheTomcat - Under Service, select
Ansible - Under Property section, provide the following details:
- Private Key: enter the Private Key value belongs to jammer user on demo-apps* VM that you saved in the
credentials file. DO NOT add a new line or space before or after the Private Key value when you copy and paste it into the field. Private Key
should include
-----BEGIN OPENSSH PRIVATE KEY -----and-----END OPENSSH PRIVATE KEY-----as part of the value - Inventory: enter Ansible Inventory as shown below. This provides the list of server - user for Ansible to connect. In this case, we have only one server which is the demo-apps VM
- Private Key: enter the Private Key value belongs to jammer user on demo-apps* VM that you saved in the
credentials file. DO NOT add a new line or space before or after the Private Key value when you copy and paste it into the field. Private Key
should include
[canary]
192.168.252.33 ansible_host=demo-apps.ibmdte.local ansible_user=jammer ansible_password=Passw0rd
Your configuration should look similar to the screenshot below

- Click Create to create the authentication
- Capture authKey value for the Ansible Authentication after it is created. The authKey value is required for Workflow to run
- The expected authKey value is ibmconcert/Ansible-apacheTomcat
4.2.2: Creating SSH Authentication for Apache Tomcat on demo-apps VM
In this section we'll show you how to create an SSH Authentication to Apache Tomcat on demo-apps VM. Later, we will use this authentication within Workflows.
- Click on + Create authentication button to start creating a new Authentication
- Under Name, type
SSH-apacheTomcat - Under Description, type
SSH-apacheTomcat - Under Service, select
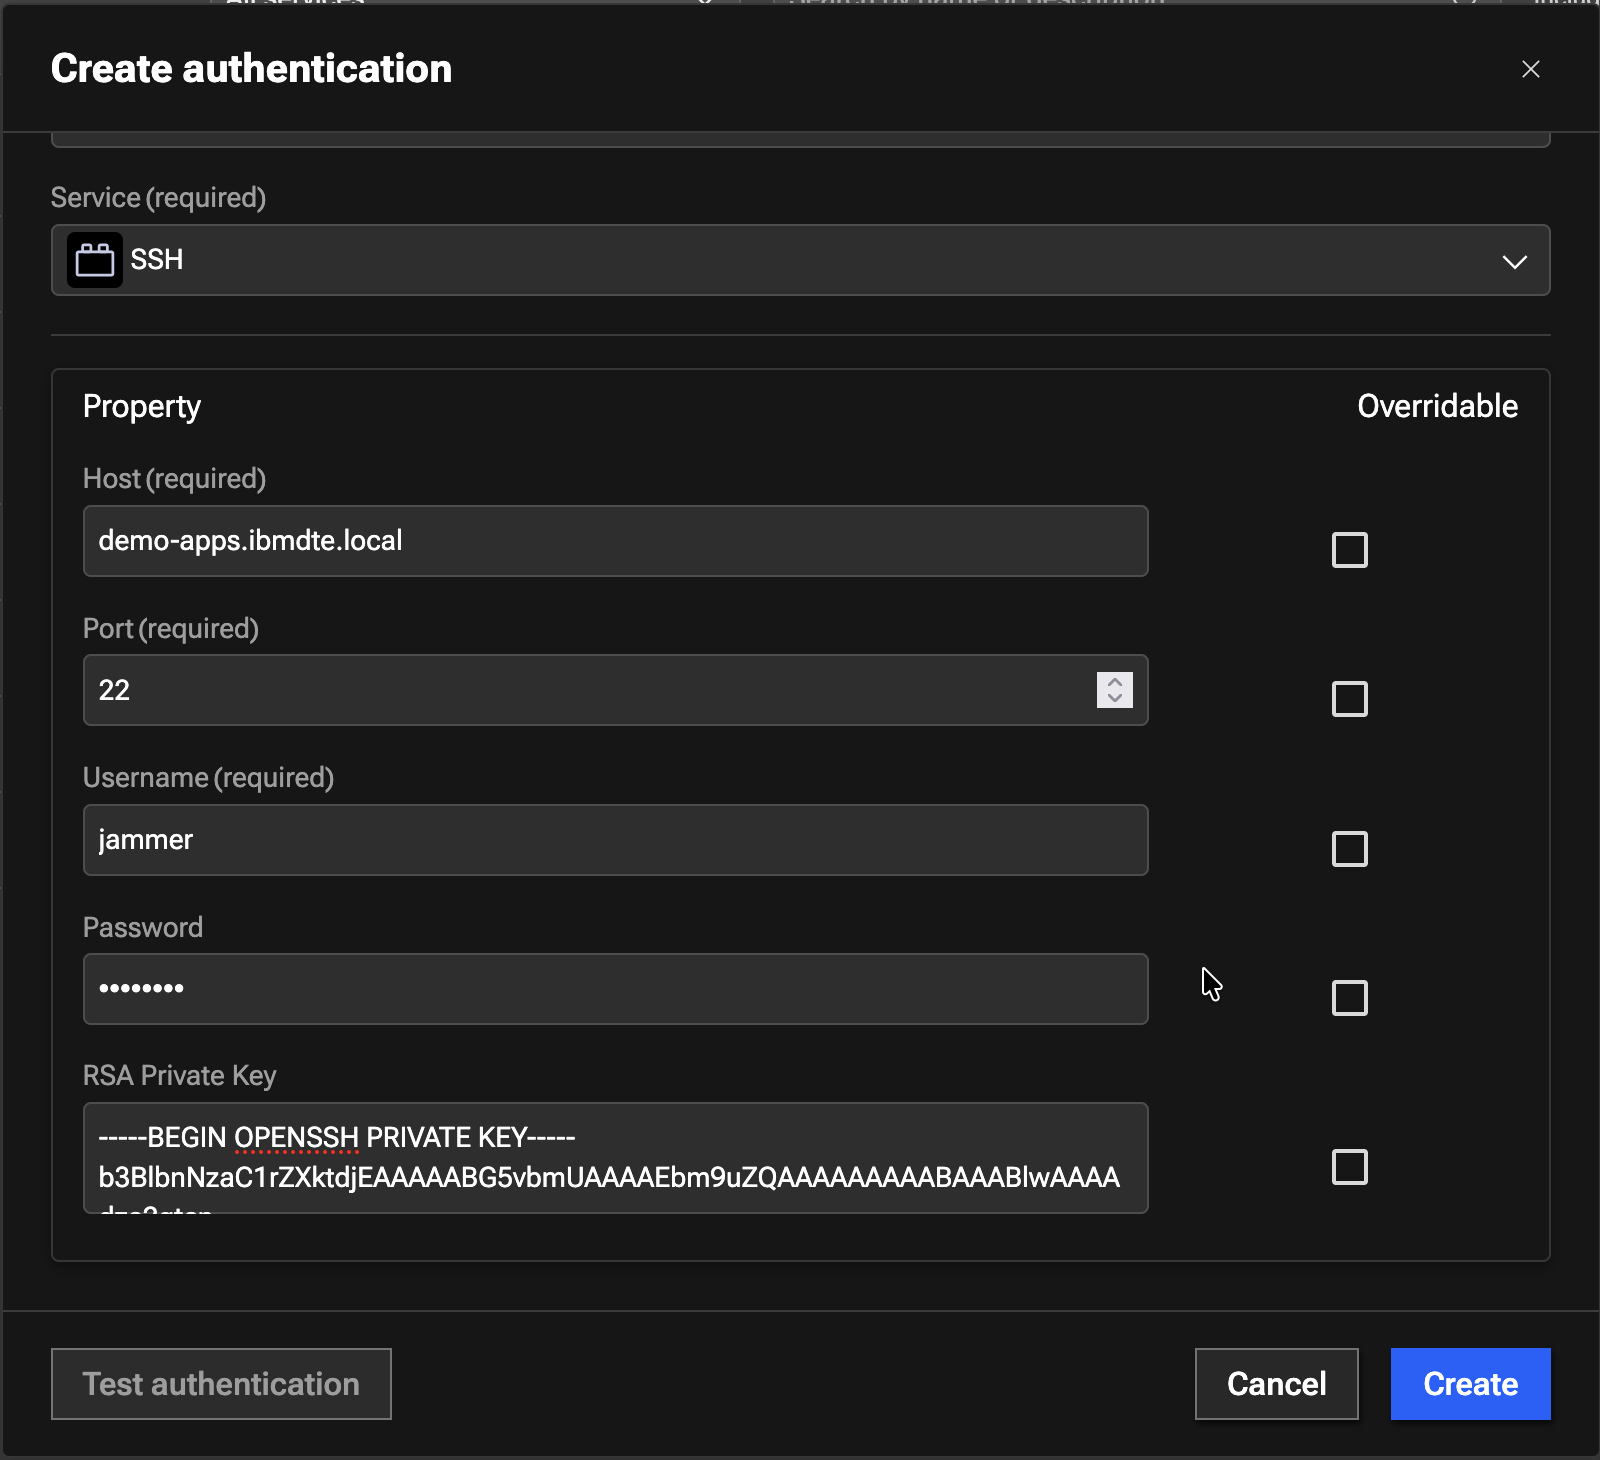
SSH - Under Property section, provide the following details:
- Host:
demo-apps.ibmdte.local - Port:
22 - Username:
jammer - Password:
Passw0rd - RSA Private Key: enter the Private Key value belongs to jammer user on demo-apps VM that you saved in the
credentials file. DO NOT add a new line or space before or after the Private Key value when you copy and paste it into the field. Private Key
should include
-----BEGIN OPENSSH PRIVATE KEY -----and-----END OPENSSH PRIVATE KEY-----as part of the value.
- Host:
Your configuration should look similar to the screenshot below
- Click Create to create the authentication
- Capture authKey value for the SSH Authentication in Authentication UI after it is created. The authKey value is required for Workflow to run
- The expected authKey value is ibmconcert/SSH-apacheTomcat
4.2.3: Creating the Ansible Authentication to CFSSL on bluebox VM
In this section we'll show you how to create an Ansible Authentication to CFSSL (CloudFlare SSL Certificate Authority) on the bluebox VM. Later, we will use this authentication to run Workflows. Before you create the new Authentication, let's capture the bluebox VM IP address and Private Key value for the jammer user
Use the ping command to capture bluebox VM ip address. Save the ip address from ping output into the credentials file.
ping bluebox.ibmdte.local
PING bluebox.ibmdte.local (192.168.252.35) 56(84) bytes of data.
64 bytes from bluebox.ibmdte.local (192.168.252.35): icmp_seq=1 ttl=64 time=0.044 ms
64 bytes from bluebox.ibmdte.local (192.168.252.35): icmp_seq=2 ttl=64 time=0.105 ms
64 bytes from bluebox.ibmdte.local (192.168.252.35): icmp_seq=3 ttl=64 time=0.101 ms
Now we wil capture the Private Key. Use the terminal to login to bluebox host:
ssh jammer@bluebox
When prompted if you want to continue connecting, type: yes
Use the cat command to print the Private Key file content. Copy the file content into the credentials file under Private Key value for "jammer" user on bluebox VM. Make sure to save the credentials file.
cat $HOME/.ssh/id_rsa
-----BEGIN OPENSSH PRIVATE KEY-----
b3BlbnNzaC1rZXktdjEAAAAABG5vbmUAAAAEbm9uZQAAAAAAAAABAAACFwAAAAdzc2gtcn
...intentionally truncated...
eh1P3+vZ/B/f5uuVE8+DZFRtmLec486FWWN2T7iV5xfdkdzts7SAciGrn3Gs854QwPYlrP
BIFFCJ0ELxE5AAAAFWFkbWluQGJhc3Rpb24tZ3ltLWxhbgECAwQF
-----END OPENSSH PRIVATE KEY-----
Now that you have the Private Key value for jammer user on bluebox, you are ready to create a new Authentication.
- Click on + Create authentication button to start creating a new Authentication
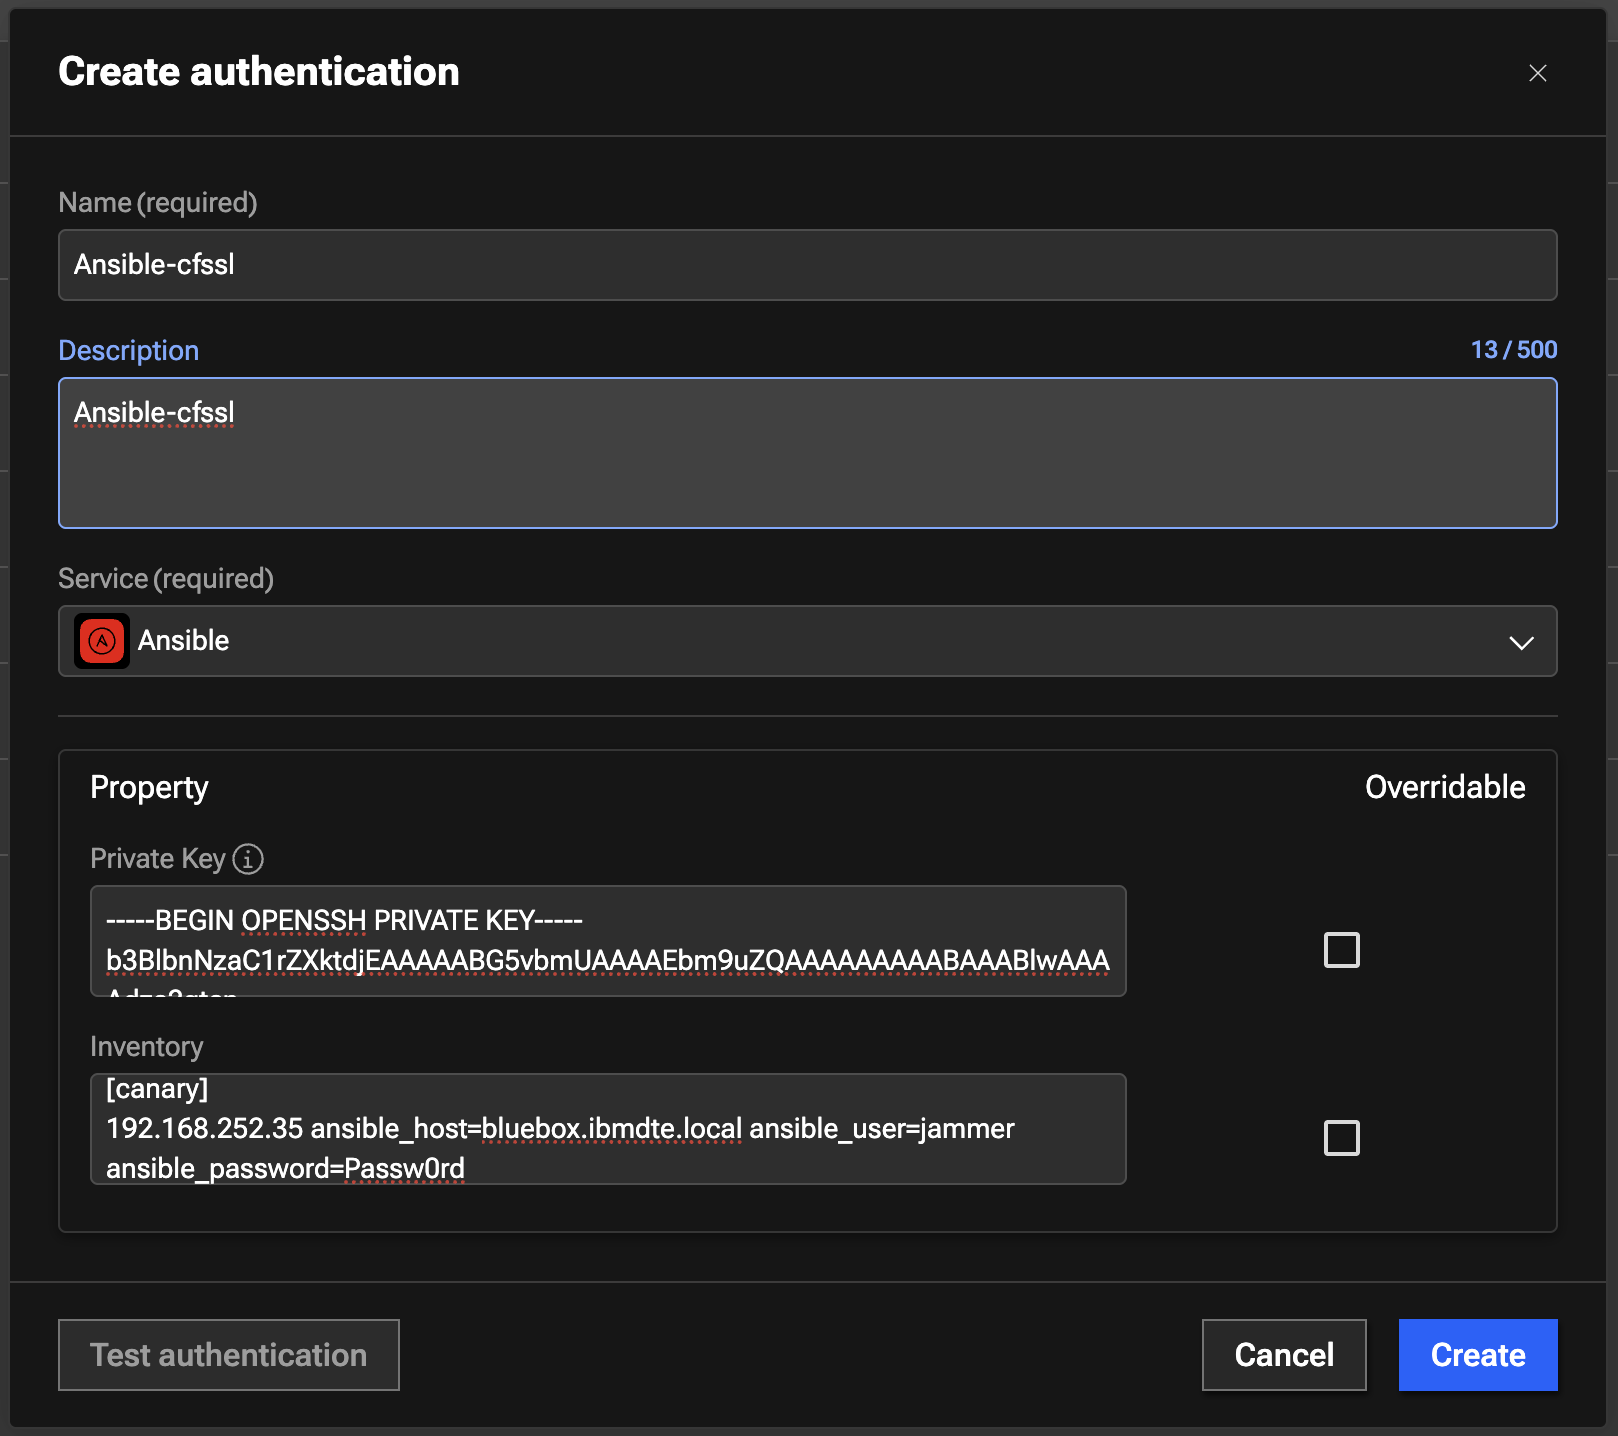
- Under Name, type
Ansible-cfssl - Under Description, type
Ansible-cfssl - Under Service, select
Ansible - Under Property section, provide the following details:
- Private Key: enter the Private Key value belongs to jammer user on bluebox VM that you saved in the
credentials file. DO NOT add a new line or space before or after the Private Key value when you copy and paste it into the field. Private Key
should include
-----BEGIN OPENSSH PRIVATE KEY -----and-----END OPENSSH PRIVATE KEY-----as part of the value. - Inventory: enter Ansible Inventory as shown below
- Private Key: enter the Private Key value belongs to jammer user on bluebox VM that you saved in the
credentials file. DO NOT add a new line or space before or after the Private Key value when you copy and paste it into the field. Private Key
should include
[canary]
192.168.252.35 ansible_host=bluebox.ibmdte.local ansible_user=jammer ansible_password=Passw0rd
Your configuration should look similar to the screenshot below
- Click Create to create the authentication
- Capture authKey value for the Ansible Authentication in Authentication UI after it is created. The authKey value is required for Workflow to run
- The expected authKey value is ibmconcert/Ansible-cfssl
4.2.4: Creating the SSH Authentication for CFSSL on bluebox VM
In this section we'll show you how to create an Ansible Authentication to CFSSL (CloudFlare SSL Certificate Authority) on bluebox VM. Later, we will use this authentication to run Workflows.
- Click on + Create authentication button to start creating a new Authentication
- Under Name, type
SSH-cfssl - Under Description, type
SSH-cfssl - Under Service, select
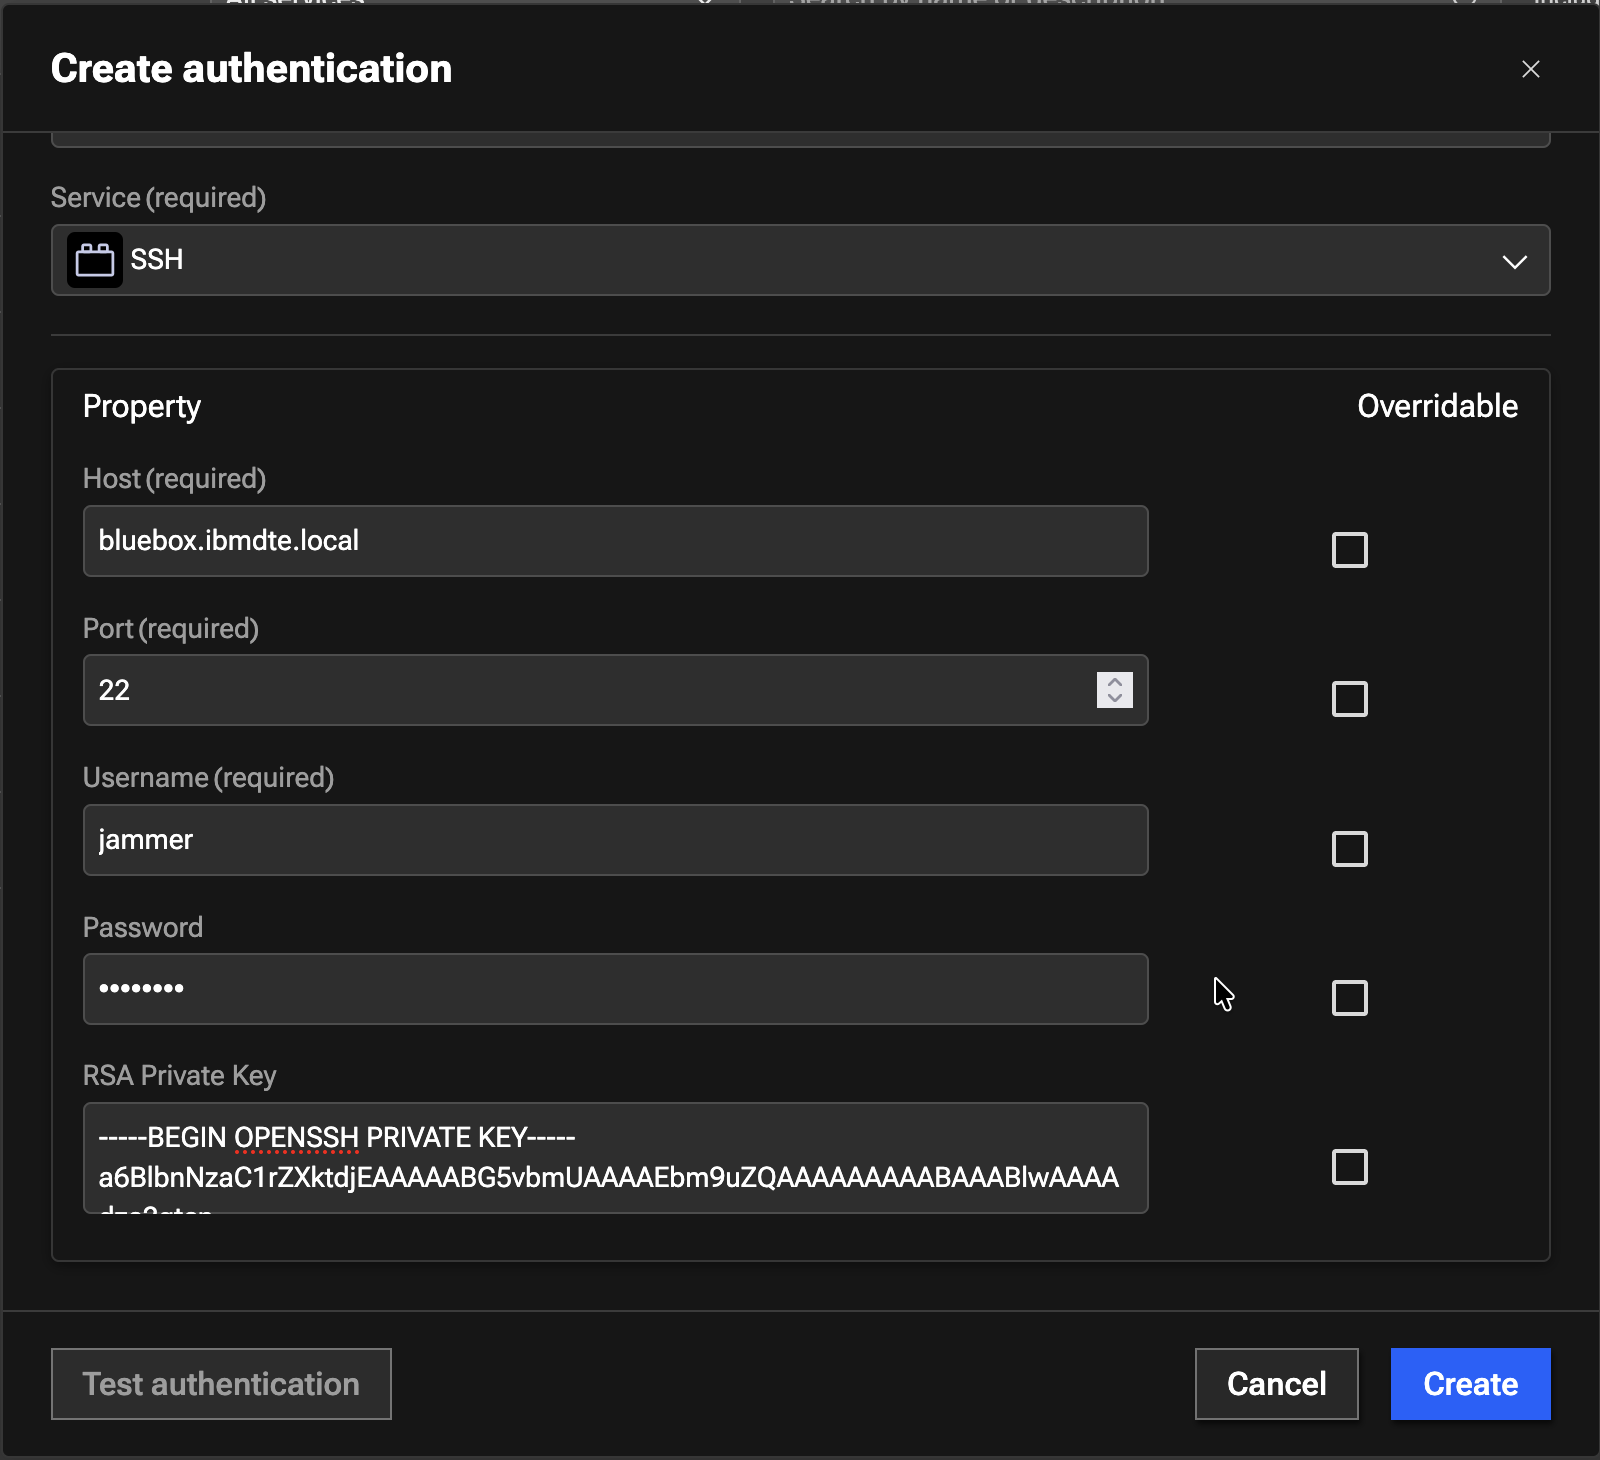
SSH - Under Property section, provide the following details:
- Host:
bluebox.ibmdte.local - Port:
22 - Username:
jammer - Password:
Passw0rd - RSA Private Key: enter the Private Key value belongs to jammer user on bluebox VM that you saved in the
credentials file. DO NOT add a new line or space before or after the Private Key value when you copy and paste it into the field. Private Key
should include
-----BEGIN OPENSSH PRIVATE KEY -----and-----END OPENSSH PRIVATE KEY-----as part of the value
- Host:
Your configuration should look similar to the screenshot below.
- Click Create to create the authentication
- Capture authKey value for the Ansible Authentication in Authentication UI after it is created. The authKey value is required for Workflow to run
- The expected authKey value is ibmconcert/SSH-cfssl
4.2.5: Creating Concert API Key Authentication
In this section we'll show you how to create a Concert API Key Authentication. Later, we will use this authentication to run Workflows.
- Click on + Create authentication button to start creating a new Authentication
- Under Name, type
ConcertAPIKey - Under Description, type
ConcertAPIKey - Under Service, select
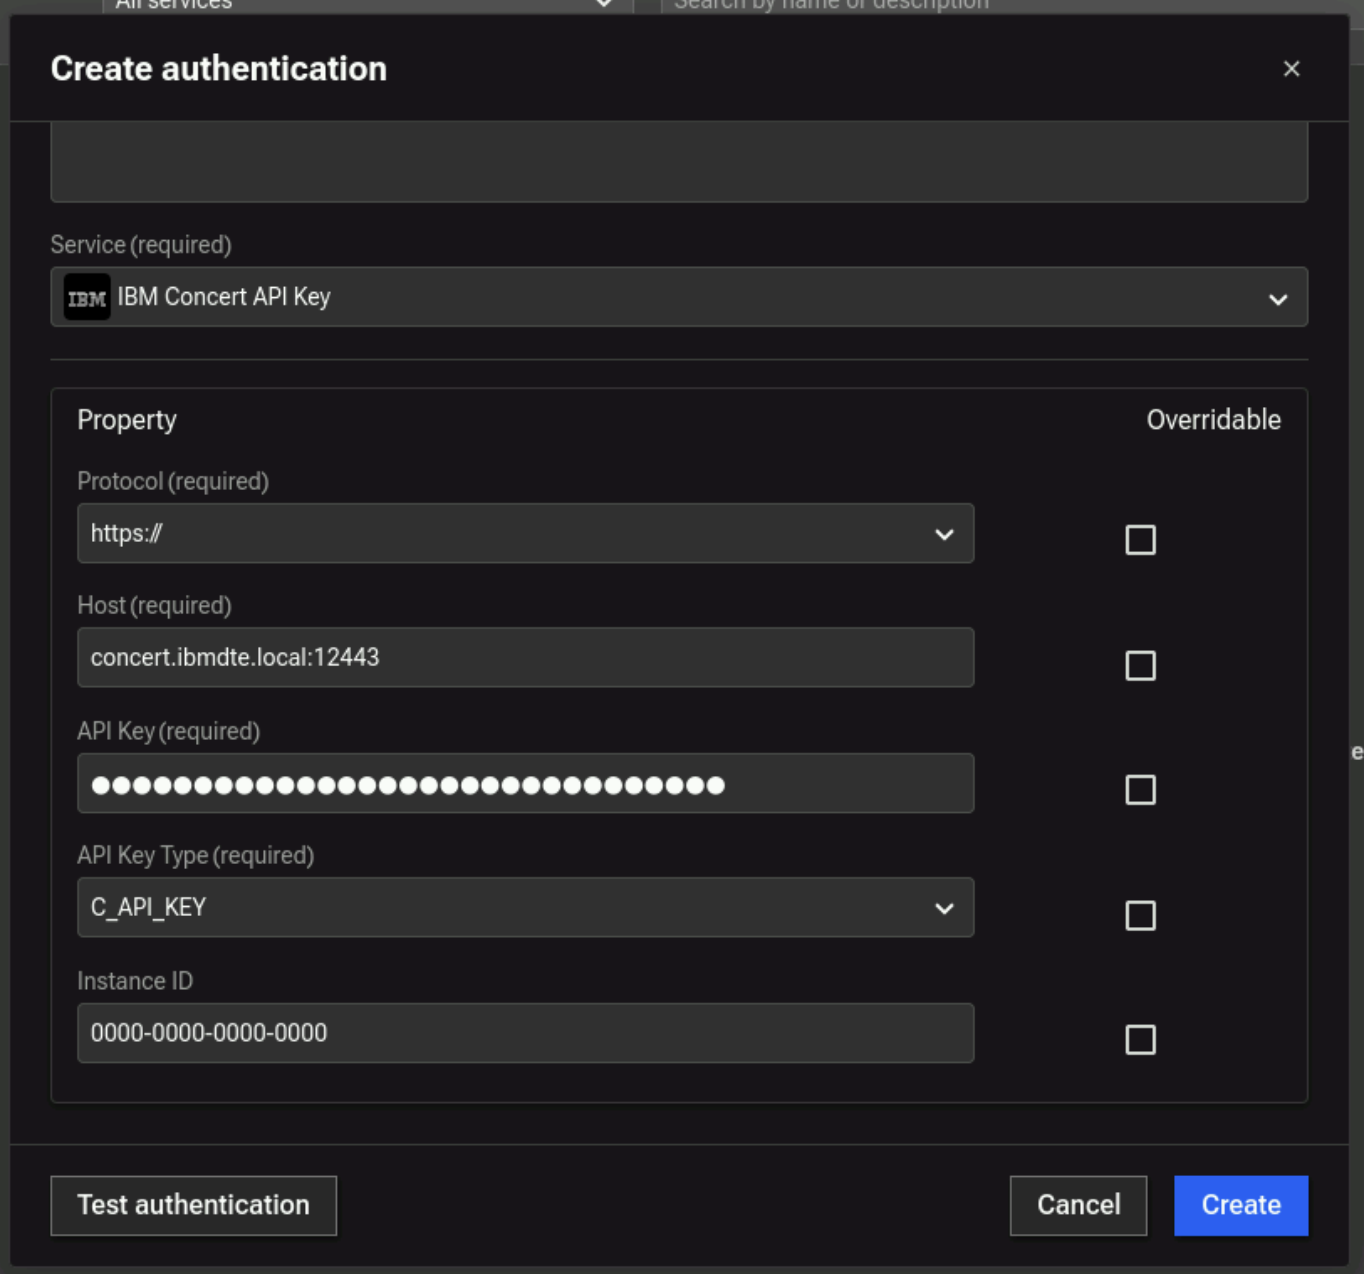
IBM Concert API Key - Under Property section, provide the following details:
- Protocol: select
https:// - Host:
concert.ibmdte.local:12443 - API Key: enter Concert API Key obtained in 3.2: Obtaining the IBM Concert API Key section
- API Key Type: select
C_API_KEY - Instance ID: type
0000-0000-0000-0000
- Protocol: select
Your configuration should look similar to the screenshot below.
- Test the authentication to make sure its successful
- Click Create to create the authentication
- Capture authKey value for the Ansible Authentication in Authentication UI after it is created. The authKey value is required for Workflow to run
- The expected authKey value is ibmconcert/ConcertAPIKey
4.2.6: Creating Config Data Authentication
In this section we'll show you how to create a Config Data Authentication. This configuration data is used to specify the location of the server.jks file. Later, we will use this authentication to run Workflows.
- Click on + Create authentication button to start creating a new Authentication
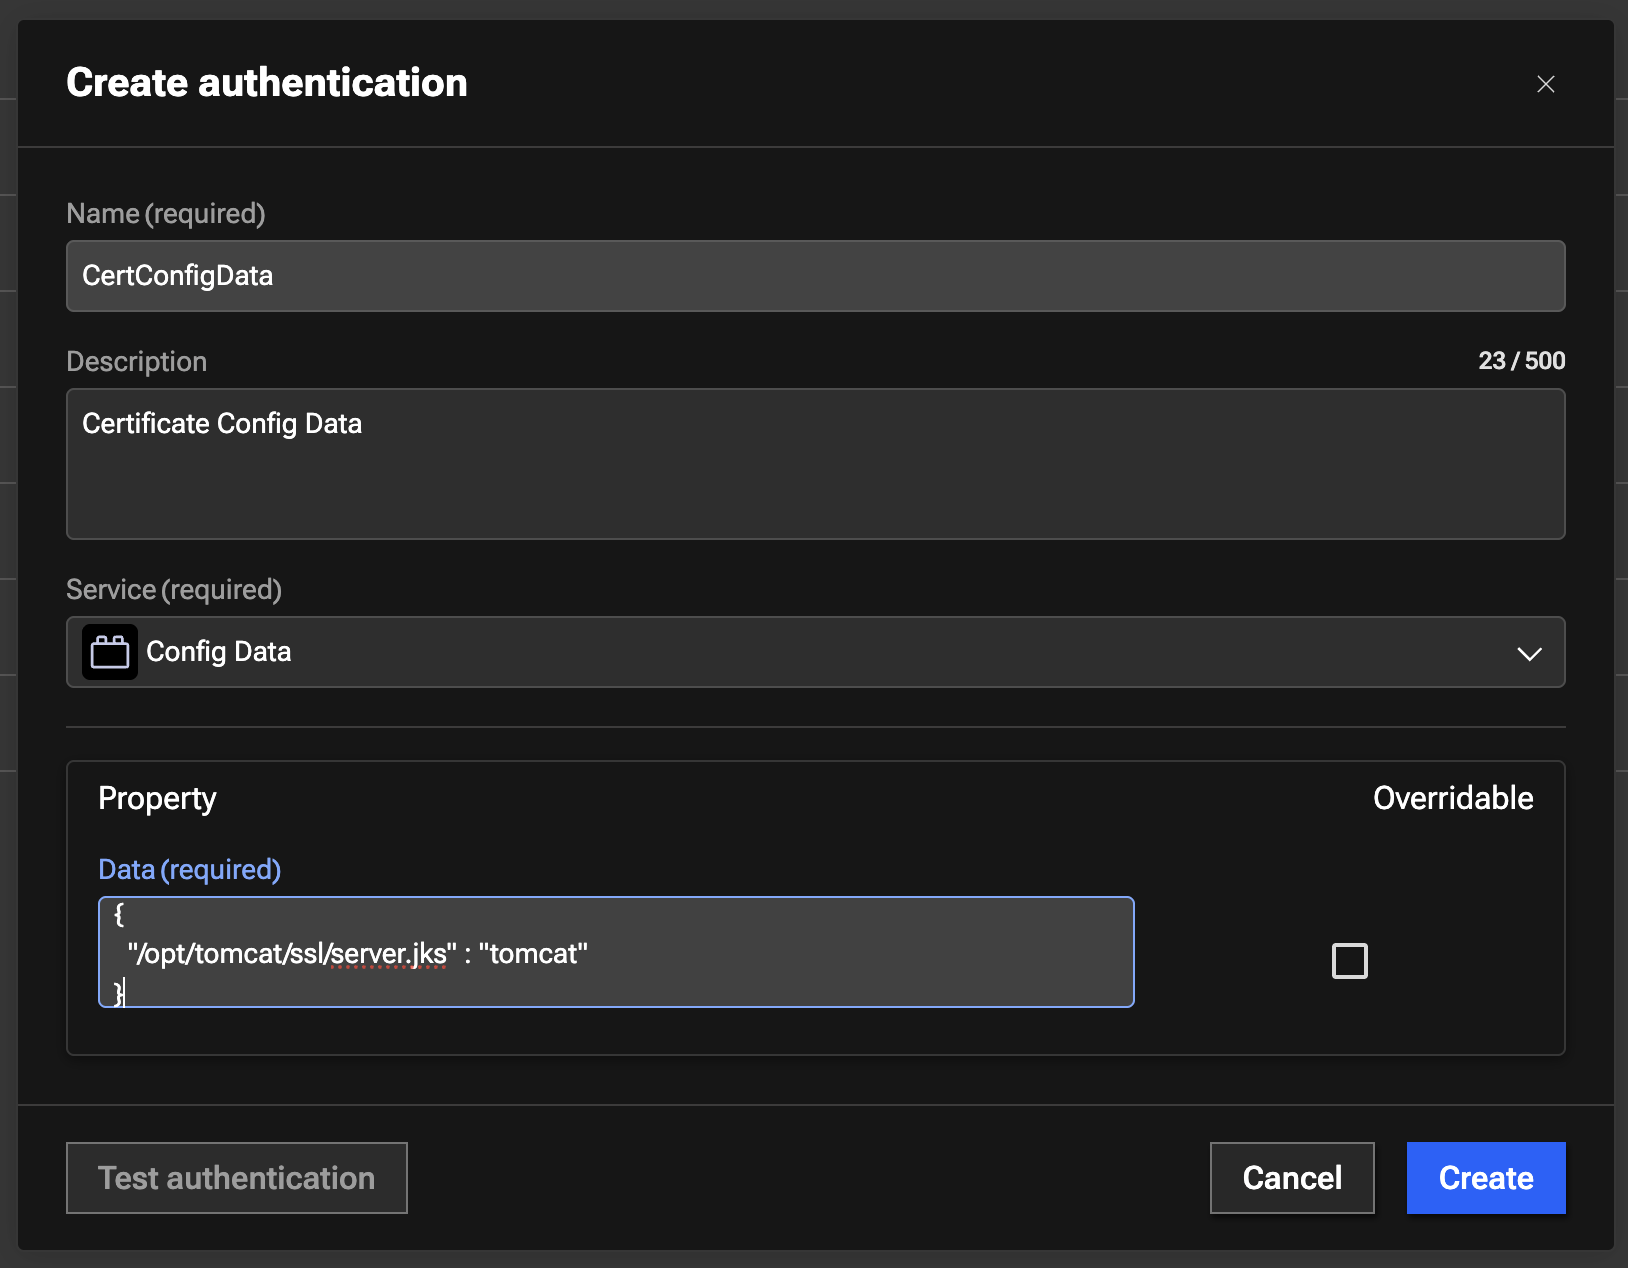
- Under Name, type
CertConfigData - Under Description, type
Certificate Config Data - Under Service, select
Config Data - Under Property section, provide the following details:
- Data: enter JSON payload below
{
  "/opt/tomcat/ssl/server.jks" : "tomcat"
}
Your configuration should look similar to the screenshot below.
- Click Create to create the authentication
- Capture authKey value for the Ansible Authentication in Authentication UI after it is created. The authKey value is required for Workflow to run
- The expected authKey value is ibmconcert/CertConfigData
4.2.7: Creating GitHub Authentication
In this section we'll show you how to create a GitHub Authentication. Later, we will use this authentication to run Workflows.
- Click on + Create authentication button to start creating a new Authentication
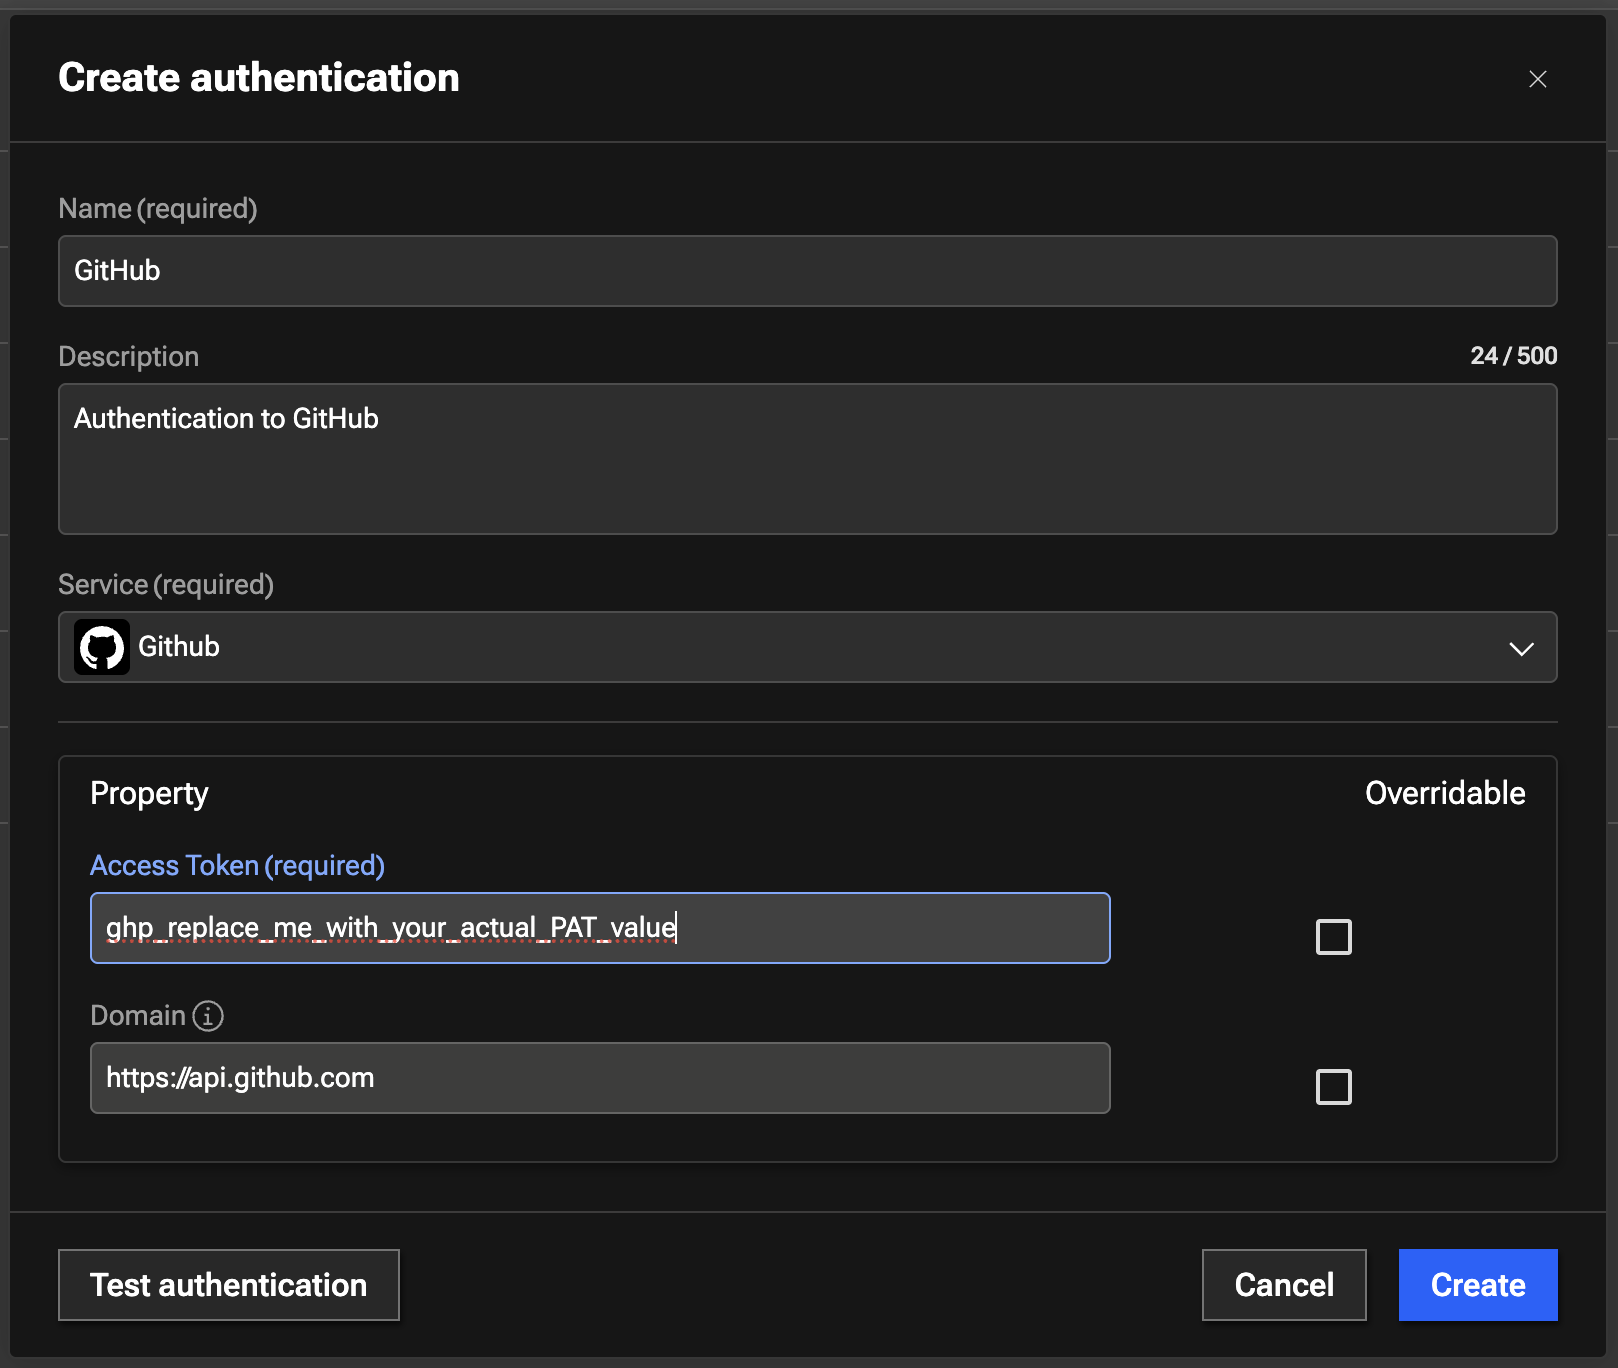
- Under Name, type
GitHub - Under Description, type
Authentication to GitHub - Under Service, select
Github - Under Property section, provide the following details:
- Access Token: enter the GitHub Personal Access Token (PAT) value that you saved in the credentials file
- Domain: type
https://api.github.com
Your configuration should look similar to the screenshot below.
- Test the authentication to make sure its successful
- Click Create to create the authentication
- Capture authKey value for the Ansible Authentication in Authentication UI after it is created. The authKey value is required for Workflow to run
- The expected authKey value is ibmconcert/GitHub
4.3: Summary
In this section, you have been able to accomplish the following:
- Have created two Ansible Authentications.
- Have created two SSH Authentications.
- Have created Concert API Key Authentication.
- Have created Config Data Authentication.
- Have created GitHub Authentication.
Now, it's time to move to the next step, please continue to the next section of the lab.