Machine Learning Model Deployment Integration to Sample Applciation
In this module, we will access an online model deployment through a REST API. This allows you to use your model for inference in any of your apps. For this workshop we'll be using a Python Flask application to collect information, score it against the model, and show the results.
Note: You can click on any image in the instructions below to zoom in and see more details. When you do that just click on your browser's back button to return to the previous page.
Note: The lab instructions below assume you have completed the setup section already, if not, be sure to complete the setup first to create a project and a deployment space. It's also assumed you have created an online deployment, if not, be sure to complete the online deployment. If you would have any issues, check the FAQ section.
Running the Python Flask Application
There are many ways of running python applications. We will cover two of them, first running as a python application on your machine, and next as a deployed application on IBM Cloud.
Common Steps
Regardless of which option we choose for deployment, we need to configure our Python application so it knows how to connect to our specific model. To do that follow these steps.
-
Unzip the python app zip file that you downloaded in the setup section. Depending on your operating system the command to do this will differ, so an online search might be in order if you don't know how already!
-
It's best practice to store secrets and configurations as environment variables, instead of hard-coding them in the code. Following this convention, we will store our API Key and model URL in a
.envfile. The key-value pairs in this files are treated as environment variables when the code runs. To create your environment file: -
Copy the
env.samplefile to.env. From a terminal (or command prompt), navigate to where you downloaded and unzipped the python app zip file. Run the following commands:cd python_app cp env.sample .env -
Edit
.envto and fill in theMODEL_URLandAPI_TOKENvariables.API_TOKENis your API Token that we created during the setup module.-
MODEL_URLis your online deployment's endpoint. If you need to get the endpoint again:- Go to the (☰) hamburger menu >
Deployments>View all spacesand then click theSpacestab. - Select the Deployment Space you created during the setup module
- Go to the
Deploymentstab and select the online deployment you created during the online deployment lab. - Finally, you can find the Endpoint in the API reference section.
- Go to the (☰) hamburger menu >
-
Here is an example of a completed lines of the .env file. Your
API_TOKENandMODEL_URLwill defer.# Copy this file to .env. # Edit the .env file with the required settings before starting the app. # 1. Required: Provide your web service URL for scoring. # E.g., MODEL_URL=https://<cluster_url>/v4/deployments/<deployment_space_guid>/predictions MODEL_URL=https://us-south.ml.cloud.ibm.com/ml/v4/deployments/012f3ebd-9885-4d1f-a720-xyzzzzff2a/predictions?version=2020-10-31 # 2. Required: fill in EITHER section A OR B below: # ### A: Authentication using API_TOKEN # Fill in your API Token. You don't need to update the TOKEN_REQUEST_URL # Example: # TOKEN_REQUEST_URL=https://iam.ng.bluemix.net/identity/token # API_TOKEN=<Your API Key> TOKEN_REQUEST_URL=https://iam.ng.bluemix.net/identity/token API_TOKEN=0evvIIfebBsssbbbbbxxxxssddddsdpMiphntzhxqO -
And we're done! Now you can proceed to your favorite option below.
Option 1: Running locally on your machine
Choose this option if you want to run the Python Flask application locally on our machines. Note that this application will still access your deployed model in Cloud Pak for Data as a Service over the internet.
Important pre-requisite: You need to have a working installation of Python 3.6 or above.
Installing the dependencies
-
You could run this Python application in your default python environment; however, the general recommendation for Python development is to use a virtual environments (see
venv). To install and initialize a virtual environment, use thevenvmodule on Python 3. -
Initialize a virtual environment with
venv. Run the following commands in a terminal (or command prompt):# Create the virtual environment using Python. # Note, it may be named python3 on your system. python -m venv venv # Python 3.X # Source the virtual environment. Use one of the two commands depending on your OS. source venv/bin/activate # Mac or Linux ./venv/Scripts/activate # Windows PowerShellTIP To terminate the virtual environment use the
deactivatecommand. -
Next, to install the Python requirements, from a terminal (or command prompt) navigate to where you downloaded and unzipped the python app zip file. Run the following commands:
cd python_app
pip install -r requirements.txt
Start and Test the Application
-
Now we are ready to start our python application. From a terminal (or command prompt), run the following commands (inside the python application directory):
# You might need to use python3 instead of python python creditriskapp.py -
Open your web browser and go to http://localhost:5000.
-
Either use the default values pre-filled in the input form, or modify the value and then click the
Submitbutton. The python application will invoke the predictive model and a risk prediction & probability is returned: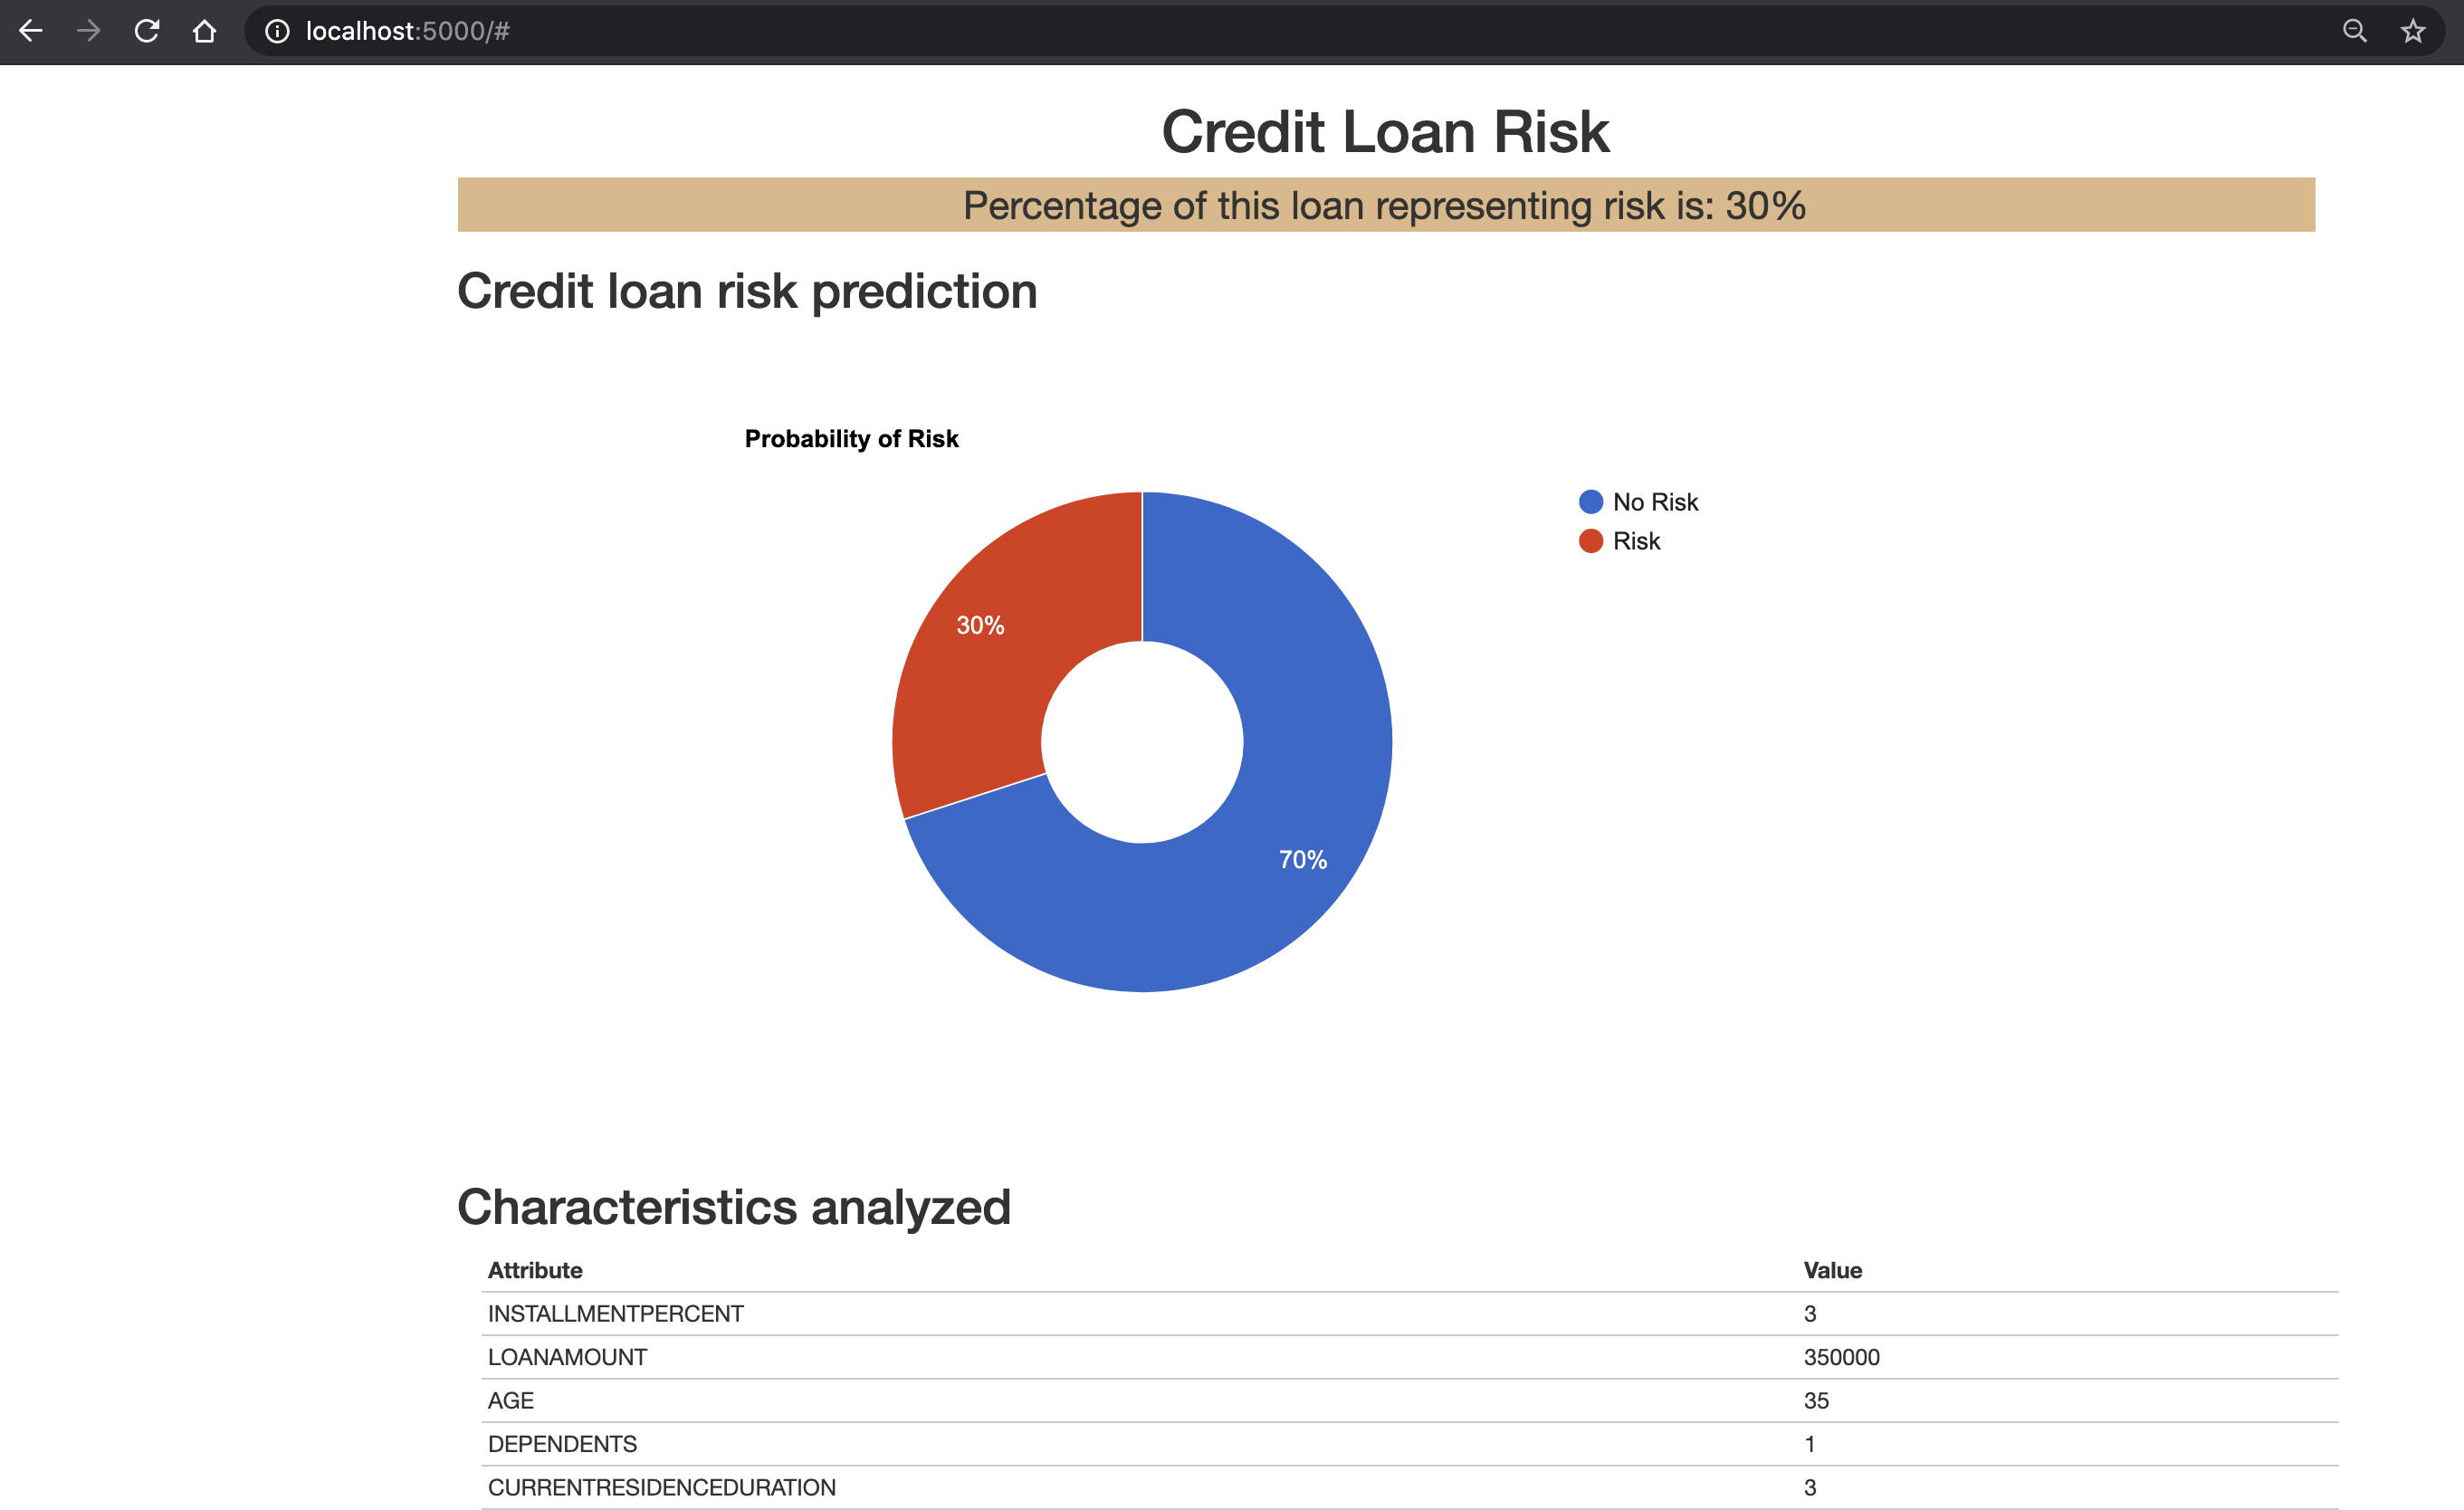
-
Feel free to test other input values, from your terminal enter
ctrl+cto stop the Flask server when you are done.
Option 2: Running on IBM Cloud
Choose this option if you want to run the Python Flask application remotely in the IBM Cloud. You will deploy the application to your IBM Cloud account as a Cloud Foundry application. In this scenario, we will use the IBM Cloud Shell since it has the command line tools necessary to push applications.
Note: If you do not want to use the cloud shell (web terminal). You will need a working installation of IBM Cloud CLI on your machine to push the application from your local machine to the cloud. (See how to get started with the CLI).
Prepare Cloud Shell
-
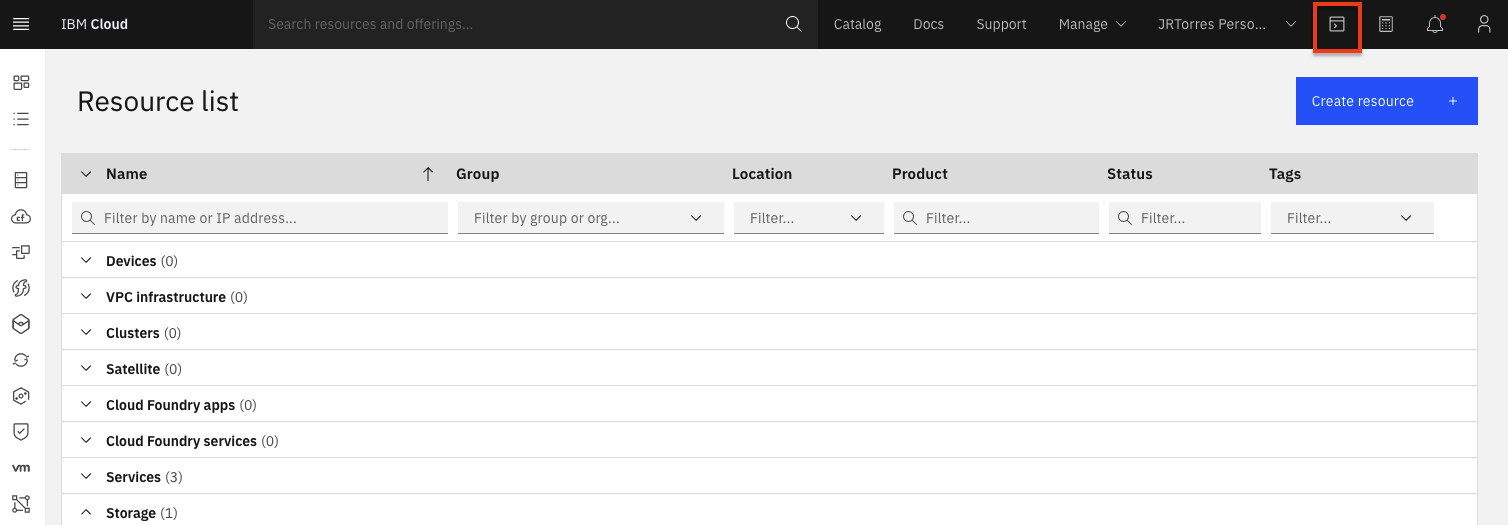
In a new browser window or tab, go to the IBM Cloud Home Page and click the terminal icon in the upper right-hand bar to launch a new cloud shell web terminal window.
-
Wait for the web terminal to be ready and then run the following commands to download the python application to the web terminal.
wget https://github.com/IBM/ddc-2021-development-to-production/raw/main/application/python_app.zip unzip python_app.zip cd python_app -
Next we need to copy the
.envfile content you've created in theCommon Stepssection above to the application in the web terminal. The easiest way to do this is to copy/paste them. -
Create the
.envfile by entering the following command:vi .envNote: The next set of steps use VI to edit the file. Although the exact VI commands are listed in the steps, feel free to explore these references: CSU Help docs or VI Intro
-
Press the
ikey in the terminal to switch into insert mode (so you can edit the file). -
Copy the entire contents of the local
.envfile you created in theCommon Stepssection above and paste it into the terminal window. -
Write and exit the file in the terminal window by first pressing the
escapekey and then entering the following command::wq
Deploy Application
-
[Optional] Configuring the application: You can inspect or change the deployment definitions for this application in the file named
manifest.yml. As defined, your application will have a random URL. You can could change that by settingrandom-route: falseand picking a unique name (for example append your initials to the existing name "ddc-workshop-app-XYZ) in thenamesection. -
Ensure you are logged in on the IBM Cloud CLI. If you are running from the Cloud Shell, the CLI is automatically logged in for you, so you could skip to the next step. Otherwise, in the terminal, enter the command
ibmcloud loginto login and authenticate. (You can also useibmcloud login --ssoif your organization uses single-sign-on). -
Target the desired cloud foundry endpoint by using the following command:
ibmcloud target --cf -
We are now ready to publish our application. In the terminal, navigate to python app directory and enter the command
ibmcloud cf pushto push your application to the cloud. Once it is complete you will see the URL for your application on the IBM Cloud. -
In a web browser, navigate to the URL that you received after publishing your application.
-
Either use the default values pre-filled in the input form, or modify the value and then click the
Submitbutton. The python application will invoke the predictive model and a risk prediction & probability is returned: -
Feel free to test other input values.
-
And we are all done. We configured our application, logged in using the IBM Cloud cli, and published our application to the cloud.
Conclusion
Congratulations. You've completed this lab and seen how to integrate an online model deployment to a sample applications.
- Important: Please go ahead and cleanup your deployments. Follow the Cleanup Deployment instructions below.