
| DEMO OVERVIEW | |
|---|---|
| Scenario overview | This demo shows how IBM’s content management capabilities allow organizations to securely organize, manage and collaborate on documents and other types of content. To illustrate this, we’ll show how the capabilities are used to streamline a company’s hiring process. |
| Demo products | Cloud Pak for Business Automation |
| Demo capabilities | Content management |
| Demo intro slides | Download the Introduction and Overview slides here. This is a short deck of customer-facing slides that sets the context for the demo. |
| Demo script | A complete demo script is on the second tab above. You can download a printer-ready PDF of the demo script here. This demo script has multiple tasks, that each have multiple steps. In each step, you have the details about what you need to do (Actions), what you can say while delivering this demo step (Narration), and what diagrams and screenshots you will see. This demo script is a suggestion, and you are welcome to customize based on your sales opportunity. Most importantly, practice this demo in advance. If the demo seems easy for you to execute, the customer will focus on the content. If it seems difficult for you to execute, the customer will focus on your delivery. |
| Demo downloads | • Demo installer archive • Resource files.zip • P8TeamspaceTemplates |
| Sales enablement video | View the enablement video here. This video is for enablement purposes only (IBMers and Business Partners) and is not customer-ready. |
| Required versions | Cloud Pak for Business Automation V23.0.2 |
| How to get support | • Open a support case at IBM Technology Zone Help regarding issues with reserving and provisioning Tech Zone environments. • IBMers, contact #ba-techlcd-support regarding issues with setting up and running this demo. |
DEMO INSTALLATION AND SETUP
1 - Provision Cloud Pak for Business Automation environment
To run this demonstration, you will need an OpenShift environment with Cloud Pak
for Business Automation 23.0.2 installed. We will use IBM Operational Decision
Manager on prem version contained in this installation.
-
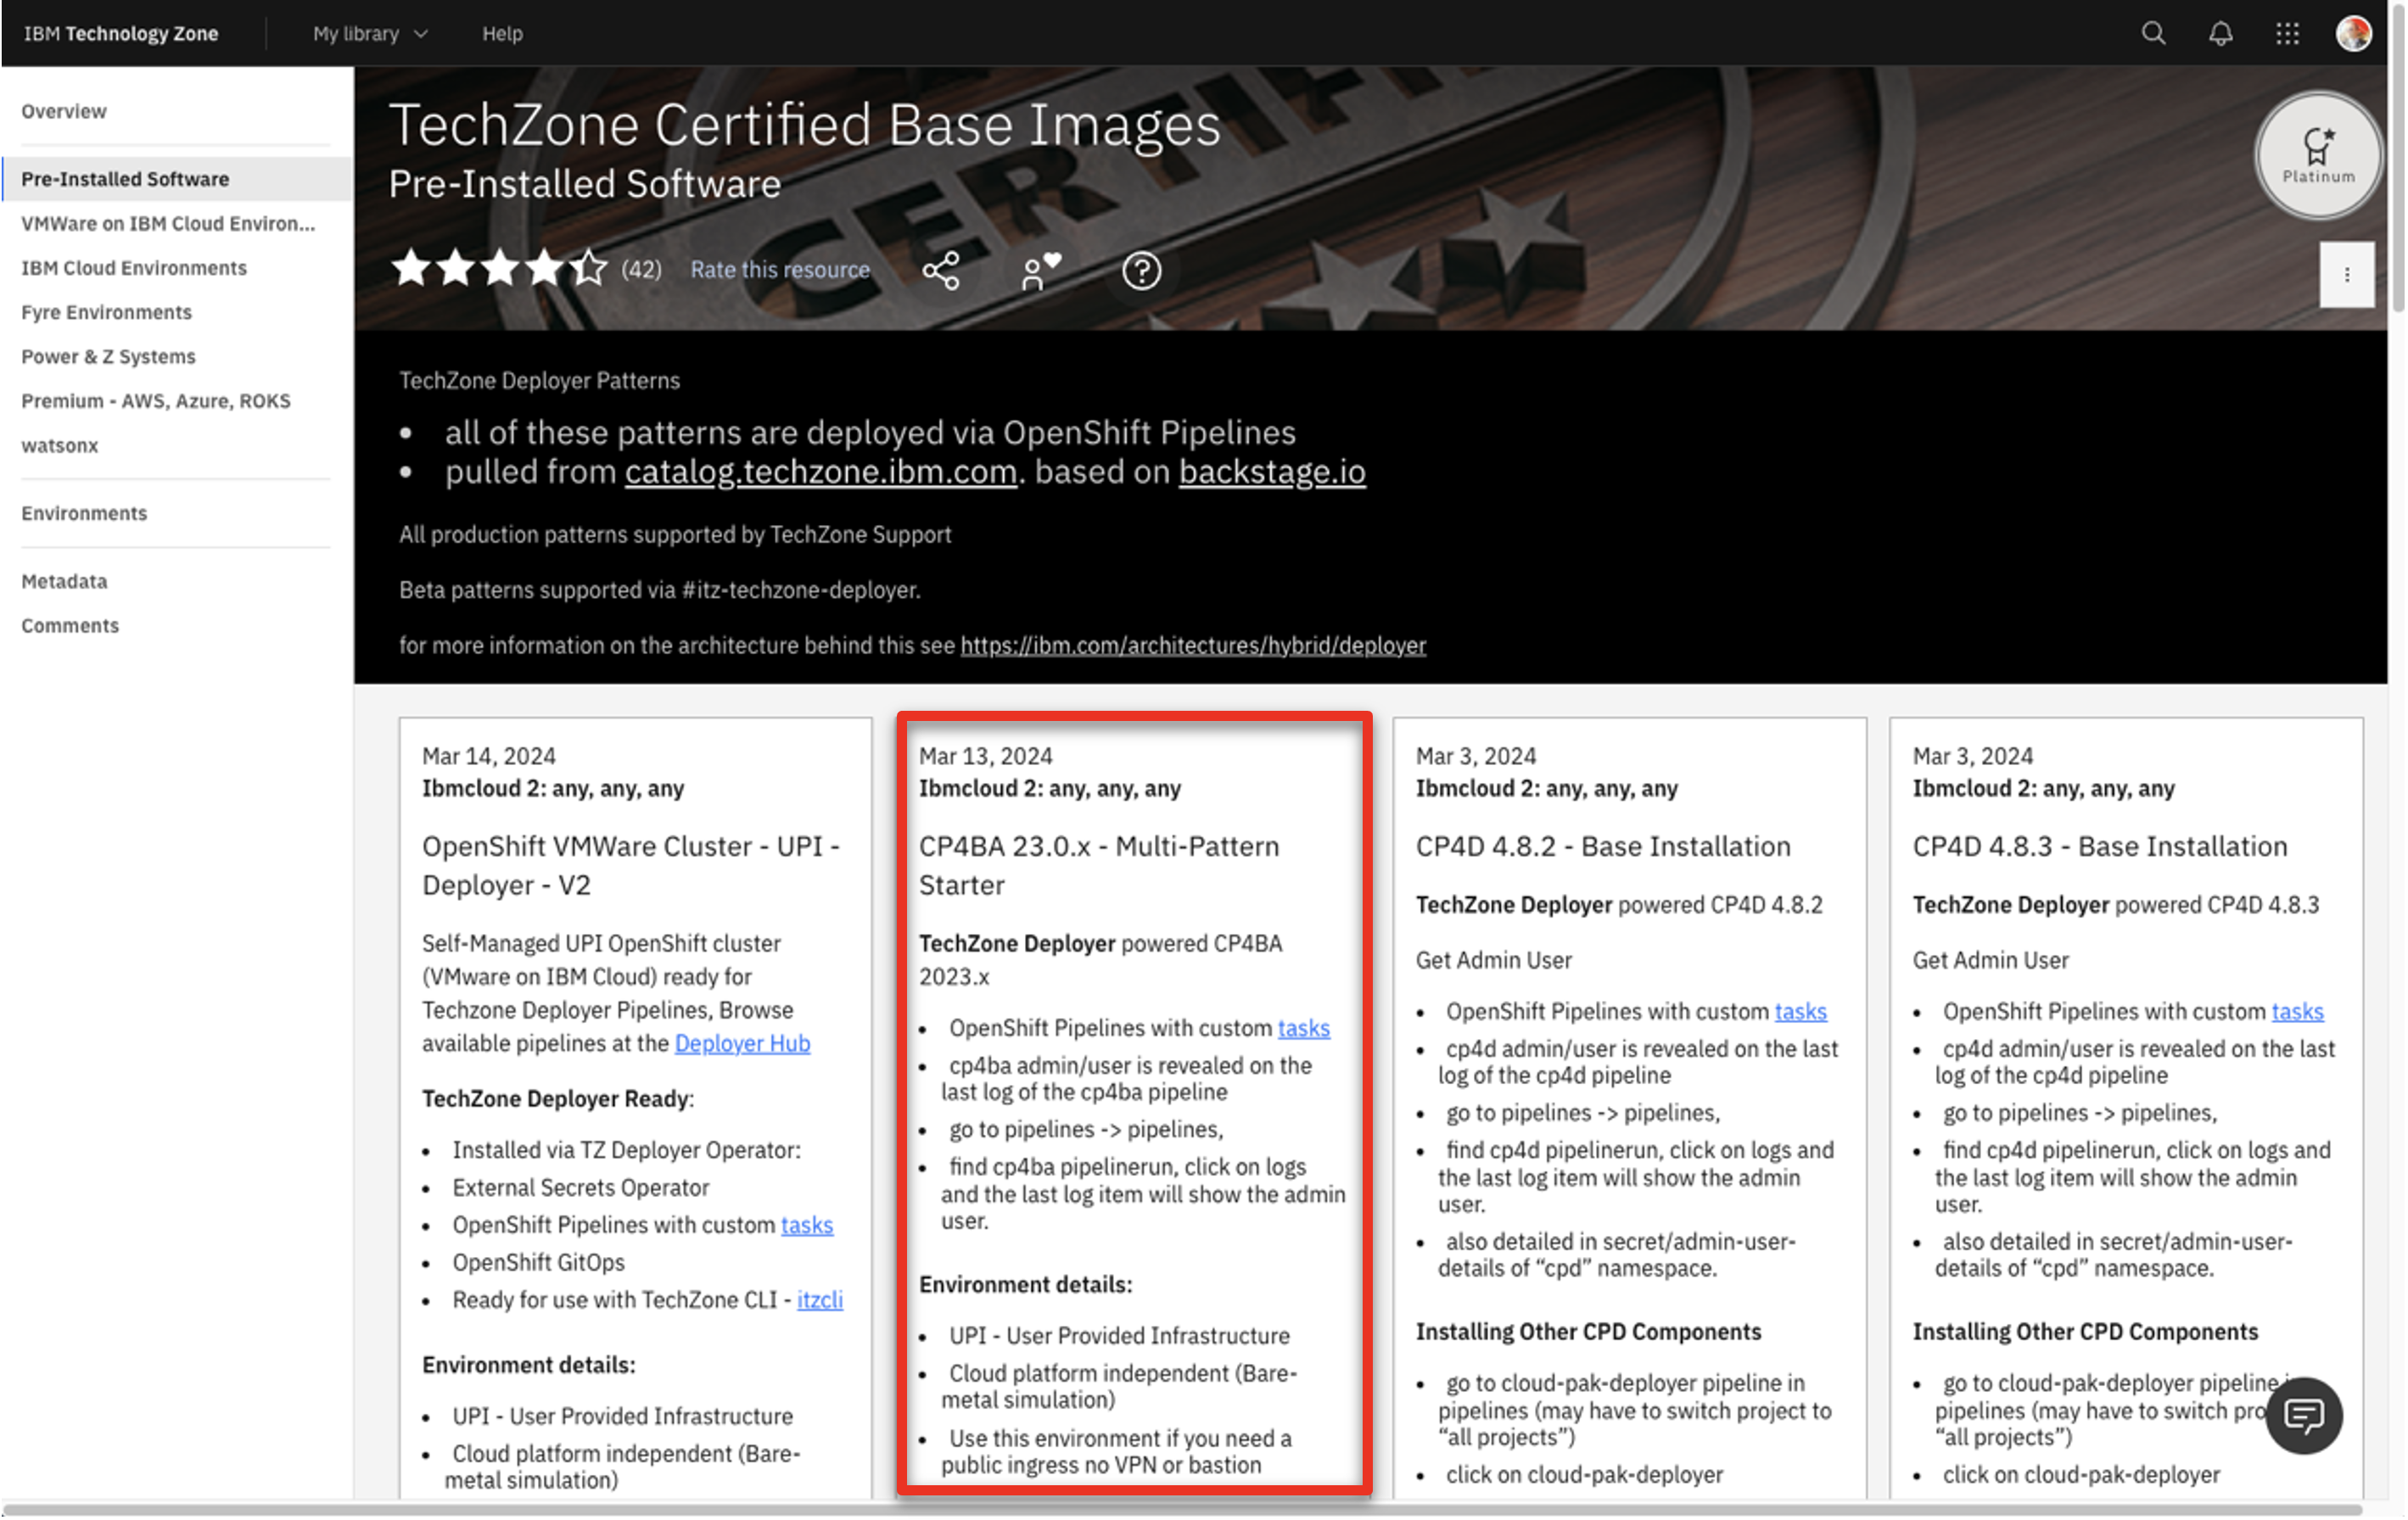
Visit the TechZone environment provisioning page. (cut/paste this link if the link does not work : https://techzone.ibm.com/collection/tech-zone-certified-base-images/journey-pre-installed-software)
-
Click the CP4BA 23.0.x - Multi-Pattern Starter tile.
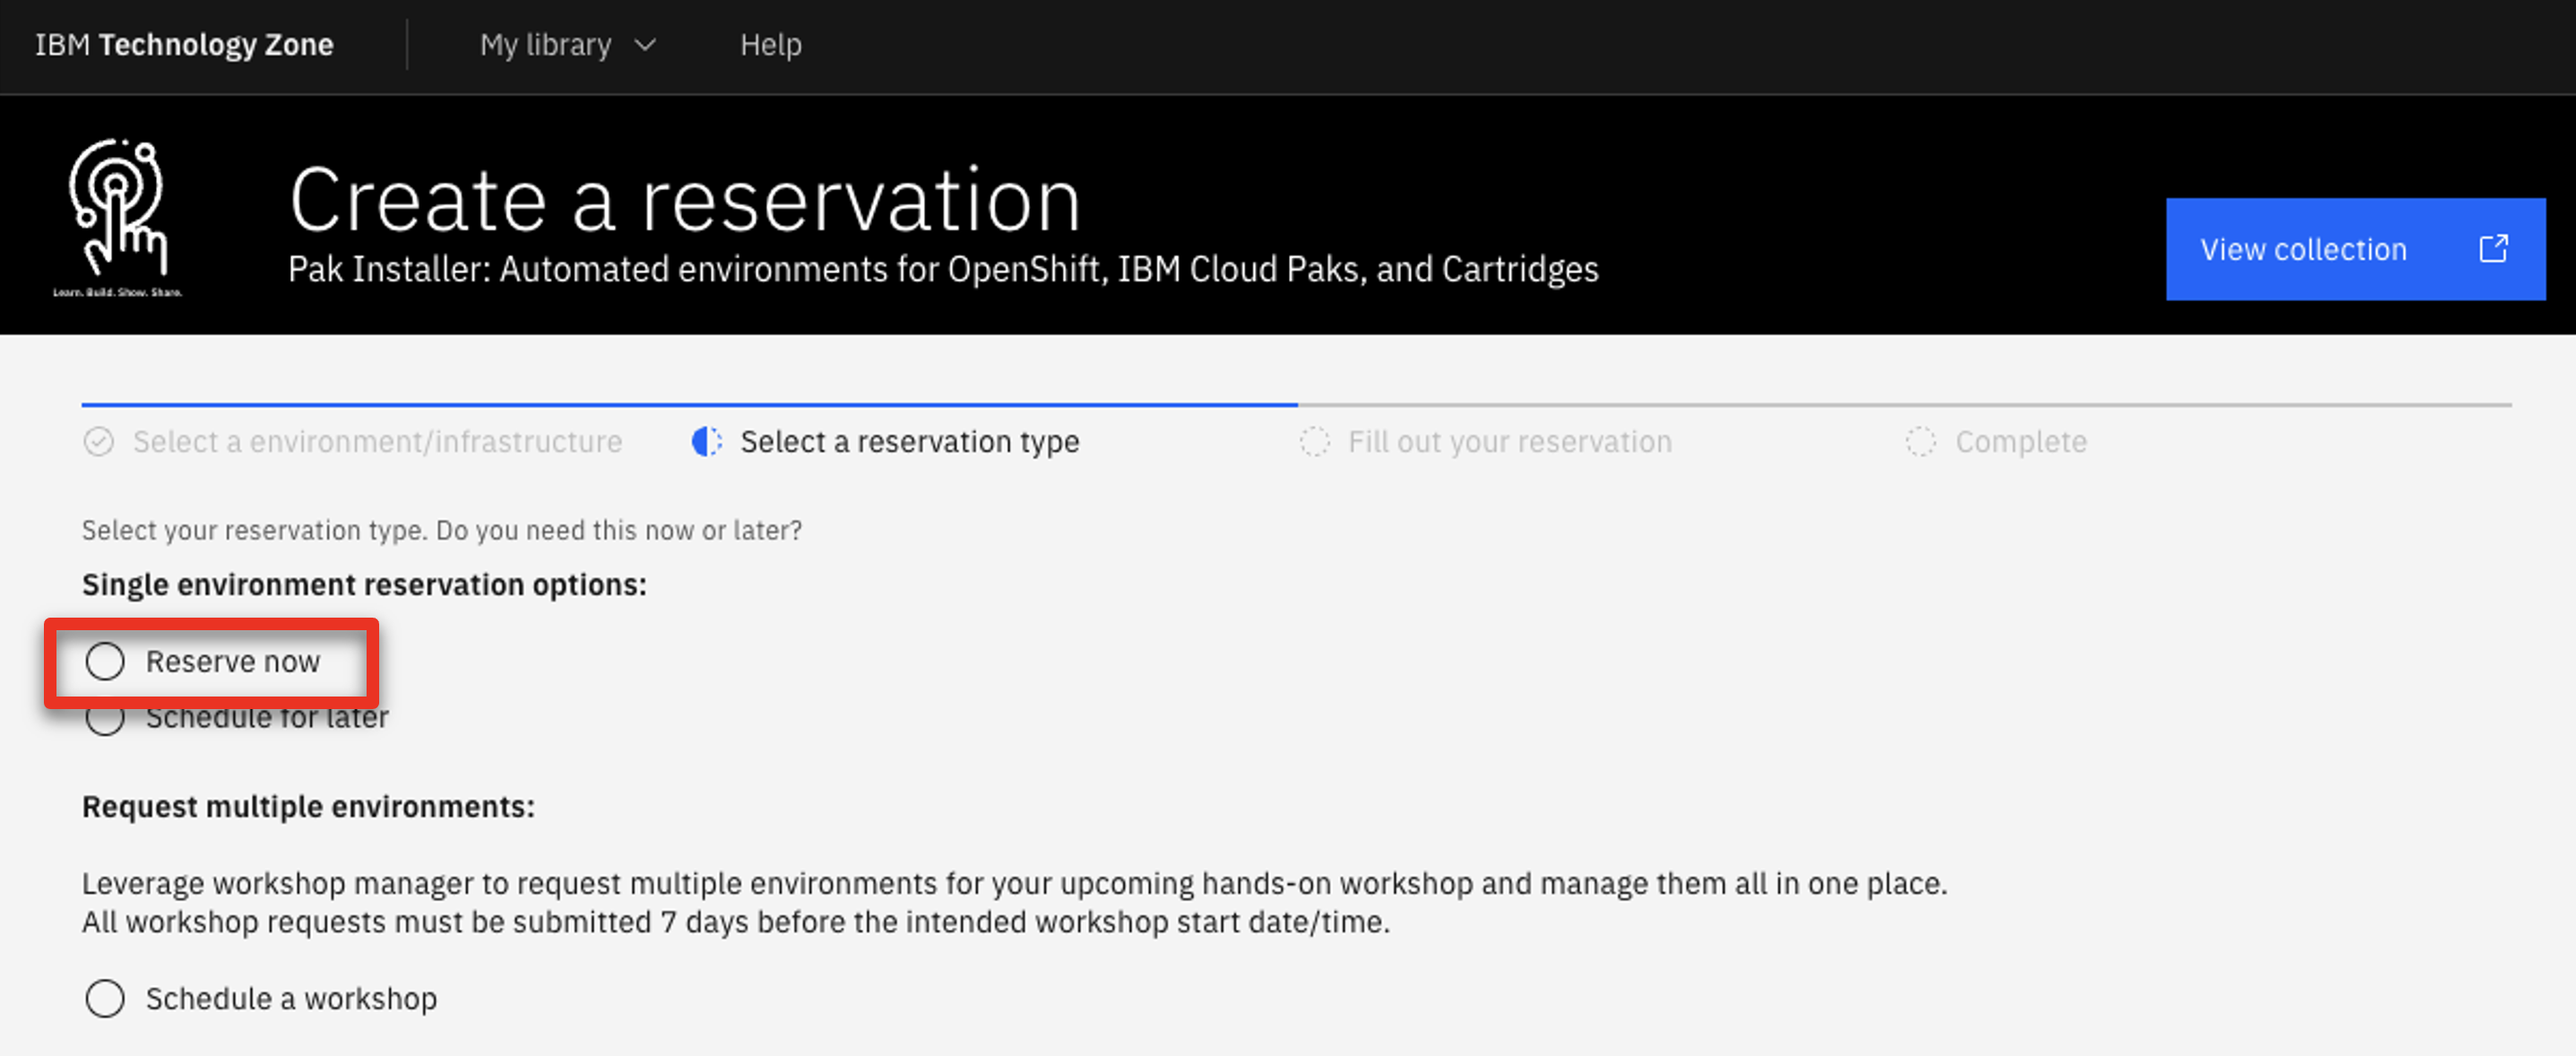
-
Select Reserve now tile.
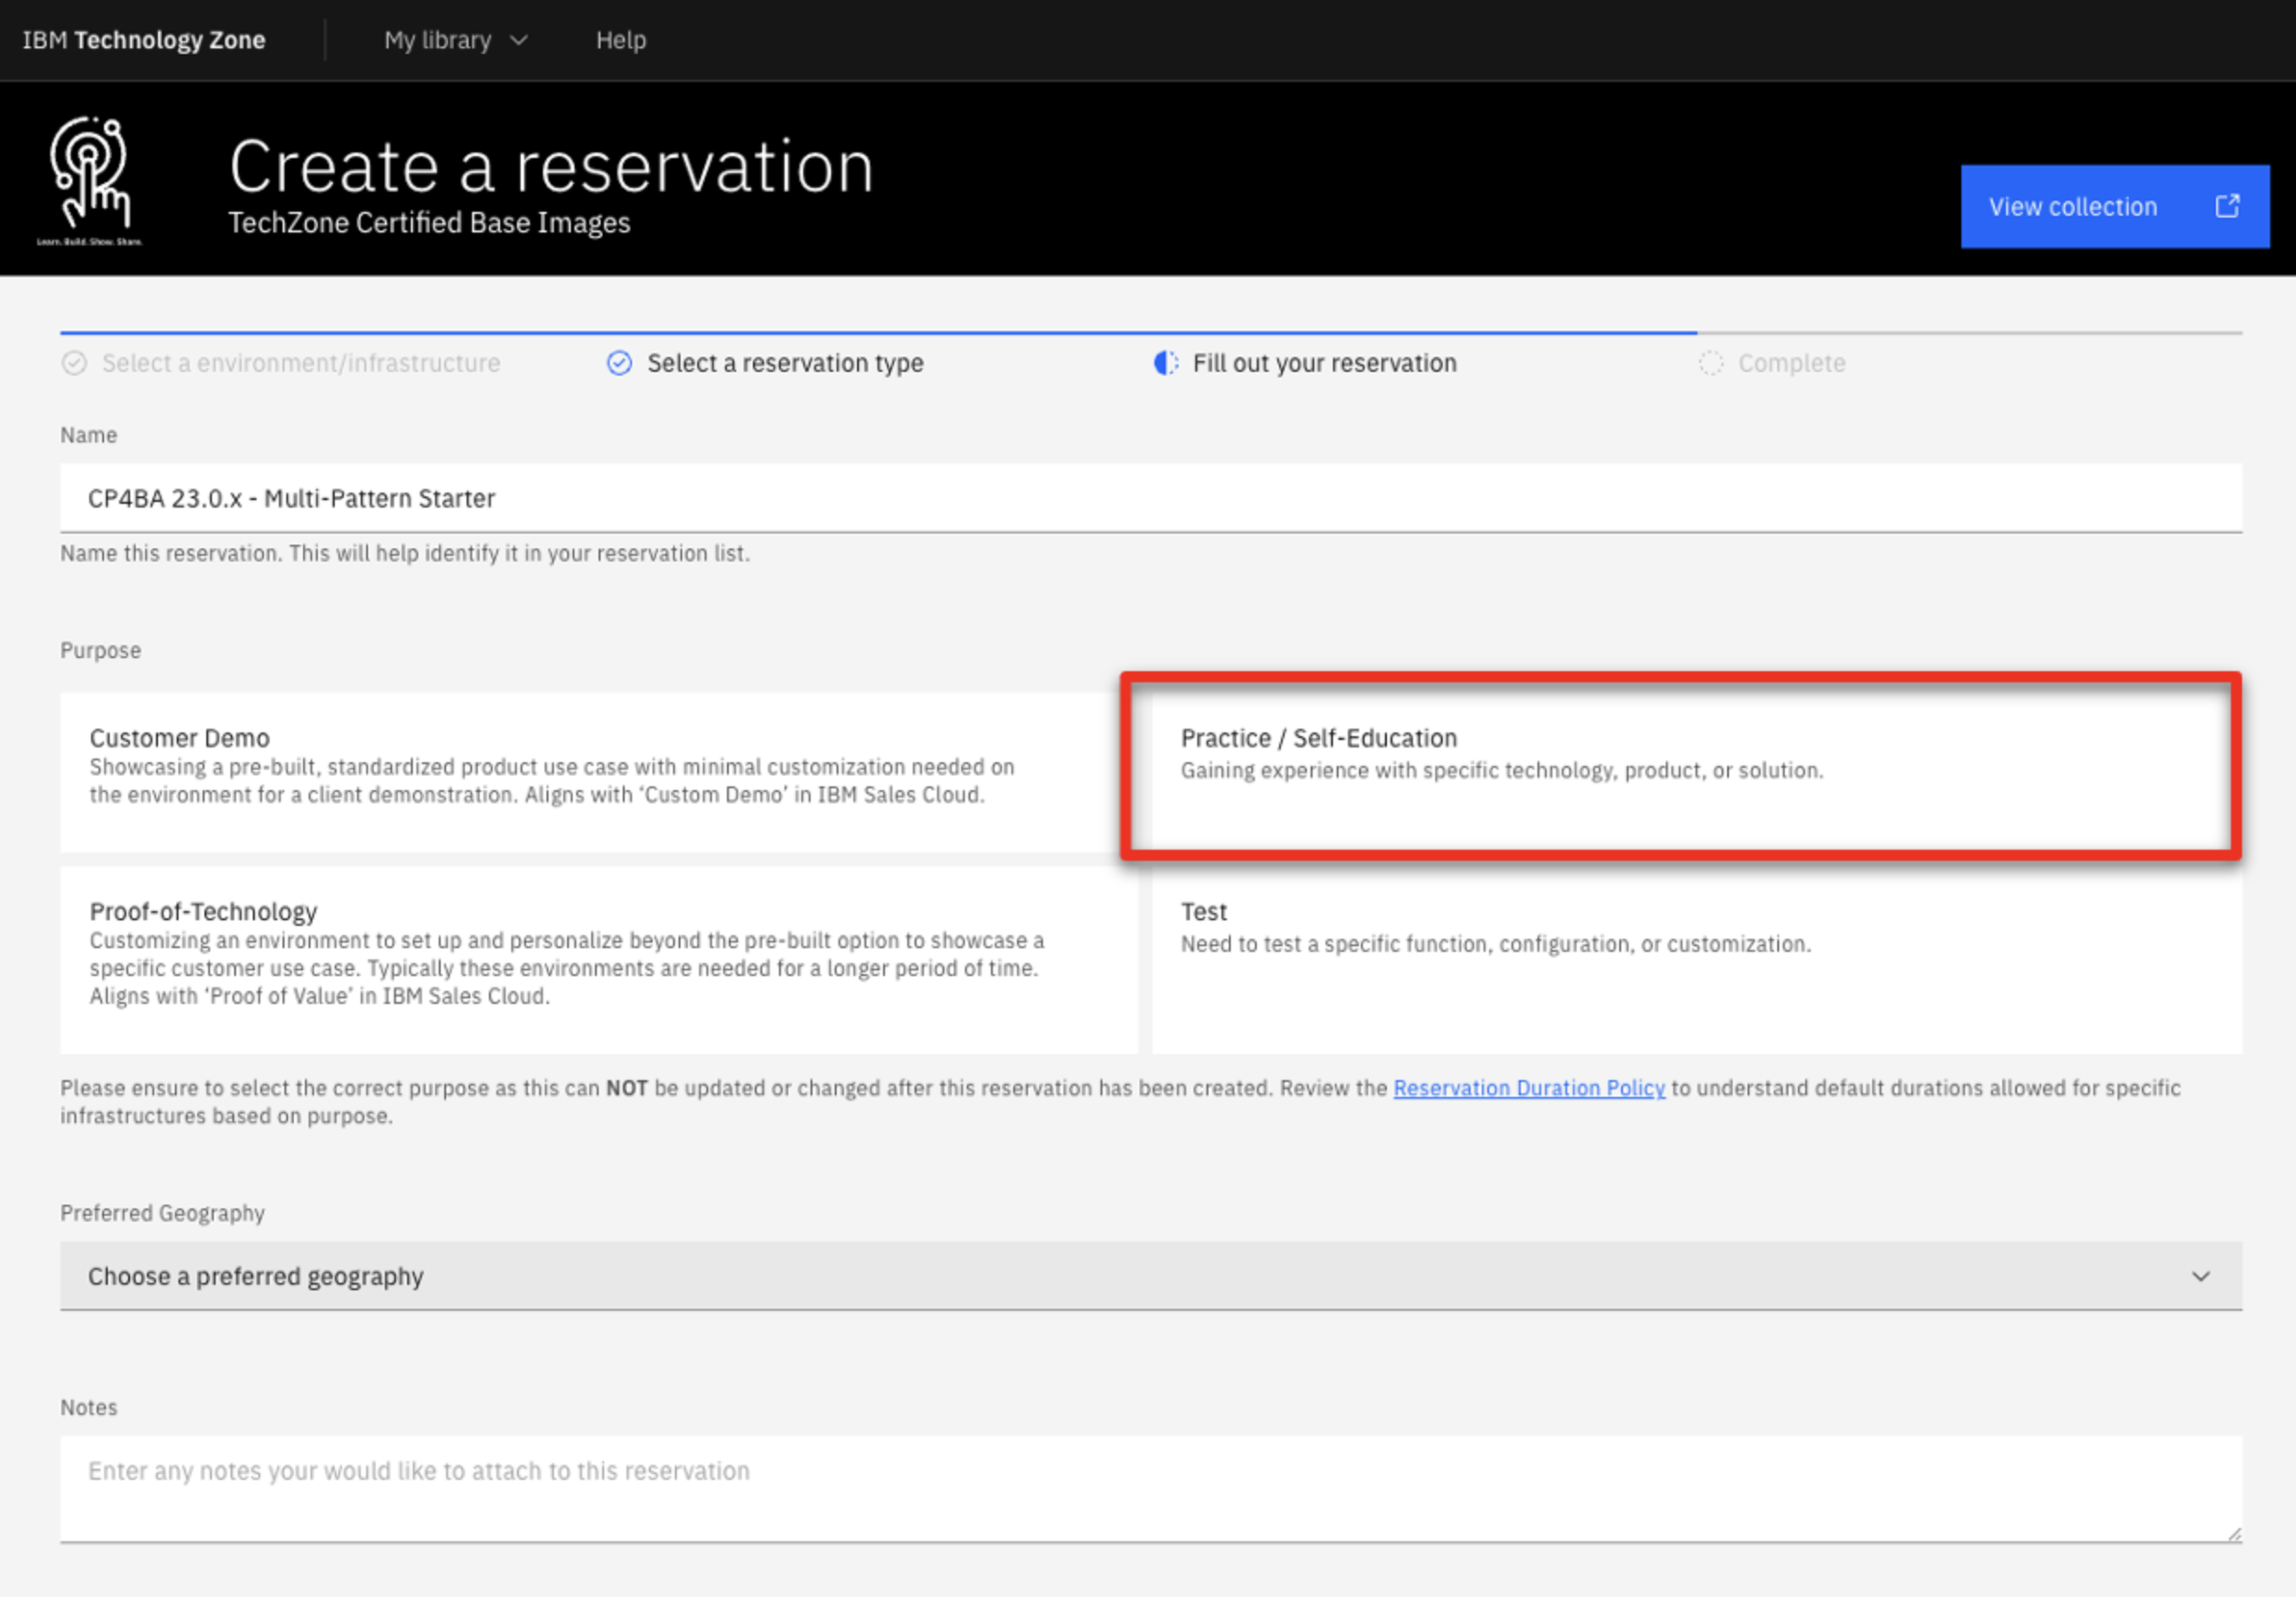
-
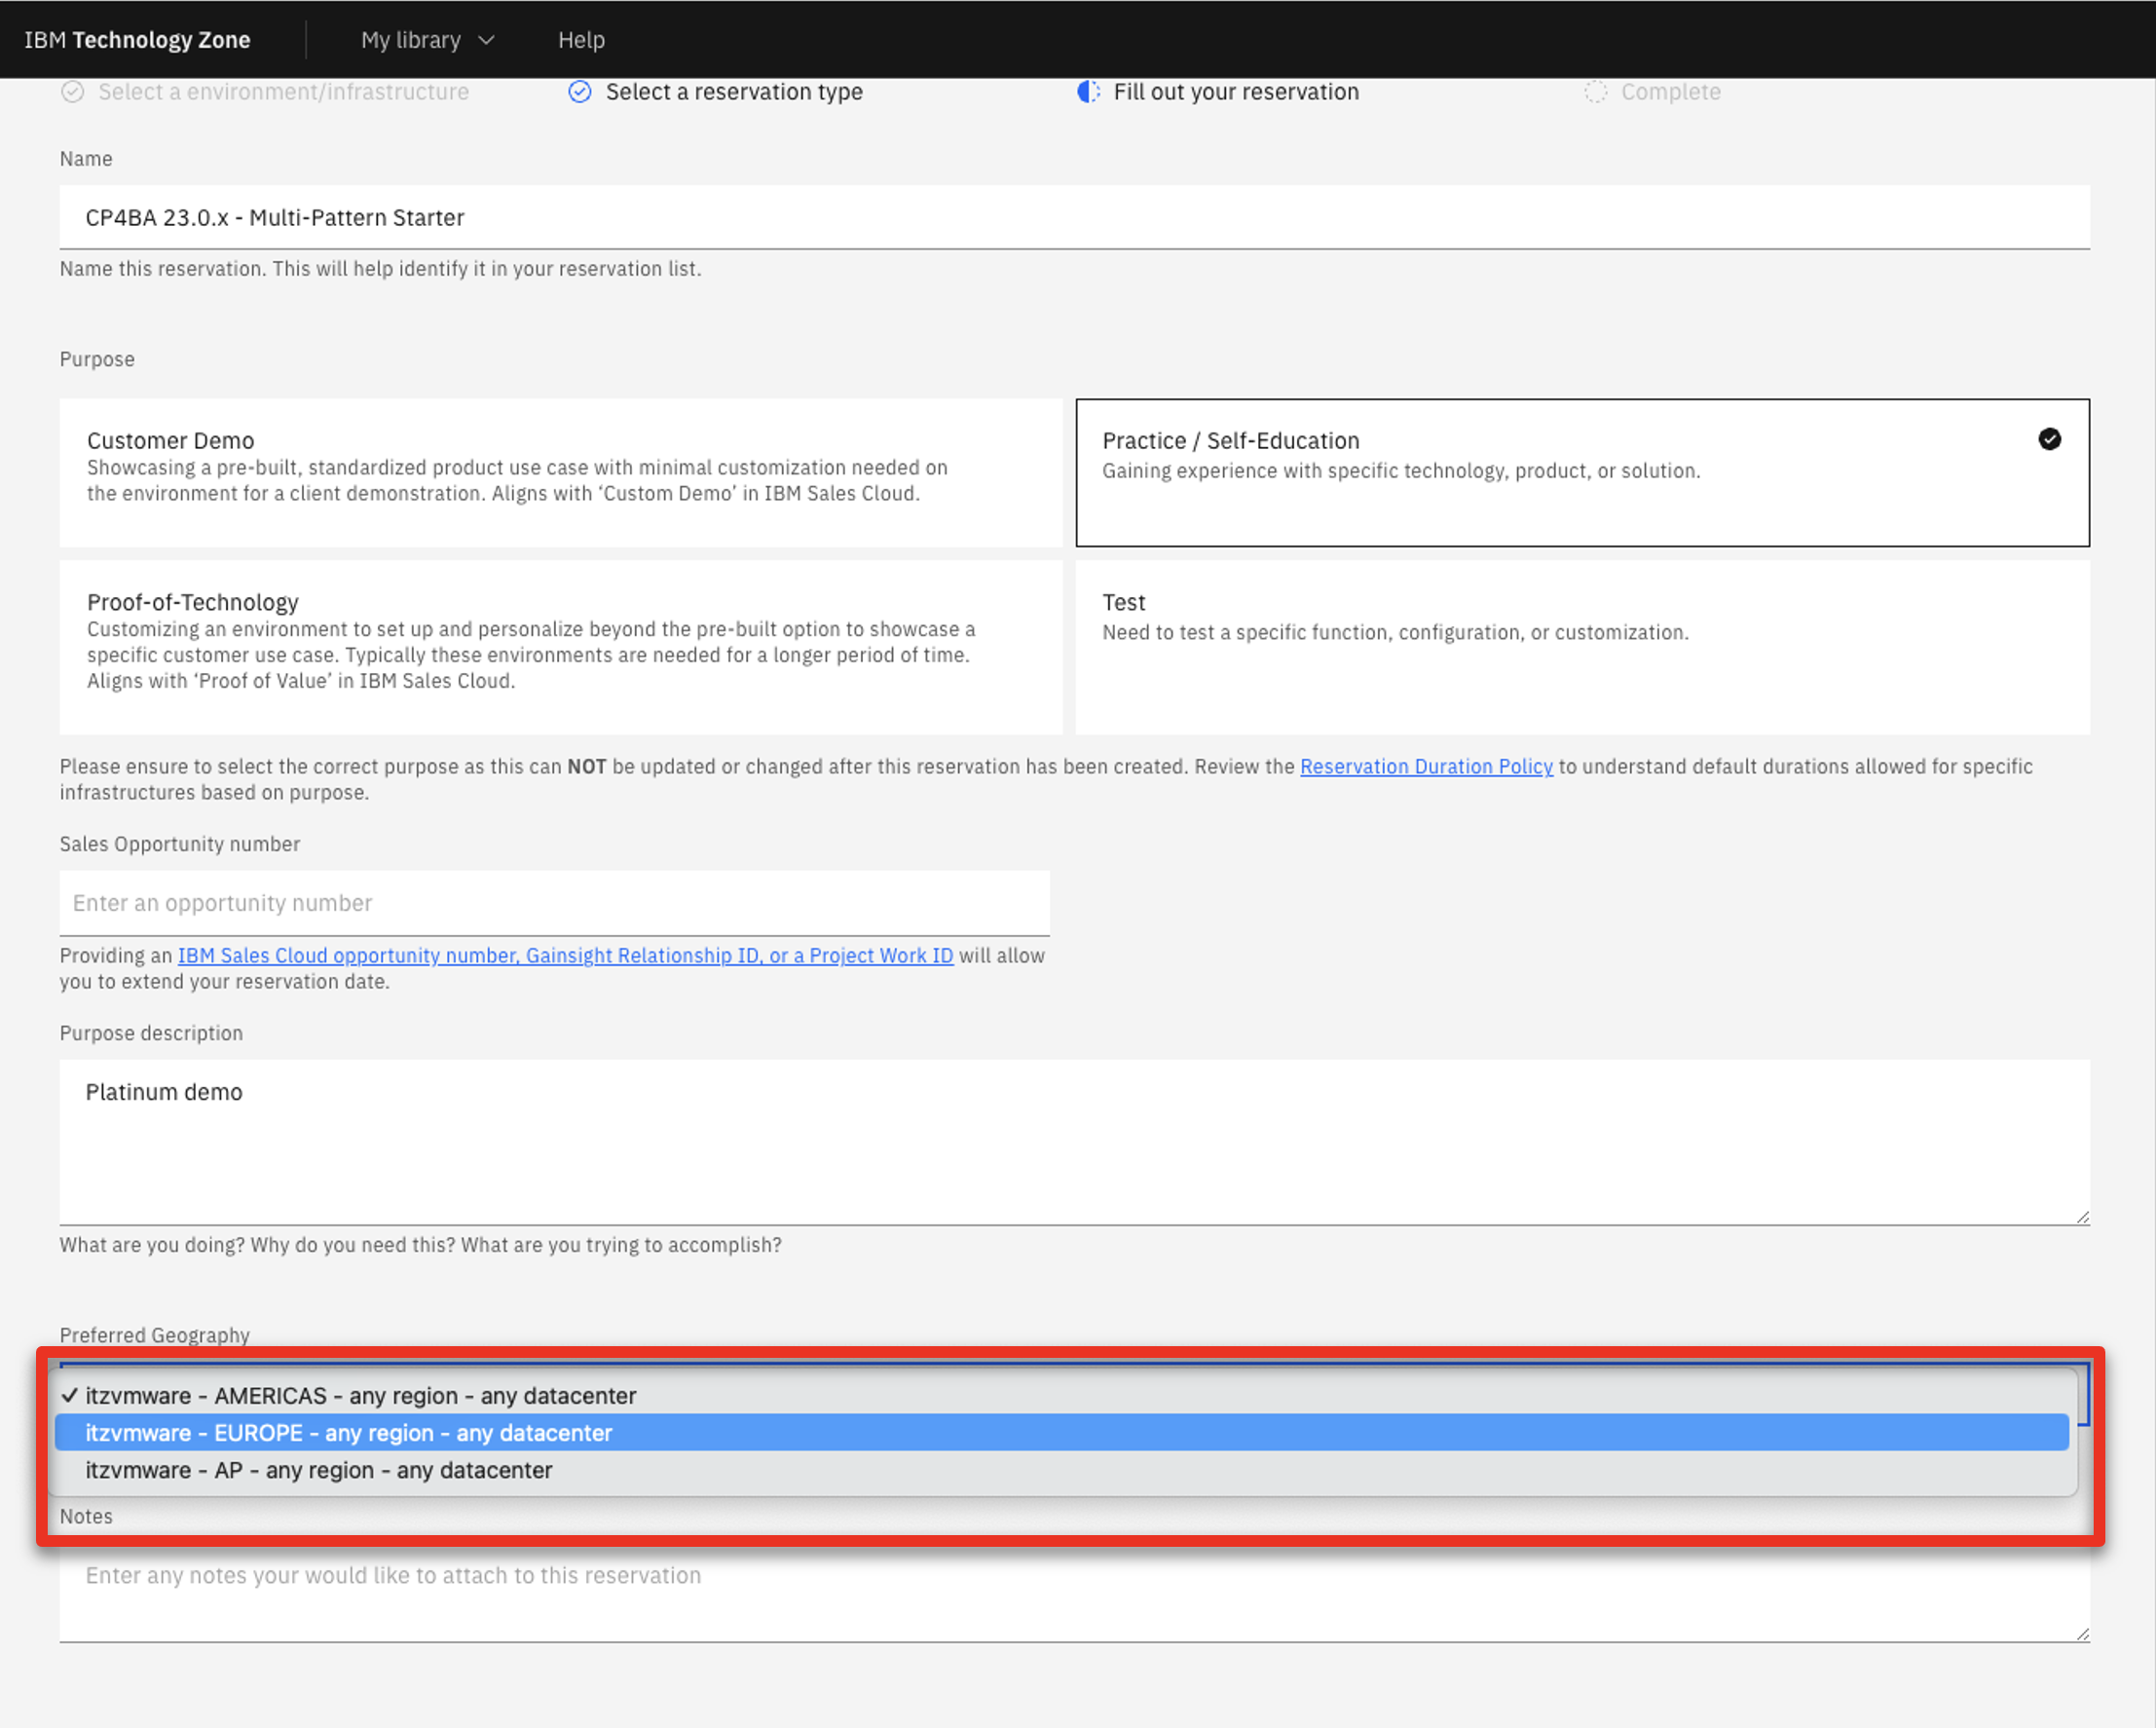
Select Practice / Self-Education
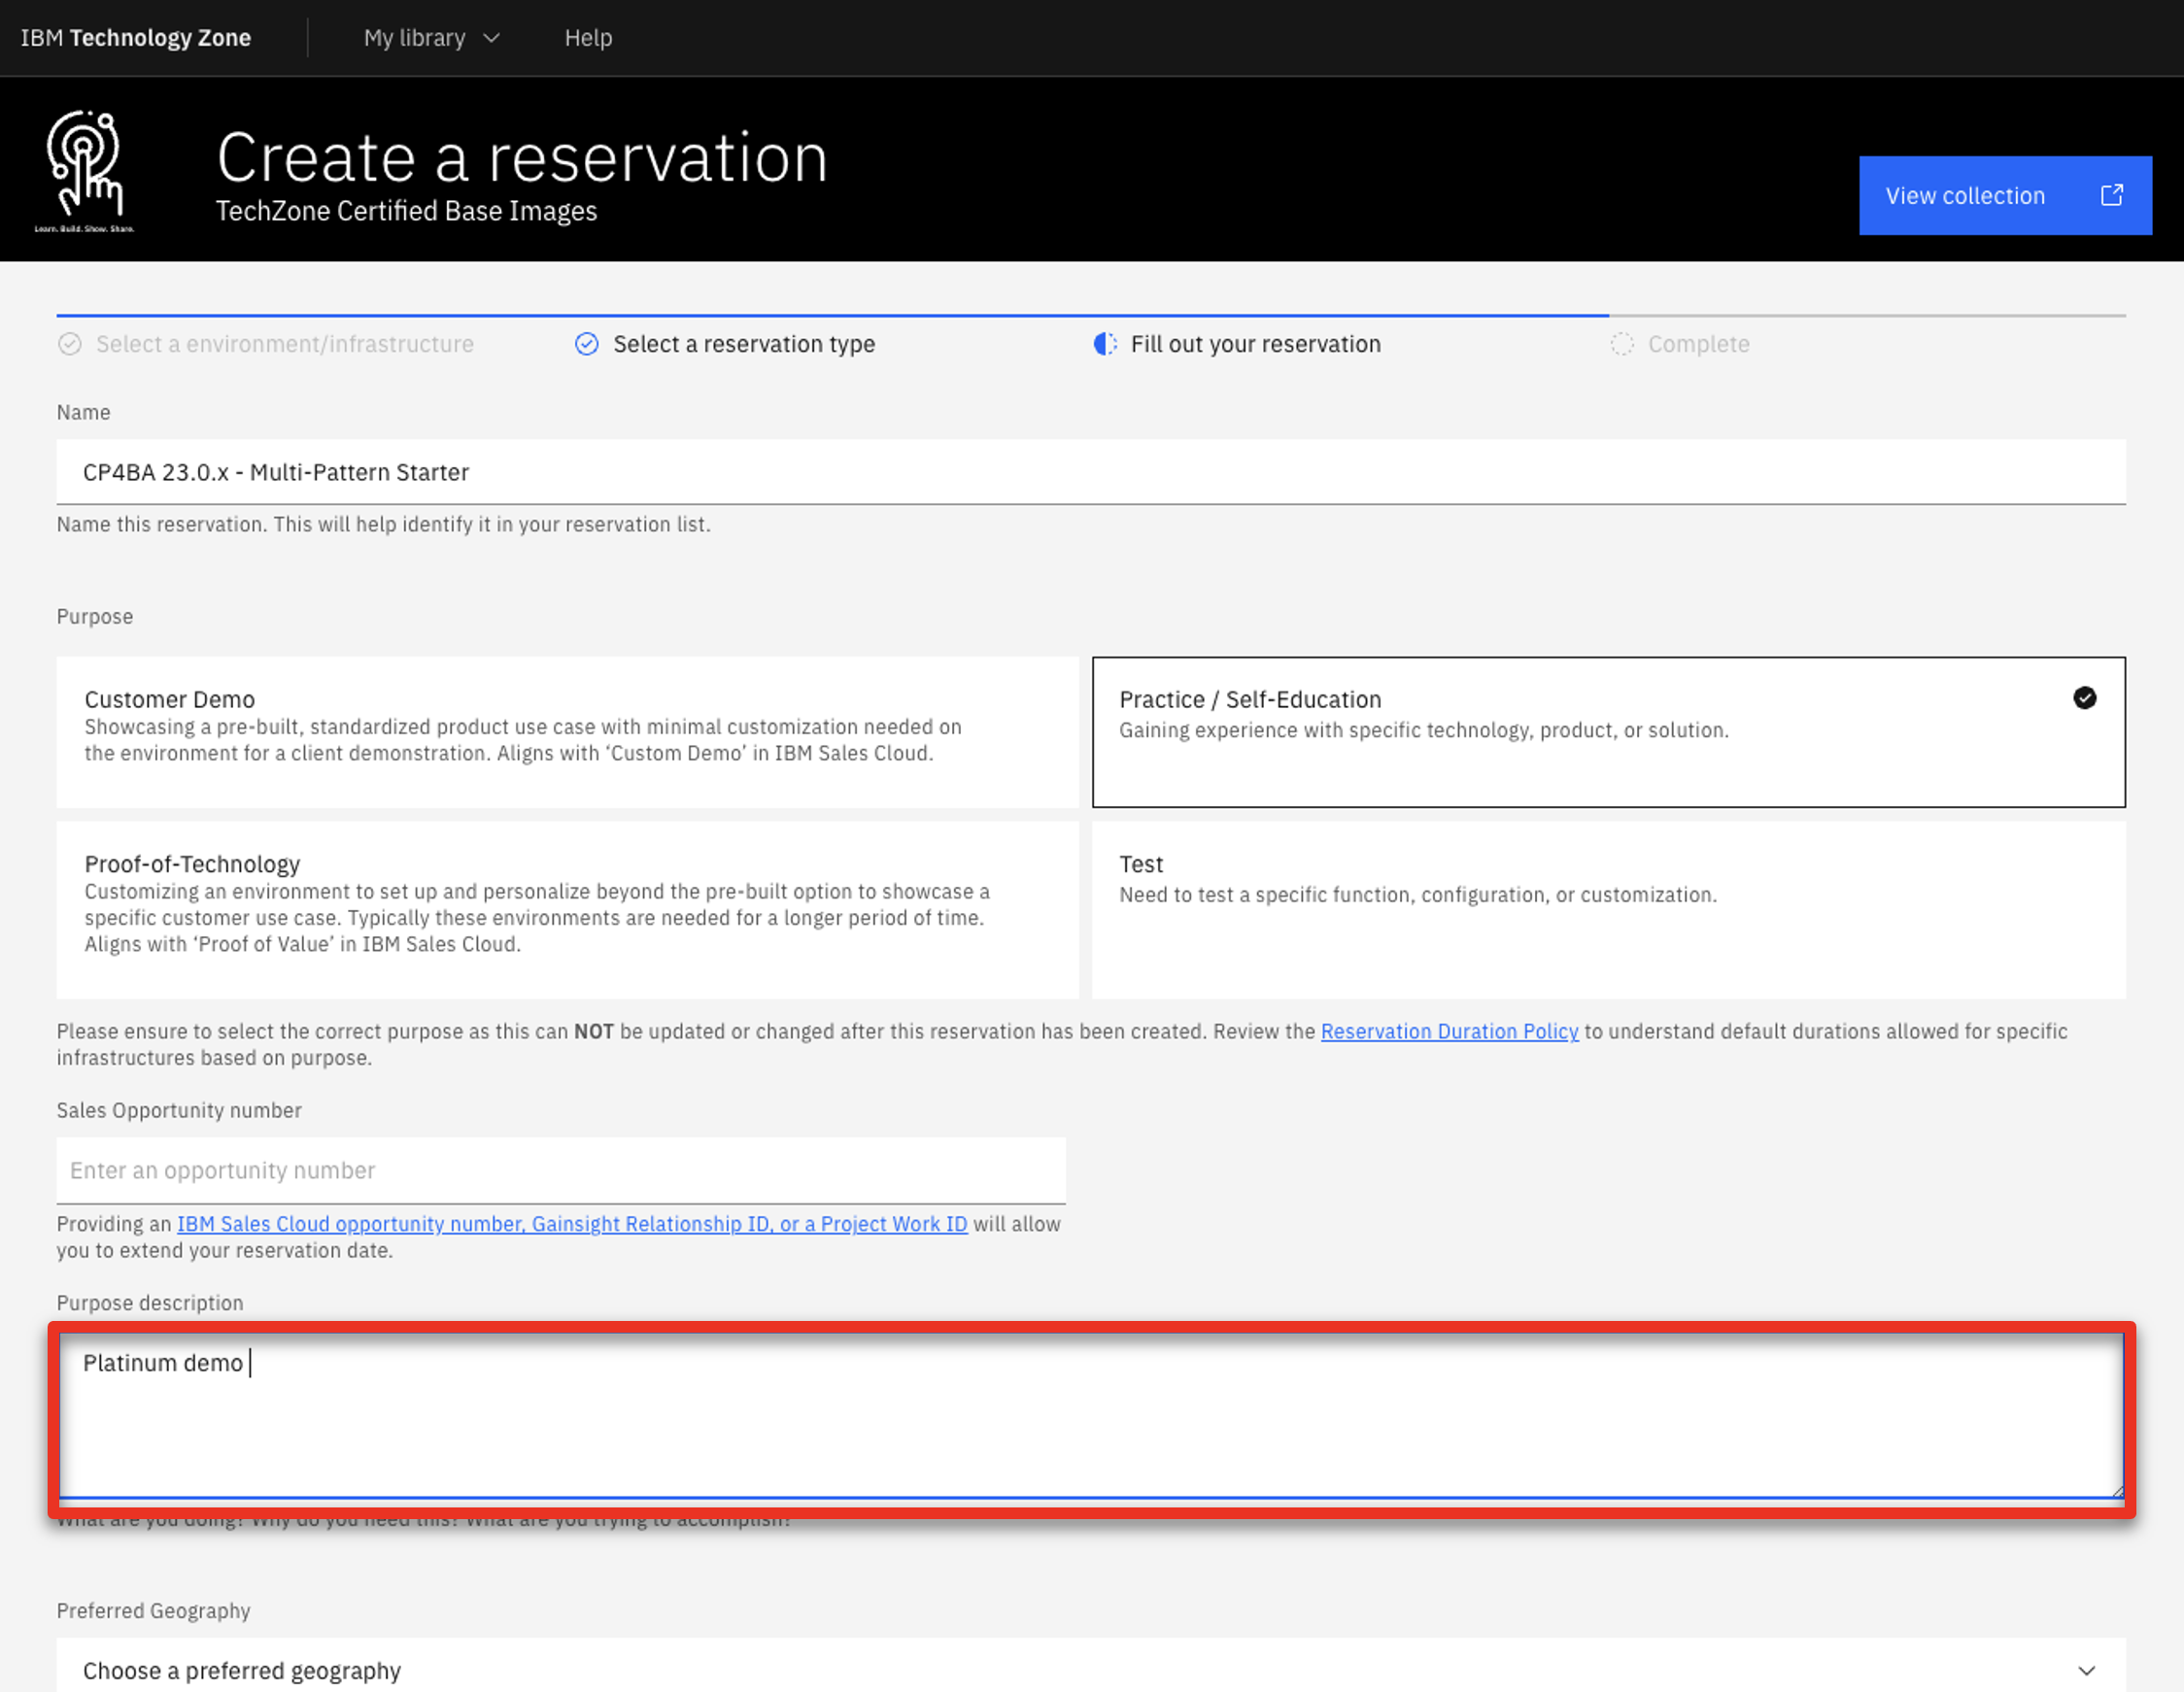
-
Enter a Purpose description
-
Select your Preferred Geography
-
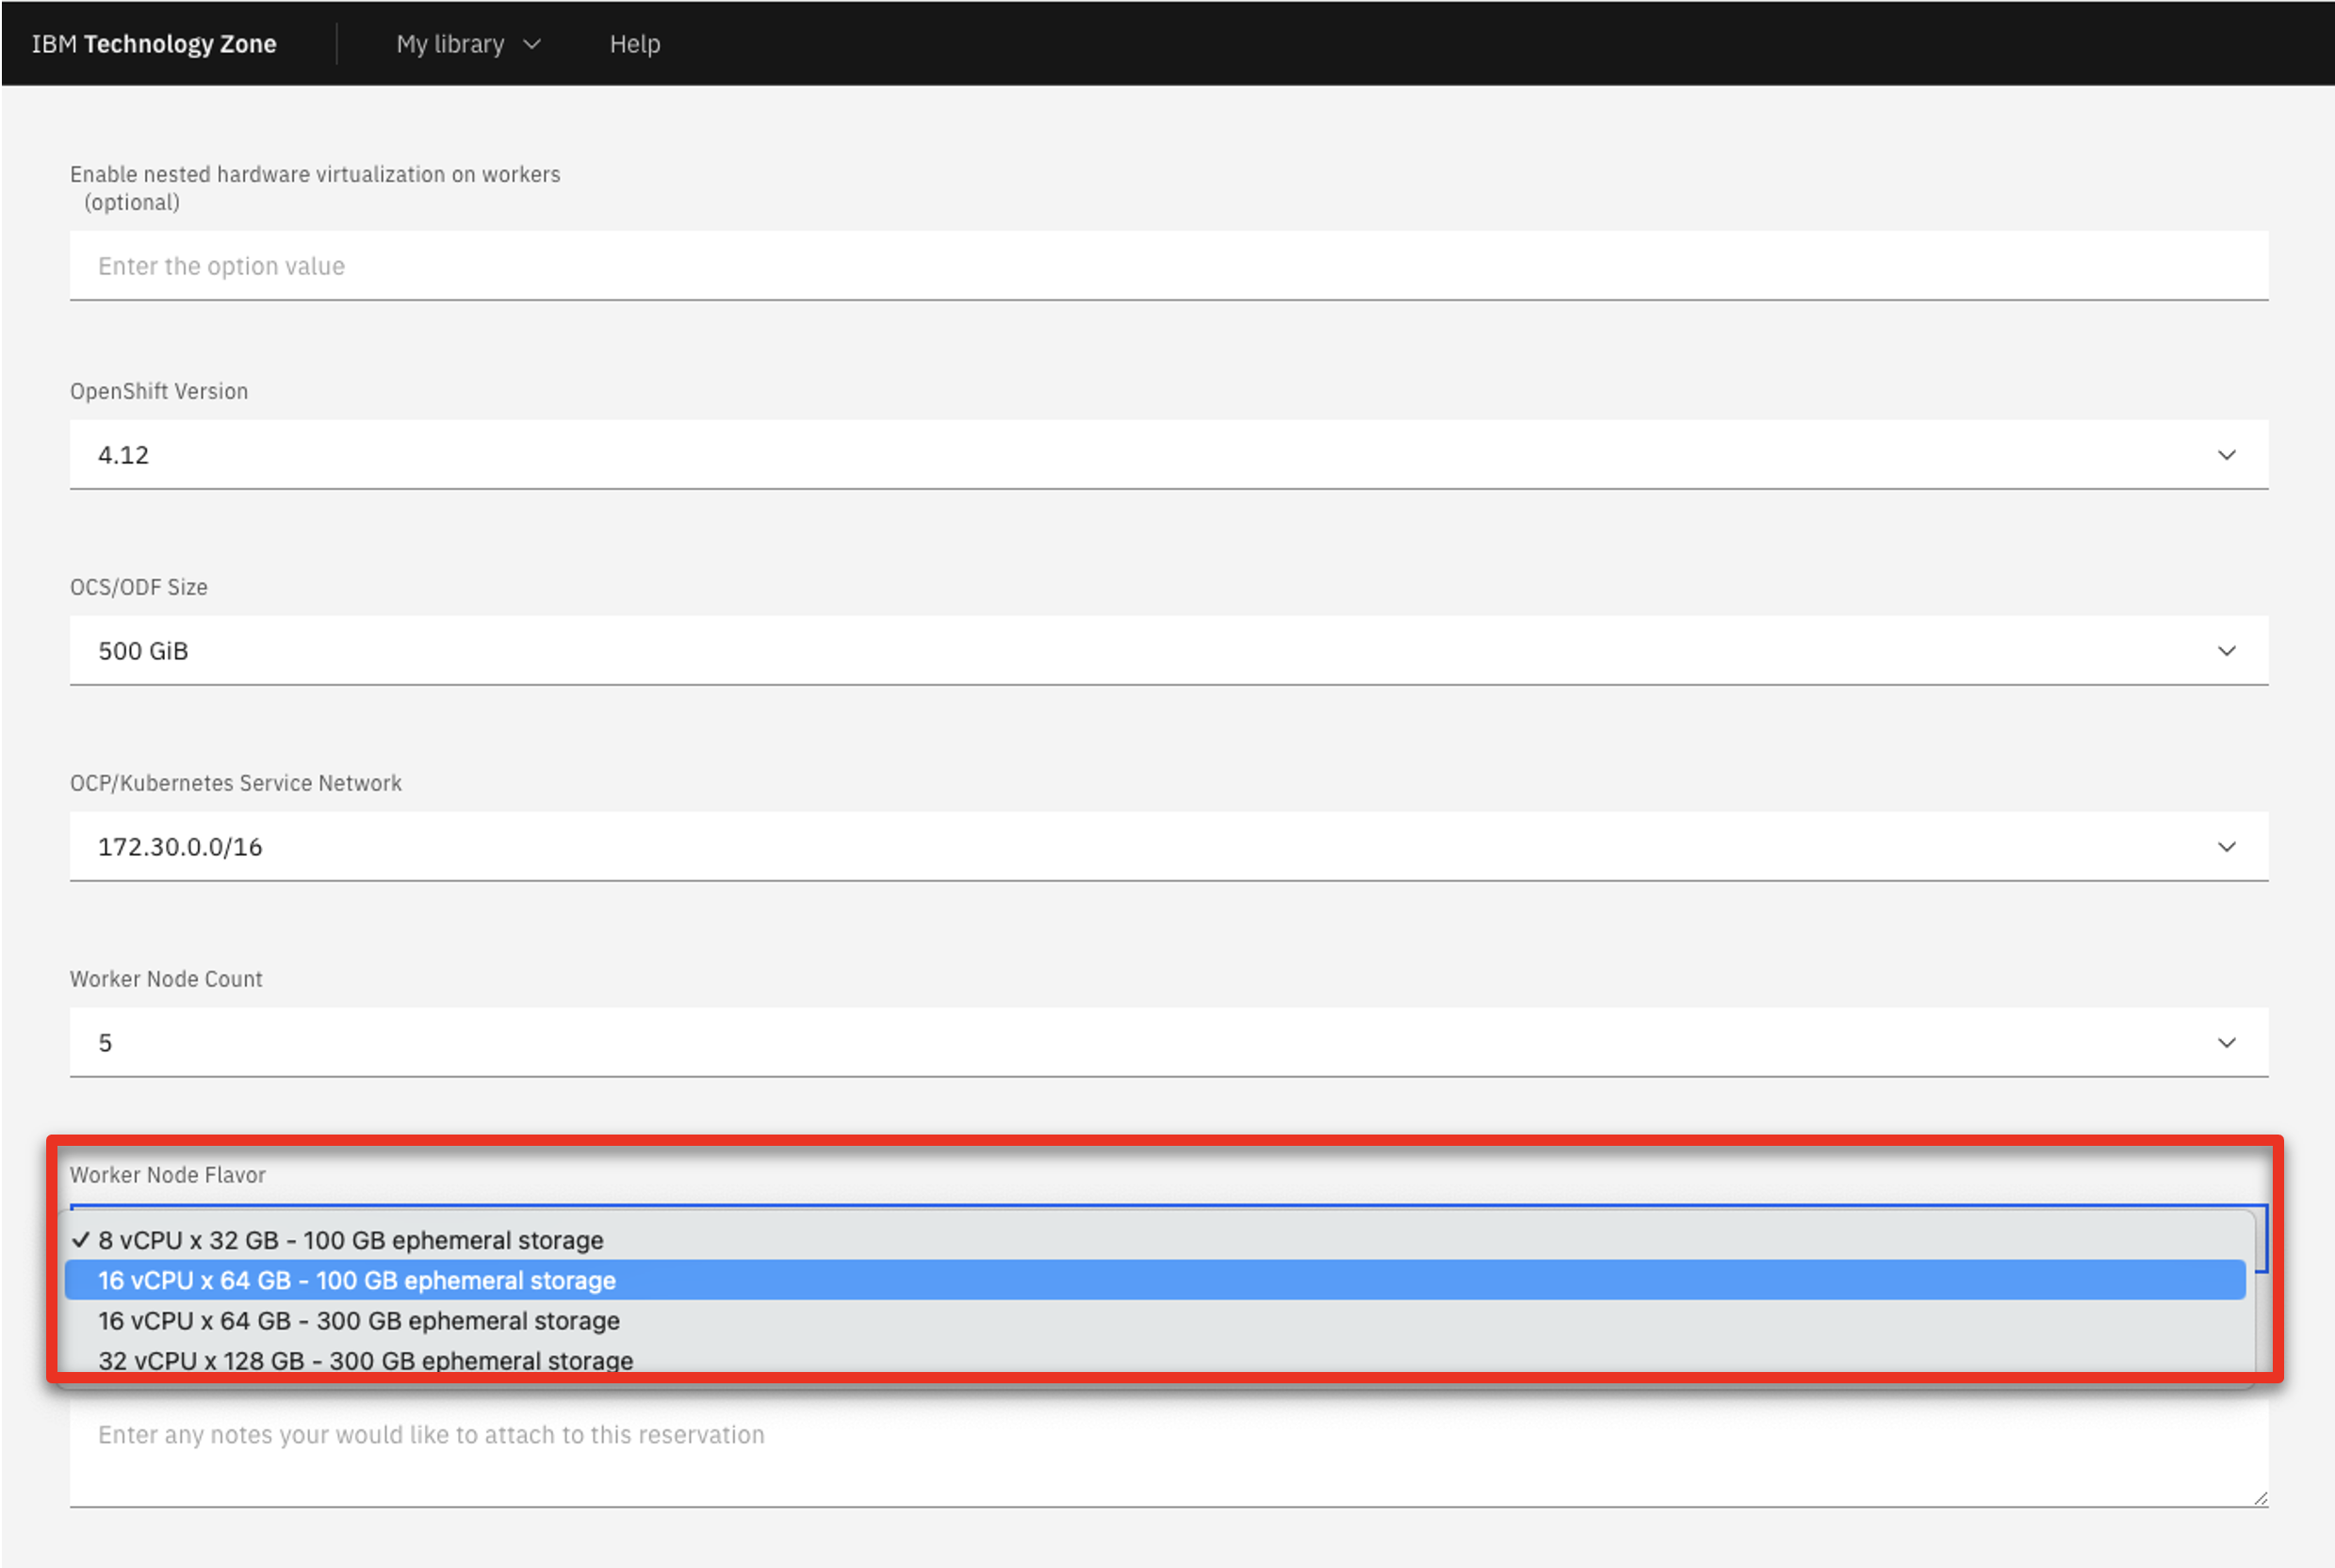
Select ‘5’‘ as ‘Worker Node Couunt’

-
Select ’16 vCPU x 64GB – 100GB ephemeral storage’ as the Starter service (1) in the Worker Node Flavor
-
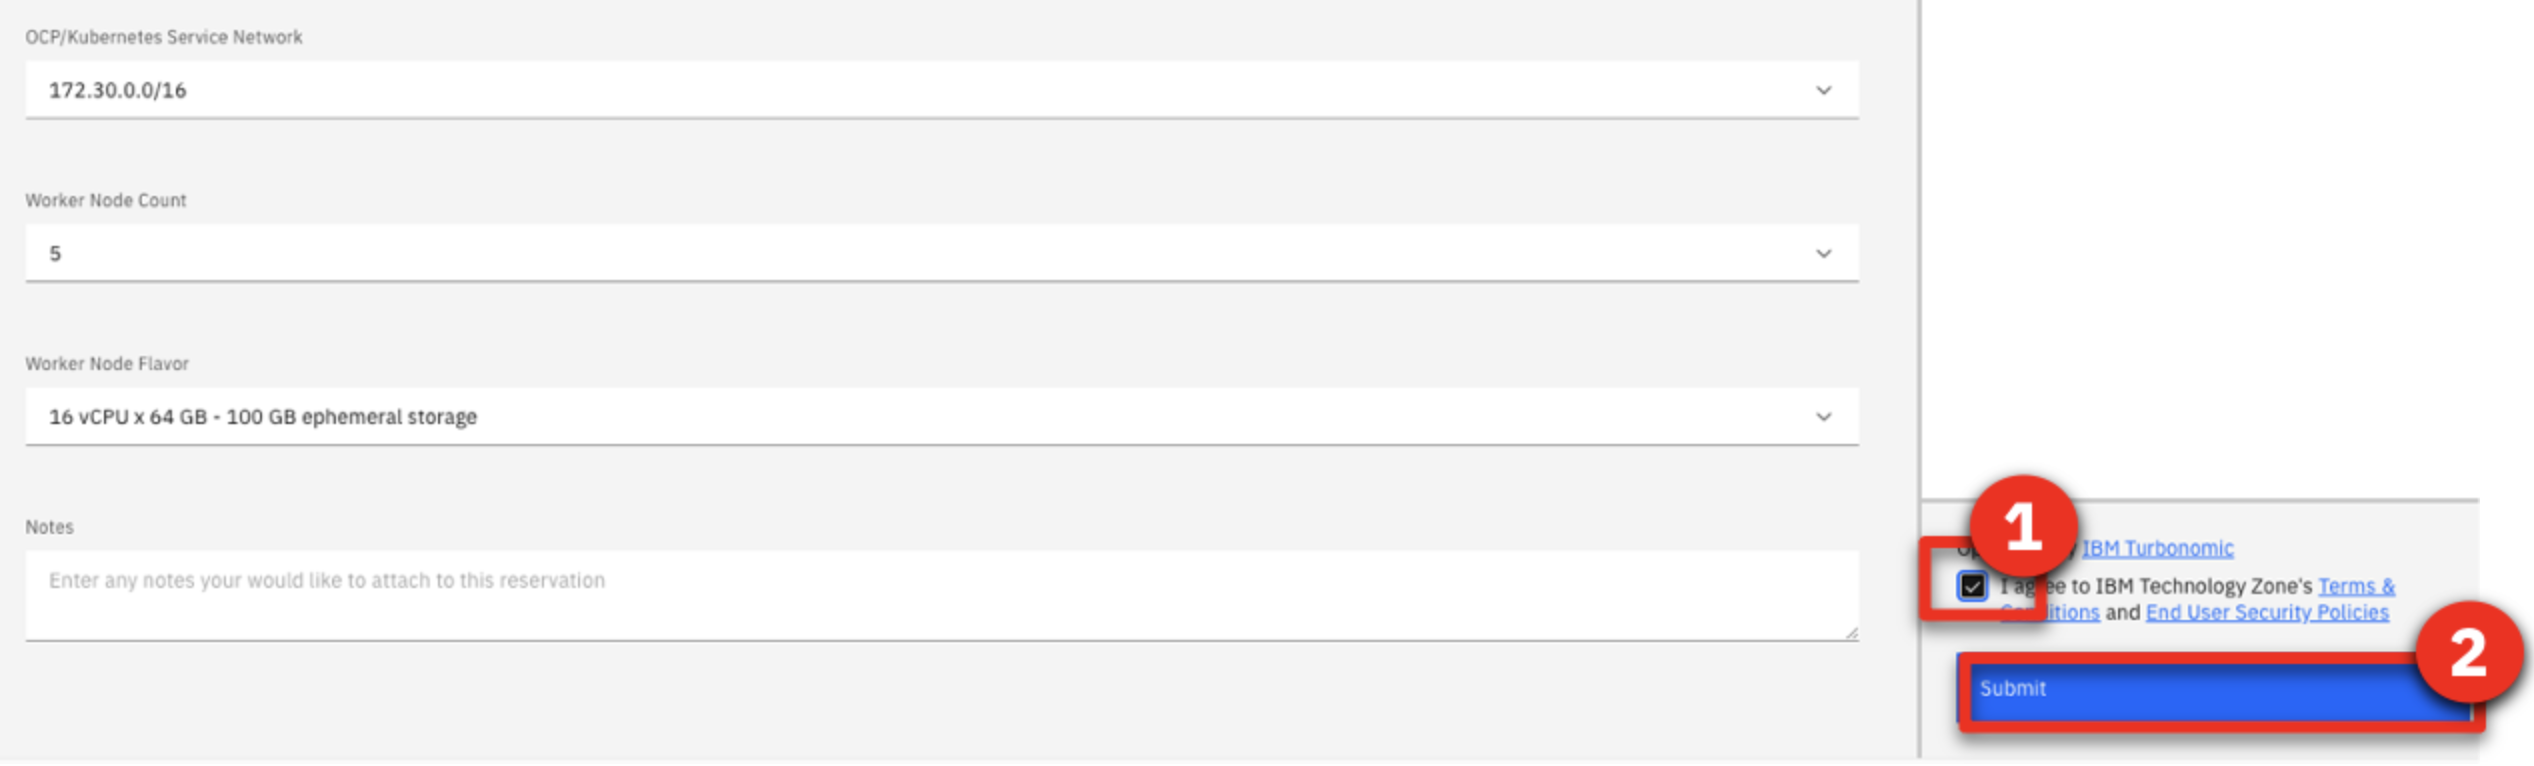
Read and agree to IBM Technology Zone’s Terms and Conditions and End User Security Policies (1). Click Submit (2).
-
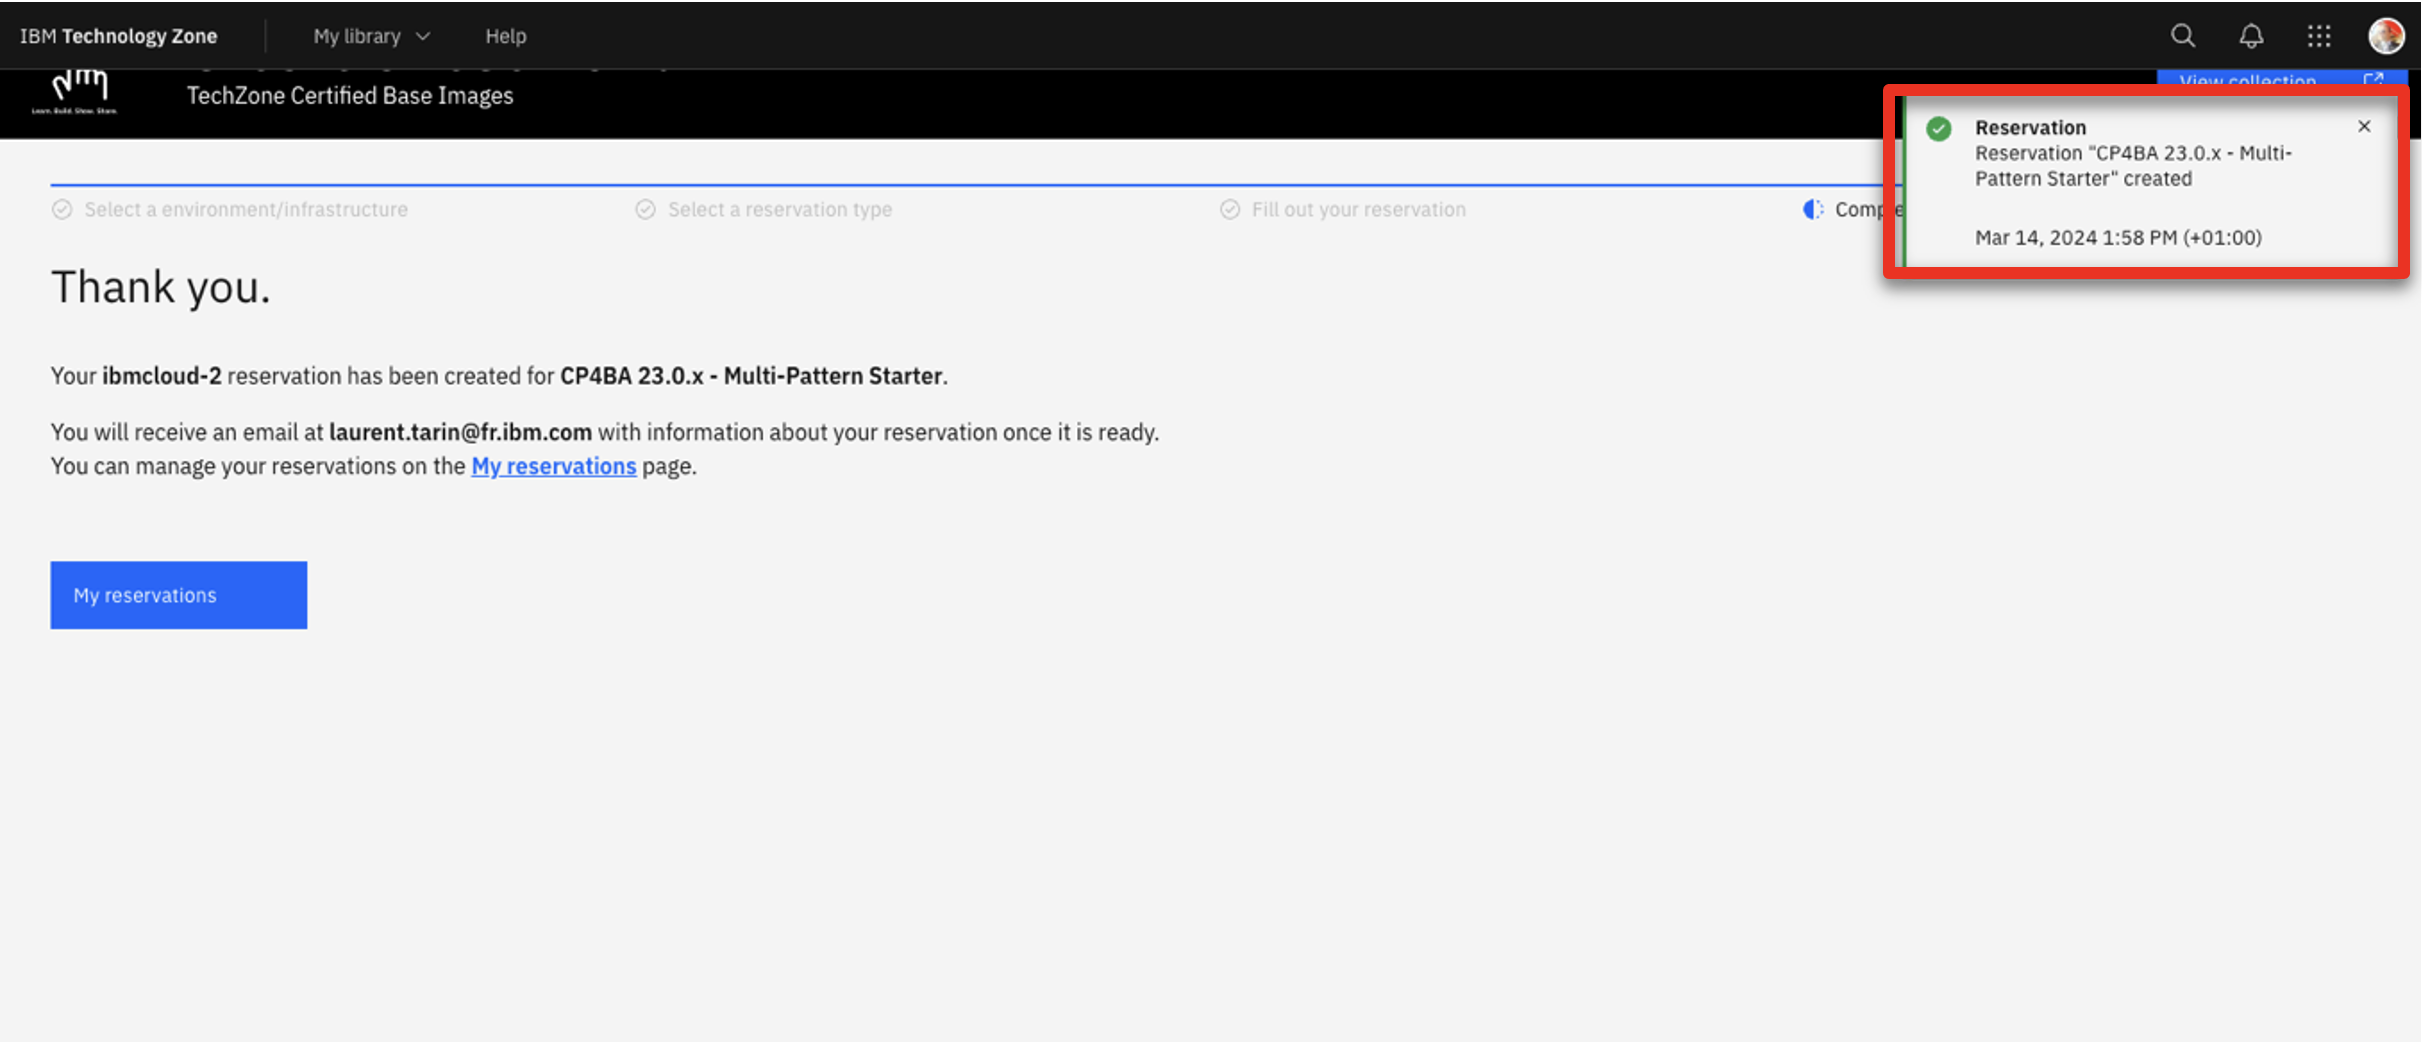
Check that the request was correctly submitted, and wait for the confirmation emails.
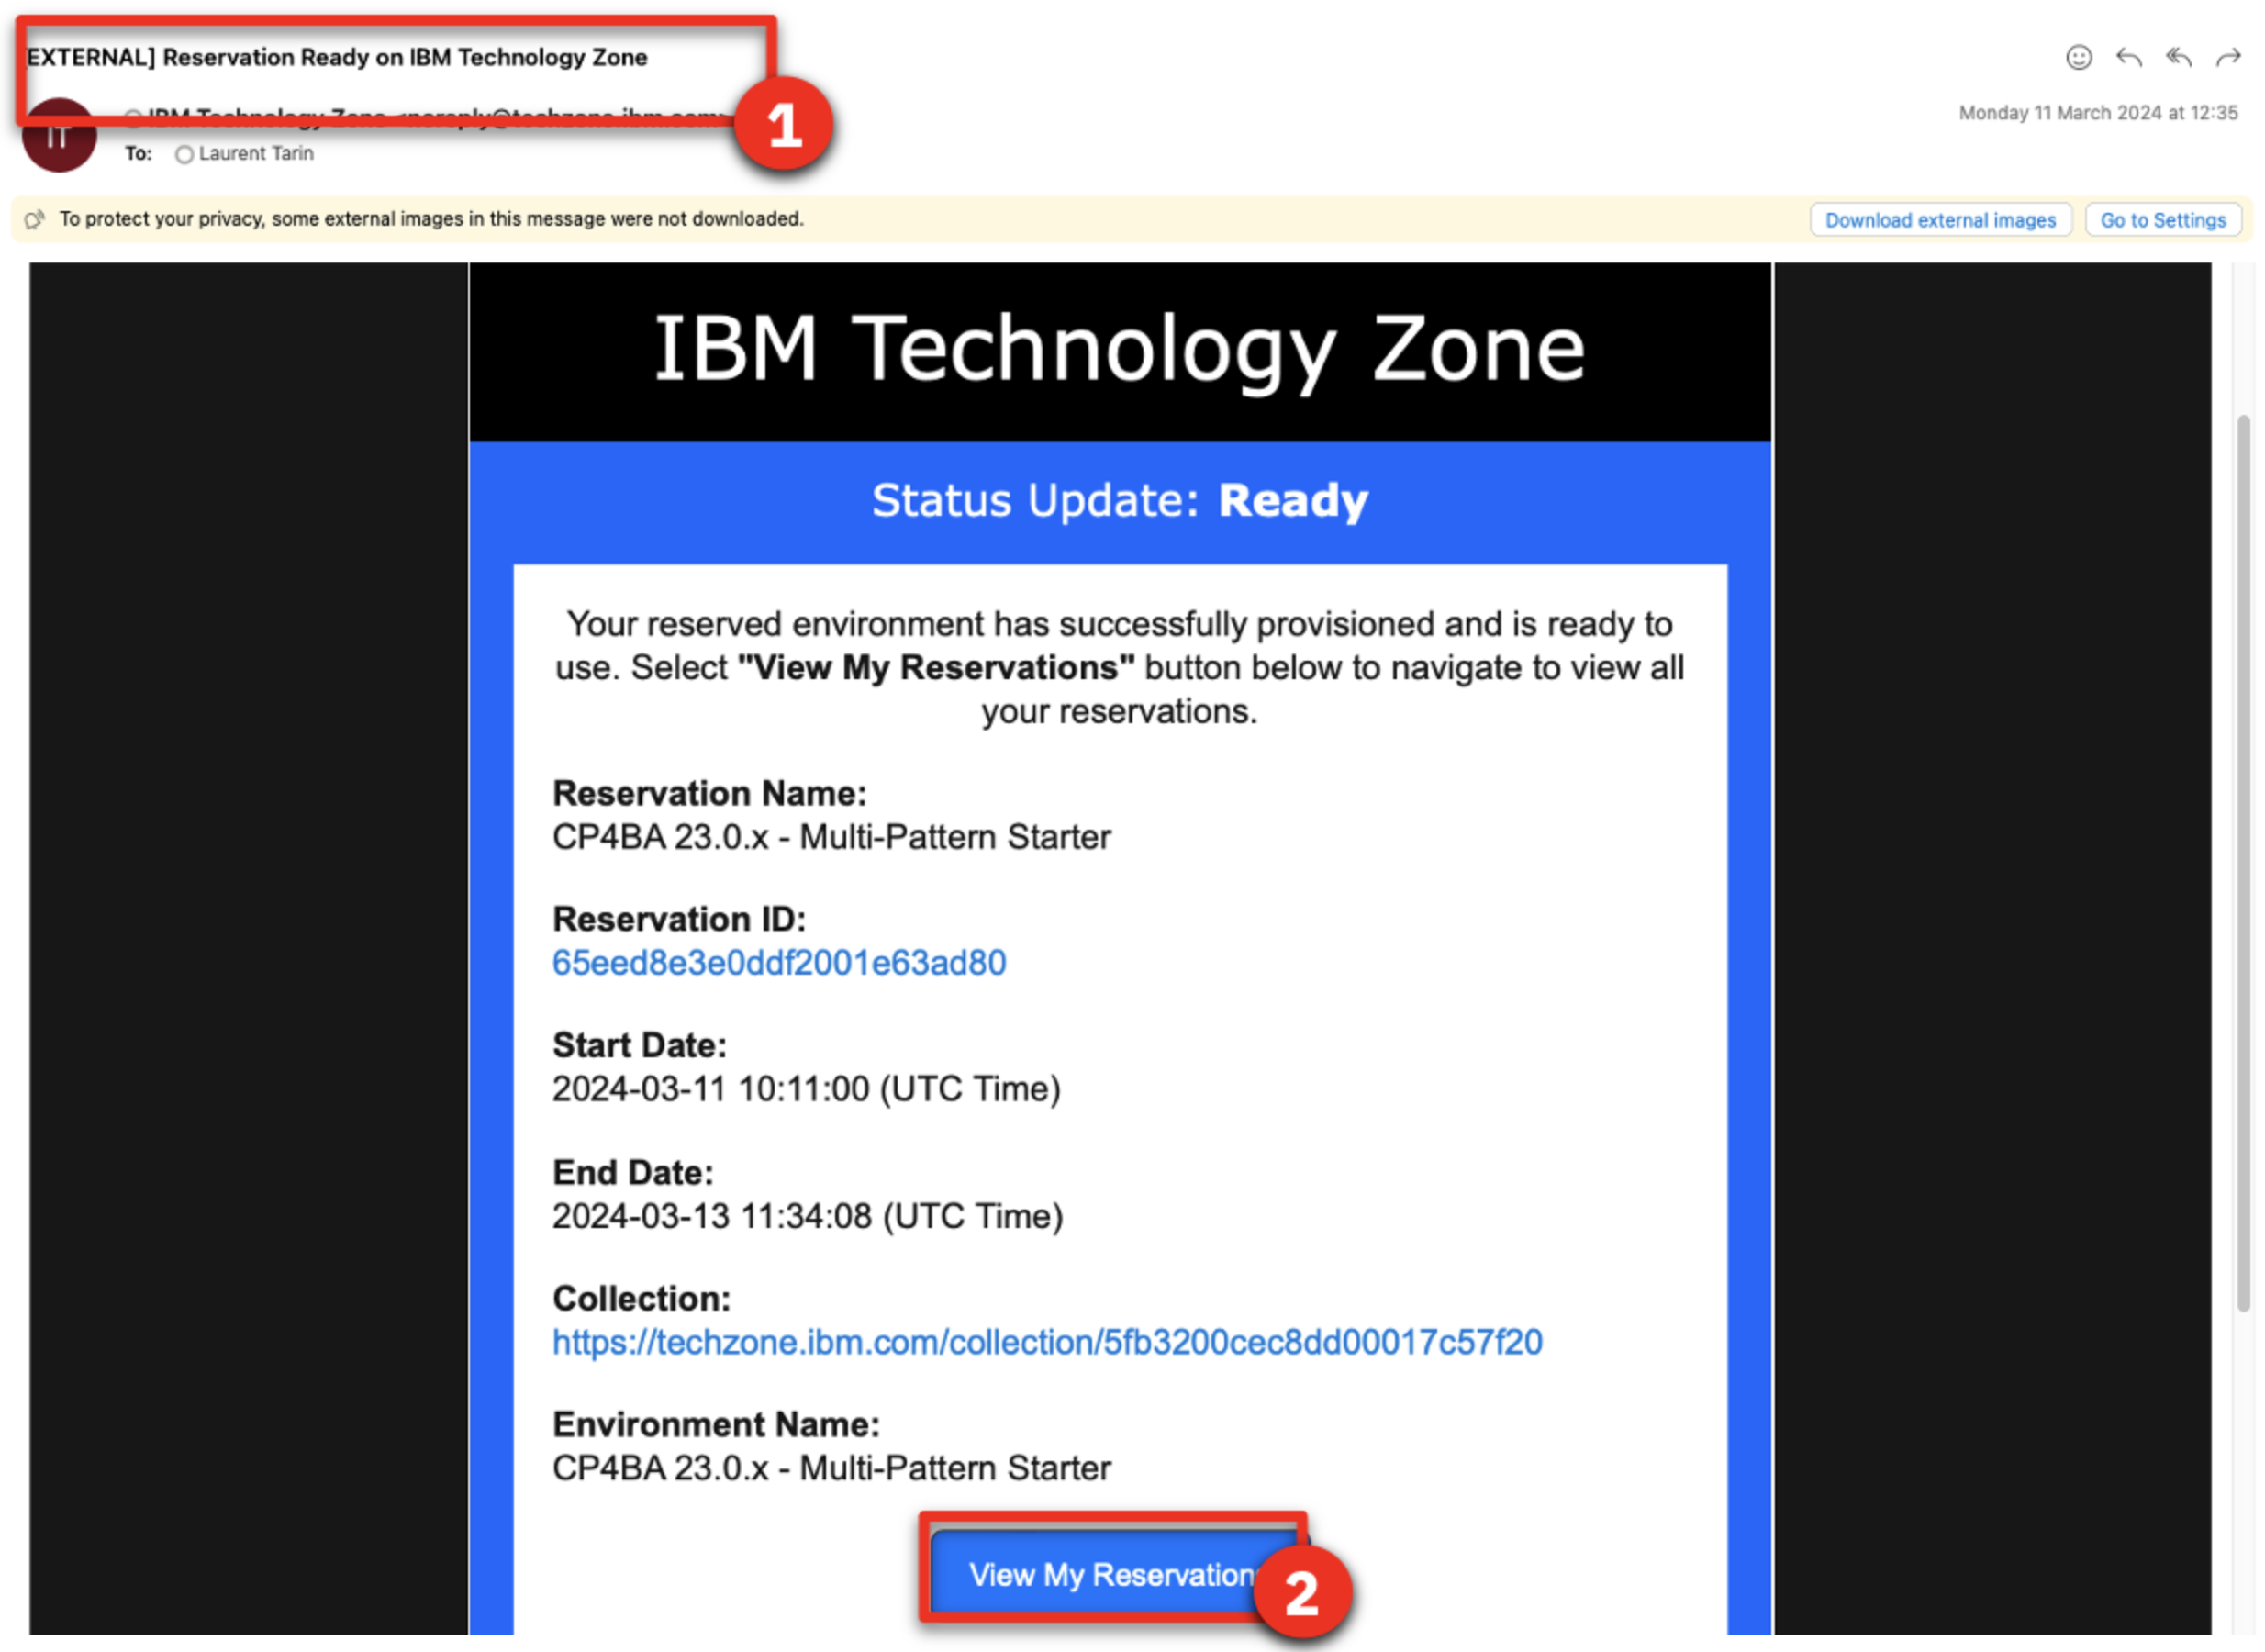
2 - Validate your environment
After 4-5 hours, your Cloud Pak for Business Automation (CP4BA) should be ready. After requesting your CP4BA, you will receive a series of emails from IBM Technology Zone regarding the progress of your request.
-
Check for an email with the subject Reservation Ready on IBM Technology Zone (1). Click View My Reservations (2)
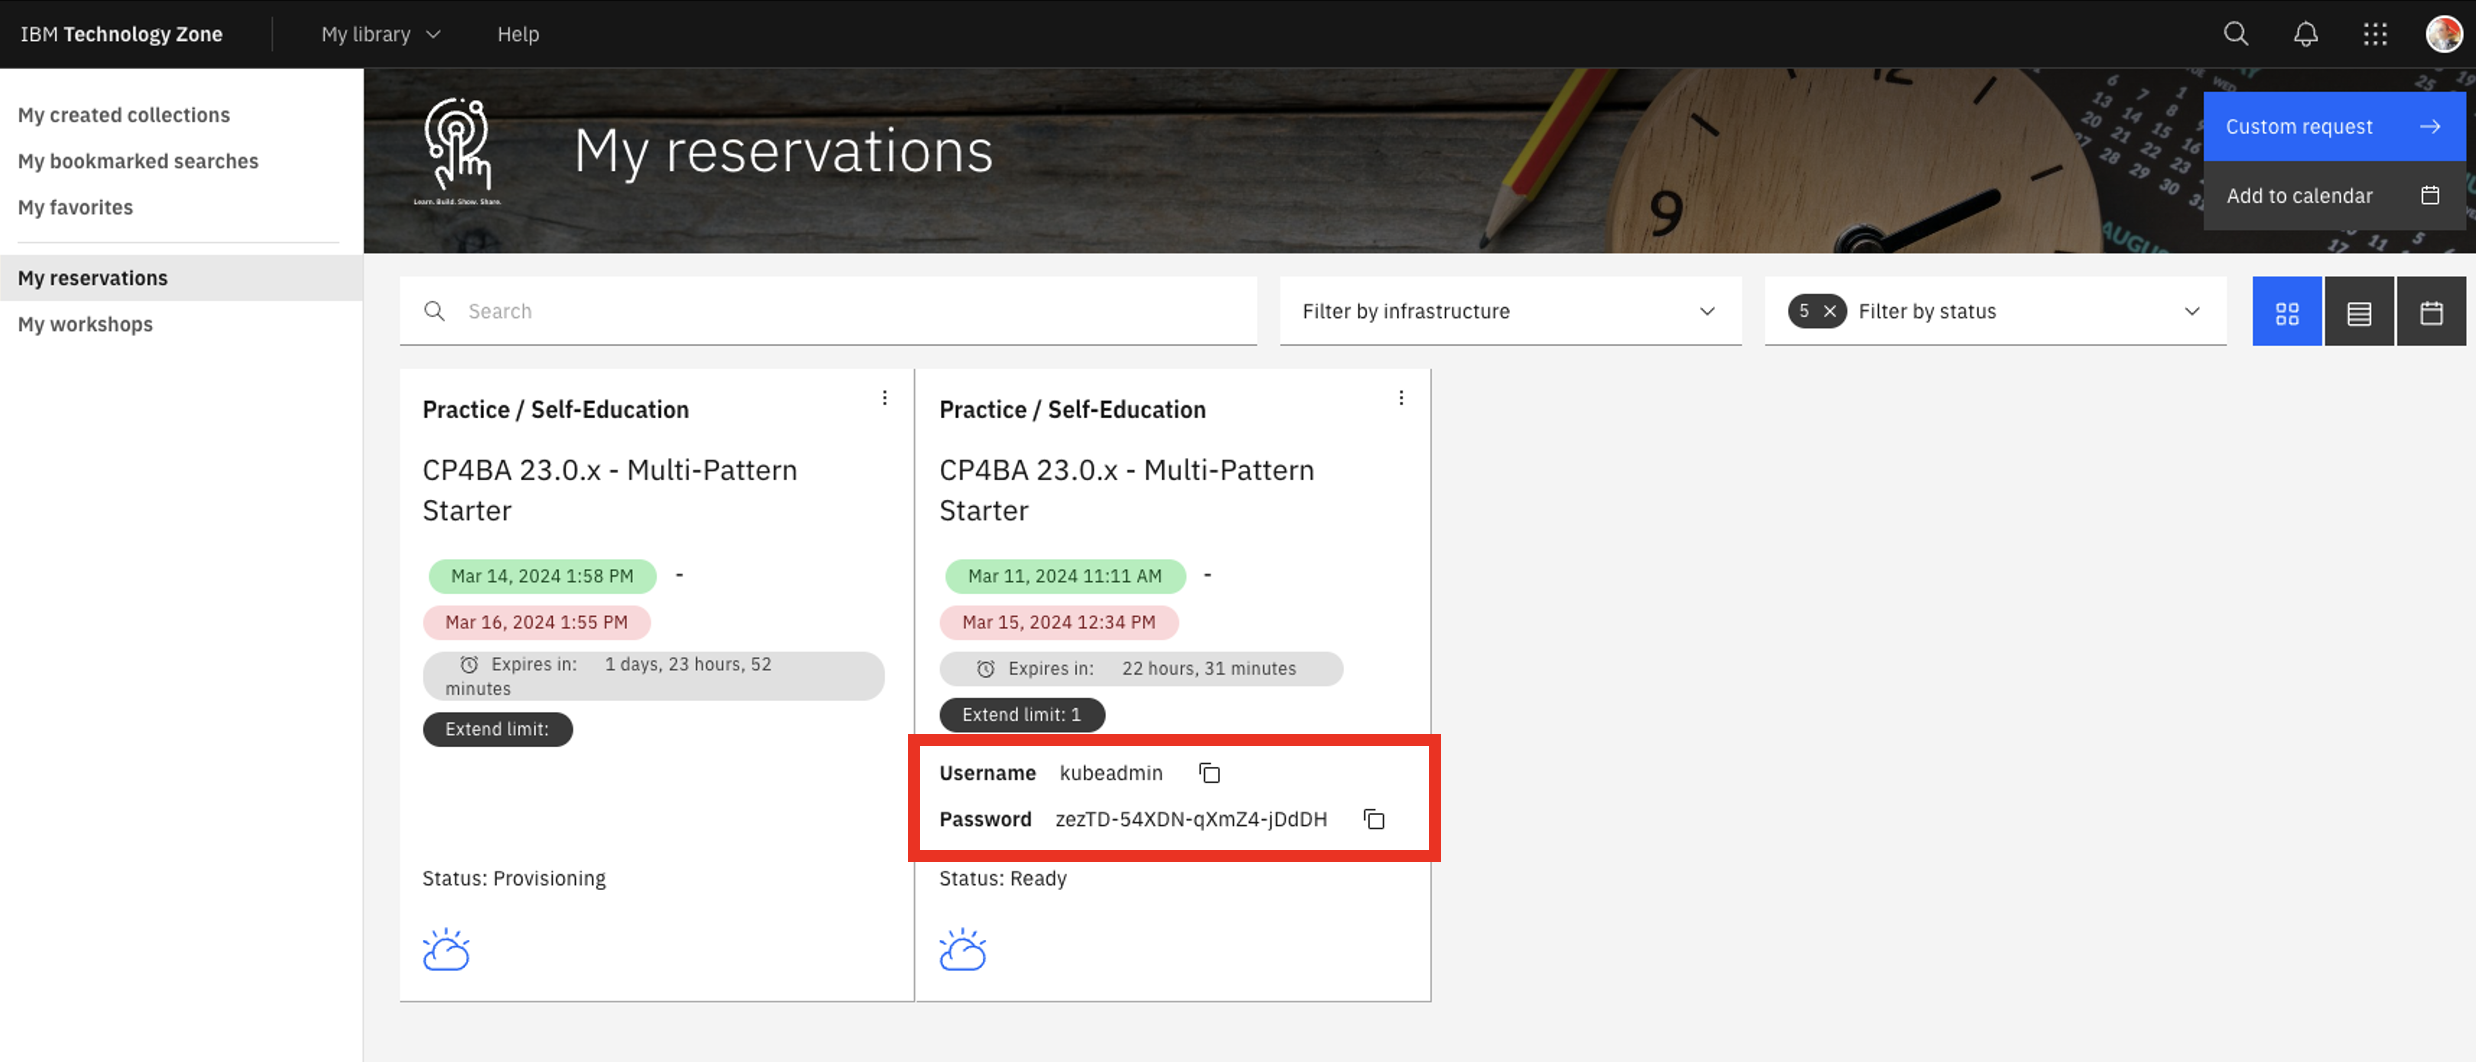
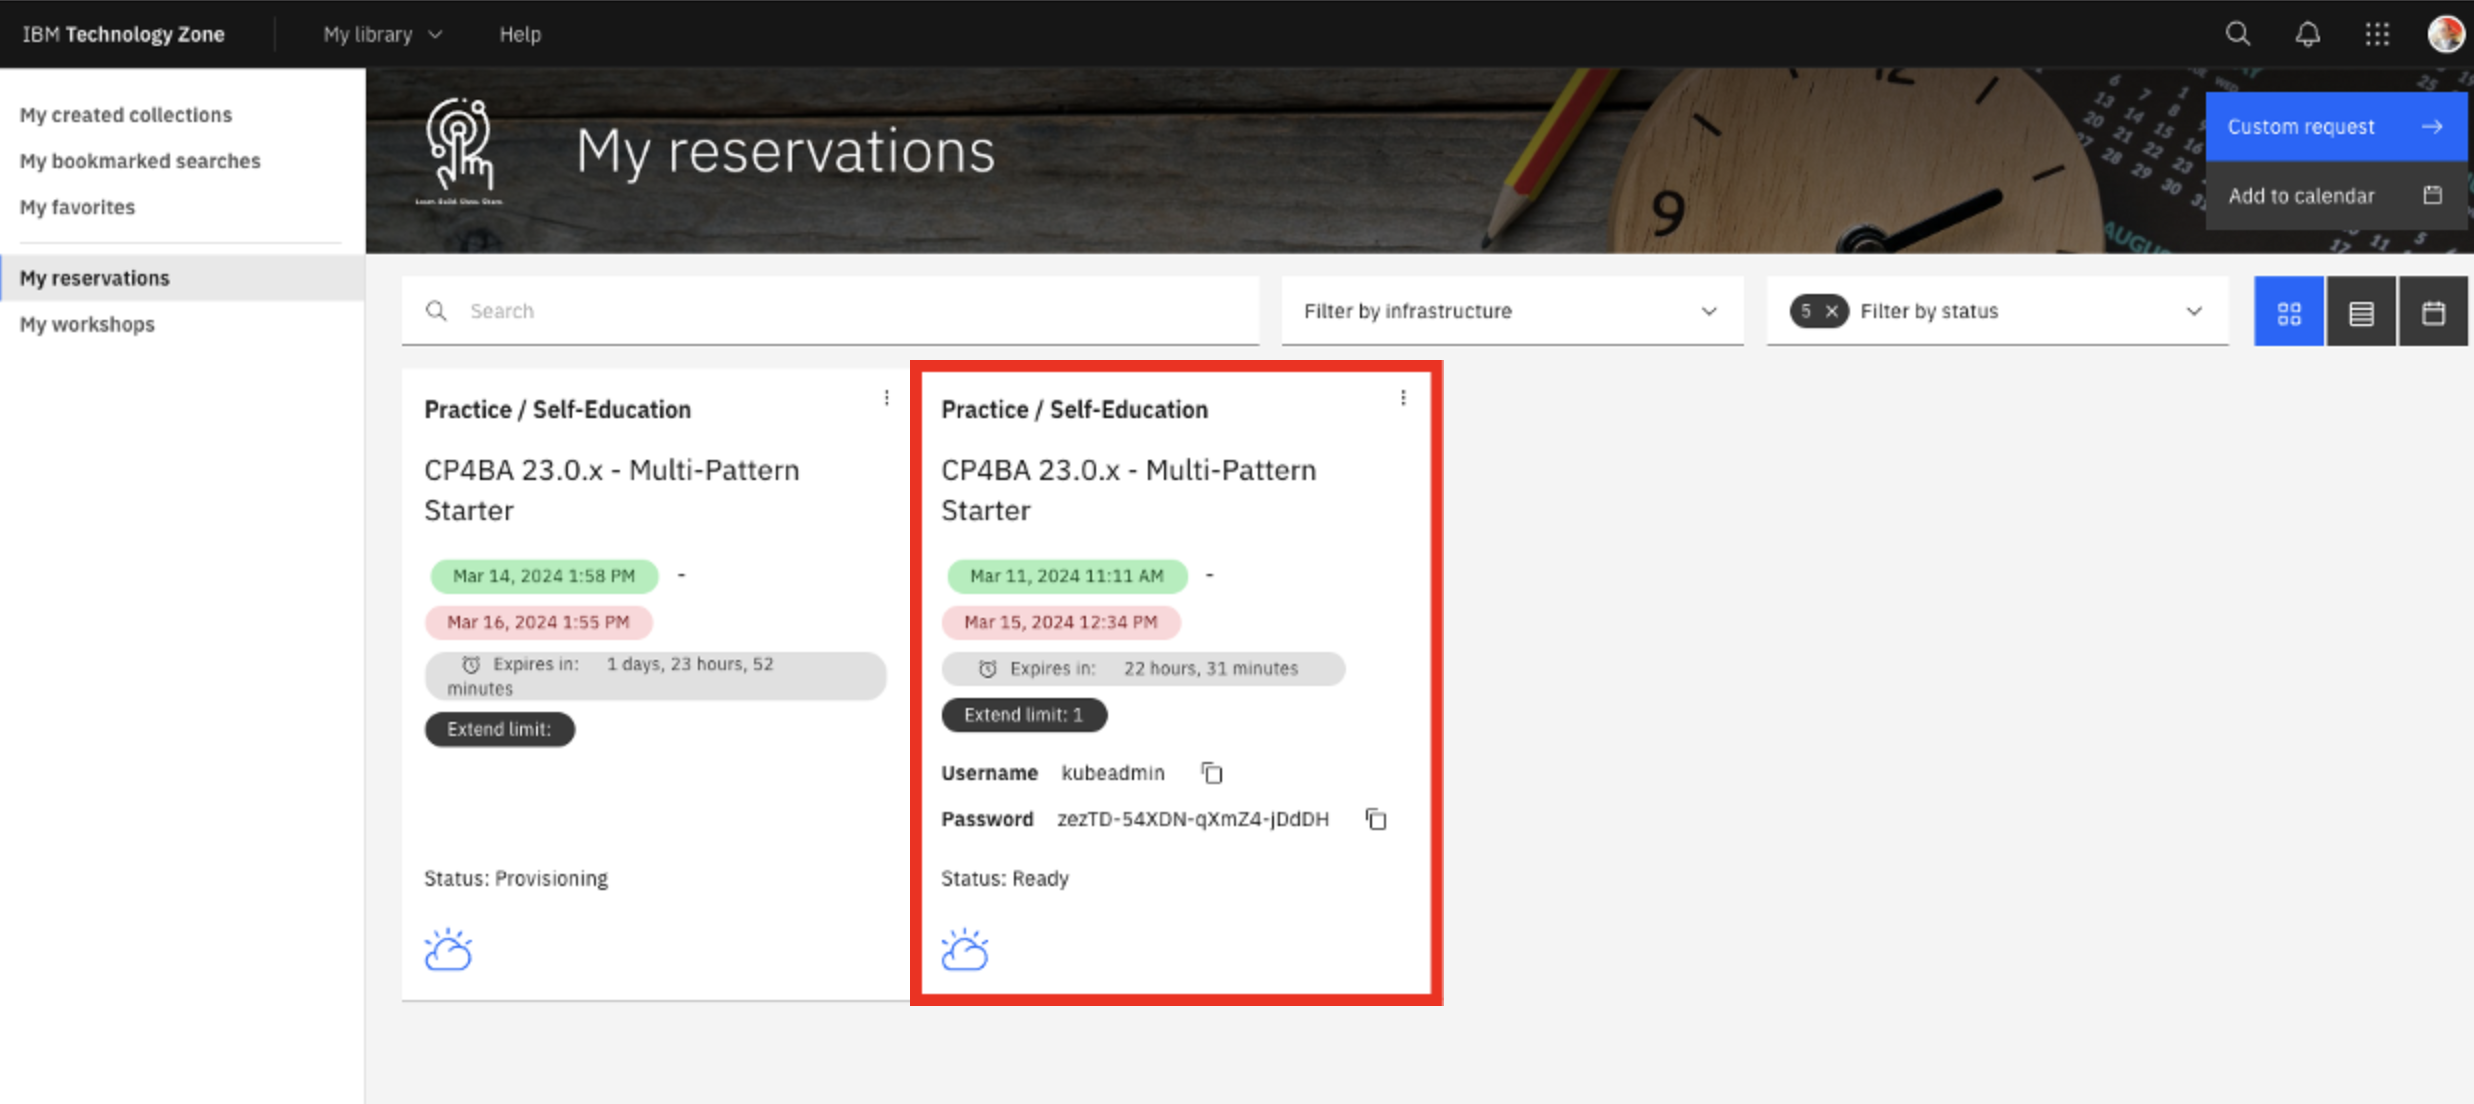
-
Copy paste your Kubeadmin / Passwords in your notebook
-
Click your reservation tile.
-
Click the Open your IBM Cloud environment.
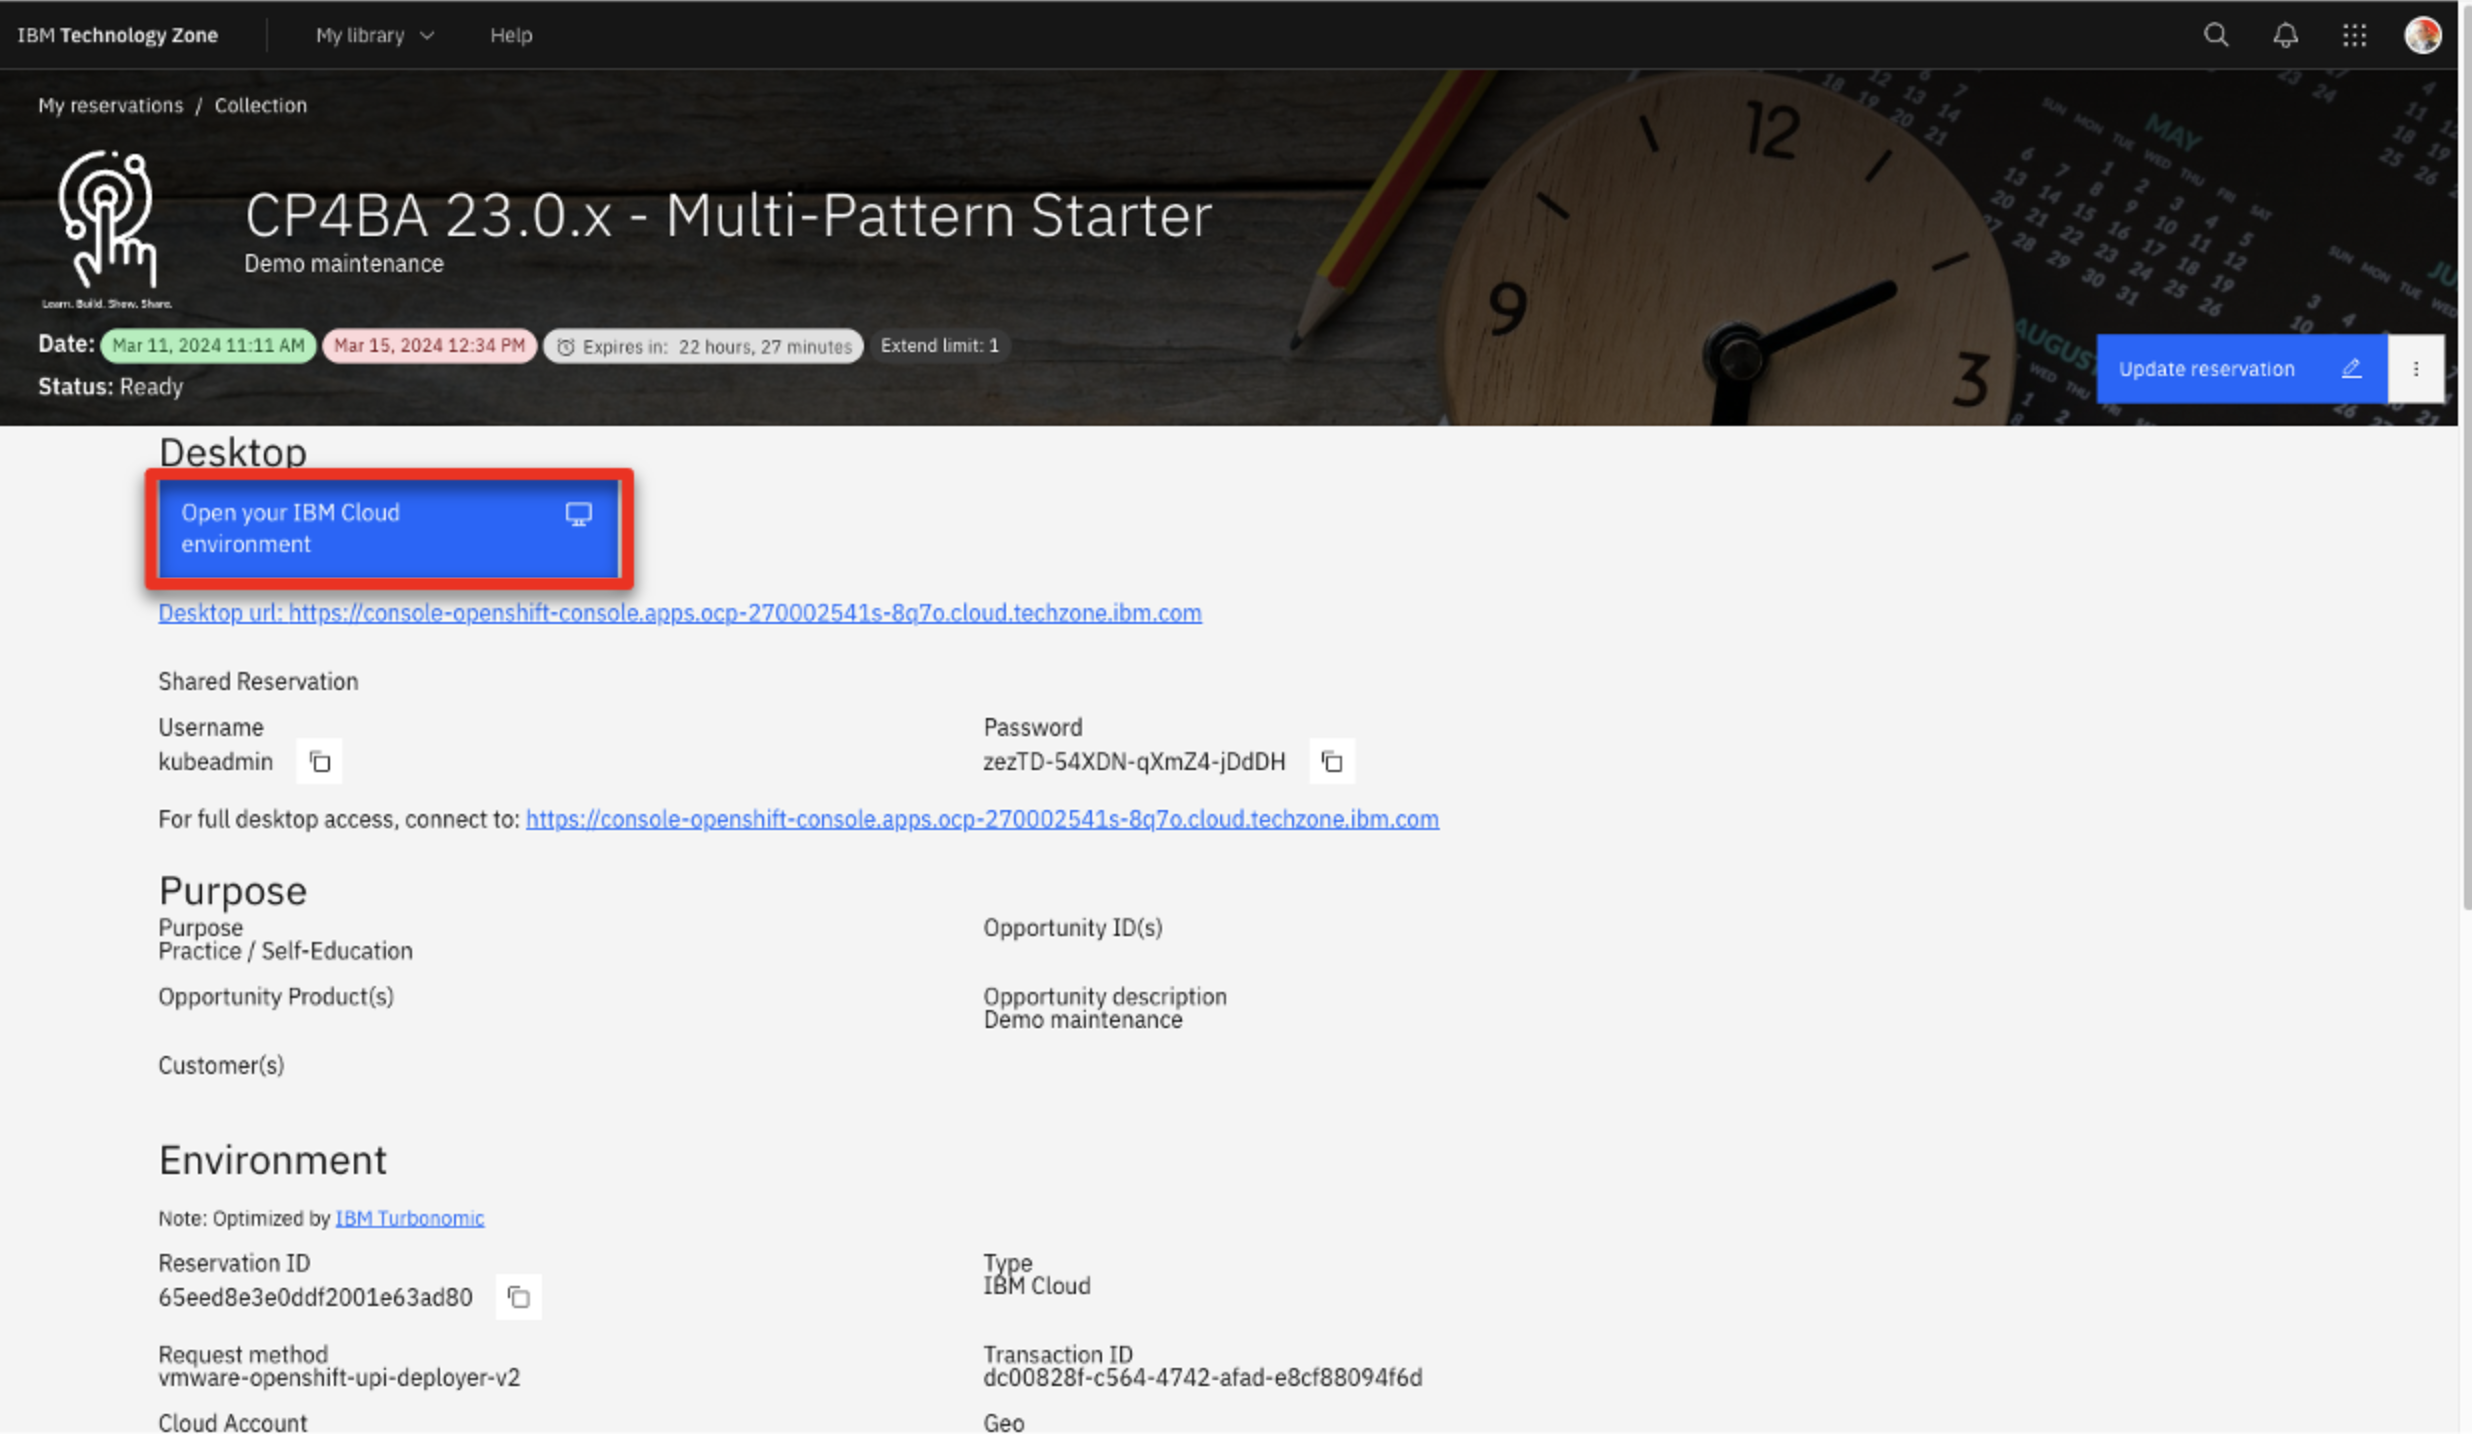
-
Log in to your OpenShift console using the credentials provided during section 1 above.
-
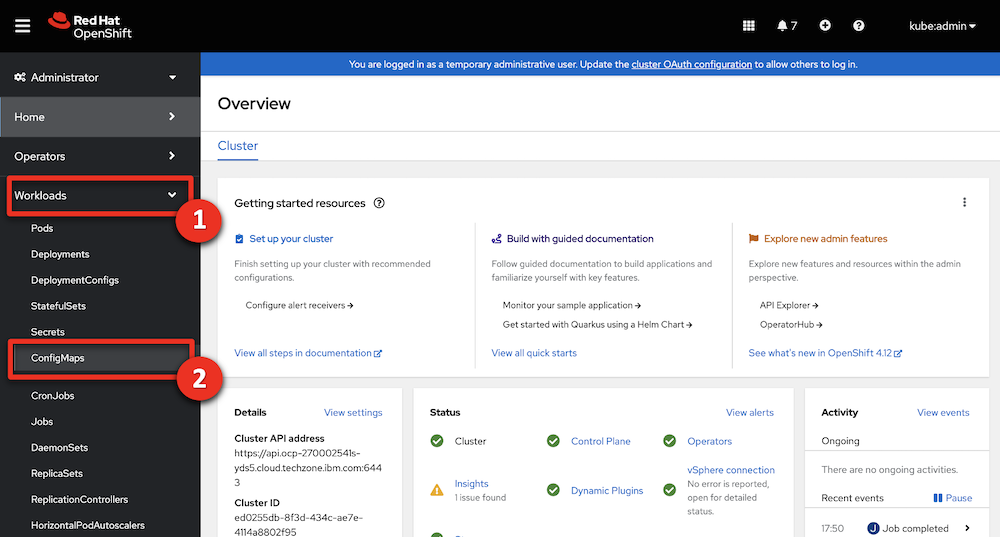
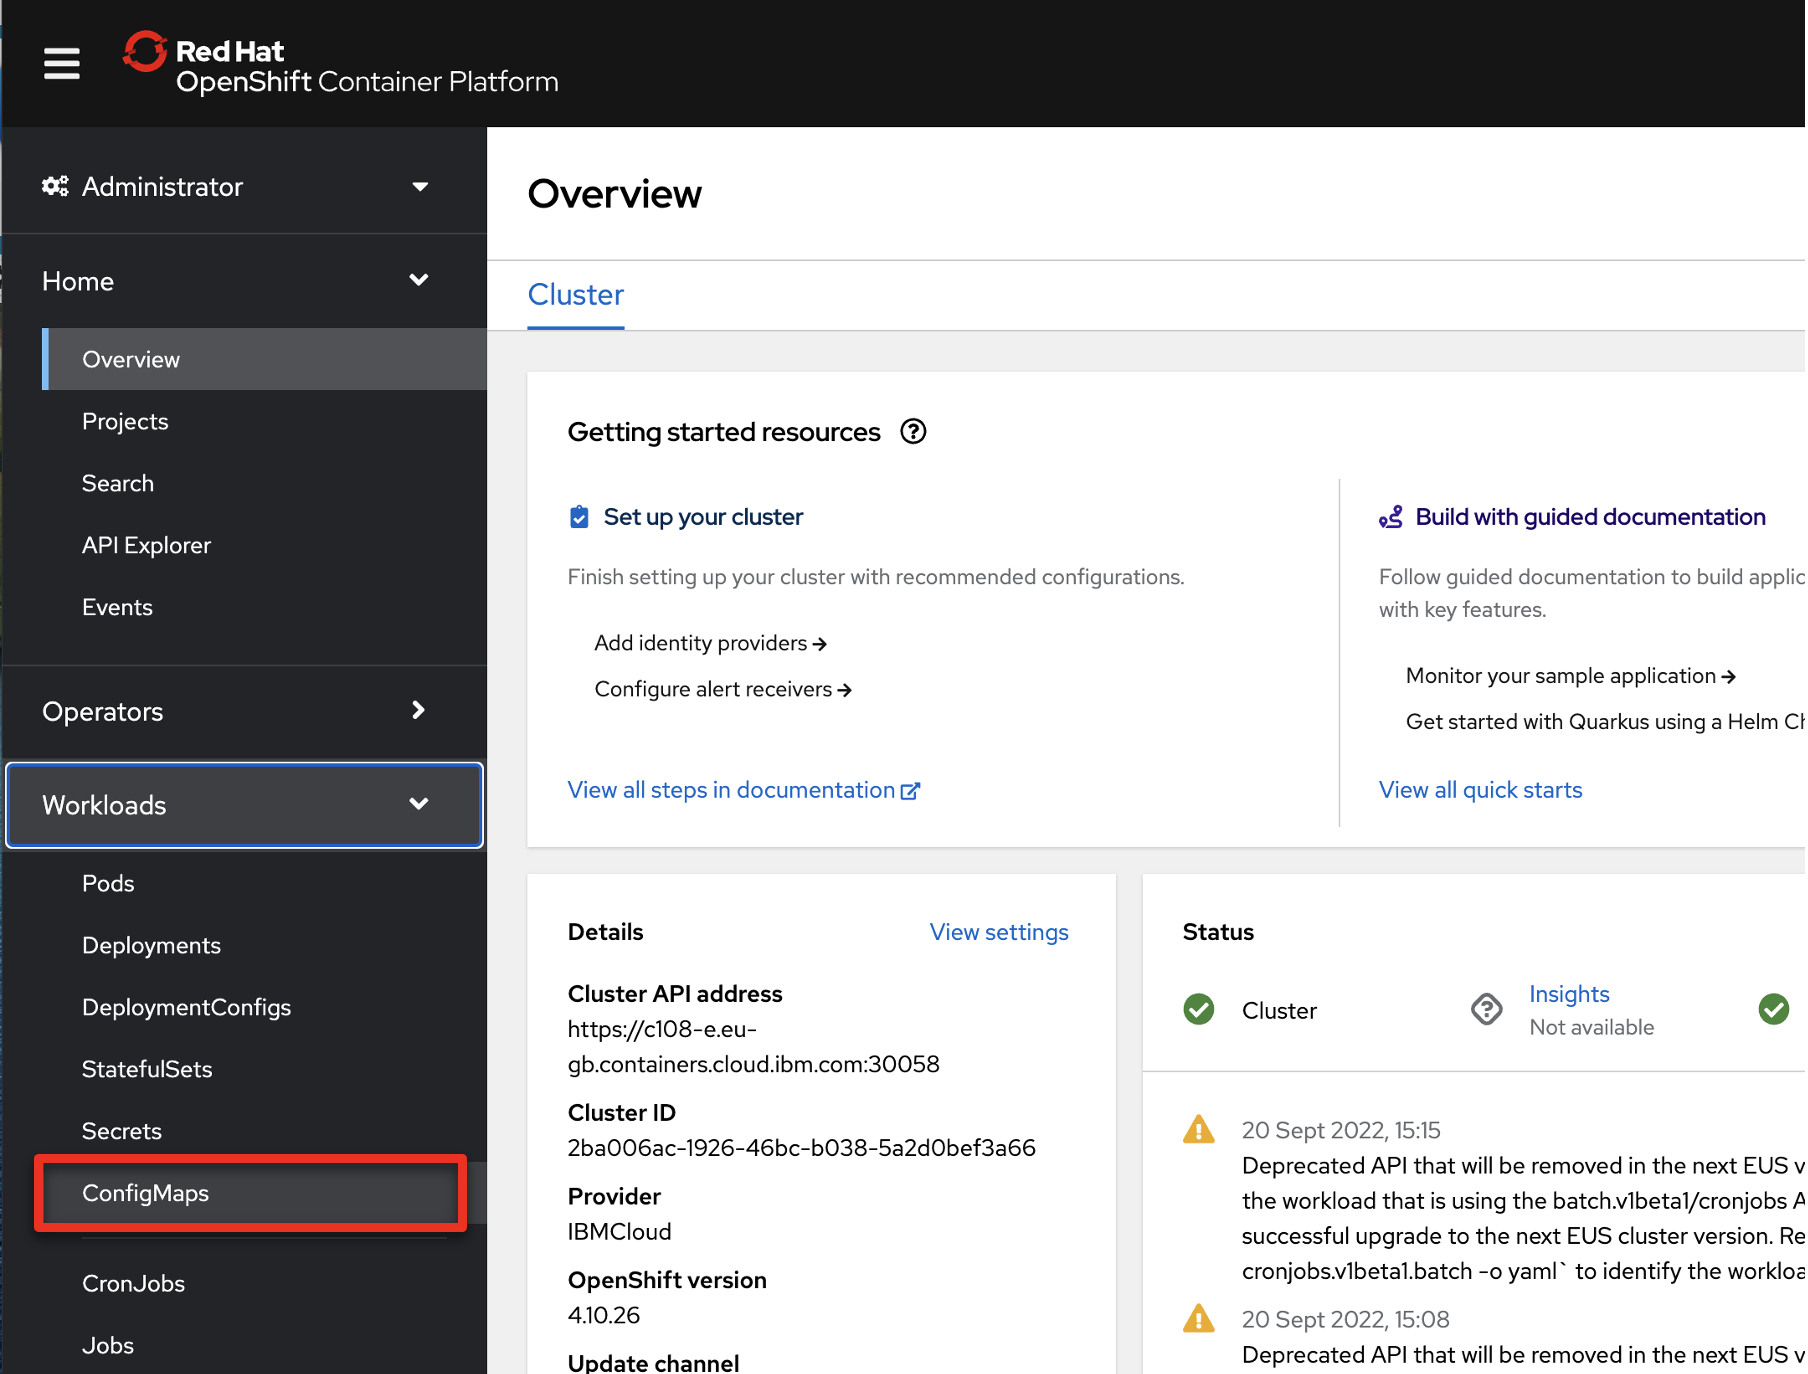
Expand the Workloads (1) and click ConfigMaps (2).
-
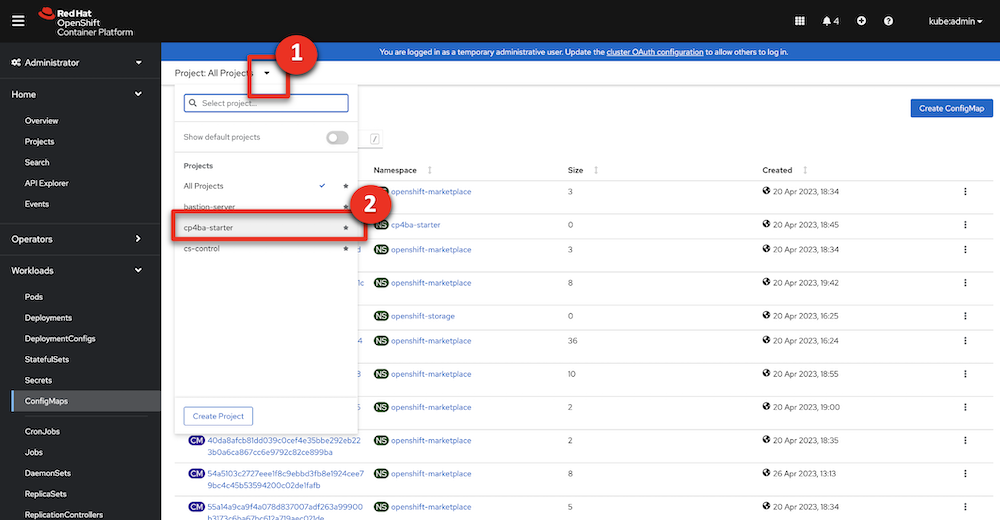
Expand the projects menu (1) and click cp4ba-starter (2).

-
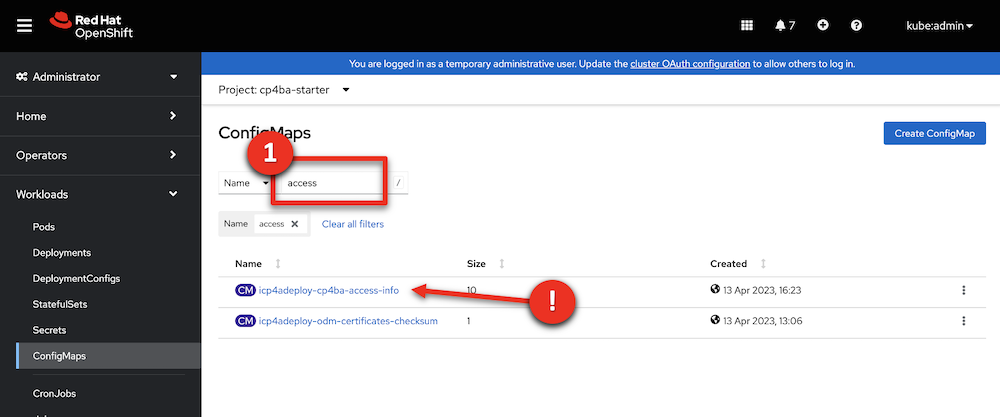
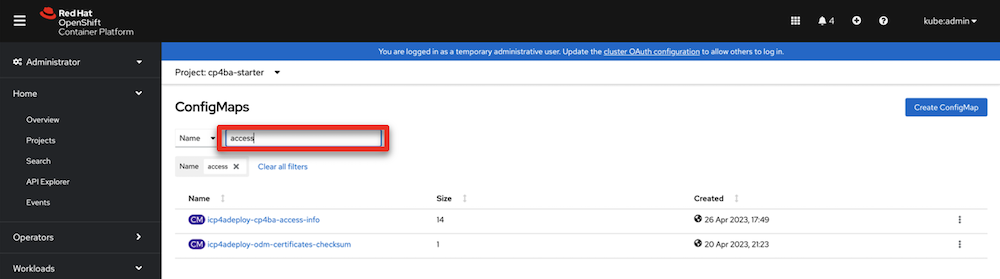
Type ‘access’ (1). Check that the icp4adeploy-cp4ba-access-info config map is present.
-
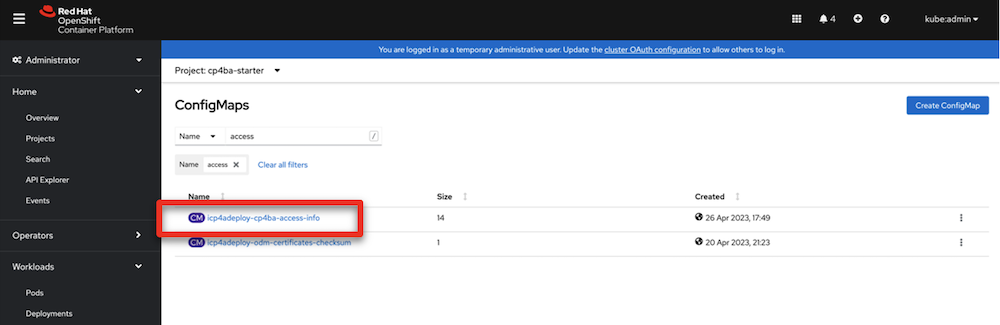
Click icp4adeploy-cp4ba-access-info.

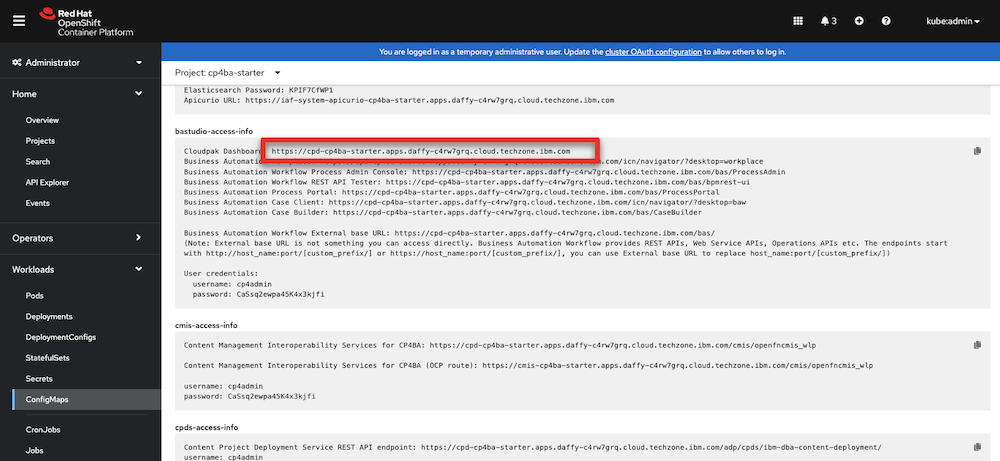
-
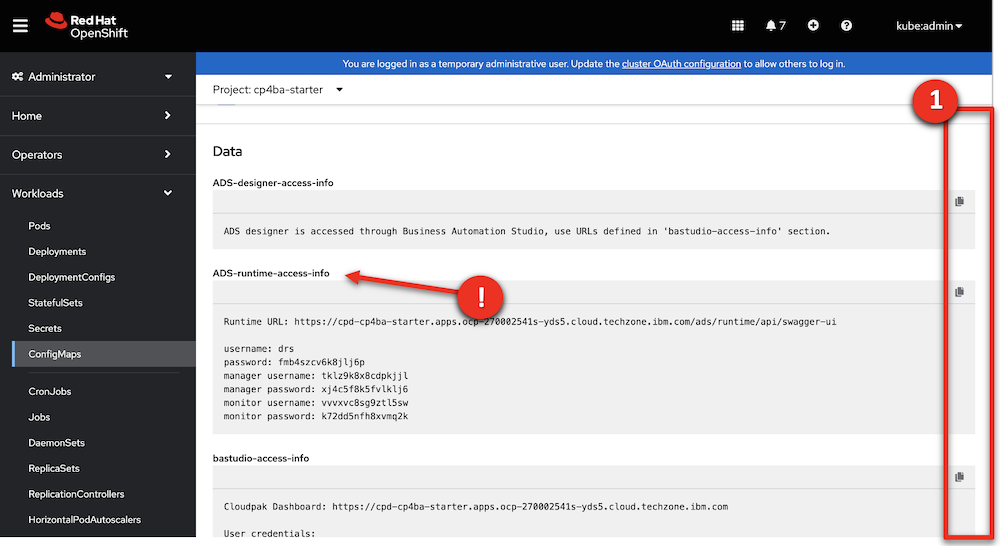
Scroll down (1) and check that all the ADS access information is displayed. ADS is the last element to install, so your CP4BA setup is completed once this info displays.
-
Copy the CP4admin username and password used to log in to the various CP4BA components into a note to access later.
-
Copy the URL needed to access the various products required in this demonstration into a note to access later.
3 - Bookmark URLs and logins
This demo shows how IBM Content Navigator manages content. A web-based console provides end-users the capability to securely access and work content assets, individually or with a team.
In this section, you will collect the links to access the required capabilities and use them to make a cheat sheet to use throughout the demo.
This is a sample completed cheat sheet: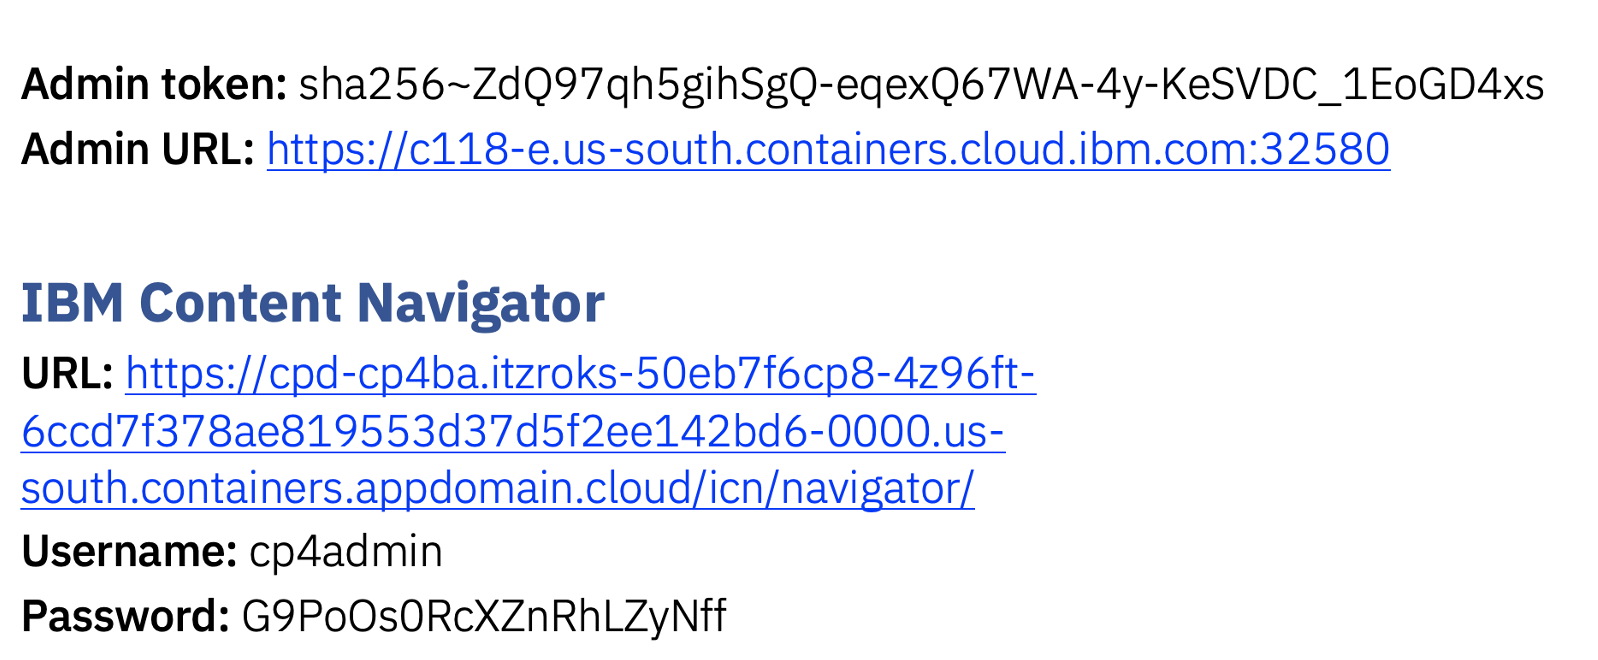
Let’s collect the URLs and passwords for the demo cheat sheet.
-
Log in your Openshift console using the credentials provided in section 1 above.
-
Expand your user menu (1) and click Copy login command (2).
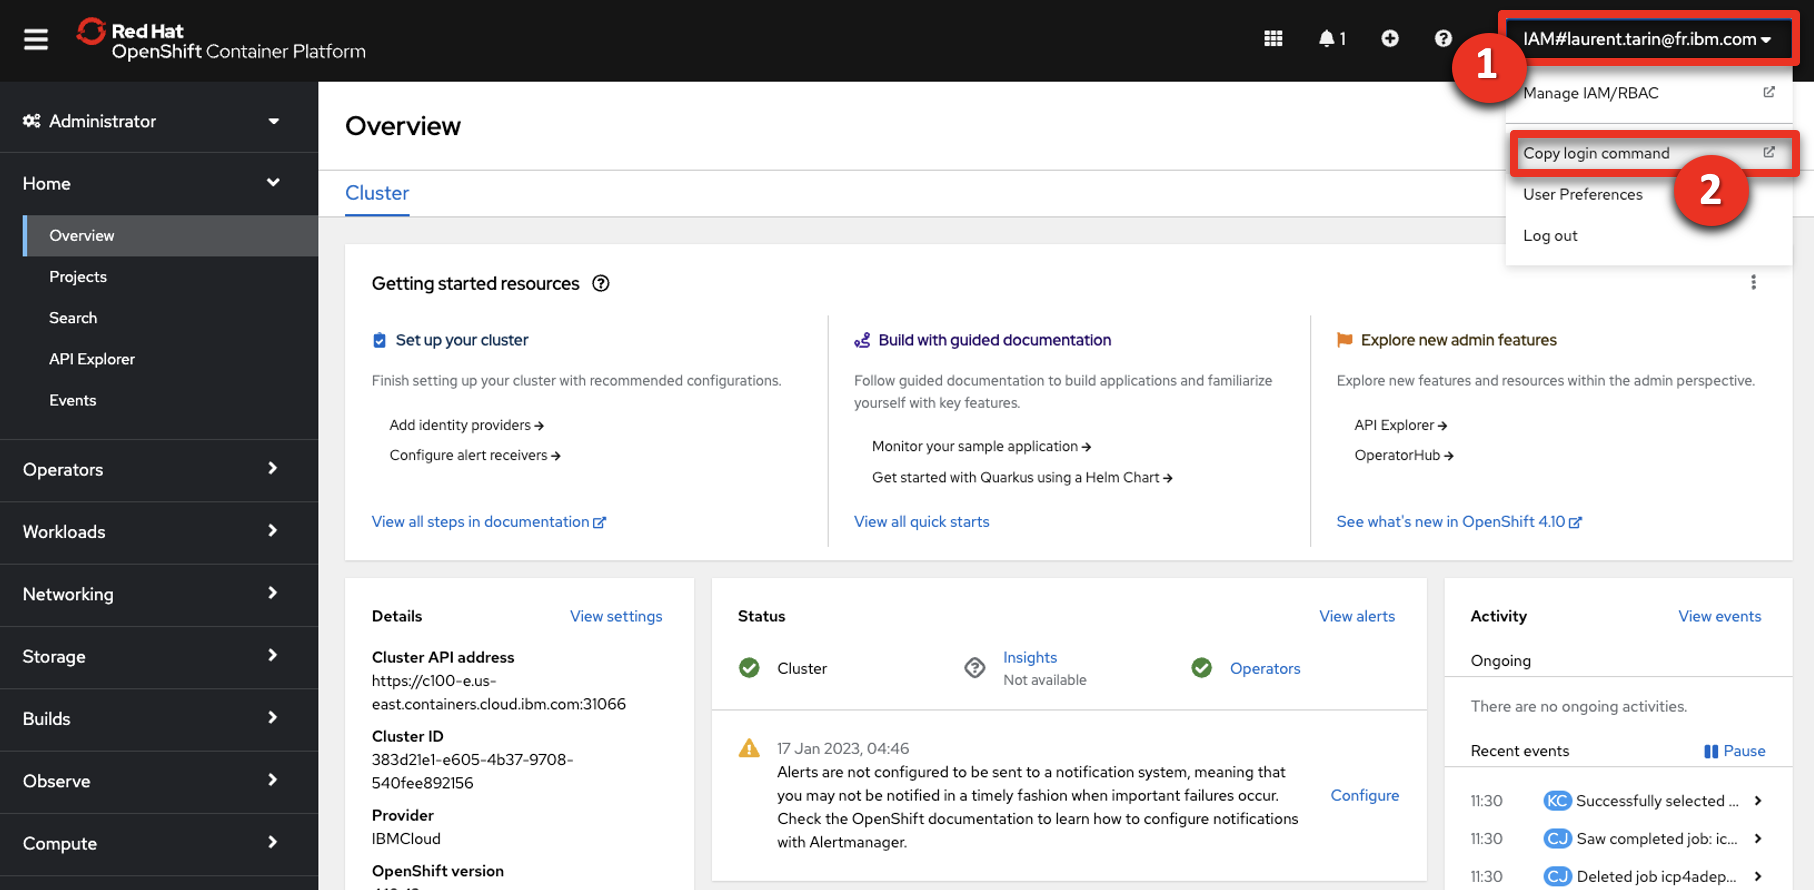
-
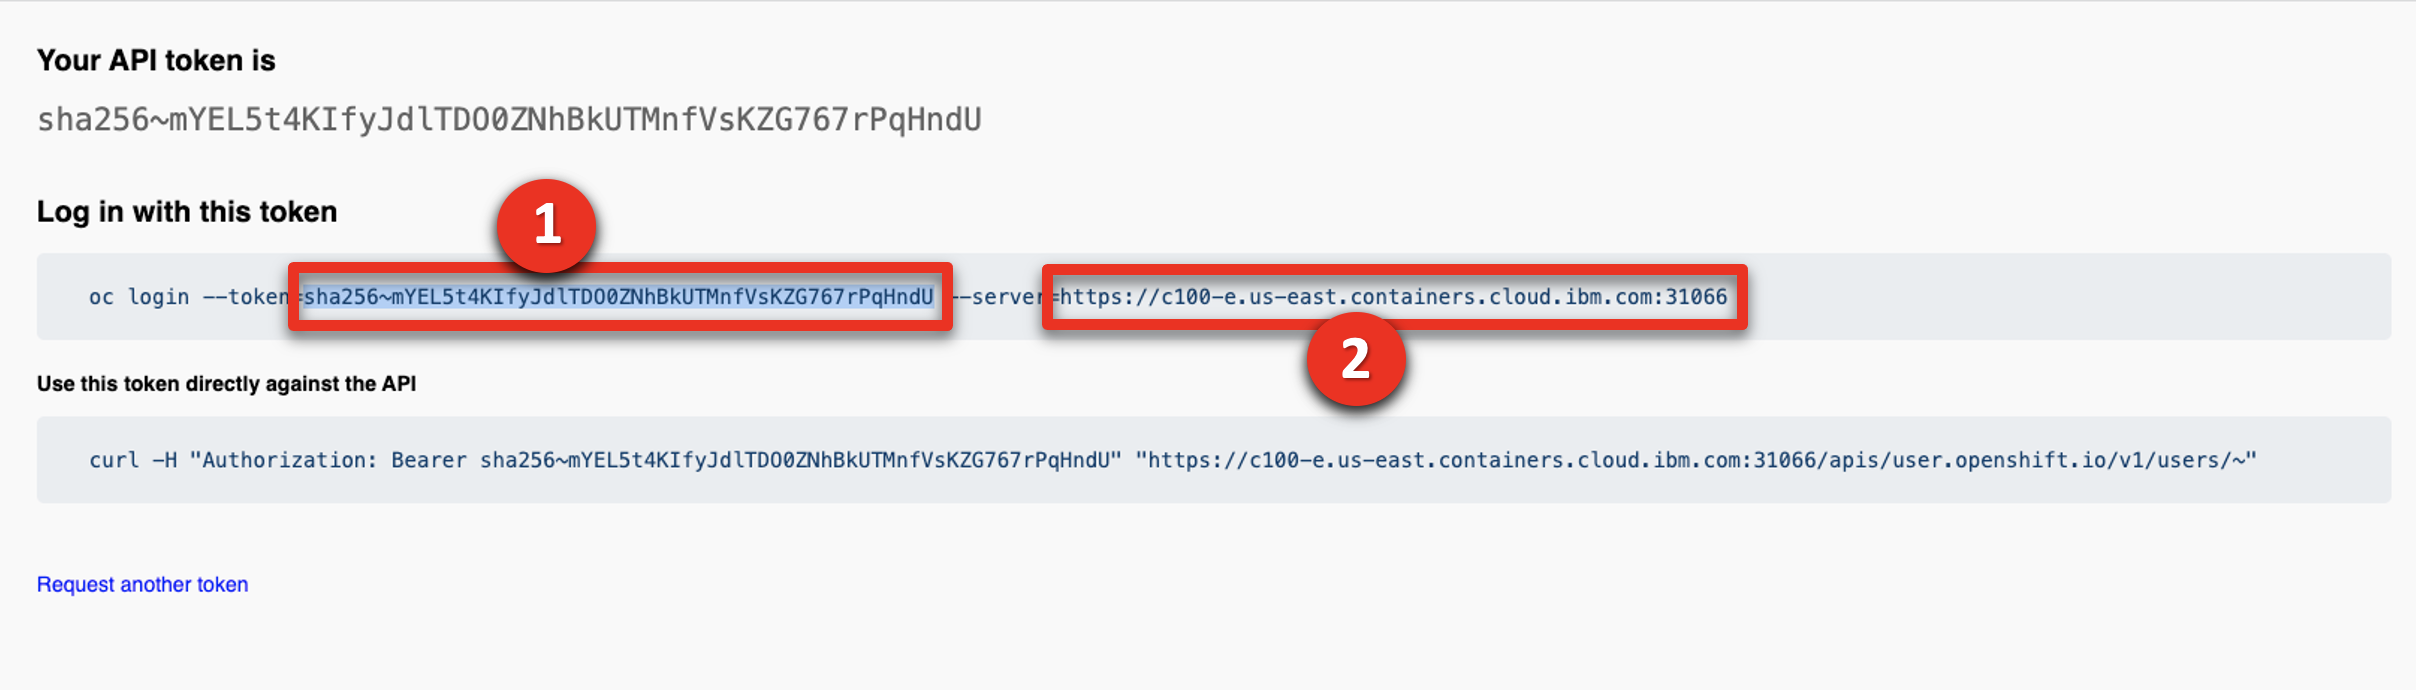
Click Display Token.

-
Copy the Admin token (1) and the Admin URL (2) to your cheat sheet.
-
Close the tab in your browser to return to the ROKS admin page.
Let’s get the URL, username, and password to access IBM Content Navigator. -
Click ConfigMaps.
-
Expand the Project menu (1) and select cp4ba-starter (2).
-
Type ‘access’ in the search field (the results will automatically filter).
-
Click the icpdeploy-cp4ba-access-info ConfigMap.
-
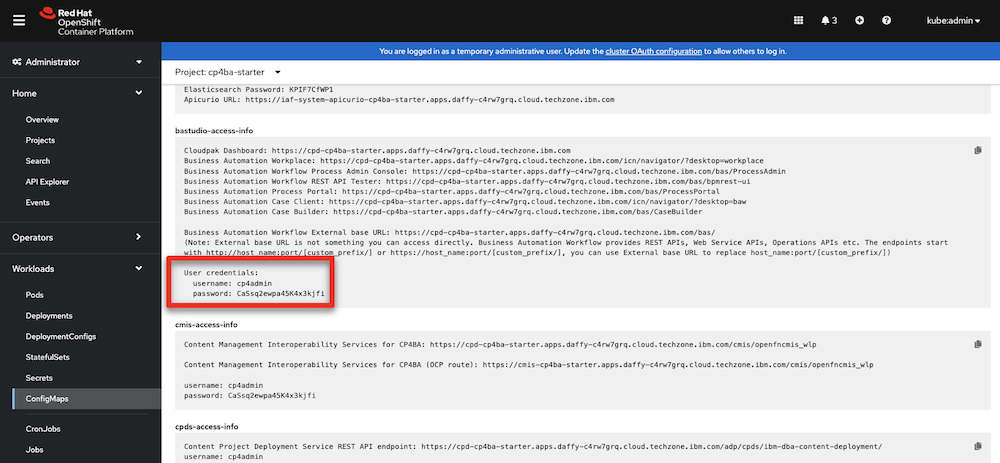
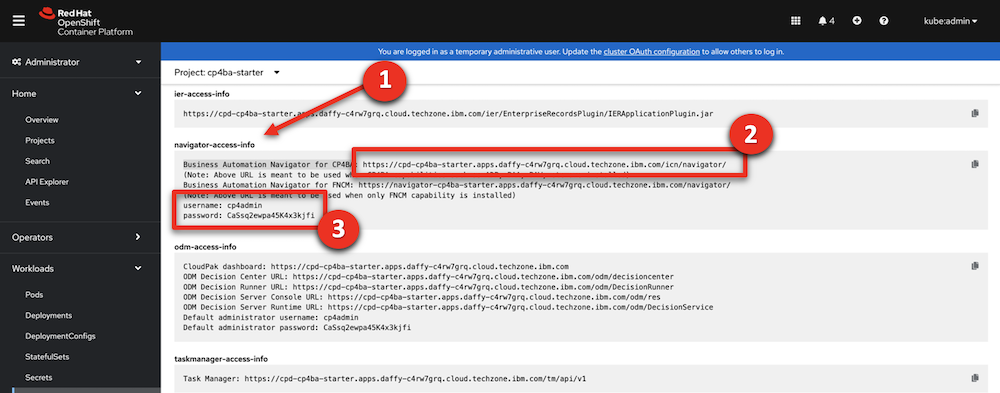
Scroll to the navigator-access-info (1) section. Copy the Business Automation Navigator for CP4BA URL (2) to your cheat sheet as the IBM Content Navigator URL. Copy username: cp4admin and the password (3) to your cheat sheet as well.
4 - Execute setup script
A script will configure IBM FileNet Content Manager (FNCM), IBM Cloud Pak for Business Automation (CP4BA) and parts of the IBM Content Navigator for the demo. Steps 4-7 explain the remaining manual configurations.
This automated configuration script uses the FNCM and CP4BA public APIs to:
- Create the three personas used in this scenario: Henry (the HR Manager), Debby (the hiring Manager), and Patrick (the payroll Manager).
- Create the document data model in FNCM.
- Configure the built-in workflows used to validate documents.
- Create and dedicated desktop in IBM Content Navigator.
- Configure role-based redactions.
- Create a document entry template.
-
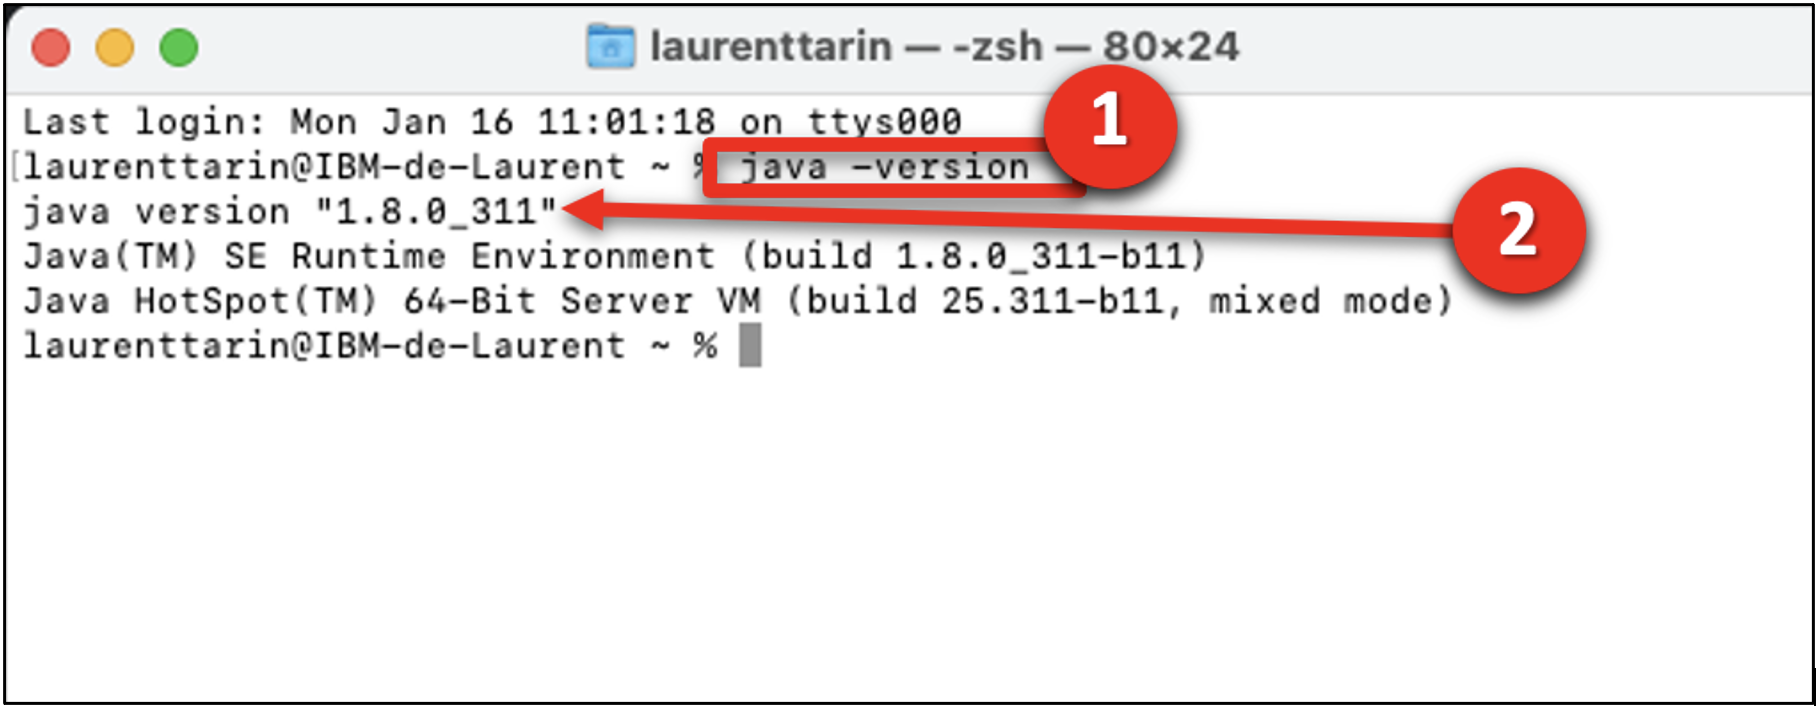
Ensure you have Java 8 or later installed on your computer. Find your Java version by opening a Terminal window, typing the command “java -version” (1), and hitting enter. The version displays (2).
If you do not have Java, download it from these locations:
• IBMers with MacOS, use the Mac@IBM store.
• IBMers with PCs, use the PC@IBM store.
• Business Partners, use the Java downloads site (or as directed by your internal IT department). -
Download and unzip the demo installer archive
on a local folder of your computer. -
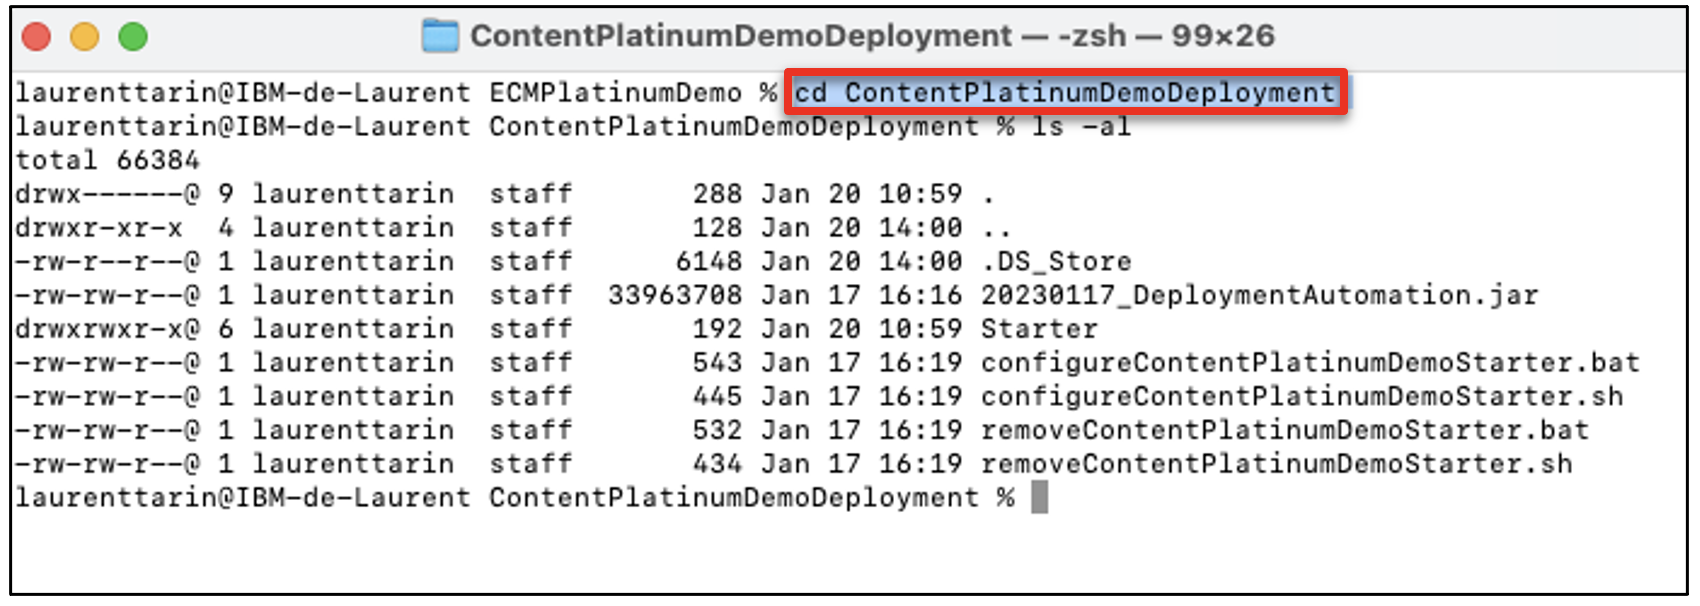
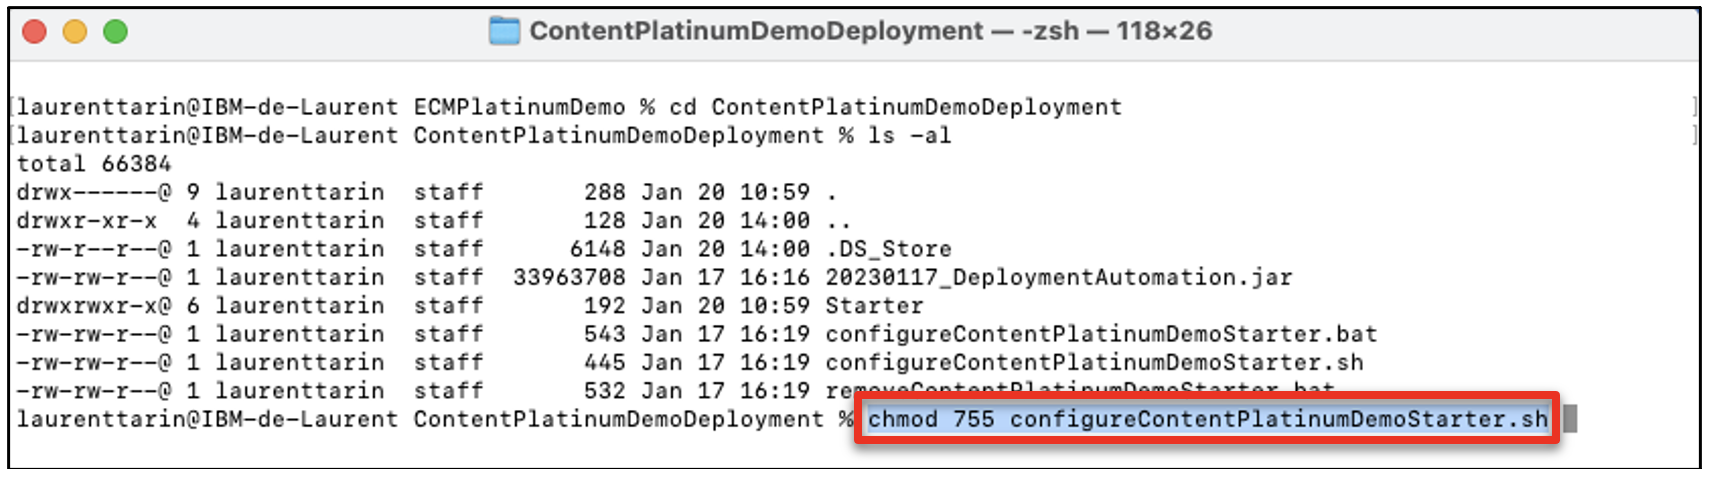
Use a Terminal Shell window to navigate to the folder where the archive was unzipped:

-
Type ‘cd ContentPlatinumDemoDeployment’ and hit enter to access the folder folder.
-
From your file browser, edit the ‘configurePlatinumDemoStarter.sh’ (.sh on Mac and .bat on Windows) file using the text editor of your choice.
-
Replace the ‘<ocpAdminURL>’ tag with the Admin URL from your cheat sheet (see step 2.3).
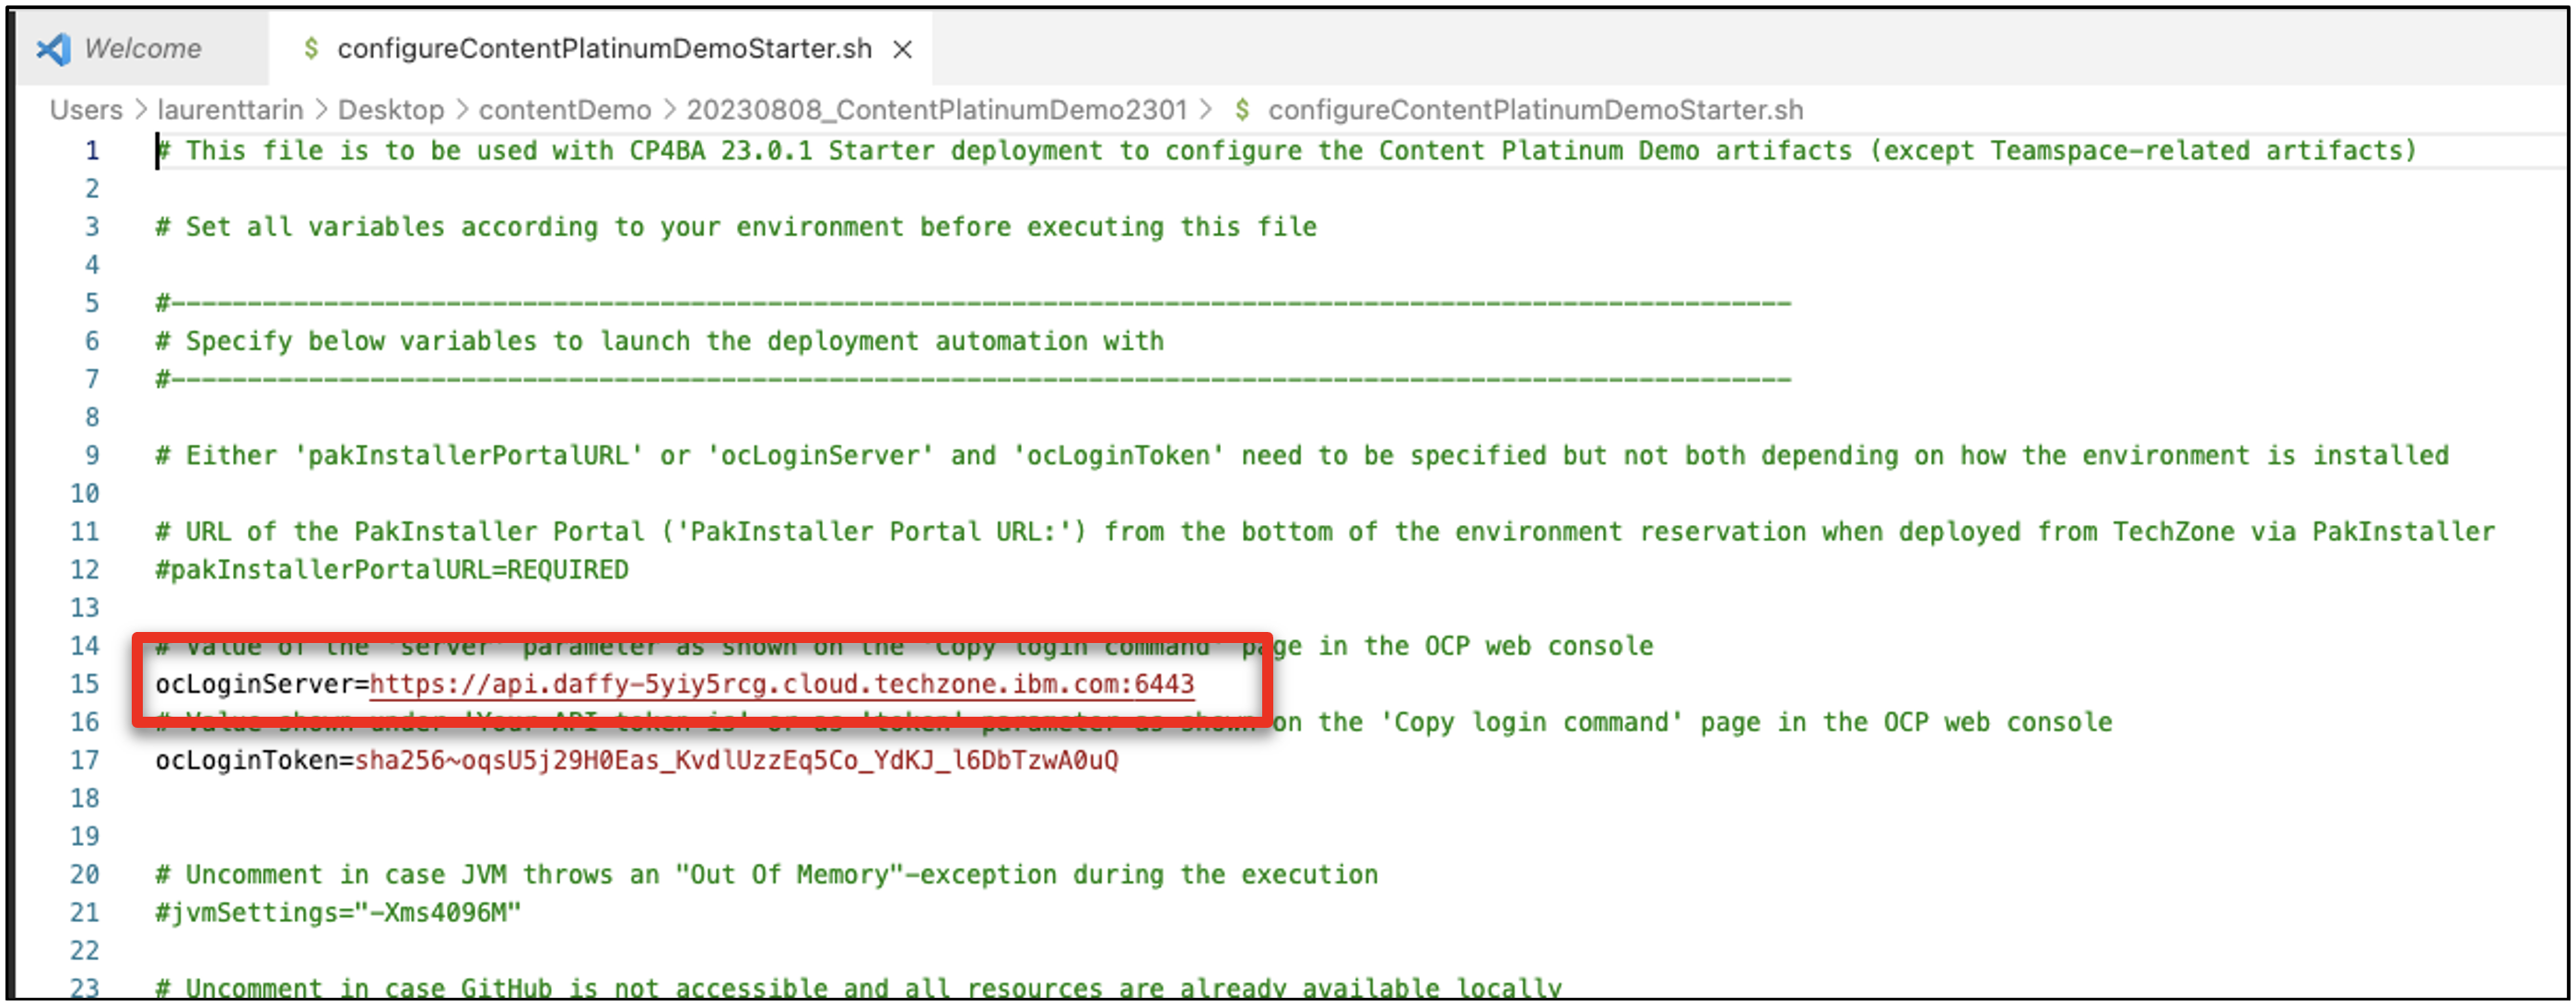
-
Replace the ‘<ocpAdminToken>’ tag with the Admin token from your cheat sheet (see step 2.3).
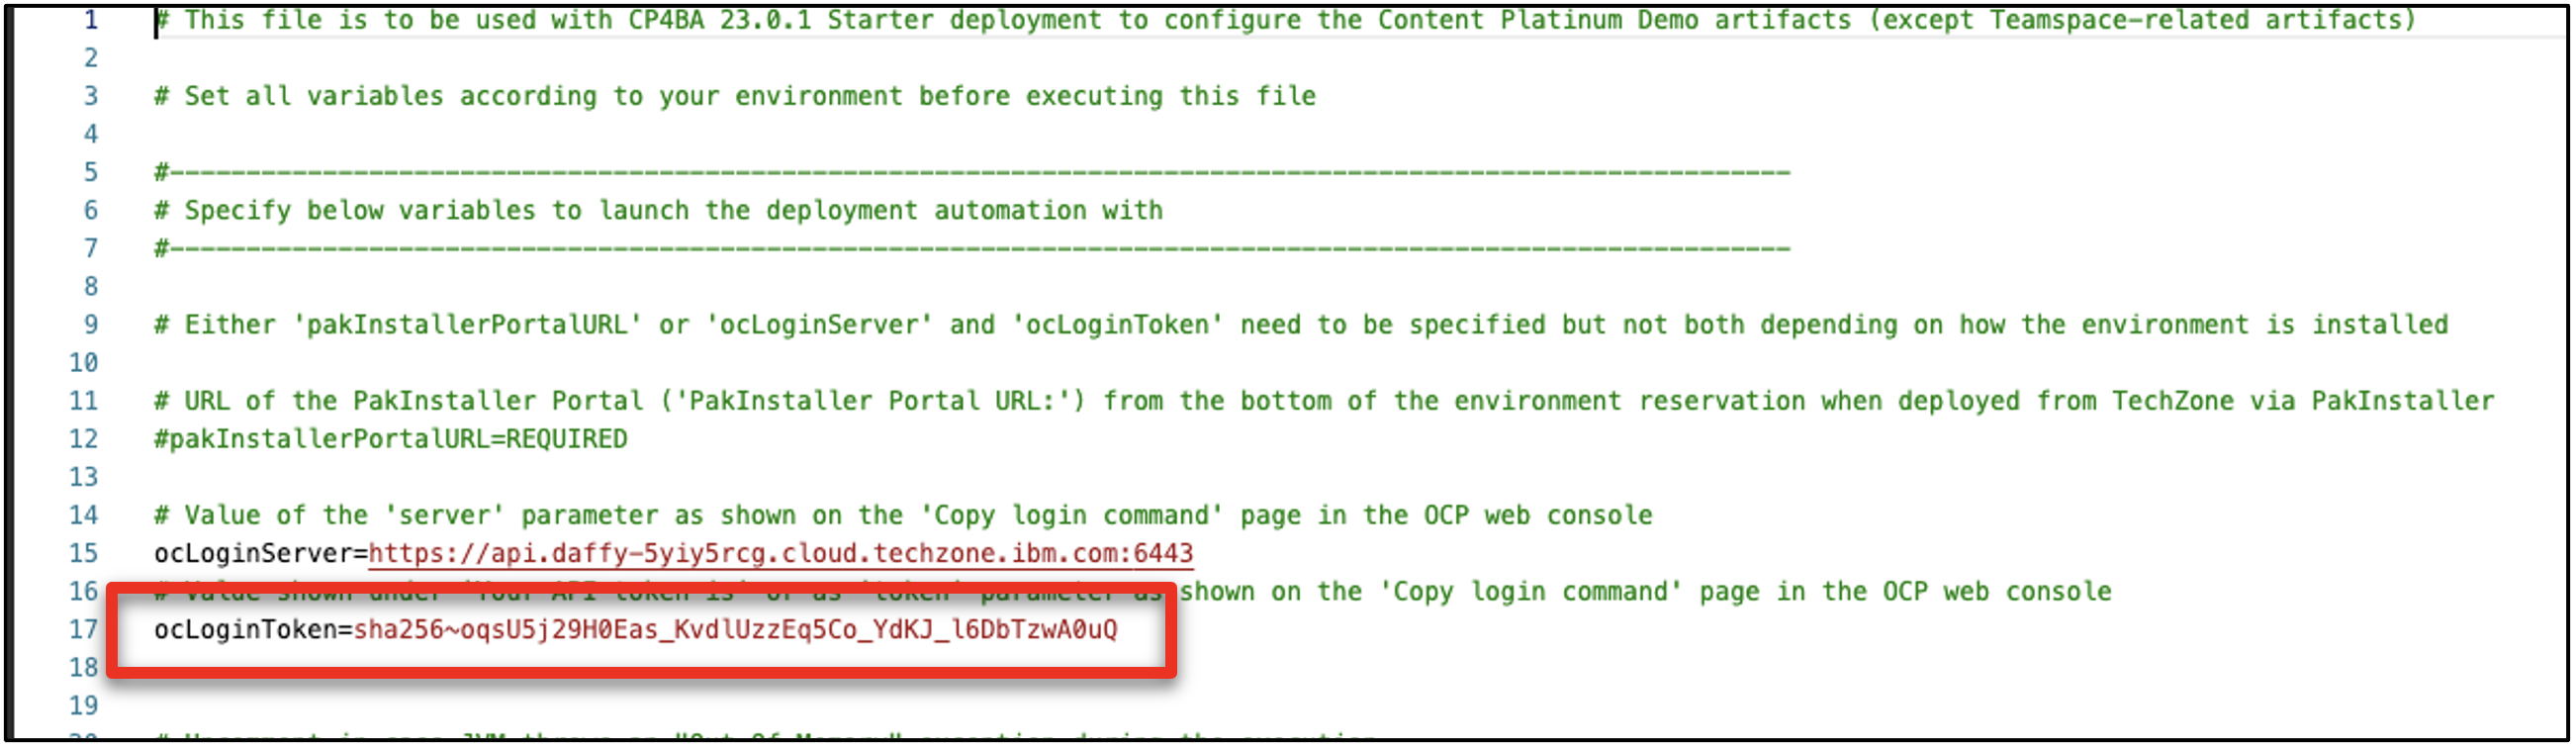
-
Save and close the file (ctrl + s).
-
On Mac: Make the file executable by typing ‘chmod 755 configureContentPlatinumDemoStarter.sh’ in the terminal window.
-
Type ‘./configureContentPlatinumDemoStarter.sh’ and hit enter to execute the script.
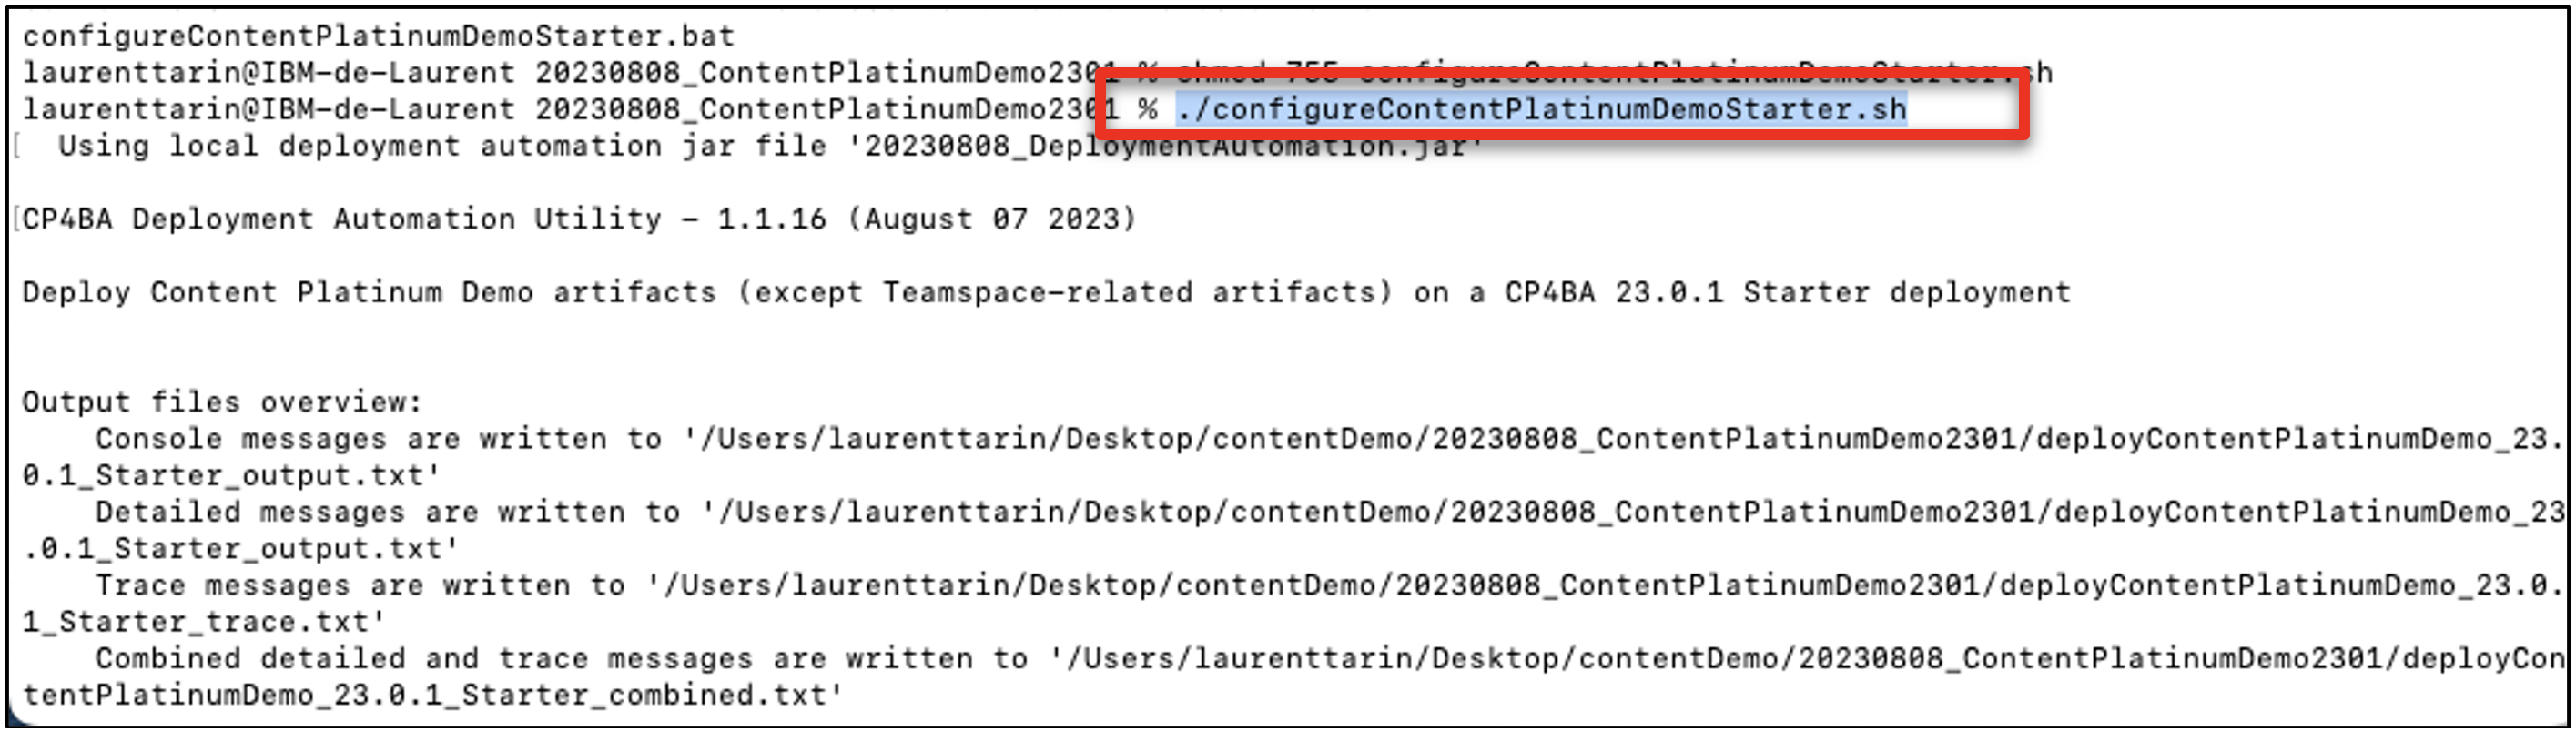
-
Wait for the execution to complete (1-3 minutes).
After the execution completes, your display should match:
5 - Prepare your document files
During the demo, documents related to the applicant John Doe will be added to the content management platform. These documents, called Candidate files, are documents sent by the applicant or pre-filled forms that reduce the demonstration duration.
- Download the Resource files.zip archive containing the documents.
- Unzip the archive.
- Open the folder containing the John Doe document repository.
6 - Create the Teamspace template
Let’s create a Teamspace template for the hiring team to use when collaborating on new applicants. Download the P8TeamspaceTemplates file.
-
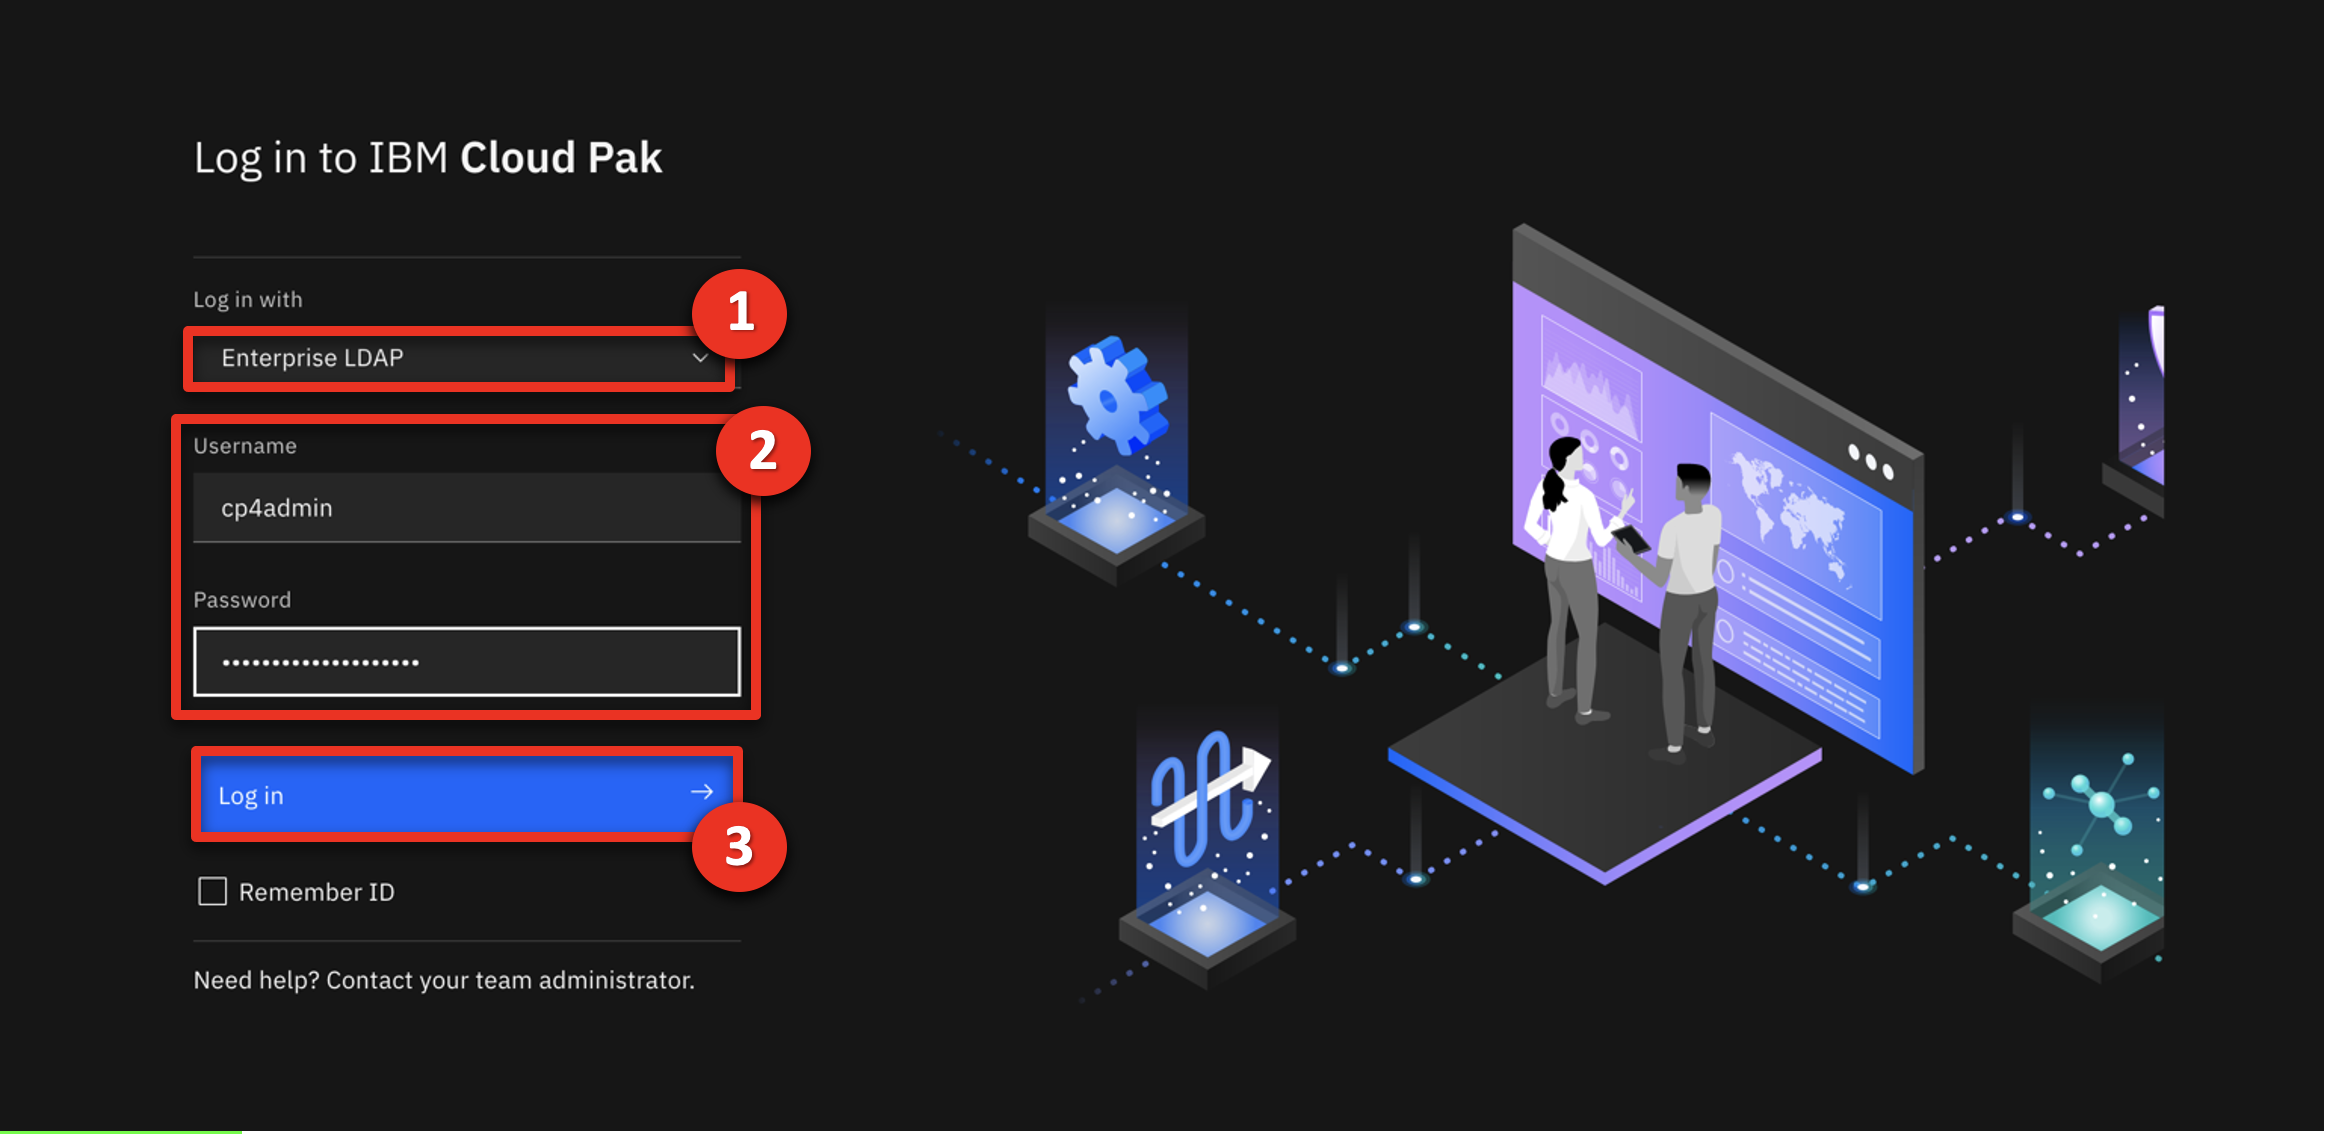
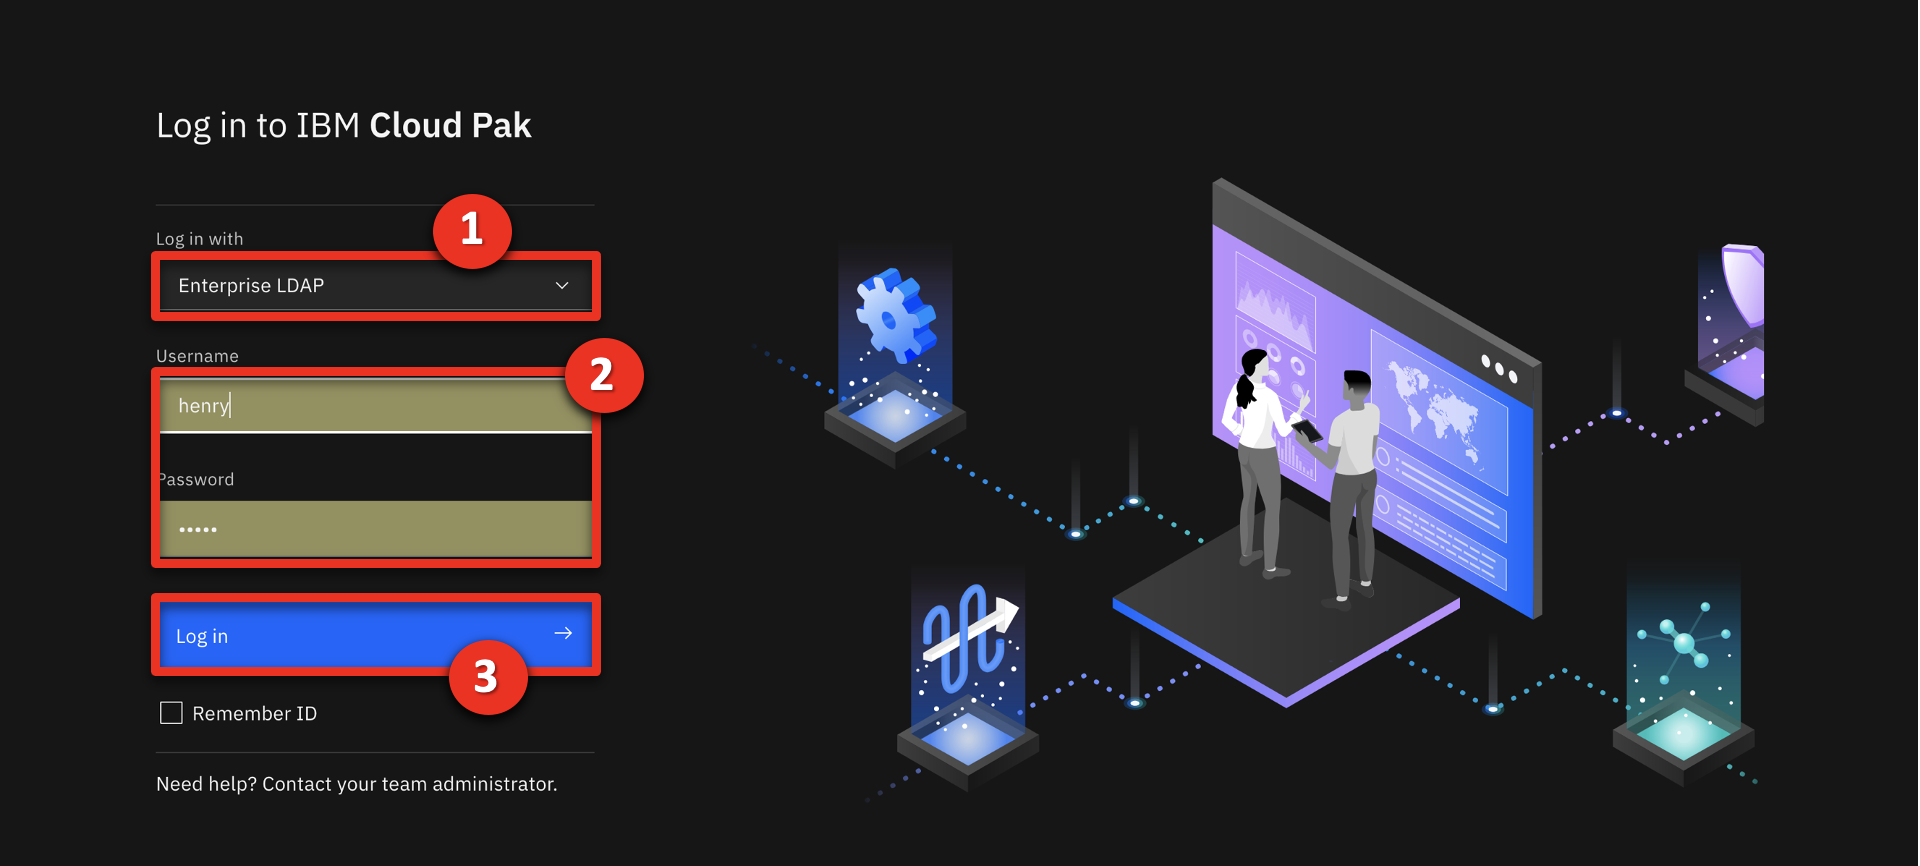
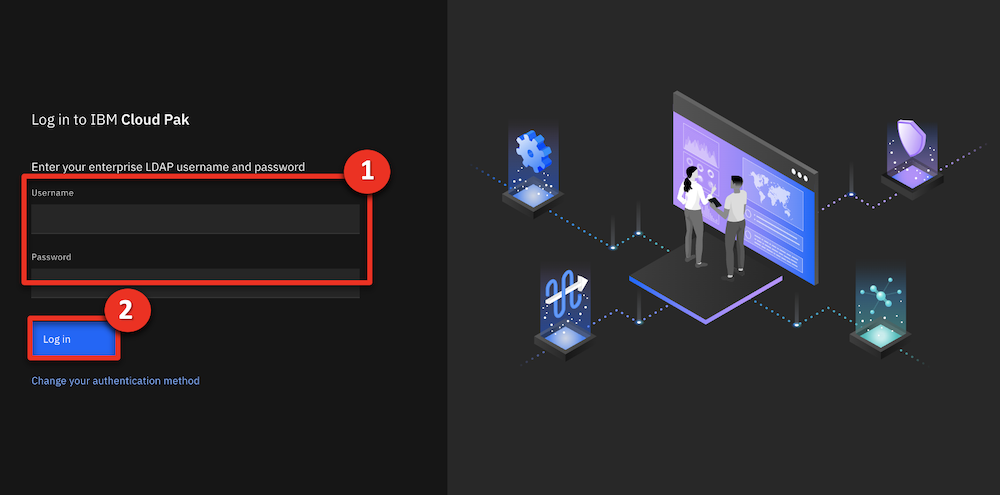
Open IBM Content Navigator using the URL from your cheat sheet. Select Enterprise LDAP in the Log in with drop down menu (1). Enter ‘cp4admin’ as the Username and the Password (2) from your cheat sheet. Click Log in (3).
-
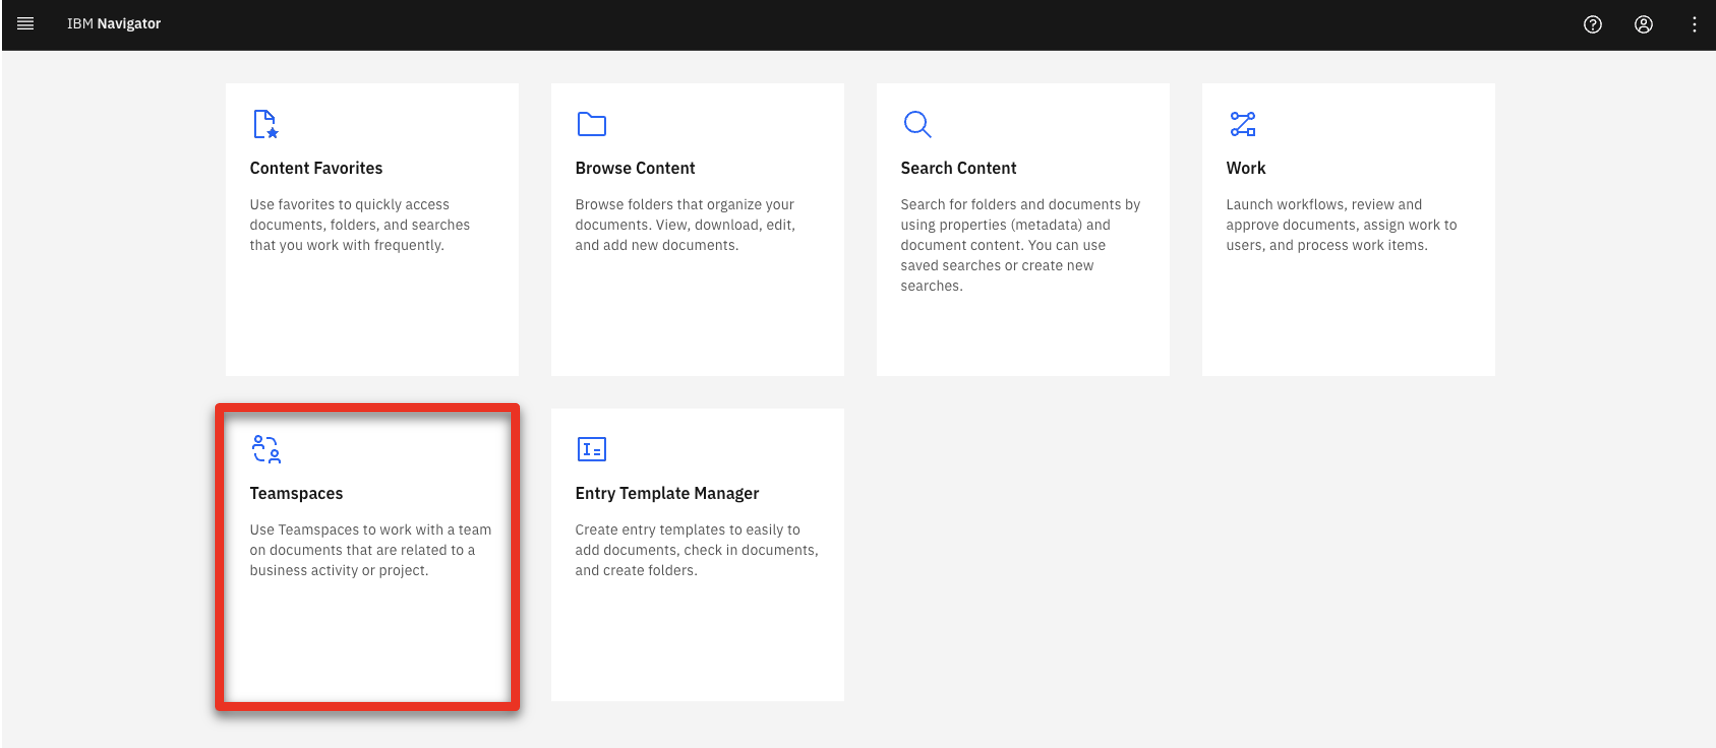
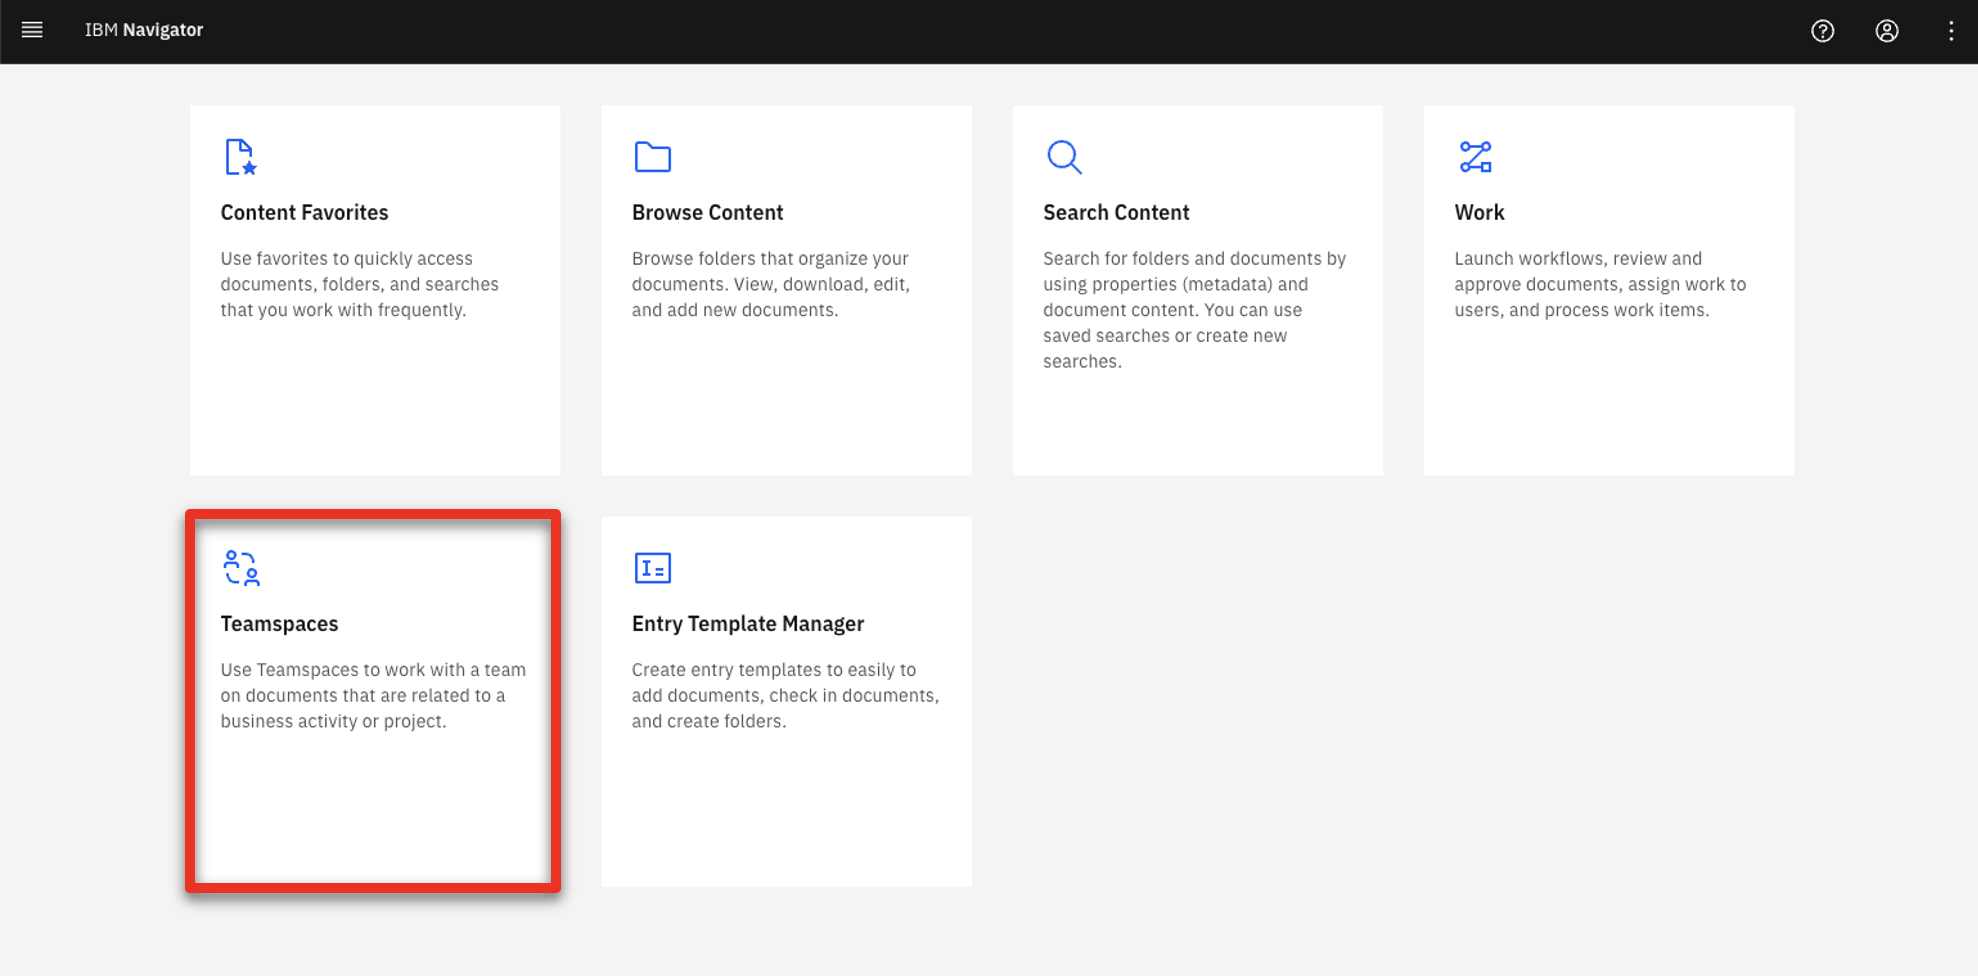
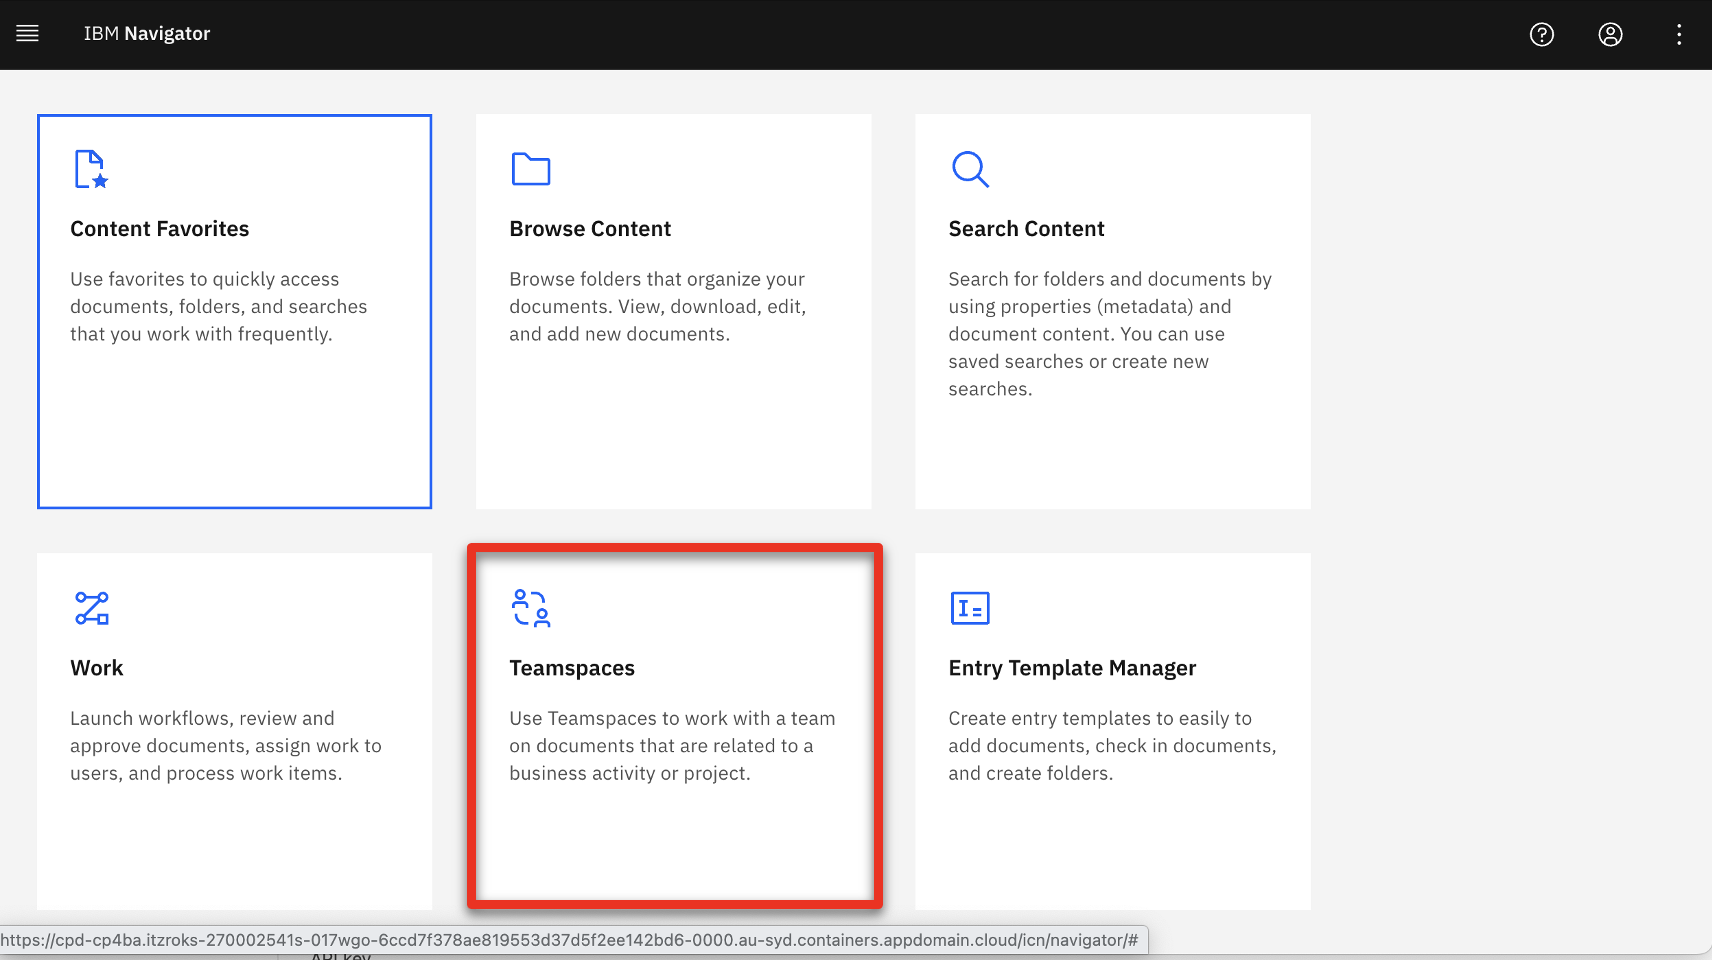
Click the Teamspaces tile.
-
Click the Templates tab.

-
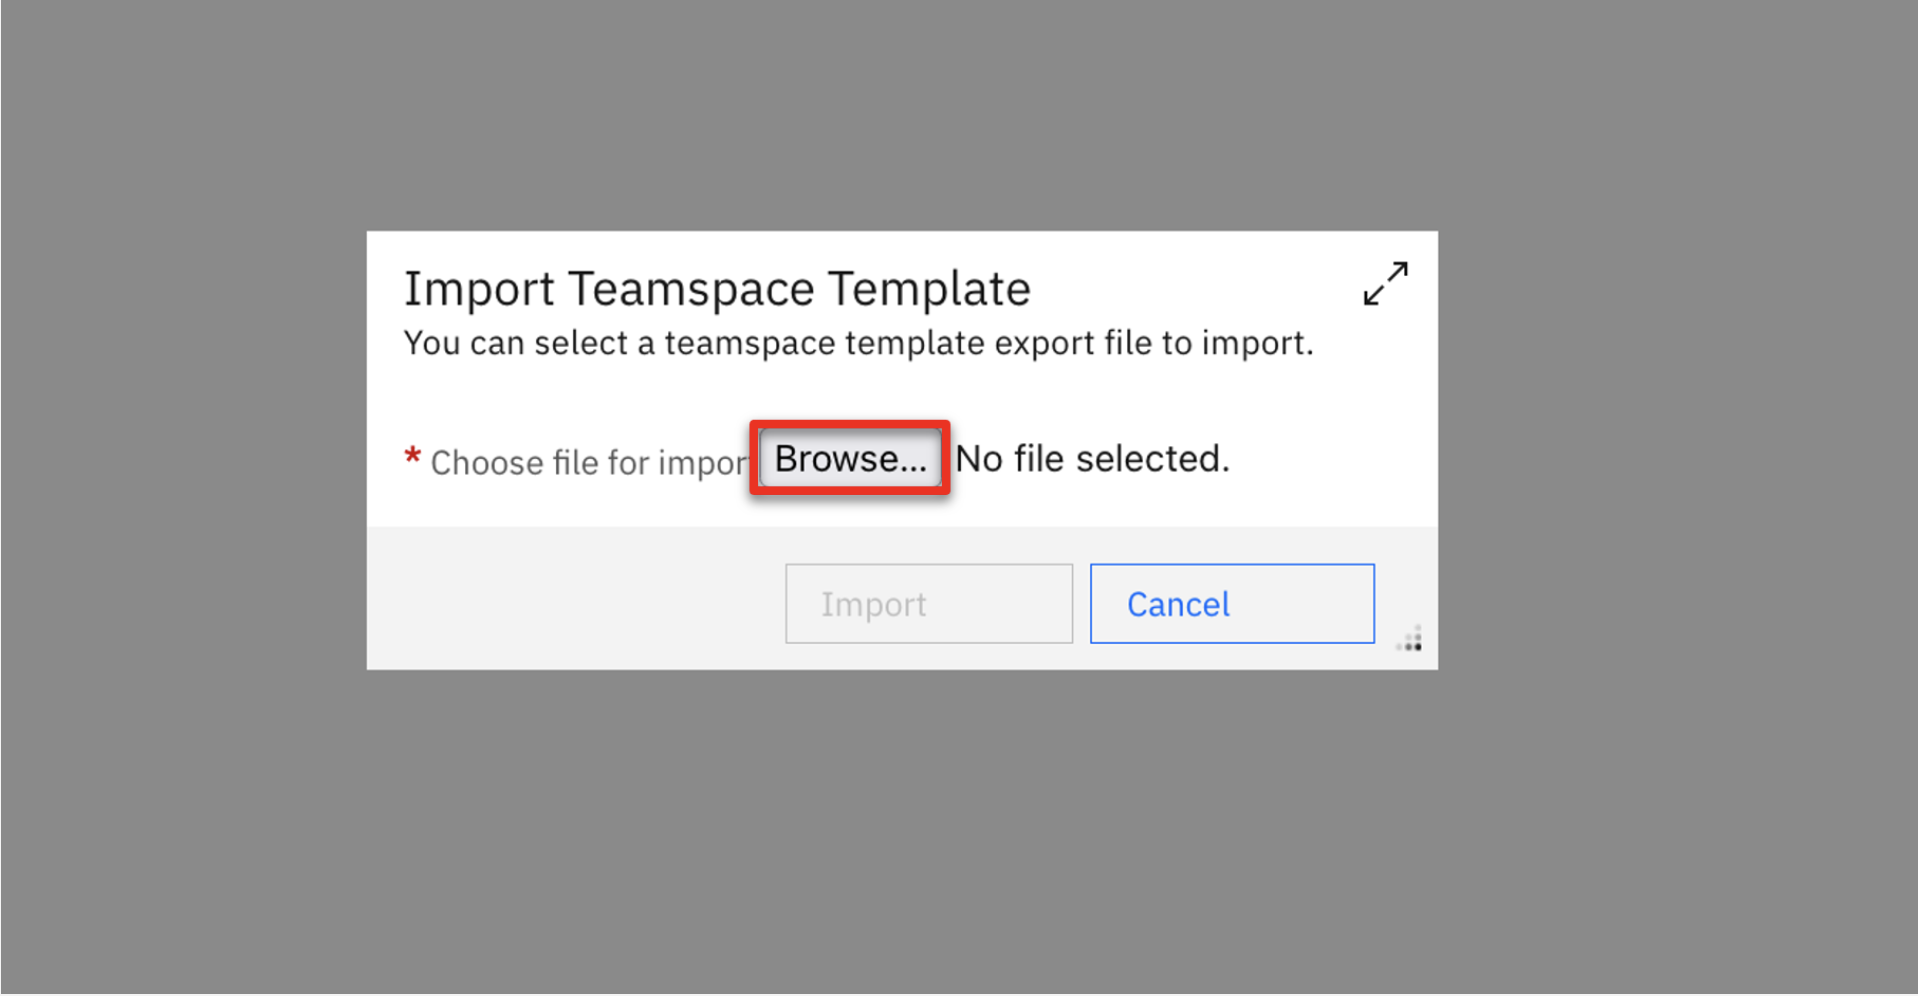
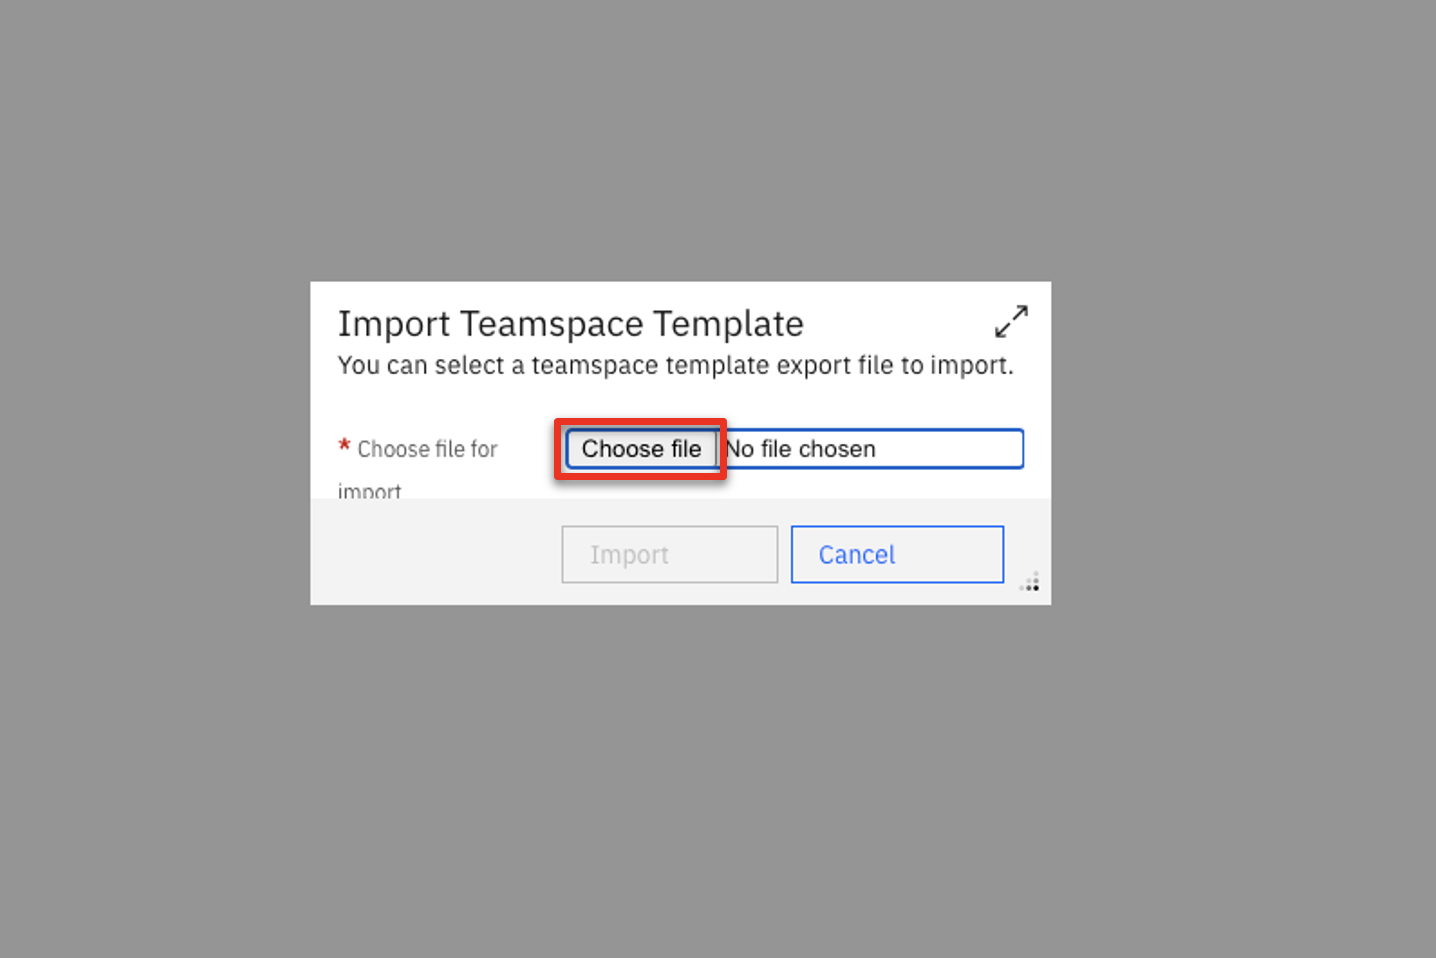
Click Import.

-
Click Browse or Choose file (based on your browser).
-
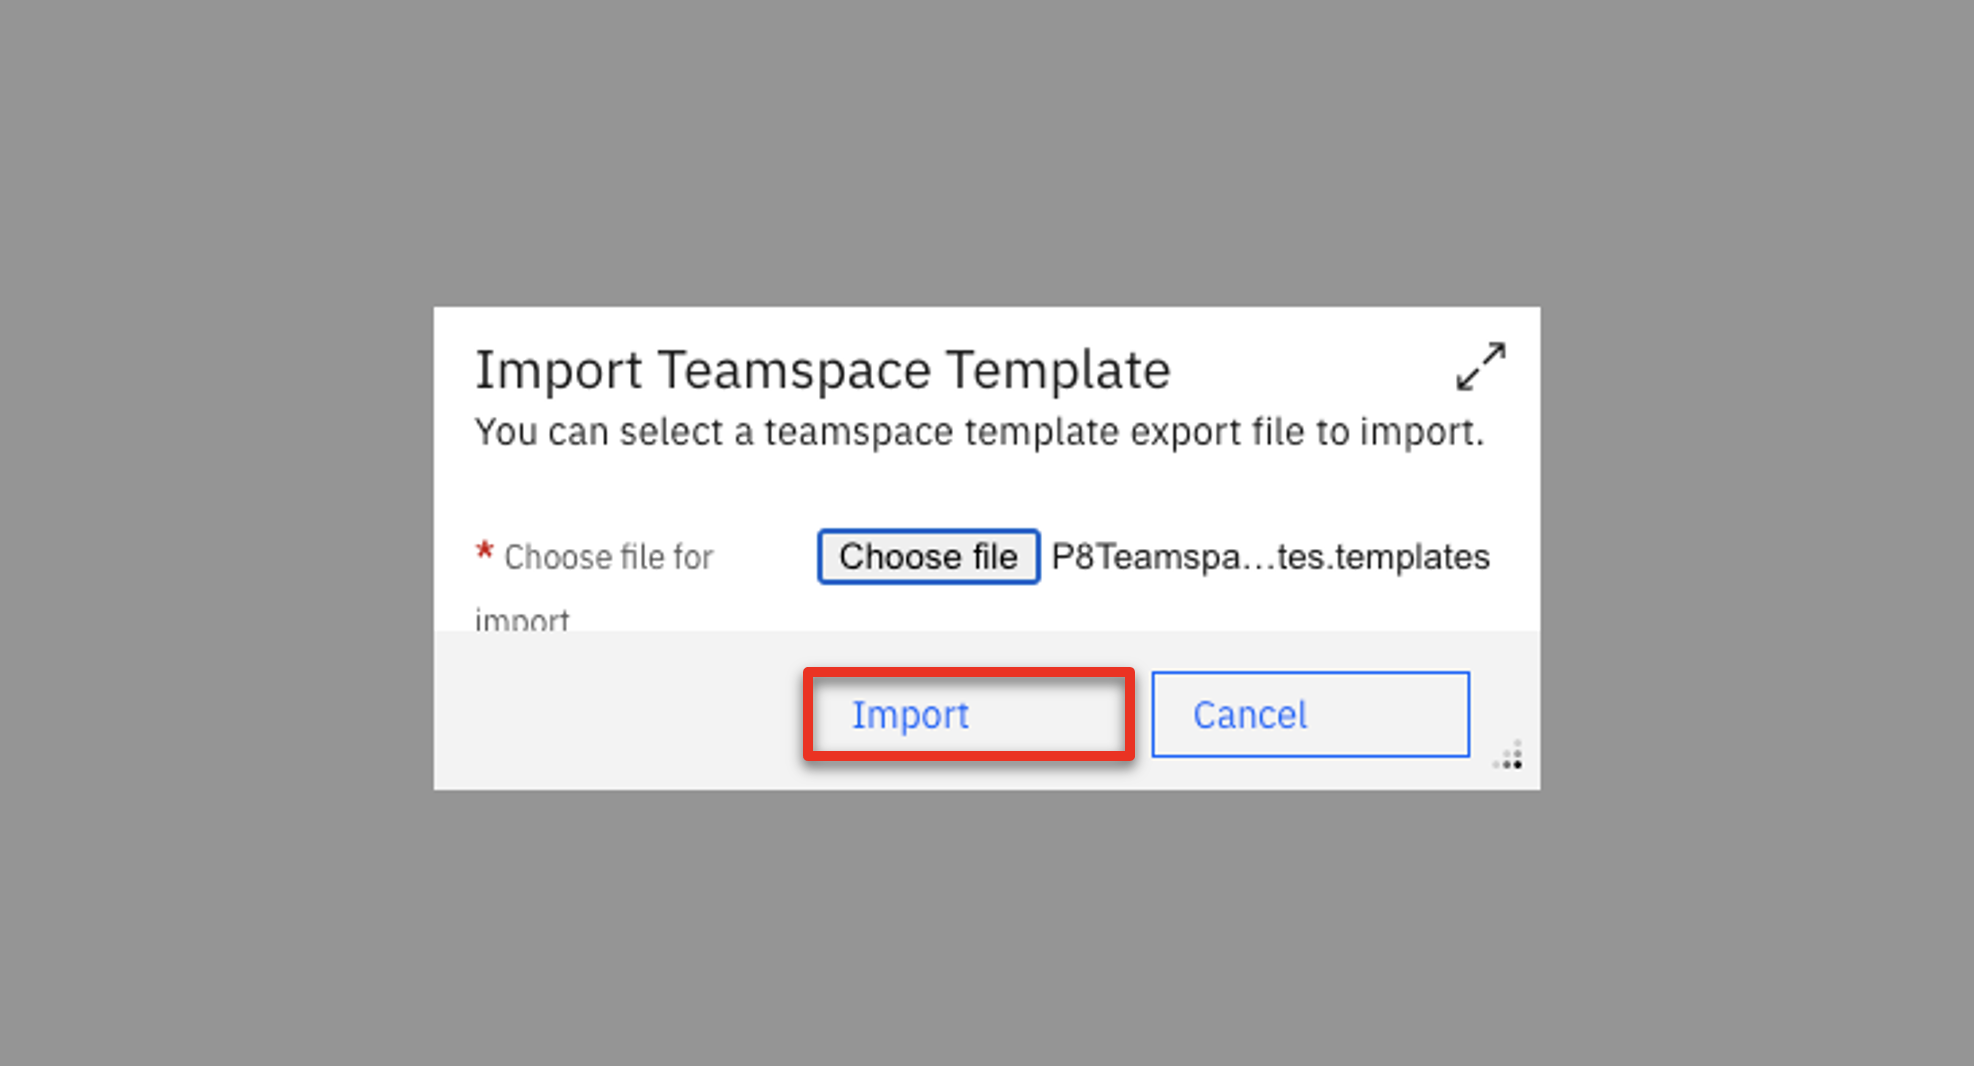
Select the P8TeamspaceTemplates file (1) and click Open (2).

-
Click Import.
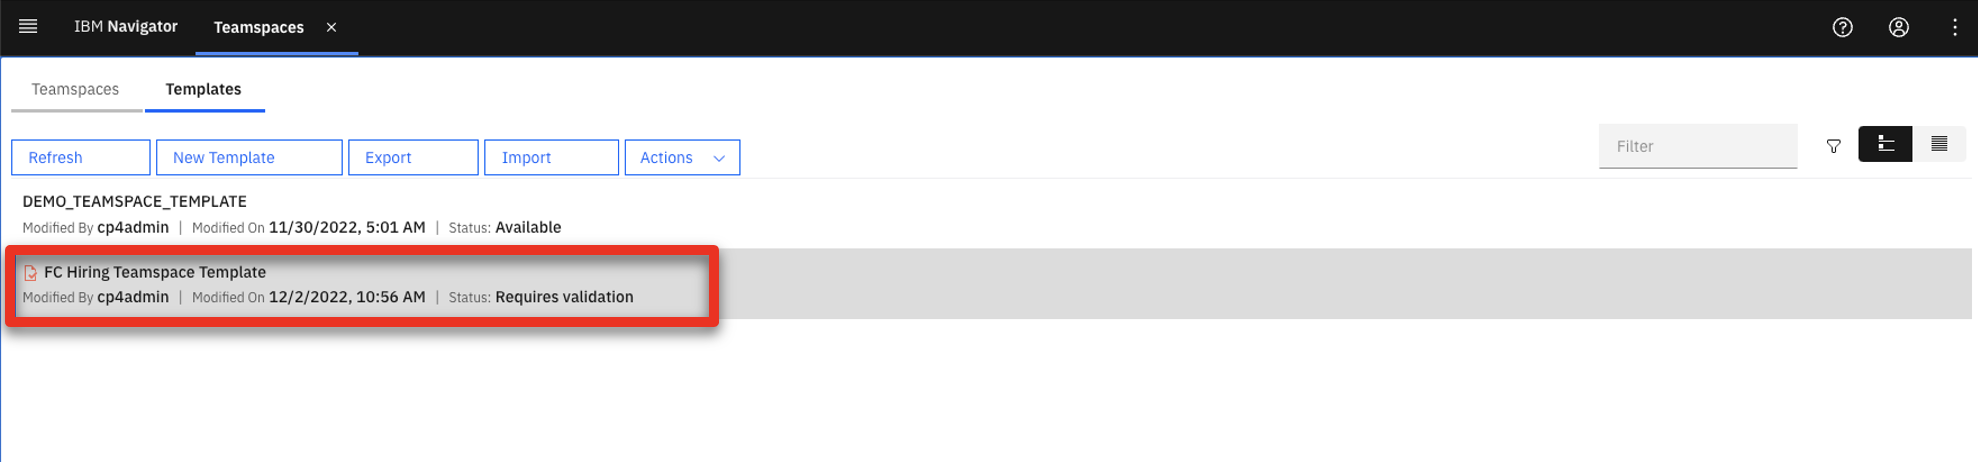
-
Double-click FC Hiring Teamspace Template.
-
Click the Select Classes or Entry Templates tab.
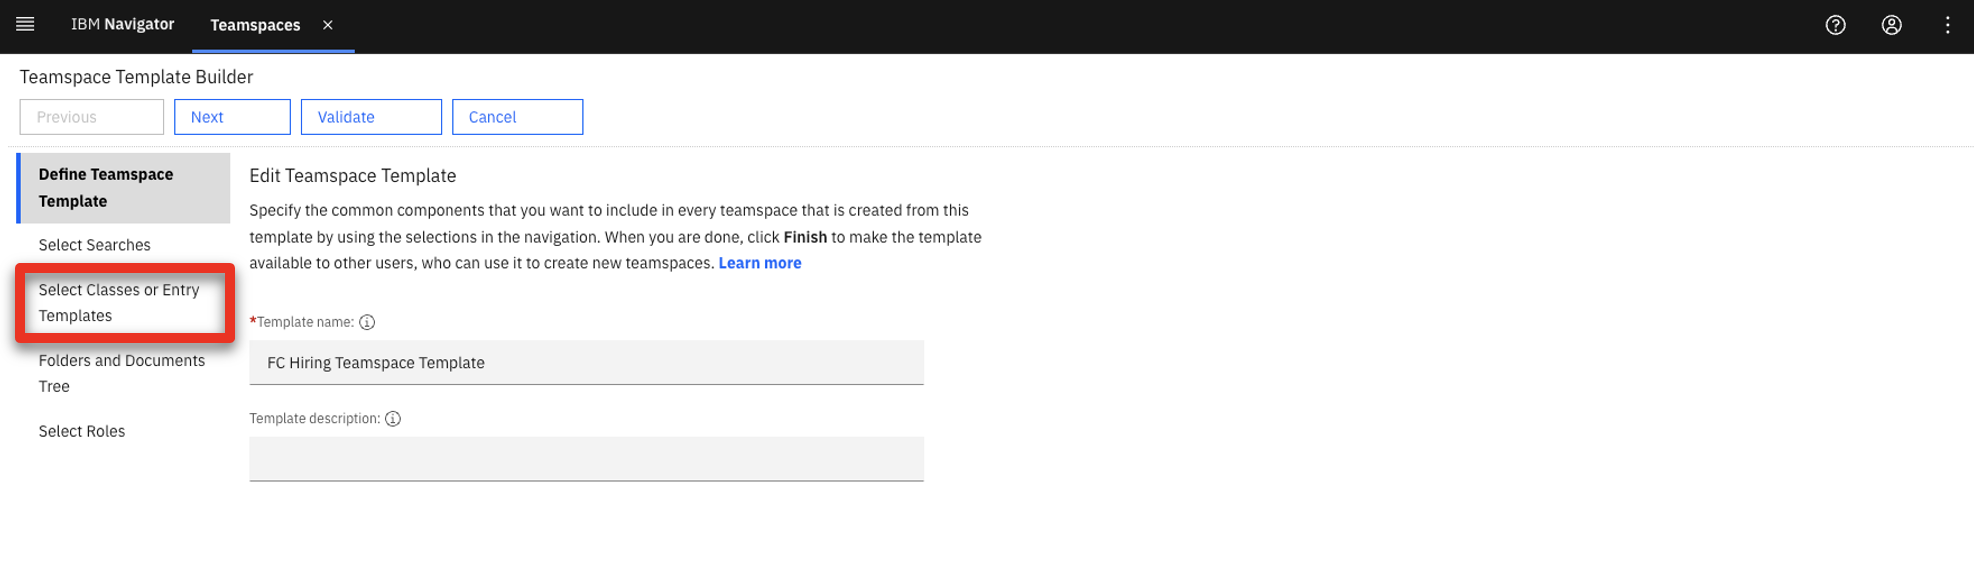
-
Select HR Application Document Entry Template (1) and click Add (2).

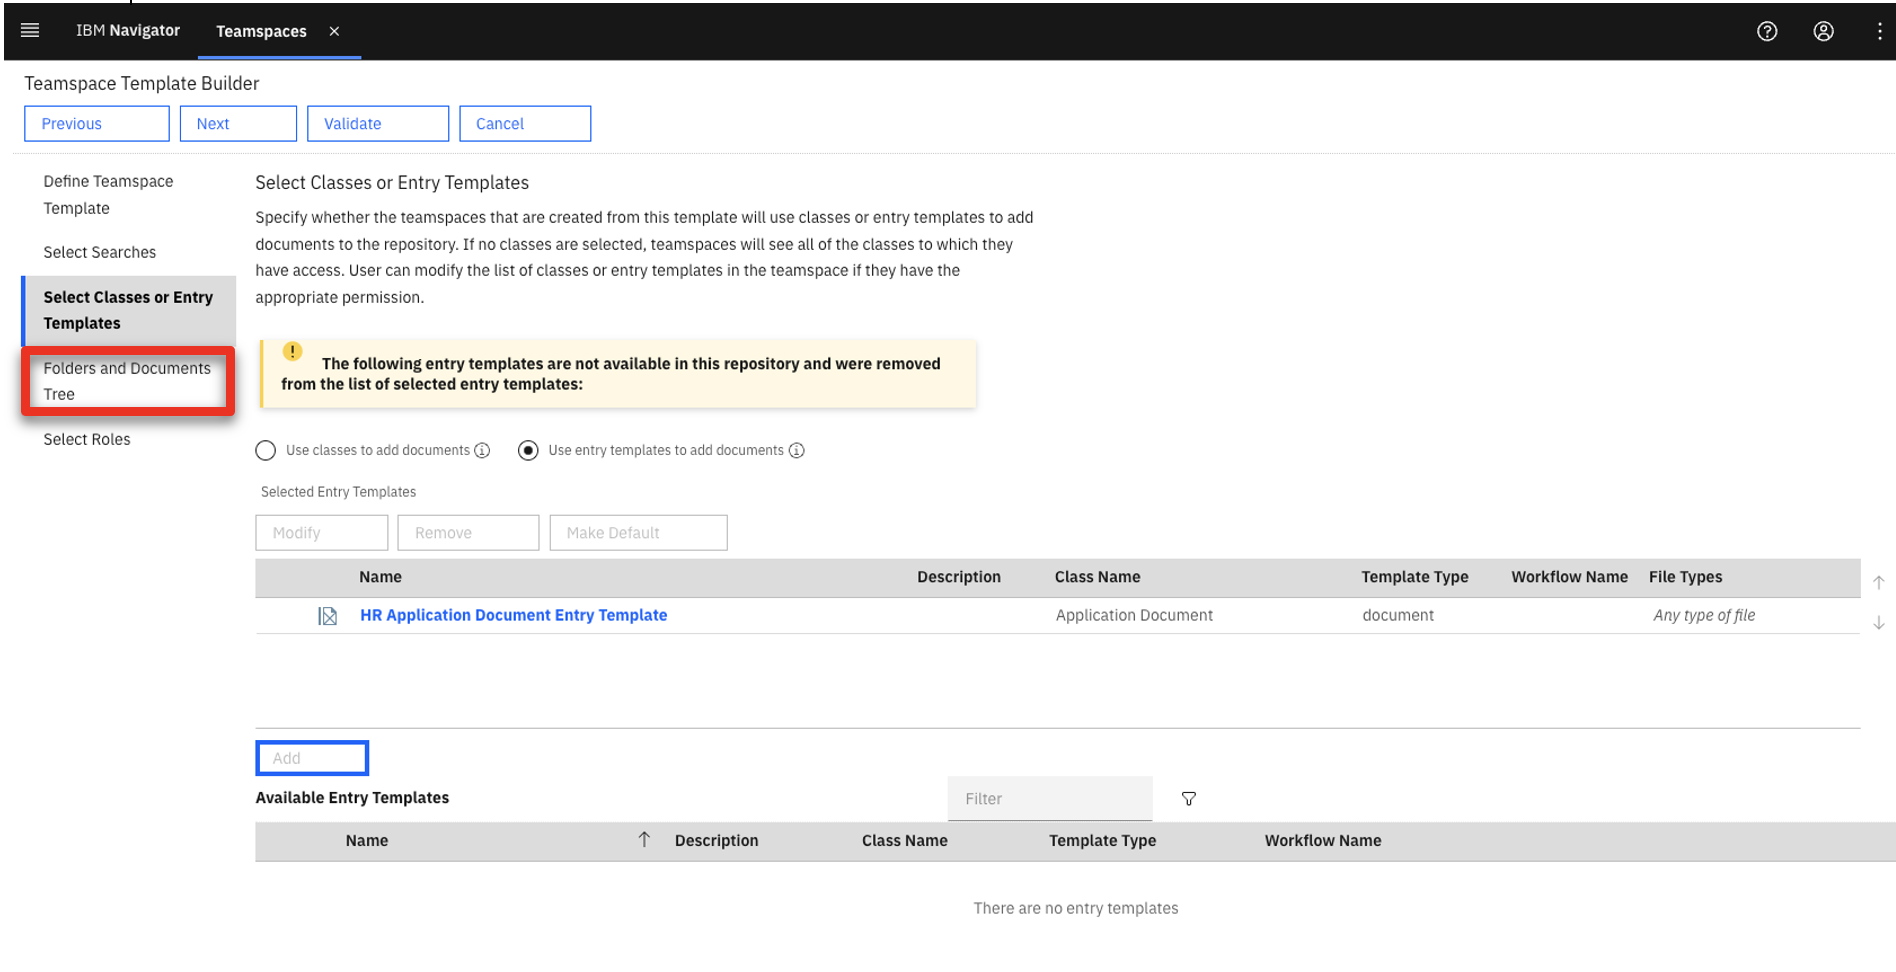
-
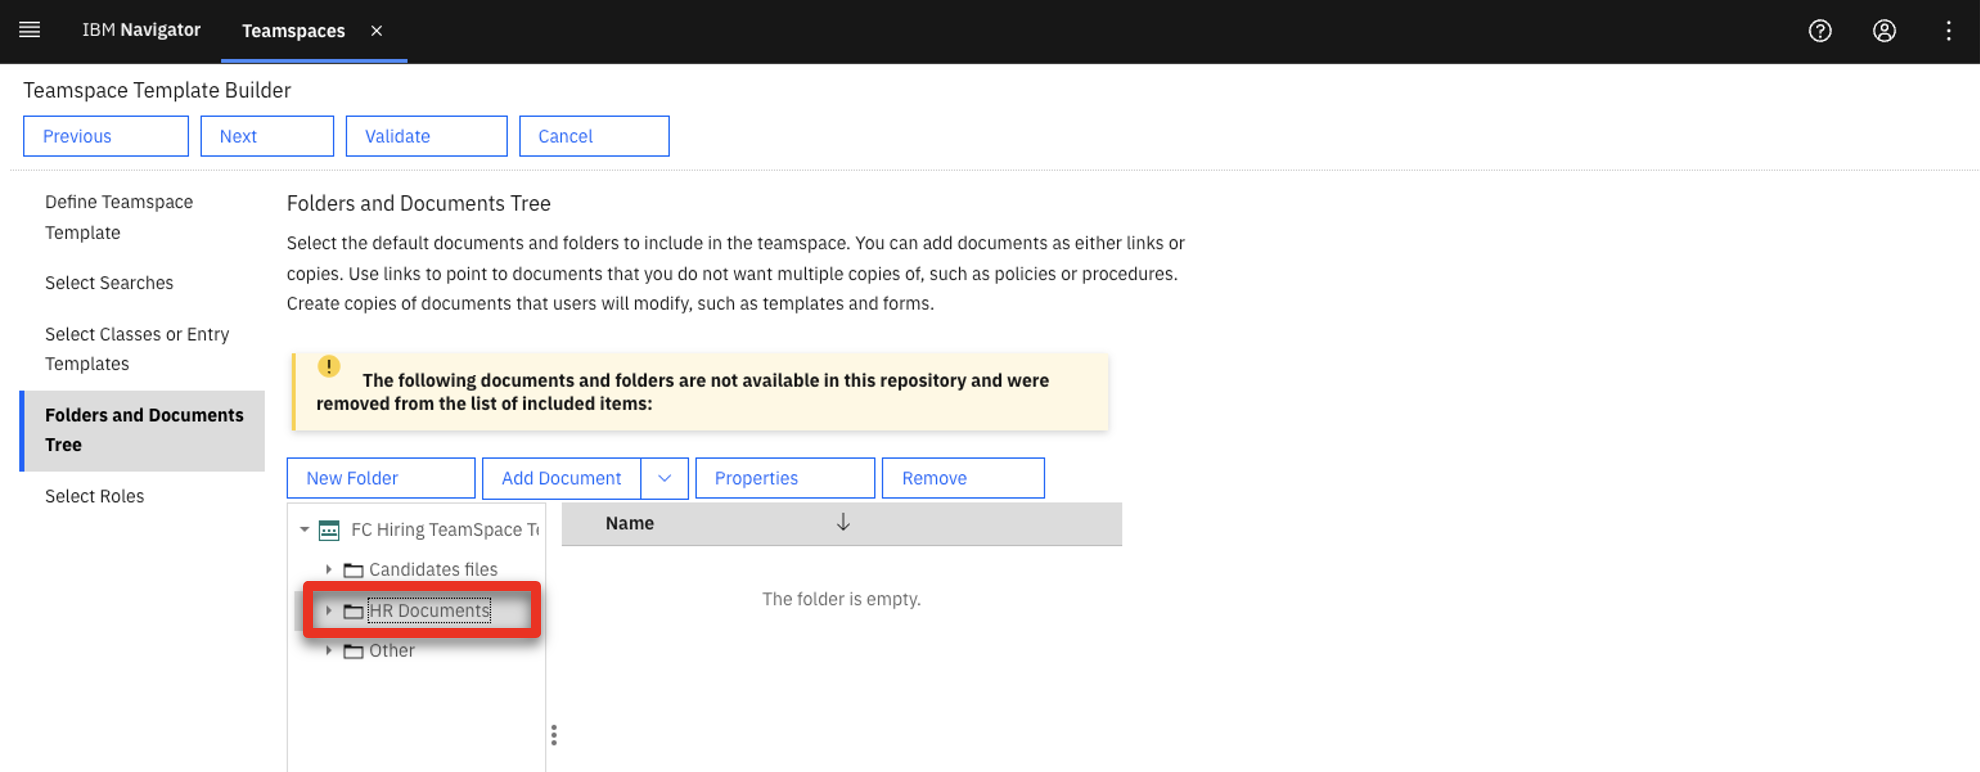
Click the Folders and Documents Tree tab.
-
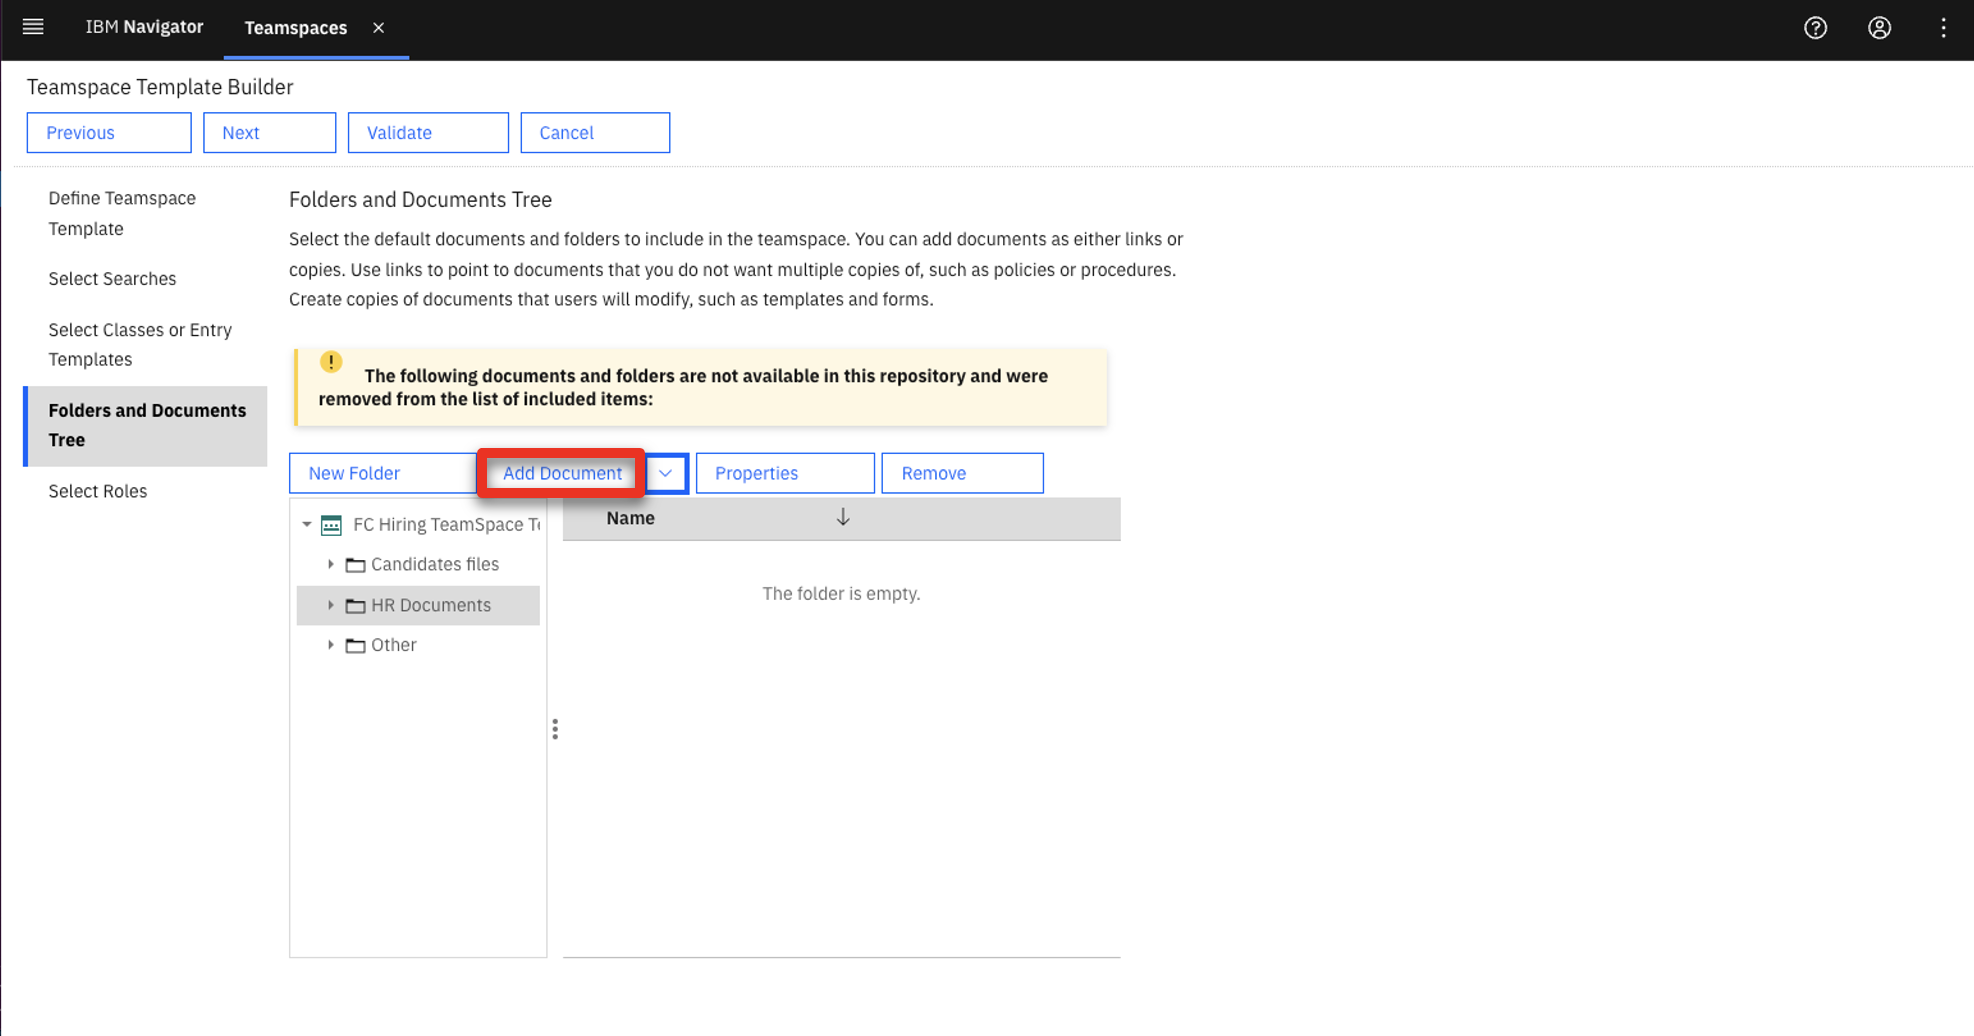
Click HR Documents.
-
Click Add Document.
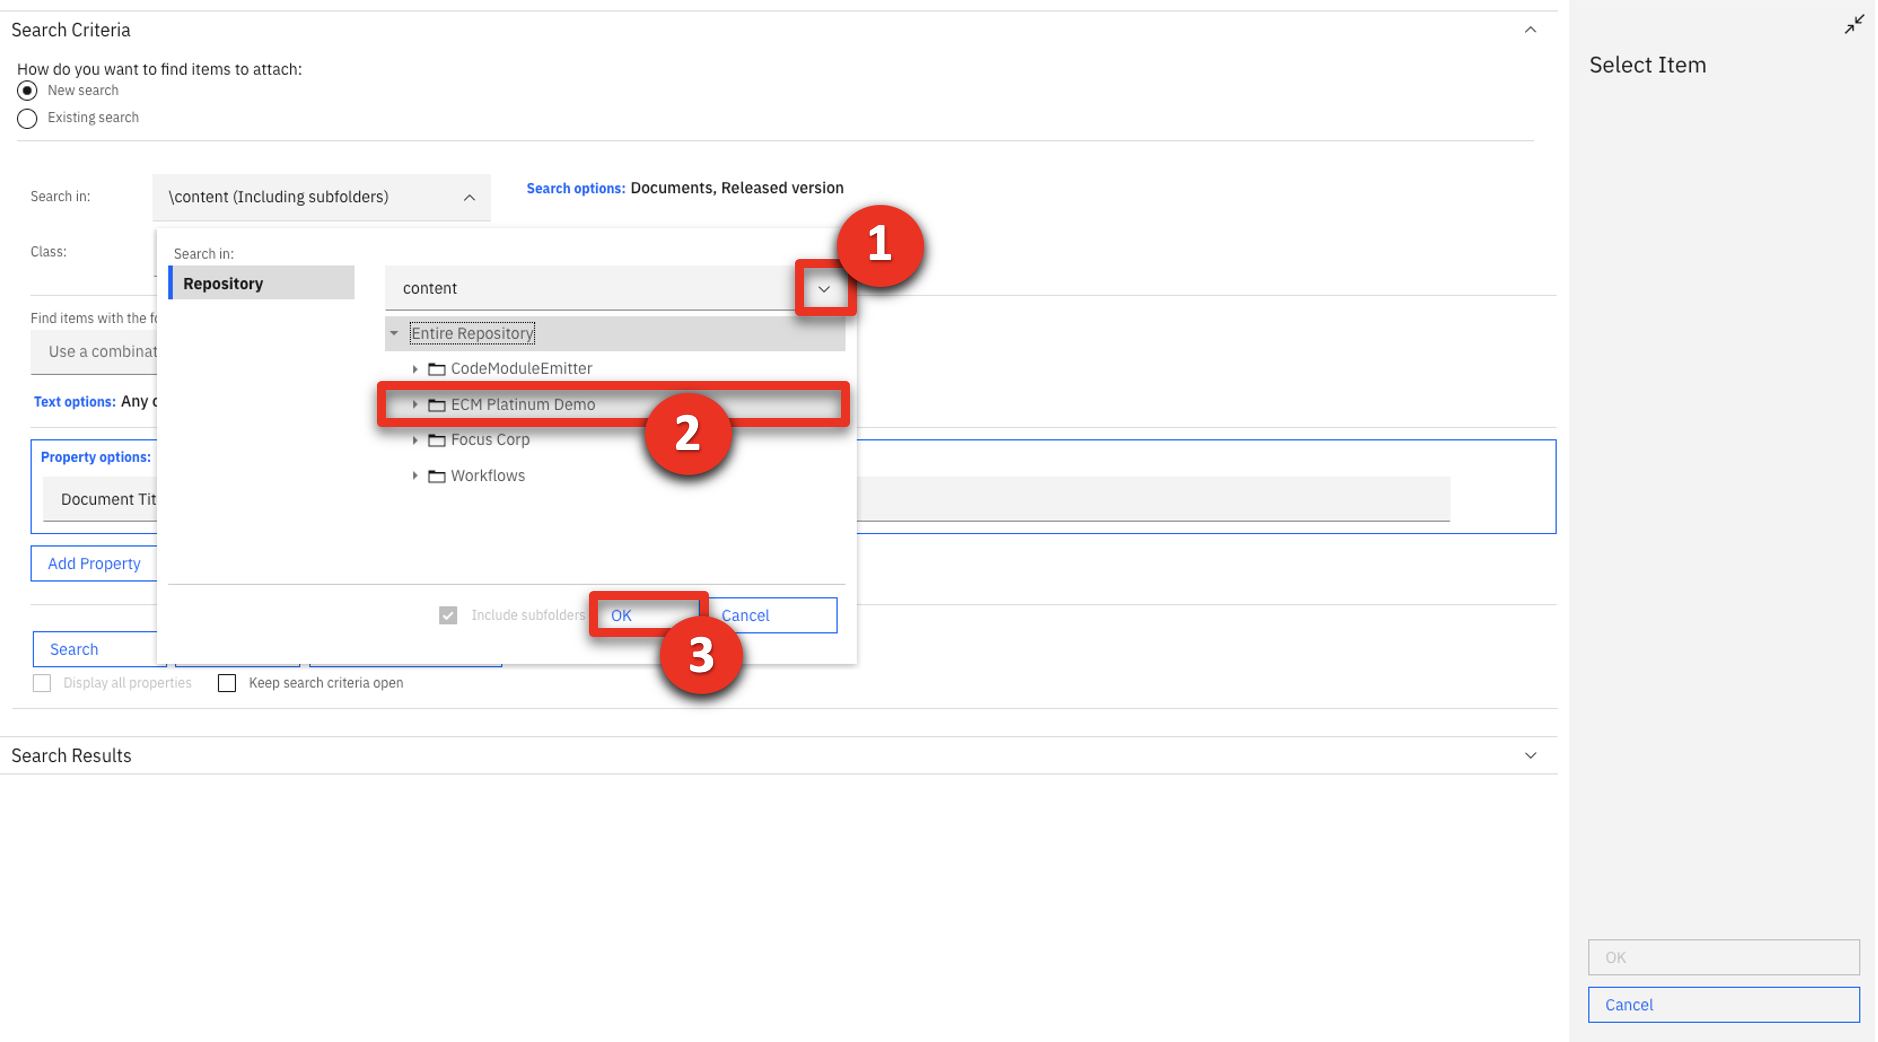
-
Expand the Search in (1) drop down menu, select the ECM Platinum Demo (2) and click OK (3).
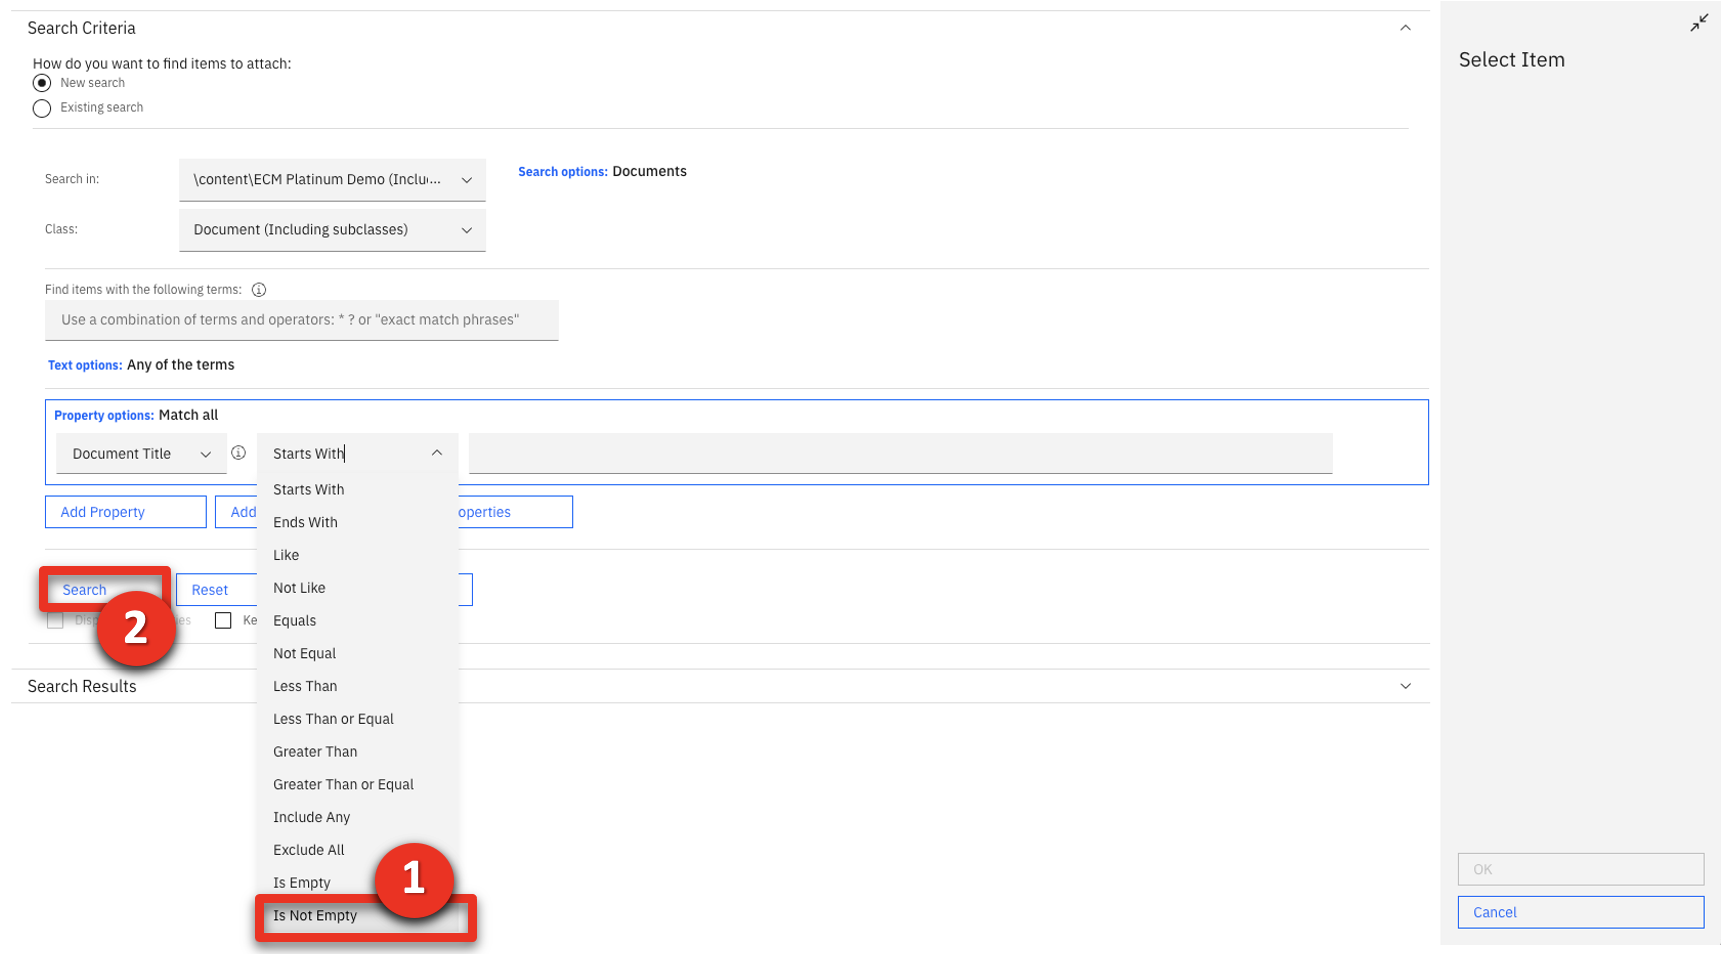
-
Scroll to the Search Criteria section. In the Property options box, select Is Not Empty (1) in the search criteria drop down menu next to Document Title. Click Search (2).
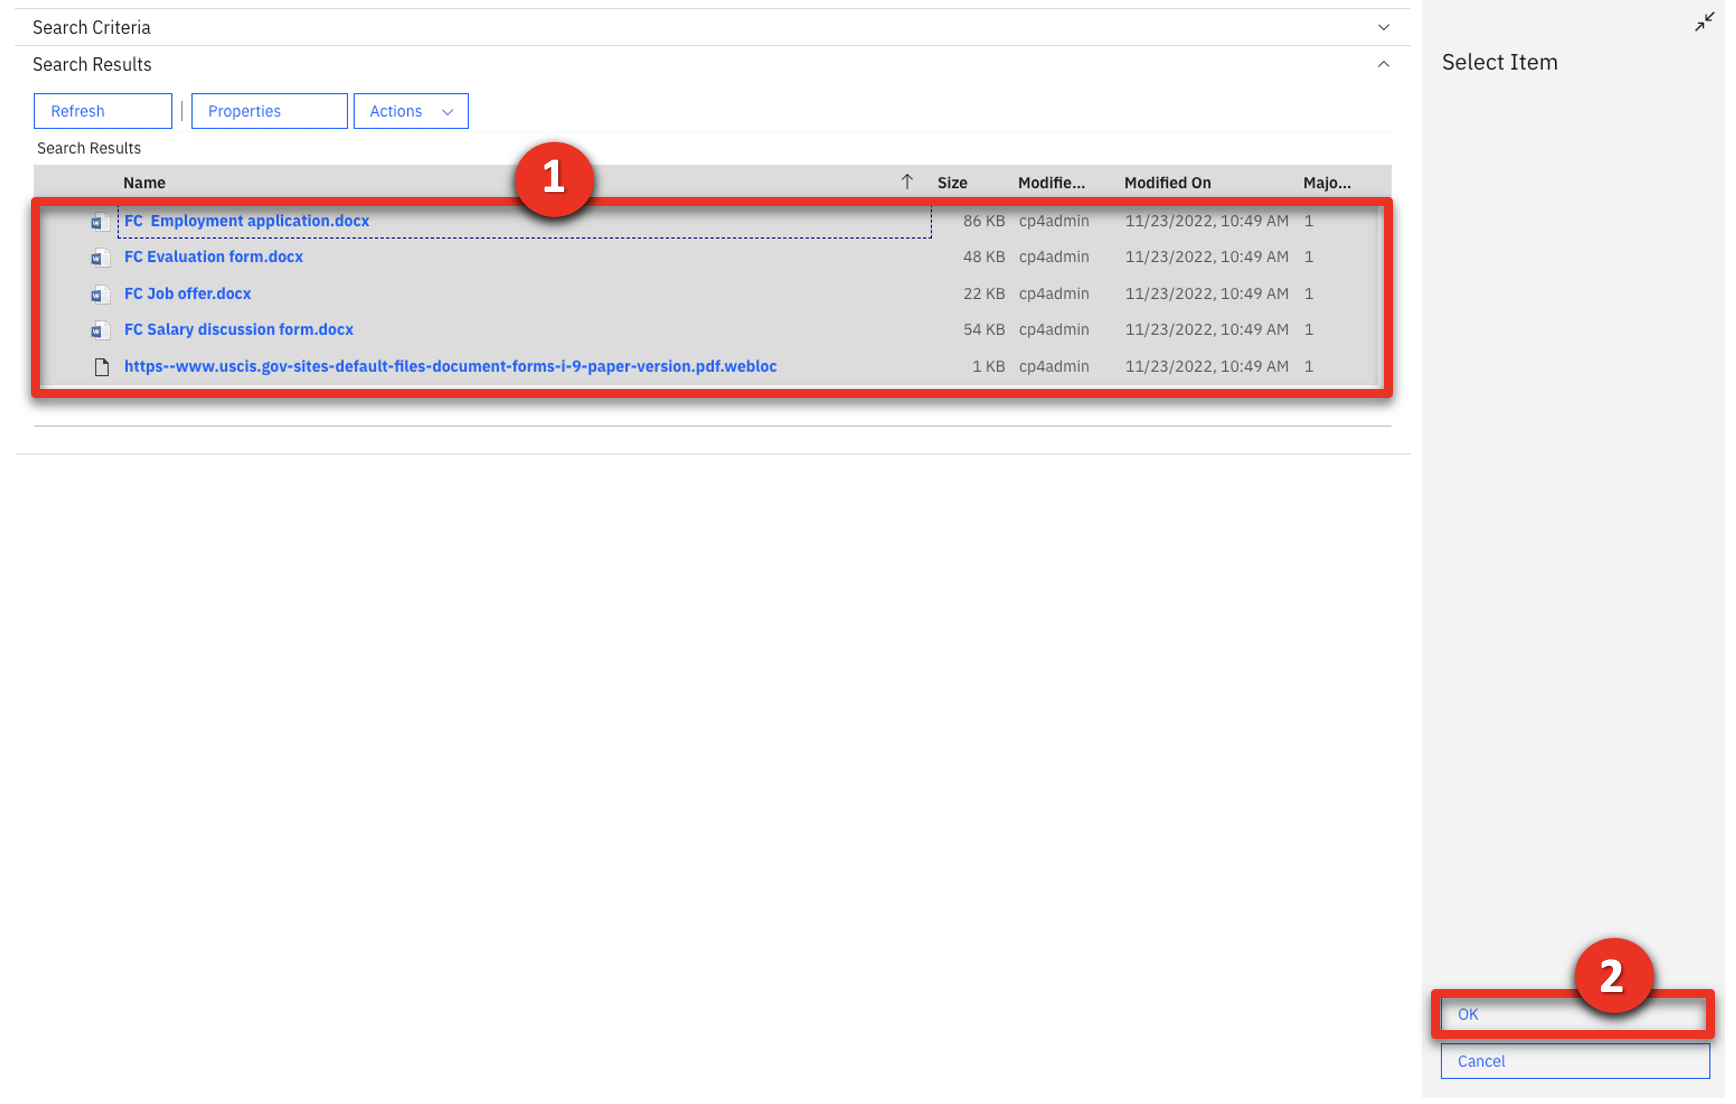
-
Select all the files (1) and click OK (2).
-
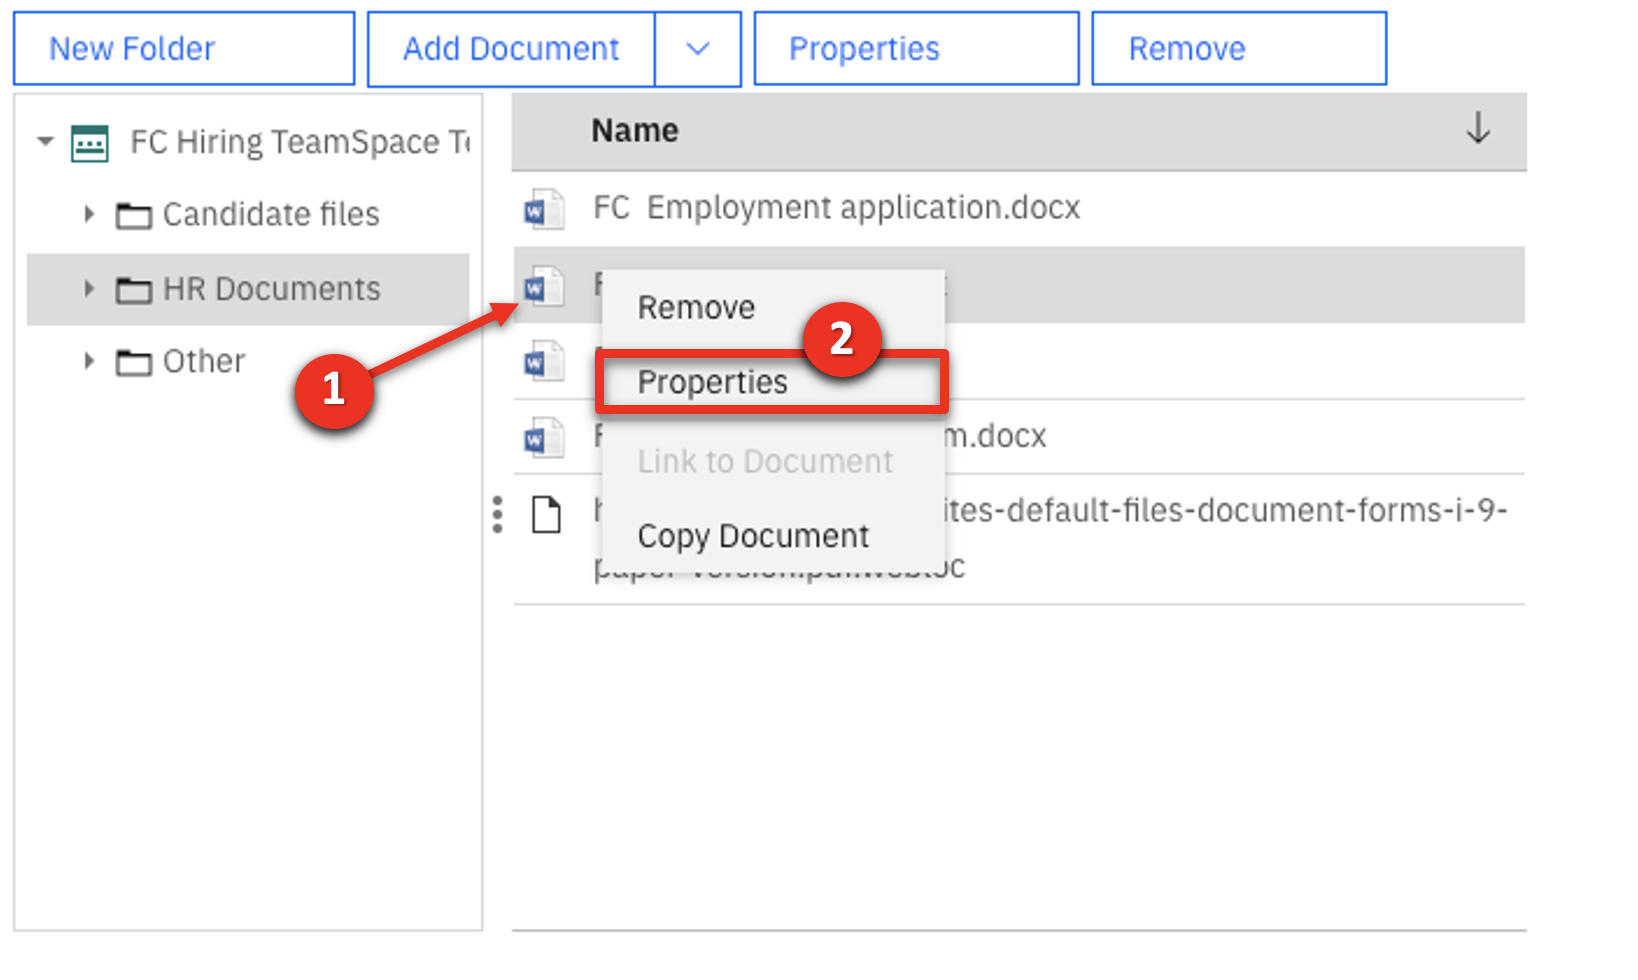
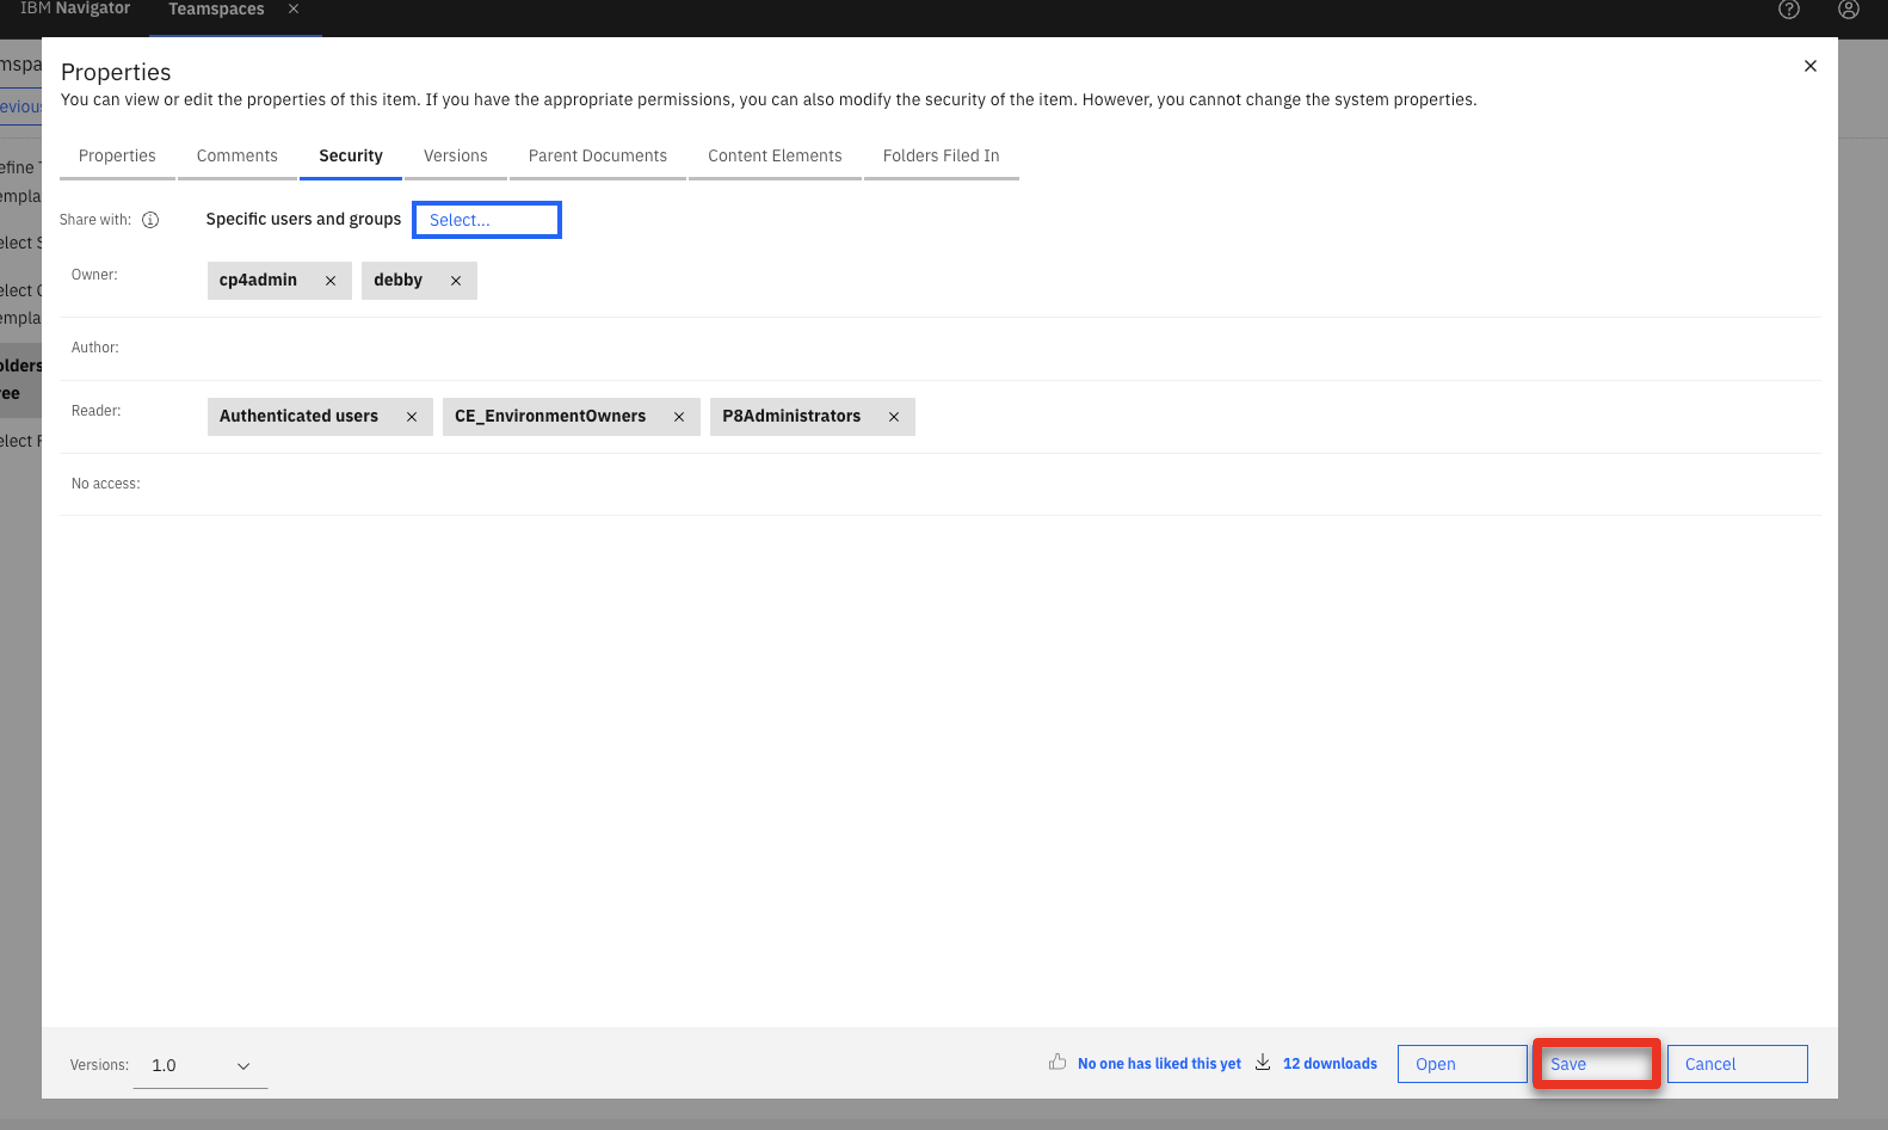
Right-click FC Evaluation form.docx (1) and click Properties (2).
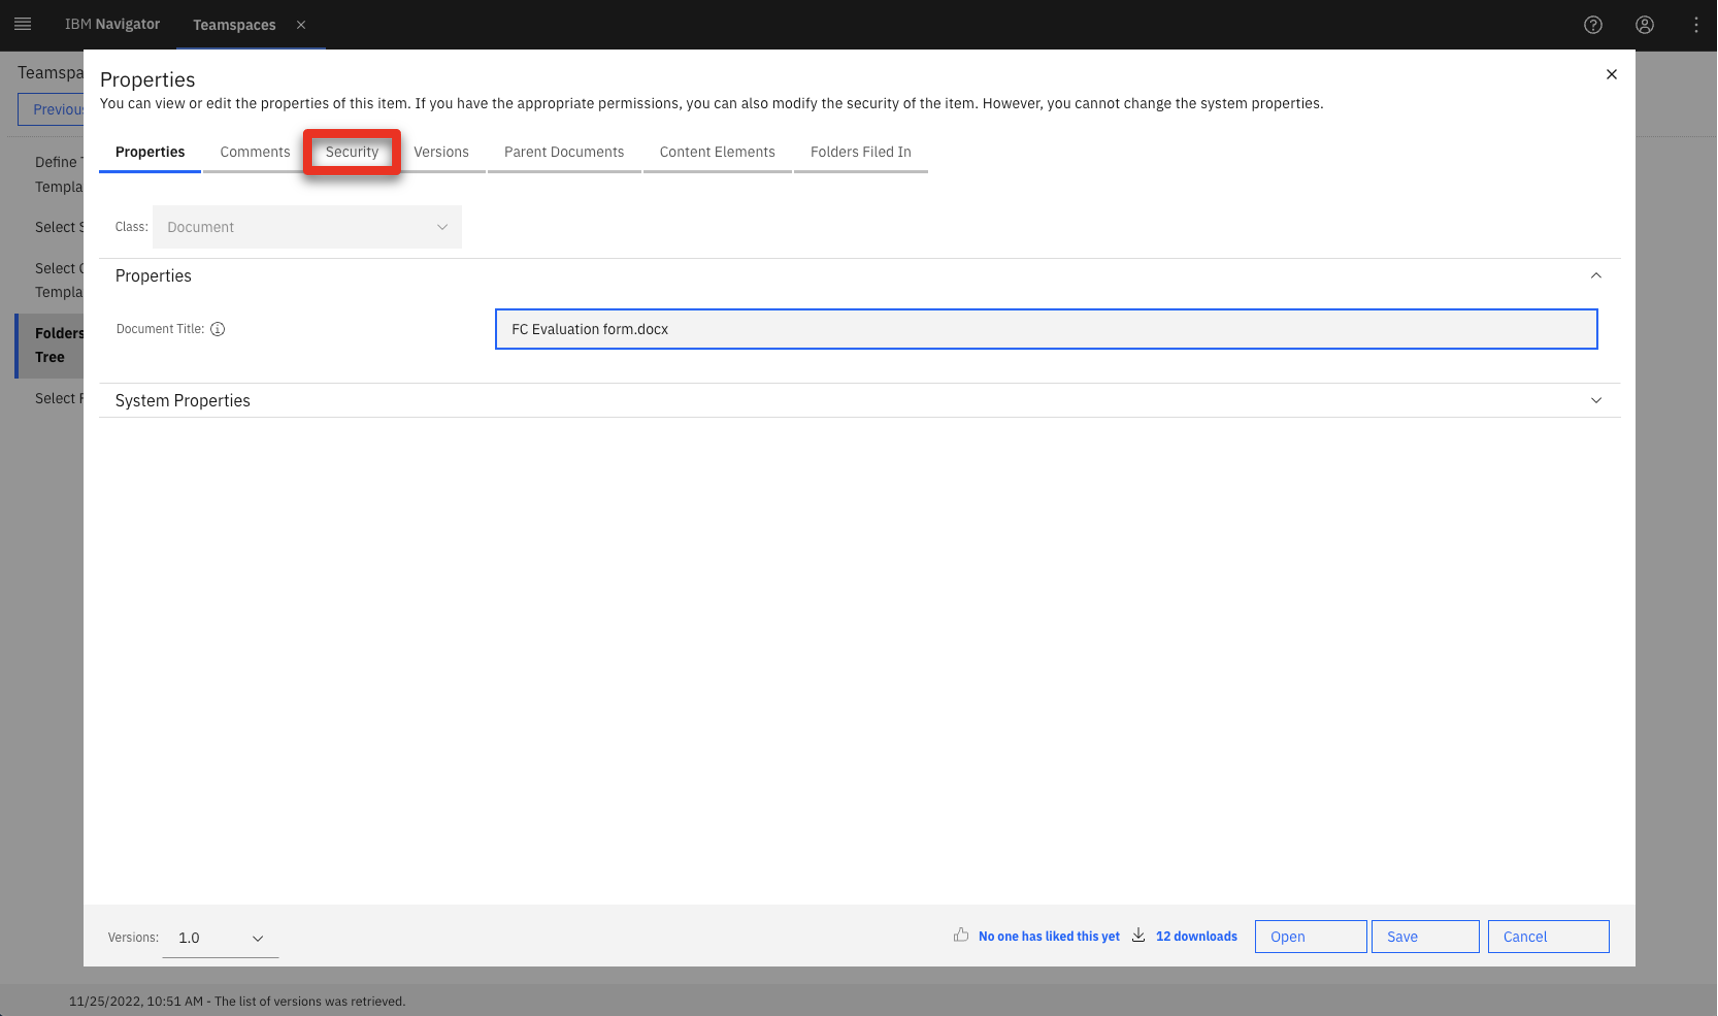
-
Click the Security tab.
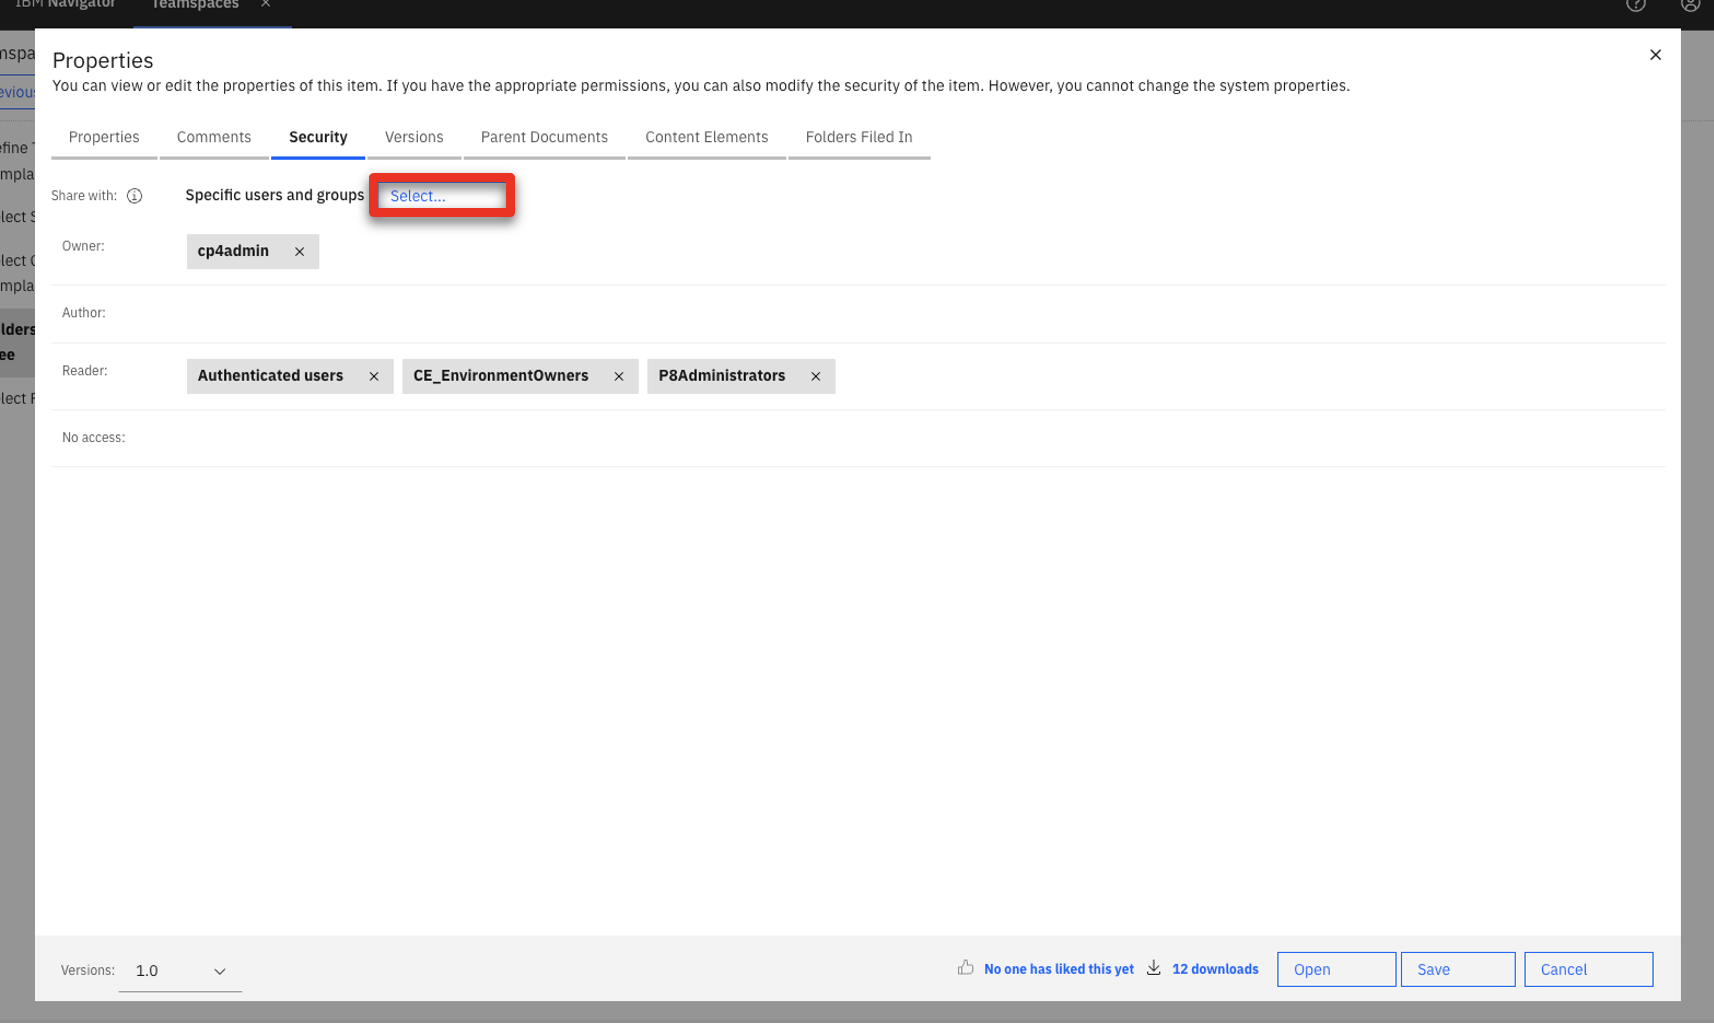
-
Click Select…
-
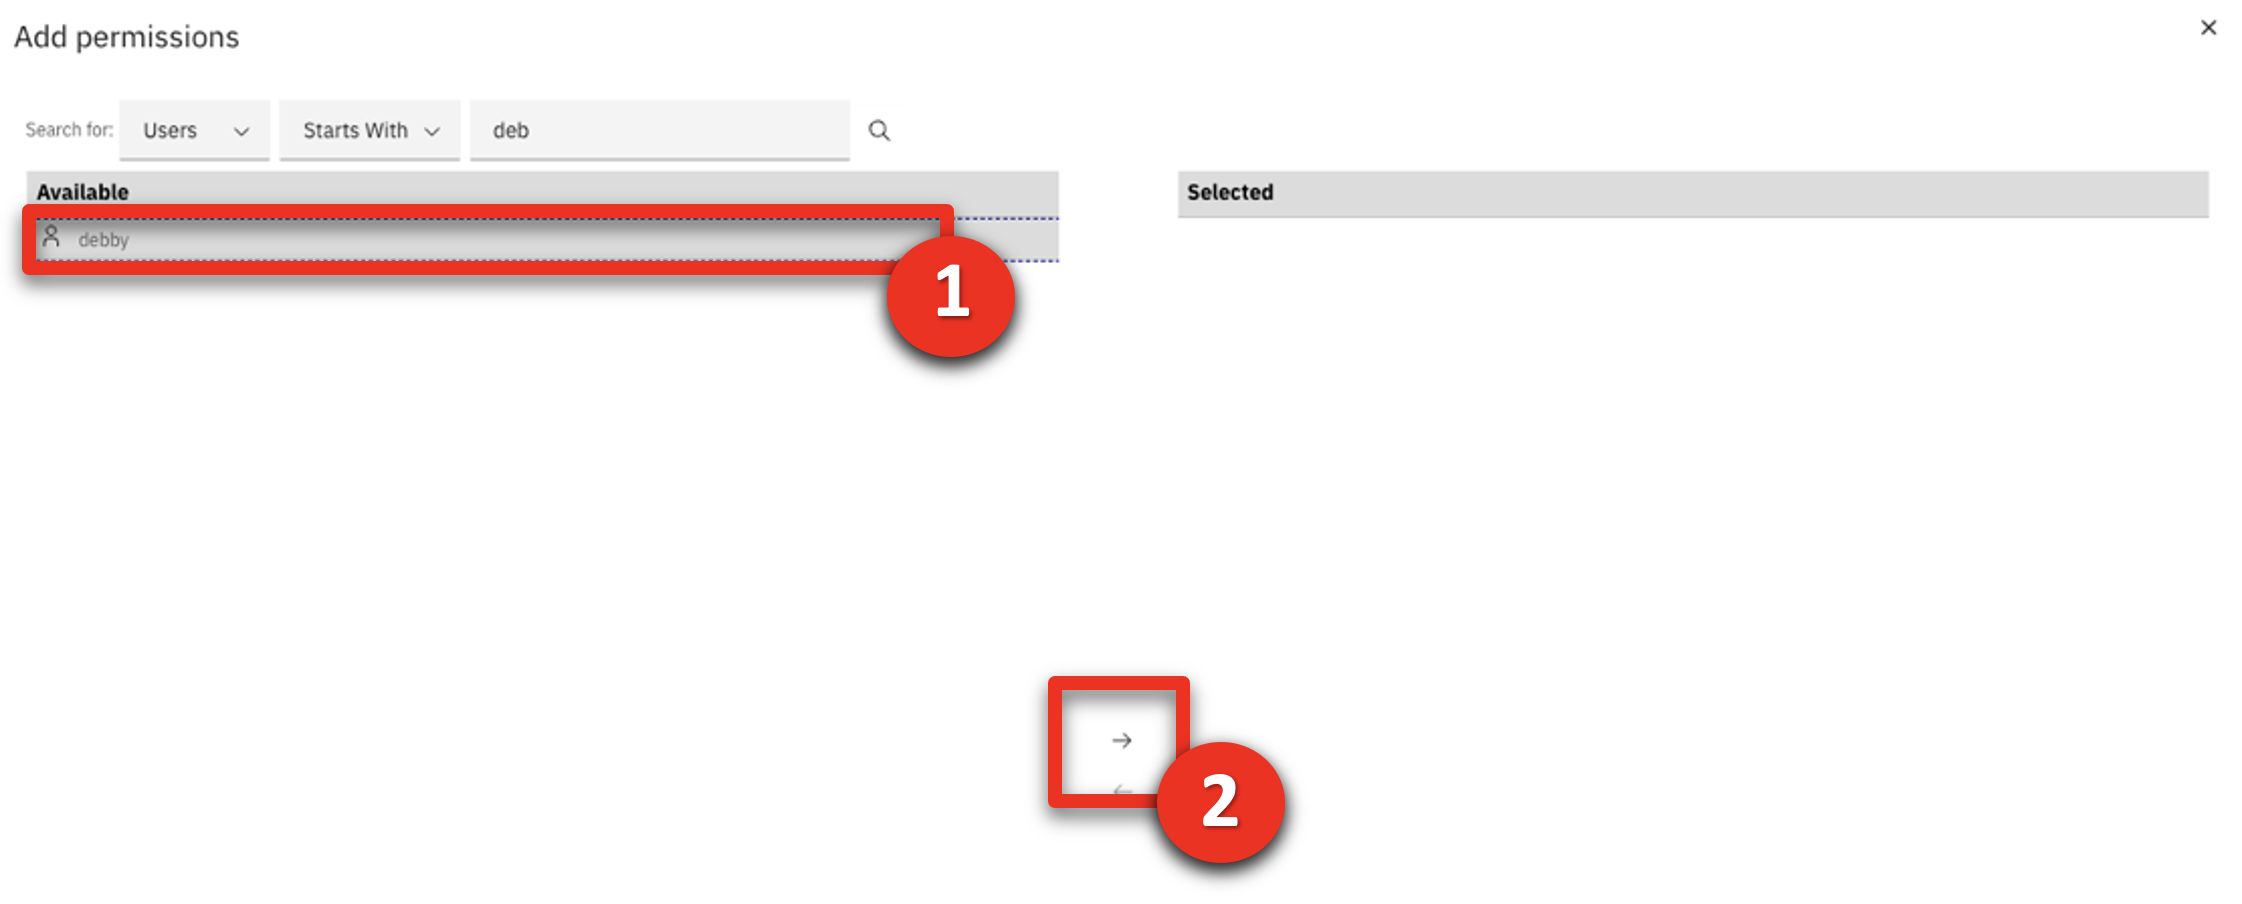
Search for ‘debby’.

-
Select debby (1) and click the right-facing arrow (2) to add her to the Selected list.
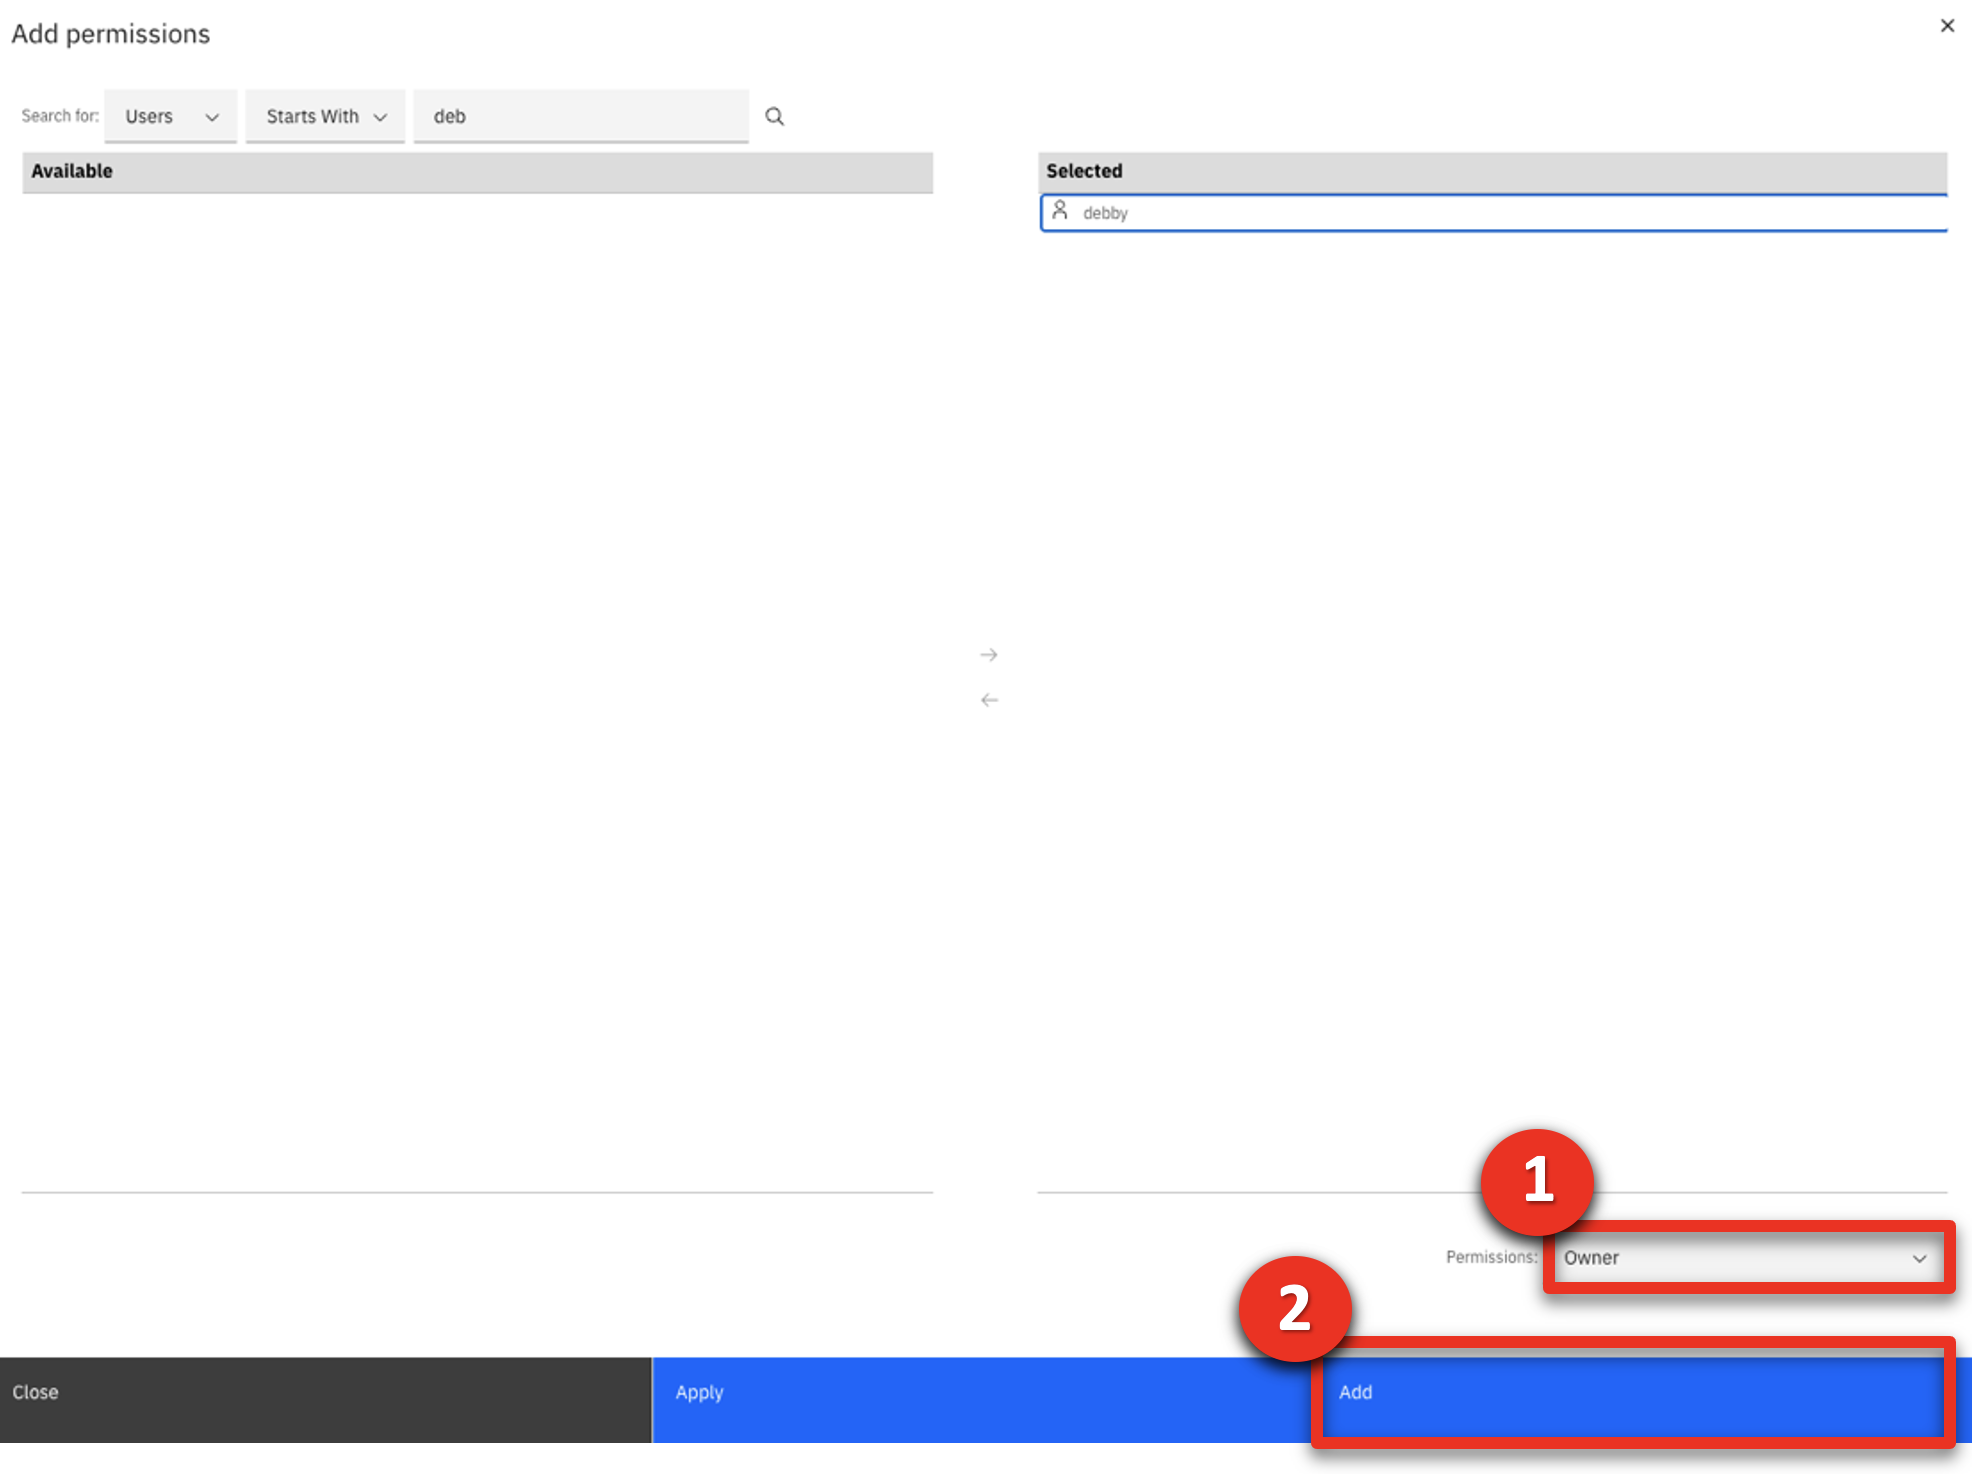
-
Verify the Permissions role is Owner (1) and click Add (2).
-
Click Save.
-
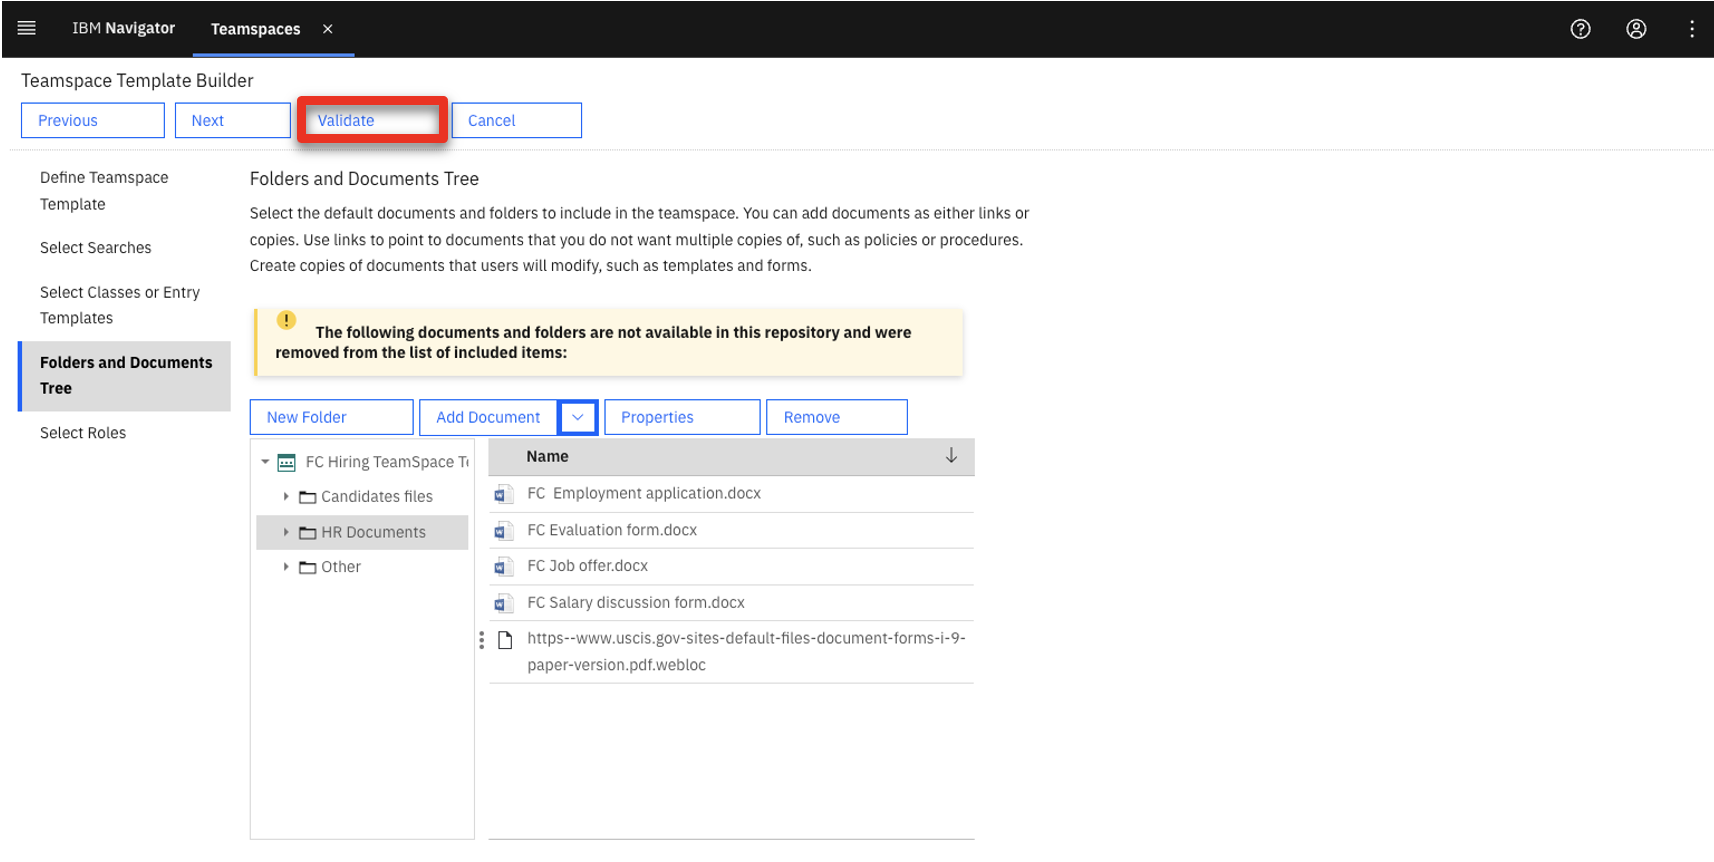
Click Validate.
-
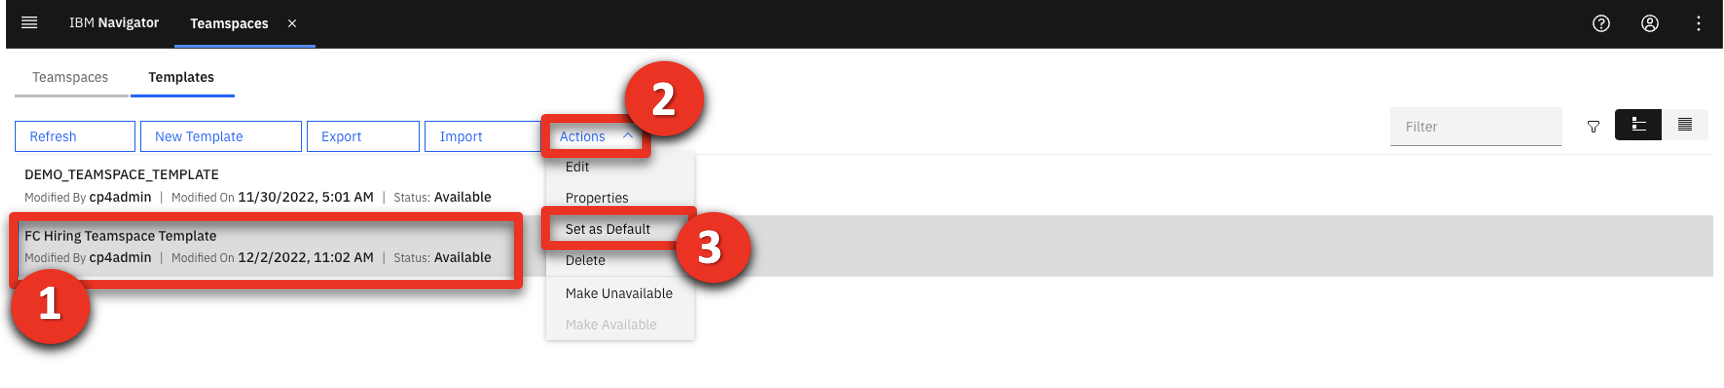
Select the FC Hiring Teamspace Template (1), click the Actions (2) drop down menu, and click Properties (3).
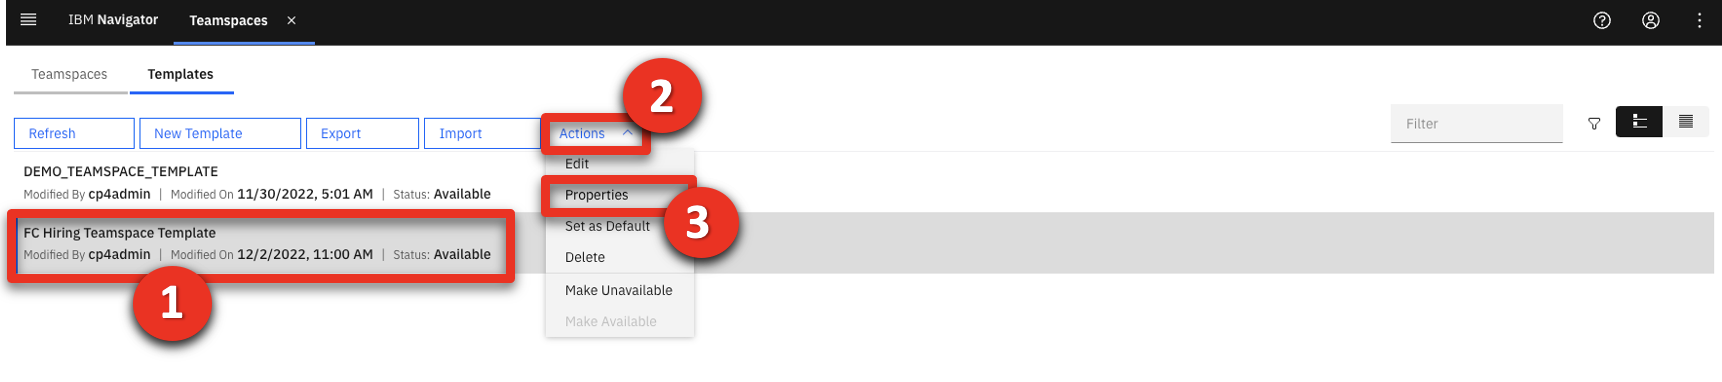
-
Click Security.

-
Click Select…

-
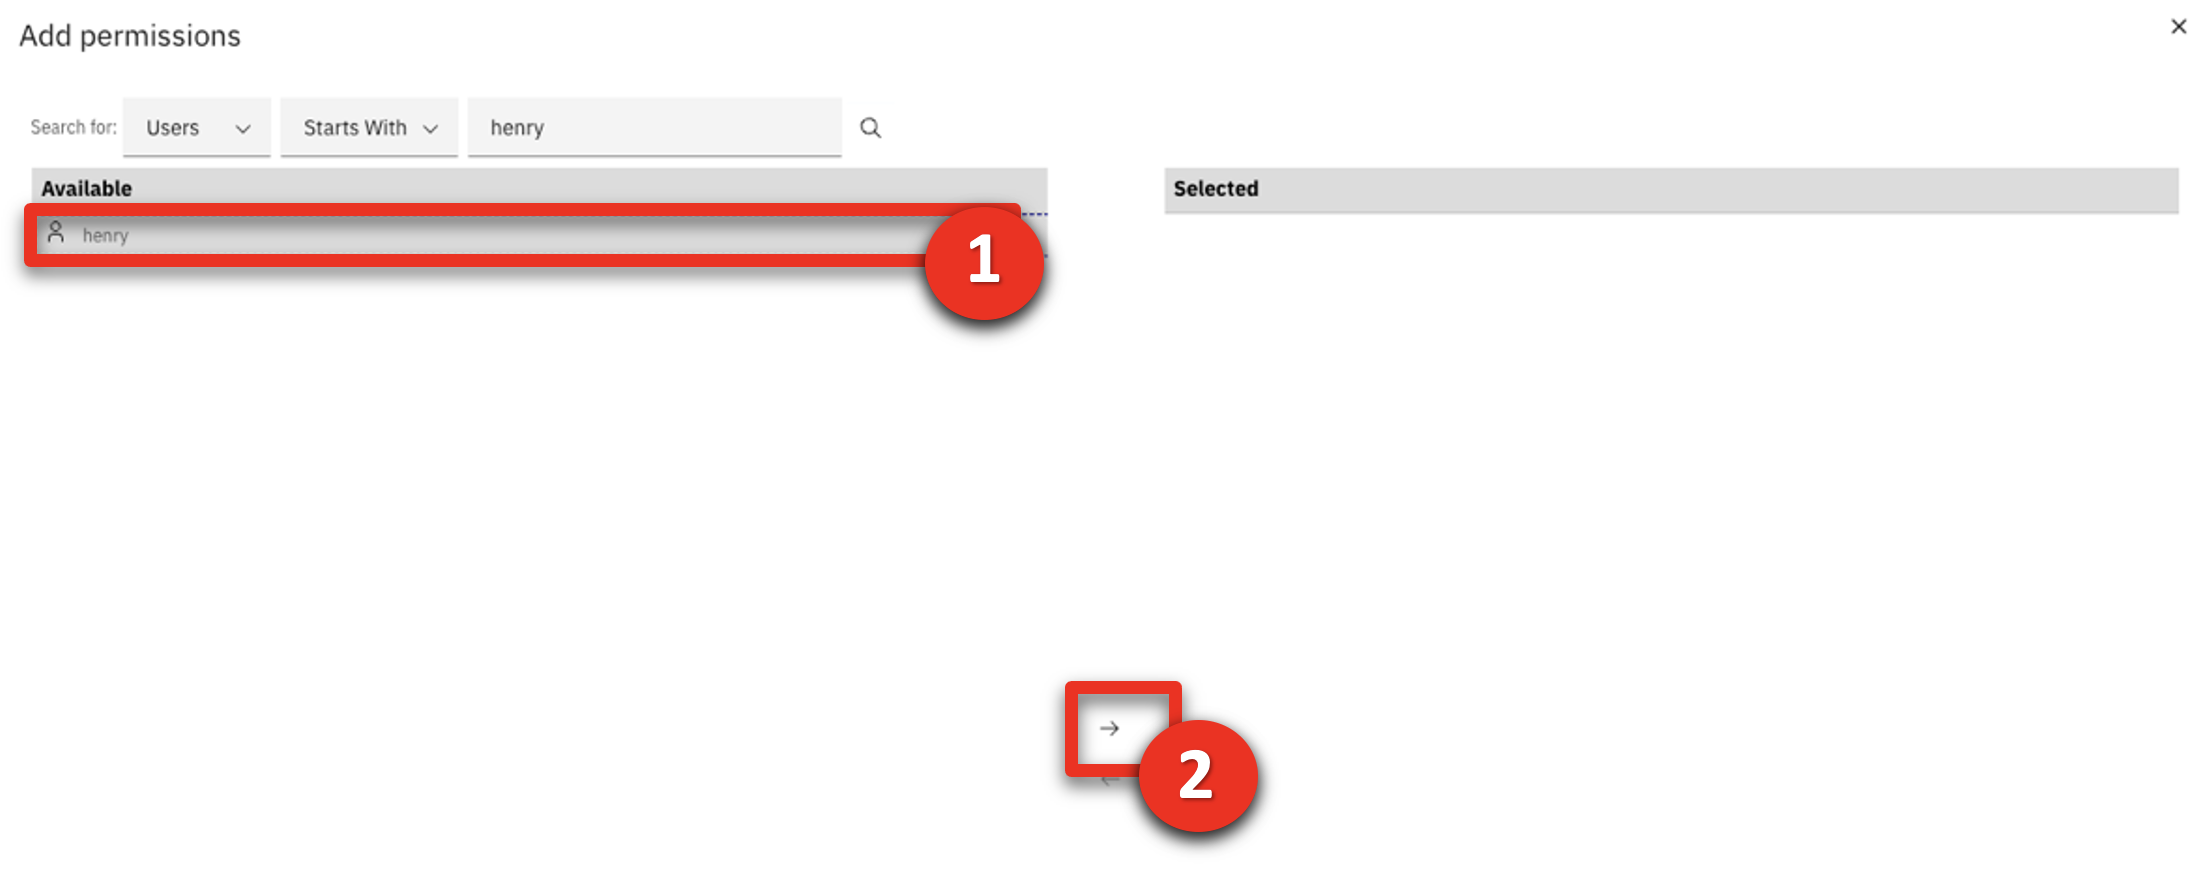
Type ‘henry’ (1) and click the magnifier icon (2).

-
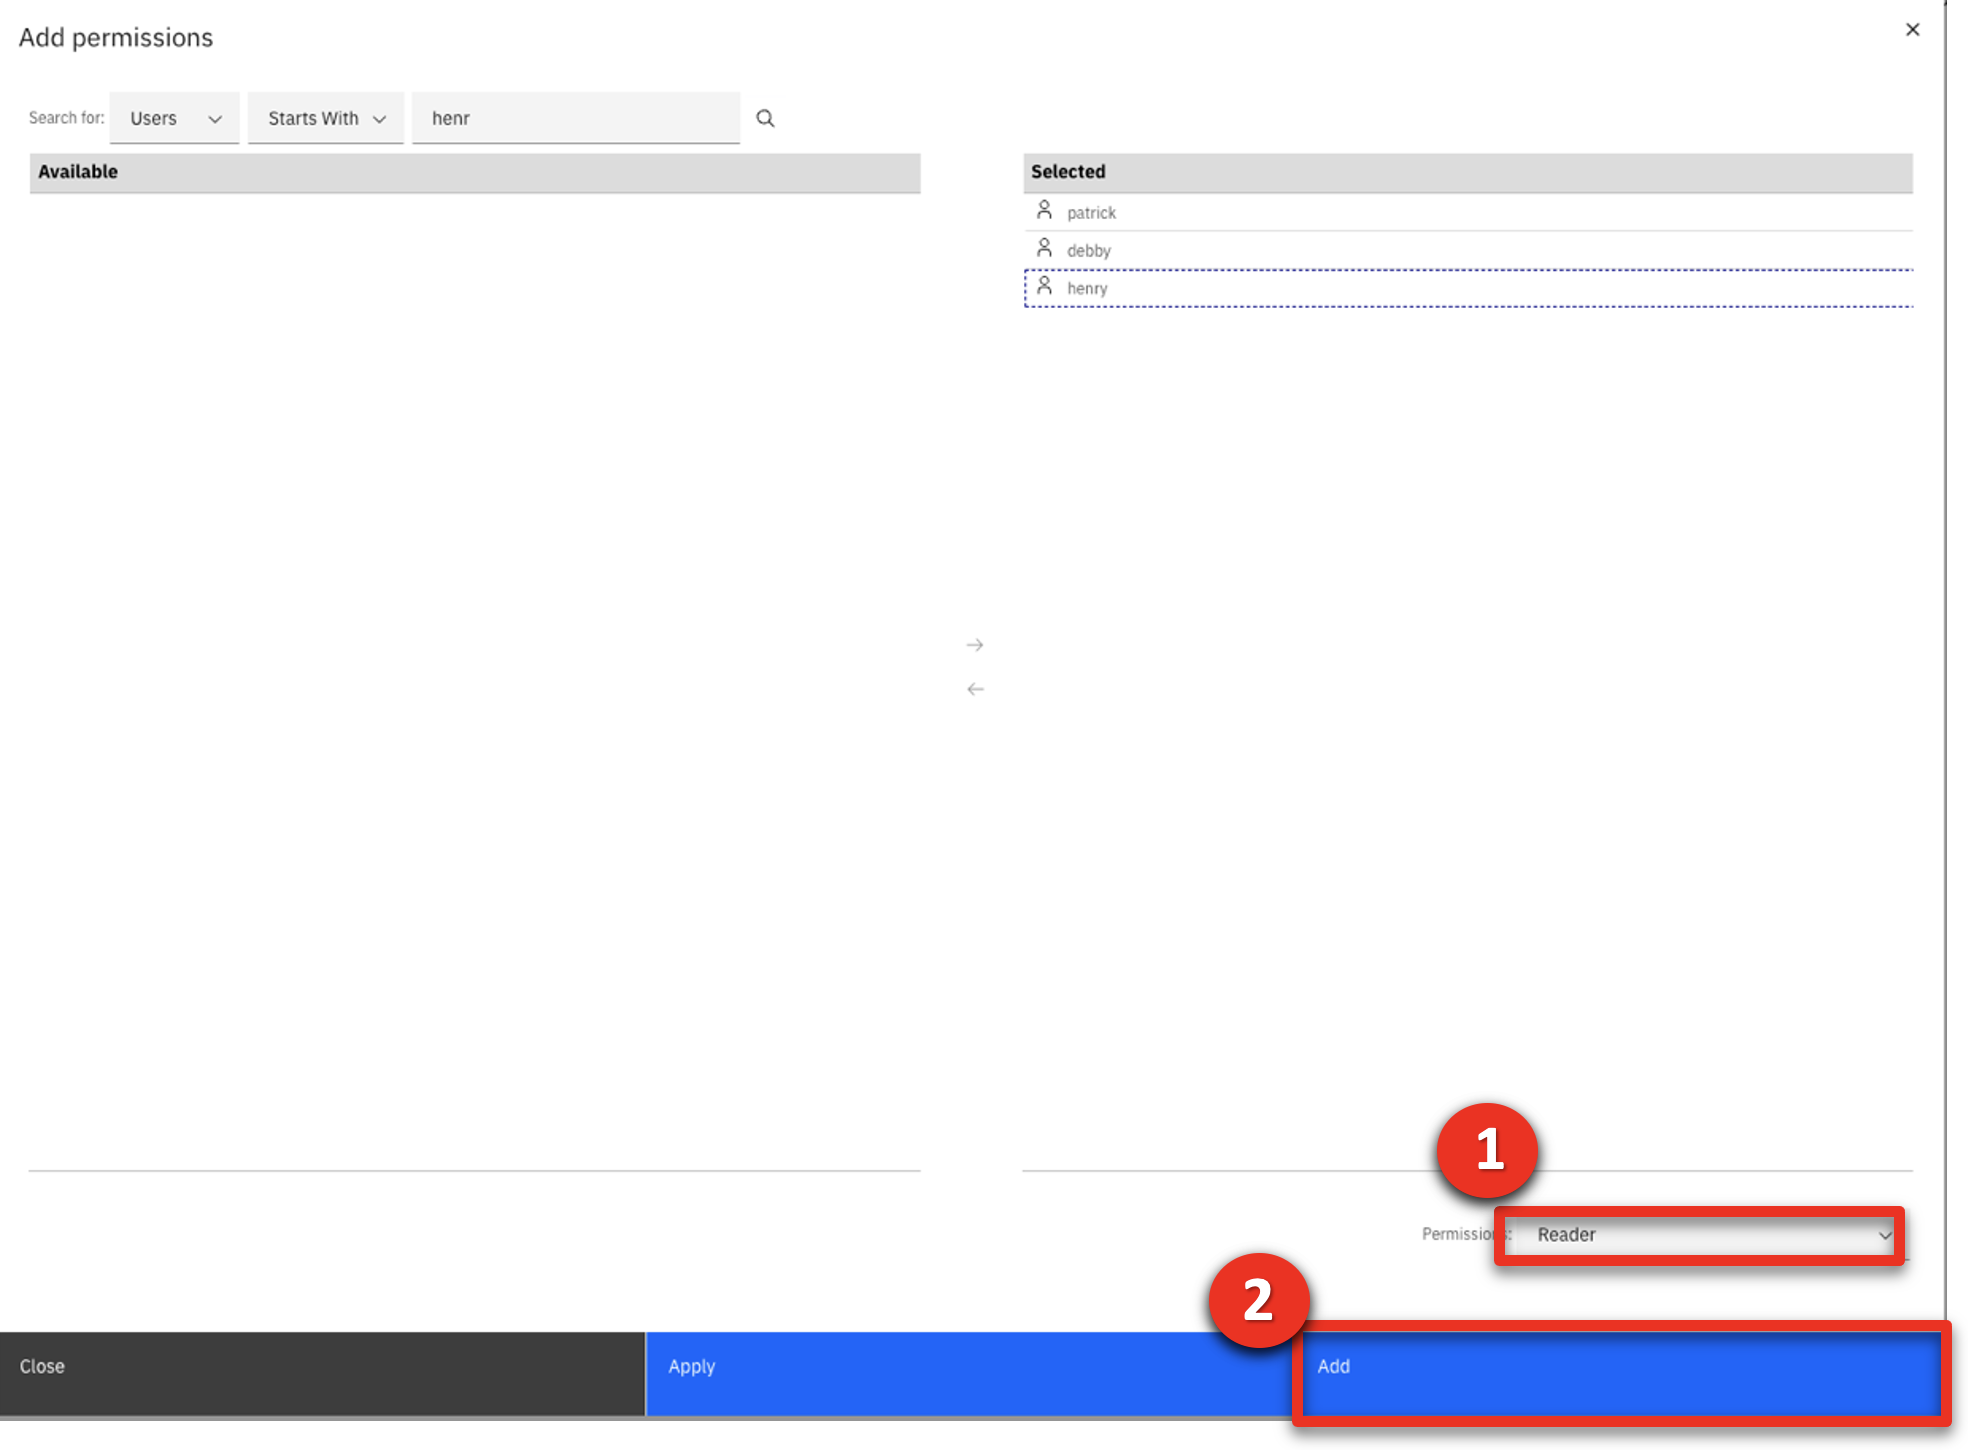
Select henry (1) and click the right-facing arrow (2) to add him to the Selected list.
-
Repeat the previous step to add debby and patrick.
-
Select Reader in the Permissions drop box (1) and click Add (2).
-
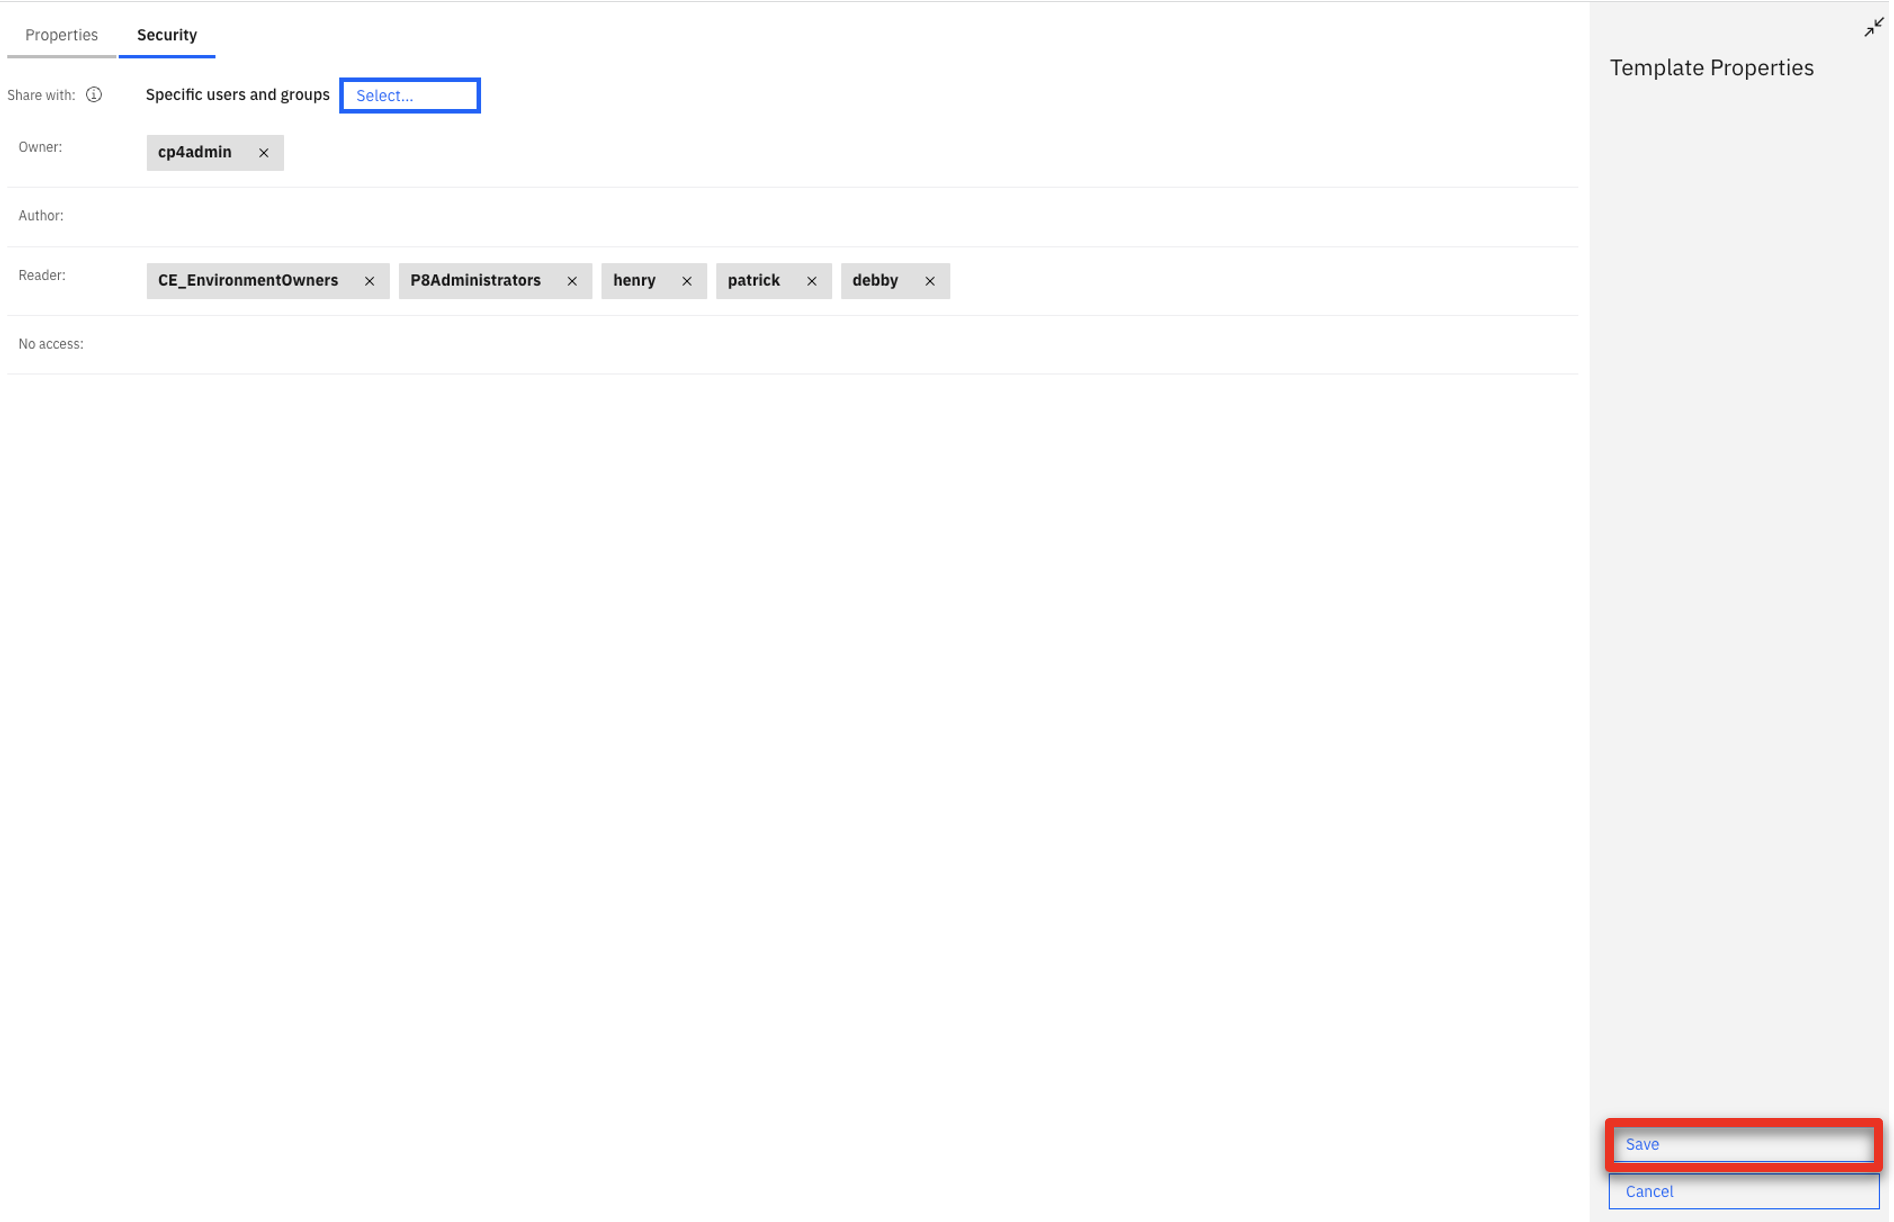
Click Save.
-
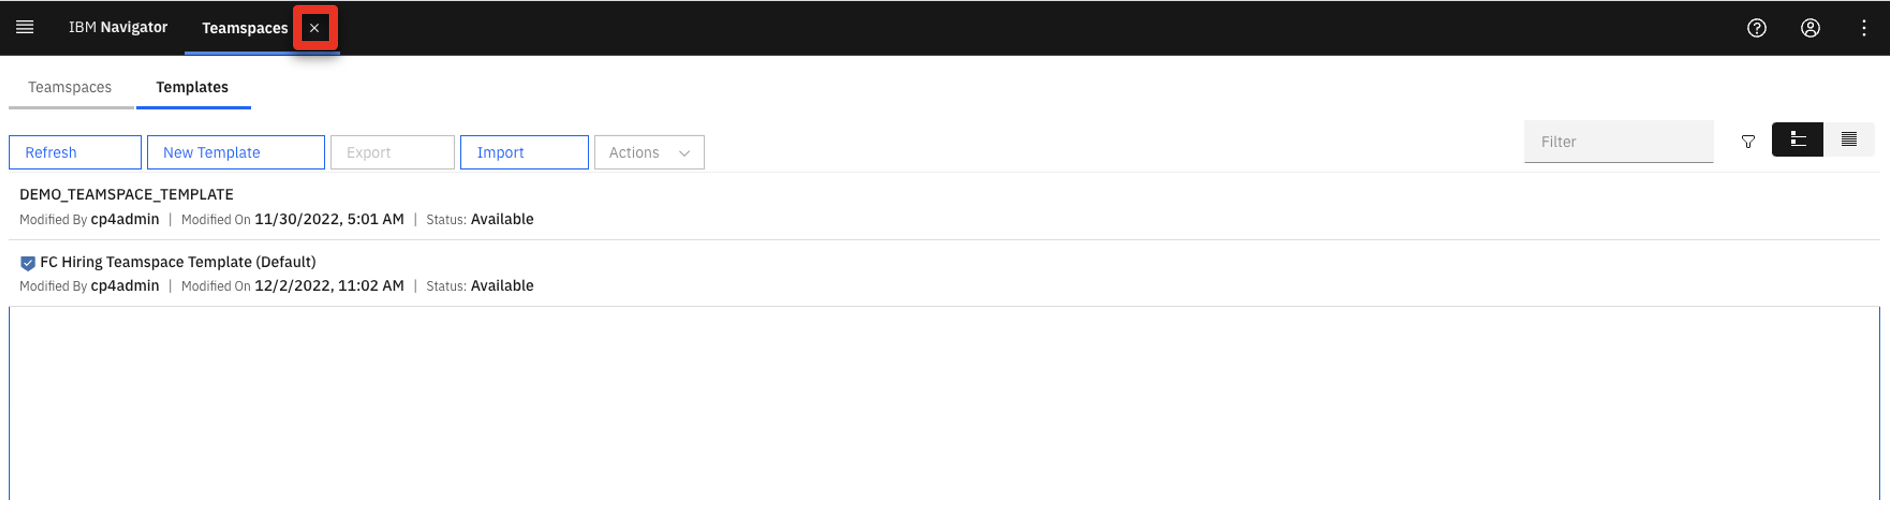
Select the FC Hiring Teamspace Template (1), click the Actions (2) drop down menu, and click Set as Default (3).
-
Click the x to close the Teamspaces view.
-
Log out of IBM Content Navigator.
7 - Create a finalized teamspace
-
Open IBM Content Navigator using the URL from your cheat sheet. Select Enterprise LDAP in the Log in with drop down menu (1). Enter the Username: ‘henry’ and Password: ‘henry’ (2). Click Log in (3).
-
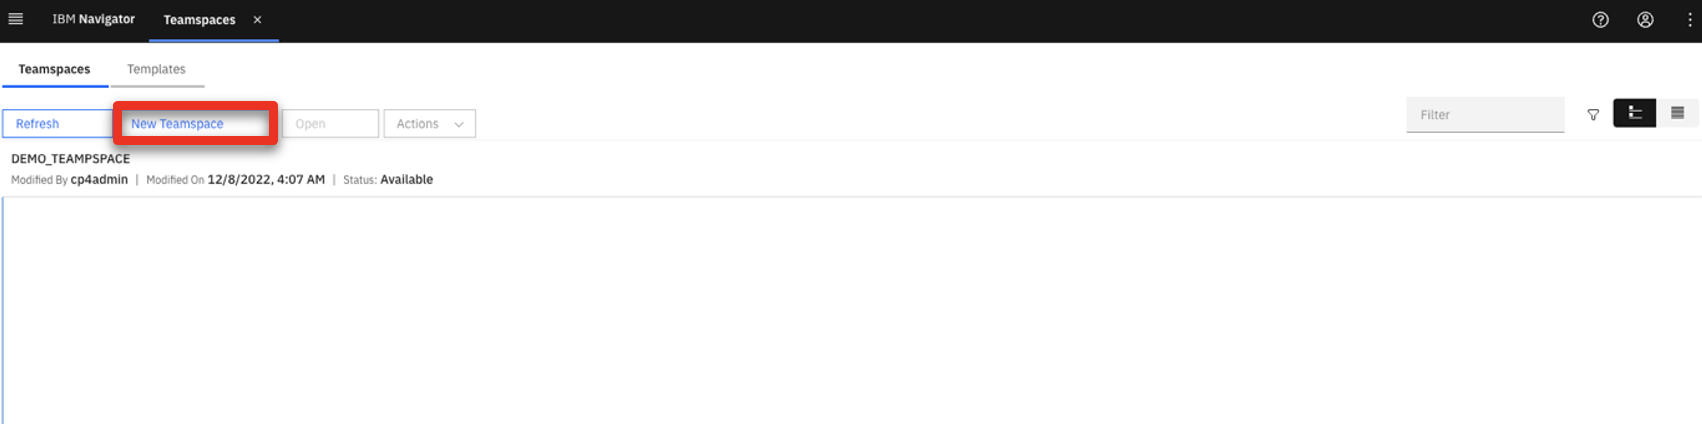
Click the Teamspaces tile.
-
Click New Teamspace.
-
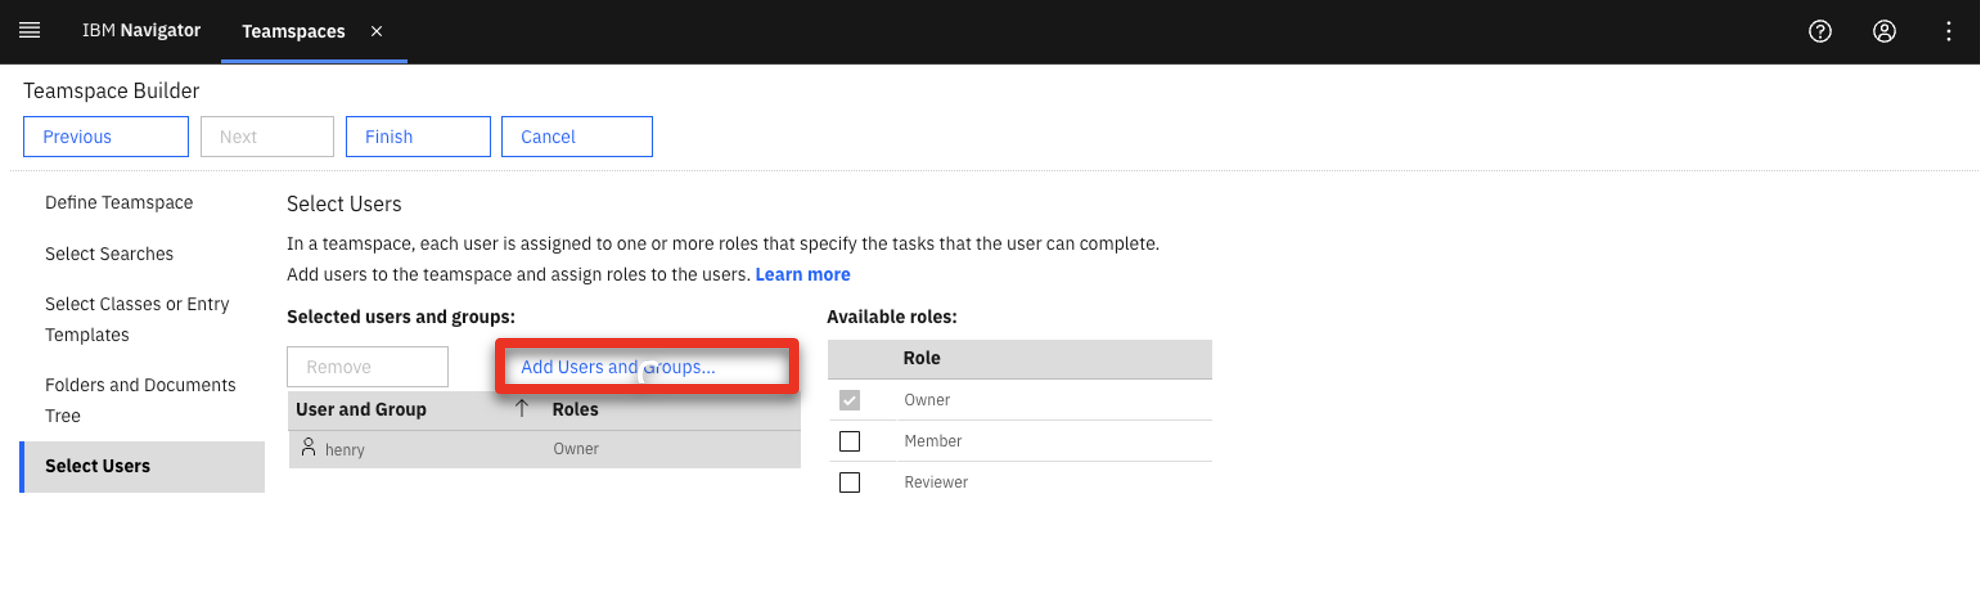
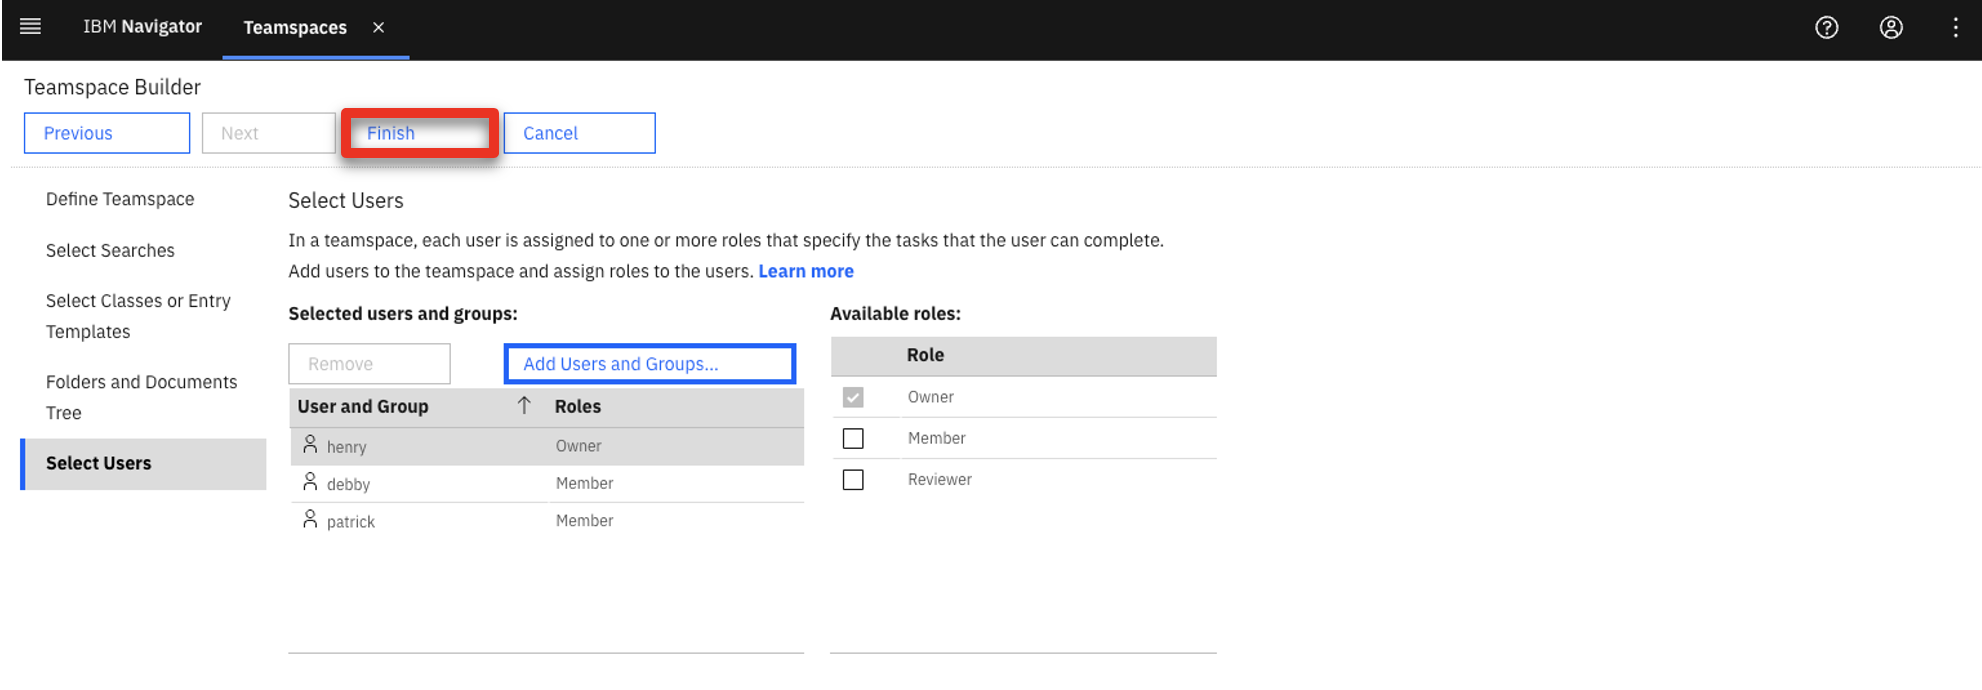
Type ‘John Doe’ (1) in the Teamspace name field and click Select Users (2).

-
Click Add Users and Groups…
-
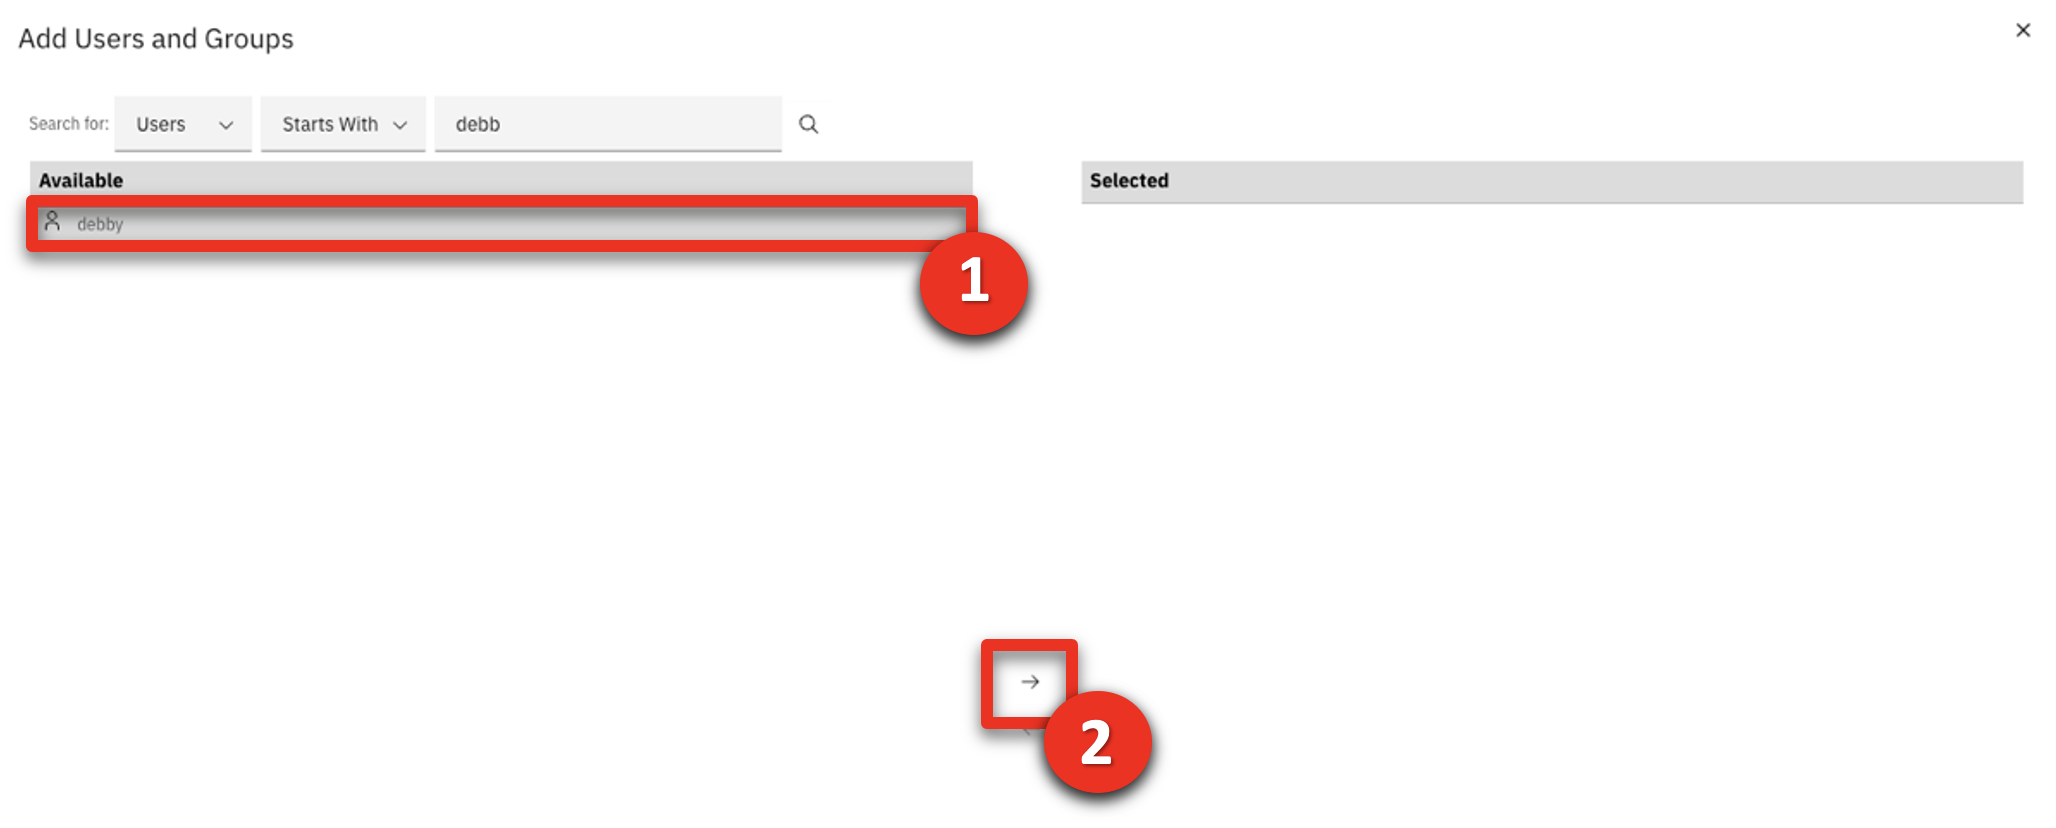
Type ‘debby’ (1) and click the magnifier icon (2).

-
Select debby (1) and click the right-facing arrow (2).
-
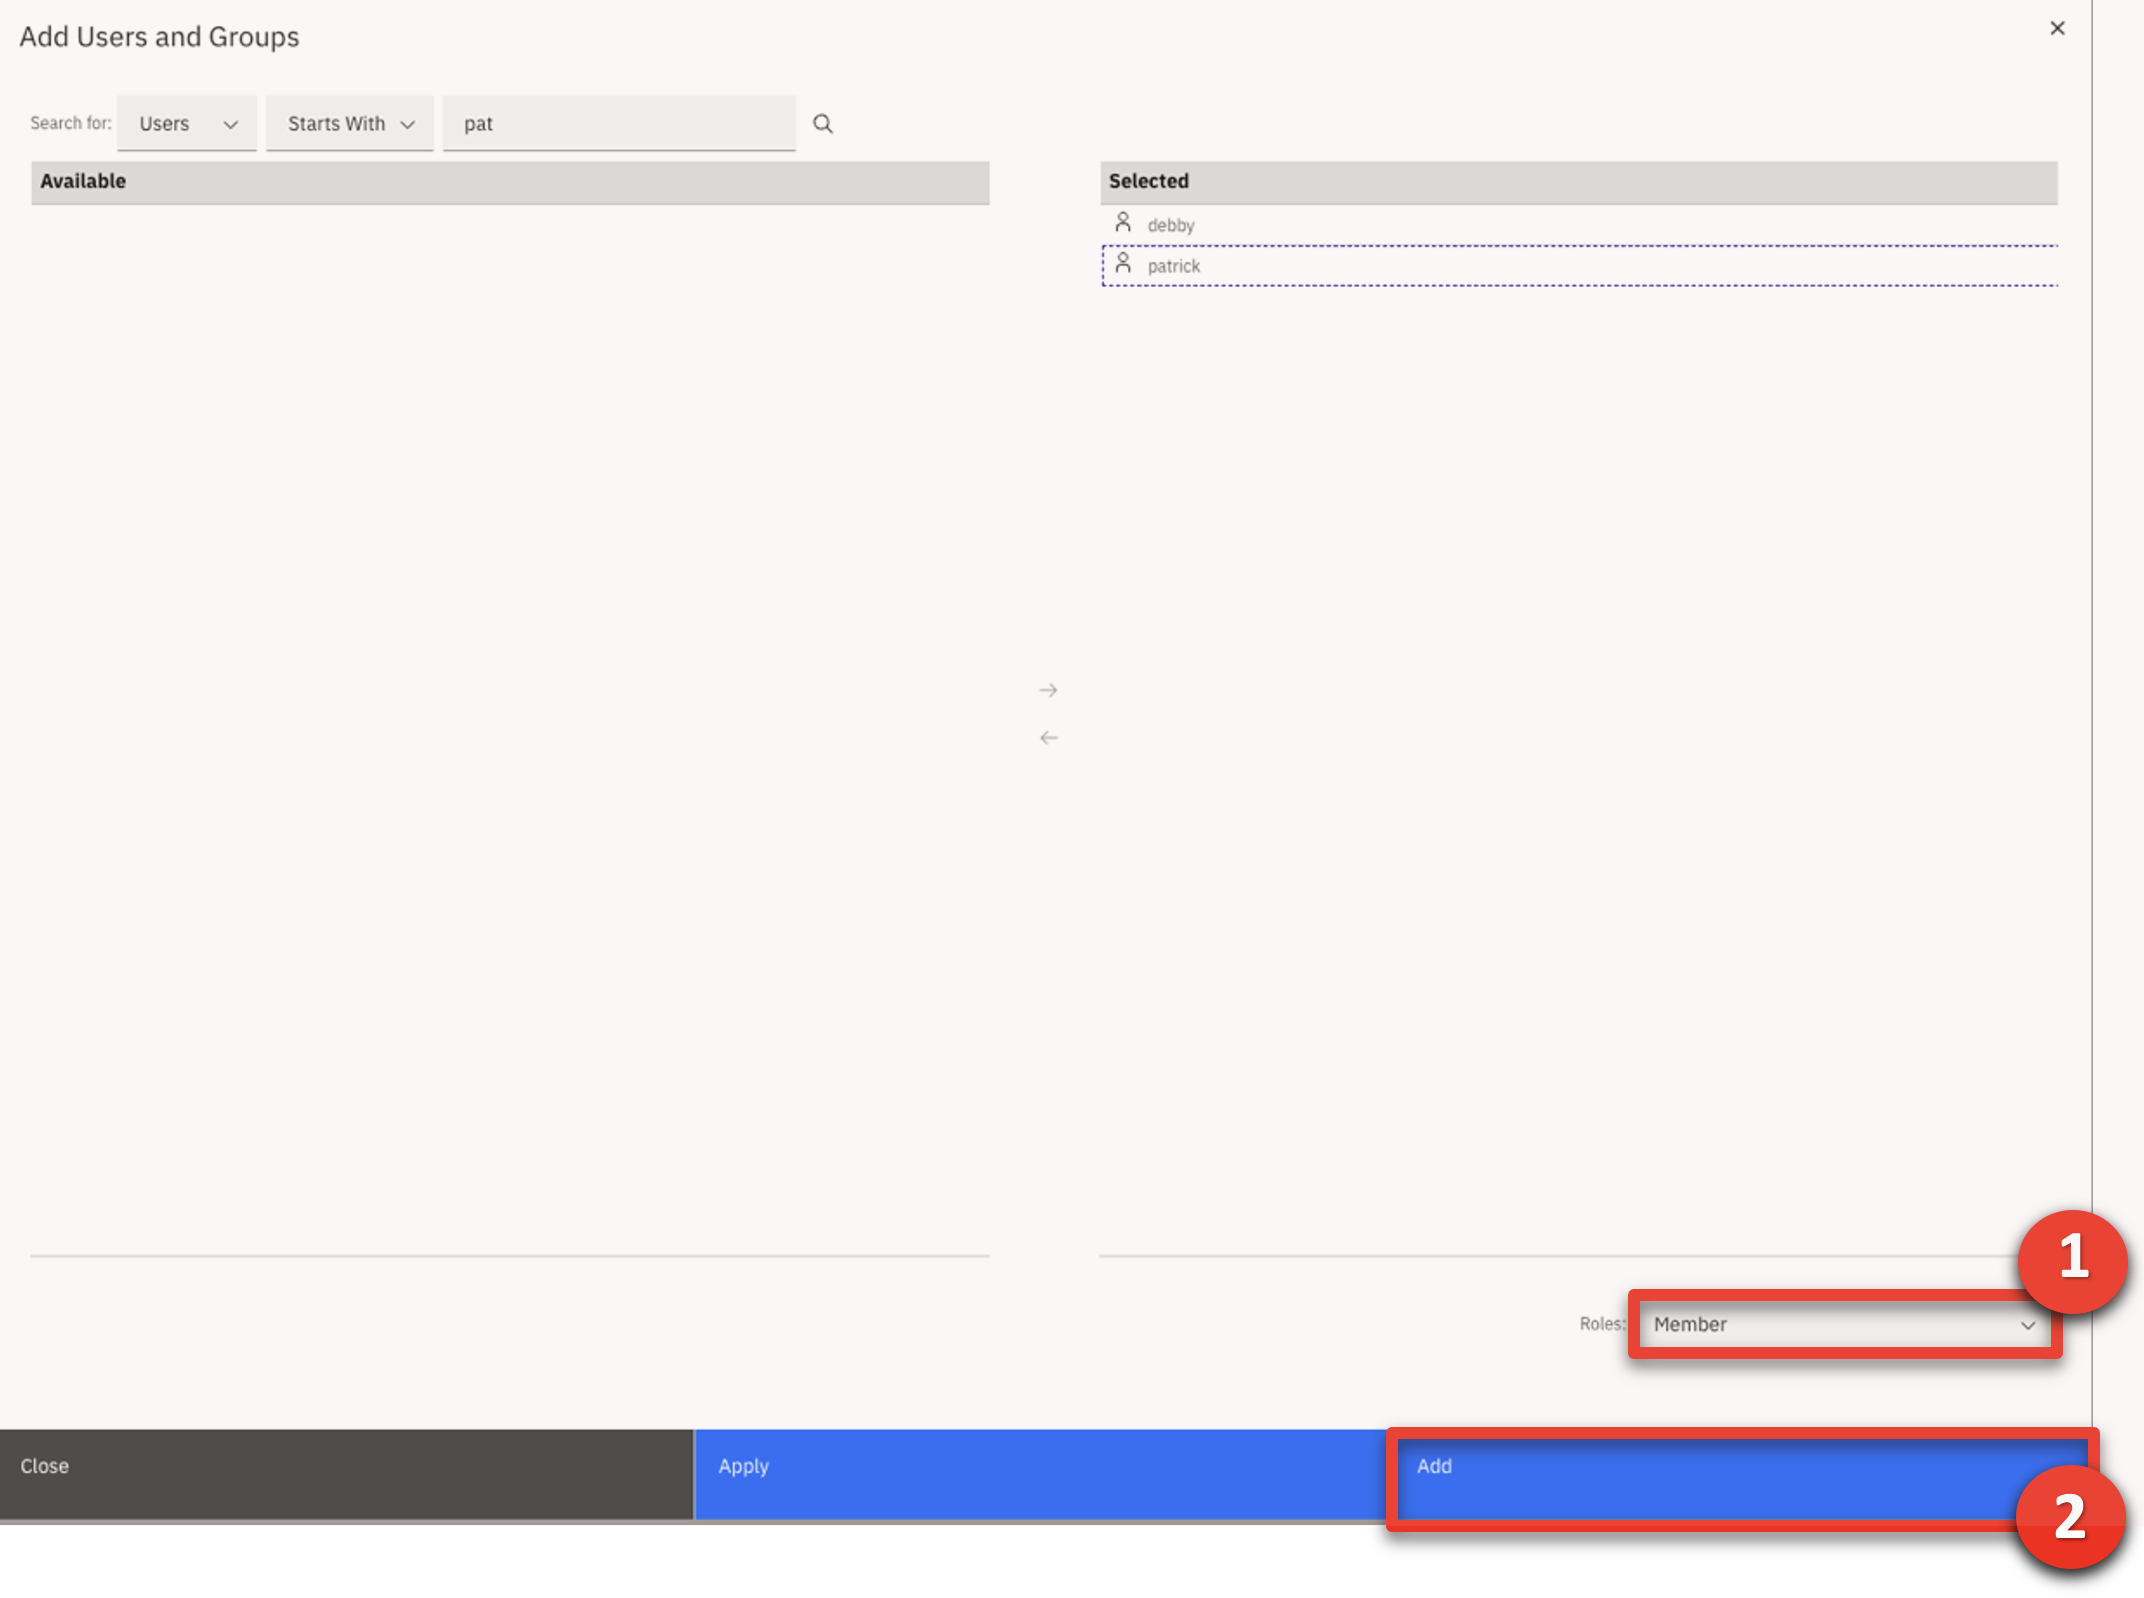
Repeat the previous step to add patrick.

-
Select Member (1) in the Roles menu and click Add (2).
-
Click Finish.
-
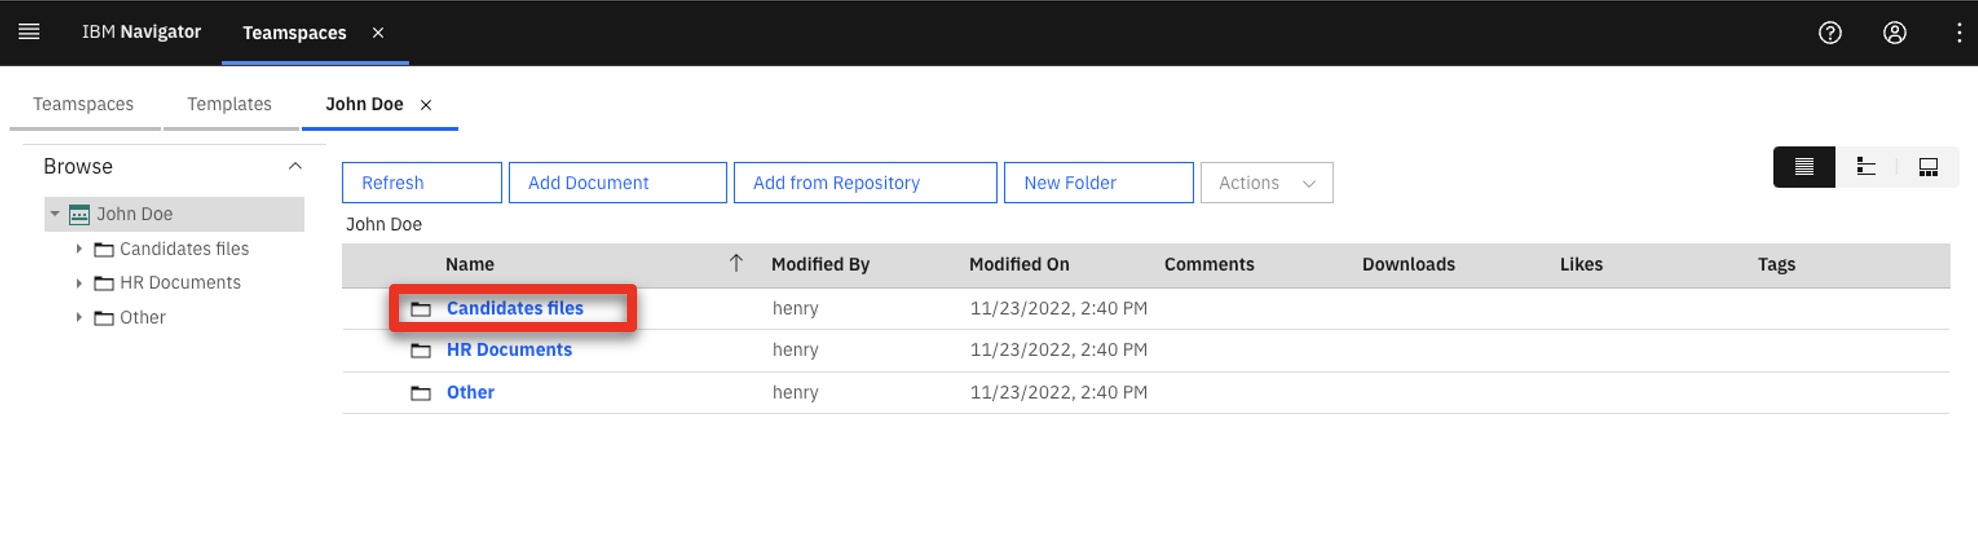
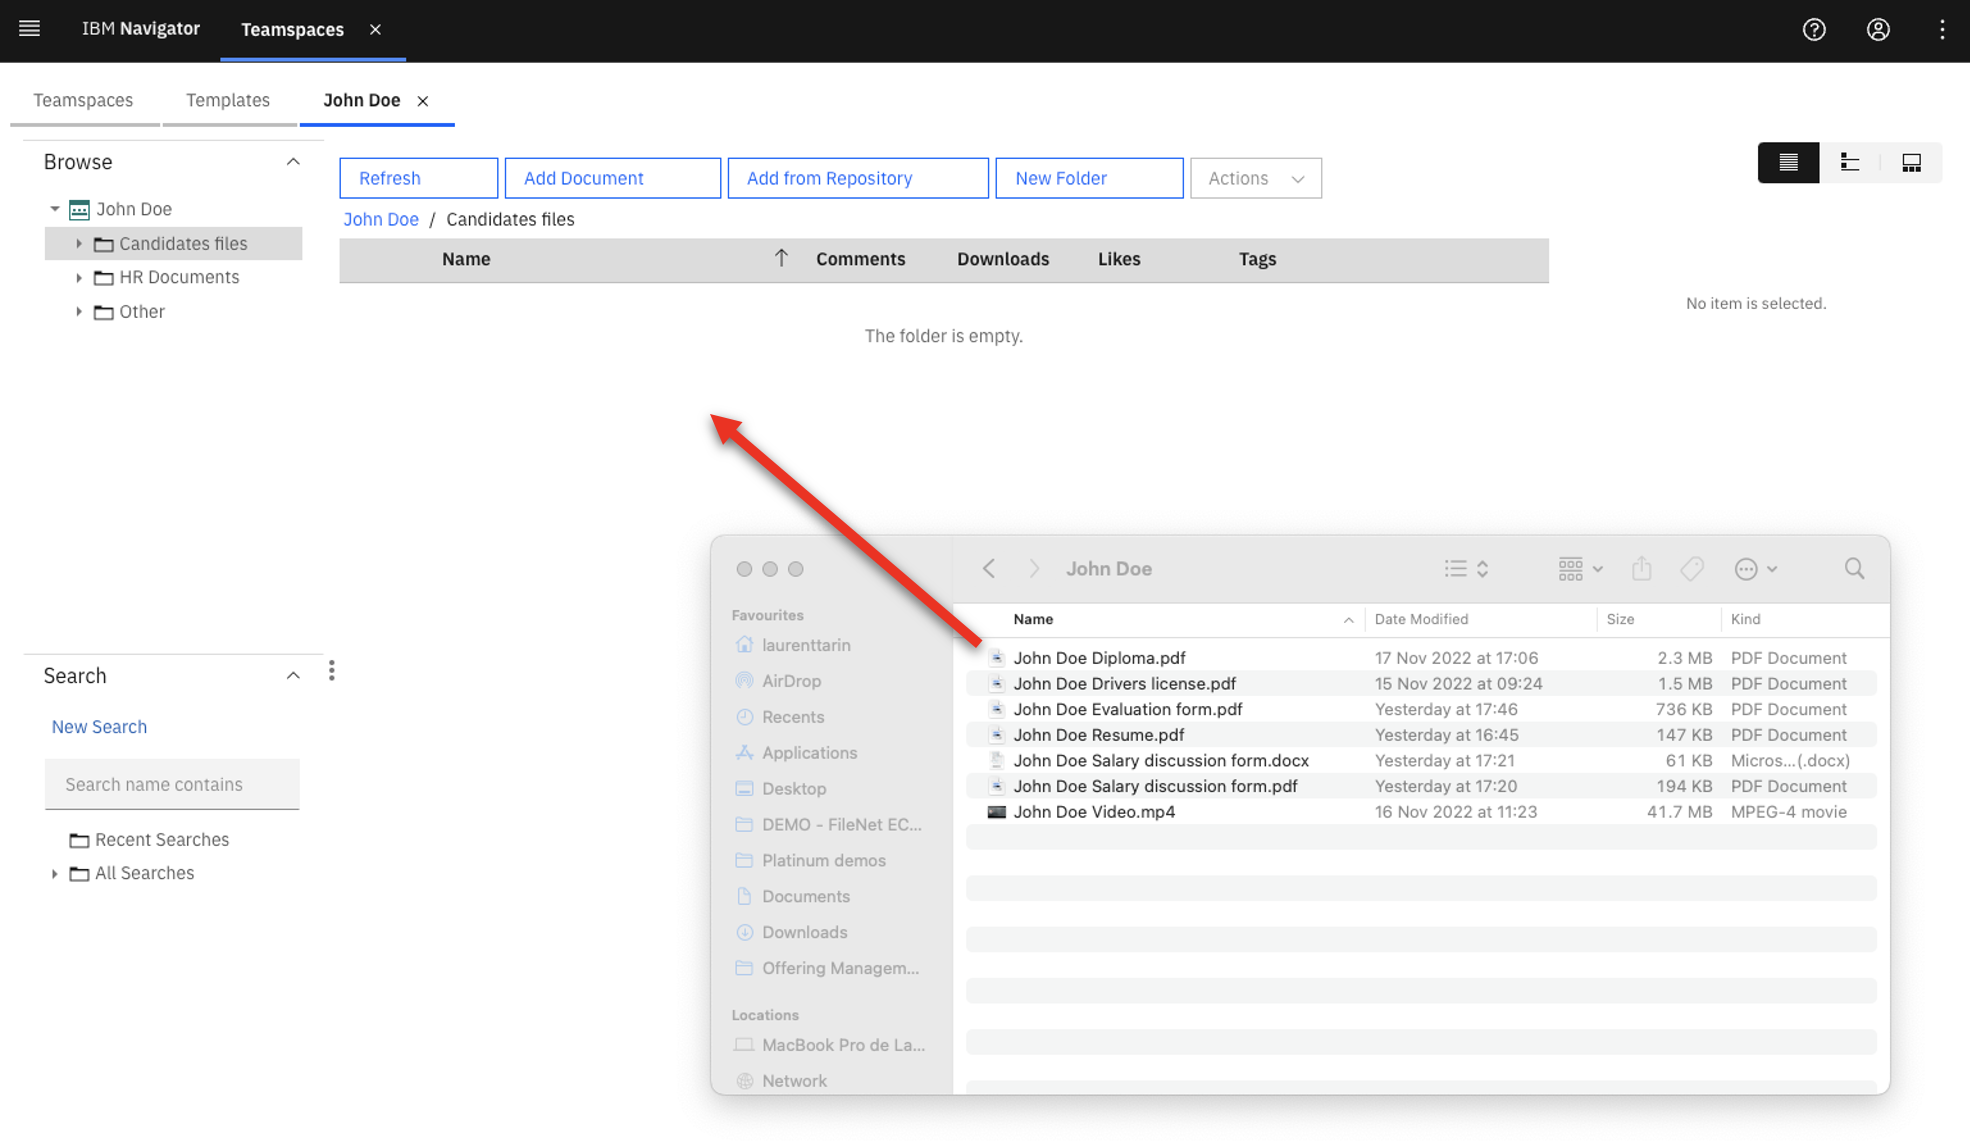
Click the Candidate files folder.
-
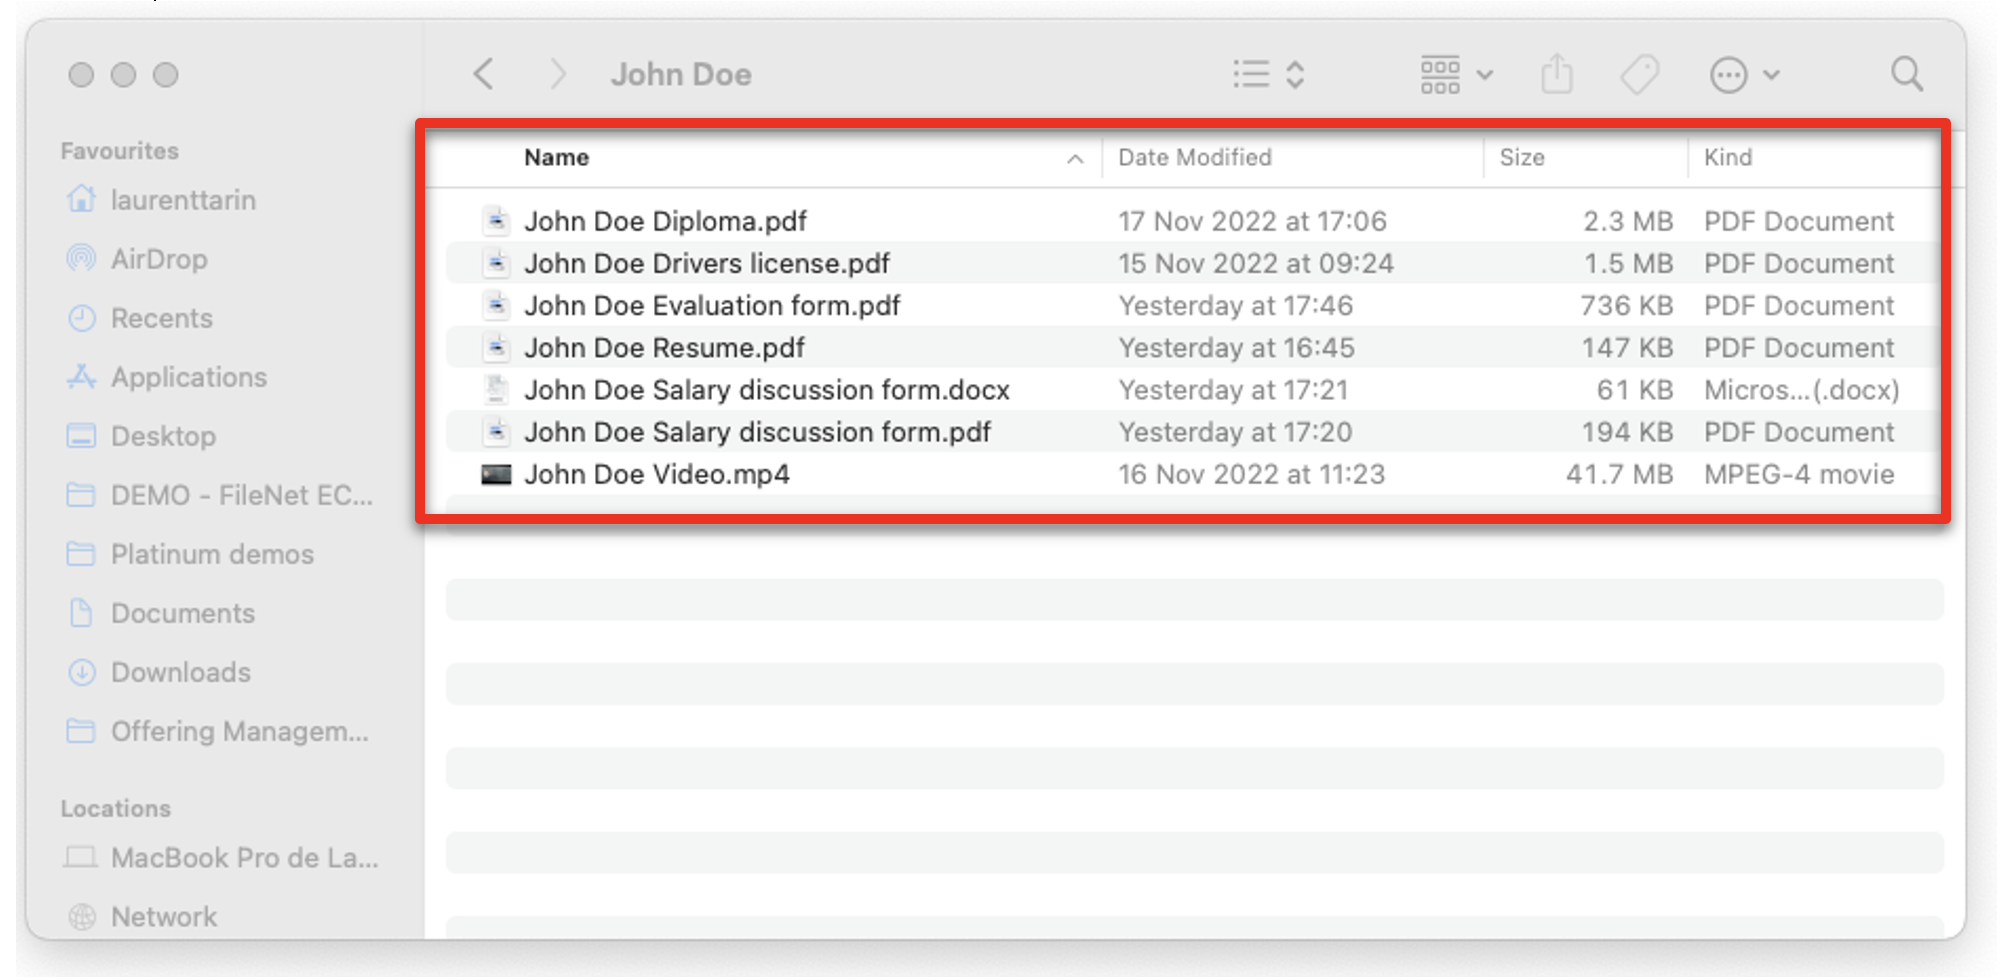
Open your local files containing John Doe’s application files.
-
Drag the John Doe Diploma.pdf file to the Candidate files folder.
-
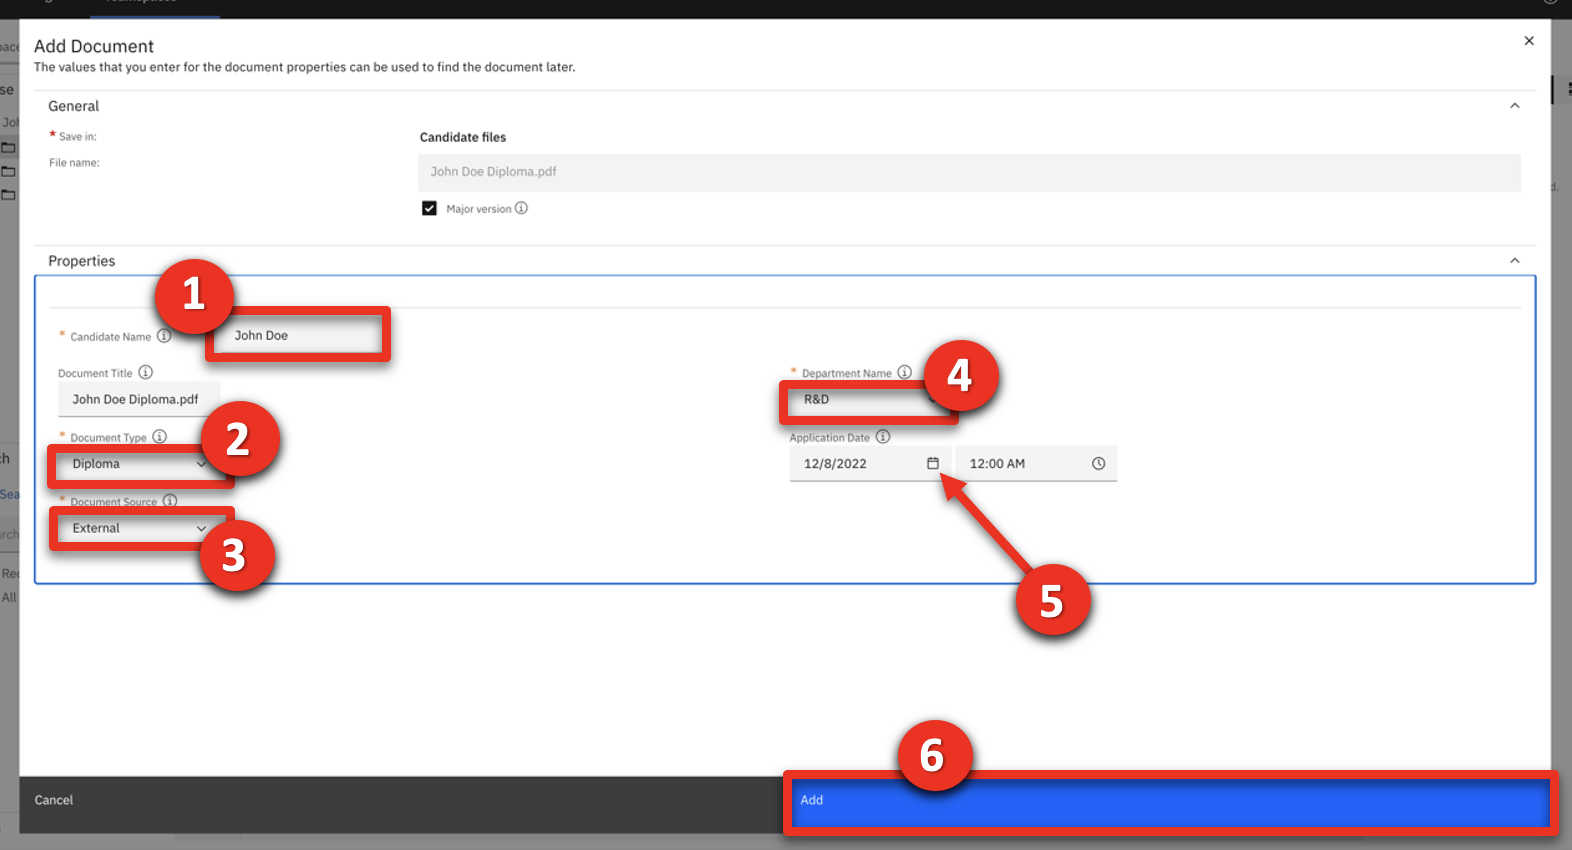
Type ‘John Doe’ for Candidate Name (1), set the Document Type to Diploma (2), set the Document Source to External (3), and set the Department Name to R&D (4). Click the calendar icon (5) and pick a day approximately three days in the future. Click Add (6).
-
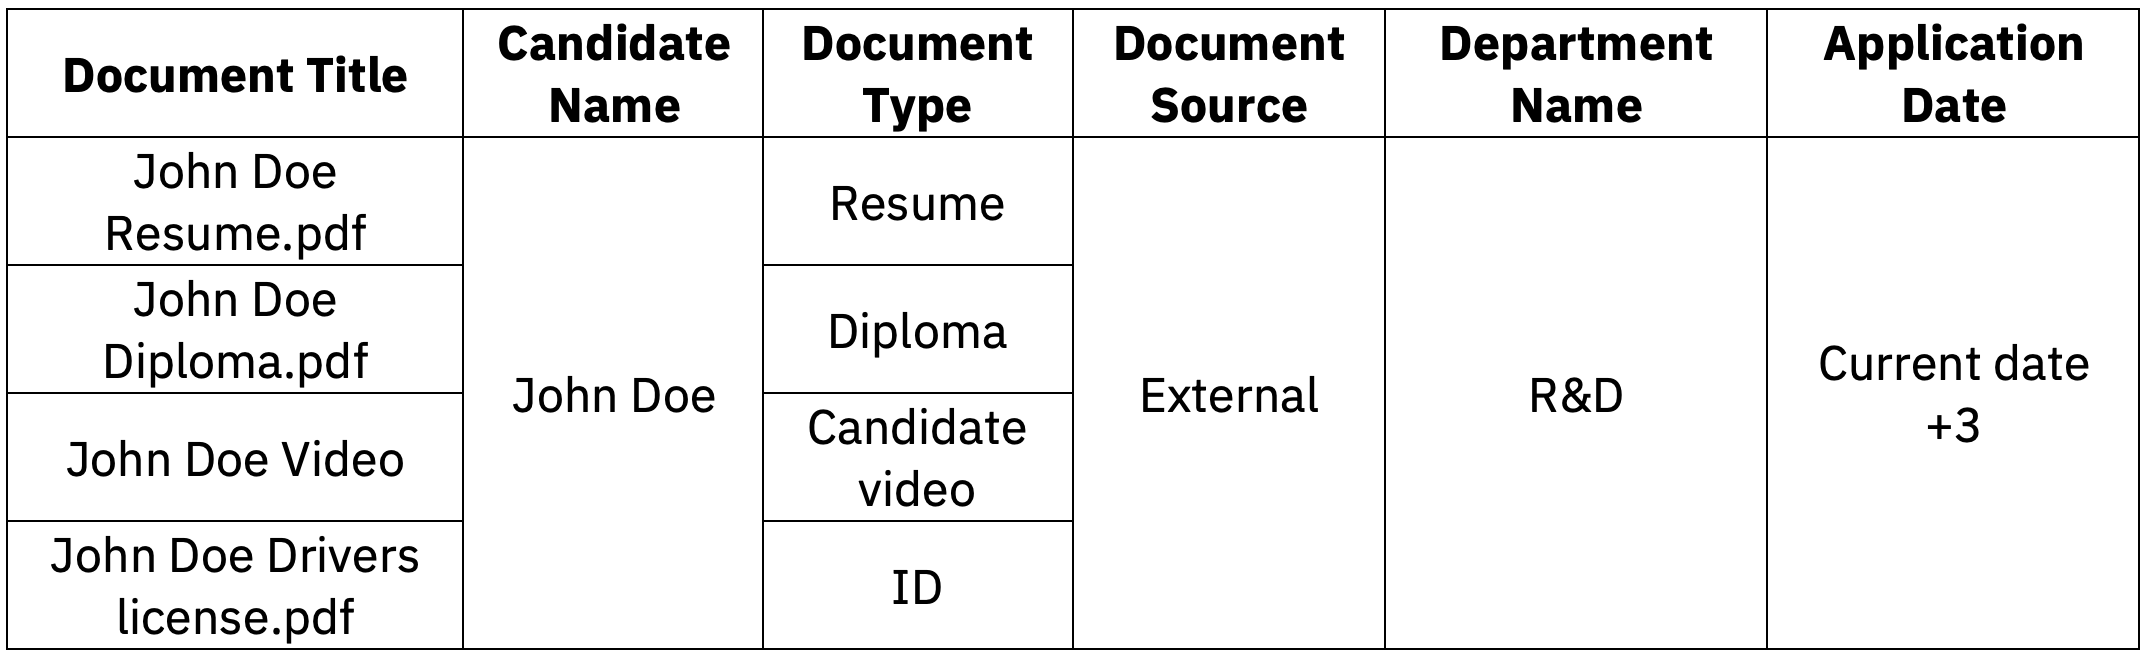
Repeat the previous two steps to add the John Doe’s Resume, Video, and Drivers License documents (individually) to the Candidate Files folder. Add the properties below to each document as you add them to the repository:
-
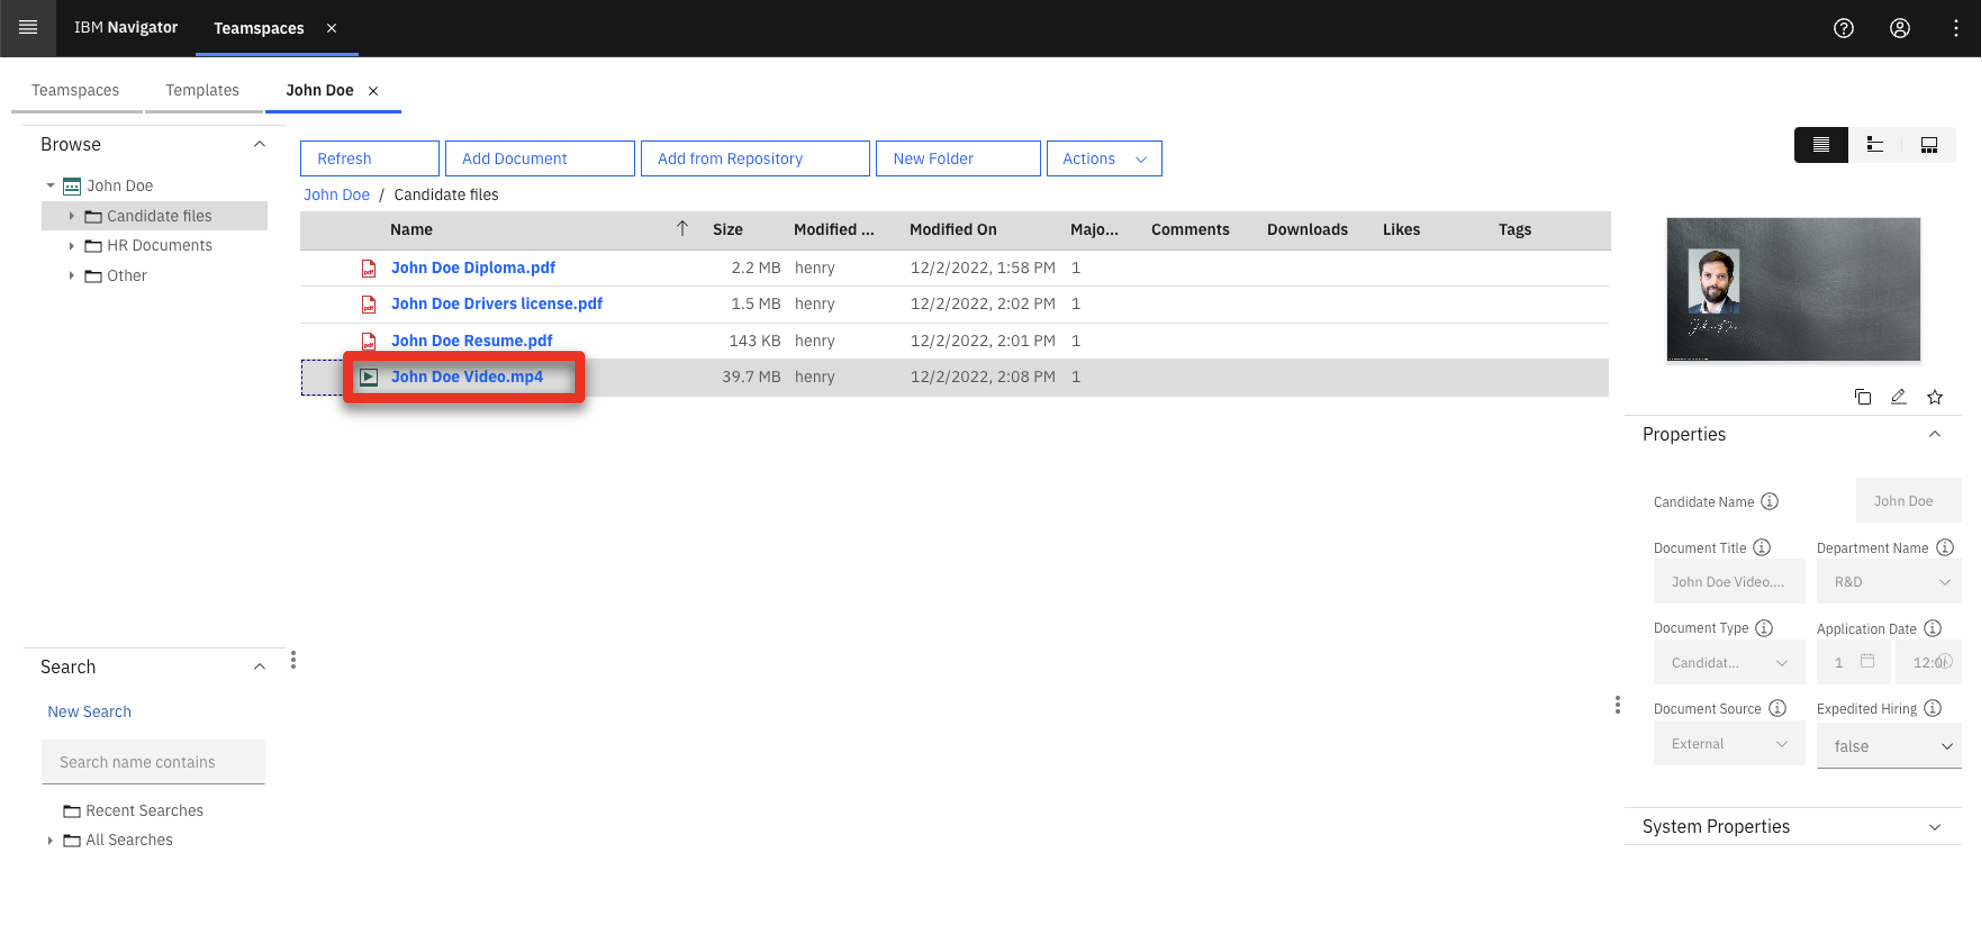
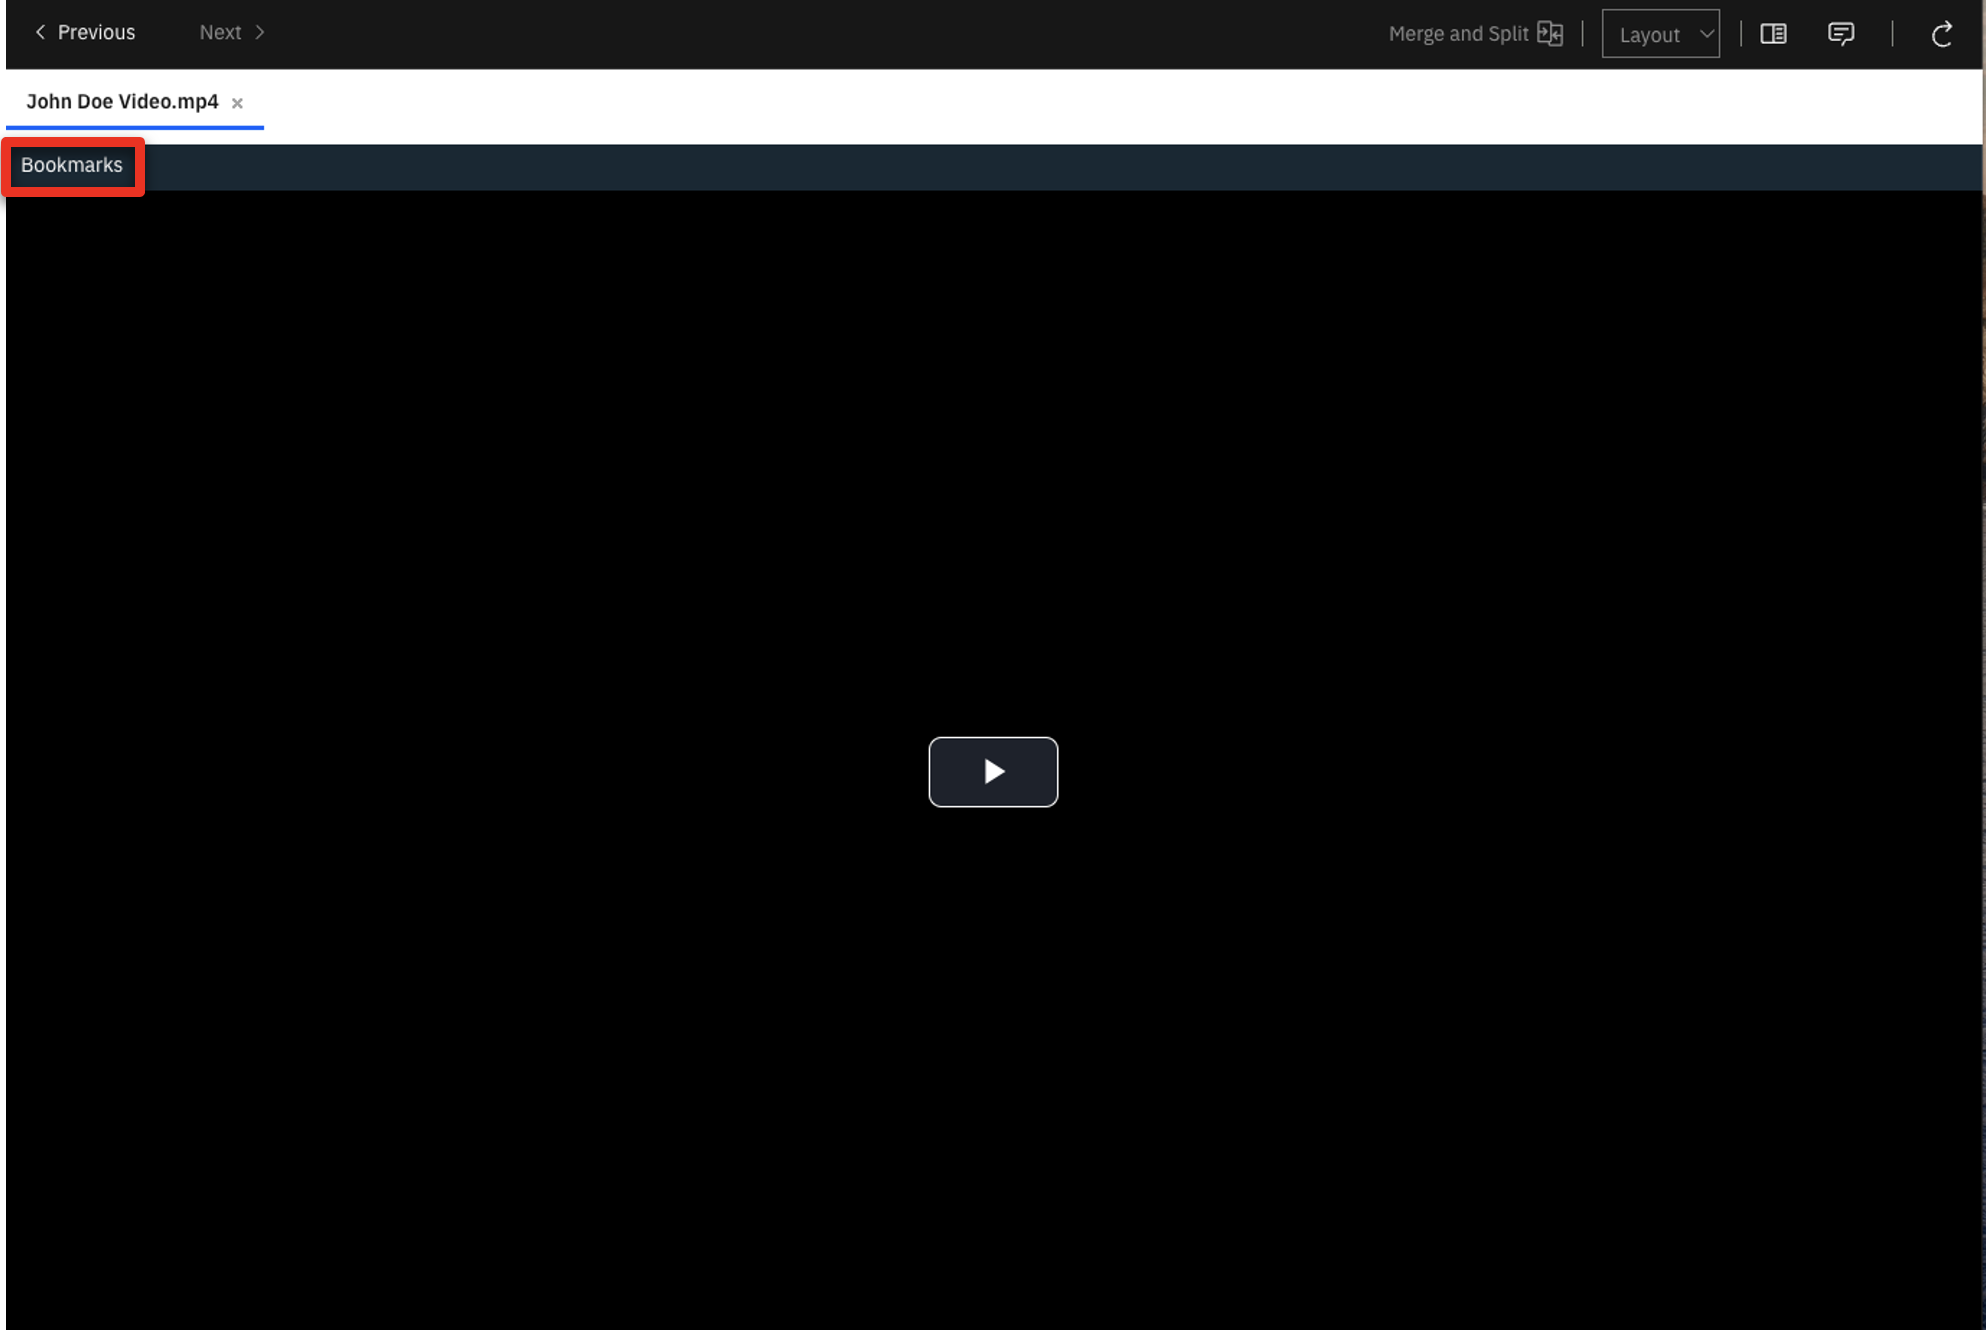
Click John Doe Video.mp4.
-
Click Bookmarks.
-
Click New Bookmark.
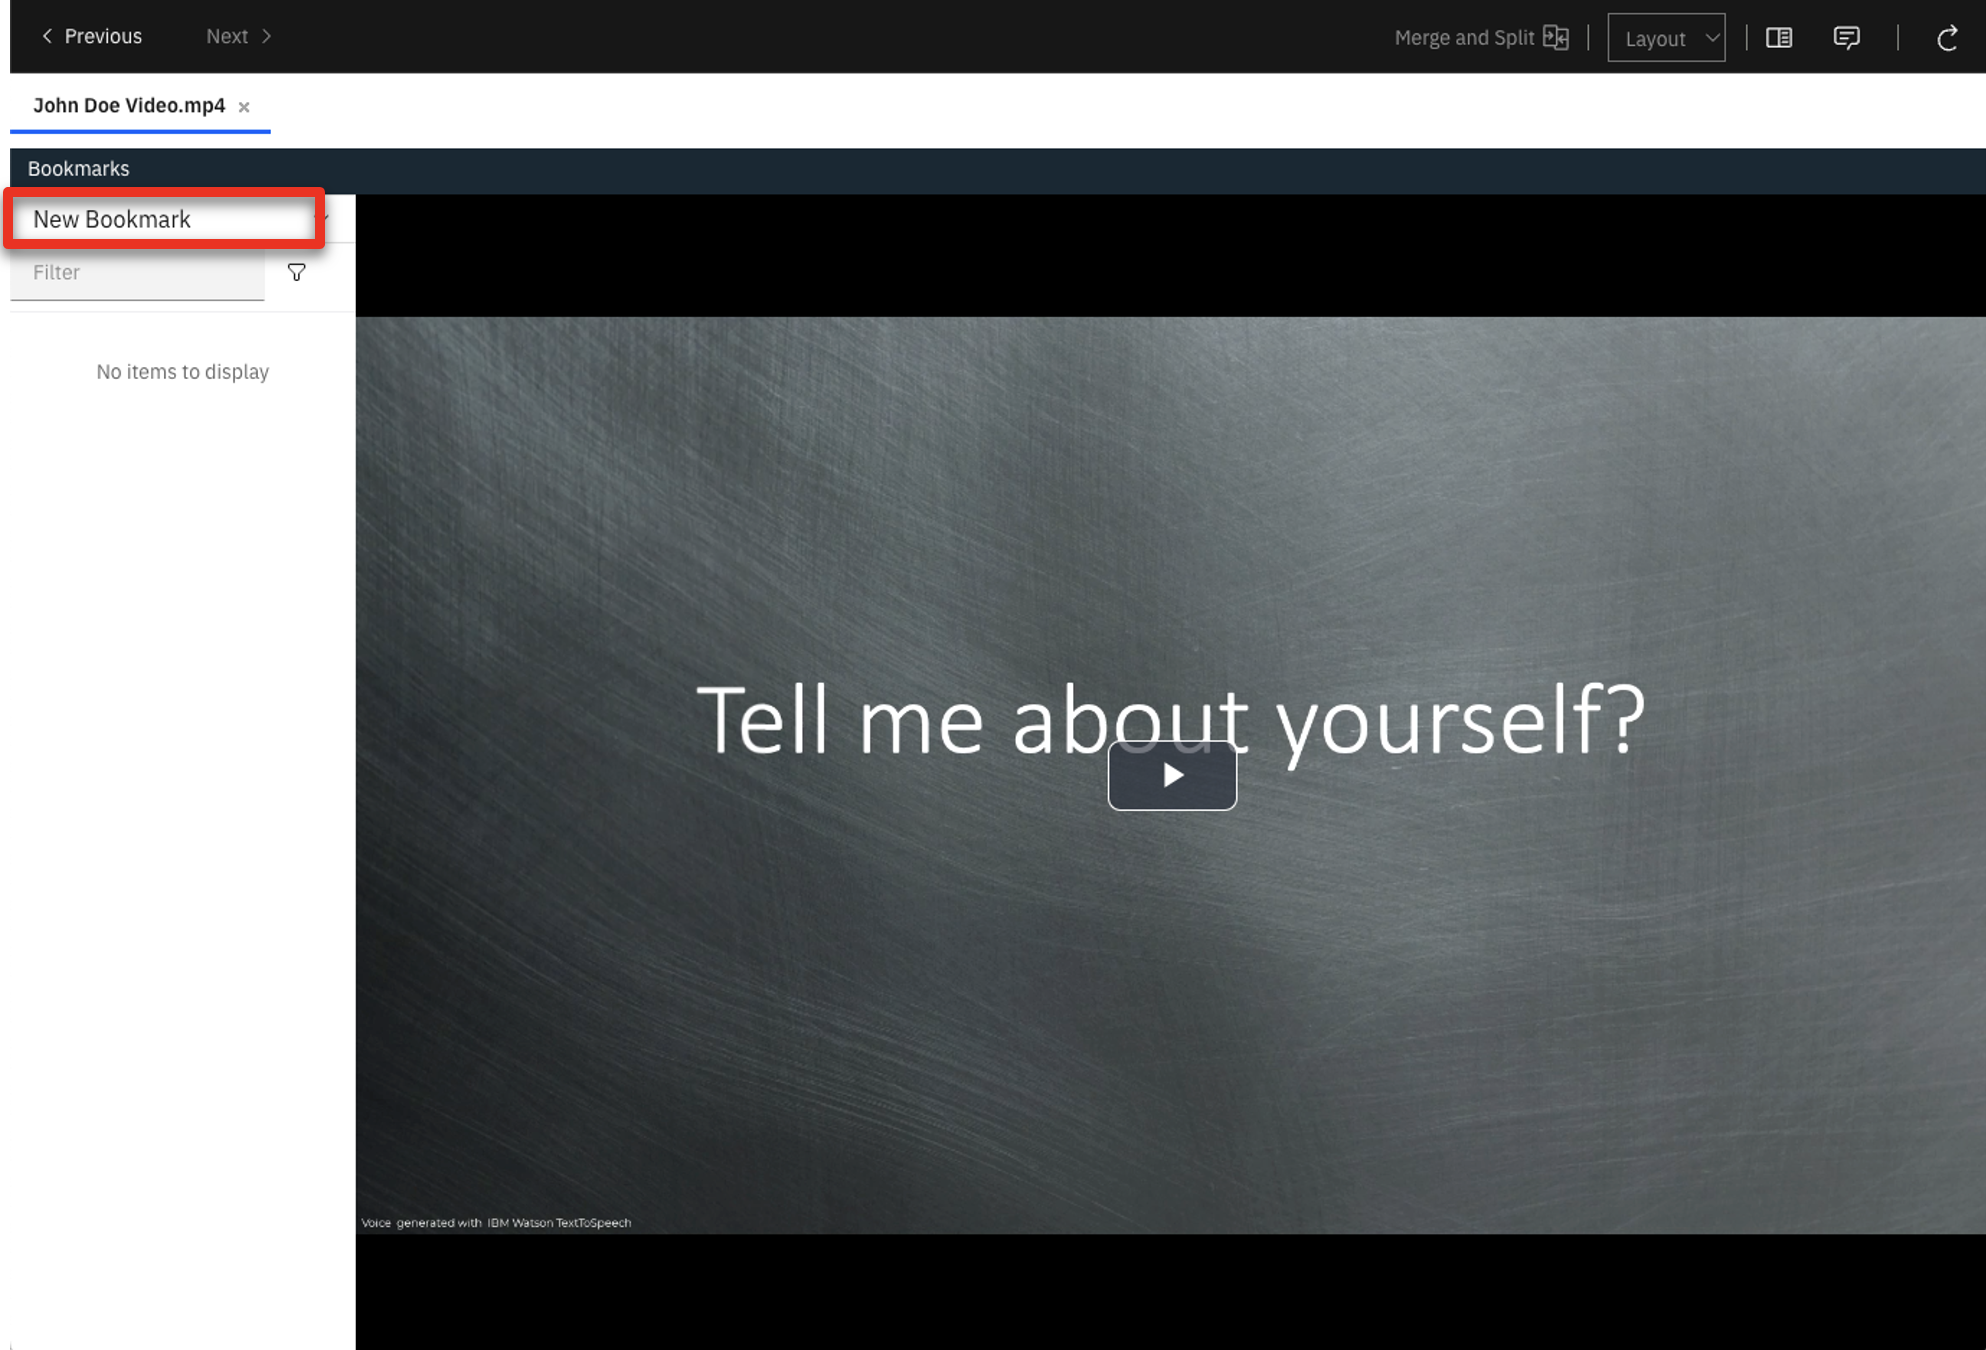
-
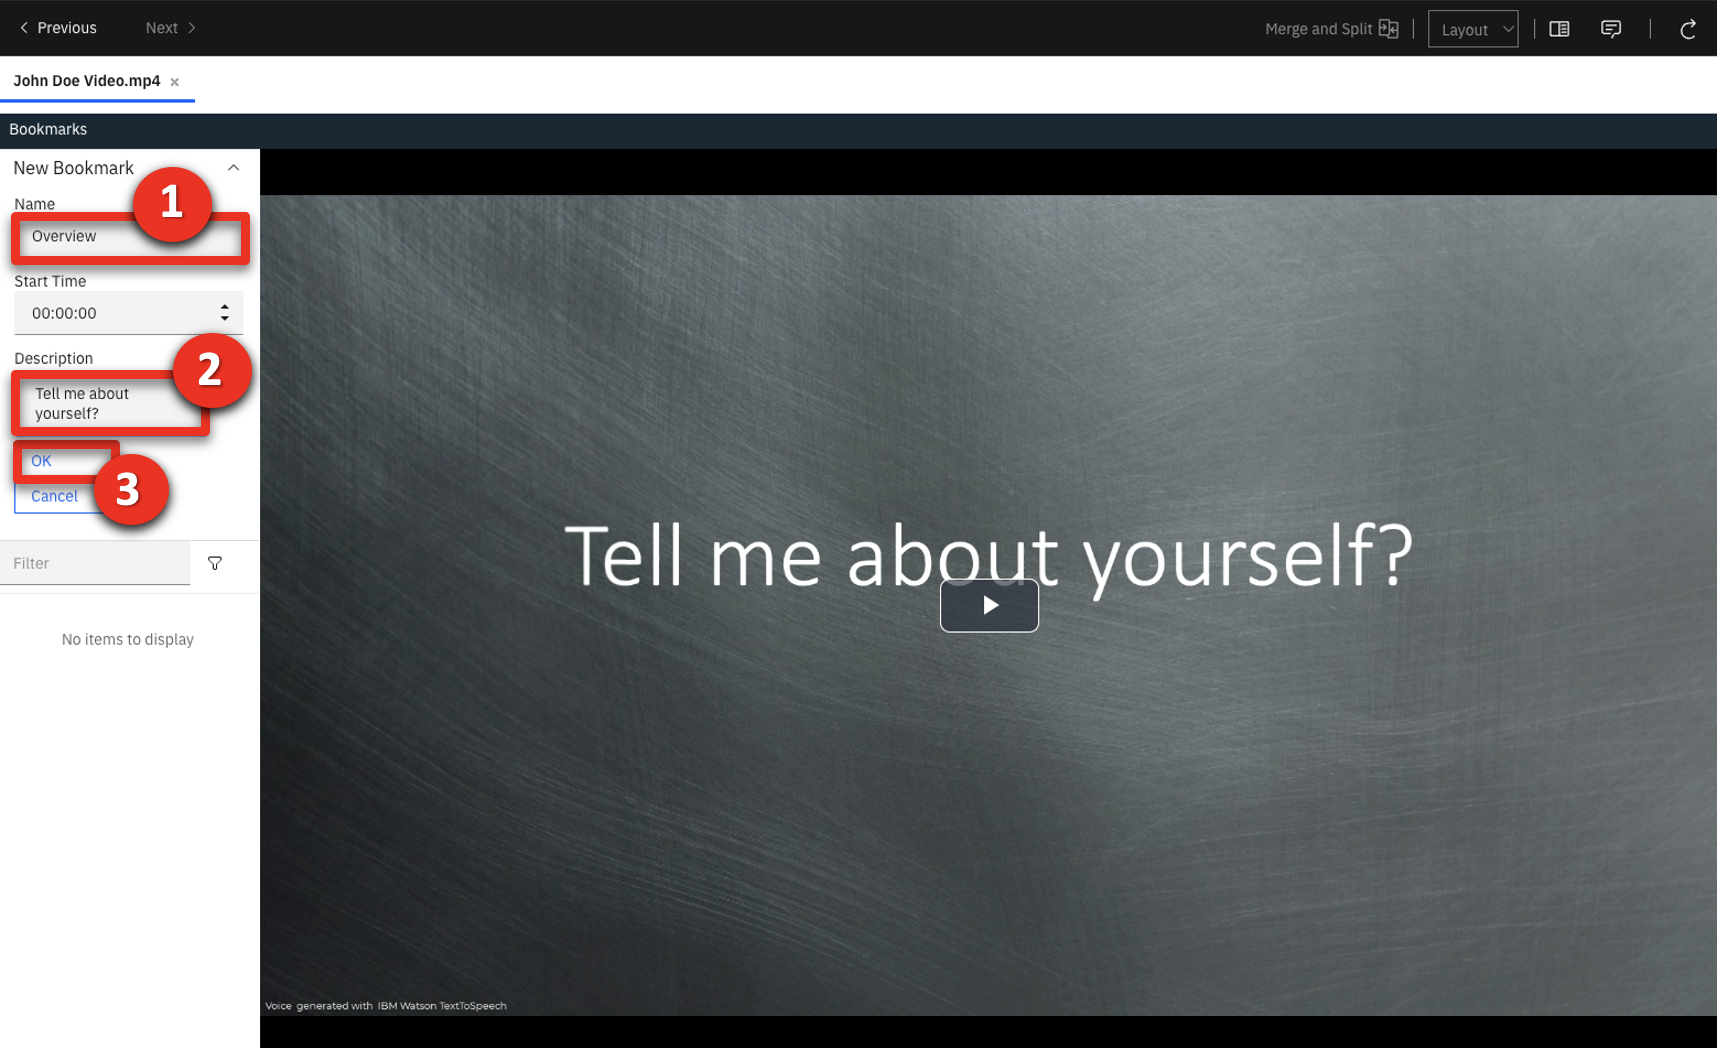
Type ‘Overview’ (1) in the Name field. Type ‘Tell me about yourself?’ (2) in the description field. Click OK (3).
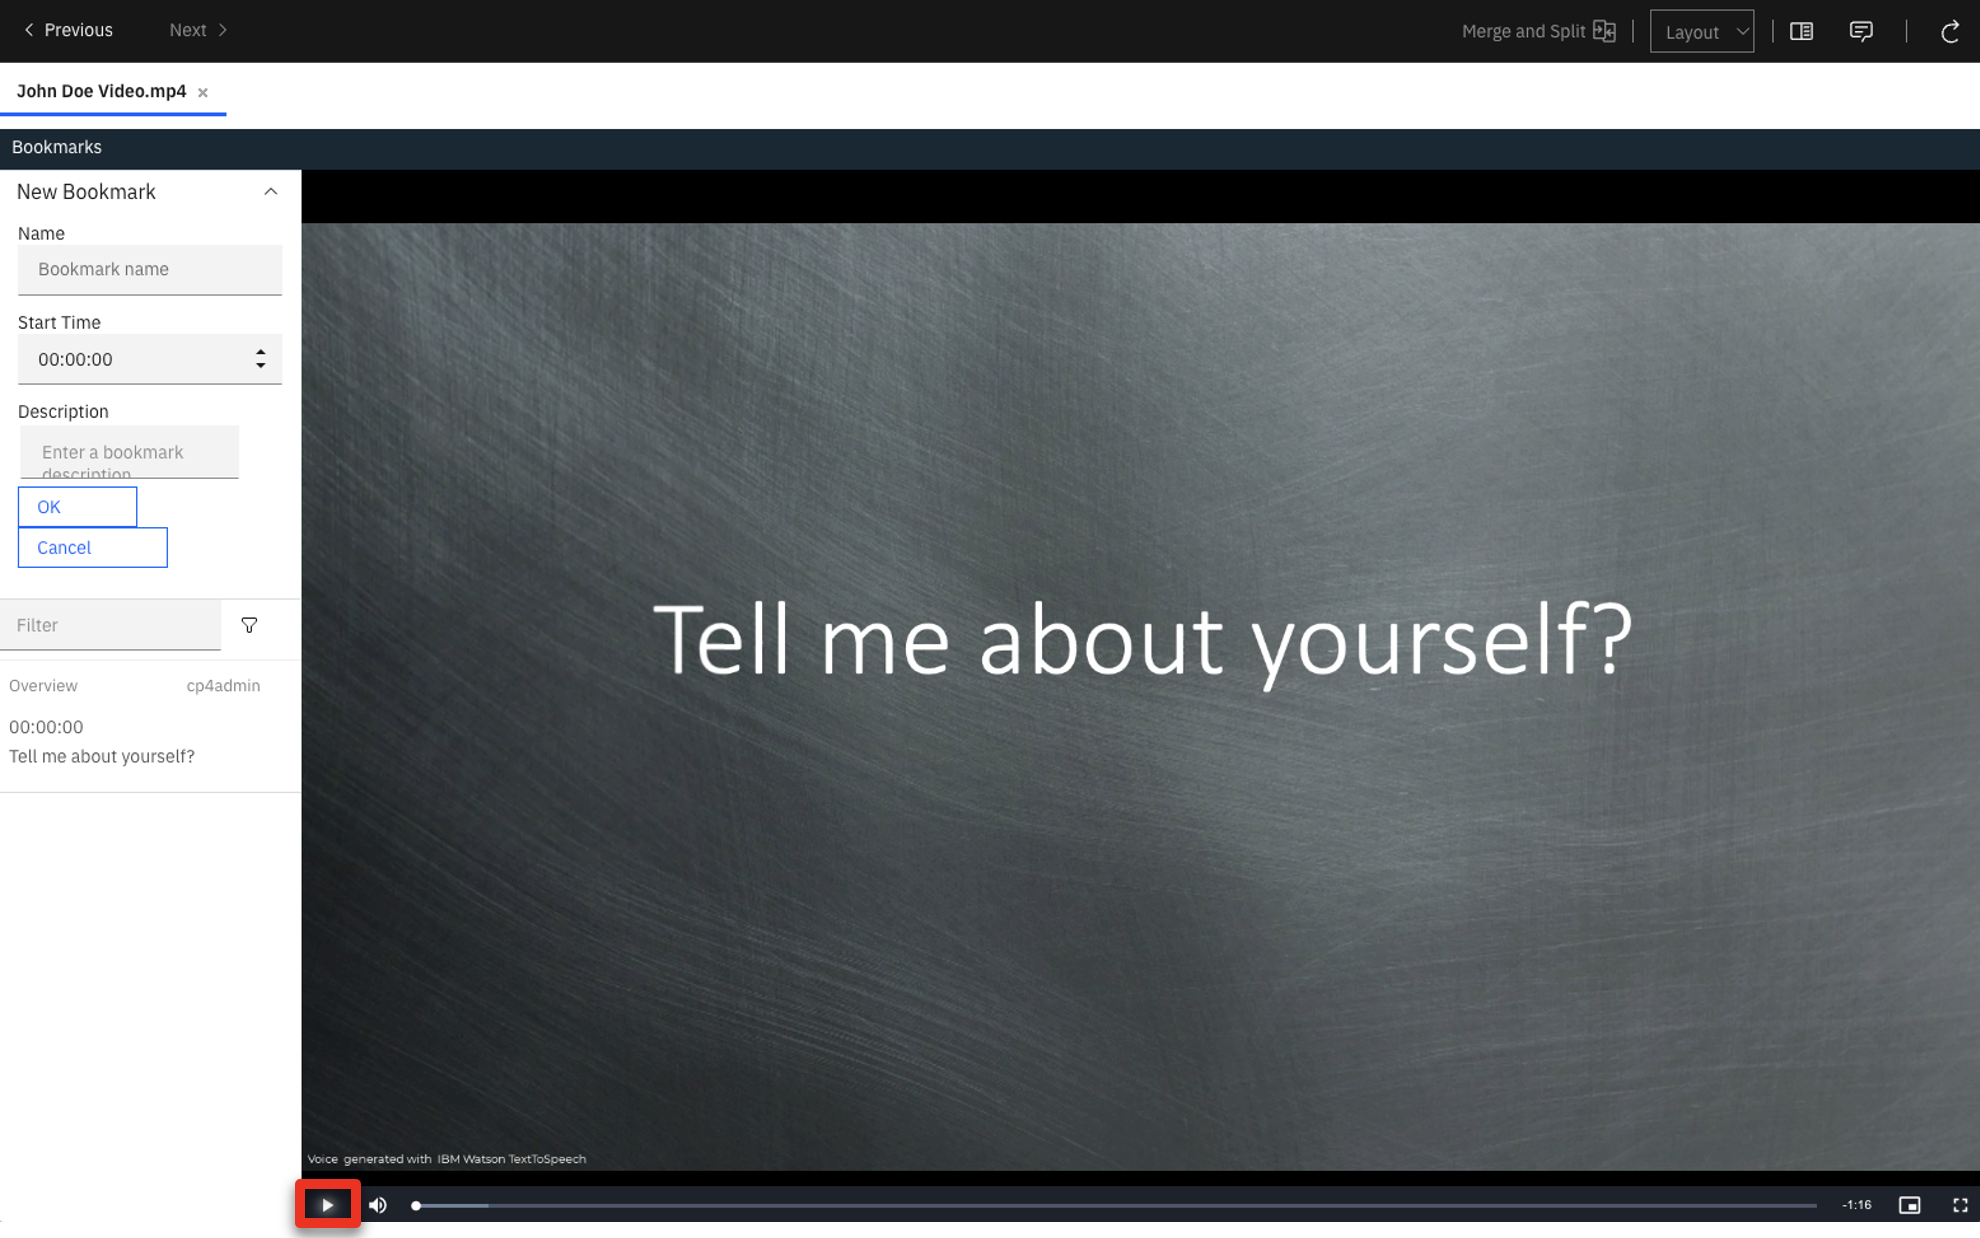
-
Click the play icon and then pause the video at the next question slide.
-
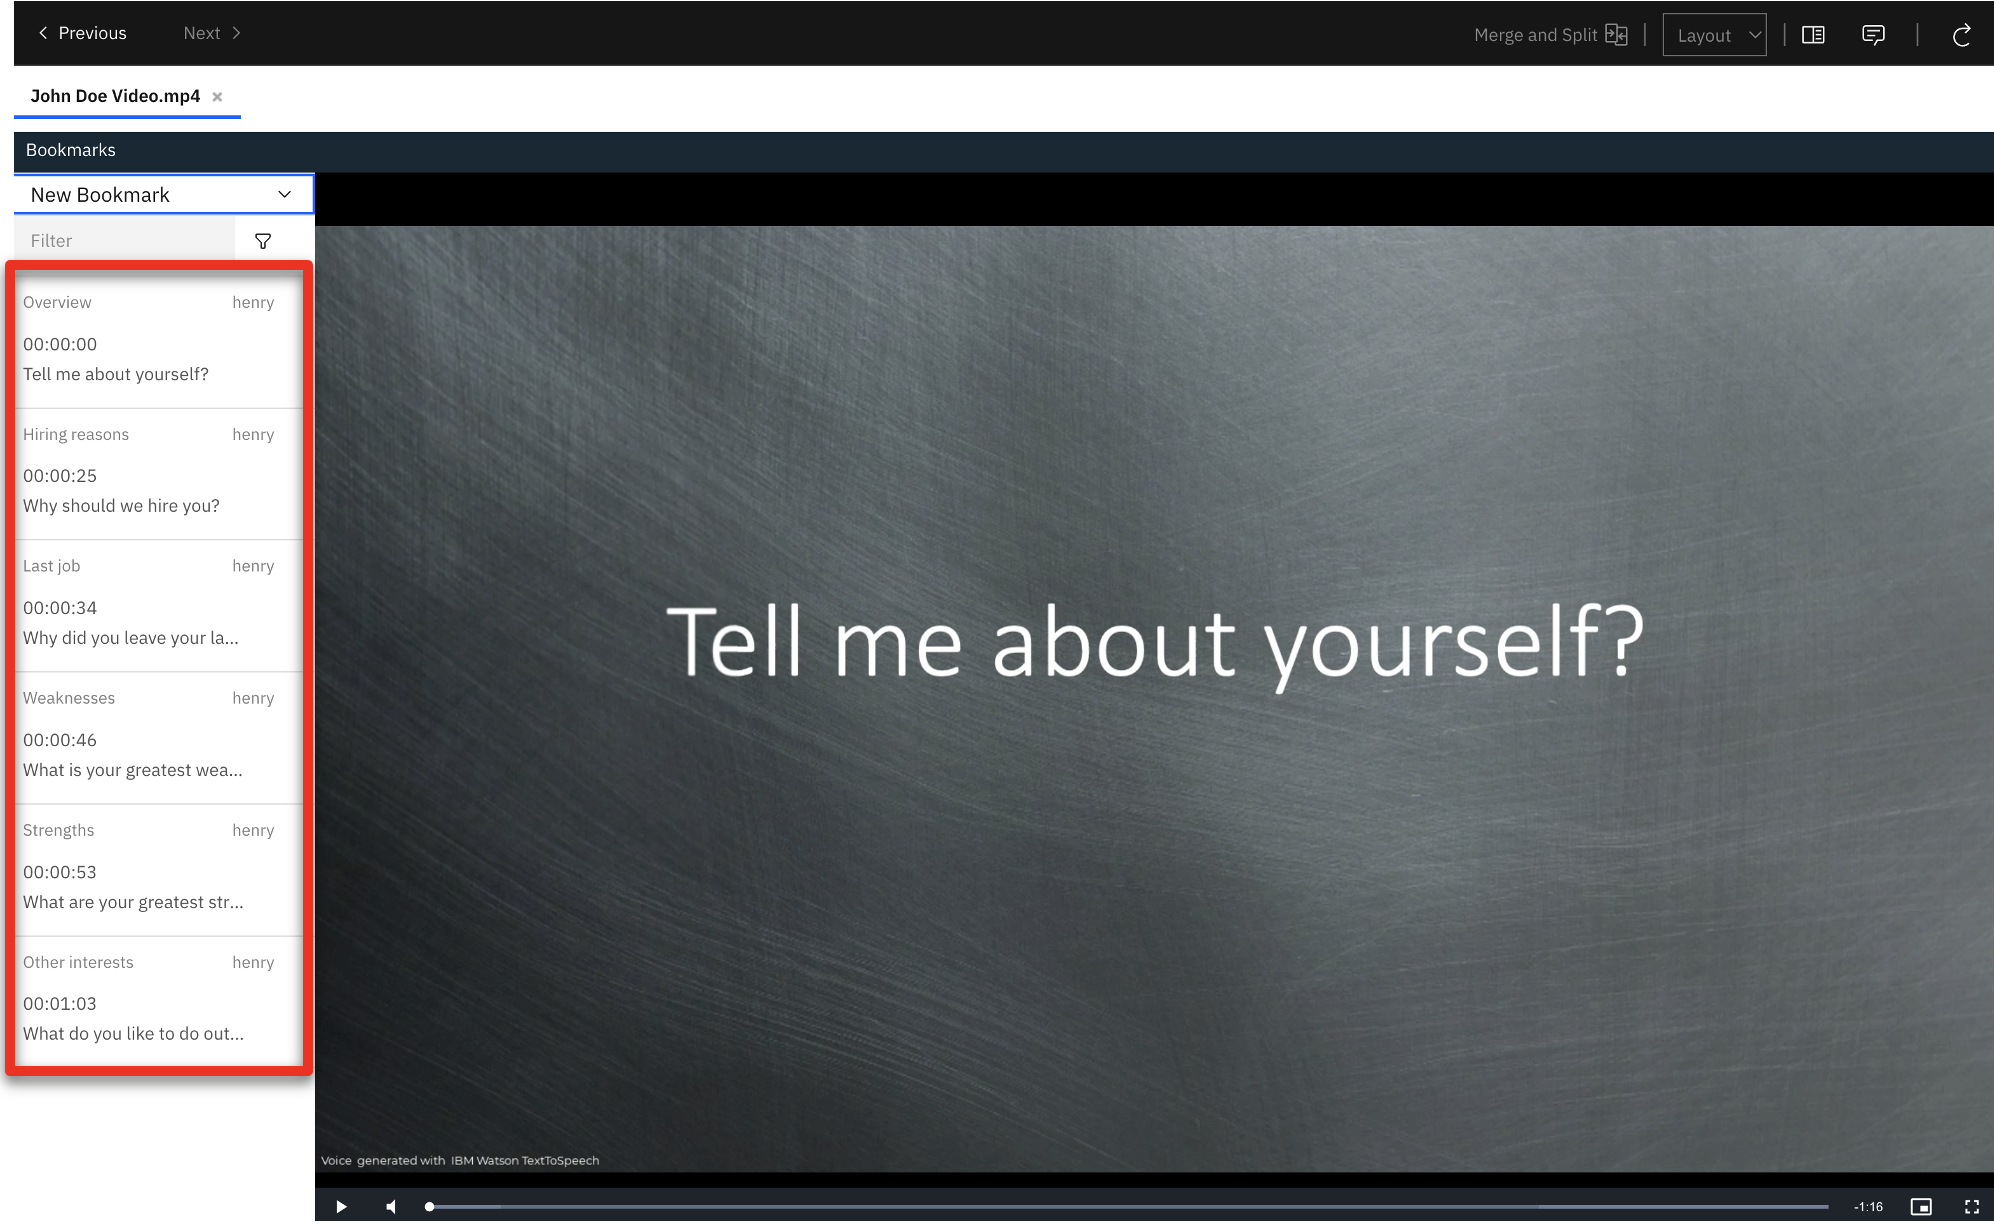
Repeat actions 17 - 19 to add more bookmarks, one at each new question slide. Repeat this process until these bookmarks are added:
| Bookmark name | Time | Description |
|---|---|---|
| Overview | 00:00:00 | Tell me about yourself? |
| Hiring reasons | 00:00:25 | Why should we hire you? |
| Last job | 00:00:34 | Why did you leave your last job? |
| Weaknesses | 00:00:46 | What is your greatest weakness? |
| Strengths | 00:00:53 | What are your greatest strengths? |
| Other interests | 00:01:03 | What do you like to do outside of work? |
-
The finalized bookmarks for the video should match the following:
-
Log out and close the IBM Navigator Viewer window.
PREPARE TO GIVE THIS DEMO
1 - Before each demo
Have these resources ready before starting the demonstration:
- Open the cheat sheet you created during demo preparation.
- Open the folder containing John Doe’s candidate files (unzipped during step 5 - Prepare your document files).
- Use the URL from your cheat sheet to open IBM Content Navigator in a browser tab.
2- Giving the demo again
To give this demo again, you must do the following steps to reset the demo to its original state:
- Delete the John Doe Teamspace.
- Delete the John Doe Demo Teamspace.
- Repeat Demo preparation step 7 – Create a finalized teamspace.
Follow these detailed instructions to delete the Teamspaces:
-
Open IBM Content Navigator using the URL from your cheat sheet. Enter the Username ‘henry’ and the Password ‘henry’ (1). Click Log in (2).
-
Click the Teamspaces tile.
-
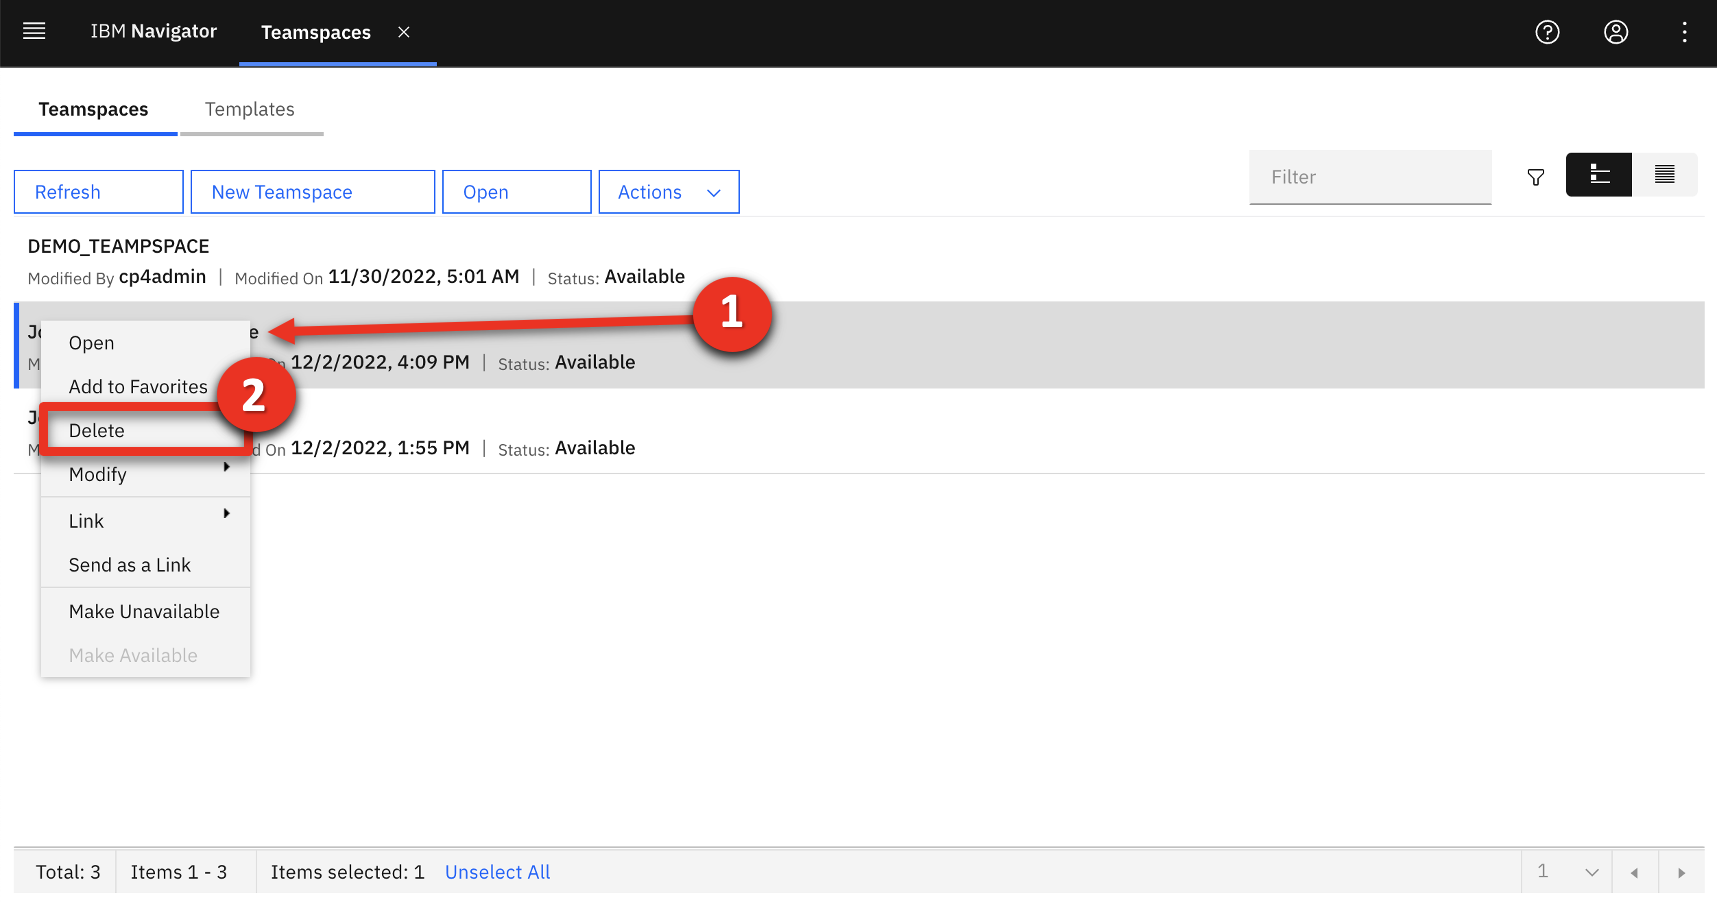
Right-click the John Doe Teamspace (1) and click Delete (2).
-
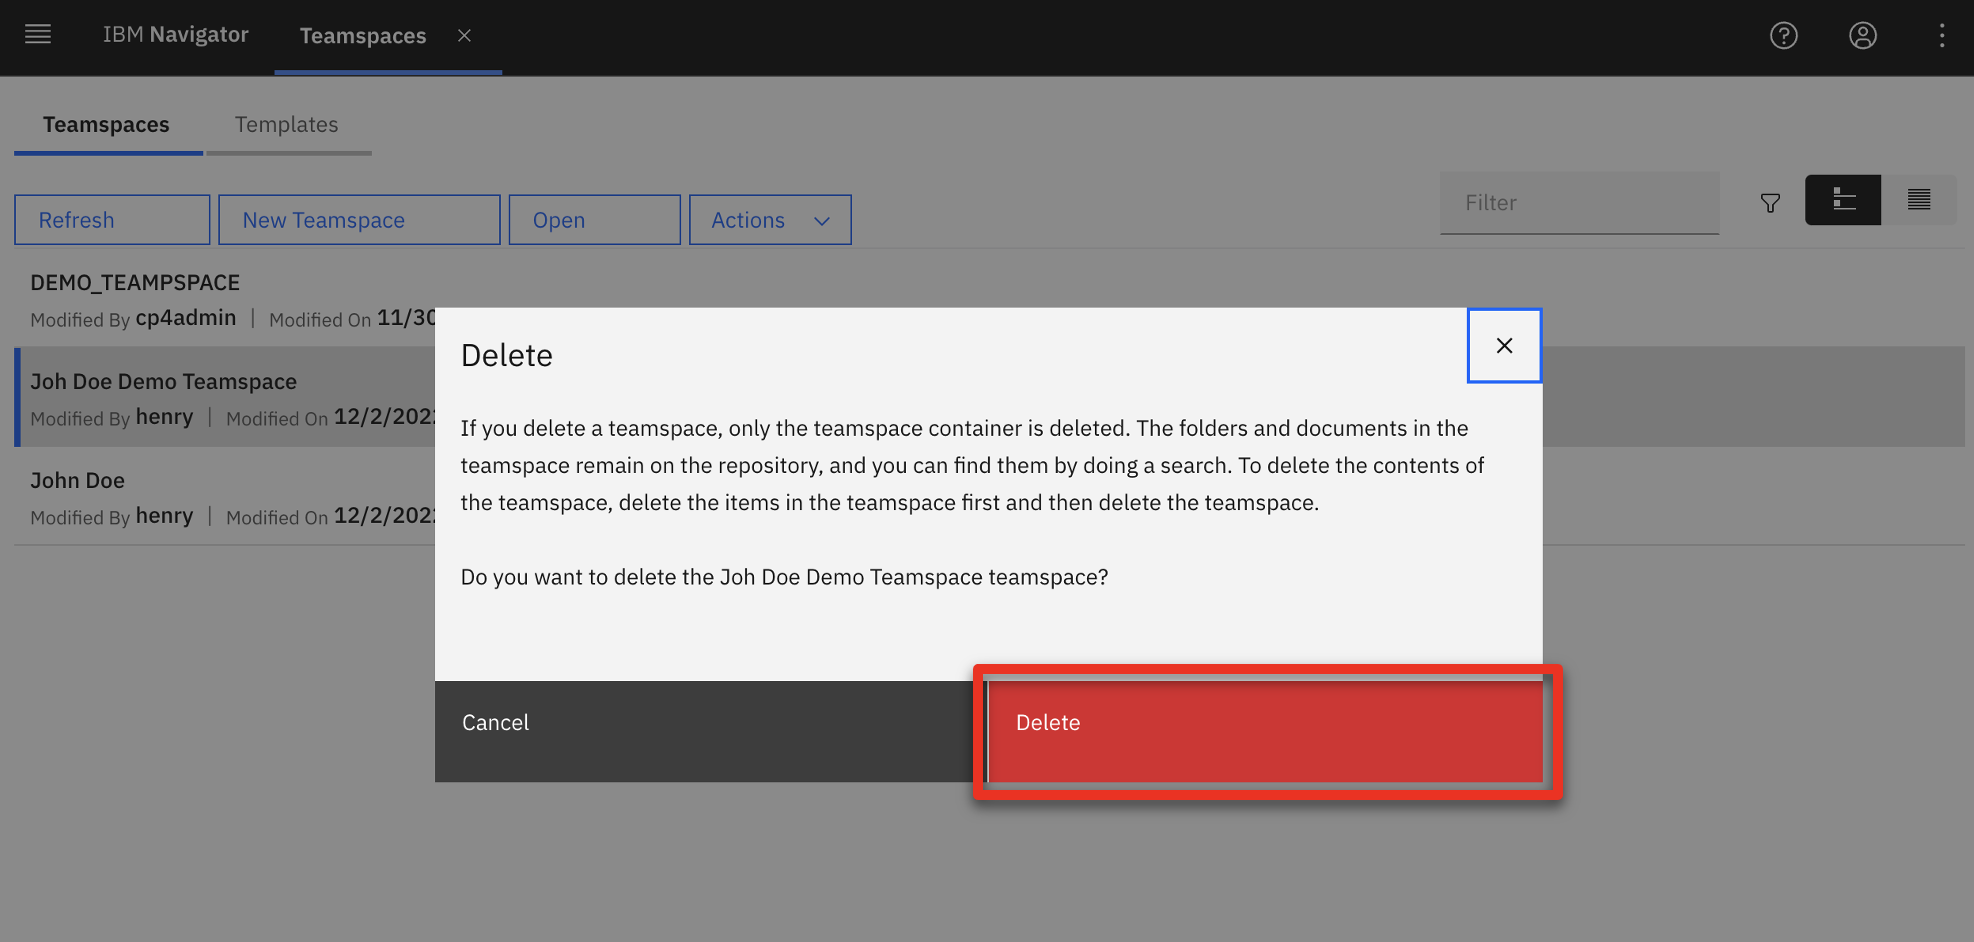
Click Delete.
-
Repeat actions 3 and 4 in this step to delete the John Doe Demo Teamspace.
-
Repeat Demo preparation step 7 – Create a finalized teamspace.
Click here to go to the Demo script on the next tab.