3. Lab Preparation
3.1: Overview
Before proceeding with the main lab activities, ensure that you have completed all Lab Preparation steps in this section.
You may receive prompts for software updates during the lab.
Please ignore these prompts and do not install any updates to avoid disrupting the lab environment.
If you encounter a security warning such as “Warning: Potential Security Risk Ahead” when using the browser, please disregard it. Select Advanced → Accept the Risk and Continue.
3.2: Using the Bastion Host Terminal and UI
This section provides background information about the Bastion environment. You will execute actual commands in later sections. This lab environment includes both Concert and Workflows installations.
Accessing the UIs
From the Bastion Host Terminal, click on Activities and open Firefox.
Then click on the bookmark Concert to launch the Concert UI.
- To open the Concert UI, click the burger menu (☰) at the top-left corner and select Concert → Home.
- To open the Workflows UI, click the burger menu (☰) and select Workflows → Home.
Using SSH from the Bastion Host
You can connect from the Bastion host to other lab VMs using SSH commands as shown below.
# Access the Concert VM
ssh jammer@concert

# Access the Demo Apps VM
ssh jammer@demo-apps
3.3: Capturing the Lab Credentials
In this section, you will collect all necessary credentials and configuration details required to complete the lab exercises. All credentials will be consolidated into a single text file, which simplifies the steps later in the lab.
Prepare the Credentials File
- From the Bastion Remote Desktop, on the left panel click Show Applications → Text Editor.
- Create a new file named
credentials.txt. - Paste the following template into the file and save it.
- Keep this window open for easy access during the lab.
Bookmarks:
  Lab guide:  https://ibm.github.io/waiops-tech-jam/labs/concert/introduction/
  Concert:    https://concert.ibmdte.local/

Concert Workflows: https://ibm.box.com/s/lrhd8y9d8bvkyv60v6kq989vdlf4du1v

Concert URL: https://concert.ibmdte.local
Concert Port: 12443

Concert API Key:
Concert Request header:

concert_username: ibmconcert
concert_password: Passw0rd

ServiceNow Host:
ServiceNow Username:
ServiceNow Password:

demo-apps-ip:

rhel_vm_private_key: <paste the private key under this line, including the BEGIN and END lines>
3.4 Retrieve the Demo App IP address
Next, run the following command from the Bastion SSH terminal to capture the IP address of the demo application:
getent hosts demo-apps | awk '{print $1}'
Copy the IP address displayed and update the corresponding section in your credentials.txt file:
demo-apps-ip: <copied_demo_app_ip>
3.5 Obtain the SSH Private Key
SSH key-based authentication is a system that replaces traditional passwords with cryptography. It relies on a mathematically linked pair: a Public Key (the lock) and a Private Key (the physical key).
- Placement: You install your Public Key on the remote RHEL server (usually in ~/.ssh/authorized_keys).
- Challenge: When you connect, the server sends a "challenge" encrypted with that public key.
- Response: Your local SSH client decrypts the challenge using your Private Key (which never leaves your machine).
- Access: If the math matches, the server confirms your identity and grants access without you ever typing a password.
The demo-apps VM uses SSH key-based authentication. There is a pre-generated SSH key pair for the jammer user on the demo-apps VM,
and you will need to retrieve the private key so we can use it later in the lab to enable Concert to connect to this VM.
Run the following command to connect from the Bastion host to the demo-apps VM:
ssh jammer@demo-apps
After connecting, display the private key by running:
cat ~/.ssh/id_rsa
Copy the entire key output and add it to your credentials.txt file under the rhel_vm_private_key field as shown below:
rhel_vm_private_key:
   -----BEGIN OPENSSH PRIVATE KEY-----
   <your_private_key_here>
   -----End OPENSSH PRIVATE KEY-----
Make sure to exit the ssh session to the demo-apps VM by running the exit command in the terminal.
exit
Keep your private key confidential. Do not share it publicly or commit it to any version control repositories.
3.6 ServiceNow Developer Instance
Paste the ServiceNow Developer Instance credentials into the credentials.txt file. This is a prerequisite
for the Lab as explained in the Lab Environment section of this Lab Guide.
3.7 Obtaining the IBM Concert API Key and Request Header
From the Bastion Remote Desktop, open the Firefox browser and click on the Concert bookmark to launch the Concert UI.
- To access the Concert UI, click the burger menu (☰) in the top-left corner and select Concert → Home.
Login to the Concert UI using the credentials from your credentials file:
- concert_username
- concert_password
If prompted with the Welcome to IBM Concert dialog, choose Skip to bypass the setup wizard.
Generating the API Key and Request Header
- In the Concert UI, locate and click the API Key icon in the top-right corner.
- Select Generate API key.
- After the API key is generated, copy and save the following values to your credentials file:
- Concert API Key →
Concert API Key: - Request Header →
Concert Request Header:
- Concert API Key →
- Click the X in the dialog window to close it.
These values will be required when configuring workflows later in the lab.
Store your API key securely in the credentials.txt file.
Do not share this file publicly or commit it to any version control repositories.
3.8: Establishing a connection between Concert and watsonx.ai
Skip this section if you already have the watsonx.ai credentials set up from a previous lab that used the same Concert instance.
Concert leverages the capabilities of watsonx.ai to provide advanced AI features. To enable this integration, you need to configure the connection between Concert and an existing instance of watsonx.ai that is used to support Concert Labs.
DO NOT use these watsonx.ai credentials for any other purpose outside this lab.
From the Bastion SSH, run the following command to login to the Concert host with the user 'jammer'. If this is your first time connecting, you may need to accept the host key fingerprint.
ssh jammer@concert
Once logged in, run the following command:
export INSTALL_DIR=/opt/ibm/concert/ibm-concert
Obtain the required credentials for connecting to watsonx.ai. Open this Box Note, copy the three lines and run them in the Concert host Terminal to set the environment variables.
# use the exports from the Box Note, they should look similar to this:
export WATSONX_API_KEY=...
export WATSONX_API_PROJECT_ID=...
export WATSONX_API_URL=...
Just to confirm the four env. variables are set, run this command and make sure each line shows a value:
echo "INSTALL_DIR=$INSTALL_DIR"
echo "WATSONX_API_KEY=$WATSONX_API_KEY"
echo "WATSONX_API_PROJECT_ID=$WATSONX_API_PROJECT_ID"
echo "WATSONX_API_URL=$WATSONX_API_URL"
Run the commands below to apply the watsonx.ai configuration into the file local_config.env:
echo "WATSONX_API_KEY=$WATSONX_API_KEY" >> $INSTALL_DIR/ibm-concert-std/etc/local_config.env
echo "WATSONX_API_PROJECT_ID=$WATSONX_API_PROJECT_ID" >> $INSTALL_DIR/ibm-concert-std/etc/local_config.env
echo "WATSONX_API_URL=$WATSONX_API_URL" >> $INSTALL_DIR/ibm-concert-std/etc/local_config.env
Finally, run the two commands below one by one to restart the py-utils service to apply the changes:
In the last start_service command, you can ignore one or more warnings WARN[0000] Failed to mount subscriptions ...
$INSTALL_DIR/ibm-concert-std/bin/stop_service ibm-roja-py-utils
$INSTALL_DIR/ibm-concert-std/bin/start_service ibm-roja-py-utils
3.9 Forcing Red Hat Security Advisories (RHSA)
As this Lab runs on TechZone infrastructure, there is a chance that the RHEL VMs may not have any vulnerabilities (e.g. everything has been already patched). To ensure that we have a vulnerable version of RHEL libraries on the demo-apps VM, we will force a downgrade of the ghostscript package to a version that has known exploits (ghostscript is an open-source interpreter for PostScript and PDF files). This will allow us to demonstrate the patch management capabilities of Concert in later sections of the lab. This open source package downgrade will trigger RHSA-2025:7586.
Run these commands:
# connect to the demo-apps VM from the Bastion host using SSH
ssh jammer@demo-apps
# downgrade the current version of ghostscript installed.
# You may get a message that the version is already the same as the one we are downgrading to (nothing to do)
sudo dnf downgrade -y ghostscript-9.54.0-14.el9_3.x86_64
# verify the downgrade was successful by checking the installed version of ghostscript
rpm -q ghostscript
# exit the ssh session to the demo-apps VM
exit
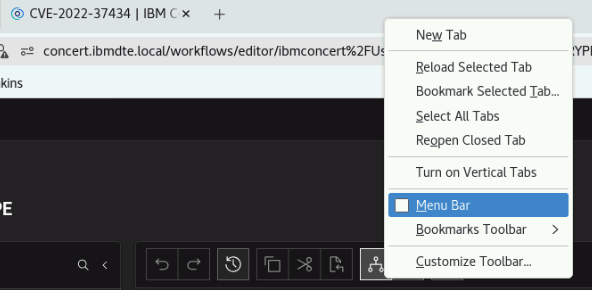
3.10 Enable Firefox Menu Bar
To enable the menu bar in Firefox, Right-click any empty space in the tab bar (or top toolbar) and check Menu Bar.
Make sure to fill and save the credentials file as described in this section. Do not skip any of the steps, as the credentials will be required for later sections of the lab.
Tip: keep the credentials file window open for easy access during the Lab.