Lab 2 - Adding Value with Custom Docker Images
Overview
In this lab, we build on our knowledge from lab 1 where we used Docker commands to run containers. We will create a custom Docker Image built from a Dockerfile. Once we build the image, we will push it to a central registry where it can be pulled to be deployed on other environments. Also, we will briefly describe image layers, and how Docker incorporates "copy-on-write" and the union file system to efficiently store images and run containers.
We will be using a few Docker commands in this lab. For full documentation on available commands check out the official documentation.
Prerequisites
Completed Lab 0: You must have access to a docker client, either on localhost, use a terminal from Theia - Cloud IDE at https://labs.cognitiveclass.ai/tools/theiadocker or be using Play with Docker for example.
Step 1: Create a python app (without using Docker)
Run the following command to create a file named app.py with a simple python program. (copy-paste the entire code block)
echo 'from flask import Flask

app = Flask(__name__)

@app.route("/")
def hello():
    return "hello world!"

if __name__ == "__main__":
    app.run(host="0.0.0.0")' > app.py
This is a simple python app that uses flask to expose a http web server on port 5000 (5000 is the default port for flask). Don't worry if you are not too familiar with python or flask, these concepts can be applied to an application written in any language.
Optional: If you have python and pip installed, you can run this app locally. If not, move on to the next step.
$ python3 --version
Python 3.6.9
$ pip3 --version
pip 9.0.1 from /usr/lib/python3/dist-packages (python 3.6)
$ pip3 install flask
Collecting flask
  Downloading https://files.pythonhosted.org/packages/f2/28/2a03252dfb9ebf377f40fba6a7841b47083260bf8bd8e737b0c6952df83f/Flask-1.1.2-py2.py3-none-any.whl (94kB)
    100% |████████████████████████████████| 102kB 6.2MB/s
Collecting Werkzeug>=0.15 (from flask)
  Downloading https://files.pythonhosted.org/packages/cc/94/5f7079a0e00bd6863ef8f1da638721e9da21e5bacee597595b318f71d62e/Werkzeug-1.0.1-py2.py3-none-any.whl (298kB)
    100% |████████████████████████████████| 307kB 3.4MB/s
Collecting itsdangerous>=0.24 (from flask)
  Downloading https://files.pythonhosted.org/packages/76/ae/44b03b253d6fade317f32c24d100b3b35c2239807046a4c953c7b89fa49e/itsdangerous-1.1.0-py2.py3-none-any.whl
Collecting click>=5.1 (from flask)
  Downloading https://files.pythonhosted.org/packages/d2/3d/fa76db83bf75c4f8d338c2fd15c8d33fdd7ad23a9b5e57eb6c5de26b430e/click-7.1.2-py2.py3-none-any.whl (82kB)
    100% |████████████████████████████████| 92kB 10.2MB/s
Collecting Jinja2>=2.10.1 (from flask)
  Downloading https://files.pythonhosted.org/packages/30/9e/f663a2aa66a09d838042ae1a2c5659828bb9b41ea3a6efa20a20fd92b121/Jinja2-2.11.2-py2.py3-none-any.whl (125kB)
    100% |████████████████████████████████| 133kB 8.5MB/s
Collecting MarkupSafe>=0.23 (from Jinja2>=2.10.1->flask)
  Downloading https://files.pythonhosted.org/packages/b2/5f/23e0023be6bb885d00ffbefad2942bc51a620328ee910f64abe5a8d18dd1/MarkupSafe-1.1.1-cp36-cp36m-manylinux1_x86_64.whl
Installing collected packages: Werkzeug, itsdangerous, click, MarkupSafe, Jinja2, flask
Successfully installed Jinja2-2.11.2 MarkupSafe-1.1.1 Werkzeug-1.0.1 click-7.1.2 flask-1.1.2 itsdangerous-1.1.0

$ python3 app.py
 * Serving Flask app "app" (lazy loading)
 * Environment: production
   WARNING: This is a development server. Do not use it in a production deployment.
   Use a production WSGI server instead.
 * Debug mode: off
 * Running on http://0.0.0.0:5000/ (Press CTRL+C to quit)
Step 2: Create and build the Docker Image
Now, what if you don't have python installed locally? Don't worry! Because you don't need it. One of the advantages of using containers is that you can build python inside your containers, without having python installed on your host machine.
-
Create a
Dockerfilebut running the following command. (copy-paste the entire code block)echo 'FROM python:3.8-alpine RUN pip install flask CMD ["python","app.py"] COPY app.py /app.py' > DockerfileA Dockerfile lists the instructions needed to build a docker image. Let's go through the above file line by line.
FROM python:3.8-alpine This is the starting point for your Dockerfile. Every Dockerfile must start with a
FROMline that is the starting image to build your layers on top of.In this case, we are selecting the
python:3.8-alpinebase layer (see Dockerfile for python3.8/alpine3.12) since it already has the version of python and pip that we need to run our application.The
alpineversion means that it uses the Alpine Linux distribution, which is significantly smaller than many alternative flavors of Linux, around 8 MB in size, while a minimal installation to disk might be around 130 MB. A smaller image means it will download (deploy) much faster, and it also has advantages for security because it has a smaller attack surface. Alpine Linux is a Linux distribution based on musl and BusyBox.Here we are using the "3.8-alpine" tag for the python image. Take a look at the available tags for the official python image on the Docker Hub. It is best practice to use a specific tag when inheriting a parent image so that changes to the parent dependency are controlled. If no tag is specified, the "latest" tag takes into effect, which is acts as a dynamic pointer that points to the latest version of an image.
For security reasons, it is very important to understand the layers that you build your docker image on top of. For that reason, it is highly recommended to only use "official" images found in the docker hub, or non-community images found in the docker-store. These images are vetted to meet certain security requirements, and also have very good documentation for users to follow. You can find more information about this python base image, as well as all other images that you can use, on the docker hub.
For a more complex application you may find the need to use a
FROMimage that is higher up the chain. For example, the parent Dockerfile for our python app starts withFROM alpine, then specifies a series ofCMDandRUNcommands for the image. If you needed more fine-grained control, you could start withFROM alpine(or a different distribution) and run those steps yourself. To start off though, I recommend using an official image that closely matches your needs.RUN pip install flask The
RUNcommand executes commands needed to set up your image for your application, such as installing packages, editing files, or changing file permissions. In this case we are installing flask. TheRUNcommands are executed at build time, and are added to the layers of your image.CMD ["python","app.py"]
CMDis the command that is executed when you start a container. Here we are usingCMDto run our python app.There can be only one
CMDper Dockerfile. If you specify more thane oneCMD, then the lastCMDwill take effect. The parent python:3.8-alpine also specifies aCMD(CMD python3). You can find the Dockerfile for the official python:alpine image here.You can use the official python image directly to run python scripts without installing python on your host. But today, we are creating a custom image to include our source, so that we can build an image with our application and ship it around to other environments.
COPY app.py /app.py This copies the app.py in the local directory (where you will run
docker image build) into a new layer of the image. This instruction is the last line in the Dockerfile. Layers that change frequently, such as copying source code into the image, should be placed near the bottom of the file to take full advantage of the Docker layer cache. This allows us to avoid rebuilding layers that could otherwise be cached. For instance, if there was a change in theFROMinstruction, it would invalidate the cache for all subsequent layers of this image. We will demonstrate a this little later in this lab.It seems counter-intuitive to put this after the
CMD ["python","app.py"]line. Remember, theCMDline is executed only when the container is started, so we won't get afile not founderror here.And there you have it: a very simple Dockerfile. A full list of commands you can put into a Dockerfile can be found here. Now that we defined our Dockerfile, let's use it to build our custom docker image.
-
Build the docker image.
Pass in
-tto name your imagepython-hello-world.$ docker image build -t python-hello-world . Sending build context to Docker daemon 3.072kB Step 1/4 : FROM python:3.8-alpine 3.8-alpine: Pulling from library/python df20fa9351a1: Pull complete 36b3adc4ff6f: Pull complete 3e7ef1bb9eba: Pull complete 78538f72d6a9: Pull complete 07bc731e0055: Pull complete Digest: sha256:cbc08bfc4b1b732076742f52852ede090e960ab7470d0a60ee4f964cfa7c710a Status: Downloaded newer image for python:3.8-alpine ---> 0f03316d4a27 Step 2/4 : RUN pip install flask ---> Running in 1454bdd1ea98 Collecting flask Downloading Flask-1.1.2-py2.py3-none-any.whl (94 kB) Collecting itsdangerous>=0.24 Downloading itsdangerous-1.1.0-py2.py3-none-any.whl (16 kB) Collecting Werkzeug>=0.15 Downloading Werkzeug-1.0.1-py2.py3-none-any.whl (298 kB) Collecting click>=5.1 Downloading click-7.1.2-py2.py3-none-any.whl (82 kB) Collecting Jinja2>=2.10.1 Downloading Jinja2-2.11.2-py2.py3-none-any.whl (125 kB) Collecting MarkupSafe>=0.23 Downloading MarkupSafe-1.1.1.tar.gz (19 kB) Building wheels for collected packages: MarkupSafe Building wheel for MarkupSafe (setup.py): started Building wheel for MarkupSafe (setup.py): finished with status 'done' Created wheel for MarkupSafe: filename=MarkupSafe-1.1.1-py3-none-any.whl size=12627 sha256=155e3314602dfac3c8ea245edc217c235afb4c818932574d6d61529ef0c14ea4 Stored in directory: /root/.cache/pip/wheels/0c/61/d6/4db4f4c28254856e82305fdb1f752ed7f8482e54c384d8cb0e Successfully built MarkupSafe Installing collected packages: itsdangerous, Werkzeug, click, MarkupSafe, Jinja2, flask Successfully installed Jinja2-2.11.2 MarkupSafe-1.1.1 Werkzeug-1.0.1 click-7.1.2 flask-1.1.2 itsdangerous-1.1.0 Removing intermediate container 1454bdd1ea98 ---> 97d747fc7771 Step 3/4 : CMD ["python","app.py"] ---> Running in e2bf74801c81 Removing intermediate container e2bf74801c81 ---> d5adbccf5116 Step 4/4 : COPY app.py /app.py ---> 3c24958f29d3 Successfully built 3c24958f29d3 Successfully tagged python-hello-world:latestVerify that your image shows up in your image list via
docker image ls.$ docker image ls REPOSITORY TAG IMAGE ID CREATED SIZE python-hello-world latest 3c24958f29d3 52 seconds ago 53.4MB python 3.8-alpine 0f03316d4a27 2 weeks ago 42.7MBNote that your base image
python:3.8-alpineis also in your list. -
You can run a history command to show the history of an image and its layers,
docker history python-hello-world
docker history python:3.8-alpine
Step 3: Run the Docker image
Now that you have built the image, you can run it to see that it works.
-
Run the Docker image
$ docker run -p 5001:5000 -d python-hello-world
0b2ba61df37fb4038d9ae5d145740c63c2c211ae2729fc27dc01b82b5aaafa26
The
-pflag maps a port running inside the container to your host. In this case, we are mapping the python app running on port 5000 inside the container, to port 5001 on your host. Note that if port 5001 is already in use by another application on your host, you may have to replace 5001 with another value, such as 5002. -
Navigate to localhost:5001 in a browser to see the results.
In a terminal run
curl localhost:5001, which returnshello world!.If you are using katacoda, click on the link in the left-hand pane that says:
View port at https://....environments.katacoda.comthen type in 5001 and clickDisplay Port.In play-with-docker, click the link
5001that should appear near the top of your session.You should see "hello world!" on your browser.
-
Check the log output of the container.
If you want to see logs from your application you can use the
docker container logscommand. By default,docker container logsprints out what is sent to standard out by your application. Usedocker container lsto find the id for your running container.sh $ docker container ls CONTAINER ID IMAGE COMMAND CREATED STATUS PORTS NAMES 7b04d5320cb4 python-hello-world "python app.py" About a minute ago Up About a minute 0.0.0.0:5001->5000/tcp elastic_ganguly $ docker container logs [container id] * Serving Flask app "app" (lazy loading) * Environment: production WARNING: This is a development server. Do not use it in a production deployment. Use a production WSGI server instead. * Debug mode: off * Running on http://0.0.0.0:5000/ (Press CTRL+C to quit) 172.17.0.1 - - [23/Sep/2020 22:00:33] "GET / HTTP/1.1" 200 -The Dockerfile is how you create reproducible builds for your application. A common workflow is to have your CI/CD automation run
docker image buildas part of its build process. Once images are built, they will be sent to a central registry, where it can be accessed by all environments (such as a test environment) that need to run instances of that application. In the next step, we will push our custom image to the public docker registry: the docker hub, where it can be consumed by other developers and operators.
Step 4: Push to a central registry
-
Navigate to Docker Hub and create an account if you haven't already. Alternatively, you can also use https://quay.io for instance.
For this lab we will be using the docker hub as our central registry. Docker hub is a free service to store publicly available images, or you can pay to store private images. Go to the Docker Hub website and create a free account.
Most organizations that use docker heavily will set up their own registry internally. To simplify things, we will be using the Docker Hub, but the following concepts apply to any registry.
-
Login
You can log into the image registry account by typing
docker loginon your terminal, or if using podman, typepodman login.$ export DOCKERHUB_USERNAME=<dockerhub-username> $ docker login docker.io -u $DOCKERHUB_USERNAME password: WARNING! Your password will be stored unencrypted in /home/theia/.docker/config.json. Configure a credential helper to remove this warning. See https://docs.docker.com/engine/reference/commandline/login/#credentials-store Login Succeeded -
Tag your image with your username
The Docker Hub naming convention is to tag your image with [dockerhub username]/[image name]. To do this, we are going to tag our previously created image
python-hello-worldto fit that format.docker tag python-hello-world $DOCKERHUB_USERNAME/python-hello-world -
Push your image to the registry
Once we have a properly tagged image, we can use the
docker pushcommand to push our image to the Docker Hub registry.$ docker push $DOCKERHUB_USERNAME/python-hello-world The push refers to a repository [docker.io/jzaccone/python-hello-world] 2bce026769ac: Pushed 64d445ecbe93: Pushed 18b27eac38a1: Mounted from library/python 3f6f25cd8b1e: Mounted from library/python b7af9d602a0f: Mounted from library/python ed06208397d5: Mounted from library/python 5accac14015f: Mounted from library/python latest: digest: sha256:508238f264616bf7bf962019d1a3826f8487ed6a48b80bf41fd3996c7175fd0f size: 1786 -
Check out your image on docker hub in your browser
Navigate to Docker Hub and go to your profile to see your newly uploaded image at
https://hub.docker.com/repository/docker/<dockerhub-username>/python-hello-world.Now that your image is on Docker Hub, other developers and operations can use the
docker pullcommand to deploy your image to other environments.Note: Docker images contain all the dependencies that it needs to run an application within the image. This is useful because we no longer have deal with environment drift (version differences) when we rely on dependencies that are install on every environment we deploy to. We also don't have to go through additional steps to provision these environments. Just one step: install docker, and you are good to go.
Step 5: Deploying a Change
The "hello world!" application is overrated, let's update the app so that it says "Hello Beautiful World!" instead.
-
Update
app.pyReplace the string "Hello World" with "Hello Beautiful World!" in
app.py. You can update the file with the following command. (copy-paste the entire code block)echo 'from flask import Flask app = Flask(__name__) @app.route("/") def hello(): return "hello beautiful world!" if __name__ == "__main__": app.run(host="0.0.0.0")' > app.py -
Rebuild and push your image
Now that your app is updated, you need repeat the steps above to rebuild your app and push it to the Docker Hub registry.
First rebuild, this time use your Docker Hub username in the build command:
$  docker image build -t $DOCKERHUB_USERNAME/python-hello-world .
Sending build context to Docker daemon  3.072kB
Step 1/4 : FROM python:3.6.1-alpine
---> c86415c03c37
Step 2/4 : RUN pip install flask
---> Using cache
---> ce41f2517c16
Step 3/4 : CMD python app.py
---> Using cache
---> 0ab91286958b
Step 4/4 : COPY app.py /app.py
---> 3e08b2eeace1
Removing intermediate container 23a955e881fc
Successfully built 3e08b2eeace1
Successfully tagged <dockerhub-username>/python-hello-world:latest
Notice the "Using cache" for steps 1-3. These layers of the Docker Image have already been built and
docker image buildwill use these layers from the cache instead of rebuilding them.$ docker push $DOCKERHUB_USERNAME/python-hello-world The push refers to a repository [docker.io/<dockerhub-username>/python-hello-world] 94525867566e: Pushed 64d445ecbe93: Layer already exists 18b27eac38a1: Layer already exists 3f6f25cd8b1e: Layer already exists b7af9d602a0f: Layer already exists ed06208397d5: Layer already exists 5accac14015f: Layer already exists latest: digest: sha256:91874e88c14f217b4cab1dd5510da307bf7d9364bd39860c9cc8688573ab1a3a size: 1786There is a caching mechanism in place for pushing layers too. Docker Hub already has all but one of the layers from an earlier push, so it only pushes the one layer that has changed.
When you change a layer, every layer built on top of that will have to be rebuilt. Each line in a Dockerfile builds a new layer that is built on the layer created from the lines before it. This is why the order of the lines in our Dockerfile is important. We optimized our Dockerfile so that the layer that is most likely to change (
COPY app.py /app.py) is the last line of the Dockerfile. Generally for an application, your code changes at the most frequent rate. This optimization is particularly important for CI/CD processes, where you want your automation to run as fast as possible.
Step 6: Understanding Image Layers
One of the major design properties of Docker is its use of the union file system.
Consider the Dockerfile that we created before:
FROM python:3.8-alpine
RUN pip install flask
CMD ["python","app.py"]
COPY app.py /app.py
Each of these lines is a layer. Each layer contains only the delta, diff or changes from the layers before it. To put these layers together into a single running container, Docker makes use of the union file system to overlay layers transparently into a single view.
Each layer of the image is read-only, except for the very top layer which is created for the running container. The read/write container layer implements "copy-on-write" which means that files that are stored in lower image layers are pulled up to the read/write container layer only when edits are being made to those files. Those changes are then stored in the running container layer. The "copy-on-write" function is very fast, and in almost all cases, does not have a noticeable effect on performance. You can inspect which files have been pulled up to the container level with the docker diff command. More information about how to use docker diff can be found here.
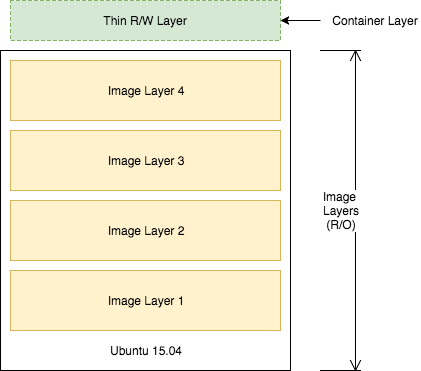
Since image layers are read-only, they can be shared by images and by running containers. For instance, creating a new python app with its own Dockerfile with similar base layers, would share all the layers that it had in common with the first python app.
FROM python:3.8-alpine
RUN pip install flask
CMD ["python","app2.py"]
COPY app2.py /app2.py
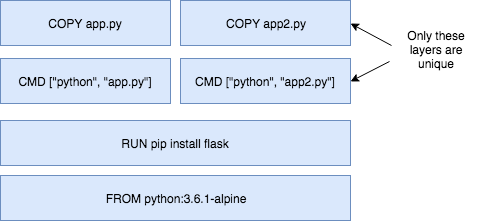
You can also experience the sharing of layers when you start multiple containers from the same image. Since the containers use the same read-only layers, you can imagine that starting up containers is very fast and has a very low footprint on the host.
You may notice that there are duplicate lines in this Dockerfile and the Dockerfile you created earlier in this lab. Although this is a very trivial example, you can pull common lines of both Dockerfiles into a "base" Dockerfile, that you can then point to with each of your child Dockerfiles using the FROM command.
Image layering enables the docker caching mechanism for builds and pushes. For example, the output for your last docker push shows that some of the layers of your image already exists on the Docker Hub.
$ docker push $DOCKERHUB_USERNAME/python-hello-world
The push refers to a repository [docker.io/<dockerhub-username>/python-hello-world]
94525867566e: Pushed
64d445ecbe93: Layer already exists
18b27eac38a1: Layer already exists
3f6f25cd8b1e: Layer already exists
b7af9d602a0f: Layer already exists
ed06208397d5: Layer already exists
5accac14015f: Layer already exists
latest: digest: sha256:91874e88c14f217b4cab1dd5510da307bf7d9364bd39860c9cc8688573ab1a3a size: 1786
To look more closely at layers, you can use the docker image history command of the python image we created.
$ docker image history python-hello-world
IMAGE               CREATED             CREATED BY                                      SIZE                COMMENT
3c24958f29d3        17 minutes ago      /bin/sh -c #(nop) COPY file:5fef1b9a6220c0e3…   159B
d5adbccf5116        17 minutes ago      /bin/sh -c #(nop)  CMD ["python" "app.py"]      0B
97d747fc7771        17 minutes ago      /bin/sh -c pip install flask                    10.7MB
0f03316d4a27        2 weeks ago         /bin/sh -c #(nop)  CMD ["python3"]              0B
<missing>           2 weeks ago         /bin/sh -c set -ex;   wget -O get-pip.py "$P…   7.24MB
<missing>           2 weeks ago         /bin/sh -c #(nop)  ENV PYTHON_GET_PIP_SHA256…   0B
<missing>           2 weeks ago         /bin/sh -c #(nop)  ENV PYTHON_GET_PIP_URL=ht…   0B
<missing>           2 weeks ago         /bin/sh -c #(nop)  ENV PYTHON_PIP_VERSION=20…   0B
<missing>           7 weeks ago         /bin/sh -c cd /usr/local/bin  && ln -s idle3…   32B
<missing>           7 weeks ago         /bin/sh -c set -ex  && apk add --no-cache --…   29.3MB
<missing>           2 months ago        /bin/sh -c #(nop)  ENV PYTHON_VERSION=3.8.5     0B
<missing>           3 months ago        /bin/sh -c #(nop)  ENV GPG_KEY=E3FF2839C048B…   0B
<missing>           3 months ago        /bin/sh -c apk add --no-cache ca-certificates   512kB
<missing>           3 months ago        /bin/sh -c #(nop)  ENV LANG=C.UTF-8             0B
<missing>           3 months ago        /bin/sh -c #(nop)  ENV PATH=/usr/local/bin:/…   0B
<missing>           3 months ago        /bin/sh -c #(nop)  CMD ["/bin/sh"]              0B
<missing>           3 months ago        /bin/sh -c #(nop) ADD file:c92c248239f8c7b9b…   5.57MB
Each line represents a layer of the image. You'll notice that the top lines match to your Dockerfile that you created, and the lines below are pulled from the parent python image. Don't worry about the "\<missing>" tags. These are still normal layers; they have just not been given an ID by the docker system.
Step 7: Clean up
Completing this lab results in a bunch of running containers on your host. Let's clean these up.
-
Run
docker container stop [container id]for each container that is runningFirst get a list of the containers running using
docker container ls.$ docker container ls CONTAINER ID IMAGE COMMAND CREATED STATUS PORTS NAMES 0b2ba61df37f python-hello-world "python app.py" 7 minutes ago Up 7 minutes 0.0.0.0:5001->5000/tcp practical_kirchThen run
docker container stop [container id]for each container in the list.$ docker container stop 0b2 0b2 -
Remove the stopped containers
docker system pruneis a really handy command to clean up your system. It will remove any stopped containers, unused volumes and networks, and dangling images.$ docker system prune WARNING! This will remove: - all stopped containers - all volumes not used by at least one container - all networks not used by at least one container - all dangling images Are you sure you want to continue? [y/N] y Deleted Containers: 0b2ba61df37fb4038d9ae5d145740c63c2c211ae2729fc27dc01b82b5aaafa26 Total reclaimed space: 300.3kB
Summary
In this lab, you started adding value by creating your own custom docker containers.
Key Takeaways:
- The Dockerfile is how you create reproducible builds for your application and how you integrate your application with Docker into the CI/CD pipeline
- Docker images can be made available to all of your environments through a central registry. The Docker Hub is one example of a registry, but you can deploy your own registry on servers you control.
- Docker images contain all the dependencies that it needs to run an application within the image. This is useful because we no longer have deal with environment drift (version differences) when we rely on dependencies that are install on every environment we deploy to.
- Docker makes use of the union file system and "copy on write" to reuse layers of images. This lowers the footprint of storing images and significantly increases the performance of starting containers.
- Image layers are cached by the Docker build and push system. No need to rebuild or repush image layers that are already present on the desired system.
- Each line in a Dockerfile creates a new layer, and because of the layer cache, the lines that change more frequently (e.g. adding source code to an image) should be listed near the bottom of the file.