Appearance
Tutorial
This tutorial will walk through the creation and execution of a notebook documenting a batch polymerization experiment. The notebook created in this tutorial will be used in other tutorials demonstrating additional features.
Tutorial Setup
Workspace Setup
To install the IBM Materials Notebook extension and setup the workspace for this tutorial. Please see the introduction to the guide section.
Once everything is setup, your home directory should look like the following:
bash
└─ my_experiment_workspace # <- root workspace folder directory
   └─ lib # <- folder for common workspace imports such as chemicals, polymers, reactors, etc.
For the initial tutorial, the exp and lib folders will largely not be used to provide imports as everything will be defined within a single notebook. Later tutorials will cover the importing of different references and the finer details of workspace setup.
Experiment Setup
Using the create new notebook command outlined in the introduction create a new blank Materials Notebook in the root directory and rename the file to 'batch_experiment.cmbnb'.
Your root directory should now have a new file:
bash
└─ my_experiment_workspace
   └─ lib
   |
   └─ batch_experiment.cmbnb # <- notebook file for tutorial
References
References are a key component underlying all experiment documentation in TYPES. References are simply entities that are either used or produced by experiments. This includes chemicals, materials, or physical hardware such as continuous-flow reactors. References can have multiple roles inside an experiment. For instance, a reference specifying ethyl acetate may be used as both a solvent in a chemical reaction and as a solvent in the experimental workup.
WARNING
Currently reference names starting with numbers, such as 1-pyrenebutanol are not supported.
Create a chemical reference
For this tutorial let's first define references for the small-molecule chemicals being used in the polymerization experiment. Add a CMDL cell to the batch_experiment.cmdnb and create a chemical group for tetrahydrofuran (THF):
cmdl
chemical THF {

}
With the group created we can define additional properties on the chemical to enable it to be used for reaction stochiometry calculations down the line. See the CMDL guide for available properties for a chemical reference.
cmdl
chemical THF {
    molecular_weight: 72.1 g/mol;
    density: 0.88 g/ml;
    smiles: "C1CCOC1";
}
The autocomplete features will automatically prompt with acceptable values for for a given property. If an incorrect value is given for a property such as a negative mass or a fictional unit, the compiler will automatically highlight the error. See the following for an example.
Running the CMDL cell
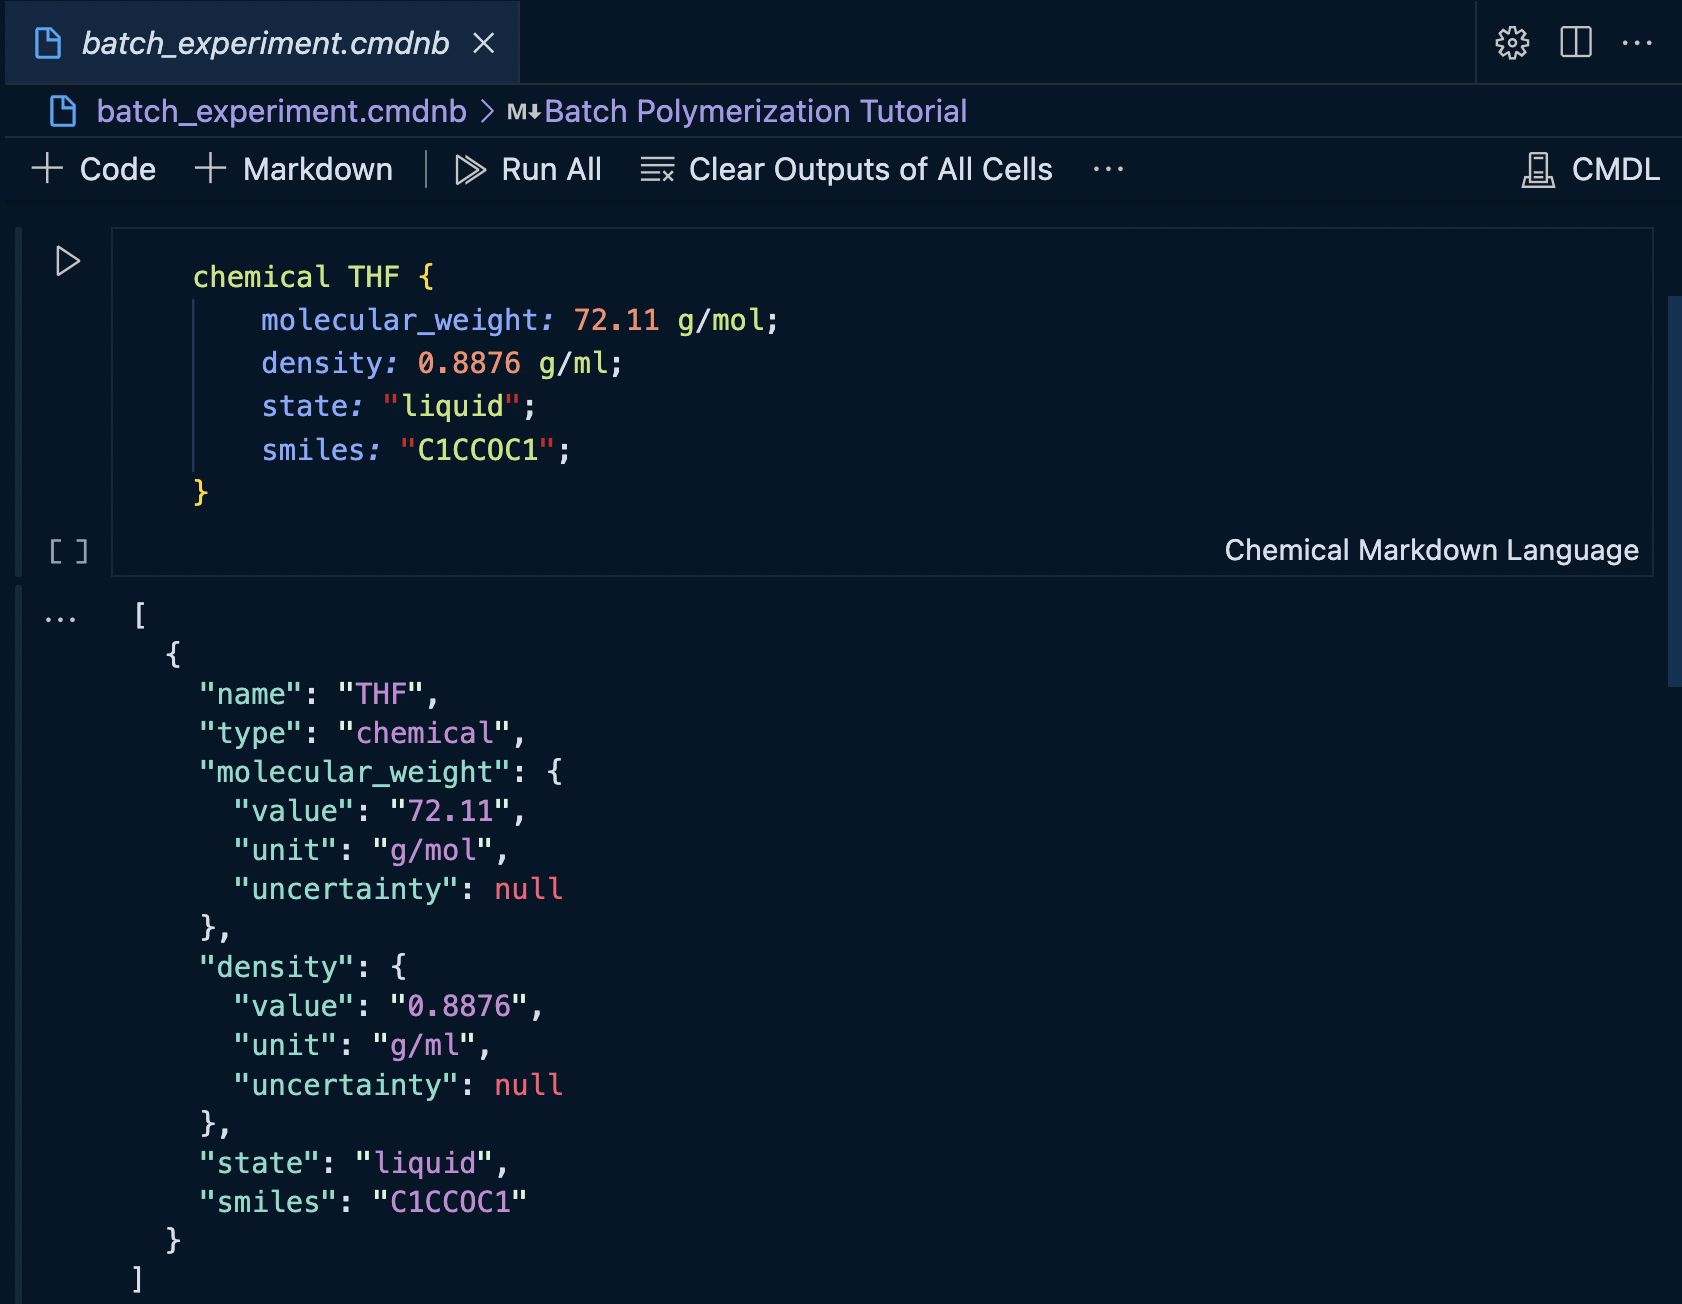
With the THF reference defined, we can execute the CMDL cell and see the output. By default the cell output will be displayed in JSON format.
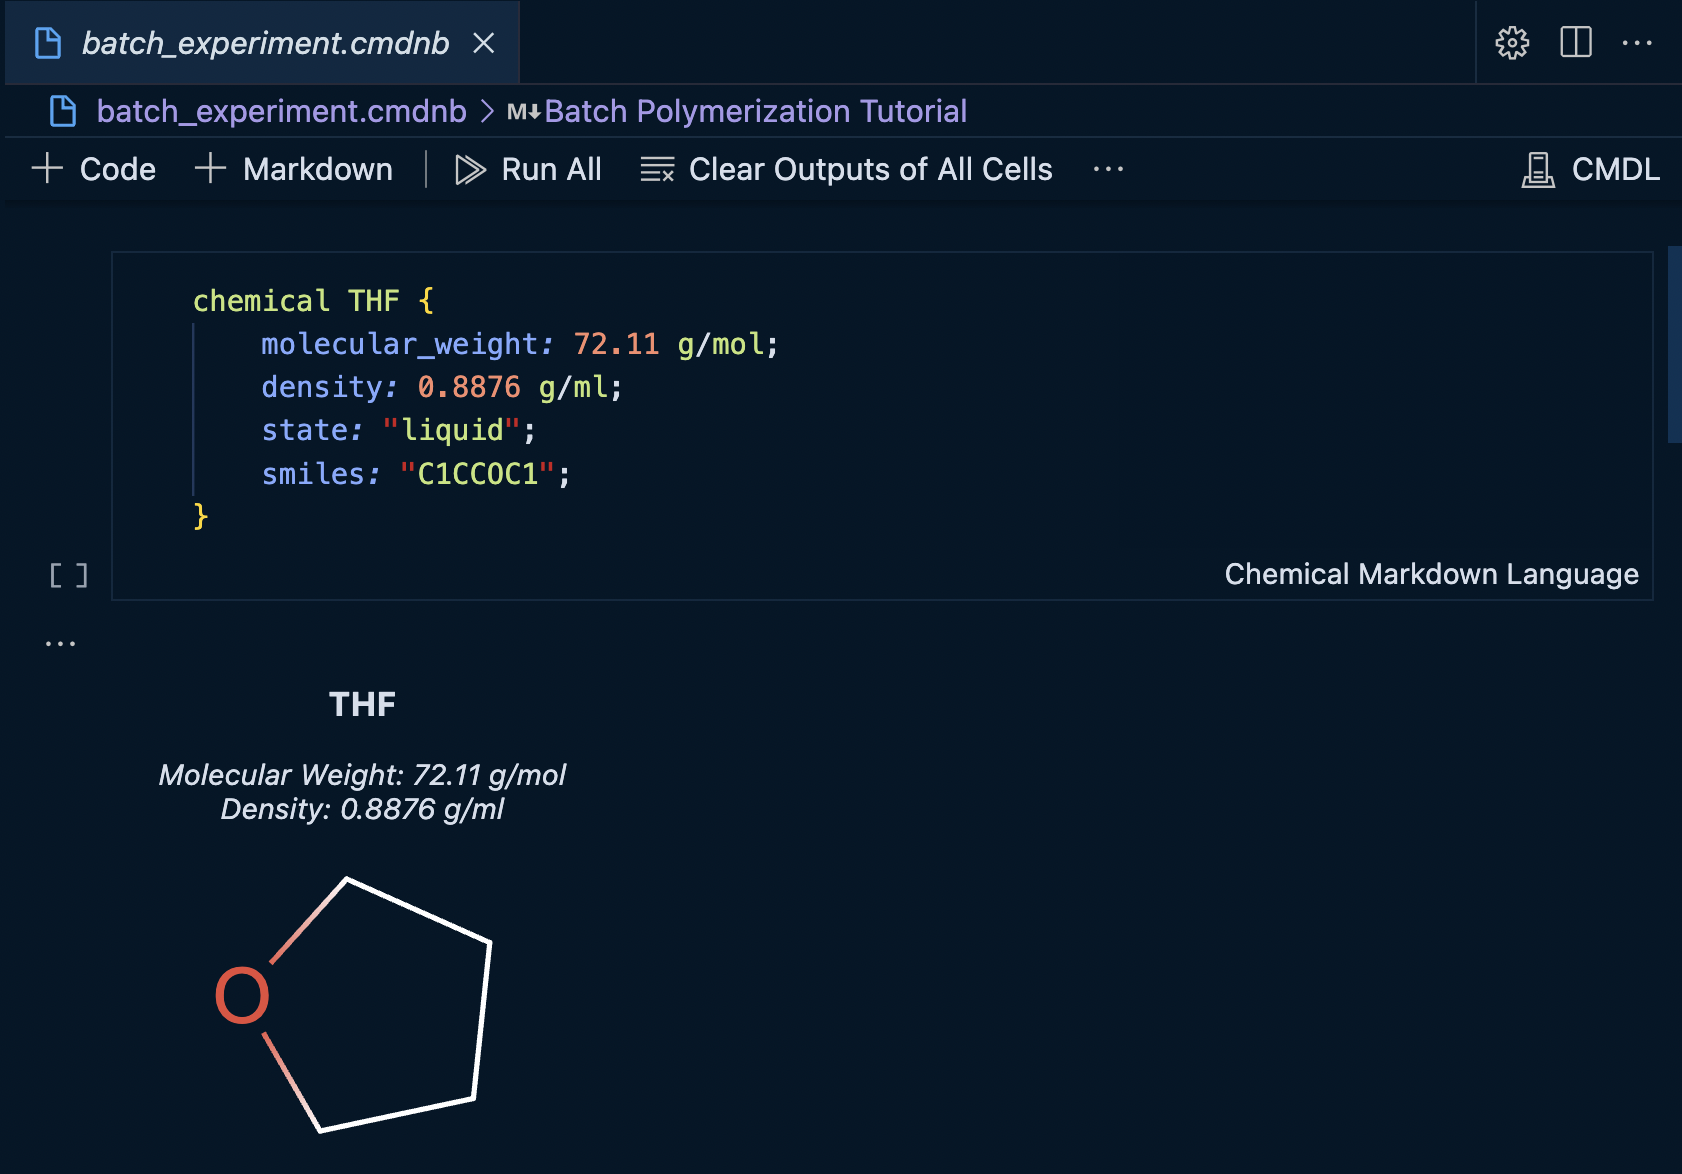
The mime type of the cell output can be changed to the custom IBM Materials Notebook renderer to display the values in a more concise format.
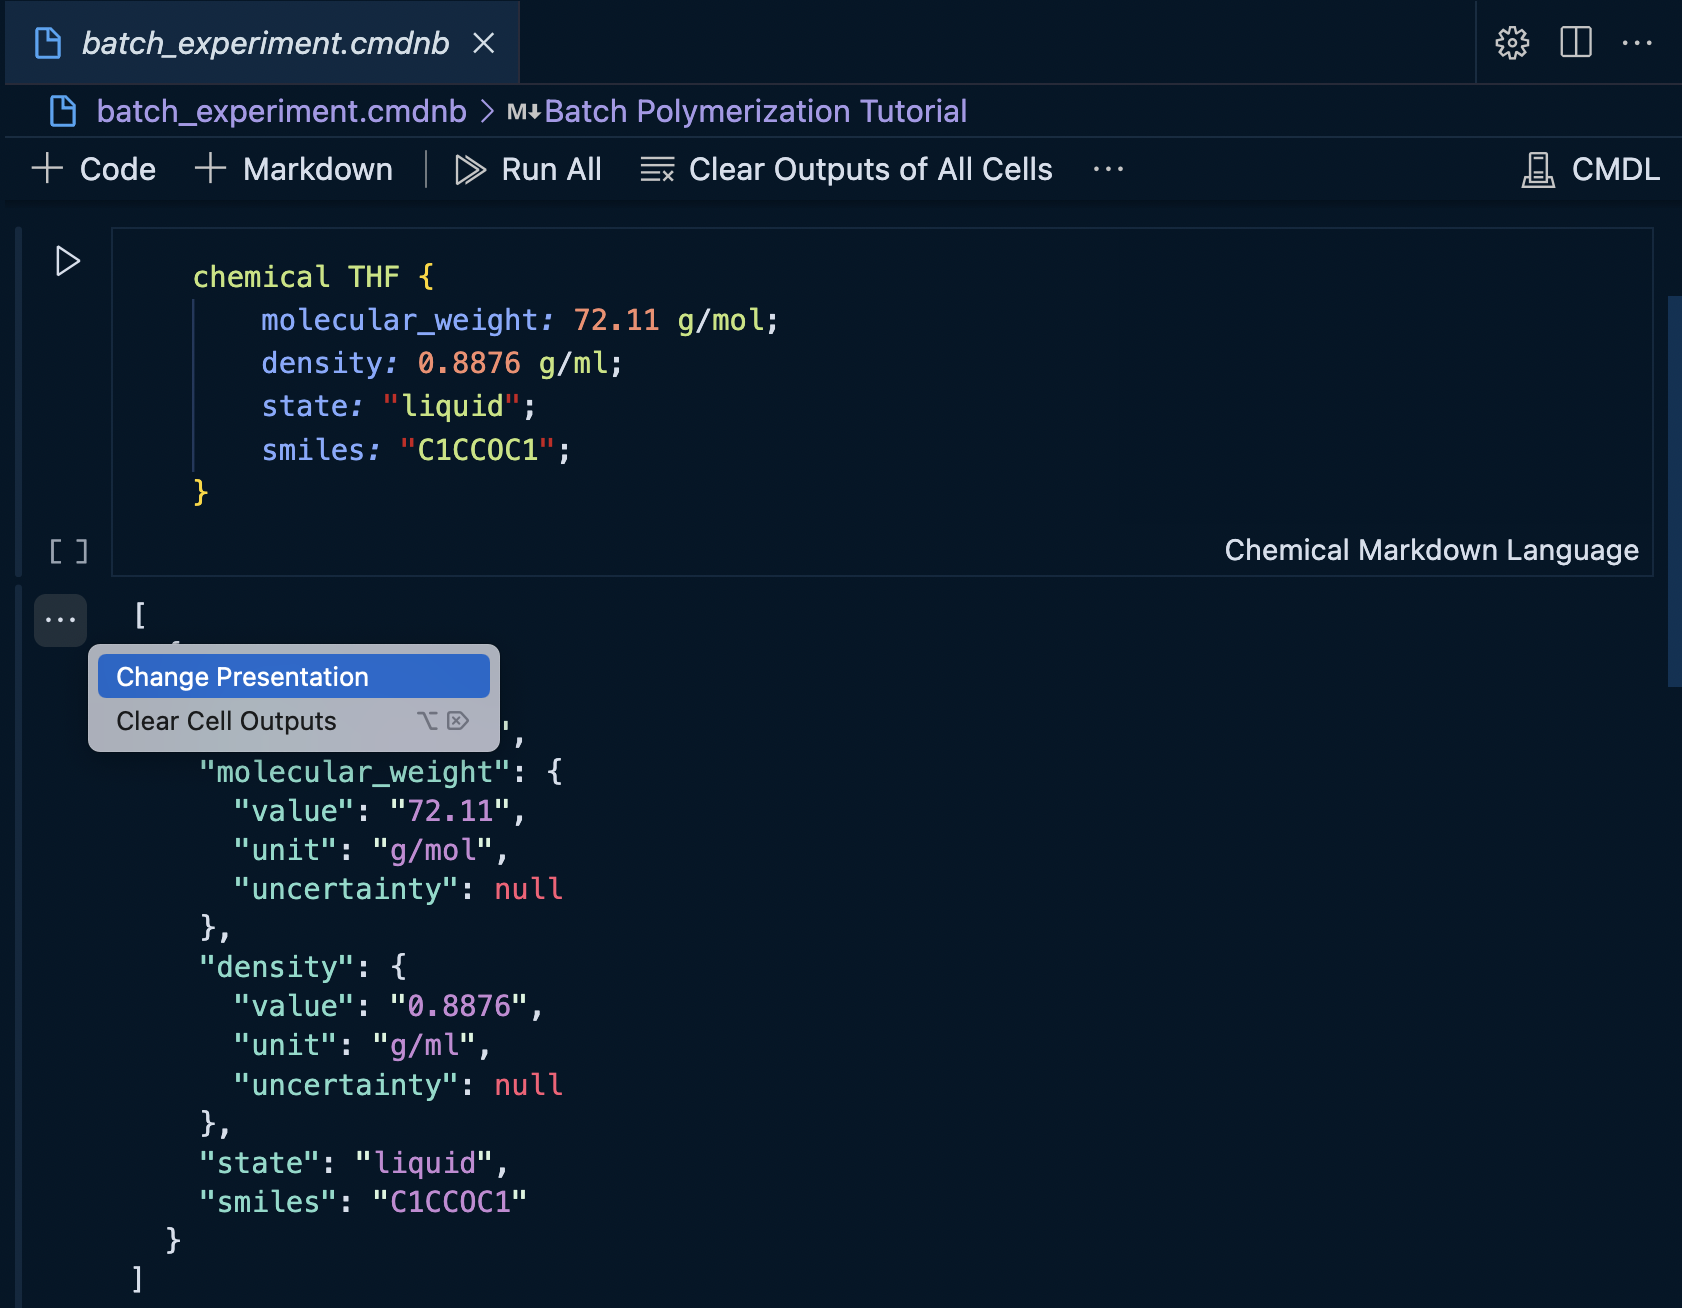
Changing the display type can be accomplished by clicking the more actions menu next to the cell.
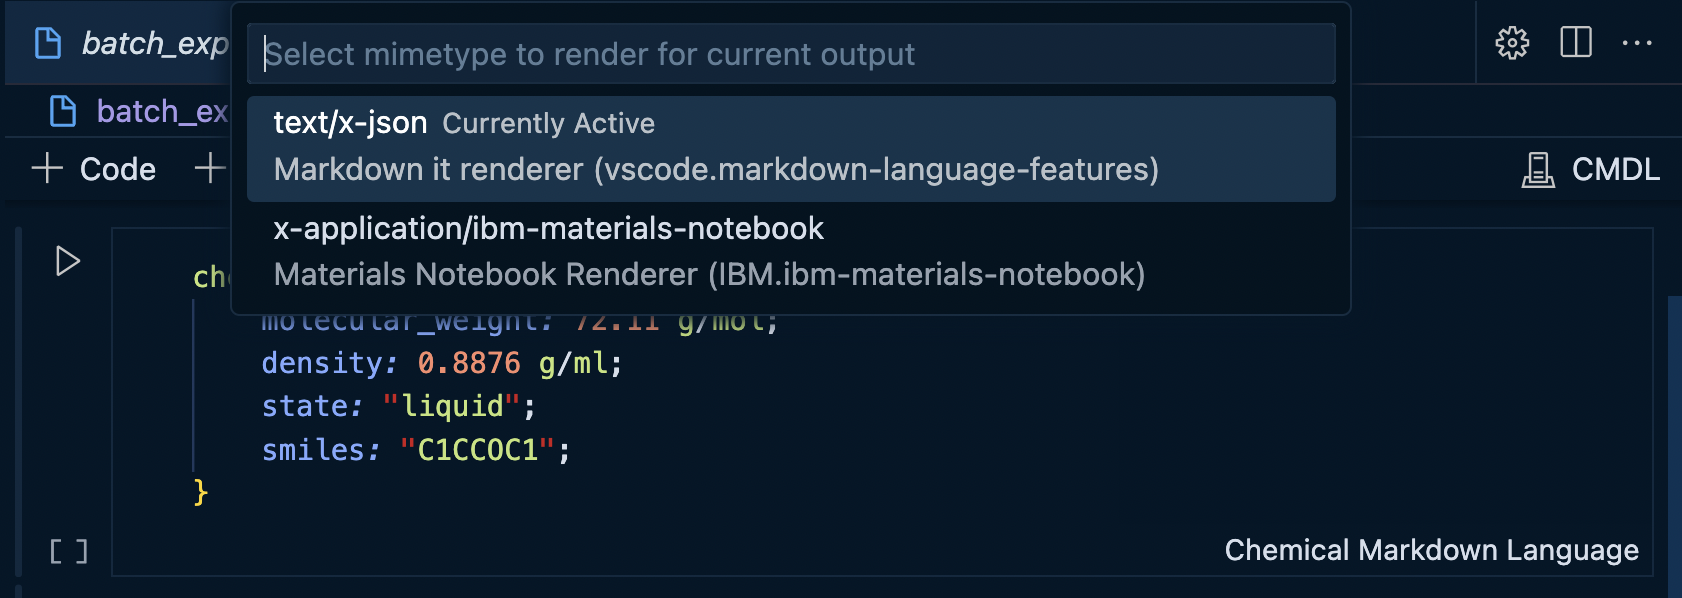
And then selecting the desired output MIME type...
Creating additional chemical references
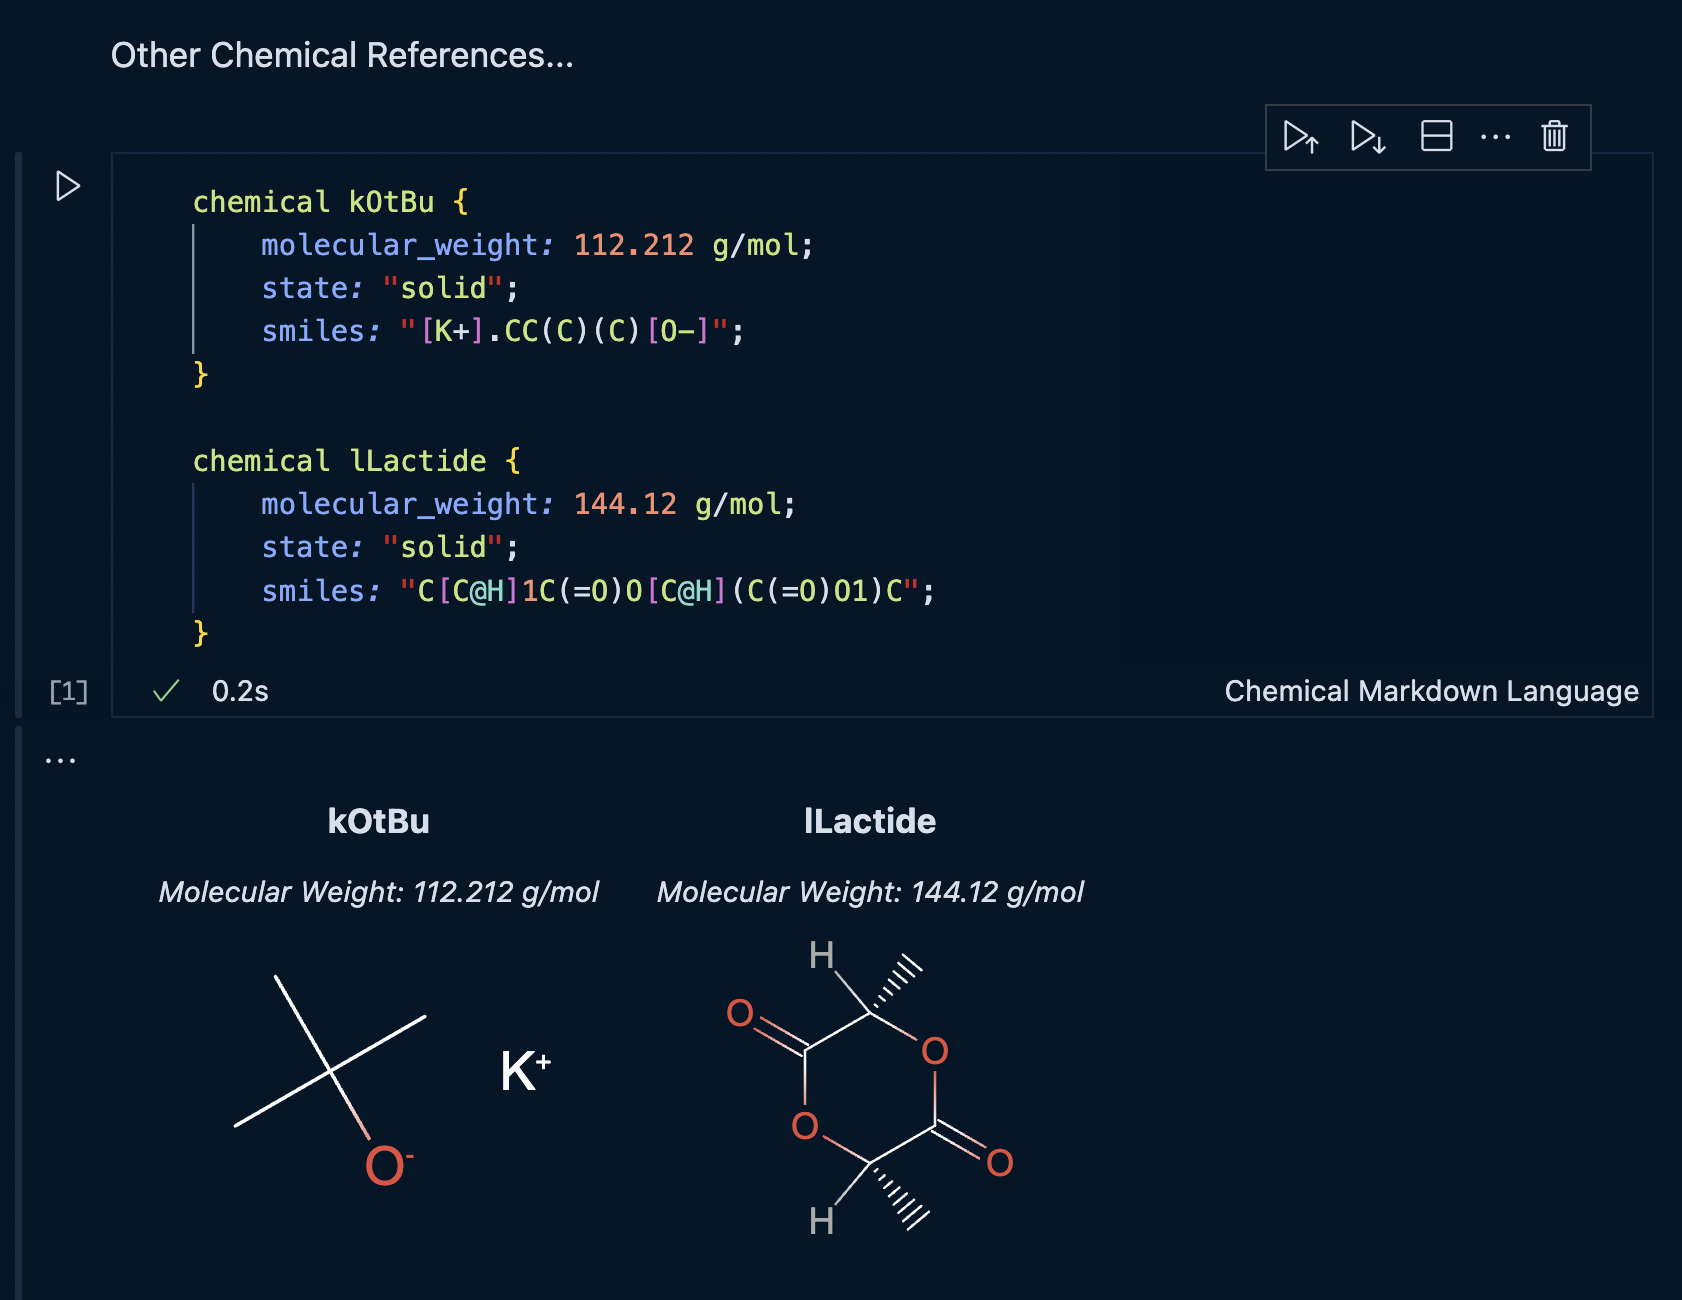
Now that we have created the first chemical reference. Add the following additional references to a separate cell or the same cell and execute that cell.
cmdl
chemical kOtBu {
    molecular_weight: 112.212 g/mol;
    smiles: "[K+].CC(C)(C)[O-]";
}

chemical lLactide {
    molecular_weight: 144.12 g/mol;
    smiles: "C[C@H]1C(=O)O[C@H](C(=O)O1)C";
}
Now all of the small molecule references are ready to be used inside the batch experiment. Next we will define the polymer product of the reaction as well as the macroinitiator.
The additional chemical references cell should look as follows:
Polymer References
Before defining the polymerization reaction itself, we must define the polymeric macroinitiator and the polymer product references that can be referenced in the reaction and any experimental results. Before defining the polymer references themselves, we'll first create graph representations of their structure so we may reference their components later.
Polymer Representations
Unlike small-molecules, representing polymeric materials is more complex due to their inherent stocastic nature. Hence, convential line notations, such as SMILES, are insufficient to describe a polymeric material. Hence, many alternateive representations have been created to represent polymers. CMDL supports defining and referencing graph representations. Line notations such as BigSMILES can also be added, however, no parsing or rendering capabilities are currently supported for line notations.
Polymer Composite Trees and Graphs
Graph representations for polymeric materials are very convenient means to relate values such as Mn to the whole polymer structure or embed properties for specific repeat units such as degree of polymerization (DP n). Graph representations in CMDL are based on defining nodes and edges within a polymeric material, with nodes containing references to SMILES strings that define placeholder characters for connection points. The following is an example for a repeat unit for L-lactide.
O=C(O[C@H](C([R])=O)C)[C@@H](O[Q])C
Here Q and R refer to chemically distinct connection points from which edges may be defined in the graph.
In order to define a graph, the CMDL interpreter will create an intermediate composite tree representation. This intermediate tree representation provides a more rigorous means to traverse the polymer structure and correctly assign weights to edges based off of experimentally measured values.
A composite tree for a polymer can be thought of breaking the structure into three separate components:
- A
node, representing a discrete chemical entity such as a repeat unit or end group. - A
connectionoredge, representing a chemical bond between two nodes. - A
containerwhich can contain child nodes, connections between child nodes, or other containers
In the followin examples, we'll define two simple polymer graph representations in TYPES. For more complicated examples of polymeric materials, see the polymer graph folder in examples.
Fragment References
Before defining the polymer graph structure itself, we need to create references to fragments of the polymer structure. These fragments will contain information such as the molecular weight of a particular end group or repeat unit as well as their SMILES strings. First lets create fragments for the methoxy-terminated poly(ethylene glycol) macro-initiator (mPEG-OH). In a new CMDL cell in the batch_experiment notebook add the following:
cmdl
fragments {
   MeO =: "CO[R]";
   PEO =: "[Q]OCC[R]";
}
Here, we break mPEG-OH into two distinct fragments, one for its methoxy end group MeO and one for its repeat unit PEO. Fragments can be used in more than one context within a single polymer graph structure definition. For instance, a methoxy group, MeO may appear in distinct parts of polymer structure, such as an end group of grafted side chain and the end group of the main chain. For this reason, fragments can be defined separately from the polymer graph or can be defined directly on the top-level of the polymer_graph group.
Polymer Graph Definition
Macroinitiatior
To create the polymer graph for mPEG-OH, in a new, create the polymer graph group as follows:
cmdl
polymer_graph PEG_BASE {

}
This group represents the full structure or the root container in the polymer composite tree of mPEG-OH. The root container of the composite tree for mPEG-OH should contain a reference to MeO and a nested container for the PEO repeat unit. Repeat units are by convention placed in separate nested containers, which is especially important for dealing with polymers that are grafted or have blocks with statistical microstructures. See the polymer graphs section for examples. Adding these to the graph definition affords the following.
cmdl
polymer_graph PEG_BASE {
   nodes: [ @MeO ];

   container PEG_Block {
      nodes: [ @PEO ]
   };
}
Now that the nodes are in place, we can add edges. Edges are defined within containers and only specify connections between the containers child nodes. Thus, an edge from a nested node will not specify a connection to a node in a parent container. In this example we have two edges, one between the MeO and PEO nodes and one between PEO and itself. Edges are denoted with a special notation within CMDL and appear as follows:
cmdl
polymer_graph PEG_BASE {
   nodes: [ @MeO ];
   <@MeO.R => @PEG_Block.PEO.R>;

   container PEG_Block {
      nodes: [ @PEO ];
      <@PEO.Q => @PEO.R>;
   };
}
Note that the prefix PEG_Block is needed to specify the which container the edge originating from the MeO is pointing towards (line 3). Edges originating and terminating within the same container (line 7), do not need any additional prefixes. The direction of the edge is by convention originating with a nucleophilic point and terminating with the electrophilic point. This works in many cases, however, there are instances where it becomes more ambiguous and the edge direction can be set at the users discretion. Future versions will aim at providing more rigorous solutions to these cases. Now that we have the mPEG-OH structure defined, we can move on to the mPEG-PLLA product.
Polylactide Product
In a new cell, we can create a fragment definintion Llac for the lactide repeat unit on the original fragments group and re-run the cell:
cmdl
fragments {
   MeO =: "CO[R]";
   PEO =: "[Q]OCC[R]";
   Llac =: "O=C(O[C@H](C([R])=O)C)[C@@H](O[Q])C";
}
In a second new cell, we can define a new polymer graph for the mPEG-PLLA product. The mPEG portion of the graph can be copied from the macroinitiator graph. The polymer graph after copying over these values would should look like this:
cmdl
polymer_graph PEG_PLLA_Base {
   nodes: [ @MeO ];
   <@MeO.R => @PEG_Block.PEO.R>;

   container PEG_Block {
      nodes: [ @PEO ];
      <@PEO.Q => @PEO.R>;
   };
}
We can add the lactide block, the lactide repeat unit edge, and the edge between the PEG and lactide blocks. The polymer graph should now look like this:
cmdl
polymer_graph PEG_PLLA_Base {
   nodes: [ @MeO ];
   <@MeO.R => @PEG_Block.PEO.R>;
   <@PEG_Block.PEO.Q => @Lactide_Block.Llac.R>;

   container PEG_Block {
      nodes: [ @PEO ];
      <@PEO.Q => @PEO.R>;
   };

   container Lactide_Block {
     nodes: [ @Llac ];
     <@Llac.Q => @Llac.R>;
   };
}
Polymer Reference Definition
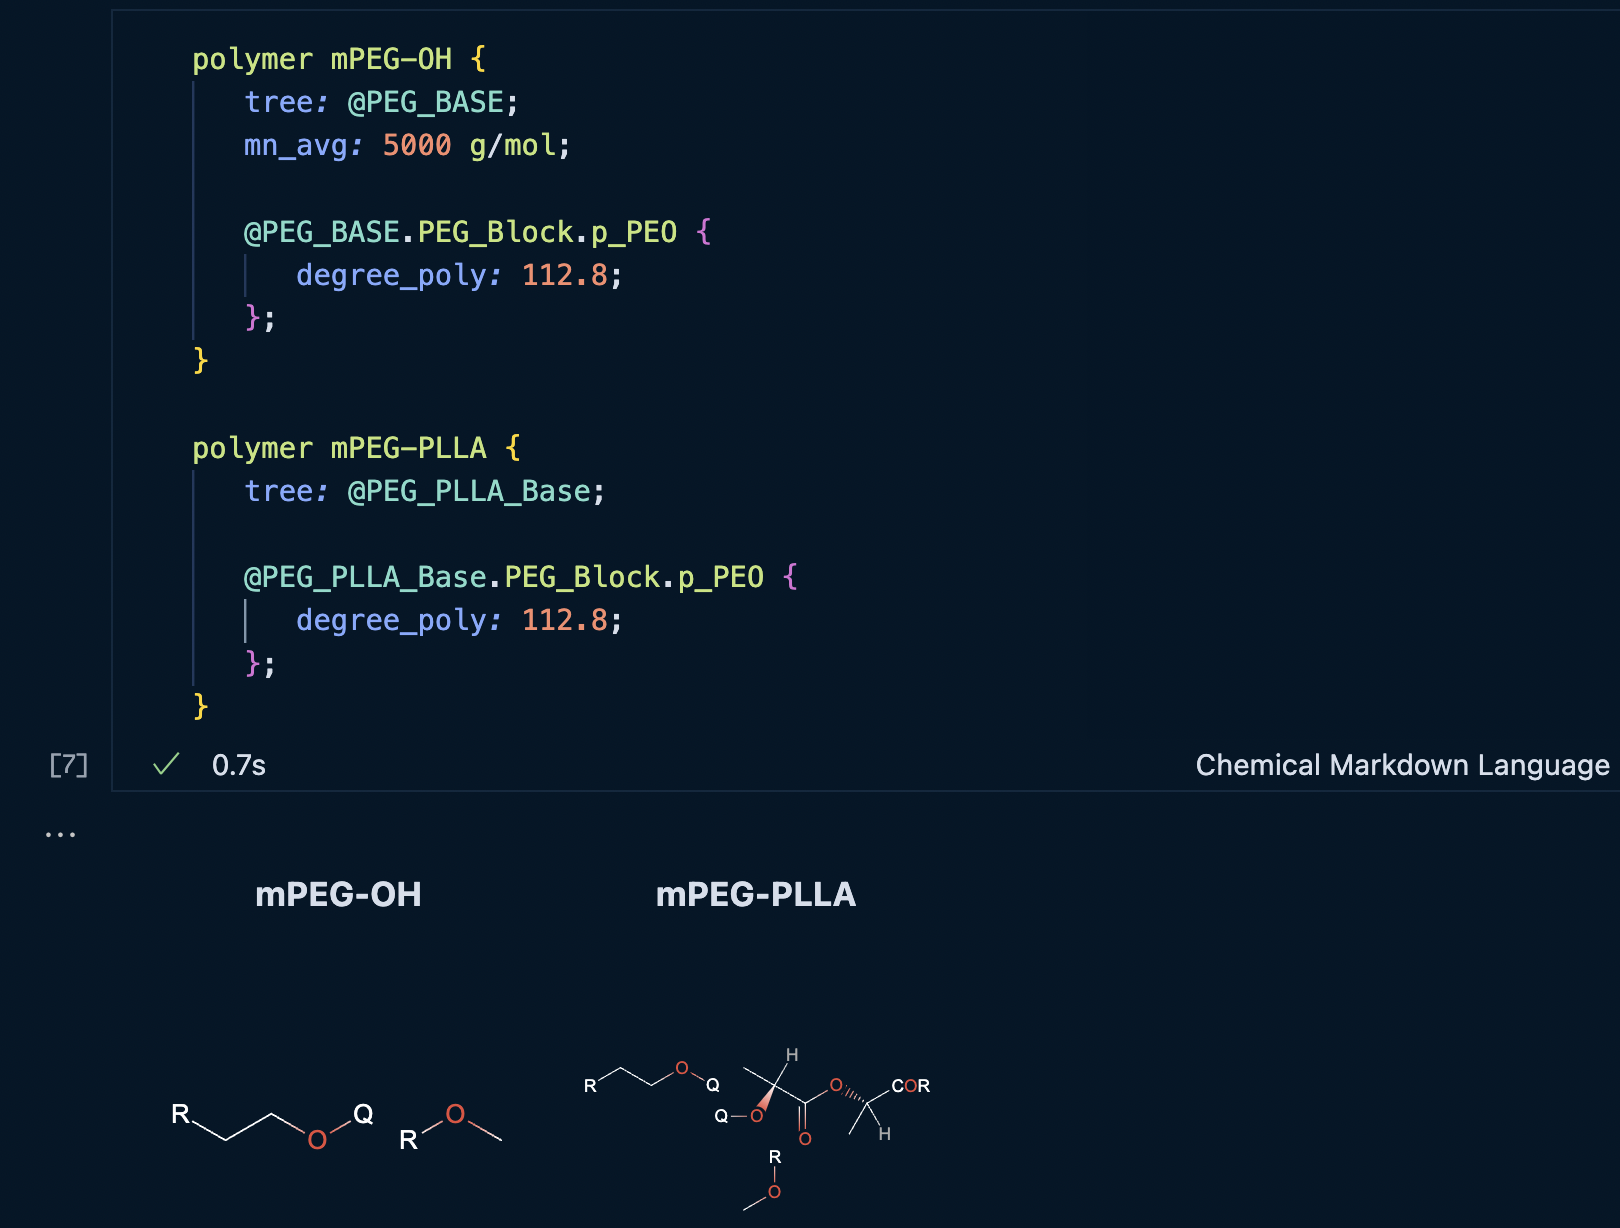
With both polymer graphs for the macroinitiator and the polymer product defined we can now define the polymer references. In a new cell, lets define both the reference to the mPEG-OH initiator and the mPEG-PLLA product. The polymer graphs created above can be referenced as a by the structure property on the polymer group.
cmdl
polymer mPEG-OH {
   structure: @PEG_BASE;
}

polymer mPEG-PLLA {
   structure: @PEG_PLLA_Base;
}
Since we'll be using mPEG-OH as an initiator in the batch polymerization reaction, we can define an Mn value on the polymer itself. This will allow for the CMDL intepreter to estimate the stochiometry when the mPEG-OH is referenced in the reaction itself.
cmdl
polymer mPEG-OH {
   structure: @PEG_BASE;
   mn_avg: 5000 g/mol;
}

polymer mPEG-PLLA {
   structure: @PEG_PLLA_Base;
}
We can also define DPn on the PEO node repeat unit both in the mPEG-OH initiator and the mPEG-PLLA product as well, as we can expect this not to change during the polymerization reaction. The full path is needed to assign the DPn value of 112.8 to the PEOnode.
cmdl
polymer mPEG-OH {
   structure: @PEG_BASE;
   mn_avg: 5000 g/mol;

   @PEG_BASE.PEG_Block.p_PEO {
      degree_poly: 112.8;
   };
}

polymer mPEG-PLLA {
   structure: @PEG_PLLA_Base;

   @PEG_PLLA_Base.PEG_Block.p_PEO {
      degree_poly: 112.8;
   };
}
With these values set, the CMDL interpreter will compute the weights for all of the edges within the polymer graph. As the targeted product is mPEG-PLLA, any characterization properties measured for the product will be set later.
Batch Reactions
Now that we have all the references to small-molecule and chemcial entities defined. We can construct our reaction object. This allows us to not only define important reaction parameters, such as time and temperature, but also refernce the chemical entities and define the amounts consumed in the reaction.
In a new cell, we can define the reaction, with the name of BatchRxn, group as follows:
cmdl
reaction BatchRxn {

}
Reaction Parameters
Parameters for a particular reaction can be added as properties on the reaction group. Here, temperature and the reaction_time can be defined:
cmdl
reaction BatchRxn {
   temperature: 22 degC;
   reaction_time: 10 s;

}
Adding Chemical and Polymer References
Adding References to the chemical reagents is straightfoward for a reaction. As with labeling the DPn on a polymer reference, references on a reaction group are prefixed with an @. Below is the result of adding references for all the reagents for the reaction BatchRxn:
cmdl
reaction BatchRxn {
   temperature: 22 degC;
   reaction_time: 10 s;

   @mPEG-OH {

   }

   @kOtBu {

   }

   @lLactide {

   }

   @THF {

   }

   @mPEG-PLLA {

   }

}
For each reference, we can define properties for their quantity and role in the reaction.
Note: Only one quantity property is needed for each reagent. The CMDL interpreter will automatically compute the reaction stoichiometry and other quantities based of of that value.
cmdl
reaction BatchRxn {
   temperature: 22 degC;
   reaction_time: 10 s;

   @mPEG-OH {
      mass: 5 mg;
      roles: [ "initiator" ];
      limiting: true;
   };

   @kOtBu {
      mass: 5 mg;
      roles: [ "catalyst", "reagent" ];
   };

   @lLactide {
      mass: 1440 mg;
      roles: [ "monomer" ];
   };

   @THF {
      volume: 2 ml;
      roles: [ "solvent" ];
   };

   @mPEG-PLLA {
      roles: [ "product" ];
   };
}
As chemicals can potentially have multiple roles in a reaction, the roles property is enclosed within square brackets. A limiting property can be set for a limiting reagent or reactant. This will instruct the CMDL interpreter will calculate the ratios of all other chemicals relative to the one with the limiting property. Not setting a limiting property will prompt the CMDL intepreter to use the reagent with the lowest mole value as the limiting reagent.
No quantity information should be provided here for any of the products. The reasons for this are outlined below when the results of the reaction are defined.
Running the Reaction Cell
With all of the values properly defined on BatchRxn we can now run the reaction cell and inspect the output. If you set the output MIME type to x-application/ibm-materials-notebook, you should see something like the following:
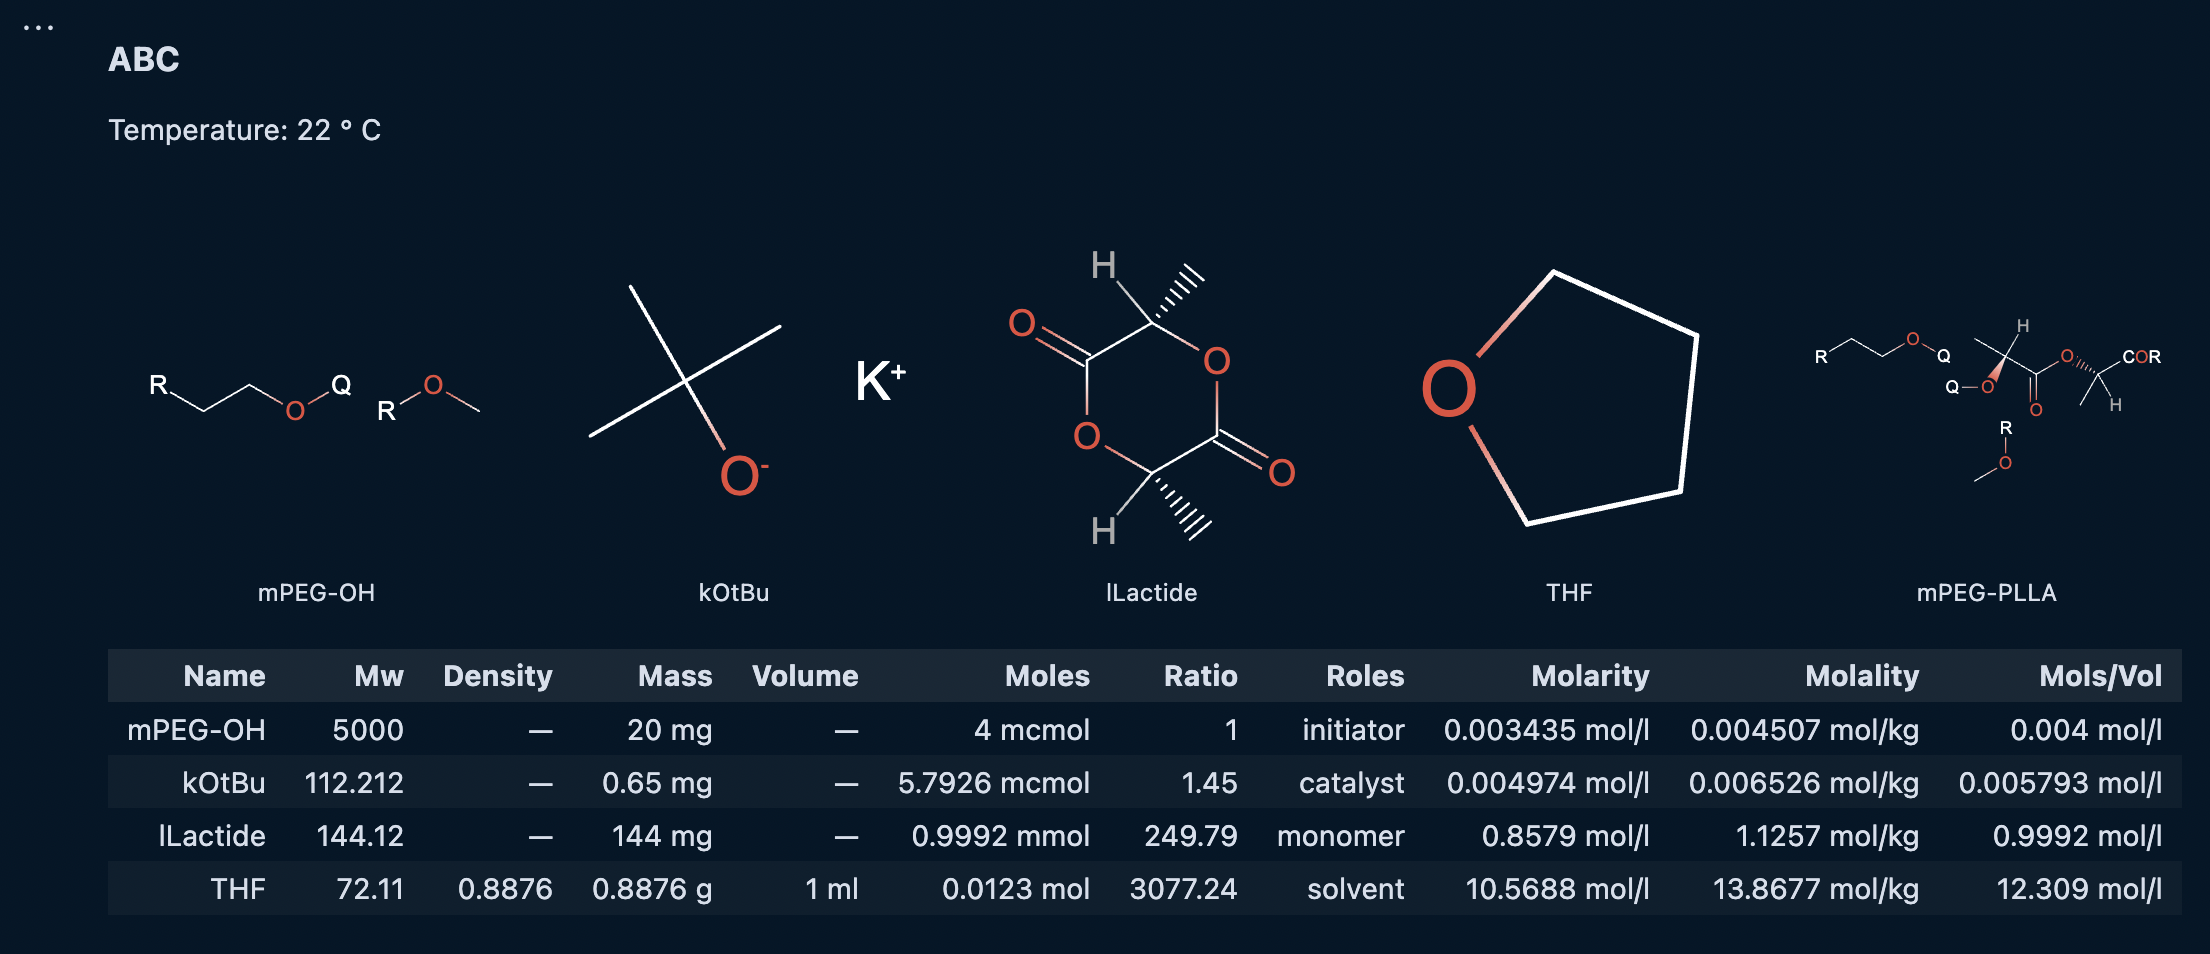
The exact values for the stoichiometry may differ based on the quantity values entered for each reagent.
Experiment Results and Characteriaztion Data
During any synthetic organic chemistry or polymer chemistry reaction experiment, samples may be removed from the crude reaction mixture itself and analyzed by various characterization techniques to measure values such as conversion or yield of the reaction product(s). For a polymerization experiment, this amounts to measuring values of a new polymer for each time point sampled, given that the statistical values of the polymer will evolve during the course of the reaction.
Additionally, purified samples may be analyzed or re-analyzed at any point in time following the completion of a reaction.
Defining a Characterization Data Group
To accomodate for all of these measurements possibilities, we can create a char_data group:
cmdl
char_data Test-I-123A {

}
We can assign this a sample_id, such that other characterization analysis using the same sample id will be grouped together by the interpreter. Assuming we collected this sample at ~5 s of reaction time we can a time_point property on the sample group:
cmdl
char_data Test-I-123A-nmr {
   time_point: 5 s;
   sample_id: "Test-I-123A";
}
Finally, within a char_data group we can define different characterization techniques such as nmr, gpc, or dsc. For a full list of currently supported characterization techniques, see the CMDL guide.
To the char_data group, let's a technique of nmr:
cmdl
char_data Test-I-123A-nmr {
   time_point: 5 s;
   sample_id: "Test-I-123A";
   technique: "nmr";
}
We can add a second char_data for gpc analysis of the same sample:
cmdl
char_data Test-I-123A-nmr {
   time_point: 5 s;
   sample_id: "Test-I-123A";
   technique: "nmr";
}

char_data Test-I-123A-gpc {
   time_point: 5 s;
   sample_id: "Test-I-123A";
   technique: "gpc";
}
Adding References
Now we can add specific results for different chemicals which participated in the reaction. For instance, from the 1H spectra we can determine the percent conversion of the L-lactide monomer. We can also add values for Mn (mn_avg) and dispersity measured by gpc for the product mPEG-PLLA.
Note: All of the properties for conversion, mn_avg, yield, and the like are values based off of the users interpretation of the characterization data
cmdl
char_data Test-I-123A-nmr {
   time_point: 5 s;
   sample_id: "Test-I-123A";
   technique: "nmr";

   @lLactide {
      conversion: 75%;
   };
}

char_data Test-I-123A-gpc {
   time_point: 5 s;
   sample_id: "Test-I-123A";
   technique: "gpc";

   @mPEG-PLLA {
      dispersity: 1.34;
      mn_avg: 12000 g/mol;
   };
}
We can also add values for specific components of the polymer product, such as the theoretical DPn for lLac repeat unit based off of monomer conversion.
cmdl
char_data Test-I-123A-nmr {
   time_point: 5 s;
   sample_id: "Test-I-123A";
   technique: "nmr";

   @lLactide {
      conversion: 75%;
   };

   @mPEG-PLLA.PLLA_Block.lLac {
      degree_poly: 60.3;
   };
}

char_data Test-I-123A-gpc {
   time_point: 5 s;
   sample_id: "Test-I-123A";
   technique: "gpc";

   @mPEG-PLLA {
      dispersity: 1.34;
      mn_avg: 12000 g/mol;
   };
}
Adding these theoretical DPn values allows the CMDL interpreter to compute weights for the edges within the graphs, enabling a better connection between structure–statistical features–properties for predictive modeling. However in some cases, it may be excedingly difficult to estimate these values experimentally. Future work on polymer graph representations will seek to address these cases.
As mentioned above, there many instances where multiple samples from a single reaction are analyzed, each of which provides a different polymer product based on statistical measures such as molecular weight distrubution. We can add a additional char_data groups to the same cell describing the results at the completion of the reaction_time of BatchRxn at 10 seconds.
cmdl
char_data Test-I-123B-nmr {
   time_point: 10 s;
   sample_id: "Test-I-123B";
   technique: "nmr";

   @lLactide {
      conversion: 99%;
   };

   @mPEG-PLLA.PLLA_Block.lLac {
      degree_poly: 80;
   };
}

char_data Test-I-123A-gpc {
   time_point: 5 s;
   sample_id: "Test-I-123A";
   technique: "gpc";

   @mPEG-PLLA {
      dispersity: 1.45;
      mn_avg: 14000 g/mol;
   };
}
Running the Sample Cell
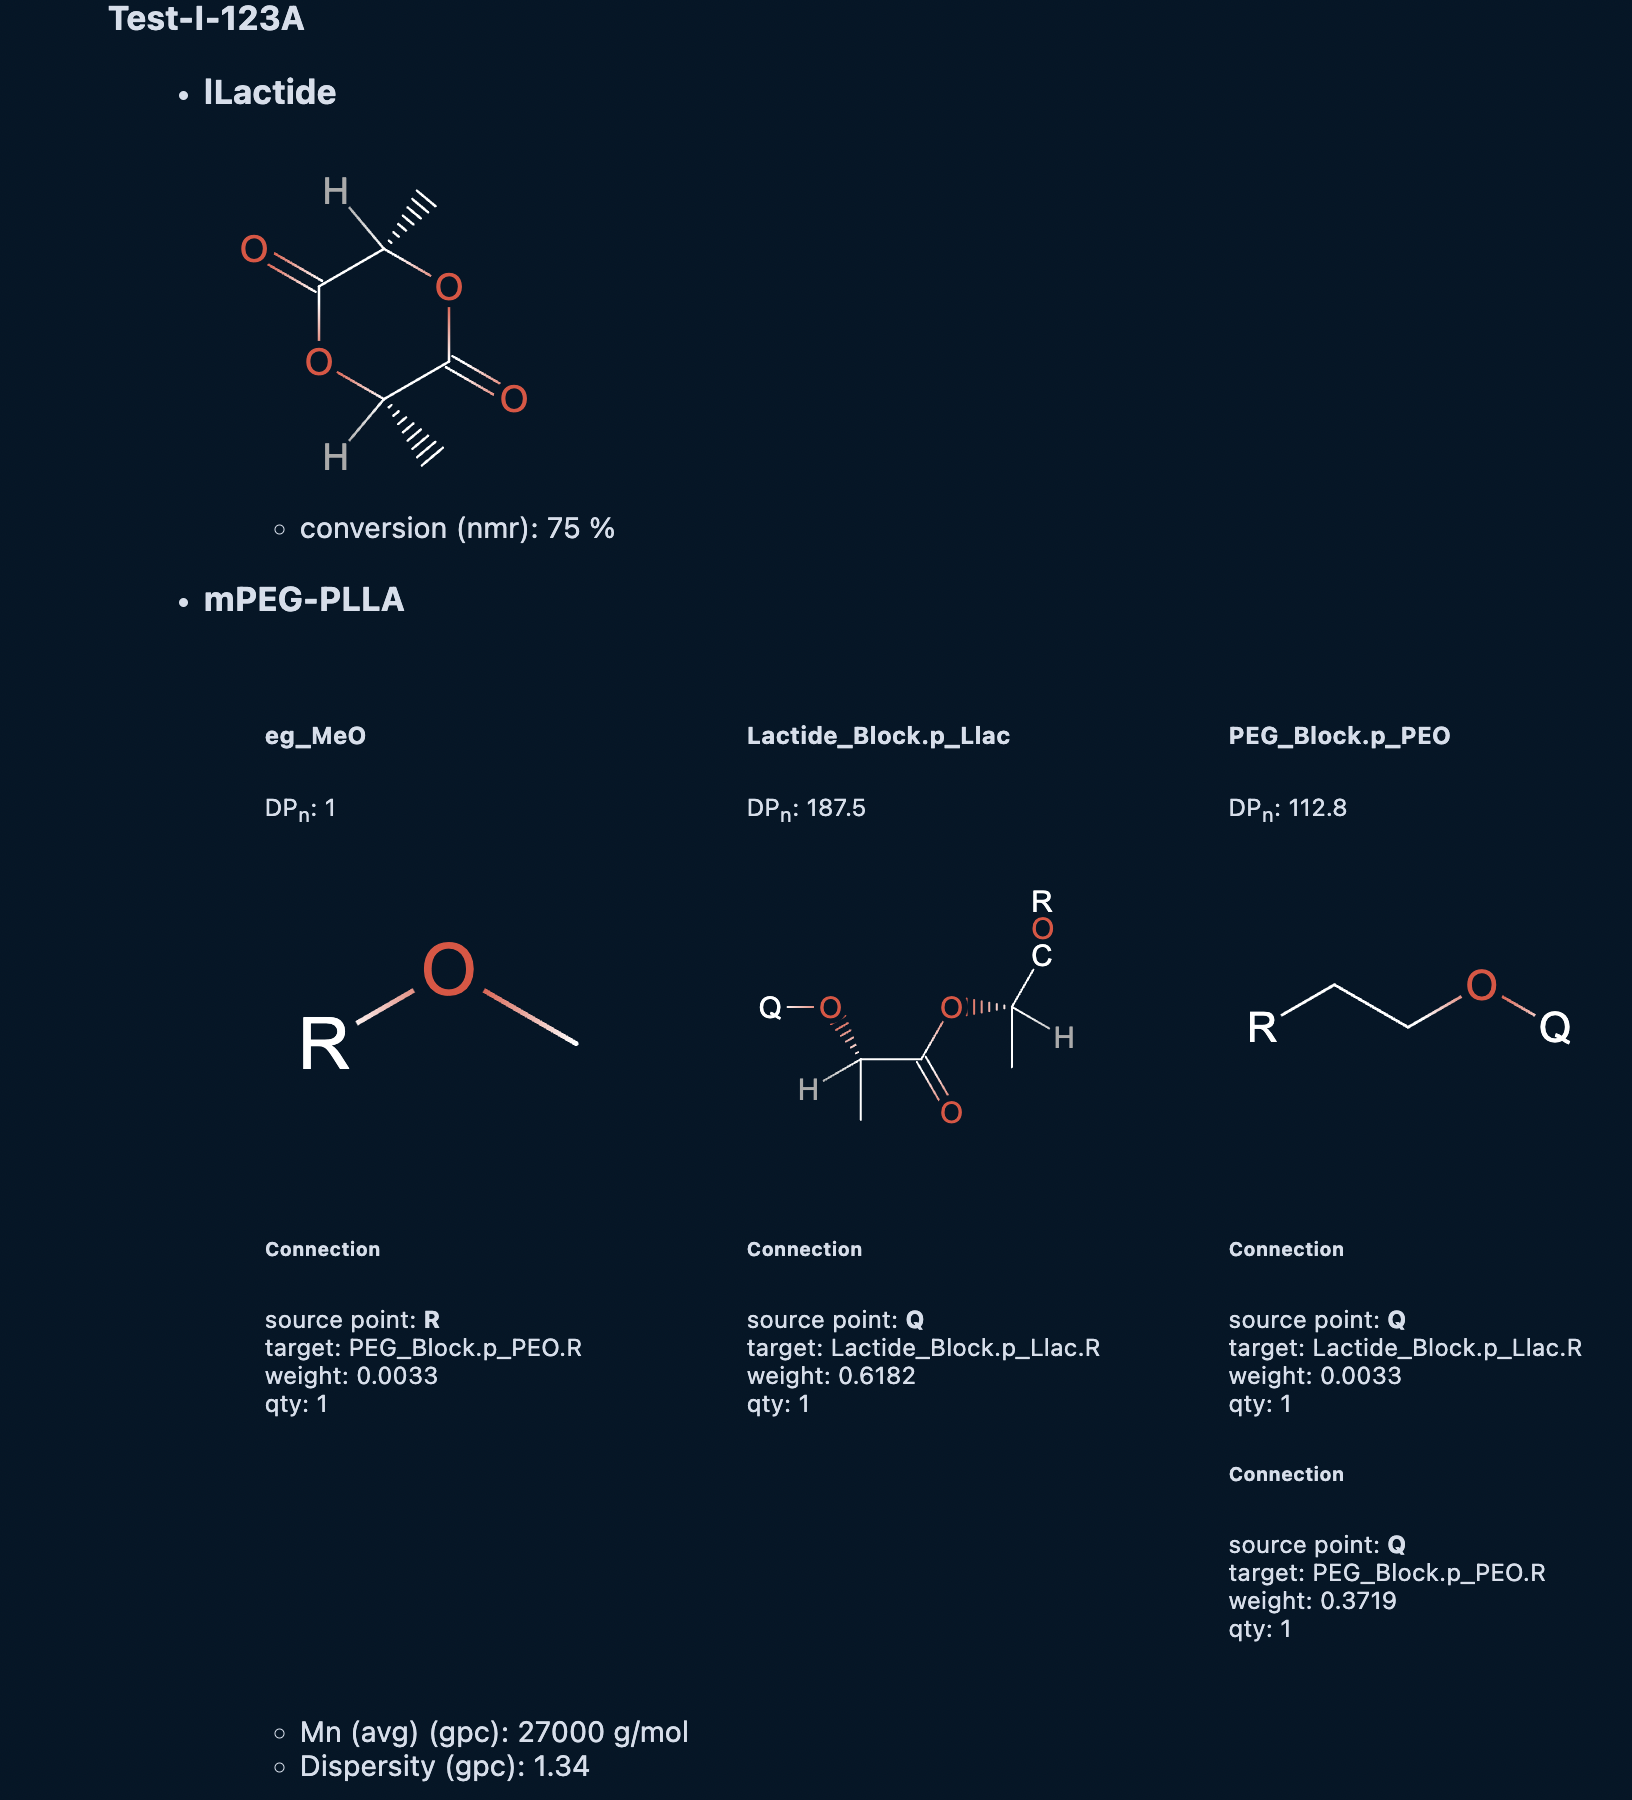
Executing the cell containing samples Test-I-123A and Test-I-123B will provide an output the looks like the following:
Experimental Protocols
Currently writing of experimental protocols is not directly supported in TYPES. As markdown cells may be interleaved with, we recommend documentation of experimental protocols using markdown. Future versions of CMDL will incorporate functionality to ingest and link experimental protocols with the larger experimental record as well as translate it into a series of machine readable steps.
Example Protocol
WARNING
Protocols are have are being migrated to use a customized version of markdown to write protocols mork expressively in natural language. This will be used in notebooks alongside regular CMDL for representing reactions and characterization data. This section will be updated once the protocol feature is finished.
Experiment Metadata
If at any point you have saved the notebook document during this tutorial, you would have a pop-up notification looking like the following screenshot:
The notification indicates that the record was not exported to JSON as no metadata for the record was set. The notebook document itself is always saved, however, without any user-defined metadata, it will not automatically export to the JSON format.
Saving and exporting the CMDL notebook
Once the metadata is set, saving the notebook itself should export the experimental record to a JSON format. The fields and arrangement of JSON export are determined by the default CMDL schema. Future versions of CMDL and the IBM Materials Notebook will enable users to customize the schema export for their records. Additional features allowing direct export to local or remote databases are also planned.
The exported recored will be written to the /lib folder. Any changes made to the notebook document that are then saved (assuming the metadata is defined and there are no errors) will overwrite the corresponding JSON export in the /lib folder.
Saving the notebook document will also export any products of the reaction to the /lib folder. This enables them to be referenced by other experiments within the same workspace and will be discussed in the import tutorial.
WARNING
The local saving, sharing, and loading of named CMDL entities (small-molecule chemicals, polymers, reactions, reactors, etc.) is being migrated to take advantage VS Code extension and workspace storage capabilities. Many of the features described here may change in subsequent versions of the extension.
Next Steps
This tutorial covered all of the necessary features needed to get started documenting experimental work using the IBM Materials Notebook extension and TYPES. While explicit defnintion of small-molecule and polymer references in each notebook document is certainly a viable approach, it can be very verbose, cumbersome and potentially error-prone.
In the next tutorial, we'll cover features that enable importing and aliasing of commonly used chemical references to streamline experimental documentation. All of this can be found in the import tutorial