IBM Z® Open Editor in the cloud with Eclipse Che
by Prasang A. Prajapati, Eric Subah, and Peter Haumer.
Last updated: 3 December 2019
IBM Z Open Editor is a free Visual Studio Code extension that provides a modern editing experience for IBM Z Enterprise languages. It gives developers the freedom to code in COBOL and PL/I using the same editor they use for other languages such as Java and JavaScript. Learn more.
However, Visual Studio Code is a rich client editor that needs to be installed and configured by every development team member on their development machines. In addition to installing the editor, enterprise developers also have to get access to source code and other resources residing in SCMs and on z/OS.
What if you could avoid all this and developers could just join a project by getting access and logging on to a website? After logging on, the source code, access to z/OS, and the development environment required for maintaining the project would just be there and developers can just dive in?
To realize on this vision, there is an excellent open source tool platform called Eclipse Che. It was built to make Kubernetes development accessible for development teams, providing one-click developer workspaces and eliminating the need for local environment configurations for the entire team. This use case applies not only to Kubernetes development, but by utilizing z/OS connectivity features such as the ones provided by the Zowe open source project also fits with the requirements for z/OS Mainframe development projects.
You can run Eclipse Che in the public cloud, private cloud, or install it on a large list of distributed OS (Ubuntu/Linux/MacOS/Windows). To learn more about Eclipse Che, see Introduction to Eclipse Che. It is also built for extensibility allowing organizations to create and plug-in additional enhancements or features.
In the following, we want to show you how easy it is to set up such an Eclipse Che environment in IBM Cloud using OpenShift that is fully integrated with IBM Z Open Editor as well as Zowe Explorer in three simple steps. We will provide a sample application that you can use for exploration, but once you have it up and running, you can explore other possibilities for this new kind of development style using your own source code. We would love to hear your feedback and engage into a discussion on how we can make this work for your teams.
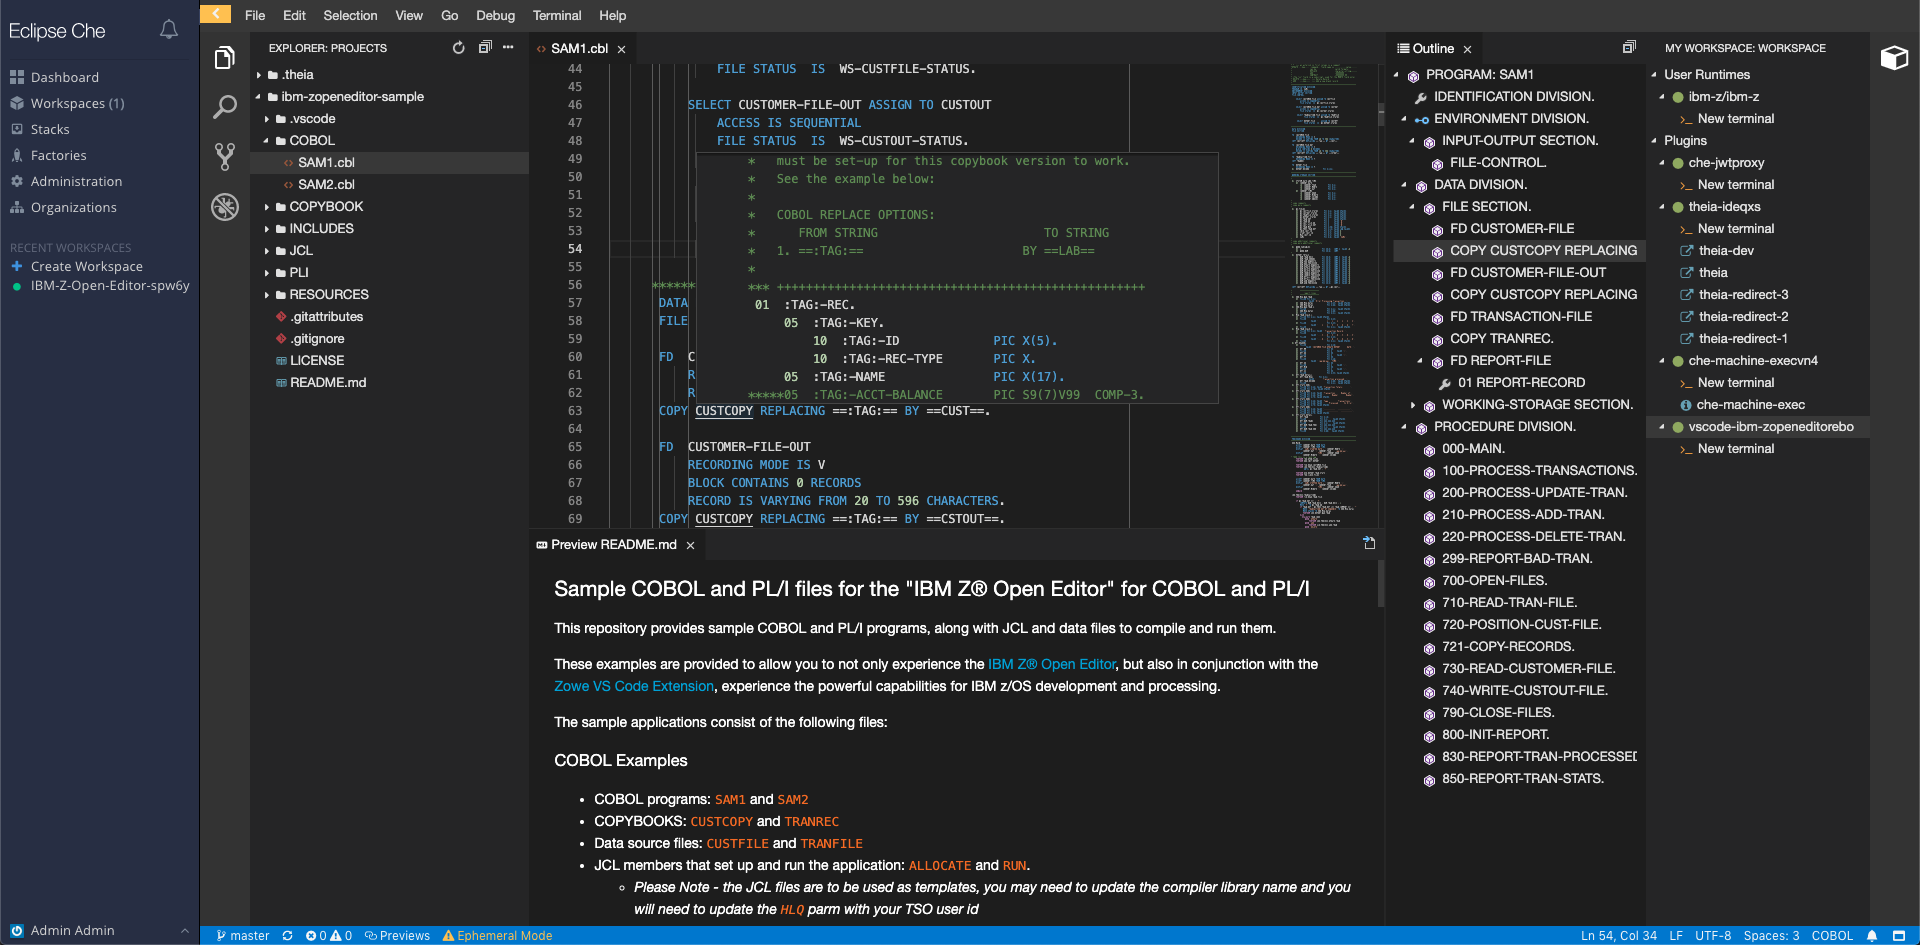 Fig. 1: The user experience of IBM Z Open Editor in Eclipse Che
Step 1: Getting started with IBM Cloud and OpenShift
We recommend exploring Eclipse Che on IBM Cloud utilizing IBM's OpenShift V3.11 offering available there. However, the instruction provided here should also work on any other OpenShift or Kubernetes hosting platforms that can run Eclipse Che. If in fact you have Eclipse Che running somewhere in your organization or a Cloud account of your own, you can directly jump to Step 3 now. Note that although the cluster and Che environment you are using needs to have at least 3 GB of memory available, the standard Che trial servers at https://che.openshift.io do not provide enough resources at the moment unfortunately.
Introducing OpenShift
- An open source containerized platform developed by Red Hat.
- It is platform as a service (PaaS). PaaS is a category of cloud computing services which provides an environment for customers to develop, run and manage their applications without the complex infrastructure of building and managing applications.
- OpenShift container platform is a service which can be deployed on public, private or hybrid cloud which will help customers to deploy applications using docker containers.
- It is built on top of Kubernetes and provides you tools like OpenShift web console or OpenShift CLI to manage projects and deployments.
- It simplifies development and operations for cloud native applications.
- It provides a web console to access and manage all the projects using built-in catalogs as well as OpenShift Container Platform templates. To learn more about OpenShift Web Console, you can view the OpenShift web console Walkthrough documentation.
Creating an OpenShift cluster on IBM Cloud
Prerequisite: To run Eclipse Che on IBM Cloud using OpenShift, you need have a full IBM Cloud account because the IBM Cloud trial accounts do not have the option to create OpenShift clusters at the moment.
After you have a full IBM Cloud account, follow the steps below to create an OpenShift cluster:
Log in to your IBM Cloud account.
From the Services Catalog, select Red Hat OpenShift Cluster. Then, click Create in the summary page.
In the Create a new OpenShift cluster page, choose your cluster setup details and name:
- For the Location, select the Single zone, which should be enough for evaluation. Set the Geography and then select any of the Worker zones.
- Enter a unique name for your cluster and select the resource group that you want to assign to your cluster.
- For Default worker pool, choose an available flavor for your worker nodes. Red Hat OpenShift on IBM Cloud supports OpenShift version 3.11 only, which includes Kubernetes version 1.11. The operating system is Red Hat Enterprise Linux 7.
- Set a number of worker nodes to create per zone, such as 3.
To finish, click Create cluster.
Notes:
Your cluster creation might take some time to complete. After the cluster state shows Normal, the cluster network and load-balancing component take about 10 more minutes to deploy and update the cluster domain that you use for the OpenShift web console and other routes.
Verify that your cluster setup is finished before you continue to the next step by checking that the Ingress subdomain on the cluster details page follows a pattern of
<cluster_name>.<region>.containers.appdomain.cloud.
Tip: If you want to learn more about customizing your cluster setup with the CLI, check out Creating an OpenShift cluster.
Step 2: Deploying Eclipse Che
Once you have an OpenShift cluster, you can deploy Eclipse Che on it. This will be done with just a few command-line operations. To be able to execute these commands, there are two prerequisites that you need to install:
- Git: To use the features that involve Git, you must install Git and have it available in your system path so that Visual Studio Code can display it. On Macs, Git comes out of the box. On Linux, you can install Git with your distribution's package manager. On Windows, you can get Git from https://git-scm.com
- OpenShift CLI: OpenShift CLI is used to manage projects and their deployments. The easiest way to download the CLI is by accessing the About page on the web console if your cluster administrator has enabled the download links. To install OpenShift CLI, you can follow the OpenShift CLI reference documentation. The steps basically consist of downloading a .zip file with two binary files that you need to place in the right location of your command path.
Once you have these two in place, your can perform these installation steps:
Using a command line shell, find a location for your home directory and clone the che-operator repository by running this command:
git clone https://github.com/eclipse/che-operator.gitThis repository contains all the scripts and configuration files needed to deploy Eclipse Che and all of its components to your cluster. Refer to Che/Codeready Workspaces Operator Documentation to learn more about che-operator. Then, navigate to the new directory with
cd che-operatoras you will execute commands form there further below.
Using the OpenShift command line tool you need to now first log in to your cluster. The OpenShift web console provides a user-friendly way to do so using access token generating the entire login command for you to copy-paste. To find that, go back to your OpenShift web console browser screen and open user menu in the upper right corner. There you find the option
Copy Login Command, which will copy the command to your clipboard. Go back to your command line shell and paste the login command and run it. For more information, see Creating a Project.Now you are ready to create a namespace in your cluster and deploy Che in that namespace. A namespace is a virtual cluster in which multiple resources exist. Each resource can be referenced by its unique name. Therefore, namespaces avoid basic naming collisions. A Project in OpenShift is equivalent to a Kubernetes namespace. However, in addition to the namespace name, OpenShift projects can also manage a user-friendly display name and description. For details, see Users, Namespaces, and Projects.
oc create namespace <your_namespace_name>Then, navigate with your cluster login to the newly created namespace:
oc project <your_namespace_name>Finally, run the command to deploy Eclipse Che into that namespace:
./deploy.sh $namespaceThe script will return to the command line prompt immediately, but the actually jobs to deploy can take a couple of minutes. You can follow along on the deployment progress in the Monitoring section of the OpenShift Application Console as described below.
Upon successful deployment, navigate back to OpenShift web console in your browser. Based on the version of OpenShift available to you and deployed to your cluster, there are new two different alternative ways to perform the next steps.
If you are using OpenShift V3
- From the list of
My Projectson the right, clickView All, then find your project name from the list and select it. - Using the
Monitoringsection from the left side menu in your project helps you to see the events and logs of your deployment. - If all the containers are in the state of
running, it means your application is up and running. If you get any issues, feel free to ask questions. - If all the containers are running, select the
Overviewtab from the left menu items which will show all your deployed application in the project. Findcheapplication and then click the URL appears at the top. - The URL will take you to a login page of Eclipse Che because che-operator uses Operator SDK and Go Kube client to deploy, update, and manage K8S/OpenShift resources that constitute a multi-user Eclipse Che. The multi-user feature in Eclipse Che allows multiple users to create workspaces in single Che instance. All workspaces created by each user are independent of each other. Each user has his/her own sandbox where workspaces are created and stored.
- From the list of
If you are using OpenShift v4:
- From the left side menu, open the
Homesection, clickProjects, find your project name from the list and select it. - Using the
Networkingsection from the left side menu in your project helps you to see the events and logs of your deployment pods. - If all the pods are in the state of
running, it means your application is up and running. If you get any issues, feel free to ask questions. - If all the pods are running, select the
Routestab from the left menu items underNetworkingtab which will show all your deployed application in the project, their routes as well as status. Successful deployment showsSTATUSasAccepted. Findcheapplication and then click the URL appears under theLOCATIONsection. - The URL will take you to a login page of Eclipse Che because che-operator uses Operator SDK and Go Kube client to deploy, update, and manage K8S/OpenShift resources that constitute a multi-user Eclipse Che. The multi-user feature in Eclipse Che allows multiple users to create workspaces in single Che instance. All workspaces created by each user are independent of each other. Each user has his/her own sandbox where workspaces are created and stored.
- From the left side menu, open the
Eclipse Che has provided an authentication mechanism called Keycloak. It uses Keycloak to create, import, manage, delete, and authenticate users.
The default Keycloak credentials are
admin:admin. You can use these credentials to log in to Eclipse Che workspaces for the first time. It has system privileges. Also you can register first. On the login page, click register and complete the form. Log in and follow the steps below to create a workspace. A workspace is just an environment in Che where projects, dependencies, Web IDE, and other necessary tools exist.
Step 3: Creating a development workspace for Z
Introducing Che workspaces
Che workspaces are kubernetes pods which were conceived for distributed development to allow Kubernetes developers to replicate the application runtime environments and micro services used in production. Container-based developer workspaces provide all the tools and dependencies needed to code, build, test, run, and debug distributed applications. All the tools are embedded and always included with the workspace. Workspaces are isolated from one another and are responsible for managing the lifecycle of their components. Developer workspaces provide four different components: Project source code, Browser-based IDE, Tool dependencies and application runtime. To learn more about workspaces refer to Workspaces overview.
For z/OS development workspaces can be used to host the source code, the IDE with enterprise language support such as the Z Open Editor as well as other client-side tools needed for development such as Debug clients. In this example, we are going to start a workspace that has IBM Z Open Editor, Zowe Explorer, plus a sample Git repository with an application. All of it was preconfigured by us in a simple yaml file called devfile. Go here with a Web browser to see the devfile we are using in the step below. Every development lead can easily create such files to define workspaces for his team that can then be easily instantiated by developers via a few mouse clicks.
Getting organized with plug-ins and devfile registries
As devfiles declare the configurations for workspaces, plug-ins are a declaration in Eclipse Che for how the tools such as IBM Z Open Editor need to be installed and configured for a workspace. You can then combine workspaces with many different plug-ins to make up your development environment.
Eclipse Che uses plug-in and devfile registry servers for default out of the box workspace declarations. Development organization can manage their own registries replacing or augmenting these defaults.
The Che devfile registry is a service that provides a list of Che stacks to create ready-to-use workspaces. This list of stacks is used in the Dashboard → Create Workspace window. The devfile registry runs in a container and can be deployed wherever the user dashboard can connect. The default registry: https://che-devfile-registry.openshift.io.
The Che plug-in registry is a service that provides the list of plug-ins and editors for the Che workspaces. A devfile only references a plug-in that is published in a Che plug-in registry. It runs in a container and can be deployed wherever wsmaster connects. The default registry: https://che-plugin-registry.openshift.io.
Creating an IBM Z Open Editor workspace
In addition to using a Devfile registry, Eclipse Che even allows you to point to a single devfile on the intranet or internet to create a workspace, which is what we are going to do now with our devfile we explored earlier.
At the end of Step 2, you logged in to your deployed Eclipse Che.
If you log on for the first time and have no workspace yet, you will be redirected automatically to the
New Workspacepage. If you have already created workspaces before, selectCreate WorkspacefromDashboardmenu item from the left.Select the
IMPORT DEVFILEoption and selectURLas a source.Add the IBM Z Open Editor stack URL: https://raw.githubusercontent.com/IBM/zopeneditor-about/master/che/ibm-z-devfile.yaml and click
CREATE AND OPEN.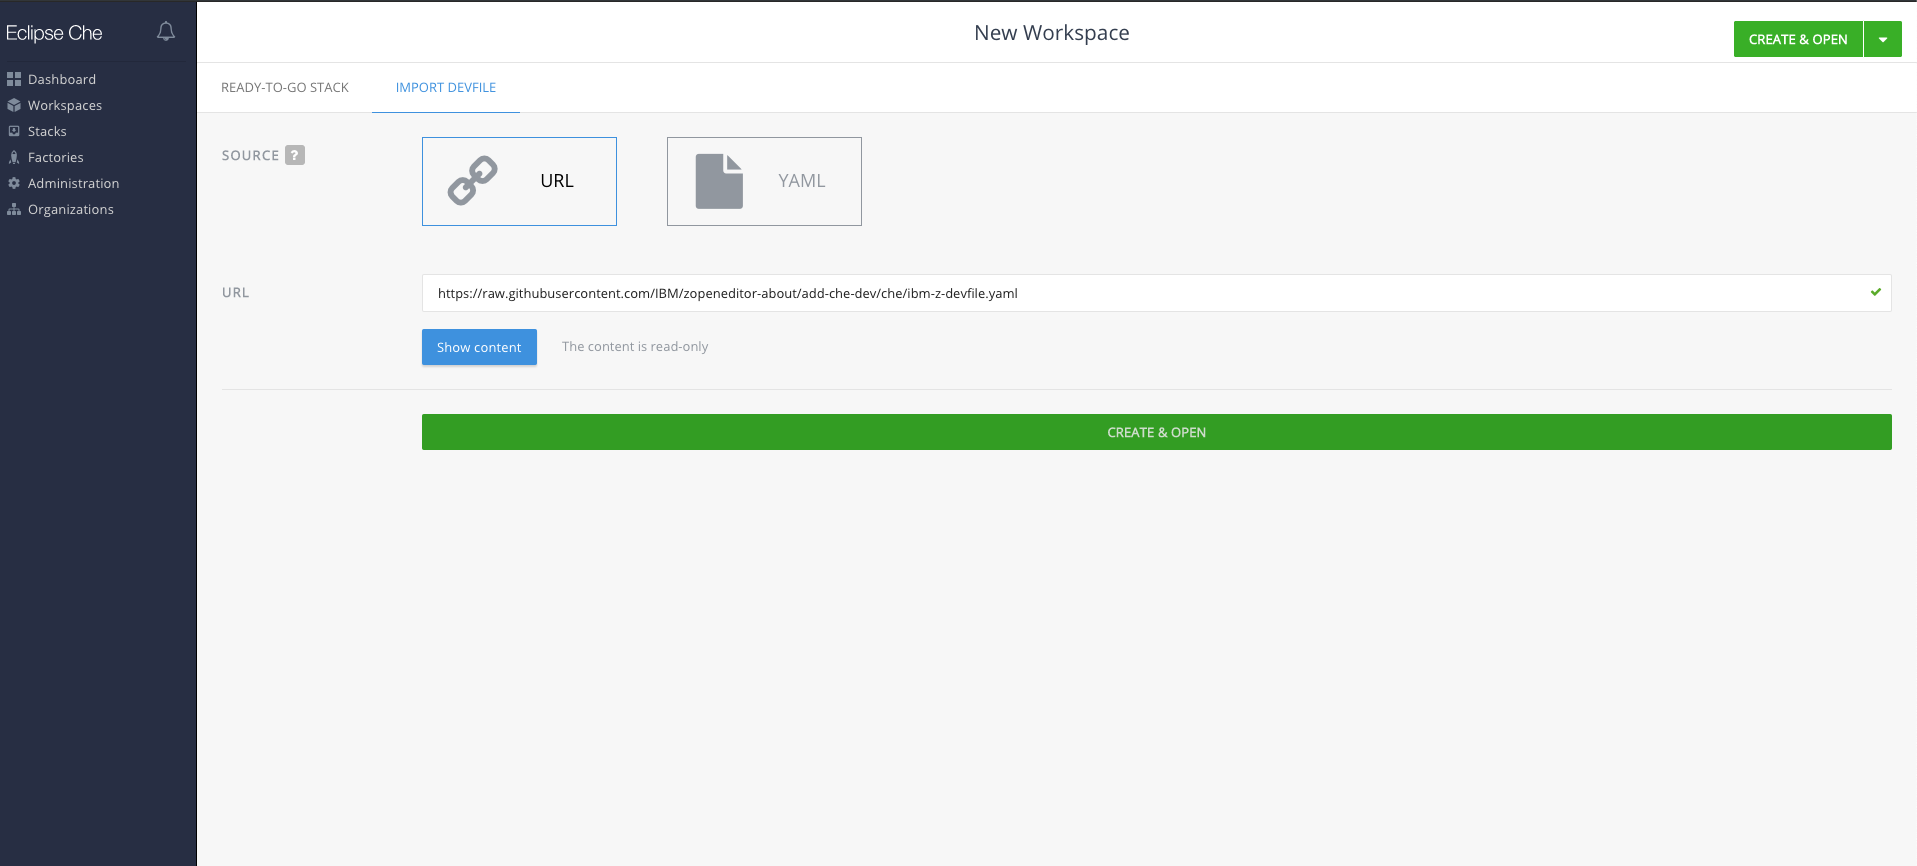 Fig. 2: Instead of a devfile registry we can use this screen to point to single devfile.
Note: While starting a workspace, you may run into some known issues such as timeouts if the creation takes longer. Refer to the Troubleshooting section for dealing with some of the known issues. The Che development team is actively working on improving these issues.
Importing the devfile as shown above will automatically start a workspace, which includes our Z Open Editor, Zowe Explorer, as well as a sample Git repository with sample application written in COBOL and PL/I. It even includes important prerequisites. Because the COBOL and PL/I language server have been written in Java, the workspace stack also includes a runtime container with Java 11. You can review the plug-in definition that was used by our devfile here.
To turn plug-ins on or off for adding or removing editors and features, you can go to the Che workspace configuration, select the plug-ins menu item, and then add or remove plug-ins. You can also turn plug-ins on or off from the Che IDE using the Che Plugins menu item from View Menu.
You can share your workspace with other teammates who have registered themselves in the same Eclipse Che deployment.
Go to the
Workspacestab and open theWorkspace Configurationitem by clicking the configuration icon on the right side under theACTIONStab.Select the
Sharetab.Click
Add Developerand add the developer's registered email address.
Exploring your workspace
Now that you are up and running, you can start exploring Eclipse Che with IBM Z Open Editor using the sample files that we included. After clicking the documents icon on the left, Che will expand the File Explorer showing you two directories: .theia and ibm-zopeneditor-sample. You now want to open that later directory directly as a top-level folder to use its predefined settings. To do that, take these steps:
Open the menu
File > Open...In the Open dialog, double-click
ibm-zopeneditor-sampleto drill down and click theOpenbutton.Another browser tab will open loading now the contents of
ibm-zopeneditor-sampleinto the top level.Close the other browser tab left open as you do not want to accidentally use it anymore.
The File Explorer now shows you several folders such as COBOL, COPYBOOK, INCLUDES, JCL, PLI with code samples in these different languages.
Expand the
COBOLfolder and select the fileSAM1.cblto open it.The COBOL program is open in the editor and you immediately see the syntax highlighting.
On the right, there are two icons. The first looks like a bullet point list. Click it to open the COBOL program's outline view.
Once you click inside the COBOL editor the outline view gets populated and you can use it to quickly navigate the program.
Try some of the other language features such as right-clicking any variable and selecting
Peek Referencesfrom the context menu showing you all the places in which the variable is used inside the program.
You can explore many other editing features that our IBM Z Open Editor's Language Servers for COBOL and PL/I provide. Find them documented in the IBM Z Open Editor online documentation. Try them out here and you will see that you have a full enterprise language editor experience in the cloud now.
Optional: Exploring z/OS using Zowe Explorer
Another thing you can try is to access z/OS system resources such as COBOL programs in MVS or USS directly from your Eclipse Che workspace by using Zowe Explorer that we included in our devfile as well. You can find Zowe Explorer by clicking the stylized Z for Zowe icon in the icon bar on the left. It should be the last icon in that list. Once opened, the view will show you three different tree browsers for MVS, USS, and JES.
To be able to try these out, you need access to a z/OS system with zOSMF configured. This could be any system that you can reach from your OpenShift cluster, if you deployed on your own in-house OpenShift deployment. If you are using IBM Cloud, you could try this using a system provided by the Master the Mainframe learning site by following these steps:
Sign up with Master the Mainframe here.
Once you received your Welcome email, follow the instructions to use a 3270 terminal to change your password to gain access.
The Welcome email will also send you a link to join the Master the Mainframe Slack community, which needs to join to get access to a Bot that will enable zOSMF for your account, which is switch off by default, but required for Zowe Explorer.
In the Slack community, follow the instruction here to get access to the
ZihBot.Do not do the steps to "Reset your password", but instead just type your username into the Bot's chat.
The Bot will ask you if you want to activate zOSMF for Zowe for your account. Follow the steps to complete that request.
Now you have an account that you can experiment with from your Eclipse Che workspace. To create a connection, connect to your z/OS account with these steps:
Open the Zowe view in Eclipse Che and click the
+icon in the Data Sets view at the upper left.A drop-down picker will appear in the middle-top of the screen. Select
Create a New Connection to z/OS. A series of follow-up prompts will ask you for all your connection details.- Specify any name for your connection.
- For the z/OSMF url, use the IP that you used for the 3270 connection above and the port 10443 for the Master the Mainframe machines. For example: https://192.86.32.91:10443. The default port for zOSMF is normally 443.
- For the final question about rejecting connections with self-signed certificates, select
falsefor the Master the Mainframe systems.
Now an entry appears in the Data Sets tree. You can use the
Searchicon next to that entry to enter your username to find theISPF.ISPPROFdata set.You can use the other action icon to create a new data set.
You can add the same connection to the USS view by simply clicking the
+icon and then just selecting that connection from the drop-down.
Before you can now open and save files, you need to do one more step.
As your Eclipse Che workspaces consist of of many different containers that have been linked together, you need to tell Zowe Explorer where it can store temporary files loaded from z/OS. It will use that folder to download files, open them in the editor from, and then send them back to z/OS during a Save. To set a folder, take these steps:
Open the menu
File > Settings > Open Preferences. The Preferences editor window will open that show User and Workspace specific settings.Note that in this case the word Workspace means a different thing than Eclipse Workspace. This is an inconsistency between Che and the editor used by Che Eclipse Theia. In this case, workspace refers to the directory in which your project files are stored.
Make sure you selected the User tab and add the following JSON object to the one displayed there.
"Zowe-Temp-Folder-Location": {
   "folderPath": "/projects"
}
The editor is saved automatically. Make sure the JSON does not have any syntax errors and then just close it. Now you can create files in USS and save them.
 Fig. 3: Using Zowe Explorer to access z/OS resources such as COBOL programs in MVS data sets from Eclipse Che.
Limitations and Outlook
The steps described above allowed you to very quickly get up and running with Eclipse Che creating a workspace that contained the IBM Z Open Editor as well as the Zowe Explorer. However, the workspace definition we used was not integrated into your Eclipse Che Stacks list now, nor can it be easily configured and changed. To set this up in your organization so that development teams can create their own custom workspace definitions and instantiate many more workspaces easily you need to setup and manage two registries: a plugin and a devfiles registry. We will go into the details for doing that in our next Blog post.
If you already want to read up on the workspace architecture of Che you can review these documentation pages for the Che Workspace Architecture and the Workspace Controller.
Troubleshooting
Working with a cluster sometimes requires a bit more patience waiting for deployment jobs to complete. Sometime timeouts or other errors could happen. Here are some of the more common issue you might run into and suggestions for how to solve them:
Failed to start workspaceSometimes it does happen when the workspace pod is not assigned to the project. Press
F5and clickrefreshlink appears on the screen.Error: Failed to run the workspace: "Workspace is going to be STOPPED. Reason: Workspace is not started in time. Trying interrupt runtime start"While creating a workspace, it requires storage to be configured on the cluster. Che claims a persistent volume to the cluster. OpenShift cluster on IBM Cloud has capability to provision storages dynamically when a project claims for the persistent volume. Depending on the IBM Cloud traffic, it spends good amount of time to approve your claim and assign a storage to your workspace pod. You may refresh or press
F5to start over again.Unable to create persistent volume on workspace podWhile creating a workspace, it requires storage to be configured on the cluster. Che claims a persistent volume to the cluster. Your cluster may not have configured for dynamic storage allocation. You need to create workspace in an
Ephemeral Mode. Ephemeral mode is a function that allows users to browse the Web on a shared device or a personal laptop by using a profile that won't save any data or history after the browser is closed. Stop our workspace first, then you can go toWorkspacestab and openWorkspace Configurationby click a middle configuration icon on the right side underACTIONStab, openOverviewtab and turn onEphemeral Mode. SAVE and RUN your workspace again.
Questions or Feedback
We would love to hear what you think of this solution. For any questions, issues, or enhancement ideas, please do not hesitate to open an issue at our GitHub.
We are always looking for ways to improve.