5. Keycloak LDAP Integration
In this section, you will configure Keycloak to federate users from the OpenLDAP directory you created in the previous section. This integration allows Keycloak to authenticate users against LDAP while managing sessions and tokens centrally.
5.1: Understanding User Federation
User Federation in Keycloak allows you to connect to external user directories (like LDAP or Active Directory) without importing users into Keycloak's database. Instead, Keycloak queries the external directory in real-time for authentication and user information.
5.1.1: Benefits of User Federation
- Single Source of Truth: User data remains in LDAP
- Real-time Synchronization: Changes in LDAP are immediately reflected
- Reduced Maintenance: No need to duplicate user management
- Scalability: Supports large user directories efficiently
5.2: Access Keycloak Admin Console
From the Bastion Host, open Firefox.
- Click on the Keycloak bookmark to open the Keycloak UI. Or navigate to:
https://concert.ibmdte.local:13443/sys/internal/kc/ - Accept the certificate warning if prompted
- Log in with Keycloak admin credentials from your credentials file:
- Username:
admin - Password: (created in Section 3.6)
- Username:
If you're already logged into Keycloak from the Lab Preparation section, you can continue using that session.
5.3: Create a New Realm for Concert SSO
Keycloak uses realms to isolate different sets of users, applications, and configurations. We'll create a dedicated realm for Concert SSO.
5.3.1: Why Create a New Realm?
- Isolation: Separates Concert SSO from other applications
- Clean Configuration: Starts with a fresh configuration
- Best Practice: Production deployments typically use dedicated realms
5.3.2: Steps to Create Realm
- In the Keycloak Admin Console, hover over the realm dropdown in the top-left corner (currently showing "Master")
- Click Create Realm
- Enter the following details:
- Realm name:
concert-realm - Enabled: Toggle to ON (should be on by default)
- Realm name:
- Click Create

After creating the realm, Keycloak automatically switches to the new realm. You should see "concert-realm" in the realm dropdown.
5.4: Create a New Client for Concert SSO
Now that the concert-realm is active, create the OIDC client that Concert will use to authenticate users via Keycloak.
5.4.1: Why Create a New Client?
- OIDC integration: Enables Concert to use Keycloak for authentication
- Client identity: Provides the client ID that Concert will reference
- Token exchange: Allows secure issuance of ID and access tokens
5.4.2: Steps to Create the Concert OIDC Client
- In the Keycloak Admin Console, ensure you're in the concert-realm realm (check the realm dropdown)
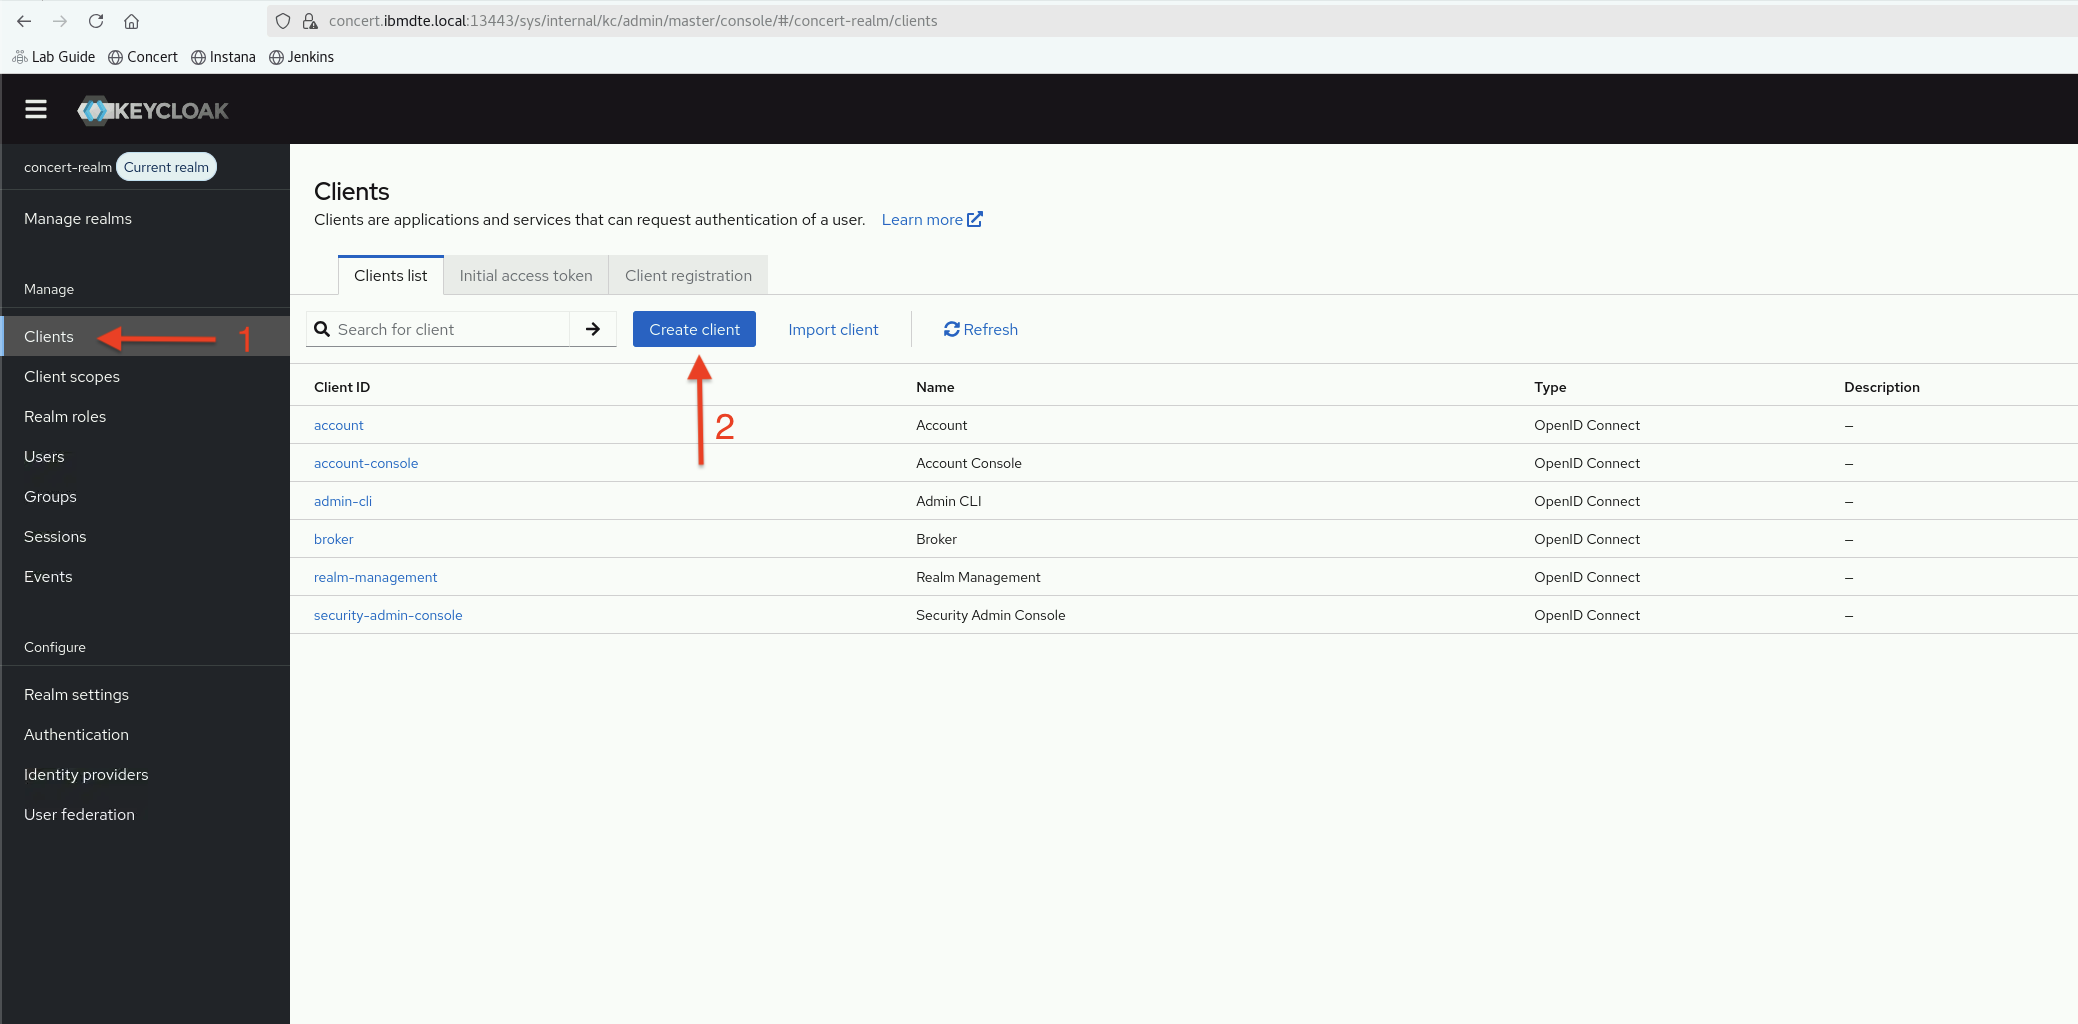
- In the left navigation menu, click Clients in the main navigation.
- Click Create client.
- Enter the following values:
- Client Protocol / Client Type:
OpenID Connect - Client ID:
concert-client - Name:
Concert SSO Client(optional internal reference) - Description:
OIDC client for Concert SSO(optional)
- Client Protocol / Client Type:
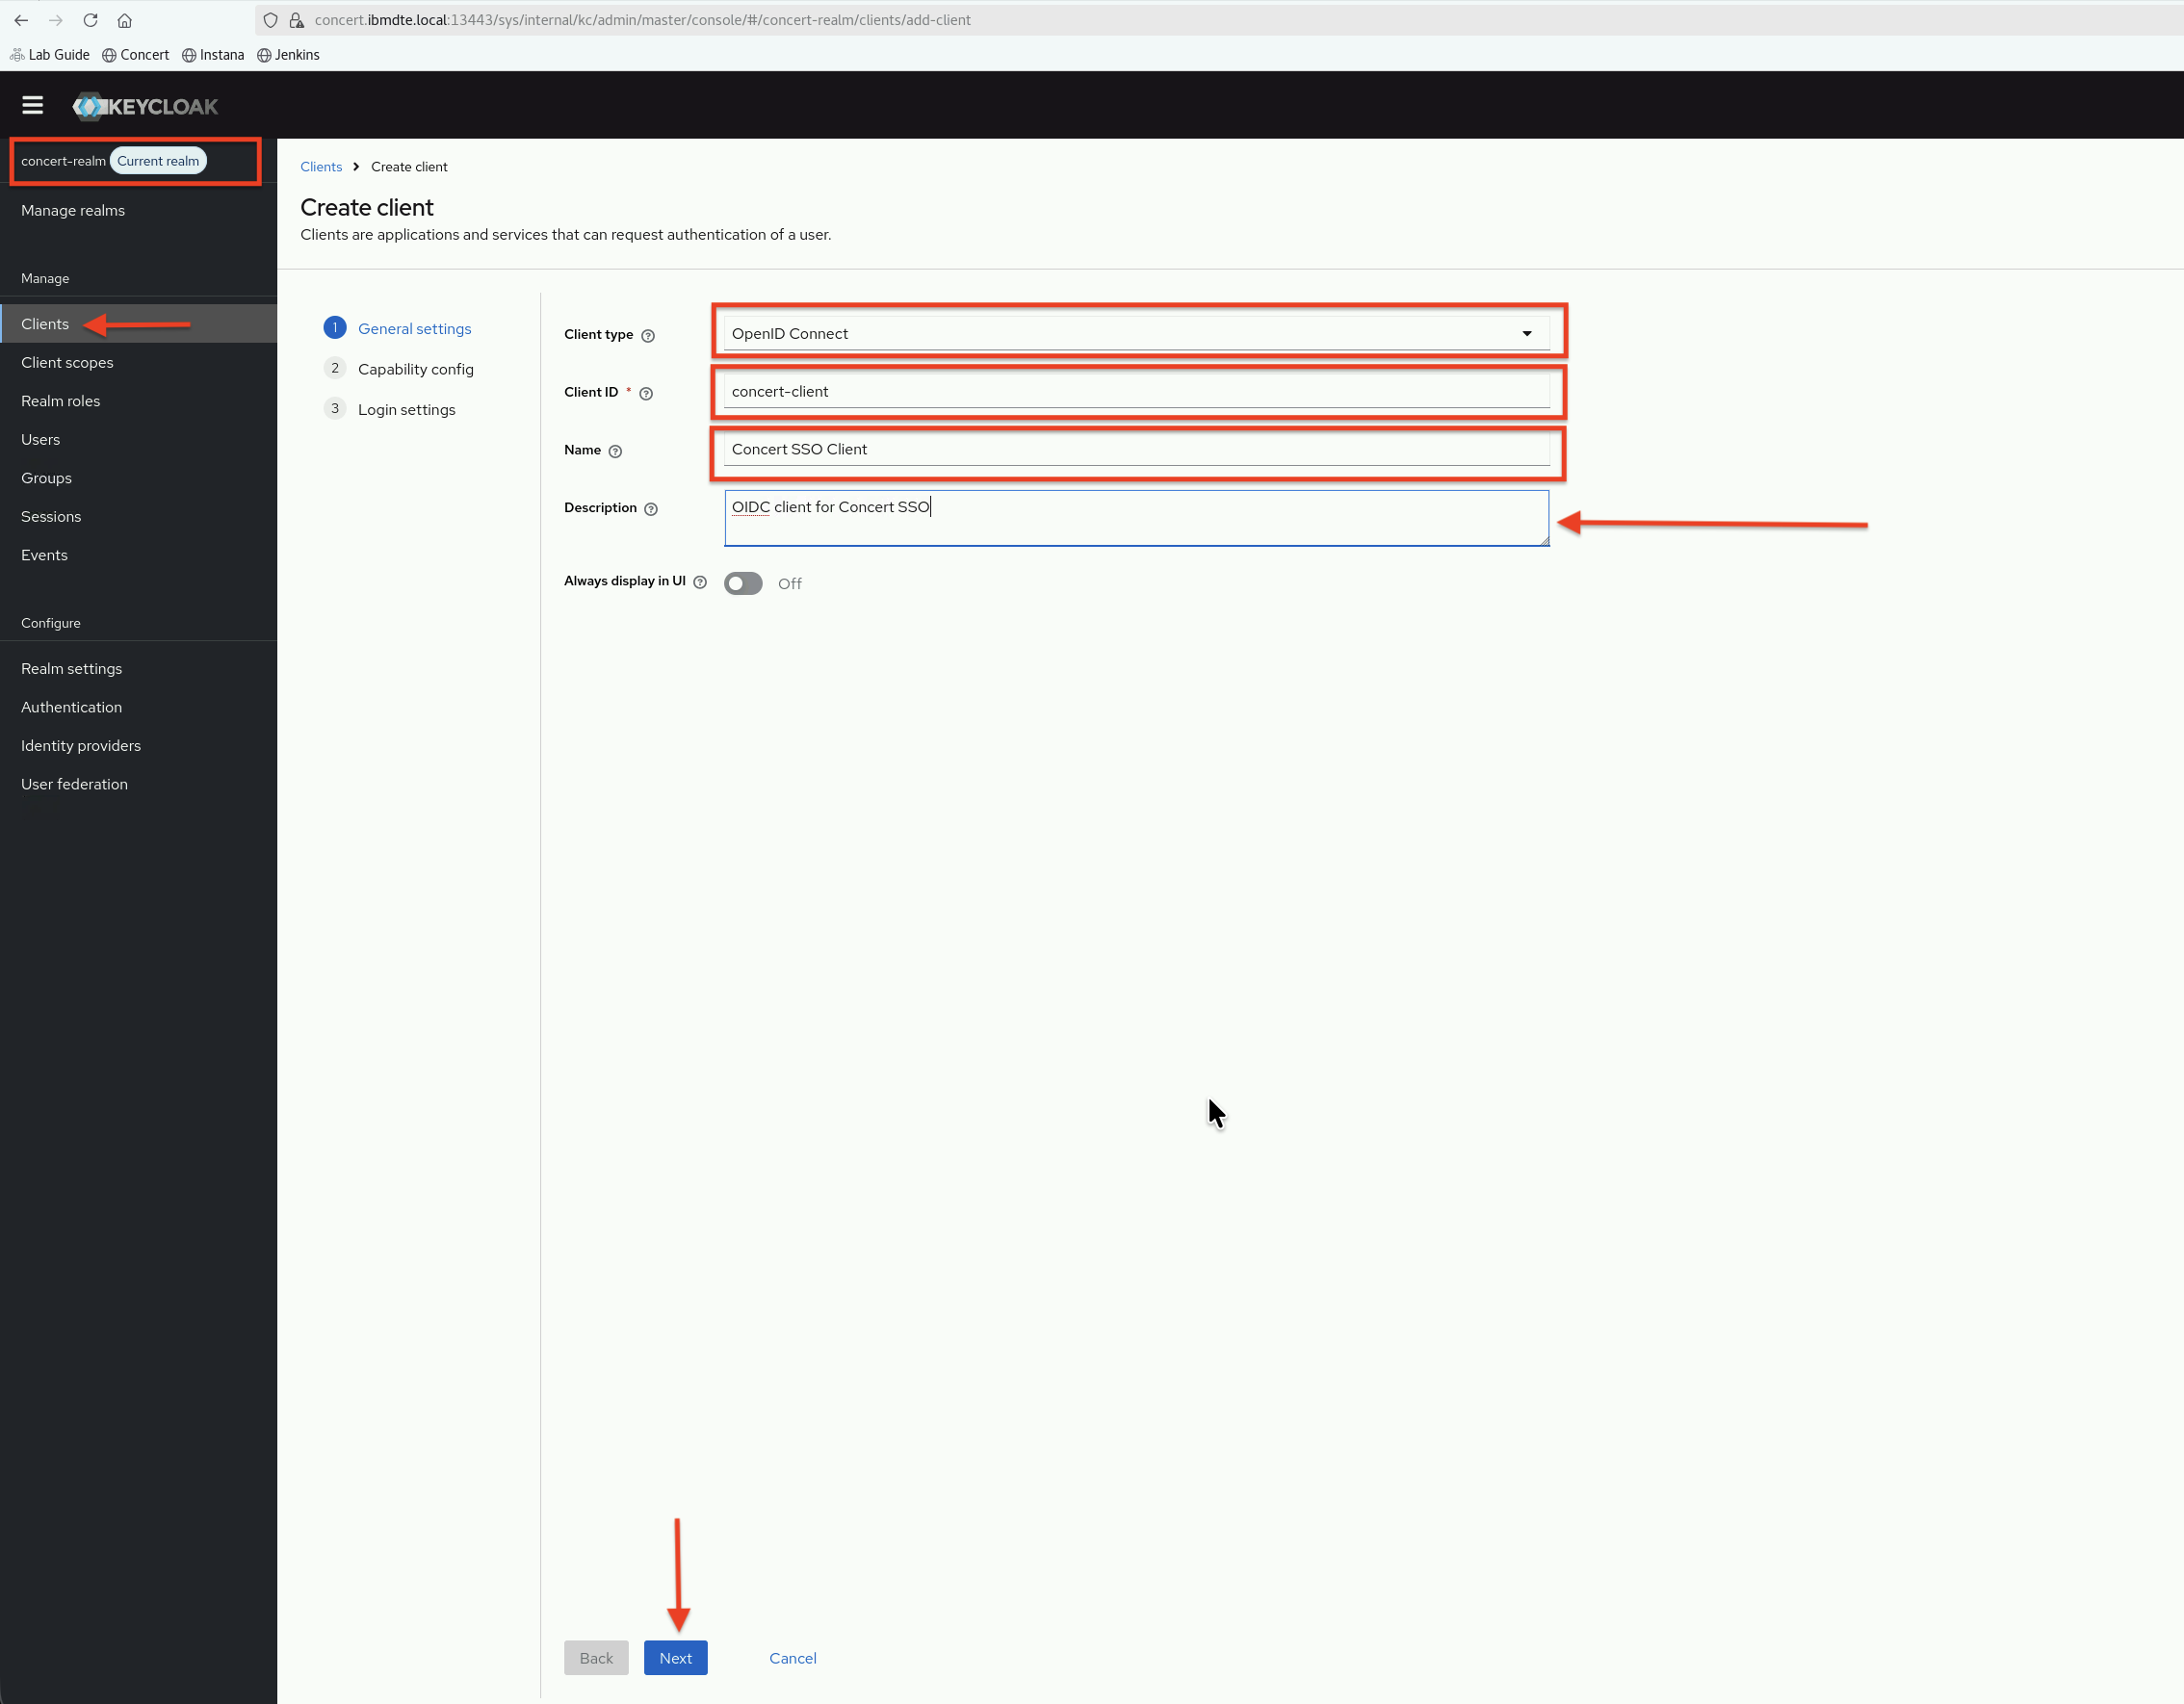
- Click Next.
This action creates the client and redirects you to the Settings tab for basic configuration.
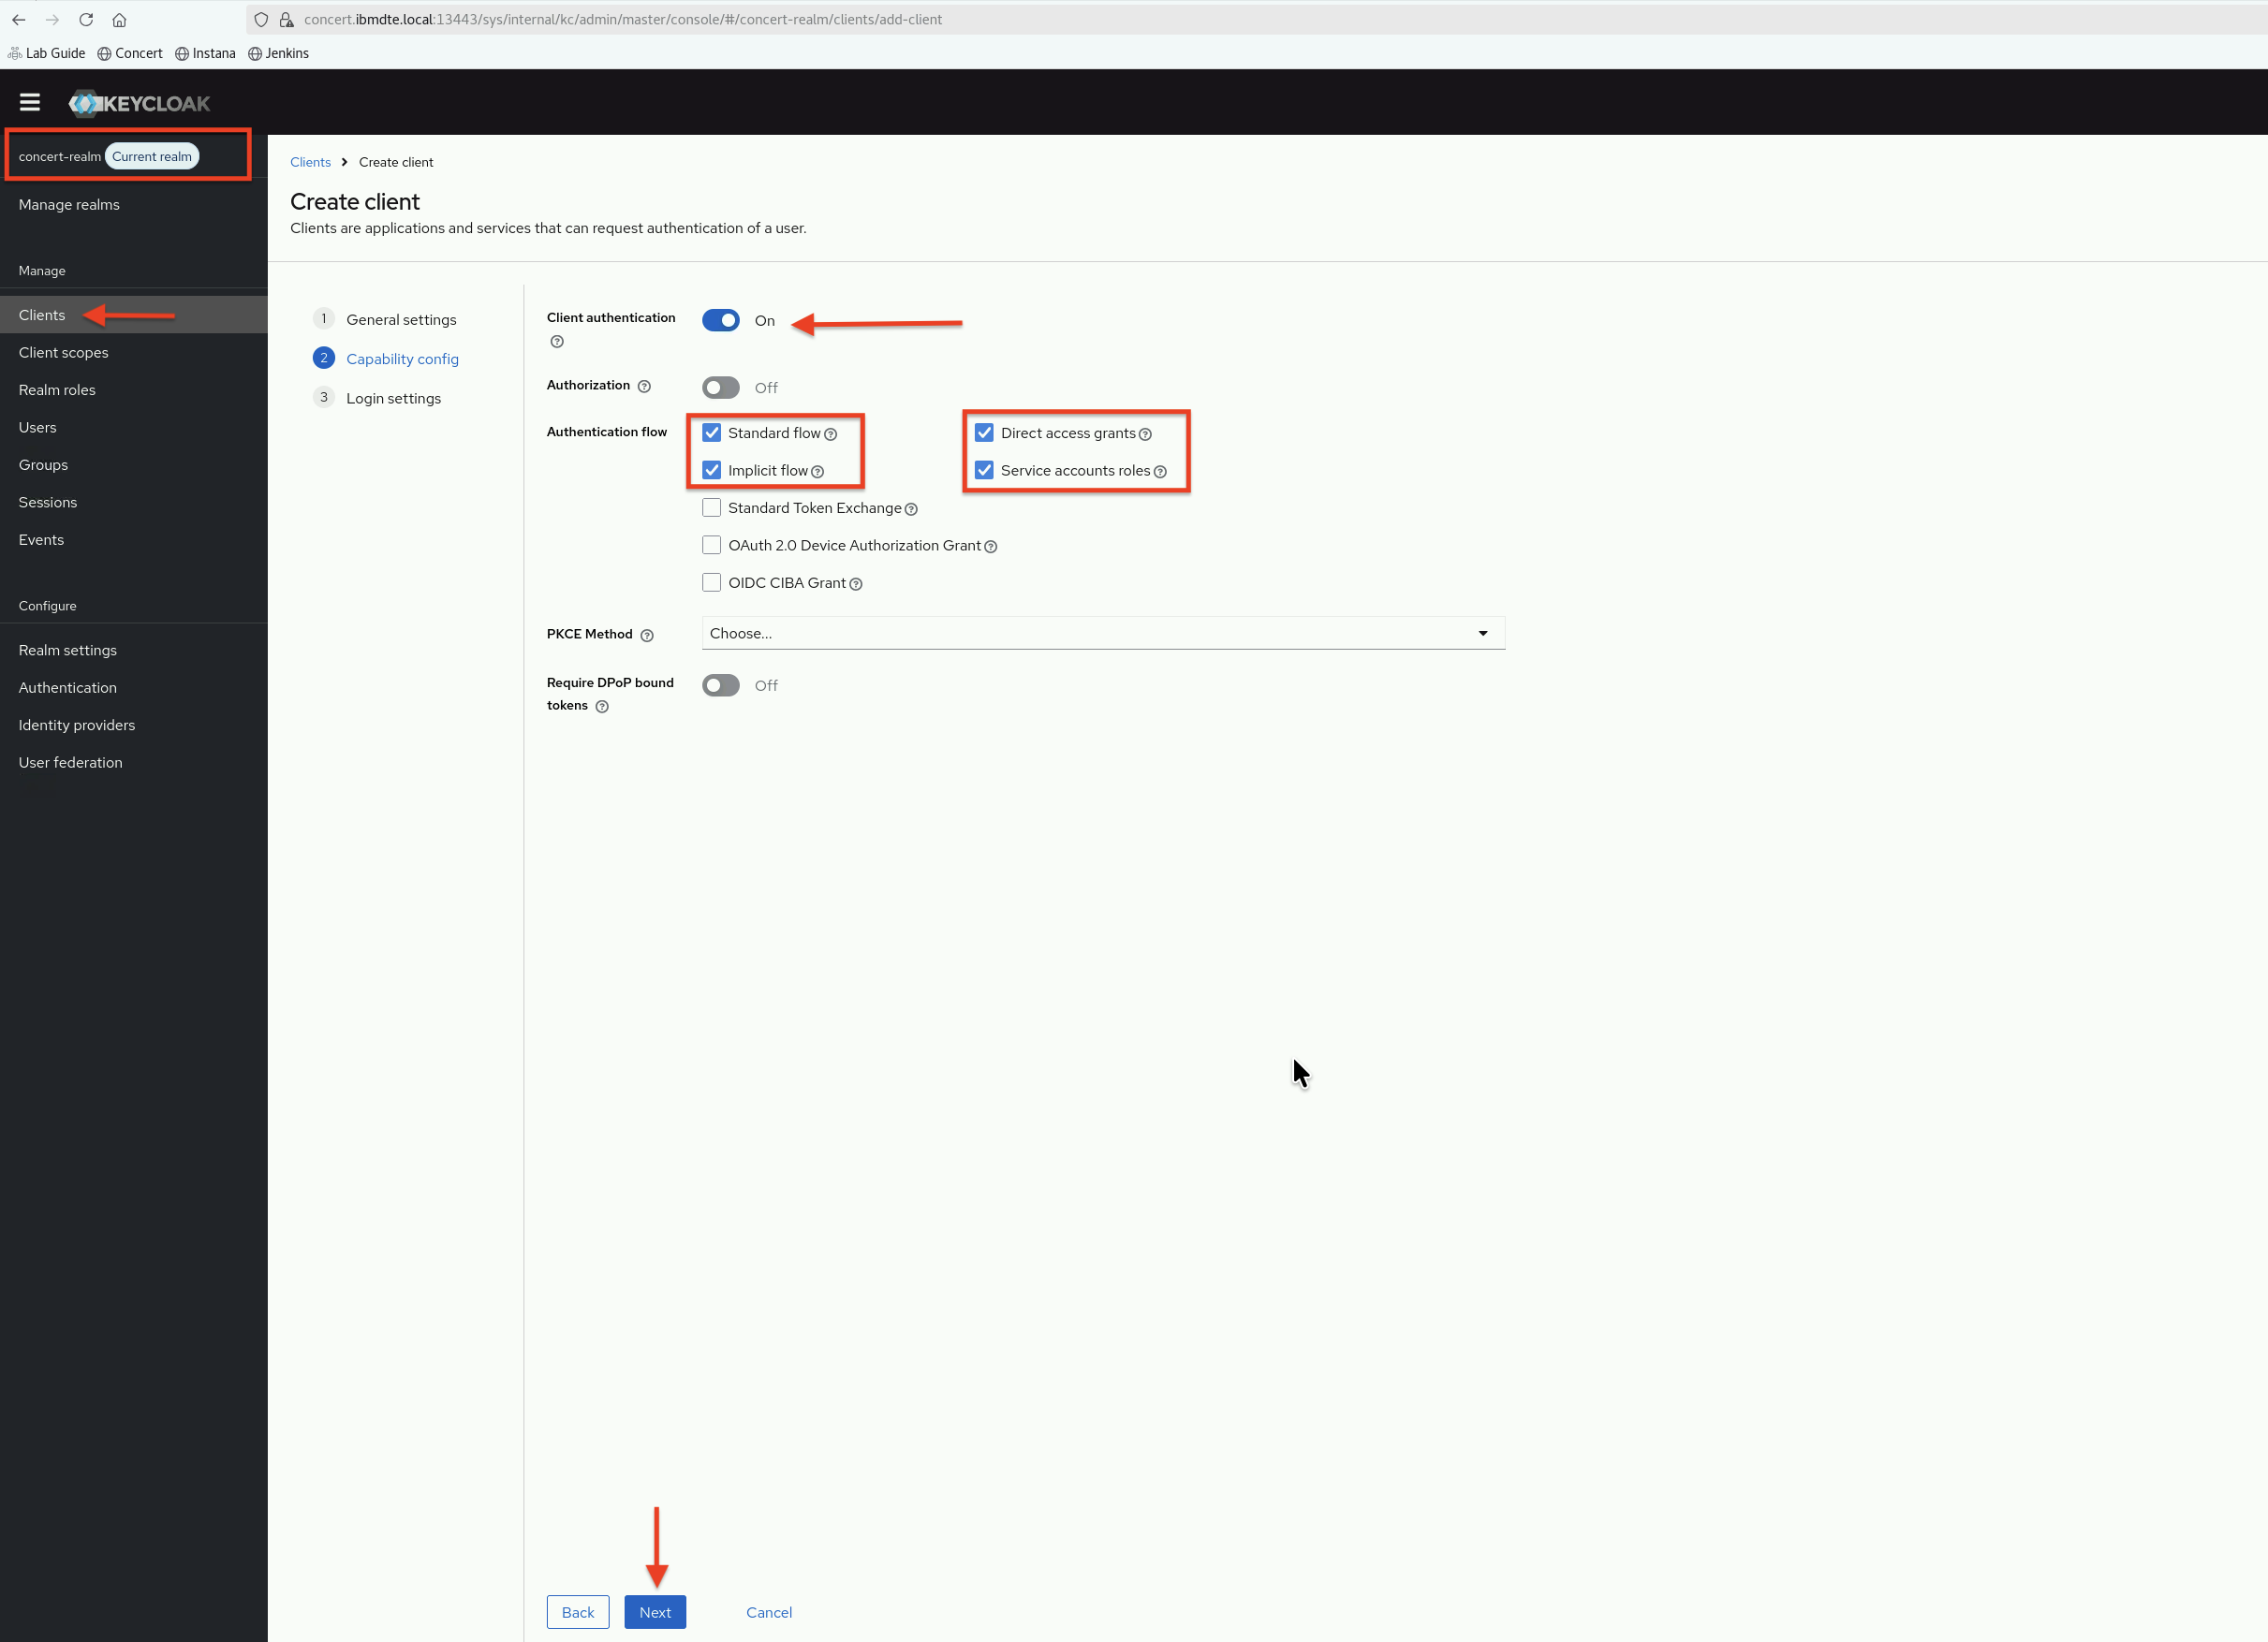
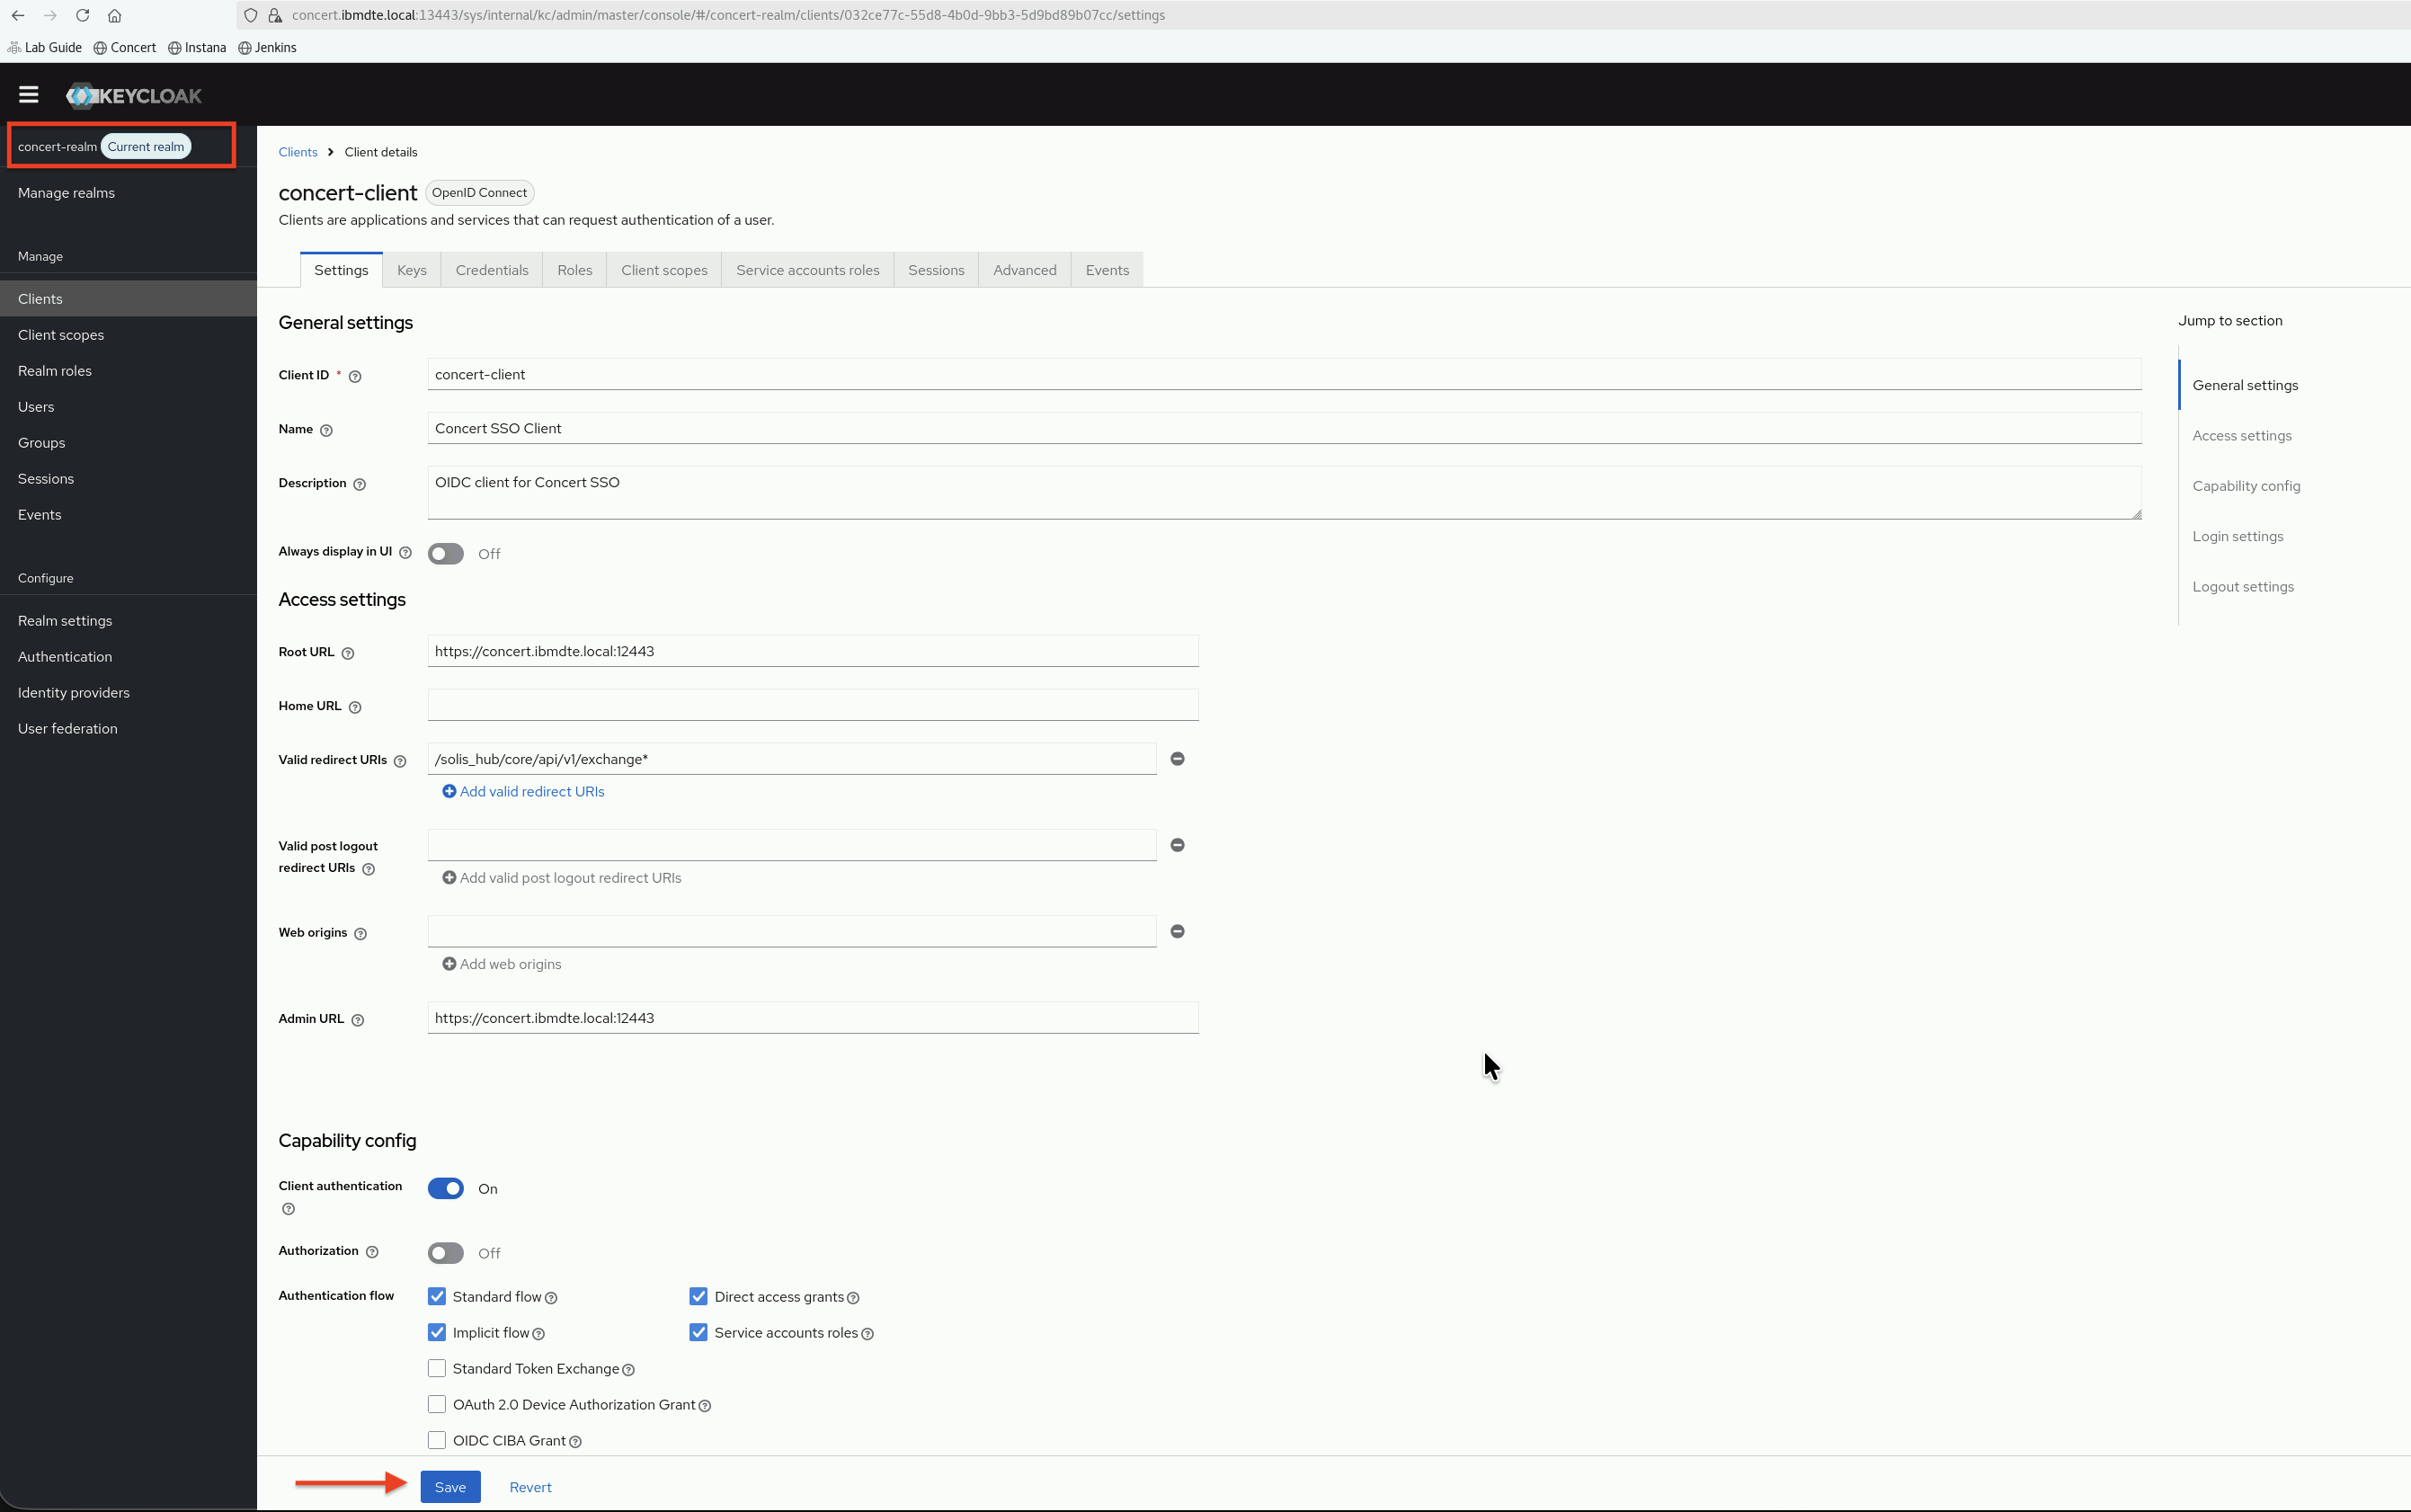
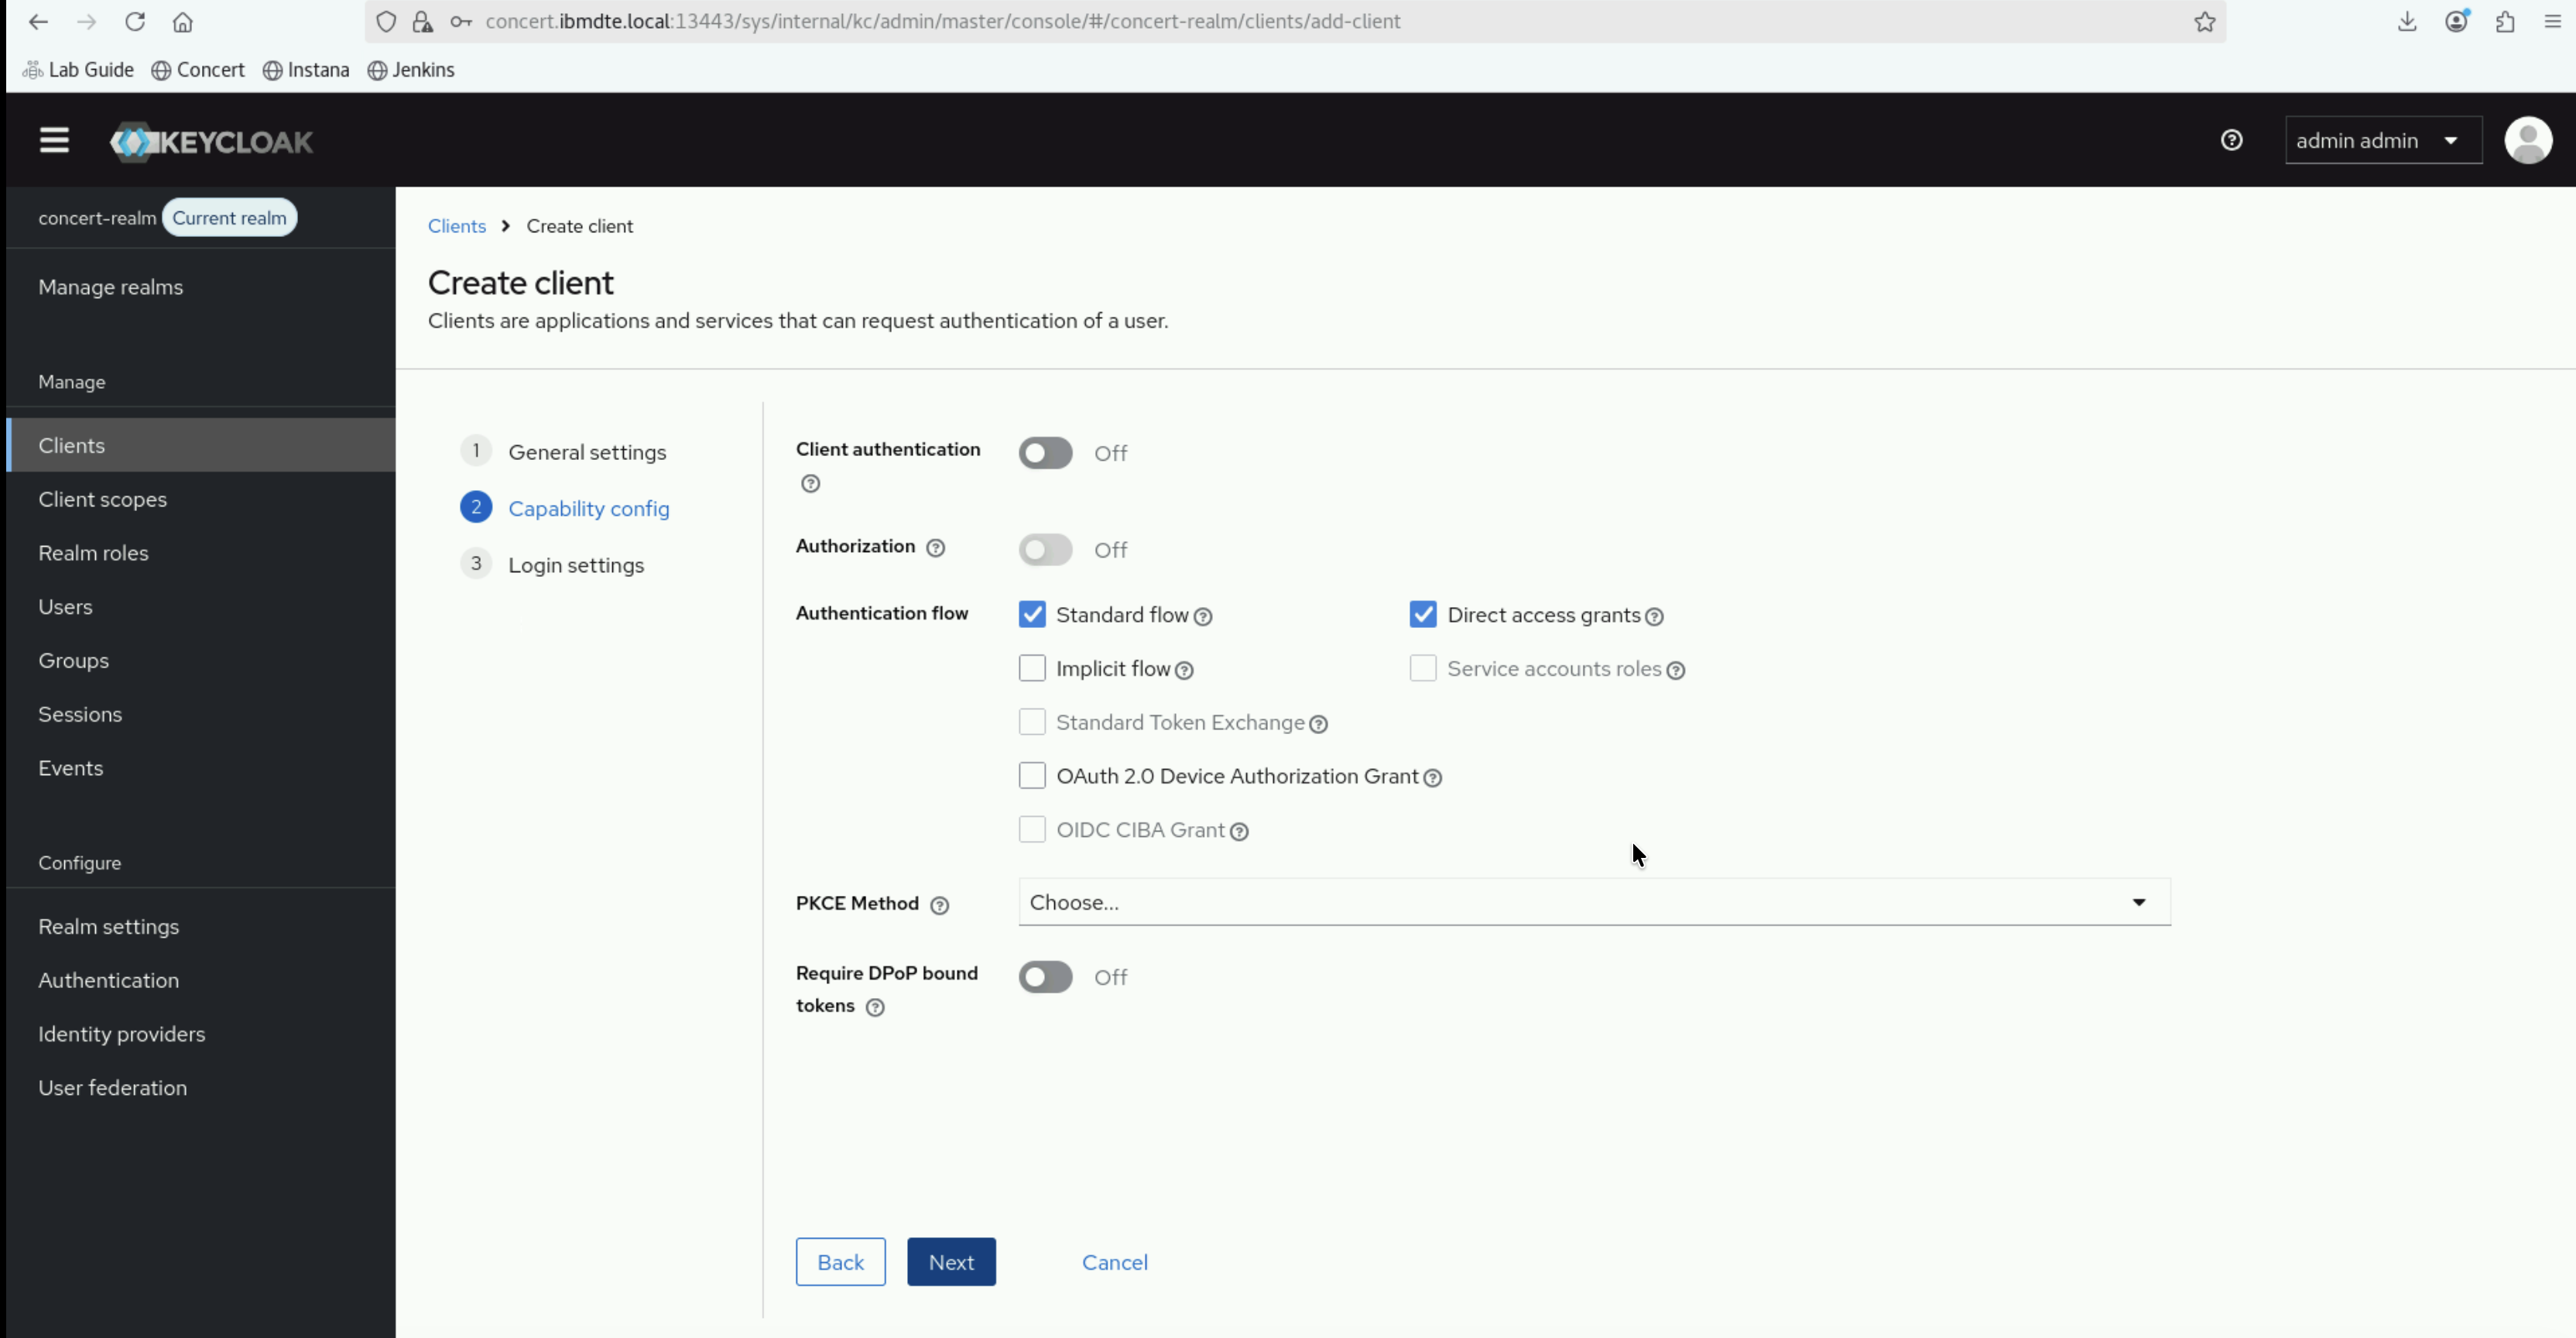
5.4.3: Configure Client Capability
- In the Capability config section, enable Client authentication.
- Select the check boxes for:
- Standard flow
- Direct access grants
- Implicit flow
- Service accounts roles
- Leave the following check boxes unselected :
- Standard Token Exchange
- OAuth 2.0 Device Authorization Grant
- OIDC CIBA Grant
- Click Next.
5.4.4: Configure Login Settings
- In the Login settings section, enter the following values:
- Root URL:
https://concert.ibmdte.local:12443 - Home URL:
**Leave empty** - Valid redirect URIs:
/solis_hub/core/api/v1/exchange* - Valid post logout redirect URIs:
**Leave empty** - Web origins:
**Leave empty**
- Root URL:
- Click Save.
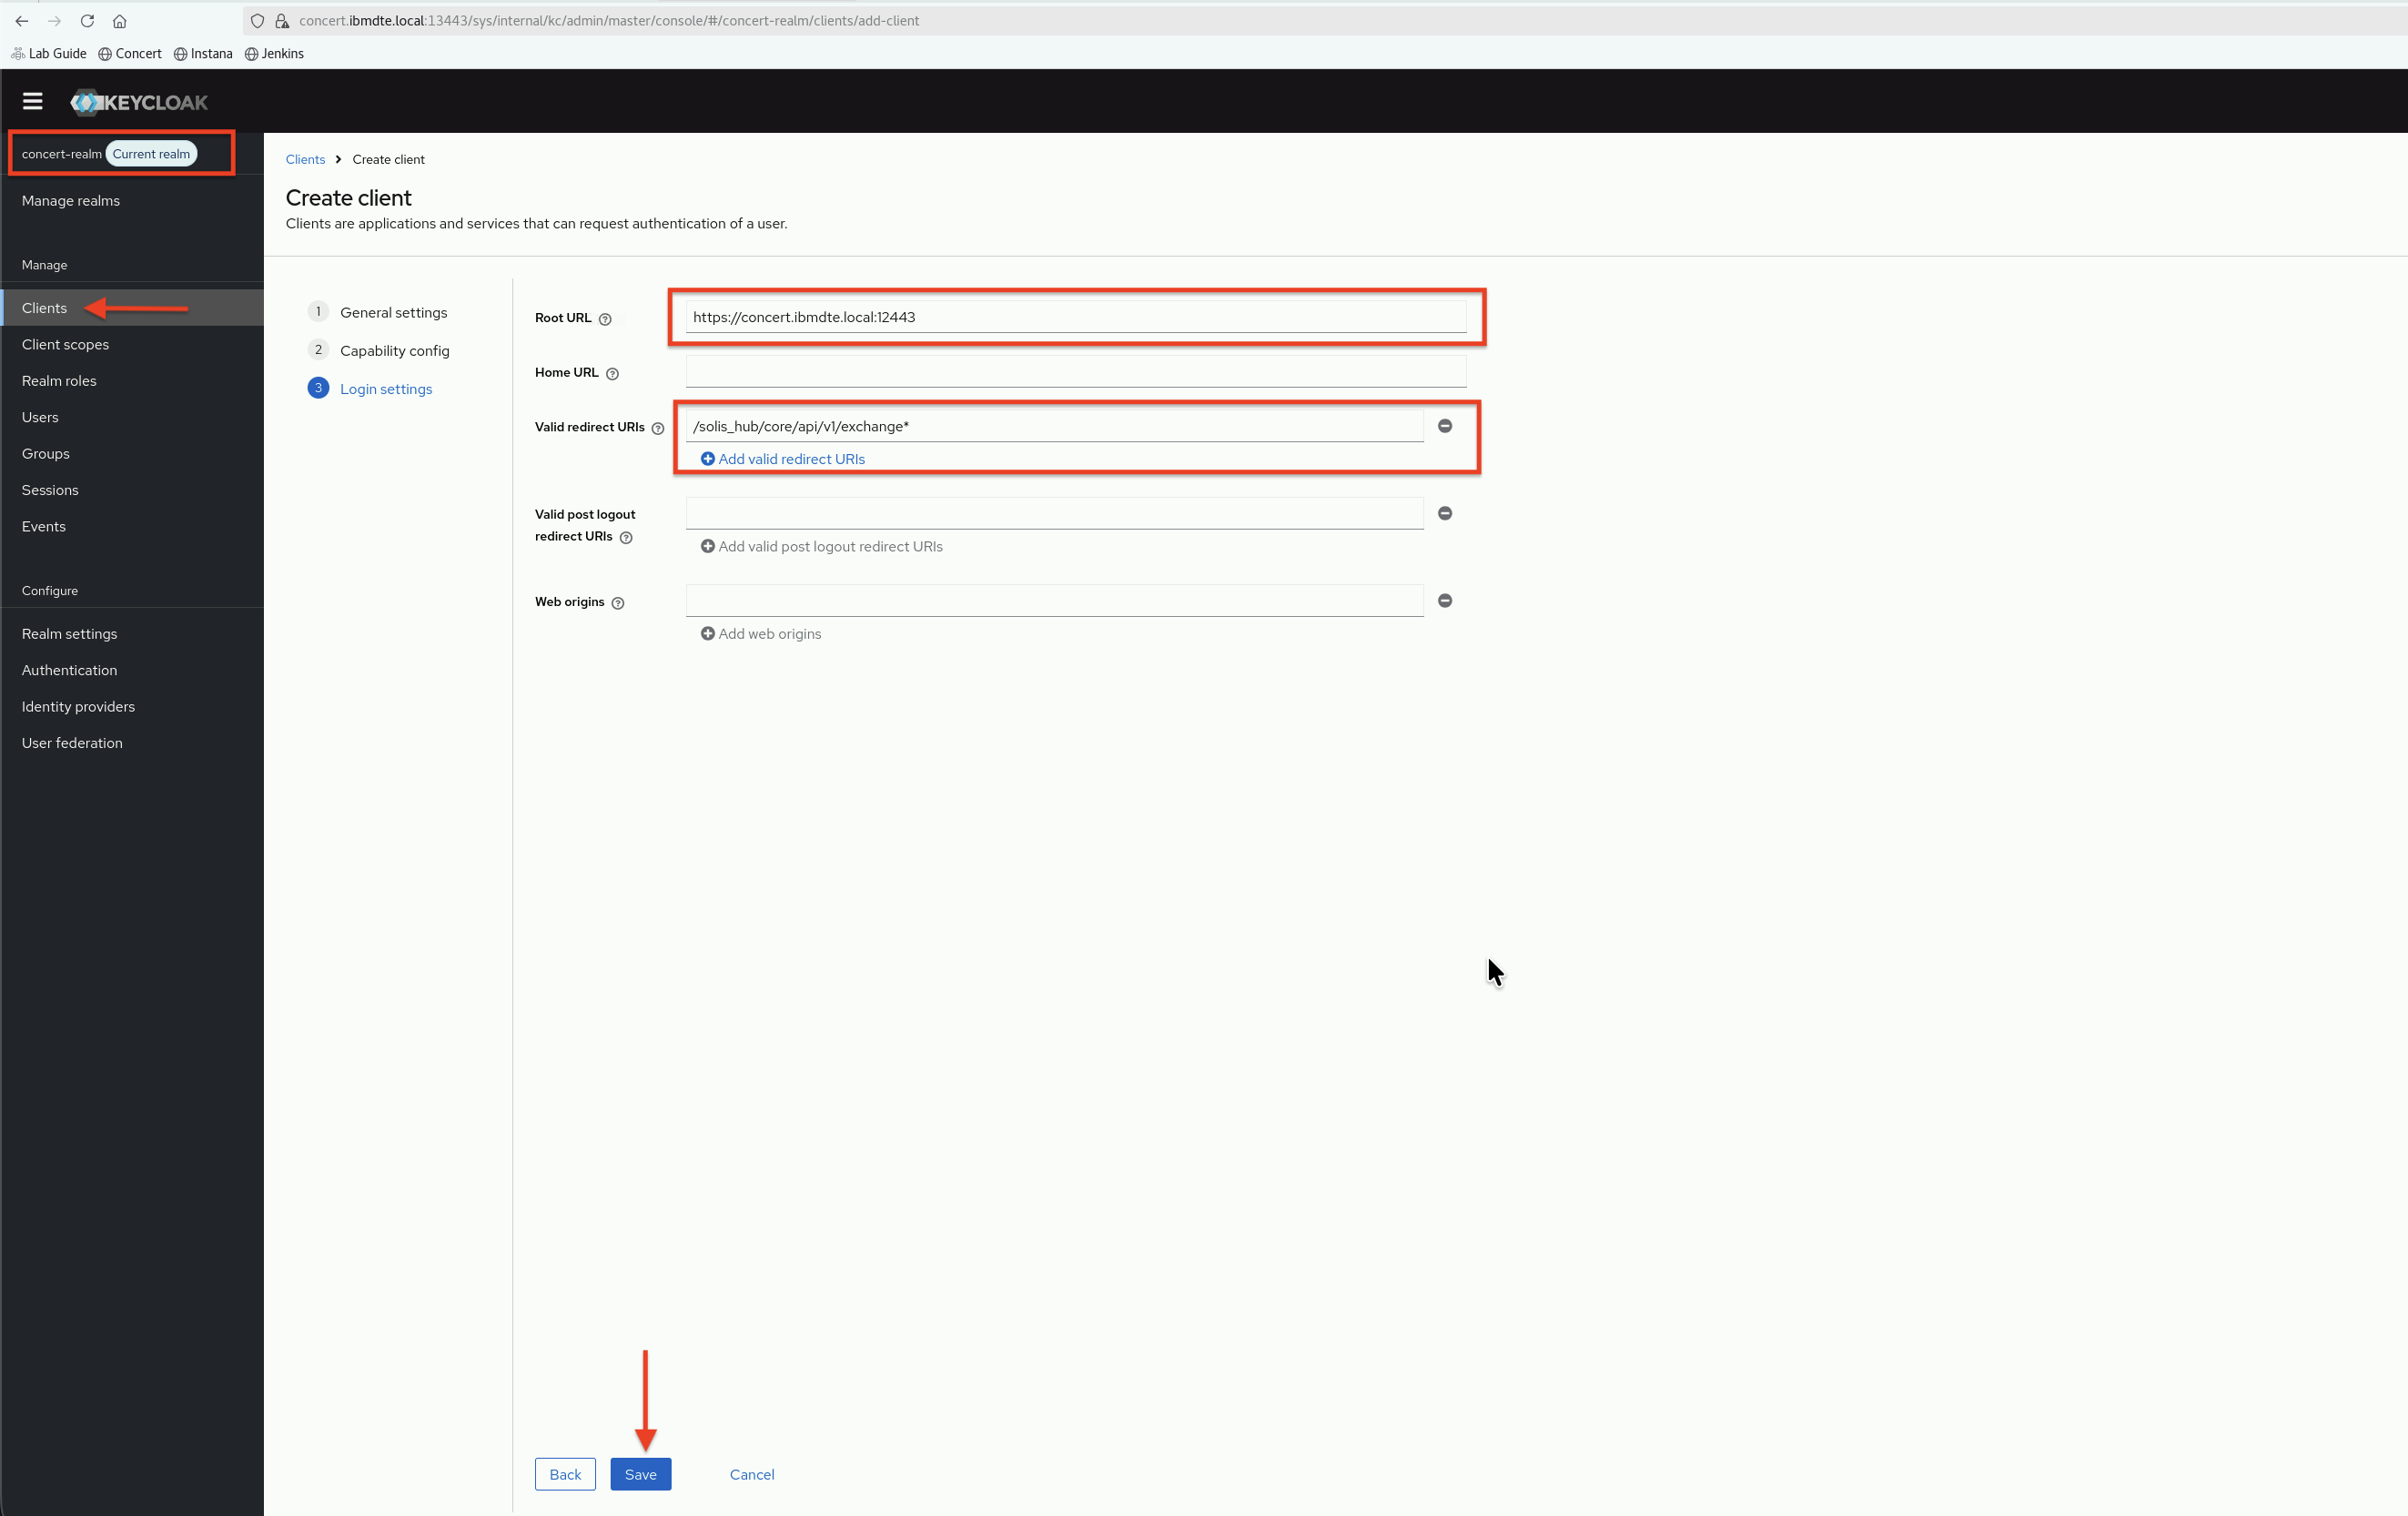
The * wildcard in redirect URIs allows Concert to redirect to any path under its domain. In production, you should specify exact redirect URIs for better security.
- Click Save on the summary screen.
5.4.5: What This Does
- The client is registered as an OIDC client in the
concert-realm. concert-clientbecomes the identifier used by Concert for authentication requests.- The Root URL and redirect URI ensure the client can complete the OIDC login flow.
5.5: Configure LDAP User Federation
Now, we will add OpenLDAP as a user federation provider in the concert-realm realm.
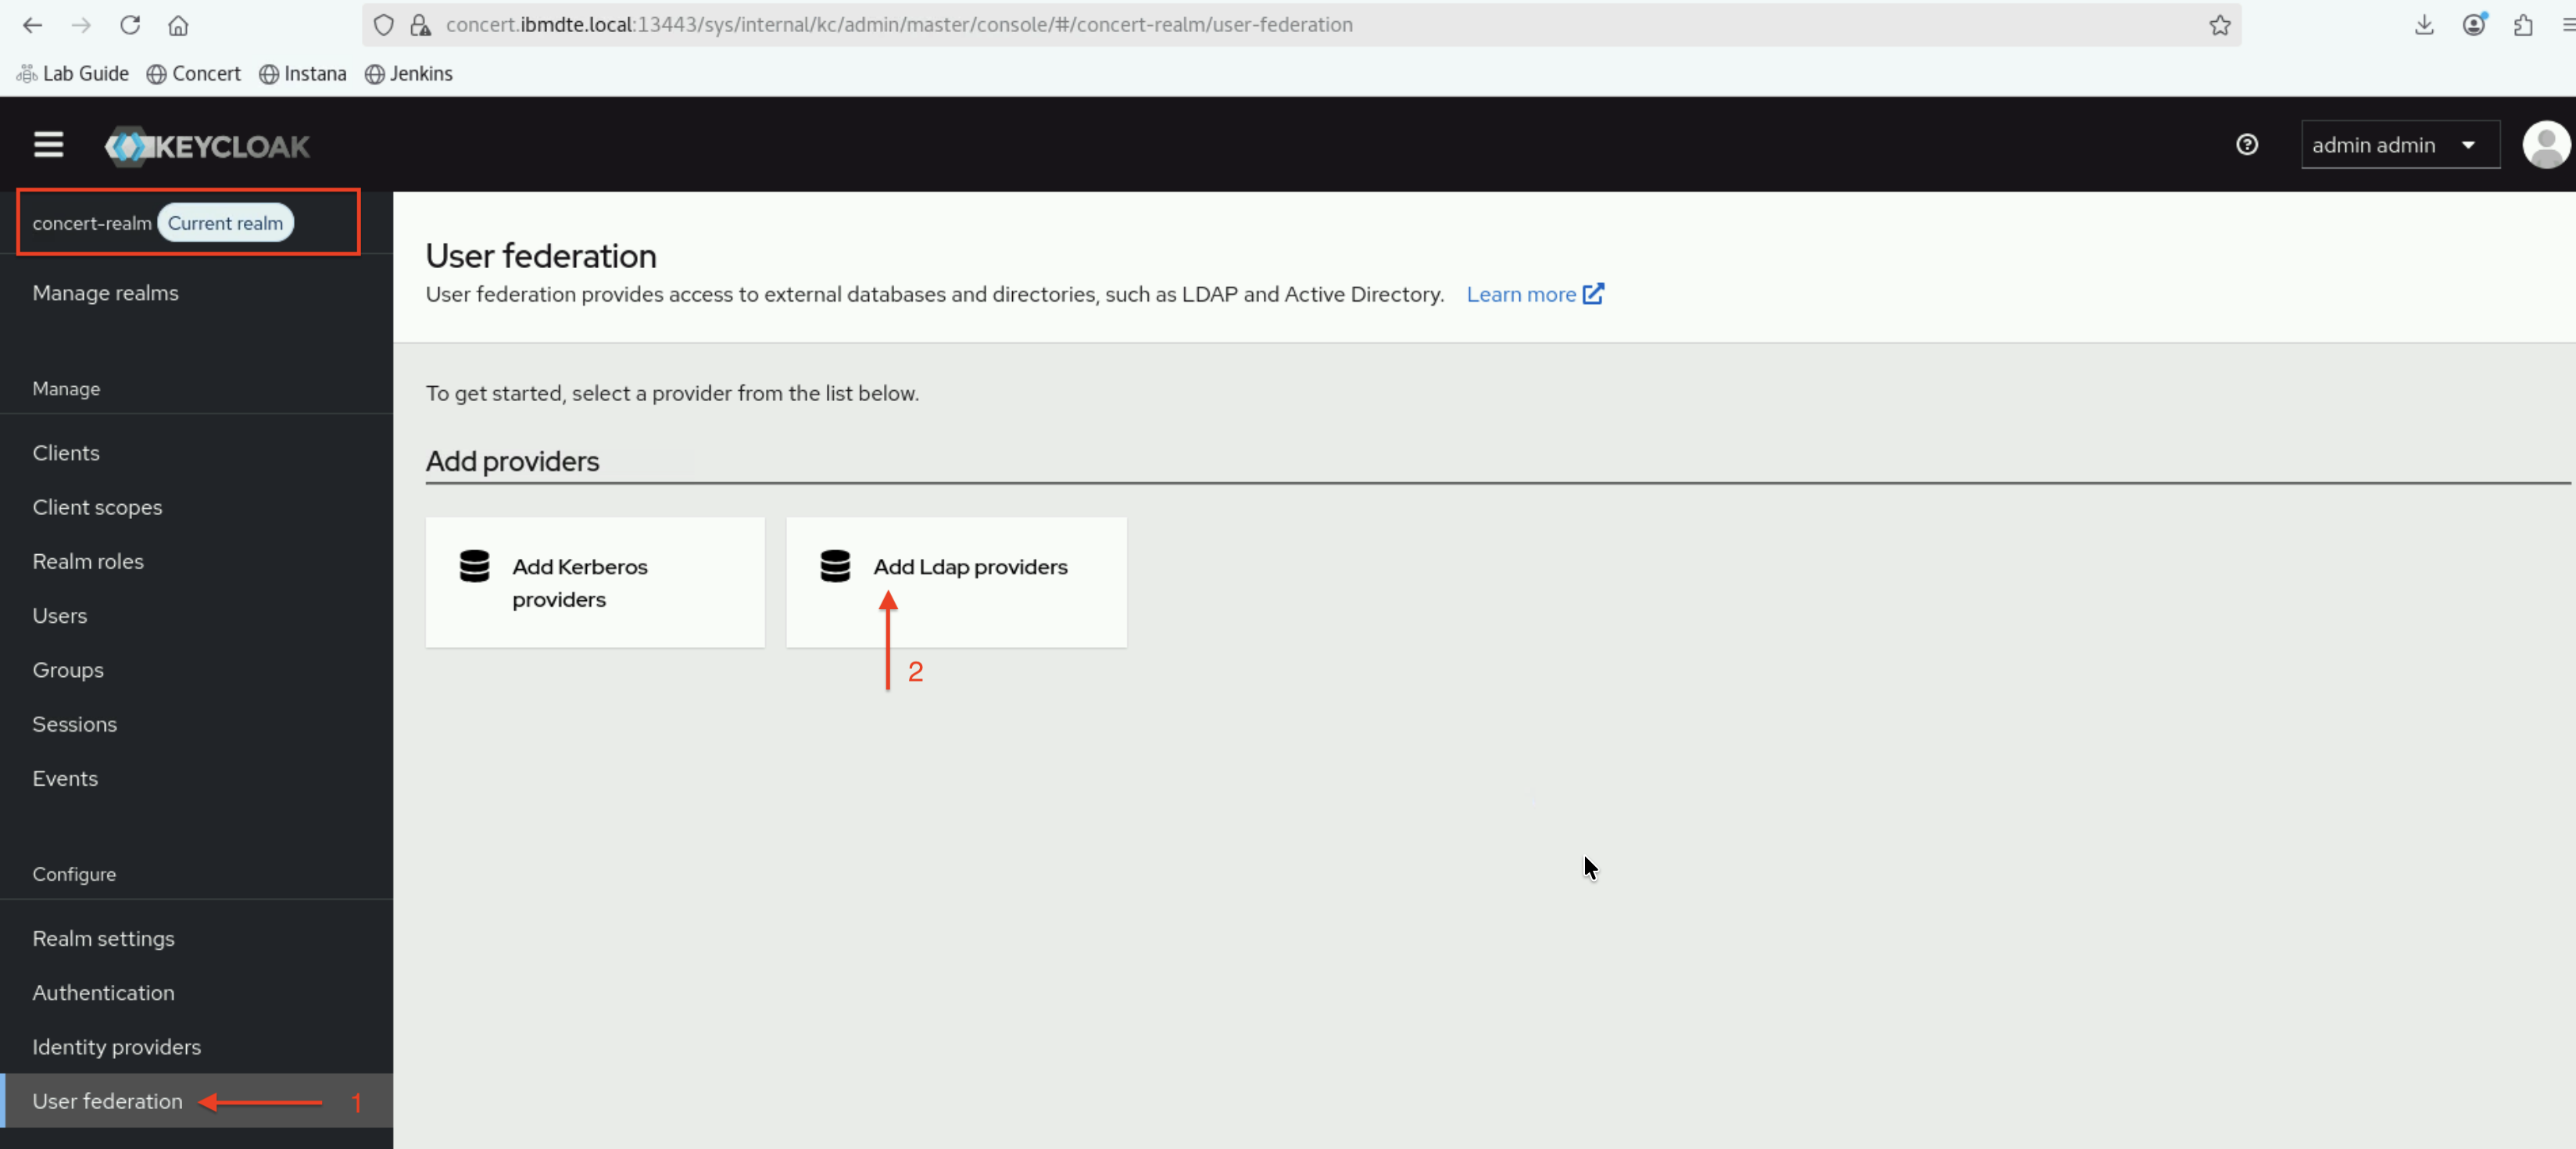
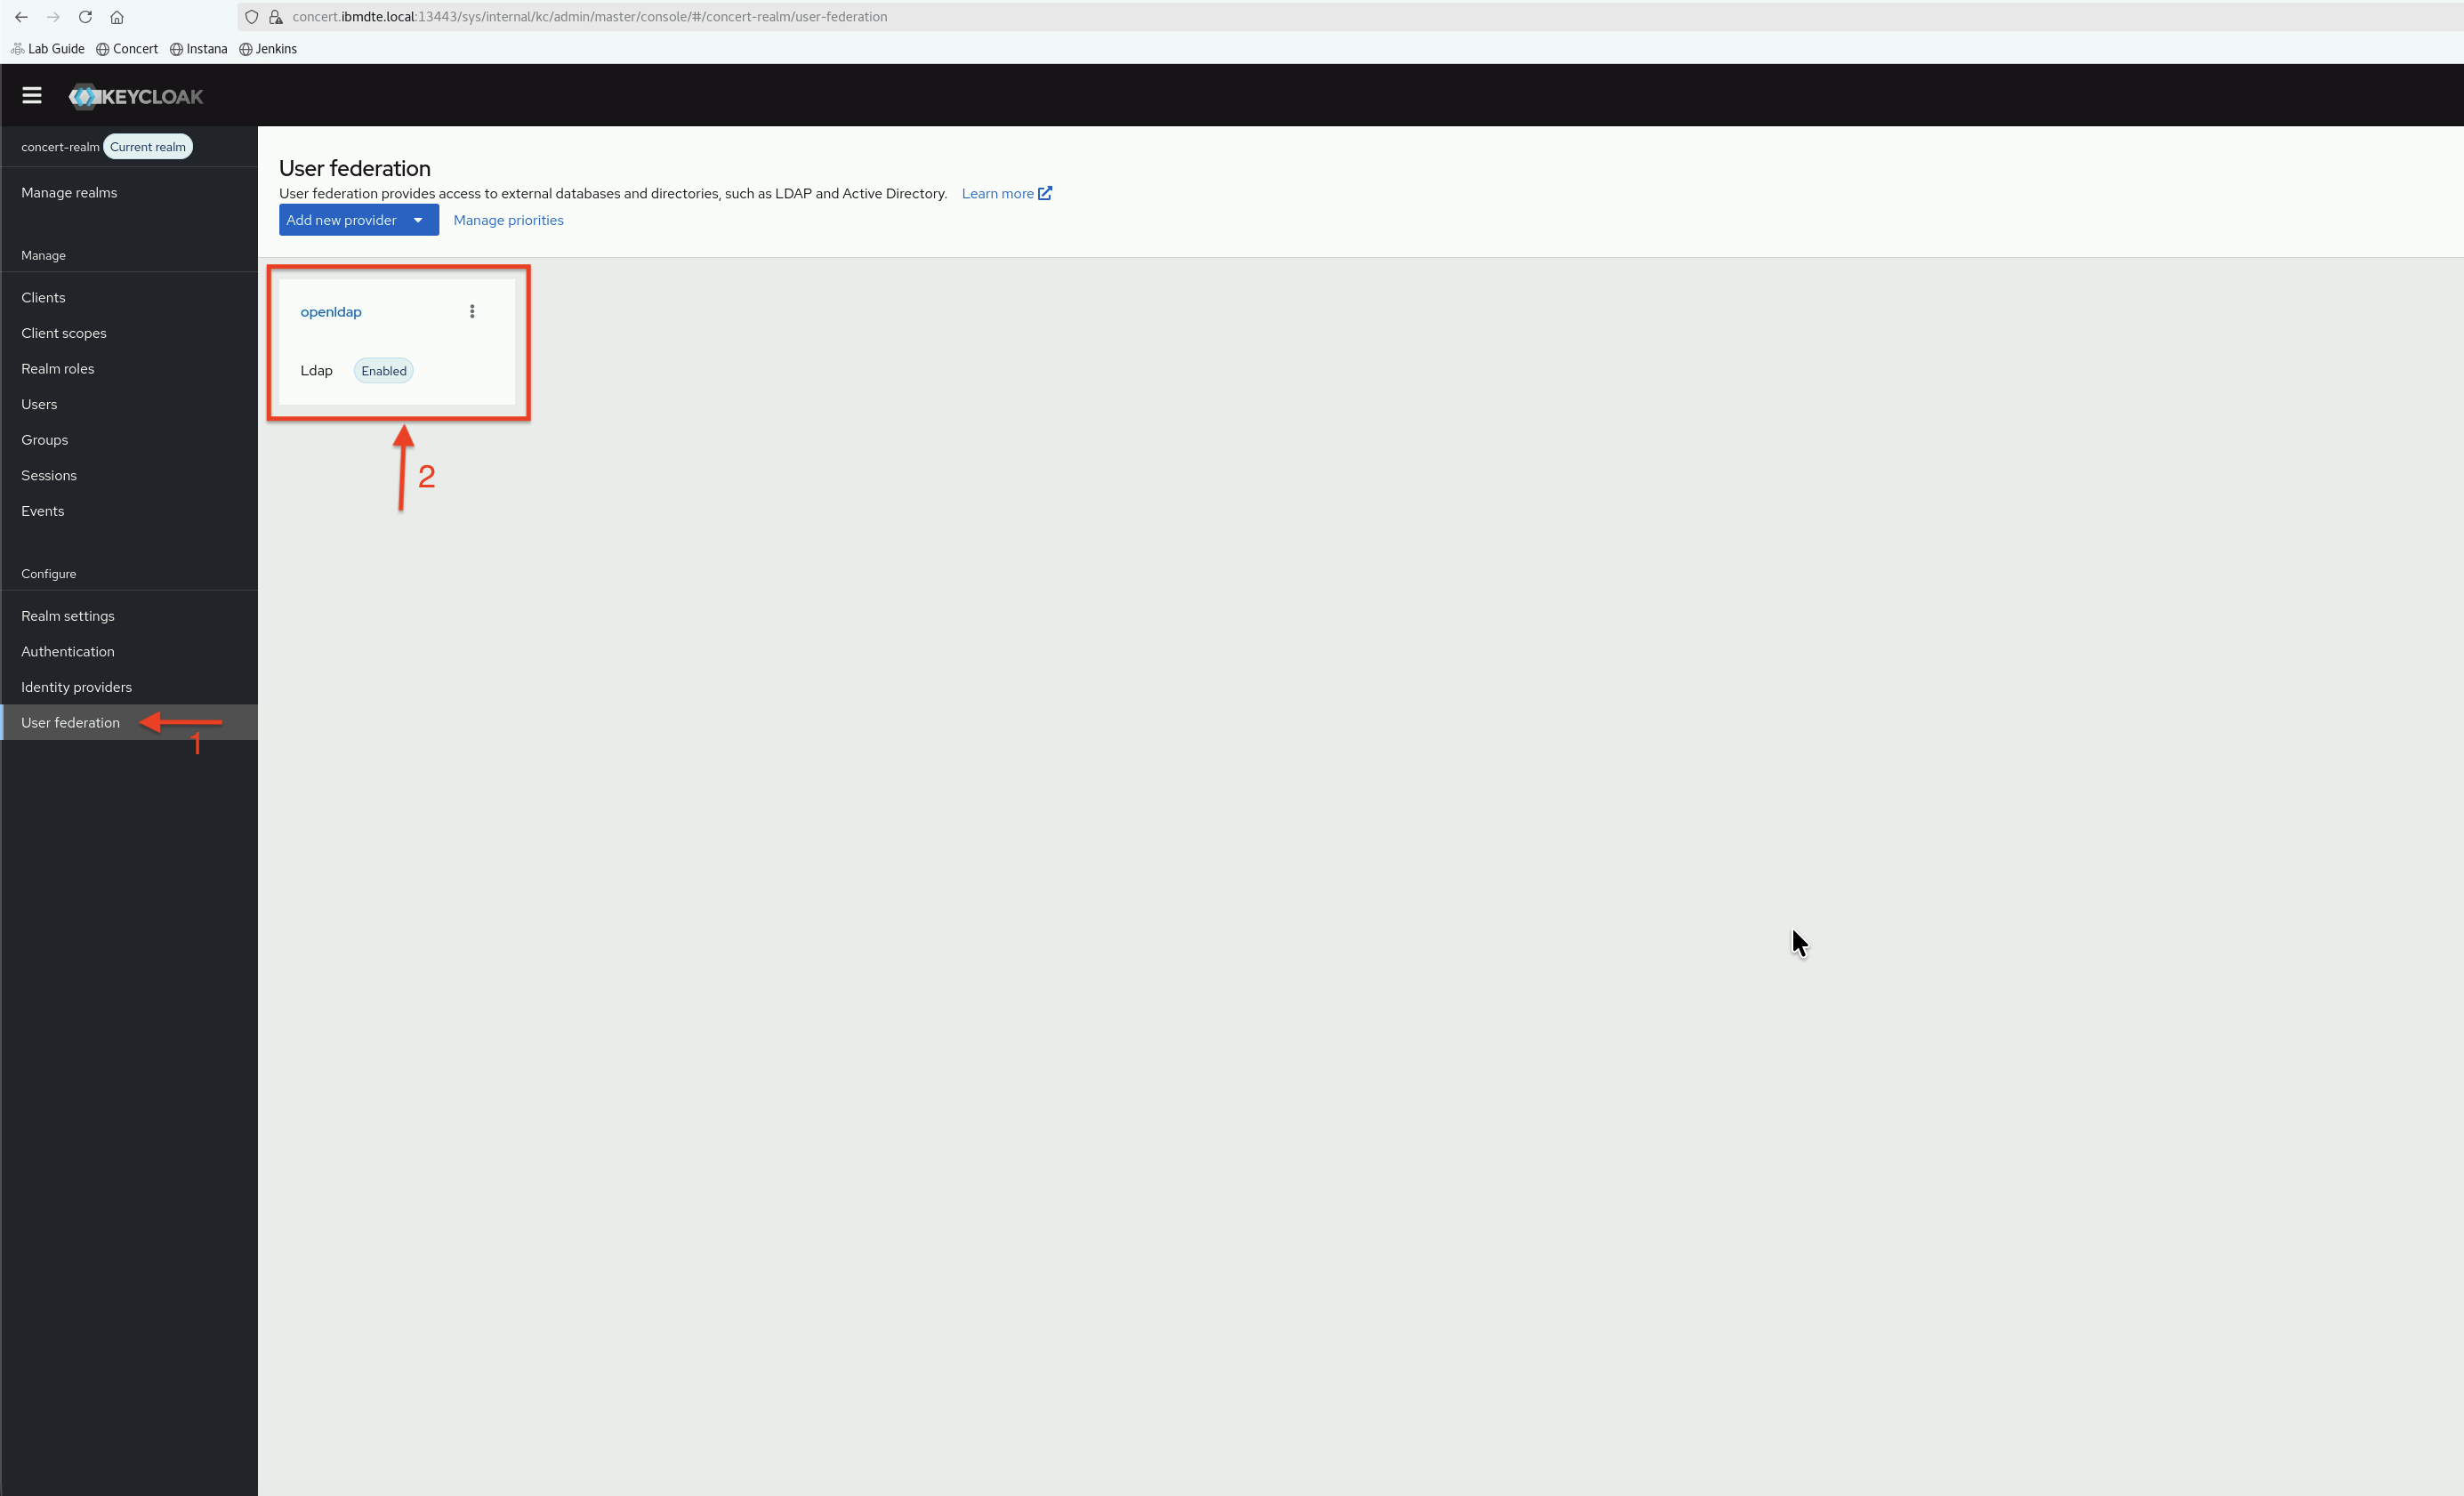
5.5.1: Navigate to User Federation
- In the left navigation menu, click User Federation
- Click Add Ldap providers tile
5.5.2: Configure LDAP Connection Settings
On the LDAP configuration page, enter the following settings:
5.5.2.1: General Settings
- Enter the following values:
- UI Display Name:
openldap - Vendor:
Other
- UI Display Name:
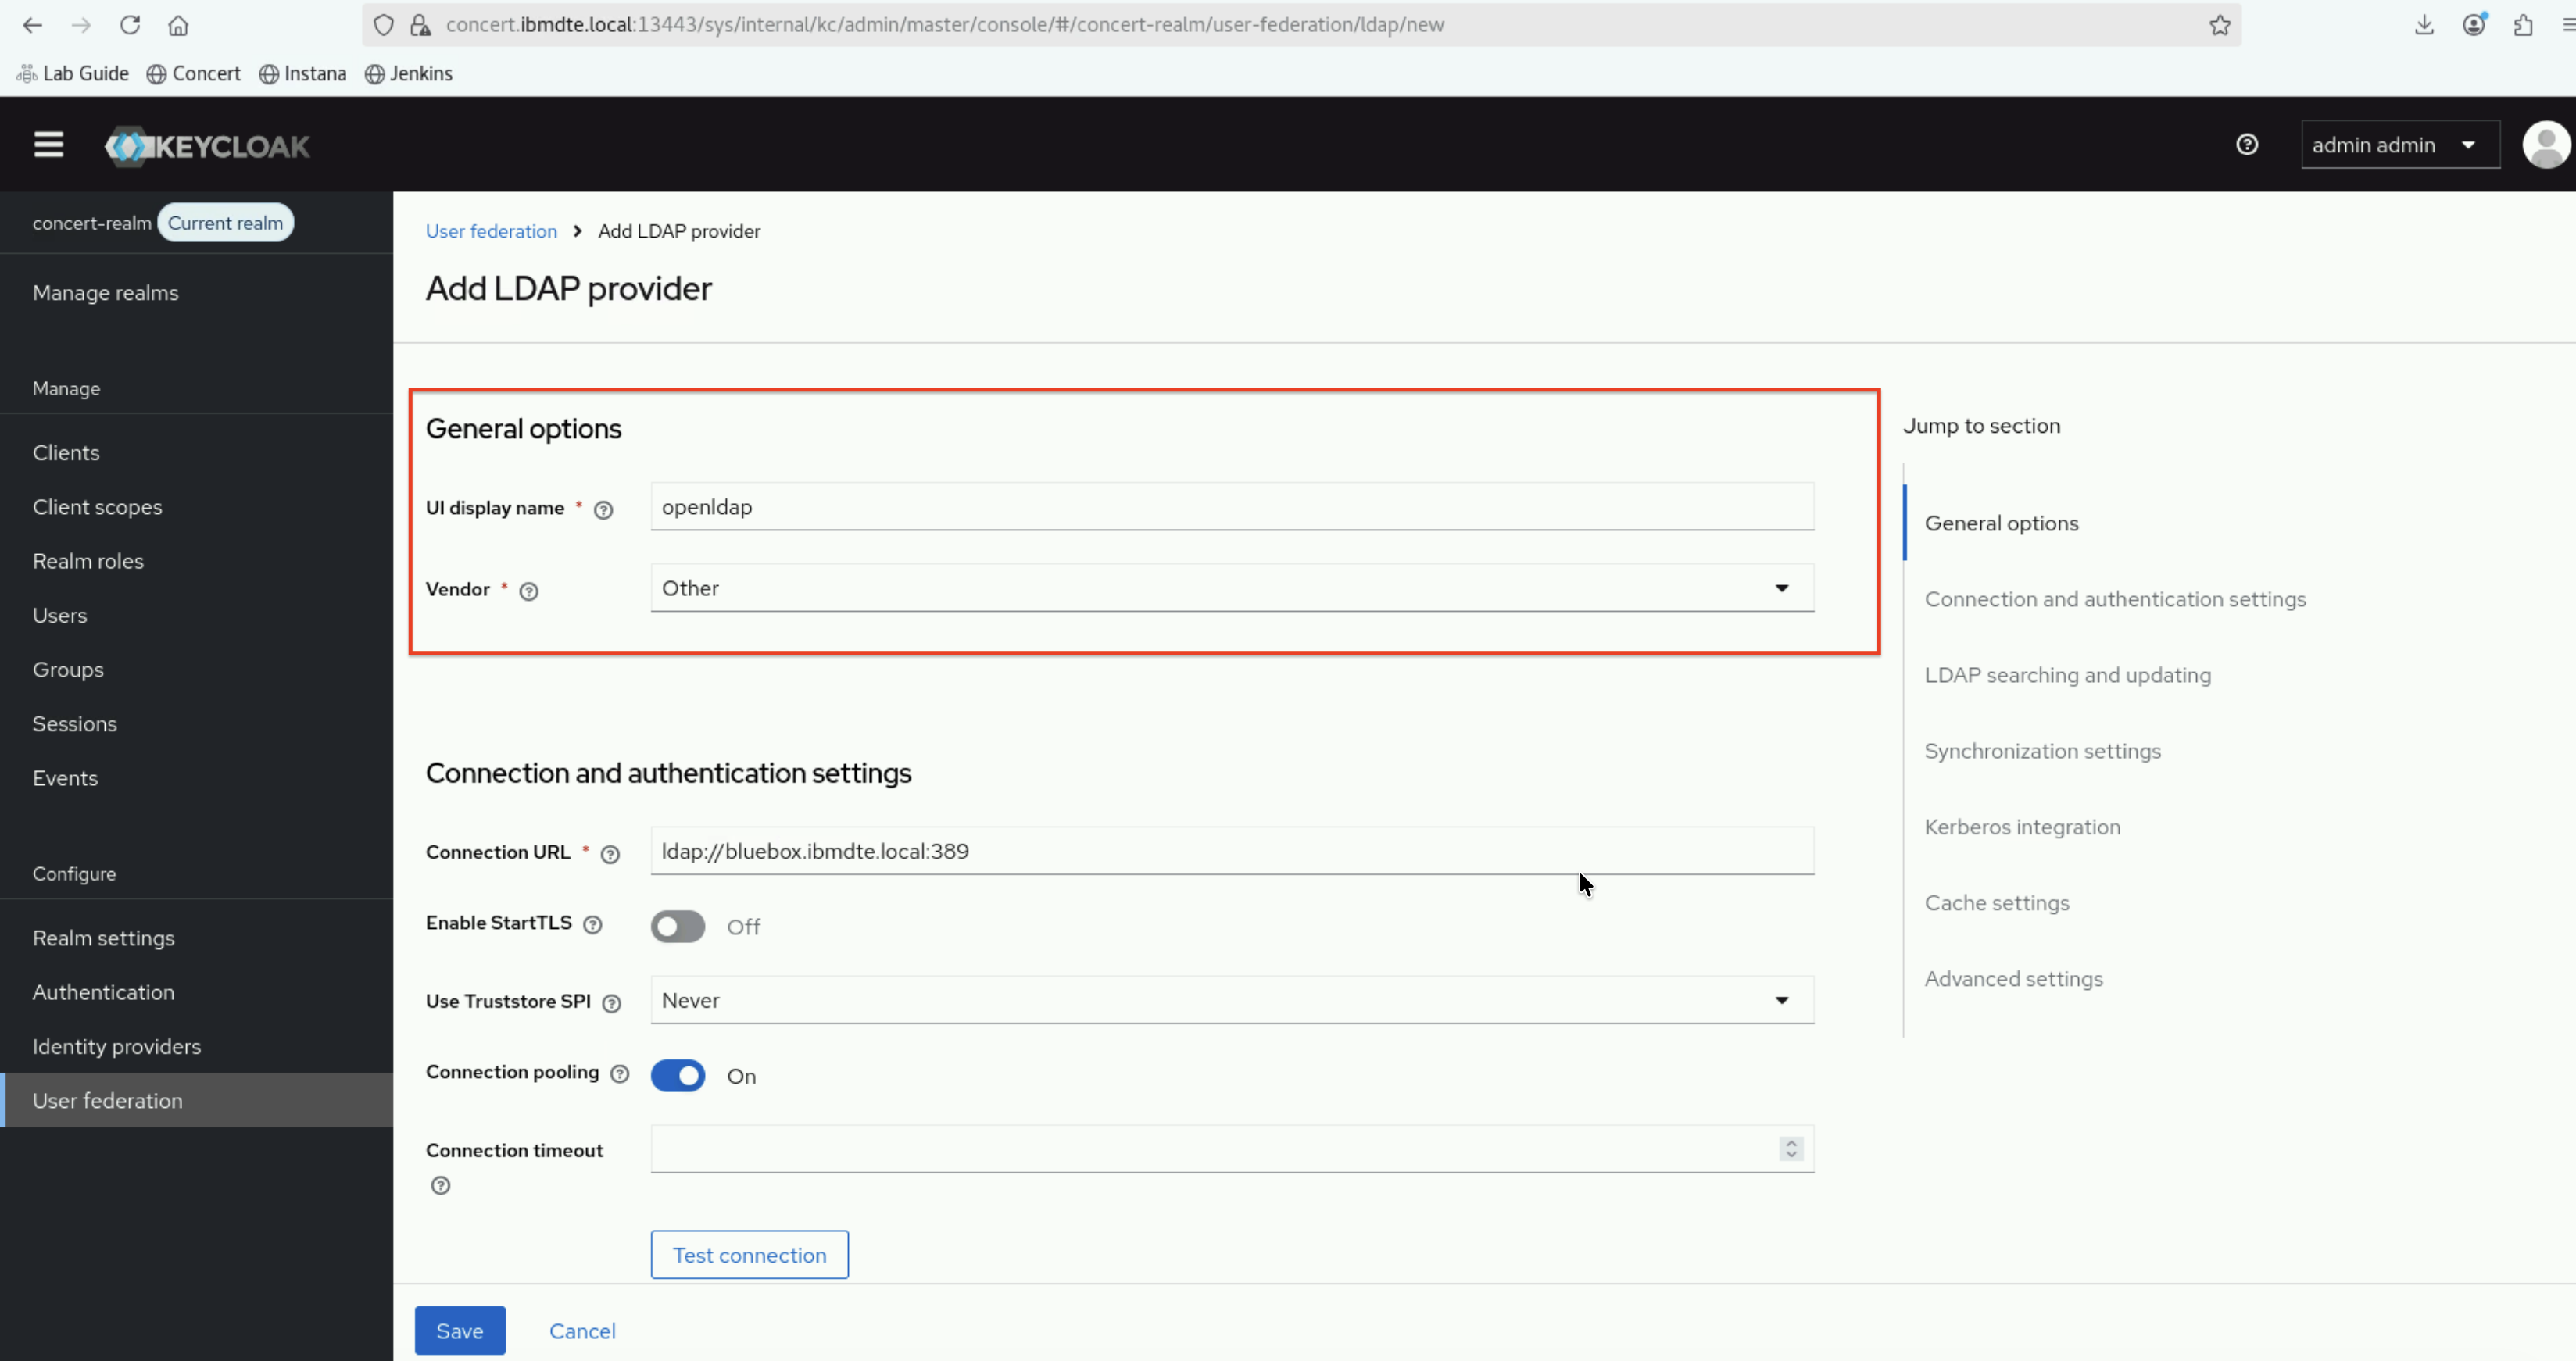
5.5.2.2: Connection and Authentication Settings
- Enter the following values:
- Connection URL:
ldap://bluebox.ibmdte.local:389 - Enable StartTLS:
OFF - Use Truststore SPI:
Never - Connection Pooling:
ON - Connection Timeout:
**Leave default**
- Connection URL:
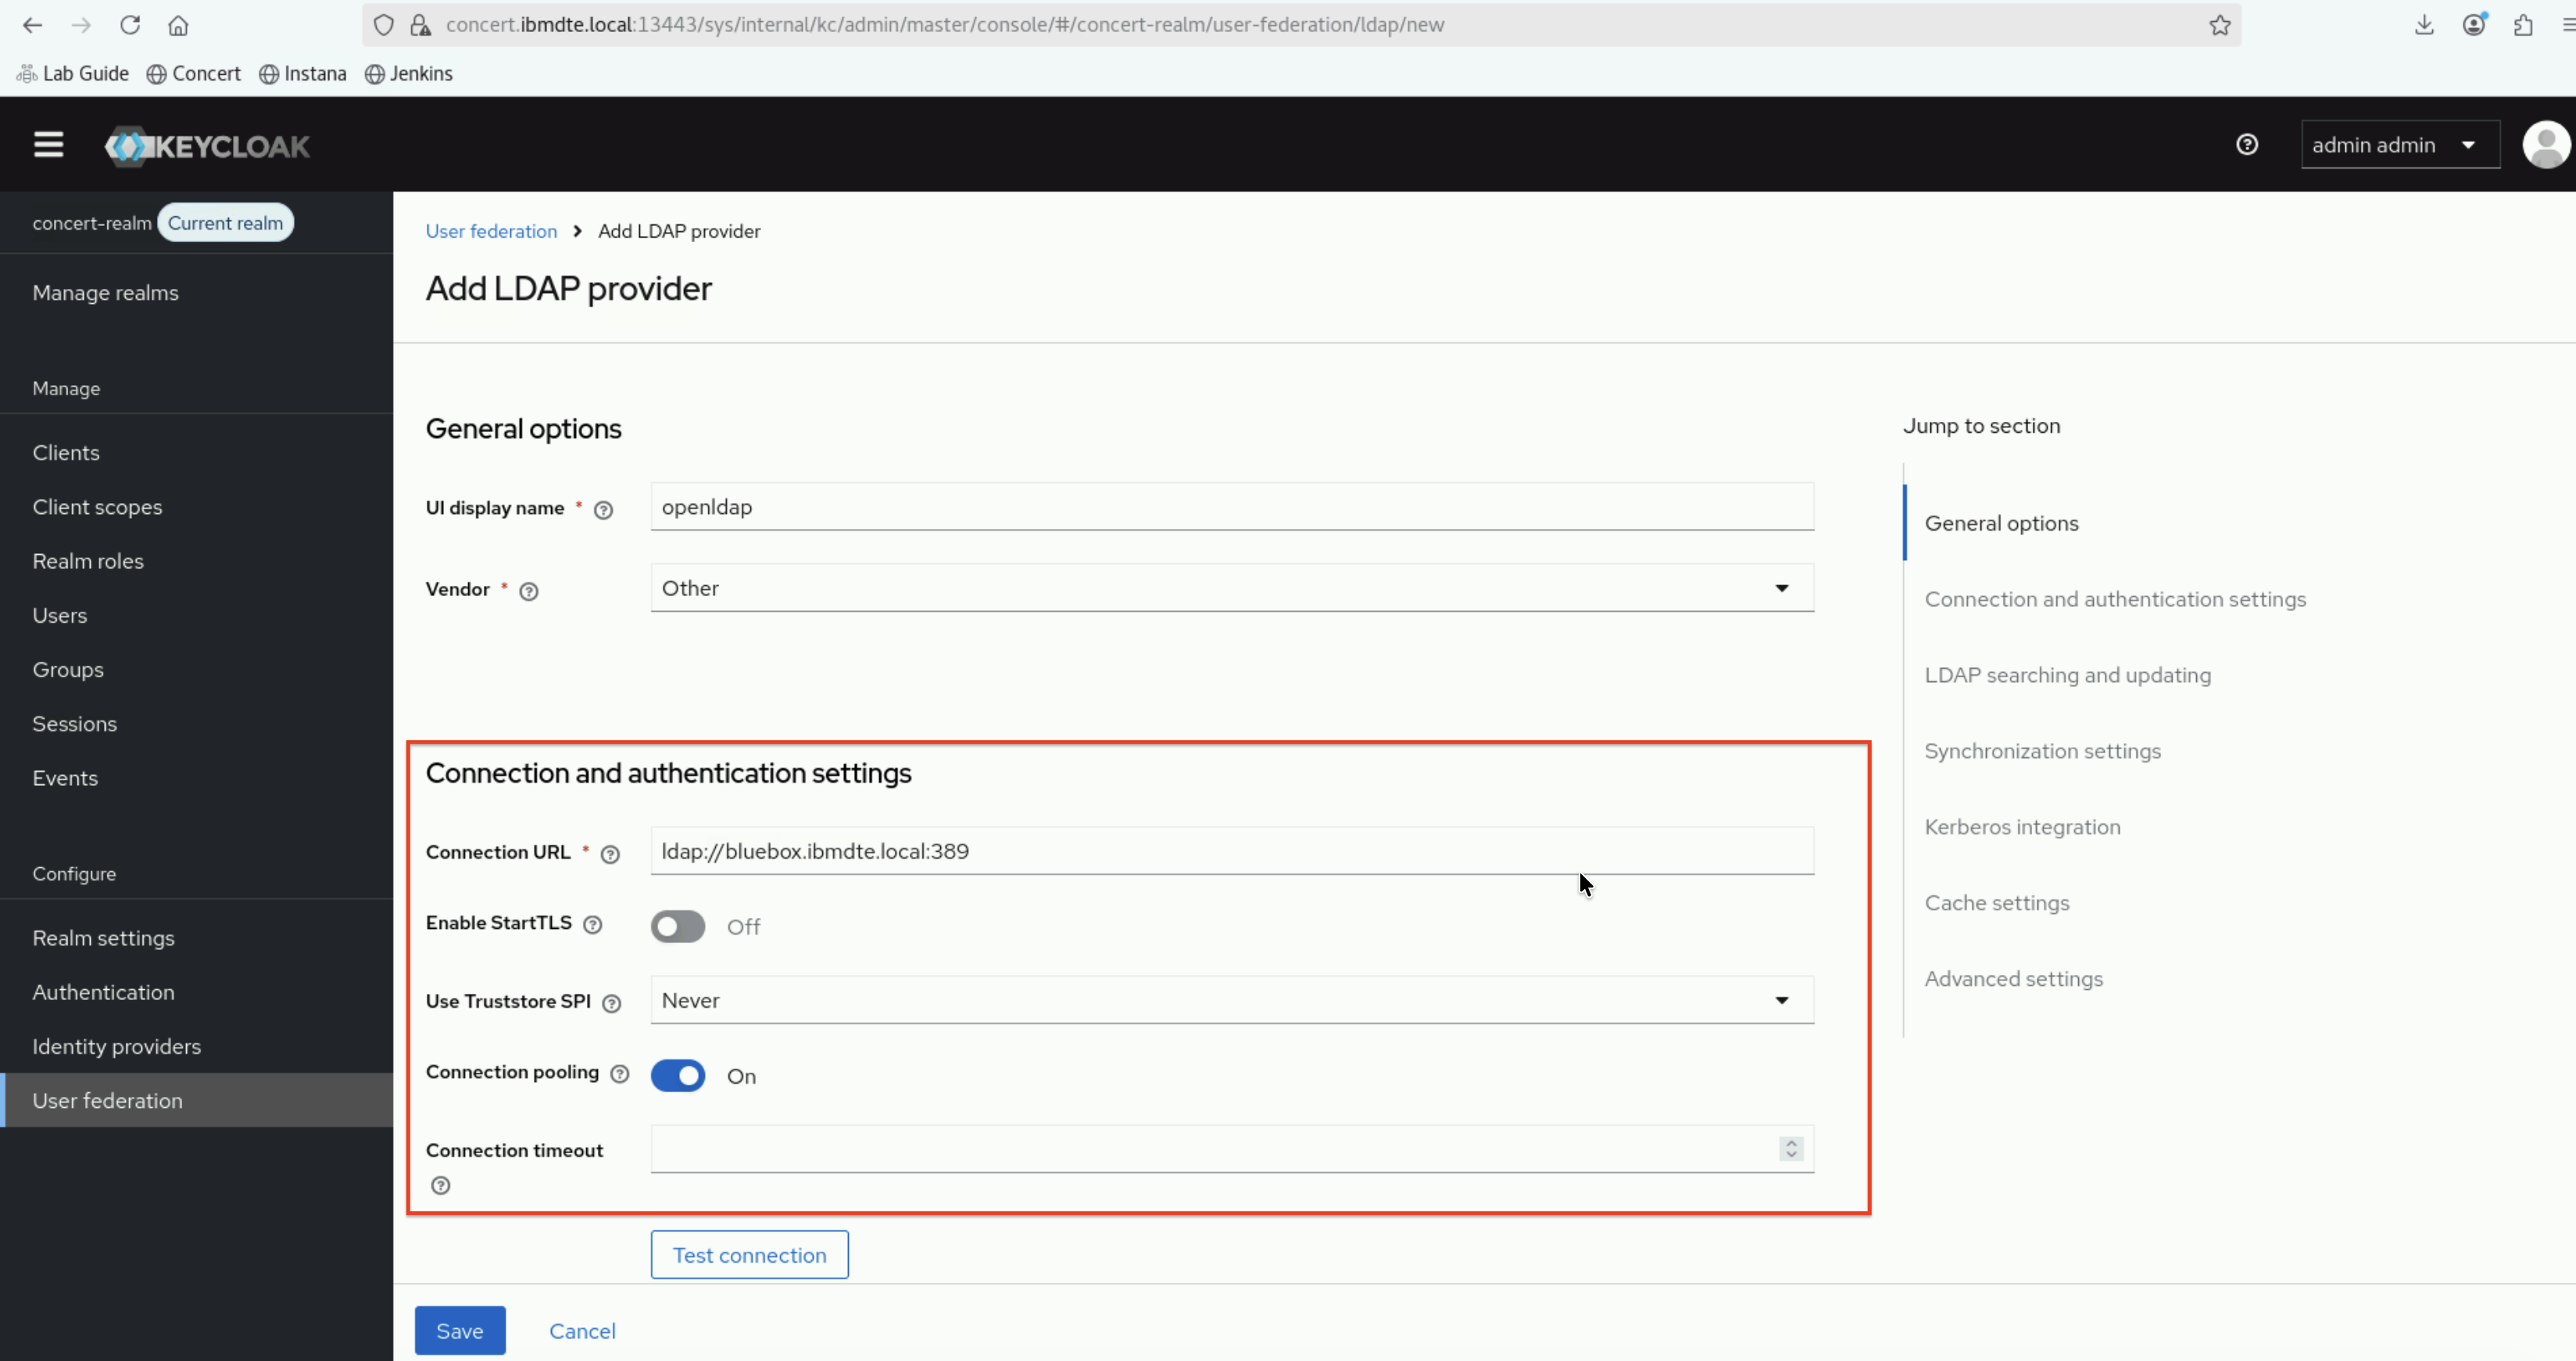
In real-life production system, Secure LDAP (LDAPS) is the recommended approach to secure the communication channel between Keycloak and OpenLDAP.
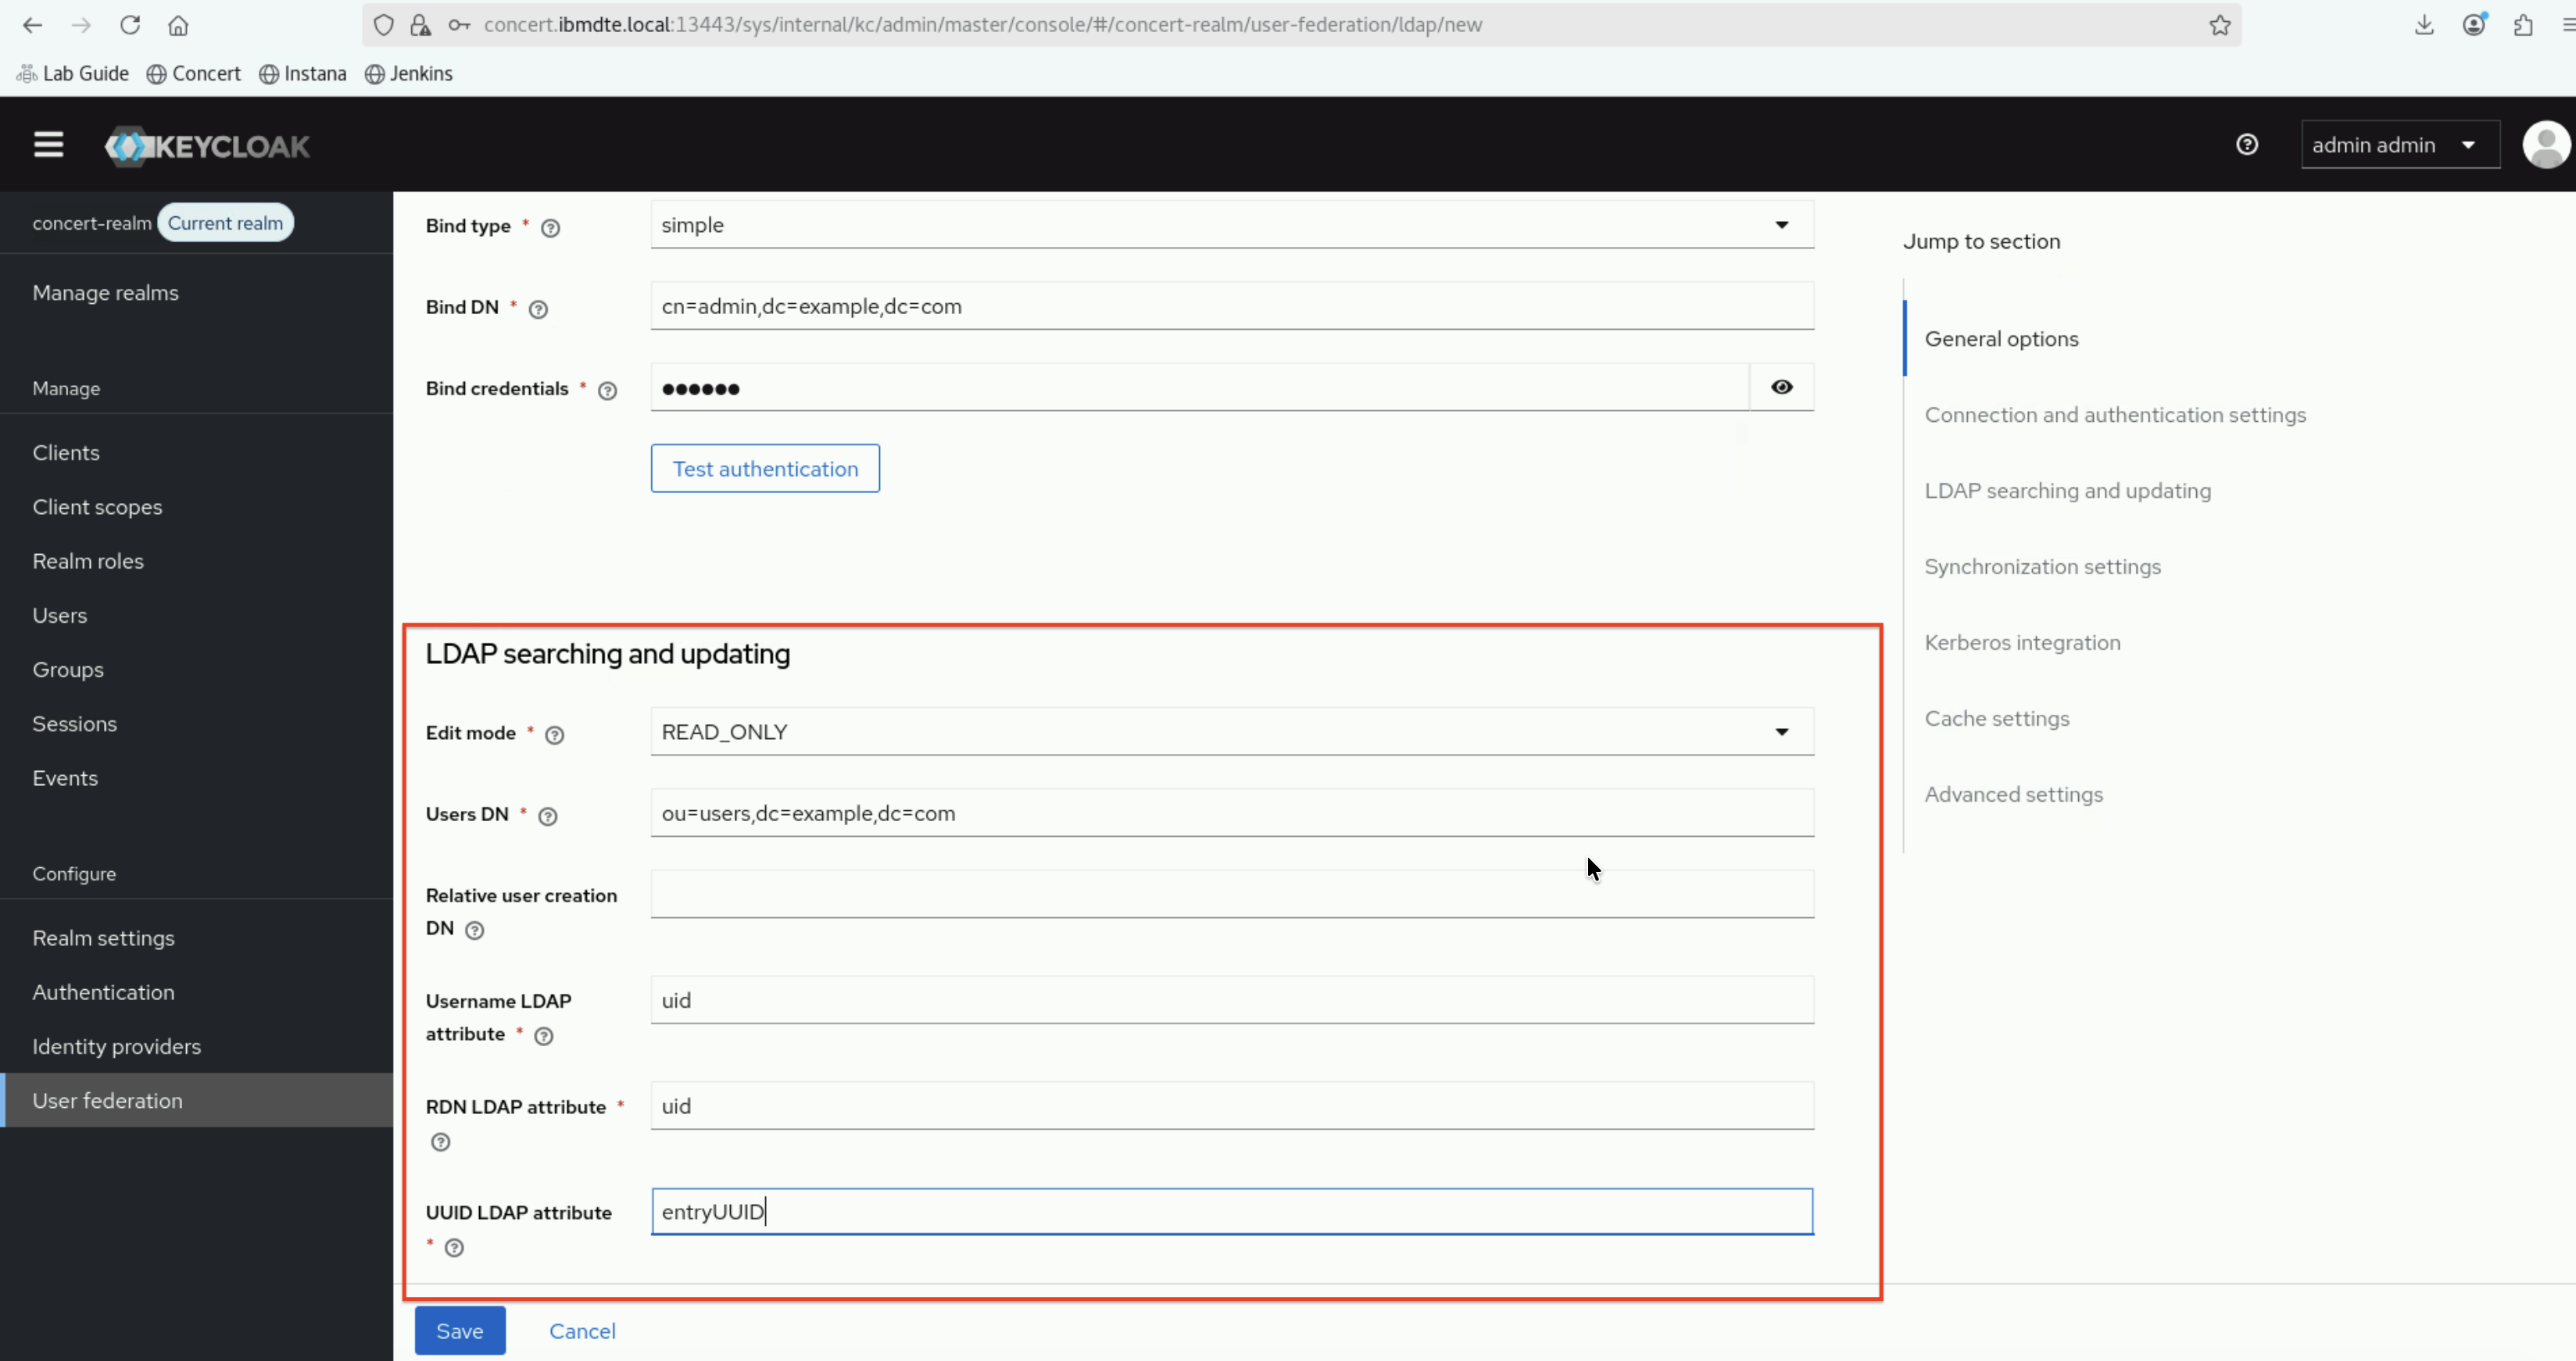
5.5.2.3: LDAP Bind Settings
- Enter the following values:
- Bind Type:
simple - Bind DN:
cn=admin,dc=example,dc=com - Bind Credential:
secret(created in Section 3.6)
- Bind Type:
Use the OpenLDAP admin password you created in Section 3.6.

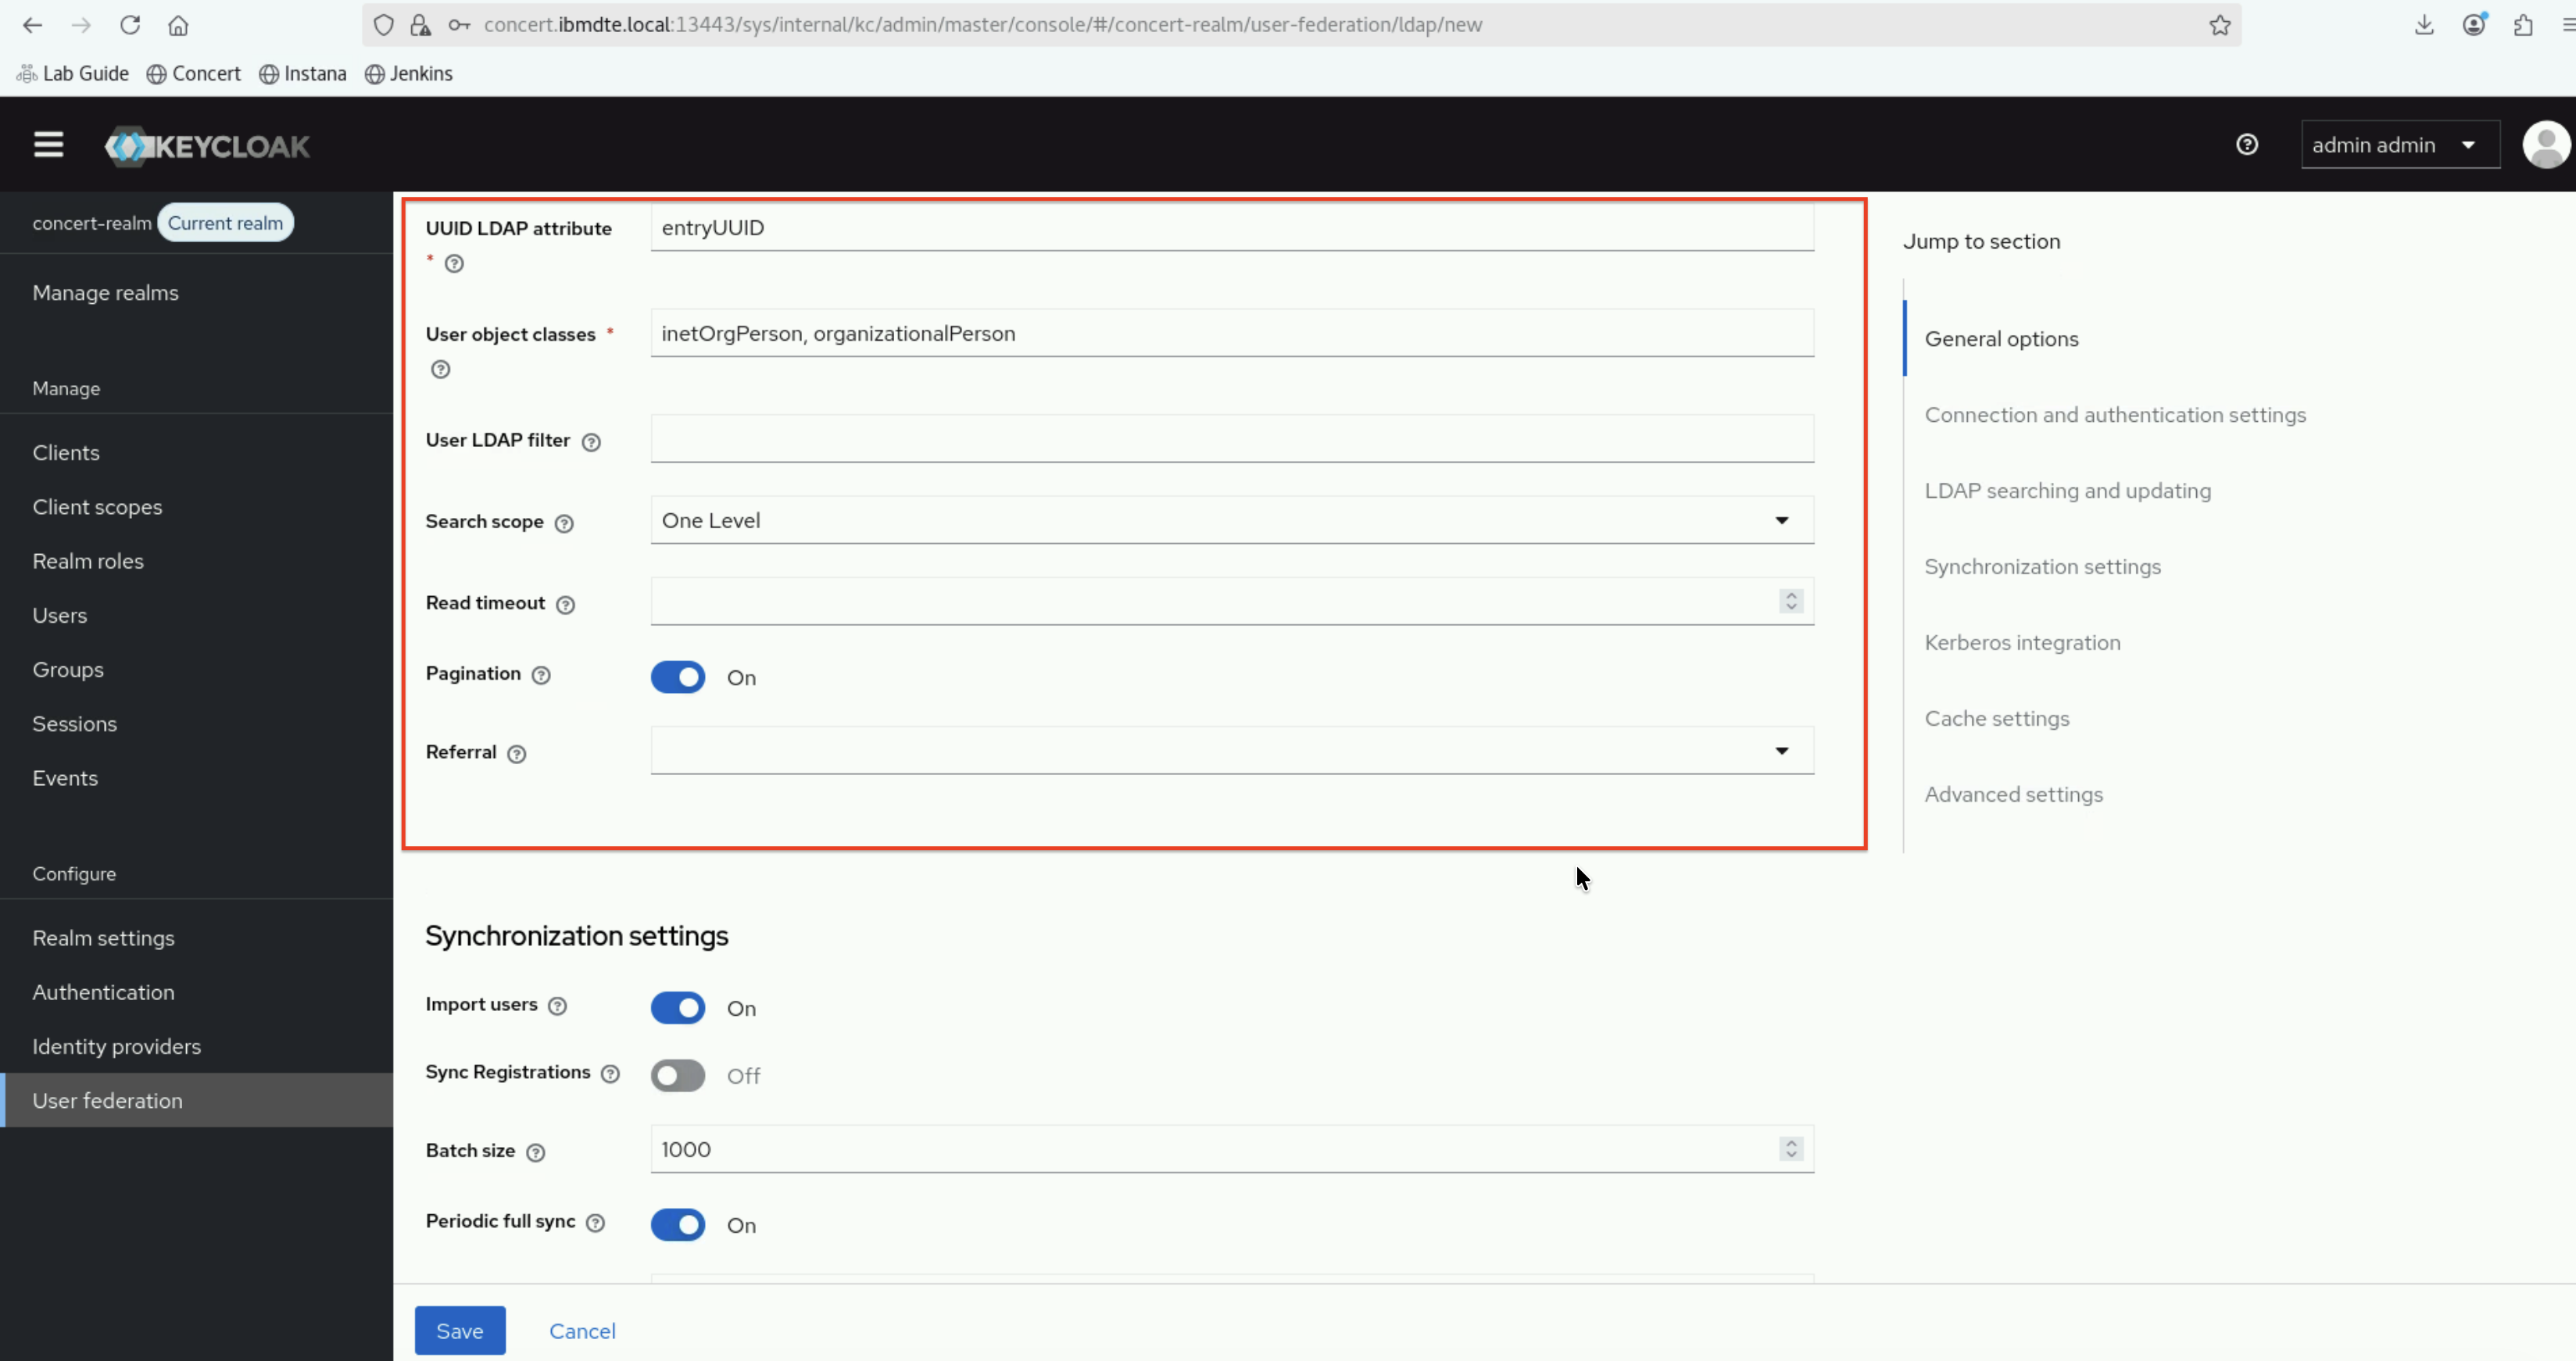
5.5.2.4: LDAP Searching and Updating
- Enter the following values:
- Edit Mode:
READ_ONLY - Users DN:
ou=users,dc=example,dc=com - Relative user creation DN:
**Leave undefined** - Username LDAP attribute:
uid - RDN LDAP attribute:
uid - UUID LDAP attribute:
entryUUID - User Object Classes:
inetOrgPerson, organizationalPerson - User LDAP filter:
**Leave undefined** - Search scope:
One Level - Read timeout:
**Leave default** - Pagination:
ON - Referral:
**Leave undefined**
- Edit Mode:
5.5.2.5: Synchronization settings
- Enter the following values:
- Import Users:
ON - Sync Registrations:
OFF - Batch size:
1000 - Periodic full sync:
ON - Full sync period:
604800 - Periodic changed users sync:
ON - Changed users sync period:
86400 - Remove invalid users during searches:
ON
- Import Users:
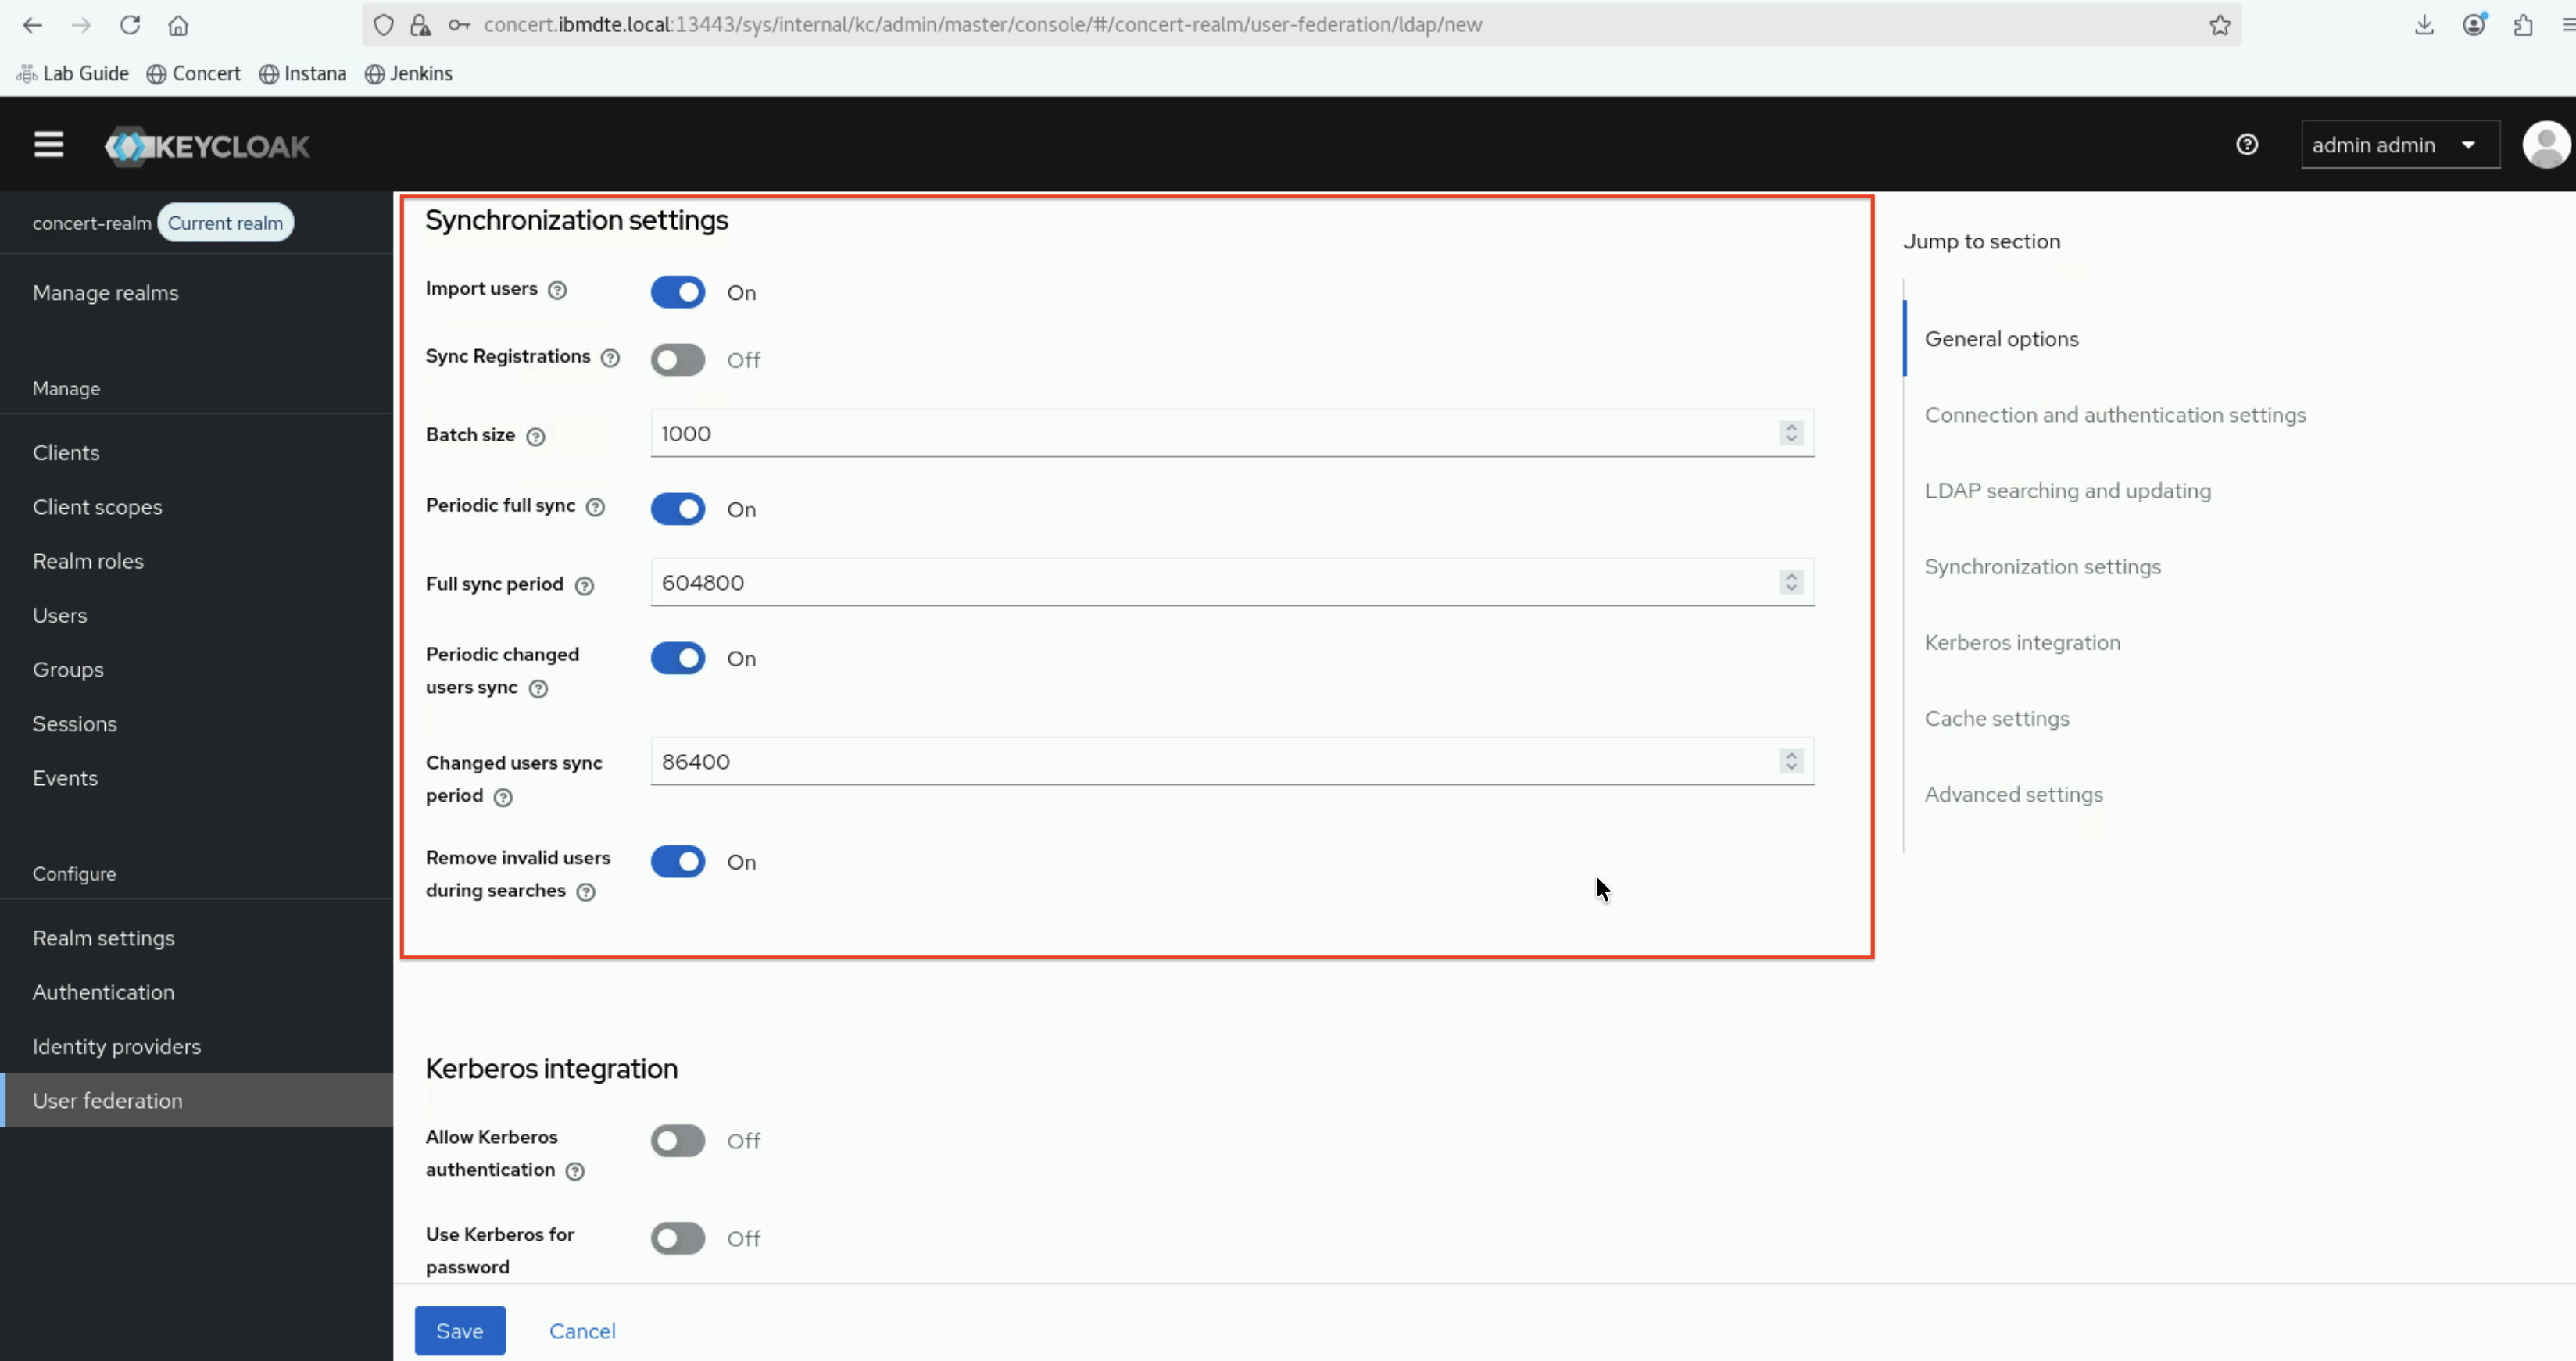
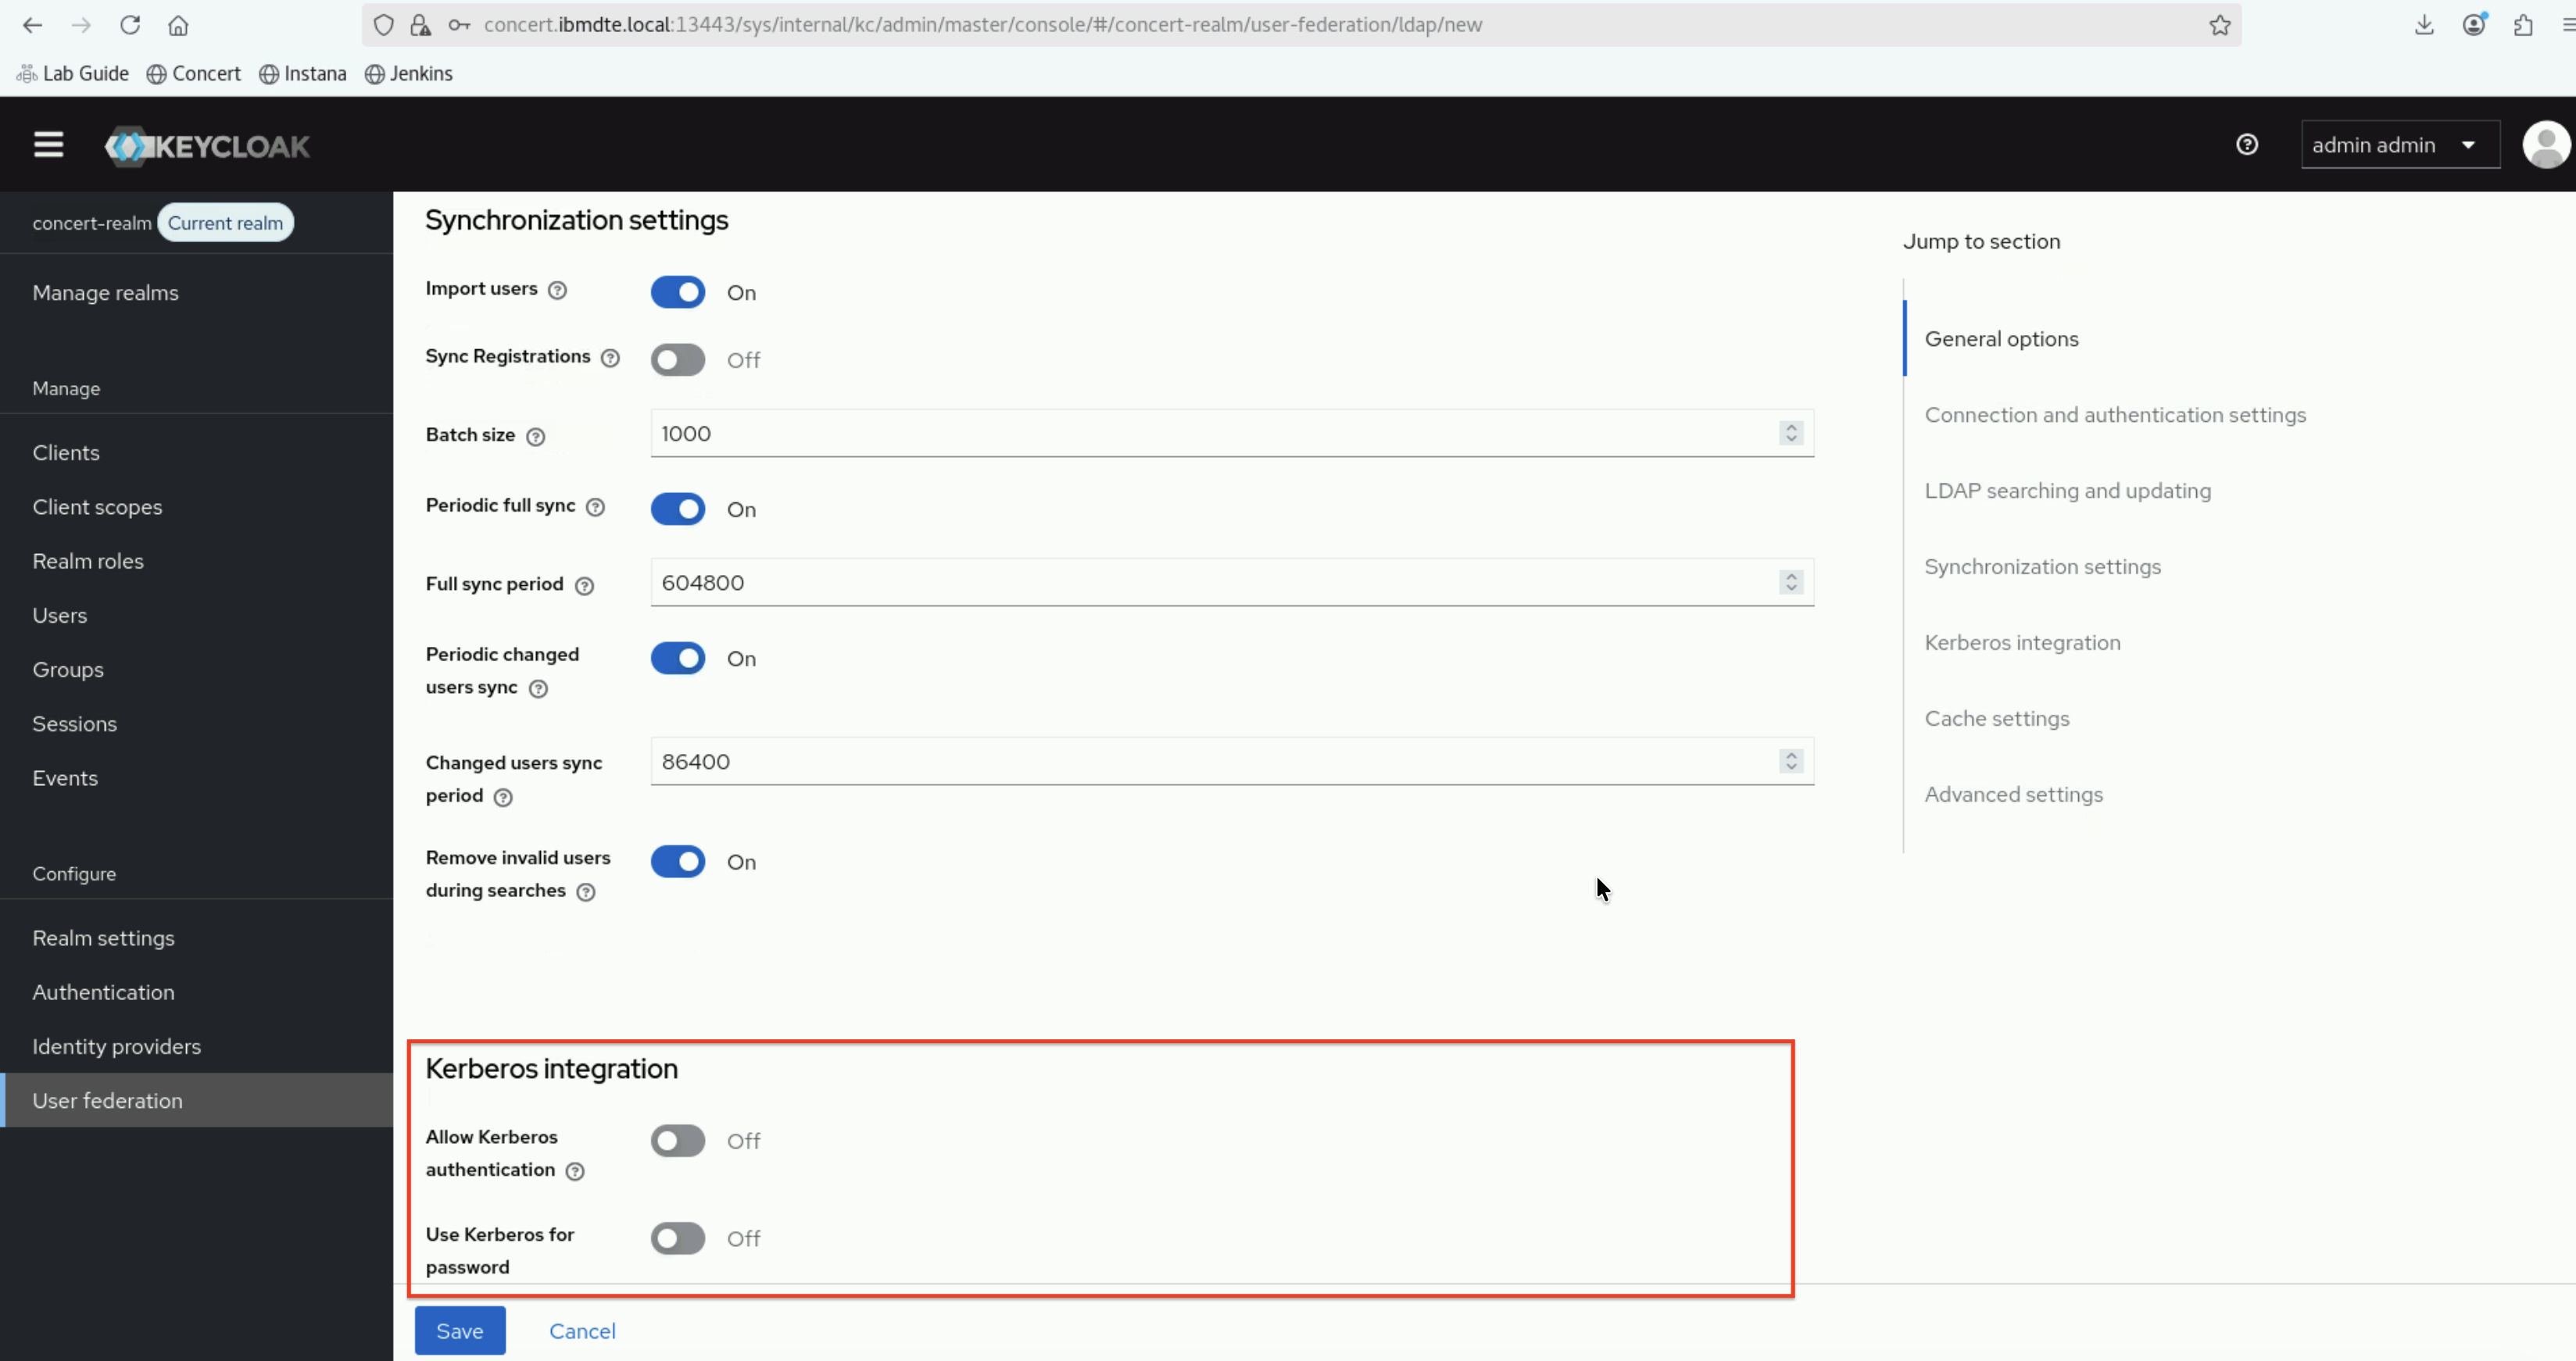
5.5.2.6: Kerberos integration
- Enter the following values:
- Allow Kerberos authentication:
OFF - Use Kerberos for password authentication:
OFF
- Allow Kerberos authentication:
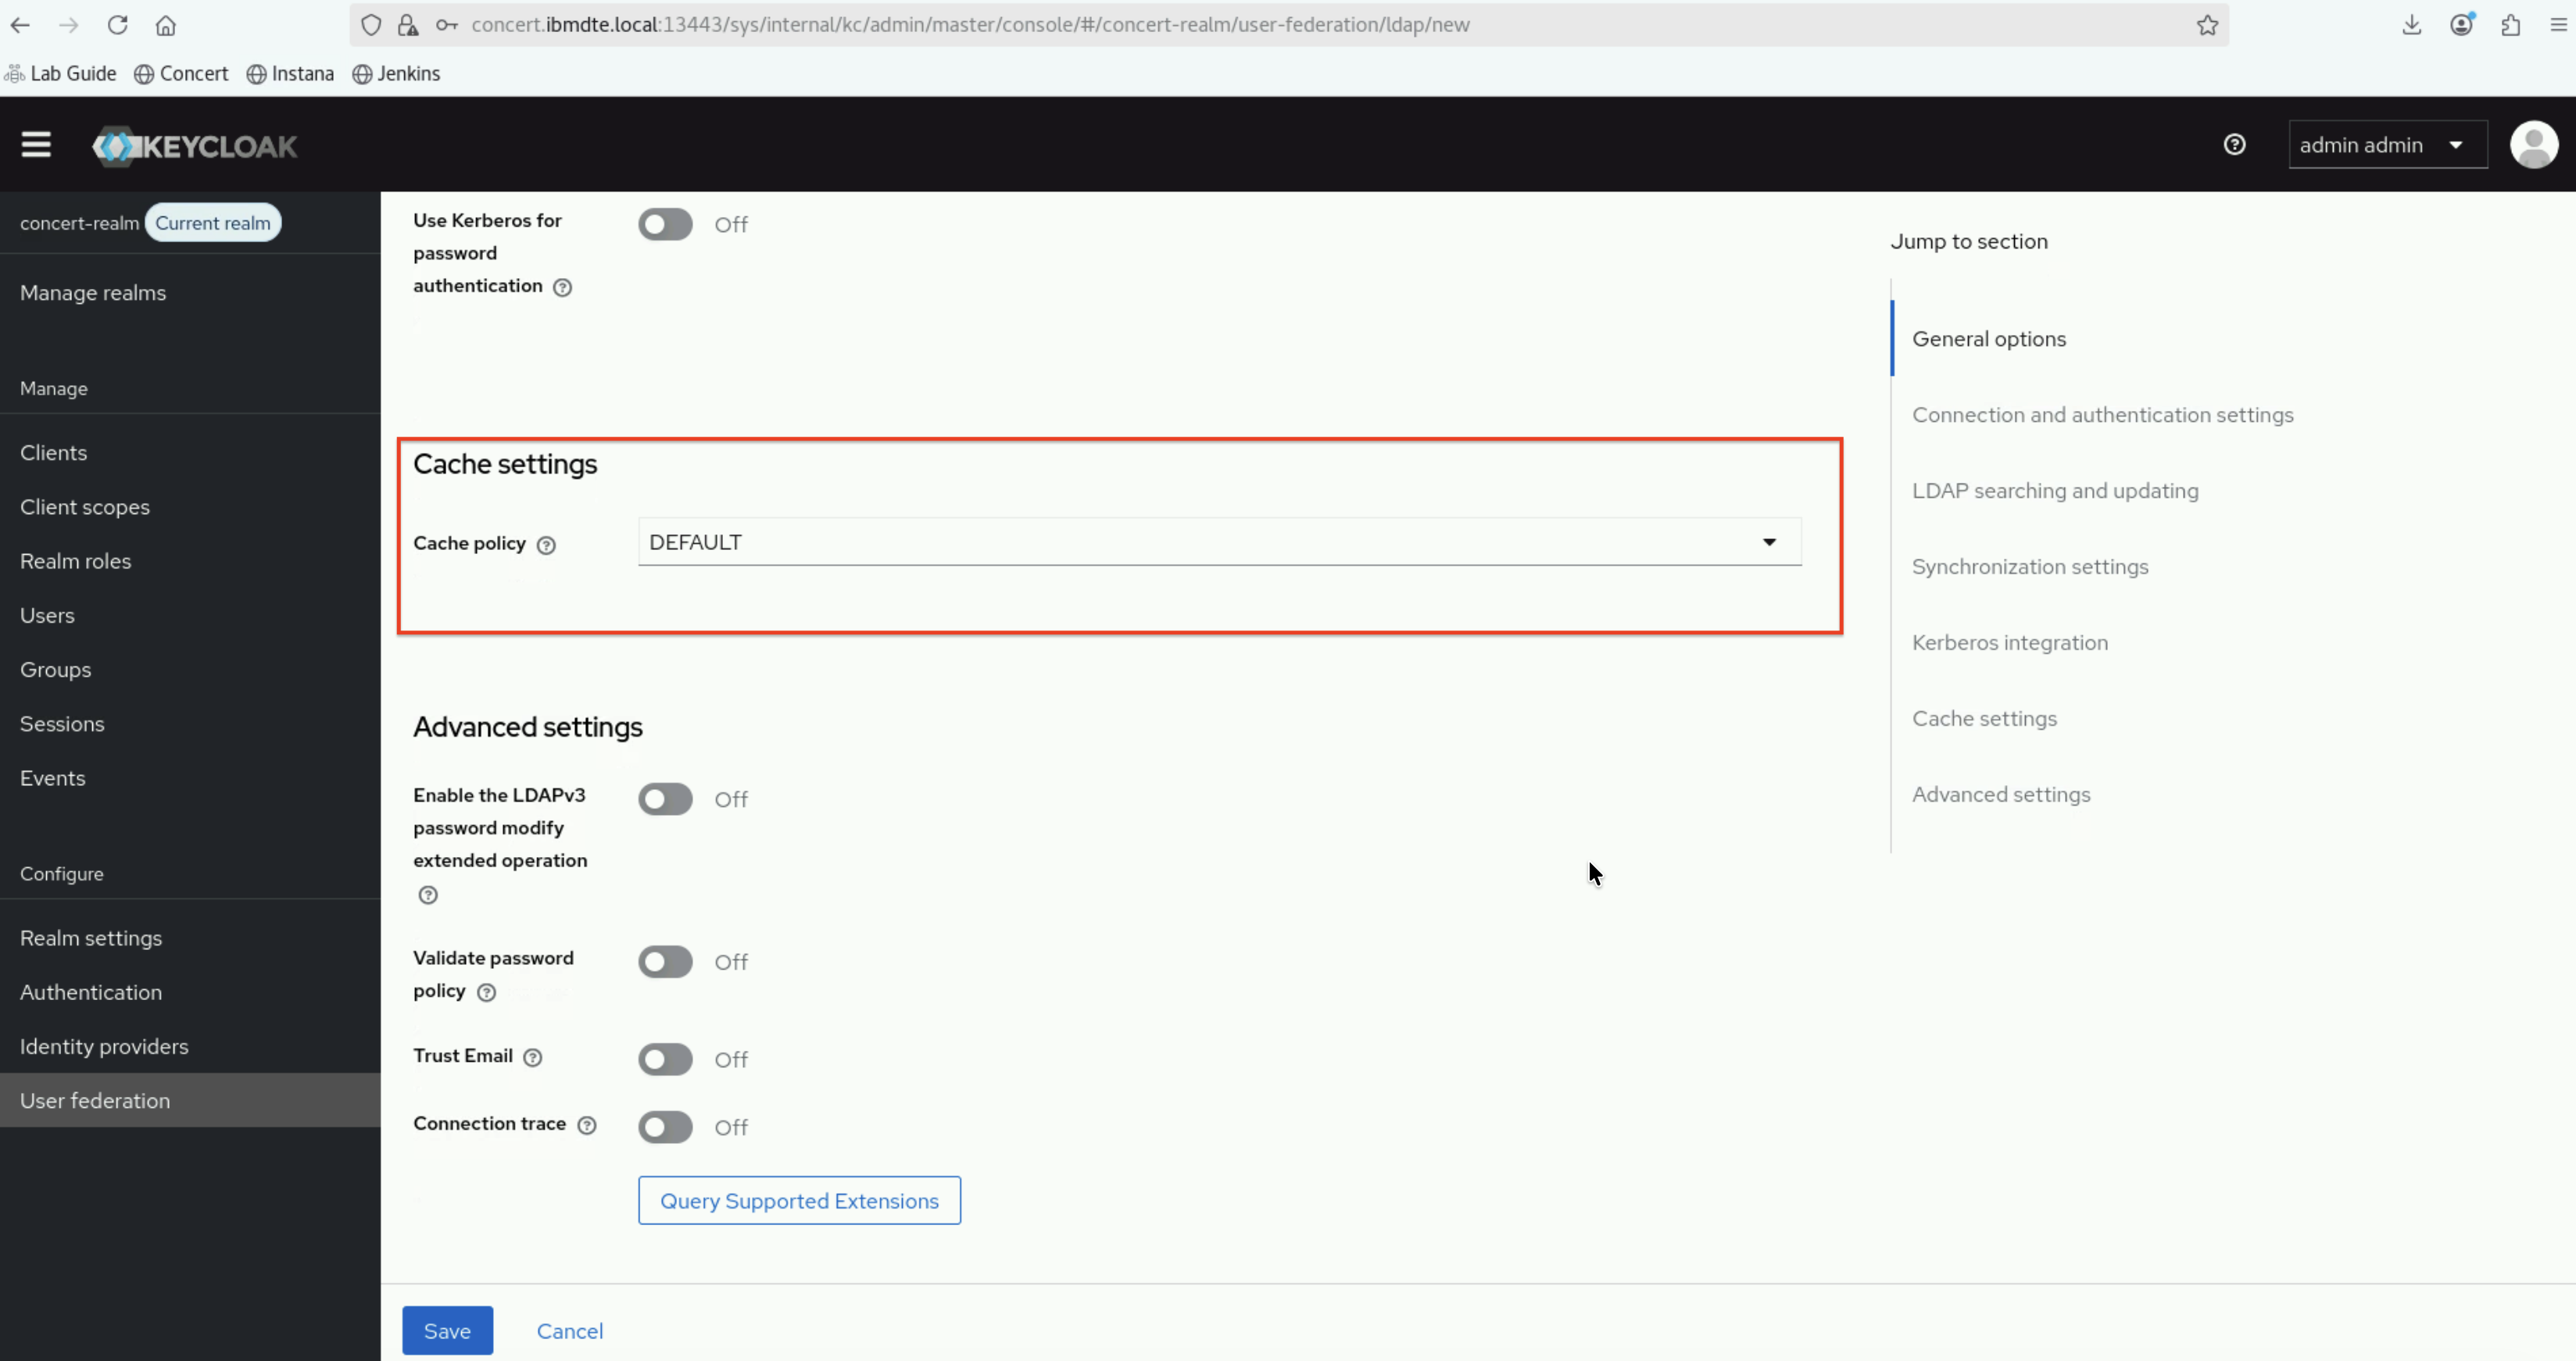
5.5.2.7: Cache settings
- Enter the following values:
- Cache policy:
DEFAULT
- Cache policy:
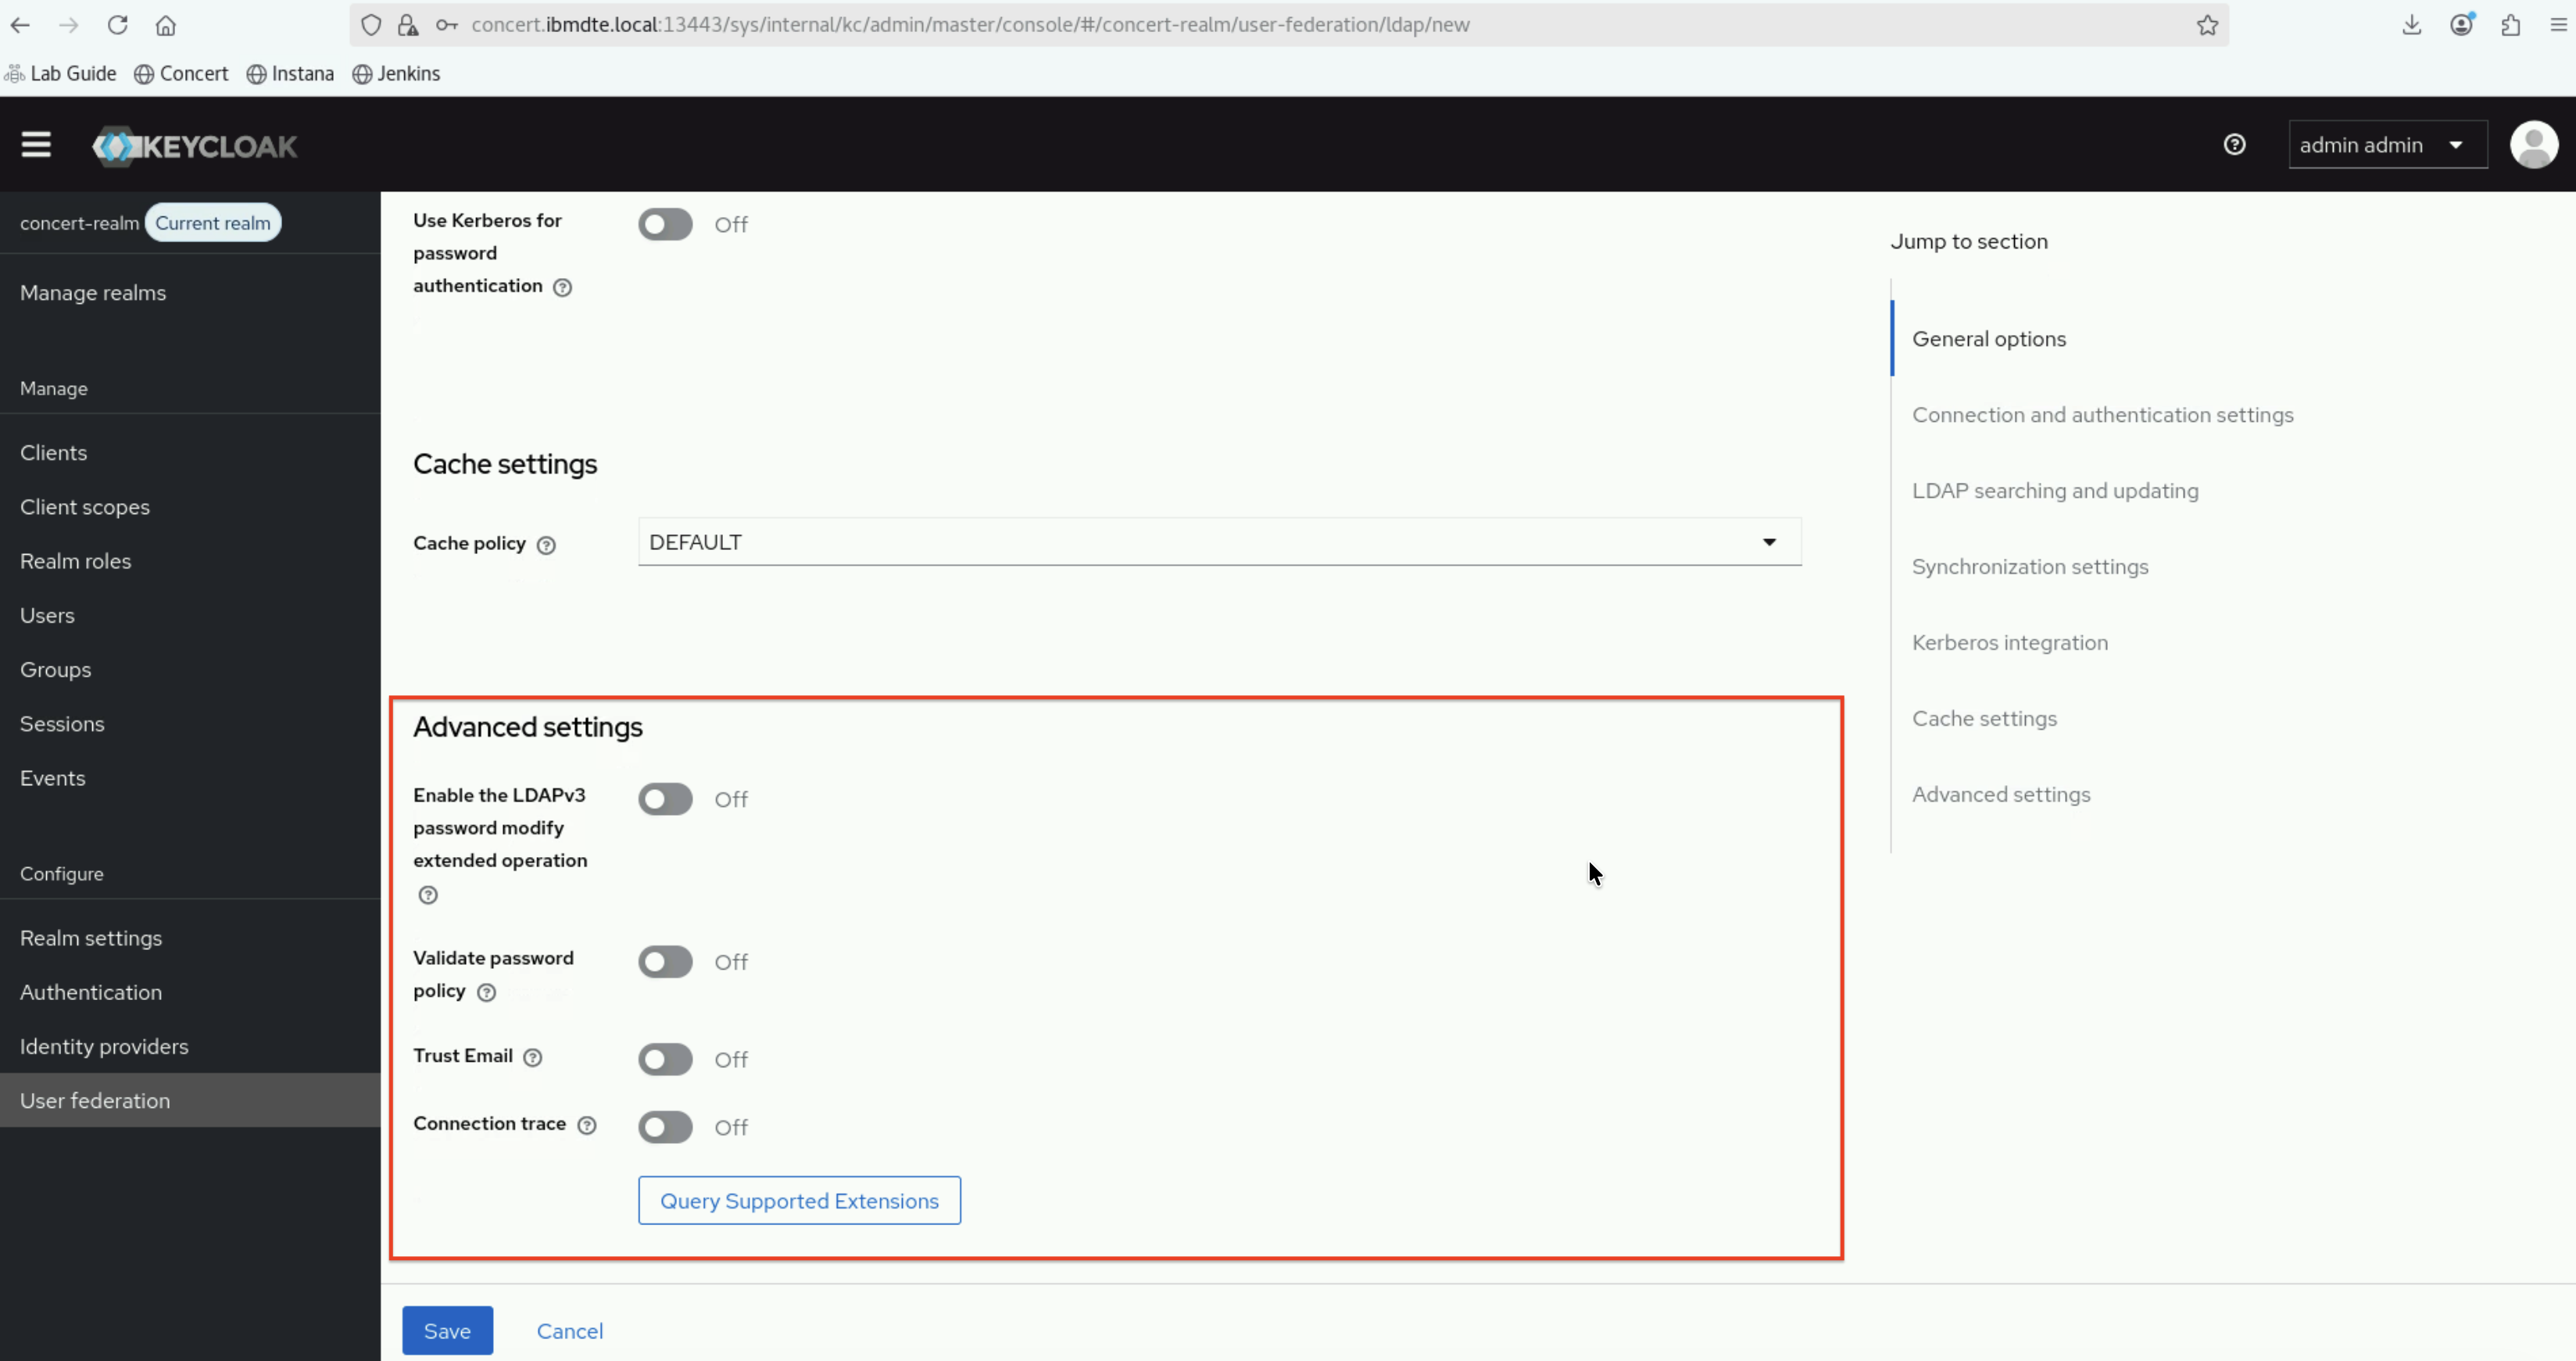
5.5.2.8: Advanced settings
- Enter the following values:
- Enable the LDAPv3 password modify extended operation:
OFF - Validate password policy:
OFF - Trust Email:
OFF - Connection trace:
OFF
- Enable the LDAPv3 password modify extended operation:
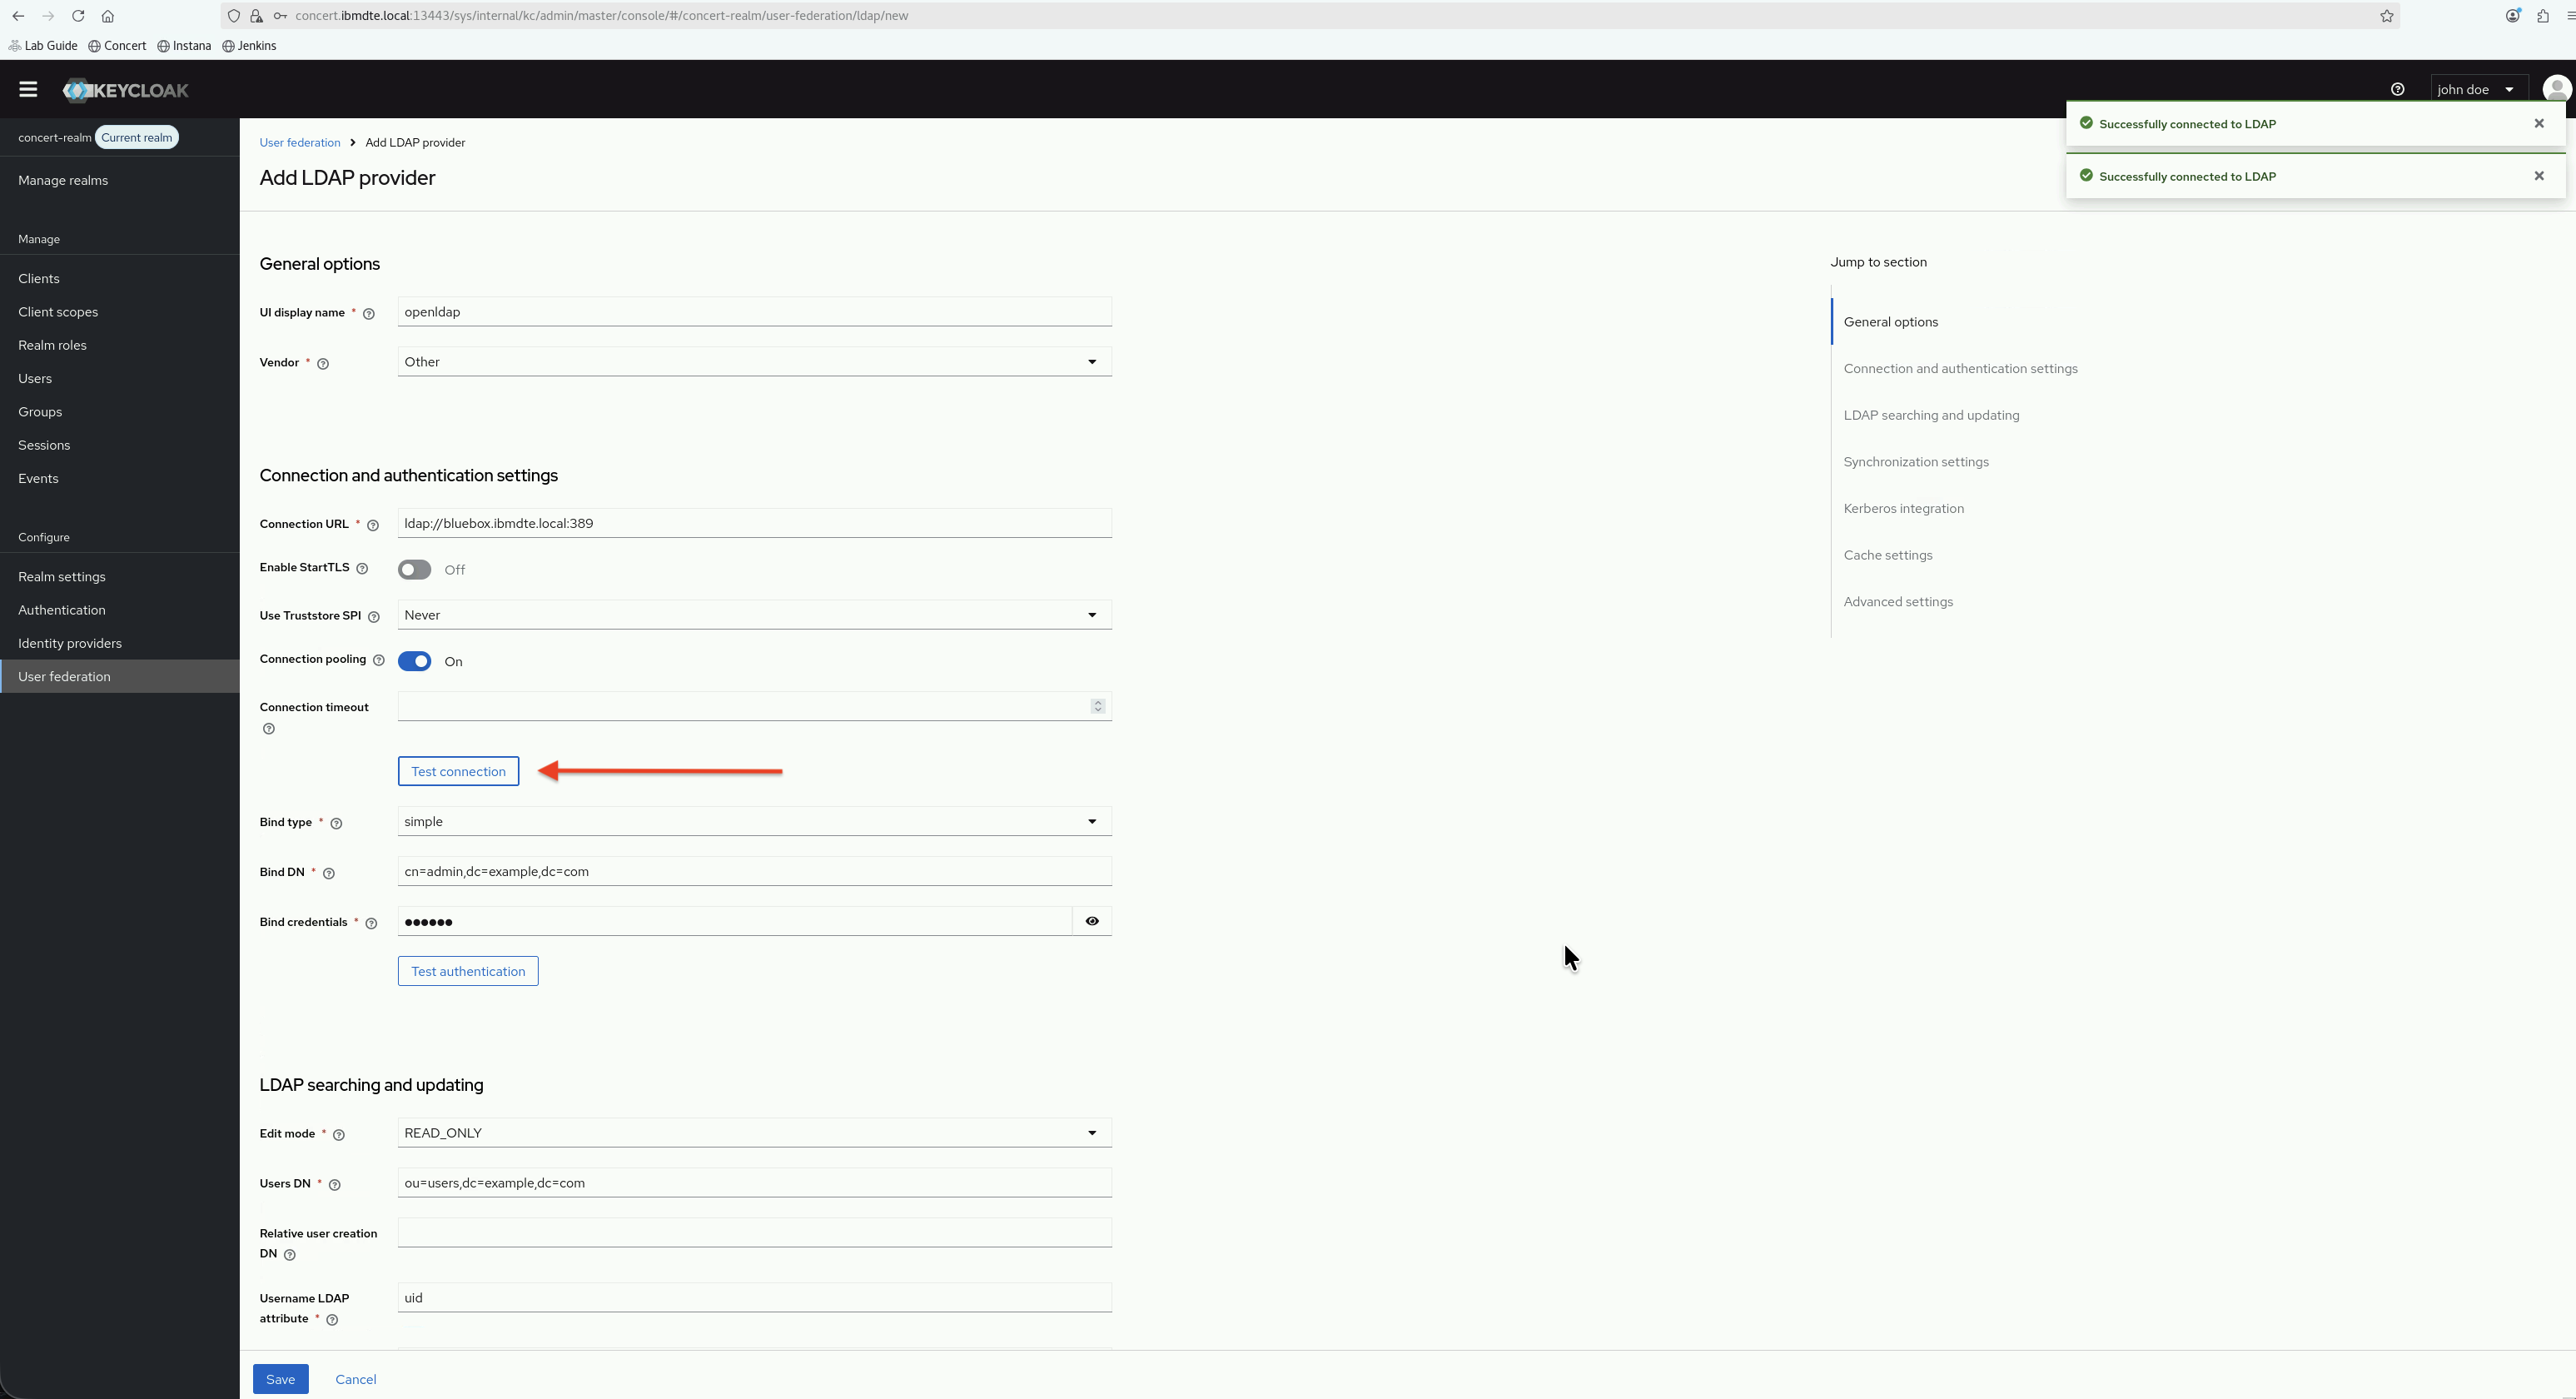
5.5.3: Test LDAP Connection
Before saving, test the connection:
- Scroll down to find the Test connection button
- Click Test connection
- You should see a success message: "Successfully connected to LDAP"
If the connection test fails:
- Verify OpenLDAP service is running on the openldap host
- Check the Connection URL is correct
- Verify the Bind DN and Bind Credential are correct
- Ensure that RHEL iptables allows connections on port 389
5.5.4: Test Authentication
After testing the connection, test authentication:
- Click Test authentication
- You should see a success message: "Successfully connected to LDAP"
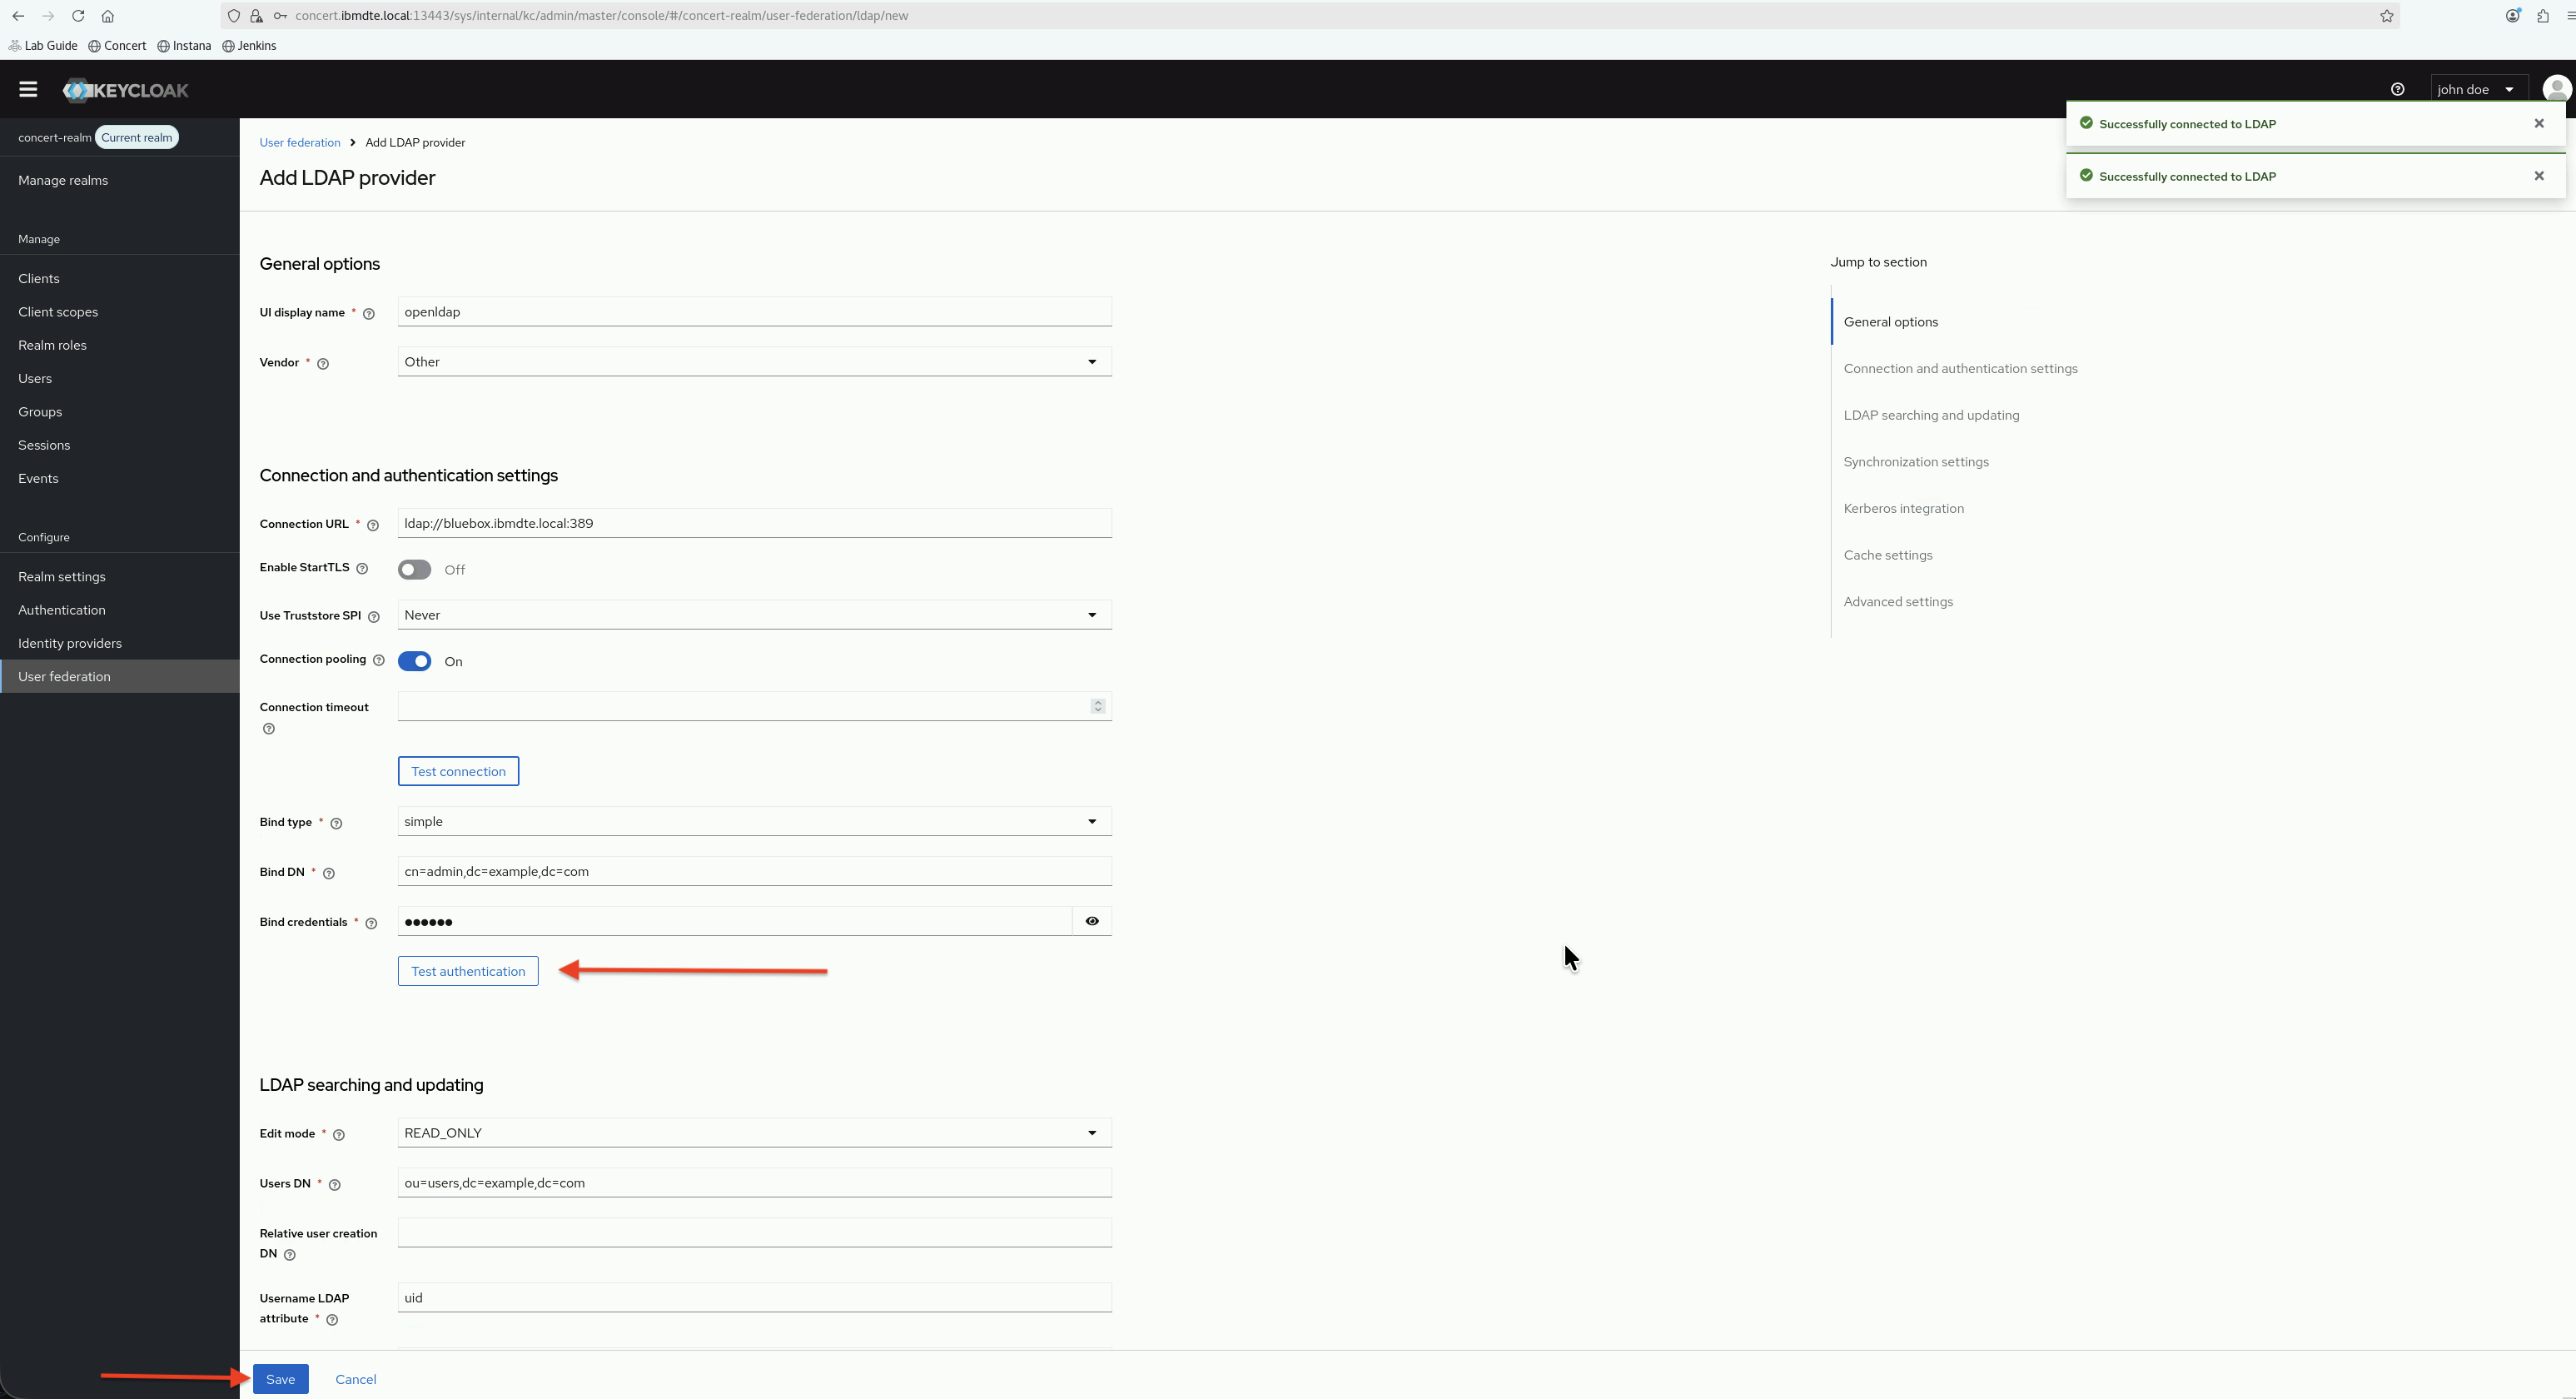
5.5.5: Save Configuration
- Scroll to the top or bottom of the page
- Click Save
You should see a success message indicating the LDAP provider was created.
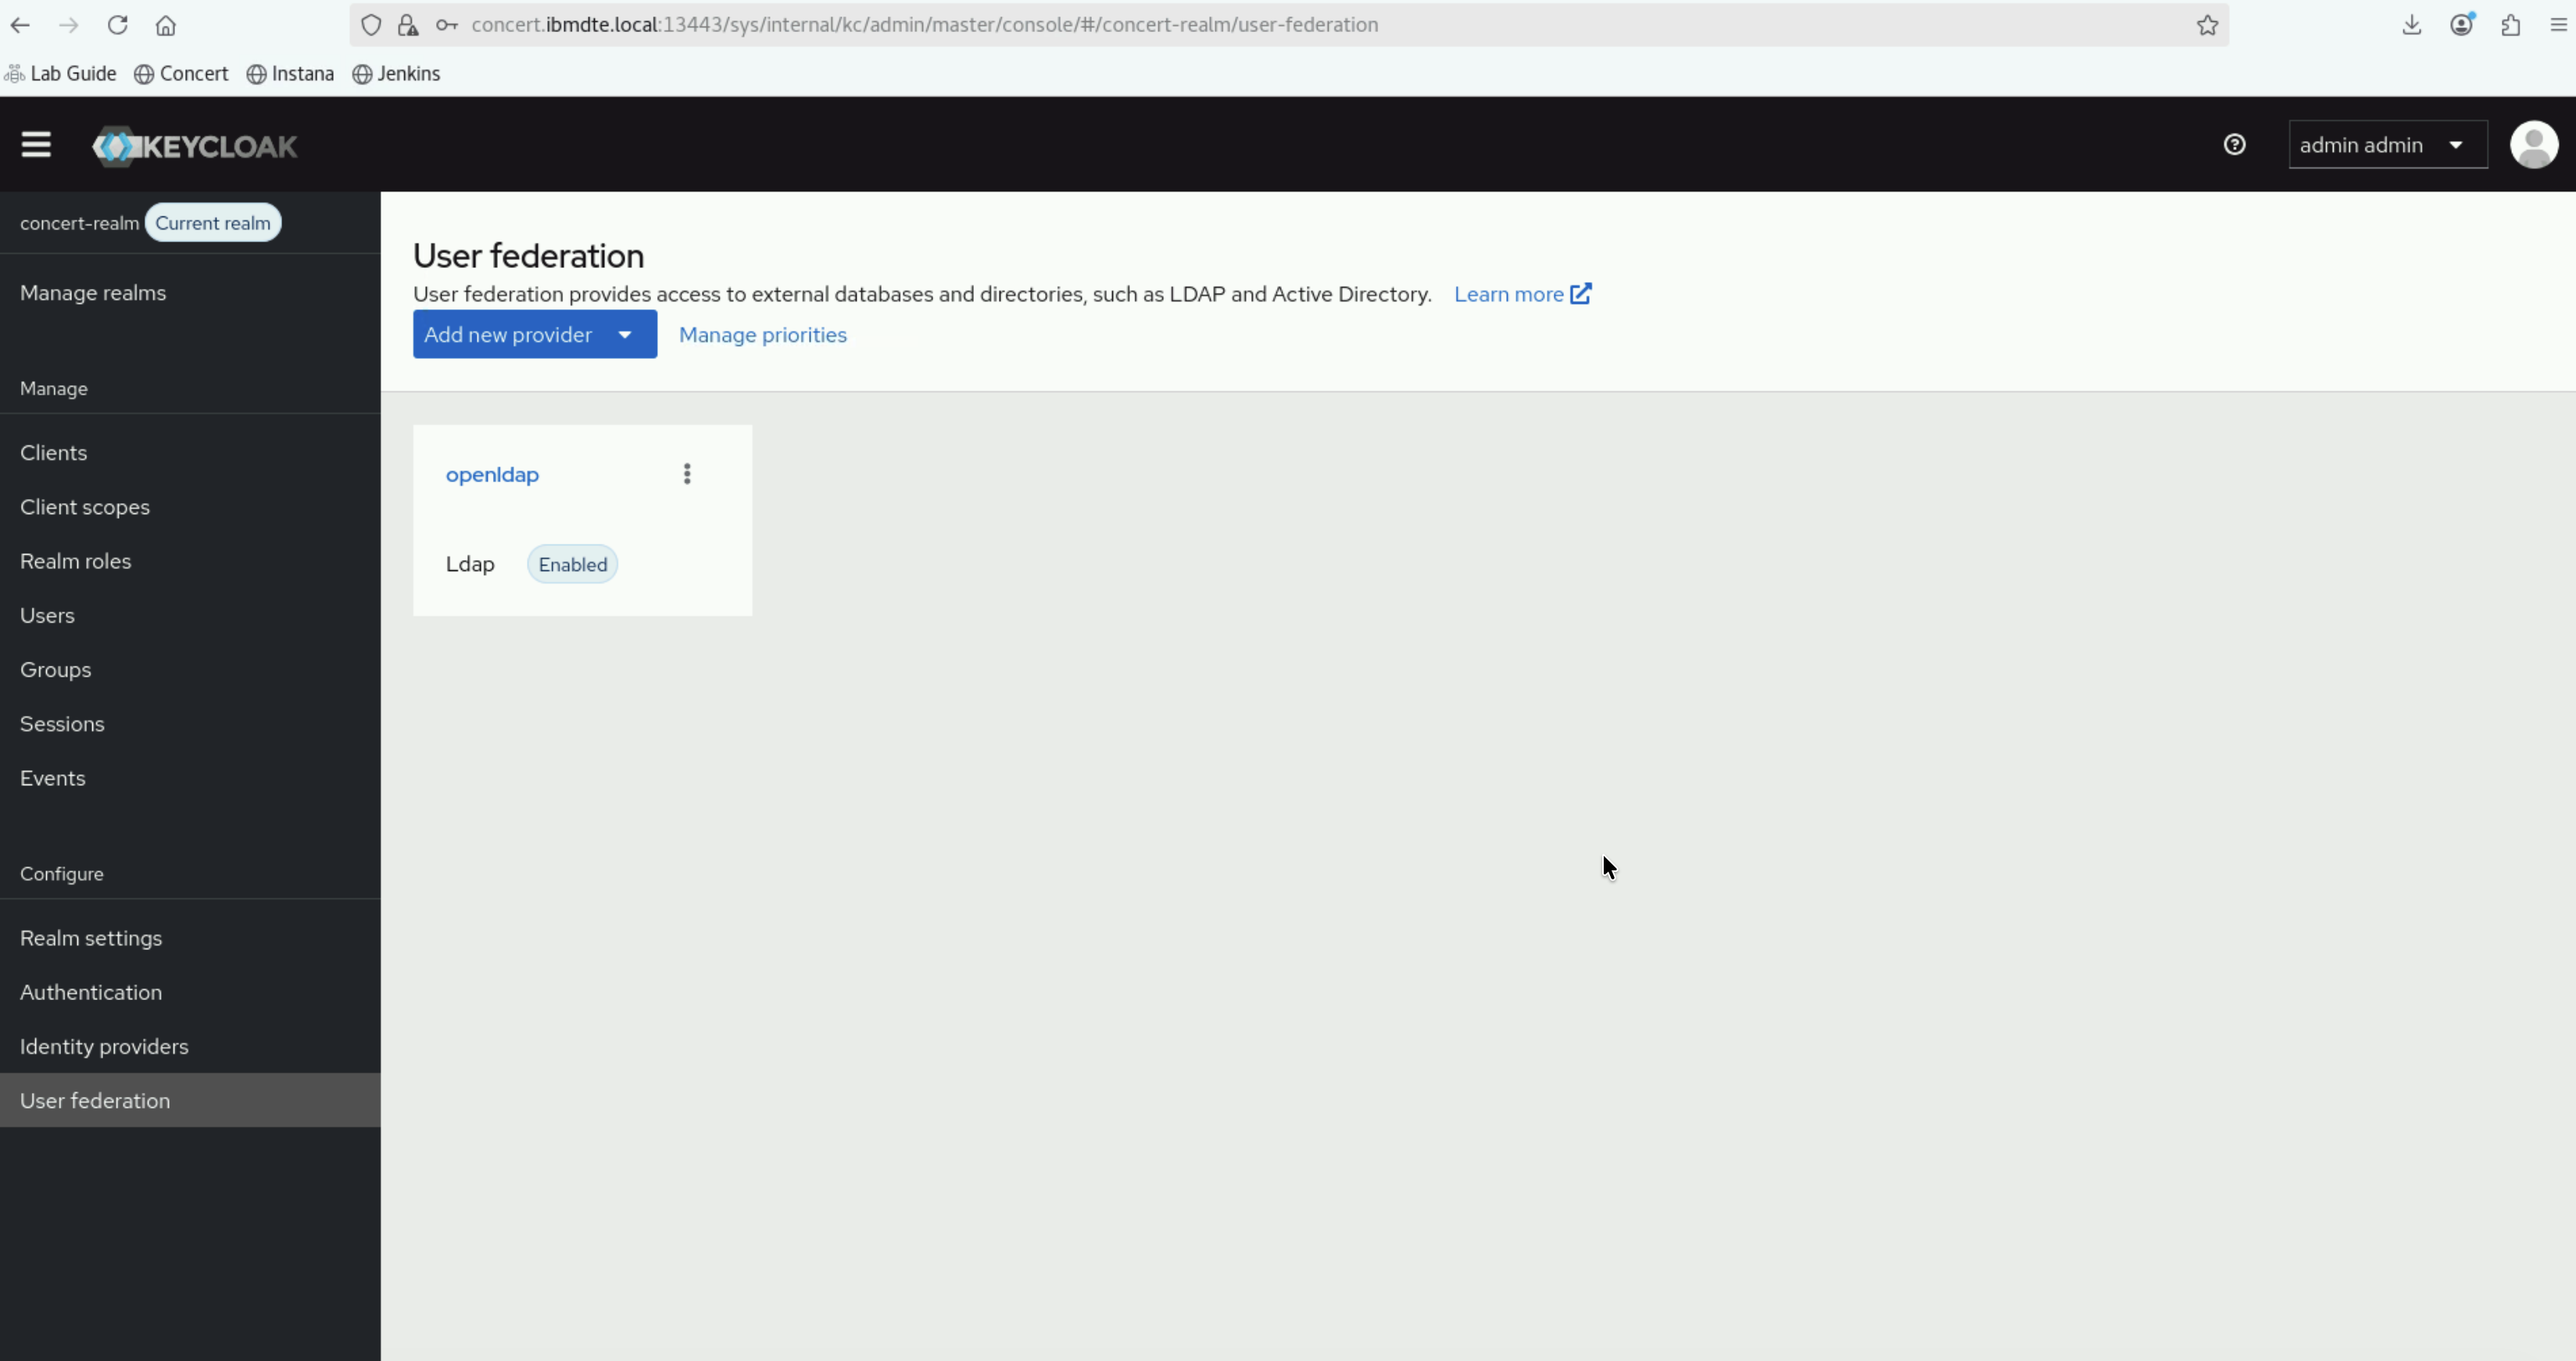
Finally, after saving the configuration, you will be able to see openldap in a tile under User federation UI.
5.6: Synchronize Users from LDAP
Now that openldap User Federation has been configured, synchronize users from OpenLDAP to Keycloak.
5.6.1: Perform Initial Sync
- On the User federation page, click openldap tile
- On openldap settings, click Action drop down
- Click Sync all users
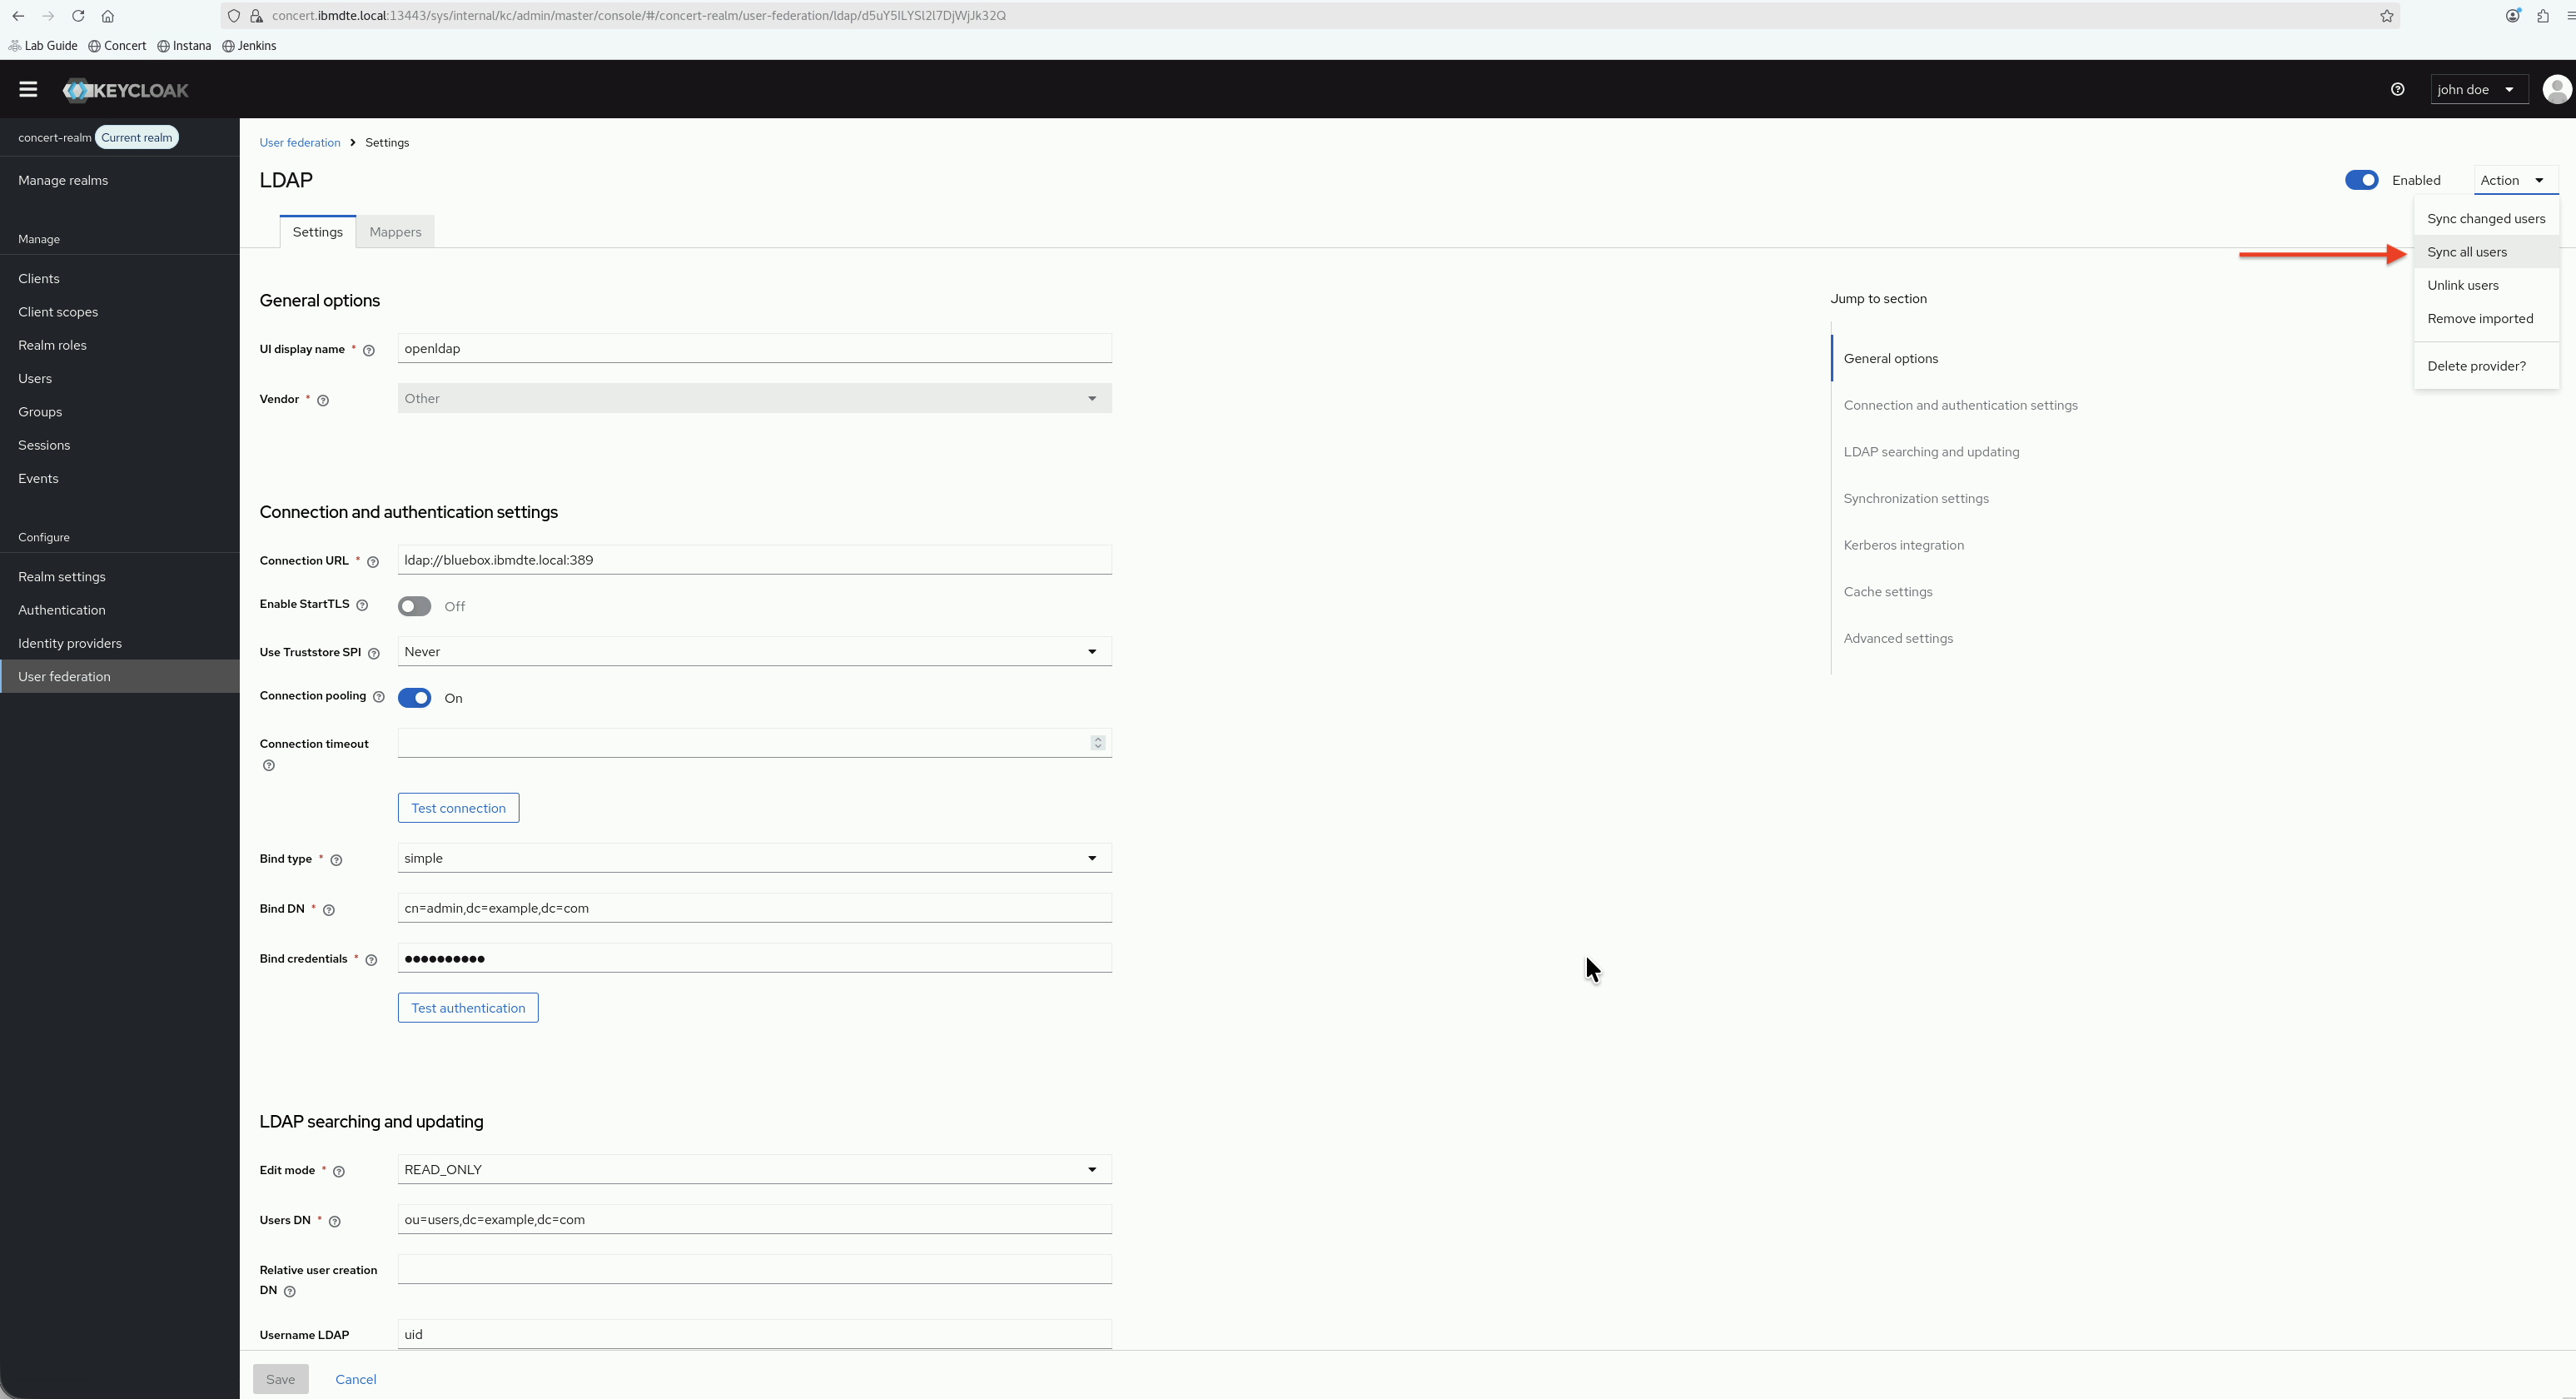
- Wait for the synchronization to complete

- You should see a message indicating how many users were synchronized (should be 3: alice, bob, charlie)
5.6.2: Verify Users in Keycloak
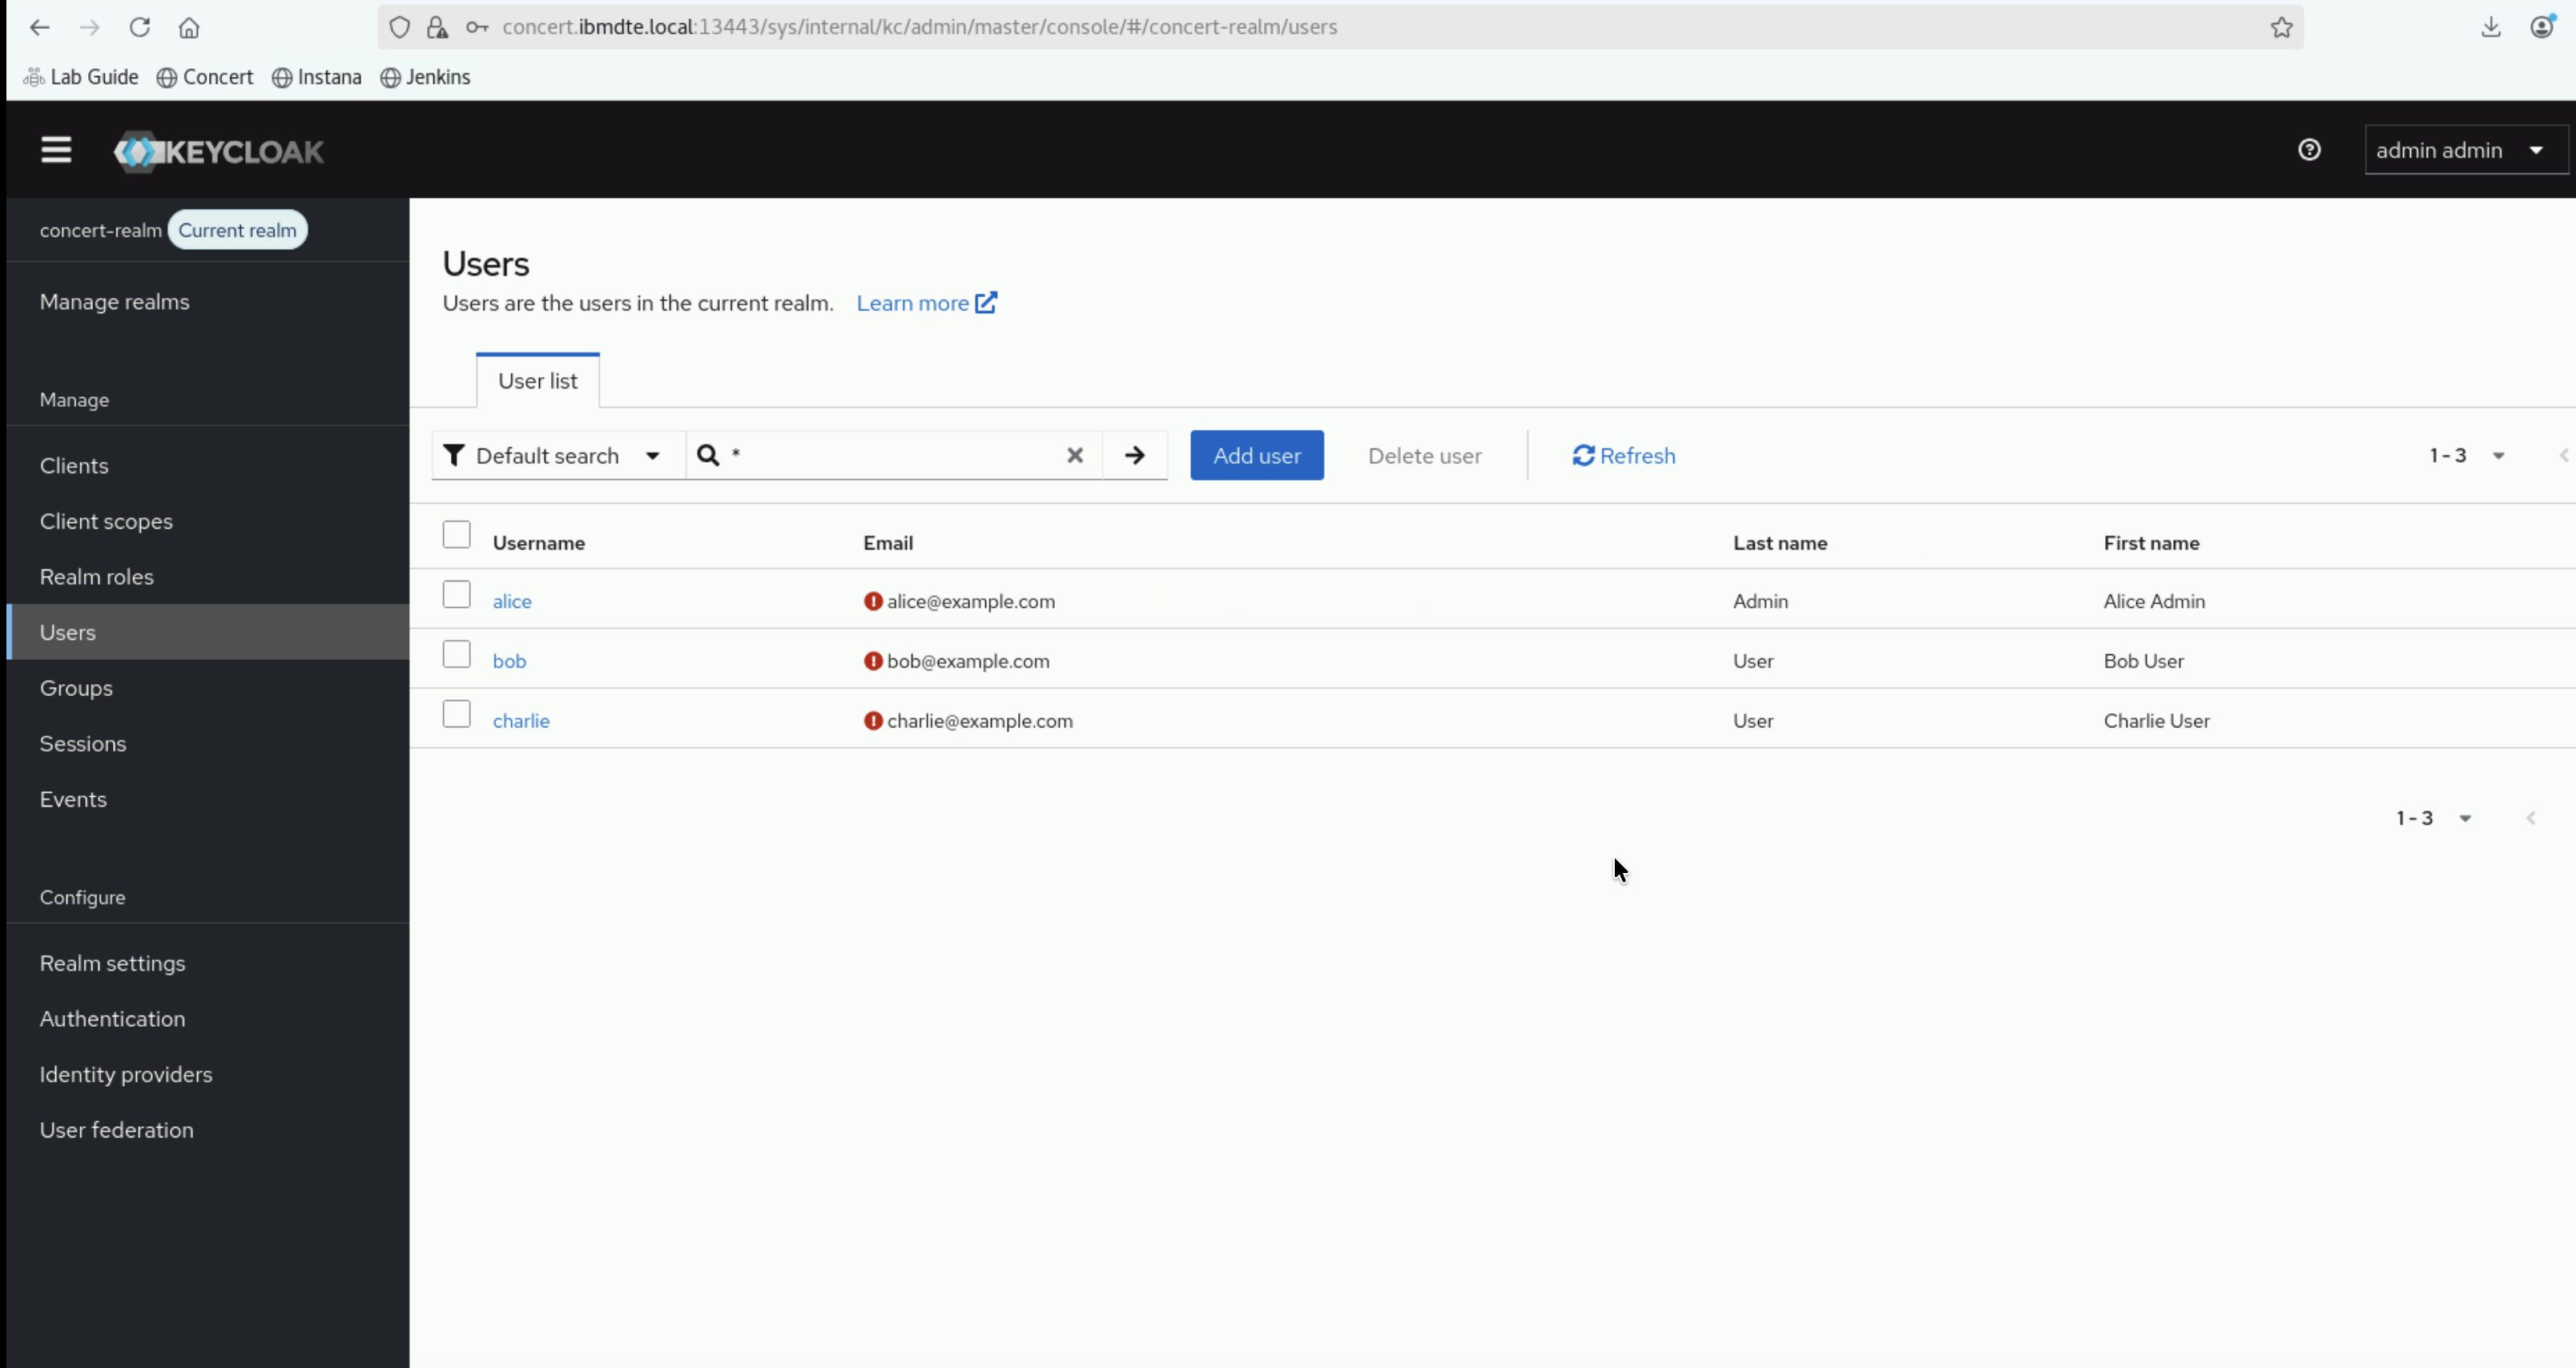
- In the left navigation menu, click Users
- Enter
*in the search box, next to magnifying glass, and clickReturnkey - You should see three users:
alice,bob, andcharlie
5.6.3: Inspect User Details
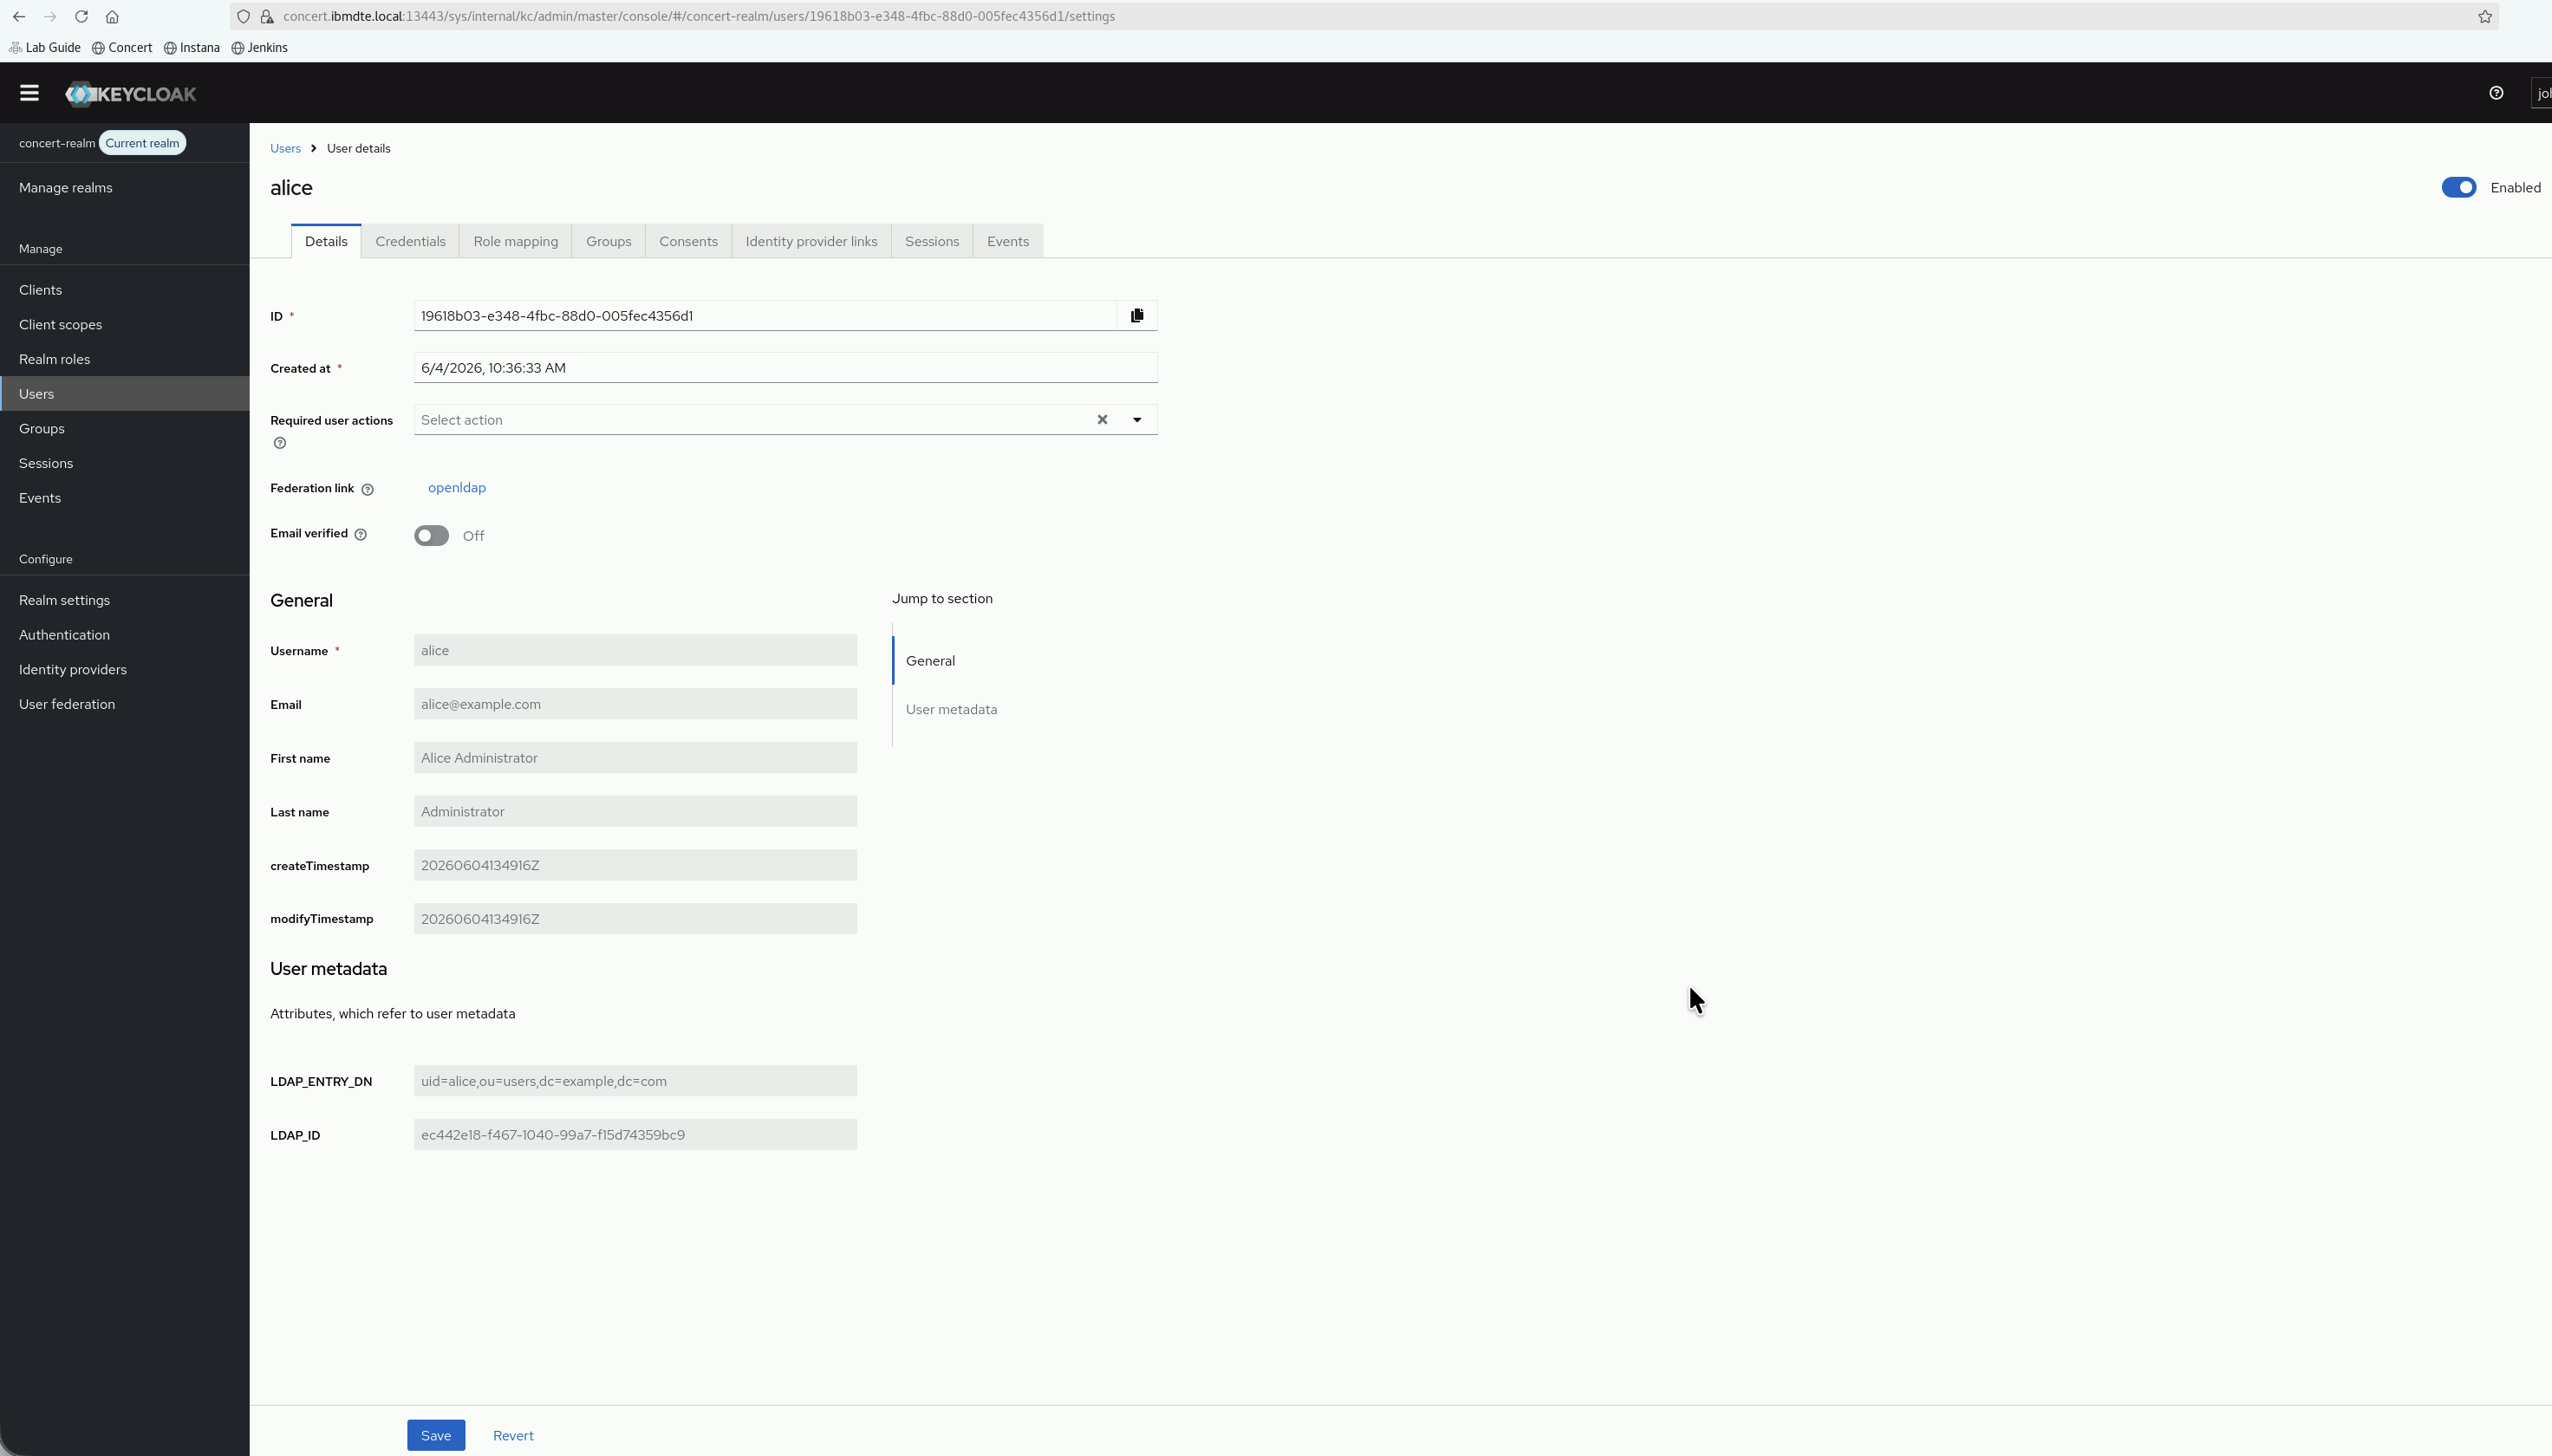
Click on one of the users (e.g., alice) to view details:
-
Details tab shows:
- Username: alice
- Email: alice@example.com
- First Name: Alice
- Last Name: Administrator
- Federation Link: openldap
-
Credentials tab shows:
- Password is managed by LDAP (cannot be changed in Keycloak)
-
Attributes tab shows:
- LDAP attributes imported from OpenLDAP
5.7: Configure LDAP Mappers
Mappers define how LDAP attributes are mapped to Keycloak user attributes. We will configure mappers for user attributes and group membership.
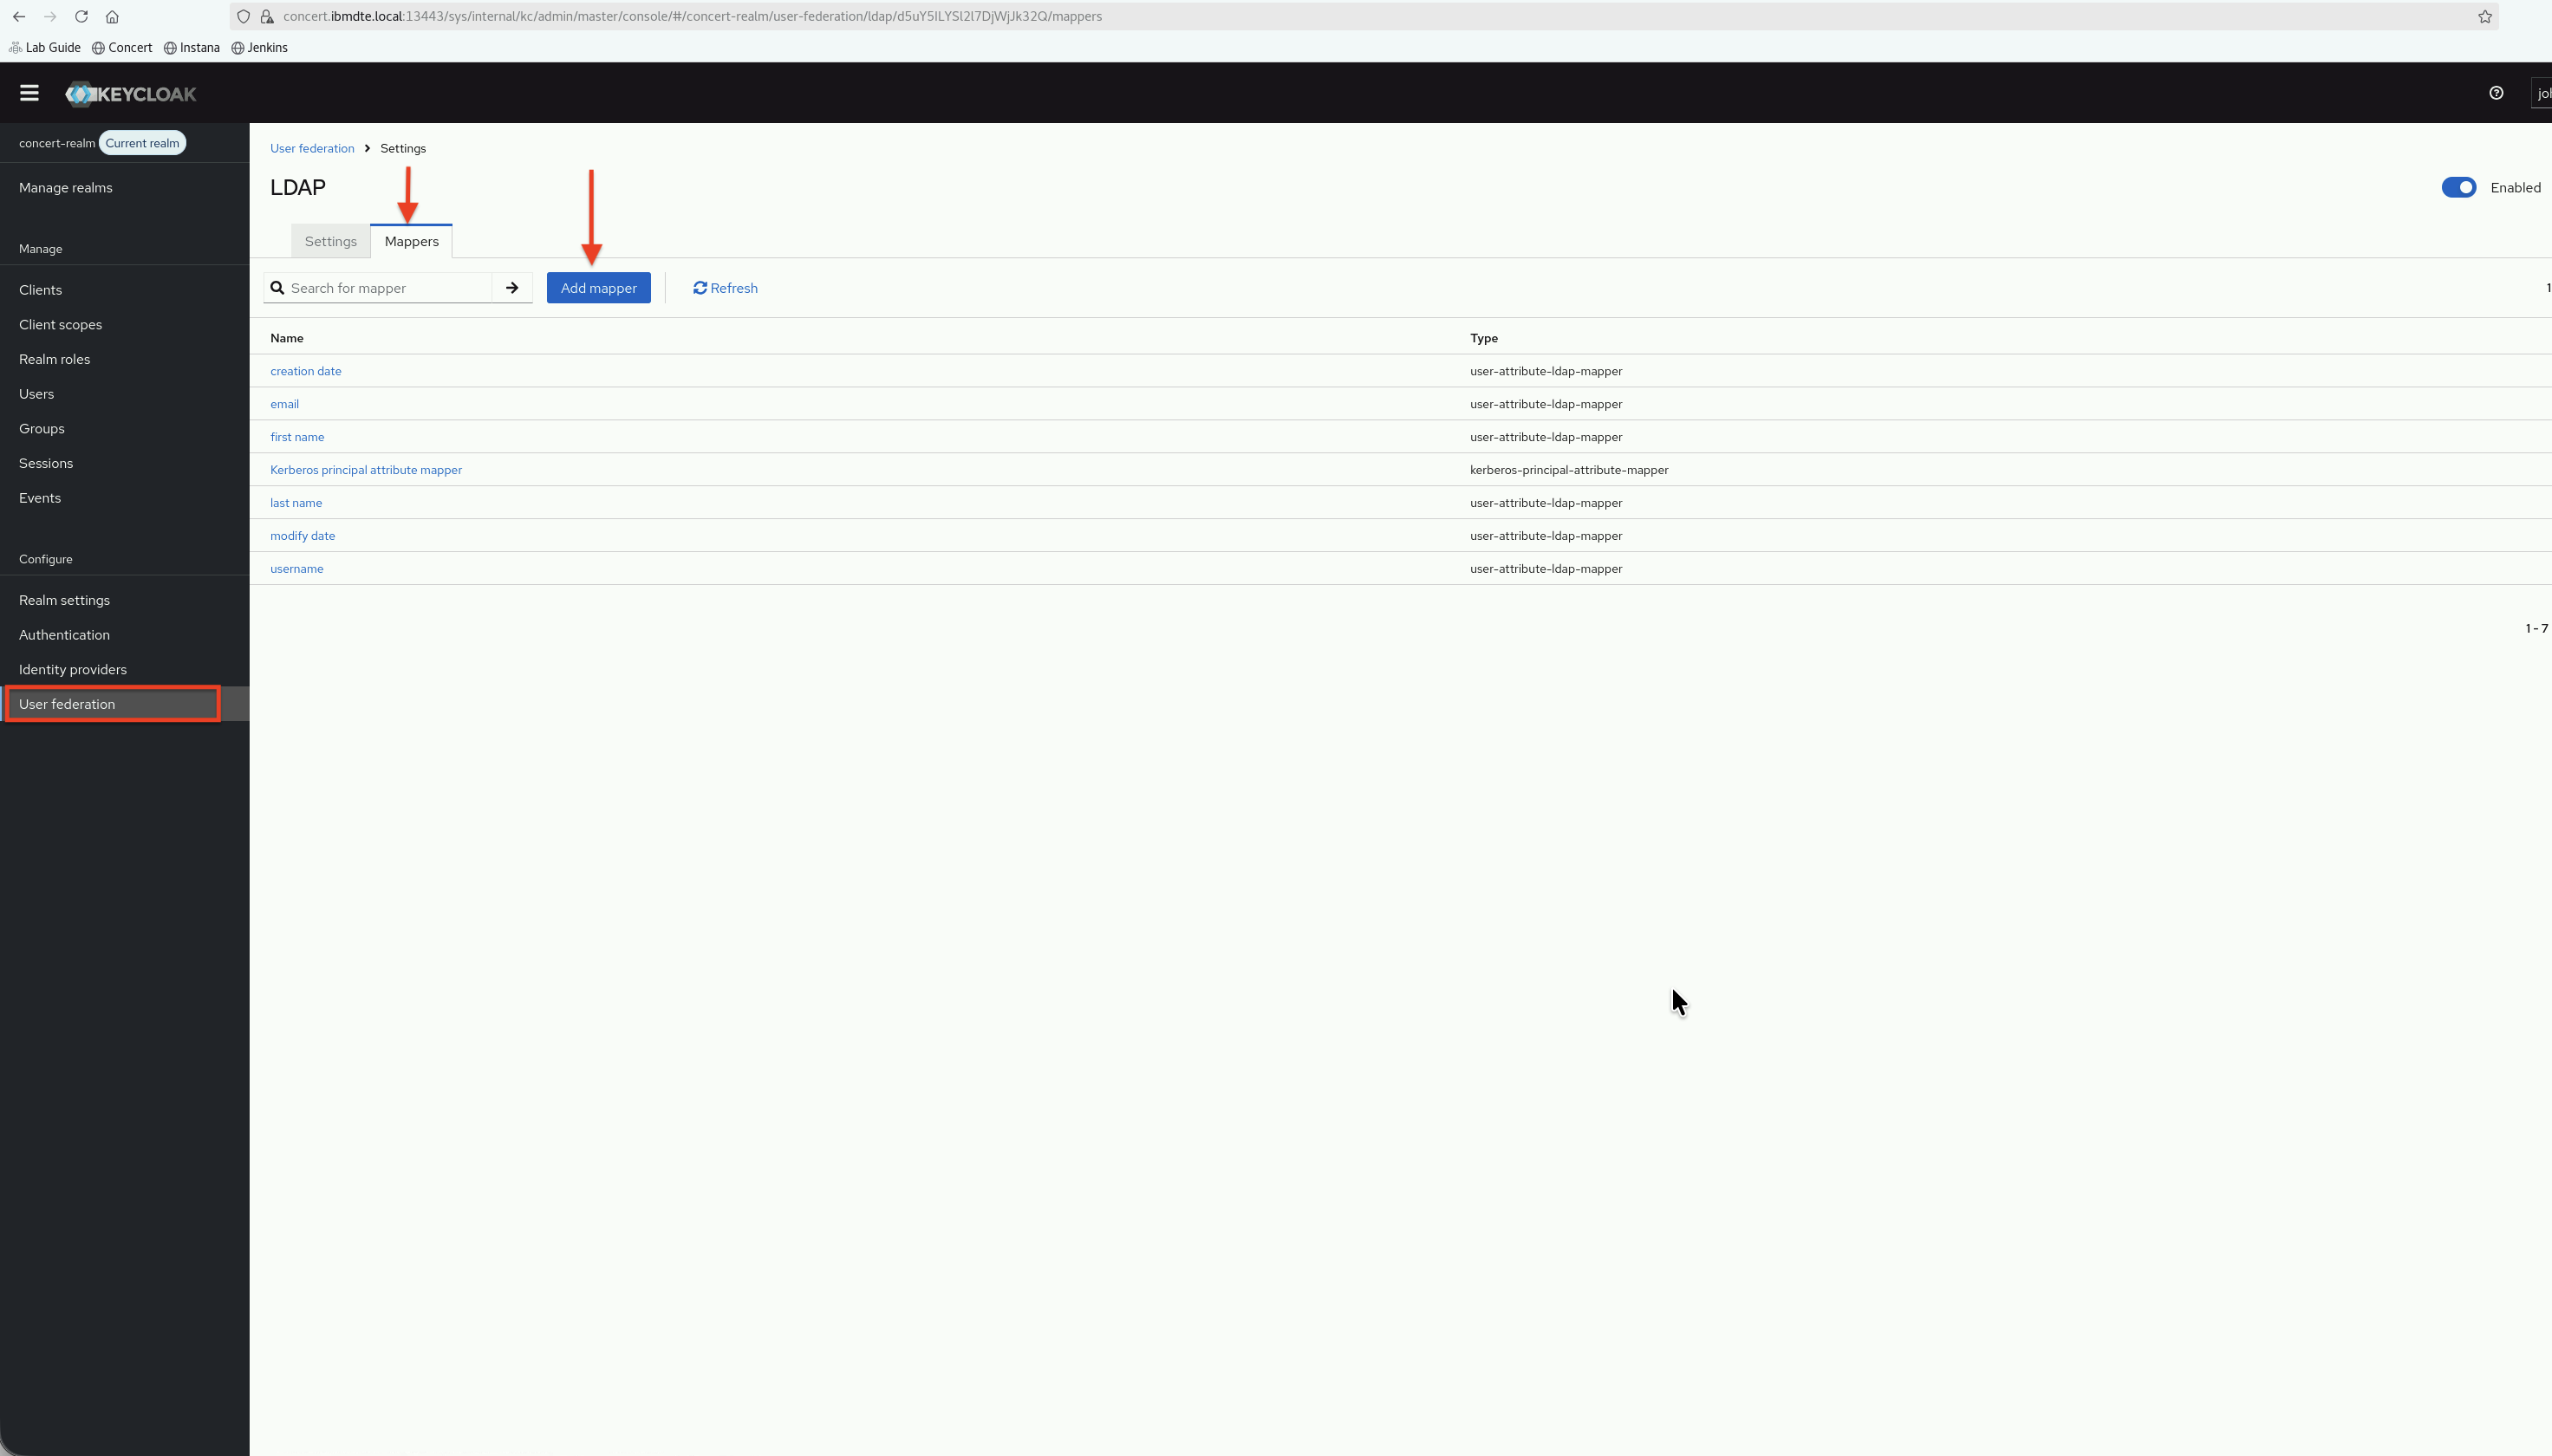
5.7.1: Navigate to Mappers
- Go back to User Federation → openldap
- Click the Mappers tab
- You'll see several default mappers already created
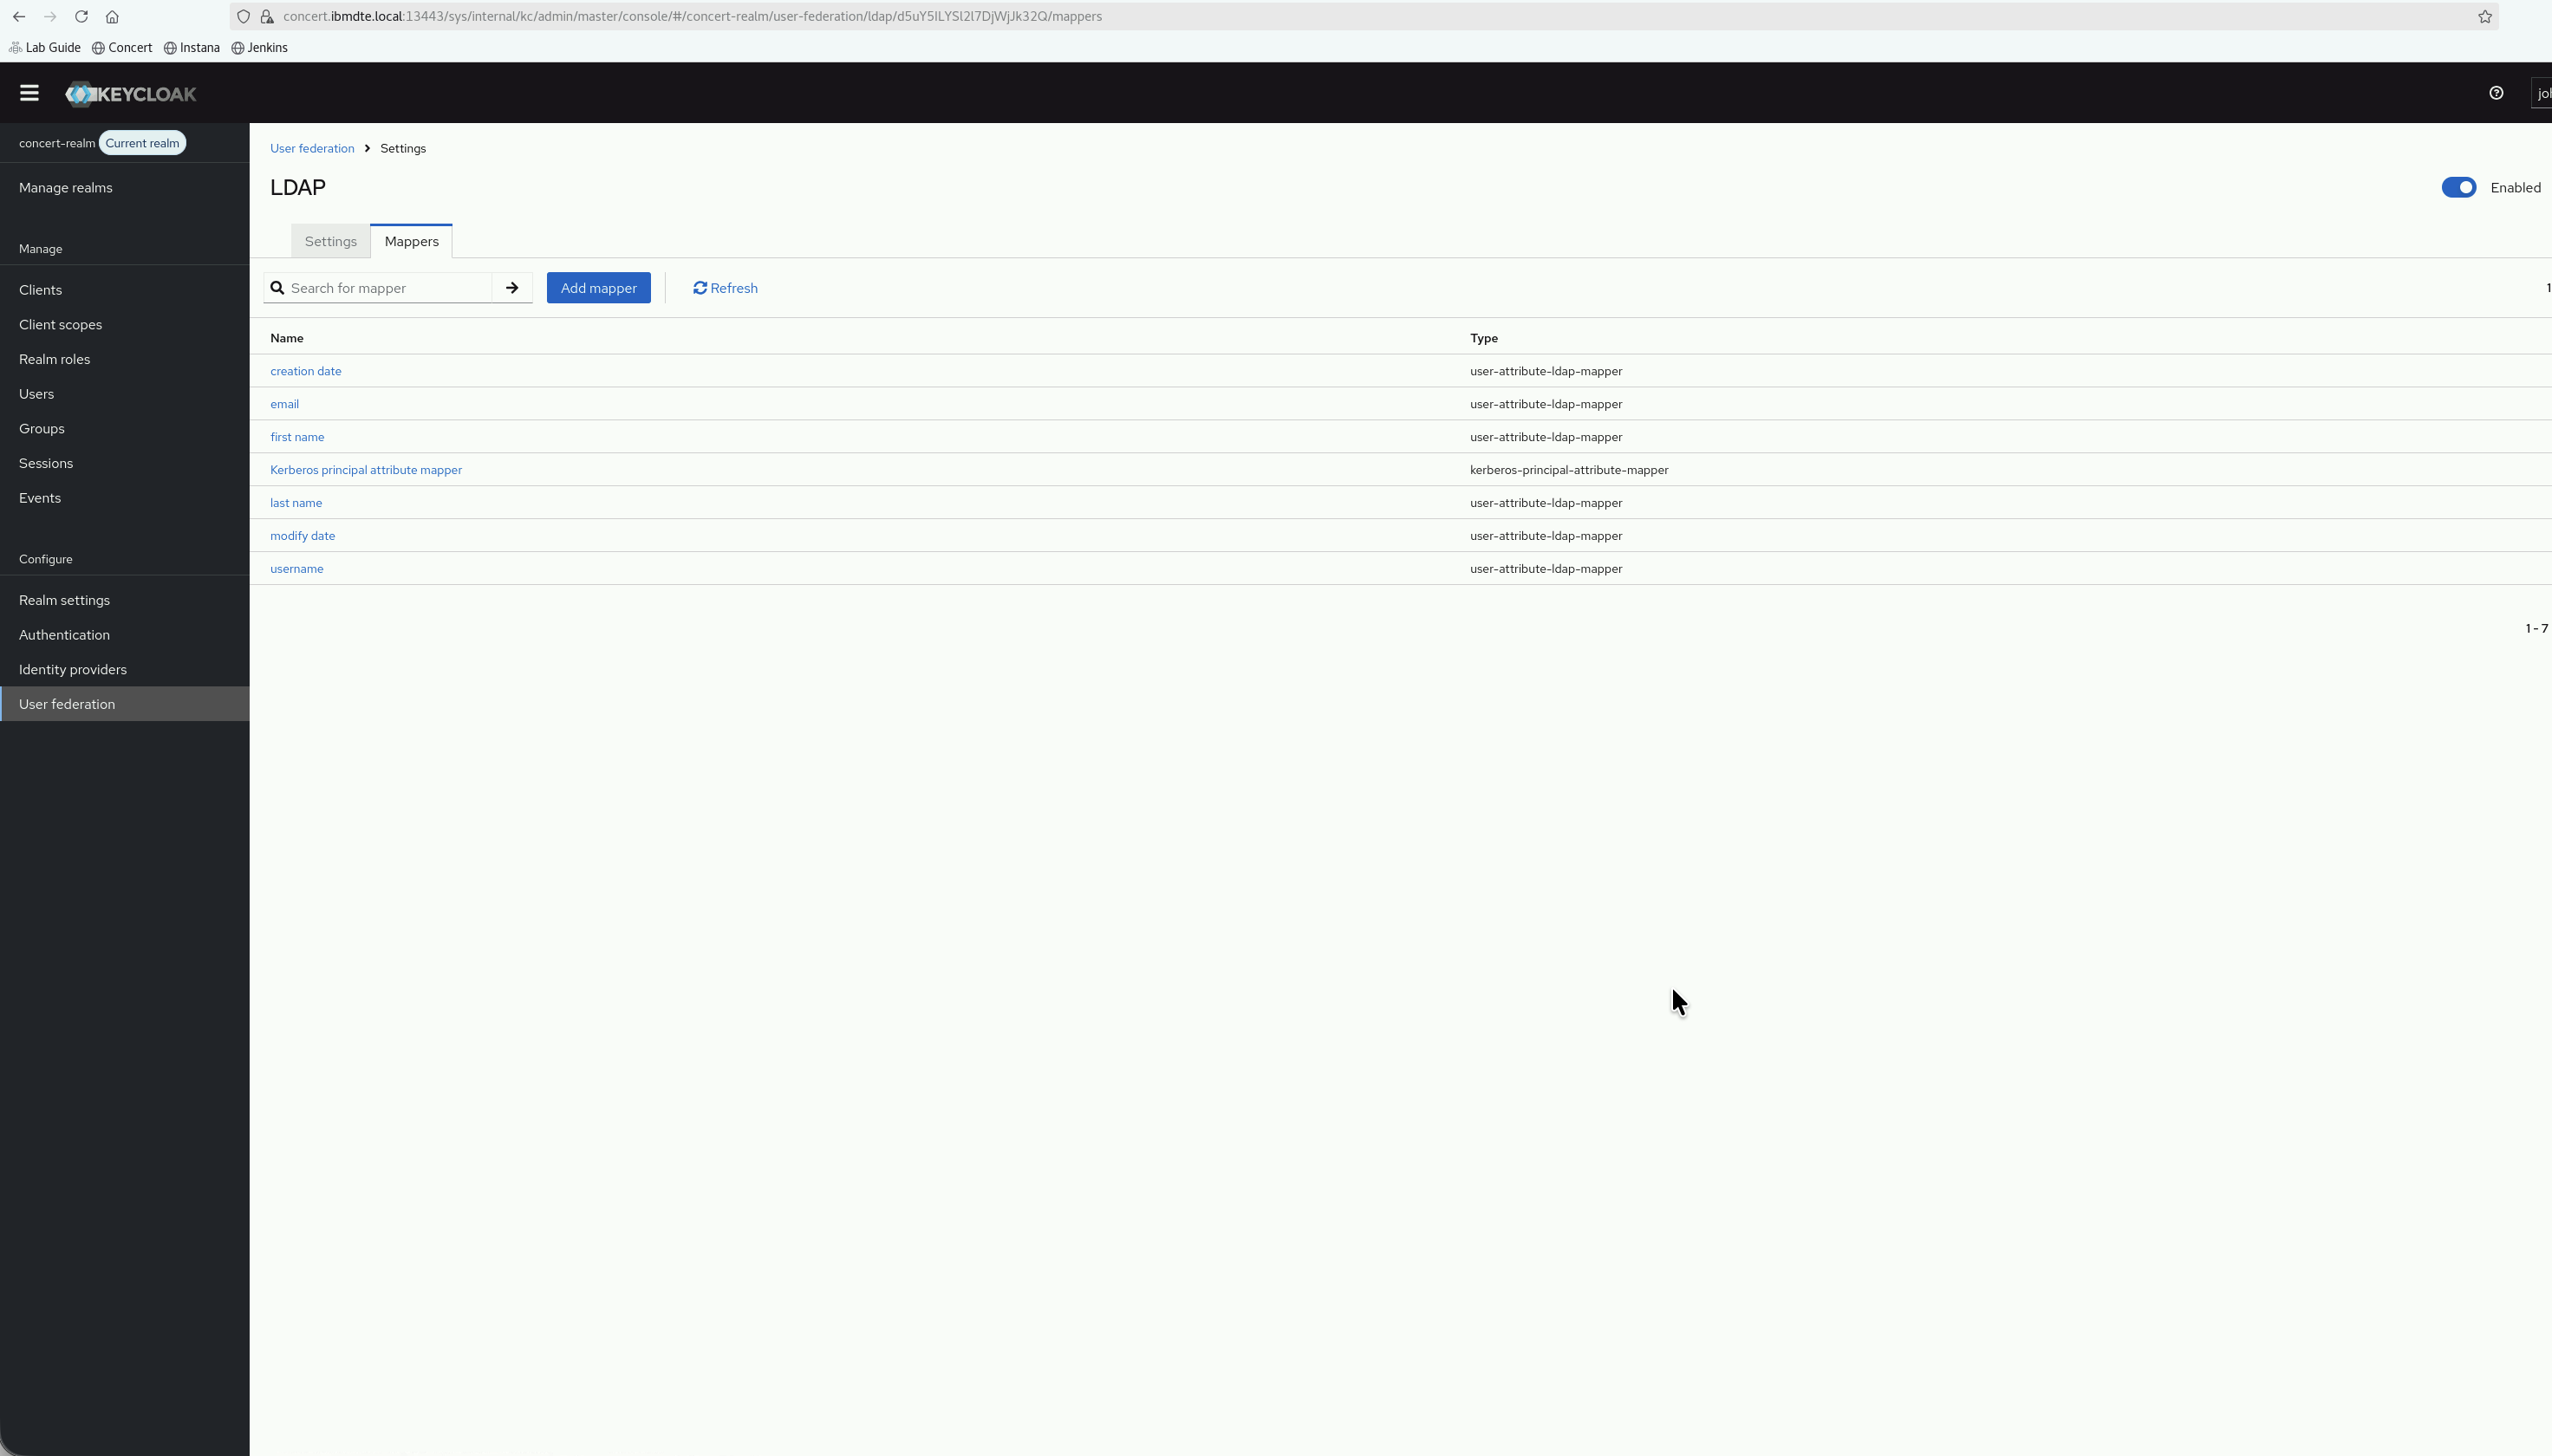
5.7.2: Review Default Mappers
Keycloak creates several default mappers automatically such as:
| Mapper Name | Type | Description |
|---|---|---|
| username | user-attribute-ldap-mapper | Maps uid to username |
| user-attribute-ldap-mapper | Maps mail to email | |
| first name | user-attribute-ldap-mapper | Maps cn to first name |
| last name | user-attribute-ldap-mapper | Maps sn to last name |
| creation date | user-attribute-ldap-mapper | Maps createTimestamp |
| modify date | user-attribute-ldap-mapper | Maps modifyTimestamp |
These default mappers are sufficient for basic user attributes.
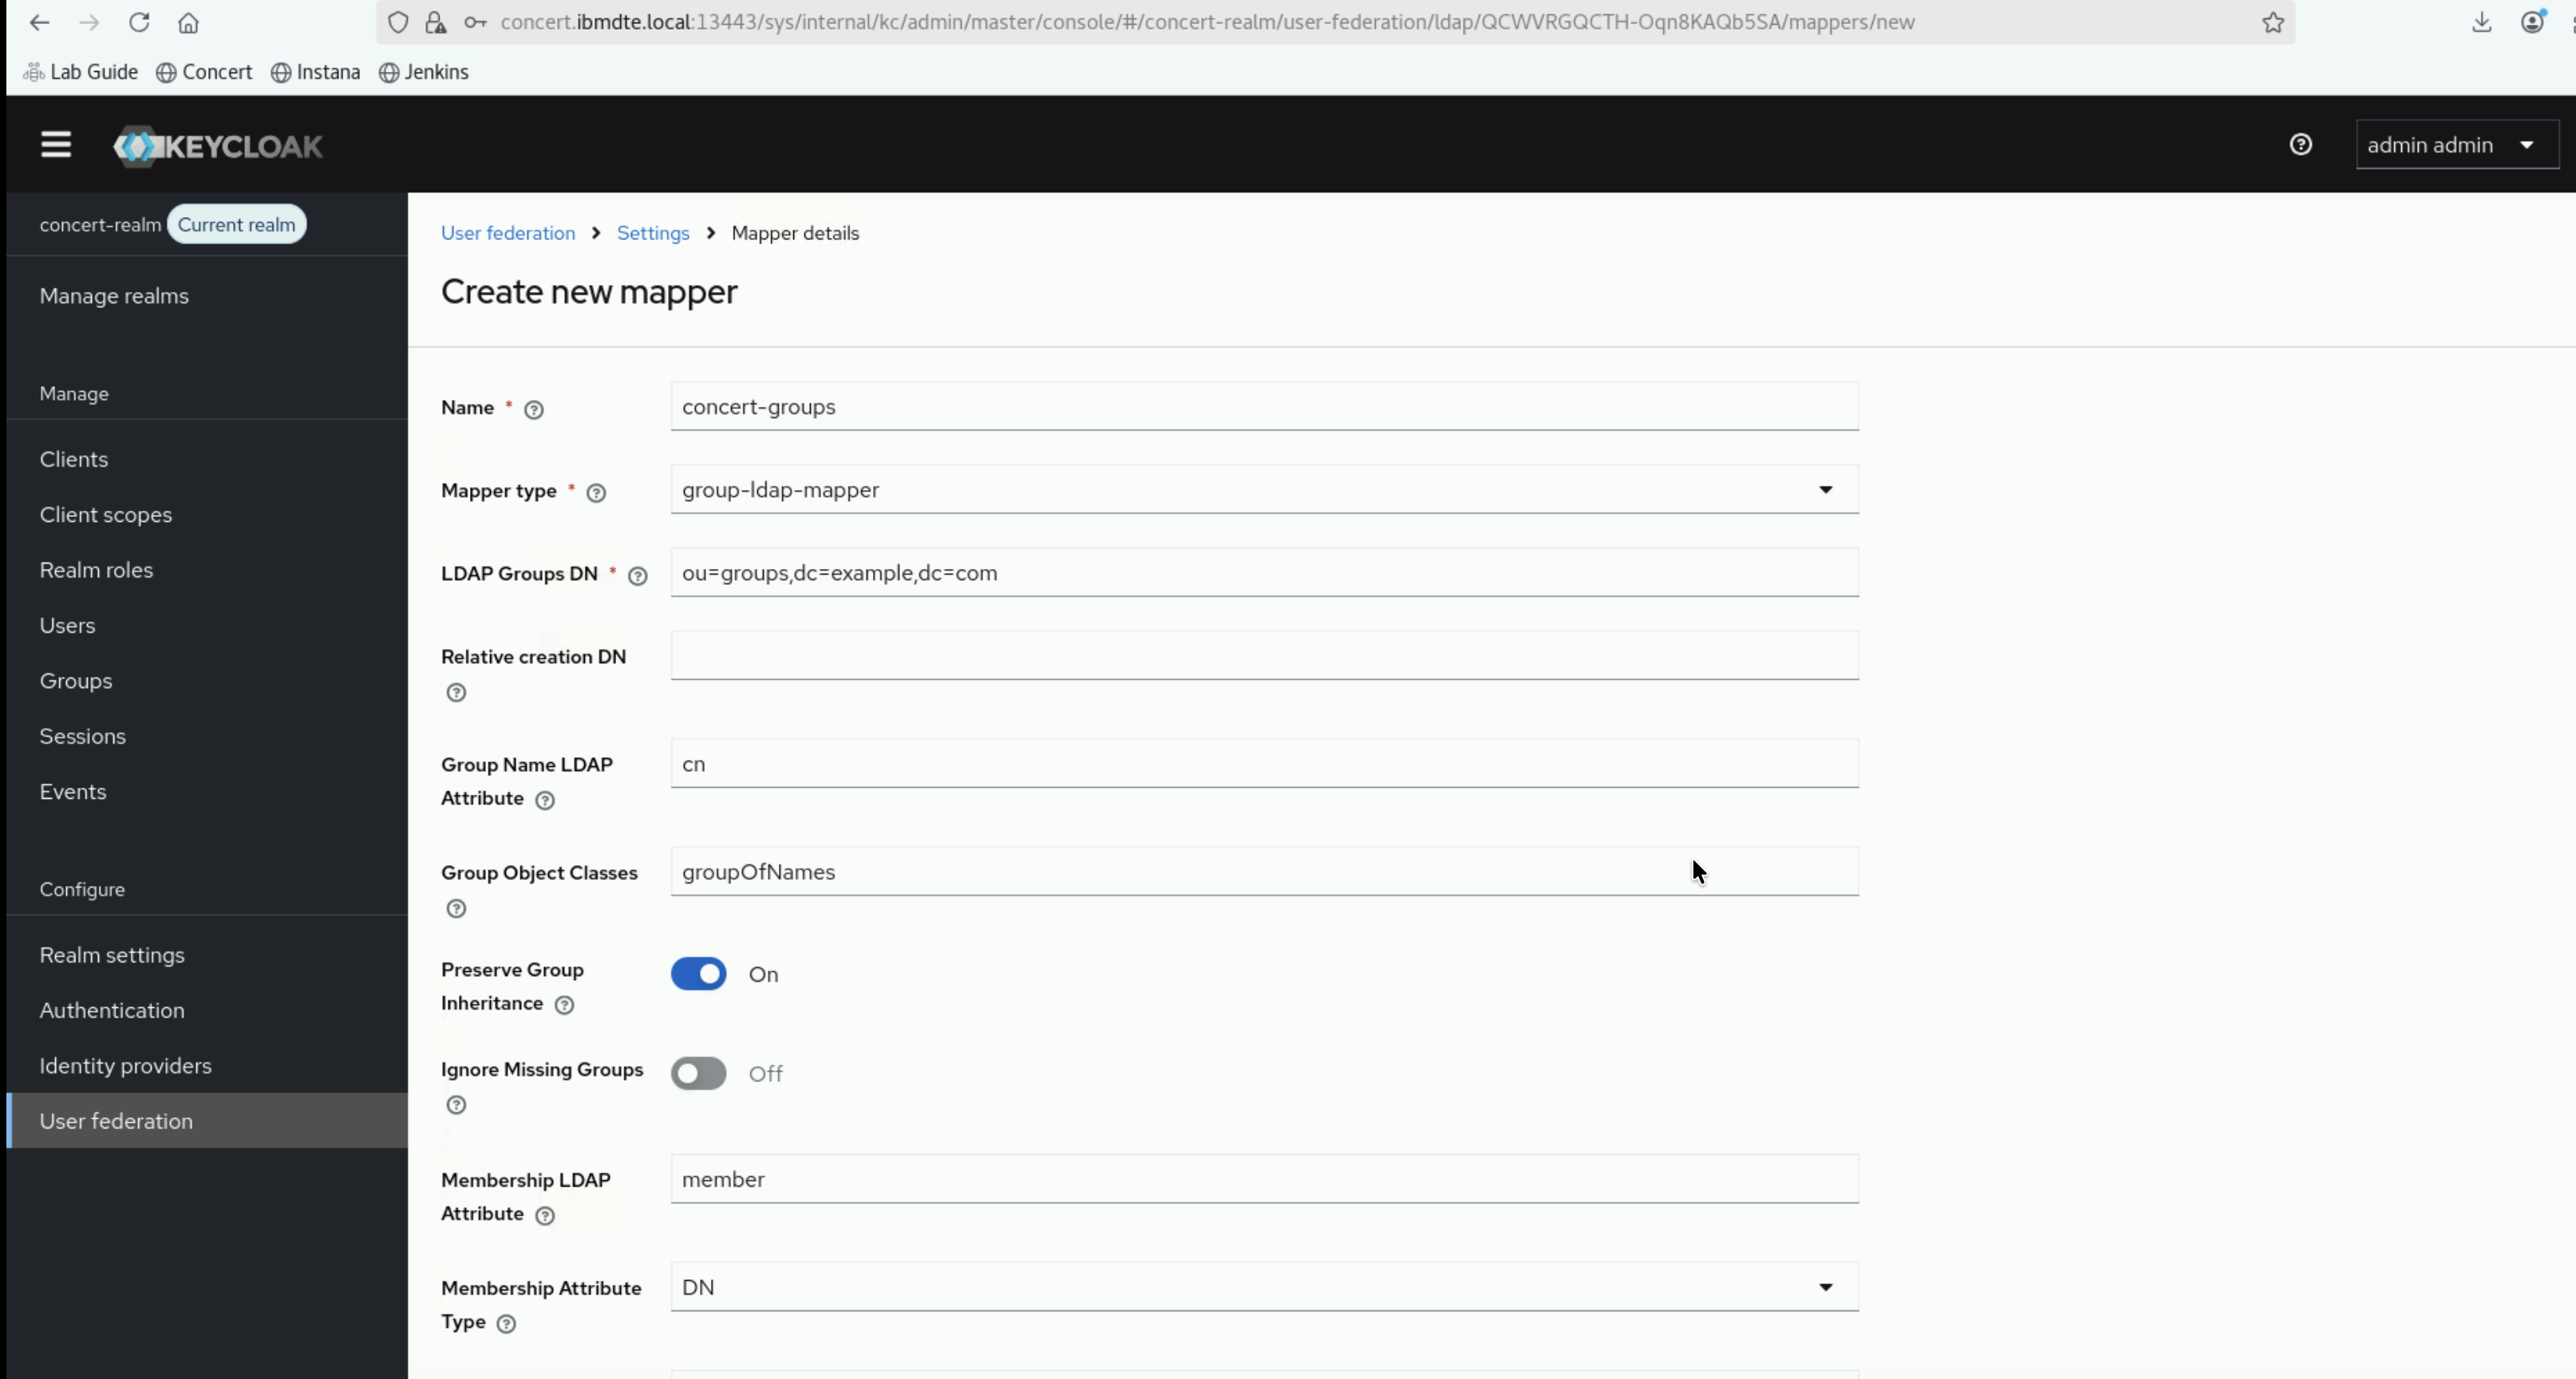
5.7.3: Create Group Mapper
Now, we will create a mapper to import LDAP groups as Keycloak groups:
- Click Add mapper
- Select group-ldap-mapper from the mapper type dropdown

-
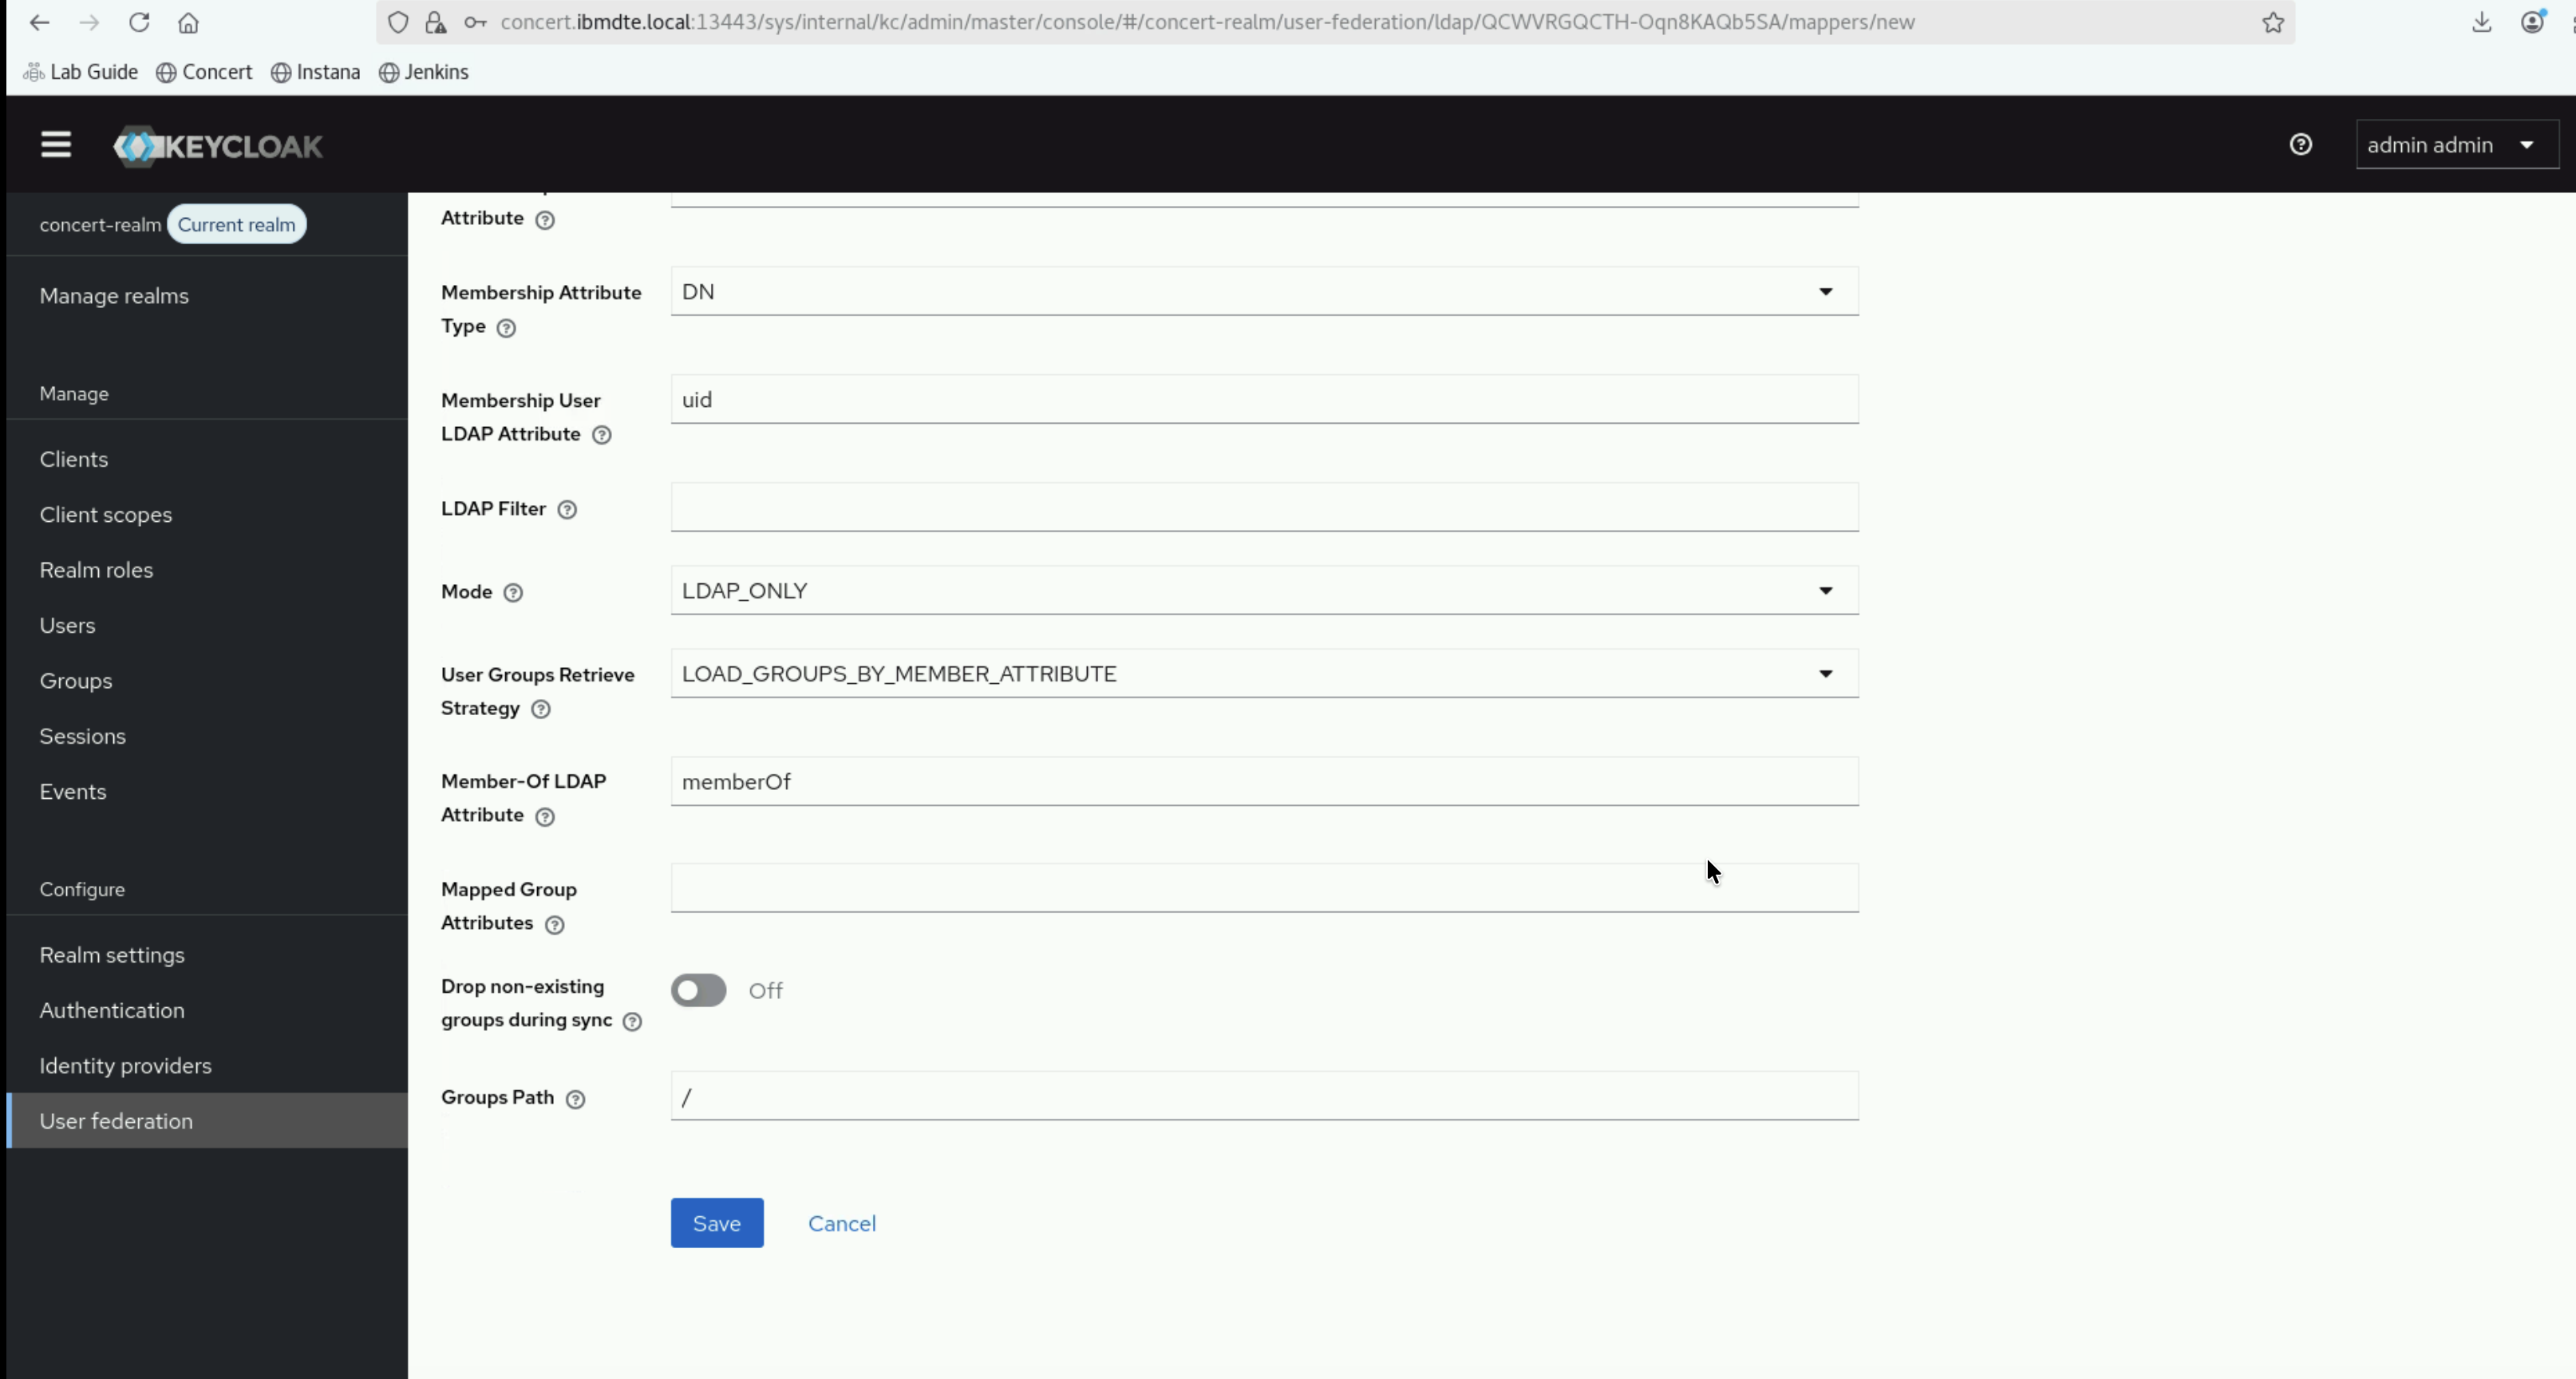
Enter the following values for the new mapper:
- Name:
concert-groups - LDAP Groups DN:
ou=groups,dc=example,dc=com - Relative creation DN:
**Leave empty** - Group Name LDAP Attribute:
cn - Group Object Classes:
groupOfNames - Preserve Group Inheritance:
ON - Ignoring Missing Groups:
OFF - Membership LDAP Attribute:
member - Membership Attribute Type:
DN - Membership User LDAP Attribute:
uid - LDAP Filter:
**Leave empty** - Mode:
READ_ONLY - User Groups Retrieve Strategy:
LOAD_GROUPS_BY_MEMBER_ATTRIBUTE - Member-Of LDAP Attribute:
memberOf - Mapped Group Attributes:
**Leave empty** - Drop non-existing groups during sync:
OFF - Groups Path:
/
- Name:
-
Click Save to save the new group mapper.
5.7.4: Synchronize Groups
After creating the group mapper:
- Find the concert-groups mapper in the list
- Click on it to open the configuration
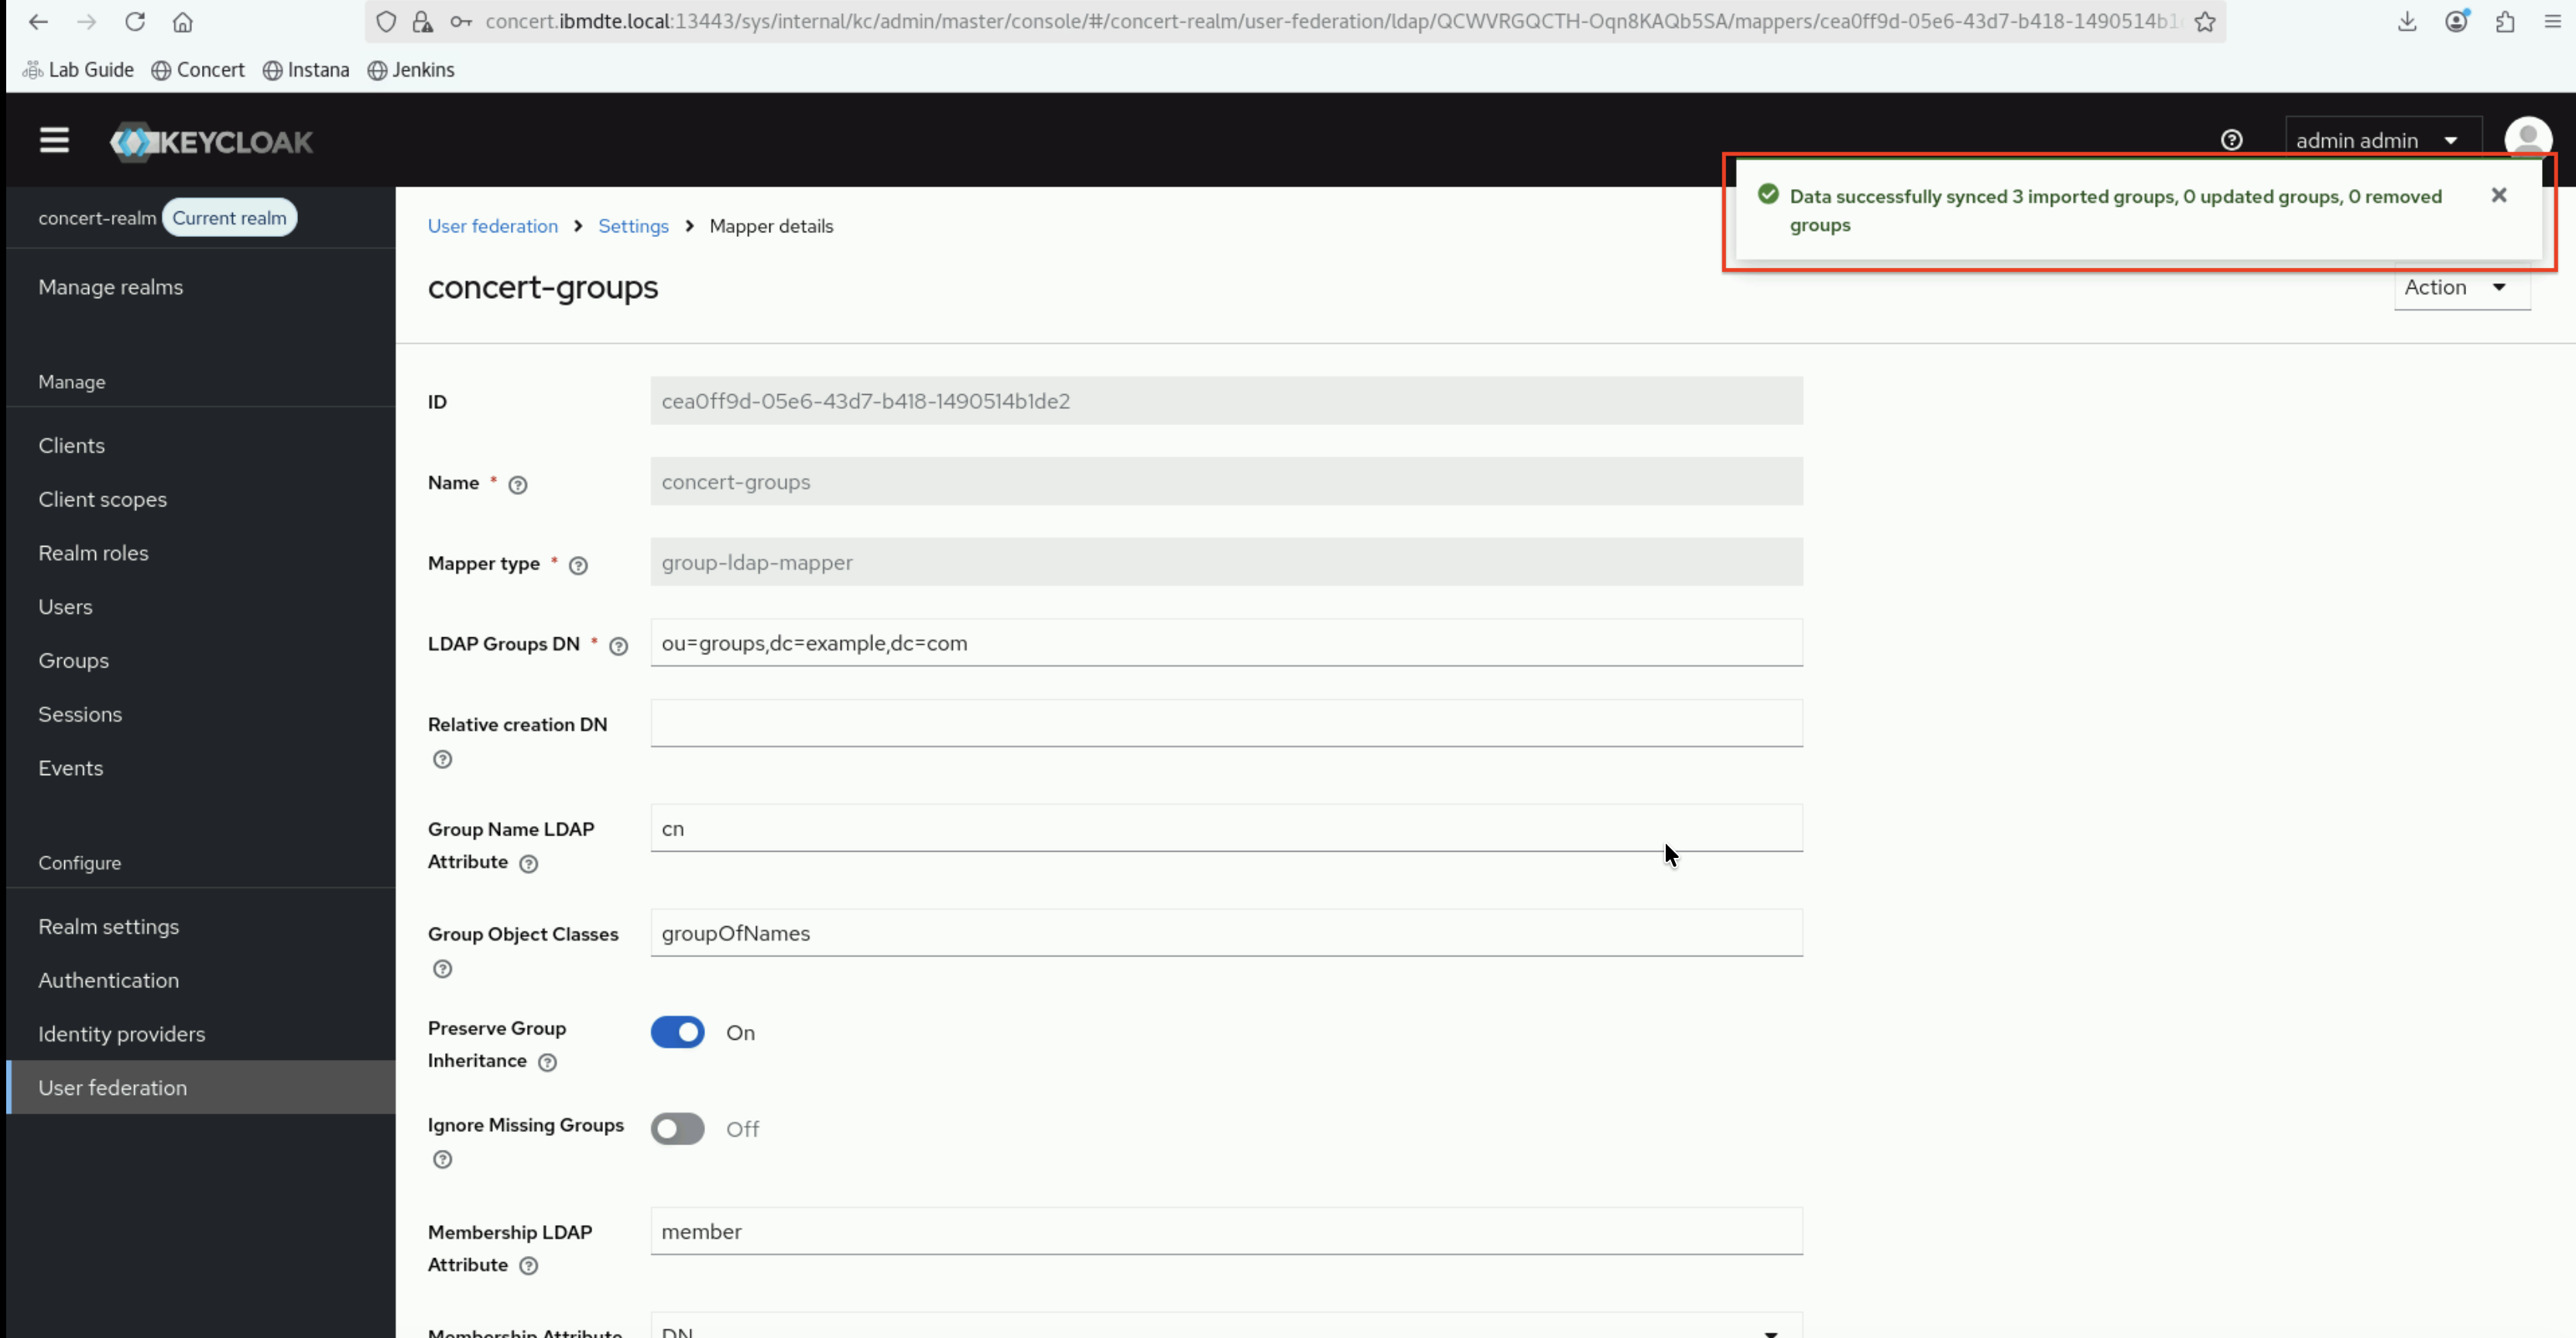
- Scroll down and click Sync LDAP Groups To Keycloak
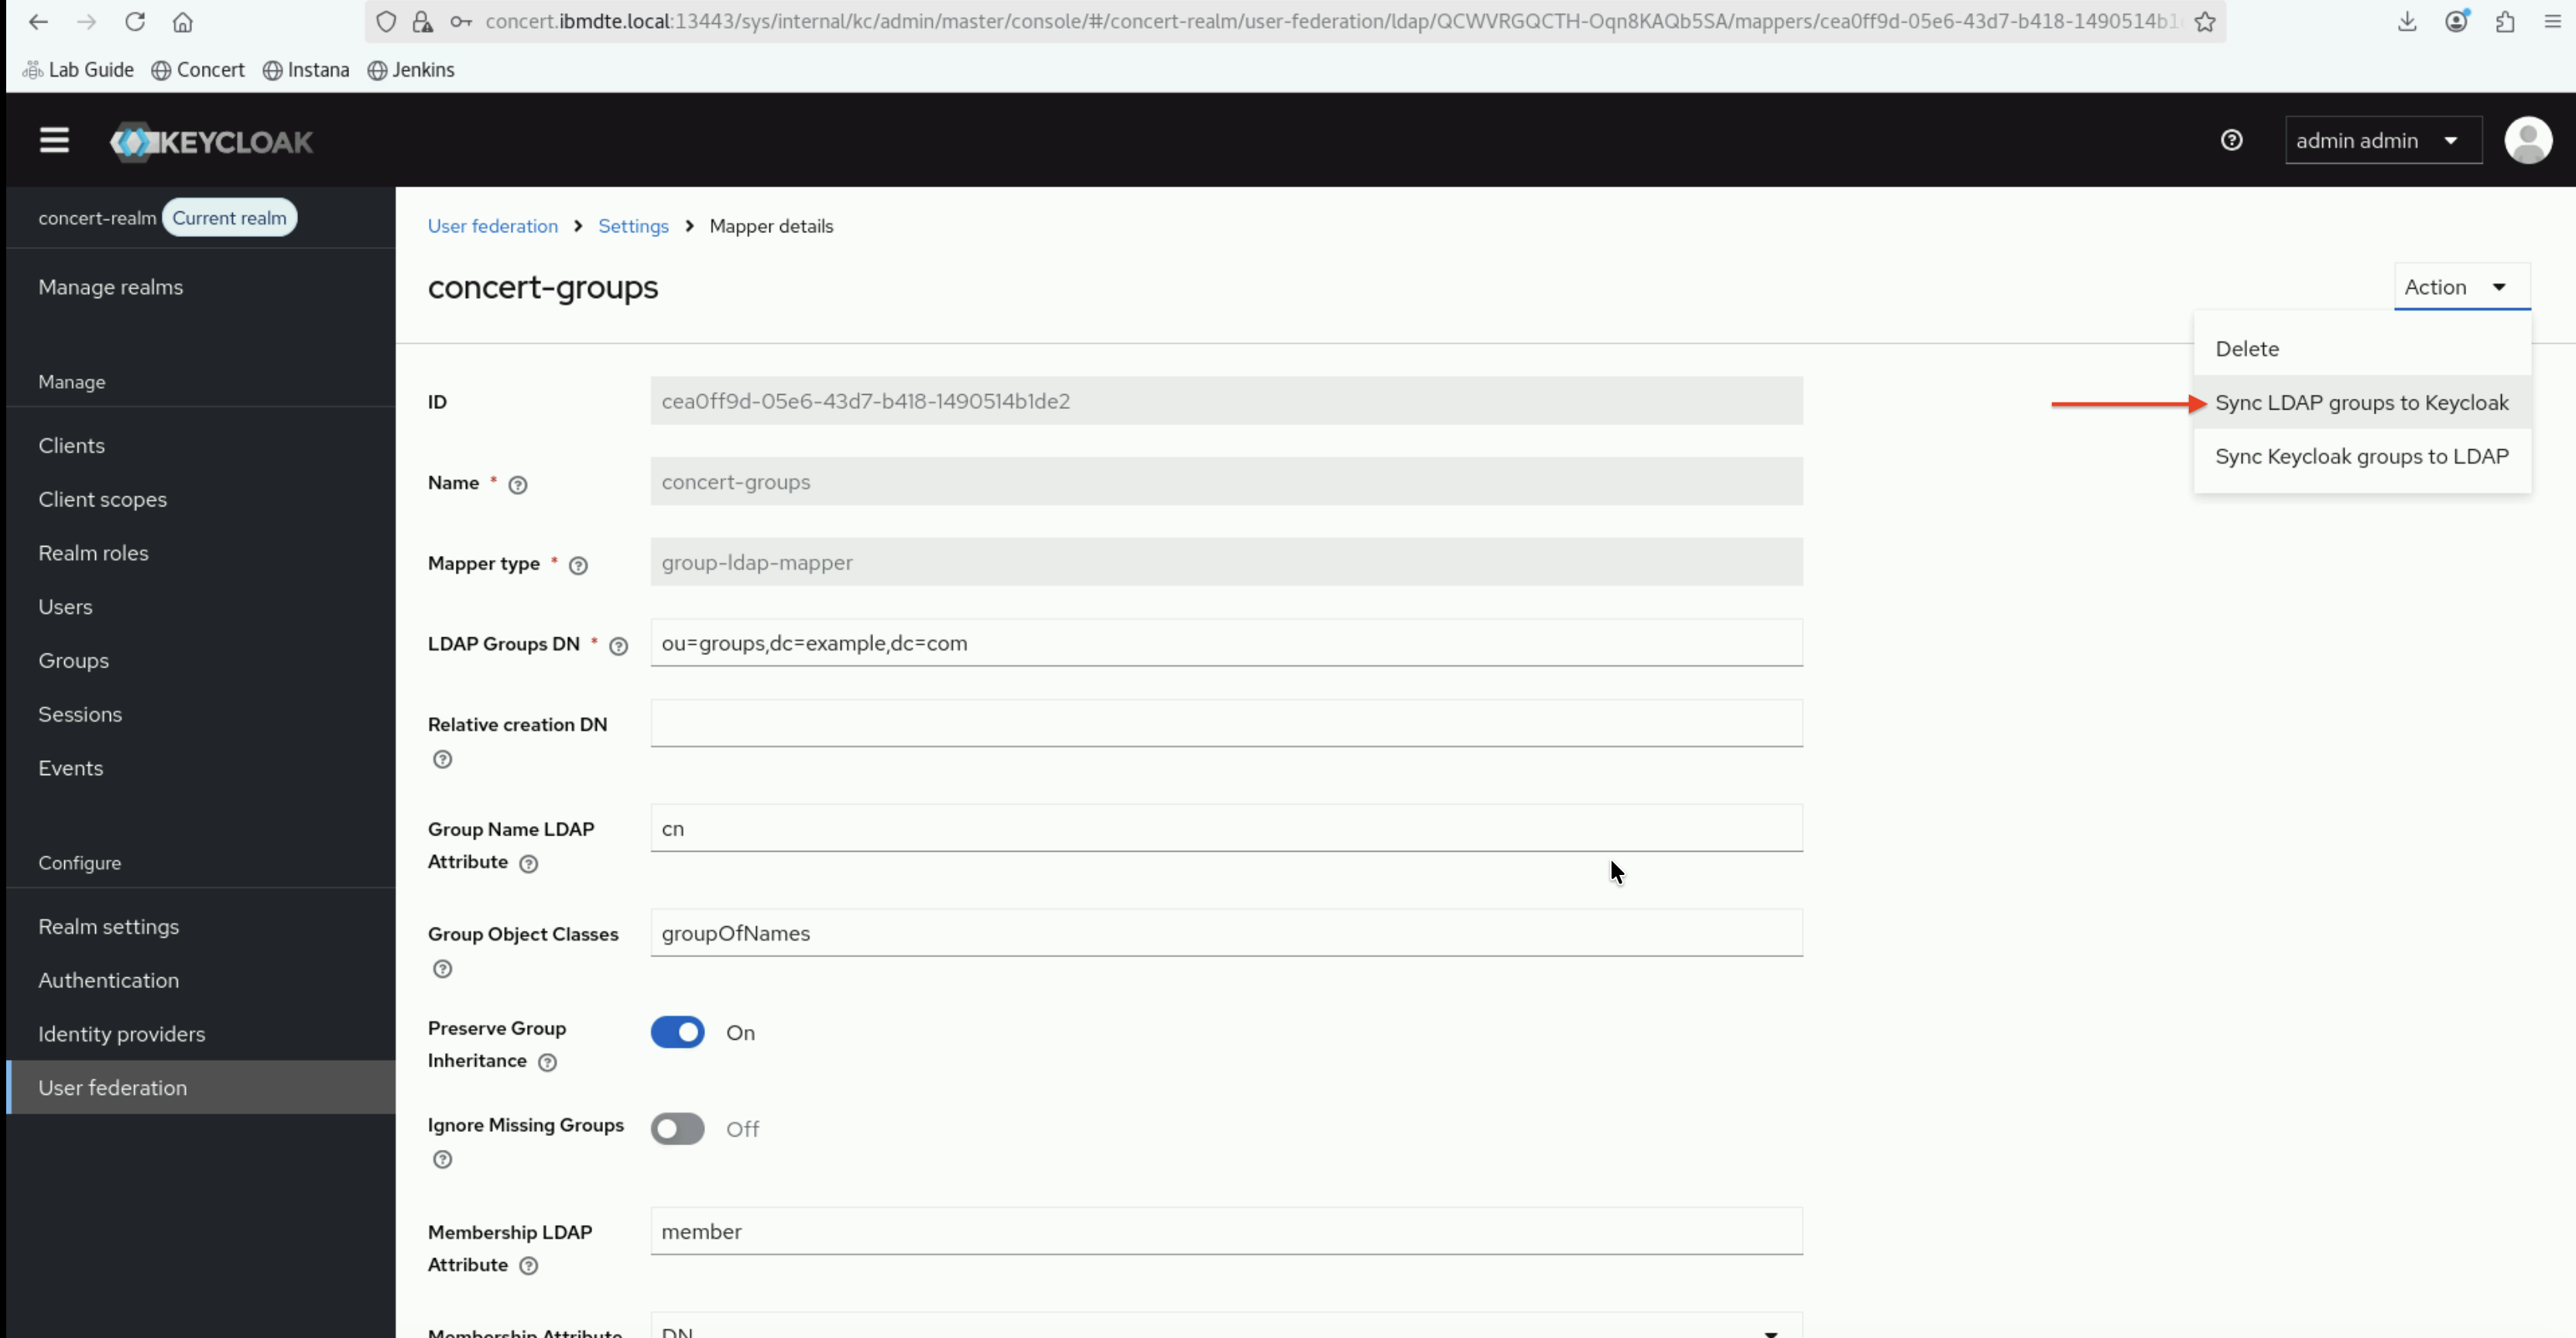
- You should see a message,
Data successfully synced ...on top right corner indicating groups were synchronized

5.8: Verify Group Synchronization
Let's verify that groups and group memberships were synchronized correctly.
5.8.1: View Groups in Keycloak
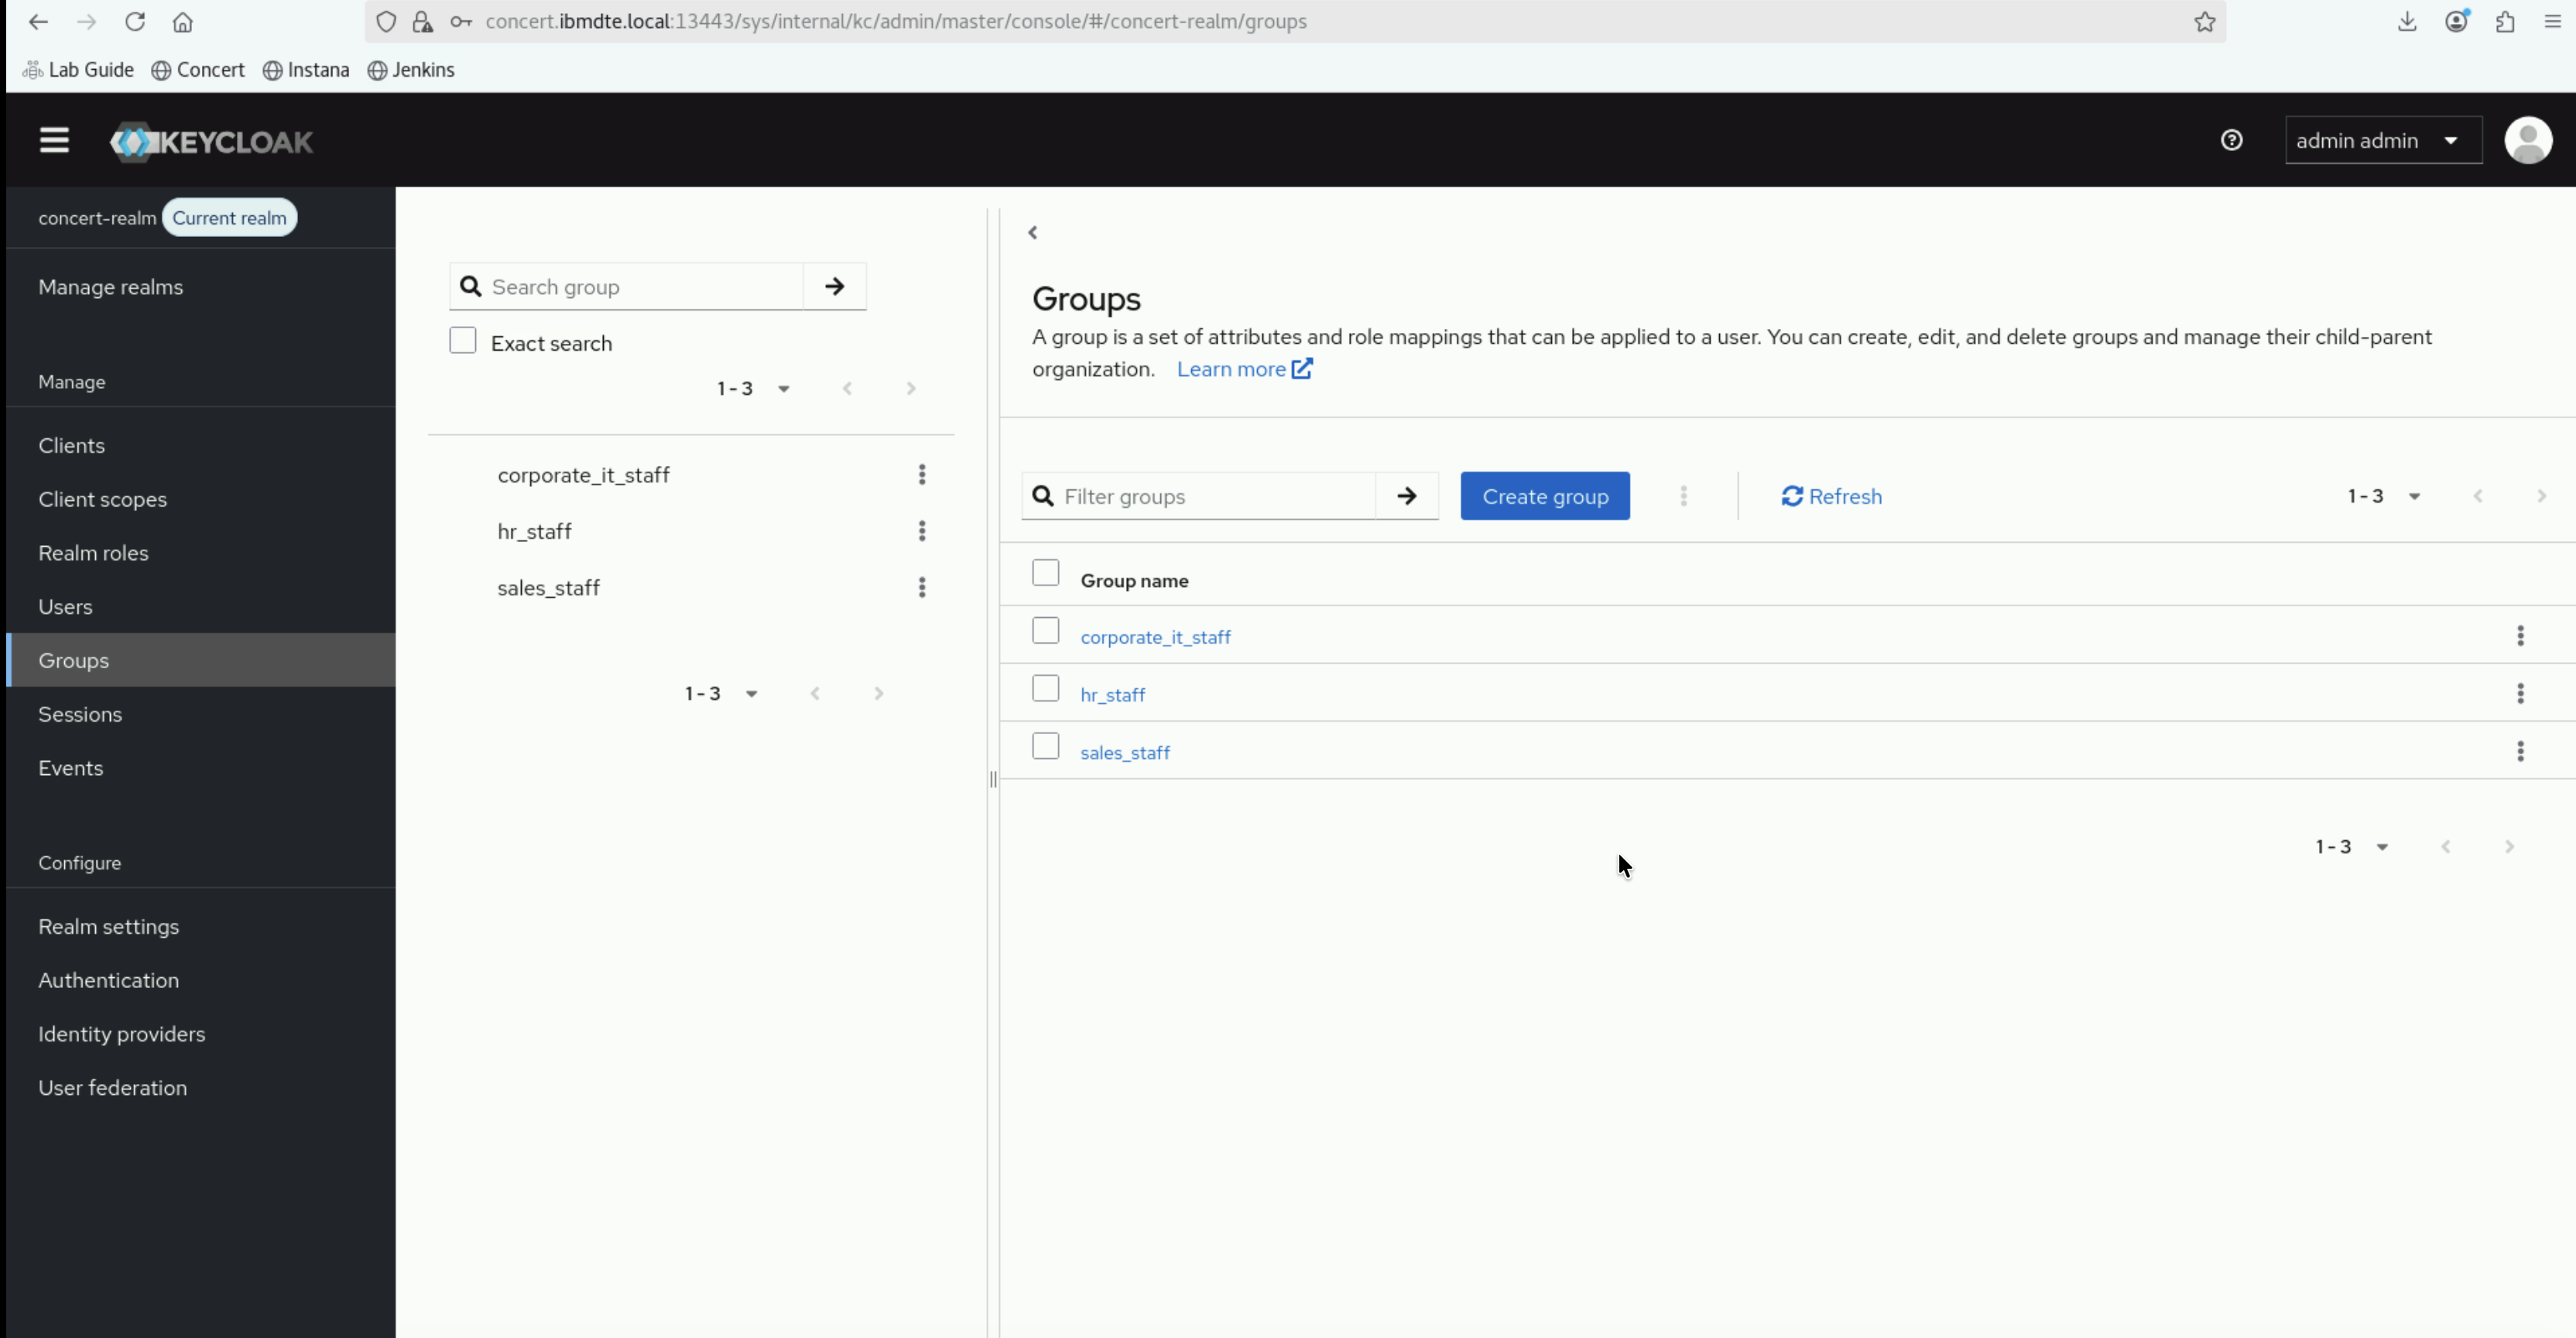
- In the left navigation menu, click Groups
- You should see three groups:
- corporate_it_staff
- hr_staff
- sales_staff
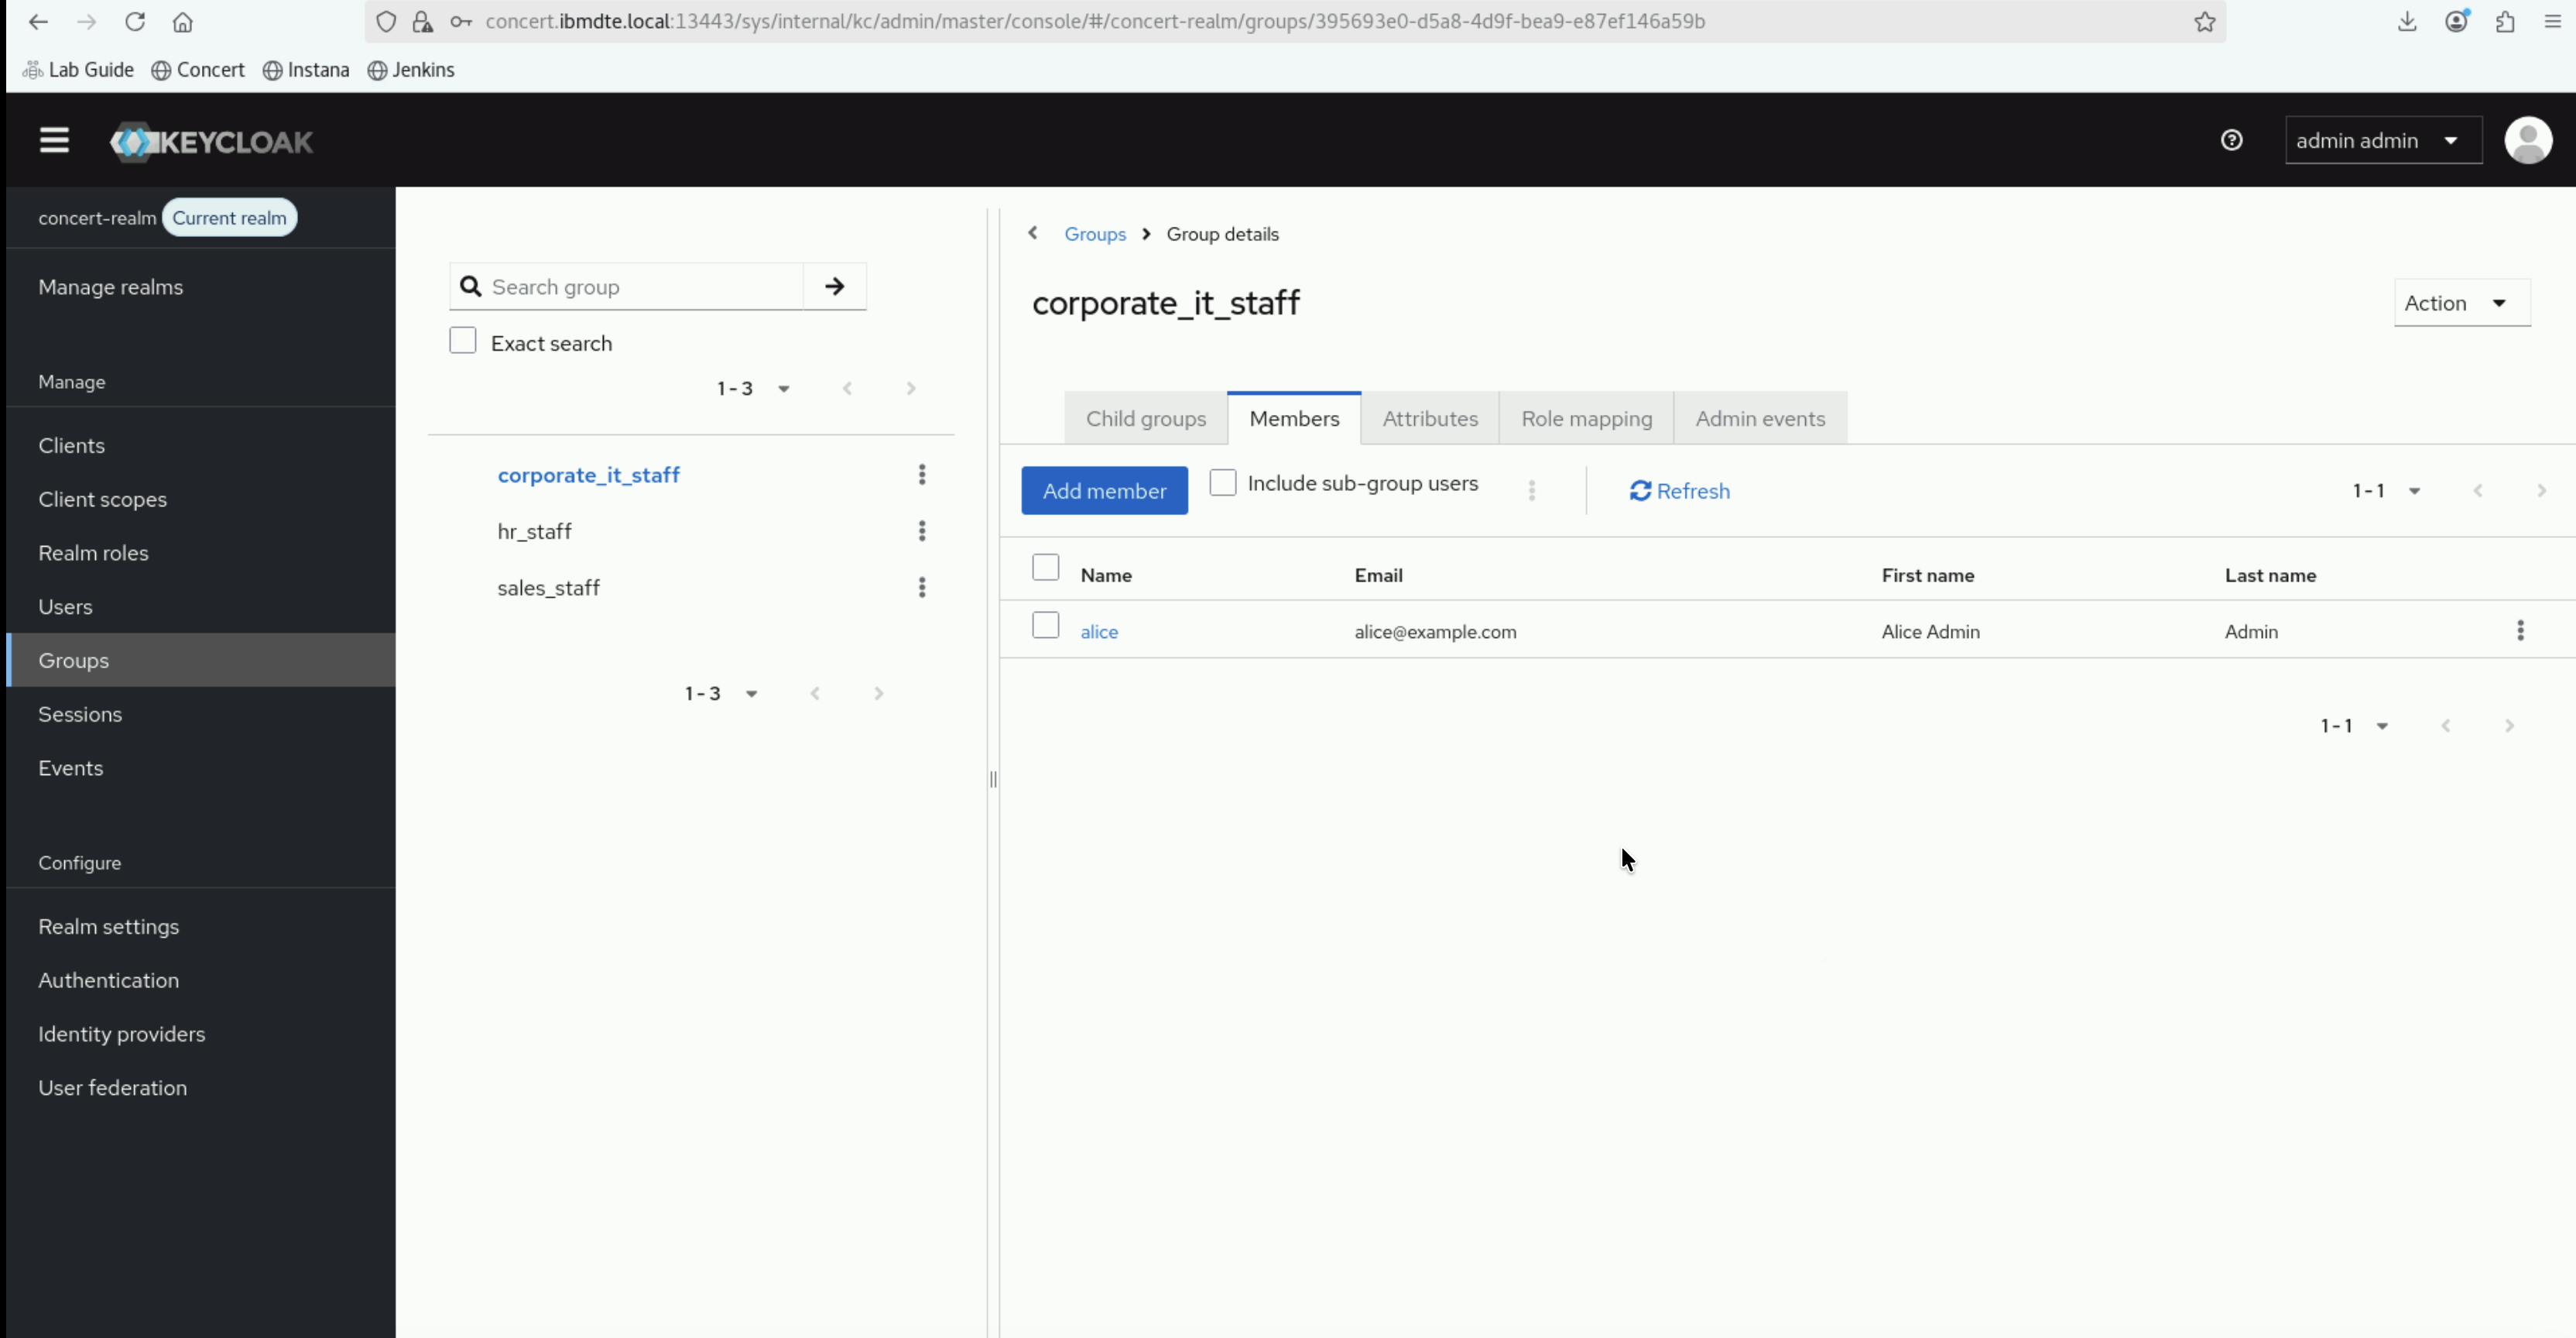
5.8.2: Verify Group Membership
- Click on corporate_it_staff group
- Click the Members tab
- You should see alice as a member
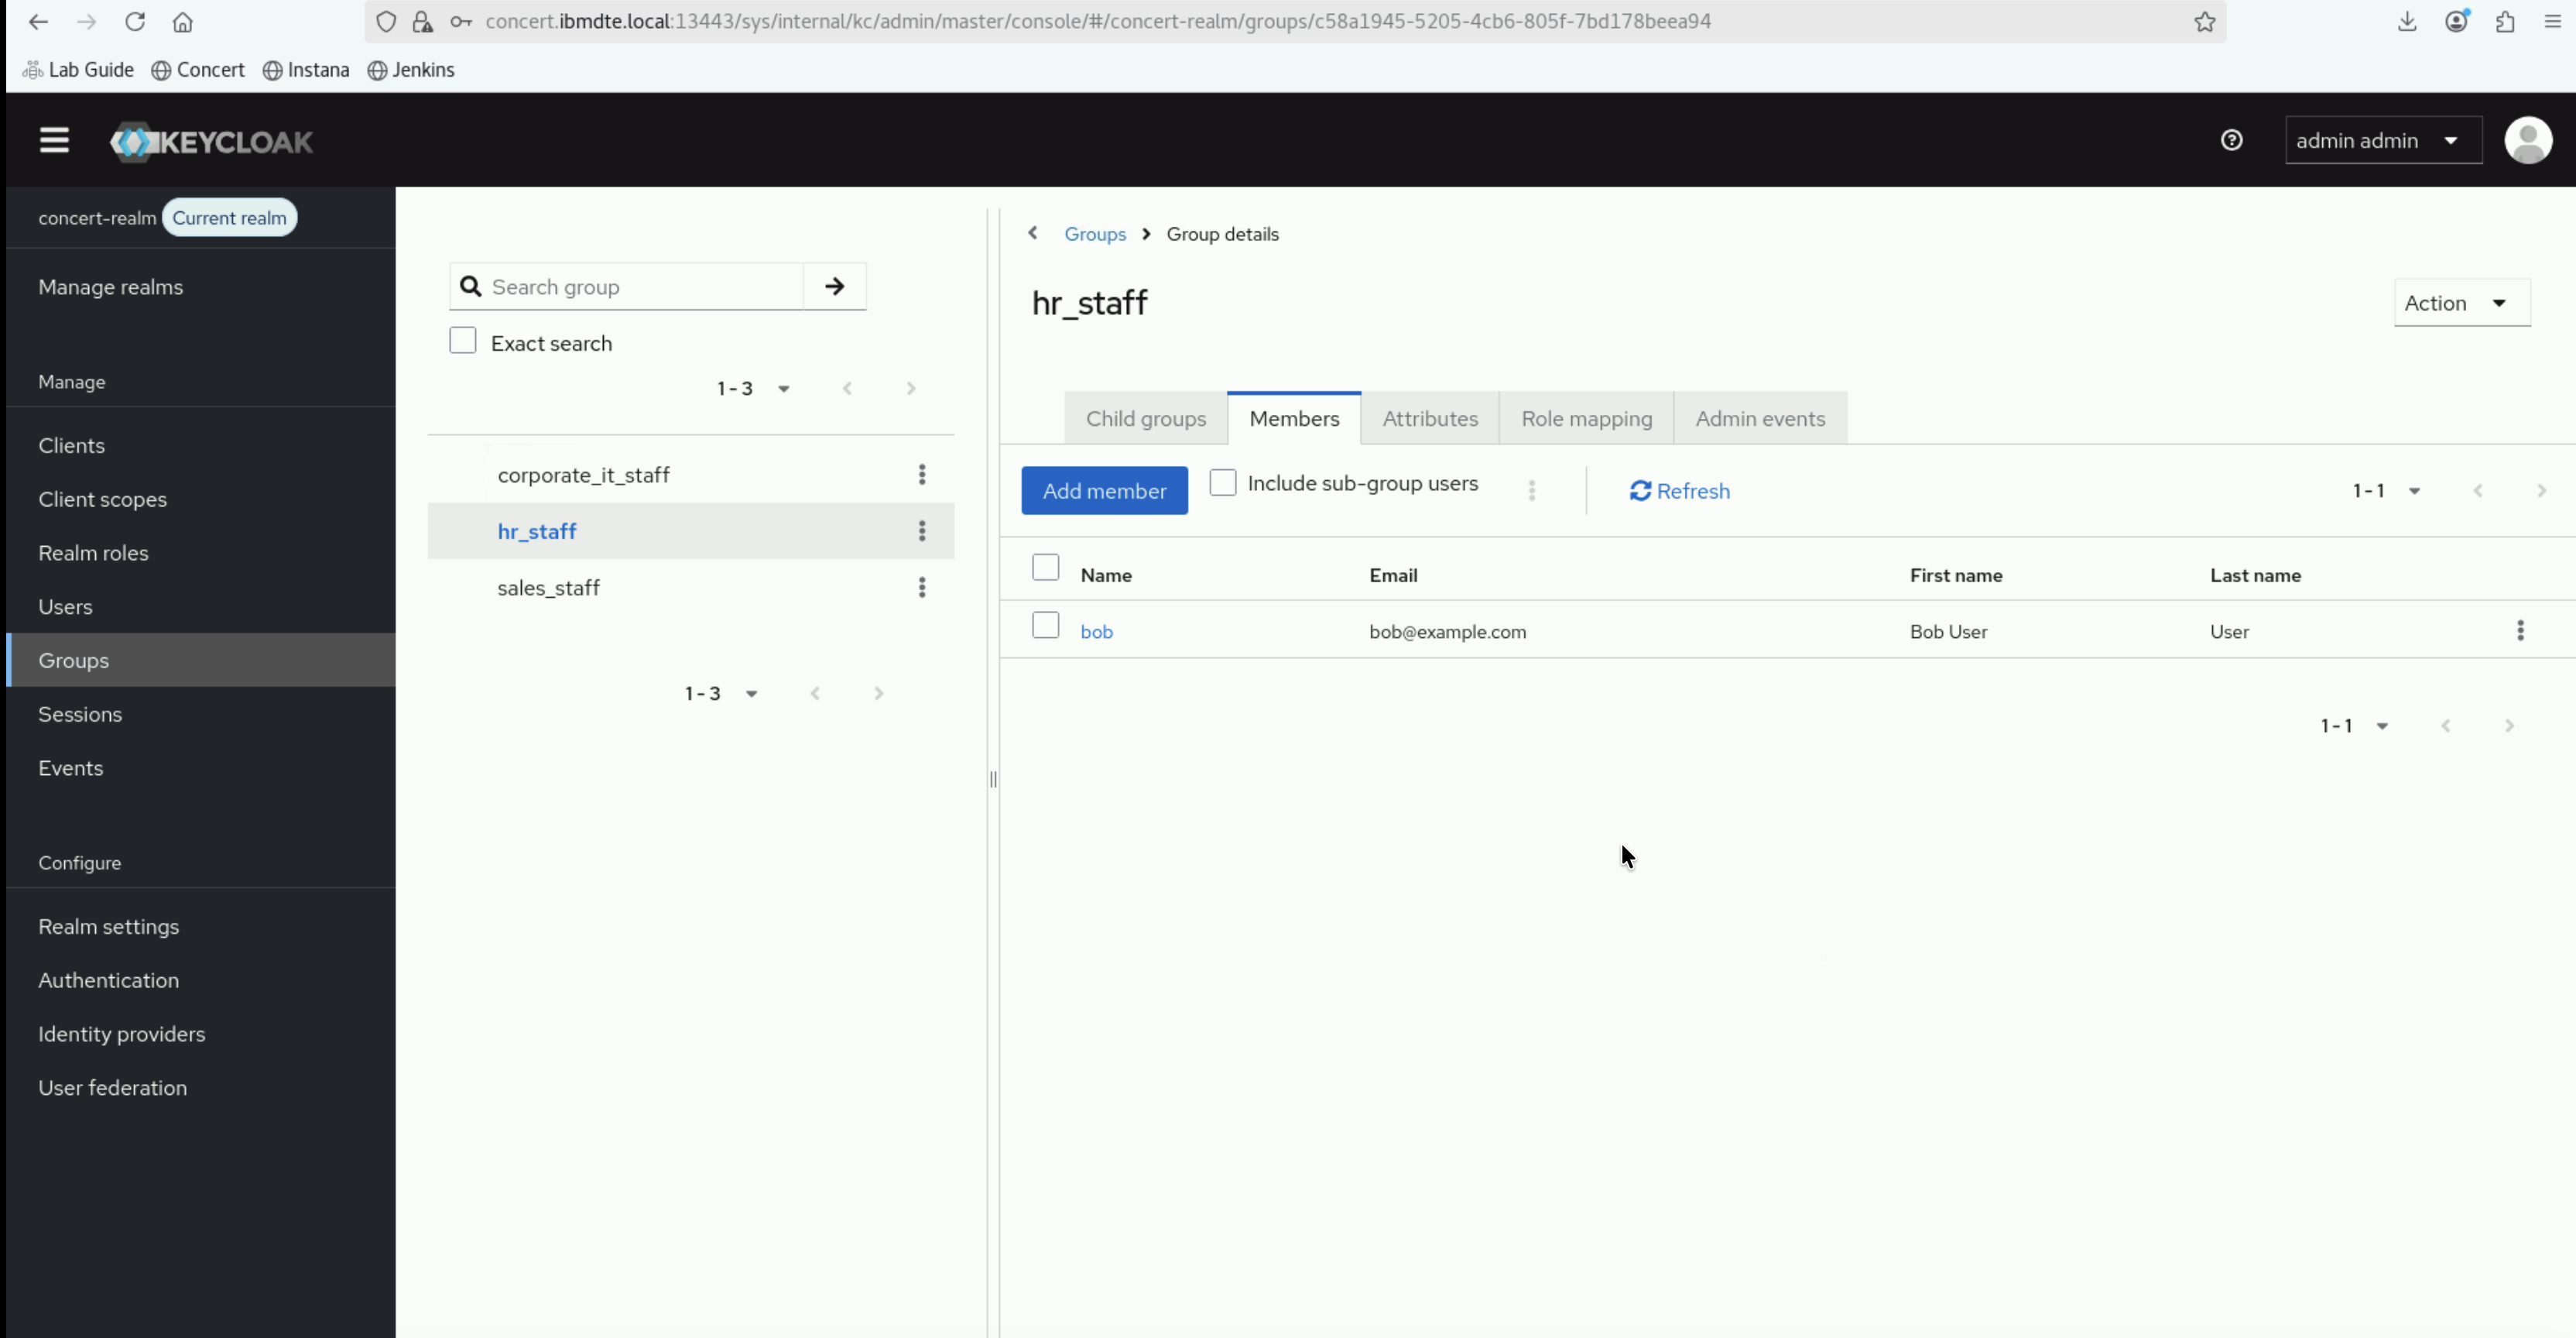
Repeat for other groups:
- hr_staff should have bob as a member
- sales_staff should have charlie as a member

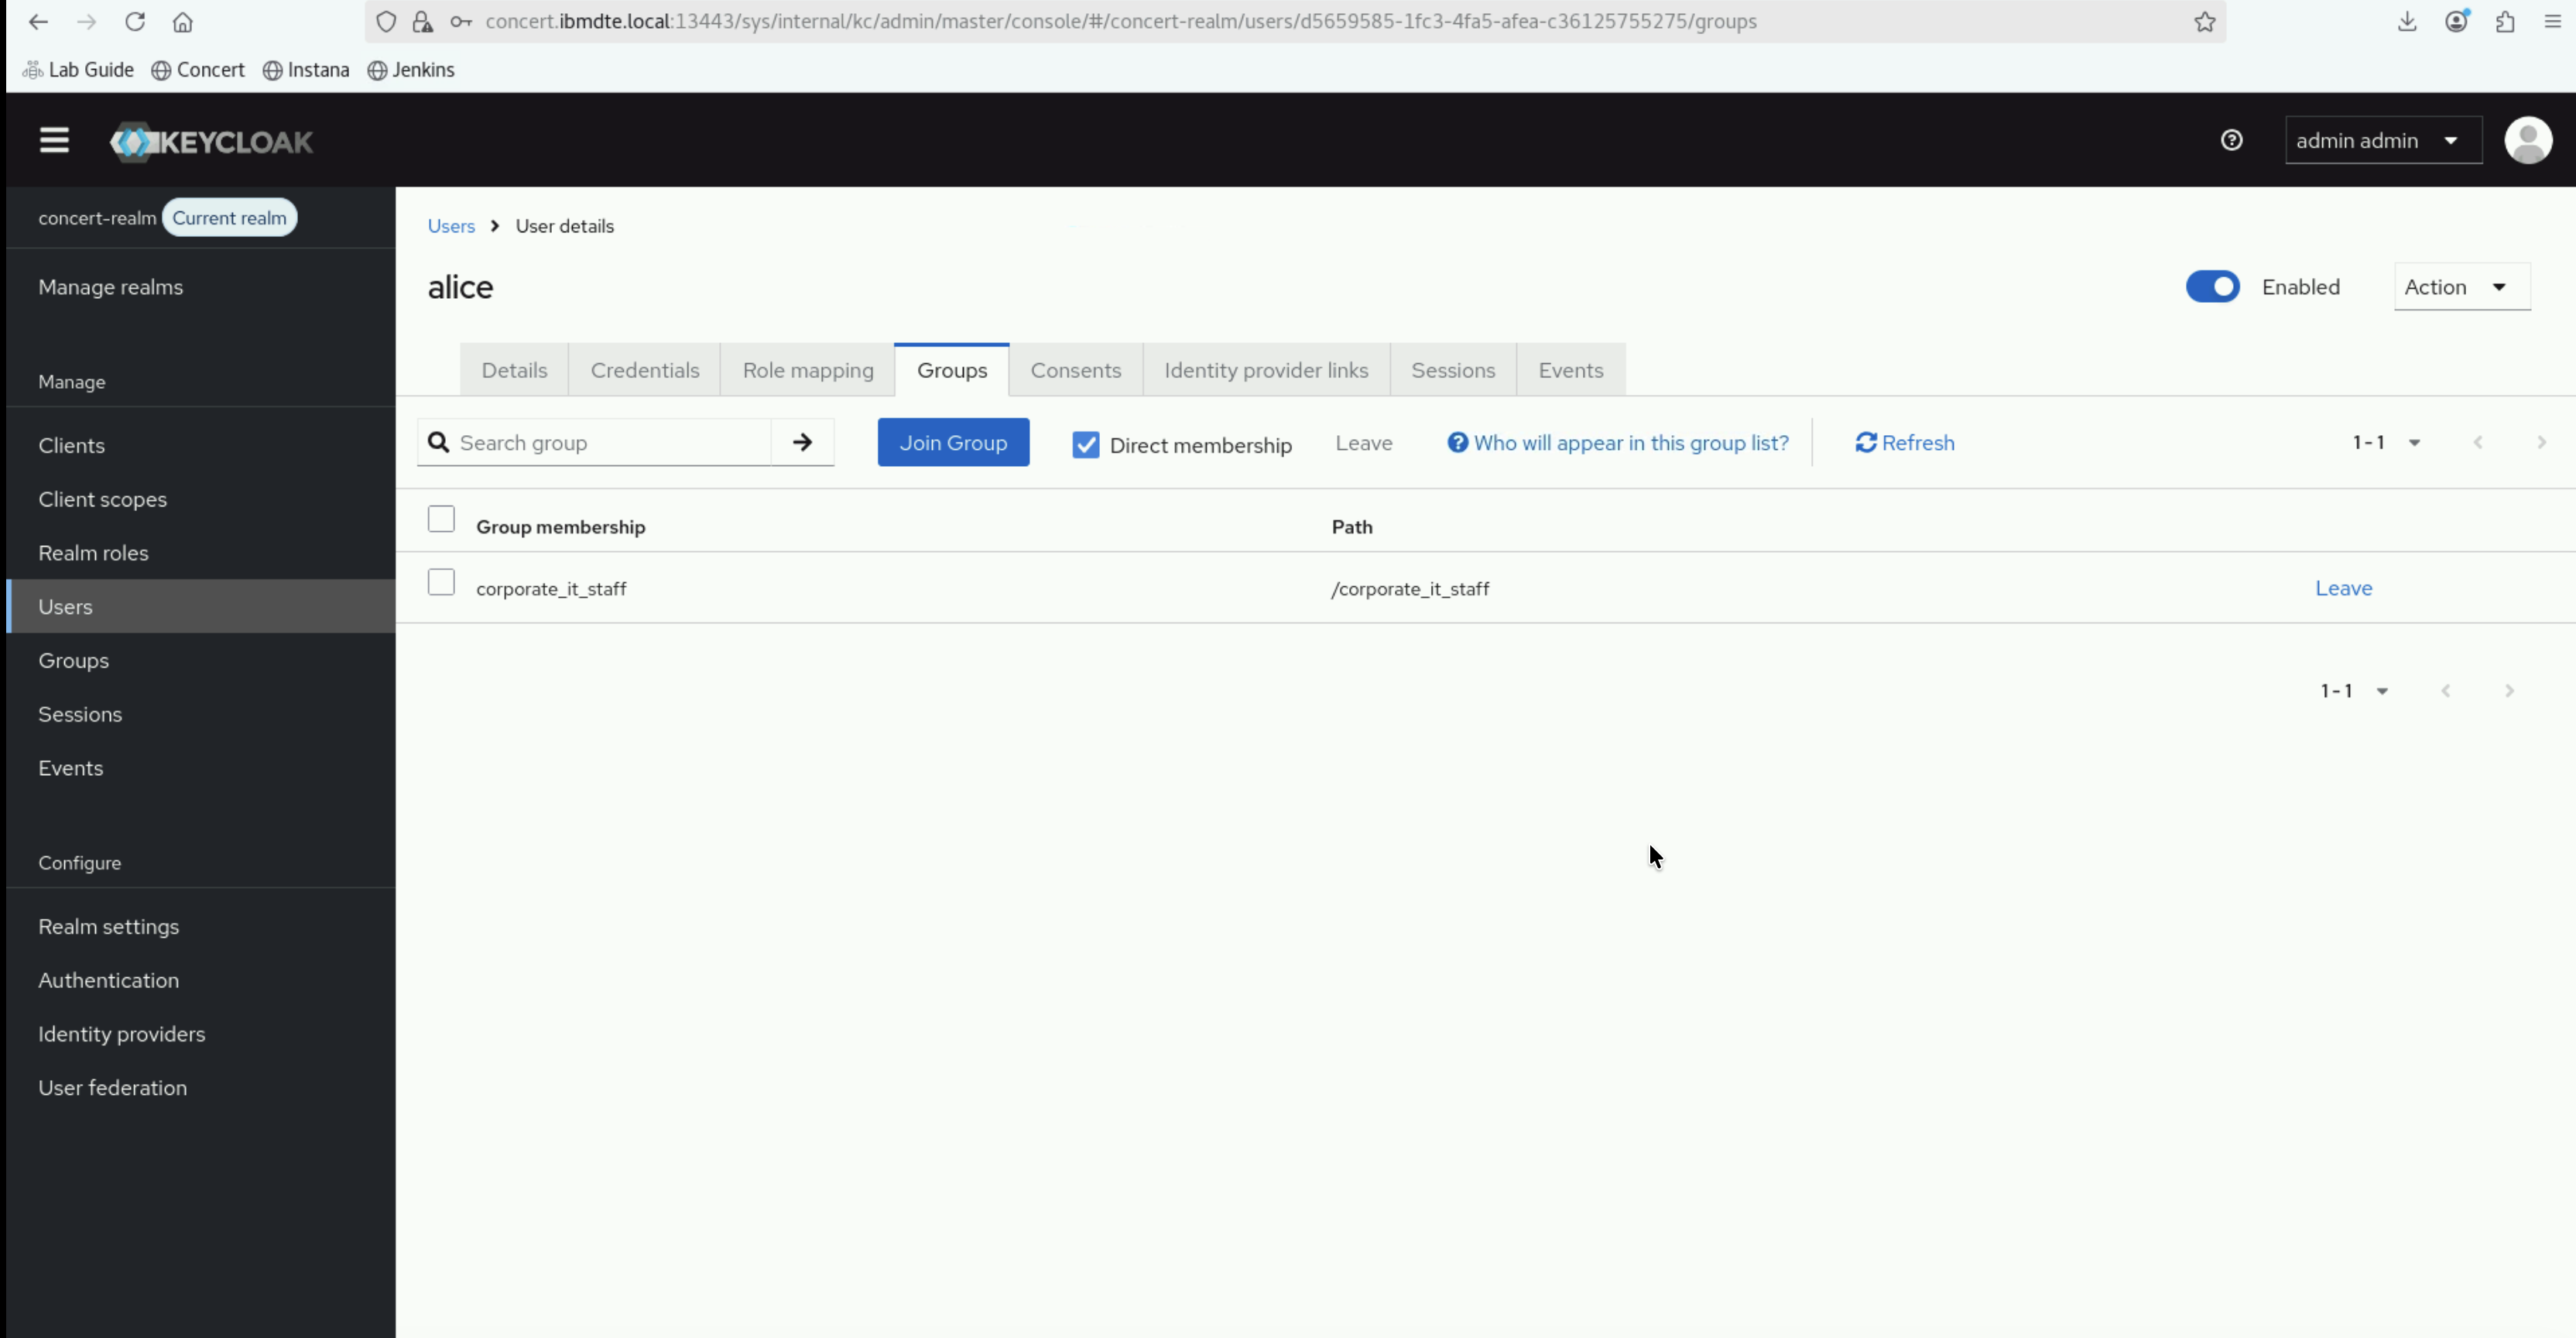
5.8.3: Verify User Group Membership
Alternatively, check from the user perspective:
- Go to Users → Enter
*in the search box, next to magnifying glass, and clickReturnkey - Click on alice
- Click the Groups tab
- You should see corporate_it_staff in the group membership list
5.9: Test LDAP Authentication
Before proceeding to Concert configuration, let's test that users can authenticate via Keycloak using their LDAP credentials. To achieve that, let's create a temporary test client.
Why Create a Test Client?
Before integrating Keycloak with Concert, we need to verify that the LDAP integration is working correctly. A test client allows us to:
- Confirm users can authenticate through Keycloak
- Verify LDAP user data is being retrieved properly
- Test that group mappings are working
- Ensure token claims are configured correctly
This test client can be deleted after verification, and the actual concert-client which you have configured in Section 5.4 will be used for all subsequent steps.
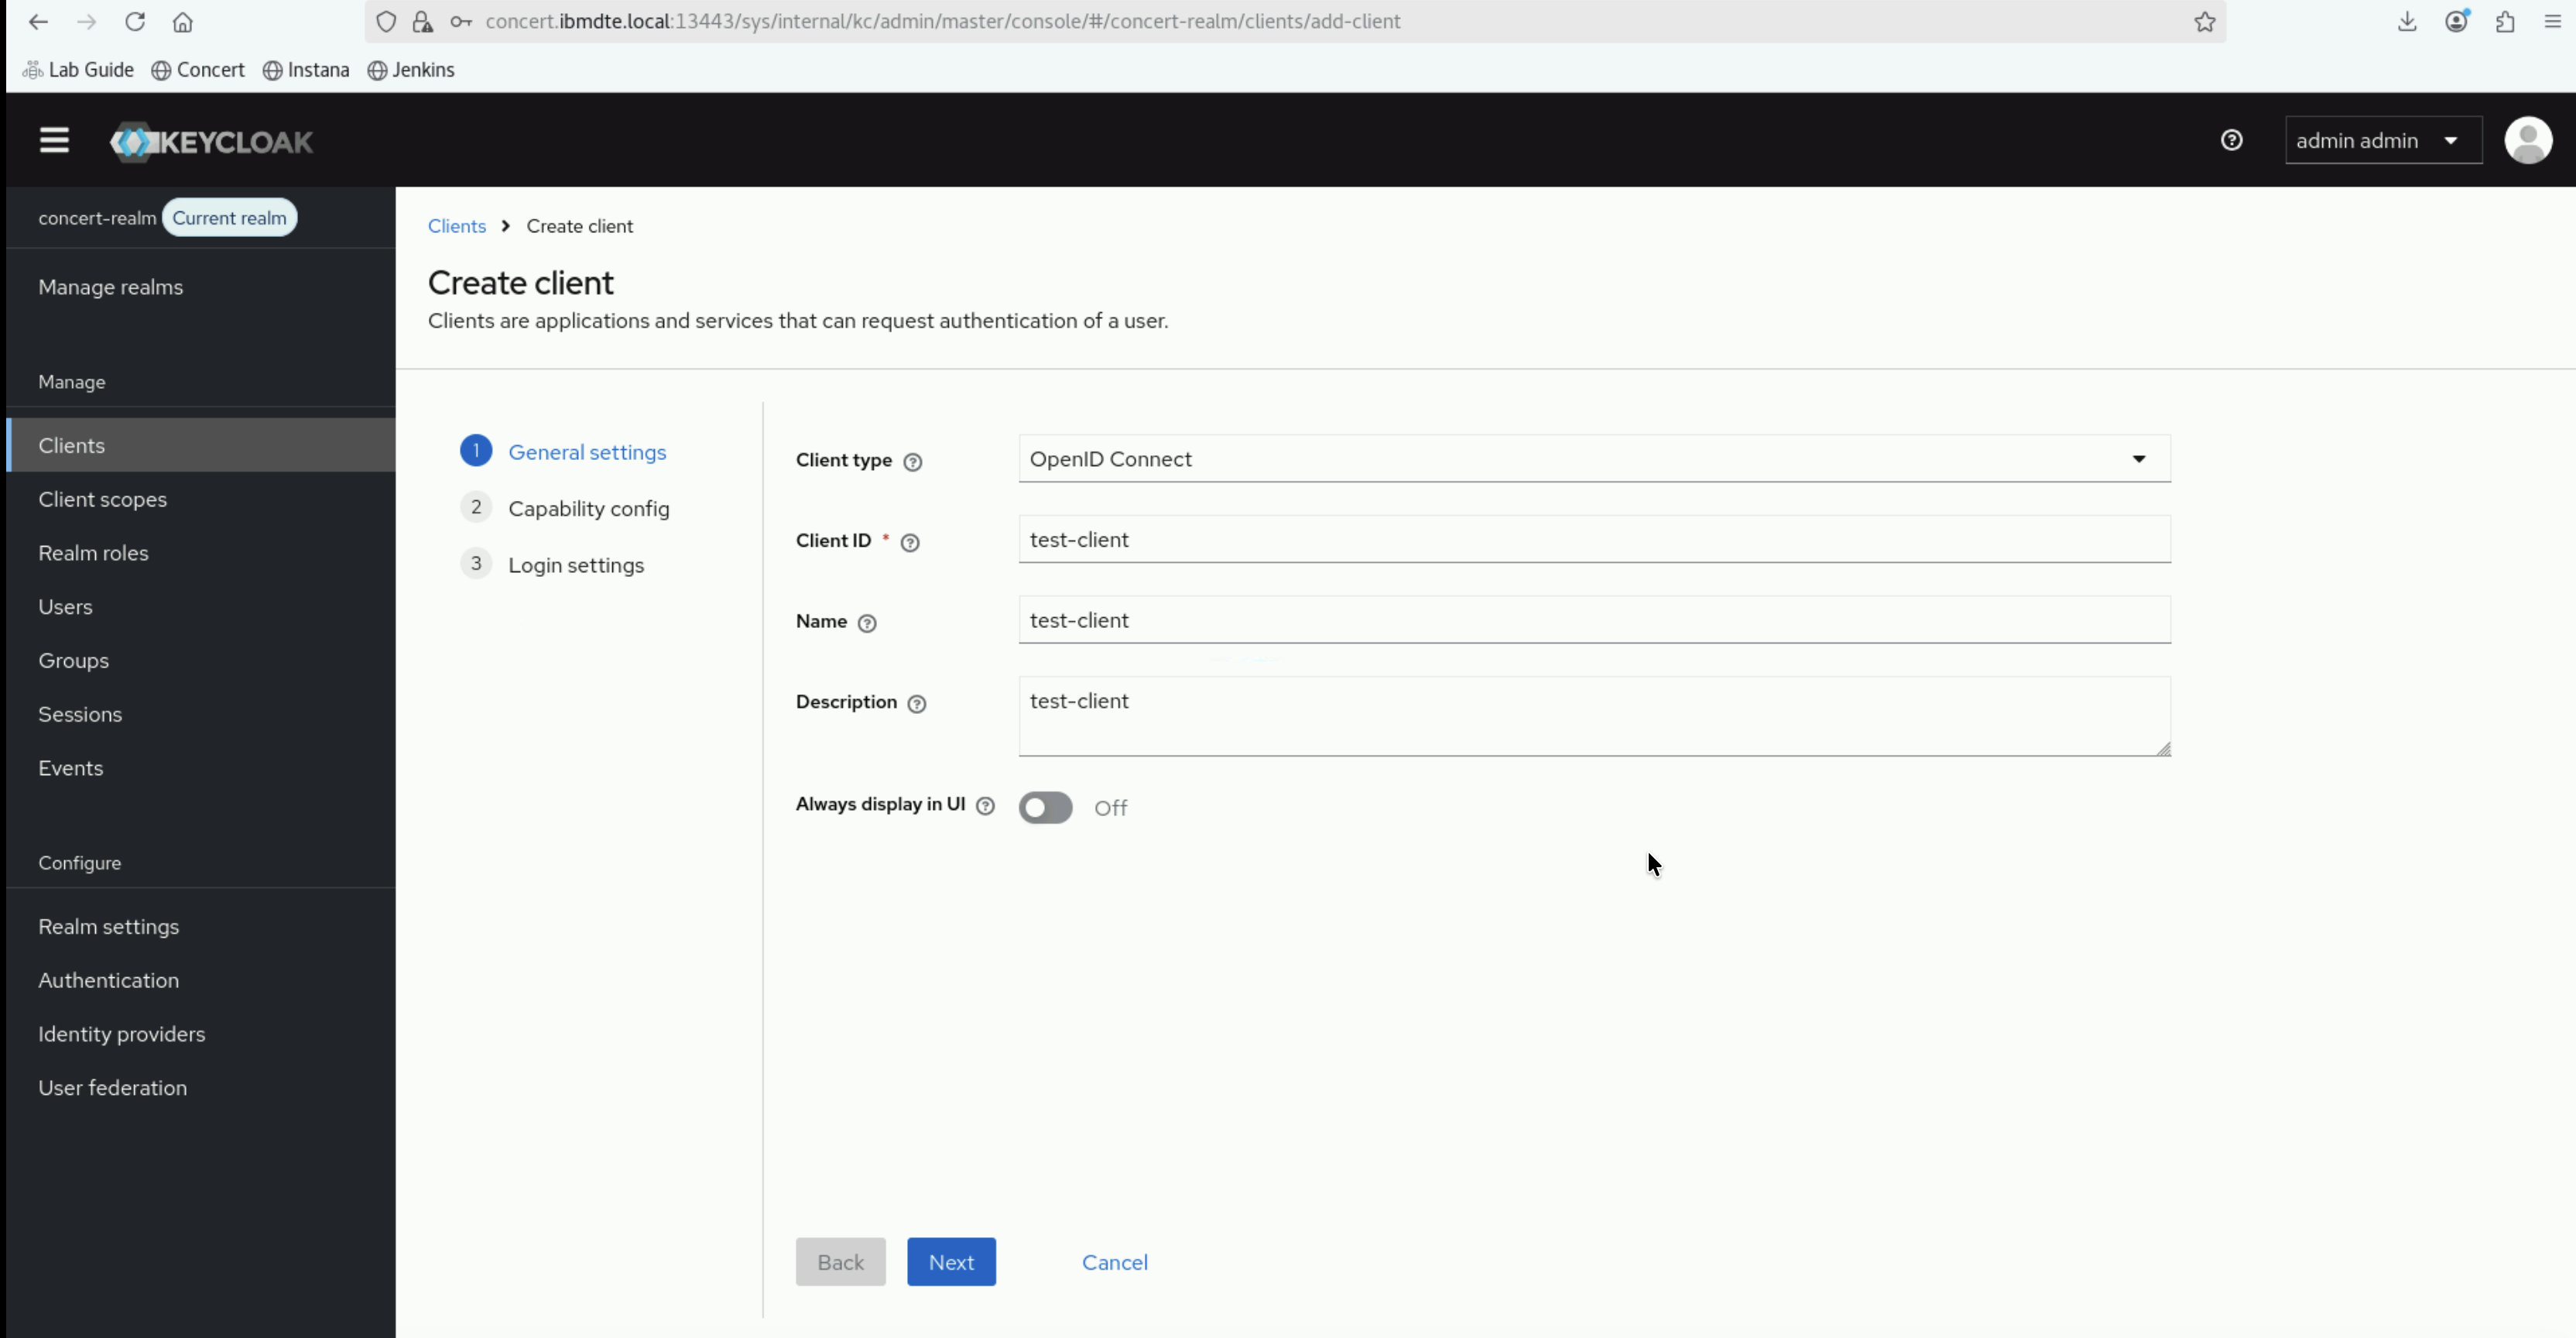
5.9.1: Create a Test Client
To test authentication, we will create a temporary test client:
- In the Keycloak left navigation menu, click Clients
- Click Create client
- Enter the following:
- Client type:
OpenID Connect - Client ID:
test-client - Name:
test-client - Description:
test-client
- Client type:
- Click Next
- Under Configure capability, configure the following:
- Client authentication:
OFF(public client) - Authorization:
OFF - Standard flow:
ON - Direct access grants:
ON
- Client authentication:
- Click Next
- Under login settings, configure the following:
- Valid redirect URIs:
* - Web origins:
*
- Valid redirect URIs:
- Click Save

5.9.2: Test Authentication with Direct Access Grant
From the Bastion Host terminal, test authentication using curl commands below:
# Test Keycloak endpoint for OIDC configuration
curl -k https://concert.ibmdte.local:13443/sys/internal/kc/realms/concert-realm/.well-known/openid-configuration
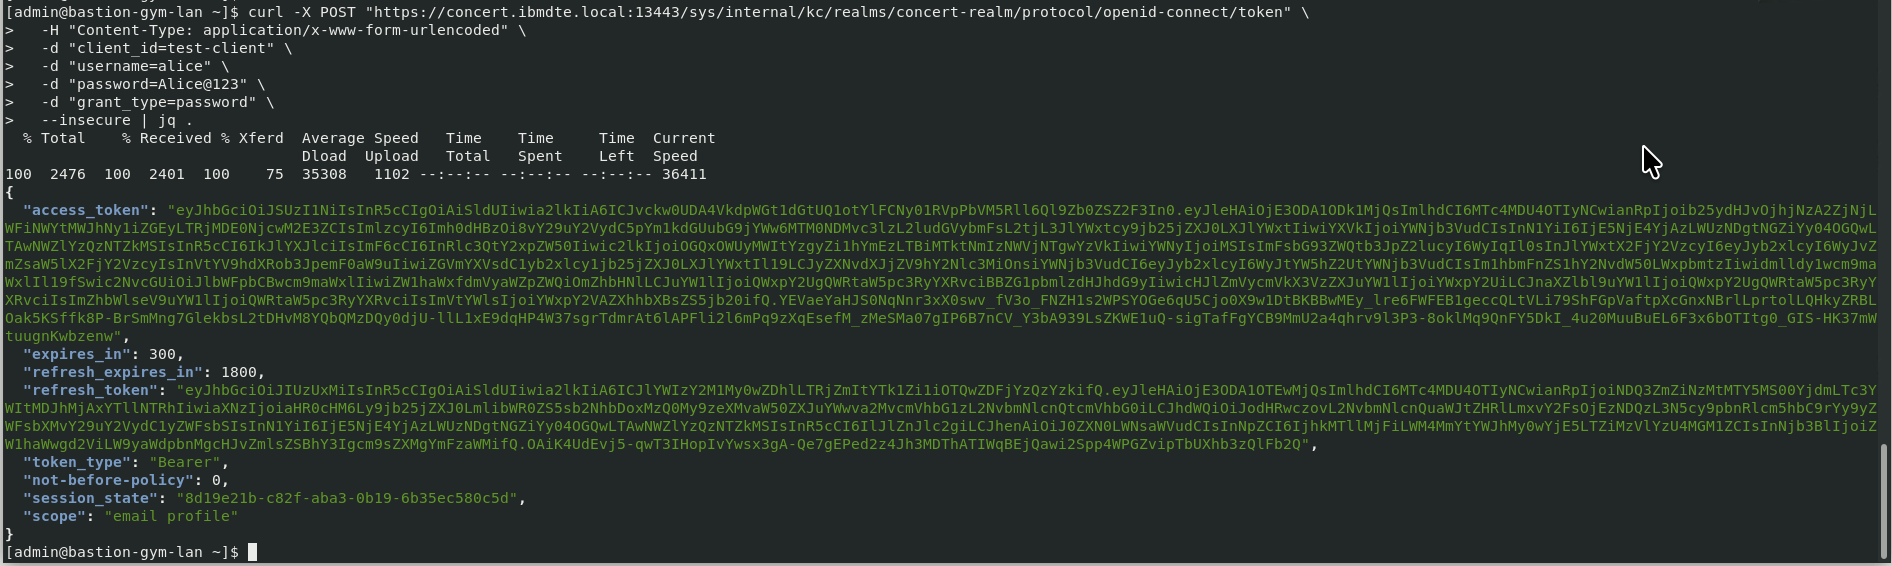
# Test Alice's authentication
curl -X POST "https://concert.ibmdte.local:13443/sys/internal/kc/realms/concert-realm/protocol/openid-connect/token" \
-H "Content-Type: application/x-www-form-urlencoded" \
-d "client_id=test-client" \
-d "username=alice" \
-d "password=Alice@123" \
-d "grant_type=password" \
--insecure | jq .
# Test Bob's authentication
curl -X POST "https://concert.ibmdte.local:13443/sys/internal/kc/realms/concert-realm/protocol/openid-connect/token" \
-H "Content-Type: application/x-www-form-urlencoded" \
-d "client_id=test-client" \
-d "username=bob" \
-d "password=Bob@123" \
-d "grant_type=password" \
--insecure | jq .
# Test Charlie's authentication
curl -X POST "https://concert.ibmdte.local:13443/sys/internal/kc/realms/concert-realm/protocol/openid-connect/token" \
-H "Content-Type: application/x-www-form-urlencoded" \
-d "client_id=test-client" \
-d "username=charlie" \
-d "password=Charlie@123" \
-d "grant_type=password" \
--insecure | jq .
If jq is not installed, you can omit | jq . to see the raw JSON response.
Endpoint https://concert.ibmdte.local:13443/sys/internal/kc/realms/<realm-name>
is specific to this embedded Keycloak instance.
For standard Keycloak deployments,
the endpoint would be
https://<keycloak-host>:<port>/auth/realms/<realm-name>
Expected output should include:
access_token: JWT token for the authenticated userrefresh_token: Token for refreshing the access tokentoken_type: "Bearer"expires_in: Token expiration time
If authentication fails, you'll see an error message like:
{
  "error": "invalid_grant",
  "error_description": "Invalid user credentials"
}
5.9.3: Delete Test Client
After testing, delete the test client:
- In the Keycloak left navigation menu, click Clients
- Find test-client
- Click on it
- Click Delete (in the Action dropdown or at the bottom)
- Confirm deletion
5.10: Configuration Summary
You have successfully configured Keycloak LDAP integration with:
5.10.1: LDAP User Federation
- ✅ Connected Keycloak to OpenLDAP server
- ✅ Configured LDAP connection and bind settings
- ✅ Tested LDAP connection and authentication
- ✅ Synchronized 3 users from LDAP to Keycloak
5.10.2: User Attribute Mappers
- ✅ Username mapper (uid → username)
- ✅ Email mapper (mail → email)
- ✅ First name mapper (cn → firstName)
- ✅ Last name mapper (sn → lastName)
5.10.3: Group Mapper
- ✅ Created group mapper for LDAP groups
- ✅ Synchronized 3 groups from LDAP to Keycloak
- ✅ Verified group memberships
Verification
- ✅ Users visible in Keycloak Users list
- ✅ Groups visible in Keycloak Groups list
- ✅ Group memberships correctly mapped
- ✅ LDAP authentication working via Keycloak
Troubleshooting
This section provides basic troubleshooting steps in case you encounter any issues while performing the steps above. These steps are optional and only need to be followed if you run into problems.
Users Not Appearing After Sync
Problem: Synchronize all users completes but no users appear
Solutions:
- Verify Users DN is correct:
ou=users,dc=example,dc=com - Check User Object Classes match LDAP:
inetOrgPerson, organizationalPerson - Verify users exist in LDAP:
ldapsearch -x -b "ou=users,dc=example,dc=com" "(uid=*)"
Groups Not Synchronizing
Problem: Group sync completes but no groups appear
Solutions:
- Verify LDAP Groups DN is correct:
ou=groups,dc=example,dc=com - Check Group Object Classes:
groupOfNames - Verify groups exist in LDAP:
ldapsearch -x -b "ou=groups,dc=example,dc=com" "(cn=*)" - Ensure Membership LDAP Attribute is
member - Check that group members use full DN format
Group Membership Not Showing
Problem: Groups exist but members are not associated
Solutions:
- Verify member attribute in LDAP contains full user DN
- Check Membership Attribute Type is set to
DN - Re-sync groups: Click Sync LDAP Groups To Keycloak
- Verify in LDAP:
ldapsearch -x -b "ou=groups,dc=example,dc=com" "(cn=concert-admins)" member
Authentication Test Fails
Problem: Test authentication button shows failure
Solutions:
- Verify Bind DN and Bind Credential are correct
- Test LDAP bind manually:
ldapwhoami -x -D "cn=admin,dc=example,dc=com" -w secret - Check OpenLDAP service is running
- Verify network connectivity to OpenLDAP host
Cannot Connect to LDAP
Problem: Test connection fails
Solutions:
- Verify Connection URL format:
ldap://bluebox.ibmdte.local:389 - Check OpenLDAP service:
ssh jammer@bluebox 'sudo systemctl status slapd' - Test network connectivity:
ping bluebox.ibmdte.local - Verify firewall allows port 389
- Try using IP address instead of hostname
Users Can't Authenticate
Problem: Direct access grant test fails with invalid credentials
Solutions:
- Verify user password in LDAP:
ldapwhoami -x -D "uid=alice,ou=users,dc=example,dc=com" -w secret - Check user exists in Keycloak: Go to Users → View all users
- Verify user is enabled in Keycloak
- Check Edit Mode is set to READ_ONLY (not UNSYNCED)
- Re-sync users from LDAP
Next Steps
Now that Keycloak is successfully integrated with OpenLDAP and can authenticate users, you're ready to proceed to the next section where you'll configure Concert to use Keycloak as its OIDC identity provider. This will enable SSO login for Concert using the LDAP users you've configured.
Keycloak LDAP integration is complete! Users from OpenLDAP can now authenticate via Keycloak with proper group memberships.