Lab Guide for AI Powered Insurance Broker
In this lab you're going to be using agent builder to create a simple AI agent that can help brokers in a hypothetical insurance brokerage. This agent will help brokers by providing an agentic chat facility that integrates into the brokerage platform and is embedded into the brokerage UI.
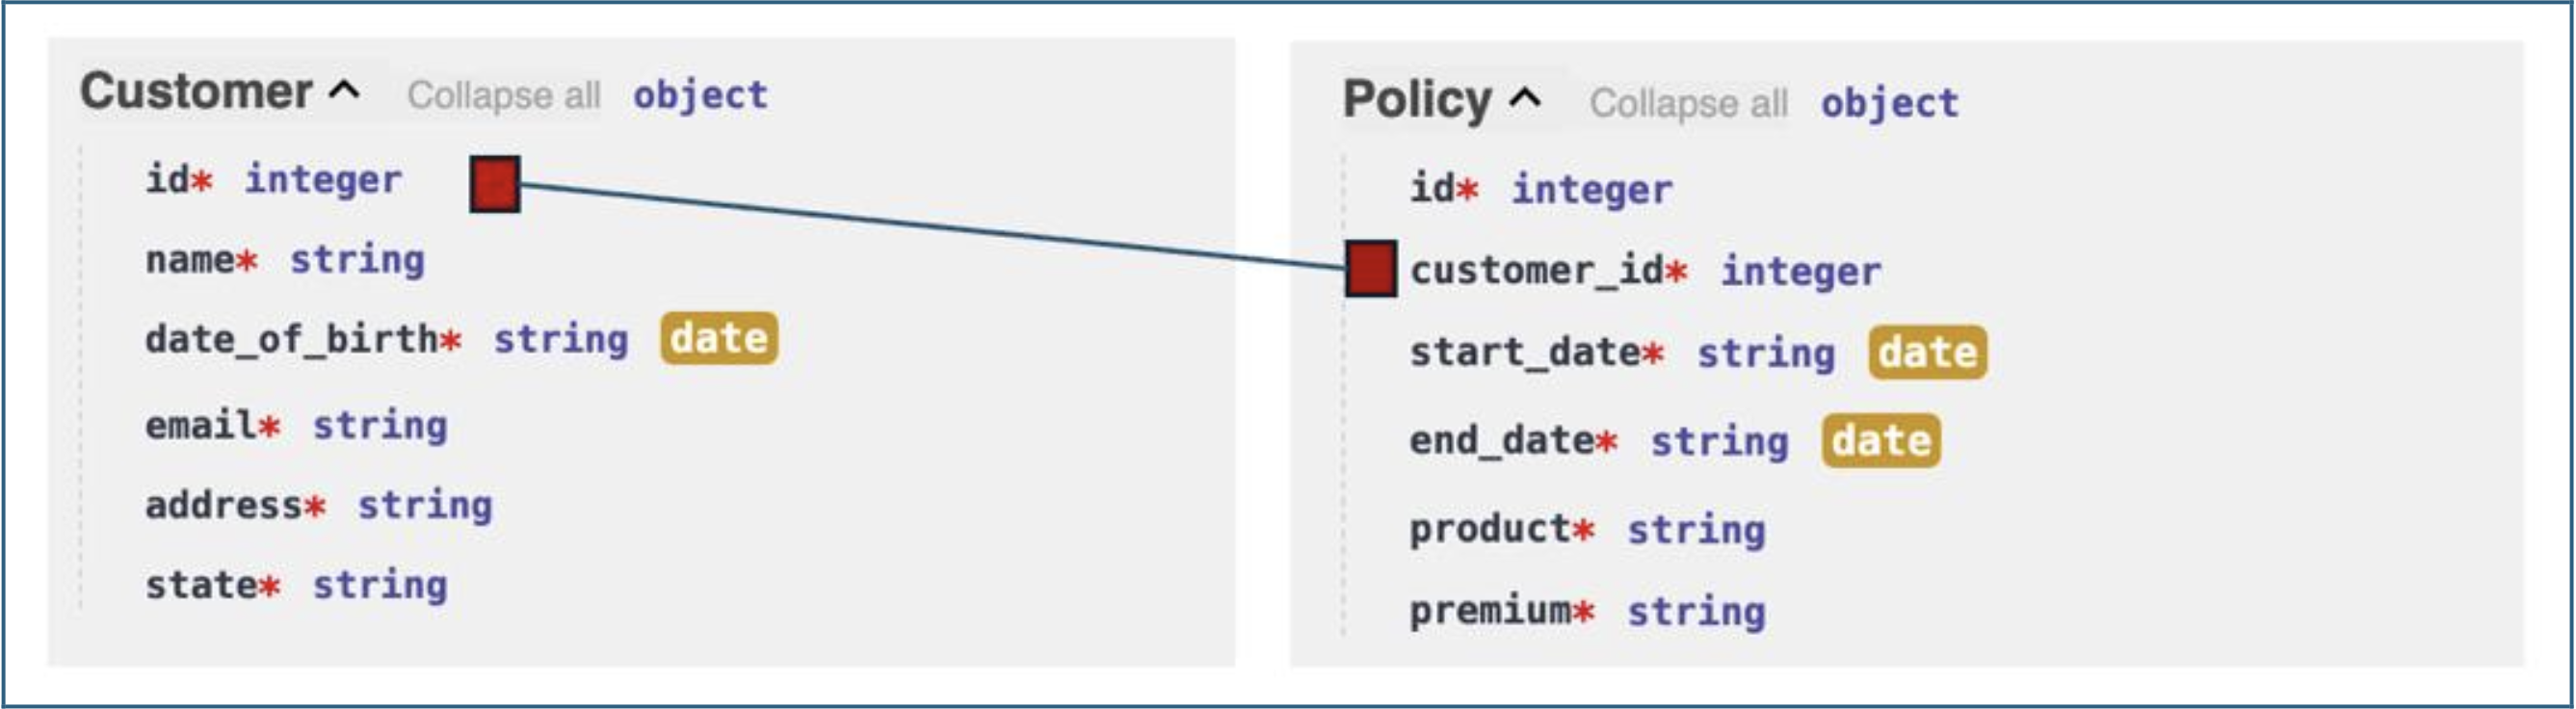
We’ll start by looking at the data model and underlying APIs. For simplicity we are only dealing two entities, Customer and Policy, and they are linked using the customer ID.
Pre-requisites
- Make sure you've already setup the environment:
- Lab Environment setup
- Download the lab files
Reference Architecture
- User sends a natural-language message via the Chat UI or embedded web widget.
- The LLM analyses the message, plans the required tool calls, and extracts parameters.
- Orchestrate invokes one or more REST API endpoints on the Insurance backend.
- Tool results are returned to the LLM, which formats the final response.
- The formatted response is rendered in the chat interface (table, list, or prose).
- All interactions are recorded in Agent Analytics as a Trace for observability.
Key Components
This lab has been tested with watsonx Orchestrate (SaaS) running on IBM Cloud.
Ensure the following components are available in your environment:
| Component | Description | Example |
|---|---|---|
| watsonx Orchestrate | Used for building and deploying the AI Agent | SaaS - IBM Cloud |
| Agent Builder | Interface to configure, test, and deploy the agent | Orchestrate ? Build ? Agent Builder |
| Customer Service API | Backend service that provides customer and order data | FastAPI / mock REST API |
| JSON Tool Files | OpenAPI specification files used to define tools | customer-service.json |
| Web Integration (Optional) | HTML page where the chat widget is embedded | index.html |
| LLM (Foundation Model) | For reasoning and planning during conversations | IBM Granite / Mistral / Meta Llama |
| Storage (Optional) | For tracking agent metrics or chat logs | Cloud Object Storage / internal DB |
Lab Files
| File | Purpose |
|---|---|
insurance-services.json |
OpenAPI specification for the Insurance API backend |
insurance.html |
Brokerage portal HTML page for web embedding exercise |
Steps
1. Explore the Insurance APIs
Before building the agent, familiarise yourself with the API endpoints that will become agent tools.
1.1 Open the API documentation
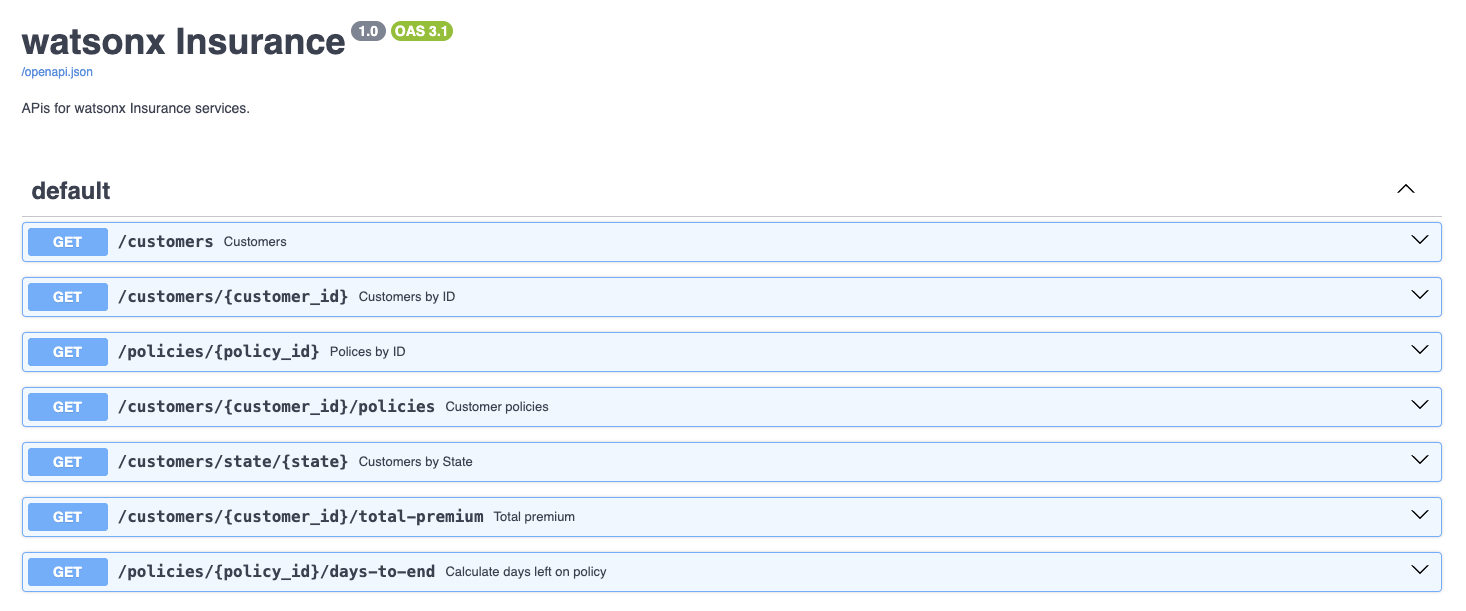
Navigate to the Insurance API Swagger UI in your browser:
You will see seven GET endpoints grouped under default.
1.2 Test Customers by ID
- Click Customers by ID to expand the section.
- Click Try it out.
- Enter
2in thecustomer_idfield. - Click Execute.
- Scroll down to view the Response body — it contains the full customer record for customer 2 (name, DOB, email, address, state).
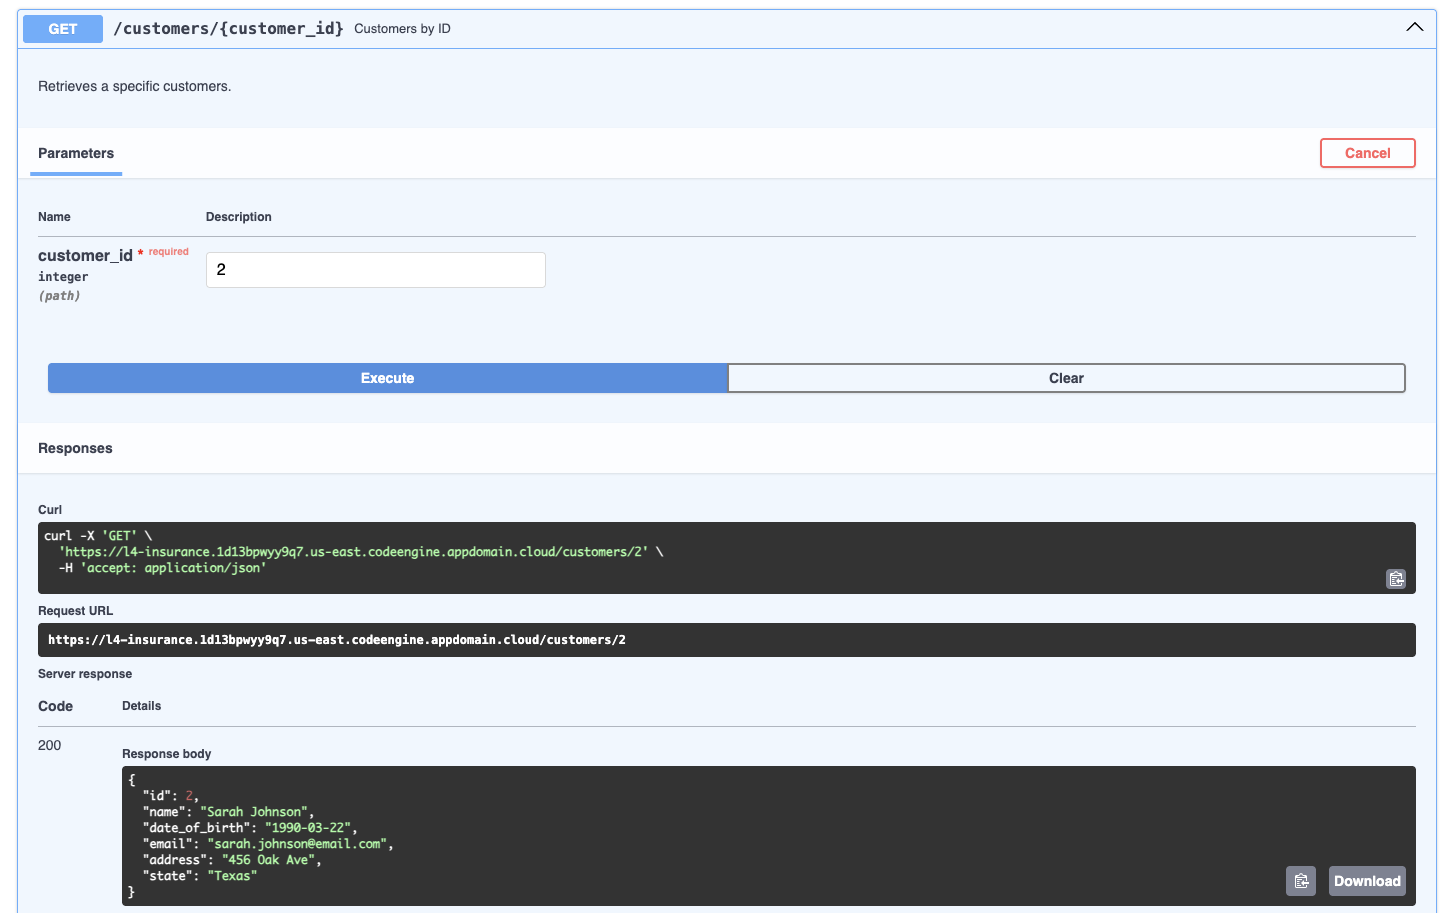
Key insight: To use this endpoint, the agent must parse the customer ID from the user's natural-language request and pass it as a path parameter to the API.
1.3 Test Customer Policies
- Collapse Customers by ID, then expand Customer policies.
- Click Try it out, enter
2, click Execute. - Scroll to the Response body — it shows all policies linked to customer 2 (product, premium, start/end dates).
Note: Policy start and end dates are dynamically regenerated from today's date, so results will differ each run.
1.4 Test the remaining endpoints
Individually test the three remaining operation types:
| Operation | Parameter to use | What it does |
|---|---|---|
| Customers by State | Texas |
Returns all customers in Texas. Case-sensitive. |
| Total premium | 2 |
Returns the sum of all premiums for customer 2. |
| Calculate days left on policy | 11 |
Returns the number of days until policy 11 expires. |
2. Create the Agent
2.1 Launch watsonx Orchestrate
- Open your IBM Cloud service and click Launch watsonx Orchestrate.
- Click the main menu icon (top-left hamburger menu).
2.2 Open Agent Builder
- Expand Build in the left navigation panel.
- Click Agent Builder.
2.3 Create a new agent
- Click Create agent.
- Select Create from scratch.
- Fill in the creation form:
| Field | Value |
|---|---|
| Name | Insurance |
| Description | This agent retrieves information about customers and their policies |

- Click Create.
The Agent Builder workspace opens with three key areas:
| Area | Description |
|---|---|
| Navigation Panel (left) | Switch between Profile, Knowledge, Toolset, Behavior, Channels |
| Configuration (centre) | Set up and customise the agent |
| Preview (right) | Live test the agent during development |

Below is a description of each section:
-
Profile: Define your agents purpose, usage scenarios, and interaction style. Describe what the agent does, when it should be used (especially in multi-agent configurations), and choose its style Default or ReAct guide how it interprets requests, plans, and uses tools.
-
Knowledge: Equip your agent with knowledge by uploading files or connecting to conversational search platforms such as Milvus, Elasticsearch, or custom-built sources. This ensures the agent can generate accurate, contextual responses by drawing on relevant content.
-
Toolset: Provide your agent with tools to perform tasks. Tools can be added from the Catalog, imported from OpenAPI specification files or MCP servers, or built with custom flows. Tools extend the agents capabilities, enabling it to automate actions such as retrieving data or sending emails.
-
Behavior: Define how the agent interacts with users, formats data, and handles requests. Add rules and instructions to shape its tone, response style, and overall behavior during interactions.
-
Channels: Connect your agent to communication platforms like Slack or embed it in a website.
3. Import API Tools
3.1 Open the Toolset
Click Toolset in the left navigation panel.
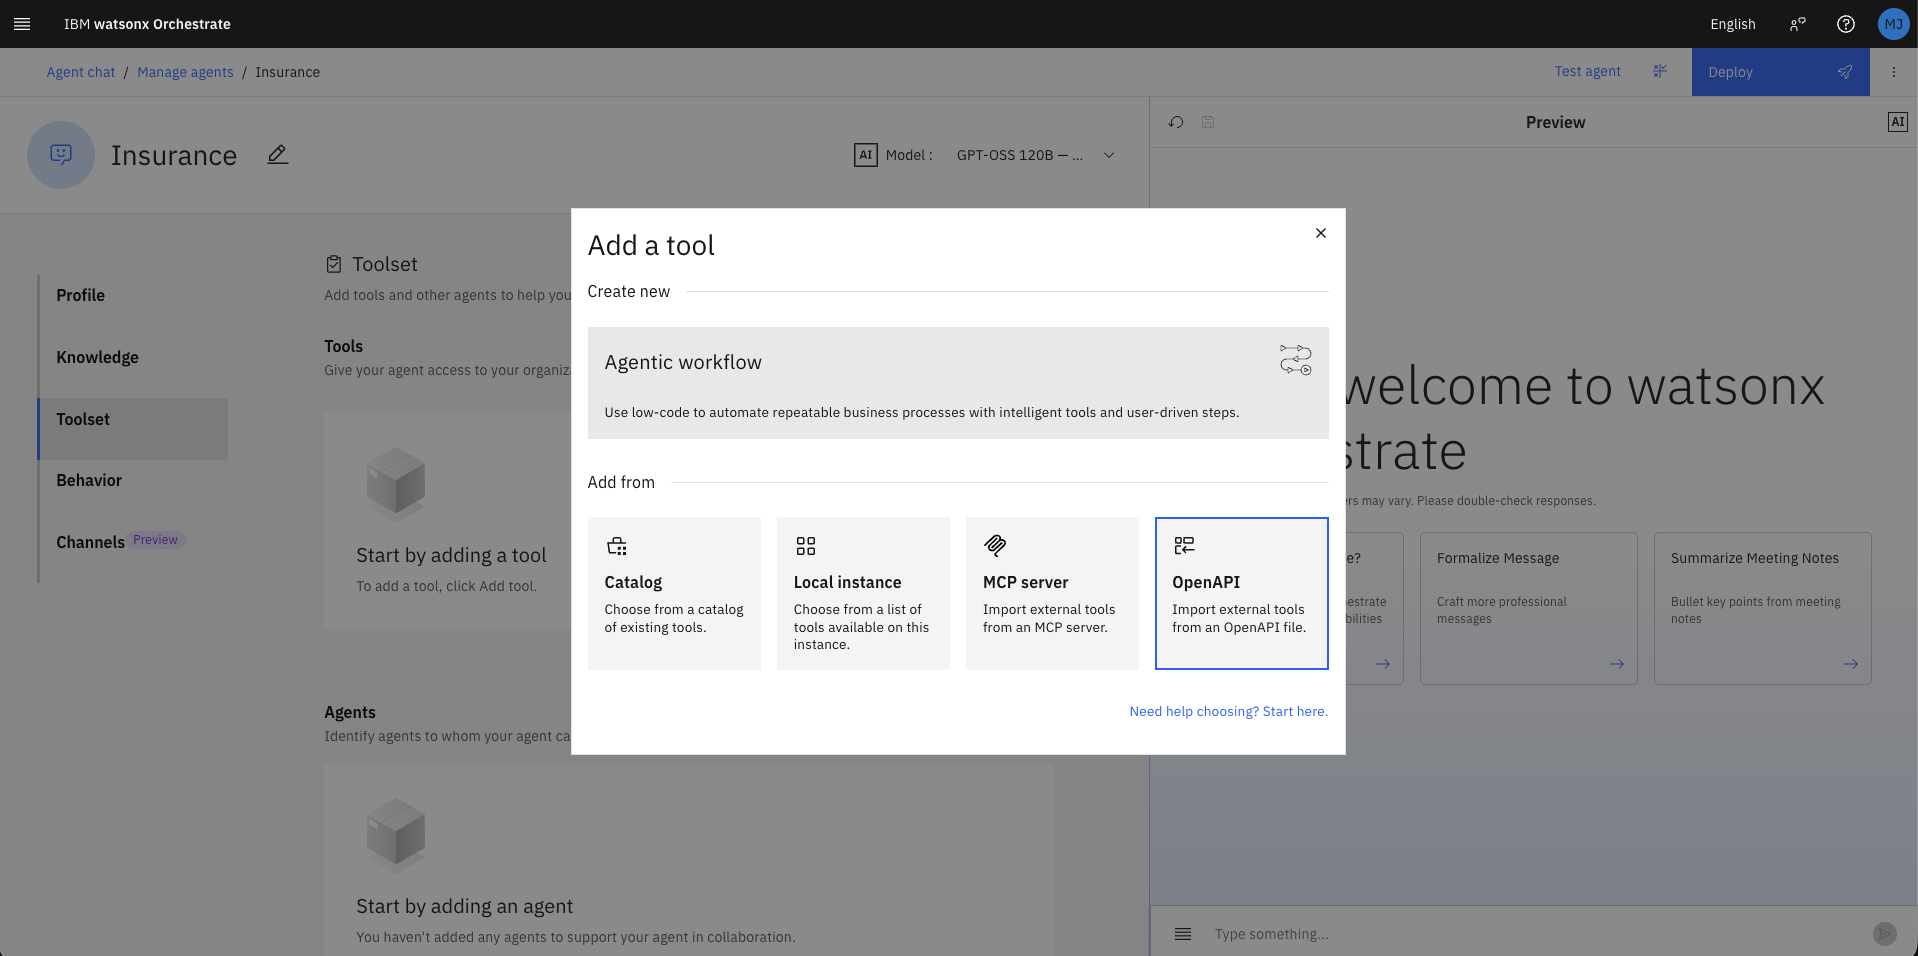
3.2 Add a new tool
- Click Add tool.
- Click OpenAPI.
3.3 Upload the OpenAPI specification
- Drag and drop (or browse to) the
insurance-services.jsonfile you downloaded earlier. - Wait for the Validation successful confirmation.
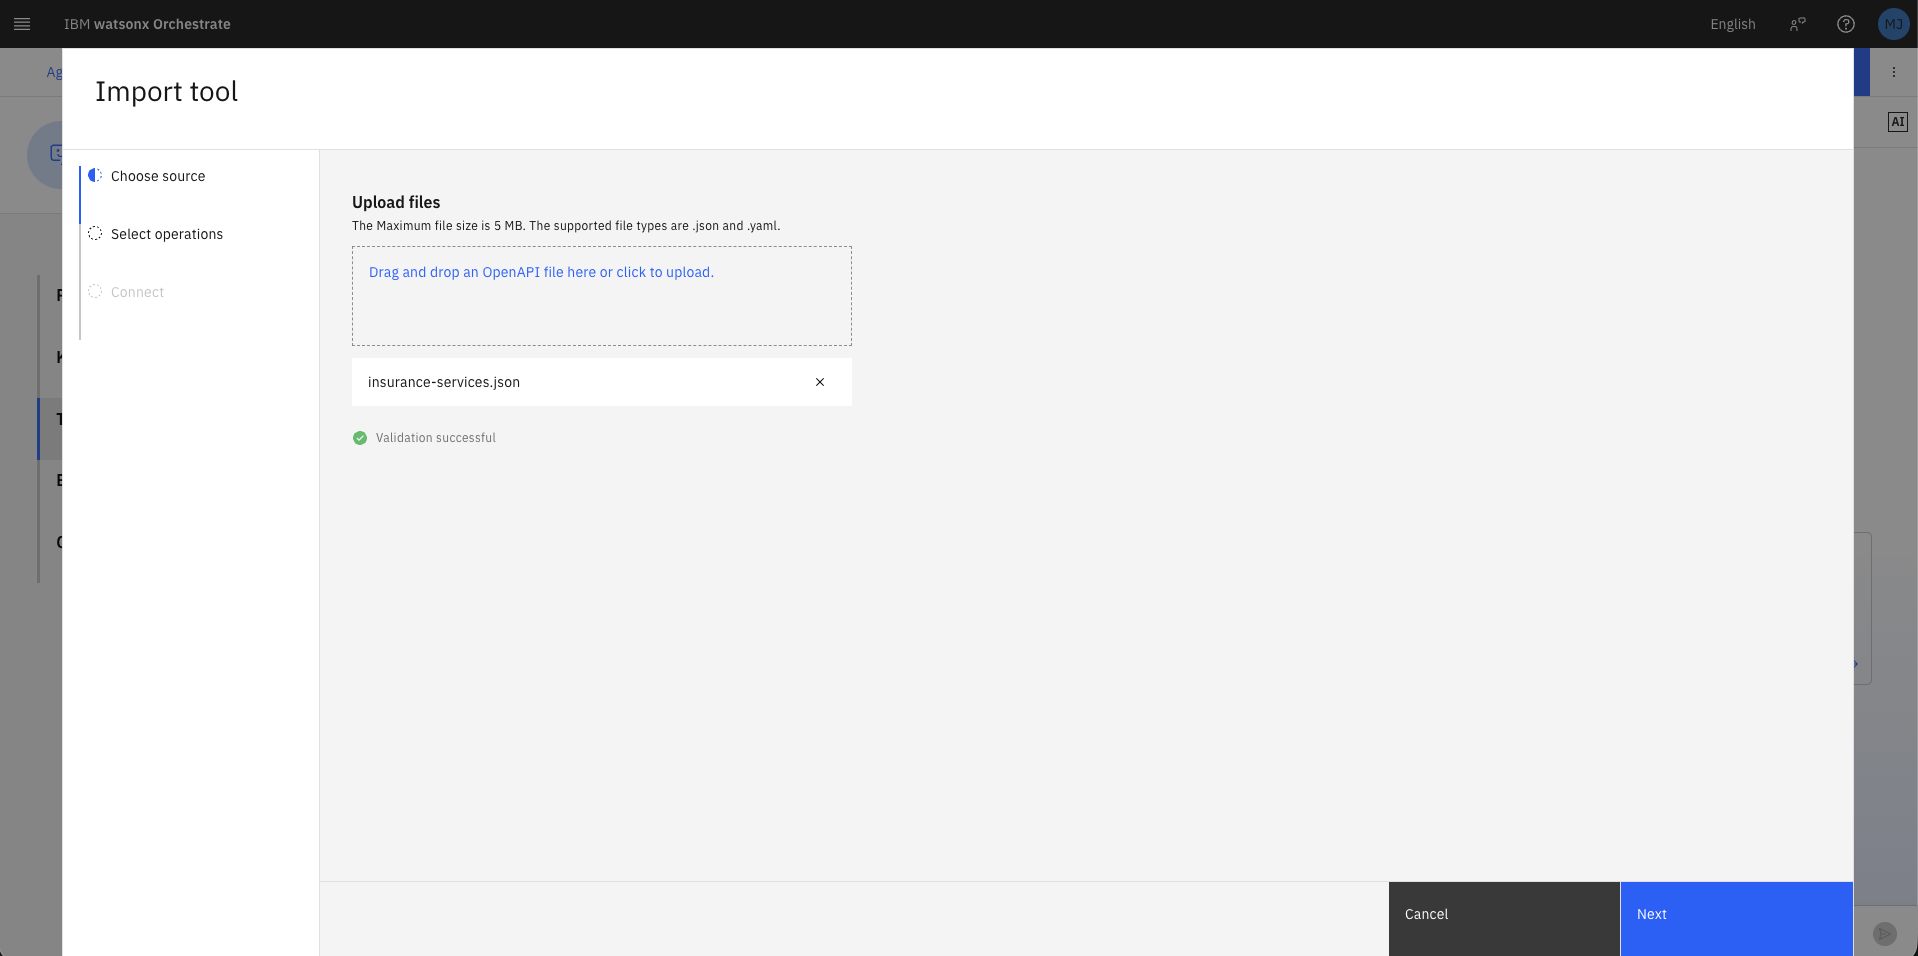
- Click Next.
The
insurance-services.jsonfile is an OpenAPI 3.1.0 specification. Orchestrate parses it to extract tool names, descriptions, input parameters, and output schemas automatically. See openapis.org for further details on the OAS format.
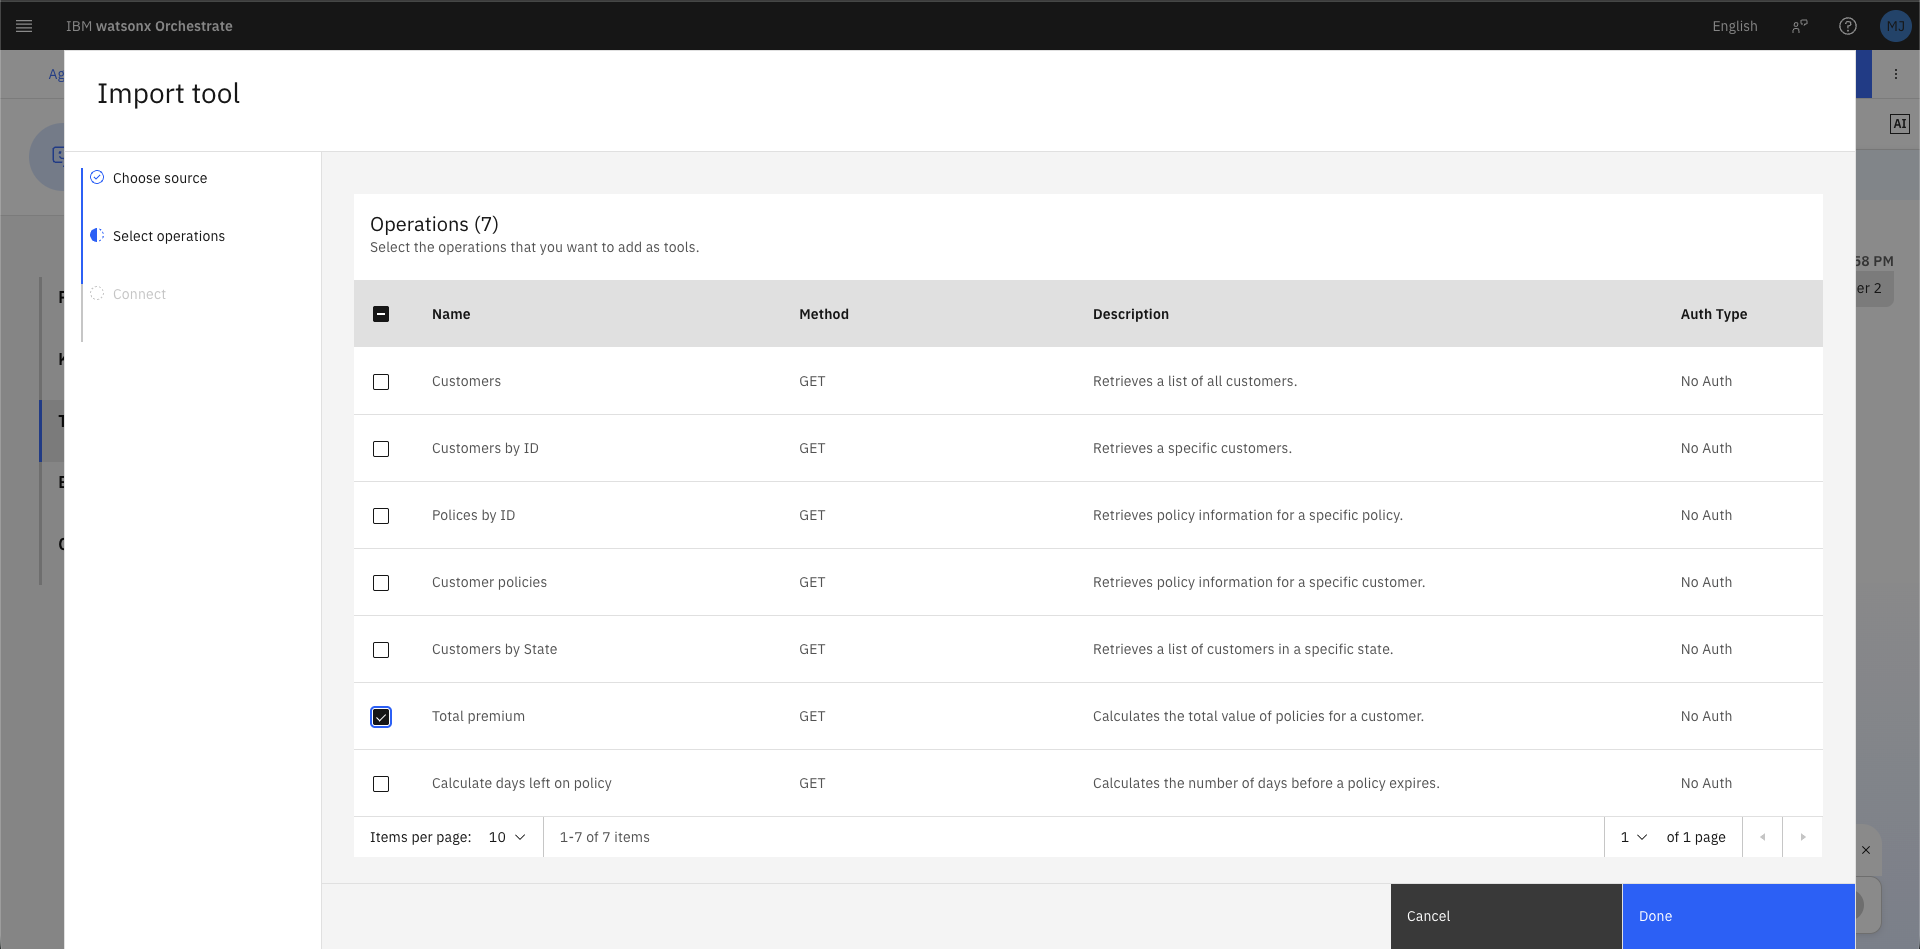
3.4 Select operations
From the list of 7 operations, select all except Total premium, then click Done.
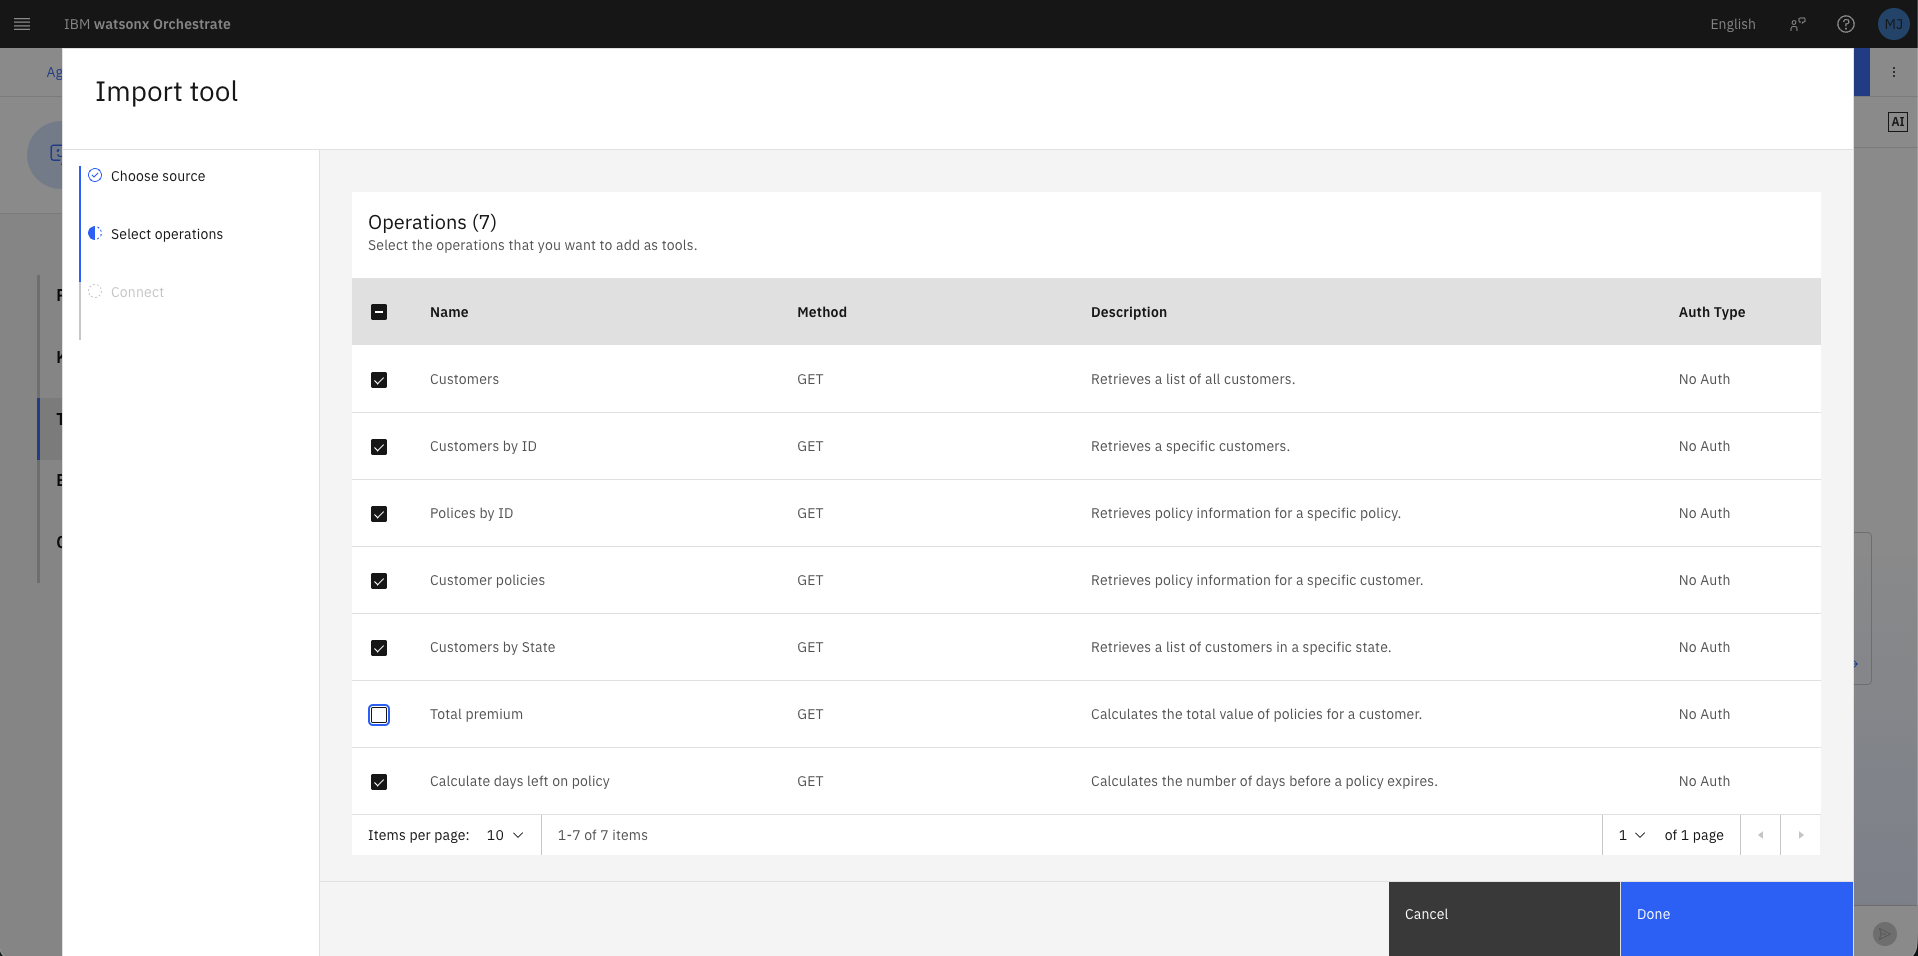
| Operation | Import now? |
|---|---|
| Customers | ✅ Yes |
| Customers by ID | ✅ Yes |
| Policies by ID | ✅ Yes |
| Customer policies | ✅ Yes |
| Customers by State | ✅ Yes |
| Total premium | ❌ No — skip for now |
| Calculate days left on policy | ✅ Yes |
Total premiumis excluded deliberately. You will add it later to compare LLM-only aggregation (unreliable) versus tool-assisted aggregation (deterministic).
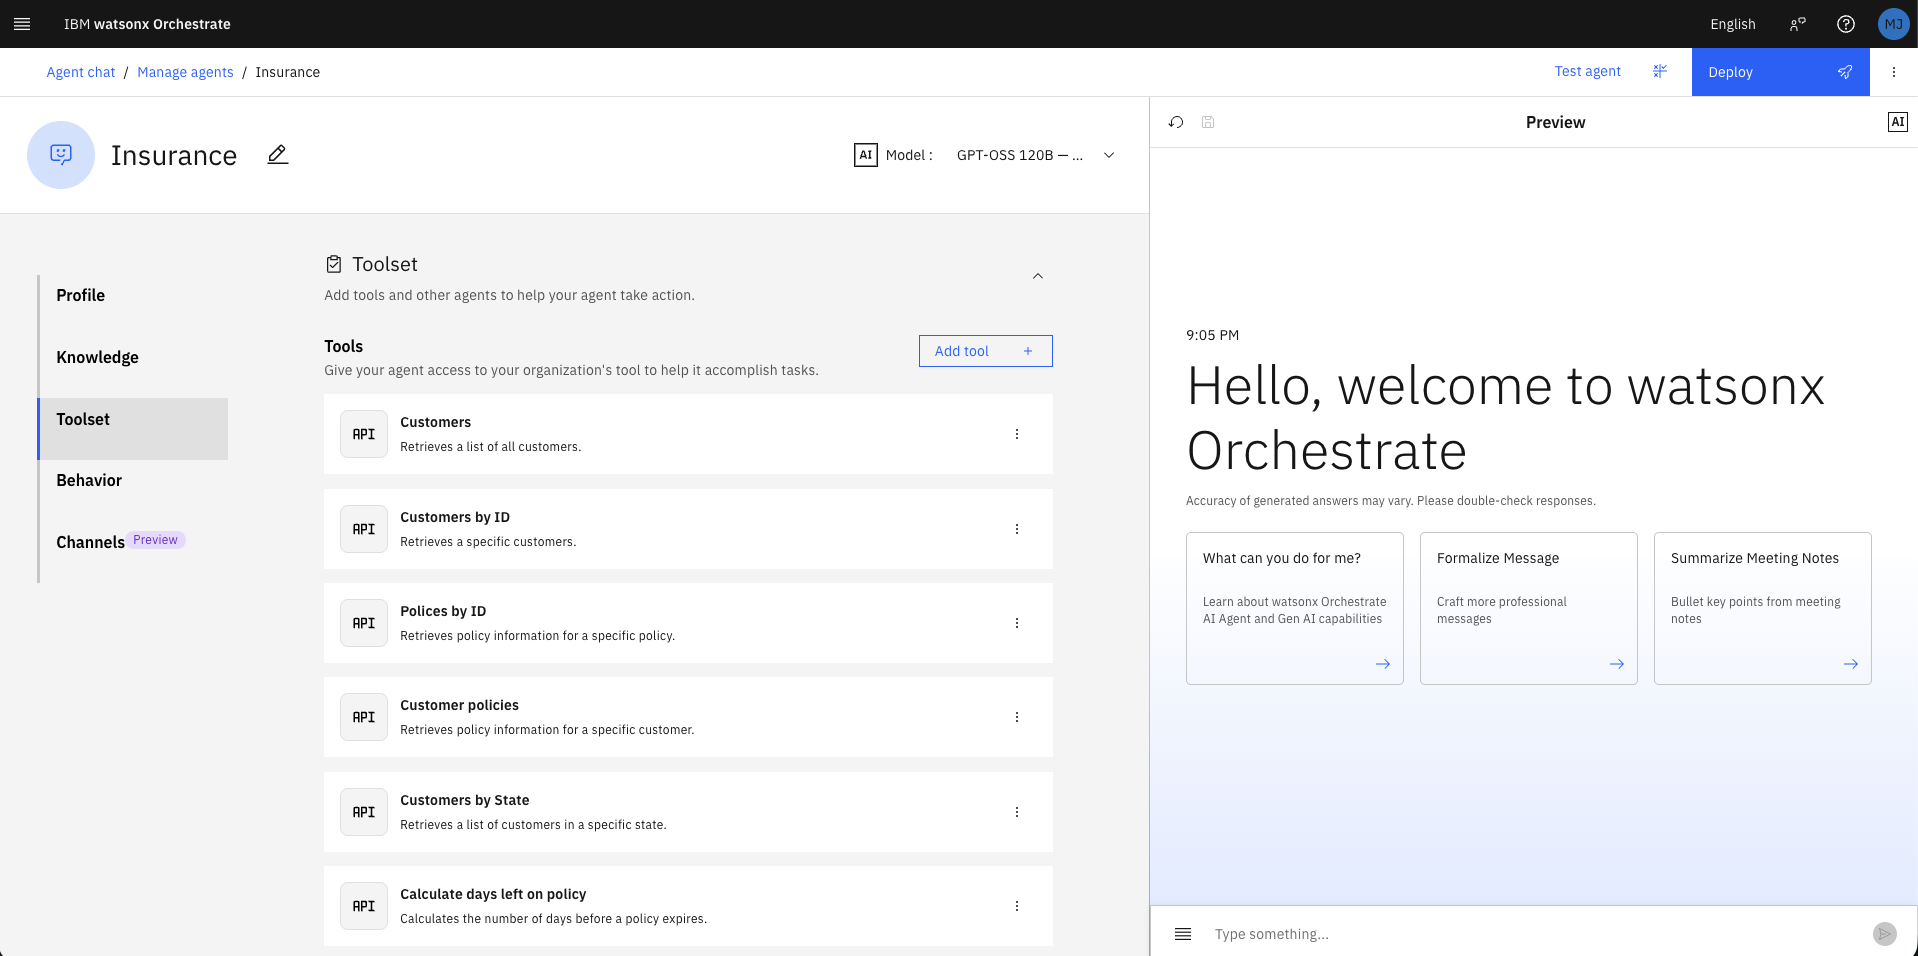
3.5 Review an imported tool
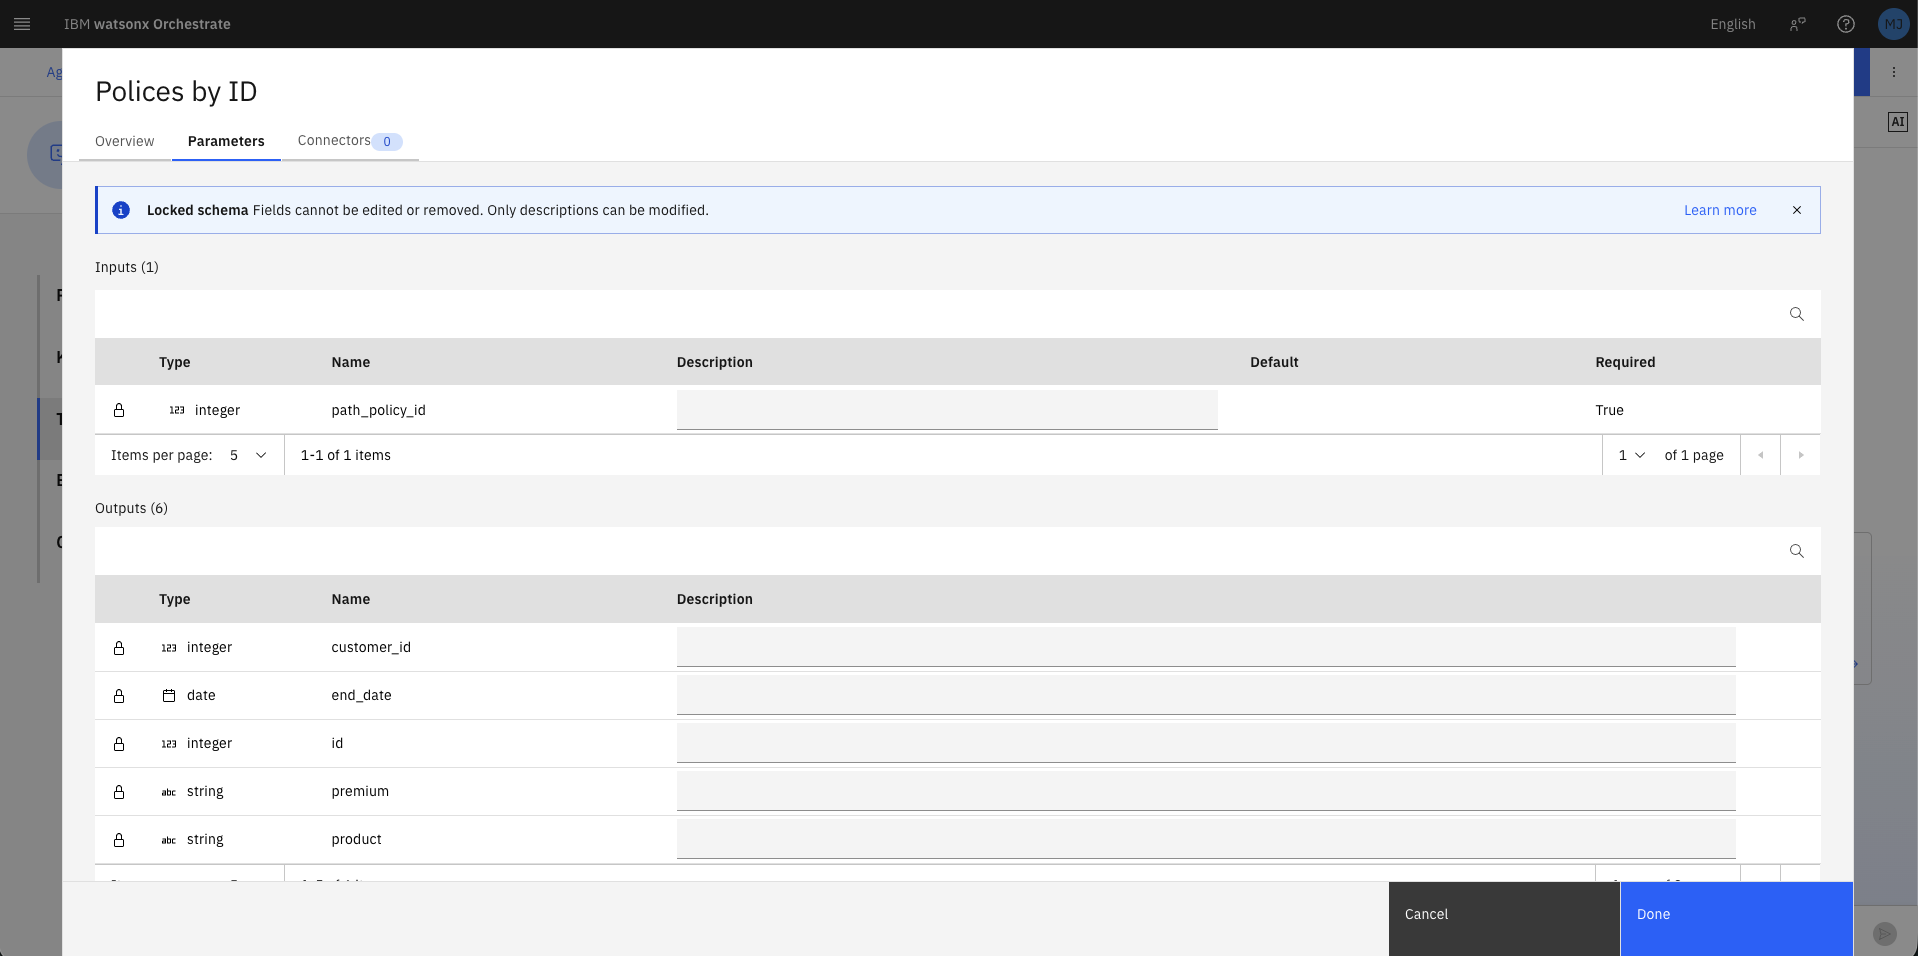
- Click the three dots (⋮) on the Policies by ID tool row.
- Click Edit details.
- Note that the tool Description has been auto-populated from the OpenAPI spec — this is what the LLM uses to decide when to call this tool.
- Select the Parameters to review Inputs (requires
path_policy_id, integer) and Outputs (returnsid,premium,product,end_date,start_date). - Click Cancel.
Best practice: Avoid tools with similar descriptions or overlapping responsibilities. Clear, distinct descriptions improve the agent's tool selection accuracy.
4. Basic Tool Usage
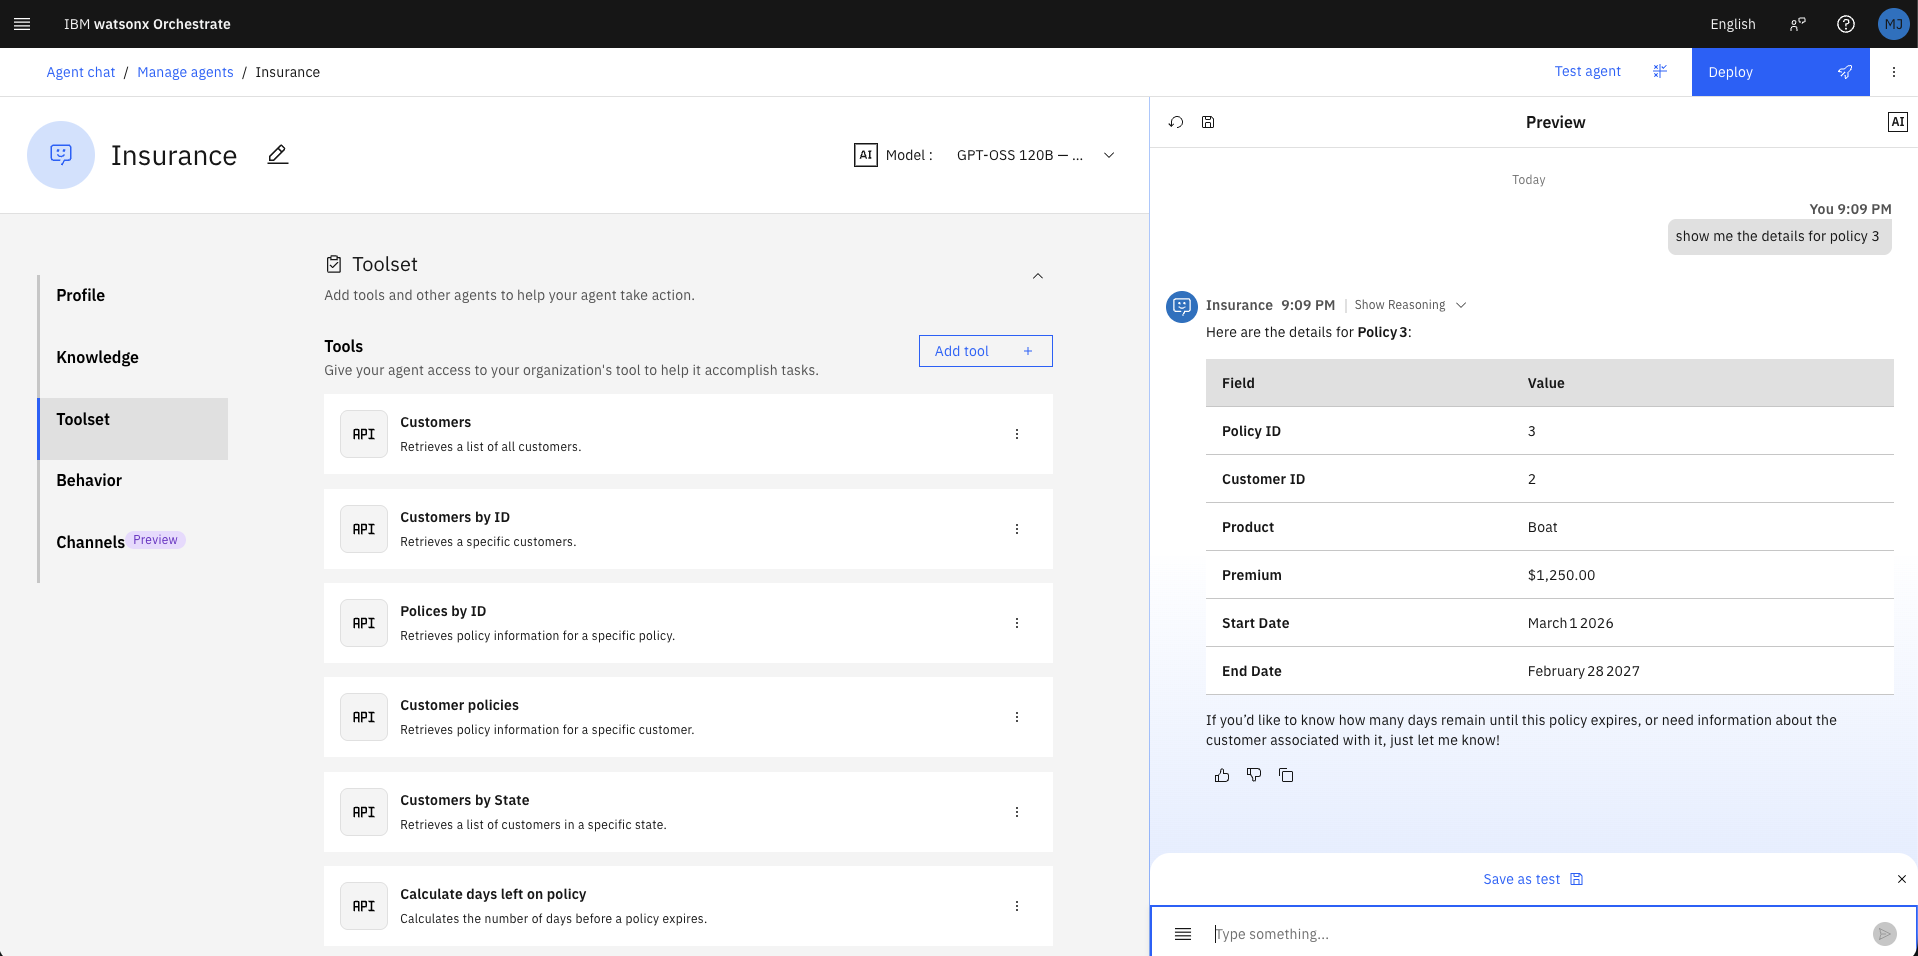
4.1 Query a specific policy
In the Preview panel (right side), type the following and press Enter:
Observe how the agent:
- Identifies the correct tool (Policies by ID)
- Extracts 3 as the policy_id parameter
- Calls the API and returns the formatted result
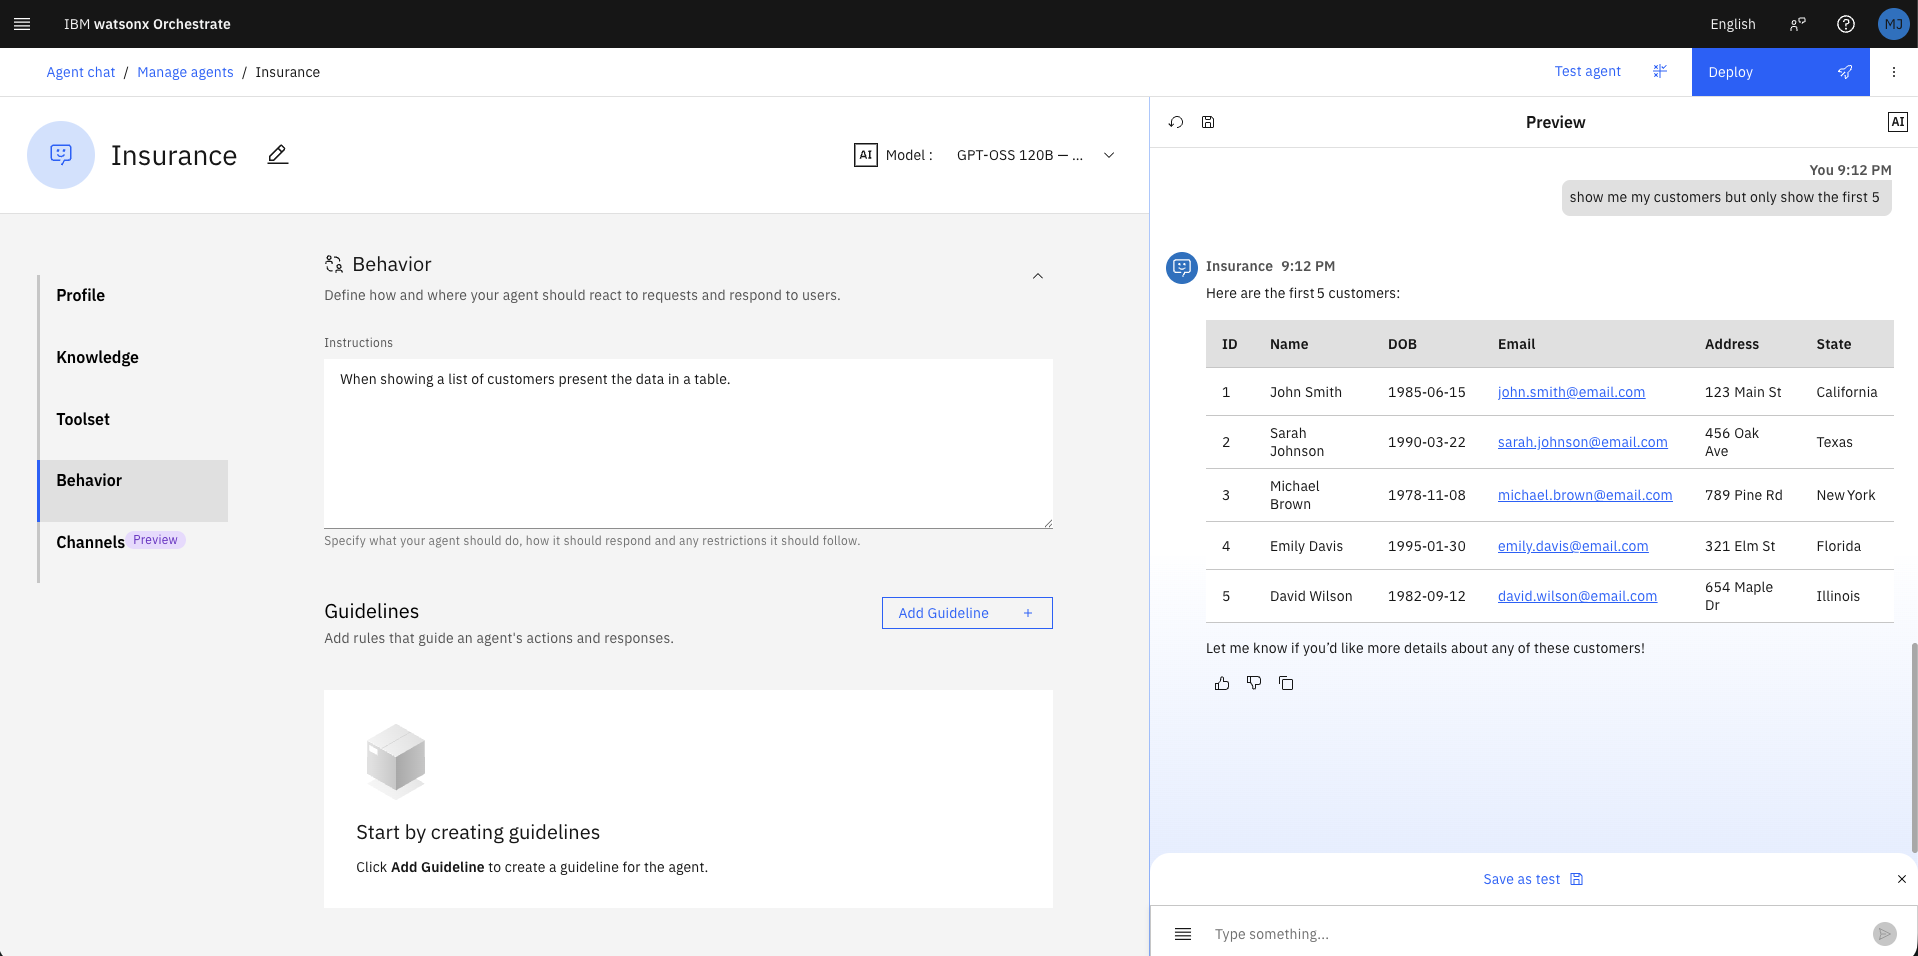
4.2 List all customers by adding improved output formatting instruction
- Click Behavior in the left navigation panel.
- In the Instructions field, enter:
- Type the following in the Preview panel:
The data is returned in a Markdown table. Note that all 13 customers are shown, which may overflow the screen.
4.3 Limit results inline
Type the following in the Preview panel:
Orchestrate calls the same Customers tool (which returns all records) but the LLM truncates the display to the first 5 rows as instructed — no API change required.
5. Filtering
5.1 Filter by a single state
In the Preview panel, type:
Click Show Reasoning on the response, then expand Step 1 to confirm:
- Tool used: customers_by_state
- Input: { "state": "Texas" }
- Output: JSON array of Texas customers
Key insight: The agent chose the targeted
Customers by Statetool rather than fetching all customers and filtering client-side. This is more efficient and avoids overloading the agent's context window with unnecessary data.
5.2 Filter by multiple states
- Click the reset icon (↺) in the Preview panel to clear conversation history.
- Type:
Click Show Reasoning — expand Step 1 and Step 2:
- Step 1: Tool
customers_by_statecalled with"state": "Texas" - Step 2: Tool
customers_by_statecalled with"state": "Florida" - Results from both calls are merged into a single response table.

5.3 Demonstrate context memory (case correction)
Without resetting, type:
Note the lowercase florida. Because the prior conversation already contained the correctly capitalised response for Florida, the agent filters from memory — no additional tool call is needed.
Now reset the chat and repeat the same lowercase query. This time:
- The agent must call the API fresh
- It may or may not correct capitalisation to
Floridadepending on LLM behaviour - If it submits
florida(lowercase) to the case-sensitive API, it returns zero results
Design implication: Do not rely on LLM case correction for case-sensitive APIs. The correct solution is to make the API case-insensitive, or to add an instruction/validator that normalises state input before the tool call.
6. Aggregation
This section demonstrates why tools should be used for calculations rather than relying on the LLM.
6.1 Aggregation with conversational context (accurate)
- Reset the chat.
-
Type:
-
After the table appears, type:
The agent will correctly sum the premiums (e.g., $3,730.00) because the policy data is already in the conversation history. The LLM can "see" the numbers and sum them reliably in this context.
6.2 Aggregation without context (unreliable)
- Reset the chat.
- Type directly:
The agent calls customer_policies to fetch the data, then attempts to sum the premiums itself. Results may be $2,730, $2,830, or $3,730. The LLM is a text generator, not a calculator, and is prone to arithmetic errors, especially when multiple currency-like fields (premium, excess, tax) exist in the output.
Key lesson
Always use a dedicated calculation tool for deterministic numeric operations. LLM-based arithmetic is non-deterministic and should not be used in production for financial data.
6.3 Add the Total premium tool
- Click Toolset, then Add tool.
- Click OpenAPI → Import from file.
- Upload
insurance-services.jsonagain, click Next. - This time, select only Total premium, then click Done.
6.4 Add a tool-use instruction
- Click Behavior.
- Append the following to the Instructions field:
6.5 Re-run with the new tool
- Reset the chat.
-
Type:
-
Click Show Reasoning → expand Step 1.
Confirm:
- Tool used:
total_premium - Input:
{ "customer_id": "2" } - Output:
{ "customer_id": 2, "total_premium": 3730 } - Result displayed: The sum of all policy premiums for customer 2 is 3730.
7. Context and Multi-Step Reasoning
This section demonstrates how the agent uses conversation history to resolve ambiguous references.
7.1 Set up context
- Reset the chat.
- Type:
A table of Texas customers appears (including Sarah Johnson, ID 2).
7.2 Follow-up with a name reference
- Type:
Click Show Reasoning expand Step 1:
- Tool:
customers_by_id - Input:
{ "customer_id": "2" }
The agent inferred Sarah's ID from the prior conversation no explicit ID was provided.
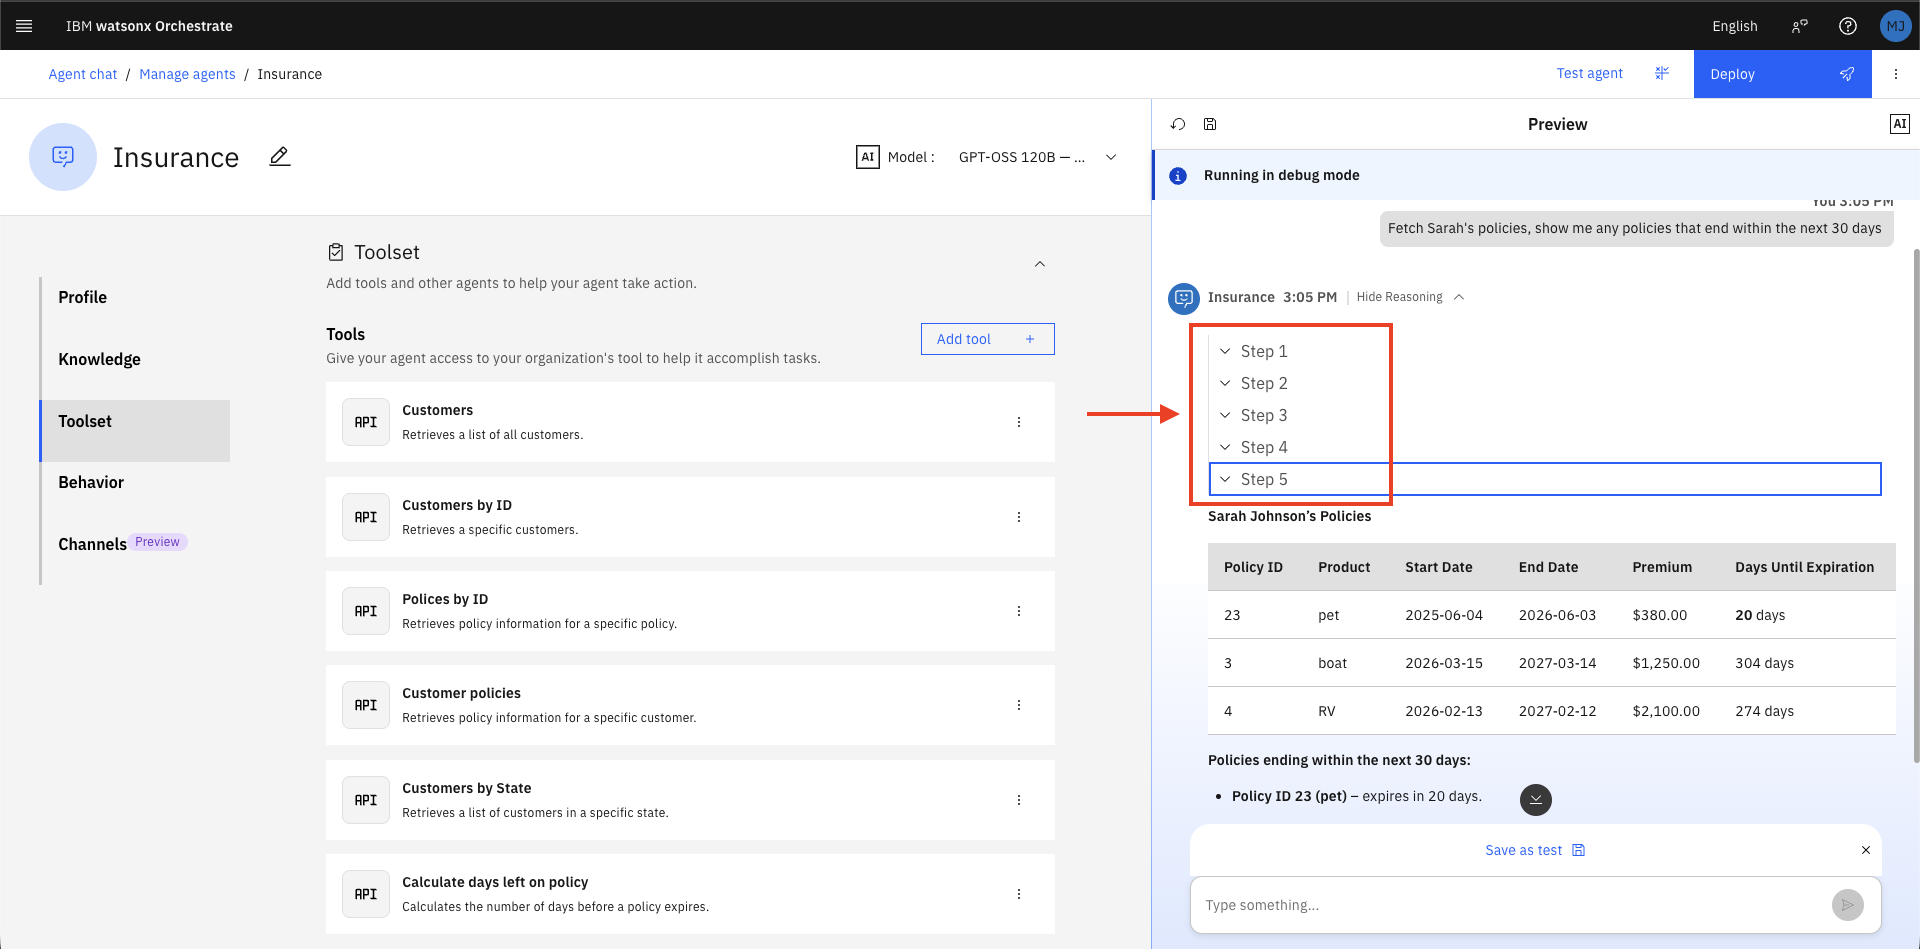
7.3 Multi-step policy analysis
- Type:
Click Show Reasoning — observe that 4 tool calls were required:
| Step | Tool | Purpose |
|---|---|---|
| Step 1 | customer_policies |
Fetch all of Sarah's policies (using ID 2 from context) |
| Step 2 | calculate_days_left_on_policy |
Check days remaining for policy A |
| Step 3 | calculate_days_left_on_policy |
Check days remaining for policy B |
| Step 4 | calculate_days_left_on_policy |
Check days remaining for policy C |
The agent then filters and displays only policies expiring within 30 days.
Design implication
Without prior context (Sarah's ID in memory), the agent may attempt a full customer scan to find "Sarah" — which is inefficient and fragile in datasets with many customers sharing the same first name. Design your data model and tool set to minimise ambiguous lookups.
8. Web Integration
Embed the agent into the provided brokerage HTML portal.
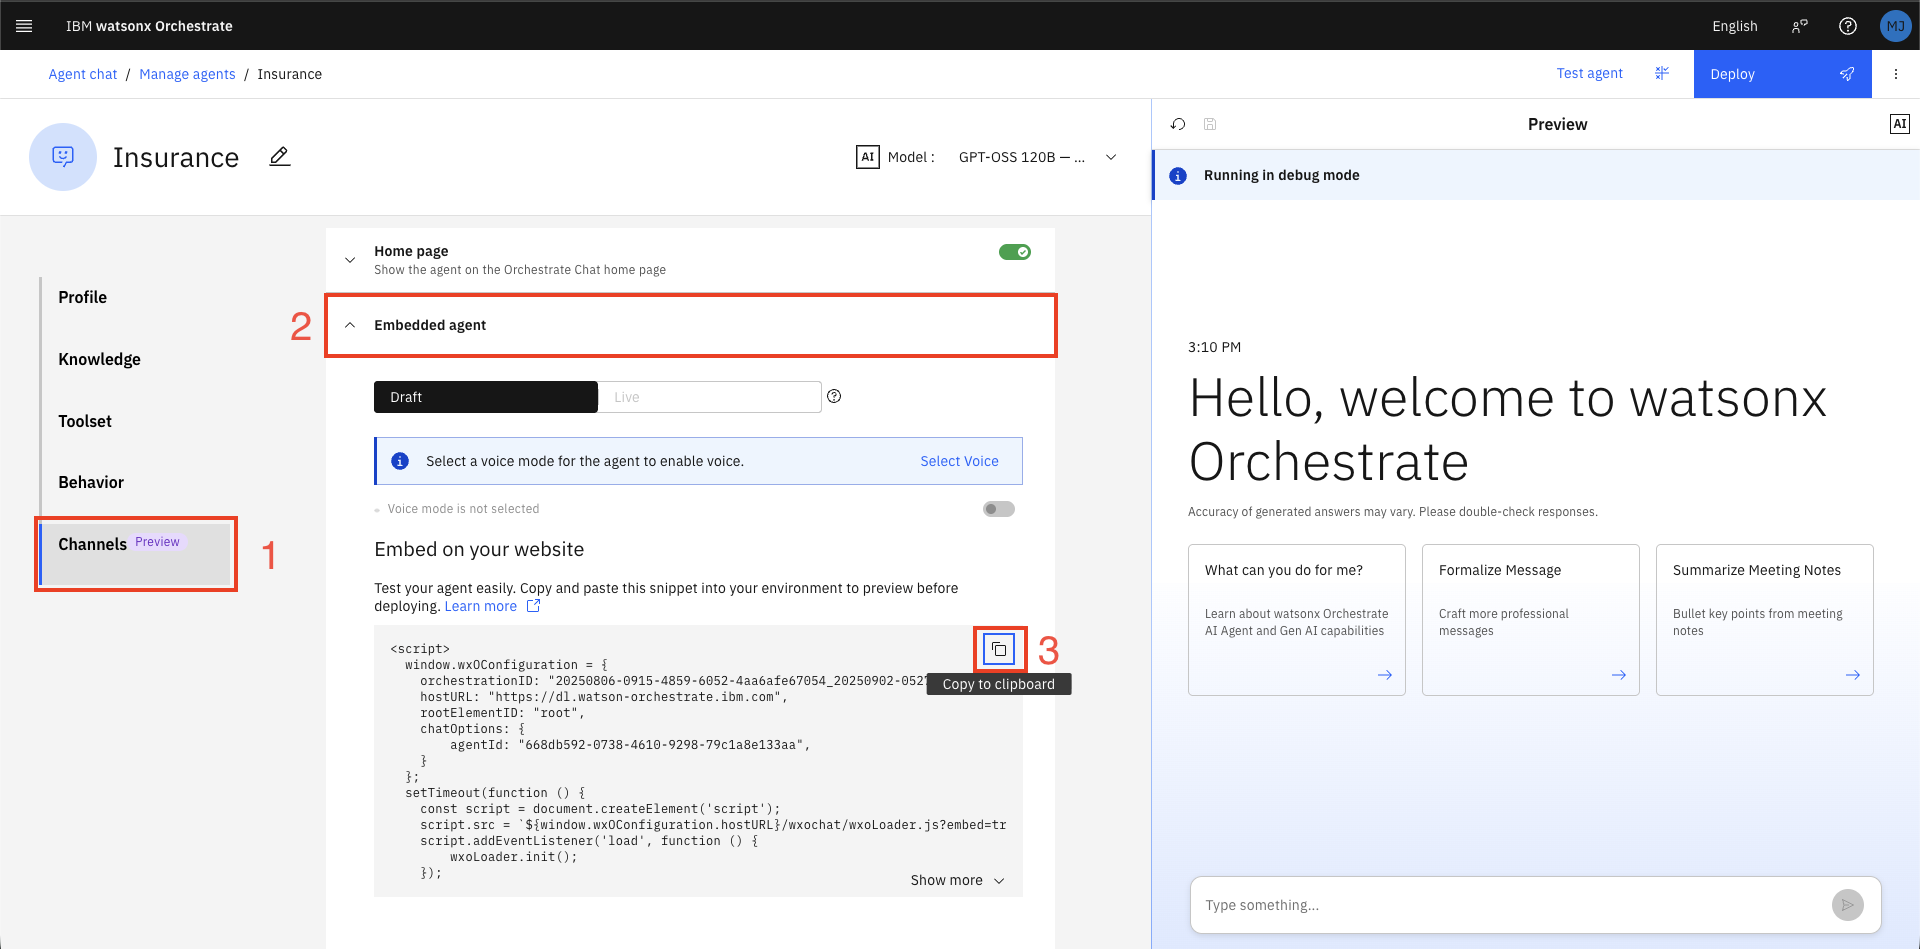
8.1 Get the embed script
- Click Channels in the left navigation panel.
- Click Embedded agent.
- Click the copy icon to copy the JavaScript snippet to your clipboard.
8.2 Edit the HTML file
- Open
insurance.htmlin a text editor (VS Code, Sublime Text, or similar — not a word processor). - Scroll to the bottom of the file. Locate the marker comment at lines 504–507:
<!-- Add the orchestrate script below this line  -->

<!-- The orchestrate script must be above this line -->
- Place your cursor on the blank line between the two comments (line 506).
- Paste the copied script. The result should look like:
<!-- Add the orchestrate script below this line  -->
<script>
  window.wxOConfiguration = {
    orchestrationID: "...",
    hostURL: "https://us-south.watson-orchestrate.cloud.ibm.com",
    rootElementID: "root",
    deploymentPlatform: "ibmcloud",
    crn: "crn:v1:bluemix:public:watsonx-orchestrate:us-south:...",
    chatOptions: {
      agentId: "...",
    }
  };
  setTimeout(function () {
    const script = document.createElement('script');
    script.src = `${window.wxOConfiguration.hostURL}/wxochat/wxoLoader.js?embed=true`;
    script.addEventListener('load', function () { wxoLoader.init(); });
    document.head.appendChild(script);
  }, 0);
</script>
<!-- The orchestrate script must be above this line -->
- Save the file and close the editor.
8.3 Open in a browser
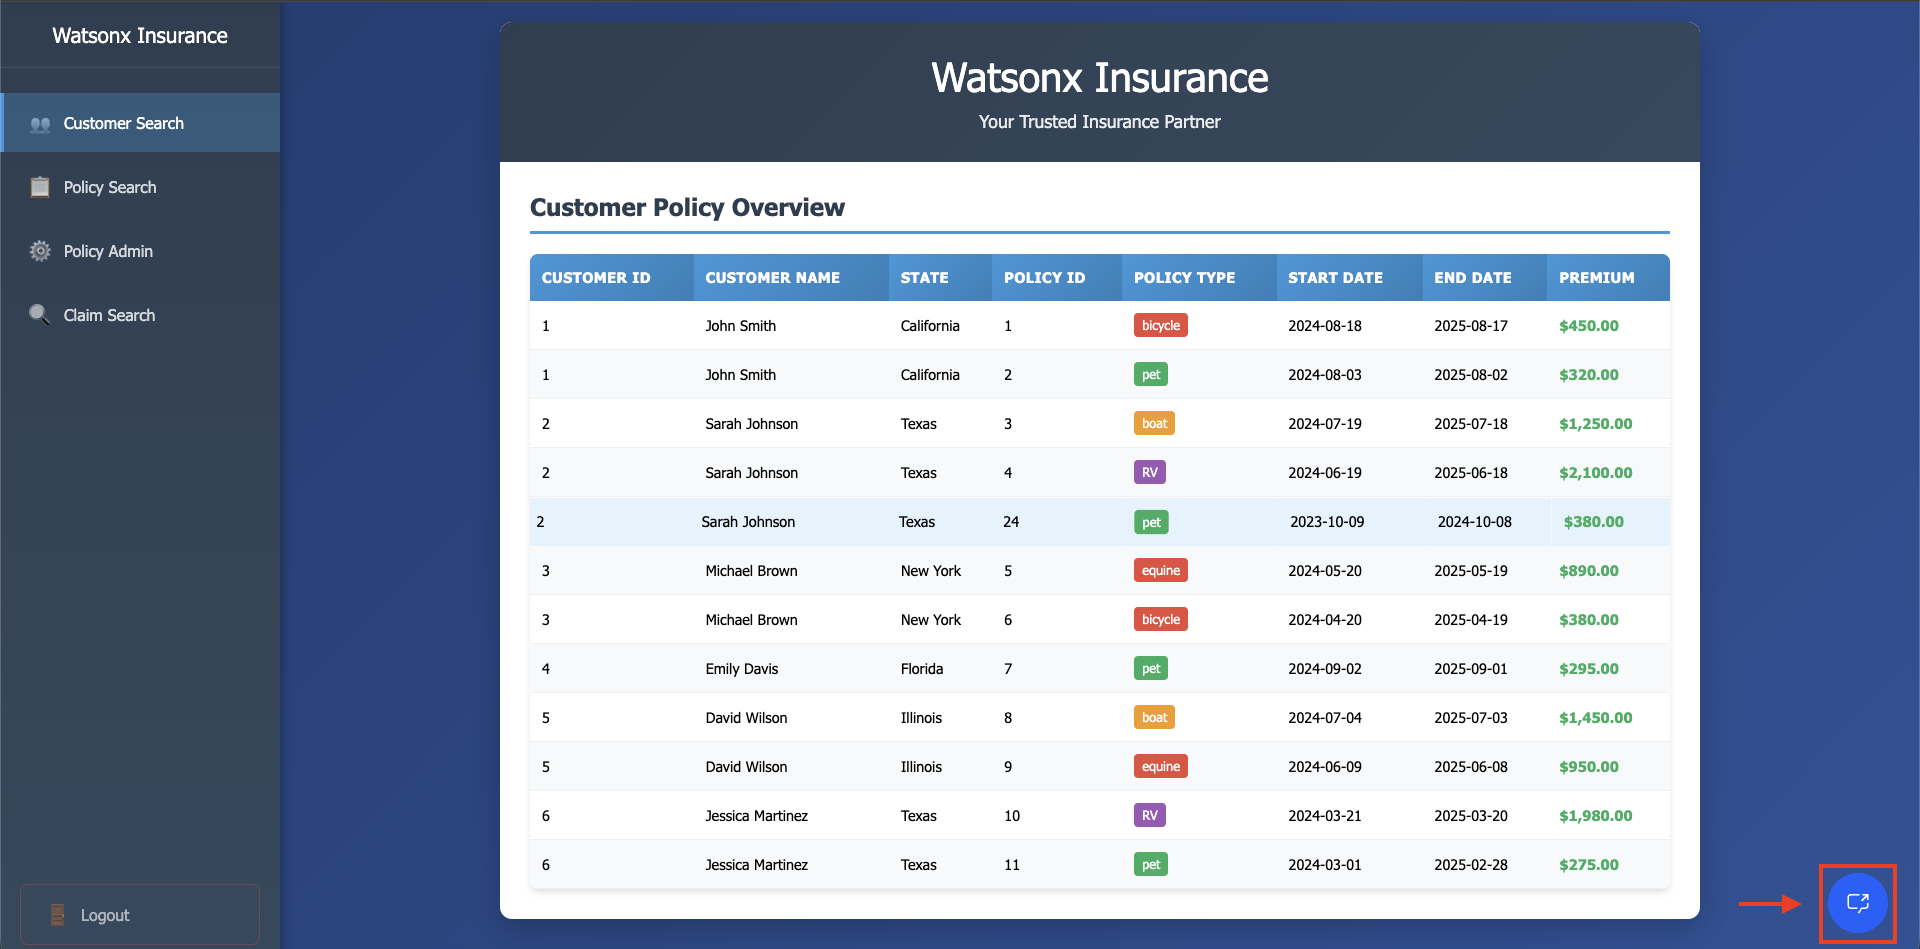
Right-click insurance.html and open with your browser (Chrome recommended).
A chat icon appears in the lower-right corner of the brokerage portal.
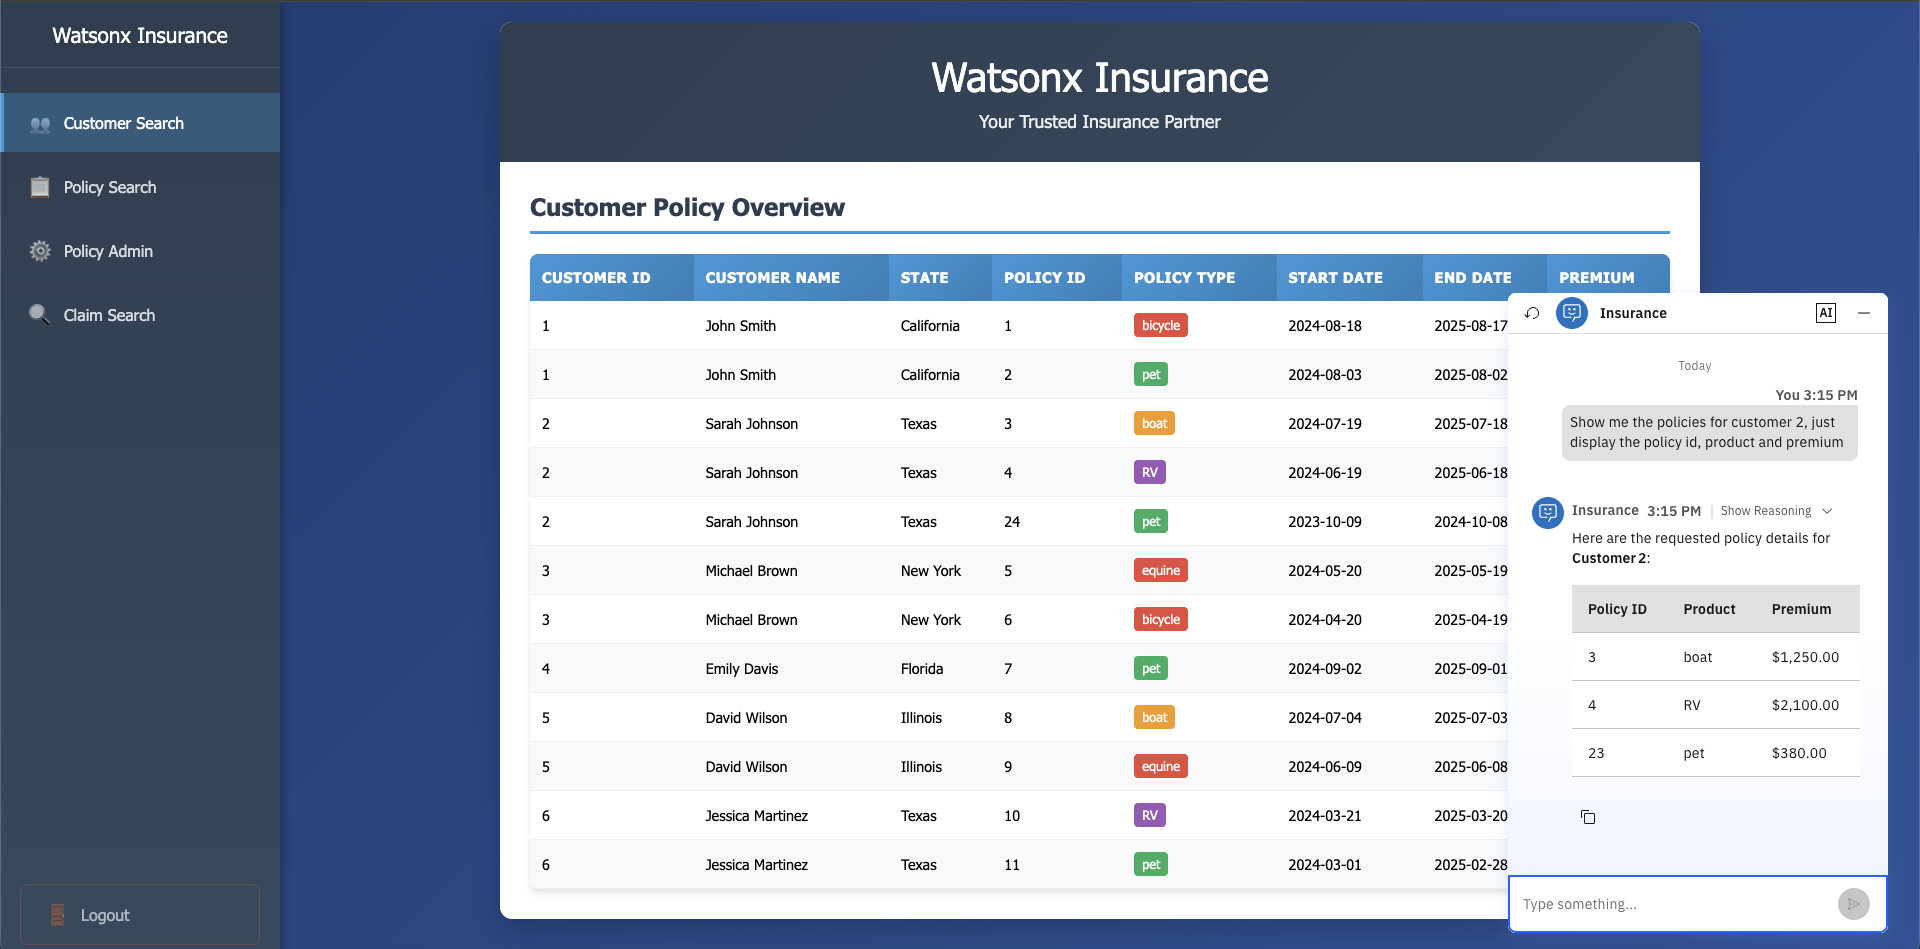
8.4 Test the embedded agent
Click the chat icon to open the widget, then type:
The agent retrieves and displays a focused table with only the three requested columns — confirming the embedded agent has full access to all configured tools.
9. Agent Deployment
Deploy the agent to make it available in the Orchestrate Chat UI for all users.
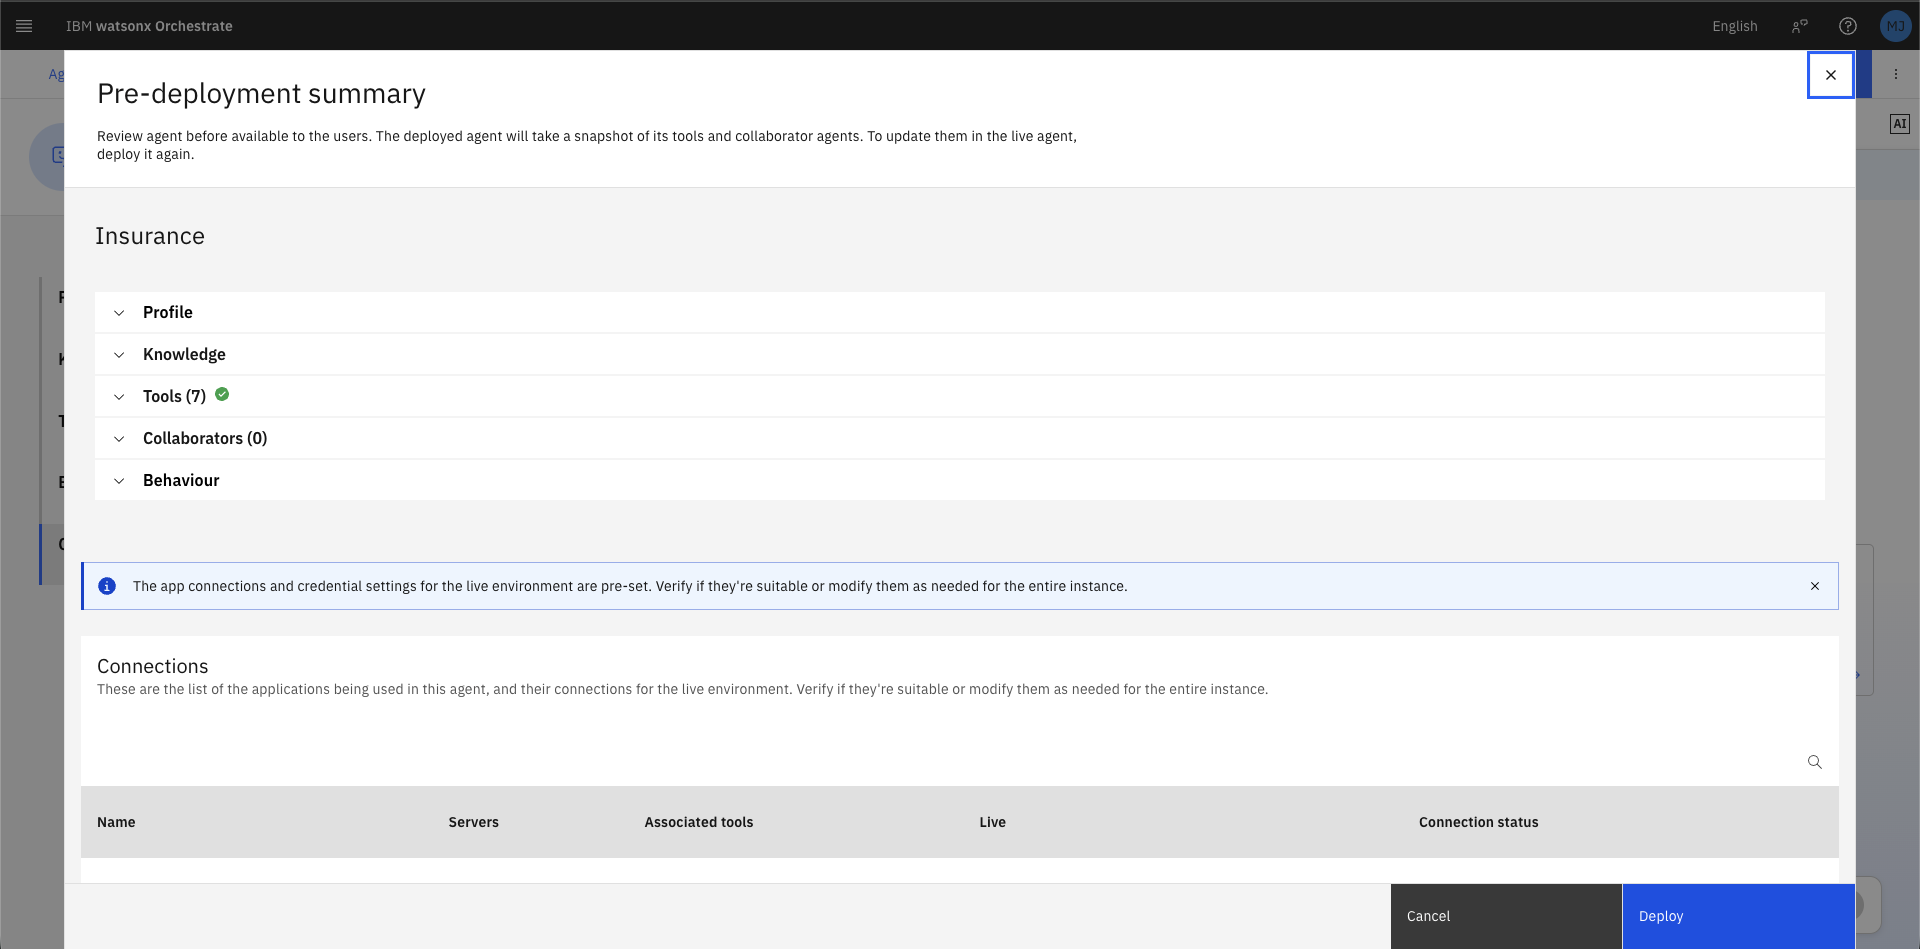
9.1 Initiate deployment
- Click Deploy (top-right button in Agent Builder).
- Review the Pre-deployment summary — it shows the agent's profile, knowledge sources, tools (7), collaborators, and behaviour configuration.
- Click Deploy to confirm.
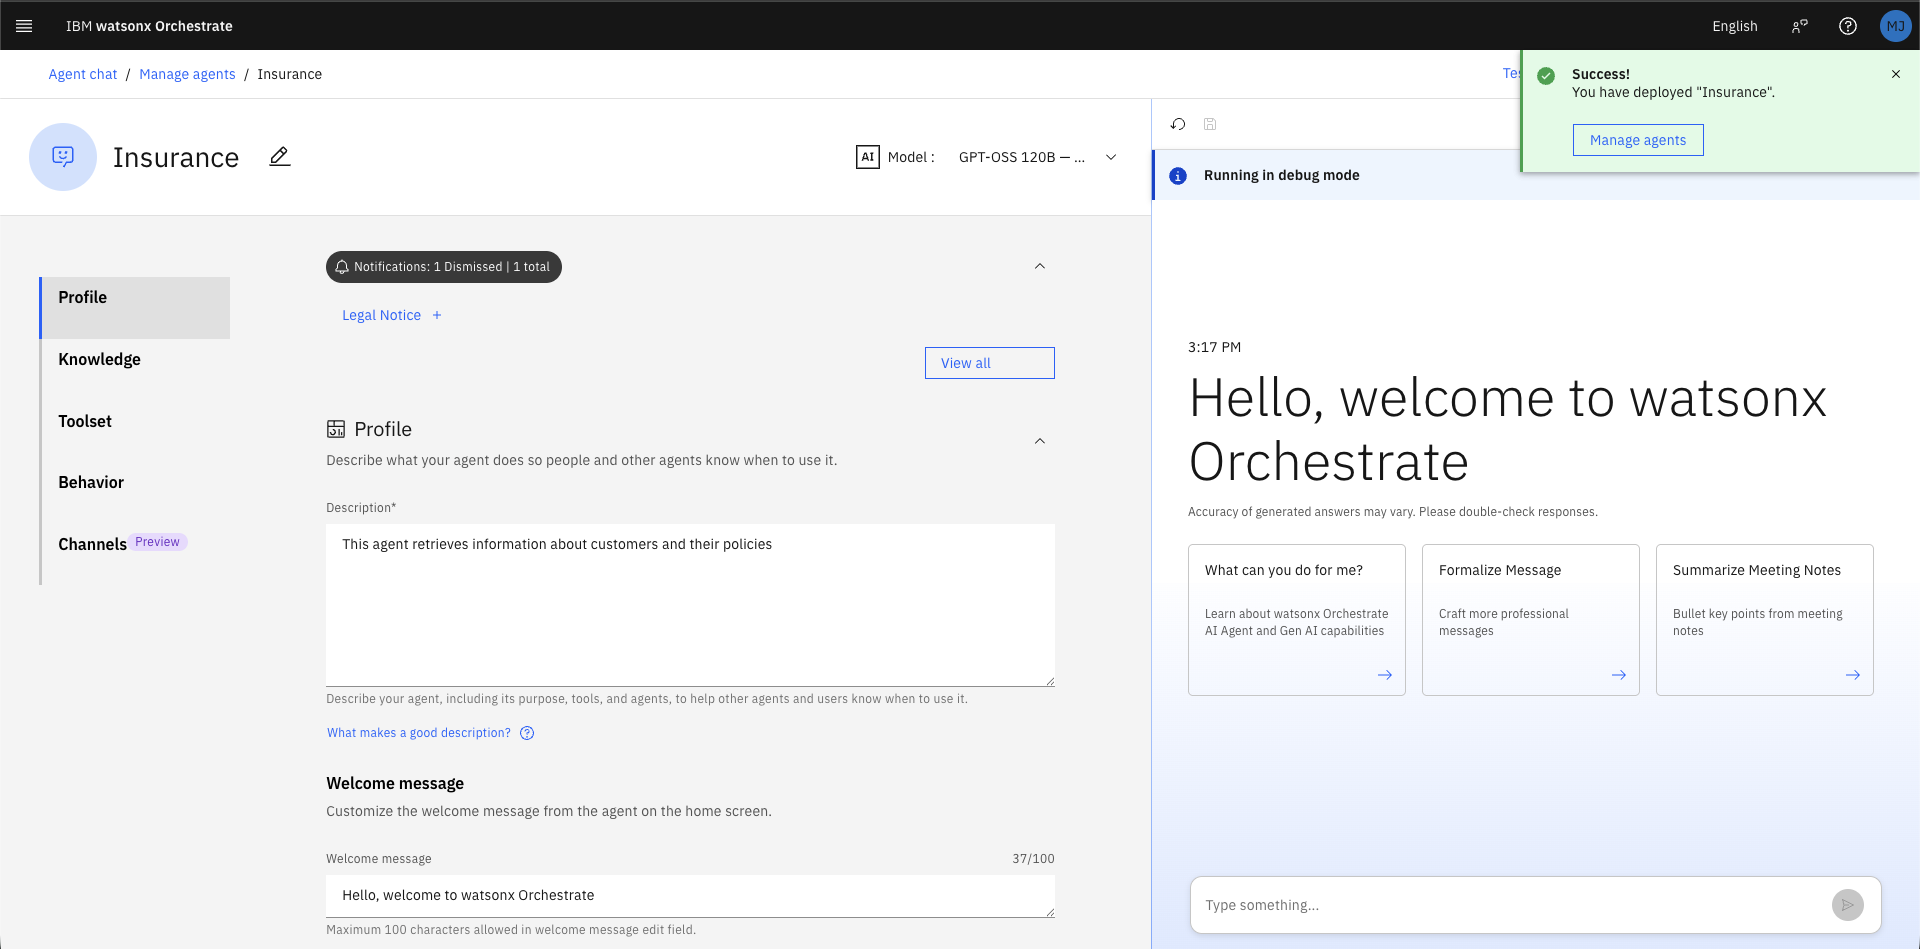
9.2 Confirm deployment
A green Success — You have deployed Insurance notification appears. The Channels panel now shows both Draft and Live states for the Embedded agent.
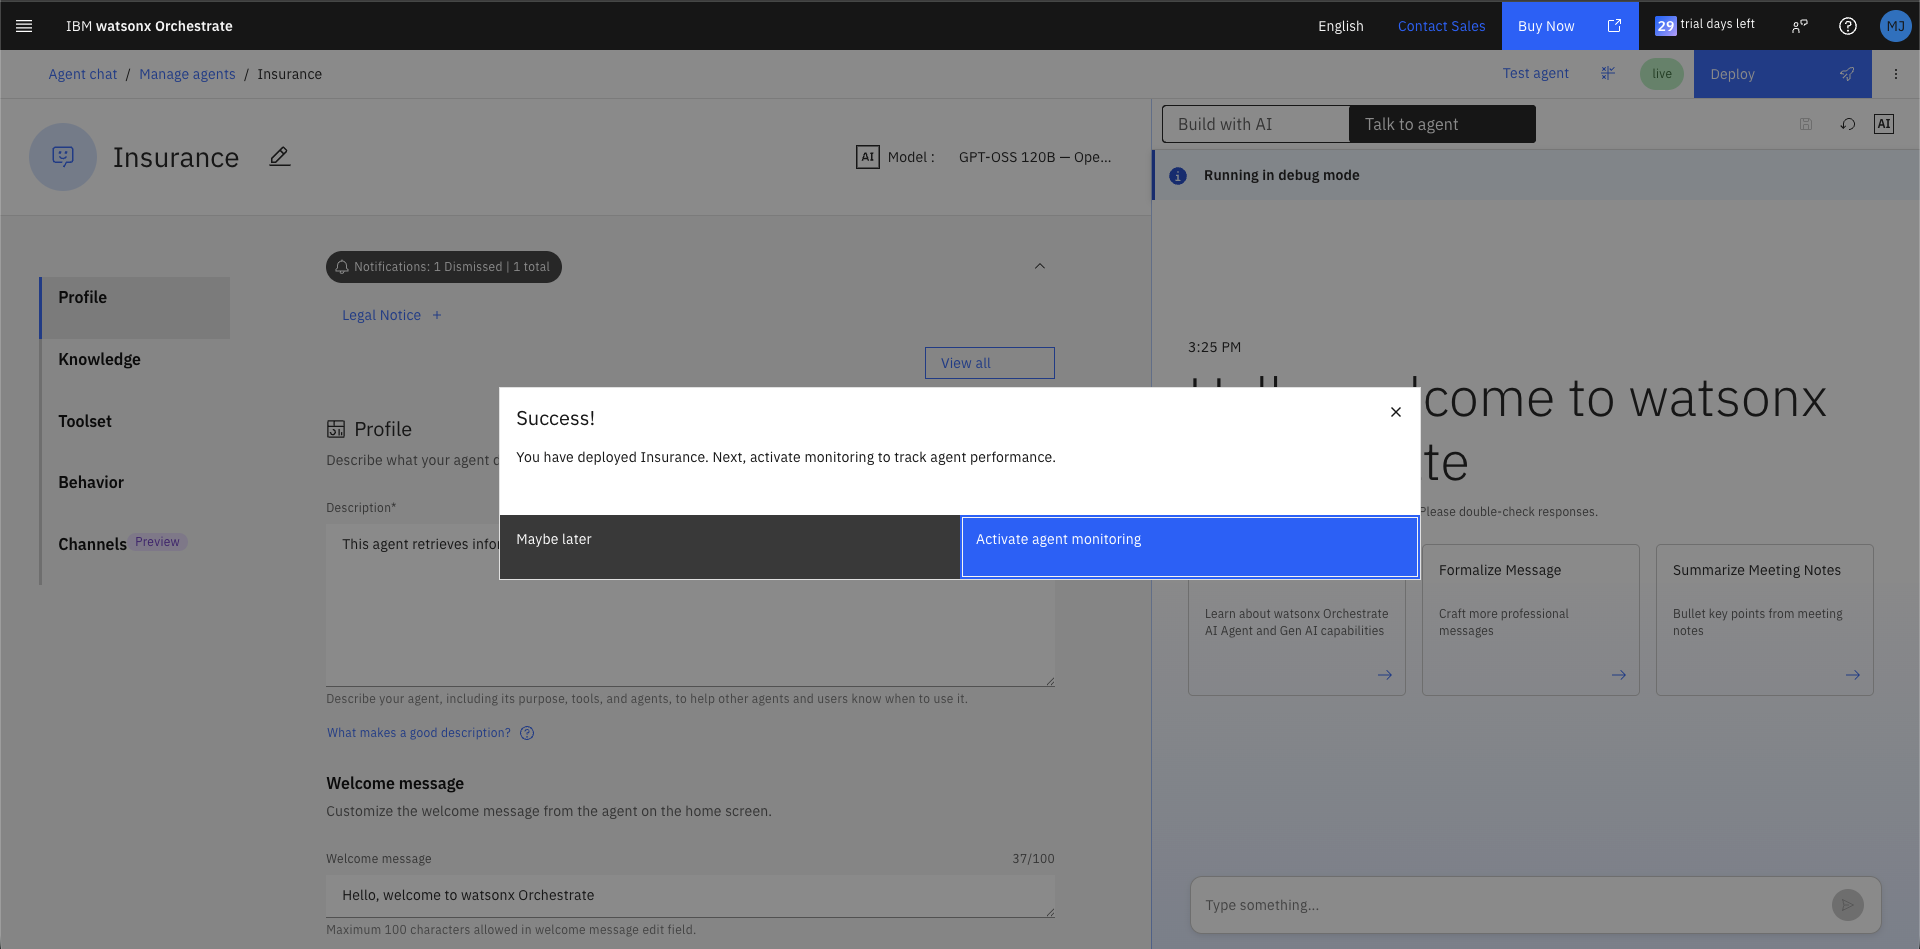
9.3 Enable Agent Monitoring
Upon deploying the agent, you will be prompted to enable the monitoring. As a best practice it is important to monitor the deployed agents and take corrective actions. Go ahead and click on Activate
9.4 Use the deployed agent in Chat
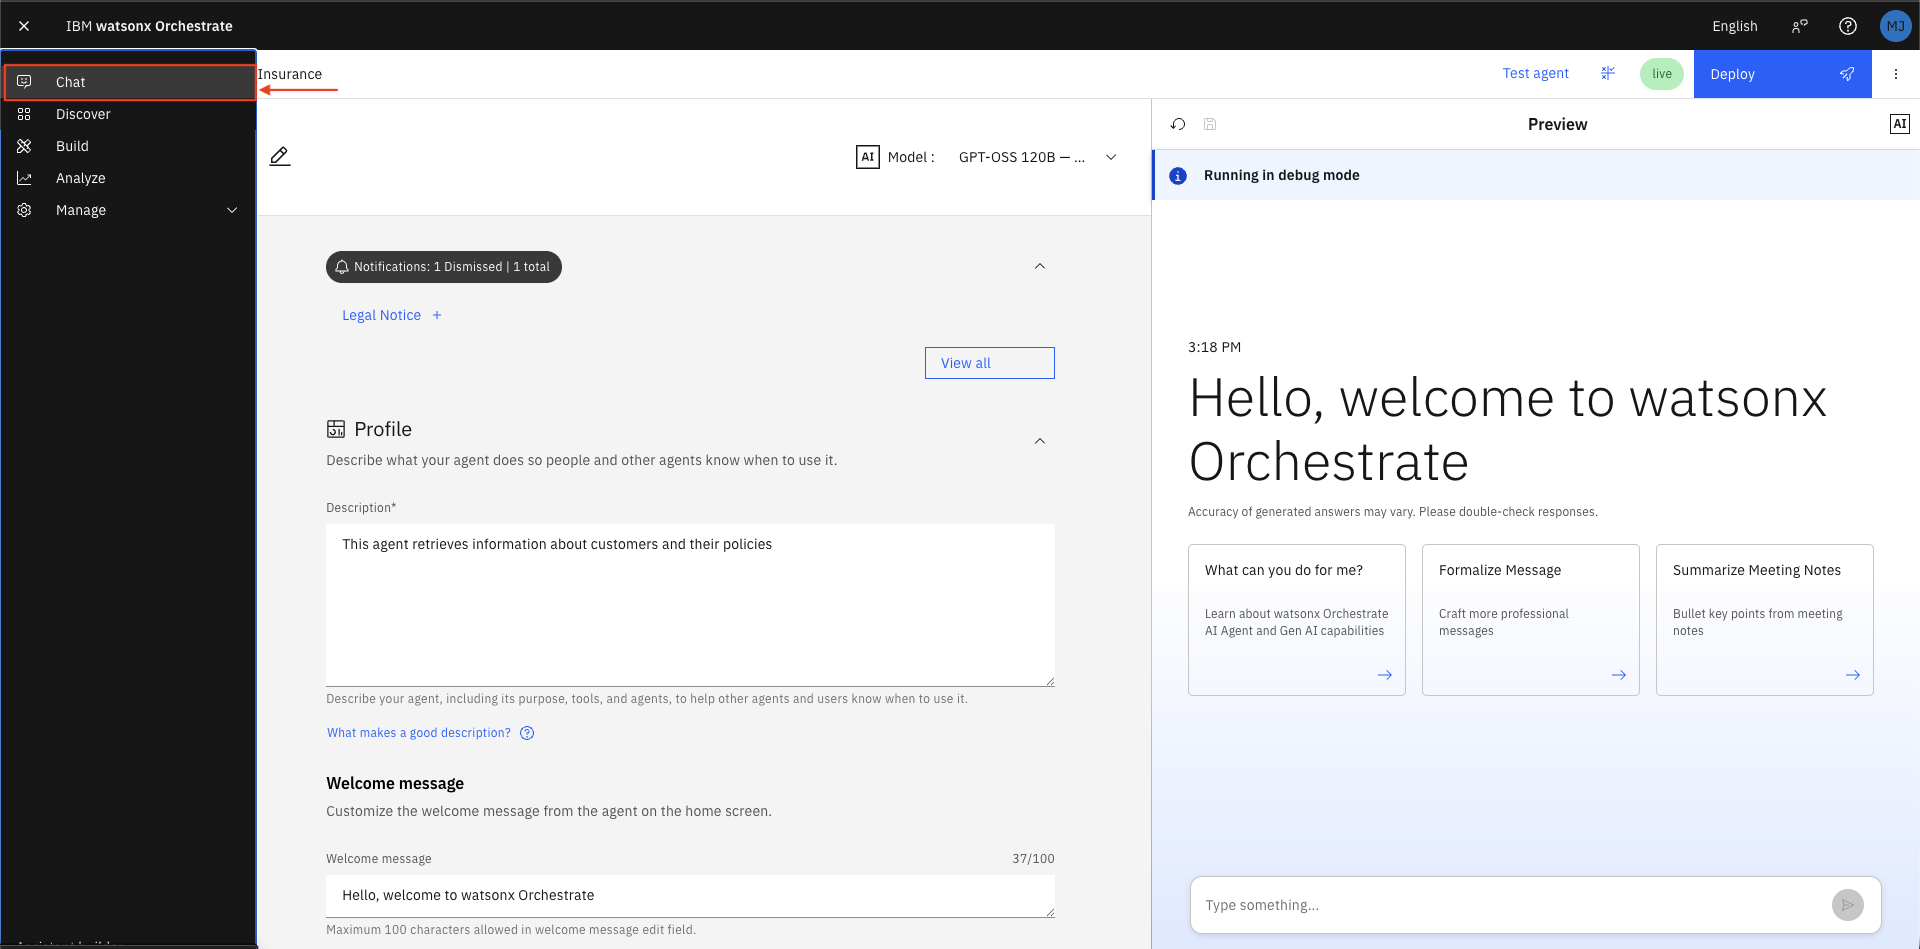
-
Open the main menu and click Chat.
-
Click the arrow next to the current agent name (top-left) to open the agent picker.
- Select Insurance.
- In the chat window, type:

The Insurance agent responds with a correctly formatted policy table confirming the live deployment is working.
10. Agent Analytics
Review usage data and inspect execution traces.
10.1 Navigate to analytics
- Open the main menu and select Analyze.
The dashboard shows aggregate metrics across all agents: - Total messages - Failed messages - Latency average (ms)
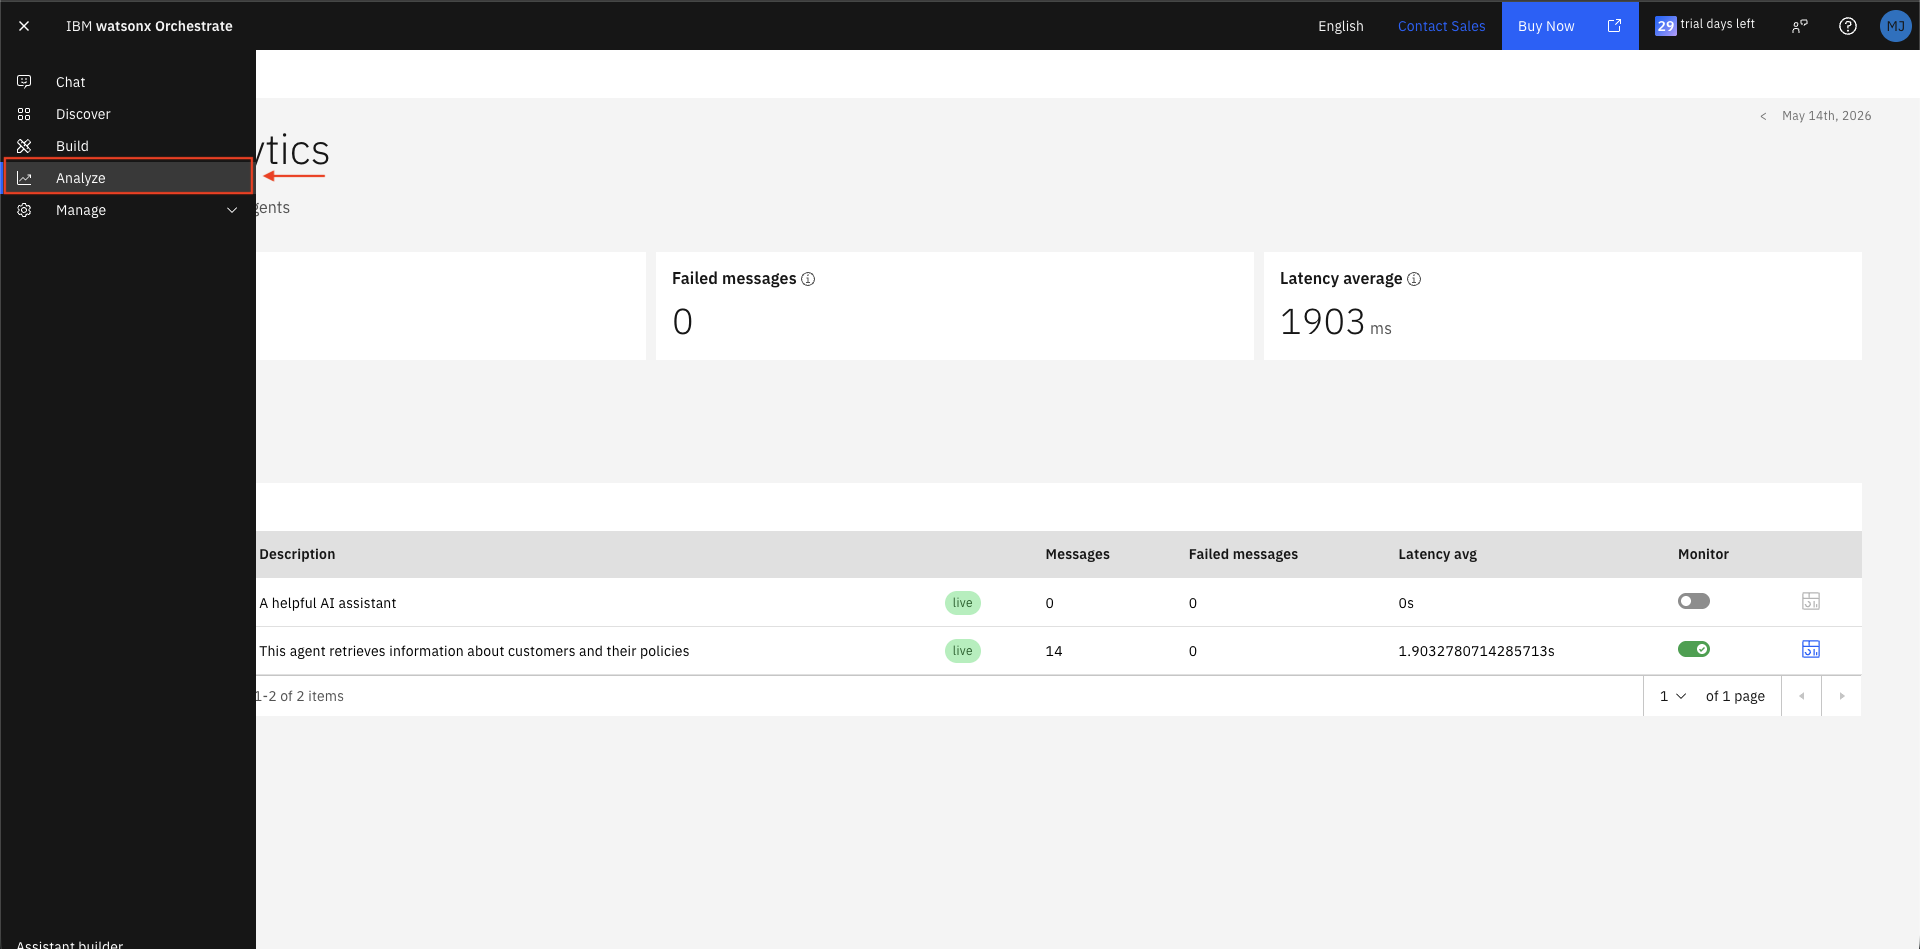
10.2 Filter to the Insurance agent
-
In the Agents search field, type
Insurance.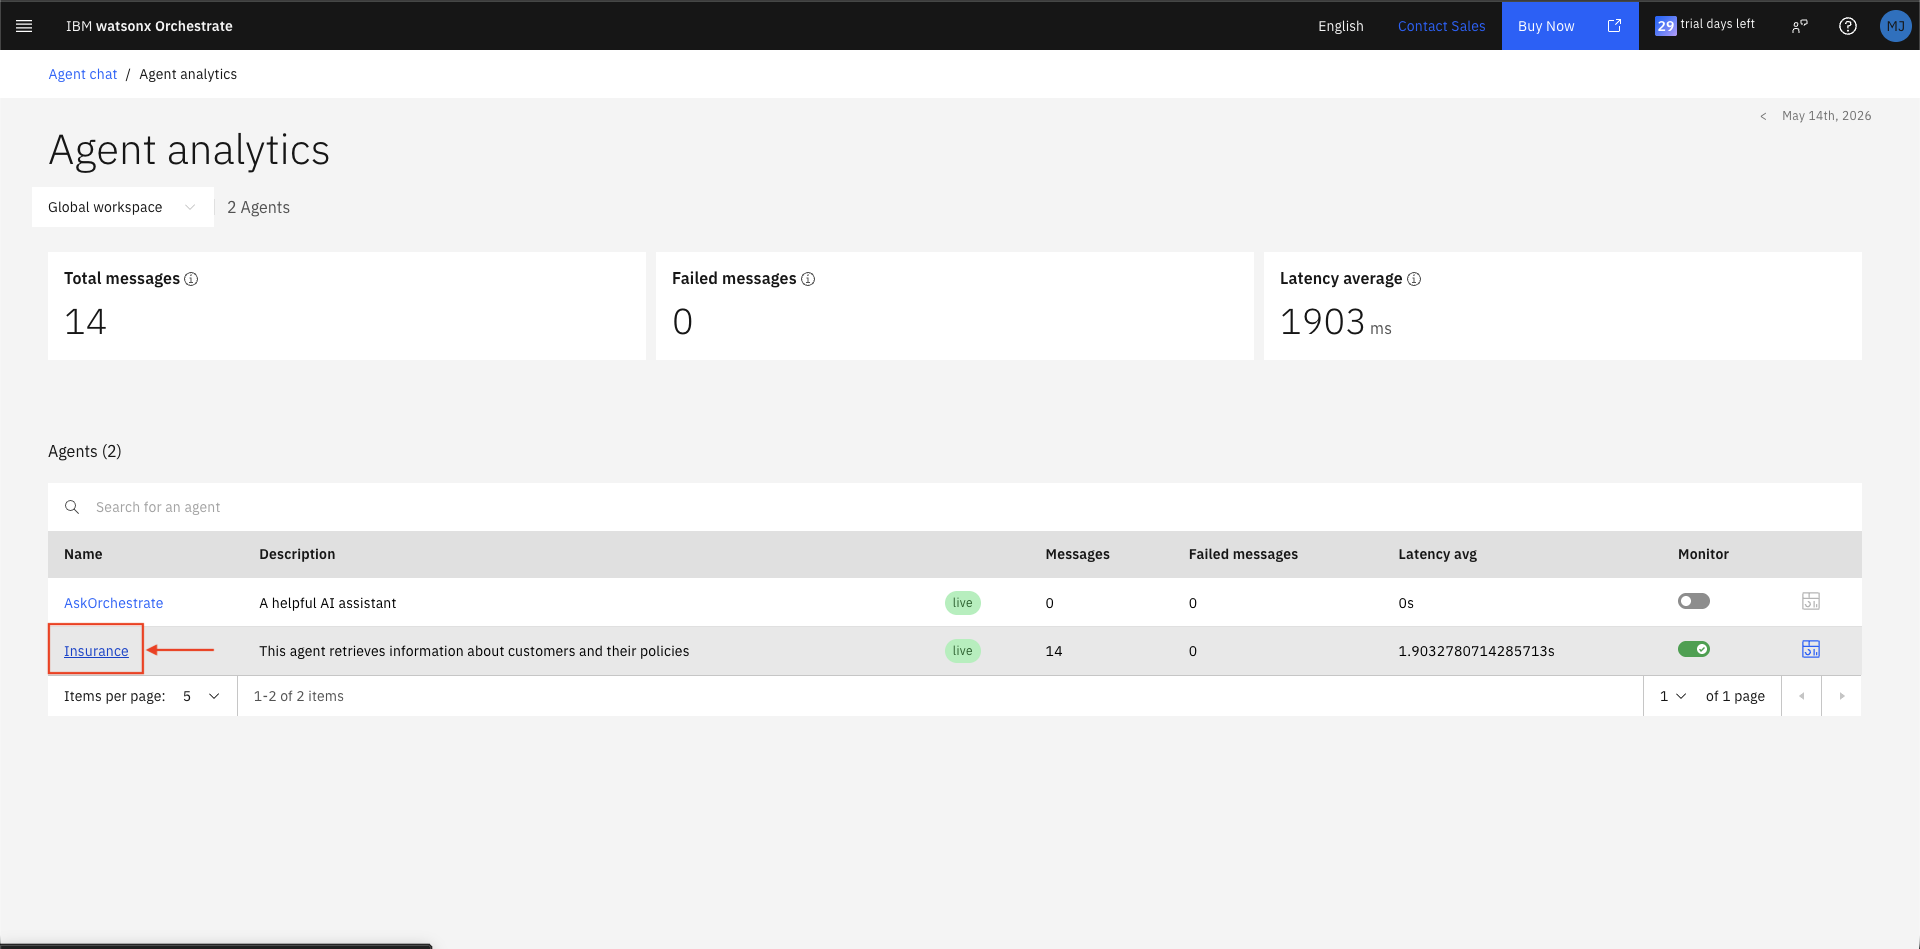
-
Click Insurance in the results table to open its analytics detail page.
You will see per-agent metrics and a Traces table listing every conversation session with timestamp, trace ID, status, model, and latency.
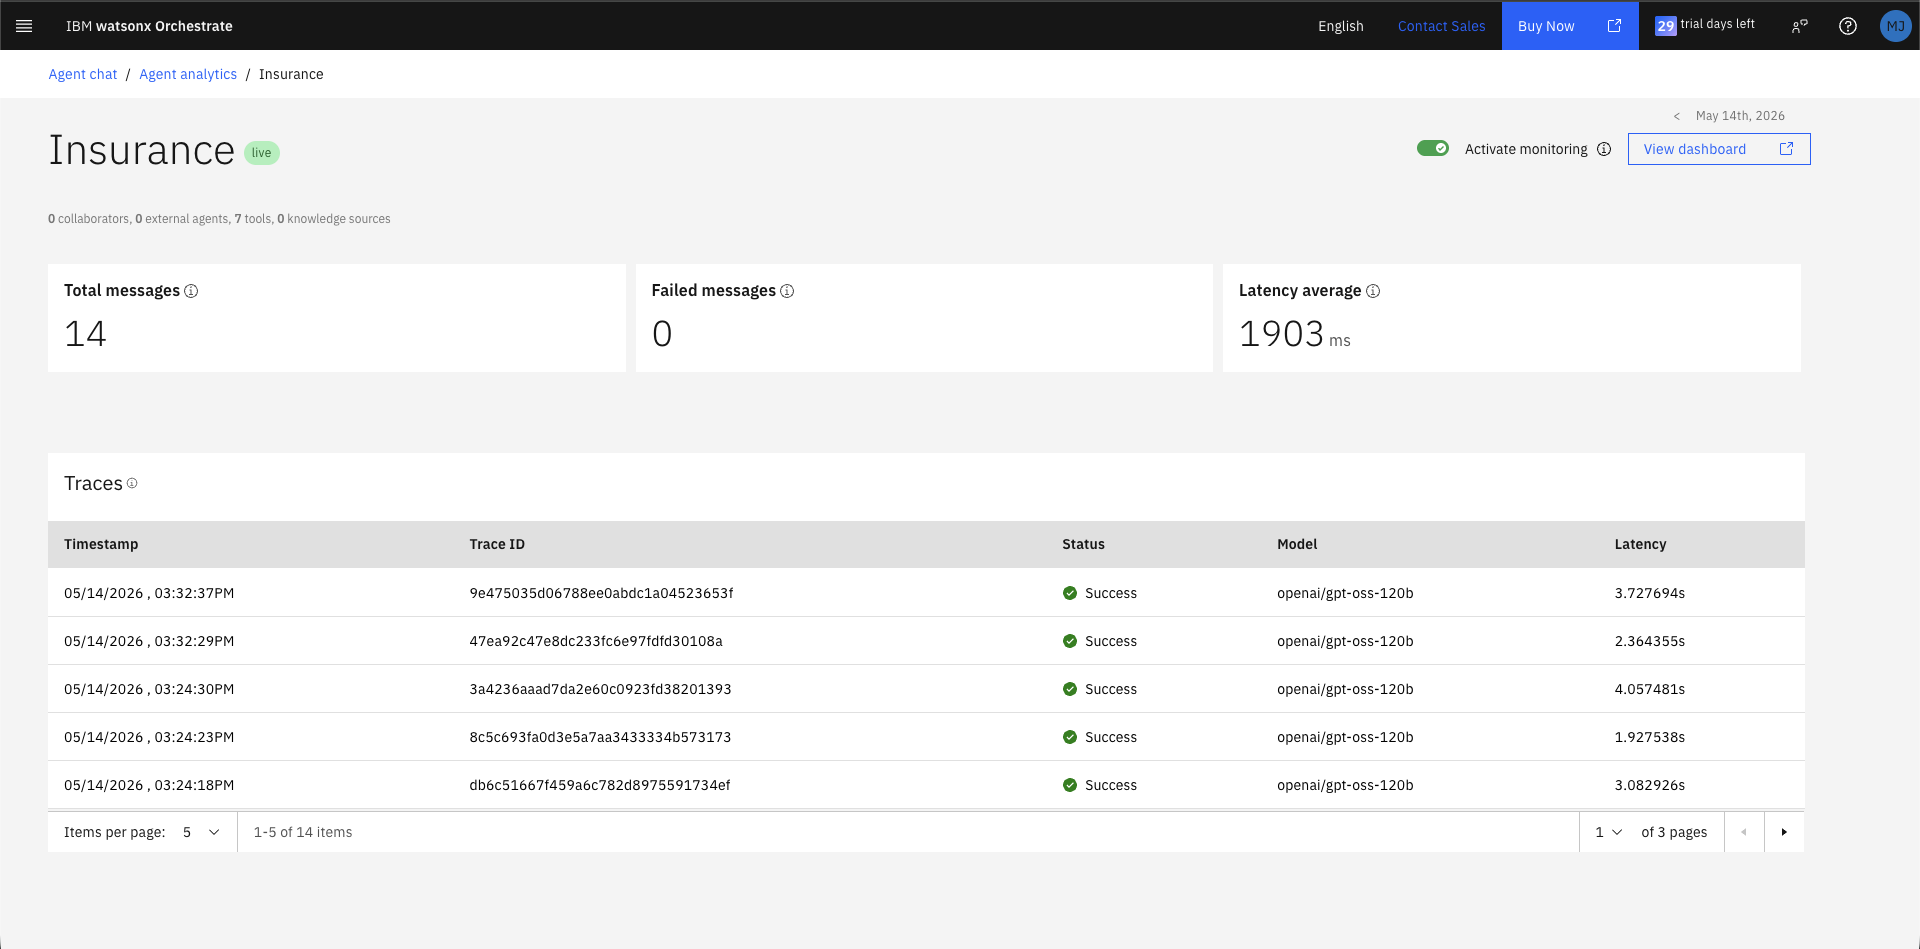
10.3 Inspect a trace
- Click the top row in the Traces table (your most recent conversation).
- The Trace Detail panel opens, showing a Gantt-style timeline of every operation in the LangGraph workflow, including:
agent_style_router.taskagent.task→invoke_agent.taskChatPromptTemplate.taskWatsonxChatModel.chat(LLM inference)tools.task→POST(API tool call)answer.task
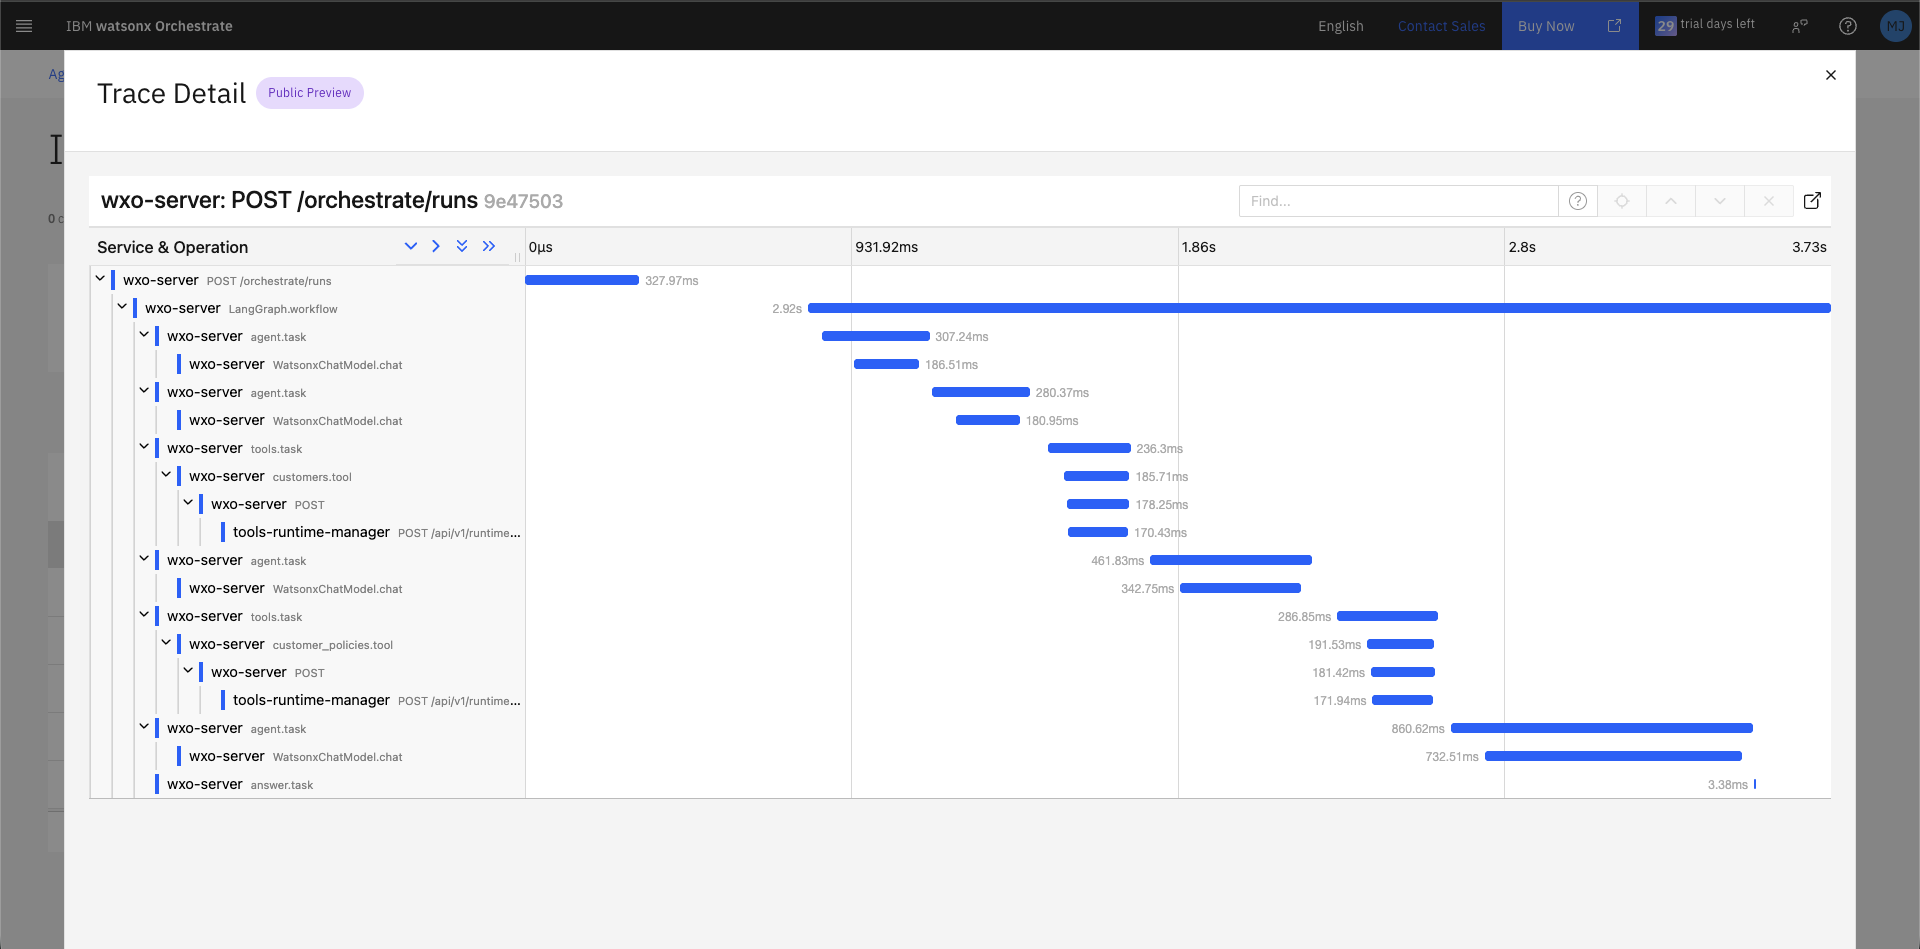
- Click the row for the last WatsonxChatModel.chat operation.
- Click Tags to expand the span details.
- Scroll down to view:
| Field | Description |
|---|---|
gen_ai.completion.0.content |
The final formatted response returned by the LLM |
gen_ai.prompt.0.content |
The system prompt content (agent role definition) |
gen_ai.prompt.1.content |
User message |
gen_ai.prompt.2.tool_calls.0.arguments |
Arguments passed to the tool |
You can also see the agent instructions (Behavior section content) and the current date injected into the system prompt at runtime.

Production tip
Use the Traces view to debug unexpected agent behaviour. You can inspect exactly what prompt was sent, which tools were called, what data was returned, and how the final response was generated.
Summary
By completing this lab you have:
Explored a live REST API and understood its data model
Created an AI agent from scratch using Agent Builder
Imported API tools from an OpenAPI specification file
Used behavioral instructions to control response formatting and tool preference
Demonstrated intelligent filtering using the correct API endpoint (not client-side scan)
Compared LLM-based aggregation (unreliable) versus tool-based aggregation (deterministic)
Leveraged conversation context for multi-step, multi-tool agentic reasoning
Embedded the agent into a standalone web page using a JavaScript snippet
Deployed the agent to the Orchestrate Chat interface
Inspected execution traces in the Agent Analytics dashboard
These skills provide a solid foundation for building production-grade agents in the IBM watsonx Orchestrate ecosystem.
Conclusion
👏 Congratulations on completing the lab! 🎉