Optional Lab 2: Push the example container images to a container image registry
In this optional lab we will push your example container images to a container image registry. We use the free Red Hat Quay.io as our example container registry. Quay has a Community Distribution that powers Red Hat Quay and Quay.io called Project QUAY You need to create a free account.
You can also use the IBM Cloud Registry which has a free lite plan with limited resources of Storage (Gigabyte-Months):
- 0.5 GB free per month and pull traffic (Gigabytes)
- 5 GB free per month. Please visit the IBM Cloud Registry catalog for the current pricing.
To run these optional exercises, you need to ensure you have installed the following tools on your local machine and you can run them in your terminal sessions.
Step 1: Login to Quay on your local machine
[docker OR podman] login [quay.io OR docker.io]
Step 2: Ensure $ROOT_PATH variable is set to YOUR_PATH/ce-cns of your cloned repository
Display the $ROOT_PATH you set in Lab 1: Setup the example application.
echo $ROOT_PATH
You can use for example:
cd YOUR_PATH/ce-cns
export ROOT_PATH=$(pwd)
Step 3: Configure articles
When you run the articles microservice on CE ensure you have uncommented quarkus.http.port=8080 and #quarkus.http.port=8083 commented out.
cd $ROOT_PATH/code/articles/src/main/resources
nano application.properties
Example:
# When running locally, uncomment the next line, add your Keycloak URL, must end on '/auth/realms/quarkus'
quarkus.oidc.auth-server-url=http://localhost:8282/auth/realms/quarkus

quarkus.oidc.client-id=backend-service
quarkus.oidc.credentials.secret=secret

quarkus.http.port=8080
# When running locally, uncomment the next line, to use the port 8083
# quarkus.http.port=8083
quarkus.http.cors=true

resteasy.role.based.security=true
Step 4: Export your container registry name as your repository name
export MY_REGISTRY=[quay.io OR docker.io]
Step 5: Export your Quay username as your repository name
export MY_REPOSITORY=YOUR_USERNAME
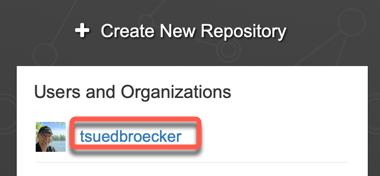
Note: In the image below you see an example where you can find the name, you should use.
Step 6: Execute the following bash automation
This bash script will build and push your container images to Red Hat Quay.io.
Invoke the script with the parameter podman or docker.
cd $ROOT_PATH/CE
bash container-image-build-and-push.sh podman
- Example output:
************************************
 Display parameter
************************************

Parameter count : podman
Parameter zero 'name of the script': container-image-build-and-push.sh
---------------------------------
Local container engine   : podman
Root path                : /Users/thomassuedbroecker/Downloads/dev/ce-workshop-ibm/ce-cns
Container repository     : tsuedbroecker
Container registry       : quay.io
-----------------------------
*** Setup container engine to Podman!
************************************
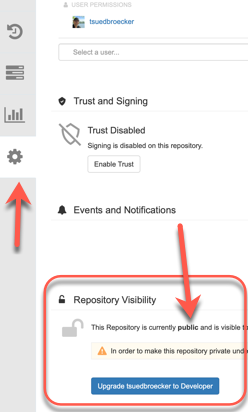
Step 7: Verify the public access for your containers
Visit your repository on Red Hat Quay.io and verify your containers are available for public usage. This is only the case if you are going to run the same setup as given in Lab 1: Setup the example application.
Step 8: Update the ce-deploy-apps.sh bash script
Now you have to reflect the changes you made for the container registry in the ce-deploy-apps.sh, if you plan to use this bash script to deploy your containers to Code Engine.
- Open the bash script with an editor
cd $ROOT_PATH/ce
nano ce-deploy-apps.sh
- In case you have just changed the repository name, you only have to replace
tsuedbroeckerwith your value and it should work.
...
export PROJECT_NAME=$MYPROJECT
export RESOURCE_GROUP=default
export REPOSITORY=tsuedbroecker
...
Congratulations, you have successfully completed this optional hands-on lab tasks for
Push the example containers to a container registrysection of the workshop. Awesome
