Deploying multiple routines simultaneously
When you are developing a Db2 for z/OS application, you might want to create and deploy many stored procedures or user-defined functions (UDFs) for your application. The following instructions describe how to deploy multiple routines in a single operation.
-
Select the routines that you want to deploy. Only files that have an extension of .spsql, .javaspsql, or .udfsql are supported.
- Select multiple individual stored procedure or UDF files, one or more folders that contain stored procedure or UDF files, or a combination of files and folders. Then right-click and select Deploy Routines from the context menu.
- Select all of the routines in your workspace by clicking the Deploy icon (
 ).
).
The Deployment options tab opens and the routines that you selected are parsed to ensure that they’re valid.
-
Specify the appropriate deployment options for your routines.
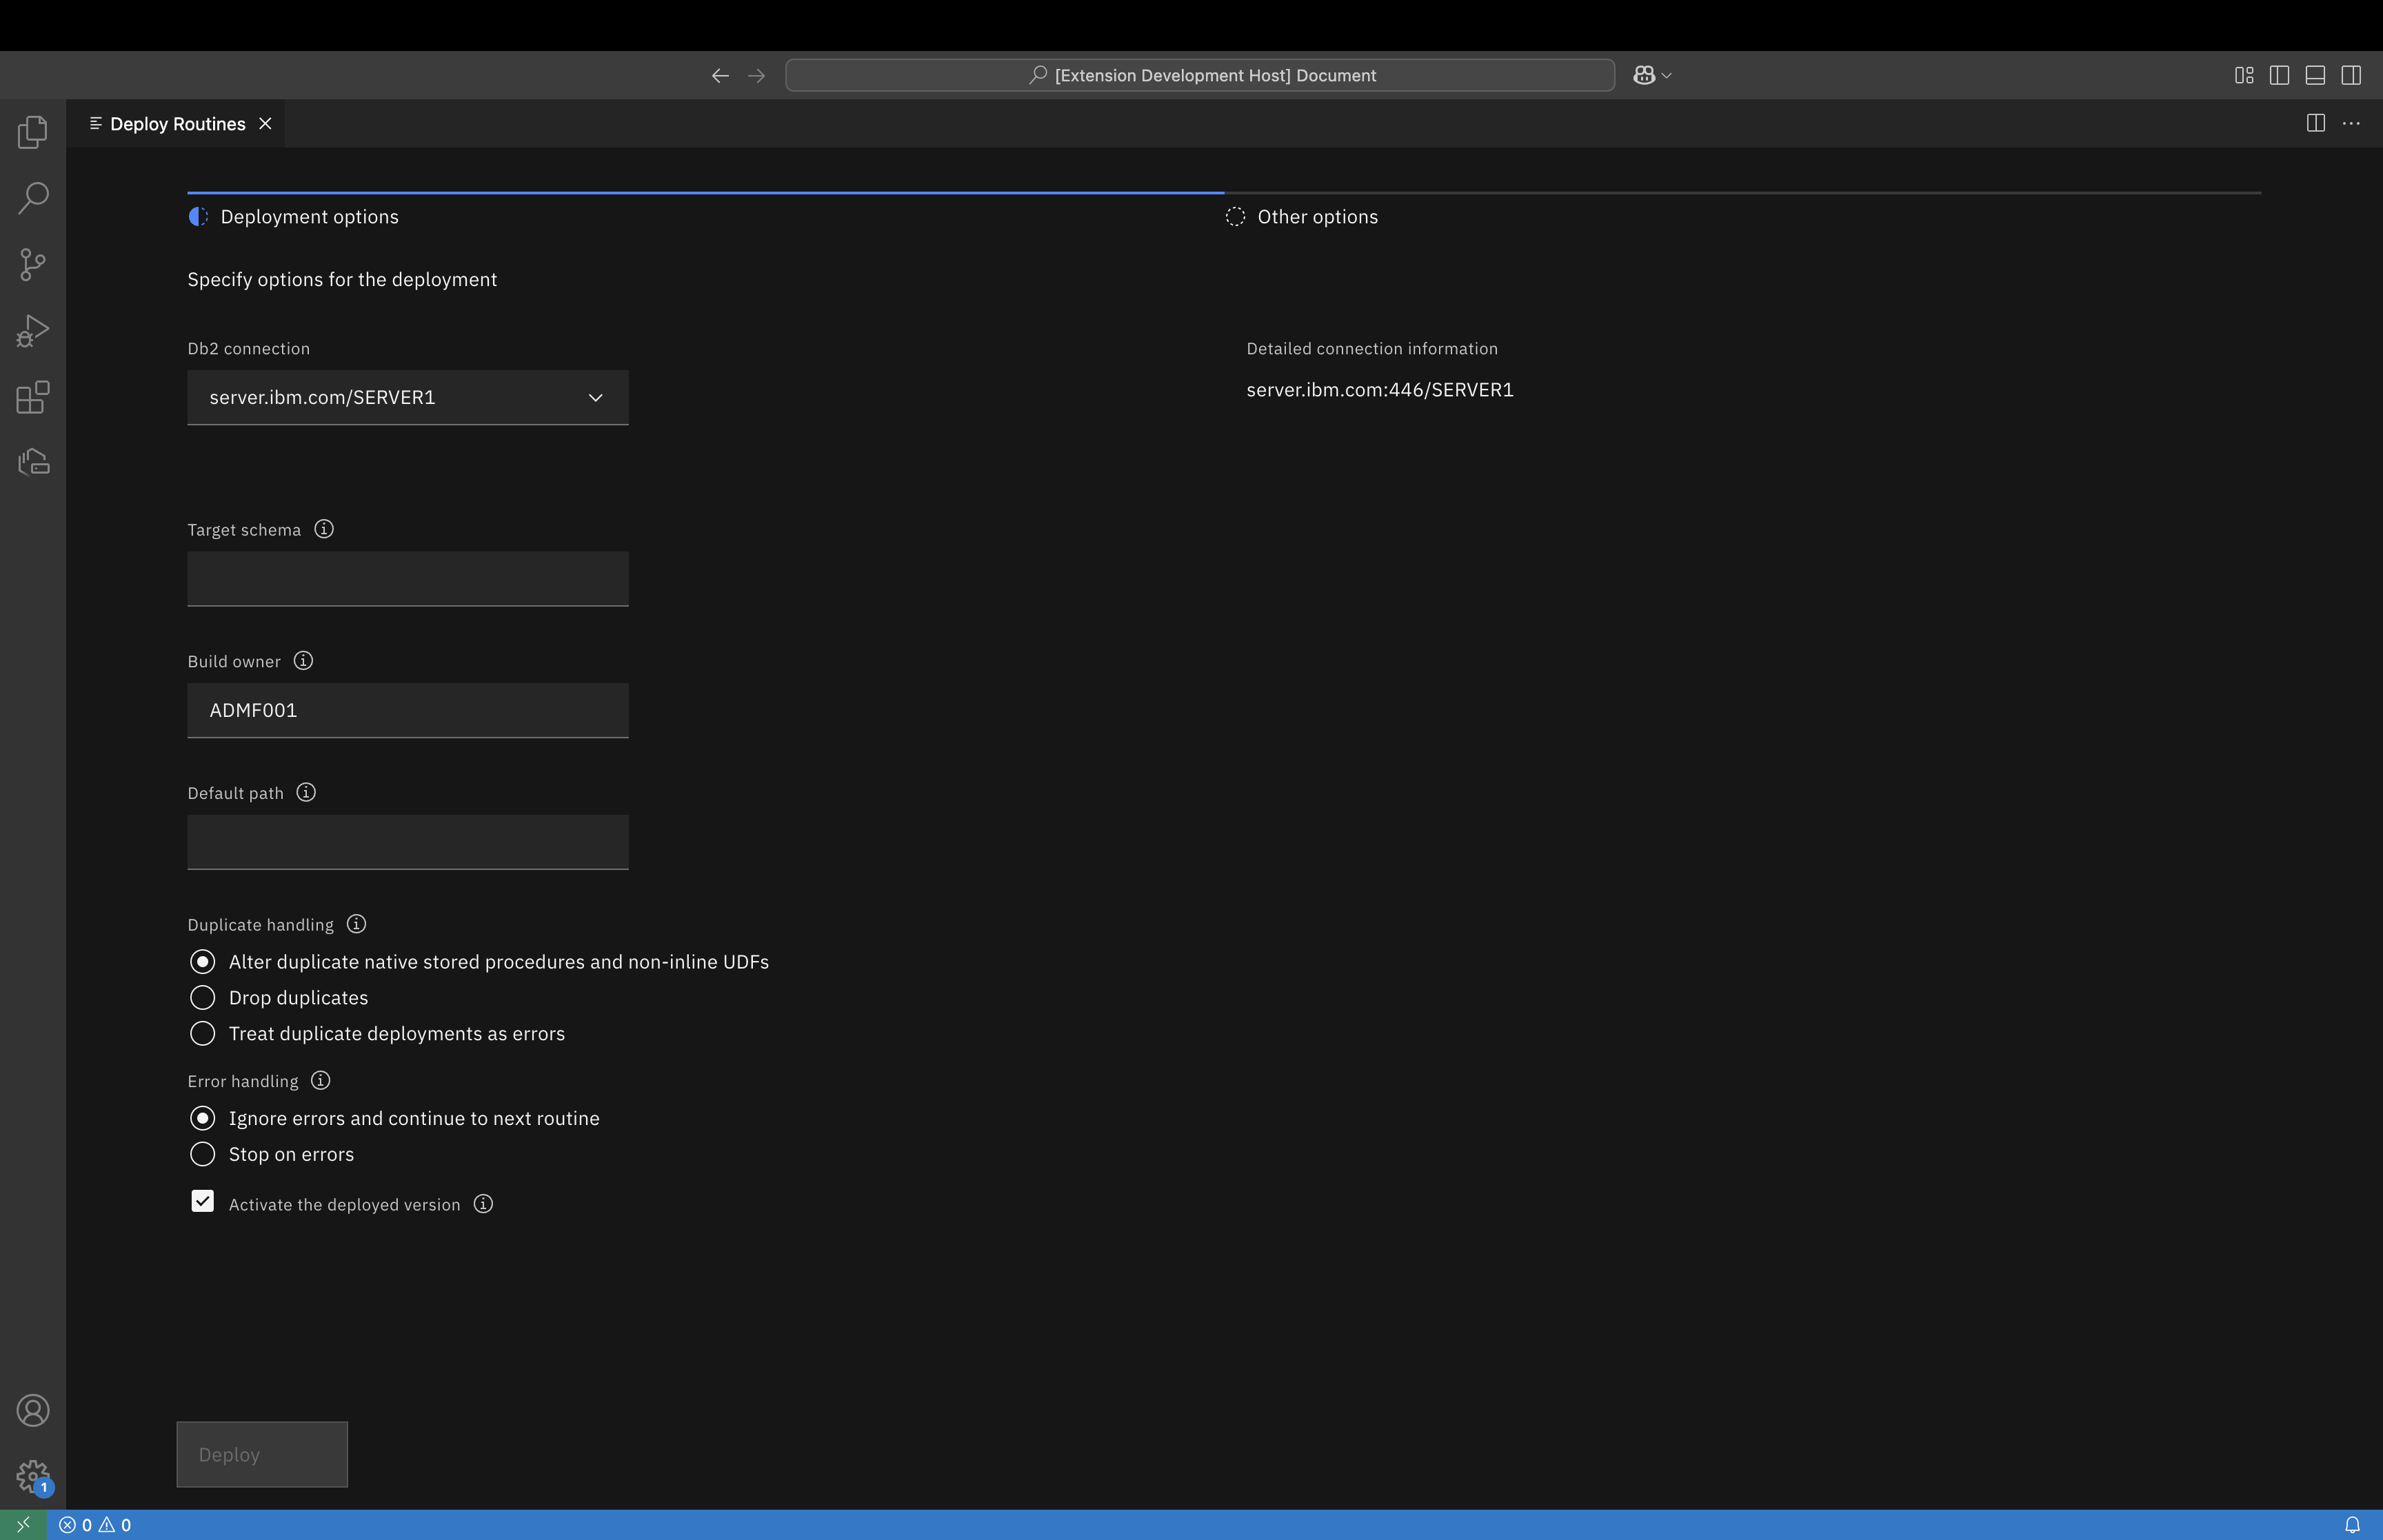
- Use the Db2 connection option to select a connection from the list of defined connections. See Creating a database connection for more information. Note that when you deploy multiple rotuines simultaneously, the Db2 connection information that you specify is not saved in the UI.
- Use the Target schema option for unqualified routines. If you leave this field empty, the currentSchema JDBC property will be used if it has been set. If currentSchema is not set, the JDBC connection username will be used.
- Use the Build owner option to specify the owner of the routine. If you leave this field empty, the currentSQLID JDBC property will be used if it has been set. If currentSQLID is not set, the JDBC connection username will be used.
-
Use the Default path option for resolving an unqualified data type, function, or procedure referenced by the routine that is being deployed. You can specify multiple schemas, each one separated by a comma. For example:
"ADMF002","ADMF003","ADMF004" -
Use the Duplicate handling option to specify the behavior of the deployment when a routine with the same name in the same schema already exists. The options that are available depend on the types of routines that you are deploying:
- Alter duplicate native stored procedures and non-inline UDFs applies to situations in which you have a combination of routines. Depending on the type of routine, this option alters an existing routine, or drops an existing routine and creates the routine.
- Drop duplicates drops the existing duplicate routine during deployment and creates a new routine.
- Treat duplicate deployments as errors returns an error if the routine already exists. If other versions of the routine do not exist, the routine is created.
-
Use the Error handling option to specify the behavior of the deployment when a deployment for a routine fails. The following options are:
- Ignore errors and continue to the next routine will continue to deploy the following routines after the first deployment error.
- Stop on errors causes the following routines after the first deployment error, to not be deployed.
-
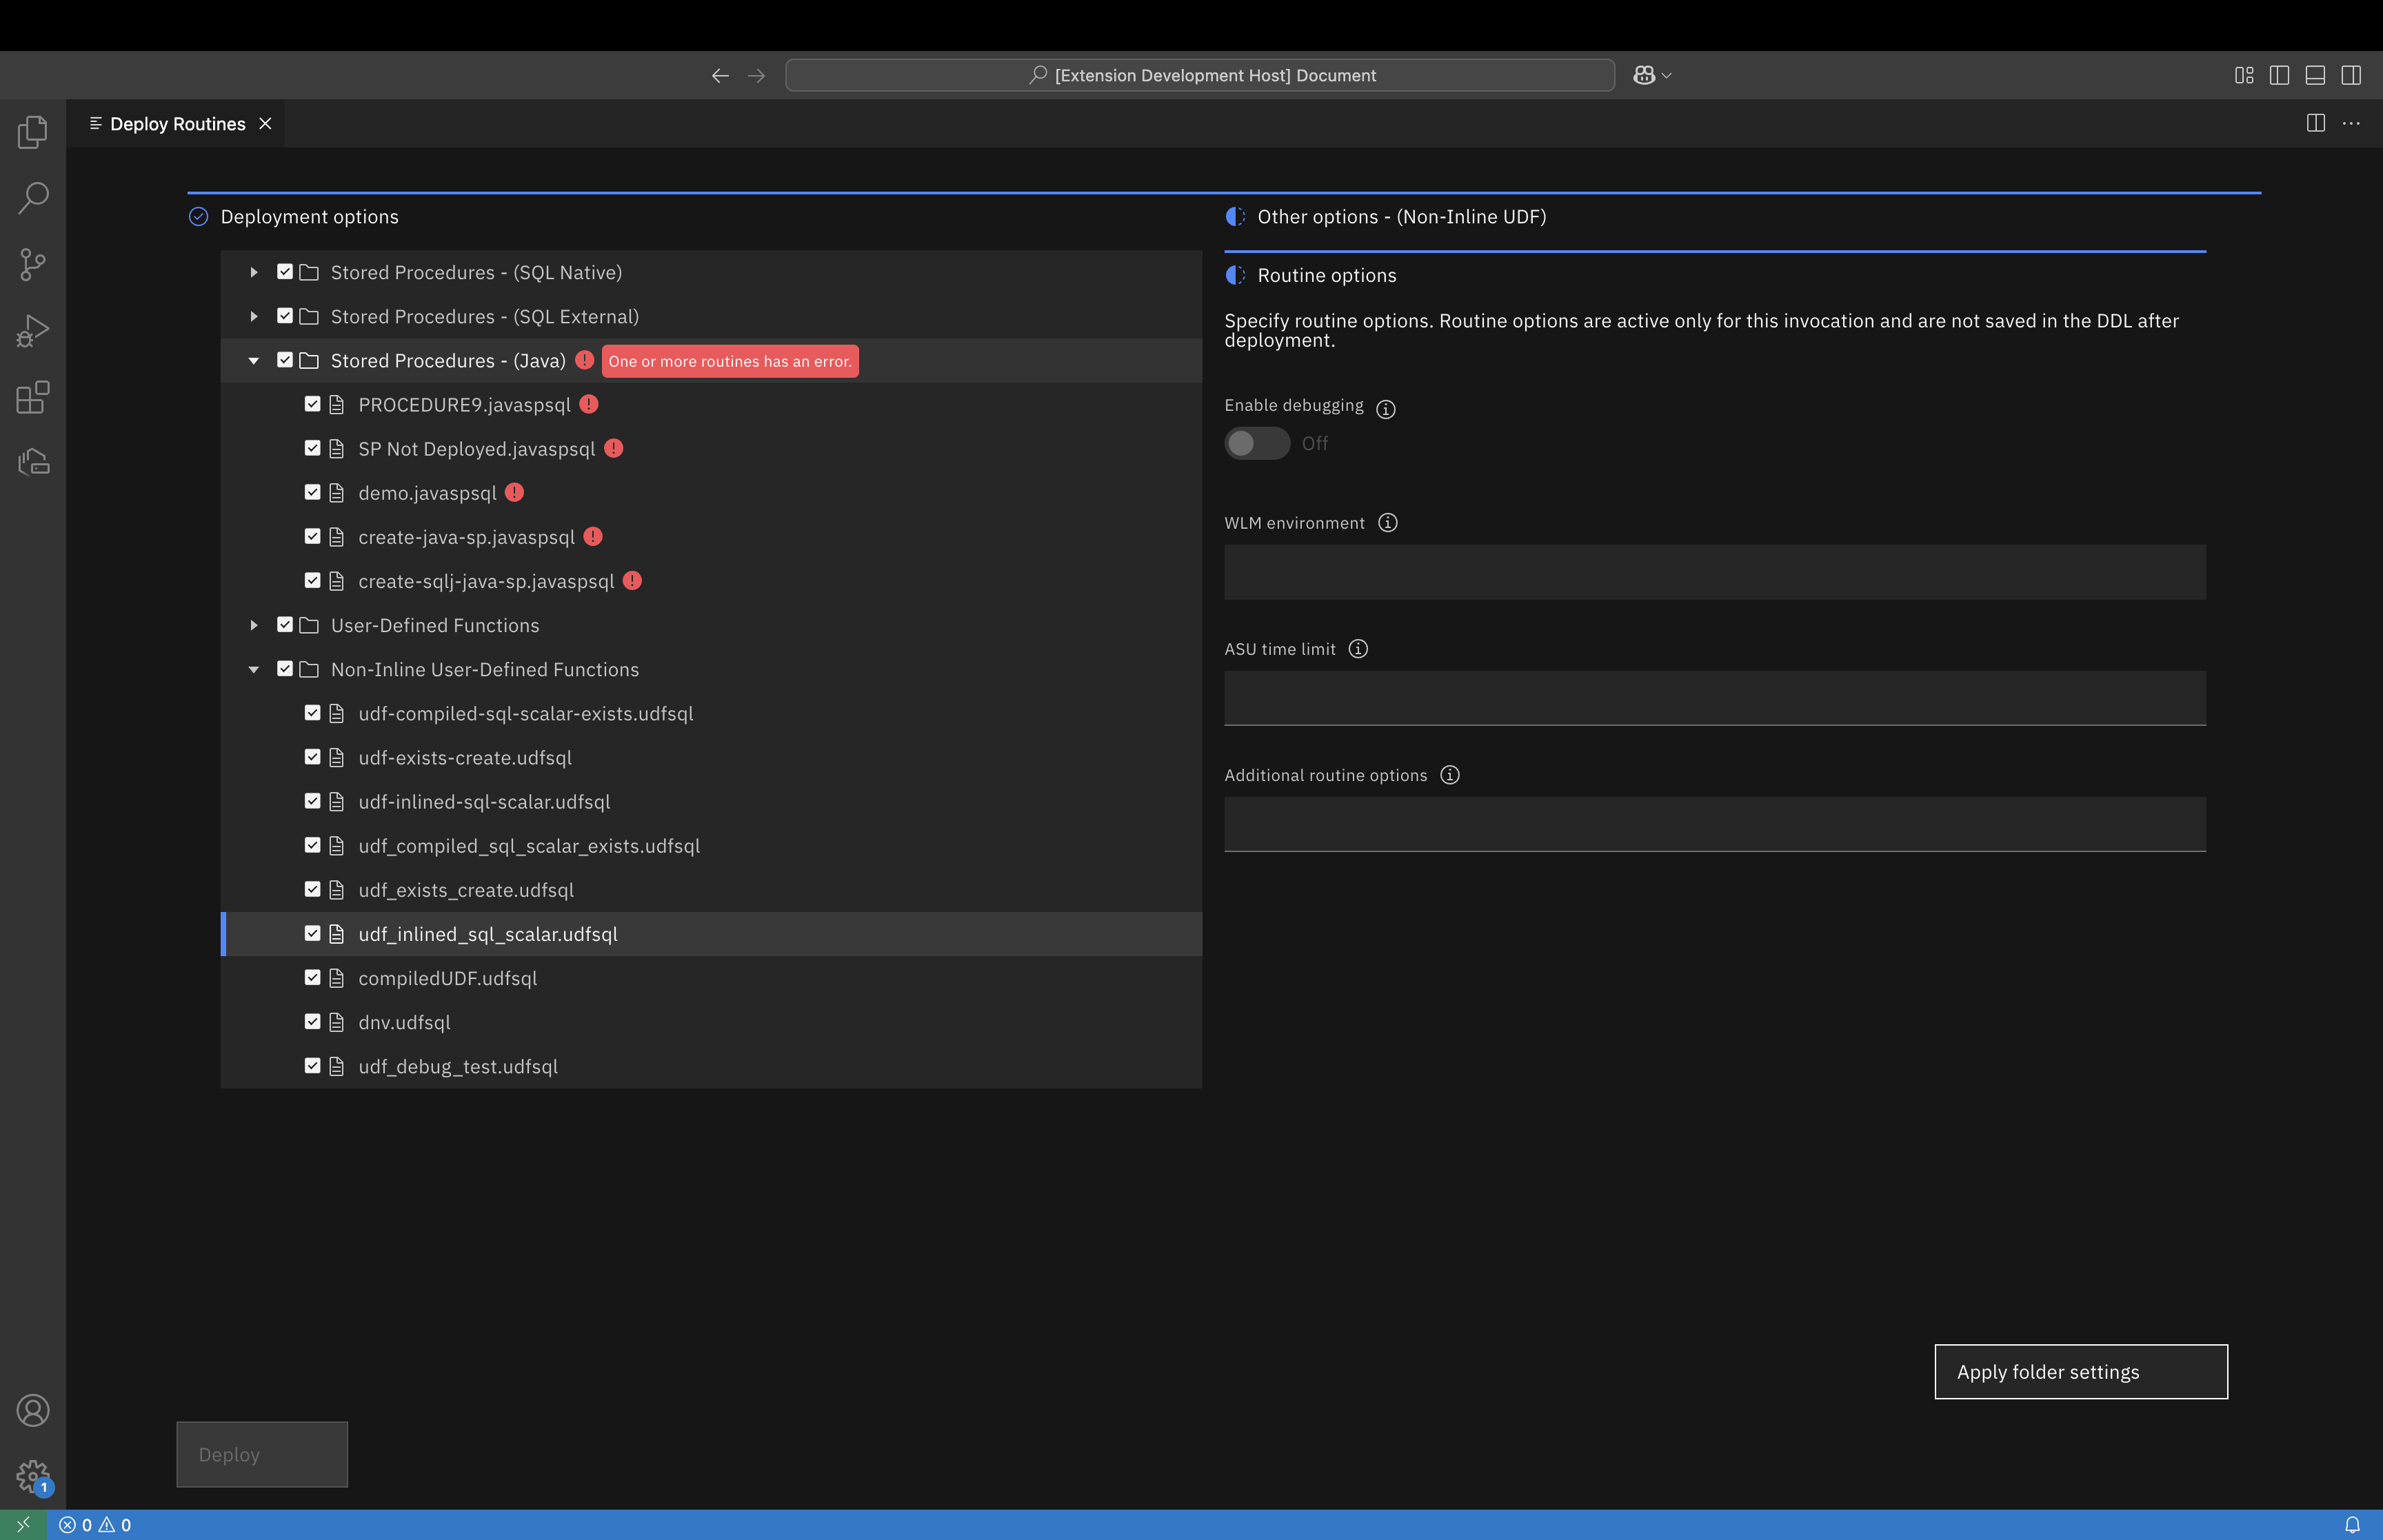
Click the Other options tab to specify additional deployment parameters. A list of the routines that you selected is displayed alongside additional deployment options. The tabs that are displayed will vary depending on the type of routine that you are working with:
- For native stored procedures and non-inline UDFs, only the Routine options tab is displayed.
- For external SQL stored procedures, the Routine options tab and the External SQL options tabs are displayed.
- For Java and SQLJ stored procedures, the Routine options tab and the Java options tabs are displayed.
- For UDFs, there are currently no additional deployment options.
Routine options
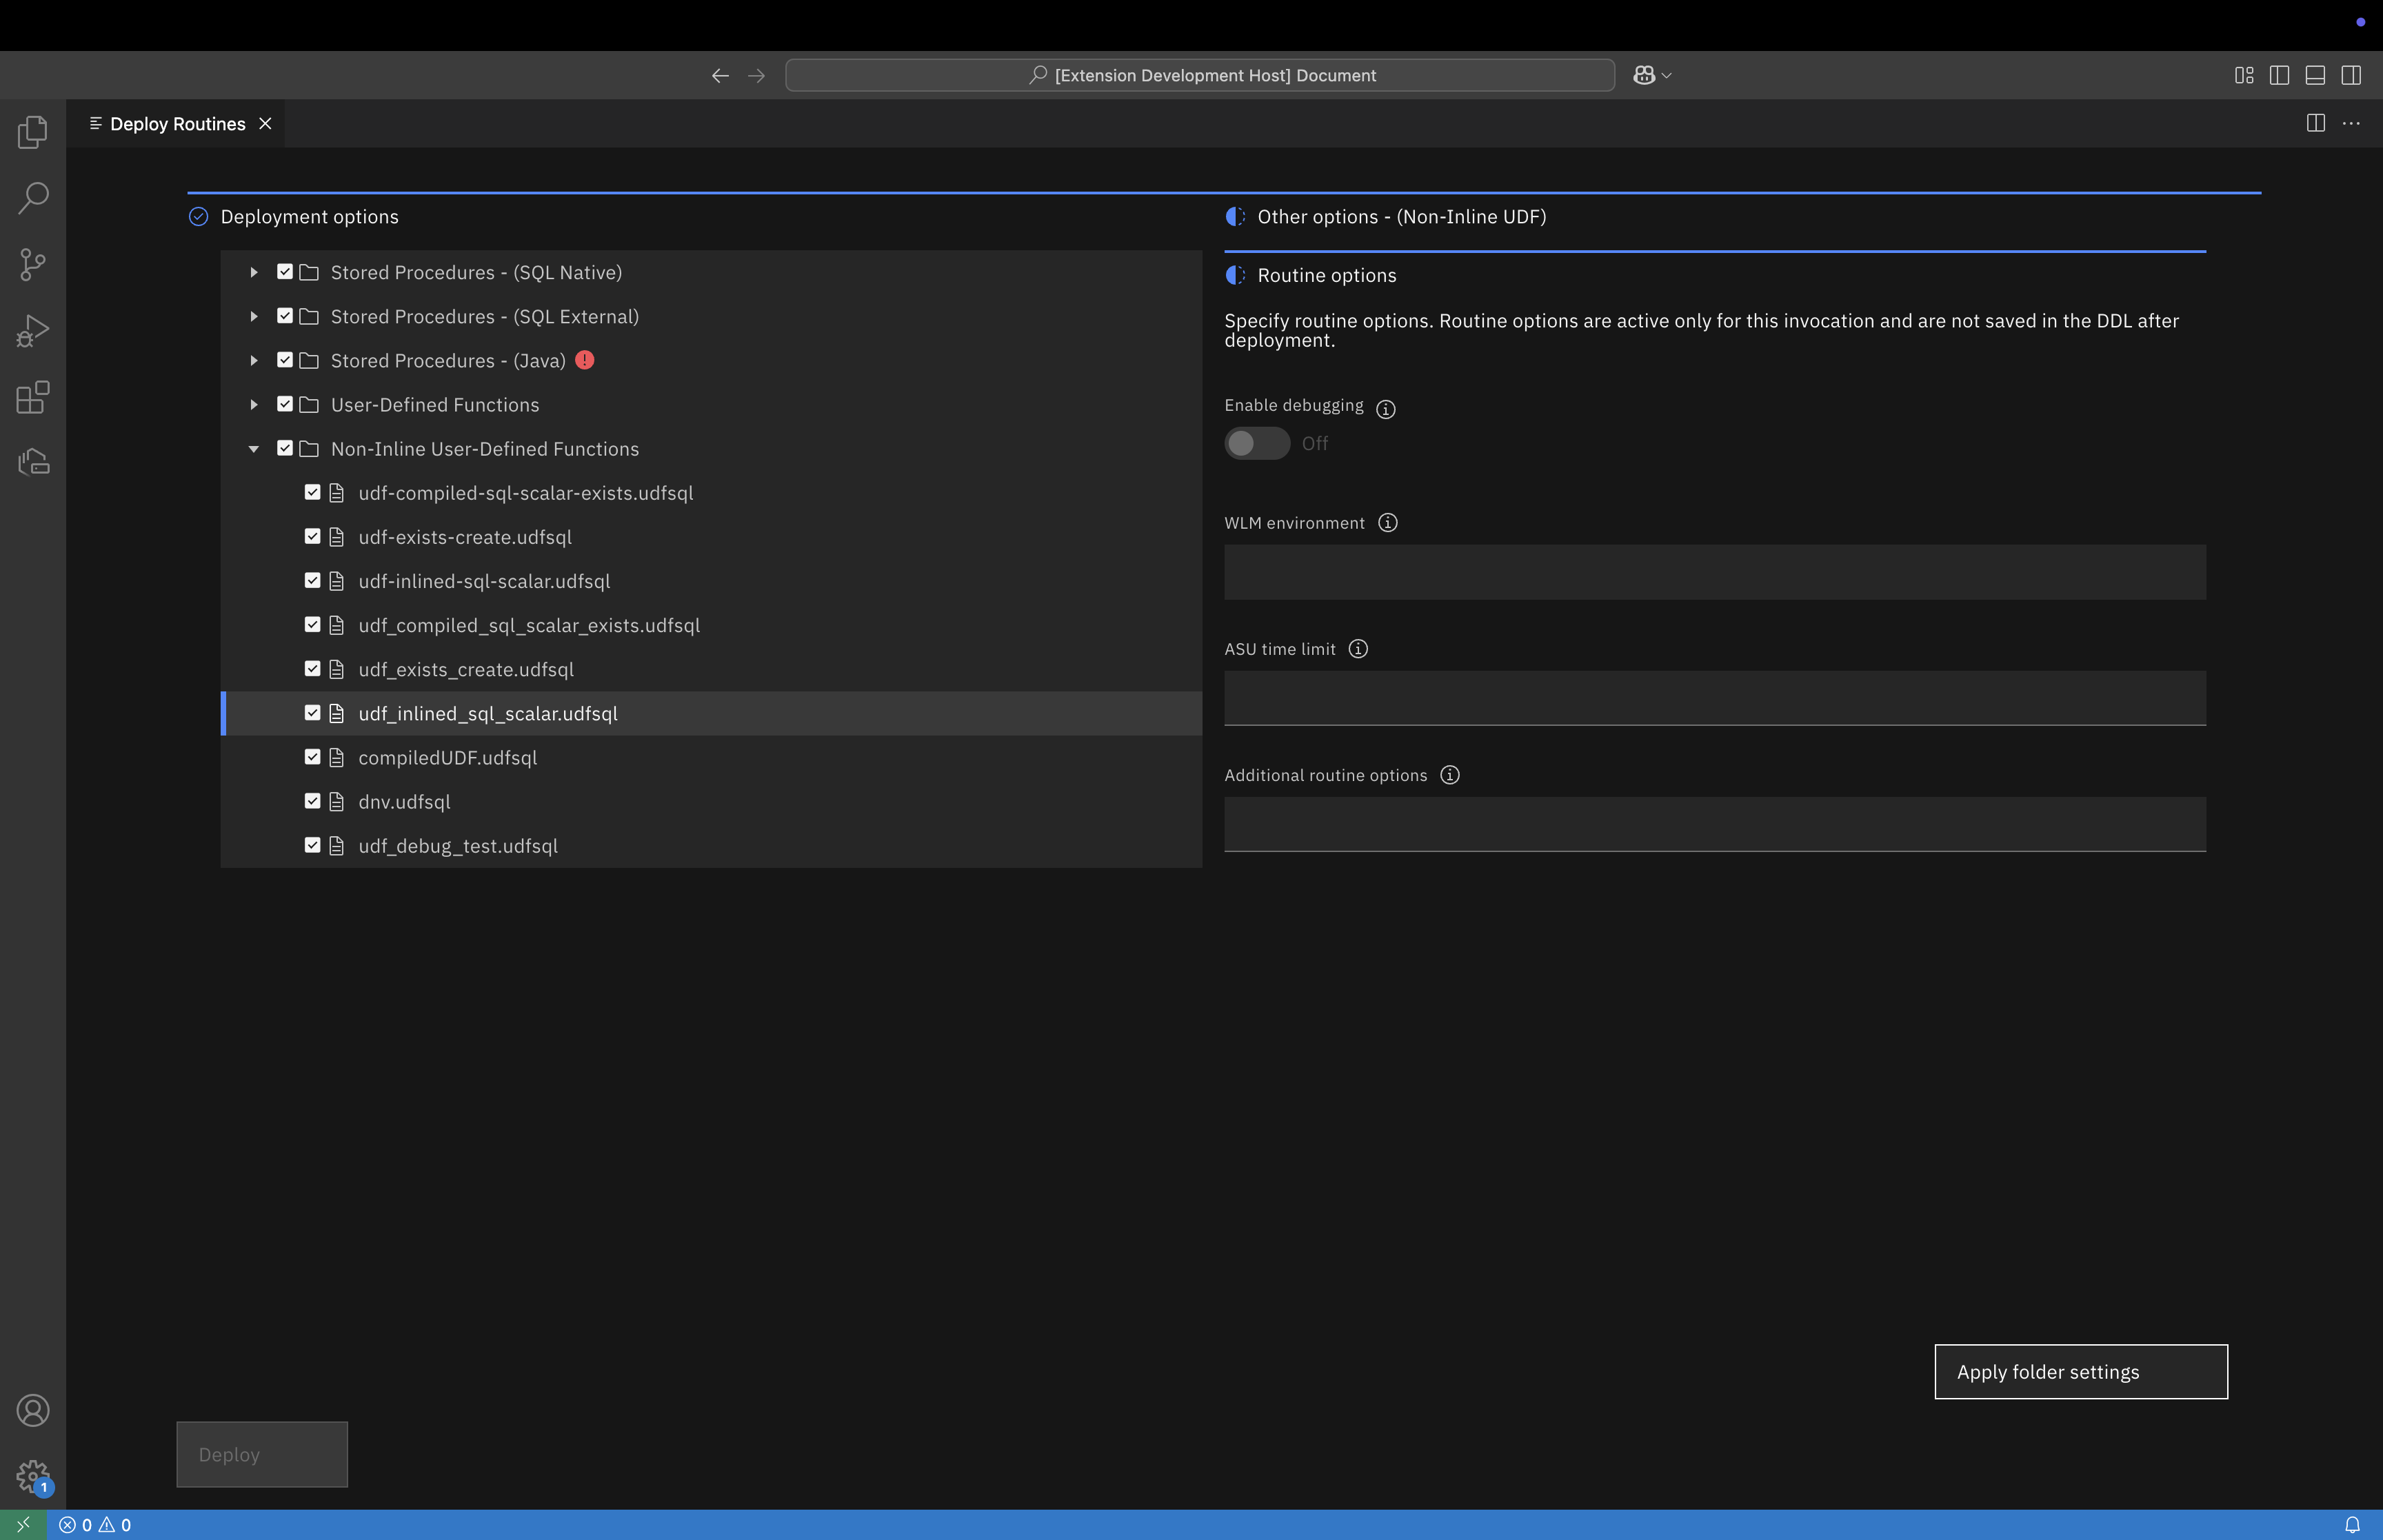
- Use the Enable debugging option to specify whether the routines are available to be debugged.
- Use the WLM environment option to specify which Workload Manager environment will be used to debug the routines. If you enable debugging but leave this field empty, the default WLM environment will be used.
- Use the ASU time limit option to set the ASUTIME, which is the number of CPU seconds permitted for each SQL statement. The default value of 0 means NO LIMIT and is not recommended.
-
Use the Additional routine options field to specify any additional options that you want to include. Separate each option with a semicolon. For example:
QUALIFIER ADMF002; ISOLATION LEVEL RS
External SQL options

- The Build utility field identifies the Db2 SQL procedure processor, SYSPROC.DSNTPSMP, which is used to create an external SQL stored procedure.
- Use the Precompile options option to specify options for precompiling the C language program that Db2 generates for the external SQL procedure. Do not specify the HOST option. For a list of these options see SQL processing options.
- Use the Compile options option to specify options for compiling the C language program that Db2 generates for the external SQL procedure.
- Use the Prelink options option to specify options for prelinking the C language program that Db2 generates for the external SQL procedure.
- Use the Link options option to specify options for linking the C language program that Db2 generates for the external SQL procedure.
- Use the Bind options option to specify options for binding the external SQL procedure package. Do not specify the MEMBER or LIBRARY option for the Db2 BIND PACKAGE command. For a list of these options, see BIND and REBIND options.
Java options
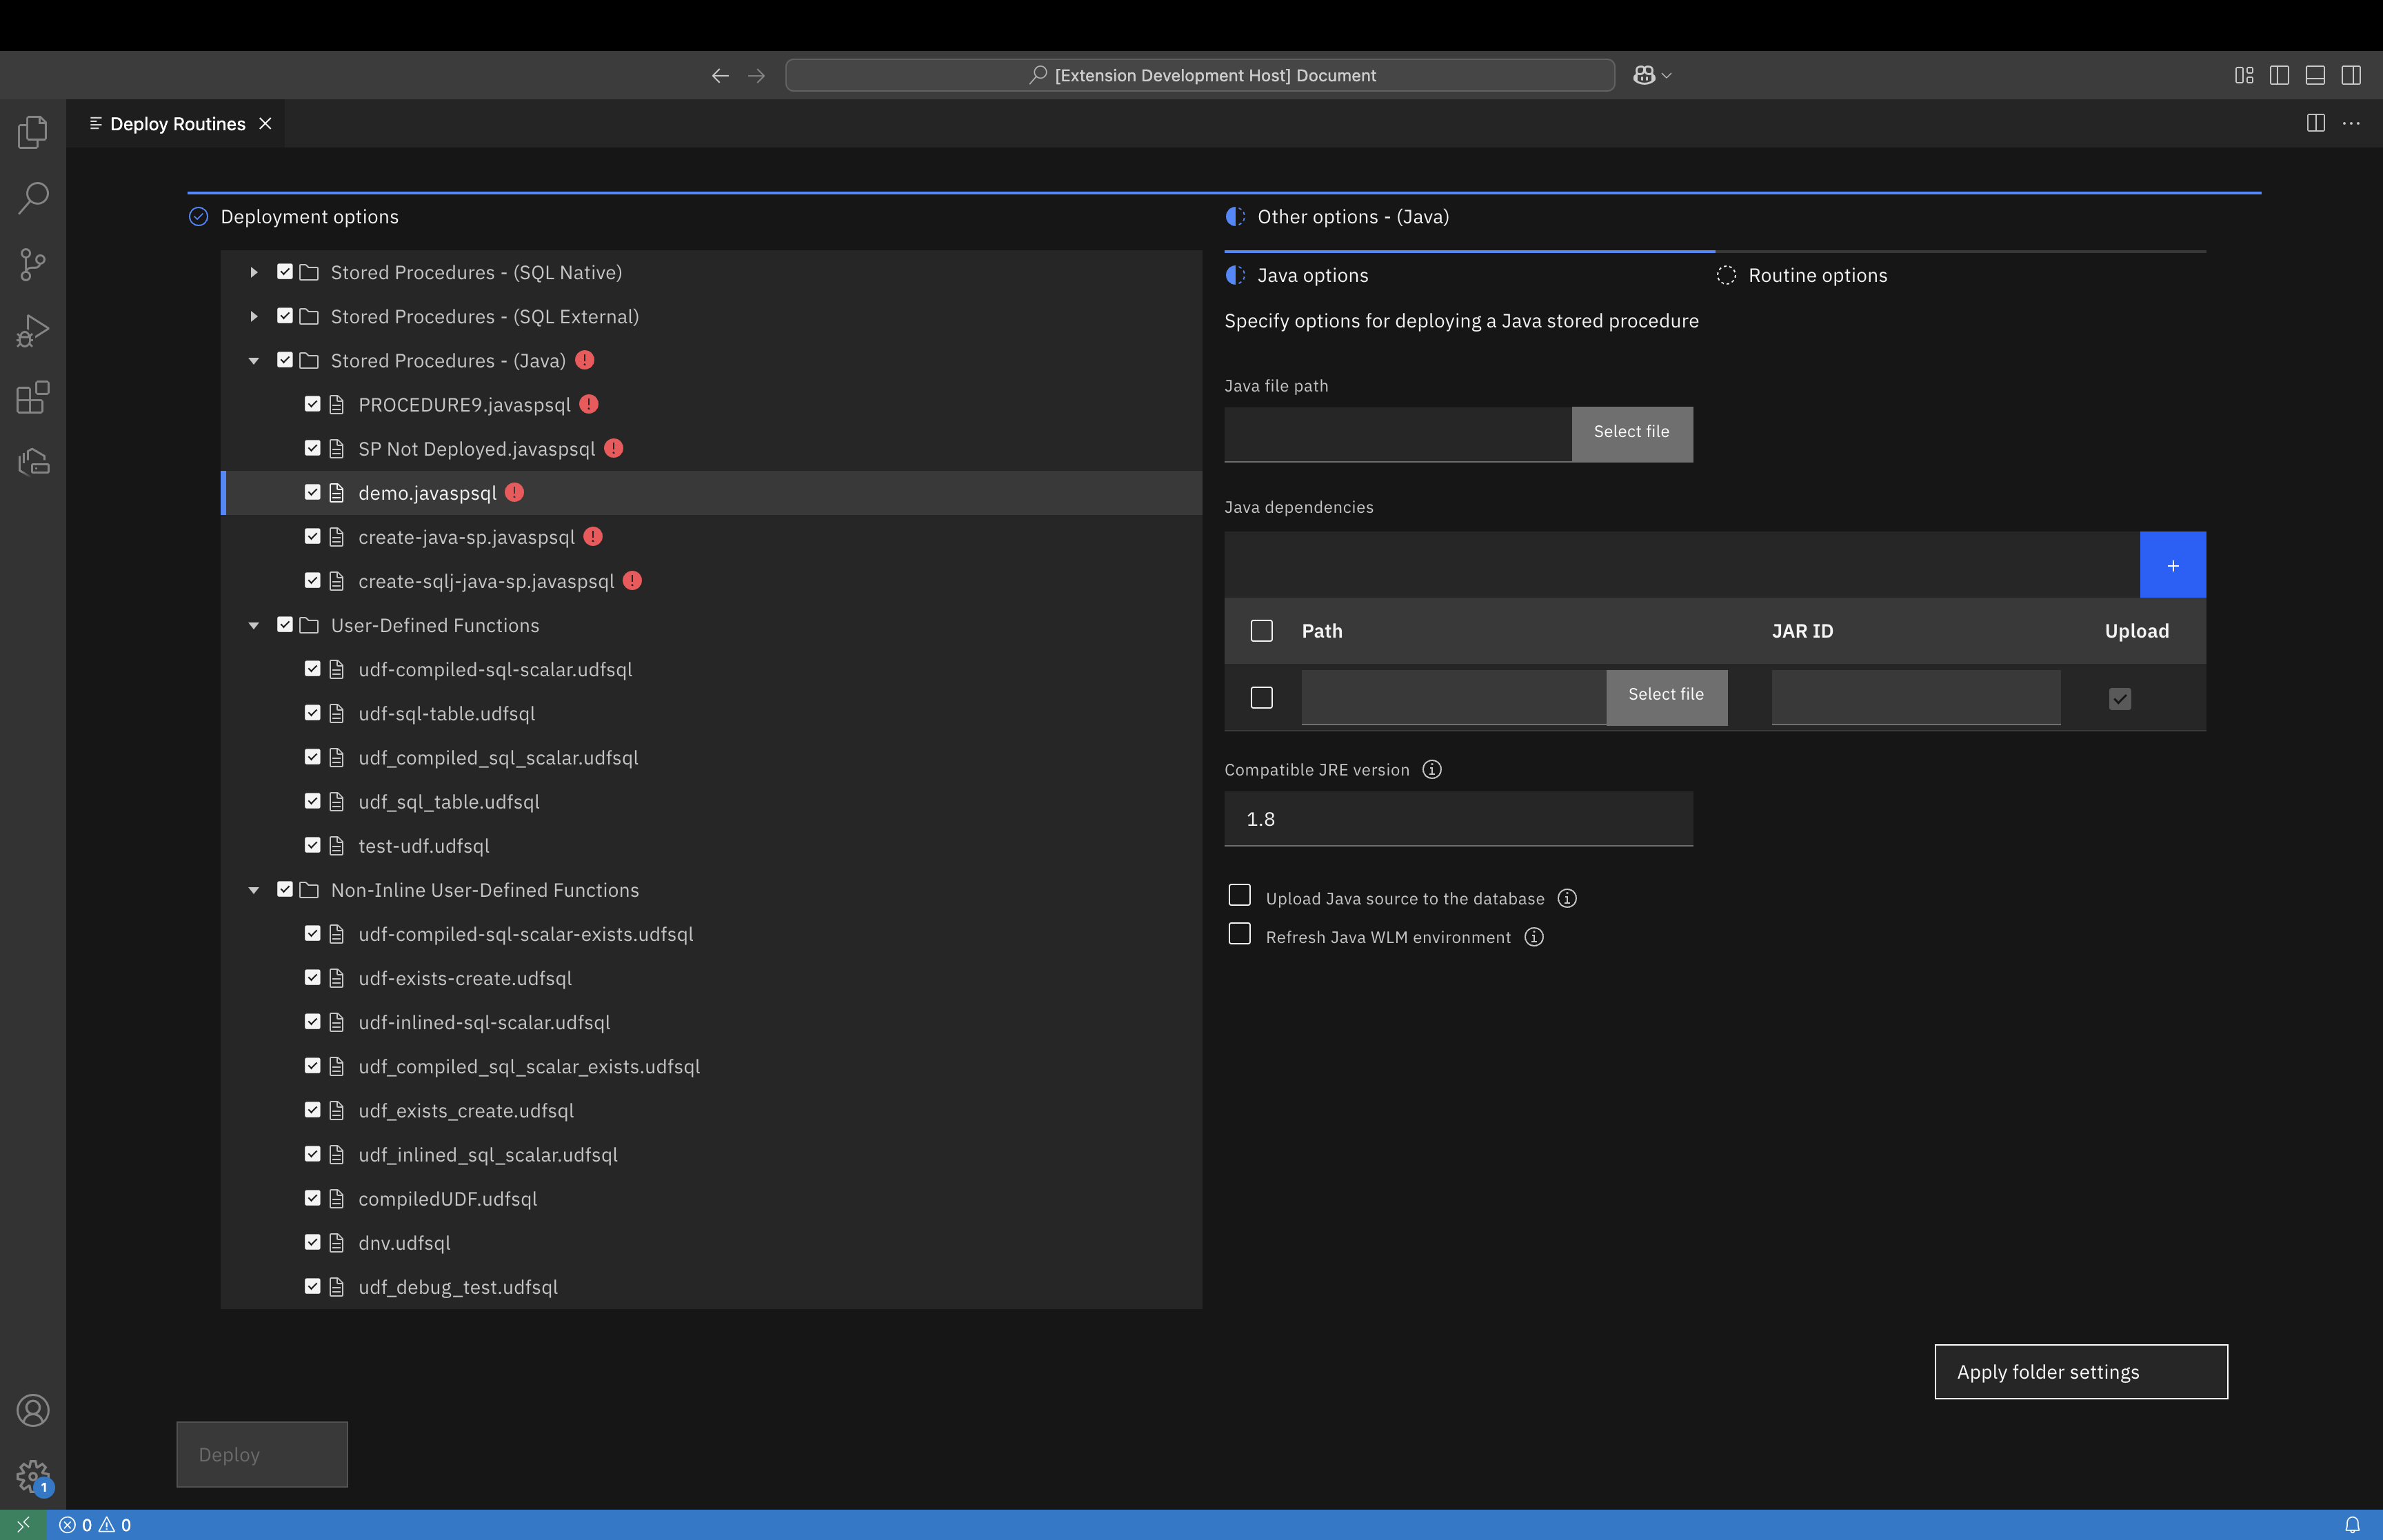
- Use the Java file path option to specify the Java class file. It must have a public static void method, which works as an entry point for the stored procedure. The class name, declared package, and method name should match the external name defined in the CREATE PROCEDURE statement. If the Java class declares a package path, its location must match the package path to be able to compile properly.
-
Use the Java dependencies option to specify any compilation and runtime dependencies that are required by the Java class. Dependent JARs are defined to Db2 if you select Upload; otherwise, dependent JARs are used only for compilation. Dependent JARs must be defined in the Java path on the server unless they have been defined already to Db2 by other Java stored procedures.
Requirement: If a dependent JAR file has its own dependent JAR files, save this JAR file and all its dependent JAR files on the server and add them to your JAVA path on the server. When you deploy this stored procedure, uncheck the Upload option for this JAR file and its dependent JAR files.
- Use the Compatible JRE version option to specify a JRE that is at the same level or lower than the JRE version that is on Db2 for z/OS database. If the specified JRE version is higher than the version on the database, the stored procedure will not run.
- Select Upload source to the database field to include the associated Java source file when you deploy the stored procedure. If this option is not selected, you can run the stored procedure, but you will not be able to view the source for the stored procedure.
- Select Refresh Java WLM environment to ensure that the most current version of the stored procedure is run.
If you don’t specify a required value or specify an invalid value, click on the error icon to troubleshoot the problem:
-
Optional: Propagate the same Routine options settings and External SQL options settings for multiple routines by using the following actions:
-
Apply settings to all is available when you highlight a folder in the list of selected routines. You can specify options at the folder level and click Apply settings to all to propagate those options to every routine file in the folder.
-
Apply folder settings is available when you highlight an individual routine in the list of routines. Click Apply folder settings to propagate the options settings that you specified to the folder to only this routine.
The options that are propagated depend on the type of routine:
- For native stored procedures, Java, and non-inline UDFs, these actions propagate the Routine options only.
- For external stored procedures, these actions propagate both the Routine options and the External options.
When you have correctly specified all the required options for all the selected routines, the Deploy button is enabled.
-
-
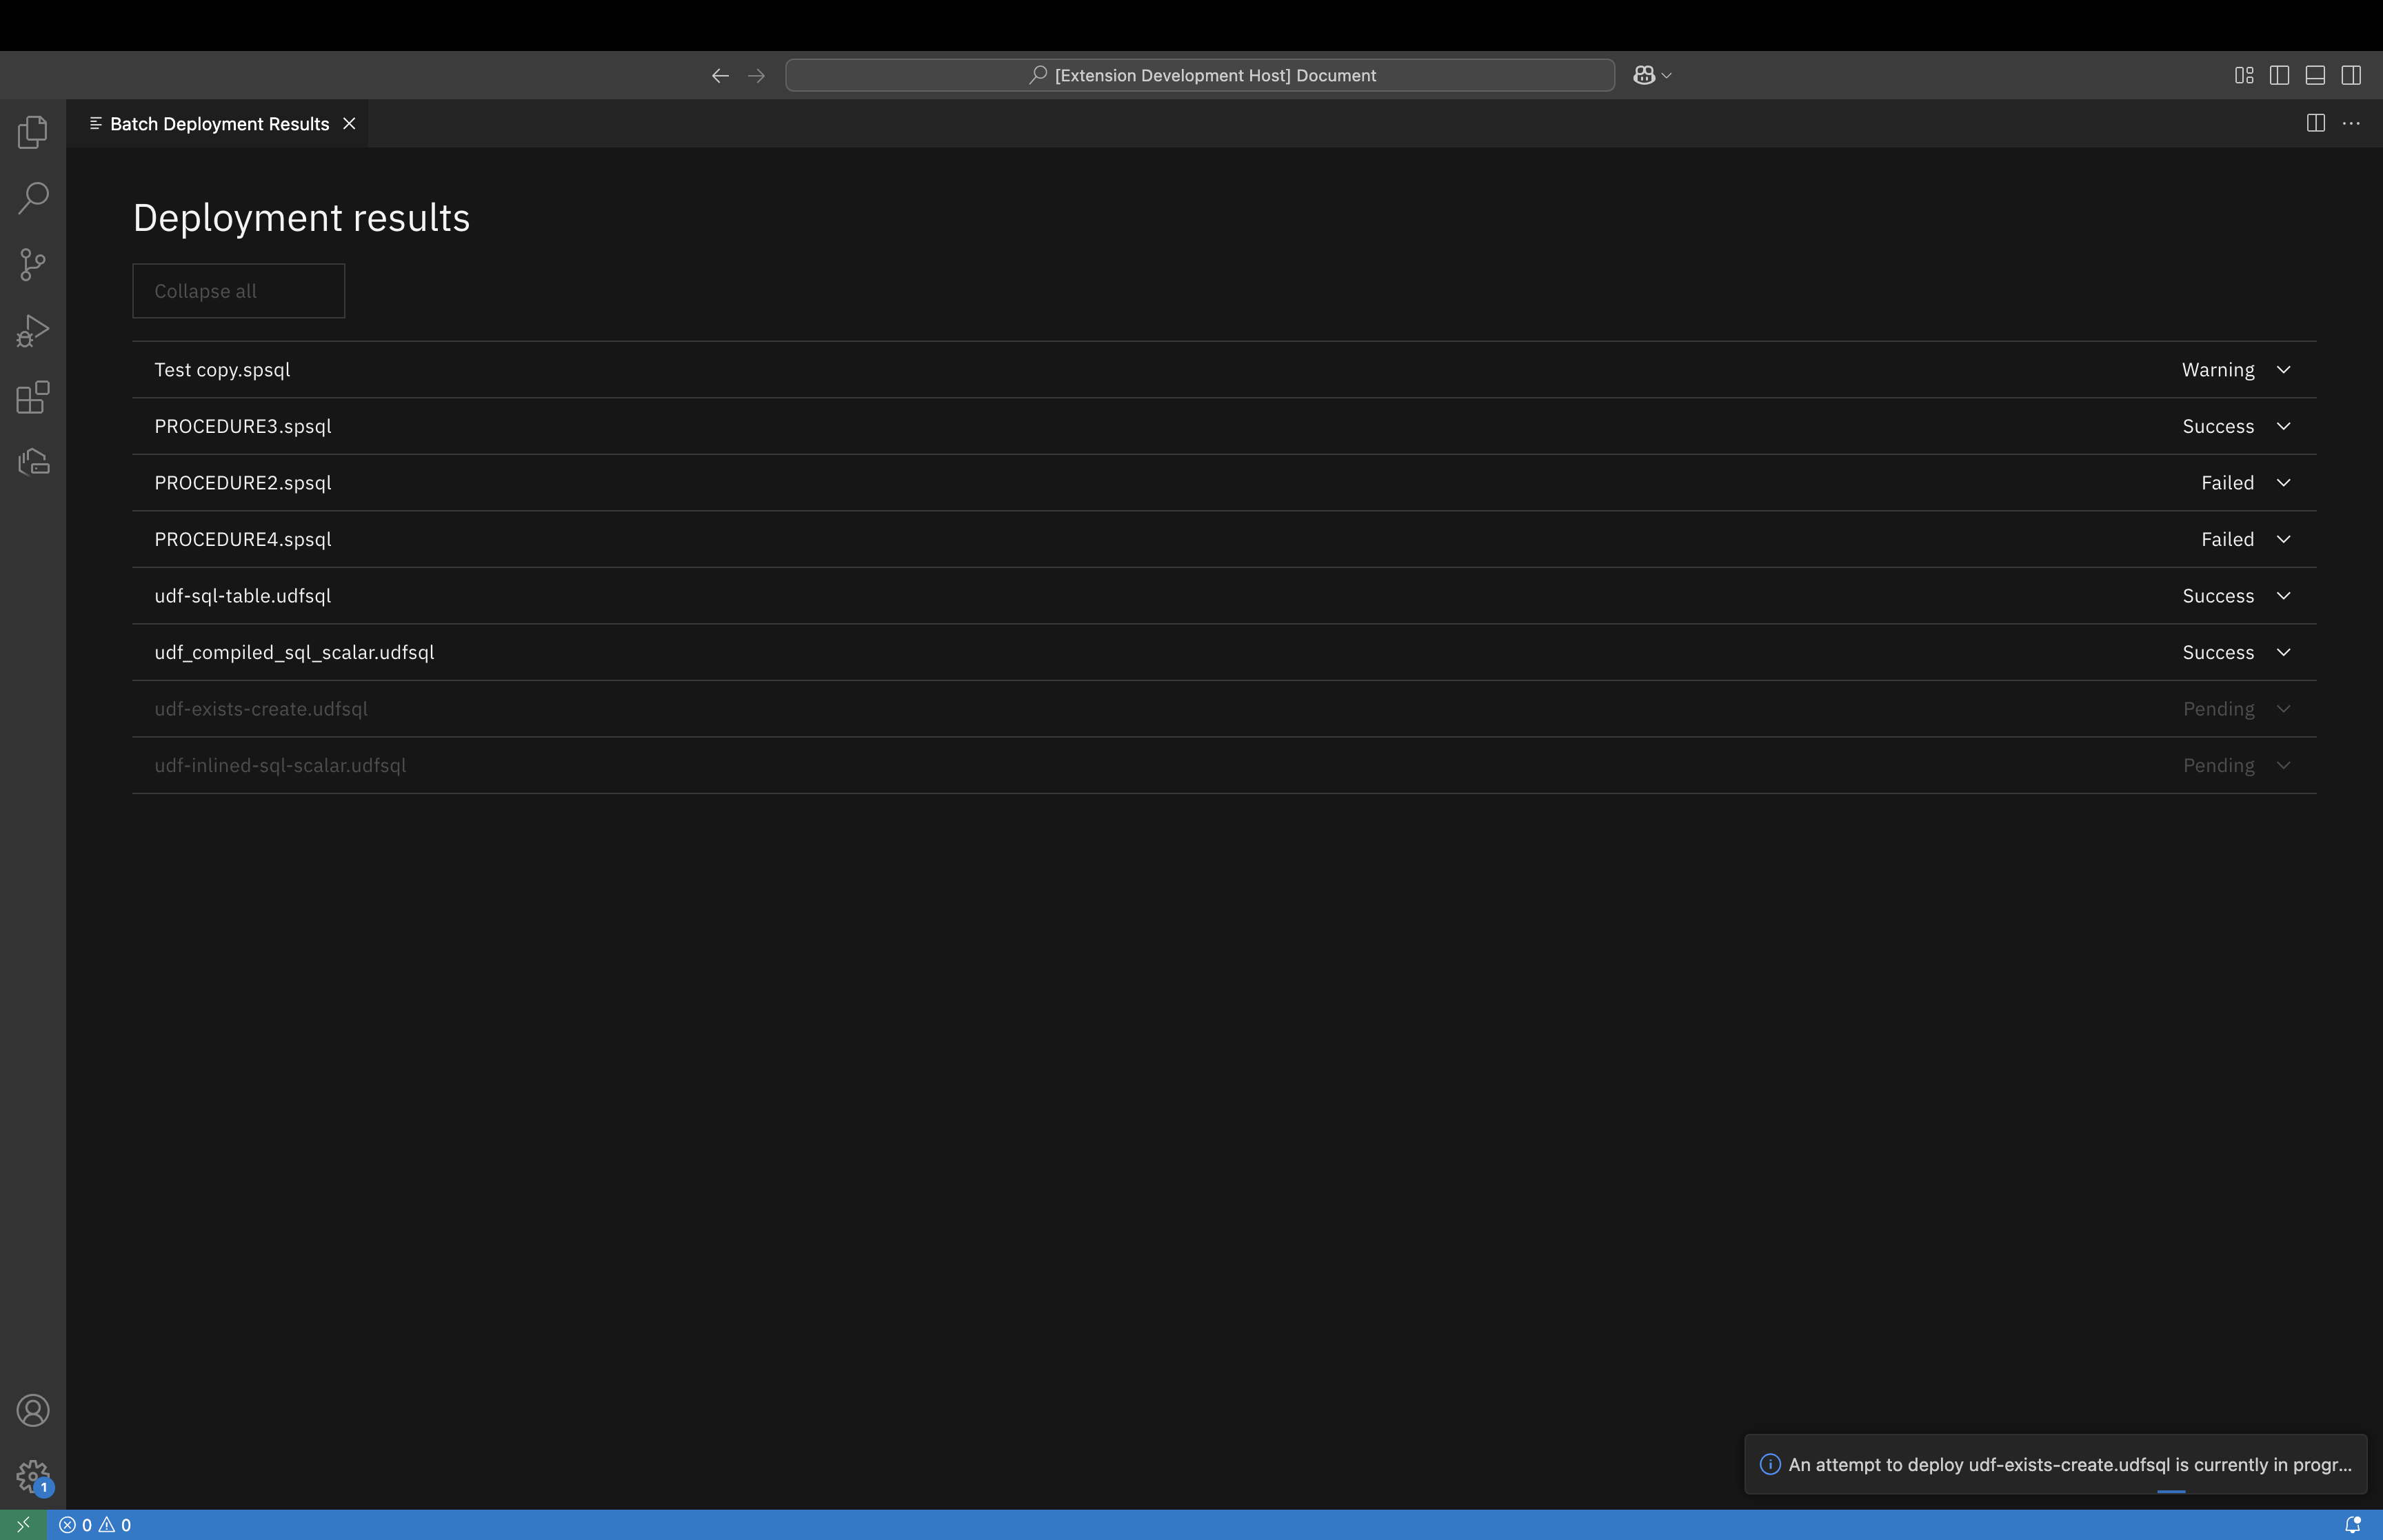
Click Deploy to start the deployment process. The Deployment results view is displayed, which provides the status and results for each routine:
-
Expand a routine to see details about its results. For routines that do not deploy successfully, information is provided to help you correct the problem:
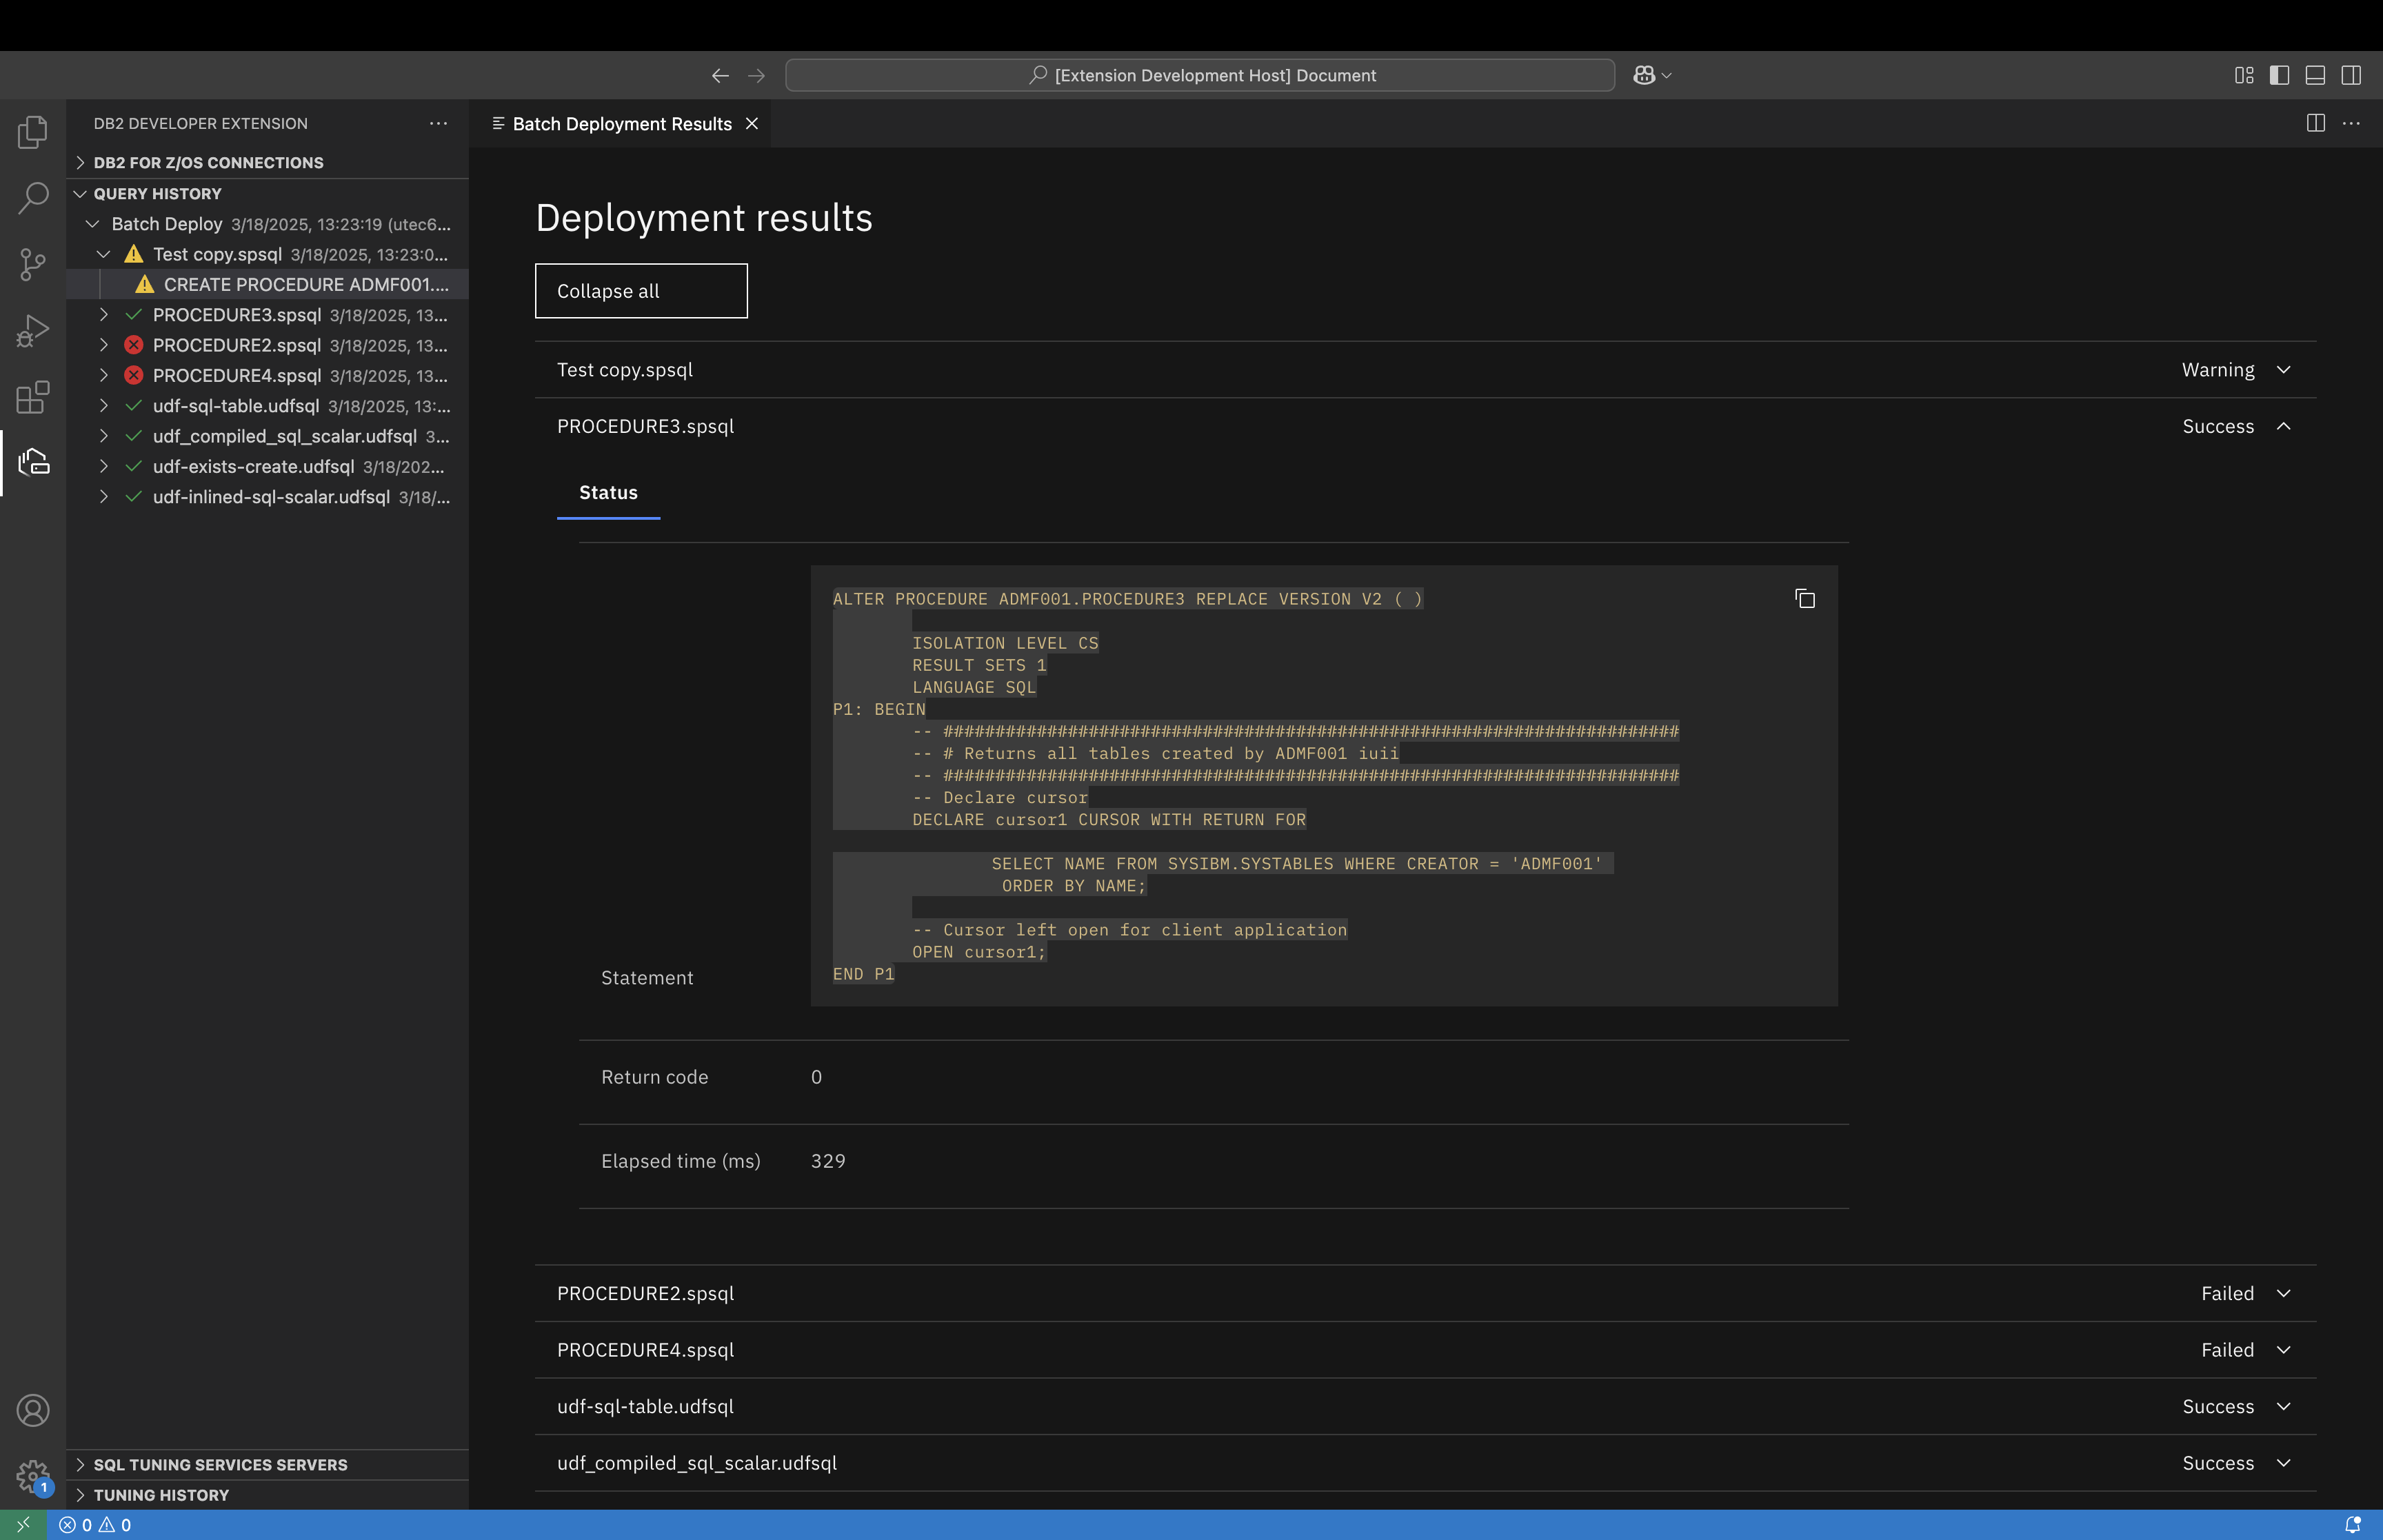
After you deploy a routine or multiple routines, an entry is added to the QUERY HISTORY view. The entry shows the schema, and the path if specified, of the routine. This information is useful when identical routine names exist across multiple schemas.