Deploying, running, and debugging stored procedures
This article shows you how to use Db2 Developer Extension to deploy a native SQL stored procedure (NSP) with various deployment options: enabling debug, altering previous deployments, setting target schema, and others. It also walks you through the process of debugging and running an NSP.
Tip: If you’re new to stored procedures, make sure you’re familiar with the information in Creating stored procedures first.
One big advantage of using Db2 Developer Extension to deploy an NSP, as opposed to manually executing SQL, is that you can save the various deployment options separately from the SQL itself, which means that you can push your code into a source code manager, such as GitHub, without having to remove the deployment debug options first.
Another advantage is that you don’t need to specify --#SET TERMINATOR in the header of .spsql files. Db2 Developer Extension uses the number sign character (#) as the default terminator character, but you can use any terminator character you want by setting a SQL routine option (explained later in this article).
Note: Currently, Db2 Developer Extension deploy, debug, and run options support only one NSP per .spsql file. When NSP options are specified, only the first NSP in the file will be executed; additional NSPs and SQL statements will be ignored.
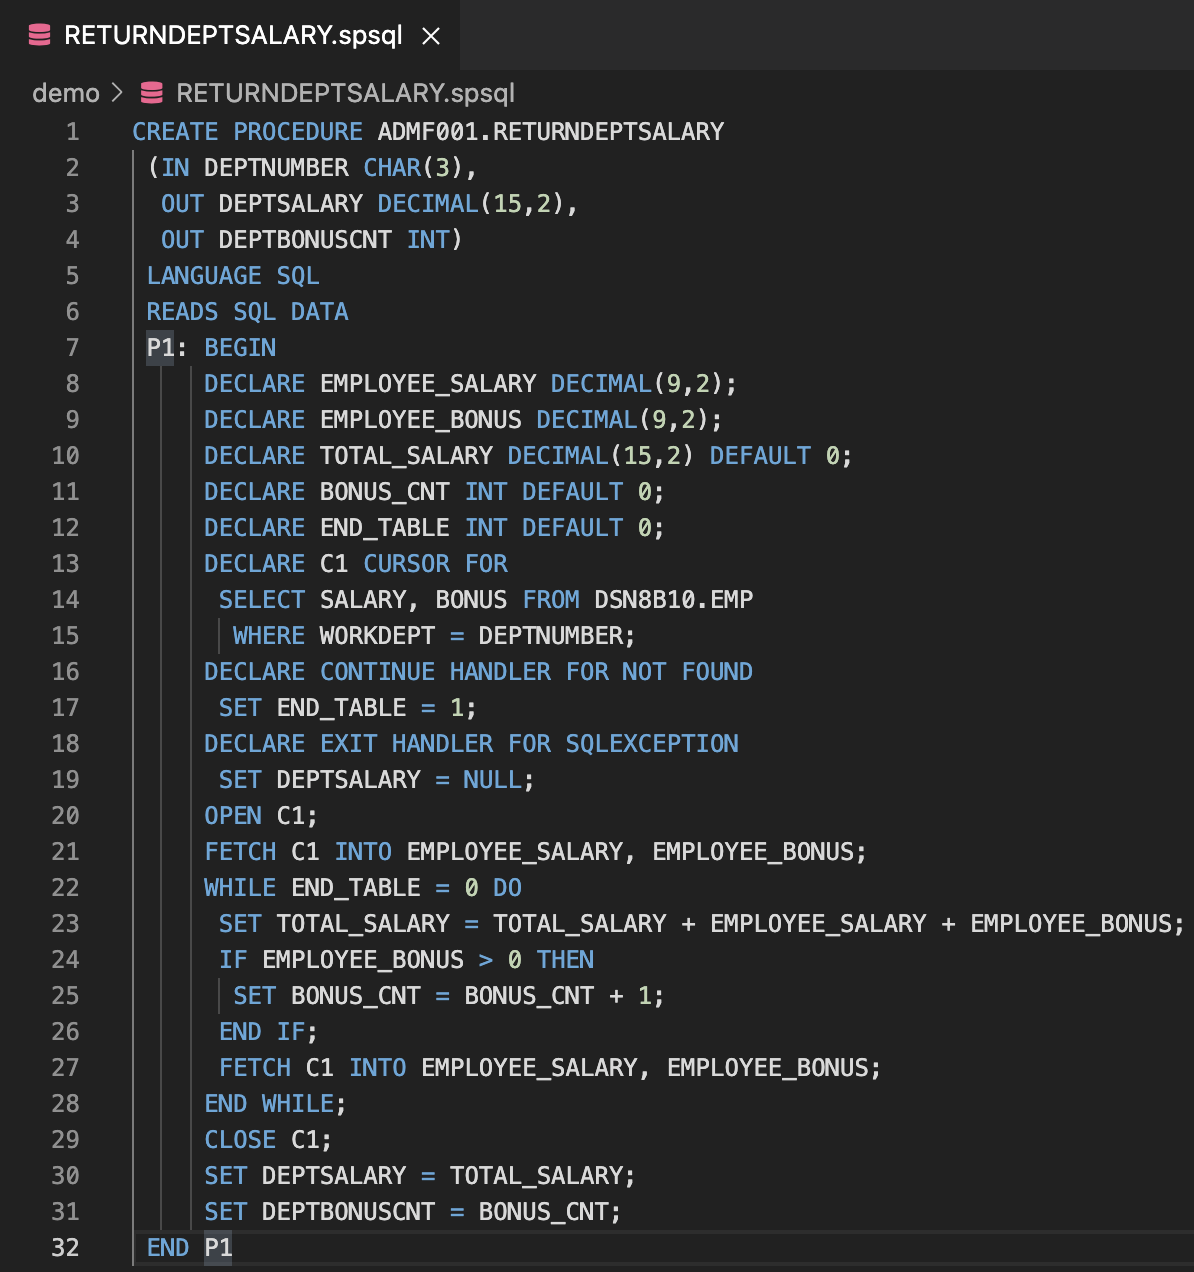
We’ll use the following example stored procedure throughout this article to demonstrate how to deploy, run, and debug an NSP. This NSP will read the total salary, including bonuses, from the table DSN8D10.EMP from a passed in-parameter DEPTNUMBER. You can paste it into a file so that you try things out for yourself.
RETURNDEPTSALARY.spsql
CREATE PROCEDURE ADMF001.RETURNDEPTSALARY
 (IN DEPTNUMBER CHAR(3),
  OUT DEPTSALARY DECIMAL(15,2),
  OUT DEPTBONUSCNT INT)
 LANGUAGE SQL
 READS SQL DATA
 P1: BEGIN
     DECLARE EMPLOYEE_SALARY DECIMAL(9,2);
     DECLARE EMPLOYEE_BONUS DECIMAL(9,2);
     DECLARE TOTAL_SALARY DECIMAL(15,2) DEFAULT 0;
     DECLARE BONUS_CNT INT DEFAULT 0;
     DECLARE END_TABLE INT DEFAULT 0;
     DECLARE C1 CURSOR FOR
      SELECT SALARY, BONUS FROM DSN8D10.EMP
       WHERE WORKDEPT = DEPTNUMBER;
     DECLARE CONTINUE HANDLER FOR NOT FOUND
      SET END_TABLE = 1;
     DECLARE EXIT HANDLER FOR SQLEXCEPTION
      SET DEPTSALARY = NULL;
     OPEN C1;
     FETCH C1 INTO EMPLOYEE_SALARY, EMPLOYEE_BONUS;
     WHILE END_TABLE = 0 DO
      SET TOTAL_SALARY = TOTAL_SALARY + EMPLOYEE_SALARY + EMPLOYEE_BONUS;
      IF EMPLOYEE_BONUS > 0 THEN
       SET BONUS_CNT = BONUS_CNT + 1;
      END IF;
      FETCH C1 INTO EMPLOYEE_SALARY, EMPLOYEE_BONUS;
     END WHILE;
     CLOSE C1;
     SET DEPTSALARY = TOTAL_SALARY;
     SET DEPTBONUSCNT = BONUS_CNT;
 END P1
Here’s how that same stored procedure looks in Db2 Developer Extension:
The file extension of .spsql identifies it as a stored procedure. When you open a .spsql file in Db2 Developer Extension, you get some additional actions in the toolbar in the upper right corner of the view:
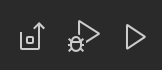
From left to right, these actions are Deploy, Debug, and Run. We’ll cover each one in the following sections.
Deploying a stored procedure
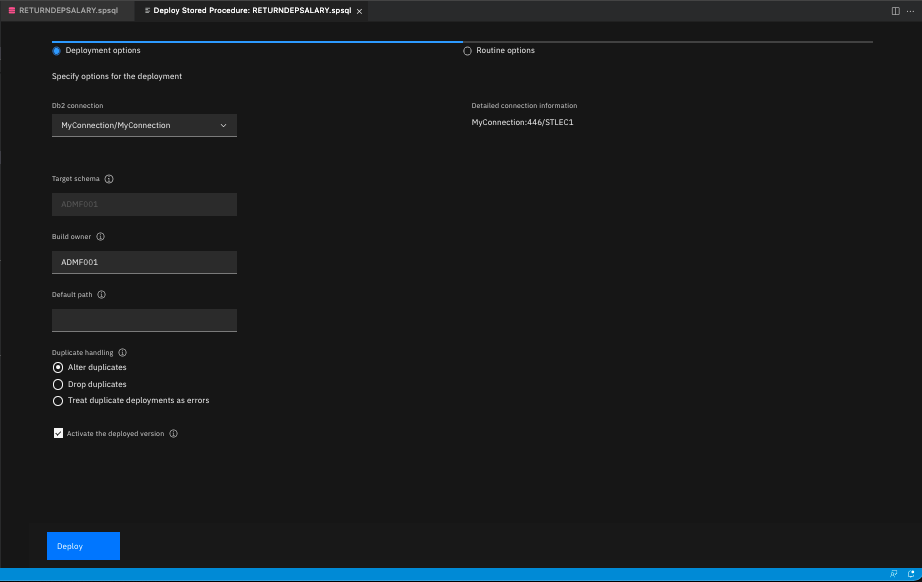
Click the Deploy action to open the Deployment view. This is where you can set and customize deployment options and save the options for the .spsql file. These options are used only during deployment and do not impact the DDL source code.
The Deployment view consists of two sections: Deployment options and Routine options.
Deployment options
-
Use the Database connection option to select a connection from the list of defined connections. See Creating a database connection for more information.
-
Use the Target schema option for unqualified NSPs. This field is enabled only for unqualified NSPs. If the NSP is qualified (like the one in our example CREATE PROCEDURE statement, which is qualified to ADMF001), the field is disabled. If you leave this field empty, the JDBC property
currentSchemawill be used. IfcurrentSchemais not set, the JDBC connection username will be used. -
Use the Build owner option to specify the owner of the NSP. If this field is left empty, the JDBC property
currentSQLIDwill be used. IfcurrentSQLIDis not set, the JDBC connection username will be used. -
Use the Default path option for resolving an unqualified data type, function, or procedure referenced by the procedure that’s being deployed. You can specify multiple schemas, each one separated by a comma. For example:
"ADMF002","ADMF003","ADMF004"
-
Use the Duplicate handling option to specify the behavior of the deployment if the procedure already exists:
-
Alter duplicates modifies the CREATE PROCEDURE DDL to ALTER PROCEDURE if the procedure already exists. Optionally, you can choose not to activate the procedure upon deployment; otherwise, it’s activated by default.
Exception: If you’re using CREATE OR REPLACE PROCEDURE, which is available in Db2 12 function level 507 or later, this option does not result in any modifications.
-
Drop duplicates calls DROP PROCEDURE before running the CREATE PROCEDURE DDL if the procedure already exists, creates the procedure, and activates it upon deployment. By default, Db2 activates the first version of a stored procedure.
-
Treat duplicate deployments as errors returns an error if the procedure already exists. If other versions of the procedure do not already exist, the procedure is created and activated upon deployment. By default, Db2 activates the first version of a stored procedure.
-
Note: Not all options mentioned above are displayed due to screen size limit.
If you’re new to SQL and want more information about embedding SQL in host languages, there’s a lot of information about this topic in the Db2 for z/OS documentation.
Routine options

-
Use the Enable debugging option to specify whether this procedure is available to be debugged.
-
Use the WLM environment option to specify which Workload Manager environment will be used to debug the procedure. If you enable debugging but leave this field empty, the default WLM environment will used.
-
Use the ASU time limit option to set the ASUTIME, which is the number of CPU seconds permitted for each SQL statement. The default value of 0 means NO LIMIT.
-
Use the Additional routine options field to specify any additional options that you want to include. Separate each option with a semicolon. For example:
QUALIFIER ADMF002; ISOLATION LEVEL RS
Click Deploy to finish the configuration and begin the deployment process for the procedure.
Debugging a stored procedure
Requirement: To enable the stored procedure debugging capabilities in Db2 Developer Extension, you must set up the Unified Debugger on Db2 for z/OS. See Debugging stored procedures by using the Unified Debugger for instructions.
The Debug action allows you to debug your stored procedure by using the native IDE debugger. You can set breakpoints in the editor, and you can watch values change over time in the debug environment. Setting conditional breakpoints is covered later in this topic.
You can also specify additional debugging options by using the Run SQL Options dialog, which is described later in this article. If input variables are specified in the SQL, you’ll be prompted to specify values for them before the SQL goes through debugging.
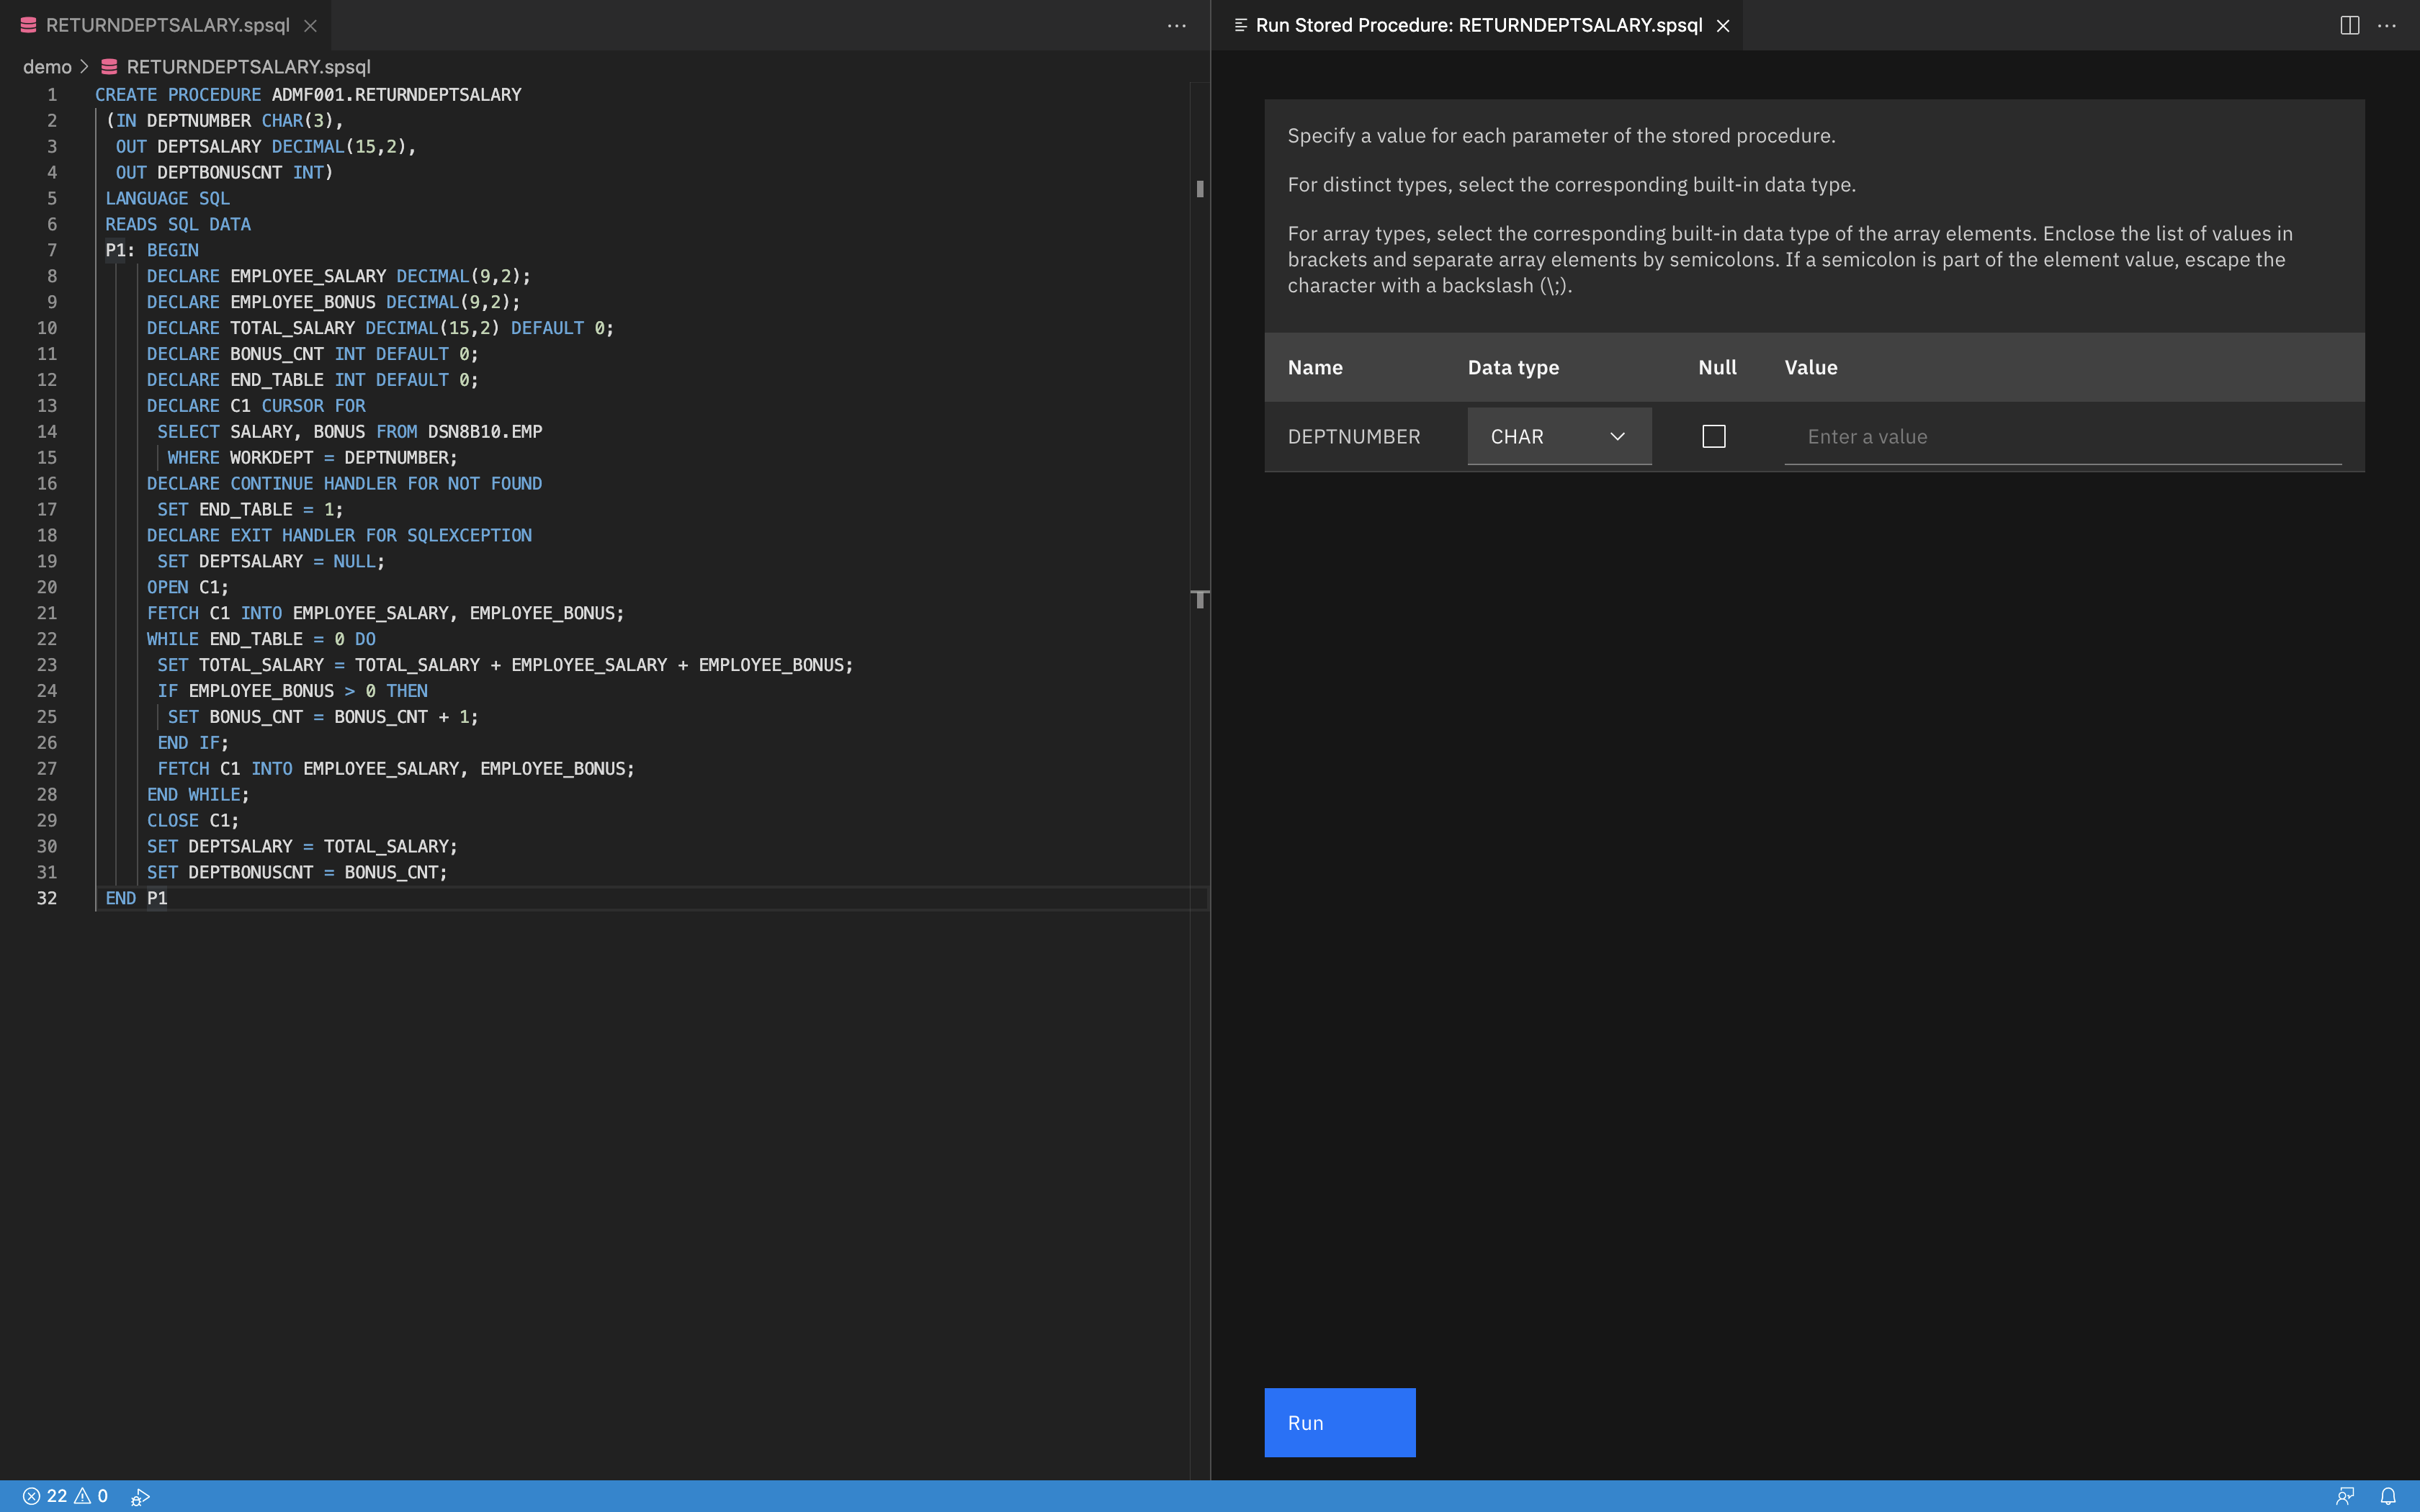
Click the Debug action to start debugging process. If your NSP contains input variables, you’ll be prompted to specify values for them before the SQL goes through debugging, as shown in the following figure. Note that built-in data types for each input variable are detected automatically and are set to the correct data type.

After you specify input parameter values, click Debug. Set the breakpoints for where you want the debugger to pause execution:

When the debugging process starts, the following toolbar is displayed at the top of the view:

You use this toolbar to step through your code. From left to right, these actions are:
-
Continue execution of the program until it hits a breakpoint, encounters an error, or completes
-
Step Over to the next line of the program in the same code level
-
Step Into the program to enter a deeper code level if the current line is a method
-
Step Out to the caller if the current code level is inside a method
-
Restart the debugging program
-
Stop the debugging program
Click the Run and Debug icon in the Activity Bar (![]() ) to display the following sections:
) to display the following sections:
-
The Variables section contains variables declared through program execution and keeps track of the defined value of each variable as the debugger works its way through the code.
-
Use the Watch section to specify variables or expressions that you want to be evaluated by the debugger.
-
The Call stack section keeps track of the current code level during debugger execution.
-
The Breakpoints section keeps track of the breakpoints set throughout the code module.
For more information about debugging your code in Visual Studio Code, see https://code.visualstudio.com/docs/editor/debugging.
Setting conditional hit-count breakpoints
You can specify a hit count when you define a breakpoint, which means that when the breakpoint is reached, instead of pausing, execution continues until the hit count that you specified is reached. This feature is useful when you debug stored procedures that contain loops. You can allow execution to continue for the specified number of loops, and then debug the code when that number is reached.
To set a breakpoint that includes a hit count:
- For a stored procedure that has already been deployed, right-click and select Debug Stored Procedure.
- Set any input parameters that need to be set.
- Click Debug. A .spsql file opens and the debugger starts at the top of this file.
- Click the line that you want to set the conditional breakpoint for, then right-click and select Edit Breakpoint > Add Conditional Breakpoint > Hit Count. (Note that in this release, the Expression and Log Message options are not supported.)
- Specify the number of times the loop should be run before the debugger pauses.
- Click Continue (
 ) to proceed with debugging.
The breakpoints that you set persist on the file. You don’t need to reset these breakpoints if you want to debug this file again.
You can clear breakpoints by deselecting them in the BREAKPOINTS view or by clicking on and removing them individually from the file.
Running a stored procedure
Click the Run action to start execution process. If your NSP contains input variables, you’ll be prompted to specify values for them before the NSP executes, as shown in the following figure. Note that built-in data types for each input variable are detected automatically and are set to the correct data type.
If you have an input type that’s an array, you’d specify the values like this:
numeric:   [1; 2; 3]
character: [hello; world]
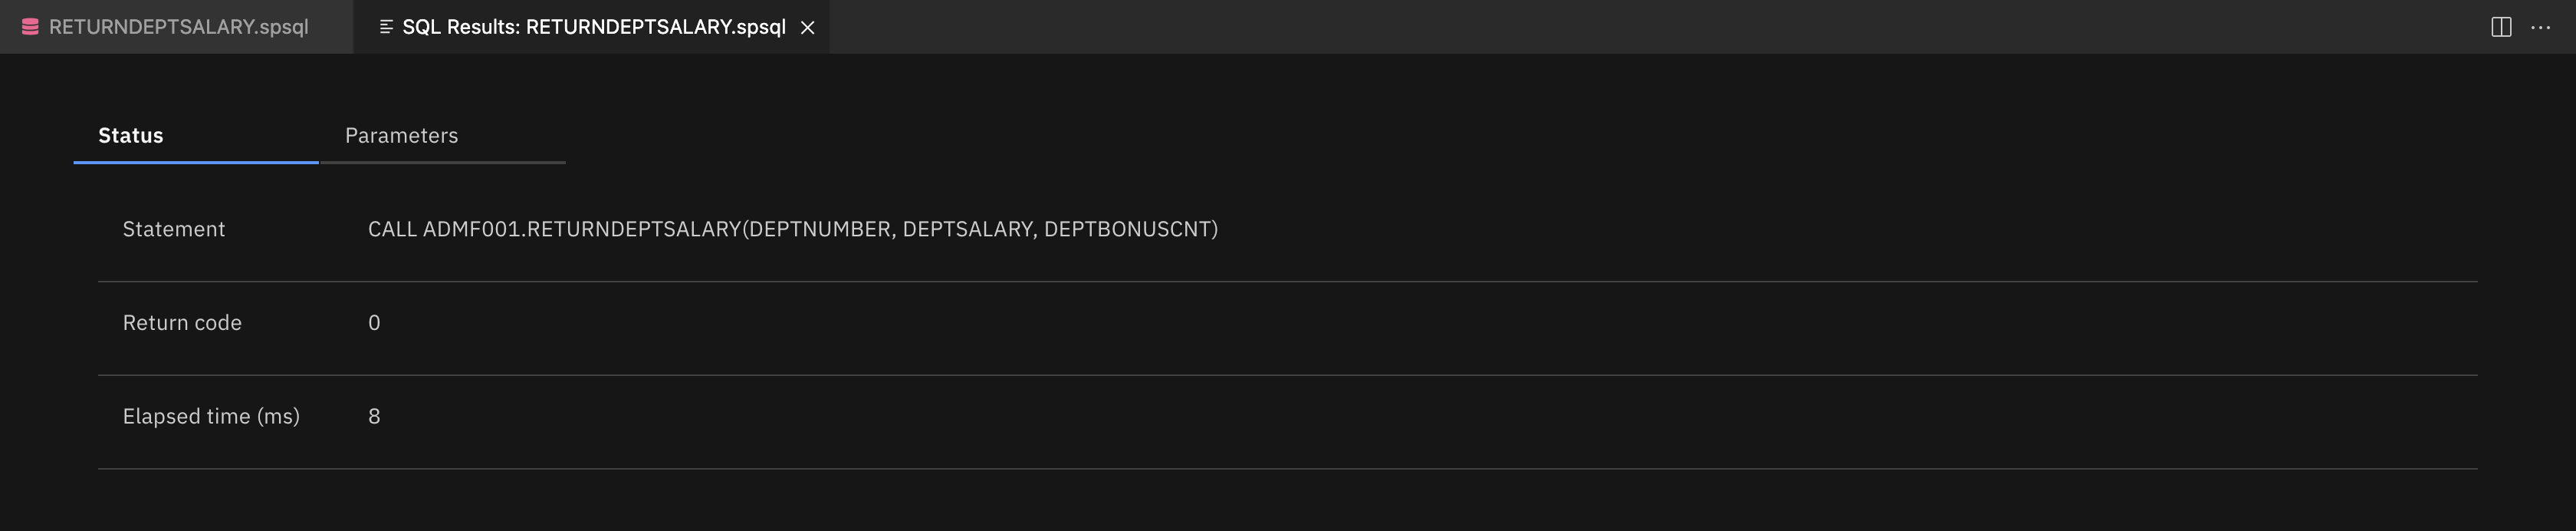
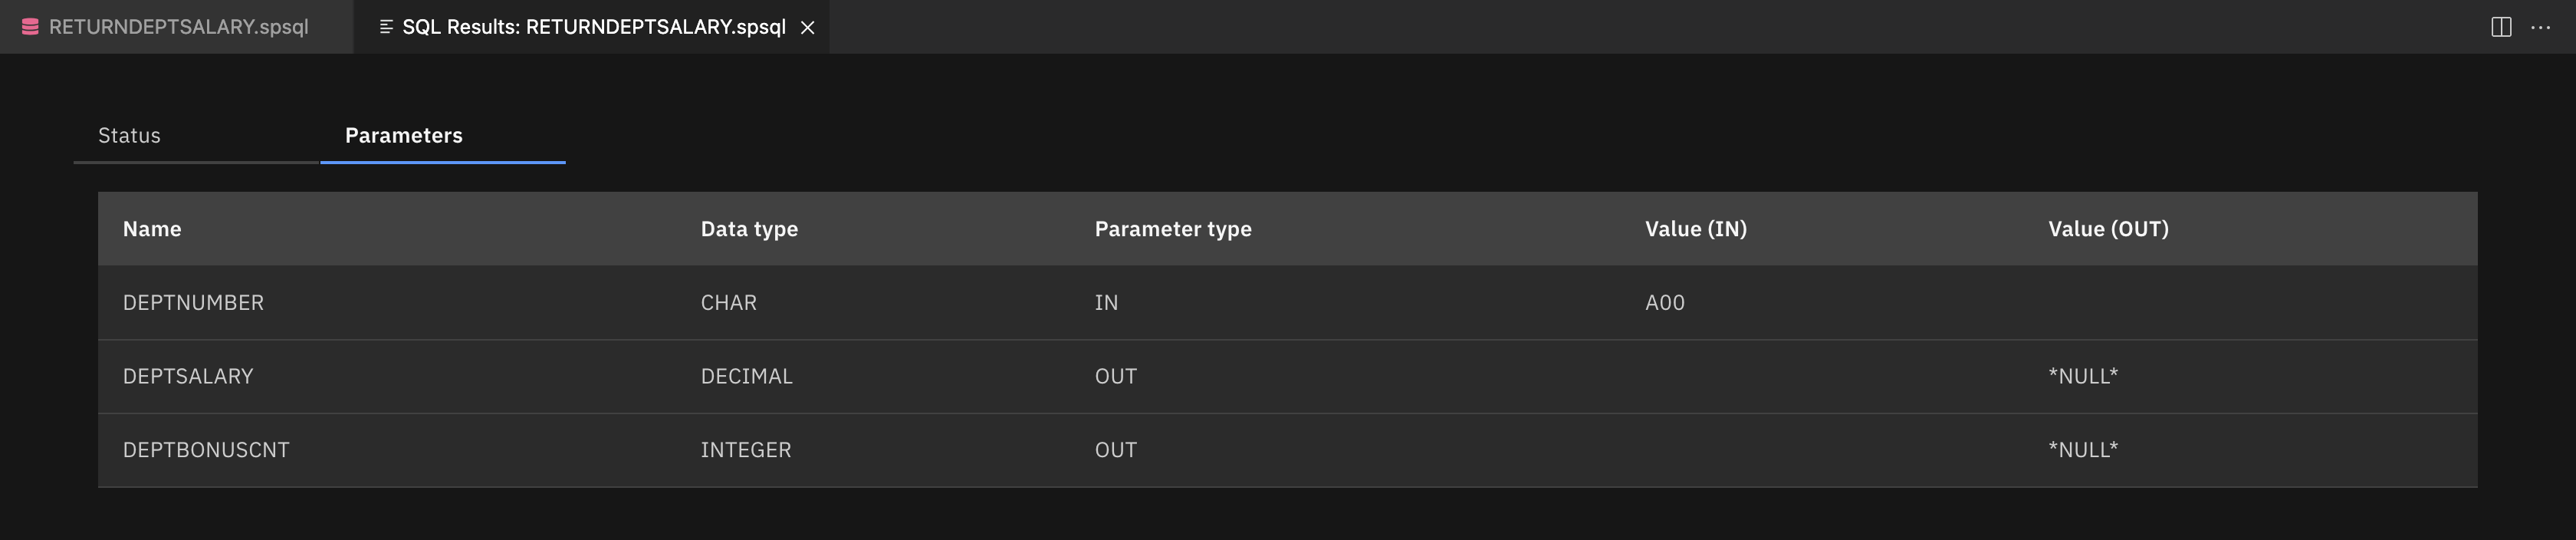
After your NSP is executed, the following output is displayed in these tabs:
- The Status tab contains overall execution status. If an error occurred, the status will contain SQL code, SQL state, and Message text.
- The Parameters tab contains variable information for passed-in parameters.
- The SQL Results view contains data if a result set is expected (in our NSP example, a result set isn’t expected so the Result tab isn’t shown).
Specifying additional options
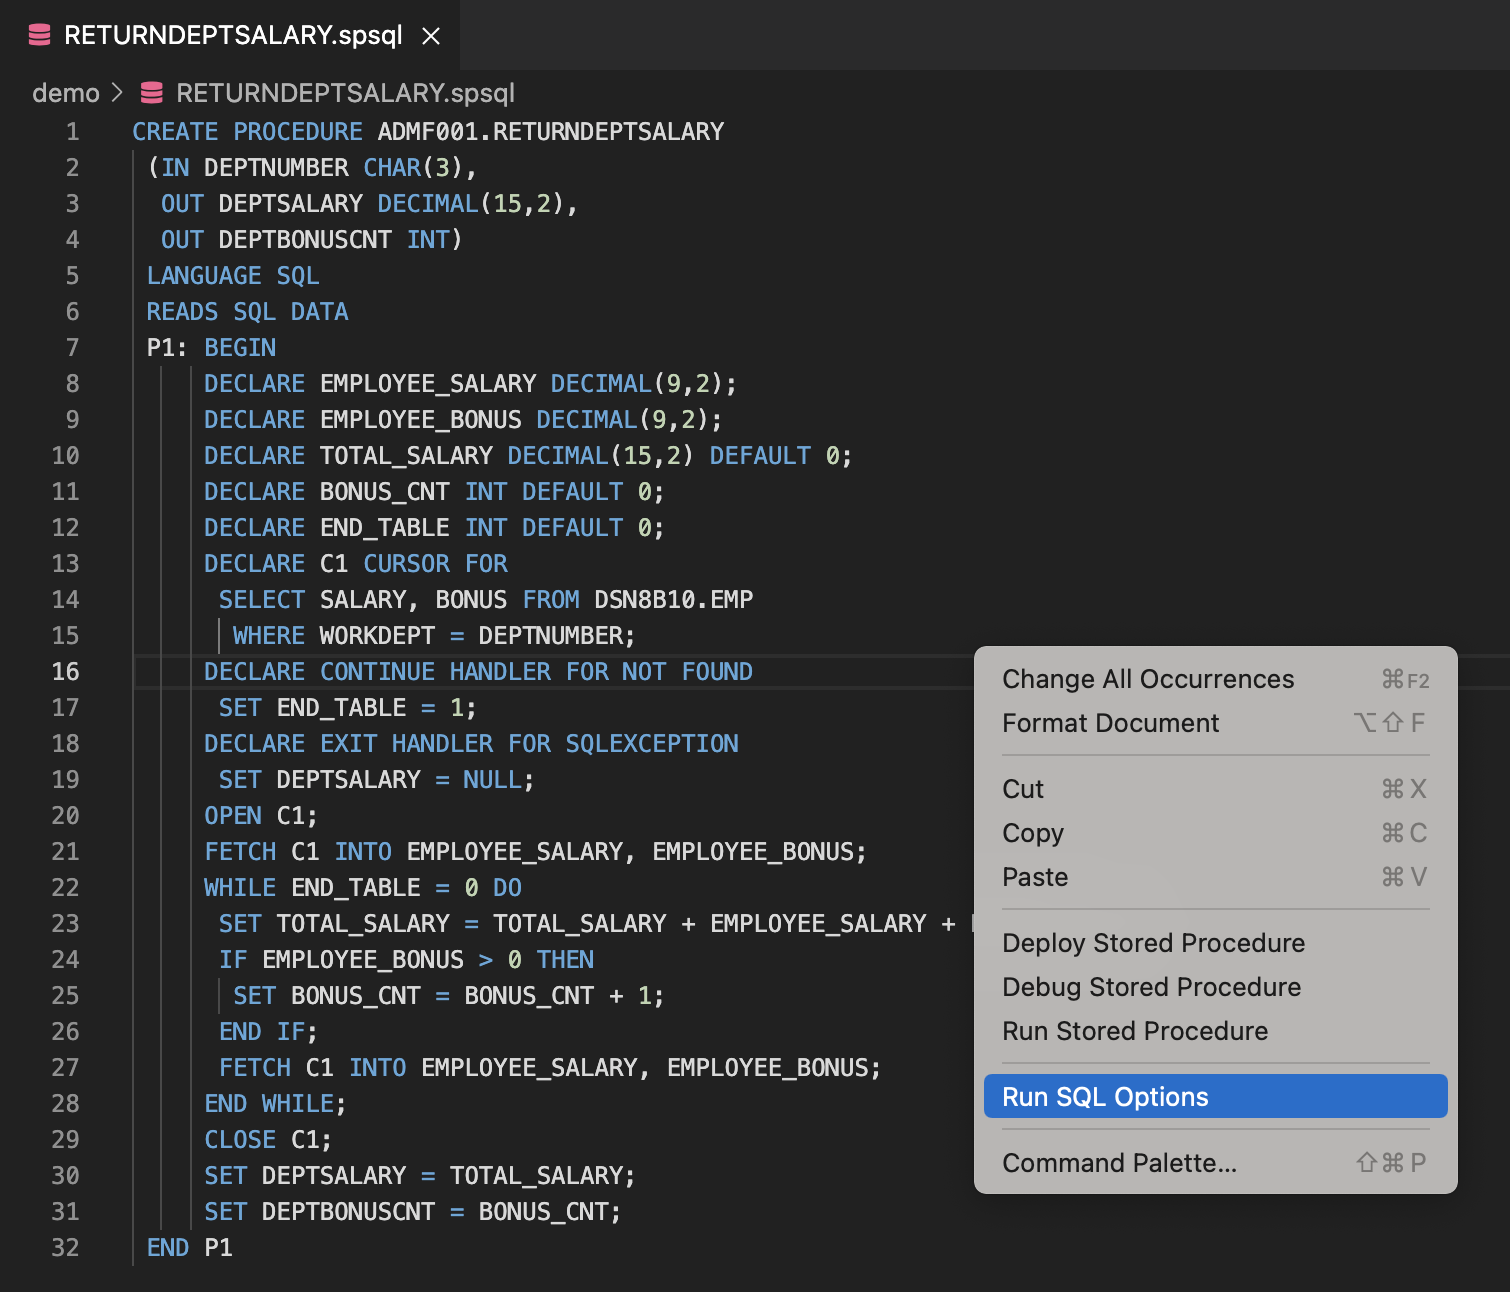
You can specify and save additional NSP debug and run options by right-clicking inside the editor and selecting Run SQL Options.
…which opens the JDBC runtime options view:
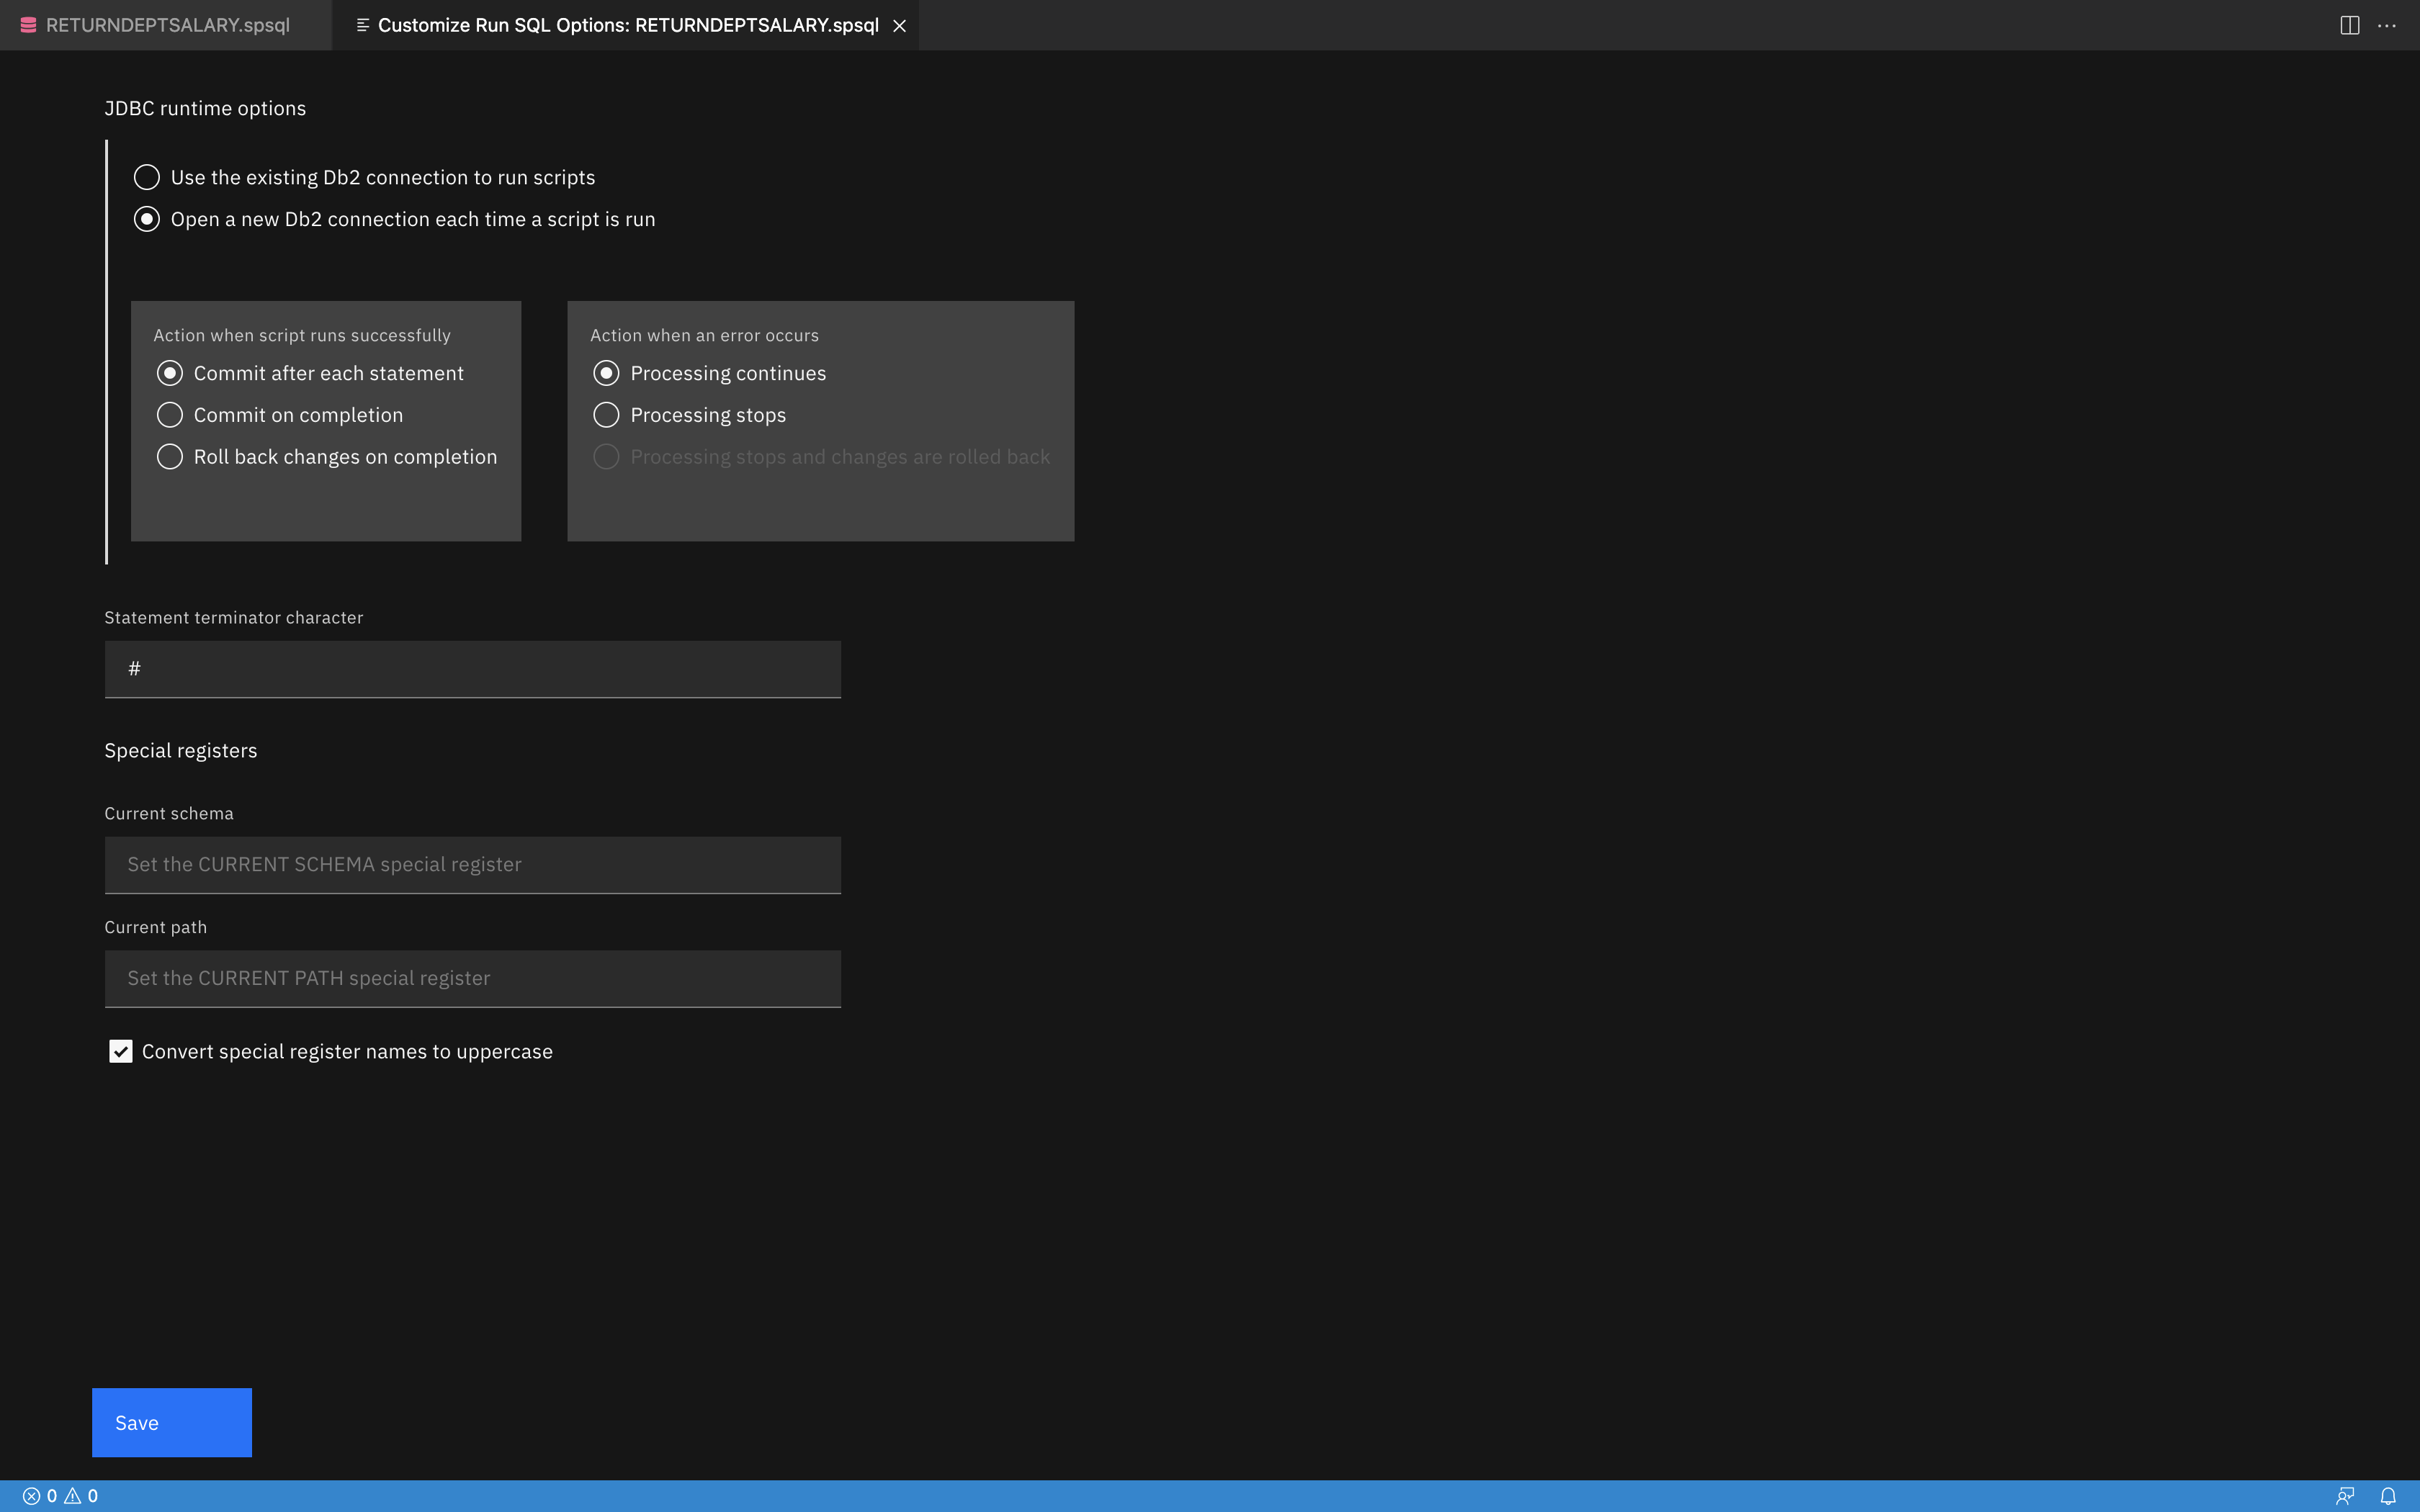
This article covers just the following options that you can set in this view:
-
Use the Statement terminator character option to set the statement terminator for the file.
-
Use the Current schema option for resolving regular object types such as tables, views, and indexes.
-
Use the Current path option for resolving an unqualified data type, function, or procedure referenced by the procedure that is being deployed. You can specify multiple schemas by separating each one with a comma. For example:
"ADMF002","ADMF003","ADMF004"
About commit and rollback options: The commit and rollback options behave a little differently with stored procedures. First, by default, all stored procedures run with COMMIT ON RETURN NO. You can change this behavior by including the COMMIT ON RETURN YES clause in your stored procedure DDL. If you need more control over the SQL statements in a stored procedure at the unit of work level, see COMMIT and ROLLBACK statements in a stored procedure.
Second, Db2 Developer Extension runs only the first stored procedure in a file and ignores any other SQL statements that you might have selected to run. If you select Commit on completion or Rollback changes on completion, processing will end after the first stored procedure is processed, even if you intended to run additional SQL statements in that same file. See Committing and rolling back changes for more information.