Line Hex Editor
The Line Hex Editor enables you to view and edit the hexadecimal representation of a sequential data set or PDS member directly in VS Code. This is an advanced capability available with an active license.
When you open a remote sequential data set or PDS member in VS Code through Zowe™ Explorer or the z/OS Resources Table, it is converted from its source encoding, such as an EBCDIC code page, into a local encoding that VS Code supports, UTF-8 by default. For most programs this conversion is clean, but for binary data modified at the byte level, the conversion can corrupt the data. Any edits made and written back to z/OS® are therefore based on corrupted content.
The Line Hex Editor avoids this problem by keeping the data in its original binary representation throughout the entire edit lifecycle: download, edit, and upload. You work directly in the source encoding at all times, with no intermediate conversion that might alter the bytes.
The editor displays a single line at a time in both its decoded characters and its raw hex values side by side. Both representations are editable with live previews: changes to the hex values are immediately reflected in the character row, and changes to the characters are immediately reflected in the hex row.
Opening the Line Hex Editor
You can open the Line Hex Editor using any of the following methods, each of which opens the editor at the current cursor position in the document:
- Cmd ⌘/Ctrl+Shift+P to open the command palette and run the command
>IBM Z Open Editor: Open Line in Hex Editor. - Right-click within a supported file and select Show In > Line Hex Editor.
- Right-click within a supported file and select Open Line in Hex Editor directly from the context menu.
The Line Hex Editor commands are available only for remote sequential data sets and PDS members with an FB or FBA record format. When opened, the data set or member must be associated with one of the supported languages: COBOL, PL/I, HLASM, REXX, or JCL. If the data set or member opens with an unsupported language association, set the correct language before running the command. To do so, click the language indicator in the status bar or run >Change Language Mode from the command palette and select the appropriate language.
When the Line Hex Editor opens, the associated text editor is set to read-only. This prevents simultaneous edits in both editors, which can cause synchronization issues. It also ensures that changes are made and saved through the Line Hex Editor, preserving the original byte representation of the data rather than the converted version displayed in the text editor. The read-only lock is released after you close the Line Hex Editor.
Layout
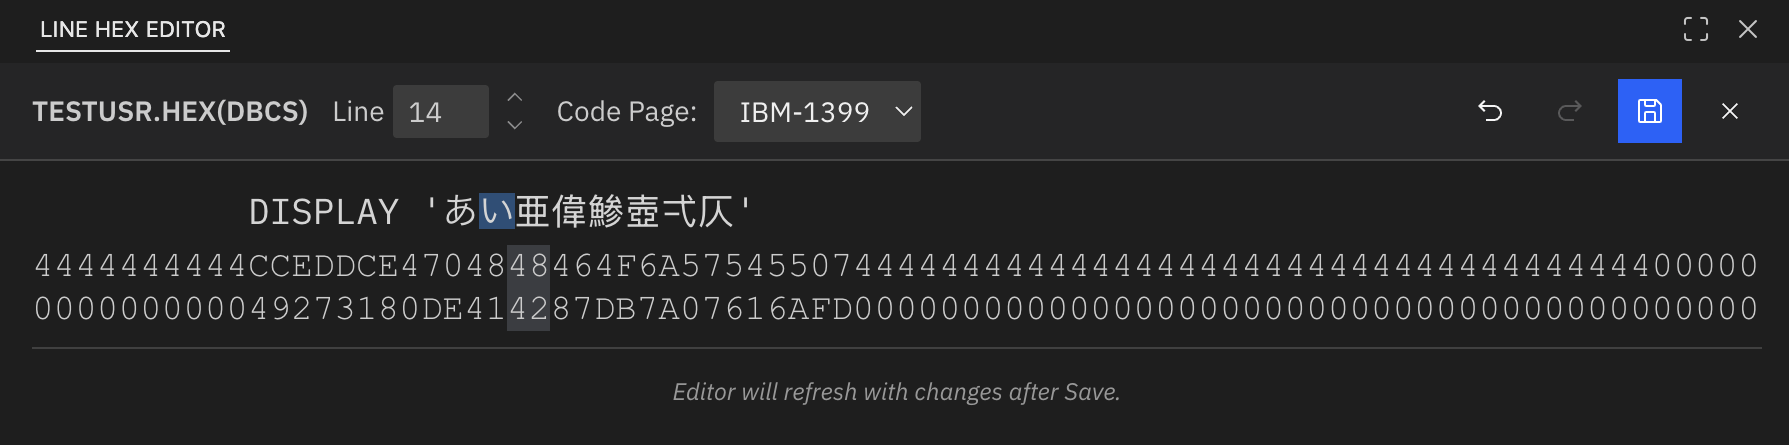
The Line Hex Editor opens in the VS Code panel. The toolbar at the top contains the following controls, from left to right:
- The name of the sequential data set or PDS member currently displayed.
- A Line input field that shows the line number currently loaded into the editor. Type a number directly or use the arrow buttons to increment or decrement the value and navigate to a different line.
- A Code Page dropdown that controls two behaviors: the code page used to decode the raw bytes into readable characters in the preview, and the encoding applied when you type a character to produce the corresponding hex value.
- Undo and Redo buttons to step backward or forward through edits.
- A Save button that also acts as a dirty indicator: it is enabled when there are pending changes and disabled when the current state matches the last saved version.
- A Close button (×) that closes the Line Hex Editor. Closing the editor also releases the read-only lock on the associated text editor.

The editor displays two rows of content for the currently loaded line, located directly under the toolbar:
- Characters: The decoded representation of the byte data, produced using the code page selected in the Code Page dropdown.
- Hex: Each byte of the line expressed as its two-digit hexadecimal representation, split vertically across two rows. The first row shows the first hex digit of each byte and the second row shows the second. For single-byte characters, the character in the preceding row aligns with the two hex digits that represent it.
Actions
Navigation and focus
Click any character or hex digit to focus it. Focusing a character highlights the hex digits that encode it, while focusing a hex digit highlights the character that the corresponding byte(s) encodes.
Use the left and right arrow keys to move between characters and hex digits along the same row. Use the up and down arrow keys to move between rows. For example, pressing the down arrow while a character is focused moves focus to the first hex digit of the bytes that encode that character. Pressing the up arrow from a hex digit moves focus to the corresponding character in the preceding row.
Editing
Both the character and hex rows are editable. The two rows stay synchronized as you type:
- Editing a hex digit automatically updates the character row: the modified bytes are decoded to characters using the active code page.
- Editing a character automatically updates the hex row: the character is encoded to bytes using the active code page, and the corresponding hex digits are updated.
Keyboard input behaves as follows:
Typing a character or hex digit
Pressing a key replaces the focused element with the typed value and advances focus to the next position. The hex row accepts only valid hexadecimal characters (0–9, A–F). Insert mode is not supported.
Backspace and delete in the character row
Both backspace and delete replace the focused character with a space. Backspace additionally moves focus back one position; delete leaves focus at the current position.
Backspace and delete in the hex row
Backspace removes the focused hex digit and shifts the remaining hex digits back to fill the gap. Delete removes the hex digit in front of the cursor and shifts the remaining digits back accordingly.
Saving
Undo and Redo reverse or reapply edits. The standard keyboard shortcuts Ctrl+Z and Ctrl+Shift+Z (Windows) or Cmd+Z and Cmd+Shift+Z (Mac) also work.
To write changes back to your host system, click the Save button in the toolbar or use the standard save keyboard shortcut. On save, the updated bytes are written directly to the remote sequential data set or PDS member. If the text editor for the remote resource is still open and visible after a successful save, the Line Hex Editor automatically refreshes its contents by pulling the updated data from the host.
Settings
There are no settings that directly control the Line Hex Editor. However, configuring the following settings enables a more seamless experience when you open sequential data sets and PDS members in the Line Hex Editor.
Code page for the hex preview
The initial code page shown in the Code Page dropdown is determined by the same evaluation process used by the Z Open Editor language servers when parsing a remote program. This process checks RSE API mappings, Zowe Explorer profile encoding properties, and the zopeneditor.encodings.filePatterns user setting, in that order. See Specifying an EBCDIC file encoding to use with the language servers for the full evaluation order and configuration options.
Language association for remote data sets
To open a sequential data set or PDS member in the Line Hex Editor, the text editor must be associated with a supported language (COBOL, PL/I, HLASM, REXX, or JCL). When you open a remote data set or PDS member, VS Code lacks a file extension to rely on for language detection. You can configure language associations for remote data sets and members using the Z Open Editor data set settings or the files.associations setting with Zowe Explorer-compatible glob patterns. See Remote file associations for details.
Limitations
- Local files are not supported. The Line Hex Editor is available only for remote sequential data sets and PDS members accessed through Zowe Explorer.
- Only data sets with a record format of FB or FBA are supported.
- The text editor must be associated with one of the supported languages: COBOL, PL/I, HLASM, REXX, or JCL.
- After a successful save, the Line Hex Editor attempts to pull the updated contents from the host to refresh the associated text editor, retrying up to five times. On slower systems or networks, the text editor might not refresh automatically.